1
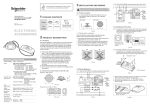
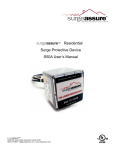
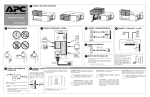
Pull
P out the battery holder with a flat blade screwdriver, and insert a new
battery (model CR2032 3V). Please make sure the battery is connected
to the correct polarities, then insert the battery holder into the housing
(See FIG.2).
USER MANUAL
IR Remote Control
Battery holder
FIG.2
CAT.NO.
752RC/D
F2427
Ensure to unlock Remote buttons before using it to set the
Occupancy Sensor.
By using “
” button, the settings of light level and time can be
transferred to different sensors.
Each button will transmit a signal for maximum 1sec. No signal
will be transmitted if two or more buttons are operated
simultaneously.
The Occupancy Sensor confirms the signal receiving by flashing
the Green LED for 1sec (f=3Hz).
Load 2 is not suitable for the single load Occupancy Sensor.
Button
Function
To unlock 752RC/D buttons
US
US
US
By pressing “
” button, IR Remote Control buttons will
be unlocked. Thereafter the remote can be used to set
Occupancy Sensor.
(Note: The 752RC/D buttons will be locked automatically
if no button is operated for 2min.)
US
US
To lock 752RC/D buttons
By pressing “
” button, IR remote control buttons will
be locked. (Except “
” button).
Rated Voltage: 3V DC (CR2032 battery)
Transmission Range: Approx. 3m
Transmission Angle: 35°
Operating Temperature: 0oC to +45oC
Storage Temperature: -25oC to +55oC
To reset settings on Occupancy Sensor
By pressing “
” button, all settings on Occupancy
Sensor will go back to the potentiometers’ settings, and
all MEMO data will be deleted.
To adjust Lux value
Pattern
USER MANUAL
IR Remote Control
CAT.NO.
752RC/D
Item
IR remote control
User Manual
Quantity
1
1
You no longer need to climb ladders,the ceiling mounted
Occupancy Sensor can be programmed easily and safely with
the 752RC/D IR Remote Control.
By pressing “
” button the
ambient light level can be recorded
in to the sensor as the threshold for
of switching on/off the sensor’s load.
Key
(Refer to function of “
” button)
chain
A key chain hole is designed for easy
hole
FIG.1
carrying (See FIG.1).
By pressing corresponding button, the selected light level
threshold (10, 30, 100 or 1000Lux) will be set to the
Occupancy Sensor for switching on the connected load.
Tip: Press "1000LUX" button twice quickly (in 2s) to disable
the light level threshold (LEDs will come on for 2s). The
sensor will operate the load even in very bright ambient. To
reset a light level threshold, just press the desired light level
button.
To Learn and record the actual light level
If above provided Lux values are not what desired, the
actual light level can be recorded in to the Occupancy
Sensorby pressing “
” button on the IR Remote
Control.
The Occupancy Sensor will take below actions.
Occupancy Sensor’s red and green LEDs will flash
for 10s (one flash one second) to learn the actual
light level.
If the actual light level is within 5-1000Lux. LEDs
will keep on for 5s to confirm the successful
learning and recording.
If the actual light level is above or below of 5-1000
Lux, LEDs will flash quickly for 5s to indicate this.
The sensor will learn the below settings:
5Lux - when actual light level is below 5Lux.
1000Lux - when actual light level is above 1000Lux
Note: Recommend to turn off loads before learning.
Button
Function
Button
Function
To set delay off TIME and turn on/off the “advance
switching off” function
By pressing “ ” button, Load1 is selected to set the
delay off time value. The LED will flash to confirm the
Load selection. By pressing the corresponding time
value button, the selected delay off time will be set to
Occupancy Sensor.
Tip: Press “60Min.” button three times quickly (in 2s) to enable
the sensor’s “Advance switching off function” (Red LED will
come on for 5s to confirm). Repeat this operation again to
disable this function (Green LED will come on for 5s to confirm).
To set load OFF for8 hours
By pressing the “
” button, the load connected to the
Sensor will be turned off for 8hrs.
Sensor will return to Auto mode after 8 hours.
To cancel the "8 hours OFF" setting, press the “
”
button again during the 8 hour period
The "8 hour OFF" setting will also be reverted back to
"Auto" mode if the power is cycled off, then on again.
Load1
To save and transfer the Lux and Time settings from
one Sensor to others
1. Set the desired Lux and Time values on one Sensor
by using IR Remote Control.
2. Then by pressing and holding the “
” button for
approx. 3sec while pointing to the above Sensor, the
Lux & Time settings of this Sensor will be saved into
the IR Remote Control, confirmed by the Sensor’s
LED flashing.
3. By pressing “
” button again for approx. 1sec,
while pointing to new Sensor, the saved settings will
be transferred to the new Sensor.
4. Transfer the settings to multiple Sensors as desired
by repeating above last step.
Notes:
If no data is saved in the IR Remote Control, the
Sensor will not react after pressing the “
” button.
If battery is removed for more than 5sec or the RESET
button is pressed, the data in the Remote Control will
be deleted.
TEST mode
By pressing the “
” button, the Occupancy Sensor
will be set to "Test" mode. This is used for walk testing
of the sensor.
Under Test mode, neither Lux nor Time settings on the
Sensor are used. See below:
“PIR+US” triggering mode: Only both of PIR and
ultrasonic are triggered, the load and LEDs will be on
for 2sec, then off for 2sec before next triggering.
“PIR/US” triggering mode: Either PIR or ultrasonic is
triggered, the load and corresponding LED will be on
for 2sec, then off for 2sec before next triggering.
“PIR only” triggering mode: Only when PIR is
triggered, the load and red LED will be on for 2sec,
then off for 2sec before next triggering.
“US only”triggering mode: Only when ultrasonic is
triggered, the load and green LED will be on for 2sec,
then off for 2sec before next triggerin g.
Short Impulse mode
By pressing the “
” button, the Occupancy Sensor
will be set to " Short Impulse mode.
Under Short Impulse mode, the Lux setting on Sensor
is used but Time setting is not used. See below:
“PIR+US” triggering mode: Only both of PIR and
ultrasonic are triggered, the load and LEDs will be on
for 1sec, then off for 9sec before next triggering.
“PIR/US” triggering mode: Either PIR or ultrasonic is
triggered, the load and corresponding LED will be on
for 1sec, then off for 9sec before next triggering.
“PIR only” triggering mode: Only when PIR is
triggered, the load and red LED will be on for 1sec,
then off for 9sec before next triggering.
“US only” triggering mode: Only when ultrasonic is
triggered, the load and green LED will be on for 1sec,
then off for 9sec before next triggering.
To set load ON for 8 hours
By pressing “
” button, the load connected to the
Sensor will be turned on for 8hrs.
Load will be turned off after 8 hours and return to
Auto mode.To cancel the "8 hours ON" setting, press
the “
” button again during the 8 hours period.The
"8 hours ON" setting will also be reverted back to "Auto"
mode if the power is cycled off, then on again.
To set ACC (Air Current Compensation) ON/OFF
1. By pressing “
” button,the air current compensation
function will be activated. It is confirmed by Sensor’s
LED keeping on for 5sec. (This will reduce the sensing
range to 1-2m)
2. By pressing “
” button, air current compensation
function will be deactivated. It is confirmed by
Sensor’s LED flashing for 5sec.
To set PIR only triggering mode
By pressing “
” button, Sensor will be set to ‘PIR
only’ triggering mode.
Sensor will be triggered and the load will turn on only
when the PIR sensor detects movement. The Sensor’s red
LED will turn on to confirm the detection.
To set Ultrasonic only triggering mode
US
By pressing “ ” button, Sensor will be set to
‘Ultrasonic only’ triggering mode.
The Sensor will be triggered and the load will turn on only
when the Ultrasonic sensor detects movement. The
Sensor’s green LED will turn on to confirm the detection.
US
To set PIR or Ultrasonic triggering mode
US
By pressing “ US ” button, Sensor will be set to ‘PIR
or Ultrasonic triggering mode.
Sensor will be triggered and the load will turn on when
either the PIR sensor or Ultrasonic sensor detects
movement. When the PIR Sensor is triggered the Sensor’s
red LED will turn on to confirm the detection. When the
Ultrasonic sensor is triggered, the sensor’s green LED
will turn on to confirm the detection.
To set PIR and Ultrasonic triggering mode
By pressing “ US ” button, Sensor will be set to ‘PIR
and Ultrasonic’ triggering mode.
The Sensor will be triggered and the load will turn on only
when both of the PIR and Ultrasonic sensors detect
movement. The Sensor’s green and red LEDs will turn on
to confirm the detection.
US
To adjust Sensitivity of Ultrasonic
By pressing “
” buttons, ultrasonic sensitivity on the
Sensor can be adjusted.
Pressing each button will increase or decrease sensitivity by
10%. The Green LED will flash to confirm the setting.
The Green LED will remain on for approx. 2sec when the
Ultrasonic sensitivity is at the highest or lowest level.
Note:
The first time sensitivity is adjusted on the sensor by
these buttons, it will start from 50%.
US
US
US
US
When the 752RC/D remote controller works abnormally, check the
assumptive problems and suggested solutions in the following chart:
Problem
Possible cause
Suggested solution
Sensor fails
to receive
signal.
Have exceeded
the transmission
range.
Operate in transmission range and
ensure the 752RC/D aims directly
at the sensor.
No signal
sent from
remote.
Low battery.
Replace battery.
Fail to
transmit
signal.
In lock mode.
Unlock
the IR remote control.
Press the unlock button before
using the remote.
3.28.0205400100300