1
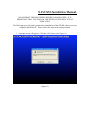
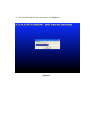
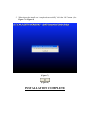
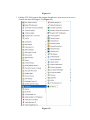
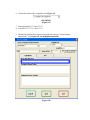
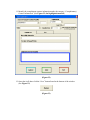
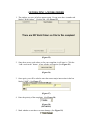
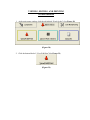
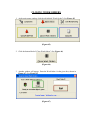
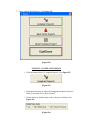
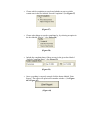
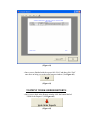
S.T.E.M.S.
Street Tree Electronic
Management System
Installation & User’s Manual
Beta Manual
Ver. 080504
USDA Forest Service
Northeast Center for Urban & Community Forestry
http://www.umass.edu/urbantree
S.T.E.M.S Installation Manual.
PLEASE PRINT THIS DOCUMENT BEFORE YOUR PROCEED. IT IS
IMPORTANT THAT YOU FOLLOW THE INSTRUCTIONS EXACTLY AS
INDICATED.
The following steps will guide you throu the insatallation of the STEMS software on your
computer and Pocket PC. Please follow the steps in the order presented.
1. A prompt screen will appear. Click the “Ok” button. (See Figure-1)
(Figure-1)
2. Make sure you have the proper directory (The install program provides a
recommended location for the files) and click the large button with the picture of
a computer on it. (See Figure-2 & Figure-3)
(Figure-2)
(Figure-3)
3. Select the program group as S.T.E.M.S and click “Continue” (See Figure-4 &
Figure-5)
(Figure-4)
(Figure-5)
4. The files will install for about one minute. (See Figure-6)
(Figure-6)
5. When shown the install was “completed successfully” click the “Ok” button. (See
Figure-7 & Figure-8)
(Figure-7)
(Figure-8)
INSTALLATION COMPLETE
Running the S.T.E.M.S program.
Make sure your computer is turned on and you are logged in properly.
Once you are in your desktop:
1. Click the “Start” button. (See Figure-9)
(Figure-9)
2. A menu appears. Move your cursor until its above the “All programs” menu. A
larger menu will appear. (See Figure-10 & Figure-11)
(Figure-10)
(Figure-11)
3. Find the S.T.E.M.S group in the program list and move your cursor so its over it.
A small side menu will appear. (See Figure-12)
(Figure-12)
4. Choose the S.T.E.M.S extension and the program should run. (See Figure-13)
(Figure-13)
Adding a Complaint
Make sure the program is running.
1. At the main menu screen, click the “Complaints” tab. (See Figure-14)
(Figure-14)
2. A new window will appear. Choose the “Location of Tree (Street Name)” at the
top of the page. Browse through the list until the desired street is found. (See
Figure-15)
(Figure-15)
3. Click the button “Add New Complaint”, located at the bottom of the window.(See
Figure-16) A new window will appear.
(Figure-16)
4. Write the house number after the already chosen street name, located at the top of
the new window. (See Figure-17)
(Figure-17)
5. Choose the complaint date. (See Figure-18)
(EXAMPLE DATE)
6. Choose the status of the complaint. (See Figure-19)
(EXAMPLE)
(Figure-19)
7. Inspection Date????? Dave??????
8. Local ID #?????????? Dave?????
9. Identify the nearest major intersection under the category “Nearest Major
Intersection” (See Figure-20 , the highlighted material)
(Figure-20)
10. Identify the damage in the “Description of Damage/Problem” category. (See
Figure-21, the highlighted material.)
(Figure-21)
11. Identify the complainants contact information under the category “Complainant(s)
Contact Information” (See Figure-22, the highlighted material)
(Figure-22)
12. Once that is all done click the “Save” button found at the bottom of the window.
(See Figure-23)
(Figure-23)
13. This will return you back to the “Find Complaints” window. The complaint you
just added will be highlighted already so double-click it to re-enter it. (See
Figure-24)
(Figure-24)
END OF SECTION
GENERATING A WORK ORDER
1. The window you were in before appears again. Except, now there is another tab
labeled “Work Orders”. Click the tab. (See Figure-25)
(Figure-25)
2. Since there are no work orders yet for your complaint, it will state it. Click the
“Add a work order” button. A new window will appear. (See Figure-26)
(Figure-26)
3. Once again, you will be asked to enter the nearest major intersection in the box
labeled “NMI” (See Figure-27)
(Figure-27)
4. Enter the priority of the complaint. (See Figure-28)
(Figure-28)
(EXAMPLE)
5. Mark whether or not there was storm damage. (See Figure-29)
(Figure-29)
6. Choose which crew/contract to assign the job to. (See Figure-30)
(Figure-30)
7. Choose the “Estimated Start Date/Duration” by selecting the day it will start and
entering the amount of work days it will take. (See Figure-31)
(Figure-31)
8. On the lower half of the window there are two tabbed windows; “Details” , and
“Description of Job/Notes” Make sure the “Details” menu is selected by clicking
the tab.
9. In that area, enter the “MCTI ID’s for Affected Trees (if known)…”
10. If there may be a match for the MCTI ID you have entered you can check by
clicking the “Look for potential tree matches in MCTI” button (See Figure-32)
(Figure-32)
11. Choose the equipment needed under the “Equipment/Personnel Needed”
category. (See Figure-33)
(Figure-33)
12. Choose the things needed to be done in the “Work Type” box. (See Figure-34)
(Figure-34)
13. Next to the “Details” tab click the “Description of Job/Notes” tab to open that
area. (See Figure-35)
(Figure-35)
14. Enter any notes needed.
15. Once all of this information is entered click “Save and Exit” (See Figure-36)
(Figure-36)
16. Hitting that brings you to the previous screen. Click the “Save” button. (See
Figure-37)
(Figure-37)
END OF SECTION
VIEWING, EDITING, AND PRINTING
WORK ORDERS
1. At the main menu window click the tab labeled “Work Orders”.(See Figure-38)
(Figure-38)
2. Click the button labeled “View/Edit/Print”(See Figure-39)
(Figure-39)
3. A new window will come up. Type in the street name in the box labeled
“Location of Damaged Tree (Stree Name)”.(See Figure-40)
(Figure-40)
4. Click the button labeled “Search/Refresh”(See Figure-41)
(Figure-41)
5. A list will come up showing all if the work orders. TO EDIT/VIEW THIS
WORK ORDER: Choose the desired on by double clicking on it.
6. Enter the desired information and click save to return back to the previous
window.(See Figure-43)
(Figure-43)
7. TO PRINT THIS WORK ORDER: Once you have clicked the button labeled
“Search/Refresh” select the desired work order by clicking it only once, to
highlight it.(See Figure-44)
(Figure-44)
8. Click the button at the bottom left corner of the window labeled “Print Selected
WO’s”(See Figure-45)
(Figure-45)
END OF SECTION
CLOSING WORK ORDERS
1. At the main menu window click the tab labeled “Work Orders”.(See Figure-45)
(Figure-45)
2. Click the button labeled “Close Work Orders” (See Figure-46)
(Figure-46)
3. Another window will appear. Enter the Work Order # in the given box, shown in
Figure-47. (See Figure-47)
(Figure-47)
4. Once you have done that click the button labeled “Scan” (See Figure-48)
(Figure-48)
5. The status window below the scan button should tell you whether or not the scan
was successful. (See Figure-49 & Figure-50)
(Figure-49)
(Successful Scan)
(Figure-50)
(Unsuccessful Scan)
6. Scan all of the work orders needing closing and when you are finished click the
“Exit” button to return you to the previous screen. (See Figure-51)
(Figure-51)
END OF SECTION
PRINTING REPORTS
1. At the main menu window click the tab labeled “Work Orders”.(See Figure-52)
(Figure-52)
2. Click the button labeled “Reports” (See Figure-53)
(Figure-53)
3. A new window should appear. (See Figure-54)
(Figure-54)
TO PRINT A COMPLAINT REPORT
•
Click the button labeled “Complaint Reports” (See Figure-55)
(Figure-55)
•
Enter the street name of where the complaint took place in the box
labeled “Location of Tree (Street Name)”
•
Choose where to include status codes in the given window. (See
Figure-56)
(Figure-56)
•
Choose which complaints to search and whether or not to exclude
certain ones in the box labeled “Search Complaints” (See Figure-57)
(Figure-57)
•
Choose what things to sort the complaints by, by selecting an option in
the box labeled “Sort by”. (See Figure-58)
(Figure-58)
•
Include the complaint dates if there are any in the given box labeled
“Include Complaint Dates”. (See Figure-59)
(Figure-59)
•
Once everything is correctly entered click the button labeled “Print
Report” The report will open itself in another window. (See Figure60 & Figure-61)
(Figure-60)
(Figure-61)
• Once you are finished with the report click “Exit” and then click “Exit”
once more to bring you to the initial reports window. (See Figure-61)
(Figure-61)
TO PRINT WORK ORDER REPORTS
• Once you are back at the Reports window click the button labeled
“Work Order Reports” (See Figure-62)
(Figure-62)
•
Enter the street name of where the complaint took place in the box
labeled “Location of Tree (Street Name)”
•
Choose which complaints to search and whether or not to exclude
certain ones in the box labeled “Search Complaints” (See Figure-63)
(Figure-63)
•
Choose what things to sort the complaints by, by selecting an option in
the box labeled “Sort by”. (See Figure-64)
(Figure-64)
•
Enter in any work order dates in the box labeled “Include Work Order
Dates (Start Date if Multiple Days)” (See Figure-65)
(Figure-65)
•
Choose whether or not to include completed work orders. (See
Figure-66)
(Figure-66)
•
Choose the Priority of the Work order. (See Figure-67)
(Figure-67)
•
Once all of this information is entered click the button labeled “Print
Report.” (See Figure-68)
(Figure-68)
•
Once you are finished with the report click “Exit” and then click
“Exit” once more to bring you to the initial reports window. (See
Figure-69)
(Figure-69)
TO PRINT STREET SUMMARY REPORTS:
•
Once you are back at the Reports window click the button labeled
“Street Summary Report”. (See Figure-70)
(Figure-70)
•
Enter the specific street summary report date period in the given
option pull down boxes. (See Figure-71)
(Figure-71)
•
Once all of this information is entered click the button labeled “Print
Report.” (See Figure-72)
(Figure-72)
•
Once you are finished with the report click “Exit” and then click
“Cancel” to bring you to the initial reports window. (See Figure-73 &
Figure-74)
(Figure-73)
(Figure-74)
4. Once every desired report has been printed click the “Exit” button to go back to
the main menu.
END OF SECTION
STREET LIST IMPORTING
Street names for your city/town can be imported from and excel file for your use.
CREW LIST IMPORTING
Crew lists from your city/town can be imported for your use.
MCTI FOLDER
The MCTI folder of your city/town can be imported to your S.T.E.M.S. program by
selecting the proper file path and directory.
END OF SECTION
END OF MANUAL.