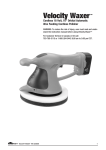
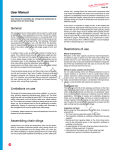
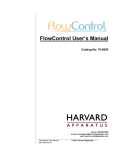
1
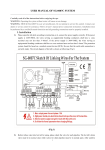
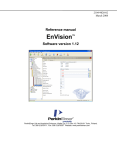
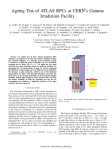
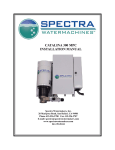
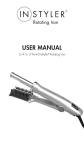
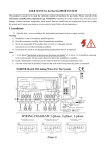
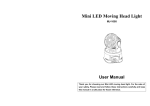
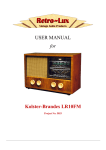
SG 0004-5 User Manual The spa equipment requires a 44 amp outlet, preferably dedicated to the spa. Carefully read all of the instructions before enjoying the spa. WARNING: Operating the system without water will cause severe damage. WARNING: SHOCK HAZARD! No user serviceable parts. Do not attempt to service this control. Contact your dealer or service center for assistance. Follow all user’s manual power connection instructions. Installation must be performed by a certified licensed electrician and all grounding connections must be properly installed. I. Installation 1. Please open the tub skirt according to instruction on it, connect the power supply correctly. The power supply should be: 220V/50HZ, the wires serving as equipotential bonding conductors shall have a cross sectional area not less than 5×6mm2. The protection system should be based on a residual current device (RCD). Be sure that the earth cable connection is correctly made. The circuit diagram of hot tub is shown as following. (Fig 1) (Fig 1) 2. Before infuse water into hot tub for using, please check the valve for each pipeline. The hot tub’s drain 1 valve must be in normal close while valves for other pipeline must be in normal open. After confirm everything is ok, fill the spa from the filter area (refer to Fig 3) with cold water 4’’ to 6’’ (100 to 150mm) below the top edge of the spa and after that, put the cartridge filter or filter bag into the filter area. Do not overfill as the spa’s water level will rise as each person enters the spa. Always keep the spa water level above the jet openings. Remark: Always fill the spa with water from the filter area (refer to Fig 3) whenever the spa is emptied and refilled up with water, and only after that put the cartridge filter or filter bag into the filter area. In this way, it can prevent the air entering into the pipes of the spa. II. Operation instruction (Fig 2) ● ● ON/OFF key (power key): Connect the power supply, press ON/OFF key, all the control systems are ready to run (indicator light is on), and the circulation and Ozone disinfection system go into working automatically (if the water temperature does not reach the pre-set one, the heating system will start to work in 10 seconds). The panel will display the symbols of circulation and Ozone (if the heating system is working, its symbol will be displayed on the panel too). Meanwhile, the panel will display the current time and the detected water temperature alternately. Long press ON/OFF key again for 20 seconds, the system can be converted between interlock mode or non-interlock mode (the indicator light on ON/OFF key shows RED under interlock mode; while it shows GREEN under non-interlock mode). PUMP key: Under interlock mode, press any pump key, the heater will stop working. Under non-interlock mode, press (PUMP1) key, its symbol will show on the screen, Pump1 will be activated, seat A1 and A2 will go into working state promptly; Press (PUMP2) key, its symbol will show on the screen, Pump2 will be activated, seat B1 and B2 will go into working state; Press (PUMP3) key, its symbol will show on the screen, Pump3 will be activated, seat C1 and C2 will go into working state. Thus, the whole hydro-therapy system will be in working. The a1, a2, b1, b2, c1 and c2 in Fig 3 are air adjusting valves. They are to control the strength of hydro-massage in seat A1, A2, B1, B2, C1 and C2 respectively. (Refer to Fig3). (Fig 3) 2 BUBBLE key: Press key, its symbol will show on the panel, the air massage system goes to work instantly. 03 key (Ozone): Press O3 key can turn on or off the Ozone disinfection system (Ozone and circulation pump work automatically when activating the spa). LAMP key: When the control systems are ready to work, first press key, its symbol will show on the panel, the underwater lights are on, the color will change automatically; second press, the color will be fixed on a certain color; press for the third time to shut it off. T/C key (need to be used together with ▲/▼ key): Short press T/C key for the first time, the panel will display system clock time. Second short press, the panel will display the water temperature set last time and keep flashing: Press “▲” key to adjust temperature to highest at 42℃; press “▼” key to adjust temperature to lowest at 10℃. It will automatically store and return to the previous working status after flashing 3 seconds. Long press T/C key for 3 seconds and loosen the hand, the panel will display system clock time and hour/minute digit flashes: Press “▲”“▼” to adjust the clock time. It will store and return to the previous working status after flashing 3 seconds. RADIO/DVD key (Radio/DVD/Control and display of temperature and time): When the control systems are ready to work, first press RADIO/DVD key, it will go into TV function (this function is optional), the panel shows TV symbol; second press, it will go into Radio function, and the panel shows radio channel set last time (under Radio status, press ▲/▼ key to select pre-stored radio station); third press, it will go into DVD function (this function is optional), the panel shows symbols of TV and DVD at the same time (Under DVD status, press ▲/▼ key to adjust the volume of DVD); press for the fourth time, the panel will show the detected water temperature and the system’s current time alternately. TUN/VOL key (need to be used together with ▲/▼ key): Under Radio status, first press TUN/VOL key, the panel will show 2-digit volume, press ▲/▼ can adjust volume upwards or downwards (the panel will automatically show radio frequency when stop adjusting for 3 seconds). Second press ,the current frequency will flash, press ▲/▼ key to adjust the current frequency , it will store automatically after flashing 3 seconds. Third press, the panel will show radio channel, press ▲/▼ key to select pre-stored radio station ( the panel will automatically show previous radio frequency when stop adjusting for 3 seconds). Long press for 5 seconds, the system will automatically search radio frequency again and store the searched frequency at different channel sequentially. Instructions for automatic circulation system: Long press T/ON key for 5 seconds to enter automatic circulation system (the indicator light on T/ON key will show GREEN). Set the first circulating period In automatic mode, press T1 key (LED screen will display the time set last time or ――.――) to enter first period of automatic circulation system; Press T/ON key, the hour digit will flash on LED screen, press “▲” and “▼” keys to adjust the hour within 3 seconds after press “T/ON” key. It will store the hour after flashing 3 seconds. Second press T/ON key, the minute digit will flash on LED screen, press “▲” and “▼” keys to adjust the minute. It will store the minute after flashing 3 seconds. When the T/ON for T1 is set, set the T/OFF for T1 same way as setting T/ON. Thus, the starting time and ending time for the first period is set. Set the second circulating period In automatic mode, press T2 key (LED screen will display the time set last time or ――.――) to enter second period of automatic circulation system; Press T/ON key, the hour digit will flash on LED screen, press “▲” and “▼” keys to adjust the hour within 3 seconds after press “T/ON” key. 3 It will store the hour after flashing 3 seconds. Second press T/ON key, the minute digit will flash on LED screen, press “▲” and “▼” keys to adjust the minute. It will store the minute after flashing 3 seconds. When the T/ON for T2 is set, set the T/OFF for T2 same way as setting T/ON. Thus, the starting time and ending time for the second period is set. Set the third circulating period In automatic mode, press T3 key (LED screen will display the time set last time or ――.――) to enter third period of automatic circulation system; Press T/ON key, the hour digit will flash on LED screen, press “▲” and “▼” keys to adjust the hour within 3 seconds after press “T/ON” key. It will store the hour after flashing 3 seconds. Second press T/ON key, the minute digit will flash on LED screen, press “▲” and “▼” keys to adjust the minute. It will store the minute after flashing 3 seconds. When the T/ON for T3 is set, set the T/OFF for T3 same way as setting T/ON. Thus, the starting time and ending time for the third period is set. Remarks: When the time for automatic circulation system is set, and if this system is not cancelled, the circulation system will be controlled by the preset timing in each use of the spa. Long press T/OFF key for 5 seconds to cancel the automatic circulation system. In automatic mode, user can let the filtration run only while the heater no need to run by setting the temperature on the panel under the actual one in the spa. When the automatic circulating periods are set, if the preset temperature is not reached while the preset filtration time runs out, the filtration will prolong working until the water temperature reaches the preset one. The Ozone will automatically work together with the filtration pump and heater in automatic mode. Protection for filtration pump when lack of water/Reminding function: In daily usage, the blockage of filtration medium (cartridge filter or filter bag) will occur. The severe blockage will lead to the intermittent lack of water for the filtration pump. When lack of water, the filtration pump and heater will stop working automatically. At this moment, the symbol of filtration pump on control panel will flash unceasingly, which reminds the user that it is time to clean or replace the filtration medium. Heating system: After the control systems are ready to work, the heater will stop heating when the temperature sensor detect that the temperature reaches the preset one. If the water temperature is under 2℃ of the preset one, the heater will be activated to work. (The heater will not be activated to work if there is not enough water flow trans-fluxing it. The heater will delay 10 seconds to work when there is enough water flow trans-fluxing it.) Anti-freezing system: The spa will instantly go into the anti-freezing system when it is turned off (the indicator light on ON/OFF flashes). The circulation pump and heating system will stop working at the default temperature of 10℃. When the water temperature in the spa drops to 8℃, the circulation pump and heating system will work automatically and stop when reaches 10℃. Anti-freezing system is to circulate automatically. When circulation pump is activated, the screen and background system is on, showing the detected water temperature and the symbol of circulation pump only. When the water temperature reaches 10℃, the screen is off and returns to the status with indicator light of power on only. (Remark : When enter anti-freezing protection system, the circulation pump and heating system is controlled synchronously. If circulation is used when ON/OFF is on, it does not controlled by temperature.) 4 Temperature sensor’s self-checking system: When the panel shows EO which means the temperature sensor is disconnected, check the wiring of temperature sensor to see whether it is disconnected. When the panel shows E1 which means the temperature sensor is short-circuited, replace the temperature sensor with a new one. The heating system can not be activated under the above two situations. Remarks: 1. Do not use cleaners or compounds containing harsh abrasives. Also, avoid using heavy-duty rubbing or buffing compounds. Use a soft liquid cleaner. A gentle mixture of any mild soap and warm water will generally dissipate most common soil from the surface. Using a soft cloth, wash the area to be cleaned and rinse. If stubborn dirt remains, as a stain embedded in the grain of the vinyl, use a soft brush, and if necessary, a touch of cleaning powder. In both situations, rinse and dry with a soft cloth. 2. If you need to dry the hot tub completely, please drain the water in the hot tub firstly, and then activate the air blower running for a while to drain the water in the air pipeline. Instruction about the Combination Lock of SPA’s Cover A. The preset number to open the combination lock at 0-0. B. You can reset the combination to your own number as follows: Open your combination lock. Use your ball point pen or other small strike to press in the reset button. Rotate the dial to the number that you want to set while keeping the reset button depressed. Release the reset button and reset the other side of the lock by the same way. WARRANTY: Five-year warranty on spa shell, the rest parts two-year warranty for quality problem free of charge dated from the shipment.(excluding the wearing parts: filter bag, pillow and cover etc.) 5