1
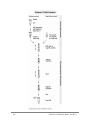
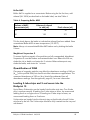
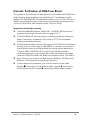
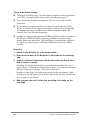
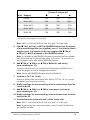
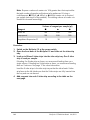
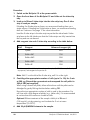
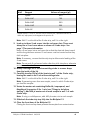
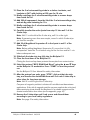
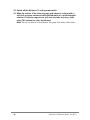
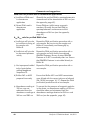
June 2012 BioSprint® 15 DNA Handbook For purification of DNA from human whole blood animal whole blood buffy coat cultured cells tissues rodent tails buccal swabs dried blood spots using the BioSprint 15 workstation Sample & Assay Technologies QIAGEN Sample and Assay Technologies QIAGEN is the leading provider of innovative sample and assay technologies, enabling the isolation and detection of contents of any biological sample. Our advanced, high-quality products and services ensure success from sample to result. QIAGEN sets standards in: Purification of DNA, RNA, and proteins Nucleic acid and protein assays microRNA research and RNAi Automation of sample and assay technologies Our mission is to enable you to achieve outstanding success and breakthroughs. For more information, visit www.qiagen.com. Contents Kit Contents 4 Storage 4 Intended Use 5 Safety Information 5 Quality Control 6 Introduction 7 Principle and procedure Equipment and Reagents to Be Supplied by User Important Notes 7 9 11 Starting material 11 Storing blood samples 11 Preparing buffy coat 12 Yield and quality of purified DNA 12 Preparing reagents 16 Quantification of DNA 17 Loading 5-tube strips and 5-rod covers into the BioSprint 15 17 Protocols: Purification of DNA from Blood 19 Rapid Purification of DNA from Human Whole Blood 23 Purification of DNA from Cultured Cells 27 Purification of DNA from Tissues 31 Purification of DNA from Rodent Tails 35 Purification of DNA from Buccal Swabs 39 Purification of DNA from Dried Blood Spots 43 Troubleshooting Guide 47 Appendix: Handling, Quantification, and Determination of Purity of DNA 49 Ordering Information 50 BioSprint 15 DNA Handbook 06/2012 3 Kit Contents BioSprint 15 DNA Blood Kit Catalog no. Number of preps* (45) (360) 940014 940017 45 360 Buffer AL† 12 ml 3 x 33 ml QIAGEN® Protease 1 vial‡ 2 vials§ Protease Solvent¶ 1.2 ml 2 x 4.4 ml MagAttract® Suspension G¶ 1.6 ml 13 ml Buffer AW1† (concentrate) 19 ml 1 x 19 ml 1 x 98 ml Buffer AW2 (concentrate) 17 ml 2 x 81 ml Buffer AE 15 ml 128 ml 5-Rod Cover 10 72 5-Tube Strip (1 ml) 45 360 Quick-Start Protocol 1 1 * When each prep is from 200 μl blood. † Contains a guanidine salt. Not compatible with disinfectants containing bleach. See page 5 for safety information. ‡ Resuspension volume 1.2 ml. § Resuspension volume 4.4 ml. ¶ Contains sodium azide as a preservative. Storage All buffers and reagents can be stored dry at room temperature (15–25ºC) for up to 1 year without showing any reduction in performance. Lyophilized QIAGEN Protease can be stored dry at room temperature for up to 1 year without any decrease in performance. For storage longer than 1 year or if ambient temperatures constantly exceed 25ºC, QIAGEN Protease should be stored dry at 2–8ºC. 4 BioSprint 15 DNA Handbook 06/2012 Reconstituted QIAGEN Protease is stable for up to 2 months when stored at 2–8ºC. Storing reconstituted QIAGEN Protease at room temperature for prolonged periods should be avoided. Reconstituted QIAGEN Protease can be stored at –20ºC for up to 6 months, but repeated freezing and thawing should be avoided. We recommend dividing the reconstituted QIAGEN Protease into aliquots before storing at –20ºC. Intended Use The BioSprint 15 DNA Blood Kit is intended for molecular biology applications. This product is not intended for the diagnosis, prevention, or treatment of a disease. All due care and attention should be exercised in the handling of the products. We recommend all users of QIAGEN products to adhere to the NIH guidelines that have been developed for recombinant DNA experiments, or to other applicable guidelines. Safety Information When working with chemicals, always wear a suitable lab coat, disposable gloves, and protective goggles. For more information, please consult the appropriate safety data sheets (SDSs). These are available online in convenient and compact PDF format at www.qiagen.com/ts/msds.asp where you can find, view, and print the SDS for each QIAGEN kit and kit component. CAUTION: DO NOT add bleach or acidic solutions directly to the sample-preparation waste. Buffers AL and AW1 contain guanidine hydrochloride, which can form highly reactive compounds when combined with bleach. If liquid containing these buffers is spilt, clean with suitable laboratory detergent and water. If the spilt liquid contains potentially infectious agents, clean the affected area first with laboratory detergent and water, and then with 1% (v/v) sodium hypochlorite. If liquid containing potentially infectious agents is spilt on the BioSprint 15 workstation, clean the affected area first with laboratory detergent and water, and then with 1% (v/v) sodium hypochlorite, followed by water. 24-hour emergency information Emergency medical information in English, French, and German can be obtained 24 hours a day from: Poison Information Center Mainz, Germany Tel: +49-6131-19240 BioSprint 15 DNA Handbook 06/2012 5 Quality Control In accordance with QIAGEN’s ISO-certified Quality Management System, each lot of BioSprint 15 DNA Blood Kit is tested against predetermined specifications to ensure consistent product quality. 6 BioSprint 15 DNA Handbook 06/2012 Introduction The BioSprint 15 DNA Blood Kit is designed for purification of total DNA (i.e., genomic and mitochondrial DNA) from whole blood, buffy coat, cultured cells, tissues, rodent tails, buccal swabs, dried blood spots, and other samples using the BioSprint 15 workstation. The BioSprint 15 DNA Blood Kit provides high-quality DNA that is free of protein, nucleases, and other contaminants or inhibitors. The DNA is suitable for direct use in downstream applications, such as amplification or other enzymatic reactions. Principle and procedure The BioSprint 15 DNA Blood Kit uses MagAttract magnetic-particle technology for DNA purification. MagAttract technology combines the speed and efficiency of silica-based DNA purification with the convenient handling of magnetic particles (see flowchart, next page). DNA binds to the silica surface of MagAttract magnetic particles in the presence of a chaotropic salt. DNA bound to the magnetic particles is then efficiently washed. Two different wash buffers are used, followed by a rapid rinse with distilled water or an air drying step, which considerably improves the purity of the DNA. High-quality DNA is eluted in Buffer AE. DNA yields depend on sample type, sample storage, and, if purifying from whole blood, white blood cell content. Supplementary protocols for processing other sample types or for purification of different target molecules using the BioSprint 15 workstation are available at www.qiagen.com/literature/protocols or from QIAGEN Technical Services. BioSprint Software protocols for automated sample processing are available from QIAGEN Technical Services. BioSprint 15 DNA Handbook 06/2012 7 8 BioSprint 15 DNA Handbook 06/2012 Equipment and Reagents to Be Supplied by User When working with chemicals, always wear a suitable lab coat, disposable gloves, and protective goggles. For more information, consult the appropriate safety data sheets (SDSs), available from the product supplier. BioSprint 15 workstation (cat. no. 9000850) Pipettors and disposable pipet tips with aerosol barriers (20–1000 μl) Multidispenser (e.g., Finnpipette® Stepper from Thermo Electron see www.thermo.com)* Water bath or a shaker–incubator (not required for rapid blood protocol) (e.g., Eppendorf® Thermomixer Comfort, cat. no. 5355 000.011)* Ethanol (96–100%)† Isopropanol (100%) Phosphate-buffered saline (PBS) (may be required for diluting samples) Buffer AE, cat. no. 19077 (may be required for diluting samples) Disposable gloves Vortexer Soft cloth or tissue and 70% ethanol or other disinfectant to clean the BioSprint worktable Buffer ATL, cat. no. 19076, if processing tissues, rodent tails, swabs, or dried blood spots QIAGEN Proteinase K (2 ml), cat. no. 19131, or QIAGEN Proteinase K (10 ml), cat. no. 19133, if processing tissues, rodent tails, swabs, or dried blood spots DNase-free RNase A (required if purified DNA needs to be RNA-free) (not required if processing swabs or dried blood spots) Microcentrifuge tubes (1.5 ml) required for lysis steps when processing blood (not needed for rapid blood protocol), cells, tissues, or rodent tails Microcentrifuge tubes (2 ml) required for lysis steps when processing buffy coat, swabs, or dried blood spots Microcentrifuge (not needed for rapid blood protocol) * This is not a complete list of suppliers and does not include many important vendors of biological supplies. † Do not use denatured alcohol, which contains other substances such as methanol or methylethylketone. BioSprint 15 DNA Handbook 06/2012 9 Swabs, such as sterile Omni Swabs (available from Whatman, www.whatman.com), or Puritan® applicators with plastic shafts and cotton or Dacron® tips (available from Hardwood Products, www.hwppuritan.com) if processing buccal swabs* Filter paper (e.g., 903® Specimen Collection Paper, Blood Stain Card, or FTA® Card [Whatman, www.whatman.com], or comparable blood cards) if processing dried blood spots. We recommend using 903 Specimen Collection Paper with the BioSprint 15 workstation* Manual paper punch, 3–6 mm (1/8–1/4 inch) if processing dried blood spots * This is not a complete list of suppliers and does not include many important vendors of biological supplies. 10 BioSprint 15 DNA Handbook 06/2012 Important Notes Starting material The amounts of starting material for use in BioSprint 15 DNA procedures are shown in Table 1. Table 1. Sample volumes used in BioSprint 15 DNA procedures Sample Amount of sample Whole blood* 100–300 μl Buffy coat 100–200 μl Cultured cells Up to 5 x 10⁶ diploid cells Tissues Up to 25 mg Rodent tails 1.2 cm (approximately 25 mg) Dried blood spots 1–3 punches (3–6 mm [1/8–1/4 inch] diameter) Buccal swabs 1 swab * We recommend using 100–200 μl animal blood containing non-nucleated erythrocytes. If necessary, the volume of animal blood used can be reduced and the sample volume adjusted to 200 μl with Buffer AE. For blood samples containing nucleated erythrocytes (e.g., samples from bird and fish), use less than 20 μl blood and adjust the sample volume to 200 μl with Buffer AE. Storing blood samples Whole blood samples treated with EDTA, ACD, or heparin can be used, and may be either fresh or frozen. Frozen samples should be thawed quickly in a 37ºC water bath with mild agitation to ensure thorough mixing and then equilibrated to room temperature (15–25ºC) before beginning the procedure. Yield and quality of the purified DNA depend on the storage conditions of the blood. Fresher blood samples may yield better results. For short-term storage of up to 10 days, collect blood in tubes containing EDTA as an anticoagulant, and store at 2–8ºC. However, for applications requiring maximum fragment size, such as Southern blotting, we recommend storage at 2–8ºC for up to 3 days only, as low levels of DNA degradation will occur after this time. For long-term storage (over 10 days), collect blood in tubes containing a standard anticoagulant (preferably EDTA, if high-molecular-weight DNA is required), and store at –70ºC. BioSprint 15 DNA Handbook 06/2012 11 Preparing buffy coat Buffy coat is a leukocyte-enriched fraction of whole blood. The efficiency of leukocyte enrichment depends on the procedure used to prepare buffy coat and on the accuracy with which the buffy coat layer is extracted. Prepare buffy coat by centrifuging whole blood samples containing a standard anticoagulant (EDTA, citrate, or heparin) at 900–1100 x g for 10 minutes at room temperature (15–25ºC). After centrifugation, 3 different fractions are distinguishable: the upper clear layer is plasma; the intermediate layer is buffy coat, containing concentrated leukocytes; and the bottom layer contains concentrated erythrocytes. Approximately 1 ml leukocyte-containing fraction should be harvested from 10 ml centrifuged whole blood, which gives 10x enrichment. To avoid overloading the DNA purification procedure, do not prepare buffy coat samples of >10x enrichment. If buffy coat samples are of >10x enrichment, use less starting material in the DNA purification procedure. Yield and quality of purified DNA DNA yields depend on the sample type, the number of nucleated cells in the sample, and the protocol used for DNA purification. Typical DNA yields obtained from a variety of sample types are shown in Table 2, page 13. Elution in smaller volumes increases the final DNA concentration in the eluate, but slightly reduces overall DNA yield. We recommend using an elution volume appropriate for the intended downstream application. The BioSprint 15 DNA procedure yields pure DNA, with A260/A280 ratios greater than 1.7. The purified DNA is up to 50 kb in size (Figures 1 and 2, pages 14 and 15), and is suitable for all downstream applications, including Southern blotting, PCR, and real-time PCR (Figure 3, page 15). 12 BioSprint 15 DNA Handbook 06/2012 Table 2. Typical DNA yields from a range of sample types Sample type Amount of sample Typical DNA yield (μg)* Bovine tissue Muscle 25 mg 16.2 ± 2.5 Heart 25 mg 5.9 ± 2.6 Spleen 25 mg 69.1 ± 23.6 Lung 25 mg 13.8 ± 7.2 Liver 25 mg 77.8 ± 29.4 Kidney 25 mg 26.2 ± 18.8 30 mg 20.3 ± 1.8 1.2 cm (~25 mg) 32.7 ± 4.6 2 x 10⁶ cells 10.1 ± 4.7 Human (5–7 x 10⁶ cells/ml) 200 μl 4.5–9.0 Horse 200 μl 5.5–6.7 Bovine 200 μl 6.2–8.0 Sheep 200 μl 5.6–11.2 Pig 200 μl 4.5–9.0 Dog 200 μl 6.7–12.3 Cat 100 μl 4.4–8.3 Mouse 100 μl 2.0–8.0 Rat 100 μl 1.0–4.0 Sheep tissue Ear Mouse tissue Tail Cultured cells HL-60 Blood Bird† 10 μl 15.0 ± 6.3 Fish† 5 μl 7.1–10.0 * Genomic DNA was purified from the indicated samples. † Sample volume adjusted to 200 μl with Buffer AE. Table 2 continued on next page. BioSprint 15 DNA Handbook 06/2012 13 Table 2 continued from previous page. Sample type Amount of sample Typical DNA yield (μg)* Dried blood spots 903 Specimen Collection Paper 1 punch (6 mm [1/4 inch] diameter) 0.30 FTA Card 1 punch (6 mm [1/4 inch] diameter) 0.12 1 swab 0.8–2.0 Swabs Buccal swabs * Genomic DNA was purified from the indicated samples. Figure 1. Purification of high-quality DNA from fresh and frozen blood. Human blood was collected and treated with one of 3 anticoagulants: heparin (H), citrate (C), or EDTA (E). DNA was purified from 200 μl blood immediately after blood collection (Fresh) and after one cycle of freezing and thawing (Frozen) using the BioSprint 15 DNA Blood Kit. DNA was eluted in 200 μl elution buffer. Eluates (15 μl) were run on a 0.8% agarose gel in 1x TBE. M: markers (Lambda HindIII). 14 BioSprint 15 DNA Handbook 06/2012 Figure 2. Reproducible purification of genomic DNA from sheep ear tissue. Sheep ear tissue samples were treated with 180 μl Buffer ATL and 20 μl QIAGEN Proteinase K at 56°C overnight. Genomic DNA was purified from the lysed tissue samples using the BioSprint 15 DNA Blood Kit with the BioSprint 15 DNA Tissue protocol. DNA was eluted in 200 μl elution buffer. Eluates (5 μl) were run on a 0.8% agarose gel in 1x TBE. M: markers (Lambda HindIII). Figure 3. Efficient amplification of the single-copy gene MECL-1. The single-copy gene MECL-1 was amplified using 5 μl purified DNA from the indicated cultured-cell samples in a final reaction volume of 50 μl. Amplification reactions were performed using the QIAGEN Taq PCR Core Kit. A 5 μl aliquot of each PCR was run on a 1.5% agarose gel. –: negative control; +: positive control; M: 100 bp ladder. BioSprint 15 DNA Handbook 06/2012 15 Preparing reagents QIAGEN Protease Pipet Protease Solvent (which is nuclease-free water containing 0.04% (w/v) sodium azide) into the vial containing lyophilized QIAGEN Protease, as described on the vial label. Reconstituted QIAGEN Protease is stable for up to 2 months when stored at 2–8ºC. Storing reconstituted QIAGEN Protease at room temperature (15–25ºC) for prolonged periods should be avoided. Reconstituted QIAGEN Protease can be stored at –20ºC for up to 6 months, but repeated freezing and thawing should be avoided. We recommend dividing the reconstituted QIAGEN Protease into aliquots before storing at –20ºC. Buffer AL Mix Buffer AL thoroughly by shaking before use. Buffer AL is stable for up to 1 year when stored at room temperature (15–25ºC). Note: Do not add QIAGEN Protease directly to Buffer AL. Buffer AW1 Buffer AW1 is supplied as a concentrate. Before using for the first time, add ethanol (96–100%) as described on the bottle label; see also Table 3. Table 3. Preparing Buffer AW1 Volume of AW1 concentrate (ml) Volume of ethanol to add (ml) Final volume (ml) 19 25 44 98 130 228 Tick the check box on the bottle to indicate that ethanol has been added. Store reconstituted Buffer AW1 at room temperature (15–25ºC). Note: Always mix reconstituted Buffer AW1 before use by shaking the bottle 5 times. 16 BioSprint 15 DNA Handbook 06/2012 Buffer AW2 Buffer AW2 is supplied as a concentrate. Before using for the first time, add ethanol (96–100%) as described on the bottle label; see also Table 4. Table 4. Preparing Buffer AW2 Volume of AW2 concentrate (ml) Volume of ethanol to add (ml) Final volume (ml) 17 40 57 81 190 271 Tick the check box on the bottle to indicate that ethanol has been added. Store reconstituted Buffer AW2 at room temperature (15–25ºC). Note: Always mix reconstituted Buffer AW2 before use by shaking the bottle 5 times. MagAttract Suspension G To ensure that the magnetic silica particles are fully resuspended, MagAttract Suspension G must be shaken and vortexed before use. Before the first use, shake the vial or bottle, and vortex for 3 minutes. Before subsequent uses, shake the bottle, and vortex for 1 minute. Quantification of DNA Carryover of magnetic particles may affect the absorbance reading at 260 nm (A260) of the purified DNA, but should not affect downstream applications. The measured absorbance at 320 nm (A320) should be subtracted from all absorbance readings. See the appendix, page 49, for more information. Loading 5-tube strips and 5-rod covers into the BioSprint 15 Up to fifteen 5-tube strips can be loaded into the tube strip tray. One 5-tube strip is used per sample. If loading five 5-tube strips or fewer, we recommend loading them as a single column. If loading ten 5-tube strips or fewer, we recommend loading them as 2 columns. 5-tube strips are loaded into the tube strip tray so that the tab of each 5-tube strip faces to the left. The 5-tube strips should be fully inserted into the tray and not skewed. BioSprint 15 DNA Handbook 06/2012 17 Tab Tab Left column Middle column Right column Figure 4. Correct loading of 5-tube strips in the tube strip tray. Up to three 5-rod covers can be loaded into the rod cover slots. There must always be a 5-rod cover above a column of 5-tube strips. Rod cover slot Figure 5. Rod cover slot. Insert a 5-rod cover into a rod cover slot so that the short tab faces inward and the long tab faces outward. 5-rod covers must be inserted so that they click into place. Short tab Long tab Figure 6. Tabs of the 5-rod cover Note: Do not push 5-rod covers further after they click into place, otherwise an instrument crash will occur. 18 BioSprint 15 DNA Handbook 06/2012 Protocol: Purification of DNA from Blood This protocol is for purification of total (genomic and mitochondrial) DNA from whole blood or blood products using the BioSprint 15 workstation and the BioSprint 15 DNA Blood Kit. Human blood samples can be 100 μl, 200 μl, or 300 μl. Animal blood samples containing non-nucleated erythrocytes can be 100 μl or 200 μl. Buffy coat samples can be 100 μl or 200 μl. Important points before starting Check that QIAGEN Protease, Buffer AW1, and Buffer AW2 have been prepared according to the instructions on pages 16–17. Check that Buffer AL does not contain a white precipitate by shaking the bottle. If necessary, incubate for 30 minutes at 37ºC with occasional shaking to dissolve precipitate. Human blood samples must be in the range of 100–300 μl. Animal blood samples must be in the range of 100–200 μl. If necessary, the volume of animal blood used can be reduced and the sample volume adjusted to 100 μl or 200 μl with Buffer AE. Since bird and fish blood contain nucleated erythrocytes, use less than 20 μl blood and adjust the sample volume to 200 μl with Buffer AE. Buffy coat samples must be 100–200 μl. Ensure that you are familiar with operating the BioSprint 15. Refer to the BioSprint 15 User Manual for operating instructions. In some steps of the procedure, one of three choices can be made. Choose if processing 100 μl blood samples; choose if processing 200 μl blood samples; choose if processing 300 μl blood samples. BioSprint 15 DNA Handbook 06/2012 19 Things to do before starting Thaw and equilibrate up to 15 whole blood samples at room temperature (15–25ºC), or prepare buffy coat samples according to page 12. Set a water bath or shaker–incubator to 70ºC for use in step 7 of the procedure. All samples in a single procedure must have the same volume (100 μl, 200 μl, or 300 μl). If the volume of a sample needs to be increased, add the appropriate volume of PBS (human blood samples) or Buffer AE (animal, bird, and fish blood samples). MagAttract magnetic particles copurify RNA and DNA if both are present in the sample. If RNA-free DNA is required, add RNase A to the sample before starting the procedure. The final RNase A concentration should be 2 mg/ml (e.g., add 4 μl of a 100 mg/ml RNase A solution to a 200 μl sample). Procedure 1. Switch on the BioSprint 15 at the power switch. 2. Open the front door of the BioSprint 15 and slide out the tube strip tray. 3. Load up to fifteen 5-tube strips into the tube strip tray. One 5-tube strip is used per sample. If loading five 5-tube strips or fewer, we recommend loading them as a single column. If loading ten 5-tube strips or fewer, we recommend loading them as 2 columns. See page 17 for more information. Load the 5-tube strips in the tube strip tray so that the tab of each 5-tube strip faces to the left. Make sure that the 5-tube strips are fully inserted into the tray and are not skewed. 4. Add reagents into each 5-tube strip according to the table on the next page. 20 BioSprint 15 DNA Handbook 06/2012 Volume of reagent (μl) Well Reagent 1 Lysate* 325 650 975 2 Buffer AW1 500 700 1000 3 Buffer AW2 500 500 500 4 Buffer AW2 500 500 500 5 Buffer AE 100 200 300 * Added at steps 11 and 12; includes volume of sample, QIAGEN Protease, Buffer AL, isopropanol, and MagAttract Suspension G. Note: Well 1 is at the left of the 5-tube strip, well 5 is at the right. 5. Pipet 10 μl, 20 μl, or 30 μl QIAGEN Protease into the bottom of a microcentrifuge tube (not supplied); use a 1.5 ml tube for blood samples and a 2 ml tube for buffy coat samples. Add 100 μl, 200 μl, or 300 μl sample to the QIAGEN Protease. Note: It is possible to add QIAGEN Protease to samples that have already been dispensed into microcentrifuge tubes. In this case, it is important to ensure proper mixing after adding QIAGEN Protease. 6. Add 100 μl, 200 μl, or 300 μl Buffer AL, and mix by pulse-vortexing for 15 s. To ensure efficient lysis, it is essential that the sample and Buffer AL are mixed thoroughly to yield a homogeneous solution. Note: Do not add QIAGEN Protease directly to Buffer AL. 7. Incubate at 70ºC for 10 min. Maximum DNA yields are achieved after lysis at 70ºC for 10 min. Longer incubation times should be avoided. 8. Briefly centrifuge the microcentrifuge tube to remove drops from the inside of the lid. 9. Add 100 μl, 200 μl, or 300 μl isopropanol, and mix by pulse-vortexing for 10 s. 10. Briefly centrifuge the microcentrifuge tube to remove drops from the inside of the lid. 11. Transfer the entire lysate into well 1 of the 5-tube strip. Note: Well 1 is at the left of the 5-tube strip, well 5 is at the right. Note: If processing more than one sample, record in which 5-tube strips you load the samples. BioSprint 15 DNA Handbook 06/2012 21 12. Add 15 μl, 30 μl, or 45 μl MagAttract Suspension G to the lysate in well 1 of the 5-tube strip. Note: Before adding MagAttract Suspension G, ensure that it is fully resuspended. Vortex for 3 min before using for the first time and for 1 min before subsequent uses. 13. Load up to three 5-rod covers into the rod cover slots. There must always be a 5-rod cover above a column of 5-tube strips. See page 17 for more information. Insert a 5-rod cover into a rod cover slot so that the short tab faces inward and the long tab faces outward. 5-rod covers must be inserted so that they click into place. Note: If necessary, remove the tube strip tray to allow easier loading of the 5-rod covers. Note: Do not push 5-rod covers further after they click into place, otherwise an instrument crash will occur. 14. Slide back the tube strip tray fully into the BioSprint 15. 15. Close the front door of the BioSprint 15. Closing the front and top doors protects the samples from contamination. 16. Select the protocol “BS15 DNA Blood 100”, “BS15 DNA Blood 200”, or “BS15 DNA Blood 300” using the and keys. Press “START” to start the protocol run. See the BioSprint 15 User Manual for safety information. 17. After the protocol run ends, press “STOP”, slide out the tube strip tray, and transfer the eluted DNA from well 5 of each 5-tube strip to other tubes for long-term storage. Note: Well 5 is at the right of the 5-tube strip. Carryover of magnetic particles in eluates will not affect most downstream applications. If the risk of magnetic-particle carryover needs to be minimized, tubes containing eluate should first be placed in a suitable magnet and the eluates transferred to clean tubes (see the appendix, page 49). 18. Remove the 5-tube strips and 5-rod covers and discard them according to your local safety regulations. Note: See page 5 for safety information. 19. Switch off the BioSprint 15 at the power switch. 20. Wipe the surface of the tube strip tray and adjacent surfaces with a soft cloth or tissue moistened with distilled water or a mild detergent solution. If infectious agents are spilt onto the tube strip tray, clean using 70% ethanol or other disinfectant. Note: Do not use bleach as disinfectant. See page 5 for safety information. 22 BioSprint 15 DNA Handbook 06/2012 Protocol: Rapid Purification of DNA from Human Whole Blood This protocol is for rapid purification of total (genomic and mitochondrial) DNA from human whole blood using the BioSprint 15 workstation and the BioSprint 15 DNA Blood Kit. Blood samples can be 100 μl, 200 μl, or 300 μl. This shorter protocol has less manual handling steps than the standard protocol (see “Protocol: Purification of DNA from Blood Using the BioSprint 15”, page 19), but yield and purity of the purified DNA may be lower. Important points before starting Check that QIAGEN Protease, Buffer AW1 and Buffer AW2 have been prepared according to the instructions on pages 16–17. Check that Buffer AL does not contain a white precipitate. If necessary, incubate Buffer AL for 30 minutes at 37ºC with occasional shaking to dissolve precipitate. This protocol is suitable for human whole blood. Blood samples must be in the range of 100–300 μl. Ensure that you are familiar with operating the BioSprint 15. Refer to the BioSprint 15 User Manual for operating instructions. In some steps of the procedure, one of three choices can be made. Choose if processing 100 μl blood samples; choose if processing 200 μl blood samples; choose if processing 300 μl blood samples. Things to do before starting Thaw and equilibrate up to 15 whole blood samples at room temperature (15–25°C). All samples in a single procedure must have the same volume (100 μl, 200 μl, or 300 μl). If the volume of a sample needs to be increased, add the appropriate volume of PBS. MagAttract magnetic particles copurify RNA and DNA if both are present in the sample. If RNA-free DNA is required, add RNase A to the sample before starting the procedure. The final RNase A concentration should be 2 mg/ml (e.g., add 4 μl of a 100 mg/ml RNase A solution to a 200 μl sample). Prepare a master mix according to the table on the next page for use in step 6 of the procedure. Before adding MagAttract Suspension G, ensure that it is fully resuspended. Vortex for 3 minutes before using for the first time, and for 1 minute before subsequent uses. BioSprint 15 DNA Handbook 06/2012 23 Note: Prepare a volume of master mix 10% greater than that required for the total number of sample purifications to be performed. If using a multidispenser, 225 μl, 450 μl, or 650 μl master mix is required per sample (see step 6 of the protocol). The starting volume of master mix should be increased accordingly. Volume of reagent per sample (μl) Reagent Buffer AL 100 200 300 Isopropanol 100 200 300 15 30 45 MagAttract Suspension G Procedure 1. Switch on the BioSprint 15 at the power switch. 2. Open the front door of the BioSprint 15 and slide out the tube strip tray. 3. Load up to fifteen 5-tube strips into the tube strip tray. One 5-tube strip is used per sample. If loading five 5-tube strips or fewer, we recommend loading them as a single column. If loading ten 5-tube strips or fewer, we recommend loading them as 2 columns. See page 17 for more information. Load the 5-tube strips in the tube strip tray so that the tab of each 5-tube strip faces to the left. Make sure that the 5-tube strips are fully inserted into the tray and are not skewed. 4. Add reagents into each 5-tube strip according to the table on the next page. 24 BioSprint 15 DNA Handbook 06/2012 Volume of reagent (μl) Well Reagent 1 Lysate* 325 650 975 2 Buffer AW1 500 700 1000 3 Buffer AW2 500 500 500 4 Buffer AW2 500 500 500 5 Buffer AE 100 200 300 * Added at steps 5 and 6; includes volume of sample, QIAGEN Protease, Buffer AL, isopropanol, and MagAttract Suspension G. Note: Well 1 is at the left of the 5-tube strip, well 5 is at the right. 5. Pipet 10 μl, 20 μl, or 30 μl QIAGEN Protease into the bottom of well 1 of each 5-tube strip. Add 100 μl, 200 μl, or 300 μl sample to the QIAGEN Protease. Note: Well 1 is at the left of the 5-tube strip, well 5 is at the right. Note: If processing more than one sample, record in which 5-tube strips you load the samples. 6. Vortex the master mix containing Buffer AL, isopropanol, and MagAttract Suspension G for 1 min (see “Things to do before starting”). Add 215 μl, 430 μl, or 645 μl master mix to each sample in well 1 of each 5-tube strip. Note: If using a multidispenser, add 225 μl, 450 μl, or 650 μl master mix to each sample. 7. Load up to three 5-rod covers into the rod cover slots. There must always be a 5-rod cover above a column of 5-tube strips. See page 17 for more information. Insert a 5-rod cover into a rod cover slot so that the short tab faces inward and the long tab faces outward. 5-rod covers must be inserted so that they click into place. Note: If necessary, remove the tube strip tray to allow easier loading of the 5-rod covers. Note: Do not push 5-rod covers further after they click into place, otherwise an instrument crash will occur. 8. Slide back the tube strip tray fully into the BioSprint 15. BioSprint 15 DNA Handbook 06/2012 25 9. Close the front door of the BioSprint 15. Closing the front and top doors protects the samples from contamination. 10. Select the protocol “BS15 DNA Blood 100”, “BS15 DNA Blood 200”, or “BS15 DNA Blood 300” using the and keys. Press “START” to start the protocol run. See the BioSprint 15 User Manual for safety information. 11. After the protocol run ends, press “STOP”, slide out the tube strip tray, and transfer the eluted DNA from well 5 of each 5-tube strip to other tubes for long-term storage. Note: Well 5 is at the right of the 5-tube strip. Carryover of magnetic particles in eluates will not affect most downstream applications. If the risk of magnetic-particle carryover needs to be minimized, tubes containing eluate should first be placed in a suitable magnet and the eluates transferred to clean tubes (see the appendix, page 49). 12. Remove the 5-tube strips and 5-rod covers and discard them according to your local safety regulations. Note: See page 5 for safety information. 13. Switch off the BioSprint 15 at the power switch. 14. Wipe the surface of the tube strip tray and adjacent surfaces with a soft cloth or tissue moistened with distilled water or a mild detergent solution. If infectious agents are spilt onto the tube strip tray, clean using 70% ethanol or other disinfectant. Note: Do not use bleach as disinfectant. See page 5 for safety information. 26 BioSprint 15 DNA Handbook 06/2012 Protocol: Purification of DNA from Cultured Cells This protocol is for purification of total (genomic and mitochondrial) DNA from up to 5 x 10⁶ diploid cells per sample using the BioSprint 15 workstation and the BioSprint 15 DNA Blood Kit. Important points before starting Check that QIAGEN Protease, Buffer AW1, and Buffer AW2 have been prepared according to the instructions on pages 16–17. Check that Buffer AL does not contain a white precipitate. If necessary, incubate Buffer AL for 30 minutes at 37ºC with occasional shaking to dissolve precipitate. Ensure that you are familiar with operating the BioSprint 15. Refer to the BioSprint 15 User Manual for operating instructions. Things to do before starting Set a water bath or shaker–incubator to 70°C for use in step 8 of the procedure. MagAttract magnetic particles copurify RNA and DNA if both are present in the sample. If RNA-free DNA is required, add RNase A to the lysate in step 5 of the procedure. The final RNase A concentration should be 2 mg/ml (e.g., add 4 μl of a 100 mg/ml RNase A solution to a 200 μl sample). Prepare a master mix according to the table below for use in step 11 of the procedure. Before adding MagAttract Suspension G, ensure that it is fully resuspended. Vortex for 3 minutes before using for the first time, and for 1 minute before subsequent uses. Note: Prepare a volume of master mix 10% greater than that required for the total number of sample purifications to be performed. Reagent Isopropanol MagAttract Suspension G BioSprint 15 DNA Handbook 06/2012 Volume of reagent per sample (μl) 200 30 27 Procedure 1. Switch on the BioSprint 15 at the power switch. 2. Open the front door of the BioSprint 15 and slide out the tube strip tray. 3. Load up to fifteen 5-tube strips into the tube strip tray. One 5-tube strip is used per sample. If loading five 5-tube strips or fewer, we recommend loading them as a single column. If loading ten 5-tube strips or fewer, we recommend loading them as 2 columns. See page 17 for more information. Load the 5-tube strips in the tube strip tray so that the tab of each 5-tube strip faces to the left. Make sure that the 5-tube strips are fully inserted into the tray and are not skewed. 4. Add reagents into each 5-tube strip according to the table below. Well Reagent Volume of reagent (μl) 1 Lysate* 650 2 Buffer AW1 700 3 Buffer AW2 500 4 Buffer AW2 500 5 Buffer AE 200 * Added at steps 10 and 11; includes volume of sample, QIAGEN Protease, Buffer AL, isopropanol, and MagAttract Suspension G. Note: Well 1 is at the left of the 5-tube strip, well 5 is at the right. 5. Centrifuge the appropriate number of cells (up to 5 x 10⁶) for 5 min at 300 x g. Discard the supernatant and resuspend the cell pellet in 200 μl PBS (not supplied). When using a frozen cell pellet, allow cells to thaw until the pellet can be dislodged by gently flicking the tube before adding PBS. Ensure that an appropriate number of cells is used in the procedure. For cell lines with a high degree of ploidy (e.g., HeLa cells), it is recommended to use less than the maximum number of cells. Optional: RNase treatment of the sample. Add 4 μl of RNase A (100 mg/ml), mix by vortexing, and incubate for 2 min at room temperature (15–25ºC). 6. Add 20 μl QIAGEN Protease to the sample. 28 BioSprint 15 DNA Handbook 06/2012 7. Add 200 μl Buffer AL and mix by pulse-vortexing for 15 s. To ensure efficient lysis, it is essential that the sample and Buffer AL are mixed thoroughly to yield a homogenous solution. Note: Do not add QIAGEN Protease directly to Buffer AL. 8. Incubate at 70°C for 10 min. Maximum DNA yields are achieved after lysis at 70°C for 10 min. Longer incubation times should be avoided. 9. Briefly centrifuge the microcentrifuge tube to remove drops from the inside of the lid. 10. Transfer the entire lysate to well 1 of the 5-tube strip. Note: Well 1 is at the left of the 5-tube strip, well 5 is at the right. Note: If processing more than one sample, record in which 5-tube strips you load the samples. 11. Vortex the master mix containing isopropanol and MagAttract Suspension G for 1 min (see “Things to do before starting”). Add 230 μl master mix to each sample in well 1 of each 5-tube strip. Note: If using a multidispenser, add 225 μl master mix to each sample. 12. Load up to three 5-rod covers into the rod cover slots. There must always be a 5-rod cover above a column of 5-tube strips. See page 17 for more information. Insert a 5-rod cover into a rod cover slot so that the short tab faces inward and the long tab faces outward. 5-rod covers must be inserted so that they click into place. Note: If necessary, remove the tube strip tray to allow easier loading of the 5-rod covers. Note: Do not push 5-rod covers further after they click into place, otherwise an instrument crash will occur. 13. Slide back the tube strip tray fully into the BioSprint 15. 14. Close the front door of the BioSprint 15. Closing the front and top doors protects the samples from contamination. 15. Select the protocol “BS15 DNA Blood 200” using the and keys on the BioSprint 15 workstation. Press “START” to start the protocol run. See the BioSprint 15 User Manual for safety information. BioSprint 15 DNA Handbook 06/2012 29 16. After the protocol run ends, press “STOP”, slide out the tube strip tray, and transfer the eluted DNA from well 5 of each 5-tube strip to other tubes for long-term storage. Note: Well 5 is at the right of the 5-tube strip. Carryover of magnetic particles in eluates will not affect most downstream applications. If the risk of magnetic-particle carryover needs to be minimized, tubes containing eluate should first be placed in a suitable magnet and the eluates transferred to clean tubes (see the appendix, page 49). 17. Remove the 5-tube strips and 5-rod covers and discard them according to your local safety regulations. Note: See page 5 for safety information. 18. Switch off the BioSprint 15 at the power switch. 19. Wipe the surface of the tube strip tray and adjacent surfaces with a soft cloth or tissue moistened with distilled water or a mild detergent solution. If infectious agents are spilt onto the tube strip tray, clean using 70% ethanol or other disinfectant. Note: Do not use bleach as disinfectant. See page 5 for safety information. 30 BioSprint 15 DNA Handbook 06/2012 Protocol: Purification of DNA from Tissues This protocol is for purification of total (genomic and mitochondrial) DNA from up to 25 mg of tissue per sample using the BioSprint 15 workstation and the BioSprint 15 DNA Blood Kit. Important points before starting Buffer ATL and QIAGEN Proteinase K are required for this protocol. See “Equipment and Reagents to Be Supplied by User”, page 9. Check that Buffer AW1 and Buffer AW2 have been prepared according to the instructions on pages 16–17. Check that Buffer AL and Buffer ATL do not contain a white precipitate. If necessary, incubate Buffer AL and Buffer ATL for 30 minutes at 37ºC with occasional shaking to dissolve precipitate. Ensure that you are familiar with operating the BioSprint 15. Refer to the BioSprint 15 User Manual for operating instructions. Things to do before starting Set a shaker–incubator to 56ºC for use in step 3 of the procedure. MagAttract magnetic particles copurify RNA and DNA if both are present in the sample. If RNA-free DNA is required, add RNase A to the lysate in step 3 of the procedure. The final RNase A concentration should be 2 mg/ml (e.g., add 4 μl of a 100 mg/ml RNase A solution to a 200 μl sample). Prepare a master mix according to the table on the next page for use in step 10 of the procedure. Before adding MagAttract Suspension G, ensure that it is fully resuspended. Vortex for 3 minutes before using for the first time, and for 1 minute before subsequent uses. Note: Prepare a volume of master mix 10% greater than that required for the total number of sample purifications to be performed. If using a multidispenser, 450 μl master mix is required per sample (see step 10 of the procedure). The starting volume of master mix should be increased accordingly. BioSprint 15 DNA Handbook 06/2012 31 Reagent Volume of reagent per sample (μl) Buffer AL 200 Isopropanol 200 MagAttract Suspension G 30 Procedure 1. Cut ≤25 mg of each tissue sample into small pieces. Place a tissue sample into a 1.5 ml microcentrifuge tube (not supplied), and add 180 μl Buffer ATL (not supplied). 2. Add 20 μl QIAGEN Proteinase K (not supplied), and close the 1.5 ml microcentrifuge tube. 3. Place the 1.5 ml microcentrifuge tube in a shaker–incubator, and incubate at 56°C with shaking until the tissue is completely lysed. Lysis time varies depending on the type of tissue processed. Lysis is usually complete in 1–3 h. If it is more convenient, samples can be lysed overnight; this will not affect the DNA quality. Optional: Transcriptionally active tissues such as liver and kidney contain high levels of RNA, which will copurify with genomic DNA. If RNA-free genomic DNA is required, add 4 μl of RNase A (100 mg/ml), mix by vortexing, and incubate for 2 min at room temperature (15–25ºC). 4. Towards the end of proteinase K digestion, switch on the BioSprint 15 at the power switch. 5. Open the front door of the BioSprint 15 and slide out the tube strip tray. 6. Load up to fifteen 5-tube strips into the tube strip tray. One 5-tube strip is used per sample. If loading five 5-tube strips or fewer, we recommend loading them as a single column. If loading ten 5-tube strips or fewer, we recommend loading them as 2 columns. See page 17 for more information. Load the 5-tube strips in the tube strip tray so that the tab of each 5-tube strip faces to the left. Make sure that the 5-tube strips are fully inserted into the tray and are not skewed. 7. Add reagents into each 5-tube strip according to the table on the next page. 32 BioSprint 15 DNA Handbook 06/2012 Well Reagent Volume of reagent (μl) 1 Lysate* 630 2 Buffer AW1 700 3 Buffer AW2 500 4 Buffer AW2 500 5 Buffer AE 200 * Added at steps 9 and 10; includes volume of sample, Buffer ATL, QIAGEN Proteinase K, Buffer AL, isopropanol, and MagAttract Suspension G. Note: Well 1 is at the left of the 5-tube strip, well 5 is at the right. 8. Briefly centrifuge the 1.5 ml microcentrifuge tube to remove drops from the inside of the lid. 9. Transfer the entire lysate to well 1 of the 5-tube strip. Note: Well 1 is at the left of the 5-tube strip, well 5 is at the right. Note: If processing more than one sample, record in which 5-tube strips you load the samples. 10. Vortex the master mix containing Buffer AL, isopropanol, and MagAttract Suspension G for 1 min (see “Things to do before starting”). Add 430 μl of master mix to each sample in well 1 of each 5-tube strip. Note: If using a multidispenser, add 450 μl master mix to each sample. 11. Load up to three 5-rod covers into the rod cover slots. There must always be a 5-rod cover above a column of 5-tube strips. See page 17 for more information. Insert a 5-rod cover into a rod cover slot so that the short tab faces inward and the long tab faces outward. 5-rod covers must be inserted so that they click into place. Note: If necessary, remove the tube strip tray to allow easier loading of the 5-rod covers. Note: Do not push 5-rod covers further after they click into place, otherwise an instrument crash will occur. 12. Slide back the tube strip tray fully into the BioSprint 15. 13. Close the front door of the BioSprint 15. Closing the front and top doors protects the samples from contamination. BioSprint 15 DNA Handbook 06/2012 33 14. Select the protocol “BS15 DNA Tissue” using the and keys on the BioSprint 15 workstation. Press “START” to start the protocol run. See the BioSprint 15 User Manual for safety information. 15. After the protocol run ends, press “STOP”, slide out the tube strip tray, and transfer the eluted DNA from well 5 of each 5-tube strip to other tubes for long-term storage. Note: Well 5 is at the right of the 5-tube strip. Carryover of magnetic particles in eluates will not affect most downstream applications. If the risk of magnetic-particle carryover needs to be minimized, tubes containing eluate should first be placed in a suitable magnet and the eluates transferred to clean tubes (see the appendix, page 49). 16. Remove the 5-tube strips and 5-rod covers and discard them according to your local safety regulations. Note: See page 5 for safety information. 17. Switch off the BioSprint 15 at the power switch. 18. Wipe the surface of the tube strip tray and adjacent surfaces with a soft cloth or tissue moistened with distilled water or a mild detergent solution. If infectious agents are spilt onto the tube strip tray, clean using 70% ethanol or other disinfectant. Note: Do not use bleach as disinfectant. See page 5 for safety information. 34 BioSprint 15 DNA Handbook 06/2012 Protocol: Purification of DNA from Rodent Tails This protocol is for purification of total (genomic and mitochondrial) DNA from up to 1.2 cm (approximately 25 mg) of rodent tail per sample using the BioSprint 15 workstation and the BioSprint 15 DNA Blood Kit. Important points before starting Buffer ATL and QIAGEN Proteinase K are required for this protocol. See “Equipment and Reagents to Be Supplied by User”, page 9. Check that Buffer AW1 and Buffer AW2 have been prepared according to the instructions on pages 16–17. Check that Buffer AL and Buffer ATL do not contain a white precipitate. If necessary, incubate Buffer AL and Buffer ATL for 30 minutes at 37ºC with occasional shaking to dissolve precipitate. Ensure that you are familiar with operating the BioSprint 15. Refer to the BioSprint 15 User Manual for operating instructions. Things to do before starting Set a shaker–incubator to 56ºC for use in step 3 of the procedure. MagAttract magnetic particles copurify RNA and DNA if both are present in the sample. If RNA-free DNA is required, add RNase A to the sample in step 3 of the procedure. The final RNase A concentration should be 2 mg/ml (e.g., add 4 μl of a 100 mg/ml RNase A solution to a 200 μl sample). Prepare a master mix according to the table on the next page for use in step 10 of the procedure. Before adding MagAttract Suspension G, ensure that it is fully resuspended. Vortex for 3 minutes before using for the first time, and for 1 minute before subsequent uses. Note: Prepare a volume of master mix 10% greater than that required for the total number of sample purifications to be performed. If using a multidispenser, 450 μl master mix is required per sample (see step 10 of the procedure). The starting volume of master mix should be increased accordingly. BioSprint 15 DNA Handbook 06/2012 35 Reagent Volume of reagent per sample (μl) Buffer AL 200 Isopropanol 200 MagAttract Suspension G 30 Procedure 1. Cut ≤1.2 cm of each rodent tail sample into small pieces. Place the tissue sample into a 1.5 ml microcentrifuge tube (not supplied), and add 180 μl Buffer ATL (not supplied). 2. Add 20 μl QIAGEN Proteinase K (not supplied), and close the 1.5 ml microcentrifuge tube. 3. Place the 1.5 ml microcentrifuge tube in a shaker–incubator, and incubate at 56°C with shaking until the tissue is completely lysed. Lysis time varies depending on the type of tissue processed. Lysis is usually complete in 1–3 h. If it is more convenient, samples can be lysed overnight; this will not affect the DNA quality. Optional: If RNA-free genomic DNA is required, add 4 μl of RNase A (100 mg/ml), mix by vortexing, and incubate for 2 min at room temperature (15–25ºC). 4. Towards the end of proteinase K digestion, switch on the BioSprint 15 at the power switch. 5. Open the front door of the BioSprint 15 and slide out the tube strip tray. 6. Load up to fifteen 5-tube strips into the tube strip tray. One 5-tube strip is used per sample. If loading five 5-tube strips or fewer, we recommend loading them as a single column. If loading ten 5-tube strips or fewer, we recommend loading them as 2 columns. See page 17 for more information. Load the 5-tube strips in the tube strip tray so that the tab of each 5-tube strip faces to the left. Make sure that the 5-tube strips are fully inserted into the tray and are not skewed. 36 BioSprint 15 DNA Handbook 06/2012 7. Add reagents into each 5-tube strip according to the table below. Well Reagent Volume of reagent (μl) 1 Lysate* 630 2 Buffer AW1 700 3 Buffer AW2 500 4 Buffer AW2 500 5 Buffer AE 200 * Added at steps 9 and 10; includes volume of sample, Buffer ATL, QIAGEN Proteinase K, Buffer AL, isopropanol, and MagAttract Suspension G. Note: Well 1 is at the left of the 5-tube strip, well 5 is at the right. 8. Briefly centrifuge the 1.5 ml microcentrifuge tube to remove drops from the inside of the lid. 9. Transfer the entire lysate to well 1 of the 5-tube strip. Note: Well 1 is at the left of the 5-tube strip, well 5 is at the right. Note: If processing more than one sample, record in which 5-tube strips you load the samples. 10. Vortex the master mix containing Buffer AL, isopropanol, and MagAttract Suspension G for 1 min (see “Things to do before starting”). Add 430 μl of master mix to each sample in well 1 of each 5-tube strip. Note: If using a multidispenser, add 450 μl master mix to each sample. 11. Load up to three 5-rod covers into the rod cover slots. There must always be a 5-rod cover above a column of 5-tube strips. See page 17 for more information. Insert a 5-rod cover into a rod cover slot so that the short tab faces inward and the long tab faces outward. 5-rod covers must be inserted so that they click into place. Note: If necessary, remove the tube strip tray to allow easier loading of the 5-rod covers. Note: Do not push 5-rod covers further after they click into place, otherwise an instrument crash will occur. 12. Slide back the tube strip tray fully into the BioSprint 15. 13. Close the front door of the BioSprint 15. Closing the front and top doors protects the samples from contamination. BioSprint 15 DNA Handbook 06/2012 37 14. Select the protocol “BS15 DNA Tissue” using the and keys on the BioSprint 15 workstation. Press “START” to start the protocol run. See the BioSprint 15 User Manual for safety information. 15. After the protocol run ends, press “STOP”, slide out the tube strip tray, and transfer the eluted DNA from well 5 of each 5-tube strip to other tubes for long-term storage. Note: Well 5 is at the right of the 5-tube strip. Carryover of magnetic particles in eluates will not affect most downstream applications. If the risk of magnetic-particle carryover needs to be minimized, tubes containing eluate should first be placed in a suitable magnet and the eluates transferred to clean tubes (see the appendix, page 49). 16. Remove the 5-tube strips and 5-rod covers and discard them according to your local safety regulations. Note: See page 5 for safety information. 17. Switch off the BioSprint 15 at the power switch. 18. Wipe the surface of the tube strip tray and adjacent surfaces with a soft cloth or tissue moistened with distilled water or a mild detergent solution. If infectious agents are spilt onto the tube strip tray, clean using 70% ethanol or other disinfectant. Note: Do not use bleach as disinfectant. See page 5 for safety information. 38 BioSprint 15 DNA Handbook 06/2012 Protocol: Purification of DNA from Buccal Swabs This protocol is for purification of total (genomic and mitochondrial) DNA from buccal swabs using the BioSprint 15 workstation and the BioSprint 15 DNA Blood Kit. The procedure is optimized for air-dried buccal swabs with cotton or Dacron tips, and brushes or swabs with an ejectable head (e.g., Whatman® Omni Swab). Other swab types may also be used. Important points before starting Buffer ATL and QIAGEN Proteinase K are required for this protocol. See “Equipment and Reagents to Be Supplied by User”, page 9. Check that Buffer AW1 and Buffer AW2 have been prepared according to the instructions on pages 16–17. Check that Buffer AL and Buffer ATL do not contain a white precipitate. If necessary, incubate Buffer AL and Buffer ATL for 30 minutes at 37ºC with occasional shaking to dissolve precipitate. Ensure that you are familiar with operating the BioSprint 15. Refer to the BioSprint 15 User Manual for operating instructions. Things to do before starting Set a shaker–incubator with an adapter for 2 ml microcentrifuge tubes to 56°C for use in step 4 of the procedure. Prepare a master mix according to the table below for use in step 12 of the procedure. Before adding MagAttract Suspension G, ensure that it is fully resuspended. Vortex for 3 minutes before using for the first time, and for 1 minute before subsequent uses. Note: Prepare a volume of master mix 10% greater than that required for the total number of sample purifications to be performed. Reagent Volume of reagent per sample (μl) Buffer AL 200 Isopropanol 200 MagAttract Suspension G BioSprint 15 DNA Handbook 06/2012 20 39 Procedure 1. Place the swab in a 2 ml microcentrifuge tube (not supplied). If using an Omni Swab, eject the swab head by pressing the end of the inner shaft towards the swab head. If using a cotton or Dacron swab, separate the swab head from its shaft by hand or by using scissors. 2. If using an Omni Swab, add 500 μl Buffer ATL (not supplied) to the 2 ml microcentrifuge tube. If using a cotton or Dacron swab, add 400 μl Buffer ATL to the 2 ml microcentrifuge tube. 3. Add 20 μl QIAGEN Proteinase K (not supplied), close the 2 ml microcentrifuge tube, and mix thoroughly by pulse vortexing for 10 s. 4. Place the 2 ml microcentrifuge tube in a shaker–incubator, and incubate at 56°C with shaking at 900 rpm for 1 h. If it is more convenient, samples can be lysed overnight; this will not affect the DNA quality. 5. Towards the end of proteinase K digestion, switch on the BioSprint 15 at the power switch. 6. Open the front door of the BioSprint 15 and slide out the tube strip tray. 7. Load up to fifteen 5-tube strips into the tube strip tray. One 5-tube strip is used per sample. If loading five 5-tube strips or fewer, we recommend loading them as a single column. If loading ten 5-tube strips or fewer, we recommend loading them as 2 columns. See page 17 for more information. Load the 5-tube strips in the tube strip tray so that the tab of each 5-tube strip faces to the left. Make sure that the 5-tube strips are fully inserted into the tray and are not skewed. 8. Add reagents into each 5-tube strip according to the table on the next page. 40 BioSprint 15 DNA Handbook 06/2012 Well Reagent Volume of reagent (μl) 1 Lysate* 620 2 Buffer AW1 700 3 Buffer AW2 500 4 Buffer AW2 500 5 Buffer AE 200 * Added at steps 11 and 12; includes volume of Buffer ATL, QIAGEN Proteinase K, Buffer AL, isopropanol, and MagAttract Suspension G. Note: Well 1 is at the left of the 5-tube strip, well 5 is at the right. 9. Load up to three 5-rod covers into the rod cover slots. There must always be a 5-rod cover above a column of 5-tube strips. See page 17 for more information. Insert a 5-rod cover into a rod cover slot so that the short tab faces inward and the long tab faces outward. 5-rod covers must be inserted so that they click into place. Note: If necessary, remove the tube strip tray to allow easier loading of the 5-rod covers. Note: Do not push 5-rod covers further after they click into place; otherwise an instrument crash will occur. 10. Briefly centrifuge the 2 ml microcentrifuge tube to remove drops from the inside of the lid. 11. Carefully transfer 200 μl of the lysate to well 1 of the 5-tube strip, leaving the swab in the 2 ml microcentrifuge tube. Note: Well 1 is at the left of the 5-tube strip, well 5 is at the right. Note: If processing more than one sample, record in which 5-tube strips you load the samples. 12. Vortex the master mix containing Buffer AL, isopropanol, and MagAttract Suspension G for 1 min (see “Things to do before starting”). Add 420 μl master mix to each sample in well 1 of each 5-tube strip. Note: If using a multidispenser, add 400 μl master mix to each sample. 13. Slide back the tube strip tray fully into the BioSprint 15. 14. Close the front door of the BioSprint 15. Closing the front and top doors protects the samples from contamination. BioSprint 15 DNA Handbook 06/2012 41 15. Select the protocol “BS15 DNA Swab” using the and keys on the BioSprint 15 workstation. Press “START” to start the protocol run. See the BioSprint 15 User Manual for safety information. 16. After the protocol run ends, press “STOP”, slide out the tube strip tray, and transfer the eluted DNA from well 5 of each 5-tube strip to other tubes for long-term storage. Note: Well 5 is at the right of the 5-tube strip. Carryover of magnetic particles in eluates will not affect most downstream applications. If the risk of magnetic-particle carryover needs to be minimized, tubes containing eluate should first be placed in a suitable magnet and the eluates transferred to clean tubes (see the appendix, page 49). 17. Remove the 5-tube strips and 5-rod covers and discard them according to your local safety regulations. Note: See page 5 for safety information. 18. Switch off the BioSprint 15 at the power switch. 19. Wipe the surface of the tube strip tray and adjacent surfaces with a soft cloth or tissue moistened with distilled water or a mild detergent solution. If infectious agents are spilt onto the tube strip tray, clean using 70% ethanol or other disinfectant. Note: Do not use bleach as disinfectant. See page 5 for safety information. 42 BioSprint 15 DNA Handbook 06/2012 Protocol: Purification of DNA from Dried Blood Spots This protocol is for purification of total (genomic and mitochondrial) DNA from blood card punches using the BioSprint 15 workstation and the BioSprint 15 DNA Blood Kit. This protocol is suitable for untreated blood or blood treated with anticoagulants, such as EDTA, citrate, or heparin. The blood must be spotted and dried on filter paper according to the manufacturer’s instructions. We recommend using 903 Specimen Collection Paper with the BioSprint 15. Important points before starting Buffer ATL and QIAGEN Proteinase K are required for this protocol. See “Equipment and Reagents to Be Supplied by User”, page 9. Check that Buffer AW1 and Buffer AW2 have been prepared according to the instructions on pages 16–17. Check that Buffer AL and Buffer ATL do not contain a white precipitate. If necessary, incubate Buffer AL and Buffer ATL for 30 minutes at 37ºC with occasional shaking to dissolve precipitate. Ensure that you are familiar with operating the BioSprint 15. Refer to the BioSprint 15 User Manual for operating instructions. Things to do before starting Set a shaker–incubator with an adapter for 2 ml microcentrifuge tubes to 56°C for use in steps 4 and 12 of the procedure. Procedure 1. Cut 3 mm (1/8 inch) or 6 mm (1/4 inch) diameter punches from a dried blood spot with a single-hole paper punch. Place up to 3 blood card punches into a 2 ml microcentrifuge tube (not supplied). 2. Add 200 μl Buffer ATL (not supplied). 3. Add 20 μl QIAGEN Proteinase K (not supplied), close the 2 ml microcentrifuge tube, and mix thoroughly by pulse vortexing for 10 s. Note: Make sure that the punches are fully covered with buffer. If necessary, briefly centrifuge the 2 ml microcentrifuge tube. 4. Place the 2 ml microcentrifuge tube in a shaker–incubator, and incubate at 56°C with shaking at 900 rpm for 1 h. 5. Towards the end of proteinase K digestion, switch on the BioSprint 15 at the power switch. 6. Open the front door of the BioSprint 15 and slide out the tube strip tray. BioSprint 15 DNA Handbook 06/2012 43 7. Load up to fifteen 5-tube strips into the tube strip tray. One 5-tube strip is used per sample. If loading five 5-tube strips or fewer, we recommend loading them as a single column. If loading ten 5-tube strips or fewer, we recommend loading them as 2 columns. See page 17 for more information. Load the 5-tube strips in the tube strip tray so that the tab of each 5-tube strip faces to the left. Make sure that the 5-tube strips are fully inserted into the tray and are not skewed. 8. Add reagents into each 5-tube strip according to the table below. Well Reagent Volume of reagent (μl) 1 Lysate* 640 2 Buffer AW1 700 3 Buffer AW2 500 4 Buffer AW2 500 5 Buffer AE 125 * Added at steps 16 and 17; includes the volume of Buffer ATL, QIAGEN Proteinase K, Buffer AL, isopropanol, and MagAttract Suspension G. Note: Well 1 is at the left of the 5-tube strip, well 5 is at the right. 9. Load up to three 5-rod covers into the rod cover slots. There must always be a 5-rod cover above a column of 5-tube strips. See page 17 for more information. Insert a 5-rod cover into a rod cover slot so that the short tab faces inward and the long tab faces outward. 5-rod covers must be inserted so that they click into place. Note: If necessary, remove the tube strip tray to allow easier loading of the 5-rod covers. Note: Do not push 5-rod covers further after they click into place; otherwise an instrument crash will occur. 10. Briefly centrifuge the 2 ml microcentrifuge tube to remove drops from the inside of the lid. 11. Add 200 μl Buffer AL, close the 2 ml microcentrifuge tube, and mix by pulse-vortexing for 10 s. Note: Make sure that the punches are fully covered with buffer. If necessary, briefly centrifuge the 2 ml microcentrifuge tube. 44 BioSprint 15 DNA Handbook 06/2012 12. Place the 2 ml microcentrifuge tube in a shaker–incubator, and incubate at 56°C with shaking at 900 rpm for 10 min. 13. Briefly centrifuge the 2 ml microcentrifuge tube to remove drops from inside the lid. 14. Add 200 μl isopropanol, close the lid of the 2 ml microcentrifuge tube, and mix by pulse-vortexing for 10 s. 15. Briefly centrifuge the 2 ml microcentrifuge tube to remove drops from inside the lid. 16. Carefully transfer the entire lysate from step 15 into well 1 of the 5-tube strip. Note: Well 1 is at the left of the 5-tube strip, well 5 is at the right. Note: If processing more than one sample, record in which 5-tube strips you load the samples. 17. Add 20 μl MagAttract Suspension G to the lysate in well 1 of the 5-tube strip. Note: Before adding MagAttract Suspension G, ensure that it is fully resuspended. Vortex for 3 min before using for the first time and for 1 min before subsequent uses. 18. Slide back the tube strip tray fully into the BioSprint 15. 19. Close the front door of the BioSprint 15. Closing the front and top doors protects the samples from contamination. 20. Select the protocol “BS15 DNA Dried Blood” using the and keys on the BioSprint 15 workstation. Press “START” to start the protocol run. See the BioSprint 15 User Manual for safety information. 21. After the protocol run ends, press “STOP”, slide out the tube strip tray, and transfer the eluted DNA from well 5 of each 5-tube strip to other tubes for long-term storage. Note: Well 5 is at the right of the 5-tube strip. Carryover of magnetic particles in eluates will not affect most downstream applications. If the risk of magnetic-particle carryover needs to be minimized, tubes containing eluate should first be placed in a suitable magnet and the eluates transferred to clean tubes (see the appendix, page 49). 22. Remove the 5-tube strips and 5-rod covers and discard them according to your local safety regulations. Note: See page 5 for safety information. BioSprint 15 DNA Handbook 06/2012 45 23. Switch off the BioSprint 15 at the power switch. 24. Wipe the surface of the tube strip tray and adjacent surfaces with a soft cloth or tissue moistened with distilled water or a mild detergent solution. If infectious agents are spilt onto the tube strip tray, clean using 70% ethanol or other disinfectant. Note: Do not use bleach as disinfectant. See page 5 for safety information. 46 BioSprint 15 DNA Handbook 06/2012 Troubleshooting Guide This troubleshooting guide may be helpful in solving any problems that may arise. For more information, see also the Frequently Asked Questions page at our Technical Support Center: www.qiagen.com/FAQ/FAQList.aspx. The scientists in QIAGEN Technical Services are always happy to answer any questions you may have about either the information and protocols in this handbook or sample and assay technologies (for contact information, see back cover or visit www.qiagen.com). Comments and suggestions Low DNA yield a) Inefficient cell lysis due to insufficient mixing of the sample with Buffer AL Repeat the DNA purification procedure with a new sample. Be sure to mix the sample and Buffer AL immediately and thoroughly by pulse-vortexing. b) Inefficient cell lysis due to decreased protease activity Repeat the DNA purification procedure with a new sample and with freshly reconstituted QIAGEN Protease. Be sure to store QIAGEN Protease at 2–8ºC immediately after use. Ensure that QIAGEN Protease is not added directly to Buffer AL. c) No isopropanol added to the lysate before adding MagAttract Suspension G Repeat the DNA purification procedure with a new sample. d) MagAttract Suspension G was not completely resuspended Before starting the procedure, ensure that the MagAttract Suspension G is fully resuspended. Vortex for at least 3 min before the first use, and for 1 min before subsequent uses. e) Buffer AW1 or AW2 prepared incorrectly Ensure that Buffer AW1 and AW2 concentrates were diluted with the correct volumes of ethanol (96–100%) (see pages 16–17). Repeat the DNA purification procedure with a new sample. f) Frozen blood samples were not mixed properly after thawing Thaw frozen blood samples quickly in a 37ºC water bath with mild agitation to ensure thorough mixing. BioSprint 15 DNA Handbook 06/2012 47 Comments and suggestions DNA does not perform well in downstream applications a) Insufficient DNA used in downstream application Quantify the purified DNA by spectrophotometric measurement of the absorbance at 260 nm (see the appendix, page 49). b) Excess DNA used in downstream application Excess DNA can inhibit some enzymatic reactions. Quantify the purified DNA by spectrophotometric measurement of the absorbance at 260 nm (see the appendix, page 49). A260/A280 ratio for purified DNA is low a) Inefficient cell lysis due to insufficient mixing of the sample with Buffer AL Repeat the DNA purification procedure with a new sample. Be sure to mix the sample and Buffer AL immediately and thoroughly by pulse-vortexing. b) Inefficient cell lysis due to decreased protease activity Repeat the DNA purification procedure with a new sample and with freshly reconstituted QIAGEN Protease. Be sure to store QIAGEN Protease at 2–8ºC immediately after use. Ensure that QIAGEN Protease is not added directly to Buffer AL. c) No isopropanol added to the lysate before adding MagAttract Suspension G Repeat the DNA purification procedure with a new sample. d) Buffer AW1 or AW2 prepared incorrectly Ensure that Buffer AW1 and AW2 concentrates were diluted with the correct volumes of ethanol (96–100%) (see pages 16–17). Repeat the DNA purification procedure with a new sample. e) Absorbance reading at 320 nm was not subtracted from the absorbance readings at 260 nm and 280 nm To correct for the presence of magnetic particles in the eluate, an absorbance reading at 320 nm should be taken and subtracted from the absorbance readings obtained at 260 nm and 280 nm (see the appendix, page 49). 48 BioSprint 15 DNA Handbook 06/2012 Appendix: Handling, Quantification, and Determination of Purity of DNA Storage of DNA Purified DNA may be stored at 2–8ºC for 24 hours or at –20ºC for longer periods. Minimizing magnetic particle carryover in the DNA If the purified DNA is to be analyzed by real-time PCR, any trace amounts of magnetic particles should be minimized using a magnet. Transfer the eluates to 1.5 ml microcentrifuge tubes. Apply the tubes to a suitable magnet (e.g., QIAGEN 12-Tube Magnet) for 10 minutes, and carefully remove the supernatants. If a suitable magnet is not available, transfer the eluates to microcentrifuge tubes, centrifuge for 1 minute at full speed to pellet any remaining magnetic particles, and carefully remove the supernatants. Quantification and determination of purity of DNA The concentration of DNA should be determined by measuring the absorbance at 260 nm (A260) in a spectrophotometer. Absorbance readings at 260 nm should fall between 0.1 and 1.0 to be accurate. An absorbance of 1 unit at 260 nm corresponds to 50 μg of DNA per ml (A260 = 1 50 μg/ml). Use a low-salt buffer of neutral pH (e.g., 10 mM Tris·HCl,* pH 7) to dilute DNA samples and to calibrate the spectrophotometer. The ratio between the absorbance values at 260 nm and 280 nm gives an estimate of DNA purity. For accurate results, use a slightly alkaline buffer (e.g., 10 mM Tris·HCl, pH 7.5) to dilute DNA samples and to calibrate the spectrophotometer. Pure DNA has an A260/A280 ratio of 1.7–1.9. Carryover of magnetic particles in the eluates may affect the A260 and A280 readings, but should not affect the performance of the DNA in downstream applications. Measure the absorbance at 320 nm, 280 nm, and 260 nm. Subtract the absorbance reading obtained at 320 nm from the readings obtained at 260 nm and 280 nm to correct for the presence of magnetic particles. Concentration of DNA sample = 50 μg/ml x (A260 – A320) x dilution factor Total amount of DNA isolated = concentration x volume of sample in ml Purity of DNA sample = (A260 – A320)/(A280 – A320) * When working with chemicals, always wear a suitable lab coat, disposable gloves, and protective goggles. For more information, consult the appropriate safety data sheets (SDSs), available from the product supplier. BioSprint 15 DNA Handbook 06/2012 49 Ordering Information Product Contents Cat. no. BioSprint 15 DNA Blood Kit (45) For 45 preps: 5-Rod Covers, 5-Tube Strips, MagAttract Suspension G, Buffers and Reagents 940014 BioSprint 15 DNA Blood Kit (360) For 360 preps: 5-Rod Covers, 5-Tube Strips, MagAttract Suspension G, Buffers and Reagents 940017 Buffer ATL (200 ml) 200 ml Tissue Lysis Buffer for 1000 preps 19076 QIAGEN Proteinase K (2 ml) 2 ml (>600 mAU/ml, solution) 19131 QIAGEN Proteinase K (10 ml) 10 ml (>600 mAU/ml, solution) 19133 Buffer AE (240 ml) 240 ml Elution Buffer 19077 Accessories BioSprint 15 Plasticware (130) For 130 preps: 26 x 5-Rod Covers and 130 x 5-Tube Strips for use with the BioSprint 15 12-Tube Magnet Magnet for separating magnetic particles in 12 x 1.5 ml or 2 ml tubes 1030058 36912 BioSprint 96 DNA Blood Kit — for rapid purification of DNA from cells, tissue, blood, buffy coat, buccal swabs, and dried blood spots using the BioSprint 96 workstation BioSprint 96 DNA Blood Kit (48)* For 48 preps: Large 96-Rod Covers, 96-Well Microplates MP, S-Blocks, MagAttract Suspension G, Buffers and Reagents 940054 * Other kit sizes are available; see www.qiagen.com. 50 BioSprint 15 DNA Handbook 06/2012 Product Contents Cat. no. BioSprint DNA Plant Kits — for rapid purification of total DNA from plant tissue using BioSprint workstations BioSprint 15 DNA Plant Kit (360) For 360 preps: 5-Rod Covers, 5-Tube Strips, MagAttract Suspension G, Buffers and Reagents 941517 BioSprint 96 DNA Plant Kit (576)* For 576 preps: Large 96-Rod Covers, 96-Well Microplates MP, S-Blocks, MagAttract Suspension G, Buffers and Reagents 941557 For up-to-date licensing information and product-specific disclaimers, see the respective QIAGEN kit handbook or user manual. QIAGEN kit handbooks and user manuals are available at www.qiagen.com or can be requested from QIAGEN Technical Services or your local distributor. * Other kit sizes are available; see www.qiagen.com. BioSprint 15 DNA Handbook 06/2012 51 Notes 52 BioSprint 15 DNA Handbook 06/2012 Notes BioSprint 15 DNA Handbook 06/2012 53 Notes 54 BioSprint 15 DNA Handbook 06/2012 Trademarks: QIAGEN®, BioSprint®, MagAttract® (QIAGEN Group); 903®, FTA®, Whatman® (Whatman International Ltd.); DACRON® (INVISTA North America S.A.R.L. Corporation); Eppendorf® (Eppendorf AG); Finnpipette® (Thermo Electron Oy Corporation); Puritan® (Puritan Medical Products Company). Limited License Agreement for BioSprint 15 DNA Kit Use of this product signifies the agreement of any purchaser or user of the product to the following terms: 1. The product may be used solely in accordance with the protocols provided with the product and this handbook and for use with components contained in the kit only. QIAGEN grants no license under any of its intellectual property to use or incorporate the enclosed components of this kit with any components not included within this kit except as described in the protocols provided with the product, this handbook, and additional protocols available at www.qiagen.com. Some of these additional protocols have been provided by QIAGEN users for QIAGEN users. These protocols have not been thoroughly tested or optimized by QIAGEN. QIAGEN neither guarantees them nor warrants that they do not infringe the rights of third-parties. 2. Other than expressly stated licenses, QIAGEN makes no warranty that this kit and/or its use(s) do not infringe the rights of third-parties. 3. This kit and its components are licensed for one-time use and may not be reused, refurbished, or resold. 4. QIAGEN specifically disclaims any other licenses, expressed or implied other than those expressly stated. 5. The purchaser and user of the kit agree not to take or permit anyone else to take any steps that could lead to or facilitate any acts prohibited above. QIAGEN may enforce the prohibitions of this Limited License Agreement in any Court, and shall recover all its investigative and Court costs, including attorney fees, in any action to enforce this Limited License Agreement or any of its intellectual property rights relating to the kit and/or its components. For updated license terms, see www.qiagen.com. © 2004–2012 QIAGEN, all rights reserved. www.qiagen.com Australia [email protected] Austria [email protected] Belgium [email protected] Brazil [email protected] Canada [email protected] China [email protected] Denmark [email protected] Finland [email protected] France [email protected] Germany [email protected] Hong Kong [email protected] India [email protected] Ireland [email protected] Italy [email protected] Japan [email protected] Korea (South) [email protected] Luxembourg [email protected] Mexico [email protected] The Netherlands [email protected] Norway [email protected] Singapore [email protected] Sweden [email protected] Switzerland [email protected] UK [email protected] USA [email protected] 1072925 06/2012 Sample & Assay Technologies