1
User Manual
Wide Color Video Phone CAV-43T2
• Thank you for purchasing COMMAX products.
• Please carefully read this User’s Guide (in particular, precautions for safety) before using a product and follow
instructions to use a product exactly.
• The company is not responsible for any safety accidents caused by abnormal operation of the product.
15
Contents
1. Greetings . . . . . . . . . . . . . . . . . . . . . . . . . . . . . . . . . . . . . . . . . . . . . . . . . . . . . . . . . . . . . . . . . . . . . . . . . . . . . . . . . 1
2. Warnings and caution . . . . . . . . . . . . . . . . . . . . . . . . . . . . . . . . . . . . . . . . . . . . . . . . . . . . . . . . . . . . . . . . . . . 2
3. Name of each part and function ..............................................................................4
4. Parts list ...................................................................................................................5
5. Installation ...............................................................................................................6
6. Wiring .....................................................................................................................7
7. How to use...............................................................................................................8
8. When the product does not function properly........................................................11
9. Caution in use........................................................................................................11
10. Specification .......................................................................................................12
1. Greetings
• Thank you for using the Commax video phone.
• Read these instructions for use carefully before using the product.
• The wall video phone that can be easily installed on a wall has been designed
based on faultless digital circuit to realize quality picture.
1
2. Warnings and caution
Make sure to follow the instructions to prevent any danger or property losses.
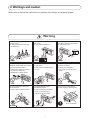
Warning
Do not put the plug in the socket
simultaneously.
It may generate abnormal heat
or cause a fire.
Do not connect to other products
while in use.
It may cause breakdown.
Do not forcibly bend the cord or
put a heavy object on the product.
It may cause a fire.
Do not use water, thinner or a
detergent used to wash oil products
when you wash the exterior.
Make sure to wash it by using a
dry cloth to prevent any
breakdown or electric shock.
Do not install the product in
a humid place.
It may cause an electric shock
or a fire.
Do not forcibly pull out the
cord from the socket.
If the cord is damaged, it
may cause a fire or an electric
shock.
Do not put the plug in the socket
with a wet hand.
It may cause an electric shock.
Do not disassemble, repair
or modify the product.
It may cause a fire, an electric
shock or an injury due to
malfunction of the product.
Do not use AC circuit breaker.
It may cause an electric shock.
AC circuit breaker
2
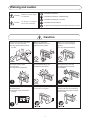
Warning and caution
Warning
Death or serious injury
is expected.
Caution
An injury or property
losses are expected.
It indicates prohibition.
It indicates prohibition of disassembly.
It indicates prohibition of contact.
It indicates dos and don’ts.
It indicates that the plug should be pulled out from the socket.
Caution
If the socket holes are larger than
normal, do not put the plug.
It may cause an electric shock
or a fire.
Do not put a heavy object
on the product.
It may cause a breakdown.
Install the product in a flat
and stable place.
Otherwise, it may not function
properly.
Make sure that dust or
foreign substances are not
gathered on the product.
Do not disassemble or give
an impact to the product.
Pull the plug if the product
is not used for a long time.
3
Make sure to prevent foreign
substances from entering the
product.
It may cause a breakdown.
Avoid direct rays of the sun
or heating devices at a time
of installation.
If the product generates strange
sound, make sure to pull the plug
immediately and contact Commax
service center.
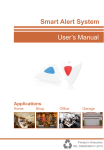
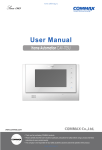
3. Name of each part and function
1) Monitor (CAV-43T2)
X
o
Y
z
Z
z
[
t
]
^
_
`
}vsU
iy{U
jvu{U
XW
vmm V vu Oz i P
jvsvy
XX
\
X^
|
w slk
k
{
t
v
kv~u i|{{vu
XY
{ i }
XZ
i j }
X[
j j }
X\
j j }
X]
w z
o
① HANDSET
② SPEAKER : The part which the call sound comes out
③ SCREEN
④ MENU BUTTON : To enter the menu for settings
⑤ DOWN BUTTON : Move left/down in the menu
⑥ UP BUTTON : Move right/up in the menu
⑦ POWER LED : LED is turned on in power on mode and light-out in power off
mode
⑧ DOOR BUTTON : To check the situation of the entrance
⑨ TELEPHONE BUTTON : To call or answer the phone )
⑩ MODE BUTTON : To adjust LCD SCREEN RATIO(ZOOM / 4:3 / wide)
⑪ OPEN BUTTON : To release the door for visitor
⑫ TELEPHONE BELL VOLUME : to set the volume of telephone bell
⑬ BRIGHTNESS CONTROL VOLUME : to set the volume of BRIGHTNESS
⑭ CONTRAST CONTROL VOLUME : to set the volume of CONTRAST
⑮ COLOR CONTROL VOLUME : to set the volume of screen COLOR
⑯ POWER SWITCH : ON/OFF switch
⑰ HANDSET JACK
4
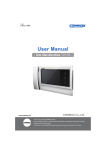
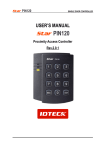
4. Parts list
① Body of CAV-43T2
② Manual
③ Screw for body(SCREW PHM 3X6 ZnY) ...........................................................................1EA
④ Screw for wall mount(SCREW GH1T 4X18 ZnW) .............................................................2EA
⑤ Bracket for wall mount
⑥ Camera connector (CONN. 4PX300) ............................................................................... 2EA
⑦ Telephone connector(CONN. 2PX300) .............................................................................1EA
}vsU
iy{U
jvu{U
jvsvy
②
vmm V vu Oz i P
①
③
④
⑤
⑥
⑦
5
5. Installation
1) Installation Method of Monitor
※ Note
- Avoid the range of direct sunlight
- The suitable height is 1,450~1,500mm from the floor.
- Avoid installing the product in the place with strong magnetism and much smoke or humidity,
2) Camera Installation
※ Note
- Avoid the range of back light or
direct sunlight
- Keep cleaning up its lens to
capture good views.
SCREW
PHM 3X6
SCREW CAP
6
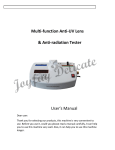
6. Wiring
※ The wiring of this equipment is as follows,.
For better image quality when using UTP CABLE[CAT.5], connect the rest 4 lines to GND after
connecting 4 lines with monitor and camera.
Wiring precautions
☞ Each device should be connected by separated cables.
To use CAMERA 1, CAMERA 2 and interphone using UTP
CABLE[CAT.5], 3 lines of UTP cable are required.
DOOR Camera Wiring
CAMERA
MONIR
CAM1
CAM2
IN
G
B+
VD
IN
G
B+
VD
☞ if you use UTP CABLE[CAT.5], connect the rest 4 lines to GND after
connecting 4 lines with monitor and camera.
7
7. How to use
1. Telephone
1) To make a phone call
Telephone lamp will be on and the bell sounds when the handset is picked up. If the
call is answered, you can talk to answerer.
2) To answer a phone call
- If the phone rings, the telephone lamp blinks and phone bell sounds.
- If you pick up the handset, the telephone lamp is turned on and you can talk to the
caller.
3) Door bell rings while on the phone
- If door bell rings while on the phone(the telephone lamp is turned on), the door lamp
blinks and it chimes.
- If you press the door button(the door lamp is turned on), the call is disconnected and
you can talk to the person at the door.
4) You can control TELEPHONE BELL VOLUME.
In case of emergency such as blackout, the local call is possible but the telephone
lamp does not work.
2. Communication to a person at the door
1) If someone at the door calls
- It chimes, and the image of visitor is shown on the screen.
(The screen and door lamp blinks for 30seconds after the call)
- By picking up the handset, you can talk to a person at the door (the door lamp is
turned on)
(You can talk for one minute from the time you picked up the handset.)
- The door release works only during being on the phone. If you press door release
button, the door is released with beep. (Please note that this function is possible only
when the door camera is interlocked with door release function)
- In order to talk for long time, Press door button after screen turns off so that you can
continue talking.
2) The phone rings while you are communicating to a person at the door
- The phone rings during communicating to a person at the door (The door lamp is
turned on) and the telephone lamp blinks.
- Press the phone button while you are communicating to a person at the door.
- The communication is disconnected and you are connected to the phone call. (The
telephone lamp is turned on)
3) Monitoring function
- The screen is turned on if you press the door button in stand-by mode.
- The screen will be turned on for 30 seconds after the time you press the door button.
- By picking up the handset during monitoring, you can talk to a person at the door.
(On stand-by mode)Operation == being put handset down
- If you press the door button, the monitor works as follows in order.
camera1 (camera2) OFF camera1 ............
(During the communication with entrance)Operation == being picked handset up
- If you press door button, the monitor works as follows in order.
camera1 (camera2) camera1 ( camera2 ) ............
8
3. Settings
For settings, use 3 buttons as follows.
MENU (Enter/Select/Exit) : MENU button
Move up / Move right : UP button
Move down/ Move left : DOWN button
In order to set UTILITY and check product information(product name and version),
press MENU button and then use UP/DOWN button during video telephony or
monitoring mode.
3-1-1 UTILITY(additional function)
Press MENU button and use UP/DONW button to move Utility list and press MENU
button again to select.
1) SPEAKER VOLUME : Adjustable ringtone which sounds when you answer the call
from the door.
Volume adjustment
- Use UP/DOWN button to move SPEAKER VOLUME setting menu in UTILITY list
- Press MENU button to enter.
- Adjust it with UP/DOWN button.
- If you finish the setting, press MENU button to exit.
2) SCREEN MODE : Adjustable screen ratio
① ZOOM : Zoom out image(full of the screen) is shown
② 4:3 : Ratio of 4:3 image is shown(This is actual ratio for camera)
③ WIDE: Ratio of 16:9 image is shown(full of the screen)
Ratio adjustment
① Use UP/DOWN button to move SCREEN MODE setting menu in UTILITY list
② Press MENU button to enter.
③ Adjust SCREEN RATIO with UP/DOWN button.
④ If you finish the setting, press MENU button to exit.
3) EXIT : Back to UTILITY list(3-1-1)
3-1-2 INFORMATION (To check model name and version)
In order to check the product information, press the MENU button and enter the
INFORMATION with UP/DOWN button during video telephony or monitoring mode.
1) Model : You can check the model name
2) Version : You can check the model version
3) VIDEO : You can check the video transmission formats(NTSC/PAL)
4) SOURCE : You can check the position of camera(DOOR1 / DOOR2) which is shown
on the screen for now.
3-1-3. EXIT(Finish setting)
9
4. Image setting( BRIGHTNESS / CONTRAST / COLOR adjustment)
- It is possible to control when the screen is on.
- Adjustable image setting with BRIGHTNESS / CONTRAST / COLOR CONTROL
VOLUME at the bottom of the product when the screen is on.
5. SCREEN MODE (Adjustable screen ratio)
① ZOOM: Zoom out image(full of the screen) is shown
② 4:3: Ratio of 4:3 image is shown(This is actual ratio for camera)
③ WIDE: Ratio of 16:9 image is shown(full of the screen)
Ratio adjustment
The image setting mode will be sequentially operated (ZOOM -> 4:3 -> WIDE) when
user presses the MODE BUTTON during video telephony or monitoring mode and
also the word which means ratio pop up on the top of the screen.
10
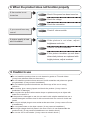
8. When the product does not function properly
If the monitor is not
Checkpoint 1.
Check if the power has been turned on.
Checkpoint 2.
Check the voltage.
Checkpoint 3.
Check the connection.
Checkpoint 1.
Check if volumn switch
Checkpoint 1.
If the picture is not clear, adjust
turned on
If you cannot hear any
sound.
If picture quality is bad
and it trembles.
brightness and color.
Checkpoint 2.
Check if it is well connected.
Checkpoint 3.
If the picture trembles up and down
when dark pictures are replaced with
bright pictures, adjust contrast.
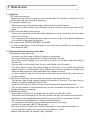
9. Caution in use
Do not install the product close to such electronic goods as TVs and videos.
(It may have adverse effect on the screen.)
Do not install the product where ammonia, acidic materials and poisonous gases
are generated. (It may cause a breakdown.)
Do not install the product where there are direct rays of the sun or strong
reflection.
Do not drop, give a strong impact and shook the product. (It may cause a
breakdown or damage.)
Do not place the product where water drops or splatters and put an object with
water like a vase on it.
If the product is damaged or wet, do not wash it with volatile materials but use a
neutral detergent and then clean it with a smooth cloth. Do not touch it with wet
hands.
Do not put multiple plugs to one socket at the same time. (It may cause a fire or
a breakdown.)
Do not spread water on the door camera. (It may cause a breakdown.)
Since high-voltage electricity flows in the inner circuit, do not disassemble the
product at will. (It may cause a breakdown or an electric shock.)
Do not use AC circuit breaker. (It may cause an electric shock.)
11
10. Specification
Dimension
Model name
CAV-43T2
Rating Voltage
100-240V~, 50/60Hz (FREE VOLTAGE)
Consumption
Stand-by : 4W
Transmission
Entrance 4wires polarity, Telephone 2wires
Screen size
4.3" TFT-DIGITAL LCD
Call mode
DUPLEX
Ringing sound
Entrance : electronic chime
Working : 15W(MAX)
Telephone : electronic ring
60 ±10sec (Communicating)
Video receiving time
30 ±10sec (Monitoring)
Communication distance
(Cable thickness)
28m(Ø0.5) / 50m(Ø0.65) / 70m(Ø0.8)
Temperatures
0 ~ +40°C (32°F ~ 104°F)
Exterior dimension
290(W)X140(H)X42(D)
12
513-11, Sangdaewon-dong, Jungwon-gu, Seongnam-si, Gyeonggi-do, Korea
Int’l Business Dept. Tel. : +82-31-7393-540~550 Fax. : +82-31-745-2133
Web site : www.commax.com
PM0243T20010
Printed In Korea / 2012.09.104