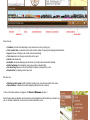
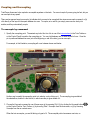
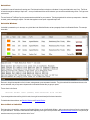
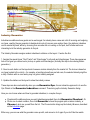
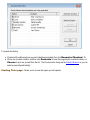
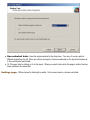
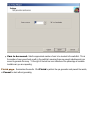
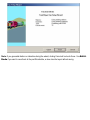
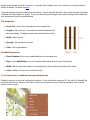
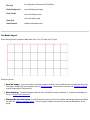
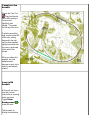
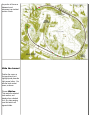
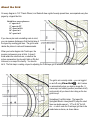
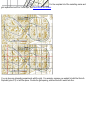
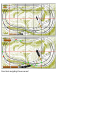
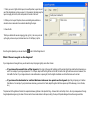
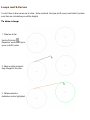
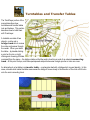
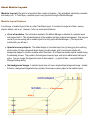
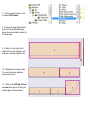
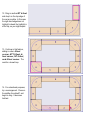
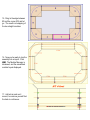
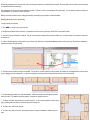
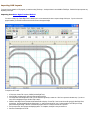
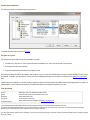
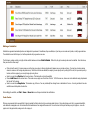
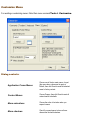
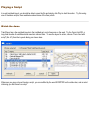
1
TrainPlayer / TrackLayer
User's Manual
Version 6.1 Dec, 2014
TrainPlayer/TrackLayer User's Manual copyright ©2005-15, TrainPlayer Software
Plans from 101 Track Plans for Model Railroaders and Model Railroader are copyright © Kalmbach
Publishing, used with permission.
TrainPlayer Contents
Introduction
Welcome to TrainPlayer
What's New in Version 6.1
What For?
About This Manual
About the Layouts
Where to Go for Help
Getting Started
About Files
Opening a Layout
A Tour of the Screen
Layout Properties
About Sizes and Scales
Adjusting the View
Layout Printing
Exporting Images
The Help Menu
What's Next
Running Trains
About Trains
The Train Control Bar
Moving Trains By Hand
Yard Mode
Switches
Coupling and Uncoupling
Horns and Sounds
Turntables
Managing Cars
About Cars
Car Collections
Default Car Sets
Car Loads
Car Properties
Collection Editors
The Car Inventory Bar
Building Trains
Selecting Cars and Trains
Adding Cars and Trains
Removing Cars and Trains
Relocating a Train
Naming Trains
Train Properties
The Train Tree
Stations and Industries
Stations
Industries
Yards and Interchanges
Station Properties
Industry Browser
Route Finder
Operations
About Ops
How To Use Ops
Switchlists
Waybills
Ops Generators
Ops Windows
Ops Setup Wizard
Scripting
About Scripting
Scripting UI Devices
Working With Scripts
How to Get Started in Scripting
TP Programming Language
Scheduling
Clock
Schedule Window
Customizing
Operation Preferences
Switch Preferences
General Preferences
Track Preferences
Train Preferences
Style Preferences
Road Preferences
Customizing Toolbars
The Customize Dialog
Windows and Views
TrackLayer Contents
Introduction
Getting Started
Starting the Program
Layout and Image Files
The Overall Process
Tutorial
The Rockport & Oyster Bay
Dimensions
About the Grid
Adjusting the Grid
Resizing and Rescaling
Straight Track and Switches
Drawing Straight Track and Switches
Editing Track
Special Track
Curved Track
Drawing Curves
Editing a Curve
Loops and S-Curves
Helices
Turntables and Transfer Tables
Creating a Turntable
Creating a Transfer Table
Scenery Toolkit
About Scenery
Tutorial: Riverbend
Choosing Scenery
Drawing Scenery
Editing Scenery
Managing Scenery
Scenery Properties
Animated Scenery
Modular Railroading
About Modules
About Modular Layouts
Modular Layout Tutorial
Building a Modular Layout
Building a Module
The Module Manager
Module Manager Settings
Advanced Topics
Debugging and Repairing
Publishing Your Layout
Importing CAD Layouts
Welcome to TrainPlayer!
TrainPlayer simulates operating a model railroad layout on the computer. It is designed for all types of model
railroad fan, from the one who has built a railroad empire in the basement, to the one who dreams of doing so, to
the one who never will, but just likes to run trains.
Opening a layout file in TrainPlayer is like walking into a room and finding a fully-built model railroad with clean
tracks, attractive scenery, a couple of trains, and a control panel sitting in the corner. You nudge the speed dial and
one of the trains starts to move. You form a smile and crank up the speed. Welcome to TrainPlayer.
TrainPlayer works with pictures of track plans which have been specially prepared by the addition of electronic
tracks. The pictures might be renderings by Kalmbach artists, or digital output from your favorite CAD program, or
scanned-in drawings made with pencil and paper. A set of features known as TrackLayer -- described in the
second half of this manual -- is used to apply the track, switches, and turntables. In TrainPlayer, you add trains,
cars, and stations, and you're ready to run.
What's New in Version 6.1
What For?
About This Manual
About the Layouts
Where to Go for Help
What's New in Version 6.1
Track To Scenery: create scenery objects by drawing track -- convenient method of creating benchwork
shapes; see Track To Scenery.
Advances in Scripting: greatly-expanded access to car, train, and track properties; new families of functions
for managing objects, strings files; local variables; new subroutine library. See the Scripting Page on the web and
the TPL page in this manual
Scripted Layouts: many new scripted layouts, both educational and challenging; see the Scripts and
Puzzles folder in the Layout Chooser
Many fixes and enhancements: Improved Input box; cars no longer go beyond end of track; improved
handling of Car Notes; fixes and improvements in all scripting dialogs
What Was New in 6.0
Advanced Scripting: Now with a full-fledged programming language, layout-based scripts, Script Central,
and lots more. See the fully-rewritten chapter on Scripting.
Doubly-detailed car images: New collections of cars with crisp images twice the size of the old ones. See
50-Pixel Cars.
Dynamic resizing of car and train images: on car and train bars, now with snap-to-fit features. See
Control Bar Settings.
Improved choosing of car collections: with enhancements to the car bar. See Car Inventory Menu.
Improved handling of freight load images: See the new Load tab in the car collection editor.
Car panels: dynamic resizing of car images of all size categories. See Car Panels.
Car notes: attach a string of data to a car for use as you require. See Car Notes.
Many fixes and enhancements: Revert to Saved; improved car and track id's; fixes in coupling and
uncoupling; read-only flag for layouts; the Note Window; small fixes and crash preventions too numerous to list.
What Was New in 5.3
Control Bars: Two old toolbars for building and running trains are gone, replaced by a pair of stylish new bars
with advanced capabilities -- the Train Control Bar, a combination control panel and train window for running
and viewing the selected train; and the Car Inventory Bar, a gallery of cars you can choose from when building
trains. Both are docking windows you can move, customize, or resize in any direction, to display large (Chris
Pedersen) car images.
Built-in Ties & Roadbed: In 5.3, ties and roadbed are no longer objects on the layout, but track drawing
styles, like special paint brushes. You just turn them on or off, and they take effect when the layout is drawn,
printed, or exported. Details are under Road Preferences.
Double Track: If you've ever tried to create a length of parallel double track --say for a passing track or a
double-track section of main line -- you know it's not easy, especially if curves are involved. Now TrackLayer 5.3
does the engineering for you. See Double Track.
Pedersen Additions: Delivered with 5.3 is an excellent new Default Pedersen car set -- 18 cars especially
designed by Chris to show a unified, representative sampling of types, with his own stylish green-black CP color
scheme. Another enhancement for CP users is the addition of a set of realistic freight loads, designed and
rendered by Chris -- double-stack containers for Husky Stack flatcars, lumber and pipe for bulkhead flats, and
more. For more about these cars, see Chris Pedersen Cars below.
Zoom Control: A Windows zoom control is now located on the status bar, for easy zooming in and out. See
Zooming.
Split Track Here: For various reasons, the TrackLayer user sometimes needs to introduce a junction into a
straight or curved section of track. In the past this was done by creating, then deleting, a temporary section of track.
In 5.3 it can be done directly; see Split Track Here.
Scenery Flip: Scenery artists have pointed out that if you find a right-handed widget in the scenery catalog, but
you need a left-handed one, you're out of luck. TrackLayer 5.3 fixes this. See Flipping.
Menu Changes: Improvements in View, Add Car, and other menus.
What Was New in 5.2
Drag Trains by Hand
Hands-on operation! Point to a train, press, and drag it along the track -- just like a railroader's fingertip on the
garage layout! Move the train in either direction, any speed. Throw switches as you go using the space bar. Bump
into another train and it couples, click between cars to uncouple. The view auto-scrolls as you drag so you don't
lose sight of your car. You can carry out a whole switching session without ever touching the control panel!
More...
Chris Pedersen Cars
Nearly a thousand great new cars from railroad artist Chris Pedersen, with detailed full-size images and prototype
paint schemes, based on actual HO models! Locomotives, freight and passenger cars from Athearn, Walthers, and
others, decorated for ATSF, BN, Chessie, and dozens of others. For information and screen shots, see the Chris
Pedersen page on our website.
To provide the full benefit of Chris' artwork, 5.2 introduces features for displaying large car images, along with easy
ways to browse through them. For details, see Large Car Images.
The Chris Pedersen Car collection is available for a nominal price. To buy, use Purchase Upgrade or
Check For Updates on the Help menu.
New Properties Scheme
The Properties dialog in 5.2 is modeless, meaning it stays on the screen and updates as you click around the
layout. This is handy for, say, browsing through your inventory of cars, especially if you have the Pedersen
collection and can see large images. Properties changes are now undoable. Combo boxes and controls have been
reworked for better operation. More...
Handy Improvements
●
●
●
Auto-Save -- your layout is quietly backed up every so often, so you don't lose work if there is a crash.
More...
Auto View Restore -- zoom and position come up just the way you left them. More...
Drag-and-Drop Loading -- drag from the Load Chooser directly onto cars; load an entire cut at
once. More...
Fixes
Version 5.2 includes fixes for many popular bugs in such areas as: coupling and uncoupling, freight loads, opening
large layouts, train horn selection, engine direction flipping, changing layout background. See the Readme for a
complete list.
What Was New in 5.1
Version 5.1 introduces new layouts, cars, scenery, and sounds for the British railway enthusiast, along with new
features to make the data easily accessible.
When you install Version 5.1, you are given a choice of US vs. UK settings. If you choose UK, you will see:
●
●
●
●
●
New welcome dialog, offering you the possibility of downloading the entire set of UK data at once. See the
Readme for details.
British flag on splash screen and About box.
British default cars when you create a new layout. This can be changed by a new drop-down in Train
Preferences.
British folder opened when you bring up the Layout Chooser.
Car class names translated to British terms. This choice is available in Train Preferences and in the AAR
Car Types dialog.
Whether you are British or not, you will benefit from other features of 5.1:
●
Folder download. Now you can click a folder in any web chooser tree and download the entire thing at
once, including subfolders. Or you can choose to download only those items you do not yet have on your
local machine.
●
●
●
●
Improved car descriptions. Tooltips and dialogs are now more consistent in displaying car type and
car class names. See the updated definitions under About Cars.
Improved handling of car and scenery errors. If you open a layout requiring external cars or
scenery, the alert dialog is now more sensible and more useful, and now includes a page of help.
Plenty of bug fixes and small improvements.
Internal work related to Mac development and change of web host.
For a complete list of what has changed, see the Readme.
What Was New in 5.0
Modular Railroading! Version 5 brings you the ability to create exposition-size layouts the same way they do at the
train shows -- by hooking together pre-built modular units. Choose from our large collection of modules and module
templates -- or build your own -- then snap them together on a virtual show floor in your choice of arrangements .
One click turns the assembly into a fully-connected modular layout, ready to run.
There is a whole new chapter of the manual on the subject -- see Modular Railroading.
See also
What's New Since 4.0
What's New Since 3.0
What For?
Q: Is there any point to moving little make-believe trains around an image of a model pretending to be a railroad?
A: Sure.
●
●
●
●
●
●
Explore layout designs. When you're thinking about designing a railroad, there is nothing handier than a book of track plans. Welldesigned plans give you ideas about how different track configurations might work with your theme and fit in the space you have. Attractive artwork
inspires you to think about the terrain and the scenery. TrainPlayer brings you some of the world's finest track plans to browse, appreciate, and try.
Develop operating plans. If you had an operating railroad and an unlimited supply of rolling stock, how would you go about running it?
You need to figure out how to deliver goods and passengers for your customers, what cars you need to run on what schedule, how to avoid delaying
the express while the local is tying up the main line. With TrainPlayer, you can develop timetables and schedules by driving the layout and letting the
program keep track of times and distances.
Test your equipment. Do you already have a collection of cars? Customize the ones in the program so they match yours, and see if your 86foot flatcars look realistic going around the 16-inch curves on your target plan.
Learn train moves. It isn't obvious how to shuffle a dense yard of cars when you have a schedule to meet. With TrainPlayer, you can learn by
practicing. Figure out how to classify cars so they're on the right tracks at the right time. Learn to minimize the number of moves it takes. Try your
hand at a switching puzzle.
Teach train moves. If you're already a skilled operator, use TrainPlayer to spread your knowledge. Use the recorder to capture a sequence
of moves, and play it back for the learners. Demonstrate how to handle a meet on the main line, or switch an industrial siding.
Share your layout. If you have a layout that welcomes visiting operators, TrainPlayer is an excellent introduction and training tool for them.
Send them a copy of your layout before their visit and they'll feel far more comfortable operating with you! Or post a copy of the file on your website
and allow people to experience your railroad from a distance.
and of course
●
Play with trains.
About This Manual
This manual is in two parts. The first covers TrainPlayer, and describes how to run trains on
prepared layouts. The second covers TrackLayer, and describes how to prepare the layouts.
We don't really expect you to read the manual. Most of what you need to know about TrainPlayer
you can figure out by opening a layout and running trains. But you might glance through to pick
up tips which could enhance your enjoyment. TrackLayer is a little more involved, so it is recommended that you at
least go through the TrackLayer tutorial.
The manual is organized by topic. The first chapter tells how to open a layout, what you'll see, and how you can
adjust the screen as you like. The next two chapters describe how to run trains, and how to assemble and
dismantle them. The next two chapters cover advanced features: scheduling and recording. Last is a chapter on
how to tailor the program to suit your preferences. The TrackLayer portion begins with an introduction and some
basic information about files and images, followed by a tutorial which goes through the process of building a layout.
Subsequent chapters go into detail about drawing track, curves, switches, and turntables.
The manual assumes a basic level of familiarity with Windows. You should know how to operate a drop-down
menu, and what it means to "navigate" in a file dialog. Menu commands are given as phrases, often in bold type,
with > symbols separating levels: Tools > Customize refers to the Customize item on the Tools menu.
About the Layouts
TrainPlayer Software is proud to be associated with Kalmbach Publishing Co., the place where model railroading began. We are
working together to bring you the world's finest collection of track plans, on your screen and runnable with TrainPlayer.
Since the first release of TrainPlayer, we have featured the most popular book of track plans in history: Linn
Westcott's classic 101 Track Plans for Model Railroaders. First published in 1956, the book has
sold over 500,000 copies worldwide and is still in print. The plans in this book come in all shapes and sizes
(101 of them, to be exact), most illustrated with that great Linn Westcott artwork which -- while nowhere close to
what today's MR artists can do on their Macs -- has an irresistible old-fashioned railroad charm about it.
101 Track Plans is just the beginning. The TrainPlayer collection includes hundreds of track plans
contributed by users, as well as several sets of professional plans drawn exclusively for TrainPlayer. If you
have an internet connection, you can browse the collection and download any you you are licensed to use.
There's one plan more interesting than any of these: your own. If you have a picture of your plan -- or your club's, or the one you
operate once a week -- there are a couple of ways you can convert it for TrainPlayer use, so you can run your own trains on your laptop:
●
Do it yourself with TrackLayer
TrackLayer is a part of TrainPlayer designed to do a very specific job: apply track on top of diagrams. It's not a CAD
program -- although it IS a great way to sketch ideas on an outline of your space, and then run trains on them -- it
doesn't do 3D perspective, or show you the view looking out the cab, or build fractal scenery, or even print. It has just a
few simple but powerful tools for drawing track, curves, and turntables. It doesn't take long to learn and, like on your
model in the basement, you can take a break from building and run trains any time.
●
Let us do it
We accept user-submitted track plans and prepare them for TrainPlayer, and with your permission post the results on
our website for public download. There are some fine user-submitted plans available now, and more coming all the
time. For information about converting and posting your layout, ask by e-mail.
Where to Go for Help
We're committed to delivering a quality product which runs on your machine and doesn't crash
unless you want it to. If you have trouble with the program, the installation, or the layouts, here
are some places to look for help:
●
●
●
●
Help menu. The Help menu in the program has links to built-in online help, to web pages, and other
sources. Try the online help, which includes index and full-text search.
Readme. The Readme file installed in your TrainPlayer directory has up-to-date details about known
problems, tips, version history, and other information. You can view the file from the Start menu, under
TrainPlayer.
Web. The Support page on our website has a list of resource, and Frequently-Asked Questions which
cover many common problems.
User groups and forums. There is a friendly, open, and well-attended TrainPlayer Forum on
Yahoo Groups, where you can contact us or our users. If you have a problem, try posting a question.
Joining the forum is simple and free.
●
Send e-mail. Lines are open: [email protected].
●
Send U. S. Mail. The address is on the Contact page of the website.
●
By phone. Send e-mail to arrange a phone call.
●
●
If you find a bug in the program or the layouts, send e-mail with the details and we'll try to fix it in an
upcoming version. The e-mail should include the program version and operating system you are using, and
a layout (.rrw) file if necessary to reproduce the problem.
Please do not contact Kalmbach with any TrainPlayer questions.
Getting Started
By now you have installed the program and figured out how to start it. It's time to open a layout and take a look
around. Trains will be covered in the following chapters.
About Files
Opening a Layout
Tour of the Screen
Layout Properties
About Sizes and Scales
Adjusting the View
Layout Printing
Help Menu
What's Next
Touch the speed dial on the control panel, and the train will start to move. See the next chapter for instructions on
how to drive it.
About Files
TrainPlayer has a lot of mechanism for dealing with files, because it has a lot of files to deal with. A fully-equipped
TrainPlayer site has thousands of files, including layouts, layout backgrounds, car collections, scenery objects, and
sounds.
Typically, the installer brings you only a small set of files. Most of the content you use comes by download from the
web, and accumulates over time. To help you manage this content, both local and web, the program has special
dialogs called "choosers," which organize the data into trees and allow you to browse preview images. For details,
see Choosers.
Where do you find the TrainPlayer files on your computer? The answer to this question has changed over the
history of the program, as Windows conventions have evolved. In the latest version, most of your data files are
found in your "application data folder," a system-defined location on disk which depends on your operating system.
As of Version 3.3.1, you can find this location easily by choosing the new command Open Data Folder from
the File menu. This opens Windows Explorer to your TrainPlayer directory, which looks more or less like this (this
one from Windows 7):
pg
If you are Windows-savvy, you can rearrange many of the files in this directory to suit yourself, but there are
restrictions. For one thing, you must not change the names or locations of the four main folders -- Sounds, Layouts,
Scenery, and Cartypes. For another, you should not change any subfolders under Sounds. In general, you will
avoid confusion if you keep your local setup aligned with that on the web.
Opening a Layout
When you start TrainPlayer, the Layout Chooser appears:
If the chooser doesn't appear at startup, you can bring it up using File > Open Layout. To open a layout: click to select it in the list, then click Open.
Or double-click in the list.
To sort the list by number, name, size, date, or filename: click on the header at the top of the corresponding column. Click again to sort in reverse
order. To resize the dialog: drag by the lower right corner. For more about this dialog, see Layout Chooser and Choosers.
Other ways to open layout files:
●
●
●
●
Use File Open
and choose a file from the Windows file system
Use File Open Layout
to bring up the Layout Chooser
Double-click an .rrw file on your desktop or in Windows Explorer
Select one or more .rrw files in Windows Explorer and drag them into the TrainPlayer window
Errors on Opening Layout
When you open a layout, the program checks to see if all the referenced components are available.
●
●
●
If the layout refers to a non-existent background file, an alert informs you of this and the layout opens without the background.
If the layout refers to cars or scenery objects which cannot be found in your local collections, the Missing Car/Scenery dialog comes up and
offers to download the missing items.
If the layout refers to other layouts linked to it, you will get an alert when the train reaches the jumping-off spot on the track and tries to go to
the missing linked layout.
Revert To Saved
New in version 6.0 is the main-menu command File > Revert To Saved. This restores the layout to the same state as when it was last
opened. It has the same effect as closing the file, answering No if asked to save changes, then reopening the file.
This command is handy for resetting trains and switches back to a fixed starting point. Popular with script developers.
Read-Only Layouts
New in version 6.0 is the ability to mark a layout file as Open for read only. This mark gives the layout author a way to protect the file from
inadvertently being overwritten. This mark is applied using a checkbox in the Advanced Layout Properties dialog.
When a file is marked for read only, it means that when you choose File > Save, the program instead brings up the Save As dialog, and
offers a new filename different from the original. You can then click OK to save the file without modifying the original.
If you do wish to overwrite the original, you can change the name in the Save As dialog. Change it back to the original name, then answer Yes
when prompted if ok to overwrite.
Tour of the Screen
Here is a screen shot of the Elizabeth & Rahway River surrounded by various gadgets:
Shown here are:
●
●
●
●
●
●
●
●
●
Toolbars: main and others depending on your license: track, scenery, scripting, ops.
Train control bar: a combination control panel and train window, for operating and displaying the selected train.
Layout: top view of the layout, with current zoom and view settings
Train tree: tree control showing cars and trains on the layout
Clock: scale railroad clock
Schedule: text window displaying ops instructions, script output, stations entered and departed
Switch window: shows interactive close-up of upcoming or selected switch
Car inventory bar: source of cars for adding to the layout, by drag-and-drop or click
Zoom slider: for adjusting zoom of layout view
Not shown are
●
●
Floating control panel: another method of operating a train, more like a real model control panel
Ops windows: a tabbed set of windows displaying switchlists and car inventories
To show or hide these windows, use toggles on the View > Windows submenu =>
Most of these windows are dockable, which means they can be dragged to become free-floating, or docked to any
side, or combined in tabbed sets. Some can be set to auto-hide when not in use.
Layout Properties
Properties of the current layout. Called from Properties on the Layout context menu. See also About the Properties
Dialog.
This dialog shows general properties of the layout and lets you edit some of them. Additional layout properties are
on the Advanced tab.
Dialog controls:
Name
Name of the railroad. This name appears at the top of the layout
window and in other displays.
Scale
Choose your modelling scale -- see About Sizes and Scales.
The scale affects dimension measurements throughout the
program.
Description
Information about the layout. For layouts from 101 Track
Plans, the description in this box is taken from the book. For
other layouts, the description usually includes the author's
name, operating instructions, and other information of interest.
Size
Overall size of the layout image (width x height) in units selected
from the drop-down to the right. The size shown here is
approximate -- it is calculated from the image file, not the layout
itself. These values are not editable; to change the layout size,
adjust the grid.
Units
Choose model scale or prototype, English or metric. Units
chosen in this dialog will apply throughout the program.
About the Properties Dialog
The Properties dialog is for viewing and editing properties of the layout and the currently-selected car and train. It is
inconvenient to do this with a normal modal dialog, because you have to close and open the dialog for each object
you want to inspect. Instead (as of Version 5.2) the Properties dialog is modeless -- it stays on the screen as you
click cars and trains around the layout.
The dialog has four buttons:
OK
Cancel
Apply
Help
apply changes from all tabs and close the dialog.
close the dialog without applying changes.
apply changes made in any tab to the selected car, train, and layout.
provide help for the current tab.
The Apply button is dimmed until you modify some property. Once you click it, the modifications are applied to the
layout, and you can no longer cancel -- the Cancel button becomes dimmed, and OK becomes Done. At this point
if you want to revert back to the original, you can use Edit > Undo.
The dialog belongs to the layout window. It does not remain on display if you close, minimize, or deactivate the
layout.
Edits are applied automatically when you change the selected car or train. If you select a car, edit one of its
properties, then select a different car, it behaves as if you had clicked Apply.
About Sizes and Scales
The layouts in 101 Track Plans are designed to be independent of scale, so that any plan can be used to design
a railroad in any scale. Each plan in the book is overlaid with a square grid, with the following legend on most
pages:
Ruled lines across plan are:
6" apart in N
9" apart in TT
12" apart in HO
18" apart in S
24" apart in O
This means a plan designed for a 4x8 HO railroad would serve just as well for a 2x4 layout in N-scale or an 8x16 in
O.
TrainPlayer adopts the same scheme. The program has its own internal
grid, which is aligned with that of the drawing as the layout is being
prepared. Aligning the grid establishes the connection between pixels in
the image and real-world dimensions, and allows the program to report
measurements in your choice of scale.
The following scales are supported in TrainPlayer.
Grid Spacing
(inches)
Scale Name
Scale Ratio
Z
220
4
N
160
6
TT
120
9
HO
87
12
OO
76
15
S
64
18
O
48
24
I
32
36
G
24
48
1/8
8
120
When you choose one of these scales in Layout Properties, it does not change the appearance or proportions of the
layout, but dictates its overall size and the sizes of the car models. Scale Ratio gives the relationship
between a given scale and actual size -- a real locomotive is 87 times the size of an HO model of it.
Adjusting the View
Commands on the View menu allow you to modify the appearance of the layout and the screen.
● Fit To Window resizes the layout to fit within the current window
frame. This is a toggle: when the command is checked, then any time you
resize the window the layout resizes with it; if you uncheck it, or zoom or
unzoom, the layout does not resize.
Rotate Layout turns the layout 90 degrees in either direction. See
details below.
●
● Zoom moves you closer to the layout for a more detailed view, or further
away for a wider view. See below for methods of zooming.
●
Refresh
redraws the screen and straightens up any crooked trains.
Auto-Follow is a toggle switch: when on, the view automatically
scrolls to keep the selected train in sight as it moves. This command is also
available on the context menu you see when you right-click anywhere on the
layout. Auto-follow becomes automatically disabled if you scroll the view
manually, via scrollbars or hand drag.
●
Loco Sounds toggles steam chuff sounds on or off. When loco
sounds are enabled, you hear speed-dependent chuffs as the selected train
moves.
●
Background
toggles the display of the background image; with
the image off, you can clearly see the track. Whenever you turn off the
background, track display is turned on.
●
This and the other items in this section also affect printing and export image.
Use View commands to get the screen looking the way you want before
printing.
●
●
Tracks
toggles the display of the track. Normally track display is off, because the lines in the image serve the
same purpose.
Grid
toggles the display of the grid. This is normally not displayed, unless you're curious about the fit between the
program and the drawing.
●
Trains
●
Rails
toggles the display of all trains (new in 3.1). Trains continue to move when they are not on view.
toggles the display of double rail (new in 3.1 -- not shown at left). See details below.
Here is an example of a plan with the background off, tracks and grid on:
●
●
Clock
toggles display of the Clock. The first time you bring up the clock, the schedule window automatically comes
up too. The clock starts automatically the first time a train moves, or you can set it manually using the clock window
context menu.
Schedule
toggles display of the Schedule Window where you can watch reports of arrivals and departures, and
see status reports while running scripts.
toggles display of the Control Panel for operating trains.
●
Control Panel
●
Switch Window
●
Train Tree
●
Status Bar shows or hides the status bar at the bottom of the window.
●
Toolbars toggles the display of selected toolbars, and provides access to the toolbar customization dialog.
toggles display of the Switch Window for showing close-up views around active switches.
toggles display of the Train Tree for navigating the rolling stock inventory of the layout.
Zooming
Zooming the document image is a feature of many Windows programs, to the extent that
there is a common control available for this purpose. This is found on the right end of the
status bar.
To zoom:
1. If the zoom control is not visible at the lower right of your app window, use View > Status Bar to display it.
2. Click + or - button to zoom in or out by one tick. Press and hold button to auto-repeat.
3. Press and drag the thumb: right to zoom in, left to zoom out. Or click a spot along the slider bar to zoom to that point.
On the left of the slider is the magnification ratio, where 1:1 means the image is the same size as the model. For example, at 1:1,
a 60-foot HO boxcar would measure 8.3" on the screen, the same as the model in the Walthers box. Maximum magnification is 2:1.
Other ways to zoom:
●
use the zoom buttons on the main toolbar
. Each click enlarges or reduces by a fixed ratio.
●
use zoom commands on the layout context menu ==>
Right-click a spot on the layout and choose a command; generally the
resulting view will center on the point you clicked.
●
To percent: zooms to a specific magnification. 100% is
defined (somewhat arbitrarily) as that zoom which causes grid
lines to be one inch apart on the screen. At 50% they are a
half inch apart, at 200%, two inches. In other words, these
commands move your vantage point to one of a set of fixed
distances above the layout.
Fit to Window: scales so the entire layout fits into the frame window, same as the command on the View menu does.
●
Zoom On Drag: zooms in to an area defined by a user-drawn rectangle.
●
This command is available only in TrackLayer. To use:
1. Activate the Edit or the Track tool. The command is dimmed if any other tool is in use.
2. Right-click anywhere on the layout and choose Zoom On Drag. This checkmarks the item on the menu, and puts
you in a special mode temporarily.
3. Press and drag to define a selection rectangle around the area you want to zoom in on.
4. When you release the drag, the indicated area will zoom to fill the window.
5. The command works for one drag only; it automatically reverts to unchecked after each use.
6. If you change your mind, choose Zoom On Drag again from the menu to toggle it off.
Auto View Restore
New in version 5.2: when you save a layout, it saves the window size and position, along with the current zoom and view settings.
The next time you open the layout, it comes up looking the same way you left it.
Rotating a Layout
Any layout can be rotated a quarter turn in either direction. Both the track and the background image are rotated, and both can be
saved in the new orientation.
To rotate a layout, choose View > Rotate Layout > [direction]. The layout rotates 90 degrees in the indicated direction. Repeat for
180, 270, etc.
To save the layout in the new orientation, choose File Save or File Save As. Both the rotated layout and the rotated image file are
saved. The default action in both cases is to overwrite the original background image. You are warned about this, and given an
opportunity to save the image to a different file.
Notes:
1. If you are running Windows 98, rotation is done a pixel at a time and is very slow. The status bar gives an indication of the
progress. If you tire of waiting, press ESC to abort the rotation. This does not apply to NT, XP, 2000, Vista, or later
systems.
2. Rotation is not undoable. To undo, rotate back in the opposite direction.
Double Rail Display
You can get a more realistic view of your track by displaying it as two rails instead of a single brown wire. For example, here is the
Pittsburgh, Midvale & Ironton shown with rails instead of track lines:
Rails can be turned on or off independently of track, so you can show one or the other or both. Use View > Track and View > Rails
commands on the main menu.
Rail display gives an interesting variation to the graphics. It was designed to become a feature to analyze electrical flow around
the layout, but that hasn't happened. There are limitations:
●
●
●
Rails are not usually updated as you draw or edit. When you are moving or removing track, the rails may not change.
When tracks and rails get out of synch, the solution is to toggle View > Rails twice. Turning rails off and then on again
generates a new set.
Some layouts have spurious circles in the rail display, or other glitches.
Rail spacing is not yet adjustable. It is hard-coded to be 3/4" in HO, or equivalent.
Rails don't show up very well against a background image (although you can change color and thickness to suit). But they provide
a nicer image when you are running a track-only layout.
Exporting an Image
TrainPlayer provides the ability to save the image you see on the screen to a jpg or other graphics file.
This topic is now covered on its own page: Exporting Images.
Dragging by Hand
As an alternative to using the scrollbars, you can pan around the view by dragging it with the mouse. When the view is zoomed in
(so the layout is larger than the document window), and the Run tool is selected, then press and drag any point on the layout and
the view will move.
Note: dragging the view by hand disables Auto-Follow. To re-enable: right-click the layout and choose Auto-Follow.
If the layout extends beyond the window in only one direction, you can only drag that way. For example, if the layout is a long
horizontal strip which extends to left and right, but is completely visible vertically, then you can only drag in a horizontal direction.
Layout Printing
In TrainPlayer, you can print your layout as it looks on the screen -- with switch lights, with or without trains, background, track, or grid. The printout
reflects the current settings on the View menu.
Use Print Setup, Print Preview, or Print commands on the File menu, the same way you do with most Windows programs.
The image is always scaled to fit the page. For most images, landscape orientation works best (choose in Print Setup). There is currently no way
to scale up to print to multiple pages.
Exporting Images
Export Image was introduced several versions ago as a way of creating a snapshot of your layout in a graphics file. In 4.1, the feature has been improved in a number of ways:
●
●
●
●
●
A new "Merge Background" mode is designed for layouts with lots of scenery (especially roadbed and ties). It draws the scenery into the background image, then deletes it from the
layout and swaps in the new background. The result is a richer background underneath a simpler, more responsive track/scenery layer.
A new graphics engine is now doing the export. This produces better output and allows higher resolution.
The exported image is no longer limited to what you see on the screen. You can now choose at export time which features you would like to see in the output -- track, trains, scenery,
stations, etc.
Output sizes are now more sensible. The default is the native size of the current background, adjustable within reasonable limits.
A new wizard leads you through the steps of the process.
To export or merge: choose File > Export Image. This brings up the Image Export Wizard.
Image Export Wizard
Welcome screen
Introduces the wizard. Shows the current layout background image, if any, with its
size in pixels. Reports whether the layout has scenery, and if so, how much.
Export Mode
Choose Export Image if you wish to create a graphics file containing an image
of the layout. This mode does not modify the layout.
Choose Merge Background if you want to replace the current background
image with a new one containing both background and scenery. In this mode you will
be offered to have the scenery deleted after export.
Output File
Specify the output path for the graphics file. Use the Browse button to bring up a file
dialog for choosing a path.
The text box shows the full path. Below that for convenience is the filename and
extension, plus an indication of whether the file is new or already exists.
The initial path offered is unique, it does not match an existing file.
Image Features
Select the display features to be drawn in the exported image. Selections made here
will not affect the layout on the screen.
The initial choices depend on the mode. For Export Image, choices match the
features on display in the current view. For Export Background, choices are
Background and Scenery only.
Image Size
Specify the size of the exported image.
The default choice (middle of the slider) is the current size of the background image if
any; if there is no background, the choice is based on the size of the layout. Move to
the right to generate a larger file with higher resolution, left for a smaller file.
You may need to experiment for best results. If you are not merging scenery, there is
no reason to export a file larger than the current background; if you export ties and
roadbed, you will want a larger file for a sharper image. However, choose too large
and you may exceed memory capacity, so you will be alerted and required to choose
a smaller size.
Finish Screen
Concludes the wizard and carries out the export. Your choices are shown.
Checkboxes allow additional input:
Show picture after export (Export Image mode only) -- launch the new
image in your default image viewing program.
Delete scenery after export (Merge Background only) -- delete all
scenery from the layout, since it will be embedded in the background.
Save file after export (Merge Background only) -- bring up a file dialog for
saving the modified rrw file.
Click Finish to do the export, or Cancel to dismiss the wizard without finishing.
The Help Menu
The Help item on the main menu provides access not only to built-in help but also to license-related commands.
Menu commands:
Contents
Brings up TrainPlayer User Manual in Microsoft Help
Viewer. You can search or browse through the help, or
jump to keywords in the index.
TP Home Page
Brings up TrainPlayer.com home page in your browser.
Upgrade License
Brings up the Upgrade License dialog where you enter
name and license key provided by e-mail from
TrainPlayer.
Purchase Upgrade
Brings up the Purchase Upgrade dialog where you see
what upgrades are available and can go directly to a
checkout page to buy one.
Check for Updates
Brings up the Check for Updates dialog to see if newer
versions of program or car collections are available.
About This Layout
Brings up the Layout Properties dialog, showing authorprovided comments and instructions about the layout.
About <license>
Brings up the TrainPlayer About Box, showing the user
name and license type.
Upgrade License Dialog
This dialog is part of the Armadillo protection system provided by a company formerly known as Software Passport.
This is where you enter the username and license key sent to you by TrainPlayer. The most convenient way to do
this is to copy both the name and key from the e-mail, then paste into the Name box of the dialog; this will fill both
lines at once.
If the key is valid, you are informed, and are then licensed to use the program.
Purchase Upgrade Dialog
This dialog takes your current license into consideration and shows you what upgrades are available, if any.
Clicking one of the large buttons takes you to a checkout page on the TrainPlayer shop site, where you can
complete the transaction. You will then typically need to wait for a response by e-mail containing the purchased
license, after which you enter it using Upgrade License.
Running Trains
If you've operated trains on a model railroad, then operating them in TrainPlayer should come easily. This chapter
gives the details.
About Trains
The Train Control Bar
Moving Trains By Hand
Yard Mode
Switches
Coupling and Uncoupling
Horns and Sounds
Turntables
About Trains
In TrainPlayer, a train is defined as any contiguous set of cars, whether moving or not, with or without motive power
-- a single car sitting on a siding is considered a train. However, a train will not move unless it has an engine. To
move an engineless set of cars, you must either couple them to a powered train, or use "artificial means" equivalent
to a railroader's hand reaching across the tracks.
In some areas, the TrainPlayer definition of the word "train" is different from that of the prototype, where the
definition is "one or more engines, with or without cars, displaying markers." In this definition, a train need not have
cars coupled to the engine, but cars without an engine are NOT a train.
In Ops, we use the prototype definition. In some older functions, such as the Train Tree window display, a train is
defined as any contiguous set of cars, whether moving or not, with or without motive power -- a single car sitting on
a siding is considered a train. However, such a train will not move unless it has an engine.
You may have any number of trains on your layout, all running simultaneously if you can manage it.
All of the layouts supplied with TrainPlayer come equipped with one or more trains. You don't have to settle for our
selection -- you can delete or modify the provided ones and/or add your own, as described in Building Trains.
The Train Control Bar
The Train Control Bar (TCB) is a combination control panel and train window, for viewing and operating a single train.
The TCB comes up by default docked across the top of the application window. It is meant to be displayed at all times, so has no Close (X) box.
You can take it down or bring it back using View > Windows > Train Control Bar on the main menu.
To undock or dock elsewhere, press and drag the header. To auto-hide, click the push-pin icon at upper right; the bar will then collapse to a button
when not in use; hovering over the button will bring it back.
The bar is in two inseparable parts: control panel on the left, train window on the right. You can change their relative sizes by dragging the divider in
the middle. You cannot reduce the control panel below its minimum size, but you can reduce the minimum by removing buttons or enlarging the
panel vertically.
Train side views are scrollable and resizable in both directions, so if you have Chris Pedersen cars, you can enlarge the bar to see them in full size, or
make it smaller and they will scale to fit. The control panel wraps its buttons in multiple rows to improve fit.
The control bar has everything you need to run and interact with trains. There is no longer any need to bring up the old rotary-dial control
panel, though it is still available if you want it.
Control Panel of the TCB
The control panel consists of a set of buttons and controls on a wood-panel background. They are arranged in one row, unless the control bar is
resized tall enough so they can wrap to two or three.
Right-click on the wood to bring up the context menu. This allows you to hide certain buttons
whose functions can be performed other ways. It also allows enabling Yard Mode, a way to set
both speed and direction with a single gesture. In Yard Mode, the speed range is divided in
half, with zero in the middle (as shown above); moving the slider away from zero increases
speed, crossing zero changes direction.
Default controls in the panel are:
Forward/reverse (rocker switch): click to change the direction of train movement.
Speed display: shows current train speed, green if forward, yellow if reverse, in current units (MPH or kp/h). To set the speed: double-click the
display so it converts to an edit box; enter a value, then press Enter. To change units, use the Metric checkbox in Preferences > General.
Speed controls on resizable plate:
Red light: glows yellow when train is moving in reverse; glows red briefly while pressed. Click to stop train.
Green light: glows green when train is moving forward. If train is not moving, click to start.
Slower (-) button: click or press and hold to reduce speed.*
Faster (+) button: click or press and hold to increase speed.*
Slider: drag right for faster, left for slower.* Click a point on the scale to go to that setting.
* Applies to panel in normal mode, or in yard mode when speed slider is right of center. In yard mode with slider left of center, moving it further left
or clicking (-) increases speed in reverse.
Note: it is possible to resize the control panel such that the slider shrinks to zero and disappears. In this case, you control speed and direction using
buttons and lights alone.
Uncouple button: click to uncouple at the position indicated by the orange pin in the train window. Dimmed if pin is not between two cars. To
reposition the pin, click the desired spot in the train window.
Horn button: press and hold to sound train's horn. Dimmed if train has no engine. Right-click the button to select a different horn for the train, or to
toggle running sounds on and off.
Load button: click to load or unload the selected car. Dimmed if no car is selected or car is unloadable; otherwise click once to toggle the status.
Right-click for more options: ability to load or unload the entire cut or train; access to Load Chooser or list of load names.
Train Window
The train window in the TCB shows a side view of the selected train. The same type of window is used to display car collections in the Car Inventory
Bar (CIB), so much of this section applies to both.
The uncoupling pin is a tall orange spike in the train window (TCB only). Its position indicates where (a) the train will separate when you uncouple; (b) car(s)
will be inserted when you add or paste. The selected car is indicated with a colored underline.
Notes about the train display and interactions:
Image sizes: See discussion below under Control Bar Settings.
Tooltips, menus: hover over a car image to see information about it; right-click to view and edit properties. (If you do not see a tooltip, check that
Tools > Show Tooltips is on, and click the window to make sure it has focus.)
Selection (TCB): click a car to select it. Its image becomes underlined, the uncoupling pin moves to the clicked point. The car becomes selected on
the layout, and highlighted with a pink X. (CIB): click a car type to select it in the Car Types listbox. Double-click to add a car of that type to the
selected train.
Scrolling: a standard scrollbar appears beneath the train or collection when it is too long to fit in the window. Scrolling to the right moves toward the
front of the train.
Menu: a down-arrow button at the right end of the scrollbar brings up a menu. In the TCB, this is the Train Menu -- a
pictorial list of trains on the layout, used to select a train, described below. In the CIB, the down-arrow brings up the Car
Inventory Menu, described on the Car Inventory Bar page.
Train Menu
The Train Menu shows a list of all trains on the layout, and allows you to select one by clicking it -- just like any other menu, except that it shows
pictures, and the display can be customized.
At the top of the menu, above the list of trains, are two text commands:
Train Menu Settings
Settings for displaying trains in the menu; see Train Menu
Train Bar Settings
Settings for car image sizing; see below
The first command applies to the Train Menu. For details of how this menu is used to display and select trains, and how to work the Train Menu
Settings, see Train Menu in the Building Trains chapter. The other command applies to train or car bars, described here.
Control Bar Settings
The train and car bars offer some adjustability regarding how car images are to be sized and displayed. Click the down-arrow in the lower right of
train or car bar, choose Train[Car] Bar Settings..., and get one of the dialogs shown below.
These bars are designed to let you adjust the height up to see more detail, or down to see more cars; then, with one click, snap back to a standard size
designed for optimum viewing. "Standard size" depends on the cars and their size classes (see 50-Pixel Cars) -- if you have a train with nothing but
small cars, it can be drawn native size in a window about 30 pixels high; if the train has medium-size cars, it needs 50 pixels; Pedersen cars, still
bigger. Mixed trains are sized according to the largest car.
You may have to experiment to find the right settings for you. If you have trains of all sizes, you might want to see each in its best size; on the other
hand you might find it annoying to have the bar size keep changing as you click trains.
Dialog controls are:
Show default collections
Checked means: whenever you select a train, draw the train in standard size, and adjust ("snap") the height of
the bar so it will just fit. Uncheck to leave bar size alone when selecting trains. Default is ON.
Applies only if Snap on Select is on. Checked means: on snap, show all trains medium size. Uncheck to allow
size to change depending on train. Default is ON.
Checked means: when you drag to resize the height of the bar, scale the train up or down to fit the window.
Uncheck to stop train from resizing. Default is OFF.
Click to set bar background color. Default is beige for train bar, light blue for car bar.
(Car bar only): in the Car Inventory Menu, include the names of all default car collections
Show MRU list + size
Defaults
(Car bar only): in the Car Inventory Menu, include recent picks, as many as specified
Click to reset current dialog to factory default settings
Snap on Select
Uniform Size
Scale on Resize
Background
Moving Trains By Hand
In the real world, the only way to move a train is to attach an engine and give it power. For years
this has also been true in TrainPlayer. Not any more! You can now reach across the track with a
non-prototypical railroader's fingertip and move the train along the tracks, just as you would on a
real layout if you needed to relocate some cars or your engine had stalled.
To move a train by hand: position the cursor over the car you want to drag. The cursor
changes to a hand:
Press and drag in either direction, and the train follows. You will get the hang of this in about five
seconds. Train dragging works no matter what tool you are using: Track, Edit, Run, etc. If you have
Auto-Follow enabled,
To throw a switch while dragging: press the space bar. This throws the next
switch coming up in the direction the train is moving. The train must be moving for this to work.
To couple while dragging: bump the train you are dragging into another one and they
couple.
To uncouple: position the cursor between two cars; it changes to an uncouple icon, like this:
Click to uncouple at this position.
Note: the checkbox Shift-click between cars to uncouple in Preferences > Operation
determines whether uncoupling requires shift-click instead of simple click. If this box is checked, the
uncouple icon does not appear and uncoupling does not happen unless you are pressing the Shift
key.
If the train is already moving: you can drag by hand; when you let go, the train
resumes its previous speed and direction.
What does not happen while dragging: some actions which normally occur for a
moving train do not apply when the train is being dragged by hand. These include:
●
Crashes and bounces. The train just stops when it can't go any further.
●
Jumps to linked layouts. If you run the train onto a linked spur, it stops.
●
Acceleration/deceleration. The train moves at the speed you drag.
●
Speed display on control panel or toolbar.
●
Running sounds.
●
Correct behavior on tunnel track. If you attempt to drag the train onto a tunnel track
(invisible link to another location), it can be made to work, but feels strange. The trick is to
watch when the car you are dragging enters the tunnel; it jumps to the other end and takes
the cursor with it, at which point you may have to continue the drag in another direction.
Yard Mode
Yard sessions are easy in TrainPlayer! When you're operating in "yard mode," rotating the speed
dial controls both the speed and the direction. Thanks to our users for suggesting this handy
feature.
To enable yard mode: right-click the Control Panel and check "Enable yard mode." Or
use the command Enable Yard Mode on the Tools menu, or click the Y button on the toolbar
.
When yard mode is enabled, a brass Y appears in the upper right of the control panel, as shown in
the illustration at right.
To use Yard Mode with the speed dial:
1. Rotate the speed knob counterclockwise, so it goes past the zero point at around 7:00.
2. The train stops and goes into reverse. Speed remains zero until you rotate past the stop
button at 6:00.
If the train is already in reverse when you rotate into yard mode, it stays in reverse.
3. Continue to rotate counterclockwise. The train speed increases in the usual way -- slowly at
first -- as the train moves in reverse. You can rotate all the way around to maximum reverse
speed at the 7:00 position.
4. While yard mode is in effect, the stop button flashes.
5. To end yard mode: (a) rotate back clockwise past the starting point, or (b) click the stop
button, which immediately stops the train and returns to normal mode.
To use Yard Mode with the speed slider:
When yard mode is enabled, the speed slider divides into two sections, as shown
here:
Normal
Yard
In normal operation, zero speed is at the left; moving to the right increases speed.
In yard mode, zero is in the middle; moving to the right increases speed, while
moving to the left begins yard mode and switches into reverse.
To disable yard mode: click the brass Y on the control panel, or click the toolbar button
, or uncheck "Enable yard mode" on the context menu.
Switches
Where three or more tracks join at a point, they form a throwable switch. Green lights indicate the open route through the
switch; reds indicate closed tracks. A train doesn't necessarily crash if it attempts to pass through a red light; it can roll right on
through, or throw the switch automatically, depending on settings in the Options dialog.
To throw a switch: position the cursor over the "frog" -- the point where the tracks join -- so you see a blue highlight,
then click. The lights change to show which route is now open.
If there are more than two routes through a switch, then each throw cycles to the next available open route. For example, here
are the results of repeated clicks at a four-way junction:
A switch will not open a route which requires a sharp turn. If a route through a switch forms too sharp an angle, then throwing
the switch will not open that route.
If you prefer, you can have only the green lights show, or only the red, or you can change to different colors. For details of settings regarding switches, see Switch
Preferences.
Press the space bar to throw the next switch the selected train will cross. For details, see Upcoming Switch below.
The Switch Window
The Switch Window provides a close-up of the area around a switch. The chosen switch is shown in the
center of the window, surrounded by a rectangular frame, zoomed in, without background, so that you can
easily see and operate it.
To bring up the window, choose View Switch Window. The window can be positioned anywhere on the
screen, resized, or docked to any side of the frame.
When the switch window is on display, and you position the cursor over a switch on the layout, the display
zooms in on that switch.
By default, the window automatically updates every time the train goes across a switch, so that it shows the
next switch in the direction of travel. (This feature can be disabled; see below.)
To throw the switch centered in the switch window,
click the blue highlight, or press the space bar. To
throw any other switch visible in the window, click its frog point.
To change characteristics of switches or the switch window, see Switch Preferences.
Upcoming Switch
As you drive, the program knows what switch is coming up next along your direction of travel, whether an inch or a mile away, and makes it easy to see and throw.
When the Switch Window is on display, it automatically shows a close-up of the upcoming switch, while a red double frame highlights it on the layout, as shown here:
To throw the upcoming switch, press the space bar. This works whether or not the switch window is on display.
The upcoming switch changes whenever the train (a) passes over a switch or (b) reverses direction. The switch window automatically updates at those events (or
not; see note below), as well as whenever you position the mouse cursor over a different switch on the layout.
Coupling and Uncoupling
TrainPlayer allows cars to be coupled or uncoupled anywhere on the track. You cannot couple if you are going too fast, but you
can uncouple at any speed.
There are two general ways to uncouple: (a) indicate which cars are to be uncoupled, then issue an uncouple command, or (b)
click directly on the layout in the space between two cars. To couple, as in real life, you simply move one car slowly into
another, and they automatically couple.
To uncouple by command:
1. Specify the uncoupling point. The easiest way to do this is to click in one of the train windows (in the Train Toolbar or
on the Control Panel) to position the uncoupling pin. You can click between cars, or near the end of a car. Once the
pin is positioned between two cars (not at the beginning or end of the train), you can uncouple.
For example, in this illustration, uncoupling will occur between boxcar and tanker:
Another way to specify the uncoupling point is to select a car by clicking on it. The uncoupling pin goes behind
the selected car, unless it is the last car, in which case the pin goes ahead of it.
2. Choose the Uncouple command in one of these ways: (a) by pressing Ctrl-U; (b) by clicking the Uncouple button
on the Control Panel or Train Toolbar; (c) by choosing Train > Uncouple from the main menu, or (d) by choosing
Uncouple from the car context menu.
When the train uncouples, you are left driving only part of it. The uncoupled portion becomes a new train, no
longer connected to your engine. The following illustration shows the result of the uncouple operation begun
above:
To uncouple by click:
You can uncouple two cars by holding down the shift key and clicking in the space between the cars. When the cursor changes
to a four-headed arrow, click to uncouple the cars. The Run tool must be active for this to work.
By default, uncoupling requires shift-click (holding down Shift as you click). If you prefer, you can change this so all it takes is a
click; see Operation Preferences.
To couple:
1. Slow down and move toward the cars to be coupled. For example, if the situation is as shown in the above diagram,
click into Reverse so the three-car train is moving toward the two stationary hoppers.
2. Bump gently. The cars couple automatically, and the train is reassembled as shown in the top diagram.
These instructions would have to be reworded somewhat to apply to other configurations, for example with the engine at the
rear of the train, or going in reverse. Experiment.
Horns and Sounds
There are two types of sound associated with a train: the "horn" (or whistle or bell) which operates on
demand, and the running sounds which you hear constantly as the train moves.
There are other sounds which come from the layout and not the train; these are discussed under Stations.
The TrainPlayer website now has a large and growing selection of all types of sounds. These are available
on the Web tab of the various Sound Choosers.
on the control panel or train toolbar. The horn
To sound the horn: press the Horn button
continues to sound as long as the button is held down.
To choose a different type of horn: either
(a) right-click the Horn button on the control panel and
choose from the context menu (see picture) or (b) right-click
the train, choose Properties, and select a horn type from
the drop-down in the Train Properties dialog.
Choose Other at the bottom of the menu to pick from a
wider variety of horn and engine sounds via the Sound
Chooser.
To turn running sounds on or off: check or
uncheck Running Sounds from the context menu on the
Horn button (pictured) or the one you see when you rightclick an empty space on the layout.
Running Sounds
In TrainPlayer, you have several choices of speed-dependent running sounds, steam or diesel.
To choose running sounds:
1. Right-click a train or engine and choose Properties. Go to the Train tab, shown below.
2. There is a drop-down menu for running sounds. Choose one.
If you see only a small number of choices (as shown below left), choose Download... and you
will get the complete set of running sounds available on our site. This may take a few minutes, but
next time your choice of running sounds in this drop-down will be much larger.
3. To hear the sounds, start the train moving. If you don't hear anything, right-click a blank spot on the
layout and check Running Sounds on the context menu (below right).
To add your own running sounds:
1. If you want to add your own running sounds, you will need a set of wav files, each having a sound at
a different speed. The program cannot read mp3 or other formats; in fact there are variations on
wav files and not all of them work in TrainPlayer.
2. In Windows Explorer, locate the folder TrainPlayer\Sounds\Chuff in your data directory. You should
see a collection of files with filenames like <name>_nn_mm.wav, where name is the sound name
which will appear in the menu, nn is the minimum speed in MPH at which the sound takes effect,
mm is the maximum speed (or the letters max representing the train's top speed). For example, the
file "diesel_26_35.wav" is the sound listed on the menu as "diesel," which is played when the train is
going between 26 and 35 MPH. Name your files accordingly and deposit them in the Chuff folder.
Turntables
Turntables are useful on model railroads, and 101 Track Plans has a lot of them. In TrainPlayer, they move and function and
never need oiling.
A turntable is equipped with a section of track drawn with a thick line (the "bridge" track) and one or more sections of track radial to
the circumference ("connecting" tracks). When you open a layout, the turntable track is likely to be oriented in a random direction.
Before you can drive onto or off the turntable, it must be rotated until the bridge track joins to a connector.
An alternative to a turntable is a transfer table -- a rectangular bed with a bridge which moves laterally. For details, see
Turntables and Transfer Tables.
To rotate a turntable: Right-click a point on the circle
and choose Rotate Right (clockwise) or Rotate Left
(counterclockwise).
As a shortcut, double-click a point on the circle to rotate right.
Double-click the rotating turntable to stop rotating.
The turntable rotates slowly until the bridge track aligns with a
connecting track, then it stops. A train can then be driven onto the
turntable from that connector, or off it.
Each time you rotate the turntable, it moves to the next connecting
track it encounters in the direction of rotation.
Turntables are tricky to get right. If you rotate one and find it doesn't stop where it should, or stops twice at the same connector, it
means the track isn't laid just where it should be. Please report any problems you find with turntables on the published plans.
You do not have to rotate through each stop. You can double-click any connecting track, and the turntable will rotate directly to
that stop by the shortest route.
Ways to operate a turntable:
●
●
●
Right-click anywhere on the rim of the table (or the center point, if not occupied by a car) and choose the direction of
rotation from the context menu. The table rotates in the indicated direction to the next stop.
Double-click the rim or center. The table rotates to the next stop, going in the same direction as any previous rotation
(counter-clockwise the first time).
Double-click a junction where a connecting track touches the rim. The table rotates to align with the indicated connector,
rotating in whichever direction is closest.
Managing Cars
Railroads need cars to carry goods and passengers. The typical model railroad has cars of various types sitting
around on the track, a bunch more in a cabinet on the wall, and probably a few more still in their boxes, waiting to
be painted.
In TrainPlayer, there are no cars waiting to be painted, and that cabinet is huge. There are thousands of car types
to choose from, and an infinite supply of each -- when you pull one down from the cabinet, another appears in its
place. All kinds of cars are available -- diesel locomotives, steam engines, freight cars, passenger cars, snowplows
-- in a large variety of colors and styles.
Cars are organized in car collections, groups of cars related by style or road name, like individual shelves in the
cabinet. Several car collections are provided with the program, many more are available by download. If you don't
find what you need, and you have some artistic ability, you can create your own, or you can ask one of the friendly
guys on the forum to make a custom set of cars for you.
With the introduction of Ops, freight cars have become more capable. They can carry loads. Each car is assigned
a detailed classification, which determines what sorts of load it can carry, which in turn determines what sorts of
industry it can serve. The loads themselves are objects much like cars, organized in downloadable collections.
About Cars
Car Collections
Default Car Sets
Car Loads
Car Properties
Car Collection Editors
The Car Inventory Bar
About Cars
There are some terms you need to know when working with cars. To understand them, consider this scenario.
You need some cars to carry grain on your prairie railroad. You go to your big-box hobby shop, wander the aisles until you find one called "Steam-Era Freight Cars," and locate a shelf called "Grain
Cars and Hoppers." You pick out a nice model of a 2-bay open-side covered hopper in Great Northern colors. In TrainPlayer terms, a car built from this kit would be described as:
Car collection: Steam-Era Freight
Car class: covered hopper
Generic class: hopper
Car type: GN 70-ton 2-bay open-side covered hopper
The "car type" is the name on the box -- a particular model from a manufacturer. The "car class" is a code from an industry-wide list indicating what the car is used for or can carry. The "car collection"
is a group of car types related by era, class, manufacturer, etc. The "generic class" is a program-assigned category, as described below.
When you add a car to your layout, you start by choosing a car type from a collection, and the program adds a car of that type on your track. You can then modify this car -- repaint it, change its size
-- but you can't change its type. You can, however, modify the collection and change the car type definition, so next time you add a car of this type, it will have the style you want.
Generic Car Classes
Every car you add to a layout is assigned one of twelve generic classes:
Diesel, Steam, Tender, Pullman, Baggage, Reefer, Hopper, Gondola, Boxcar, Tankcar, Flatcar, Caboose
This is partly for historical reasons, and partly because we have only these twelve icons on the car toolbar.
A car's generic class determines certain aspects of its behavior:
●
●
●
●
Diesel and Steam are the only classes which have motive power. If you want a car to move when you hit the throttle, make sure it is classified as one of these (even if it is an electric trolley,
mule-drawn wagon, handcar, etc.).
Freight types are the six from Reefer through Flatcar.
Passenger types are Pullman and Baggage.
Only freight types are loadable. You cannot attach load types to engines, cabooses, or (currently) passenger cars.
When you add a car using the car toolbar, you are choosing a generic class. The actual car type you get is whichever member of the current Default Car Collection has been assigned to this class.
For example, if you click the hopper icon, and the current default collection is "Default Steam," the car you create is of type "2-bay hopper."
AAR Codes
● With the introduction of Ops, it became necessary to be more specific about car types. If you need to carry logs, you need a flatcar, but not one with a depressed center. To classify cars more
precisely, we now use AAR Codes.
An AAR Code is a one- to three-letter string representing a specific type of car, as classified by the Association of American Railroads. The TrainPlayer list is adapted from that on the Great
Northern Empire site (we appreciate the author's permission to use this list). For an informative article on the subject, see AAR Freight Car Codes from the Model Railroad Operations SIG.
●
● In TrainPlayer, a two- or three-letter code refers to a specific type, where one letter is a generic type. For example, a code of "GD" means a side-dump gondola, suitable for gravel; "G" means a
general-purpose gondola, suitable for loads which can be carried in any type of gondola.
The complete list of AAR codes available in TrainPlayer can be seen in the AAR Codes Dialog, accessible when editing car properties.
Each car has both a class and an AAR code. If you create or edit a car type and give it an AAR code, the program assigns the appropriate class. This can usually be done by looking at the first letter
of the AAR code -- any code starting with F is a type of flatcar, G a gondola, etc. Conversely, if you choose a class for a car type, the program gives it a matching AAR code -- a one-letter generic
code. Example: choose class "Flatcar" and you get AAR code "F".
Car loads have their own sort of AAR code -- a list of individual codes indicating cars able to carry a given load. For details, see Load AAR Strings.
Types of Cars
The AAR code assigned to a car dictates its behavior. TrainPlayer recognizes several types of cars based on their codes. Some of these can be overridden by adding or changing a code in the
carcodes.csv file; the following rules apply when not overridden:
●
●
●
●
●
Passenger cars: code starts with one of: B, C, D, P or is equal to EP, MA, MB, MR
Locomotive power: code starts with E, except for ET (tender) -- all cars of this type move when power is applied
Freight cars: all types which are not passenger or locomotive or tender or caboose
Loadable cars: any car is loadable if it has a default load assigned to it (this applies to most passenger and freight cars)
Closed cars: cars with codes not starting with G or H or F or O
Normally it is easy to tell whether a car is loadable -- most dialogs which display cars give you the option to show them with loads displayed, but (a) the option is dimmed for unloadable cars, and (b)
for closed cars, loads are shown as text labels above the car.
Default Cars
There are two ways to add cars to a layout: (a) using the Car Chooser, which lets you pick any car from any collection, or (b) choosing from the Add Car menu or its toolbar (see Adding Cars And
Trains). The second method is quicker, but means you don't get to choose the collection -- in this case the car comes from the Default collection, one of a few collections specially set up for this
purpose.
The program comes with two basic default sets: Default Steam and Default Modern. (Examples from Default Steam are shown at the top of this page; Default Modern examples are on the Car
Collections page.) The program activates one or the other of these when you open a layout, depending on the ratio of steam to diesel engines on the layout. You can override this choice, and specify
your choice of defaults for any layout, whether Steam or Diesel, or one of several others you can download, or one you create yourself. For details, see Default Car Sets.
Car IDs
Every car on the layout has two forms of identification:
●
●
a numeric ID, assigned and managed by the program and not editable by you. This is used internally for keeping track of cars. The program goes to some trouble to ensure that every car on
the layout has a unique ID, and warns you if this is not the case.
a text label, which you can optionally display on top of the car. Initially the label is a combination of the car class and the ID, where the class is represented by one or two letters -- a gondola
might be labelled "G64," a steam engine "ES99." However, the label can be edited, so you can change it to say whatever you like. You do not need to ensure the label is unique.
Unfortunately the terminology in the program confuses these two. The menu command for turning car labels on and off is Show Car IDs on the Train menu. The text box where you edit the
label (in Car Properties) is called Car ID. Both actually refer to car labels, not internal IDs. In Ops windows, the car label is displayed in a column simply called Car.
For information about how to display car IDs, see Car ID Display.
Car Notes
New in version 6.0 is the ability to add a car note to any car. This can be any string of information you wish to attach to the car, like a post-it note stuck to the side. You create a car note in the Car
Properties dialog. It is saved with the car in the layout file, and displayed in various places (tooltips, dialogs). It is accessible via the $car system function in scripts, so it is handy for script authors
keeping track of car movements.
Car Images
Cars are displayed in two ways: as top views on the layout, and as side views in the train windows. Each view of each car type is in a separate file, so a typical car collection has a folder containing
dozens of small image files. You can find plenty of examples in your Cartypes folder.
These image files are not created or edited in TrainPlayer. If you want to modify car images -- say, to apply your own paint scheme to a set of cars, or create a new collection from scratch -- you will
need to use a bitmap editing program such as Paint, which comes with Windows. You will also need to be aware of certain size and style limitations; details are spelled out on the Car Collections
page.
Large Car Images
As of Version 5.2, certain car collections provide large, detailed side views in addition to the normal toolbar-sized ones. Here for example is an Athearn boxcar from the Chris Pedersen Cars
collection:
In Version 6.0 we went a step further and introduced a new 50-pixel medium-sized car image. When you are working with any of these collections, the large and medium images can be seen in
several places:
●
Car Properties -- in the car panel, scalable up to full size
●
●
●
●
Car Collection Editor -- in the car panels, scalable up to full size
Car Chooser -- in the Preview window
Train Window -- in the resizable train window
Car Inventory Bar -- in the resizable car bar
All of these displays are resizable; for optimal viewing, enlarge until the image reaches its full size.
50-Pixel Cars
New in Version 6.0 are several new car collections in a new size category. Car collections now come in three sizes:
●
●
●
small: the original cars since Version 1.0, with side images made from train gifs, maximum height around 28 pixels
medium: new, more detailed images, with side views maximum height 50 pixels; sample shown above at full size
large: the Chris Pedersen cars, with side views actual size of HO models
Medium size is now the standard for all default cars and for most new collections being built. The 50-pixel size allows for quite a bit of detail, without taking up too much screen space.
Every collection belongs to one of the three size types, as shown under Image Type in the Images tab of the Car Collection Editor. All cars in a single collection are of the same type. However,
this does not mean your trains are restricted to a single type. A train can contain a mixture of sizes; for example, this train has four 50-px cars followed by two small, then two Pedersen:
In this case the program applies some rules and attempts to scale the cars more or less uniformly. For more about train side-view scaling, and what control you have over it, see Train Control Bar
Settings.
Car Panels
A single display device called a car panel is used to display cars of all size types. This panel appears in Car Properties and in several tabs of the Car Collection Editor. It consists of two images,
side image on the left, top image on the right, separated by a moveable divider. All dialogs containing car panels are resizable, so you can make the panel as large as you like, then move the divider
to make one size large relative to the other. Both side and top view rescale accordingly.
Most car panels have a checkbox nearby allowing you to turn on and off the display of the load for loadable cars.
Car Collections
A car collection is a set of car type definitions. To add a car to the layout, you choose it from a car collection. If you use a quick method -- click a button on the toolbar or choose
from the Add Car menu -- you are choosing from a special collection called the Default Car Set. The other method is to select from the Car Chooser, where you can browse through
many collections and choose cars from any.
TrainPlayer is installed with several car collections, including a few default sets. There are many (many!) others available for download from the TrainPlayer website. You can shop
through these on the Web tab of your Car Chooser; if you find a collection you like, you can download the entire set with one click, and then use the car types in your layouts.
If you have a layout which uses cars from some non-default collection, and you want to send it to your friend Joe, then if he is going to see the right cars he will need the same
collection on his machine. If the collection came from TrainPlayer, Joe will be given a chance to download a copy for himself. If it is a custom set you created yourself, then you will
need to publish the collection -- process it into a separate folder and send him a zip of that.
Using Car Collections
Most of the instructions for using car collections are found in other sections of the manual. Follow links below for details.
To browse car collections: choose Other... from one of the Add Car commands -- (a) on the Train menu, (b) on right-click of a car, (c) on toolbar button
Add Car Here on a track section. Any of these brings up the Car Chooser, where you can browse and select cars to be added.
, (d) from
To edit a car type or collection: right-click an icon in the Car Chooser middle window, or a folder in the tree at the left, and choose Properties. This brings up the Car
Collection Editor, for browsing and editing the selected car type or any other type in the same collection.
To download a car collection: in the Car Chooser, go to the Web tab. Browse and find what you like, then click Install. The actual download is done into a temporary
directory while you browse, so that you can view the images; clicking Install copies the files from the temp location into Cartypes.
To publish a car collection: in the Car Collection Editor (Collection tab), click Export.
Creating a Collection by Hand
If you know Microsoft Paint®, Adobe Photoshop®, or some other bitmap editing program, you can create your own car side and top images. This doesn't require a lot of artistic skill -it's a little grid of pixels, not a blank mural -- and even less if you just want to copy an existing set and do a recoloring or kitbashing job.
To create your own collection from scratch:
1. Create an image for each side and top view in the collection. See instructions under Editing Images below.
2. Name the files appropriately. The name you give the side view image is the name you will see in the chooser for the car type, so make it something friendly. A top file is
associated with a side, and must have the same name with "_T" before the extension. The top and side need not be in the same format.
Example: side = "Pacific Fruit Reefer.gif" top = "Pacific Fruit Reefer_T.bmp"
3.
4.
5.
6.
Collect all side and tops into a single folder, named what you want to call the collection. This folder can go anywhere on your disk.
Bring up the Car Chooser.
Right-click the folder under which you want the new collection to appear, and choose Import From Folder.
Navigate to the folder of images and click OK.
The program will create a new xml file and subfolder in your TrainPlayer\Cartypes directory, copy the side and top image files into it, then add the new collection to your chooser tree.
Editing Images in Microsoft Paint®
Click Paint... in the Car Collection Editor Images tab and it will open the selected image in Paint.
The preferred format for top and side images is 24-bit BMP, but other formats will work too (.jpg, .png, .gif).
To edit in Paint:
1. Use View > Zoom > Large Size (or Ctrl-PgDn) to enlarge the image so you can see what you're doing.
2. Use paint tools to color or modify the image to suit. Read the technical details below regarding sizes and shapes.
3. Save the file, either using File Save or confirming save when closing the window. (Do not use Save As.)
4. Return to TrainPlayer; the modified image will show up in the Car Collection Editor.
Changes made and saved in Paint cannot be undone or cancelled. If you want to modify factory-supplied images, we recommend you first make your own copy (using the Save As
button) and work with that. If you accidentally change a factory-supplied image and want to revert to the default, download a new copy of the collection.
Note: if you prefer to use a program other than Paint when you click the Edit button, this can be arranged. There is a registry value called PaintExeName which you can set to the
name of a program. This value is located under HKCU\Software\TrainPlayer\TrainPlayer\Settings. For help modifying this value, send e-mail to support.
Side-view images must be sized correctly so they will look ok when mixed with other cars, and so they will fit in the train windows.
●
Use a drawing space 32 pixels high.
●
Draw the image so it touches the bottom. Do not exceed a height of 26 pixels, otherwise it will not show fully in the control panel.
●
●
The width can be whatever you need -- to change the width, drag the tiny blue dot at right center. A good rule of thumb is that one pixel equals about a foot on the prototype, so
a 50-foot car is around 50 pixels wide. (Note that the size in pixels is shown on the status bar as you drag the dot).
The transparent color is whatever color is in the top left pixel. If the top left pixel is pink, then all pink pixels in the image will become invisible when the image is displayed. In
the above example, the transparent color is light grey.
Top-view images may be any size or shape -- the program scales them as needed to fit the car tops on the layout.
●
Top images must be oriented vertically, with the nose of the car at the top.
●
The transparent color of a top image is taken from the lower left pixel.
Car Collection Errors
When you open a layout, it may require cars not found among your installed collections. When this happens, you are presented with an alert showing several choices:
OK: ignore the errors; for the current session, substitute cars from the standard set for the ones specified in the layout.
Cancel: do not open the layout.
Download: download and install the collection from the web, then proceed to open the layout with its full set of cars. This button is available only if you have an
internet connection, and if the requested collection is available on our website.
If someone sends you a layout file, and it requires a car collection not available on our website, you will need to ask that person to send you the collection. Or zip it up
and send it to TrainPlayer, so we can post it for general use.
Convert: modify the layout so that it uses standard cars instead of the specified ones. The modifications are saved the next time you save the layout. Warning!
once you make this change to a layout, it cannot be changed back! The layout permanently forgets what car collection it was originally designed to use.
Default Car Sets
When you are adding cars to a layout, you have a big catalog of types to choose from. Flipping through it in the Car
Chooser is straightforward but a bit of a job. As a convenient alternative, you can use the menu or car bar to choose
from a special collection called the default car set.
What Is a Default Set
A default set is a collection with a full complement of the basic passenger, freight, and locomotive types, all related
by theme or era. TrainPlayer comes with several of these. You can choose one to be associated with a layout, then
use it as your main car source, as described in this section.
Here are some excerpts from the supplied default sets:
●
Steam -- 1930's-era equipment with steam locomotives
●
Modern -- 1990's-era equipment with diesels
●
Lionel -- O-scale equipment
To browse the whole collection, open the Defaults folder in your Car Chooser and take a look around:
Choosing a Default Set for a Layout
A default car set is assigned to each layout you open. The program makes an initial assignment as described
below; to override it, use the drop-down at the bottom of Layout Properties:
Choose the default car set you want to be associated with the layout. The choice you make is saved in the rrw file.
Modifying this choice will affect the layout and the display as soon as you click OK or Apply -- all standard car types
on the layout will be converted to the newly-chosen default set. Rules for doing this are complicated, but basically a
boxcar of one style is converted to a boxcar of the other, unless it is a car which was not chosen from the default set
to begin with.
The initial default assigned by the program is one of four sets -- Default Steam / Modern / Brit Steam / Brit Modern -based on your US-UK preference, and the ratio of steam to diesel locos on the layout.
More default sets are available for download in your Web Car Chooser. There is a nice set of cars from John
Allen's legendary Gorre & Daphetid. A beautiful set of default Chris Pedersen cars is now available for all users.
Using the Default Set
The default set comes into play in the Add Car menu =>
The twelve class names below the line refer to cars in the
current default set. When you choose By Name, the Car
Inventory Bar comes up, showing the default set.
For more, see Car Inventory Bar and Adding Cars and Trains.
Creating Your Own Default Set
There is a white paper on this subject in the How-To section
of our website; see Customizing Default Cars.
Car Loads
A load is a batch of goods you can carry in a freight car. It has a name, like "coal" or "pipes," along with top and side images which are superimposed on the car images
when you load a car. Associated with each load is a list of car types eligible to carry the load, so you can't put coal in a flatcar or farm equipment in a hopper.
Loads with images are suitable for use in open-top cars, like flatcars, gondolas, and hoppers. For closed cars, like boxcars and tankcars, there is a large collection of
"closed-car loads," represented by generic symbols on top views, and by text on side views.
TrainPlayer comes with hundreds of load types and easy ways to browse and deposit them in cars. The loads come ready to use -- open a random layout, and you'll see
that every freight car has already been assigned a typical load, ready to be loaded or emptied with a click. You can change the load associated with any car, and/or set
a default load for each car type.
About Loads
Loads come in two varieties. Open-car loads are for open-top cars -- gondolas, flatcars, hoppers -- and have a pair of images for each load. Closed-car loads
are for closed cars -- boxcars, reefers, tankcars -- and are represented by generic symbols in top views, text in side views. The above picture shows both types.
Loads are similar in many ways to car types. They come in sets, like car collections, each defined by a file of data and (for open-car loads) a folder of images. Like car
types, they are selected from a chooser, and edited in a collection editor. The installer delivers a sample set of loads; more can be downloaded from the collections on
the web.
There are a lot of moving parts associated with loads, and they appear in various places in the program. Here is a compact guide to relevant reading matter:
Load Management
Load Menu
popup menu for choosing a load for a car
Load Chooser
dialog for choosing pictorial loads for one or more cars
Load Collection Editor
dialog for editing load collections or modifying individual load definitions
Load Definition Dialog
dialog for creating new closed-car loads for an industry
Loads Appear In
Car Properties
where the load for a car can be viewed or changed
Car Collection Editor
where a default load can be assigned to a car type
Industry Browser
where incoming and outgoing loads are defined for a standard industry
Station Properties
where loads are defined for a specific industry
Loading Cars
Every freight car has a load type assigned to it, whether by default or by you. There are two steps to loading a car: selecting a load for the car -- which you normally do
once -- then toggling it on or off whenever the car is loaded or unloaded.
To select a load for a car:
●
●
Right-click the car and make a choice from the Load Menu described below. This lets you choose from a list of load names or from the gallery of pictures in the
Load Chooser. Both the Load Menu and Load Chooser offer ways to load more than just the selected car.
Or: right-click, choose Properties, and select from the Load drop-down in Car Properties.
Either way, if the car already has a load assigned, it will be replaced by the new choice, and the car status will be set to Loaded.
Note: another way to set a load for a car is to set a default load for the car type. Then every time you create a car of that type, it will be assigned the default
load. See Default Loads below.
To load or unload the car:
●
Right-click the car and choose Load > Loaded to mark the car as loaded, or Load > Empty to mark it empty.
●
Or: click Loaded or Empty on the toolbar.
Setting the loaded/empty status of a car modifies its image in side and top views. Emptying the car does not remove its assigned load type.
Car Load Menu
1. Right-click a freight car to see the Load submenu.
The menu does not appear for unloadable cars -- locomotives, tenders, passenger cars, or cabooses. Commands on the menu are:
●
●
●
●
●
●
Empty/Loaded: changes the empty/loaded status of the car. If no load is associated with the car, choosing Loaded brings up the Load Chooser. Notice
that these two commands are also available on the toolbar (icons at right -- on the train toolbar next to the uncoupler.).
Load Chooser: brings up the Load Chooser for selecting loads.
Choose By Name: shows a list of loads suitable for the car -- pick one and it deposits the load in the car.
Load/Unload Car: toggles the loaded status of the selected car.
Load/Unload Cut: toggles the loaded status of the selected car and any coupled cars of the same type.
Load/Unload Train: toggles the loaded status of all loadable cars in the train, regardless of type.
Note: the Load menu is also available from the main menu under Train > Car. This makes it accessible in Tools Customize, so you can create your own keyboard
shortcuts or toolbar buttons for load commands.
Default Loads
The load system features a scheme of "cascading defaults," designed to make it easy to use loads without a lot of setup. The following diagram illustrates this.
In the AAR Car Types list (just above), you can see that a default load is assigned to each car class, or AAR type. This allows you to open a random layout and
find meaningful loads on all cars without having to specify anything.
In the Car Collection Editor (above right), a default load can be assigned to each car type, overriding the default based on the AAR code. The default load for
a car type applies only when you create a car of that type -- it does not automatically change the load of every such car on the layout. For example, the diagram shows
that the next time you create a gondola (class G) from the named collection, its load will be "scrap metal."
In the Car Properties dialog (top left), a specific load can be assigned to any car on the layout, overriding any defaults. The same result is achieved by
dropping a load on the car from the load chooser, or choosing it by name from the load menu. In the illustrated example, gondola G1 is modified to have the load
"crates2."
The loaded/unloaded status of a car is also changed by the program to accommodate switchlist moves or as a car is delivered to its destination. No user action is
required for this.
Creating Your Own Loads
Creating a new open-car load is just like creating a new car type. First you will need to decide which load collection you want it to go into, and use a paint program to
prepare top and side images of the load. Then bring up the Load Collection Editor and follow the instructions for Adding a New Car Type.
Creating a closed-car load is simpler, because it requires no images. The easiest way to do this is to edit an industry in Station Properties; in the Incoming or Outgoing
Loads box, type in the name of the load you want to create, then click OK. If the load name is not recognized, you get an alert asking if you want to create it, and
prompting for additional necessary info.
For advanced users, there is a quicker way. Closed-car loads are defined in the following file, located under your TrainPlayer application data directory:
TrainPlayer\Cartypes\Loads\z_closed_car_loads.xml
You can open this file in Notepad, and if you can make sense of it, feel free to add, delete, or modify lines. But caution: if you change your version, layouts you obtain
from the web may complain about missing loads.
Car Properties
For viewing and editing properties of the selected car. Called from Properties on the Car context menu. See also About the
Properties Dialog.
Car properties are of two kinds: those associated with the general car type, and those of the individual car. For example, two
forty-foot wood boxcars are of the same car type -- have the same shape and appearance -- but differ in the numbers painted
on their sides.
In this dialog, you set properties of the individual car. You cannot change the car type -- if you have a boxcar and want a
flatcar instead, you have to delete the car and create a new one.
Dialog data:
images
Top and side images of the car type. The top image resizes with the dialog, side does
not. These images belong to the car collection and cannot be changed here. Images
are displayed in a car panel.
text
The block of text at the upper right includes car type name, collection name, AAR code,
class, class description, load information, and car notes if any.
Car ID
The identifier of the car. This appears on the car top when the Show Car IDs command
is used (see illustration below), and is also used in scripts to refer to this car. The initial
ID assigned to a car is a one-letter initial of the car class, followed by a number which
makes the label unique. You can change this to any short string, as long as it remains
unique.
Reverse Engine
[checkbox appears only if car is an engine] Check to flip the engine so it points in the
opposite direction. See discussion below.
car note
An optional string of information attached to the car. A car note may be used to keep
track of a car's home location, destination, reporting marks, etc.
Size
Size of the car, length x width as viewed from the top, in units selected in the dropdown. Changing the size in this dialog changes only the currently-selected car. To
change the size of all cars of this type, use the Car Collection Editor.
Units
Units for car size display. Units chosen in this drop-down will remain in effect
throughout the program until changed.
Load
Name of load assigned to car. Choose a different load by name from the drop-down, or
select Load Chooser from the topmost item. This item is dimmed if car is unloadable
(engine, tender, etc.)
Loaded
Check indicating whether car is loaded. Clicking this box changes the load status of the
car and updates the picture to show or hide the load. Checkbox is not shown if car is
unloadable.
Collection...
Click to view or edit the car type properties in the Car Collection Editor.
Reverse Engine
This property of an engine, if true, says the engine is to be pointing toward the back of the train. This is designed to allow
you to have back-to-back locomotives. For example, the second of the diesels in the train at left is marked as a Reverse
Engine:
Reverse engines are designed to be used in a train with other non-reverse engines. If a reverse engine sits by itself or is the
only engine in a train, then it drives backwards, i.e., moving the throttle forward will cause the engine to go in reverse, and
vice-versa.
The program automatically sets and unsets this property on coupling and uncoupling. For example, if you have two locos
sitting on a track, back to back, and you couple them together, then one will become a reverse engine.
Some car collections provide engines which are already pointed toward the back -- nose to the left in the side image -- as
shown by the two "-L" examples above right. You should NOT check the Reverse Engine box to use these. They already
behave like reverse engines even though they are not marked as such. This sounds confusing, but the behavior is
reasonable.
Car ID Display
It is often useful to see car identifiers on the layout. These can be
turned on and off for all or selected cars.
Note: this section has been updated for version 4.1.
Think of car id's as lighted signs on top of the cars. There are two
mechanisms for controlling them: (1) inside each car is a switch to
turn its own sign on and off, and (2) there is a master power switch to disable or enable all lighting. The idea is that you can
display id's on a set of cars of interest, and with one click, turn them on or off without losing the selection.
This model is in effect unless you are running an ops session, and color codes are on. In that case the program controls the
id display and overrides your settings.
Another feature affecting car id display is the option Turn off labels while moving in Train Preferences. This
causes id's to be suppressed when cars are moving, re-displayed when they stop. This applies both in and outside of ops.
The appearance of the id display can be customized. You can set font and background color in Train Preferences.
To turn id's on or off for specific cars:
1. Right-click a car and choose Show Car ID. This displays the id on the selected car, and turns on the master
switch if necessary so you can see it.
If the id is already showing, the command changes to Hide Car ID. Choose that to turn off the id.
2. To toggle id's for an entire train: right-click any car of the train and choose Train > Show Car IDs. This
changes to Train > Hide Car IDs if any car in the train is displaying an id.
To turn all car id's on or off (master switch):
1. Choose View > Car IDs from the main menu.
This is a toggle. If some id's are already showing, choose this command to turn them off. Choose it again to turn
them back on. This item is checkmarked on the menu so you can tell if the switch is on or off.
If you have not yet turned on id's for any cars or trains, then as a convenience, View > Car IDs turns them on
for all cars on the layout.
Car Collection Editors
The Car Collection Editor is for viewing and editing properties of car types within a collection. Also described on this page are the related dialogs Load Collection Editor and AAR Car Types.
To bring up the Car Collection Editor: (a) click the Collection button in Car Properties, or (b) in the Car Chooser, right-click a collection in the tree and choose Properties. This dialog has three
or four tabs. One has properties for the overall collection; others refer to a specific car type within it. The Load tab appears only when a loadable car is active.
Car Type Tab
This tab is for viewing and editing a single car type. It has VCR-style back/forward buttons to let you move to other types in the collection. The "current" type is the one on display in this tab. The
instructions in this section apply if you are building a car collection or adding a new type; for most collections, all the data is already filled in.
images
Resizable car panel showing side and top views. Drag the divider to enlarge one side.
Name
Name of the car type. Enter a short, descriptive name, suitable for display on the icon in the car chooser.
Class
General category of car. Choose one unless you are assigning an AAR code, in which case the class will be automatically set to
match the code. For more, see Car Classes below. To choose an AAR code from the dialog, select AAR Codes... -- the last
item on the drop-down menu.
Note: if you want a car of this type to have power, choose Diesel or Steam as its class.
AAR
A one- to three-letter code specifying the car type in detail. You can either type a code into this box, or choose from a list. See
AAR Codes.
Size
Dimensions of a car of this type -- length x width, as seen from above. Displayed in the units selected in the drop-down.
Units
Units for size values. If you change the units in this drop-down, the choice will apply throughout the program.
Show load
Check to have the load displayed in the car panel. Dimmed if car is not loadable. Note that in this dialog, the load you see is the
default load connected to the car type; if may not match the load of a car on the layout.
Arrows < >
Buttons for scrolling through the list of car types in the collection.
Index
Position of current car type within the collection. You can type a number in this box to go to a specific index.
Add
Click to add a new car type to the collection. See Adding a New Type below.
Delete
Click to delete the current car type from the collection.
Images Tab
This tab is for changing the side and/or top images for the current type. Each car type has two images: a top view and a side view. Each view is in a separate graphics file.
images
Resizable car panel showing side and top views
Side Image path
Image type
Path to the graphics file of the side image. To choose a different file, click Browse.
Image size type for the collection: small, medium, or large; see 50-pixel cars
Paint
Click to call up a paint program to edit the side image. See Editing Images.
Browse
Top image path
Choose
Click to call up a file dialog to select a side image file. Supported types are as listed in the drop-down -- bmp, jpg, gif, png.
Path to the graphics file of the top image. To choose a different file, click Browse.
Select a new top image from a chooser of available tops.
Paint
Click to call up a paint program to edit the top image. See Editing Images.
Browse
Click to call up a file dialog to select a top image file.
Note: CP car images are special cases in the Images tab. If a car type has a CP image, it is in a file with the same name and path as the top image, but with "_F" instead of "_t" at the end. If you want
to view the large image in Paint, make this change in the Top Image box and click Paint. But then be sure to click Cancel! You do not want either of the paths in this dialog to point to a _F file.
Collection Tab
This tab is for editing properties of the overall collection.
Name
Info
Path
Export
This can be any name you like, but best to keep it short.
Description and author. If the collection is of your own creation, include some information about it.
Full pathname to the xml file defining the collection. You cannot change the path in this dialog.
Copy collection data to output directory and prepare for publication; see Car Collection Publisher.
Load Tab
This tab gives properties of the default load for the car type, and access to adjustable parameters having to do with how loads sit in this type of car. Most of these parameters are new in Version 6.0, and
are intended for experts to fine-tune their loaded cars. These settings take effect immediately on the car images, so you can fool with them to see what effect they have, then Cancel if you did not intend
to make changes.
images
Resizable car panel showing side and top views
car type name
Default Load
Chooser
Load AAR
Name duplicated from Car Type tab
Name of load to fill this car by default, if no other has been defined. Drop-down gives list of load names suitable for this car type.
Click to bring up Load Chooser, where you can choose a new default load graphically instead of by name
List of AAR codes indicating cars which can accept this load; this duplicates what is seen in the Load Chooser
A text label "Closed Car" appears above the display frame when a car is classified as closed; see Types of Cars
Closed Car indicator
Display Length
Show load as text
Draw load in front
Floor Height
Insets
units
arrows
Percent of car length which can be occupied by load. For most cars, leave this as 0 (default) and loads will look ok; change to a smaller value if load images stick
out over the ends of the car. Applies to both top and side views.
Check means this car type is closed, and a graphical load image will not work; instead, display the load by name above the car. Applied by default to closed cars;
use this checkbox to override normal behavior for special cars.
Load image is to be displayed in front of car image. Use this for example in a barrel rack car, where there is one inner wall instead of two outer ones, and the load
shows visibly.
Height of car floor above ground; for positioning loads within gondolas or drop-bottom flats. Default of zero gives acceptable positioning in most cases.
Distance load should be inset from outer edges, in top view. These values represent the "wall thickness" of the car, ends x sides -- i.e., a larger value for the first
value will cause the load to sit less close to the end walls
Units apply to insets and floor height
Click to move through the collection, same as on the Car Type ta
Show load
Toggles display of load in the car panel
Adding a New Car Type
To add a new type to a collection, click the Add button on the Car Type tab. This creates a new undefined type and blanks the dialog for entry of data. To provide a complete definition, you will need to
enter data into both the Car Type and Images tabs.
Name
Class, AAR
Size, Units
Default Load
Provide a short, descriptive name of the new car type.
Choose a car class or an AAR code.
Specify the car size, length x width, in the selected units.
Choose a load to be the default for this car type.
The OK button remains dimmed until you have entered all the necessary information. On Cancel, the new type is discarded and no change is made to the collection.
AAR Car Types Dialog
An AAR code is a symbol for a specific type of car, as explained under AAR Codes. Every car and car type has one, whether assigned by the program or by you, as described here.
To assign an AAR code to a car type:
1. In the Class drop-down, choose the last item, "AAR Types List." This brings up the AAR types in a separate list window:
Each row has the AAR Code as defined in TrainPlayer, a description of the car type, the corresponding generic class, and the default load for the car type.
The class name varies depending on the setting in the drop-down at the bottom. The US version is shown in the screen shot; an alternate version is available for UK users. If you change the selection in
the drop-down, it will change the entries in the Class column, and whenever a car description appears in the program (on dialogs, tooltips, etc.), the name given in this column will be used. This choice
can also be made in Preferences -- see Car Defaults.
2. Click a row in the list window to select a type. This updates the AAR text in the Car Type tab.
Note: if you are in the Load Collection Editor, the code you select will be appended to the text in the AAR box (with comma) rather than replacing it.
3. Or: type a code directly into the AAR box. If the code is a valid one, the list window will scroll to that type.
The AAR Car Types window remains up as you browse through the car collection. To take it down, click the close box or OK button.
Load Collection Editor
The Load Collection Editor is very similar to the Car Collection Editor, and can be operated as described above. To bring up the Load Collection Editor, right-click a load image in the Load Chooser and
choose Properties.
The differences between the Load version and the Car Collection one are (a) some controls are removed from the former which do not apply to loads (Size, Units, Default Load, Show Load); (b) the AAR
box in the Load dialog contains a different kind of string, described below.
Load AAR Strings
What you see in the AAR box for a load definition is not a single code, but a list of codes indicating all car types suitable to carry the current load. For example, as shown above, a bulldozer can be
transported by a general-service flatcar (FM), or a well car (FW), or a solid-bottom gondola (GB).
A single-letter code represents all car types of the same class; for example, "G" means "all types starting with G." A minus sign before a code means "except this type;" for example, "F,-FA" means "all
types F except FA."
A letter in parentheses is a display code for modifying the appearance of the load. At the moment there is only one such code: "(S)" => "stretchable," meaning the load image is to be stretched
horizontally to cover the entire car top. Without this indicator, a load image is shown at its natural size, even if it is shorter than the car. Stretchable loads are those like coal or gravel, which look like
piles covering the whole car; unstretchable are those like bulldozers, which remain fixed size regardless of the size of the car.
You can use the AAR Car Types window to create a multi-code string. When you click a row in that window, it adds a comma and a new code to the string in the AAR box. For example, you can click
three rows in the AAR Car Types window (one at a time) and get a string like "FA,FB,FC."
The Car Inventory Bar
The Car Inventory Bar (CIB) replaces the old twelve-button car toolbar with a new docking, resizable, scrollable window where
you choose rolling stock to populate your layout. The window is a source of cars -- it shows a complete car collection, from which
you can drag any car type onto the track or into the train window. Initially, the collection shown in the CIB is the default set
associated with the layout, but you can choose any other set.
The CIB is one of two new control bars introduced in Version 5.2. The other is the Train Control Bar (TCB). Both use the same
train display window -- see Train Window.
To view the Car Inventory Bar:
(a) toggle using View > Windows > Car Inventory Bar from the
main menu. OR:
(b) in a track or train context menu, choose Add Car > By Name
(or Add Car Here > By Name). This brings up the CIB at the
bottom of the screen, along with a floating window called Car Types
showing the same collection as a list of names.
The header of the CIB window shows the name of the collection on display. The order in which cars are displayed in the CIB is by
car type. Engines are shown first, at the left, then passenger cars, then freight. You can hover over an image to see information
about it -- in a tooltip if those are enabled, otherwise on the status bar -- or right-click and choose Properties to get the full details.
Clicking a car type selects it -- gives it a pink underline, and highlights it in the Car Types window if visible.
Like the TCB, the Car Inventory Bar can be dragged by its header to undock or dock elsewhere, or it can be set up for auto-hide. It
has a horizontal scrollbar for viewing long trains. It can be resized vertically, and can show large-image (Chris Pedersen)
collections at any size up to full.
To add a car from the Car Inventory Bar:
(a) right-click a car image and choose Add Car; or double-click an image. This adds a car of the selected type to the current train
at the insert position -- the place where you see the orange pin in the train window. To change the insert position, click a different
spot in the train window.
(b) select the name in the Car Types list and click Add.
(c) press the image and drag. You can drag to:
(1) any point along any track, where the cursor changes to an arrow -- let go and a new car is created at that position. OR:
(2) the top of an existing train on the layout -- point to an end car or to a space between cars, where you see one or two red
highlights around the cars -- let go and a new car is created, attached to the indicated car(s). OR:
(3) a position in the train window. The orange pin moves as you drag -- let go and a new car is added at the pin position.
To display a different collection in the Car Inventory Bar:
Click the down arrow at the right end of the scrollbar. This brings up the CIB menu, with these choices:
(a) a list of all installed default collections -- choose one by name and it will fill the CIB window.
(b) Choose By Name -- brings up the Car Types list, so you can choose a car type by name.
(c) Car Chooser -- brings up the Car Chooser, where you can select an individual car type in the usual way, or you can select a
different collection to be displayed in the CIB. To select a collection, select its folder in the tree, then click OK to dismiss the
chooser.
Car Inventory Menu
Building Trains
In TrainPlayer, you can't modify the tracks on a layout, but you can equip it with the rolling stock of your choice.
This chapter tells how.
Selecting Cars and Trains
Adding Cars and Trains
Removing Cars and Trains
Relocating a Train
Naming Trains
Train Properties
Train Tree
Selecting Cars and Trains
If there are any trains on a layout, then one of them is always designated the "selected train." This is the one
●
●
●
●
which appears in the train window on the Control Panel or Train Control Bar
which is being controlled by the the panel or bar
which appears outlined or checked in the Train menu
which is the one affected by most of the commands under Train on the main menu
To select a train: (a) click any car in the train, (b) choose its name or picture from the Train menu, or (c)
click its name in the Train Tree.
At any given time there may be at most one "selected car" on the layout. If a car is selected:
●
●
●
●
●
a pink X is shown on the car top
an orange line is shown under the car in the Train Window
the uncoupling pin is positioned before or after the car
the Add Car command will deposit its new car at the pin position
Edit commands (cut, copy, delete) apply to the selected car
To select a car: (a) click its image on the layout, (b) click its icon in a train window, or (c) click its name in
the Train Tree. When you select a car, you also select its train.
To unselect: click a blank space on the layout, or the blank space behind the train in the train window.
Train Menu
To select a train on the layout, you can choose from either a normal text menu or a menu of pictures. These can be
annotated with the train and car identifiers if you choose.
The Train Menu appears when you click the down-arrow at the right in the train window, or choose Train >
Train Menu from the main menu. The currently-selected train is shown with a blue outline, or a checkmark if
you have a text-only menu. To select a train from the menu, just click its row.
To specify what the train menu should display, click Train Menu Settings... and see the following dialog.
(For information about the other menu item, see Train Control Bar Settings.)
Controls are:
Show on Menu
Text only
Show train names
Show car ID's
choose whether you want to see all the trains on the layout, or only those having
engines, or only those to which you have assigned non-default names
check if you want a normal text menu without pictures
check if you want train names displayed along with the pictures. The train name
is shown at top left of the picture. This option is disregarded if "Text only" is
checked.
check if you want each car to have its ID shown underneath (as in the picture
above). This option is disregarded if Text only is checked.
Note: trains do not have names until you provide them. Do not choose "Only named trains" or "Text only" unless
you have some named trains on the layout. Most of the ops-ready layouts you can download from your web
chooser have train names.
Settings you make in this dialog stay in effect until you change them again in this or another session.
Adding Cars and Trains
Building trains on your layout is a matter of choosing
the types of cars and locos you want, and placing
them on the track. The usual starting point is an
Add Car menu, as shown here =>
Accessing the Add Car menu
This menu provides ways of choosing the type of car
you want to add. It comes up when you:
●
●
●
right-click a track section and choose Add
Car Here. This deposits the chosen car
at the specified location on the track. Use
this to place the first car of a train, or to
deposit an isolated car.
right-click a train and choose Add Car.
This deposits the car in the clicked train at
the clicked position. Use this to add or insert
a car into an existing train.
choose Train > Add Car from the
main menu. This inserts the car into the
selected train at the position of the
uncoupling pin -- the orange spike in the train
window.
Reposition this pin by clicking in the train window or by selecting a different car.
Using the Add Car menu
On the Add Car menu, pick one:
●
●
●
By Name. This brings up both the
Car Inventory Bar and the Car Type
Names list box => showing the layout's
default car set. Choose a car type by
(a) clicking a name in the list box, or (b)
double-clicking an image in the car bar,
or (c) dragging an image from the car
bar onto the layout or the train window.
For more info, see Car Inventory Bar.
Car Chooser. This brings up the
Car Chooser, where you can browse
and select from the entire catalog of
cars and locos, including both ones locally installed and others downloadable from the web.
a class name. As a convenient shortcut, the menu lists a dozen standard car classes. Each retrieves
a car of that class from the default car set, if there is one. If there is more than one, the menu item gets you
the first one (in order as you browse through the collection).
Other methods of adding cars and trains
●
●
Choose New Locomotive
from the Train menu. This creates a new train consisting of a single
steam locomotive, and deposits it in an arbitrary location on the layout (actually, it goes on the lowestnumbered suitable straight track).
Choose New Train
from the Train menu. This is the same as New Locomotive, except that the
loco is followed by a tender, boxcar, and caboose.
If you are going to create more than one train using these commands, move each one away from its
starting position before adding another. Otherwise, they will land on the same track and obscure
each other.
●
Copy and paste. If there is a selected car, Edit Copy (or just Copy on a context menu) puts a copy of it
on the TrainPlayer clipboard. You can then select a different car in any train, and Edit Paste to deposit
the copied car behind the currently-selected one.
You can also copy and paste entire trains. If no car is selected (there is no pink underline in the
train window), then Edit Copy puts the complete train on the clipboard. You can then paste this into
a different layout, or paste another copy of the train in the current one.
You can paste either a car or a train to a specific point on the track. Right-click the track and
choose Paste Here.
●
Generate random
trains. When you choose the
Generate Random Trains
command on the Train menu, it
erases the current set of trains and
replaces it with a random collection
of cars and trains scattered around
the layout. You can control the
generation to some extent by
setting Train Preferences.
Removing Cars and Trains
To delete a train: right-click the train image or one of the train windows and choose Delete Train. The
train is permanently erased from the layout.
To delete a car do one of the following:
●
●
●
right-click the car image or icon in a train window and choose Delete Car
click to select the car image and press the Del key
select the car and choose Edit Cut or Edit Delete
All these actions are undoable.
Relocating a Train
Normally you place a train where you want it by driving it there. However, not all situations allow that, and
sometimes you find yourself wishing you could just reach out and pick the thing up off the track. TrainPlayer has a
couple of commands for this purpose: one moves a train from its current location to the spot of your choice, the
other turns a train around end for end.
To move a train to a specific location:
1. Select the train to be moved.
2. Position the cursor on the destination track, right-click and choose Place Train Here.
The train jumps immediately to an end of the specified track. If it lands pointing in the wrong direction, read on.
To reverse the direction a train is pointing:
1. Right-click the train on the layout or in a train window.
2. Choose Reverse Train.
The train picks itself up, rotates 180 degrees, and sets down again.
To move or copy a train to a different layout:
1.
2.
3.
4.
5.
Have the target layout open in a window on the screen.
Unselect the selected car, if any (see Selecting Cars and Trains).
Choose Edit Copy to copy or Edit Cut to move.
Click in the target layout to make it active.
Choose Edit Paste. The copied train is deposited at the normal new train location.
Naming Trains
On a real railroad, trains have names. You can name your trains in TrainPlayer, to aid in setting up switching
moves, identifying car and train locations and giving your railroad that prototype feel.
In earlier versions of the program, train names were provided automatically but could be overridden. This is no
longer the case. In 4.0, if you want trains to have names, you have to provide them yourself. There is some
complexity about what happens to a name during a series of moves, so we provide the details on this page.
Definitions
The standard AAR definition of a train is: one or more engines, with or without cars, displaying markers. A train
need not have cars coupled to the engine, but cars without an engine are not a train. Note that this is not the same
definition used elsewhere in TrainPlayer.
Two or more cars coupled together and not coupled to a train is a cut.
To name a train or cut:
You can name a train in either of two ways:
●
●
Right-click any car in a train or cut (either on the layout or in a train window) and choose Name. Enter a
name in the prompt dialog and click OK. The title of the dialog indicates whether you are naming a train or
a cut.
Or: Right-click a car, choose Properties, go to the Train tab and enter a name:
The name you supply may get passed around as cars are coupled or uncoupled. In general, for a train, the name
stays with the engine; for a cut, it applies to that specific set of cars, whenever they are coupled together (in any
order) and not coupled to any other cars. But there are other details to consider, as spelled out in the Naming
Rules below.
To see train naming in action
1. Name some trains and cuts on your layout.
2. Use View > Ops to bring up the Cars window.
3. If the window does not include the column "Train," right-click the grid, bring up the Field Chooser, and drag the
Train column onto the grid header. The train column shows the train name (if any) for every car.
4. Do some couplings and uncouplings. Note how train names change in the grid as you perform the moves.
Train Naming Rules
It is not really necessary for you to know the details of how names move around. Our goal is to retain any name
you provide, and make sure it shows up where you would expect. The particulars are as follows.
1.
When you first open a layout, any old style names from previous versions are erased.
2.
When you name a train, you are actually naming the engine.
3.
The name of a train does not change when cars are coupled to it or uncoupled from it.
4.
If all the cars are uncoupled from an engine, the engine retains the name of the train.
5.
Cuts of cars may be named in the same manner as trains. The name is specific to the cut of cars.
6.
If a named cut of cars is coupled to a named train, the train name is preserved.
7.
If a named cut is uncoupled from a train, its original name returns. This rule allows a train to move a cut of
cars around a yard without erasing the name of the cut.
8.
If a named cut is coupled to unnamed cars, the cut name is lost. It will come back if the named cut becomes
again isolated.
9.
If two named trains are coupled, the new train takes the name of the longer train. For example, if “Helper
2345” with one car is coupled to “The Denver Flyer” with ten cars, the resulting train is called “The Denver Flyer.”
10. When two named trains uncouple, each retains its original name. Thus, when “Helper 2345” uncouples from
“The Denver Flyer,” its name returns.
11. Copying and pasting a named train or named cut produces a named train or cut whose name is the original
name plus a number. Copying and pasting “The Denver Flyer” gives you “The Denver Flyer1.” However, if you cut
and paste, the name does not change.
Train Properties
Properties of the selected train. Called from Properties on the Train context menu. See also About the Properties
Dialog.
Dialog controls:
Shows side view of the train.
image
If the train is too long to fit in the window, you can
enlarge the dialog. This train window is mainly for
display but is partly interactive -- you can select a
car by clicking, or access its car menu by rightclicking.
The train's name, used to identify it in the Train
Tree, on the Train menu, and in scripts.
Name
The initial name assigned to a train is blank; for
display purposes, a blank name is usually shown as
"Train<id>" with the current ID of the train. Once
you assign a name, it stays with the engine as the
train consist changes. For more information, see
Naming Trains.
Choose the sound to be generated by this train
when pressing the Horn button on the control panel
or using Sound Horn from the Train menu.
Horn
Running
Choose one of the four built-in loco sounds, or
choose Other to bring up the Sound Chooser. The
sound you select for this train will remain attached to
the engine if the train consist changes.
Choose the sound to be generated by this train
whenever it is moving. Sounds vary depending on
speed. Default is either Steam or Diesel, depending
on the train's engine type.
For more information, see Running Sounds.
Default Car Collection
The car collection to be available on menus and
toolbar when this layout is active.
For more information, see Default Car Sets.
The Train Tree
The Train Tree is a standard Windows tree control useful for surveying and navigating your rolling stock. It displays car ID's and train
names. For example:
A train having a script attached to it is shown with (s) in the tree.
This tree shows that the Jersey Valley Central has four trains: two freights and two strings of boxcars.
To use the Train Tree:
●
●
Click to select a train and/or car. If you click a train name, it selects the train and makes it active. If you click a car
name, it selects both the train and the car.
Right-click a car or train and choose an action from the context menu. The context menu is the
same as the one you get when you right-click a car in a train window or on the layout:
Note: as soon as you right-click a car or train in the tree, it becomes the selected car or train.
●
Use up/down arrow keys to navigate the tree. As you move to a car or train, it becomes selected.
Stations and Industries
In TrainPlayer, as in your basement, it's fun to watch a train run around a loop of track. In the real world, that's not
what they do. In that world, a train moves from one place to another -- between cities, industries, yards, freight
houses -- and the places have names, which show up on maps, schedules, and work orders.
Model railroads have place names too. Linn Westcott's layouts are dotted with colorful names -- Port Stillwater,
Swampside, Dead Horse Gulch. At any given time, a train is in, near, or en route to one of these places, and
its location is most conveniently reported by name.
In TrainPlayer, a named location is called a station. It is defined by a name, one or more sections of track, and a
rectangular area. With this information, the program can detect when a train enters or leaves a station, and can use
this to report to you about train locations.
With the introduction of ops, stations take on more significance. They not only have names, they have functions -reasons a train would stop there. Some stations are industries, where goods are shipped or received -- the
definition of an industry includes lists of incoming and outgoing loads -- some are yards or interchanges, where
cars are collected or exchanged during operations.
You can create stations and industries on your layout as described in this chapter. Or you can take one of a couple
of shortcuts: (a) let the program generate them for you automatically (see Ops Setup Wizard), or (b) open an opsready layout, which already has them all set up (see Ops Quick Start). In any case, you might want to skim this
chapter to familiarize yourself with the various parts.
This chapter also includes instructions for using the Route Finder, a device for finding track paths from one location
to another.
Stations
Industries
Yards and Interchanges
Station Properties
Industry Browser
Route Finder
Stations
In TrainPlayer, a "station" is a named location on the layout. It may represent a terminal, loading dock, warehouse, yard,
city, or any place a train might stop to interchange passengers or goods. By defining stations on the layout, you give the
program a way to keep track of where a train has travelled.
Two new types of station have been introduced as part of the Ops system: yards and interchanges. These are used as
areas for storing, exchanging, and manipulating cars when shipping and receiving goods. These types of stations -- called
yard-style -- have somewhat different properties and methods of creation than normal stations, as detailed below.
A station is represented on the layout as a rectangular area, with a dashed blue outline and one or two lines of text.
Stations are visible only at certain times: (a) when you are using the Station tool, (b) when you choose View Stations, or (c)
when you are working in an ops session.
Stations may have sounds attached to them. The sound will play whenever a train goes through the station. Available
sounds include farm noises, traffic, crossing bells, running water, and many others, or you can supply your own.
Many of the layouts available in TrainPlayer are equipped with stations. The ops version provides a generator which can
create them automatically. If neither of those helps, this section describes how to create or edit your own stations by hand.
About arrivals and departures
The point of a station is to let the program know where a car is located, so it is useful to understand how it determines that.
Associated with each station is one or more track sections. (You can see these by hovering over a station edge using the
Station tool.) For a car to be in a station, it must be on one of these track sections. At a normal station, the car must also
be sitting completely or partially within the station rectangle; at a yard-style station, this is not required.
A car arrives at a normal station when it (a) is on one of the station's tracks, and (b) crosses the rectangular boundary. It
arrives at a yard-style station when it moves onto any of the station's tracks. It departs when these conditions are no
longer met.
A train arrives at a station when its lead car moves into the station. It departs when its last car leaves.
A car is considered to be in a station when it meets the above requirements. It is at a station when any car of the same
train is in the station.
Creating a Station
1. Click to select the Station tool
on the main toolbar, or choose Tools Stations. If there are stations defined on the
layout, selecting this tool causes them to become visible as dashed blue rectangles with names:
2. To create a new station: press and drag to form a rectangle around the desired station area. This must enclose some
section of track, or it will be disregarded.
3. When you release the mouse button, the Station Properties dialog comes up so you can supply a name and other
information for the new station. Enter a name and click OK, or click Cancel to abort creating the station.
Creating a Yard-StyleStation
These instructions are for creating either a yard or an interchange.
1. Click to select the Edit tool
. You do not use the Station tool to create this type of station.
2. Select the track sections you want to make up the yard or interchange. Hold down the Shift key, then click each section
and it will add to the selection. Or, you can drag a rectangle around an area to select all tracks in it, or shift-drag to add the
enclosed tracks to the previous selection. To remove a section from the selected set, shift-click it.
If you are creating an interchange, the sections you select should form a single length of track ending in a stub.
3. When all the tracks you want are selected (blue), right-click any of them and choose Selection To Station.
This creates the station and attaches the selected tracks, then brings up Station Properties so you can supply a name. A
default name is offered, starting with "Yard." If you are creating an interchange, change the name to "Interchange."
4. While the properties dialog is up, choose the appropriate "industry." Click Choose Industry. This brings up the
Industry Browser dialog. In the folder "Miscellaneous," choose either Yard Tracks or Interchange.
5. Click OK to dismiss the dialog. The new station is shown with a big rectangle completely surrounding the set of tracks.
(Don't worry about the size of this rectangle -- it is not used to detect car arrivals and departures. See below.)
6. Check your work. Choose the Station tool, then hover over an edge of the rectangle. The tracks associated with the
station will highlight in green, as shown above right.
To modify a station:
To change a station's name: position the cursor on one edge of the station's rectangle so it highlights, right-click and
choose Station Properties. You are prompted to enter a new name.
To change size, shape, or position: position at a side or corner of a station, then press and drag.
To delete a station:
Position the cursor on one edge of the station's rectangle so it highlights, then press the Del key.
To define a sound at a station:
Right-click the station and choose Station Properties. Click the browser button (...), and you are presented with the Sound
Chooser dialog.
Choose a sound from the list. Click the preview window to hear the sound. If you like it, click OK and it will become the
station sound, played once whenever a train arrives at the station.
Industries
Industries give your railroad a purpose. By defining industries in conjunction with the load system, you specify what sorts of goods
are to be transported, from where to where, and by what means.
About Industries
An industry in TrainPlayer is defined as a place where goods are exchanged -- where cars are loaded and/or unloaded. Industry
properties include a name, a location, and two lists of load types, incoming and outgoing. The loads define what car types are
required to haul them.
Industries are different from other TrainPlayer objects -- they do not have icons and are not selected from a chooser or
downloaded from the web. We do provide a list you can choose from, but it is mainly designed to give you ideas and templates
you can modify. Most industries are created by you, for your railroad, to suit your needs and designs.
The location of an industry is specified by attaching it to a station, a named area on the track. A single industry can span several
stations, each with its own list of incoming and outgoing loads. For example, a manufacturing industry might have two stations: a
factory siding where raw materials arrive in hoppers, and a loading platform where finished goods go out in boxcars.
Creating An Industry
Here are the general steps for creating an industry on your layout.
1. Decide where load exchange will take place.
You will need a single section of track where cars must sit to be loaded or unloaded. The length should suit the industry and the
expected traffic.
Only one station may occupy a single section of track. If you plan to have two stations for one industry (such as shipping and
receiving), you have to place each station on a separate track section. To isolate this, you may have to chop or redraw a longer
section (see Isolating Track). Note: If you are using a plan imported from AnyRail, it may be necessary to redraw several of the
short segments that AnyRail creates in order to make one section long enough for the station.
2. Create a station there.
Activate the Station tool . Press and drag a small rectangle so it highlights just the loading track, then let go. The Station
Properties dialog appears
3. Enter station properties.
Enter a station name and optional sound. Note that we now have a large collection of industrial sounds in the Web chooser under
Layouts. A sound selected for a station will play when a train first crosses the station boundary.
Name the station in a way that describes the location. The name must be unique for the layout. This name will show up in
messages like "Train 5 arriving at <station name>."
4. Choose or enter industry properties.
The bottom half of the dialog is where you define the industry and specify incoming and outgoing loads at this station. You can
choose a predefined one from the Industry Browser, or just type in an industry name and some load names.
5. Click OK.
The program then checks the data you entered, and if valid, copies it to the selected station. If the data is invalid or incomplete,
you will be prompted to fix it. If the incoming or outgoing lists contain load names not known to the system, you will be asked to
define them in the next step.
6. Define unknown loads.
Unknown loads are presented in the Load Definition Dialog, where you can fix mistyped names or define new ones. Loads you
create here are added to the "closed-car loads" folder in the Loads collection. If you prefer to create a visual load for an open car,
follow the procedure below (insert link here)
7. Save the layout.
The modified station properties are not saved to disk until you save the layout.
Load car type overrides
This is an expert feature which allows more flexibility in waybill and switchlist generations. Here's how it works. Associated with
each industry is a list of incoming and outgoing loads. Each load is associated with one or more car types which can carry that
load. The feature allows you to override this default list of car types for a load, and instead specify a particular car type to carry
that load to or from that industry.
For example, at the industry Feed Mill, one of the incoming loads is Corn. This load is listed as being transportable by car types
"LO,XM,H" -- covered hopper, general-purpose boxcar, or hopper. Say your feed mill is only equipped with a loader which
handles open hoppers and not closed cars. In this case you could override the load Corn in the list for Feed Mill to say "H" only,
meaning that the ops generator will not assign a waybill to carry corn in open hoppers only and not any other type of car.
To specify the override, you must edit the item in the industry load list and add one or more car types (AAR codes) in square
brackets. In the above example, the line saying "corn" in the incoming load list must be changed to say "corn [H]." The string
within the brackets may be a single AAR code, or several of them separated by commas. This override code is displayed in the
industry load list and also in any generated waybill which refers to it.
Override codes may be specified for industries on the layout (in the top portion of the Industry Browser), or for any of the standard
industries in the lower portion. In the latter case, they will apply to any new industry of that type. For example, you can modify
Feed Mill so that it includes "corn [H]", and this will then apply to any feed mill you create.
Yard and Interchanges
In the pre-ops version of TrainPlayer, you could select a region of track and give it a name, and the result was
called a "station." It was used for a few minor purposes, such as reporting arrivals and departures of trains.
In the ops version, stations play a larger role, and it was necessary to define a couple of new types -- yards and
interchanges -- to serve special purposes. It was also necessary to enhance the tools so that these new types
could be created. This section gives an overview of the new types; more information can be found under Stations.
Yards
A yard is an area of track where cars are stored until needed, and where trains are made up or broken down. Most
are easy to recognize --- designed to fit as many cars as possible into a small area, they usually consist of parallel
tracks about a car width apart.
Ops requires yards. They serve as sources of empty cars to be sent to industries, and as off-the-mainline areas
where switchers can gather cars and assemble them into trains ready to go out on the line. On model railroads,
they serve as places to stash all that rolling stock you've accumulated over time.
Interchanges
An interchange is a length of track where cars are exchanged with another railroad. If a model railroad covers
some region, then the interchange is the place where that region connects by rail with the outside world. It is
usually a length of track sufficient to hold several cars, ending in a stub, often near the outer edge of the layout.
The interchange is an important component in ops. When an industry on the layout ships out goods, they are
usually destined for some market out beyond the layout area -- otherwise they would be shipped by truck. Your job
as the operator of the local railroad is to set them out on the interchange, where someone else's long-distance
hauler will pick them up and get them to market.
On a model railroad, there is probably no other railroad -- it's likely nobody is actually going to come by and pick up
the cars you set out -- and the interchange is basically symbolic. Put cars there and your job is done. Come back
the next day and find returned empties or incoming loads to be delivered locally. What happens in between is up to
your imagination.
Yard-Style Stations
Both yards and interchanges are examples of a new type of station called yard-style. Yard-style stations differ
from normal stations in both the method of creation and the behavior of arrivals and departures.
A normal station is created by dragging a rectangle over one or more sections of track. The resulting rectangle
defines the station region -- a car is in the station if any part of it is sitting inside the rectangle.
A yard-style station is defined not by a rectangle but by a set of track sections. A car is in a yard-style station if it is
sitting on any of the sections in the set. To define a yard-style station, you click and shift-click to select tracks one
at a time, then use a menu command to create the station and associate it with the tracks. For details and screen
shots, see Stations.
How To Create a Yard or Interchange
There are three general ways to add yards and interchanges to a layout:
●
●
Don't. Start with one of the ops-ready layouts in the web collection, which already have yards and
interchanges defined. See Ops Quick Start.
Let the program do it. The Yard Finder and Interchange Generator can start with any layout having
●
track, recognize certain track patterns, and automatically create yards and interchanges. For details of how
these work, see Yard Finder and Interchange Generator. For instructions on how to use them, see Ops
Setup Wizard.
Create them by hand. Draw the track, select an appropriate set of them, use a menu command to
convert the set to a yard-style station, then select the appropriate "industry" to identify as yard vs.
interchange. Full details of the procedure are given under Stations.
Station Properties
The Station Properties dialog is where you define a station and optionally its industry. To bring it up, (a) activate the Station tool so that stations are
visible, (b) right-click a station border and choose Properties. The data you see and edit here applies to the selected station.
Dialog controls:
Station Name: A name to identify the track location.
You can give a station any name you like, but it must be unique on this layout; if not, you will be alerted on clicking OK. For operational purposes, it
should be. For example, at an industry with multiple stations, you might want to use “Acme Powder – Door 1” or “Baker and Co. Loading:” The station
name is used for reporting car and train locations
Sound: Sound to be played when a train enters the station area.
To choose a sound, click the Browse button to call up the Sound Chooser. To remove the sound, erase the contents of the edit box.
Industry Name: Name of the industry at this station, if any.
If goods are to be exchanged at this station, then it must have a non-blank industry name and at least one incoming or outgoing load. Normally the
industry name is that of a firm where goods are shipped and received, but it might also be the name of an interchange, dock, storage location, etc. -whatever name goes on the paperwork.
The industry name does not have to be unique -- more than one station can attach to the same industry. Once you define an industry at one station, it
goes on the list so you can choose it at the others. To continue the example from above, all of the stations associated with “Acme Powder” will have the
same industry name, although each has a unique station name.
Choose Industry... Brings up the Industry Browser for browsing pre-defined industries.
For convenience when defining industries, we have assembled a collection of standard types with typical load lists. You can browse these in the
Industry Browser, which shows the standard types along with all the industries defined on the current layout, plus any types you might have added to the
collection yourself.
When you make a selection from the Browser, it fills the industry-related fields of the current dialog. You can then edit these to suit the industry you are
defining.
Incoming/Outgoing Loads: Types of load arriving at / shipping from this station.
The load list windows are simple text boxes. You can type in load names, delete existing ones, copy and paste, etc. Load names may be entered on
separate lines (the Enter key works safely in these boxes) or as comma-delimited lines with multiple names per line ("coal,oil,fuel"). It will probably be
easier to read if you list each load on a separate line.
If you enter a name not known in the master load list, it will be brought to your attention when you click OK, and you will be given a chance to add it to the
master list. How this works is described below.
Instead of (or in addition to) typing load names, you may choose incoming/outgoing loads from the Load Chooser, as follows.
Choose Loads... Brings up the Load Chooser for selecting incoming and outgoing loads.
The Load Chooser gives you browsable access to the entire collection of loads on your machine and on the web. When the Load Chooser is called up
from incoming/outgoing text boxes, it arranges itself so the two windows are side by side, and operates by drag-and-drop. You select a load in the
chooser window, drag it to either the Incoming or Outgoing Loads box, and it adds the load name to the list. The chooser window remains up so that you
can do this repeatedly.
Or, instead of drag-and-drop, you can select a load and click OK. This will dismiss the chooser, and add the load to either the Incoming or Outgoing box,
whichever most recently had the focus.
OK: validates, saves changes and dismisses the dialog.
When you click OK, the data are checked for validity before the dialog is dismissed. If the station name is blank or a duplicate of an existing station, you
are alerted and prevented from proceeding. If any of the load names in either list box is not found in the loads collection, you are presented with the
Load Definition Dialog which offers to create new loads for you.
Changes made in the Station Properties dialog apply to the selected station. They are not actually saved on disk until you save the layout.
Cancel: discards changes and dismisses the dialog.
No warning is given if you made changes and are about to discard them.
Industry Browser Dialog
The Industry Browser is a dialog for viewing and managing a list of templates you can use to create your own industries.
The initial list comes from the factory, and includes over fifty types of railroad-oriented industry with typical lists of incoming and outgoing
loads, grouped into a half dozen convenient folders. A special additional folder shows the set of industries currently defined on the layout.
The list will expand if you choose to add templates of your own.
Structured display of the list is made possible by a new grid control. In this grid, you can choose, organize, and group columns as you see
fit. The same type of grid is the basis of the Ops Windows, and details of its operation are described there.
At the bottom of the control is a panel displaying the details of the current selection, dimmed by default to prevent accidental editing. Click
Edit, and this panel works pretty much the same as the corresponding set of boxes in Station Properties.
Controls in this dialog:
Grid control: foldered grid display of the industry template list. Most of the operation of the grid is done via the context menu
(below), but other operations are possible:
●
●
●
To change column width, horizontally drag the divider between two column headers.
To reorder columns, press a column header button, drag and drop to the left or right of another header button.
To expand or collapse folders (groups): click the +/- sign at the left end of the folder (group) row.
Grid context menu: grid control and list management commands. Right-click a row to see
the menu.
Commands are:
Add New: create a new, empty row in the same folder as the selection. Choosing this command
creates a new industry with a generic name and empty load lists, then activates it for editing. When
you are finished editing the new entry, validate and commit the changes by clicking OK or selecting a
different record in the list.
Duplicate: create a new industry with the same properties as the selection, except for the name,
which is modified to become unique. Duplicate works like Add New, except that it copies data into the new record . Of course, the new
row can be edited as required.
Delete: delete the selected industry from the list. You are prompted to confirm before deleting.
Note: The above commands are dimmed if the selected row is an industry in the current layout folder. These can only be edited in
Station Properties on the corresponding stations.
Expand All Items: show all rows within each folder. All rows are expanded by default when the dialog comes up. (Note that
"within each folder" may not be the right wording if you have grouped the grid on some other field.)
Collapse All Items: collapse all folder contents and show only folder names. Folders can then be expanded one by one.
Field Chooser: display a popup window containing a button for each column not already visible in the grid. To add one of these to
the grid, drag it from the Field Chooser to the desired spot on the grid header. To remove a column from the grid, drag it off the grid
header; it will automatically move into the Field Chooser.
"Group By" Box: display a panel at the top of the grid for grouping by selected columns. When the Group By box is visible, drag
column headers into and out of it to specify how you want the grid rows to be grouped. By default the rows are grouped by Folder. Other
groupings are not very meaningful in the Industry Browser, but feel free to experiment.
Column Auto-Resize: specifies whether columns resize proportionally as the window is resized. By default this is on. If you turn
it off, resizing the window will not affect column widths.
Selected Industry: panel of details for the selected row. Not editable unless you click Edit. When editing, most of the operation
is the same as described under Station Properties.
Name: name of the selected industry.
Folder: folder containing the selected industry. This is read-only under all circumstances; you cannot change the folder of an existing
entry -- you must delete and re-create in a different folder.
Loads Incoming/Outgoing: load lists for the selected industry. These boxes work as described under Station Properties.
Browse (...) button: brings up the Load Chooser for selecting incoming/outgoing loads.
Edit button: unlock selection to allow editing. This button is dimmed if the selection is in the local layout folder; local industry
definitions can only be edited in Station Properties. Clicking Edit activates the name and load boxes so you can modify their contents. To
validate and commit the changes, click OK or select a different record in the list.
OK: validate, save changes and dismiss dialog. The same validations apply as in Station Properties. If you click OK, you save all the
changes you have made to the industry list.
Cancel: discard changes and dismiss dialog. All changes made to the list are discarded, not just those on the current record.
Help: Brings up the appropriate Help page.
Route Finder
If the switchlist tells you to deliver a string of hoppers to Punky Junction, the first thing you'll need to know is how to get there. Even on
a small layout, it's not always easy to figure this out. That's why we developed the Route Finder, a device which calculates all possible
routes between two points and displays them interactively so you can choose one.
To use, select the Route Finder menu command or click the Find Routes toolbar button. You see this dialog:
To operate:
1. In the “From” and “To” boxes, select the endpoints of the route you want to find. For each end, you can select either a station by
name or a junction by number, using drop-down menus.
If you select a station, the route will go to or from the junction nearest the center of the station rectangle. As soon as you have made
choices for both ends, the dialog will display the distance a crow would fly between the two points, expressed in actual feet and inches.
2. Click Go. The program begins finding routes, and displays a new row in the list for each one it finds. The information shown for
each route is:
●
●
Name: an arbitrary but unique name assigned to the route.
From, To: endpoints as chosen in step 1, same for every row.
●
●
●
●
●
●
Via: a list of the stations the route passes through on its way.
Length: total length by rail of the route. To change the units of measure, select from a Units drop-down in some dialog which
has one (e.g., Layout Properties).
Switches: number of switches the route passes through.
Turns: number of junctions where the train is going to have to reverse direction along the route.
Overlap: a measure of similarity between this route and some other route, in percent. For example, a value of 50 means that
exactly half the track on this route is the same as on some other route.
Switches: a list of junction numbers along the route where switches are located.
3. If the resulting list is too long, click the Filter button to bring up the Route Finder Filters dialog:
Here you can trim down the number of results by eliminating those which are too long, or have too many switches or turns, or which
overlap too much with another route. Changing the settings does not require a new route calculation; the list is filtered instantly.
Using the filters shown above, we reduce the 29 routes in the first figure to a more manageable list:
4. Click a row in the list and the corresponding route is highlighted in pink on the layout, like this:
At the moment this is as far as you can go with this tool. Routes are not saved anywhere or used by the ops generators. In a future
version we may make further use of this tool.
NOTE: The Route Finder does not find the shortest or most efficient or most logistically effective route for you. It finds ALL possible
routes (subject to filters that you set). The selection of the BEST route is up to you and depends on a number of factors in each
session.
Operations
The TrainPlayer Operations System (Ops) was developed to answer the question you might find yourself asking
after you've opened a layout and run the trains around a while -- "Now what?"
On a real railroad, you would report to the yard first thing in the morning, punch in, get your work orders from the
dispatcher, climb into your cab, and head out to make money for the railroad. On a club layout, it's the same idea
except for the early-morning and the money parts. But if you're an old guy sitting in front of a computer all by
yourself, there's nobody to tell you what to do -- you have to just make it up as you go along. Until now, that is. Meet
your new dispatcher: TrainPlayer Ops.
There is a lot of reading matter on this subject. If you're not into reading, skip to the Quick Start. Otherwise glance
through the chapter and see what you're in for.
About Ops
How To Use Ops
Switchlists
Waybills
Ops Generators
Ops Windows
Ops Setup Wizard
About Ops
TrainPlayer Ops is a set of features designed to give you a feel for real-world for-profit railroading. It means moving goods by rail between shippers and
receivers on and off the layout. Industries issue the shipping orders; the railroad carries them out; money changes hands.
You and TrainPlayer work together to carry out this simulation. Your role is like that of a club member. Once a week you and the boys go over to Joe's
basement for an operating session. As you walk in, Joe hands you the controls for a locomotive and a stack of cards detailing this week's deliveries.
"Tonight you run the AB Local, serving A and B and points between. Pick up two tankers of milk at the A Dairy, a hopper of coal from the AA mine, set them
out on the interchange at B. Return empties to A." Your job is to plan your approach, start your engine, and get the cars where they need to go, preferably
before everyone else is done and the cookies are all gone.
TrainPlayer plays the role of Joe. It provides the layout, track, trains, industries, and random sets of shipping orders -- everything but the cookies.
Ops Components
An operating session in TrainPlayer is represented by a switchlist, a set of instructions telling you to move a given set of cars to given destinations. The
program generates a switchlist, and you deliver the cars as instructed. When you're finished, you can toss the switchlist and generate a new one, or rewind
and work the same one again.
The switchlist generator starts by creating a random set of waybills -- orders to ship or receive goods -- for the industries on the layout. It then randomly
assigns cars to carry the goods, and determines whether each car is to be loaded or empty, based on its current location. The results are presented as a
set of lines in a text window and a set of rows in an ops window, a new type of interactive grid window. You can use either or both as your work orders.
The text presentation is more readable, the grid more interactive.
A lot of data is required for this process. Each industry ships and receives particular types of goods; each car is capable of carrying specific types of load.
This information comes from databases provided by the program but modifiable and extendable by you. In generating a switchlist, the program has to make
sure the cars, loads, and industries match -- for example, you will not be told to deliver a flatcar of logs to a dairy or an empty coal hopper to a lumber mill.
Ops Reading Matter
There is a lot of gadgetry associated with Ops. Practically everything mentioned above is new in Version 4.0 -- industries, car loads, switchlists, waybills -along with new ops-related menus, toolbars, interactive display windows, and internal computational devices. You don't need to master all this, but if you
care to read about it, here is a handy guide to the various parts. If not, skip it and go to the next section, How To Use Ops.
Concepts
Car Loads
goods you can transport in cars
Industries
locations where goods are shipped or received
Yards
locations where cars are stored and assembled into trains
Interchanges
locations where cars are exchanged with other railroads
Waybills
orders to ship or receive goods at an industry
Switchlists
sets of instructions for picking up and delivering cars
Generators
internal devices for creating random ops sessions
Devices
Ops Windows
tables of data about cars and switchlists
Ops Setup Wizard
step-by-step procedure to prepare a layout for ops
Ops Toolbar
buttons for quick access to ops commands
Switchlist Window
docking grid window showing current switchlist
Cars Window
docking grid window showing layout car inventory
Schedule Window
window showing textual switchlist instructions
Route Finder
dialog for identifying track routes between given points
Color Codes
colored cues for visualizing car moves
Ops Limitations
In the current version, Ops supports only freight traffic, not passenger -- the two types of activity are just too different to be handled by a single scheme. We
plan to support passenger ops in a future version.
Another limitation at present is that Ops will not extend beyond a single layout -- if you work with linked layouts, watch for them to be supported in a future
release.
Ops Setup Case Study
To make all this a little more real, let's take a look at what it would take to set up a small layout for some operation. For this example we'll use a slightlymodified version of the Lime Ridge, Hercules & Portland RR (#30 in 101 Track Plans). It's a simple, roomy layout with nice Westcott artwork suggesting
an operational theme similar to the following.
The LRH&P is a branch line which services the Hercules Cement Co, located in the countryside near a limestone quarry. Hoppers deliver stone from the
quarry to the kiln, where cement is produced and dumped into gondolas for the short trip to the main plant. There it is bagged and set out on the loading
dock, to be transported in boxcars to an interchange with the main line to Portland. We modified the original design by adding a branch along the south
edge to represent this interchange.
The first step in setting up for operation is to define the load/unload locations. This is done with the Station tool. In the above screen shot we added the four
stations where goods will be exchanged: at the quarry, next to the kiln, by the main plant, and at the interchange.
Now we establish the industries. One way to do this is to use the Industry Browser to see if a suitable one is already available. In this case we are in luck -there is a Cement industry in the Mining section, showing typical in and out loads for this type of industry. It doesn't quite work for our purposes, but we can
use it for reference.
To define an industry, we need to specify the incoming and outgoing loads at each station. The quarry will ship out limestone, the kiln will take in limestone
and ship out cement, the plant will take in raw cement and ship out bags. (We will also need coal or fuel and chemical agents for the factory, but let's keep
it simple.) To input this information, we go to each station, right-click and bring up Station Properties, and fill in the Industry section of the dialog. There are
few restrictions here -- we can pretty much just make up stuff and type it in -- and choosers are available to help. The error-checking routines built into the
program will help in correcting any mistakes or omissions.
Some of the loads we need are already available in the Loads collection, but most are not. For example, there is no load called "bags of cement." To
handle this, while defining the industry, the program calls up the Load Definition dialog to prompt for the one piece of information it needs about this load:
the car type required to carry it. We give it an X for boxcar, and a new load is added to the list. We can now load any boxcar with it, and it shows up as
"bags of cement" on top of the car icon.
The last step is to populate the layout with appropriate cars. There is no automatic way to do this. If necessary, you can consult the properties of each
load to find out what car types it requires. In our case, we already know we need hoppers, gondolas, and boxcars, because we just finished setting it up this
way. Once you select the car types, place the cars in the yard, at the interchange and at some of the industry spots.
Then what? We have industries to ship and receive goods, and cars to carry them, and we're ready for some work orders. The next step is to Generate
Ops, as explained in How To Use Ops.
How To Use Ops
Before you can operate a layout, it needs to be equipped with stations, industries, and freight cars. The fastest way to get started is to use one of the hundreds of layouts already
equipped, as described in Quick Start. The next fastest is to let the program create you a random setup, using the Ops Setup Wizard, as described in Slightly Less Quick Start. Or, in
the likely event you are a do-it-yourselfer, there is Manual Setup.
Once the layout is ready for ops, then each time you are ready for a new session, just click Generate Ops on the Ops Toolbar. This generates a new switchlist, displays it in the ops
windows, and turns on color coding and car labels for the stations and cars involved. Your job is then to carry out the moves, as described in How to Work a Switchlist.
Ops Quick Start
1. Open a layout ready for ops. You can find one in your web chooser by looking for "Y" in the Ops column at the right:
Note: practically all of the 101 Track Plans are ops-ready, as is the entire Demo folder, and many from the Standard and Premium sets.
2. Choose Tools > Ops > Generate Ops or click the
button on the Ops Toolbar.
That's it. You get a switchlist, ready to execute. If you can make sense of what you see on the screen, you're good to go.
Ops Slightly Less Quick Start
1. Open any layout. Add some engines and freight cars if it doesn't have any.
2. Choose Tools > Ops > Generate Ops or click
on the toolbar.
When the Ops Generator finds an unprepared layout, it brings up the Ops Setup Wizard. Here you go through the steps to set up your layout and set some ops generation
preferences. The last step generates a switchlist, and brings you to the same state as Quick Start above -- ready to start delivering cars.
Ops Manual Setup
Here's what it takes to prepare a layout.
Get the trains ready. You will need freight cars and engines. If your layout doesn't already have some, create them. If you are starting with bare track and aren't too picky about
what you get, you might try the Random Train Generator.
Get the track ready. For best results you will need a yard or two and an interchange track. You can create these by hand, or let the Ops Setup Wizard do the job automatically.
For more information, see Yards and Interchanges.
Create some industries. You will need stations around the layout with industries defined for them. Again, you can create them by hand or let the Wizard do it. For more, see
Industries.
It is up to you to make sure that the industries on the layout can be serviced by the available cars. If your layout has a coal mine, you should have some hoppers somewhere.
Ops Toolbar
Access to Ops is through the Tools > Ops menu (at right) or the Ops Toolbar:
What these commands do:
Generate Ops. Creates a random switchlist. If the layout is not equipped with stations and industries, calls
up the Ops Setup Wizard.
Rewind Ops. Allows you to start the same operating session over. Rewinds the position of all trains and cars to the beginning of the session. This is useful if you want to
better your time or try new methods or if you made a mistake.
Clear Ops. Erases the current Ops session and clears all windows.
Route Finder. Finds all track paths between any given pair of junctions or stations. Brings up a dialog where you choose locations and view results. See Route Finder.
Ops Setup Wizard. Leads you through a step-by-step procedure for setting up your layout and generating a switchlist. The wizard covers all the major steps, one by one,
with explanations and choices along the way. See Ops Setup Wizard.
View Operations. Shows or hides the Ops Windows, a set of docking windows which come up automatically when you generate a session. This command is a toggle to
show or hide them all at once.
View Color Codes. (Not available on toolbar) Shows or hides color blocks on car tops and stations. See Color Codes.
Note: Most ops commands will make modifications to your layout. You might want to use File > Save As to make a copy before you start using these commands.
Switchlists
A switchlist is a set of instructions for moving cars. Each instruction refers to a single car, tells where it is to go and what load to carry if any. The full set
of instructions might be called your "day's work" -- once you've delivered all the cars as instructed, you can toss the switchlist and go home. You'll get a new
one tomorrow.
The core function of TrainPlayer Ops is to generate random switchlists for you to execute. This brings together all the various ops components -- industries,
car loads, yards, interchanges, waybills -- and stirs them together to come up with a purposeful day's work.
Switchlist Windows
A switchlist is presented to you in two ways: as a grid of data in the Switchlist Window, and as a paragraph of text in the Schedule Window. This example
shows both:
Each row in the grid corresponds to a line in the text, and represents one car movement instruction. The grid contains all the same data as the text, so the
two are redundant, and you may want to dispense with the Schedule Window after you get up to speed.
The text line is in this format:
<Action> <Class> <Car> (<Load>) from <Location> to/at <To/At>
If you rearranged the columns of the grid in this order, then a grid row would read just like the text instruction.
For details about these windows, see Switchlist Window and Schedule Window.
How to Work a Switchlist
Each instruction in the switchlist -- sentence in the Schedule Window, or row in the Switchlist Window -- tells you to move a given car from its current location
to a given destination. Instructions contain different verbs depending on the type of move (see notes under Switchlist Window Contents for a list) but they all
mean the same, and you could just read them all as "move."
How you do these moves is up to you. The brute force method would be to move each car one at a time: (a) choose an engine or train with engine, (b)
couple to the given car, (c) drive it to the destination, (d) uncouple, (e) repeat for each car listed.
The more prototypical method is to start by collecting all cars into a yard, assembling them into a train, then delivering them all in one trip. For maximum
efficiency, the train should be "blocked" -- all cars headed for the same destination are grouped together so they can be dropped off as a unit. This process
is spelled out in the "Freight Operations" article on the How-To Clinics page on the TrainPlayer website.
A move is completed when two conditions are met: (a) the car arrives at the destination station, and (b) the train stops. When this occurs, you hear a ping
sound, and an X appears in the Done column of the switchlist grid. What it means for a car to "arrive" is described in About Arrivals and Departures in the
Stations chapter.
When the entire switchlist is completed, there is no special reward other than the satisfaction of a day's work well done. At this point you can:
●
●
●
Save the layout. This saves the switchlist in its completed state. Next time you open it and generate a new switchlist, it will more or less
continue where this one left off, i.e., cars will start in their current positions and go on to the next cycle of the waybill.
Rewind to the beginning and start over. Use Tools > Ops > Rewind or the toolbar button. This moves trains back to their
starting positions -- where they were when the switchlist was generated -- and resets the Done column, so you are ready to work the same switchlist
again.
Toss the switchlist and try a different one. Use Tools > Ops > Generate Ops to create a new switchlist. This destroys the
previous one.
The challenge of Ops is to learn how to work a switchlist efficiently, with a minimum of couplings and uncouplings and loco fuel. At present the program
does not have a move counter or scoring function so you can rate your work, but this is planned for future.
Waybills
A waybill is an order issued by an industry telling the railroad it has goods to ship or receive. Each waybill
represents one delivery, specified by a type of load, a shipper, and a receiver. In the real world it might also have a
quantity or frequency ("5 carloads per day") but in TrainPlayer each waybill refers to single car load.
For example, here is a typical TrainPlayer waybill:
Both shipper and receiver are given by industry name and location. The load is given, along with the car type(s)
suitable for carrying it -- determined from the program's database and listed by AAR code. Each waybill is assigned
a unique number for identification purposes.
In this example, Waybill No. 240, a load of tools is to be shipped by boxcar (code X) from the industry "Tool and Die
Maker" located at "GSW Inc" to a destination called "Offline." This means the ultimate destination of the load is
some receiver out beyond the boundaries of the layout; the load is to be delivered to the interchange, where it will
be picked up and taken away by another (possibly imaginary) rail line.
In TrainPlayer Ops, either the shipper or receiver is an industry, and the other is always "offline." This follows
prototype practice. In an area the size of a model railroad, it would be unusual to pick up a load at a shipper and
deliver it to a receiver in the same area. Ops is based on the more realistic scenario of loads entering and leaving
the layout at designated interchanges.
Waybill Cycles
To the customer, the waybill represents a single job to be done; to the railroad, it is a series of moves which we call
a "waybill cycle." A typical one goes like this:
●
●
●
●
●
●
The railroad finds a car of the appropriate type to haul the specified load. This car is sitting in some yard Y.
The car is taken empty from Y to the shipper industry S.
It is loaded with goods.
It is then taken to the interchange track R, where it is to be picked up and taken to a remote destination.
There it is unloaded, then brought back empty to the interchange.
The empty car is returned to Y, ready for the next cycle.
This example might be represented by a schematic:
Y -> S -> R -> Y
showing the three separate car moves required to service the waybill. To make this a bit more descriptive, we
introduce the symbol "+" to mean "car is loaded during this move." Now the schematic becomes
Y -> S +> R -> Y
meaning the car is empty for two of the three legs of the trip, loaded for the other.
If the industry is receiving goods instead of shipping them, the same schematic applies, except in this case S is the
offline shipper, R is the receiving industry on the layout, so the cycle of moves is Y -> interchange(S) +> industry(R)
-> Y.
How Waybills Are Used
Each time you generate a new ops session, a waybill is created for each industry on the layout. Each industry has
a list of incoming and outgoing loads; the waybill generator picks one randomly and chooses whether the industry
will be shipper or receiver. These waybills are then used as input to the switchlist generator. Each move in the
generated switchlist is associated with a waybill, and represents one step in its cycle.
To see the waybill for a switchlist move, right-click a row in the Switchlist grid and choose Show Waybill.
This brings up a dialog like that pictured above. This dialog is read-only; you can view but not modify it.
In the current version of the program, you cannot view the complete list of waybills, you have to view them one at a
time. Also, waybills cannot be saved and reused, you get a new set for each ops generation. Both of these are
likely to change in the next version.
Generators
We use the term generator to mean a device which comes up with a random set of something. It produces a list
of candidates according to some rules, ranks them by desirability according to other rules, then randomly picks
some number of them, starting at the top. For example: the interchange generator attempts to find a long spur
which might serve as an interchange point with another railroad. It looks at the list of all spurs on the layout, ranks
them according to length and location, and picks a random one from the top few choices.
Ops uses several generators, as listed here and described below. You don't really need to know how these work,
but if you're curious, read on.
●
●
●
●
●
●
Station generator: creates stations at random locations around layout
Yard finder: identifies all yard areas on layout
Interchange generator: identifies one interchange track per layout
Industry generator: selects one random industry per station
Waybill generator: creates one random waybill per industry
Switchlist (Ops) generator: creates switchlist from subset of waybills
The first four of these are called up from the Ops Setup Wizard, the last two from the Generate Ops command.
Station Generator
We didn't originally plan to offer a station generator. Stations are not that hard to create, and if they are to match the
layout scenery, they need to be made by hand. Still, on a big layout, spending an hour making stations is a barrier
to getting started with ops, so we looked into creating them automatically. The results turned out to be fun.
Here's what the station generator does:
1. Uses the Yard Finder to find all the yards it can recognize, and adds most of them to the layout as stations
named "Yard1," "Yard2," etc. It doesn't usually find many, because the rules are fairly restrictive.
2. Uses the Interchange Generator to find a spur suitable for use as an interchange. If it finds one, it adds it to the
layout and names it "Interchange."
3. Generates a random set of standard stations distributed around the layout. The number you get depends on
layout size -- figure about two or three per square yard. Station names are chosen randomly from a list names taken
from 101 Track Plans -- over 500 of them (this list is in your TrainPlayer data folder, named "stn_names.txt").
Preferential locations are near the ends of spurs, or in the middle of long straight or curved sections.
There is no dialog for the station generator -- you just click Generate Stations, and it replaces all existing
stations with a new random set. If you don't like the results, you can (a) revert using Edit > Undo, (b) click
again to get a different random set, or (c) take what it gives you and modify to suit, using the Station tool to move,
resize, rename, etc.
The other way to generate stations is from the Ops Wizard. This gives you a bit more flexibility -- you can create
stations and yards/interchange as separate independent steps.
Yard Finder
The Yard Finder looks around the layout for patterns of track which meet certain requirements. If it finds one, it
creates a "yard-style station" around the area and gives it a unique name starting with "Yard."
Requirements are: every track must be straight, not curved, and must be a spur, i.e., a dead-end. Each track must
have a neighbor parallel to it and a specific distance away from it, where that distance is the "parallel" distance
found in the track snap settings. All sections collinear with the end section are included; i.e., if a long straight spur
is made of five short segments, all five are used.
For example, here is a typical find -- four parallel straight stubs, highlighted in green:
When creating the yard, the Yard Finder includes tracks connecting the parallel sections. This example has three:
one crossover and two end sections.
What this scheme tries to do is find one or more yards suitable for use in ops sessions. It is not designed to find all
yards. It does not find those with curved track, with connections on both ends, or with tracks not parallel or not
equally spaced. If your layout has yards like those, you will need to specify them by hand; see Yards and
Interchanges.
Interchange Generator
The Interchange Generator attempts to find one long spur which can serve as an interchange track. It starts by
finding all spurs
Industry Generator
Industries are stations where goods can be exchanged. An industry has a name and a list of incoming and outgoing
car types, used by the ops generator to decide what sorts of cars can come and go there. Like stations, industries
can be created by hand, either by choosing from a master list or inventing on the spot, but it's faster and more
interesting to let the industry generator do the job.
The Industry Generator assigns random industries to stations on the layout. It works like this:
1. Assigns the special types "Yard Tracks" and "Interchange" to all yards and interchanges. These have generous
lists of car types you can set out or pick up on yards and interchanges. (Actually this step is done during station
generation.)
2. Goes to each station on the layout and chooses a random industry from the master list. The choice is based on
car types located in the vicinity -- for example, at a siding where there are tank cars, the selected industry might be
a dairy. Stations with no cars nearby may not get an industry assigned.
3. Updates the stations on the layout to show the industry names.
These steps are done automatically when you use Generate Ops. A more interactive approach is to use the
Ops Wizard or the Generate Industries command. These bring up the Industry Generator dialog:
Here you can choose where and how to generate industries, in a couple of ways:
●
●
Checkmark the stations where you want industries generated, then click Generate Checked. Or:
Click a row to select a station, then click Generate to have the program pick a random industry, or
Choose to pick one yourself from the list. The Choose button brings up the Industry Browser, described
on the Industries page.
Either way, you can see what the generator came up with, and cancel or do it again if you don't like the results.
Ops Generator
This creates a scheduled train with switchlist and instructions. It is a multi-step process which does this:
1. Chooses an engine. This may be from the selected train, or the choice you made in the wizard, or a random
choice.
2. Chooses a set of outgoing cars. A random selection is made from cars attached to or in the vicinity of the chosen
engine. The number of cars it chooses depends on a setting you can make in the wizard -- minimum about 5,
maximum 20.
3. Chooses a destination for each outgoing car. Choices are limited to industries which can receive or dispatch that
car type; a random selection is made from these.
4. Selects some cars to be picked up at some of the destinations. If you are going to be making a delivery at Joe's
Lumber, and Joe has an empty flatcar on his siding, you might need to pick it up as you pass through.
5. Expands some of the selected cars to include cuts. If you have two identical coupled hoppers, then the switchlist
is likely to send them both to the same place.
6. Selects one of the destinations as the end point of the trip, and creates a scheduled train to go there.
7. Creates a switchlist from the car/destination choices, and attaches it to the scheduled train.
8. Assigns a load and a loaded/empty status to each car in the list. Destination industries are taken into account
when assigning loads; you can take a loaded car to an industry which receives that load, or an empty car to one
which ships it, but not vice-versa.
9. Displays the results. One new row goes in the scheduled train window, cars and destinations become rows in the
switchlist window, and a set of text instructions is created and displayed in the schedule window. Color codes are
enabled and displayed. Car labels are shown on the cars involved in the switchlist. All ops windows are brought up
if not already on display.
The ops generator replaces any existing scheduled train and switchlist with the generated one. If you undo an ops
generation, it goes back to the previous version.
Ops Windows
There is a lot of data associated with ops, and thus a new type of window for viewing and interacting with it: an Ops Window, a dockable window containing an
interactive grid. The grids come from BCGSoft, and are quite full-featured, like miniature spreadsheets.
In the current version there are two ops windows, one showing the current switchlist, the other the inventory of cars on the layout. Features the two have in
common are described below. For screen shots, contents, and details specific to each, see Switchlist Window and Cars Window.
By default these windows come up as a tabbed pair, docked to the right-hand side of the layout window, with the Switchlist Window in front.
Ops Window Features / How-To
The following is a combination feature list and task-oriented instruction set. These instructions apply to all grid windows, except where noted.
Feature
How
Move and dock windows
Press and drag on the title bar of a window. The window becomes undocked and you see docking navigator arrows as
shown below. Position over one of the arrows -- you see a shadow where the window will dock -- then release the
mouse button.
Split tabs into separate windows
As above, but start by pressing on one of the tab buttons. To rejoin tabs into a single window, first dock one of them to
a side, then drag the other onto the middle button of the navigator.
Resize grid columns
Rearrange grid columns
Press the divider between two column headers and drag right or left.
Press a column header; drag right or left until red arrows appear, then release.
Show or hide columns
Right-click anywhere in the grid and choose Field Chooser. This brings up a list of fields available but not in the
grid (for a screen shot, see Switchlist Window). Drag one onto a division between two column headers, then release.
To hide a column, just drag it away from the grid.
Edit the grid
(Applies to Switchlist Window only.) Right-click anywhere and choose Grid Editable. Then you can (a) click in a
cell and edit the text or choose from the drop-down (note that not all cells are editable), or (b) add or delete rows by
choosing Add New, Duplicate, or Delete from the context menu. For more on editing, see Switchlist Window.
Group rows by data value
Right-click anywhere and choose Group By Box. This displays a panel at the top of the window. Drag a column
header into that box, and the grid will change into a sort of tree -- all rows having the same value in that column will
become a single collapsible row. (For an example, see Cars Window.) To ungroup, drag the header out of the group
box.
Sort the grid
Click the header of any text column (i.e., any column except pictures). The grid will be sorted on that column. Click
again to sort in reverse order. See additional notes below regarding sorting.
Print the grid
Right-click and choose Print Grid. This brings up the system dialog and prints the entire grid (text that is, no
images). This is quick and basic -- you may need to resize columns so they don't get truncated, and you have no
control over margins or page layout. For fancier printing, copy the grid to a spreadsheet and print from there.
Select rows or cells
Select a row by clicking the row header at the left. To select multiple rows, select one, then press shift and select
another. To select a block of cells, press in one and drag to another. You cannot select columns. To select the entire
grid, right-click and choose Select All.
Copy to clipboard
Select rows or cells as above, then choose Copy from the context menu. This copies text to the Windows Clipboard
(no images). The selection can then be pasted into Notepad, Excel, or other programs.
Auto-resize columns
Right-click and choose Column Auto-Resize. When checked, this causes columns to automatically resize to
fill the grid whenever its window is resized. When unchecked, columns remain at fixed sizes.
Zoom to an object
Right-click a grid cell and choose Zoom To <object>. This zooms the layout to be centered on the selected
object -- car, station, train, or industry.
Reduce grid row height
Drag the Image column header off the grid. This removes the pictures from the grid, and causes all rows to shrink to
standard text height. To bring the images back, use the Field Chooser.
Docking Navigator Arrows (Windows 7)
Sorting can be done over more than one column, or using a custom sort order.
●
●
To sort on multiple columns: simply click on more than one column header. The first click sorts by the column you choose and shows a triangular sort indicator at the top. A second click on a different column
does a secondary sort -- sorts the values in that column without overriding the sort of the first one. A second click on a sorted column sorts it in reverse order; a third click removes it from the sort.
To set up your own sort order: add a column of your own and enter values by hand, then sort on them. To do this, right-click the grid and select Field Chooser. Drag the field called "Sort Order" onto the grid
header. In this column you can type whatever strings you like and then sort on them.
In the Sort Order column, duplicate values and blanks are allowed. If you are entering numbers, they will be sorted alphabetically (meaning "11" will come before "9"), so use zeros to pad values (enter "09" instead of just
"9"). Values entered in the Sort Order column are attached to the cars in each row; they are saved with the layout, and they show up in both Switchlist and Cars grids.
Ops Window Context Menus
Each ops window has a context menu which comes up when you right-click anywhere in the grid. What you see in this menu depends on what you clicked: some commands apply to the entire grid,
some to the selected row, some to the selected cell. Below is the full list of commands available on all these menus.
Command
Effect
Notes
Add New
Add new empty row at bottom of grid
1,4
Duplicate
Add duplicate of selected row
1,4
Delete
Delete selected row
1,4
Copy
Copy selected row(s) to clipboard
2
Select All
Select all rows
Print Grid...
Print entire grid
2
Expand All Items
Show contents under each group
3
Collapse All Items
Hide contents under each group
3
Field Chooser
Show dialog for choosing grid columns to display
Group By Box
Show header to allow grouping
Column Auto-Resize
If checked, columns always adjust to fill window
Grid Editable
If checked, grid rows can be edited
4
Show Waybill
Display waybill for selected row
4
Zoom to
Zoom layout in to location of selected object
5
Properties...
Show properties dialog for selected object
5
Notes
1. Applies to editable grids only, i.e., Grid Editable must be checked on the context menu.
2. Applies to text data only, no images.
3. Applies to grids which have grouping in effect.
4. Applies to Switchlist Window only.
5. Applies to the object represented by the clicked row and column: a car, station, industry, load, or train.
Ops Setup Wizard
To start the wizard, choose Tools > Ops > Ops Setup Wizard from the menu, or click the Wizard
on the toolbar. Then follow along.
button
Welcome page. Shows some information about your layout. If the layout is not suitable for ops (for example,
has no trains), this page will say so and give you the opportunity to cancel and make it so. Click Next to continue.
Stations page. Calls the Station Generator to create new stations if you want or need them.
Choose one:
●
●
●
Use existing stations. Leaves the stations as they are. This is the default if your layout has
stations and yards. Click Next to go to the next page.
Add yards and interchange. Leaves the stations, but creates new yards and interchange,
replacing any existing ones. This is the default for layouts with stations but no yards. Click Next to create
without going to the next page.
Generate new stations. Replaces all existing stations with new stations and yards. This is the
default for layouts with no stations. Click Next to do the generation and remain on this page.
If you select one of the two latter choices, clicking Next does not take you to the next page. Instead, it does the
generation, displays the new stations on the layout, and then moves the radio button to Use Existing Stations. At
that point, you can click Next to go on, or make a different choice and repeat the generation until you get results you
like.
Industries page. Calls the Industry Generator to assign random industries to stations.
Choose one:
●
●
●
Use existing industries. Leaves the current industries alone. Click Next to go to the next page.
Generate new, automatic. Picks random industries at all stations. Click Next to do the
creation and remain on this page.
Generate new, interactive. Brings up the Industry Generator dialog (below), where you can
generate or choose industries individually for each station.
Whichever way you choose to generate industries, you can see what the generator came up with, and cancel or do
it again if you don't like the results.
As on the Stations page, when you create new industries, the wizard remains on this page until you choose Use
Existing and click Next. This gives you a chance to review the results and retry as needed.
Industry Generator Dialog
To operate this dialog:
●
●
Checkmark the stations where you want industries generated, then click Generate Checked. Or:
Click a row to select a station, and then click Generate to have the program pick a random industry, or
Choose to pick one yourself from the list. The Choose button brings up the Industry Browser so you can
select a preconfigured industry.
Starting Train page. Allows you to choose the engine you will operate.
●
●
Use selected train. Uses the engine selected in the drop-down. You may, of course, select a
different engine from the list. When you choose an engine, it becomes selected on the layout and shows up
in the control panel and toolbar.
Or: Choose a train by clicking on it on the layout. When you select a train while this page is visible, the dropdown updates to the same train.
Settings page. Offers choices for tailoring the results. In the current version, choices are limited.
●
Cars to be moved. Sets the approximate number of cars to be involved in the switchlist. This is
the number of rows you will end up with in the switchlist, assuming there are enough industries and cars
around to generate this many. To the right of the text box is an indication of the percentage of available
loadable cars you are requesting.
Finish page. Summarizes the results. Click Finish to perform the ops generation and present the results,
or Cancel to abort without generating.
Note: if you generated stations or industries during the wizard, clicking Cancel will not undo those. Use Edit >
Undo if you want to revert back to the pre-Wizard state, or else close the layout without saving.
Scripting
You've worked out a particularly elegant sequence of moves in a dense yard, and you'd like to remember it so you
can show it to your fellow operators on club night. TrainPlayer can help by letting you capture, program, and play
back operations using "scripts," little programs written in a language designed for running trains.
Advanced Scripting in 6.1
Scripting was introduced in TrainPlayer version 2.3, back in 2006. Then, a script was something rather simple that
you could attach to a train. In versions 6.0-1 we introduce Advanced Scripting, with plenty of enhancements, such
as:
●
●
●
●
●
Scripts may now be attached to locations on the layout, to spring into action when specified cars pass by
A master script can be attached to the layout, to carry out startup operations when the layout opens
The script language now becomes a full programming language, including variables, if, while, subroutines,
inline procedures, arithmetic, system functions, property set/get
New Script Central dialog organizes all scripts and reference materials
Variables, system functions, function families
This chapter has been completely rewritten to describe the new system. See About Scripting for a guide to the
documentation, or just march through the links below.
About Scripting
Scripting UI Devices
Working With Scripts
How to Get Started in Scripting
TP Programming Language
For more information, visit the Scripting Page on the TrainPlayer website.
About Scripting
A TrainPlayer script is a series of instructions for operating a layout. It may contain commands to drive trains, throw
switches, set preferences, execute menu commands, make decisions -- pretty much everything you need to
choreograph a complex operation, then play it back and watch it all run automatically. Scripting is the name we
give to the enjoyable and challenging activity of designing and developing these things.
It's a form of computer programming, is what it really is. Possibly you have done some of this in the past, possibly
not, but if you are a railroader and a do-it-yourselfer, you will probably enjoy tinkering with it. You can actually get
started without doing any programming at all -- just use the script record/playback machinery to create and run
scripts. For more, see How to Get Started in Scripting.
There are several types of script, different in how they are connected to the layout and how activated. Types are:
Train Script
Junction Action
Master Script
Subroutine
Proc
a script attached to an engine, designed to drive a train through a series of moves
a script attached to a track junction, activated when a given car or train goes across
a script attached to a layout, designed to run automatically when the layout is opened
a batch of script language designed to be called and executed from within other scripts
a subroutine stored not in a file, but between special delimiters inside another script
For more about these types, and procedures for handling them, see Working With Scripts.
Some layouts have multiple scripts of various types. To manage and keep track of all of them, use the handy new
tabbed dialog called Script Central. This dialog gives you a way to browse through scripts and subroutines, not just
examining but also editing, deleting, and setting properties. Scripting also involves a collection of menus, dialogs,
toolbars, and other interactive devices; an illustrated overview is given in Scripting UI Devices.
All scripts are written in a custom programming language especially designed for operating TrainPlayer layouts. An
overview of the language is given in TrainPlayer Programming Language. For a detailed language and command
reference, use the built-in guide in the Script Central Reference Tab.
For more information:
●
●
●
Website: for additional documentation, tips, samples, see the Scripting page on the TP site
Forum: join our Yahoo forum and get expert advice from us and our users
Customer Support: if all else fails, send e-mail to our fine Support Dept
Scripting UI Devices
Scripting involves a number of dialogs, menus, and controls. Here is an illustrated overview, with links to more
information. Click any framed image to see it full size.
Train Script Menu
Right-click a train or
choose Train >
Script from the main
menu to get a set of
commands for operating
train scripts. See Train
Script Menu below.
Script Toolbar
Button-based version of
the menu. See Script
Toolbar below.
Script Editor
For editing, playing, and
watching train scripts in
action. See Script Editor.
Junction Action
Editor
For editing and setting
parameters of junction
actions. See Junction
Action Editor.
Script Central
Five-tab dialog provides
access to all scripts, plus
reference material. See
Script Central.
Schedule Window
Displays output from
running scripts. See
Schedule Window.
Insert Here menu
When a script editor
window is up, right-click
a junction and get
commands to insert
special text into the
script. See Insert Here
Menu below.
Note Window
Comes up when a Note
command is executed in
a script. Can be
manipulated by user or
by script. See Note
Window below.
Input Box
Comes up when Input
command is executed.
Prompts for value and
returns in named
variable.
Train Script Menu
Commands on the Script context menu apply to the script attached to the rightclicked train. If the train has no script, only Edit is enabled. If the train has no
engine, none of the commands is available -- you cannot create a script on a train
unless it has an engine.
●
●
●
●
●
Start: start playing script at current line.
Stop: stop train and script.
Rewind: rewind script to starting line, reposition trains to rewind point.
Can be undone using Edit > Undo from the main menu.
Edit: brings up Script Editor showing train's script. If train has no script, a new, empty one is created with
a header stamped with the current time.
Remove: remove and delete script from train. This is not undoable, but does not become permanent
until layout file is saved.
Script Toolbar
Buttons from left to right:
●
●
●
●
●
●
●
Record button / Run light: click to begin recording, creating a script on the selected train.
Button lights red while recording; green while any train script is playing.
Rewind: click to rewind all scripts to start, and all trains to rewind point. Can be undone using Edit >
Undo from the main menu. For more, see Rewind Point.
Stop: click to stop all scripts and trains.
Play: click to start all train scripts.
Edit: click to bring up Script Editor for the selected train, creating script if train has none.
Pause: click to pause running scripts; brings up a modal alert, which requires a click to dismiss and
continue playing the scripts
SC: click to bring up Script Central
Insert Here menu
A special context menu comes up when you right-click a
junction when one of the script editor windows is on
display and focus is in the text box. The commands on
this menu insert different junction-based items into the text
box at the position of the cursor.
●
●
●
Insert Junction Number (any junction):
insert the junction number prefixed by J. This is
typically used when entering an AT or AFTER
condition to cause an action at the junction.
Insert Throw Here (for switches only):
insert a Throw statement with the clicked junction
number and a value matching the current switch
position. In other words, cause the script to throw the switch to the same position it is now showing.
Insert Throw Alternate (for switches only): insert a Throw statement to the next position. For a
two-way switch, this throws to open the route which is currently closed.
Note Window
The Note Window is a special window used by a script to display text. There is only one such window, shared by all
scripts and all layouts. The user can adjust its size, position, and style, and the settings will stick until changed, but
the script author also has some control over these settings and may override user choices.
Behind the scenes, the note window is a floating window containing a rectangular scenery object which supplies the
style. By default it has a thin resizing border -- drag an edge or corner to resize the window, or press and drag
anywhere inside to move it. Right-click for the context menu with these commands:
●
●
●
●
Hide: take down the window. To bring it back, a script must execute another Note command.
Framed: if checked, the window gets a title bar with close box, as shown above. Default is a thin
resizing border.
Auto-Fit: if checked, causes the window to resize automatically when its text changes. The width of the
window is unchanged, height is adjusted so text will just fit. Default is off, meaning the window size remains
unchanged regardless of text.
Properties: brings up the Scenery Properties dialog where you can set text and background styles.
Managing the window from a script involves these commands:
note <string>
bring up Note Window and display the string. May be
a multi-line string if quoted; see Display Strings
note
with no argument => take down Note Window
set NoteWndRect <t,l,b,r>
set NoteWndAutoFit <0/1>
set NoteWndTextPos <L/C/R>
specify size and position to apply at next showing.
Coordinates are relative to main app window
turn off/on auto-fit at next showing
set text position for next showing
In some scripts, the Note Window is used as a sort of modal dialog. It provides a prompt and the script waits for a
reply (e.g., a certain key to be pressed). In these situations you are expected to provide a response, and not use
Hide to avoid doing so.
Working With Scripts
All scripts are blocks of text. The interesting part is what happens inside the text -- the commands, waits, logic. This page is not about that.
Here we treat scripts as black boxes, describing how to create, access, and manage them.
Much of what you need to do with scripts can be done in Script Central. There you can create, delete, browse, view, and edit all types of
script. The rest of what you need to do is described below on this page, according to script type.
All scripts except subroutines are layout dependent, and stored as text blocks within the layout file. When you modify a script in one of the
script editors and click OK or Apply, the changes are saved in memory. They are not permanently saved to disk until you use File Save
or File Save As to save the layout file.
Working with Train Scripts
A train script is attached to an engine. This is the original type of script dating back to TP 2.0. You might think of it as a little robot which sits
in the cab and drives the train, following a prescribed list of instructions. A train script is normally used to direct a particular train through a
series of operations, for example running its daily route, or performing a switching task.
Creating: select a train having an engine, then: (a) right-click any car and choose Train > Script > Edit from the context menu;
(b) choose Train > Script > Edit from the main menu; or (c) click the Edit button on the Script Toolbar. All of these bring up the
Script Editor, displaying the script attached to the train. If the train has no script, a new empty one is created.
When you create a script on a train, it becomes attached to the engine, and sticks with it during later couplings and uncouplings. If the train
has more than one engine, the script attaches to the leading one -- the frontmost one in the current direction of travel. If the train is not
moving, the position of the Forward/Reverse switch is consulted to see which direction it is heading.
Editing: select a train having a script, then proceed as for creating, above.
Note: To see which trains on the layout have scripts, look in the Train Tree
(shown at right) or the Scripts tab of Script Central.
Deleting: use Script Central, or see note:
Note: Most scripts can be deleted by erasing. In a script edit window, rightclick and choose Select All, then Delete (or press Ctrl-A, Del), then click OK or
Apply to save the empty script. This will delete it and remove it from the script
list.
Playing back: select a scripted train and: (a) choose Train > Script > Play from the context menu or main menu; (b) click the
Play button on the Script Toolbar; or (c) open the Script Editor and click Play.
If there is more than one scripted train on the layout, clicking Play on the Script Toolbar starts them all. The other methods start only the script
on the selected train.
If you have already been running a script, before you can start it again you will need to rewind it to the beginning. This will move trains back to
their starting points, and will revert the layout to an earlier state, and may cause unexpected surprises. Read about the Rewind Point.
Recording: Script recording is a way to create and develop a script without doing any programming. It creates a train script based on
your actions operating that train. It does not apply to junction actions or the master script, though you can create script code by recording
which can be pasted into any type of script.
To create a recording:
1. Choose the train you want to record, and move it into a suitable starting position.
2. It is a good idea to set the Rewind Point to the current situation, so you can rewind back to here later. You can do this using Script
Central, Settings tab.
3. Click the Record button on the Script Toolbar. The bulb lights in red, indicating that recording is now active.
4. Operate the train as usual. All operations using the train controls are recorded; most hand-drag operations are recorded also, except
for speed changes.
5. When finished, click Stop on the toolbar. This terminates recording and saves the script.
6. To play back, click Rewind, then Play. Or bring up the Script Editor so you can follow along.
Disclaimers: recording isn't a perfect science, and may not capture all the action exactly as you expect. It is intended to capture simple action
sequences, and to provide starting points for developing your own scripts.
Debugging: Once you have developed or recorded a script, and you are playing it back, something is likely to go wrong. Figuring out
what's wrong and fixing it is not usually easy, and the program doesn't provide much in the way of tools to help you, but here are some
suggestions:
1. Watch the script run. Bring up the Script Editor before starting the script, so you can
see what line is being executed when the trains go awry.
This applies to train scripts. For a junction action, wait until a car or train crosses the
junction to trigger the action, then bring up the Script Editor. (Warning: do not use rewind
or replay when watching a junction action.)
2. Use Go To Statement. In the Script Editor, right-click a line of the script and
choose Go To Statement from the context menu (shown at right). The script will position
to that line and start execution there on the next Play. This gives you a way to run a part
of the script over and over.
Warning! it is up to you to make sure the trains are in the right places to be starting at the indicated statement. Some statements are more
suitable than others as starting points.
Working with Junction Actions
A junction action is attached to a junction, activated when a given car or train passes across it ("triggers" it). The trigger can a particular car
or train, or any, or a particular type; for details, see Junction Action Editor.
When triggered, the script attaches itself to the crossing train and starts executing. Once it has carried out all its instructions, it stops and
turns control back over to the train. You might think of a junction action as a robot sitting at a trackside location; when it sees the appropriate
train come by, it climbs into the cab and takes over, runs until the end of the script, then climbs off and goes back to wait for the next one.
Creating: Creating a junction action requires TrackLayer. Using the Track or Edit tool, right-click a junction and choose Action...
This brings up the Junction Action Editor, where you can define one or more actions to occur at the junction.
Once a junction action has been created at a junction, it is
displayed with a little circle symbol, as shown at right. The symbol
does not appear when the Run tool is active.
Editing: bring up the editor as above, or edit using Script
Central.
Deleting: use Script Central, or see note.
Playing back: the script starts running when the triggering event occurs -- when the center of a specified car passes across the
junction in a specified direction. The action script attaches itself to the crossing train, runs to completion, then detaches.
Notes regarding triggering of junction actions:
●
●
●
To prevent an action from triggering, mark it as disabled, using either Script Central or the Junction Action Editor.
By default, a junction action does not trigger when you drag a train across by hand, you must drive using the throttle. This behavior
can be changed in the Settings tab of Script Central.
An action will not trigger if it is already running from a previous triggering. If one train starts an action, other trains crossing the
junction are ignored until the action completes.
Working with the Master Script
The master script is a special script attached to a layout, designed to run automatically when the
layout is opened. There is only one master script per layout. It can serve to initialize variables,
provide information to the user, or start trains or scripts into action.
Creating: use Add Master Script on the context menu in Script Central, as shown at
right. Brings up the Script Editor, creating a new empty master script. This command is dimmed if a
master script is already defined for the layout.
Editing: edit the master script directly in Script Central, or launch the Script Editor from there.
Deleting: Use Script Central, or see note.
Playing back: by default, the master script starts automatically as soon as the layout is
opened, and it runs to completion. You can prevent this from happening by disabling the master
script, using the Enabled toggle on the context menu. If you want to rerun the master script, bring it up in the Script Editor, click Rewind,
then Play.
Working with Subroutines
A subroutine is a named batch of code residing outside of any script, which can be called in and used when needed. That is, instead of
having ten lines in a script to perform some action -- say reverse an engine using a turntable -- you could replace it with a single line calling a
ten-line subroutine named something like "ReverseViaTurntable". Subroutines make for cleaner code, help organize complex tasks, and have
other benefits.
A subroutine is stored in a text file, located in a special folder, the Scripts folder in your TrainPlayer data directory. If you build up a collection
of these, you can browse and edit them in Script Central.
Creating: the program does not have a mechanism for creating a subroutine. Just use Notepad or other text editor, create a text file,
and store it in the Scripts folder in your TP App Data directory. Any text file in this folder or its subfolders shows up in the Subroutines tab of
Script Central.
The name you give the file becomes the command used to call the routine (minus the .txt extension). The name should be one word, no
spaces (underscores ok) and should be descriptive of what the routine does.
Editing: you can edit a subroutine directly in Script Central, or right-click and choose Edit in Notepad. After you edit a subroutine
and save its file, the changes will go into effect the next time the routine is called.
Deleting: you can delete a subroutine (a) using Script Central, or (b) by deleting the file using Windows Explorer.
Working with Procs
A proc (short for "procedure") is a subroutine not stored in its own file but
embedded in a larger script. A proc statement in a script defines a block of
statements and gives it a name; the end of the block is indicated by
endproc. The thereafter, any script can call the proc by name to execute
that block of statements.
Procs are typically defined inside the master script; they are recognized as soon
as the layout is opened, and can be called by any scripts therein. Procs defined
inside other scripts are not recognized until the containing script has been run
once and the proc statement encountered.
How To Get Started
There is a lot of material to be covered on the subject of scripting. Here is a suggested recipe for easing your way
into it.
1. Watch the L27S in action.
Included with the latest release is the Scripted Tremont & Cambridge RR (filename L27s.rrw). This layout has a
single passenger train which makes regular rounds, stopping at several stations along the way. The train is driven
by a train script. When it reaches each scheduled stop, a junction action at that location kicks in and takes over the
train -- parks it in the station, waits for a change of passengers, then moves back out onto the mainline, where the
train script again takes control.
In addition to demonstrating train and junction scripts, the L27s has a master script, which does nothing but put a
message on the status bar, and illustrate the concept.
Here's how to get the most out of the L27s demo:
1. Open the layout from the Layouts101 folder in the Layout Chooser.
2. Use View > Windows > Schedule Window to bring up the window which shows script text
output. Right-click and make sure Show Script Output is checked.
3. View > Windows > Script Central. This tabbed dialog shows all the scripts connected to the
layout. Take a minute to browse through and look at them. If you have plenty of screen space, you should
leave Script Central up while you watch the action; if not, take it down after the next step.
4. Double-click Script 1 in the Scripts tab. This opens the train script in the Script Editor.
This dialog has the feature that it shows highlights as script lines execute, to give you a dynamic picture of
what the script is doing.
5. Use View > Toolbars > Script Toolbar if necessary.
6. Position all these windows so they don't obscure the layout too much (good luck), then
7. Click the Play button on the toolbar.
The train starts to move and so does the script. Script comments and messages are echoed to the schedule
window to keep you informed as the scripts run. With luck, the train will run all the way around the layout, making
three stops, then wait a bit and start over. And you will have gotten a reasonable idea of what a script can do.
2. Record a script.
You can create a script without doing any programming or having any knowledge of the script language: just press
Record, and let the program generate a script as you operate the train; change speed, throw switches, reverse,
uncouple -- every action generates the corresponding script language. Press Stop when done, and there you
have a script you can rewind, replay, save, and study. If you have the Script Editor up while recording, you can see
the script as it gets created.
It is just that easy to record a script, but here are a few disclaimers. First, when you replay a recorded script, it may
not exactly reproduce your sequence of actions. You have to cut it some slack as it tries to convert mouse moves
into script commands. Second, the result is not optimized for readability. For example, varying the train speed
while recording often generates a pile of speed-change commands, where in a hand-made script, only a single
speed command is needed to do the job.
If you are not the programmer type, you don't need to go beyond this step. Use script recording to capture the
action on your layout, then play it back, or send it to another TP user to play back.
3. Write a Junction Action.
The low-barrier way to write your first script is to right-click a track junction and create a little action there -- say a
one-line script to announce something in the output window. Bring a car up next to the junction, roll it across, and
the action executes. Do this a time or two and you might find yourself wanting to make fancier actions.
The procedure:
1. Choose a convenient junction or switch; use the Track or Edit tool, right-click and choose Action...
2. In the Junction Action Editor, you can choose a triggering device, or leave the default Any Train, then click
in the text box to enter your script. You might start with something like this:
echo Crossing the junction!
3. Click OK. This saves the action to the layout (but not yet to the disk until you save the layout).
4. Bring up the Schedule Window so you can see the output.
5. Run a car across the junction, using the throttle. As soon as the center of an eligible car crosses (in this
case the first car of any train), the action should trigger and show the message.
6. Go hog wild. Look at the Reference window in Script Central to get an idea what commands you can use,
type one into the text box, run your car across and see what happens.
4. Write a Train Script
Writing a train script is no harder than writing a junction action, but it involves an additional complexity or two.
The procedure:
1. Select the train you want to drive and move it into a starting position. The script will begin running the train
from this position.
2. Right-click any car and choose Train > Script > Edit. Either that or click the Edit button on the Script
Toolbar. Either way you get the Script Editor, showing a blank script with a machine-generated header.
3. Type some commands into the text box. The most reasonable way to start is to give the train some speed
and throw some switches to direct its route. Your code might look like:
speed 20
throw J36 1
at J37 stop
except yours will of course have appropriate junction numbers for your layout.
4. Click Apply to save the code.
5. In the Script Editor, click Rewind. This highlights the first line of the script, and moves the train to its starting
position if necessary.
6. Click Play. Off goes your train, until it gets to the destination, then it stops.
A couple of shortcuts:
1. When the Script Editor is up on the screen, and the cursor is positioned at the next line in the text box, rightclick a junction on the layout and you get a little menu of commands: Insert Throw Here, In... The first adds
a Throw statement which causes the switch to go to its current position, ...
2. You can copy code to the Windows Clipboard and paste it into the Script Editor. In case you prefer to do
your editing in Notepad or elsewhere.
5. Join the Scripters' Forum
You will surely come up with questions. The best place to go for answers is our panel of experts.
6. Become an expert.
Script your layout, or do one of ours, send us the result and we'll post it for others to enjoy. To inquire, send e-mail.
TrainPlayer Programming Language v. 6.1
The vocabulary and grammar you use to write scripts is called TrainPlayer Programming Language, or TPL. It recognizes a given list of commands and keywords -- some related to
trains, such as setting speed and direction, and some standard programming constructs, like loops, ifs, and branches. It allows you to create and substitute variables, and to separate
frequently-used code into subroutines and procedures. It is rudimentary but reasonably complete.
This document gives an overview of the components of the language. It does not attempt to teach you programming, or even give you much more than a brief overview and a
command reference. The main documentation is built into the program, and can be found on the Reference tab of Script Central -- the same table of commands and variables as shown
below, but with more detail and examples under each topic.
Further reading matter can be found on the Scripting page of the TrainPlayer web site.
TPL Overview
A script consists of a series of statements. Some are comments -- text provided by the script author to annotate or explain -- and are skipped over when the script is executed.
Others are either executable statements, which cause actions to occur, or wait conditions, which cause the script to pause for some specified event or time period before
proceeding. The text in the script is sometimes referred to as code, and the act of creating it is called coding.
An executable statement begins with a command -- one of the words or phrases recognized by the language, such as those listed below -- followed by arguments providing data
needed by the command. An argument might consist of a single string or numeric value, or an expression formed by combining multiple values using arithmetic operators. In place of
a literal string or numeric value, you can use the name of a variable, and it will be replaced by the corresponding value when the statement is executed.
Statements are normally executed one after another as they appear in the script. However, this behavior can be altered using flow commands. A loop is a block of statements which
are executed repeatedly a given number of times. A branch is a jump to another place in the script, sometimes based on a decision made in an IF statement.
A call is a jump to a separate external block of statements; these execute in their entirety, and then control jumps back to the statement after the call. There are three variations on
this. A subroutine is a block of script code stored in a text file; a call to the subroutine executes the file and then returns. A proc is a small routine stored between two tags within
another script; the first time it is encountered, as its parent script executes, it is extracted and saved in memory under a speciried name; subsequently it can be called using this name.
A function is a body of code which carries out a calculation and returns a result to be used by the calling script.
Whenever a train script or junction action is running, it is connected to a train. Commands in the script which do not specify otherwise are directed to this train. Train control
commands can be used to redirect commands from the script-owning train to another one.
Variables are created and assigned using a Set statement, or the equivalent Let. This takes the name of a variable and an expression; the expression is evaluated and its value
assigned to the variable. If the name is new, the variable is created, otherwise the existing variable is updated.
TPL Statements
A script consists of a series of statements, usually one per line in a text file. Lines starting with * are comments, and are not executed. By default, comments starting with a single
asterisk are echoed to the output window as the script runs; those starting with ** are not. Blank lines are ignored.
An executable statement consists of a command or wait condition name -- one of the words in the first column of the table below -- followed by any required arguments.
Multiple statements may be concatenated on a single line, using semicolon (;) as delimiter. As a special case, a wait statement may be followed immediately by a command on the
same line.
Built-in Commands
A command is an instruction telling the program to take some action. There are two types: commands accessible from the program menus vs. those built into the language. The menu
commands are described in the next section. The built-in commands are in these categories:
●
●
●
●
●
●
●
●
Train commands: for setting speed and direction and operating the train owning the script. This group of commands is the script equivalent of the control panel.
Layout commands: for throwing switches, rotating turntables, and carrying out other layout-based actions.
Train control commands: for directing movements of other trains, or turning control over to them.
Flow commands: for looping, branching, choosing different courses of action based on conditions.
Set/Let commands: for creating variables and assigning values.
UI commands: for taking input from or providing feedback to the user.
Subroutine commands: for calling and defining subroutines, plus special commands for use within them
User interface commands: for communicating with the user, both input and output
Most commands consist of a single verb followed by one or more arguments telling what to act on or what to do. In the table below, arguments are indicated by angle brackets -- you
supply the value, not the brackets. Optional arguments are enclosed in braces; if omitted, these take on default values.
speed 20
echo "note to user!"
throw J35 1
drive "Broadway Limited"
set speed of script owner to 20; start moving if stationary
display message in output window
throw switch at junction 35 to position 1
begin block of statements to be directed to another train
A complete list of commands is given below. A better one is found in the Reference tab of Script Central.
Menu Commands
When you select any command from a menu, you see a cascading series of names starting with a top-level menu. Write these names down one after another and you have a
command you can use in a script. Menu names must be separated by spaces, multi-word names must be quoted. Examples:
file open
file "open layout"
train "add car" boxcar
bring up Open File dialog
bring up Layout Chooser; note quotes required around two-word command
add car to selected train at insert position; note menu command applies to selected train, not script owner
Wait Conditions
A wait condition tells the script to wait for a certain event or until a certain time before proceeding. There are only a few wait condition keywords, serving multiple purposes: AT a certain
time on the clock, or when the first car of the train reaches a certain junction or station; AFTER an elapsed time, or when the last car passes the given location; or ON specified events.
when first car of train crosses junction 35, stop train, continue with script
at J35 stop
after 0:0:02 speed 20
wait 2 seconds, then set speed to 20
Flow Control
Script statements are normally executed one after another. Commands in the "flow control" category change this behavior, by jumping to other parts of the code based on some
criterion. The following types of flow control are available:
●
●
●
●
●
Conditionals. Use If/Endif to evaluate a criterion and take different courses of action depending on the result. A criterion is two expressions connected by a comparison
operator, enclosed in parentheses.
Loops. Use While/Endwhile to execute the same block of statements as long as a given criterion is met.
Branches. Use Goto to jump to a specified location elsewhere in the code.
Calls. Use Call to jump to an external body of code, execute it, then return and continue at the next statement.
Procs. Use Proc to define a small subroutine within a script.
jump to statement "nextPart:"
goto nextPart
call sitandwait 10
call subroutine "sitandwait.txt" and pass one argument
If Statement
An IF statement takes the form
if (val1 comp-op val2)
code block 1
[else
code block 2]
endif
where val1 and val2 are string or numeric values, variables, or expressions, and comp-op is a comparison operator, one of:
=
<
>
<>
<=
>=
The two values are compared using the given operator; if the result is TRUE, then code block 1 is executed; if FALSE, code block 1 is skipped, and control passes to the optional code
block 2 or, if none, to the statement after the endif.
let ncars = $train(train1, length)
if (ncars < 10)
echo "short train"
create a variable and assign value from a system function
compare value to literal; if true, output this text
else
if comparison is false, output alternate text instead
echo "long train"
endif
While statement
A while statement defines a loop. It takes a form similar to IF:
while (val1 comp-op val2)
code block
endwhile
where the code block executes once every time the comparison expression evaluates to TRUE; if it is FALSE, the code block is skipped and control passes to the statement after the
endwhile.
let i = 1
while (i < 10)
echo Line @i
let i = i + 1
endwhile
create variable and initialize
compare variable to literal; if true, go to next statement
from here, jump back to start of loop
when comparison is false, jump to here
Use a CONTINUE statement within a loop to go to the next iteration, or a BREAK statement to jump out and terminate the loop.
Let/Set statement
Set/Let statements take the form
set var expr
let var = expr
where var is the name of a new or existing variable, and expr is an expression, one or more components joined by operators:
comp [op comp [...]]
A component is one of:
●
●
●
●
a number
an expression in parentheses
a variable name, with or without prefix @
a display string
Op is an arithmetic operator. Between two numeric components, it can be one of these four:
+
-
/
*
Between strings, only the + operator is used, and means concatenation of strings.
Examples:
let
let
set
let
v = (2 + 6) / 12
v2 = v + 99
AllowYardMode 0
s = "speed is " + $x_speed
Variables and Functions
A variable is a named value. You can make up a name, assign it a value, then use the name in place of the value in a script statement. This is the key to writing abstract code which
can work on different input data.
To create a variable and/or assign it a value, you use a LET or SET statement. To represent it in a script statement, you normally* precede it with "@" -- a symbol you can read as
"contents of," which identifies what follows as a variable name.
Example:
let CruisingSpeed = 55
...
at j22
speed @CruisingSpeed
* You don't need to precede a variable name with @ when you refer to it in a LET or SET statement. If you want to embed a variable contents into a larger string, use @ on both ends:
let s = "def"
echo The Alphabet: abc@s@ghi...
A system variable or function is a value supplied by the system. You call for a system value by giving a function name, often followed by a list of arguments in parentheses. An
argument might be the id of an object, a keyword requesting a specific action or value, or an input value for a calculation or operation. Sometimes you don't get a value back, you just
call the function to do some work, using a CALL statement.
System function names begin with "$". A list of them is given below, and also in the Reference tab of Script Central.
Examples:
echo Today's date is $DATE
echo Name of active layout is $LAYOUT(Name)
let r = $RAND(1,100)
echo A random percentage -> @r
let storedData = $READ("C:\myfile.txt")
let outputData = storedData + "additional info"
call $WRITE("C:\myfile_new.txt", @outputData)
A function family is a set of related functions with the same name, and a list of arguments which usually includes the identifier of an object and/or a keyword representing a specific
value. Several function families provide access to objects on the layout -- cars, trains, tracks, junctions, the layout itself -- while others work with general objects, like strings and files.
Some functions are "writable," meaning their values can be changed in LET or SET statements. Writable functions are indicated by "r/w" in the Reference listing in Script Central.
Example:
echo The load
let newLoad =
echo Changing
set $CAR(x44,
in box 44 is $CAR(x44, Loadname)
"Toy Tractors"
load to @newLoad!
Loadname) = newLoad
A local variable is one which is inaccessible outside of a certain limited region of code (or "scope"). Normally, when a variable is defined and assigned a value, it is "global" -- it can be
referenced by any scripts or actions anywhere. But if it is named in a preceding LOCAL statement, then it is known only to the script (or subroutine or proc) where it is defined.
Example:
* train script 1
let gv = "a global value"
local lv
let lv = "a local value"
* train script 2
echo global value was defined as: @gv
echo value local to script 1 is undefined here: @lv
An excellent discussion with detailed descriptions of each system function can be found on the web in TrainPlayer 6.1 - Extensions to the Trainplayer Programming Language (TPL).
Subroutines
A subroutine is a named body of code stored in a file outside a script. The code can be executed within the script by inserting a CALL statement including the name of the file.
To pass data into and out of the subroutine, one or more arguments may be included in the call. Arguments are numbered from left to right in the call, and are represented within the
subroutine as placeholders starting with "%". For example, wherever the subroutine contains "%1", it will be replaced by the first argument in the call.
Here is a simple example of a subroutine which takes a single argument. It doesn't do anything particularly useful, but the point of making it into a subroutine is that it could be made
fancier if needed.
* subroutine sitandwait <secs>
echo sitting for %1 secs...
after 0:0:%1
comment at first line of subroutine tells how to call
using passed arg in a string
wait number of seconds given by arg 1, then return
These lines become a subroutine if stored as a text file sitandwait.txt in the TP Scripts folder.
A proc is a type of subroutine which is not defined in an external file, but in a section of another script. Using proc and endproc statements within a script, you define a callable
block of code and give it a name.
proc sitandwait
echo ...
after 0:0:%1
endproc
defines proc and gives it a name
content as above
ends definition
This becomes callable once the script containing it is run. Including it within the master script guarantees this.
If either of the above is available, a script can then say
call sitandwait 5
to cause 5 seconds of idleness.
Display Strings
The term "display string" (DS) means a lengthy string for conveying information to the user or to a file. Each of the following commands takes a ds as argument, and all process it in
exactly the same way:
ECHO ds
NOTE ds
$MSGBOX([type,] ds)
$WRITE(fname, ds)
●
●
●
●
Display strings:
●
●
●
●
may contain references to variables. User variables are prefixed by @, globals by $. These are substituted by appropriate values before the string is output.
may be surrounded by quotes, or not -- author's choice. Quotes are removed before output.
may be multi-line text blocks containing returns and blank lines. A multi-line string must be quoted, and any embedded quotes must be doubled.
may be components of LET statements.
Quotes in TPL
Our general philosophy is: quotes are not required (except in certain situations listed below), but may be used if desired. Programmers used to formal languages tend to prefer quoted
strings. Thus either of these is valid:
echo this is a string to be output
echo "this is a string to be output"
In a display string, variables are substituted whether or not the string is quoted. Examples:
echo the speed of the crossing train is $train($x_train, speed)
echo "today is $date and it is already $time"
Quotes are optional around most function arguments and keywords. Thus both of these work:
echo the speed is $train(train66, speed)
echo the speed is $train("train66", "speed")
Where quotes are required:
1. Around a multi-word command, registry setting name, or filename -- that is, any of these which contains a space. In a menu, this applies only to a single level of a cascading menu.
Examples:
file open "c:\my file.txt"
<== filename with space
file "revert to saved"
<== menu command
set "Default Car Length" 400 <== reg setting name
3. Around a string containing a parsable character, where the meaning of that depends on the context. In a function call, an unquoted string must not contain the character ")", because
that would terminate the call. In a comma-delimited list, a string must be quoted if it contains comma. Examples:
call $write(c:\myfile.txt, a string with ) paren)
<== WRONG
call $write(c:\myfile.txt, "a string with ) paren") <== OK
4. Around a multi-line text block. This is the only way to define such a block, by enclosing it in double quotes and including carriage returns:
echo "this is a string
with multiple lines
and a blank line"
Note that if you want the string itself to include a quote, you must double it:
echo "string with embedded "" quote"
Table 1. TPL Command Reference
This table shows the command vocabulary as it stood at some point prior to release. For a more up-to-date listing, consult the Reference tab in Script Central. Contents of that tab can
be exported for printing if desired.
Flow Commands
Goto <label>
Autopause <secs>
If (<expr> <comp-op> <expr>)
Else
Elseif (<expr> <comp-op> <expr>)
Endif
While (<expr> <comp-op> <expr>)
Endwhile
Break
Continue
Exit
jump to statement after given label
turn on pauses of given duration during train movements
compare two expressions, branch based on result
begin alternate block after IF
evaluate alternate after IF
end IF block
compare two expressions, execute or skip next block based on result
end WHILE block
break out of WHILE loop
continue to next iteration of WHILE loop
terminate running script
Layout Commands
Throw <jxn> [<pos>]
Rotate <ttbl> <jxn> [CCW]
Tablestop
Sound [loop|stop] <spath>
throw switch to given position or next available
rotate given turntable to junction, clockwise unless CCW added
stop turntable rotation
play or stop sound in named wav file. If LOOP omitted play once.
Set Commands
Set <var> <expr>
Reset <var>
Let <var>=<expr>
set variable to value; equivalent to LET <var>=<expr>
reset registry variable to stored value
set given variable to value of expression; create variable if needed
Subroutine Commands
Call <routine> <arglist>
Proc <routine>
Endproc
Local <var[,var...]>
call given subroutine or proc and pass any required arguments
begin definition of procedure of given name
end procedure definition
declare local variables
Return
return from subroutine or proc to calling script
Train Commands
Forward
Reverse
Speed <mph>
Stop
Uncouple <slot> OR <car> OR <car><car>
Horn [<msec>]
set direction to forward
set direction to reverse
set speed to given mph; starts train moving if stopped
decelerate to a stop
uncouple at given position, at given car, or between given cars
sound train horn for 3 sec or given time in millisec
Train Control Commands
Train <train>
Load [Toggle] [Car/Train/Cut] <ids> [<loadname>]
Unload [Toggle] [Car/Train/Cut] <ids>
Drive <train>
Enddrive
Start <train> [<mph>]
select given train
load given car(s) with given load or default
unload given car(s)
transfer control temporarily to given train
transfer control back to original train
start train script, or start train moving at 5 mph or given speed
User Interface Commands
Echo <string>
Input <var> [<prompt>]
Note [<string>]
display given string in schedule window
set user variable from input dialog, optionally using given prompt
display given string in popup window; hide window if no string
Car Functions
$CAR(label, ID)
$CAR(label, Loaded)
$CAR(label, Loadname)
$CAR(label, Label)
$CAR(label, AAR)
$CAR(label, RevEngine)
$CAR(label, Note)
$CAR(label, Track)
$CAR(label, <any>)
$CAR(label, Class)
$CAR(label, Type)
$CAR(label, Position)
$CAR(label, SortOrder)
numeric car id
1 if car is loaded, otherwise 0
name of load assigned to car, if any
car label
car aar code
1 if car is marked as reverse engine, else 0
user-applied note on car
track number where car is currently located
custom property; set blank to remove
general car class
name of car type within collection
trackno, dist to S end, 1=>headed S
user-applied integer value
$CAR(label, Train_ID)
$CAR(label, Car_ID)
$CAR(label, Train)
$CAR(label, Consist)
$CAR(label, ExcludeOps)
$CAR(label, Load)
$CAR(label, Location)
id of owning train
id of car
name of owning train
one-word description of train consist
X => exclude car from switchlists
current load or 'unloadable' or 'empty'
at or near track or station
Train Functions
$TRAIN(name, ID)
$TRAIN(name, NCars)
$TRAIN(name, Car)
$TRAIN(name, Name)
$TRAIN(name, Speed)
$TRAIN(name, Direction)
$TRAIN(name, Length)
$TRAIN(name, Flip)
$TRAIN(name, <any>)
numeric train id
number of cars in the train
label of car i, i between 0 and NCars-1
train name, either user-assigned or Train<id>
current speed, same as returned by $SPEED
F = forward, R = reverse, T = toggle
length in cars; returns same value as NCars
invert train on track
custom property; set blank to remove
Layout Functions
$LAYOUT(Name)
$LAYOUT(NTrains)
$LAYOUT(Train)
layout name
number of trains on the layout
name of train i, i between 0 and NTrains
Track Functions
$TRACK(id, OccupiedBy)
$SCENERY(id, Show)
$SCENERY(id, Hide)
$SCENERY(id, Toggle)
$SCENERY(id, IsVisible)
$STATION(id, OccupiedBy)
$TURNTABLE(id, OccupiedBy)
$TURNTABLE(id, Track)
$TURNTABLE(id, AlignedTo)
return labels of cars on track
show scenery object
hide scenery object
toggle visibility of scenery object
1 if scenery object is showing, else 0
return labels of cars in station
return labels of cars on turntable
id of bridge track
id(s) of 1 or 2 locked external tracks
String Functions
$STRING(string, Length)
length of string in characters
$STRING(string, Contains, argument)
$STRING(string, StartsWith, argument)
$STRING(string, EndsWith, argument)
$STRING(string, NextToken[, delims])
returns 1 if string contains argument, 0 if not
returns 1 if string starts with argument
returns 1 if string ends with argument
returns next substring, removes from string
File Functions
$FILE(name, Open)
$FILE(id, Close)
$FILE(id, ReadAll)
$FILE(id, ReadLine)
$FILE(name, SaveVars)
$FILE(name, ReadVars)
open named text file, return id or 0 if fail
close file
read contents and return as string
read next line; return 'EOF' when done
write all user variables to named file
read all user variables from named file
System Functions
$RAND(i1,i2)
$SUBSTR(i1,n,s)
$FINDSTR(sub,s)
$SETTING(name)
$RRCLOCK(arg)
$READ(f)
$WRITE(f,[a,]s)
$STRLEN(s)
$MSGBOX([type,]s)
$VIEW(op,name)
$SWITCH(j)
$SYSTEM(cmd)
random integer between i1 and i2; defaults false,100 if not specified
substring of s starting at i1, n chars long; if n = -1, go to end
return zero-based position of sub within s, or -1 if not found
return named registry setting
rrclock functions: get, set t, add t
return contents of text file f as string
write string s to file f, optionally append; 0 if fail
return length of s
show message s with ok/cancel or yes/no buttons; return 1=ok/yes 0=no
get/set visibility of named window or feature; op=IsVisible,Show,Hide
return switch pos at j (0 or 1 standard), -1 if j not a switch
execute system command in command box
System Variables
$TIME
$DATE
$LAYOUT
$TRAIN
$CAR
$SPEED
$KEY
$X_TRAIN
$X_SPEED
current time of day (h:m:s in 24-hour format)
today's date (mm/dd/yyyy)
layout name
name of selected train
name of selected car
speed of train in MPH (KPH if metric settings in effect)
numeric code of last key hit on keyboard
name of crossing train -- train owning calling script
speed of crossing train
$X_CAR
$DATADIR
label of crossing car
TP application data directory path
Wait Conditions
AT <jxn>
AT <(t j d)>
AT <h:m[:s]>
AT <station>
AFTER <jxn>
AFTER <(t j d)>
AFTER <h:m:s>
AFTER <station>
ON STOP
ON COUPLE
ON THROW <jxn>
ON TABLESTOP
ON KEY [<key>]
lead car of train crosses junction
lead car of train crosses exact spot (dist d from jxn j on track t)
specified time is shown on layout clock; h:m required, secs optional
lead car of train enters named station
last car of train crosses junction
last car of train crosses exact spot
specified actual time has elapsed on wall clock
last car of train leaves station
train comes to a complete stop
train couples with another car
specified switch is thrown by any means
turntable finishes rotating
user presses any key or specified key
Scheduling
This chapter describes a couple of features helpful in making up a schedule or timetable for your railroad.
The idea is this. Suppose you are making up a timetable for the daily run of a train which goes from A to B with
several stops in between. You will need to know the average time it takes to get from one stop to the next. The
scheduling features help you with this, by reporting when the train arrives and departs at stations along the way.
You can use these reports to calculate travel times for your schedule.
In TrainPlayer, the travel times are likely to be in minutes, rather than hours as the prototype would take. For this
reason there is a scale clock -- a clock which runs faster than the one on your wall, so that, say, ten minutes on
the layout equals an hour on the railroad. So you can run your simulated eight-hour shift all the way from A to B
and still be done in time for lunch.
This chapter used to be bigger. With the introduction of Ops, the part about Stations was removed and expanded
into its own chapter.
Clock
Schedule Window
Clock
When operating a model railroad, it may take one minute to travel from Cincinnati to Columbus. Such time spans
don't make for very convincing schedules. The model railroader's solution to this is the "scale clock," which runs at
some multiple of normal speed. If that multiple is, say, 6, then it appears to take 6 minutes to make the trip, which is
still record time but at least more manageable.
TrainPlayer offers an adjustable-speed railroad-style scale clock in its own dockable, resizable window. You can
use it to time your operations, or start it and let the program refer to it as it keeps track of your schedule.
If the clock is visible when you open a layout, then it will start automatically as soon as any train moves.
To operate the clock:
1. To show or hide the clock, use Tools Clock. If it
is visible when you exit the program, it will come up
again when you restart.
2. To start the clock: right-click in the clock window and
choose Start from the context menu. The clock
hand advances about once every scale minute.
3. To stop the clock: right-click and choose Stop.
4. To reset the clock back to its default starting time: click
Reset.
5. To modify the starting time or clock speed, click Settings. This brings up the Clock Settings dialog.
Schedule Window
Together the station definitions and the clock give the program enough information to keep track of train arrivals and departures.
The Schedule Window reports and collects this data. It works automatically -- all you have to do is display the window and then
start driving. Once you have driven your route successfully, the Schedule Window contains a schedule you can print out and
hang on the wall for a future operating session.
The Schedule Window also serves as the output window when running scripts. When a script is running, it can report its
activities in this window. By default, the window comes up automatically as soon as you start playing a script.
The Schedule Window also serves as the place where text switchlist instructions are displayed after an ops generation. During
an ops session, you may want to turn off arrival and departure and script messages so the switchlist data doesn't scroll away.
Like the clock window, the schedule window is dockable and resizable. Our preference is to put the two side by side at the
bottom of the screen, then adjust the divider between them until the clock window becomes square, like this:
To show or hide the Schedule Window: choose View Schedule.
To clear the window: right-click in the window, choose Clear All.
To copy the window contents to other programs: press and drag within the window to select the text
you want to copy, then right-click and choose Copy. The selected text is copied to the Windows Clipboard. It can be pasted
into Notepad, Microsoft Word, or any other program which accepts text.
To control the output: the context menu includes two checkmark items to specify what you want to see in the
window: Show Stations and Show Script Output. Check or uncheck the type(s) of data you want.
Customizing
There are many ways to adjust the look and feel of TrainPlayer. Some have been covered in other chapters; this
one describes the rest.
Operation Preferences
Switch Preferences
General Preferences
Track Preferences
Train Preferences
Style Preferences
Road Preferences
Customizing Toolbars
The Customize Dialog
Windows and Views
Operation Preferences
Settings related to train operation. Called from menu command File > Preferences.
Speeds:
Maximum speed
Sets the speed at the top end of the dial. No train can
exceed this speed. Use the drop-down at the right to
choose whether speeds are displayed in miles or
kilometers per hour.
Coupling speed
Sets the speed below which coupling can occur. If
trains approach each other with a relative speed
below this value, the couple; above this value, they
collide (bounce or crash).
Options:
Collisions
Determines what happens when a train hits a closed
switch, end of track, or another train. Choose Bounce
if you want the train to go into reverse and keep
travelling. Choose Crash if you want the train to stop
and destruct.
The destruction is temporary. After a crash, the train
will repair itself as soon as you begin to move it.
Crash severity
Affects the amount of destruction upon crashing. The
lowest values cause a bit of derailing; highest values
cause cars to blow apart and scatter across the
landscape. Has no effect unless Collisions is set to
Crash.
Acceleration
Sets the amount of acceleration / deceleration when
trains start, stop, or change speed. A low value
reduces the effect and makes train control more
responsive; a high value increases the effect so that
trains take longer to come up to speed or coast to a
stop. Set the value to zero to eliminate acceleration.
Shift-click to uncouple
Affects what happens when you point the mouse
cursor between two cars on the layout. With this box
unchecked, the cursor changes to an uncouple icon
and a click causes the cars to uncouple. With the box
checked, the cursor does not change unless you are
pressing the shift key; this prevents accidental
uncouplings.
For a picture of the uncouple icon, see Moving Trains
By Hand.
Click dial to rotate
Check this box to enable a special feature of the
control panel. When this box is checked, then when
you click a point on the perimeter of the speed dial,
the dial automatically rotates to that point. Uncheck
this box if you find that feature to get in the way.
Switch Preferences
Settings for switch display and operation and for the switch window. Called from menu command File >
Preferences.
Switch display:
Open lights
Check if you want to see highlight squares on the
two tracks forming the open route through a switch.
The default color is green, but you can change it
using the color button.
Closed lights
Check if you want highlights showing the other track
(s) not on the open route. Default color is red,
change with color button.
Highlighting
Color of the highlight indicating when the mouse
cursor is pointing to the frog (center) of a switch and
can be thrown. Note: if you are in TrackLayer, this
color applies only when the Run tool is active.
Distance to frog
Distance in arbitrary units between the center of the
switch and the open / closed light.
Light size
Size of highlight square in arbitrary units.
Switch operation:
Open lights
Check if you want to see highlight squares on the
two tracks forming the open route through a switch.
The default color is green, but you can change it
using the color button.
Closed lights
Check if you want highlights showing the other track
(s) not on the open route. Default color is red,
change with color button.
Highlighting
Color of the highlight indicating when the mouse
cursor is pointing to the frog (center) of a switch and
can be thrown. Note: if you are in TrackLayer, this
color applies only when the Run tool is active.
Distance to frog
Distance in arbitrary units between the center of the
switch and the open / closed light.
Light size
Size of highlight square in arbitrary units.
Barrel through
Check to allow a train to pass through a closed
switch. If this box is unchecked, then when a train
attempts to enter a switch from a closed track (i.e.,
pass through a red light), it collides -- bounces or
crashes, depending on the collision mode (see
Operation).
Auto-throw
A stronger version of Barrel Through: allows a train
to pass through a closed switch, then changes the
switch to match the route taken. This is the default,
and allows for easy if non-realistic operation -- the
train meanders the layout, setting switches to follow
the route as it goes.
Random throw
Check to have a random switch thrown every so
often, where the time between throws is set in the
number box to the right. This is a way to vary the
route if you just want to let the trains run.
Switch Window:
Background
Click to set the background color of the Switch
Window.
Show Next Switch
Check to have the window redrawn every time the
train moves across a switch, so it is always showing
the next switch coming up along the route.
Uncheck if you prefer to operate the window
manually. In either case, click a switch on the
layout to reposition the window around that area.
General Preferences
Various program settings. Called from menu command File > Preferences.
General options:
Metric units
Select type of units for dimension and
speed displays throughout the
program. Note: Metric units are
turned on whenever you select one of
the metric choices in the units dropdown in various dialogs.
Show car-top images
Check to display bitmap images for car
tops, uncheck to display tops as solid
colors.
Layout sounds
Check to activate all sounds except
loco running sounds. These include
train horns, switch throws, couplings,
sounds associated with stations,
switchlist completion sounds, and
others.
Running sounds
Check to activate speed-dependent
engine running sounds. These sounds
can also be turned on or off from the
layout context menu. For more
information, see Running Sounds.
Mouse wheel zoom
Check this box if you want the mouse
wheel to zoom the layout in and out.
Uncheck if you prefer to use the wheel
for default behavior (vertical scrolling).
Options at program startup:
Show splash screen
Display the splash screen for a few
seconds. Click takes it down.
Show open layout dialog
Bring up the Layout Chooser.
Show last open layout
Automatically open the latest layout
from the Most Recently Used list.
Check for program updates
Check the website to see if a newer
version of the program is available. If
you choose not to have this done on
startup, you can do it manually using
Help > Check for Updates.
Other general options:
Show control panel
Automatically bring up the control
panel when opening a layout having
trains.
Show schedule window
Automatically open the Schedule
Window when starting to play a script.
Many scripts direct status reports to
this window as they run.
Show industry names
Check to display industry names in red
whenever stations are on display. If
unchecked, industries are not shown,
just station names.
Show station color codes
Determines the style of station display
when color codes are active during an
ops session. If checked, station colors
are shown as thick outlines around the
station; if unchecked, colors show as
solid blocks.
Auto-save:
New in version 5.2, auto-save creates a copy of your layout periodically, so that in case of program or computer
crash, you won't lose much work.
To enable auto-save: check the box "Auto-save every" and enter the time between saves.
After the specified time, the program makes a copy of your layout in the system TEMP directory, overwriting any
previous copy. The name of the file is the same as your layout, with "bak" appended. You see an indication on the
status bar while the file is being saved.
To retrieve an auto-saved layout: use the command Restore Backup on the File menu. This opens a file
browser in the directory where saved layouts are stored. Choose the one you want and open it.
Track Preferences
Settings for displaying and building track. Called from menu command File > Preferences.
Track display options. The track color options work in conjunction with the Color commands on the
Track context menu. By default, track is all the same color as set in this dialog. The track context menu lets you
change specific sections to some other color. If you want to draw a set of track all in some other color, set the For
New Track color, then begin drawing.
Default color
Click to change the default track color -- the color applied to all
track not specifically colored otherwise.
For new track
Click to set the color to be applied to track you are about to draw.
This allows you to draw a section of track (yard, mainline, etc.) all
in the same non-default color.
Thickness
Width in pixels of track lines on the screen. The same width is
used in printing and exporting an image file.
Rail options. If you are displaying double rails around the track (see Double Rail Display), you can adjust the
color and rail separation here. To display rails, use View > Rails on the main menu.
Color
Click to set the color for display of rails. Default is silver.
Separation
Enter the distance between rails, in current selected units.
Default is 0.9" HO, or about 6-1/2 feet on the prototype.
Check Track. Check to have the track checker run every time you add or modify tracks, so if an error occurs
you will be notified of it immediately. If this box is checked, and an error is detected while drawing, an alert appears
describing the error.
Snap options. These options affect drawing certain track sections and circles in TrackLayer. This set of
options is dimmed if you are running TrainPlayer.
Snap options aid in creating precise layouts quickly. Angle snap is for creating switches at one of a set of standard
turnout angles. Parallel snap is for drawing yards and ladders, placing switch points in such a way that parallel
tracks are evenly spaced. Radius snap is for drawing and editing circles with standard radii.
Applies when the Track tool is active, and you are drawing a
straight section with its stationary point lying on another straight
section, i.e., you are creating the branch of a switch (see left
diagram below). As you drag the moving end of one track, if the
angle between it and the stationary track is close to one of the
checkmarked choices, the moving line snaps to that angle. When
snap occurs, the cursor changes to show the snapped angle.
To angle
You may choose up to four different snap angles: #4, #6, 90
degrees, and/or one other angle between #1 and #9, selected
from the drop-down. Note: The designation "#N" means an
angle which deviates from linear by one part in N. On a
calculator, the angle is the arctangent of 1/N. For example, a #4
angle is 14.04 degrees. #1 is 45 degrees.
Angle snap choices are disregarded unless To Angle is checked.
This allows you to turn the feature on and off without losing your
preferred set of snap angles. An alternative to the To Angle
check box is the toggle Snap On/Off on the Track context menu.
Applies in similar situation as angle snap, with one additional
condition: the switch you are creating must be within a certain
distance of an adjacent switch. This distance is set in the edit
box to the right.
To parallel
Refer to the right diagram below. When parallel snap is in effect,
and you start to draw anywhere near B, the starting point snaps
to exactly B, where the distance to the neighboring track is as
specified (default is 2" in HO). After the starting point snaps into
place, then angle snap will kick in as you drag so that the track at
B remains parallel to its neighbor.
Sometimes parallel snap can prevent you from creating a switch
at a desired place. When this happens, hold down the Shift key
as you begin to draw, so you can place the endpoint where you
want, then release Shift as you continue to drag so angle snap
will take effect.
Applies when you are modifying the radius of a circle: drawing a
new circle with the Shift key up, or editing a circle with Shift
down. When the radius is close to one of the checkmarked
choices, it snaps to the exact value. The radius is displayed on
the status bar as you drag.
To radius
Units
You may choose up to four different snap radii: three standard
choices and/or one other value you specify. All these choices are
labelled in the selected units, using the scale of the current layout
if one is open. For example, the above diagram shows the
standard choices as 18"-24" in HO; if the active layout were O,
these choices would be displayed as 36"-48."
Choose units for display of radius values. The choice made in
this drop-down affects dimension displays throughout the
program.
Snap examples. Left: user drags up and left from the main line at
point A; when the angle is close enough, it snaps to exact #4 and the
cursor changes. Right: user drags left from a point near B; starting point
snaps to the exact point B, then angle snap takes effect so tracks remain
parallel.
Any snap option can be temporarily overridden by holding down the Shift key as you drag. Or the entire set of
options can be overridden using the Snap On/Off command on the Track context menu.
Train Preferences
Settings for trains, random train generation, and car labels. Called from menu command File >
Preferences.
Random Train Generation - Generate Trains
Click Generate Trains to remove all trains from the layout (if any) and replace with a random new set of
trains distributed around the tracks. This command cannot be undone, so you might want to save a copy of the
layout before trying it. Settings which affect the generation are:
% track
Determines the number of trains to be generated, by specifying how
much of the track to cover. "Eligible" means track which is unpopulated
and long enough to hold trains. Increase this value to generate more
trains, decrease for fewer.
% engines
Increase to have a larger number of trains with motive power, decrease
to have a larger proportion of standing cars.
% steam
Increase if you prefer engines to be steam, decrease if you want more
diesels.
If you try a generate and don't like the results, try again. Each click gets you a new set.
Delete All Trains
Click to delete all trains from the layout. An alert warns that this operation is not undoable, and gives you a chance
to cancel. If you click OK, all trains will be removed from the layout.
Note: if you just want the trains to be invisible but not deleted, use View > Trains from the main menu.
Car Defaults
These settings choose a couple of general preferences involving cars.
Collection
Class Names
Choose a default car collection to be in effect when you are creating a
new layout. See Default Cars. The types of cars you select here will be
created from tools on the Car Toolbar.
Choose a language to be used when naming car classes. This is the
same choice you can make in the AAR Car Types dialog. The language
chosen here affects car class names throughout the program, wherever
car descriptions appear (dialogs, tooltips).
Car ID Label Style
Settings in this area are for adjusting the appearance of car-top labels, as described in Car ID Display.
Font
Click to bring up the system Font Selector dialog to select font style and
size to be displayed on car-top labels. Choose a font which is not so
large that it exceeds the size of the car image.
Background
Click to bring up a system Color Chooser to specify the background color
you want behind car labels. This color is overridden when color coding is
in effect.
Turn Off Labels
Check this box if you want car labels to be hidden while cars are moving,
then automatically displayed again on stop.
Style Preferences
Settings for application style. Called from menu command File > Preferences.
Application Style
The "application style" refers to the overall color and design scheme used for windows, menus, toolbars, and dialogs. Several choices are available; not all of them
work or look good on all operating systems. The thing to do is choose one from the drop-down -- the change takes effect immediately, so you can see how you like
it before you commit. Clicking Cancel in this dialog will revert back to your previous app style.
The "TrainPlayer" style is one we developed to match the brass-and-wood motif of the program. For pictures of other styles, see Sample Application Styles
below.
Some styles have adjustable colors (TrainPlayer is one of them). With one of these styles in effect, you can move the Hue and Saturation sliders to adjust
the colors and brightness of the theme. There is no recipe for doing this -- fool with it until you get something you like.
Background Colors
There are two types of background on the TrainPlayer screen. You can choose
your favorite colors for each of these.
Layout background: color of the layout surface for a new layout or one
which does not have a background image. The default for this color is off-white.
To set a different background color for a particular layout, use the Color button
in Layout Properties.
Window background: color surrounding the layout when it does not fill
the document window. Default is a light gold.
To change one of these colors, click the appropriate color button in the dialog
and select from the system color chooser.
Sample Application Styles
Office 2007
TrainPlayer
Carbon
Visual Studio Style
Road Preferences
Settings for tie and roadbed styles. Called from menu command File > Preferences.
In Version 3.3 we introduced the ability to decorate track with ties and roadbed. This has proved popular with layout designers, but
problematic in its implementation as large collections of scenery objects. Now, in 5.3, ties and roadbed are no longer objects on the
layout, but track drawing styles, like special paint brushes. You just turn them on or off, and they take effect when the layout is drawn,
printed, or exported.
plain track =>
with ties and solid roadbed =>
In Road Preferences, you indicate whether you want to see ties or roadbed on the track, and how you want it to appear.
By default, settings apply to all track on the layout -- you get ties and/or roadbed on all or none. However, you can mark individual
tracks to be exempt. For details, see below.
The checks indicating what to hide and show are view settings -- they are saved with the layout. Other choices are global, and apply to
all displays of ties and roadbed in all layouts. Thus you can have one layout showing ties only, another showing ties and roadbed, but
both use the same tie length and spacing settings.
Tie Properties
●
●
Show Ties: check to have ties displayed on all non-exempt track.
Length: length of each tie, in units selected in the Units drop-down at the
bottom of the dialog. The diagram at right shows which dimension is which.
●
Width: width of each tie.
●
Spacing: distance between tie centers.
●
Color: color of generated ties.
Roadbed Properties
●
Show Roadbed: check to have roadbed displayed on all non-exempt track.
●
Style: choose solid color or one of the roadbed patterns listed, as found in your Scenery folder.
●
Width: width of the generated roadbed, in units selected in the Units drop-down at the bottom of the dialog.
●
Color: roadbed color,if solid color is indicated for Style.
To exclude ties or roadbed from specified tracsk:
By default, every track on the layout is affected by the settings. You can override this by setting a "No Ties" and/or "No Roadbed" flag
on selected track sections. Using the Track Edit tool, right-click a track section (or one of a multi-track selection), then choose the
option you want to toggle:
Deleting old tie and roadbed scenery objects:
Because you are sure to like the new scheme, we provide a way to get rid of all traces of the old. If you have a layout on which you
have created ties and/or roadbed using an earlier version, you can modernize it by deleting those scenery objects and using the new
style instead. Here's how.
With a layout you suspect contains old tie or roadbed scenery objects, Bring up File > Preferences (General tab) , and you
see a button "Delete Old...." This button only appears if the layout contains old tie or roadbed objects.
Click the button and you are offered the chance to delete them all with one click, or cancel. If you agree, click Yes, and the objects are
deleted. You can then Save As to save the modified layout without affecting the old.
Exported backgrounds: What many users have been doing is adding ties and roadbed to their layouts, then exporting the
image -- thus capturing those objects as part of the background -- then deleting the objects. If you are in this category, then the
method described above won't work. What you need to do is to change the background to one without ties or roadbed. If you thought
ahead and saved the original background, then you can swap it in using Layout Properties > Advanced >
Background Image. If not, improvise. Or leave it as is -- the new ties and roadbed will hide the old.
Customizing Toolbars
Toolbars are handy for keeping your favorite commands easily clickable. The installed program has our choice of commands on the toolbars
and has them in default locations. You can change these to suit yourself.
Toolbars start out docked on the top of the main window.
To reposition a toolbar:
●
●
●
Press the "grabber bar" at the left end of the toolbar and drag. If you drag it away from the window frame, it will float (as with the Train
and Scenery toolbar in this picture).
Drag a toolbar to any edge of the window frame and it will dock there.
If a toolbar is floating, you can change its size and shape by dragging the lower right corner of the floating window.
To remove a toolbar:
●
●
Drag it away from the frame, so it floats, then click the close (x) box. Or:
Uncheck it in the View Toolbars menu.
Modifications made to toolbar arrangements are saved between program sessions. To set all toolbars back to factory defaults, use the Reset
buttons in the Tools Customize dialog.
The Customize dialog
To modify the commands on toolbars, choose View Toolbars Customize or Tools Customize to bring up the
Customize dialog, shown below. You can then use drag-and-drop to set up your toolbars. As long as the
Customize dialog is on the screen, you can:
●
●
●
Remove a button from a toolbar by dragging it off into space.
Adjust the sizes of non-button controls on the toolbars -- train window, train combo, and speed display -- by
clicking in the control to select it, then dragging an edge of it.
Add a button to a toolbar by dragging it from the Commands window (Commands tab, shown below) to the
place you want it on a toolbar. If the command has no icon, the button will be labelled with text.
The Customize dialog is brought to you by BCGSoft.
For details of the individual tabs, see separate pages:
Commands
Toolbars
Keyboard
Menu
Options
Windows and Views
Some appearance features were described in Adjusting the View. Others are available on the Window menu:
●
●
●
●
New Window: creates a new window with a separate view of the same layout. Views in separate windows may
be resized or zoomed independently. Trains runs in all visible views.
Cascade, Tile Horizontal, Tile Vertical: rearranges the windows on the screen.
Window Manager: brings up a standard Windows dialog for selecting and arranging multiple windows, shown
below.
<Active Window>: all open windows are listed at the bottom of the Window menu; choose one to activate and
bring it forward.
An effective way to view a running railroad is to set up one window showing the overall layout, and another zoomed in and
following the train, as shown here:
To set up a dual view, with a layout on the screen:
1. Choose Window New Window to create a second view of the layout.
2. In the original view, use View Zoom In to get a close view of the train. Right-click the layout and make sure
Auto-Follow is checked.
3. Choose Window Tile (pick a direction based on the layout orientation) to arrange both windows together.
4. In the second window, choose View Fit To Window so you can see the entire layout in it.
The train runs in both windows.
Welcome to TrackLayer!
TrainPlayer lets you operate trains on prepared track plans. TrackLayer is the program which prepares the track
plans. You can use it to edit plans provided by us, or draw your own from a diagram, or just sketch some track on a
blank screen.
The two are actually the same program. When the program is in TrainPlayer mode, you get a collection of tools for
building and running trains. In TrackLayer mode, you get one additional toolbar, with a half dozen tools for drawing
and editing track, curves, switches, and turntables. Building and operating features are fully integrated --- as soon
as you have a single piece of track down, you can put a train on it and operate with all the features of TrainPlayer.
The best way to get started with TrackLayer is to go through the next chapter, "Getting Started," and then work your
way through the tutorial in the following chapter. The tutorial leads you through the complete process of preparing a
small layout. The remaining chapters go into more detail on track-laying operations.
About This Manual
About the Layouts
Where to Go for Help
Getting Started
Where you start with TrackLayer depends on what you have to start with. If you have a picture of a track plan -from a book or magazine, web site, CAD program, or a sketch on a piece of paper -- then you're the user
TrackLayer was designed to accommodate. Most of the features of the program are aimed at tracing over a
diagram, applying track where lines are already laid out.
If you don't have a diagram, you can draw a plan by hand on a blank tabletop. If a rectangular space will do,
choose the size and scale you want and you're ready to lay track. If you are designing for an L- or odd-shaped
space, you might consider using a drawing program to make a scale drawing of the space outline, as background
for sketching track.
Starting TrackLayer
Layout and Image Files
The Overall Process
What's Next
Try your hand at creating a small layout, the Rockport & Oyster Bay, in the tutorial.
Starting TrackLayer
There is only one program containing both TrainPlayer and Tracklayer.
To start the program:
Select TrainPlayer from the Start menu under Programs > TrainPlayer, or double-click the icon on your desktop. The splash
screen and about box will tell whether you are running in TrainPlayer or TrackLayer mode, as determined from the license key you entered.
If you are running the demo version, you have a choice. At startup, you are presented with an alert asking if you would like to enable
TrackLayer features. The demo version allows you to use all TrackLayer features except Save and Print.
If you're only interested in trying TrainPlayer, click No. To change your mind later, choose Help > Enable TrackLayer
Features. Click Yes to enable TrackLayer features at the outset, and prevent this alert from appearing again.
The Track Toolbar
The main difference you see on the screen when you are in TrackLayer mode is the addition of the Track Toolbar:
Tools on the Track toolbar are as follows. Some are duplicates of commands available in TrainPlayer.
Edit tool
Track tool
Circle tool
for selecting, moving, deleting track or other objects
for drawing straight track sections and switches
Turntable tool
for drawing turntables
Station tool
for drawing station areas (also available in TrainPlayer)
for drawing guide circles, used in making curves
Run tool
for running trains -- behaves just like TrainPlayer
View Background
turns on/off background image
View Tracks
turns on/off display of tracks
View Grid
View Refresh
turns on/off display of grid
refreshes and updates screen
The Blank Layout
When TrackLayer starts, it presents a default blank layout: 4' x 8', HO scale, with a 12" grid:
At this point you can:
●
●
●
Load an image. If you have a picture or track plan you want to work with, ignore the default layout and instead load the picture.
If the image is already in the form of a graphics file, see "Loading an Image" in the next section; otherwise, see "Preparing the Image"
to get the image ready for TrackLayer use.
Start drawing. The default 4x8 space is ready for track, and useful for learning or sketching. If you want to start drawing, you
can go to "Straight Track and Switches."
Change the size and scale. If a 4x8 HO layout isn't what you have in mind, create a new blank layout the size and shape
you want. See "Creating a New Blank Layout." Once you choose a particular size and scale, that becomes the default for all new
layouts.
Layout and Image Files
About Layout Files
A layout for use in TrainPlayer consists of two files:
●
The layout file (extension .rrw). The layout file contains the definitions of all tracks, trains, stations,
and every other object and bit of data about the layout.
You can see for yourself -- an rrw file is plain text in xml format, so you can open it with Notepad or
any text editor. Better yet, change its extension to .xml and double-click -- it will open in your
browser in collapsible outline form.
●
The image file (extension .jpg, .bmp, .png, .gif, .tpg). The image file contains the background graphics
-- scenery, text, and track lines in a picture of the track plan.
Image files can come from a variety of sources. An image file suitable for TrackLayer use has these characteristics:
●
●
●
High resolution. The resolution should be 300 DPI (pixels per inch), so that it will look good in closeup views. A typical high-resolution image file is around 1MB in size.
Cropped. The image should be cropped tightly around the edges of the layout, with a minimum of white
space surrounding. This makes better use of your screen space and allows the program to calculate the
layout size accurately.
Standard format. TrackLayer accepts standard JPG, GIF, BMP, and PNG formats, as well as our
own called TPG, the "TrainPlayer Protected Graphics" format, an encrypted form of a JPG file. The
encryption prevents the image from being used in programs other than TrainPlayer and TrackLayer, and
protects the file from opening without the appropriate license. If you are licensed to use a layout in
TrainPlayer, then you can open the TPG file in TrackLayer to use as background.
Layouts distributed with TrainPlayer are installed in the trainplayer\layouts directory (.rrw files) and trainplayer
\layouts\images (.tpg). When you create a new layout with TrackLayer, you can store it in the same directories and
it will show up in the Open Layouts dialog.
The rrw file contains the name and relative location of its image file. The two files need not be in the same location.
Preparing an Image
Images on Paper: If you have a track plan from a book or magazine, or a drawing on a sheet of paper, the
picture will need to be scanned or otherwise digitized. Here are three ways to do this:
●
●
●
Scan it yourself. If you have a scanner, set it for 300 DPI, scan, and use the scanner software to
crop and rotate the image if necessary. Save as JPG.
Visit Kinko's. Many outfits will do scanning. Take the picture, a few dollars, a blank CD if you have
one, and return with an image file.
Use a camera. A good high-resolution image can be made with a digital camera aimed at a layout
picture or at the layout itself, if you have the equipment and the know-how.
Images from the Web: If you have a track plan on a Web page, you can save it as a JPG file for use in
TrackLayer. In Internet Explorer you can do this by right-clicking on the image and choosing Save Picture
As...
Be sure you're saving the largest possible image. Don't save a thumbnail picture.
Images in CAD programs: all CAD programs save files in some format, and many will save to standard
graphics formats. If your CAD program can save to JPG, BMP, GIF, or PNG, you're all set -- just save the file in
one of those formats, and it can be used in TrackLayer.
Many programs allow you to set export options, depending on the output format chosen. If you can set options, be
sure to choose "high resolution" or "highest quality" before you export.
If your program does not export to one of the formats listed above, but to another such as DXF or EPS, you will
need to export to the supported format and then convert. You can find conversion programs on the Internet -- for
example, a search for "DXF to JPG" turns up several programs for converting CAD files to graphics.
As a last resort, you can take a screen shot:
1. Open the layout in your CAD program, and adjust to make the image as large as possible.
2. Press Print Screen on your keyboard.
3. Start Paint, the system bitmap editing program. On most systems Paint is found under Start > Programs
> Accessories.
4. Choose Edit Paste. The screen image you captured is brought into Paint.
5. Move the image. When you paste, the image is automatically selected and ready to drag. Drag so that the
top left corner of the layout is at the top left of the Paint window.
6. Crop. Use the Select tool to draw a rectangle just around the border of the layout, then Edit Copy,
File New, Edit Paste. You should now have a picture of just the layout, without desktop or other
surroundings.
7. Save as JPG or BMP.
Loading an Image
To load an image file:
●
●
Choose File Open.
Open a file of type JPG/JPEG, BMP, GIF, PNG, or TPG.
The image appears on the screen, overlaid with a default grid.
Creating a New Blank Layout
If you don't have an image and just want to sketch track on a blank screen, start by creating a space with the
dimensions you have in mind.
1. Choose File New. The New Layout dialog appears:
2. If you want a layout of standard size and dimensions, try the Size drop-down and see if your choice is
there. The program offers a collection of standard layout arrangements, including various NTrak modules.
If you choose one of the standard sizes, you can skip the rest of this section and just click OK.
OR:
3. Choose the scale you want in the Scale drop-down, and enter the dimensions you want in the Height and
Width boxes. Click OK to dismiss the dialog and create the new drawing space.
You can select the units you want to use for display and data entry, using the drop-down at the right. Units
you select in this drop-down will become the defaults throughout the program.
The Overall Process
Here are the basic steps in preparing a layout for TrainPlayer use. All are described in more detail
throughout the manual.
1. Prepare the image
If you're starting with a picture of a track plan, you'll need to turn it into a graphics file on your
computer. If the image is on paper, you'll need to scan and crop it; if on a website, download it; if in
a CAD program, export it. The result needs to be a high-resolution graphics file in any of several
standard formats.
You don't actually need a background image. You can start with a blank screen and just lay track
freehand.
2. Adjust the grid
To create an accurate layout, you need to establish the relationship between the image on your
screen and the real-world dimensions on the layout. You do this by adjusting the TrackLayer grid.
The grid is defined in real-world units -- in HO, for example, grid lines are defined to be 12" apart -so when you overlay the grid on the image, you tell TrackLayer all it needs to know about layout
size and dimensions in any scale.
Most published layouts, including all those in 101 Track Plans, have grid lines included in the
image. So adjusting the grid in TrackLayer is a matter of dragging the mouse a couple of times until
it matches the one on the background.
3. Draw curves and turntables
Curves and turntables are a little tricky to create, more so when working in an area already crowded
with track. Therefore the experienced track layer draws these items first.
4. Draw straight track and switches
Drawing straight track is easy -- you just trace over the lines on the image with a series of
connected line segments. Switches are created automatically whenever three or more segments
come together.
5. Add special features
Most layouts have sections of track hidden in tunnels or underneath the layout. You can mark these
sections in TrackLayer so that when trains pass over them, they appear hidden. Or you can mark a
section of track as "tunnel," so that a train entering at one end immediately emerges at the other.
6. Debug
TrackLayer provides tools for checking your work. Diagnostics can spot overlapping junctions, zerolength tracks, and other problems, so that you can fix them before anyone derails.
7. Annotate and save
Give the layout a name, add descriptive or historical comments and credit to the designer, then save
the file, and you're ready to run.
8. Add trains and enjoy
Actually you can add trains at any point during the building process, and drive them over whatever
track is available.
TrackLayer Tutorial
The Rockport & Oyster Bay
This tutorial takes you through the steps of preparing a layout for TrainPlayer use, starting with a background image
file. We've chosen a simple one: the Rockport & Oyster Bay, layout #21 in the 101 Track Plans collection. If
you have the complete collection, you can start with the tpg file you already have; otherwise you can download the
jpg from the web.
The R&OB is a small loop with two branches. Follow along in TrackLayer and see if you can build it.
Open the
image file
Use File Open to
open the graphics file.
For this tutorial, use
L21.tpg from your
trainplayer\layouts
\images directory, or
click here to download
the same image in jpg
format:
download rockport.jpg
Copy or save the file to
a convenient directory,
and open it from there.
The image opens, the
grid appears in a default
position, and the Edit
Tool
becomes active.
Align the grid
Point to an intersection
point on the grid, press
the Shift key (the
cursor becomes a 4headed arrow), and drag
until the red lines
coincide with any two
grid lines on the
drawing. This anchors
an origin point.
Without the Shift key,
drag an intersection
point to resize the grid,
until the grid squares
match the drawing as
shown at right.
(Shift-drag moves the
grid, drag alone resizes
it. Dragging by an
intersection point keeps
the grid square.)
After adjusting, use View
Grid
to turn off the
grid display.
Place a circle
Choose the Circle
Tool . Point to the
center mark near
Gills Landing, press and
drag. Adjust until the
circle exactly overlays
the left-hand curve, as
shown.
To move rather than
resize the circle, press
the shift key while
you drag.
Place second
circle
Draw a second circle
overlaying the right-hand
curve, with center near
Oyster Bay.
This picture shows the
result when you use
View
to
Background
turn off the image.
Toggle this every now
and then, to check your
work.
Add first
tangent
Choose the Track Tool
. Point to the top of
the left-hand circle (so it
highlights), then press
and drag to the right as
shown.
Note that the straight
section remains tangent
to the circle as you drag.
Complete the
straight
Drag until the moving
end touches the righthand circle (so it
highlights), then release.
The straight snaps to be
tangent to both circles.
Complete the
loop
Repeat the above steps
to add a segment
completing the loop:
press and drag from the
bottom of one circle to
the other (in either
direction).
When you release, the
circles disappear and
become curved track
sections.
If the result doesn't look
like this picture, use
Edit Undo to go
back a step, then try
again. Make sure a
circle is highlighted
when you start or end
drawing each straight.
You might use File
Save As to save a
copy of the layout at this
stage, and again every
so often as you work.
Place circle
for branch
Choose the Circle
Tool . Drag from the
center near Oyster Bay
and overlay the curve
leading to Gills Landing.
Toggle the shift key on
and off while you drag,
until you get both radius
and position just right.
Complete the
branch
Choose the Track Tool
. Drag from the stub
above Gills Landing to
the circle (so it
highlights), then
release. This creates
the first leg of the curve.
Create the second leg:
drag from the bottom left
of the circle, moving
down and to the right,
until the lower segment
highlights as shown and
the cursor is positioned
at the switch, then
release.
When you release this
segment, the circle
disappears and
becomes a curve, and a
switch is automatically
created.
Loop with
branch
At this point you have a
loop and a curved
branch with an operating
switch, as shown.
Toggle View
to
Background
check your work.
Test the switch by
clicking the intersection
point.
Add siding
Drag a straight segment
starting at the stub
above left of
Swampscott. Release
at the point where the
track bends, as shown
by the cursor position in
this picture.
Complete the
siding
Drag another segment
starting where you
released the last one. A
green square highlight
must be showing before
you begin the drag, as
shown above right.
Release at the point
where the siding
intersects the loop,
shown at right.
When you release this
segment, a second
switch is created.
Loop, branch,
and siding
The track is complete.
Operational possibilities:
you can run around the
loop, or divert to Gills
Landing or Swampscott.
Test the switches. Save
a copy of the file.
Admire your work.
Chop at tunnel
entrances
To have the train to hide
as it goes through the
tunnel under Telegraph
Hill, you need to isolate
that portion of track and
mark it hidden. You can
isolate a portion of track
by chopping it where
you want the ends,
using temporary straight
segments.
Drag a segment from an
arbitrary point and
release at the upper
tunnel entrance. When
you release, a switch is
formed, as shown at
right.
Repeat with another
segment at the lower
entrance, as shown in
progress at right.
Delete the
chop tracks
You now have two
unwanted straights and
two switches at the
tunnel entrances. The
next step is to get rid of
them.
Point to the lower
segment, so it highlights
as shown at right, then
press the Del key. The
segment and switch
disappear.
Repeat with the upper
segment.
You have now created
two junctions, such that
the portion of the curve
between tunnel
entrances is an isolated
section of track.
Hide the tunnel
Position the cursor on
the tunnel track (so it
highlights) and press the
right mouse button. You
see the track context
menu, as shown.
Choose Hidden.
This marks the selected
track section, and
displays it as a dashed
line. Any train passing
over this section will
appear hidden.
Completed
track
Congratulations! The
track for the Rockport &
Oyster Bay is complete.
Add properties
Choose File
Properties. Enter
the layout name, add
some comments, and
save the completed
layout.
Add trains and
enjoy
Use Train New
Train to create a train
on the layout. You're
ready to begin operating.
Dimensions
The first part of the process of developing a layout in TrackLayer is to specify its size and
dimensions. This is done by overlaying the image with a grid of standard size, as described in
this chapter.
For background on layout dimensions and scaling, see About Sizes and Scales in the
TrainPlayer part of the manual.
About the Grid
Adjusting the Grid
Resizing and Rescaling
About the Grid
On every diagram in 101 Track Plans, Linn Westcott drew a grid of evenly-spaced lines, accompanied every few
pages by a legend like this:
Ruled lines across plan are:
6" apart in N
9" apart in TT
12" apart in HO
18" apart in S
24" apart in O
If you have a plan and a modelling scale in mind,
you can measure distances or find the total size of
the layout by counting grid lines. The grid is what
relates the picture to real-world measurements.
When you load a diagram into TrackLayer, the
program just sees an array of dots. It doesn't
know where the ruled lines are, or whether the
picture represents a four-by-eight table, a fifty-foot
clubroom, or a map of the county. You have to
tell it. The first step in creating a layout is adjusting the TrackLayer grid to establish the dimensions of the image.
The grid is not normally visible -- you can toggle it
-- but it comes
on and off using View Grid
on automatically when you load an image file. It
comes up in an arbitrary position (as shown at left),
and normally all you have to do is drag so the two
grids line up.
Sometimes it's a little trickier. The legend for
Springfield Electric Lines(plan #70) says the ruled
lines are double-spaced -- 12" for N, 24" for HO,
etc. -- in which case the TrackLayer grid has to be
made twice as dense, as shown below.
For the complete list of the modelling scales and
grid separations built into TrackLayer, see About Sizes and Scales.
You can do some interesting experiments with the grid. For example, suppose you wanted to build the Gorre &
Daphetid (plan #17) in half the space. Double the grid spacing, and here's what it would look like:
Good luck navigating those curves!
Adjusting the Grid
There are a few things you need to know before working with the grid:
●
Grid must be on display. Use View Grid
●
Edit Tool
●
●
●
.
must be active. You cannot drag the grid with any other tool.
Red lines are anchors. One particular horizontal and one vertical are special, and colored in red. When you drag to adjust the grid dimensions, these
lines stay put. You don't usually see these red lines when you open a layout; they're often along the left and top edges, just out of sight.
Drag by corner is different from drag by line. If you press and begin dragging at the intersection of two lines, then the grid stays square and
resizes as you drag. If you press at some other point on a vertical or horizontal line, the grid does not stay square -- you resize either the horizontal or the vertical
spacing.
Drag resizes, shift-drag moves. Press and drag on a line or intersection, and the grid resizes relative to the origin (intersection of the red lines).
Hold down the shift key while you drag, and the entire grid moves without resizing. The cursor changes to a four-headed arrow when you have the shift key down.
With that background, here's how to use the grid to set up a layout. We'll start with the easiest case, where the image has grid lines spaced according to the Westcott
conventions (12" apart in HO, etc.; see About Sizes and Scales for the complete list). If the spacing is different on your image, or it doesn't have any grid lines, see below.
1. Open the image file.
The program grid comes up automatically, not quite aligned with the image grid.
In this example, we're using the Reddy River & Piedras RR, plan #4. If you have this
layout and want to follow along, open the file L04.tpg in your TrainPlayer\Layouts
\Images directory.
How well the default grid lines up with the image depends on several factors, the main
one being the resolution of the image. If you start with a low-resolution image (72 dpi),
then the initial alignment will be way off.
2. Select the Edit Track tool
.
3. Hold down the shift key, point to any intersection point on the grid, press and drag
toward the lower right.
The entire grid moves, and the red origin lines become visible.
4. Drag until the red lines are superimposed on two lines in the image, then release.
This establishes the origin point.
5. Without holding the shift key, press and drag a grid intersection point.
The grid resizes while it remains square. Red lines do not move.
6. Release when the grid is aligned with the image.
If the grid on the image is not square, you can get a better fit by adjusting horizontal
and vertical spacing independently, dragging lines instead of intersection points.
7. Check your work. Right-click the layout, choose Properties, Layout tab, and
see if the indicated size is what you expect. In this example, the dialog says the
layout is roughly 4x6 in HO, which corresponds to the size in the book.
8. While you're in Layout Properties, choose a modelling scale, and take a
minute to enter a name and a few comments describing the layout.
9. Save the file.
The file you started with was an image (jpg, bmp, gif, etc.), but once you've set
up the grid, you have a layout, and must save it as a TrainPlayer (.rrw) file.
Once the grid is adjusted, you can use View Grid
to turn it off and forget about it.
What if there is no grid on the diagram?
If your image does not have grid lines, you will need to set up the program grid by some other criterion.
●
●
If you know the overall size of the layout: set the origin at the upper left, and drag until the number of grid lines matches the dimensions you
want. For example, if your image represents a 10' x 6' layout, adjust until the first grid line is at the left, the tenth at the right, and there are nine in between, for a
total width of ten feet. If your image is drawn to scale and based on a square grid, then the height should take care of itself and come out to six feet.
If you know the horizontal or vertical distance between two points on the layout: adjust the grid spacing so it matches
that distance. For example, if your picture shows a doorway you know to be 3' wide, adjust the grid so that three squares just fit the doorway (or six in N scale,
etc.).
The placement of the grid doesn't matter, the separation between grid lines is the important thing. And even that is not terribly critical -- the only consequences of having
the grid adjusted wrong are (a) the sizes of the cars will not be accurate relative to the layout, and (b) the Layout Properties dialog will show the wrong overall size.
Resizing and Rescaling
In a computer simulation of a scale model of the real world, the term "resize" can have different meanings. Until now, the way to
resize a layout was to adjust the grid, changing the mapping of the virtual layout onto the real one. For example if you have a 4x8 HO
layout, and you drag the grid to double the number of squares, you end up with an 8x16 version of the same layout, as if you
somehow stretched it to take up twice as much space in your garage.
TrackLayer offers a dual-purpose tool which gives two new ways to resize your layout without modifying the background. One
rescales or moves the entire set of track; the other changes the size and shape of the "benchwork." In your garage, the first method is
like replacing the HO track with N -- it changes the overall size of the track relative to the scenery. The second is like adding a shelf -it increases space for track beyond existing scenery.
Technically this means the bitmap size is now independent of the layout size, so the two no longer need to be the same size and
shape. This fixes a few long-standing problems, adds flexibility in plan-bashing, and solves some import problems which arise when a
CAD app doesn't generate an image of the right shape.
Resizing a layout to add or subtract track space:
1. Zoom out so the entire layout is smaller than the window on the screen. This is not required, but it's a good idea until you get
the hang of resizing.
2. Choose the new command Tools > Resize/Rescale or click the Resize/Rescale button
on the toolbar.
The first time you choose this command, you get an alert with brief instructions. This appears only the first time you activate
the tool after starting the program, so read it the first time it comes up. If you want to get rid of it permanently, check "do not
show again."
Two rectangular frames appear: a pink one around the outer border of the layout, and a blue one surrounding the
track.
3. Press and drag the pink outer rectangle by any side or corner. The overall layout space changes while the bitmap remains in
position or becomes cropped. Keep your eye on the status bar, which displays the size as you drag.
4. If you make a mistake or don't like the result, use Edit > Undo.
5. To dismiss the tool, (a) press ESC, (b) click a spot inside the pink but outside the blue rectangle, or (c) choose a different
TrackLayer tool.
Rescaling or moving track relative to the background:
1. Do steps 1 and 2 as above.
2. Press and drag the blue inner rectangle by a corner to resize, or by the middle to move. Note: the blue border cannot be
dragged by a side. The entire set of track moves or rescales proportionately.
3. See steps 4 and 5 above.
Straight Track and Switches
The electronic track on a TrainPlayer layout is like sectional track from the hobby shop. It consists of an
interconnected set of line segments, mostly straight but some curved. The point where two segments join together
is a "junction," and the train rolls right across it. The point where three or more segments meet is a "switch," which
you can "throw" to choose between alternate routes.
Unlike sectional track, TrainPlayer track
segments can be any length, and joined at any angle. Switches can have any number of branches. Track
segments can have special properties, like the ability to hide the train, or cause it to jump instantly from one end to
the other. And, of course, TrainPlayer track never needs cleaning.
Straight track is easy to work with -- you just draw a series of line segments, and you're ready to drive trains. Draw
three or more tracks to the same point and you automatically get a working switch. Since you can draw any curve
as a series of short straight segments, it is possible to build the entire layout using nothing but straight track, but
you'll get better results if you take the trouble to learn about curves too.
Before you work on a real layout, we suggest you start with a blank screen and learn some of the basic drawing
operations. The tool you use most in TrackLayer is the Straight Track tool
, used for creating straight track
segments and switches. Since curves can be represented by a series of short segments, you can build the entire
layout with the Straight Track tool, although you'll get better results if you learn to make curves as described in the
next chapter. In this chapter we describe how to create straight track.
If you want to add ties and/or roadbed to your track, those are covered in the scenery chapter. See Ties and
Roadbed.
Drawing Straight Track and Switches
Editing Track
Special Track
Drawing Straight Track and Switches
To draw straight track:
1. Choose the Straight Track tool
.
2. Press the mouse button where you want one end of a track segment.
3. Drag to where you want the other end, release the button.
You have a point-to-point railroad! If you wanted to, you could add a train and start operating.
4. Position the cursor on one endpoint, so it highlights with a little green square (see picture above right).
5. Press and drag.
You now have a continuous section of road with a bend in the middle.
6. And so on. You can draw segments in any order and any direction -- they'll join together as long as the highlight square is showing when you
press or release the mouse button.
To draw a switch:
A switch is automatically created whenever three tracks join. This happens when you
begin or end drawing a segment at either an existing junction or a point along an existing
track.
To draw the switch shown here:
1. Draw the mainline in two segments, A-B and B-C.
2. Draw the branch in either direction, B-D or D-B. Junction B highlights when you
begin or end drawing the branch.
OR:
1. Draw the mainline in one segment, A-C.
2. Draw the branch in either direction, B-D or D-B. The track segment AC highlights when you begin or end at B. Junction B is created by this
operation, chopping AC into two parts.
As soon as you release the mouse button using either method, the switch is created and the stop/go lights appear. You can test the switch by clicking
at B.
To draw a multi-way switch:
Simply draw more than three segments to a switch. Whenever more than three segments
join, a multi-way switch is formed with more than two routes through it. Each throw opens
a different route.
In this picture, the current open route is A-B-D. The first throw opens route A-B-C; the
second, E-B-D; the third goes back to A-B-D.
To draw a crossing:
Draw tracks which cross but do not join. In this example, AB and DC cross each other, but there is no
junction in common, so trains cannot go from one track to the other.
Track Snap
Snap features assist you in drawing precise switches and curves.
Snap takes effect only when you are drawing new track, not editing or moving existing sections. By default it is disabled, as it tends to get in the way
when you are tracing over an existing plan. But when you are drawing a new layout from scratch, it is invaluable. Enable it as follows:
1. Set up your choices in Track Preferences. Here you specify what sorts of snap you wish to enable, and at what angles or radii, as shown
above left.
2. Use the Track or Circle tool. Snap does not apply when using other tools.
3. Use the Snap Disable/Enable command on the layout context menu (above right) to turn snap off and on as needed while drawing.
4. When angle or parallel snap is in effect, you can disable it temporarily by pressing the shift key as you draw.
There are three kinds of snap:
●
To angle: applies when you are creating a new switch. Restricts the switch angle to one of up to four choices.
Refer to the diagram above. After you have drawn section AC and want to create a switch at B, angle snap takes effect when you
press at B and drag toward D (but not if you drag from D toward B). As you drag, when the angle DBC gets close to one of the
predefined values, it snaps to that angle.
Switch angles are given not in degrees or radians, but as integers. The integer indicates the slope, or ratio of "rise over run" between
diverging tracks. For example, at a #4 switch, the tracks are one unit apart at a distance of four units from the frog.
●
To parallel: applies when you are creating a new switch in the vicinity of another. Restricts the distance between parallel tracks to a
specific value.
Parallel snap is designed for creating ladder tracks, such as those shown in the diagram above. Once you have drawn the base
section and the branch, you create each ladder track by pressing on the branch and dragging away from it. When parallel snap is in
effect, the starting endpoint of a new track is not exactly where you press, but snapped to a nearby point such that the distance
between the new track and its neighbor is a fixed value (default is 2" in HO).
●
To radius: applies when you are creating a circle. Restricts the radius to one of up to four choices.
When you are using the Circle tool, and dragging without the shift key pressed, then you are adjusting the radius of a circle as you
drag. When radius snap is in effect, if the radius is near one of the predefined values, it snaps to that value.
More details about snap features are given in Track Preferences.
Track Coloring
Not all the track on your layout has to be the same color. You can give individual sections or entire regions of track their own colors. You might use
this feature, for example, to distinguish standard from narrow-gauge lines in a mixed-gauge layout.
To color a single track section:
1. Use the Track or Edit tool.
2. Right-click a track section and choose from the Track Color menu:
●
●
Normal: track will be colored the default color, as specified in Track Preferences.
Change: brings up a color chooser so you can choose a different color for the selected track.
To change a track from one non-default color to another, you must first go back to Normal, then Change.
To color multiple track sections:
The above instructions apply to all selected track, so you can color many tracks at once: select them -- drag a selection rectangle, or
shift-click individual sections -- then right-click any one and choose color as above.
An alternative is to choose a color to be applied to new track only, using the "For new track" button in Track Preferences. Any track
you draw from that point on will be in the specified color. This would be useful, for example, if you drew the standard-gauge line of
your layout first, then changed colors before drawing the narrow-gauge part.
Editing Track
If you've drawn some track and want to make changes, there are several choices. You can correct a mistake by undoing it. You can delete a single track object -- track segment,
curve, circle, turntable -- by point-and-press, or you can select several and delete them all at once. You can move or resize track objects, or copy them from one place and paste them
into another.
Once a network of track is laid and interconnected, it's a little tricky to move it around without fouling something up. This is especially true where curves are involved -- the program
attempts to keep straight segments tangent to their curve arcs, and this can restrict movement.
Undo/Redo
If you make a mistake, the easiest and safest way to fix it is to immediately undo it. To undo the latest drawing or editing operation:
1. Choose Edit Undo <, or press Ctrl-Z. The last operation is undone, and the layout reverts back to its previous state. The menu command includes the type of operation
which will be undone, e.g., Undo New Track.
2. You can use the command repeatedly to undo earlier operations. There is no limit on the number of undo's -- you can go all the way back to the blank screen or the file you
started with.
3. If you change your mind, use Edit Redo (Ctrl-Y) to undo the last undo.
Undoable operations include deleting, adding, or moving track, circles, stations, or turntables, and changing most track properties. Train moves are not undoable, nor changes made
in the Properties dialog.
Deleting objects
You can delete a single object -- track segment, circle, or turntable -- by point-and-press, as follows:
or the Edit tool .
1. Choose the Track tool
2. Position the cursor on the segment or object to be deleted, so it highlights (see A). On a circle or turntable, point to a spot on the circumference of the circle.
3. Press the Del key, or right-click and choose Delete, Delete Track, or Edit Cut from the context menu. Note that context menus differ depending on what type of
object is highlighted.
When you delete a turntable or its bridge track, both the circle and the track are deleted.
To delete multiple tracks or objects:
1. Select the objects as described below.
2. Delete with the Del key or a menu command, as in step 3 above.
Selecting objects
To move or delete a collection of objects, you must first select the ones to be modified. You can choose them one at a time, or several at once by dragging a selection box.
To select individual objects:
1.
2.
3.
4.
Choose the Edit tool .
Click a track segment, circle, or turntable. The object is selected, and turns navy blue.
To select another object, press Shift and click the object.
To unselect a selected object, press Shift and click the object.
To unselect all objects: click an empty spot on the layout.
To select all objects: choose Edit Select All or press Ctrl-A.
To select all objects in a given region:
1. Choose the Edit tool .
2. Press and drag to form a selection rectangle (see B). Any track or object intersecting the rectangle is highlighted in green. It is not necessary for the track or object to be
completely enclosed by the rectangle.
3. Release. Highlighted track becomes selected (see C).
If you hold down the shift key while dragging, the newly-selected items will add to the previous selection.
Moving objects
Once a network of track is laid and interconnected, it's a little tricky to move it around without fouling something up. One simple and safe operation is to move a track endpoint or
junction.
To move a track endpoint (shown in D):
1. Choose the Edit tool .
2. Position the cursor over the endpoint you want to move, so you see the green highlight square.
3. Press and drag. The endpoint moves, the other end remains anchored.
To move a junction or switch (shown in E):
1. Choose the Edit tool .
2. Position the cursor over the junction or switch you want to move, so you see the green highlight square.
3. Press and drag. The junction or switch moves, the other ends of all attached tracks remain anchored.
To move a collection of track and/or other objects (shown in F):
1. Select the tracks and objects to be moved, by shift-clicking or dragging a selection rectangle.
2. Point to any of the selected tracks or objects, press and drag.
All selected tracks and objects move as a unit. Attached tracks which are not selected are repositioned so as to remain attached.
In this example, five segments in a yard are all being moved at once. One end of the yard lead track remains fixed, the other end moves with the selection. The
resulting angles are not train-friendly.
Copy/Paste
Selected objects -- tracks, circles, turntables -- may be copied to the TrainPlayer clipboard and then pasted elsewhere on the layout or in another layout. These objects cannot be
pasted into other programs.
To copy a collection of objects:
1. Select the objects as described previously.
2. Right-click any object and choose Copy, or choose Edit Copy from the main menu, or press Ctrl-C. The objects are copied to the clipboard.
To paste copied objects:
1. Choose Edit Paste from the main menu, or press Ctrl-V. Objects on the clipboard are added to the layout in the upper left corner, and are selected so that you can drag
them into position.
Pasted objects do not automatically connect to existing track, even if you position them so it looks like they should. To connect pasted track with existing track, you can
delete and redraw a segment, or you can drag one junction on top of another and they will "fuse."
Track Transform, Rotate, Flip
A selection of track can be rotated by an arbitrary angle, or flipped horizontally or vertically.
To rotate or flip track:
1. Select one or more track sections. To select an entire area (such as a yard), you can start by dragging a selection rectangle around the area, then shift-click to include or
exclude individual sections.
2. Right-click a selected section and choose a Transform Selection command, Flip or Rotate.
To rotate by an arbitrary angle, choose Rotate... and enter an angle in the dialog. A positive value rotates clockwise.
The selected tracks are rotated or flipped about the center of the rectangle enclosing the selection. If there are adjacent unselected tracks, these will be reoriented as necessary to
remain connected. For example, here is a rotation of -10 degrees on a selected yard:
Junctions shown in red remain fixed, while those touching the selected tracks move.
Transform Selection is undoable, so you can experiment with it, then undo, and nothing will be harmed.
Ties and Roadbed
If you want to add ties and/or roadbed to your track, see Road Preferences.
Special Track
Once you have some track down, you can mark sections of it to have special properties. A section can be marked as:
●
●
●
Hidden track. When a train passes over a section marked Hidden, the cars become thin outlines. This simulates passing through a tunnel or
a section of track underneath the layout. Hidden track is shown on the layout as dashed lines. You specify this type by choosing Hidden >
With Car Outlines from the track context menu.
Hidden track with hidden cars. If you choose Hidden > No Car Outlines, then cars disappear completely when they pass
over this section of hidden track.
Tunnel track. When a train enters one end of a section of tunnel track, it "tunnels through" and immediately begins to emerge at the other
end. Tunnel track is used when the layout has multiple images, for example a separate picture for upper and lower levels. As soon as the train
leaves the upper level diagram, it appears at the corresponding place on the lower level diagram, as long as the exit and entry points are connected
by a length of tunnel track. Tunnel track is shown on the layout as light grey lines, visible only when the Track Tool is in use.
This illustration shows tunnel track (hard to see) connecting levels of the helix in John Armstrong's Southern Pacific Shasta Division, from
Model Railroader, Apr 2005:
Tunnel track is also used to specify "clipping regions." See details below.
●
●
Untouchable track. When track is marked Untouchable, it becomes like the background -- it cannot be selected or moved or highlighted.
This is an advanced feature. Untouchable track is used for building helices or other constructions requiring curves right on top of each other; for a
step-by-step procedure, see Helices.
Linked track. You can mark a stub section of track as "linked," and connect it to another layout. When the train reaches that stub, it "jumps"
to the other layout and continues on its way. Details below.
●
No Ties or Roadbed. Track with this mark are excluded when displaying ties or roadbed.
●
Double Track. Choose a set of tracks and clone them to get parallel double track. See Double Track below.
Split Track Here
For various reasons, the you sometimes need to introduce a junction into a straight or curved section of track. In the past this was done as described under
Isolating Track below; as of v. 5.3 it can be done directly, like this:
1. Use the Track Edit tool.
2. Right-click a point along a track where you want to create a junction, and choose Split Track Here.
The track is split and a junction created at the indicated point. There is no immediate visible evidence of this, but you'll see the new junction if you hover over
it. The operation is undoable. Works on both straights and curves.
Isolating Track
Most of these properties can be applied only to one or more complete segments of track. To apply a property to a portion of a track segment or curve, you
must first isolate that portion by chopping it out.
Note: while these instructions are still valid, most steps are obsolete. You no longer need to introduce a temporary track in order to split a segment; instead,
use Split Track Here.
To isolate a section of track:
Say you want to isolate the portion of this curve between the hash
marks. You can see the full extent of the original curve by
highlighting it.
Use the Track tool
for this procedure.
1. Draw a straight segment touching the curve where you want the
first chop point.
2. When you release, a switch is formed.
3. Repeat, drawing another segment at the other chop point.
4. Point to one segment and press Del. The segment and switch
disappear.
5. Repeat for the other segment.
6. A small portion of the original curve is now isolated between two
new junctions.
Modifying Track
1. If necessary, isolate the segment of track to be hidden. This is not necessary if you want to hide one or more entire segments.
2. Point to the segment to be hidden, so it highlights, then press the right mouse button.
3. Choose Hidden from the context menu.
The track is redrawn as a dashed line. Trains passing over this dashed
section will appear hidden.
To create a section of tunnel track: the procedure is
the same: draw the track or isolate it, right-press and choose Tunnel.
When a contiguous series of track segments are marked Tunnel, the
train hyperspaces across all of them at once.
To mark a section of track untouchable: same
procedure again. Be careful when you use this feature! Once a section is marked untouchable, you can no longer select it, move it, delete it, create a
switch or junction in it, change its properties, or connect any other track to it -- it becomes dead. Make sure the track is fully connected and its properties set
before you mark it untouchable.
To reenable an untouchable section: right-press any track and choose All Retouchable. This reverts all untouchable track to its normal state.
Clipping Regions
Hidden track works fine for long tunnels, but for short sections going beneath underpasses or behind scenery, a better scheme is required. In TrainPlayer,
tricks involving track marked Tunnel are used to hide specific areas.
These tricks can be used to indicate clip angles at tunnel portals, or to define regions of invisibility.
Tunnel portal clipping: where the
train is moving between hidden and normal
track, and needs to be clipped to a specific
angle.
For this effect, draw a section of Tunnel track
passing over the junction between hidden
and normal track. This section defines the
clip angle.
The tunnel track section must not be
connected to anything else, must not form a
switch with the track it crosses, and must
pass directly over the hidden-to-normal
junction.
Overpass clipping: where the train
is to be completely hidden as it passes
through a given region.
For this effect, draw a "clipping box"
surrounding each area to be hidden.
A box must consist of exactly four connected
track segments, all marked Tunnel.
As a shortcut, you can shift-click to select all
segments at once, then point to any one and
choose Tunnel from the context menu.
Boxes appear as dotted gray lines, shown
only when Track or Edit tool is active.
When trains pass, the portion within each clip
box is completely hidden.
Over-underpass regions: where
trains going underneath are to hide, trains on
top to remain visible.
For this effect, first draw a clipping box as
above, defining the hidden region.
Then identify the track(s) to be on top, where
trains are to remain visible. To do this,
introduce a junction where any top track
crosses the clip box boundary.
Best procedure is: (a) mark the tunnel track
as Untouchable; (b) draw a temporary
segment to the point where you want the
junction; (c) delete the segment.
This junction serves no purpose except to
flag a track as being on top. All other track
"electrically connected" to the junction is also
on top.
Trains passing on top tracks remain visible,
while those on non-top tracks are clipped.
Linked Layouts
Special new track lets you drive from one layout right onto another! Pick any stub or siding, specify a target layout, drive off the siding, and poof! the scene
changes and you are running the same train in a different world. Great for connections between multi-level layouts, N-Trak modules, or just cruising
randomly through your layout collection.
To link layouts:
1. Choose the jumping off point. This must be a "stub" track, one with no connections on one end (like a siding or yard track). When the train reaches
the end of this track, it will jump to the linked layout.
2. With the Edit or Track tool selected, right-click the track section and choose Link to Layout. The Layout Link dialog appears.
3. Choose the target layout. In the Link to document box, enter the path to a layout file, or use the Browse button to navigate to one. Or, if the
layout is already open in another window, choose it from the drop-down menu.
4. Assign a Link ID. The Link ID is a label used to connect this track to a specific track on the target layout. In the example, this particular jump-off
point is called A. When the train jumps from this point onto the target layout, if it finds a linked track called A, it will land there. If it does not find a
matching label, it will jump to an arbitrary place. Thus, in order to set up a precise jump, you will need to follow this same procedure on both layouts.
5. Click OK, and the link is set up.
6. Drive a train onto the linked track, and keep going as if you were driving right past the stub. When the train reaches the end, it will begin a jump.
The other layout will be automatically opened if not already on the screen, will come to the front, and you will see the train emerging onto it.
7. While the train is jumping, you may change its speed or direction, and both parts will act together.
To unlink:
1. Right-click a linked track section, choose Link to Layout, then click the Unlink button.
Double Track
If you've ever tried to create a length of parallel double track --say for a passing track or a double-track section of main line -- you know it's not easy,
especially if curves are involved. Now a feature introduced inTrackLayer 5.3 does the engineering for you. Here's how to use it:
1. Use the Track Edit tool. Click or shift-click to select one or more track segments, defining the stretch you want to double.
2. Right-click any selected track and choose Make Double Track.
The entire selection splits in two, joined at the ends by Y switches:
==>
While doubling works over an arbitrary selection, for best results you should be careful to select a contiguous set of tracks between two well-chosen
endpoints, with no switches in the selection. If you try it and don't like the results, use Edit > Undo.
The distance between parallel tracks is taken from the global roadbed width set in File > Preferences > Road tab > Roadbed > Width.
Note: Make Double Track is dimmed unless you have already selected some track, i.e., turned it blue. It won't work just to point at a track and
press the right mouse button.
Curved Track
Like the curves in Linn Westcott's book, all curves in TrackLayer are circular -- if you want splines or spiral
easements, you will have to draw them by hand using short straight segments.
A curve is created by three objects: a circle and two
"legs," like a horseshoe. The circle establishes the
radius and position of the curve, while the legs
establish the end points and the approach tracks.
TrackLayer goes to some trouble to help you make
nice curves. The program keeps the leg segments
exactly tangent to the circles, both when drawing and
editing.
This chapter describes how to draw and edit curves
and circles.
Drawing a Curve
Editing a Curve
Loops and S-Curves
Helices
Drawing Curves
To draw a curve, first you place the circle, then attach the legs. If you do this right, the circle disappears and a curved track
is generated between the leg segments.
To draw the circle:
1. Choose the Circle tool
.
2. Press the mouse button near where you want
the center of the circle.
3. Drag to adjust the circle's radius.
4. To move the circle instead of resizing it, press
the Shift key as you drag.
5. Continue dragging, toggling the shift key as
necessary, until the circle is where you want
it; then release.
Note: in version 3.1 you can have the radius snap to a specific value as you drag; see Track Preferences.
To draw the first leg:
1. Choose the Straight Track tool
.
2. Position the cursor on the circle where you want the leg to join the
curve. The circle highlights.
3. While the circle is highlighted, press the mouse button.
4. Drag to where you want the other end of the leg. While you drag one
end, the other end adjusts automatically to remain tangent to the
circle.
You can draw a leg in either direction, either starting on the circle or ending
on it. Just be sure that before you press or release the mouse button, the circle is highlighted so the segment will connect.
To complete the curve:
Draw the second leg as you did
the first. This time, when you
release the mouse button, the
circle disappears and the arc
section between the two legs
becomes a curve.
When the train comes down one
leg, it will go smoothly into and
around the curve and exit on the
other leg.
Notes
●
●
All curves must be horseshoes. That is, if
you go clockwise from leg A onto the curve, then you must
also go clockwise from the curve onto B. In other words,
when you draw the second segment, don't orient it
backwards, as in the picture at right.
Avoid crowds. If you are working in a crowded area, and a
track end happens to lie near the rim of a circle, then as soon as
you draw the first leg to that circle, it will automatically form a curve
with that track end.
In the picture at right, when you draw the tangent segment at the
top (green), the curve will automatically connect to the track end at
A, whether you meant it to or not.
If this happens, Undo and try a different approach: draw the other
leg first, or temporarily move the offending track end away from the
circle.
●
Watch the highlights. If the curve doesn't form automatically after you release the second leg, it probably
means you didn't get one leg close enough to the circle. Be sure the circle is highlighted when you start or end
drawing the leg segment.,
Editing a Curve
Editing curved track is like editing straight, except a little trickier. When you move a curve, or a straight track
tangent to a curve, the program adjusts connections points as you drag so as to maintain tangency. If a curve is
tied into a network of straight sections, this can cause quite a bit of movement, and if you attempt to move a curve
too far, track can become tangled.
To move a curve:
1. Choose the Edit tool .
2. Click to select the curve to be moved (shown at left). The curve turns blue.
3. Press and drag carefully. As you drag, attached straight sections, and curves on the far ends of those, are
automatically adjusted (see above center). If you drag too far, some curves may not be able to stay
tangent, and you can end up with a spiral (above right). If this happens, Edit Undo and try again.
Because of the requirement that curves remain tangent, you cannot drag a
junction which joins a curve and a straight. In the diagram at left,
dragging the highlighted point has no effect, because anywhere you try to drag it will
cause the tangency to break.
Loops and S-Curves
You don't have to draw curves one at a time. Some constructs, like loops and S-curves, work better if you draw
more than one circle before you add the straights.
To draw a loop:
1. Draw two circles.
.
Use the Circle tool
Remember: use the shift key to
move, unshift to resize.
2. Begin on either circle and
drag a tangent to the other.
3. Release when the
destination circle is highlighted.
4. Repeat the procedure on
the other side of the loop.
5. When you release the
second tangent, both circles
become curves, and the loop is
complete.
To draw an S-curve:
1. Draw two circles. Leave a
little space between them.
2. Begin a tangent on the inside
edge of one circle.
3. Drag to the inside edge of
the other circle. Release when
the destination circle is
highlighted.
4. Draw an outer tangent. This
completes one curve and
removes one circle.
5. Draw the other outer
tangent. This completes the
other curve and removes the
other circle.
6. The completed S.
Helices
A helix is a device for moving a train between levels of a multi-level layout. The
train enters at one level, changes altitude gradually as it proceeds up or down a
series of loops, and emerges at another level.
None of Linn Westcott's 101 Track Plans has a helix, but many modern track
plans and club layouts do. For an elegant example, see John Armstrong's
Southern Pacific Lines Shasta Division, featured in Model
Railroader, April 2005.
It takes some effort to draw a helix in TrackLayer, but it's worth it. When a train
enters the helix and climbs it in a series of slow loops, it comes to life and makes
sense out of that bundle of looped wires on the track plan.
Drawing a Helix
Draw a helix by starting at the bottom, with the lower approach track and the lowest loop. Proceed upwards, adding
and connecting new loops right on top of the lower ones.
To do this requires a special device, because normally if you put circles on top of each other, then when you try to
add tangents, they won't snap to the right places. The secret is to mark track as "untouchable." Once a loop is in
place, you can mark it so it will not be affected when you add the next loop. As you draw each loop, you leave a
little "handle" sticking out so you can connect it to the next loop.
In this example, we will construct a circular two-loop helix, with the lower approach from the northwest and the
upper exit to the northeast.
1. Draw a circle (Circle tool
).
2. Draw the lower approach track (Track
tool
).
3. Draw a short straight segment at the
top of the circle. This completes a large
curve, and serves as a handle to connect
to the next loop.
4. Mark the curve "untouchable." Rightclick on the curve so it highlights as
shown, and choose Untouchable.
This causes the curve to become
unresponsive: it will not highlight, you
cannot connect track to it, and most
important, tangents you create on the next
loop will not snap to it.
Before you mark the curve untouchable,
you might want to mark it Hidden. See
notes below.
5. Draw a circle for the second loop
(Circle tool
). Start at the center of the
first circle, and drag until the circle is
superimposed on the first one.
This illustration shows the drag in process,
not quite finished.
6. This shows the second circle in place.
7. Draw a short segment to connect the
second loop to the first. Begin by
highlighting the circle as shown...
8. ...and connect to the handle drawn in
step 3.
Don't worry about the kink in the track,
you'll fix it shortly. You now have the first
leg of the second curve.
9. Draw the other leg of the curve. Begin
on the circle at about the same place as in
step 3...
10. ...and drag to form a new handle,
near (but not right on top of) the first.
11. You now have one complete but
kinked loop, and another almost-complete
loop with handle.
12. Fix the kink. Use the Edit tool .
Point to the junction so it highlights as
shown, press and drag to move it into
position.
13. Release when the junction is on the
circle.
14. And so on. Mark the second curve
untouchable.
15. Draw the next circle.
16. Draw the segment to connect to the
previous handle.
17. Release when connected.
18. Draw the upper approach track,
tangent to the topmost circle.
19. Fix the kink in the previous layer.
Be careful when moving this junction that
it does not land on top of the earlier one, i.
e., do not release where you see a green
highlight square.
20. And you're done.
21. Test the helix. Add a loco on one of
the approach tracks, give it some speed,
and watch the show. It should make two
complete loops around before exiting.
Notes
●
For best appearance, the train should hide as it goes around the lower loops, and appear when it gets to the
top one. You can arrange this by marking track as hidden, starting with the lowest loop and continuing until
the top loop. Mark each track as you add it, and be sure to apply the hidden mark before you mark a
track untouchable, otherwise you won't be able to.
In the above example, tracks added in each of the following steps should be marked hidden before
going on to the next step: 3, 4, 8, 10.
●
If you mark a track untouchable by mistake, you can no longer select it so you can't unmark it. Instead,
choose All Retouchable from the track context menu. All untouchable tracks become unmarked
and touchable.
Turntables and Transfer Tables
The TrainPlayer portion of the
manual describes how
turntables and transfer tables
look and behave. This section
describes how to build them
with TrackLayer.
A turntable consists of two
objects: a circle and a
bridge track which crosses
the circle and passes through
the center. When you rotate
the table -- by double-clicking
a point on the rim, or rightclicking and choosing a Rotate
command from the menu -- the bridge rotates until either end is touching an end of an external connecting
track. At this point it stops, and the superimposed endpoints become a single junction a train can cross.
An alternative to a turntable is a transfer table -- a rectangular bed with a bridge which moves laterally. In this
case, a double-click inside the table area causes the bridge to move slowly in the direction of the click until it locks
onto the next connecting track.
This section describes how to build and edit turntables and transfer tables.
Creating a Turntable
Creating a Transfer Table
Creating a Transfer Table
A transfer table has several moving parts, a combination of scenery and track. They are:
●
●
●
●
●
Pit: the bed over which the bridge moves. This is a rectangular scenery object, so can be solid or filled with bitmap or
pattern (default is solid ivory color).
Rails: lines perpendicular to the bridge, representing rails on which it rides. These are non-functional, just for display.
You can change the number of them or remove them (default is to show four rails).
Bridge: narrow rectangular platform which moves across the pit. You can adjust the width (default is 3" in HO). By
default the bridge is shown as solid grey, but you can instead display a scenery object if you wish.
Bridge Track: track on which the engine rides. Sits on top of the bridge and bisects it. This is a normal section of live
track.
Bridge Scenery: an optional scenery object representing the bridge (not shown in the above illustration). Several are
available in the Miscellanous scenery collection, such as:
There is no special tool for creating transfer tables. You first create a scenery object for the pit, then convert it to a transfer table, as
described below.
To create a transfer table:
1. Choose the RectangleTool Tool on the Scenery Toolbar:
2. Draw a rectangle for the pit (below left). Size, position, and rotate to suit on the layout.
3. Right-click the rectangle and choose Convert to Transfer Table.
This adds a vertical bridge, bridge track, and rails (above right). The table is now ready to hook up and use.
4. Try it! Double-click anywhere in the pit, and the bridge will move. Double-click again to stop.
To connect external tracks:
The transfer table is not useful unless it has external tracks for entry and exit. An external track must have one endpoint lying on
the edge of the pit, and is normally perpendicular to the rails. You must construct the table before drawing or attaching external
tracks -- that is, if you already have tracks in place and you attempt to move a table so that it touches them, it won't work.
Note: size, position, and rotate the table before connecting external tracks. These tracks do not move if you later decide to
reposition the table.
1. Choose the Track tool.
2. Begin drawing a track section outside the table. Drag the end until it touches and highlights the table edge, as shown here
(left). When you let go, the track snaps to perpendicular (right).
Note that the edge of the table will highlight only if you are touching a serviceable location. It must be (a) on one of the two
edges perpendicular to the bridge, and (b) more than half a bridge width from the side of the pit.
3. Test your work! Double-click the pit on the external track side, and the bridge should move until it locks onto the track.
To make a cross-over:
If you want the engine to be able to drive straight across the table, you must
take care to make sure the connecting tracks are aligned. Here's the best way:
1. Draw the first track as described above, to define where you want the crossover.
2. Double-click to move the bridge until it locks onto that track.
3. Draw the second track, dropping the end onto the highlighted junction at the
end of the bridge track, as shown here:
In this case, it is up to you to make the track perpendicular to the pit. When
you drop the end onto a junction, instead of on the pit edge, it will not snap.
You may have to adjust the far end until all three tracks are aligned.
4. Test. Put an engine on one of the track sections, and verify that you can drive
it all the way across.
To decorate a transfer table:
You can change the appearance of a transfer table in several ways:
Change the pit color or background. Right-click the table and choose Properties
to see the Scenery Properties dialog. You can set the background color or image in
this dialog, as described in the Scenery chapter.
●
For example, at left the pit has the "ground_concrete_01" image from the
"background" collection.
●
●
Modify transfer table properties. In
the Properties dialog, when you are
editing a transfer table there is a
special tab for this purpose, as
shown at right. In this tab you can
set:
❍ Number of guide rails. Set
to zero to remove rails.
❍ Whether or not to display
the bridge track. Normally
you turn this off when you
have a bridge scenery
object.
❍ Width of the bridge. Units
are those in use throughout
the program.
❍ The name of a scenery
object to be used as the
bridge. See below for
details.
Add a bridge scenery object. Here's how:
1. Choose or draw the object to be used for the bridge. In this example, we are using "bridge2" from the
"miscellaneous" collection.
2. Size and rotate the bridge so it aligns with the bridge track and is the same size. as shown below. Then position it
right on top of the bridge track.
3. Display properties of the bridge object and note its name (in this case, "Rectangle12").
4. Select the transfer table and bring up its Properties dialog, Transfer Table tab.
5. In the "Bridge Scenery" drop-down, select the name of the bridge object. (Note: this will not change the display in the
properties dialog.)
6. Click OK and you are ready to go. Double-click to start up the table movement, and the new fancy bridge will move along
with the bridge track.
To edit a transfer table:
To move, resize, rotate, or delete a transfer table, use the Scenery Edit tool:
table by working with the pit as you would work with any other scenery object.
. You manipulate the transfer
If you have a bridge scenery object, it is not connected to the table and will not move or delete along with the table. To manipulate
both the bridge and the table as a single object, group them using the scenery Group tool:
Scenery Toolkit
The Scenery Toolkit in TrainPlayer is the armchair railroader's equivalent of that big box in the basement, full of
miniature trees, buildings, bridges, earth powders, paints, and other decorative whatnot. In TrainPlayer, the box
has an unlimited quantity, the objects are thin (they're just top views), and if you don't see what you like, there are
tools for making your own. It's quick and easy! With Scenery Toolkit you can scenic an entire layout in an evening,
and not spill a drop of Sculptamold on the floor.
This chapter describes how to create scenery on your layout. For a quick lesson, try the tutorial.
About Scenery
Tutorial: Riverbend
Choosing Scenery
Drawing Scenery
Editing Scenery
Managing Scenery
Scenery Properties
About Scenery
Shapes
TrainPlayer scenery consists of a collection of shapes, or "scenery objects." There are regular shapes (rectangle, circle,
ellipse), irregular (polygons, odd-shaped bitmap images), and linear (lines, polylines). Non-linear shapes can be filled with
solid colors, hatched patterns, or bitmap images, and outlined with lines of various styles. Shapes can be moved, resized,
rotated, grouped, copied, and pasted, one or more at a time. Each shape has its own style and colors, which can viewed
and modified in a tabbed dialog and are saved in the layout file.
Tools
Most scenery operations are available from a single toolbar, with about a dozen buttons for creating and editing scenery
objects. Some are drawing tools, which determine what you get when you press and drag; others carry out one-click editing
operations or toggle switches. In an ergonomic way, most drawing tools can also be used to edit objects.
Added in Version 6.1 is the ability to draw scenery using track tools. This provides a convenient way to draw large shapes
containing circular arcs, such as you might use to create custom benchwork shapes to go underneath the track. Another
special tool on the track menu allows you to create roadbed scenery objects fitted to the track. These features are
described in Drawing Scenery.
Images
Any fillable scenery object can contain an image taken from a graphics file. All standard formats are
supported (bmp, jpg, gif, png, etc.). Images may have regions of transparency, and thus appear as irregular shapes. A
collection of assorted scenery images is provided with the installer; more are available by download from the web; or you
can use images from graphics files on your disk. Images may be stretched and reshaped, or prevented from doing so.
Background texture images can be tiled or stretched to fill large objects.
Layers
All scenery objects are in one of two layers: foreground or background. While any
type of object can be drawn in either layer, the idea is to have large groundcovering objects or bench work shapes in the background, with buildings, trees,
and smaller objects in the foreground. The layers are drawn and edited
independently, so that you can draw and manipulate foreground objects without
accidentally modifying the background underneath.
The Scenery Toolbar
Scenery commands can be found on the Tools menu under Scenery
(shown at right), or on the Scenery Toolbar (use View > Toolbars >
Scenery if you don't see it). Below is a reference guide to the tools. All
are described in more detail in this chapter.
Selection tool
Scenery Selector
is for selecting multiple objects. Press
and drag to completely surround the objects you want to select. To
select single objects (or shift-select multiple ones), you do not need to
use this tool.
Draw tools
Line/Polygon
for drawing lines, polylines, and polygons.
Lines which share endpoints are automatically fused into polylines;
closing a polyline figure creates a filled polygon.
Rectangle
for drawing simple rectangular objects.
Oval
for drawing circles and ellipses. The tool creates a circle. To form an ellipse, create a circle,
then change its shape by dragging a side or corner.
Convenience tools
Bitmap
for creating an object containing an image. After you drag to define a space, a file dialog
prompts for the image file to be displayed.
Text
for creating a text label. Define a rectangular space, then when prompted, enter the text to be
displayed.
Layer tools
Edit Foreground
selects the foreground as the active layer for drawing and editing. In this mode,
background objects cannot be selected or modified.
Edit Background
do not appear at all.
selects the background as the active layer. In this mode, foreground objects
Edit operations
Group
selected.
joins the selected objects into a single group object. Dimmed unless multiple objects are
Ungroup
undoes a Group operation: breaks the selected grouped object back into its original
components. Dimmed unless at least one grouped object is selected.
Bring to Front
moves the selected object(s) to the front of the display order.
Send to Back
moves the selected object(s) to the back of the display order.
Gallery
View Scenery Chooser
displays the Scenery Chooser, for browsing, downloading, and
dragging scenery images onto the layout.
Creating "Riverbend"
This tutorial takes you through the steps of creating a brand new layout with the Scenery Toolkit, starting with a blank image file. We've chosen to design a simple loop with some sidings
for industries and stations
Follow along and see if you can build it.
As with all good design concepts, we suggest that you start out with a rough idea of what you want your finished layout to look like. Do you want a lot of scenery or do you prefer bustling
industries? This planning stage will help you decide what key design elements you want and where you would like to place them on your layout.
But, remember, the first goal of model railroading and virtual railroading is to have FUN!!
Open to blank screen
Use File New to open a new layout file.
For this tutorial, select HO 4x8
The image opens, the grid appears in a default position.
A Quick Note about Foreground and
Background layers
You should always plan on working the Background layer first and
try to make it as complete as possible.
Then start to work on the Foreground layer by adding buildings,
industries etc.
When you shift back to the Background layer after working in the
Foreground, all of your images will disappear. Don't panic,
they have just been temporarily suppressed to allow you to see the
Background layer more clearly
Create your Background
From your Scenery toolbar, make sure you are in Background mode
and that you have selected the Rectangle drawing tool as shown
below.
With both Background and Rectangle active, use a left mouse click
and drag and draw a large box across your basic grid pattern
Adding Grass - 2 methods
1) Locate the Scenery Chooser icon on the Scenery Toolbar
,
left mouse click on it and it will bring up the main Scenery Chooser
window. This window provides you with a thumbnail view of the BMP
image.
Scroll through the selections in each folder.
When you find the image you want, left mouse click on it and drag it
onto your layout to be positioned. You will need to manually adjust
the selected image to fit the shaded box.
Hint - You will likely use the Scenery Chooser most frequently
because it has the handy thumbnail sketch!!
2) Alternatively, you can place your cursor anywhere inside the
shaded area and use a right mouse click to bring up a submenu select "Load Bitmap"
Hint - Using this method fills the shaded box completely
That click opens another window which lists your TrainPlayer files
and should direct you to your Scenery folder. Click on your Scenery
directory to expand and display the sub-folders there. Click on the
"background folder" and when it opens, select "ground grass_01". A
double click fills the rectangular box that you drew with "grass" .
Making your Grass more Realistic
Right Mouse Click anywhere on your Grass area to first select it;
from the submenu that appears choose Properties..."
In the Scenery Properties window which appears, you will see that
the default setting is "Stretch". Choose "Tile" and then press the
"Apply" button at the bottom of the window and your grass should
now look better!
A River Runs Through It!!
To add a river, ensure that you are still in Background mode
select the Poly Line
,
tool.
Using the left mouse button, drag and create whatever kind of river
line you wish.
Note: Remember to connect the ploy lines together. When this is
done correctly, a shaded area will appear.
Working with the Poly line Tool
When you have completed your first outline of the river above, you
may want to smooth out some of the edges along the river banks.
Double click with the left mouse button and it will activate the poly
line control points->
Use your cursor to drag the control point in any direction to widen
or narrow the river. You will see the change immediately and can
choose the Edit \ Undo if you do not like the result.
Hint: When working with an existing plan, you can use Grass in
the Foreground and use the control points on the poly line tool to
have the grass wrap around a building or another land feature.
Just Add Water!
As we did earlier, either use the Scenery Chooser
, and in
the Background folder, left mouse click on water_01 and drag it to
the shaded area on your background.
Alternatively, use a Right mouse click inside the shaded area for the
river. This action brings up the submenu from which you will select
"Insert Bitmap". From your Scenery file directory, go to the
"background" folder and select "water_01" and it is immediately
added to your drawing.
Hint: A good habit to get into is to Save your work often in
case something unexpected happens and it will!
Background is Done!
This is a partial view of what your background now looks like. At this
point you can continue to add backgrounds elements like dirt and
gravel areas, trees etc.
For this tutorial we will proceed to adding a simple track plan
Adding a Track Plan
Select the Track tool menu
and add what track arrangement you would like to see, directly onto
the Background image. This is a sample of what your background
with tracks would look like
Adding the tracks at this point makes it easier to place your towns,
stations and industries.
Adding an industry
From your Scenery toolbar, make sure you are in Foreground mode
below:
and that you select the Rectangle drawing tool as shown
Using your left mouse button, click and drag to open a shaded
rectangle. -->
As we did earlier, use the Scenery Chooser
, and from the
folder "coal_ore mines_sand_coal loaders", select "coal_gravel
loader 4. Drag it to the shaded area on your background.
Scenery Chooser
Once it is inserted into the rectangle it will appear as it does on the
right -->
Positioning and Sizing an Industry
Use a single left mouse click to "activate" the control points for the
image.
When it is first placed on your layout, the top left hand control point
controls the rotation of the image which allows you to place it
correctly with your tracks.
The other points control the sizing aspects for the image,
which allow you to make it wider
or longer than it might normal appear AND also to control both length
and width together.
Moving an Image
If you need to move the industry image to somewhere else on your
layout, again use a left mouse click to activate the image. Your
cursor should now change to a 4 arrow head marker and this will
allow you to move the industry anywhere you want on your layout
About Image Properties
Use a right mouse click on any image and from the submenu, select
- Properties. This submenu then appears. -->
Hint: For all Bitmap buildings, you will want to have "Stretch" as
the default setting and you will want to ensure to "Lock Proportions"
to ensure that the image retains its basic structural and visual
integrity.
Naming your industry or Town
From your Scenery toolbar, ensure you are in Foreground mode,
then near your industry, left
then press the Text tool icon
mouse click and drag to create a new text box.
Insert whatever name you want for that industry.
As with other image boxes, you can click on it to move it around to
whatever position suits you.
.
Working with Your new Text
If you want to change the font size and font type and color of your
new Text label, use a left mouse click to highlight it, use a right
mouse click to open the submenu. At the submenu, select
Properties which will open this new menu -------->
You can edit your original text in the Text box. If you click on the
Font prompt, then you can adjust both Font size and Font type in the
next pop-up window .
Font Color can be changed in the Color box.
Remember to hit the Apply button to have these changes
reflected in your layout.
Using the Group / Ungroup feature
There will be situations where you create a small town and you will
want to keep all those images connected to each other in the same
sequence and the same proportion. Here's how you will do that:
First, from the Scenery toolbar, ensure you are in the Foreground
mode, then use a left mouse click on the Scenery Select tool to
activate it.
Then drag a rectangle shape around all of the images to be included
in the Group image. If you have correctly selected all of the images,
you will see their "control points" on the screen.
If you have missed some, as the old adage goes - just try again until
you succeed!
At that point, click on the Group icon
and all images will be wrapped into one, with its own set of
"control points".
If you need to change something within this group, just click
on it and select the Ungroup feature
back into its original smaller pieces
to break the group
Using the Send to Back and Bring to
Front Features
There will be times when you will place a factory too close to some
vegetation and it will look wrong. You can either choose to move
your trees!!
Or, you can use these features to change the appearance. Here the
trees over hang the buildings which looks more natural
Before
After
Final Hint
Sometimes, it can get confusing moving between the Background
and Foreground layers. What we have done is to completely create
the Background layer to our satisfaction first.
Then use the File \ Export Image feature to "Name" and save the
Background layer as a JPEG image. <<my layout1.jpg>>. Close the
layout.
On the TrainPlayer blank screen, we select File\Open and select
that newly named background JPEG image as our starting point to
add our track work and Foreground images. You never need worry
about the Background image again!
Add More Scenery Items, trains and
enjoy !
Use Train\ New Train to create a train on your layout. You're
ready to begin operating.
Only your imagination will limit the layout designs you can now create with
TrainPlayer Scenery Toolkit
Choosing Scenery
TrainPlayer offers a large and growing collection of scenery objects of all types -- buildings, trees, factories, streets,
vehicles, background patterns, industrial complexes -- a regular Walthers catalog of goods you can add to your
layout. A small subset of these is delivered to your disk when you install the program. Many more are available on
the web, easily downloaded with a minimum of clicks.
About the Scenery Chooser
Like the other Chooser dialogs, the Scenery Chooser is a resizable, three-panel dialog with a tree on the left, a list
in the middle, and a preview panel on the right. There are two tabs, one for local scenery (stored on your disk), the
other for scenery on the web. The tree can be configured to show your own content located anywhere on your disk
or network. For more information, see Scenery Chooser.
But unlike the others, the Scenery Chooser not designed for selecting a single result, like opening a layout or
choosing a sound. Instead, it stays open, like a box of scenery on the floor -- you browse through it, grab what you
want, put it on the layout, and repeat until you've built a whole town or planted a forest along the entire main line.
The dialog is modeless, so you can work on the layout without taking it down, and it offers an easy drag-and-drop
mechanism for adding objects to the layout. Because the list pane is in icon view, there is no real need for a
preview pane. You navigate through the collections using the tree, find what you want, drag it onto the layout, and
adjust its size and location to suit.
Using the Chooser
To add scenery to your layout:
1. Select the layer you want to work in, using Edit Foreground
objects will go in this layer.
or Edit Background
. Added
2. Click the Scenery Chooser tool , or select Tools > Scenery > View Scenery
Chooser from the menu. This brings up the Scenery Chooser:
3. Click a folder in the tree to see its contents in the middle pane.
4. Point to the object you want, press the mouse button, drag to a
location on the layout, then release. The object appears on the
layout, possibly somewhat resized.
5. Click the object to select it, so it shows "drag handles" on the
sides and corners, as shown here:
To move the object, press and drag by the middle. To resize, drag
one of the handles. To rotate, drag by the handle at the upper
right. For more information, see Editing Scenery.
6. Repeat steps 2-5 to add more objects. When you are finished, click Done.
To add a single scenery object:
The drag-and-drop method above works no matter how many objects you are adding, but if you only want to add
one object, there are alternative methods:
●
Click to select an object in the middle pane, then click OK. The object is deposited in the middle of the
layout window, and the dialog is taken down.
Note: once you have dragged an object from the dialog, the OK button changes to say "Done" and
will not add an object when clicked.
●
Click Browse, then navigate to an image file on your disk. Click OK. An object with the selected image
is created on the layout, and the dialog is taken down.
Using any of the above methods, what you are creating on the layout is a rectangular object with a bitmap fill. You
could get the same result by creating a rectangle object and editing its properties, or by using the Bitmap tool.
Downloading Scenery from the Web
To see the scenery objects available on the TrainPlayer web site, click the Web tab. For details, see Scenery
Web Chooser.
Objects you see in these folders must be installed to your disk before you can add them to your layout. Here's how:
1. Click a folder in the tree to see its contents in the middle pane. This may take a minute -- the
program has to download the folder before it can display the images.
2. When you find the object or set you want, click Install. This copies the downloaded files into
your Scenery folder. It then switches back to the Local tab and selects the installed folder, so you
are ready to proceed to add objects as described previously.
3. Or click Install All. This downloads and installs the entire set of web scenery onto your
disk. Chances are you will eventually want to use a lot of it, so you might as well take a couple of
minutes to get it all at once.
For details regarding the download procedure, see Managing Scenery.
Drawing Scenery
If you are building a layout on a plywood sheet, you can use the Scenery Chooser to plop a few buildings and trees on it and you're set. But the
more serious layout will require ground cover, water, roads, and other fanciness which can only be constructed by drawing. This section
describes how to draw your own scenery objects.
Drawing New Scenery Objects
The general procedure for drawing a new scenery object is as follows:
1. Select a layer. Choose one:
●
●
Edit Foreground Layer to create smaller objects in the foreground.
Edit Background Layer to create larger shapes behind the foreground objects.
The layer you choose becomes the active layer, where new objects will go. The active layer is
displayed as FOREGR or BACKGR on the status bar at lower right. When the foreground layer is
active, background objects cannot be selected or modified; when the background layer is active, foreground objects are not
displayed at all.
2. Select a drawing tool. Choose one:
●
●
●
●
●
Rectangle to create a rectangular or square object.
Oval to create a circle or ellipse.
Line/Polygon to create a line, a chain of line segments, or a polygon.
Text to create a plain text label.
Bitmap to create a rectangular object with an image.
3. Press and drag. Press the left mouse button where you want one end or corner of the object; drag and release where you want the
opposite end or corner.
●
●
●
If you are using the Oval tool, you will be dragging a circle. Press the Shift key as you drag if you want to move instead
of resize the circle. To create an ellipse, you first draw a circle, then adjust as described below.
If you are using the Line/Polygon tool, you are dragging a line. To create a polyline or polygon, the point where you
press to start or release to end must coincide with the endpoint of another line.
If you are using one of the other tools, you are dragging a rectangle.
4. Enter data if prompted.
●
●
If you are using the Text tool, you are prompted to enter a line of text.
If you are using the Bitmap tool, you are presented with an Open File dialog, so you can choose a graphics file.
5. Adjust the object. Click somewhere in the interior of the object to select it, so it
shows "drag handles" on the sides and corners as shown at right, then:
●
●
●
Move: point to the interior of the object (cursor changes to fourheaded arrow), press and drag to move the object.
Resize: point to any drag handle except the upper right (cursor
changes to a double-headed arrow), press and drag to move that side or
corner. Hold down Shift as you drag to resize the object without changing
its proportions.
Rotate: point to the upper right handle (cursor changes to a circle),
press and drag to rotate the object.
6. Set properties. To change the attributes of the object -- color, style, fill, text, etc. -- point to it, press the right mouse button, and select
Properties from the context menu (as shown above). This brings up the Scenery Properties dialog, described in detail under Editing
Scenery.
Drawing Polygons
For most objects, a single press-and-drag operation creates the object. For polylines and polygons, a multi-step procedure is required, as
follows:
1. Choose the Line/Polygon tool .
2. Press and drag to create a line segment.
3. With the cursor still positioned at the end of the first segment, press and drag to create another segment. Since the two segments share
an endpoint, they are automatically fused to create a single two-segment polyline object.
4. Repeat step 3 to extend the polyline.
5. Finally, draw a segment connecting the two free ends of the polyline, forming a closed figure. The resulting polygon is automatically filled
with the default fill color.
It does not matter in which order or direction you draw each segment -- as long as one end or the other coincides with the endpoint of another
segment, they will join. The cursor changes to "+" when you are touching a segment endpoint.
When you select a polyline or polygon object, its drag handles are on the rectangular space around it. Dragging by these handles changes the
overall size and shape of the figure. To adjust the position of a single vertex point, click a second time on the object; drag handles now appear
on the vertex points, and can be used to move those points individually. Click repeatedly to toggle between these two editing modes.
Drawing Polygons Using Track Tools (Track To Scenery)
An alternative method of creating a polyline or polygon allows you to create shapes containing straight line segments and circular arcs, using the
track drawing tools. This feature is convenient for creating custom benchwork shapes. To create scenery using this method:
1. Using the Straight Track and other track tools, draw track in the desired shape.
2. Select all the track to be converted; use shift-click to add or subtract from the selection as needed. When the whole set is selected, rightclick any selected section and choose Track To Scenery.
The program converts the selected track to one or more polyline scenery objects in default style. If the track forms a closed figure (as shown in
the picture) then the resulting object will be a closed, filled polygon. Otherwise, it will be one or more line or polyline objects. If more than one
polyline is created, all created objects are grouped together into a single object.
The new scenery is created in the currently-active layer. If you want it to be in a particular layer, choose that layer in the scenery toolbar before
doing the conversion.
After the conversion, the Scenery Edit tool will become active, and the new scenery object(s) will be selected. You can then drag them around,
group them, restyle, etc. The original track will be deleted unless there are any cars or trains on it, in which case it will remain intact.
The operation can be undone using Edit > Undo. If a grouped object was created, the undo has two steps: first undoes the grouping,
second undoes the track->scenery conversion.
Creating Roadbed Scenery
Roadbed is normally displayed as a track drawing style, as described under Road Preferences. An alternative is to create a set of scenery
objects to fit underneath the track. To do this:
1. Select the track section(s) where you want roadbed.
2. Right-click a selected track section and choose Grow Roadbed Scenery.
The program generates polygon scenery objects under all selected track sections, overlapped to look like a continuous thick section of roadbed.
Style and width are taken from the Roadbed choices under File > Preferences > Road. The generated objects are regular scenery,
so you can change the style of one or many parts by selecting and editing as described elsewhere in this chapter.
If you create roadbed as scenery instead of drawing it as a track style, it is more flexible in that you can have more than one style on a layout,
and it need not appear under all the tracks. The disadvantage is that if you have a lot of roadbed, the large number of scenery objects will be
cumbersome and slow the program down.
Scenery Convenience Tools
Two of the drawing tools do not actually create new types of object, they just provide convenient shortcuts to creating standard objects with
certain attributes. In all cases, you could acheive the same results by drawing a rectangle object and setting its properties.
●
●
●
The Text tool
creates a rectangle object with a text string, no fill and no border line. On dragging to create a new object, you are
prompted to enter the text string. Note that the overall size of the object is the rectangle you define by drawing; it is not automatically
adjusted to fit the text.
The Bitmap tool
creates a rectangle object with no border line, filled with a given image marked as stretch-with-distortion. On
dragging to create a new object, you are presented with a dialog for selecting an image file. The image fills the space you define by
drawing.
The Scenery Chooser
allows you to drag in pre-defined objects. These are rectangle objects with image fill, marked as
stretch-without-distortion. The object size is automatically adjusted to fit the image.
Text Labelling
When you have completed placing scenery around your layout, you may want to go back and add place names, track directions or even building
names to your layout. For individual objects, you can add a text label via the Text tab of Scenery Properties. For other situations, you
may want a text box separate from any specific object. For example:
To create a label, select the Text tool
prompt dialog appears:
. Press and drag a box in the area where you want to place your text. When you release the button, a
Enter the text and click OK. The label appears on the layout.
Click on the text to select the object, so you can reposition, rotate, or adjust properties of the label. Note that the font size rescales as you zoom
the layout, but not when you resize the text scenery box.
Editing Scenery
Drawing or choosing scenery is the equivalent of taking a pre-built structure out of the box. Editing is the rest of the
job -- placing it where you want, making it the right size and shape, painting, labelling, and adding trim. This section
describes how to edit scenery objects, whether drawn by hand or dragged in from the chooser.
About Editing Scenery
The Scenery Toolkit is designed to make it easy to move scenery objects around on the layout. One of the most
convenient features is that it doesn't matter what tool you have selected, you can still select, move, or otherwise
modify any type of object -- you don't need to keep switching back and forth between a drawing tool and an editing
tool. So for the most part, the operations below work the same way with any scenery tool active.
There is a scenery edit tool, the green arrow
on the left end of the toolbar. The one function this tool can
perform which the others can't is dragging a rectangle to define a multiple selection.
Selecting Objects
Before you can work with a scenery object, you must select it. A selected object is
drawn with "drag handles," as shown at right.
●
●
To select a single object: click anywhere in the interior of the
object. To unselect, click outside the object.
To select multiple objects: (a) hold the Shift key down while
clicking to select an object. This will add the object to the selection, or
remove it if it is already selected; or (b) choose the Scenery Edit tool
and drag a rectangle around the objects you want to select. Press Shift to add the surrounded objects
to the selection.
Selecting By Type
If your layout has ties or roadbed, you can choose from the Edit > Select menu whether you want to select
only those types.
If you choose, say, Ties Only, then the next time you drag a rectangle to select a region of scenery, or use
Select All (Ctrl-A), the only objects selected will be ties.
The selection you make in this menu stays in effect until you change back to Any Scenery.
Standard Editing Operations
As with just about any selection in any Windows program:
●
●
●
●
●
To delete selected object(s): choose Edit Clear from the main menu, or press Del.
To copy selected object(s) to the Clipboard: choose Edit Copy from the main
menu; or right-click a selected object and choose Copy; or press Ctrl-C. A copy of the selected object(s)
is made on the Windows Clipboard. If you choose Cut (Ctrl-X) instead of Copy, the objects are copied
and then deleted.
To paste objects from the Clipboard: choose Edit Paste, or press Ctrl-V. Objects
previously copied to the Clipboard are deposited at the upper left of the screen, selected and ready to move
into position.
To undo an editing operation: after any move, resize, rotation, property change, or other
modification of selected objects, choose Edit Undo or press Ctrl-Z to revert back to the state before the
change.
To redo an undone operation: after an Undo, choose Edit Redo or press Ctrl-Y to undo
the undo and revert back to the changed state.
Moving and Resizing
Once one or more objects is selected:
●
●
●
To move the selected object(s): press the interior of any selected object (the cursor
changes to a four-headed arrow) and drag. All selected objects will move simultaneously.
To resize a single object: press a drag handle on any side or corner (cursor changes to a twoheaded arrow) and drag. The side or corner will move relative to the rest of the object. Note: this does not
work if you are pointing to the upper right corner -- that one does rotation, described below. Note that the
orientation of the two-headed cursor may not be correct if the object has been rotated.
To resize multiple objects: if you want to change the size or shape of several objects at once,
you must first group them, as described below.
Rotating
If an object is selected:
●
●
To rotate the selected object: point to the upper right
corner of the object (cursor changes to a circle) and drag. The object will
rotate around its center. (Obviously once the object has been rotated,
these instructions may not be strictly correct, because the draggable
corner may no longer be in the upper right.)
To rotate several objects: the way to rotate more than one object at a time is to group them, as
described below. A grouped object can be rotated the same way as any other single object. The picture
above shows rotating a grouped object.
An alternative way of rotating an object is to type an angle into the properties dialog; see Editing Properties.
Flipping
If you find a right-handed widget in the scenery catalog, but you need a left-handed one, you can flip it.
1. Use the Scenery Edit tool.
2. Right-click an object and choose Flip Horizontal or Flip Vertical.
The object is inverted across the appropriate axis. If multiple objects are selected, each flips on its own individual
axis, but if they are grouped, the flip is on the group's axis. Flipping an object with a non-zero angle of rotation will
change its rotation angle. The operation is reversible with Edit > Undo/Redo. If the object has a bitmap image, the
image is flipped in memory, without modifying the image file.
Grouping and Ungrouping
Some operations, such as moving or setting properties, work on several selected objects at once. Other
operations, such as resizing or rotating, work only on a single object. Grouping is a way of turning several objects
into a single one, so the latter type of operation can be performed on the group.
●
●
To group two or more objects: select at least two objects by shift-clicking or using the
Scenery Edit tool, then click Group . The selected objects become a single grouped object, with a
single set of drag handles, which can be manipulated the same way as any other single object. Note that
the Group tool is dimmed unless you have at least two objects selected.
To ungroup a grouped object: select at least one grouped object, then click Ungroup .
The grouped object reverts to a set of individual objects.
Grouping can go more than one level deep, that is, a grouped object may contain other grouped objects. In this
case you have to ungroup more than once to go all the way back to the initial separate objects.
Changing Display Order
If multiple objects overlap on the layout, two factors determine which one appears in front: (a) all objects in the
background layer are behind all objects in the foreground, and (b) within a layer, objects are drawn based on their
semi-arbitrary positions in a list. This order may be changed using two special editing commands:
●
●
To move an obscured object in front of its neighbors: select the object and
choose Bring to Front . This changes the order of objects so the selected one is higher in the list.
To move a front object behind its neighbors: select the object and choose Send
to Back . This moves the selected object lower in the list.
You can use these commands on multiple selected objects, in which case all of them will be moved up or down
relative to the unselected neighbors.
These features come in handy when you're adding details like sidewalks, vegetation etc. The images below show a
concrete driveway being added to the scene. In the left image, the driveway is on top. sending it to the back gives
the image on the right.
Another way of changing the display order of objects is to move them from one layer to another. For example,
moving an object from the foreground to the background will cause it to be drawn behind all foreground objects.
●
To move an object from one layer to another: select the object and cut it to the
clipboard, using Edit Cut or Ctrl-X; activate the alternate layer, using the Background Layer
or
Foreground Layer
tools; then paste, using Edit Paste or Ctrl-V.
Editing Scenery Properties
In case you don't want all your scenery objects to be plain
yellow, you will need to learn about the Scenery Properties
dialog. This is a dialog with four tabs, used to modify the
properties of one or more objects. Each tab has its own help
page, linked here and from the Help button on each tab:
●
●
●
●
General Scenery Properties
Background Scenery Properties
Line Scenery Properties
Text Scenery Properties
The easy way to bring up the appropriate page is to click the Help button on the dialog.
The Scenery Properties dialog has a preview pane, showing a picture of the selected object(s) with changes as they
are being applied. The changes do not affect the objects on the layout until you click OK or Apply.
To change the properties of one or more objects:
1. Select the object(s).
2. Right-click a selected object and choose Properties
(as shown above). This brings up the Scenery
Properties dialog.
3. Change values in the dialog as desired. Refer to the
above help pages for details. A sample drawing of the
object(s) shows how the changes will look.
4. Click Apply to apply the changes to the selected object
(s) without taking down the dialog, or OK to apply the
changes and dismiss the dialog, or Cancel to dismiss
the dialog without applying the changes.
Any changes made in the Scenery Properties dialog can be undone using Edit Undo.
Managing Scenery
This section contains semi-advanced information for users who want to create and manage their own scenery images, or troubleshoot scenery
problems.
About Scenery Files
Most information about scenery objects -- shape, style, position, text, etc. -- is stored in the rrw file along with the layout. What is not stored there
are the images associated with bitmap-filled objects. If you'll be working with scenery, it's useful to know where these files reside and how they are
managed.
The TrainPlayer scenery collections are organized in folders by type: "factories," "urban buildings," "vegetation," etc. Each folder contains a
collection of image files, mostly in bmp format but also jpg, gif, and png. The installation delivers a small set of these to the Scenery folder located
in your Application Data directory.
The location of this folder depends on your operating system. An easy way to find out where it is: point to an installed folder in the Scenery
Chooser tree and look at the tooltip. For example:
If you navigate to that folder in Windows Explorer, you'll find the files which are on display here in the chooser. (f you add, delete, or reorganize
them on the disk, changes will be reflected in the tree after you use Refresh from the context menu).
Downloading and Installing Scenery
Delivering scenery from the web to your local collection is a two-step process. The first time you click a folder in the web tree to view its images,
the image files are downloaded into a temporary directory on your disk. When you then choose to install them, they are copied into the Scenery
folder.
The temporary directory is under a folder named "Scenery_DL" in your system TEMP folder. This serves as a "cache" -- the next time you request
the same files, they are retrieved from the cache instead of being downloaded again. This makes for faster browsing, but runs the risk that the
temporary files become out of date when web collections are updated. For this reason, there is a command on the menu when you right-click the
Scenery folder in the web tree: Clear Download Cache. Choose this to delete the temporary files and force them to be re-downloaded.
We recommand you do this once in a while before browsing the web collections. (In a future version, the program will do it automatically.)
Modifying the Scenery Chooser Tree
The tree in the local Scenery Chooser, like those in other choosers, is a flexible and somewhat complex device. Detailed instructions for how to
operate a chooser tree are given under Choosers. Regarding the Scenery Chooser:
●
●
The initial content in the tree is the set of objects delivered by the installer -- a few folders with a few items each. New folders downloaded
and installed from the Web tab go in the same location, and add to this tree automatically. If you do an Install All, your local tree
becomes a mirror of the one on the web.
If you have scenery images of your own, you can add them to the tree by dragging in files or folders from Windows Explorer. Once you do
this, be wary of using Rebuild All Trees, as that will lose these additions.
Creating Your Own Scenery Objects
If you have an artistic bent and a working knowledge of Microsoft Paint or other image editing software, you can create you own scenery objects to
add to your layouts. Let's say you want to add a little country church to a rural section of your layout. Here's how.
1. Draw the picture. You will need a top view of the church. It does not need to be any particular size, but should not be
too big -- not more than about an inch square. For example:
2. Indicate the background. If the image has a non-rectangular shape as this one does, then you will have areas of
background which you want to be invisible when the image is placed on the layout. Fill these with a uniform color. It can be any
color which is not contained in the image itself.
The program recognizes the background (mask) color by looking at the pixel in the upper left -- whatever color it finds in this
pixel is taken as the masking color, and is erased from the drawing.
3. Crop. Make the image as small as possible, but be careful! Remember to leave at least 1 pixel of background at the upper
left.
4. Save to file. In principle you can save in any graphics format and any location, but in practice it is best to save as a fullcolor (24-bit) bmp file, to a location already known to the program. The easiest thing to do is to save the file to one of the folders
which already exist in your scenery collection. Here we are saving to the Miscellaneous folder:
5. Add to Chooser. If you saved the file to one of your Scenery folders, then it will automatically show up in your Scenery
Chooser when you refresh the folder (right-click on the folder in the tree and choose Refresh). If you saved it to a different
location, locate the file in Windows Explorer and drag it into your scenery chooser tree.
Note that a bit of the background color may show around the edges of the image when you see it in the chooser. This goes away
when you drag the object to the layout. If you want to get rid of it, use a fill color which is almost (but not quite) white.
6. Add to layout. Now you are ready to drag the church from the chooser onto your layout. Adjust the size, location, and
orientation to suit.
7. Consider sharing with other users. If you've drawn some nice scenery objects which may be useful to others,
send us an e-mail and we will consider adding them to our TP web collection.
Publishing Scenery
Suppose you have added some homemade scenery objects to your layout, and now you want to send the layout to a friend. Unless you arrange to
also send the custom scenery files, he will get an alert on opening the layout instead of seeing your objects.
This problem is solved by using File Publish. This command does not actually put your layout anywhere, it just prepares it for sending -- it
gathers the component files in one place, assigns uniform filenames, checks for errors, and gives you a chance to enter missing data. This feature
is described elsewhere in the manual (see xxx), but additional notes are in order regarding scenery.
If your layout contains scenery objects from the TP collections, these are not flagged at publish time, as the recipient can download them if
needed. However, if you have custom objects not available from TP, you are alerted about these in the Publish dialog:
When you publish, the named image files are copied to the output directory and placed in a folder alongside the layout. This folder has the same
name as the layout but with suffix _files. For example, the above generates the following output:
The rrw file is the layout, the jpg is the background image, the _t.jpg is a thumbnail image, and the _files folder contains the additional scenery
objects, in this case just country_church.bmp.
To transmit this layout to a friend, zip all four of these items into a single zip file. Instruct the recipient to unzip into a folder and double-click the rrw
file.
Scenery Image Ideas
Here are a couple of sources for ideas for new bitmaps - the Walthers Catalog and Google / Bing maps.
From the Walthers catalog, http://www.walthers.com/exec/page/flyer you can get an idea about what the major kit makers are producing.
Sometimes there are measurements of buildings or "top down" views. Use that information to try and create something suitable with Microsoft
Paint - much like creating a car top for a train car collection. Here's an example of a relatively simple bitmap design of a warehouse created with
MS Paint:
From Google© and Bing© maps and using a decent Screen Capture program, you can get 2D shots of actual industries at various "zoom" levels.
For example, here is a steel / "rolling" mill as captured in a photo:
Once you've made the "screen capture", then you can use MS Paint or any photo editing software to remove the parts you don't want:
You can use the original photo capture as inspiration (see below) or you can actually edit it to suit your needs in all its original aspects. Several of
the images in the Scenery Toolkit folders - warehouses and factories are based on edited screen captures..
Inside the Scenery Toolkit, you can also create a comparable image of an industry of your choice. By putting together some rectangles, 4 circles
and some poly lines, you can quickly create a typical small town flour mill:
At present, you cannot save this image separately from the layout you are working on but we hope to have that capability added in the future.
Scenery Properties: General
General properties of the selected scenery object(s). Called from Properties on the scenery context menu.
See also: Editing Scenery Properties, Background Properties, Line Properties, Text Properties.
This dialog sets general properties of a scenery object. If multiple objects are selected, the dialog displays "--" for values
which differ among the objects; any change you make applies to all. Most of the values in this dialog are normally adjusted
by moving the object on the layout rather than entering numeric values, but both are possible.
Dialog controls:
Name
Foreground
Size
Name of the object. This is a program-generated name consisting of
the object's type and its ID. It cannot be changed.
Check this box to move the scenery object into the foreground layer.
Uncheck to move to the background.
Height and width of the unrotated object's rectangular bounds, in units
chosen from the drop-down menu. You can enter a new value in
either box to change the dimensions of the object.
Location
Coordinates of the upper left corner of the unrotated object, relative to
the upper left corner of the layout. You can enter new values to
change the object's position on the layout. Units are as chosen from
the drop-down.
Units
Specifies units of length for display and entry of size and location
values. Any choice you make here will apply in similar Units menus
throughout the program.
Rotation
Angle in degrees by which the object is rotated clockwise from
normal. Enter a new value to change the orientation, or enter 0 to
return the object to normal.
Hide track & trains
Specifies whether the object sits above or below track and trains.
Check this box if you want the object to appear on top, so that track is
obscured and trains disappear as they travel beneath, as shown here.
Uncheck the box to have the scenery at ground level, with track and
trains passing above it.
Note: if the object has a non-zero transparency setting (see
Background Properties), and this box is checked, then the trains will
disappear but the track will be partially visible.
Animated Scenery
Animated images in TrainPlayer are little movies you can place around your layout. These can be made to play continuously, or on demand, or
automatically whenever a train passes a given spot. You can choose from a supplied collection of animations (small but growing), or find many
more by searching the web, or create them in your favorite paint program. They can be connected with sounds, so that, say, a crossing signal will
both move and clang as the train passes by.
To see animations in action, check out this video: animation demo
About Animated Images
An animated image is a new type of scenery object. It can be moved, resized, rotated, and styled just like any other, but it has a special type of
background consisting of a series of frames, each with its own image and duration. These are in one of two formats:
Animated gif: the well-known animation files you see all over the web. These can be loaded directly into scenery objects in TrainPlayer.
Image sequence / ANM file: a series of separate files for each image, plus a text file with extension ".anm," listing the frames and
durations. The image files may be in any popular graphics format -- bmp, png, jpg, gif -- and the simple text file can be created by the program or
by hand. This scheme was designed to make it easy for users to create their own animations.
Because animated images are tied to scenery, creating and manipulating them requires TrackLayer with Scenery Toolkit. Viewing and playing
them in an existing layout can be done in TrainPlayer [except: in the current version, you cannot start or stop animation if you don't have access
to the scenery toolbar.]
Triggers: events which cause animations to start and stop. We have in mind a variety of these, but for the time being there are only two:
Station trigger: animation starts when the lead car of a train (any train) enters a given station, and stops when the last car leaves.
This is the same scheme which controls sounds attached to stations, so if you want a sound to play at the same time the animation
moves, use a station trigger on the animation, and specify a sound on the same station.
Junction trigger: animation starts when the lead car of a train crosses a given junction, and ends when the last car crosses it.
Triggers are specified using the Scenery Properties Animation tab, as described below.
Adding Animation to Your Layout
There are two ways to add animated images to your layout: from the Scenery Chooser, or via Load Bitmap. The first is easier, the second more
flexible.
Using the Scenery Chooser
The initial release of this feature comes with a small set of sample animations in both gif and anm formats. More will become available over time
in the web scenery collections. To add one of these to your layout:
1. Bring up the Scenery Chooser using Tools > Scenery > View Scenery Chooser or the button on the scenery toolbar.
2. Click to open the new animations folder. (If you don't see it, try right-clicking the Scenery folder and choosing Refresh.)
3. Press an image and drag onto the layout. That's it -- it starts playing immediately. (To stop, use the Scenery Edit tool, right-click and choose
Stop Animation.)
Confession: most of the animations in our sample set came from the Microsoft Office Online clip-art collection. There do not appear to be
restrictions on distributing these, unless we missed some fine print.
Using Load Bitmap
The alternative to loading an image from the chooser is to create the scenery object first and then attach the image. The procedure is the same
as when adding a non-animated image, as follows:
1. Select the Rectangle tool on the scenery toolbar, and drag to create a rectangle where you want the animated image. By default this gets a
beige background.
2. Select the Scenery Edit tool (green arrow), right-click the new rectangle and choose Load Bitmap. You get a standard file dialog.
This is the same dialog you use for static background images. It is still used for that, but now supports three more types of input:
a. Browse to an anm file -- the program will create an animated image.
b. Browse to a gif file -- the program will examine it and decide whether to create an animated or static image.
c. Browse to the first of a series of images -- the program will create an animation and anm file automatically. This process is
described in detail below.
Once you successfully load an animated image, you get an alert confirming the import and reporting the number of frames.
An animated image created using Load Bitmap does not automatically start playing upon creation. To start it, use the Scenery Edit tool, right-
click the image and choose Start Animation.
Working with Animated Images
Animated images work basically like other scenery objects.
To manipulate: Use the Scenery Edit tool (green arrow on the scenery toolbar), click to select an
image, then you can move, resize, rotate, and restyle it as usual. It keeps animating as you move it
around.
By default, an animated image has its proportions locked, so resizing the image will not distort it. To rotate
an image, drag the handle at its upper right.
To stop or start animation: select the Scenery Edit tool, right-click the image and choose
Stop Animation or Start Animation, as shown ==>
Once you start an object moving, it keeps going until you stop it, or until a trigger event causes it to stop. If you save the layout while the object is
animating, it will come back that way the next time you open the layout.
To set object properties: select, right-click and choose Properties. Most properties of standard scenery objects apply to animated
ones.
To trigger animation on train moves: see the following section.
Animated Image Properties
To view or adjust properties of an animated image, right-click on it (using the Scenery Edit tool) and choose Properties. The Scenery
Properties dialog appears, showing the new Animation tab.
This dialog is modeless -- it remains up while you work on the layout. You can select different objects on the layout and adjust their properties
one at a time, or shift-click to select multiple objects and set all their common properties at once.
Controls on the Animation tab:
Type: Animated gif file vs Image series/anm file. This is read-only -- you can't change the type in this dialog.
Frames: number of frames in the animation. Read-only.
Frames button: click to bring up the Frames dialog, showing filenames and durations in a little grid:
If the animation type is anm, then you can edit the values in this grid; for animated gifs, the data is uneditable [in fact, for the time being,
the Frames button does nothing at all if you are dealing with gif rather than anm].
Times are in milliseconds. Filenames can be changed -- they need not be numbered sequentially once they have been listed in an anm
file -- but they must exist and all be in the same folder as the anm file.
This dialog appears automatically whenever you import a sequence of image files.
Playing: check or uncheck to start or stop animation. The setting does not take effect until the dialog comes down.
Play once: check if you want the animation sequence to play once and then stop, instead of repeating continuously. This applies
whether you start the animation manually from the context menu or automatically based on a trigger.
Rewind after play: check if you want the image to revert to its first frame after every play. If you do not check this box, then
stopping the animation will freeze it, and starting it later will pick up where it left off. [Note: due to a bug in the current version, you may
need a View Refresh to update the image so it will go back to its first frame.]
Trigger type drop-down: choose a trigger action, or None. At the moment there are two actions available: when a train passes
through a station, or when it crosses a junction.
Trigger id drop-down: choose the station name or junction id where animation is to start and stop. The drop-down shows either
station names or junction numbers, depending on the trigger type choice.
Preview window: shows a thumbnail of the selected image. For the moment, the preview is static and does not move, but this may
change in a future version.
Normally in the Background tab of Scenery Properties, you can choose a different image for a scenery object. However, what you cannot do is
change the background from static to animated, or vice-versa. If you try this, an alert tells you it is not allowed.
Creating Your Own Animations
If you want to create your own animations, one method is to obtain a program capable of making animated gifs. Many such programs are
available -- Adobe ImageReady, CyD GIF Studio, Microsoft GIF Animator, several shareware titles -- but TrainPlayer offers an easier way: create
a series of images, give them suitable filenames, and import them with one click into a single object.
A series of images is a set of files in the same folder with names ending in underscore, then sequential numbers starting with 1; e.g.,
flagman_1.png, flagman_2.png, flagman_3.png. Using Load Bitmap, if you browse to a file whose name ends with "_1," and
there are other files with the same name but different numbers, the program will prompt and ask if you wish to create an animated image from the
series, like this:
Click Yes, and the program will create a file with the name of the series and extension.anm (e.g., flagman.anm), then load it into the scenery
object.
When you create an animated image from a series of files, the Frames dialog (shown above) comes up so you can set the frame timings. By
default, all are set to 100 ms.
After a successful load, an alert informs you of the number of frames, and the output anm filename if applicable:
If you create an anm file from a series of images, and want it to appear in your Scenery Chooser, copy the anm file and all the component image
files to your Scenery\animation folder. Note that the chooser will display only the anm file, not any of its components.
If you create an animation sequence and want to send it to us or to a friend, zip the entire set of images, along with the anm file, and send the zip.
If you have an animated gif, and you want to modify it, you will need to split it into separate frame files. TrainPlayer has the ability to do this; in
fact, it does this job whenever you read in an animated gif -- the gif is split into frames, which are saved in your Windows Temp directory. You
can capture these and use them to make your own animation sequence. For details, send e-mail and request information.
Modular Railroading
If you've been to a train show and seen a miniature hundred-car coal train winding along what appeared to be miles
of track, then no doubt you've seen modular railroading in action. It's a way of creating a huge layout in a short
time, often for a temporary display. You get a bunch of railroaders to each bring a section, then you arrange them
on the show floor and hook them together with sections of track, so trains can run from one end to the other, or
around a giant loop.
Modular Railroading in TrainPlayer provides tools for building virtual modules, arranging them in patterns, and
automatically hooking them together so you can test drive the overall layout. The arranging is done by drag and
drop, and the hookup is a one-click operation, so it's easy to experiment with different patterns. TrainPlayer
provides a large library of pre-built modules, including all types of corner, junction, yard modules, scenic runthroughs, and lots of interesting plans you can use as the basis for your own designs.
The majority of modular railroading is done in N scale, according to standards from the NTRAK Modular Railroading
Society, but there are also a growing number of HO module clubs using similar standards. TrainPlayer supports
modules in any scale, and provides pre-designed units for both N and HO.
For a quick start, skip the reading matter and try the tutorial.
About Modules
About Modular Layouts
Modular Layout Tutorial
Building a Modular Layout
Building a Module
The Module Manager
Module Manager Settings
About Modules
In principle, any layout can be used as a module, in the sense that it can be brought into the Module Manager and strung together with others.
However, this only makes sense if the a layout is constructed in such a way that it can hook to a neighbor for continuous running. We use the
term module to refer to a layout constructed in this way. In the Layout Chooser, all layouts under the Modules folder are in this category.
Module Standards
Every module must have sections of straight track ending at certain positions near the layout edges. These positions are called connection
points.
The numbers and positions of connection points on a module depend on a scale-specific body of standards, of which there are several. The
most popular modules are N scale, based on standards published by the NTrak Modular Railroading Society. HO scale standards are less
universal; ours are based on HOTrak as published by the Ottawa Valley club. In TrackLayer, you can build modules in any scale, based on
standards of your own invention, but all the layouts in the collections are either NTrak or HO.
A module is designed to be oriented a certain way. The front is the edge closest to the viewer; in the diagrams below this is at the bottom.
The track closest to the front is the main line, which generally runs uninterrupted around the entire layout. For full details about the the
ordering, positioning, and labelling of tracks, see Building a Module.
Sizes of modules vary but are not random. The typical NTrak straight module is 2 feet deep and 4, 6, or 8 feet wide. The depth may vary -- an
extension may be added to front or back -- but if the widths were to vary, it would become impossible to arrange a series of modules into a
seamless loop. And if the width were much bigger than 8 feet, you'd never get the thing in the truck.
Module Types
Straight
Corner
Junction
A straight module has connection points on opposite edges of a rectangle. You can join another module on either side. The main line is in
front, and generally goes straight across.
A corner module has connection points on adjacent sides of a square, with curved track between. When you join two modules onto a
corner, they form a 90-degree angle. Only the outer tracks proceed through a corner module.
An inside corner module is an inverted corner which introduces a turn in the opposite direction. Inside corner modules are not common.
A junction module has four sets of connection points on three sides of a rectangle, in a back-to-back corner arrangement. You can join up
to four other modules to a junction -- one on each side, two at the top (i.e., with reference to the above diagram). Switches in the track provide a
choice of travel directions for a train going through a junction -- it can go straight across on the main line, or make a 90-degree turn into a
branch, another chain of modules. This picture shows a junction module with all its connection points hooked up:
Junction modules allow a variety of show-floor arrangements. Without them, you can set up only chains and loops. Using junctions, you can
create spidery patterns with multiple loops and chains, all connected.
Scenic Modules
Each module is a TrainPlayer layout, so it can be decorated in the usual ways: by adding a bitmap background, or by adding scenery with the
Scenery Toolkit. When a module is fused into a layout, any scenery objects it has are carried along with it. If it has a bitmap background, on
fusing this is converted to a rectangular scenery object the same size as the module.
Here are some examples of scenic modules our layout artists have designed. You can find these and many more in the web layout collections.
About Modular Layouts
Modular Layout is the term for a layout built from a series of modules -- fully assembled, electrically connected,
and ready to run. In TrainPlayer, a modular layout is any layout built using the Module Manager.
Modular Layout Features
In most ways, a modular layout is like any other TrainPlayer layout. It consists of a single set of track, scenery
objects, stations, and so on. However, it also has some special features:
●
●
●
A set of modules. The information supplied in the Module Manager is attached to a modular layout
and is saved with it. This includes filenames of the modules and their positional arrangement. One way you
can tell if you are working with a modular layout is to bring up the Module Manager -- if the layout has
module data, you will see it.
Special scenery objects. The default display of a modular layout has (a) heavy grey lines outlining
each module, (b) large orange text labels showing module names, and (c) rectangular objects with
background images or colors for modules which have them. All of these are scenery objects created during
the assembly process. They reside in the background scenery layer, and can be edited when that layer is
active. You can change the styles and colors of these objects -- or get rid of them -- using the Module
Manager Settings dialog.
No background image. A modular layout does not have a single bitmap background image. Instead,
if there is a background image behind any module, it becomes a scenery object in the modular layout.
Modular Layout Files
A modular layout is stored in an rrw file, like any other layout, but with an additional section containing module
information. This section contains sequence and position information about the modules. It does not contain the
modules themselves, but filenames pointing to them.
When you open a modular layout file, it displays the full layout. If you bring up Module Manager, it displays the
assembly, based on information stored in the rrw file. If you then click OK, each module is reloaded from its stored
pathname, and a new modular layout is created from them. This is a one-way operation -- modules are read-only,
not dynamically linked. So:
●
●
●
●
If you make changes to a module, the changes are not reflected in the modular layout. Changes will be
seen only if the layout is rebuilt from its assembly.
If you make changes to a modular layout, they are not reflected in the associated modules. There is no way
to transfer changes made in the overall layout back into the source modules, except by copying and pasting
between layouts.
If you move or rename the modular layout or any of its module files, the layout might lose them and be
unable to rebuild.
If you want to send the layout to a friend, you should supply the module files along with the main layout rrw.
In short, modules are external files, like homemade scenery objects or linked layouts. Techniques for dealing with
external files are given in the Publishing chapter.
Tutorial: A Loop of Modules
This exercise demonstrates most of the features of the modular railroading system. In it, we will build a large loop
layout from a set of basic component modules. The result will not lead to very interesting operation, but you can run
trains around it.
1. Start with a blank layout or
no layout. If you start with an
existing layout, a new blank one
will be created automatically.
2. Choose Module
Manager from the File
menu. This brings up the
Module Manager with a blank
workspace.
3. Click Add... This brings up
the Layout Chooser. By default,
it opens to the NTrak
Components folder.
4. Position the two windows
side by side so you can work
with both together.
5. Click in the Layout Chooser
to select NT 6-foot, a plain Nscale module template six feet
long.
6. Press the selected row and
drag it into the Module Manager
workspace. It appears as a
framed rectangle filling most of
the workspace, with a label
showing it as module #1 in the
assembly.
7. In the Layout Chooser, click
to select NT 4-foot.
8. Press and drag the selected
row into the Module Manager.
Keep the mouse button down for
the next step.
9. Position to the right-hand
edge of the 6-foot module, until
you see a narrow highlight box.
10. Release the mouse button.
You now have two modules
joined end to end.
11. Drag in the NTrak 4-foot
corner and drop it at the righthand edge of the assembly.
12. Drag in another NT 4-foot
and drop it on the top edge of
the corner module. In this case
the right-hand edge does not
highlight; instead, the highlight is
at the top, as you might expect.
13. Continue in this fashion,
adding in order: 4-foot
corner, NT 10-foot, 4foot corner, NT 4-foot,
and 4-foot corner. The
result is a closed loop.
14. For educational purposes,
try a rearrangement. Press on
the middle of module #1 and
begin to drag. It becomes
hatched.
15. Drag to the edge between
#2 and the corner (#3) and let
go. The result is a swapping of
the two straight modules.
16. Now you're ready to turn the
assembly into a layout. Click
OK. The Module Manager is
dismissed, and the assembled
modular layout displayed.
17. Add a train and run it
around, to convince yourself that
the track is continuous.
18. Save the modular layout
using File > Save As. Do
not save it into the Modules
folder -- it is a full layout, not a
module. Save it where you keep
other user-built layouts.
For this tutorial just give it a
name, and it will go directly
under Layouts.
19. Close the layout. Reopen it
from either the Layout Chooser
or the File menu (at the top of
the recently-used list). Choose
File > Module
Manager to convince
yourself that you can get back
the modules and continue to
work with the assembly.
Building a Modular Layout
This section describes the basic steps for building a layout from modules, and gives information about how the
process works.
How to Create a Modular Layout
Creating a modular layout involves three basic steps:
1. Prepare modules. If you are a member of a club, and you have your own module, spend a pleasant
evening working up a TrainPlayer version of it to add to your collection of modules. If not, you can skip this
step and choose modules from our large and growing collections of templates and samples.
2. Assemble. Bring up the Module Manager, introduce modules one at a time, and arrange them in chains,
loops, or more complex patterns. It's fun and easy. Arrangement is done by drag and drop, and the
program takes care of aligning and snapping the modules together so they will hook up correctly.
3. Fuse. This is the easiest step for you: just click OK. The Module Manager does the work -- loads in each
module, positions it, and fuses it to its neighbors by adding short sections of track. The result is a finished
layout, ready to add trains and run. If you're interested in the details of this process, see the next section.
Once you have created a modular layout, you can save it to a file as with any other layout. However, it is not fully
self-contained, so you need to exercise caution before moving it or sending it to someone else. See the section
about modular layout files below.
The Module Fusing Process
In the real world, modules are scooted around on the show floor until their connection points line up, then short
segments of track are added to connect them. In TrainPlayer, the Module Manager does this automatically, in a
process called fusing. Fusing one module to another involves several steps:
1. Locating the connection points. The program searches a narrow stripe along the edge of each layout
for any junctions at the ends of straight track segments.
2. Aligning the modules. A specific connection point on each edge -- the one closest to the front of the
module -- is designated as the registration point. The two modules are adjusted front to back until
their registration points line up.
3. Introducing gaps. If the connection points on a module are at the very edge, then there will be no room
to insert connecting track. The program detects this situation, and backs the connection point junctions a
little ways from the edge.
4. Adding connecting tracks. Wherever a connection point on one module has a partner at the same
position on the other, a segment of straight track is added between the two points.
5. Detecting loop closures. After fusing one end of a module, the program looks at the other end to see if
it is touching any other module. If so, it means there is a loop, and one more fusion will be required to finish
the job.
The overall process of building a modular layout is a matter of marching down the list of modules, fusing each to the
next, closing loops when necessary.
Building a Module
The general procedure for constructing your own virtual module is the same as for building any layout in TrackLayer. You can start from scratch, draw your
track plan, and carefully make sure it conforms to specs. Or you can take an easier and more reliable approach: start from a preconfigured plan or template
and modify to suit. This is the method our artists used to create the scenic layouts already available.
Module Starting Points
●
●
●
From an existing physical module. If you already have a real module you take to shows, to work with it in Module Manager you will
need to construct a virtual replica of it using TrackLayer. First you will need to convey the track plan to electronic media -- for example by taking a scan
of an overhead photo -- then "trace over" it, applying track. This process is described in the Getting Started chapter of the TrackLayer manual. The
procedure is the same whether you are creating a module or a regular stand-alone layout.
From a sample plan. We provide a generous collection of NTrak and HO sample modules, some just track plans, others with structures and
scenery. The set you get installed with the product is small; the rest are found in the Web tab of your Layout Chooser, under the Modules folder. You
can add or remove track or scenery or otherwise modify as desired.
From a template. In the Components folders under Modules\[HO or NTrak] you will find a series of bare-bones module templates of various
sizes. Here for example is a picture of the two-foot NTrak template:
Each NTrak template comes with five tracks going all the way across (HO templates have three). These tracks form different railroad lines running
around the layout. Each is labelled according to its purpose, as follows:
ML1 = main line 1, 4" back from the front of the module. This is the track which is used to align a module with its neighbors, so it must be
present and correctly positioned. Normally the main line goes straight across each module and all the way around the layout.
ML2 = main line 2, 5.5" back.
BL1 = branch line 1, 7" back.
BL2 = branch line 2, 11" back.
M = mountain line, 14" back.
For HO modules, only ML1, ML2, and BL are present (at 4", 7", and 14" from the front).
The picture shows how you can remove the inner tracks and just leave the connecting stubs. Using the Track edit tool, drag a selection rectangle so it
surrounds the middle portions of all five lines (as shown), then press Del. This leaves short stubs on the sides, which you can connect with your own
trackage.
The labels on the tracks are scenery objects. If you want to get rid of them, use the Scenery Edit tool.
●
From an existing layout. You can start with just about any layout and convert it into a module, as long as you can add connecting tracks at
the side edges and tie them somehow into the existing track. To make room for the connectors, it may be necessary to resize the layout using the
Resize/Rescale tool.
Here is an example in which the Custer & Front Range has been enlarged and modified to work as an NTrak module. Connecting tracks were copied
from a template and pasted into the enlarged side areas, then connecting tracks (shown in red) were added by hand.
●
●
From scratch. Even if you start with a blank layout, TrackLayer provides assistance in creating modules. Choose File > New to bring up
the New Layout dialog. Choose one of the standard NTrak sizes from the Size drop-down. If "Add connectors" is checked, then the new layout will be
created with stubs on each side, appropriately positioned as shown below.
This feature is available only for NTrak modules, not HO or other scales.
Module Orientation
The Module Manager requires module layouts to be oriented in specific ways, as shown in the following table.
Straight
Main line across bottom
Corner
Main line from lower left to upper right
Inside Corner
Main line from upper left to lower right
Junction
Main line across bottom, switchable to alternate main on
each end
Whatever method you use to create a module, make sure it is oriented as shown here. Do not use View Rotate or other means to reorient it, or the Module
Manager will not interpret it correctly.
Module Tags
The program is not (yet) smart enough to look at a layout and determine that it is a module. It is up to the creator of the module to supply this information. This
is done by selecting a tag from a drop-down menu in the Layout Properties dialog:
If you are creating a layout to be used as a module, select the appropriate tag. This will inform the Module Manager how to interpret the layout. This is not vital
for a straight module, but corners and junctions must be tagged or they will not work.
The Module Manager
The Module Manager is a dialog for organizing and assembling modules into modular layouts. Called from the menu command File > Module
Manager.
The process you carry out in the Module Manager is called assembly. It's like sliding dominoes around on a table: you position them end to end, using
special corner and junction units to make turns. They can only fit together in certain ways, so they are like magnets -- you drop them roughly into position, and
the program snaps them into place.
The dialog is operated mostly by drag and drop. To build a modular layout, you introduce modules by dragging them in from other windows-- Layout Chooser
or Windows Explorer -- then you rearrange or delete them by dragging, or change the sequence by moving rows up and down in a list. Once you have an
assembly you like, click OK, and the program automatically creates the full modular layout. It reads in the track and scenery of each module, positions them
according to your assembly, automatically adds little track sections between modules, and presents you with a complete layout, ready to add trains and run.
Tour of the Module Manager
The Module Manager is a resizable dialog with several components, as shown in this annotated screen shot:
The upper half of the dialog is the workspace where modules are schematically displayed and manipulated. The workspace starts out empty; this example
shows an assembly in progress with three straight modules and one corner module. Modules are by default displayed as filled rectangles with numeric
labels. Corners are shown as squares, with 45-degree cutoff lines suggesting the typical shape of an actual unit.
Along one edge of the each module is the front track, a line approximating the route of the main track going around the assembly. In a train show, viewers
stand on this side of the layout.
Beneath the workspace is the module list, a list box showing the sequence of modules with their details. Each row begins with a number which corresponds
to a labelled module in the assembly.
The highlighted row in the list shows the selected module. This one is shown in the workspace with a pink frame. You can select a module by clicking on it
in the workspace, or by clicking its row in the list box.
Buttons around the module list are for editing the assembly and modifying its properties, as described below.
Adding Modules to the Assembly
To begin creating an assembly:
1. Click Add... to bring up the Layout Chooser.
2. Navigate to a Modules folder if necessary. By default the chooser comes up pointing to the NTrak Components folder.
3. Choose a layout to be the base module. This just means all other modules will be positioned relative to it -- the base retains its orientation as others are
moved around.
4. Press on the selected layout, drag it off the Layout Chooser list, and drop it into the Module Manager window. When you let go, the module is displayed in
standard orientation, filling the window.
5. Choose a second module and drag it into the MM. You can drop it on either end of the existing module, as indicated by red highlights which show up while
you are dragging (see left image below). Let go while a highlight is showing, and the incoming module will snap onto the existing one.
6. Continue dragging modules in to build the assembly. Additional modules can be dropped onto either
end of the chain, or in between two linked modules -- wherever the highlight shows up.
7. To replace a module, drag another one onto the center of it. In this case the highlight is a red X (above
right), indicating that the incoming module will replace the existing one.
8. To make a turn, add a corner module.
9. To make a loop, add four corners, and the right number of modules in between so that the ends just
meet.
Dragging Modules from Windows Explorer
An alternative method of adding modules to the Module Manager is to drag them from Windows Explorer instead of the Layout Chooser. To do this:
1. With TrainPlayer running and the Module Manager visible, bring up Windows Explorer (Start > All Programs > Accessories). Navigate to a folder of module
layouts.
2. Choose a module layout and drag it into the MM window. Highlighting and locations of attachment are the same as described above.
Be sure to choose a file with extension .rrw. If you drag the wrong type of file, nothing will happen when you drop it.
Rearranging Modules
Once you have more than one module in the Module Manager window, you can move them around or delete them by drag and drop, or by rearranging rows in
the list box. After any such operation, the overall assembly is reconfigured to reflect the change.
By drag and drop:
1. Position the cursor over the middle of a module, press the left button, and begin to drag. The module takes on a hatched pattern, meaning it is "on the
move."
1. Drag to any of the locations indicated above -- to the edge of a module, on top of a module -- and let go. The module is moved from its original location
to the new one.
2. To remove a module from the assembly: drag the module and release it on an empty space, where nothing is highlighted, i.e., drag it out of the
assembly onto the floor.
By list box:
1. Select a module by clicking on it in the workspace, or by clicking a row in the list box. The module is highlighted with a colored frame, and the selected
row is highlighted in the list box.
2. Click the up or down arrow to the right of the list box (labelled "move selected" above). The module will trade places with the one immediately above or
below it in the list.
3. To remove a module: click Remove. The selected module will be removed from the assembly.
Zooming Modules
By default, the Module Manager displays the entire assembly, regardless of how large it becomes. You can enlarge or maximize the window, but for very large
assemblies this may not be enough, and you may want to zoom in for a closer look. This is the purpose of the zoom controls at the lower right of the dialog.
To enlarge the view: click the up arrow. Each click zooms in by a fixed amount. There is a limit -- you can't zoom so far that the module edges
disappear; the up arrow is dimmed when you reach the limit. When the view is enlarged, scrollbars appear so you can move around.
To shrink the view: click the down arrow. Each click reduces by a fixed amount, until the assembly goes to a fixed minimum size.
To restore to normal fit-to-window mode: click Fit. This resizes the assembly to fit in the window.
Settings
The Settings button at the bottom of the dialog brings up the Module Manager Settings dialog. This allows you to set display features applying to the Module
Manager and to the resulting modular layouts.
Module Manager Settings
Sets display properties in the Module Manager and in layouts created by it. Called from the Settings button on the Module
Manager dialog.
In this dialog you can adjust most elements of the display in the Module Manager, and some module-related ones in the
assembled layout. The drop-down menu at the top gives you a choice of display elements; you choose one, then specify whether
you want it visible, and set its color, font, and line width, or whichever apply.
Choices you make in this dialog apply immediately in the Module Manager window, so you can experiment with different options
and see what they do. (This does not apply to items with "in Assembly" in the name -- these do not apply until you click OK to
leave the Module Manager to create the assembled layout.) If you Cancel out of this dialog, the Module Manager display reverts to
its previous state.
Module Manager Settings dialog controls
Item
Select a feature of the display to be edited. The full list of features is
shown in the screen shot above; where these features appear in the
display is shown in pictures below. Settings in this section of the dialog
apply only to the selected feature.
Show this
Check this box if you want the selected item to appear in the display.
Applies to all items except Floor.
Color
Click to choose a color for the selected item. Applies to all items except
Background in Assembly.
Font
Click to specify a font for the selected item. Applies only to Module
Label and Label in Assembly.
Line Width
Choose a line width in pixels for the selected item, where zero means
thinnest possible. Applies to Module Frame, Module Highlight,
Track Line, and Frame in Assembly.
Click to retrieve an assembly previously saved as a Module Definition
(MDEF) file. For information about MDEF files, see below.
Load
Warning! Loading an MDEF file replaces the current contents of the
manager, without asking if you want to save it first.
Save
Click to save the current assembly to MDEF, for later reuse. See below.
Reset This
Reset the current display item to factory settings. Changes do not become
permanent until you click OK.
Reset All
Reset all display items to factory settings. Changes do not become
permanent until you click OK.
OK, Cancel
Click OK to retain the current settings and make them permanent. Click
Cancel to revert to settings in effect before the dialog came up.
Module Definition (MDEF) files
Module definition files provide a lightweight, convenient way to avoid having to rebuild the same assembly more than once. A file
with extension MDEF is a simple xml file, readable in Notepad, which contains a list of the current set of modules and their
arrangement -- basically the same information you see in the Module Manager listbox.
If you have an arrangement you might want to reuse, save it to an MDEF file. Later you can load it and get back the same
arrangement.
MDEF files are not designed to be portable or exportable. They contain pathnames pointing to the individual module files. If you
move or rename any of these, the mdef may not load correctly.
For convenience, you can load an mdef file by dragging it from Windows Explorer directly into the manager workspace. The
incoming file replaces the current contents of the window.
Module Display Items
Features of the display which have user-settable properties are indicated in the following screen shots. Those with "in Assembly"
in the name refer to features of the assembled layout, others to the assembly as it appears in the Module Manager.
"Background in Assembly" is not shown in these shots -- this turns on or off any background images or solid-color backgrounds in
the individual modules.
Advanced Topics
After you've got the hang of drawing layouts, you should check them for errors, and take some final steps if you
want your layout to be used by others. This chapter explains how.
Debugging and Repairing
Publishing Your Layout
Importing CAD Layouts
Debugging and Repairing
Preparing a layout in TrackLayer is a many-step process fraught with possibilities for error. This section gives some tips for avoiding errors and describes tools to
help you spot and correct them.
Zoom in
Work on one section of the layout at a time. Zoom in so you have room to work.
You can draw tracks out to the edges of the window, then when you scroll over to work on the next
section, hook up or move the disconnected track ends.
Inspect visually
When you are working in a crowded area, it's easy to forget a crossover or siding, and it's not easy to
tell you've done it. Here are two ways to check for missing track:
●
●
Mouse over. With the Track tool
or the Edit tool
active, when you move the cursor over a
section of track, it highlights in green and stands out against the background. This makes it easy to
tell where there is a background line with no track on it.
Flash the background. In the picture at right, there is a crossover missing -- can you spot it?
Try this: use the View Background button
to turn the background on and off, say once per
second. As it flashes on and off, your eye can usually spot differences in the track patterns.
Test the layout
●
●
●
Throw the switches. If you can't get a switch to throw, it probably means bad trackwork in
the vicinity.
Test the turntables. Make sure rotation stops where it should.
Drive a train. The ultimate test of a layout is whether a train navigates it correctly. Drive
around and see.
Track Checker
TrackLayer can help you find errors. Use the command Tools > Check Track. This runs a series of tests against the layout, as listed in the table
below. Results are reported in the Track Check dialog.
If errors are found, they are listed in an alert box as shown. Each error is listed with an object type (3-letter code from the following table), the
object's number, and the error text; the corresponding track or junction on the layout is highlighted in pink.
STR
straight track section
CUR
curved track
JXN
junction / switch
CTR
circle center
CAR
car
TRN
train
CIR
circle
TTB
turntable
STN
station
In the example shown, tracks 34, 70, and 153 meet near a common point, but
there is no switch there. The fix is to drag junction 152 on top of 68, so a
switch is created.
Error conditions found by Check Track include:
Object flagged for delete
object has been deleted
Invalid object ID
object ID is out of range
Unretrievable object
object no longer exists in memory
Invalid junction number on track
junction number on one end of track is out of range
Same junction number on both ends of track
track has both ends on same junction
Bad track length
track length is zero
Invalid station number
track points to non-existent station
Object has zero space
track or circle has no dimensions
Junction has no tracks
invalid junction, disconnected from any track
Invalid track number on junction
junction is connected to invalid track ID
Superimposed junctions
two junctions are at or near the same place
Invalid radius
circle radius is zero or negative
Station is missing name
station object has no name
Tracks superimposed
two track segments are on the same line segment
Endpoint on track but no junction
endpoint of one track lies near point on another track
Track Numbers
To identify tracks and objects, use Tools > Show Numbers to turn on the
display of track and junction numbers. Track numbers are shown in blue, junction
numbers in red.
If the Scenery Edit tool is active, instead of track and junction numbers, scenery
object numbers are displayed in green.
This command is a toggle; use again to turn off the numbers.
Another way is to use tooltips. Choose Tools > Show Tooltips to enable
this feature. Then hover the mouse over a track, junction, switch, circle, turntable,
or station and you will see a note indicating its number and other data. If you do not
see the tooltip, try clicking in the layout window to make sure it is the active window.
Highlight a Track or Junction
If an error message gives a track or junction number you're having trouble finding on the layout, use Tools > Highlight Track.
In the Track Highlight dialog, enter the track or junction number. The corresponding object will be highlighted in pink on the layout.
To turn off the pink highlight, click any empty space on the layout, as if removing a selection.
Publishing Your Layout
If you have an interesting layout and you've gone to the trouble of laying track on it, consider
sharing it with other TrainPlayer users. If you take the following few steps to make it ready, and
are the artist or have rights to distribute the artwork, we will be glad to post it on the User Layouts
page at trainplayer.com.
1. Check for errors. Run Tools > Check Track. For details, see Track Check Dialog.
2. Test switches and turntables.
3. Add some trains. Put suitable rolling stock at reasonable locations for starting an operating session.
4. Add comments. In Layout Properties, add as much commentary as you like, but please include your name,
the author or designer of the layout, and any operating instructions.
5. Use File > Publish to bring up the Layout Publisher dialog to finish the job.
External Files
A TrainPlayer layout is stored in a text file with extension rrw. This file contains information about track, stations,
and other layout objects, but does not have all the data you need to run the layout. Additional data is stored in
external files referenced by the rrw. If you want to send a layout to someone else, you need to know about these
files and make sure the recipient has access to them.
One external file is the background image. If a layout has a background image, it is often stored in a file in the
same folder as the rrw, with the same filename but a different extension -- jpg, tpg, bmp, gif, or png. But this does
not have to be the case -- the background image can reside in a file anywhere on your disk, with its pathname
referenced in the rrw file.
Many external files are stored in system folders common to all TrainPlayer users. These include car collections,
loads, sounds, and many scenery objects. When you open a layout, the program looks for these files in your local
system data folder; if it doesn't find them, it looks in the TrainPlayer web collection, and offers to download what it
finds there. Failing both, the program proceeds using standard replacements for the missing objects. In any case,
you do not have to provide these common files to a recipient.
Other types of external file may come from anywhere on your disk. These include background images, linked
layouts, components of window snapshots, scenery object bitmaps, and module layouts. If you want the layout to
work for the recipient the same way it does for you, you will need to provide these files along with the rrw file. How
do you find out what these files are, and what is the best way to transmit them?
To see a list of external files required by a layout, run Track Check or Layout Publisher.
To include external files when you are transmitting a layout, you have several choices. This is because when the
recipient opens the layout, the program looks in several places to find them:
1. Alongside the rrw file. If an external file is found in the same folder as the rrw, it will be taken from there.
2. In a _files subfolder. If the layout is named abc.rrw, the program looks for a folder in the same location
called abc_files, and if found, looks there for external files.
3. At the path stored in the rrw. What is stored for an external object is its path relative to the rrw file, as
determined at the time the file was saved. (If it is not possible to derive a relative path, then the absolute
path is stored.) This means that if the layout and its external files are in different folders, you can send them
separately as long as you maintain their locations relative to each other.
4. In the appropriate system folder -- Layouts, Scenery, Sounds, etc. If an external file resides in the system
folder on the recipient's computer, then it will be taken from there.
The simplest way to transmit a layout and its external files is to take advantage of #1, and just put them all into a
single folder.
RZP (Zip) Files
TrainPlayer Version 5 introduces a new type of format for transferring layout data: the railroad zip file, with
extension rzp. This is a standard zip file -- you can change the extension to zip and work with it just like any other
zip file. The rzp file contains a layout, background bitmap if any, and a _files subfolder containing external files.
The recipient can open it directly, just as they would for a normal rrw file.
To save a layout to an rzp file: use File > Save As, choose type rzp from the drop-down. The
program creates a zip file, copies all components into it, and saves it to the indicated location.
To open an rzp file: use File > Open, choose type rzp from the drop-down, then browse to the file. Or:
drag the rzp file from Windows Explorer into TrainPlayer. In either case, the program unzips the file into a
temporary location, opens the rrw from there, and locates its external files in the _files subfolder alongside.
To unzip an rzp file to your disk: open the rzp file as indicated above, then use File > Save As and
choose type rrw. The rrw file will be saved to the indicated location, and alongside will be a _files subfolder
containing external files.
Importing CAD Layouts
To convert a layout created in a CAD program, you must be running TrackLayer -- the import feature is not available in TrainPlayer. Details of the import process vary
depending on the input.
Importing from Atlas Right Track or WinRail
You need a working copy of Atlas Right Track or WinRail (ver 8 or 9 recommended) in order to export an image of the layout. If you do not have the
program installed, you can still convert the track but will not have a background image.
To import from ART or WR:
1. In TrackLayer, choose File > Import > WinRail (or Atlas Right Track).
2. In the file dialog, navigate to the .ral file to be imported and click Open.
3. If no image file is found alongside the .ral file, you are offered the opportunity to create one. Click Yes to proceed to the next step. If you do not
care to have a background image, click No to skip to step 5.
4. WinRail or Atlas Right Track is launched with the selected file on display. Choose File > Save As and choose file type jpg (in Atlas Right Track,
choose bmp). Save the image file with the offered name, i.e., same name as the ral file. Note: for best resolution, zoom the layout to large
size before saving the image. Then exit or minimize the program, return to TrackLayer and click OK to proceed.
5. The import proceeds, with a progress bar displaying status. On completion, the layout is ready to test and run.
6. Save the converted layout as rrw file.
Importing from AnyRail
To convert from AnyRail, you must have an installed copy of AnyRail 3.11 or above. You will need to export the layout from AnyRail before you can
import it into Tracklayer.
To import from AR:
1. Start AnyRail and open the layout to be converted.
2. Choose File > Export as TrainPlayer. (If you do not see this command on the File menu, see notes below). Choose an output file name. You
are actually saving two files, one a file with extension xml containing the data, the other a jpg of the graphics.
3. Start TrackLayer and choose File > Import AnyRail. Open the xml just created.
4. The import proceeds, with a progress bar displaying status. On completion, the layout is ready to test and run.
5. Save the converted layout as rrw file.
Notes
1. A common problem in a converted layout is gaps in the track, where the train crashes or bounces instead of rolling on through. Usually this
means the track sections were not connected in the input file. To fix it, drag one of the disconnected junctions on top of the other, so they fuse
and become a single junction.
2. If turnouts or slipswitches do not work properly, it is likely to be due to errors in the conversion. Please report it.
3. Graphics files exported from WinRail and Atlas Right Track sometimes do not come out the same size and shape as the layout. If this happens,
try exporting a new graphics file at a different zoom level. At the same time, re-save the ral file at the same zoom, then try the import again.
Check for Updates
Check web for program and car updates. Called from menu command Help > Check for Updates.
This dialog appears automatically at program startup if you have "Check for program updates" checked in General
Preferences, and a program update is available.
Use this dialog to see if an update to the program is available, or, if you are a user of Chris Pedersen Cars, to see if
there are new CP collections you may obtain.
Program Update
The top part of the dialog indicates whether a new version of the program is available. If so, the Download button is
enabled. Click it to download and install the update.
Once the download starts, exit TrainPlayer so that it is not running when the installer begins.
Cars Update
The bottom part of the dialog is for updating or purchasing Chris Pedersen Cars.
If you have already purchased this set, then the dialog checks whether new cars have been posted which you don't
have. If so, these sets are listed (as shown above). Click Download to download and install them all at once.
If you are not a CP Cars user, the dialog offers you a chance to buy them (shown below). Click Purchase to go to
the checkout page on our online store. Check out with credit card or PayPal, and you will receive an e-mail with
download instructions and serial number.
Load Chooser
The Load Chooser appears when you (a) select Load Chooser from the Load menu, (b) choose Loaded for a car which has not yet been assigned a load, or (c)
double-click the Load Car toolbar icon.
The Load Chooser is much like the Car Chooser. It shows about a dozen folders named for types of goods, each containing an assortment of pictorial loads in
that category. When you click a load, it shows top and side views in the preview window, and data in the lower left about what sorts of cars can carry the load.
Note: the behavior of the Load Chooser changed at version 5.2. The following instructions have been revised.
To operate:
Browse the collection -- click a folder in the tree to see its contents.
Select a load by clicking its image in the middle panel. Note the indication on the status bar at lower left: it shows the types of car (by AAR code) which are
suitable for carrying the selected load.
Press on the load image and drag the load onto the layout. As you move over a suitable car, it is highlighted with a red outline, meaning that the load
can be deposited there. Release the mouse button over the car you want to load.
Hold the Ctrl key down while you drag if you wish to load more than one car at a time. When Ctrl is down, an entire cut of cars is highlighted at once and can be
loaded with the dragged load. (Cut means a connected group of cars of the same class.)
To modify a load or see its properties, right-click the load icon in the middle window and choose Properties. You get the Load Collection Editor.
Closed-car loads
One special load folder works differently: closed-car loads. These are loads without pictures, for loading on boxcars, refrigerated cars, covered hoppers,
and other closed cars. When you select this folder, the center panel changes to list view and shows you a lengthy collection of load names:
In this case the preview window shows the load as text, which will be displayed above side views of the car, and as a pattern which will be overlaid onto the car
top image. By default, all closed-car loads are shown as a pair of double red bars, but you can change this: right-click the load, choose Properties, go to the
Images tab, click Browse.
Missing Car/Scenery Alert
To report and optionally download missing cars and scenery. Comes up automatically if you open a layout which
references data not found in your local collection.
When you open a layout, it attempts to retrieve the required cars and scenery from your local data folder. If it fails
to find some of them, you see this alert, with a list of the missing items in the window. To proceed, you have four
choices. Click one:
Dialog controls:
OK
Open the layout without the missing items. Cars not found
are converted to generic types; missing scenery objects
are simply omitted. These conversions are temporary; the
next time you open the layout, you will get this alert again.
Cancel
Cancel and do not open the layout.
Download
Connect to the web and look for missing items there. If a
missing car type is found on the web, the entire car
collection is downloaded and installed; missing scenery
items are downloaded individually, so that you may end up
with partially-filled scenery folders on your local machine.
Convert
Permanently convert missing cars to generic types, so that
the next time the layout is saved, the missing cars will be
dropped. Applies only to cars, not scenery.
If you choose to download missing items, you may not get all of them. If for example the layout author included
custom scenery objects not in the TrainPlayer collections, then the download will not retrieve them.
What's New Since 4.0
In 4.2:
●
●
●
●
●
Revamped graphics! Infinite zoom, smoother performance, better appearance
View drag: grab the view and drag it around with the hand cursor, just like in a map program
Car sizes: specify sizes of individual cars rather than settling for the defaults -- the way it used to work
Background colors: choose your favorite background color for a blank layout and another for the area
outside it
Fixes: many small fixes and enhancements, as detailed in the Readme
In 4.1:
●
●
●
●
●
●
Ties: precise railroad ties laid for you automatically with a single click.
Export image: save your layout as a picture, or merge scenery with background and reduce layout
complexity
Track transforms: flip or rotate track sections or entire yards
Animation: add moving images which spring into action as the train rolls by
Car ID display: improved mechanisms for turning car labels on and off
AnyRail improvements: repaired turntables, better conversion of flex track in imports from AnyRail
In 4.0:
●
●
●
●
●
●
●
●
●
●
Car Loads
Industries
Yards & Interchanges
Default Car Sets
Ops Generators
Ops Windows
Ops Setup Wizard
Waybills
Switchlists
Color Codes
Changes in the manual for 4.0
●
●
●
All-new chapter on Ops includes pages on Waybills, Switchlists, Generators, Ops Windows, Ops Setup
Wizard
New chapter Managing Cars includes older pages from trains chapter, with reworked Car Collections and
new car-related features Car Loads, Default Car Sets
New chapter Stations and Industries includes revised Stations page taken from scheduling chapter, plus
new sections for Industries, Yards & Interchanges, Industry Browser
What's New Since Version 3.0
In 3.3.1
Transfer Tables: create working transfer tables with optional scenic objects for pit or bridge.
Roadbed: automatically add scenic roadbed fitted around track, in your choice of styles.
AAR Codes: official codes for car types, allowing detailed car classification.
Chooser Changes: improvements and simplifications in all choosers.
What's New Folder: special folders show recent content in the web collections.
Open Data Folder: opens your TrainPlayer application data folder in Windows Explorer.
In 3.3
●
Scenery: TrackLayer 3.3 introduces the ability to create your own scenery.
In 3.2
●
Import from CAD: TrackLayer 3.2 introduces the ability to automatically convert plans from three track
CAD programs: AnyRail, WinRail, and Atlas Right Track. Starting with a layout developed in one of these
programs, all it takes is a few clicks and you're ready to add trains and go.
●
●
Layout sizing: TrackLayer 3.2 has a simple new tool for resizing your layout and rescaling the track.
You can now easily make adjustments if the track doesn't fit the background, or if you want to add roadbed
or staging space outside the background boundaries.
Choice of running sounds: New in TrainPlayer: a choice of train running sounds, including speeddependent sounds for both steam and diesel engines. You can assign different running sounds (formerly
called "chuffs") to different engines; if you have sounds of your own, copy the files into the right folder and
they will show up on the menu.
In 3.1
●
●
●
●
●
Choosers: A single style of dialog now takes the place of three previous ones, and adds many
conveniences for selecting layouts, car collections, and sounds. Files from all over your disk can be
dragged in from Windows Explorer and organized in tree controls for easy navigation and browsing. Each
chooser has a Web tab where you can browse and download files directly from the website. A preview
window shows thumbnails of layouts and car types, or plays sounds.
Premium content: Several great new collections of layouts were custom built for TrainPlayer by a
talented group of railroad artists -- scenic renderings of some of our best plans, fully-tracked satellite photos
of yards from all over the continent, a beautiful set of original plans developed in 3rd Plan-It by Peter LloydLee. The package includes car collections -- detailed renderings of hundreds of cars and locomotives.
Access to the Premium collection requires a license.
Snap: Version 3.1 becomes more useful for track plan design with the addition of several types of snap
while drawing. Snap to angle creates exact #4 or #6 (or your choice) turnouts; snap to parallel keeps yard
tracks at uniform separation; snap to radius gives precise circles and curves. Detailed on/off choices are
available in the preferences.
Preferences: The Preferences dialog has been redesigned for enhanced friendliness, tossing some old
clutter while adding new choices, reducing the number of tabs while organizing more sensibly. Each tab
has its own help page.
Track check: The Track Checker now gives you more information in a more useful form. Output is
given in a list box, and includes not just errors but data such as external links, associated files, and required
car collections. If you click on an error line, the layout zooms to that location and highlights the offending
track automatically. The Track Highlight dialog also has this new auto-zoom feature.
●
●
●
●
●
●
●
Track color: Now you can color individual track sections, or choose a color for new track so that you can
draw a whole yard or mainline in the shade of your choice. Some of the satellite layouts use different track
colors to clarify complex multi-line yards.
Zoom: The Zoom menu now includes choices for quick zoom to percent sizes. Or, to zoom to a specific
area, choose "zoom on drag" and drag a rectangle around the area.
Export image: Generate a JPG (or your choice of graphic format) which shows track, grid, background
and/or trains. Output size and quality is adjustable.
Publish: New dialogs prepare layouts and car collections for publication -- gather the components, unify
links and filenames, check for errors, copy to a destination folder. We developed these tools for our own
use, but they are handy for anyone who shares layouts and cars.
Help buttons: have been added to all dialogs, showing context-specific pages from the local help file.
Show/hide/delete trains: Now you can toggle display of trains, along with track, grid, background. A
new button in preferences allows you to delete all trains from the layout.
Rail display: Now you can see two steel rails instead of just a single brown line.
In 3.0
●
Scripting. Program your operations to run automatically.
●
New Graphics. Smoother scrolling, infinite zoom, reduced memory.
●
Sounds. New sounds for trains and layout background sounds.
●
Tunnels. Precise hiding for underpasses, tunnels, multi-layer tracks.
●
Downloads. Browse and download layouts from within the program.
●
Car Display. Improved turning, car-top labelling.
●
Fixes. Many repairs and improvements throughout.
Choosers
A chooser is dialog used to select layouts, cars, scenery, or sounds.
A chooser has three panels: a tree control (left), a list box (center), and a preview window (right). In general, what you do is click a
folder in the tree to see its contents in the list, click an item in the list to see its preview, then double-click to open it.
Each chooser has two tabs, one for local content on your disk, the other for content available by download from the web. As long as
you have an internet connection, when you select an item from the web tab, it downloads and becomes part of your local content.
How choosers work has evolved over time. Many changes to the content and operation were made in Version 3.3.1. The
description below describes the current system, with notes indicating how it differs from earlier versions.
Instructions in this section are for all choosers. For details specific to each type, see the individual help pages:
Layout Chooser
Layout Web Chooser
Car Chooser
Car Web Chooser
Sound Chooser
Sound Web Chooser
Scenery Chooser
Scenery Web Chooser
Contents of a Chooser
In general, the files you see in the local tab of a chooser are those in the corresponding folder (and subfolders) in your TrainPlayer
application data directory.* The files and folders you see in the web tab are those on our website. In addition, most chooser trees
have additional special folders -- for example, Recent, Downloads, or What's New.
As of Version 3.3.1, you can no longer modify the Car, Scenery, or Sound chooser trees. If you want the files in these sets to be
organized differently, you can rearrange them on the disk and the chooser trees will reflect your changes. The exception is the local
Layout chooser, where you can add folders of your own and reorganize the tree to suit.
*New in Version 3.3.1: you can now easily locate and inspect your application data directory. Choose Open Data Folder
from the File menu, and it will bring up Windows Explorer in that location.
Operating a Chooser
Components of a chooser work generally as follows. Details differ; see the individual help pages.
Tree: Click a folder to select it. If it contains files, you will see a list of them in the list window. If it contains subfolders, click the +
sign to expand it so you can select a subfolder.
List: The list window shows a collection of files or objects as either a table or a set of icons. Icon view can be changed to list view
using the context menu. Click an icon or a row of the table to make a selection; in most cases you will then see a picture of the
selected object in the preview window.
Preview: The preview window shows a small picture. In the Sound chooser, you can click the picture to play the sound; in other
choosers the preview is not interactive.
Buttons: Each chooser has four buttons at the lower right, which differ depending on the context. Click the left button (which
might say OK, Download, Install, Add Car, or Done) to carry out the default action on the selected item; Cancel to take down
the chooser without further action; Browse to browse the file system for a layout (available only in the local Layout chooser); or Help
to go to the appropriate page of the help system.
Resizing: A chooser window can be resized by dragging its lower left corner. Individual panes can be resized by dragging the
divider bars between them.
Modality: Layout and Sound choosers are "modal," meaning once you click OK, the selected item is opened and the chooser
goes away. Car collection and Scenery choosers are not: they remain on the screen as you choose multiple items.
Context menus: Right-click an item in either the tree or list window to see a menu of context-specific commands. Menus differ
depending on the chooser; see the individual help pages for menu screen shots and details.
Web tab: If you have a live internet connection, the web tab of each chooser shows content available on our website. Selecting
an item or collection from this tab causes it to be downloaded to your machine and added to your local content. Details vary
depending on chooser; see individual help pages.
The content you see in a web tab depends on your license; for example, you won't see Premium folders unless you purchased the
full package. (If you are bothered by this, try Help > Purchase Upgrade.) We are constantly updating and enhancing the web
collections, so check back once in a while to see what's new.
Search: If you are looking for a particular file, use Find and Find Next on the tree context menu. Right-click a folder to search
through it and its subfolders (to search all, select the topmost tree item), choose Find, and enter all or part of an item name or path.
If a match is found, it is selected in the list window. If there is more than one match, Find Next goes to the next one.
Sort: Items in the list window can be sorted on any column, when the window is in list (not icon) view. To sort, click the header of a
column. To sort in the reverse direction, click the header again.
What's New: Each web chooser includes a folder called "What's New." This shows items which have been posted on the web
since a certain date, or within a certain period before today. You can adjust the cutoff criteria -- right-click the What's New Folder
and choose Settings. The dialog is self-explanatory:
The settings in this dialog also determine which items are marked as "Recent on Web" in the web choosers.
Status icons: Web chooser lists and trees show icons next to
items, indicating how the local version of a file compares to its web
version. There are four choices:
●
●
●
●
(empty document) -- you do not have a local version of
this file
(filled document) -- you have an up-to-date local version
(filled document with red star) -- you have a local
version, but the version on the web is more recent than the local one
(empty document with blue star) -- web version is recent, i.e., meets the conditions on the What's New folder
For car collections, icons appear on the entire collections. i.e., on folders in the tree rather than rows in the list window. A legend at
the bottom of the dialog reminds you what the icons mean.
Export: contents of folders in chooser trees can be exported to text or xml files. This is an expert feature, used mostly by us to
manage our file collections, but you might find it useful in various ways.
The exported file contains the same data as what you see in list (not icon) view -- item name, filename, date, etc. -- for each file
under the folder you are exporting. To export the entire tree, right-click the root item. Exported data can be in one of two formats:
comma-delimited text, or structured xml.
To export :
1. Right-click a folder and choose Export. This will export data about all files contained in the selected folder and its subfolders.
2. In the file dialog, specify the output file and format (.txt for delimited text, .xml for structured xml).
3. Click OK.
The file is generated. Take a look at it in a text editor or web browser.
Local Layout Chooser
The local layout chooser is for selecting a layout to open and run.
For general information about choosers, see Choosers.
To Open a Layout
The local layout tree shows folders of layouts which reside on your disk.
1. If a folder has a + sign next to it, click to expand it and show its subfolders; if not, click to show its contents in the list window.
2. Click a layout in the list to see its preview.
3. To open the previewed layout and take down the dialog, click OK.
The local layout chooser has features not available in other choosers. For one, you can click the Browse button to bring up a regular file dialog to choose a layout
to be opened. For another, you can modify the contents of the tree, by adding and populating your own folders. For instructions, see Adding Your Own Layouts
below.
A folder is shown with a padlock if it is "locked", meaning it represents a folder on the disk and cannot be modified (except by rearranging the files on the disk). An
unlocked folder is one you create by hand, which you can populate with layouts from anywhere and organize as you wish.
Tree Contents
Layouts
Entire layouts folder from TrainPlayer app data directory
Recent
Layouts recently opened (same as at bottom of File menu)
Downloads
Downloaded layouts (note 1)
CD Layouts
Layouts residing on CD (note 2)
<user-added folders>
Folders created manually or dragged in; see Adding Your Own Layouts
(1) The Downloads folder contains aliases to layouts recently downloaded. There is no actual folder named Downloads on the disk.
(2) The CD Layouts folder appears in the tree if (a) you ran the installer from a TrainPlayer CD and chose to run the layouts from CD, and (b) you have the CD currently
mounted. In this case the CD Layouts folder contains the entire set of layouts on the CD.
If you have been running an earlier version of TrainPlayer, you may not see all your previous layouts in the tree. Folders you previously added by hand or by drag-and-drop will
need to be re-added.
Tree Menu
Open
Open folder to show subfolders or files
Refresh
Reload folder contents from disk (note 1)
Find...
Search for name or filename. See Search.
Find Next
Go to next hit after Find
New Folder
Create folder in tree (2)
Add File...
Browse for file, add to open folder (2)
Remove
Remove file or folder from tree (2, 3)
Rename
Rename folder in tree (2, 3)
Properties...
Display folder properties
Export Filenames...
Export text or xml file of folder contents. See Export.
(1) Refresh is available on locked folders and folders containing other folders; is dimmed for folders created manually.
(2) Editing commands are dimmed on or inside a locked folder, as these cannot be modified. For more, see Adding Your Own Layouts.
(3) Remove and Rename are dimmed on special folders (Layouts, Recent, Downloads).
List Menu
Open
Refresh Thumbnail
Open selected layout and take down dialog
Recreate thumbnail image from layout
Adding Your Own Layouts to the Tree
The local layout chooser is more flexible than the others. In addition to showing you layouts residing in your TP Layouts folder, it can also show layouts stored in
other locations. You can add files or folders to the chooser and organize them so you can find them easily.
For example, you might create a "Favorites" folder containing the layouts you like best -- say some from the 101 Track Plans, some from the Bruno collection,
some from a folder you downloaded from a forum. One way to do this would be to create a new folder on your disk and copy the files into it, a process which
requires time, expertise, and disk space. An easier and more economical way is to leave the files where they are, and create a folder in the chooser tree
containing shortcuts pointing to them. A very convenient way to do this is to drag files or folders into the chooser tree from Windows Explorer.
There are restrictions on what you can do in the chooser tree. The main one is that you cannot modify a locked folder -- you can't add a folder or file to one of
these, or rearrange subfolders in it, or rename it, otherwise it would no longer match what's on the disk. In a typical situation there is only one unlocked folder in
the tree -- the Layouts folder at the top -- so this is the starting place for adding your own content.
To create a folder:
1. Right-click a folder in the tree and choose New Folder (below left). This command is dimmed in most places, but always available on the Layouts folder at
the top.
2. The folder is created at the bottom of the tree and called "New Folder," with the name selected. Type the name you want for the folder (below right).
To create a subfolder, repeat the process starting on an existing folder. To delete a folder or subfolder, right-click and choose Remove (dimmed if the folder is
locked or is within a locked folder).
To add a layout to a folder:
1. Right-click the folder and choose Add File.
2. In the file dialog, navigate to the layout (.rrw) file you wish to add, and click OK.
The program adds an alias pointing to the layout file. You do not see a change in the tree, but if you click on the selected folder, you'll see the layout in the list
window.
To add layouts from Windows Explorer:
1. Open Windows Explorer and position it alongside TrainPlayer.
2. Navigate in Windows Explorer to a folder containing layouts and/or subfolders. In this example, we are bringing in a folder called My Layouts, with two
subfolders.
3. Position the mouse on the folder in Windows Explorer, press, and drag to an unlocked folder in the chooser tree (shown by the arrow below left).
When you release the mouse button, the new folder and subfolders appear in the chooser tree (above right).
Dragged-in folders are automatically marked as locked, because their contents reflect files on the disk.
Advanced Layout Properties
For viewing and editing advanced properties of the layout. Called from Properties on the Layout context menu.
See also About the Properties Dialog.
Advanced layout data:
Path
Full pathname of the layout (.rrw) file. This item is not editable; to
change the path, save the layout to a different location.
Pathname of the background image file, blank if none. To remove the
background image from a layout, erase the contents of this box. To
change to a different image, enter a filename or use the browse (...)
button to browse for a different image file.
Background Image
Caution: it is not recommended to change the background image
file! If you change from one background to another, it is likely that the
track will no longer match the background, the size and shape of the
background will be wrong, and other problems will arise. You are
warned about this when you dismiss the dialog.
Background color of the layout. A color button appears on the dialog
if the layout is new or has no background image. Click to bring up
the color chooser to select a new background color for the layout.
Background Color
Module
The default color is set in Preferences (Style tab) -- this applies to all
new layouts. The color you choose here in Layout Properties applies
only to the current layout.
Trick: choose black as the background color, and it will reset the
layout to the default color. If you really want a black background,
choose a nearly-black shade instead.
Indicates whether the layout is designed to be used in a modular
layout, and if so, what kind of module.
See Module Tags, Building a Module.
Open for read only
Check to mark the layout as open for read only. When this box is
checked, then the next time you save the file, you will be prevented
from overwriting the original. For more, see Read-Only Layouts.
Control Panel
For operating trains. Called from menu command View > Control Panel.
Note: this control panel has been superseded by the Train Control Bar. The one described below is still available
-- call it the "old-fashioned free-standing control panel" -- but the TCB is the preferred device.
The TrainPlayer Control Panel provides all the tools you need to operate trains, in a classy brass-and-walnut frame. If it
takes too much room on your screen, you can choose the minimized version and still control speed and direction.
The panel operates a single train at a time. If you have more than one train, select the one you want to operate by one of
these methods:
●
●
●
●
Choose a train from the Train menu
Choose from the drop-down list in the Train Toolbar
Click a car or train in the Train Tree
Click any car of the train on the layout
The selected train appears in the control panel train window, and speed and direction indicators are adjusted to match.
Features of the control panel:
●
●
●
●
●
●
●
●
Train Window: Displays the train being controlled. Allows selecting a car and/or uncoupling point, scrolling the
train, viewing car or train properties. For details, see Train Window. Note: an identical train control window is also
available in the Train Toolbar.
Horn Button: Press and hold to sound the horn. Right-click to choose horn type.
Speed Dial: Controls the train speed. To rotate, press and drag anywhere on the perimeter of the dial. Doubleclick a point on the perimeter and the speed dial will jump to that value. In Yard Mode, you can rotate counterclockwise past stop and go into reverse.
Speed Dial Knob: Shows the current dial setting. Press and drag on knob to rotate dial.
Forward/Reverse: Click to change the direction of train movement. Green light indicates forward, red
reverse.
Minimize Button: Change control panel to compact form. The minimized
control panel allows dial rotation, stop by click, and reverse direction when yard
mode is enabled.
Uncoupling Pin: Shows location of the next uncouple, add car, or paste
operation. To change the position of the pin, click between cars, press right or left arrow keys, or select a car. For
more, see Train Window.
Train Scroller: Press to scroll the train horizontally within the window. Press and hold to auto-scroll. Pressing
the right scroller moves the train to the left, and vice-versa.
●
●
●
●
●
Uncouple Button: Click to uncouple at the current position of the uncoupling pin. This button has no effect if
pin is at front or end of train.
Speed Display: Displays current speed in miles per hour
(MPH) or kilometers per hour (KPH). To change from MPH to KPH,
select a metric setting in Layout Properties or various other dialogs.
Stop Button: Click to stop the train. Button shows lit red when stopped, flashing red when in yard mode.
Clicking stop exits yard mode and returns direction to forward.
Close Button: Click to remove control panel from the screen. To bring it back, use View > Control Panel.
Context menu. Right-click anywhere on the control panel (except in train control window) to access the
context menu, with these commands:
●
●
●
●
Lock in position: When checked, causes the control panel to become unmoveable so it can't
be dragged. When unchecked, panel can be dragged anywhere on screen. Used to prevent
accidentally dragging while operating controls.
Enable yard mode: When checked, allows control panel to be operated in yard mode.
Uncheck for normal operation. You can also enable yard mode by using the Yard Mode toolbar
button, or choosing Enable Yard Mode from the Tools menu.
Locked: Icon appears when control panel is locked and unmoveable. To lock, choose Lock in position from the
context menu. To unlock, use the same menu command or simply click on the lock icon.
Yard mode enabled: Icon appears when Yard Mode is enabled. To enable or disable Yard mode, see
above. You can also disable yard mode by clicking the Y icon.
The TrainPlayer control panel was custom designed by Rick Fernandez of creativeblox.
The Train Window
This page is obsolete. The Train Window is now described under Train Control Bar.
Local Sound Chooser
The local sound chooser is for selecting locomotive horn sounds, or layout sounds to play when the train passes a given area.
For general information about choosers, see Choosers.
To Add a Sound to your Layout
The sound chooser shows a subfolder of sounds on your disk; which folder depends on whether you are choosing an engine horn sound or a layout sound.
1. Click the folder in the tree to show the list of sounds it contains.
2. Click a sound in the list to select it.
3. Click the icon on the right if you want to hear the sound.
4. If you like it, click OK to choose the sound and take down the dialog.
Tree Contents
Sounds\Loco
Engine horn, bell, whistle sounds. Shown when chooser is called from "Other..." on Horn menu in Train Properties (below left).
Sounds\Layout
Sounds to play when the train passes an area on the layout. Shown when chooser is called from Sound browse button in Station Properties (below right).
Tree Menu
Open
Refresh
Find...
Find Next
Properties...
Open folder to show list of sounds
Reload folder contents from disk. Dimmed on root folder of tree.
Search for name or filename. See Search.
Export Filenames...
Go to next hit after Find
Display folder properties
Export text or xml file of folder contents. See Export.
Open
Choose selected sound, take down dialog
List Menu
For more information about sounds, see Horns and Sounds; also Stations.
Local Car Chooser
The local car chooser is for selecting cars and adding them to the layout. This chooser is also used to create new car collections.
For general information about choosers, see Choosers.
To Add a Car to the Layout
1. Choose a car collection in the tree and click to open it. A car collection is shown as a folder with a locomotive icon. When you open a collection, you see its cars in the
list window.
2. Click one of the cars in the list window. You see its side and top view in the preview window.
3. To add this car to the layout, click Add Car, or double-click the icon. The car is added to the currently-selected train at the current position of the insert pin. If there is no
train selected, the car is added to a random track.
The car chooser is a modeless dialog: it remains on the screen so you can keep adding cars. When you are finished, click Done. If you change your mind, use Edit > Undo to
remove added cars.
You can choose whether you want the list view to show side views (as shown above), or top views, or a list showing type name, class, AAR code, filename, and date.
Tree Contents
Defaults
Folder of collections which can be selected as default car sets; see Default Cars
British
Folder of British car collections
Standard
Folder of standard car collections
Premium
Folder of premium collections; available with Premium license only
<other collections>
Collections from previous versions (1)
(1) Previously all collections were stored directly in the Cartypes folder. Now collections are stored under Standard or Premium folders. Older collections which have not been moved will show
up at the top level of the car chooser tree. For instructions about reorganizing your collections, see the Readme.
Tree Menu
Open
Open folder to show subfolders or files
Refresh
Reload contents from disk
Find...
Search for name or filename. See Search.
Find Next
Go to next hit after Find
Properties...
Display folder or car collection properties
Export Filenames...
Export text or xml file of folder contents. See Export.
Import from Folder...
Under the selected folder, create new car collection from a folder of image files. Dimmed if
selection is not a folder. See Creating a New Collection.
Add Car
Side Views
Top Views
List View
Properties...
Add selected car to layout
Display icons of side views
Display icons of top views
Show contents in list form. List includes name, class, AAR code, date.
Display and edit car type properties
List Menu
Creating a New Car Collection
Here's how you can create a new car collection if you have a set of side and top images. For more information, see Car Collections.
1. Collect or prepare the set of images. You will need at least a side view for each car type; for top views, you can create your own or choose from among the ones you
already have. Many side-view icons of the correct size are available as gif files for download from various web sites.
2. Gather the image files into a folder, named as you want to name the collection. If you have created car-top images, you need to make sure their files are named
correctly. In the example below, we have prepared a folder of images called "My Cars."
3. Point to a folder in the tree where you want the new collection to appear. This must be a folder, not a car collection. In the example below, we are creating the new
collection at the top level, right under Cartypes.
4. Right-click and choose Import from Folder (below left).
5. In the Browse for Folder dialog, navigate to the folder where the images are stored (in this case, "My Cars").
A new collection is created in your tree and under the TrainPlayer\Cartypes folder. The image files are copied from the original folder into the new. You see the new collection in
your chooser tree (above right), ready to use.
Large Car Images
If the selected collection has large car images, they are displayed underneath the side and top images, as shown here:
For optimum viewing, enlarge the right panel -- the large image looks best when drawn full size.
Web Car Chooser
The web car chooser is for downloading and installing car collections from the web. You must have a live internet connection while using this chooser.
For general information about choosers, see Choosers.
To Download a Car Collection
1. Choose a car collection in the tree and click to open it. A car collection is shown as a folder with a locomotive icon. When you open a collection, it is downloaded to a temporary
directory called the "cache," then shown in the list window. Once a collection is downloaded to the cache, it remains there for future access, until you (a) use the Clear Download
Cache command, or (b) choose Refresh on the collection.
2. Click one of the cars in the list window. You see its side and top view in the preview window.
3. To add this collection to your local set, click Install. This copies the files from the cache directory to their permanent location in your Cartypes directory, then switches to the
Local Car Chooser so you can add them to your layout.
In the web car chooser, unlike others, status icons are shown on the folders in the tree instead of on individual items in the list. Decorations on the folder icons indicate whether you
have a local copy of a car collection, or whether there is a recent or newer version available on the web. For more, see Status Icons.
Tree Contents
Cartypes\British
Folder of British car collections
Cartypes\Defaults
Folder of car collections which can be used as default cars; see Default Cars
Cartypes\European
Folder of European car collections (German, French)
Cartypes\Premium
Folder of premium collections. Available only with Premium license.
Cartypes\Standard
Folder of standard car collections, available to all users
Cartypes\What's New
Recent additions to the web collection; see What's New.
Tree Menu
Open
Open folder or download collection to cache folder to show contents
Refresh
Re-download car collection to cache folder. Dimmed unless selected item is car collection.
Find...
Search for name or filename. See Search.
Find Next
Go to next hit after Find
Download All...
Download and install all car collections within the selected folder and subfolders.
Download Missing Items...
Look at all web car collections within the selected folder and subfolders; if collections available on the web
are not yet installed on your local machine, download and install those
Clear Download Cache
(on root Cartypes folder only) Remove local cached files, force re-download
What's New Settings
(on What's New folder only) Set cutoff date; see What's New.
List Menu
Install
Side Views
Top Views
List View
Install selected car collection
Display icons of side views
Display icons of top views
Show contents in list form. List includes name, class, AAR code, date.
Load Definition Dialog
When you click OK to leave the Station Properties or Industry Browser dialogs, the program checks Incoming and Outgoing boxes to
see if all names are known among the load collections. If any are not, the Load Definition dialog appears, where you can add new
loads or correct mis-entered names.
In order to add a new load to the system, you need to provide a load name and one or more AAR codes indicating the types of car
suitable to carry it. Given this data, the program creates a new image-free load in the closed-car collection. If the load you need is for
an open car (flatcar, hopper, gondola), consider using one of the existing loads with images, or create one in the Load Collection Editor,
where you can supply images for it.
If you have more than one unknown load, the Load Definition dialog operates in a Wizard-like way. You edit one item at a time, and
use Next and Back buttons to browse through the list. At the last item, Next changes to OK, which saves all the changes and
dismisses the dialog.
Controls in this dialog:
Load name not recognized: name of the load as entered in the Incoming or Outgoing box.
If the name is that of a valid load which you wish to add to the list, proceed to the next box. If it is a misspelled version of an existing
load, you can edit to correct the spelling. As soon as the name becomes recognizable, the text above the box changes to "known load"
and its AAR code is displayed (dimmed, not editable for a known load).
Choose Load... button: click to bring up the Load Chooser if you want to look for a known load rather than create a new
one. The chooser is modal in this case: find the load you want, double-click it, or click to select and click OK to return. The selected
load is shown as "known load," with AAR code displayed but not editable.
AAR code(s): a comma-delimited string of AAR codes indicating car types suitable to carry the load. For details, see Load AAR
Strings.
Usually you enter a single code for a closed car: X boxcar, T tank car, S stock car, R refrigerator car, LO covered hopper. If more than
one type can be used for this load, enter a list; for example "RB,RBL,XI" -- all can carry boxed fruit. (For more, see AAR codes.)
Choose Code... button: click to display the AAR Codes dialog for choosing one or more codes.
The list of codes defined in TP is presented in a list box. Click a row and the selected code is entered in the text box. Shift- or ctl-click
to select multiple rows, and a list of codes is generated.
<<Back, Next>>: move to previous or next load being defined. Next changes to OK at the end of the list; click to save all the
changes and return to the calling dialog.
Cancel: dismiss dialog without adding or modifying any loads.
Switchlist Window
The Switchlist Window shows the current switchlist. Each row describes one car movement -- a car, a destination, and a load. When the car in a row arrives at the given destination,
then the move is finished and an X appears in the Done column.
Selecting a row in this window helps you visualize the move. When you click a row header (left end of row), it selects the indicated car on the layout and shows color codes for that car
and its destination only, hiding all others. To restore all the color codes, unselect all rows of the grid by clicking in the blank space below the last row.
Information on this page is specific to the Switchlist Window. See also the general instructions under Ops Windows.
Switchlist Window Contents
Items
Color
Action
Edit
Color code for car and destination station
Verb indicating type of move
Hidden Notes
1
Class
Car
To/At
Load
From
Done
AAR
Shipper
Receiver
Waybill
ToggleOnArrival
Schematic
Instructions
CarID
Train
TrainID
General car class
Car identifier as displayed on car top
Destination station for move; move ends here
Load carried by car during move, or "Empty"
Current location of car
Shows X when move is completed
Car class from AAR codes list
Name of shipping industry, or "offline"
Name of receiving industry, or "offline"
ID of waybill for this move; to view waybill, use context menu
Checked if car is to be automatically loaded or unloaded on completion
Symbolic display of waybill cycle; see Waybills
Full-text move instruction, same as displayed in Schedule Window
Internal numeric ID of car
Name of train containing car, if train is named
Internal numeric ID of train containing car
y
y
2
3
y
y
y
h
h
h
h
h
h
h
h
h
h
4
Notes
Edit: "y" in this column means the item can be edited. This applies only if Grid Editable is checked in the context menu.
Hidden: "h" in this column means the item is hidden by default at install time. To see it, drag it onto the grid from the Field Chooser.
1. Action verbs are:
●
●
●
●
●
Set out: take car to interchange
Return: take car to yard
Deliver: take car to industry, loaded
Send: take car to industry, empty
Pick up: move to car's location
2. Location is a station name or a track location. Car "in" station means the car is within the bounds of the station; "at" means any car of the train is in the station; "near" means car is
on a neighboring track to the station. If none of these apply, then the track location is given.
3. In order to complete a move and see an X in the Done column, the car must reach the destination station and then its train must come to a stop. Once a move is completed, the X
remains in the column until (a) you clear it by hand -- set grid editable, then erase the X, or (b) a new switchlist is generated.
4. If you show Instructions, then you will need a wide column, but you will no longer need the Schedule Window. You might want to close that and dock this in its place, wide across the
bottom of the screen. For example:
Editing a Switchlist
Switchlists are generated automatically and are not designed to be permanent. Nevertheless, they are editable, so if you like you can create one by hand, or modify a generated one.
The switchlist is saved with the layout, so it will be permanent until you generate a new one.
The first step in creating or editing is to right-click the switchlist window and choose Grid Editable. Without this, the grid is read-only and cannot be modified. Once this is done,
then you can edit in various ways:
●
●
●
●
Click a text cell to select it. In some cases you can then type a new value; in others, a drop-down list appears so you can make a choice. (You may have to resize a narrow
column to make room for the large drop-down arrow.) Note that not all items are editable; for example, you can specify a car by setting its ID in a cell, but you cannot specify a
location, as that is a property you can only change by moving the car.
Select a row and choose Delete from the context menu. This deletes the row from the switchlist.
Choose Add New from the context menu. This creates a new, empty row at the bottom of the list. To fill in the new row, choose a car and a destination using drop-downs in
the Car and To/At columns.
Select a row and choose Duplicate. This creates a copy of the row. You can (and should) then change the car or destination in the row -- it is not a good idea to have two
switchlist rows which duplicate of each other.
After modifying the switchlist, use File > Save or Save As to save the layout and retain the modifications.
Color Codes
When you are presented with a new switchlist, it helps to visualize the final location of what you are being asked to deliver . Color coding helps you do this. In a generated switchlist,
each destination is assigned a color. All cars bound for that destination are then assigned the same color. You can then look at the layout and see your job at a glance -- move the
purple cars to the purple station, orange cars to the orange, etc.
After an ops generation, color codes are automatically shown on all cars and stations in the switchlist, and car id's are also displayed on the cars.
To turn all color codes on or off: use View > Color Codes on the main menu. To turn car id's on or off, use Train > Show Car IDs. You can toggle the
display of Car IDs on moving trains by using the checkbox Preferences>Trains>”Turn off while moving.”
To highlight a single move: you can interact with the switchlist window for a more detailed look at your assigned job. Click to select a row in the switchlist window, and it will turn
off all color codes EXCEPT the one on that car and its destination. This gives you a handy way to click down through the list and see where each car is located and where it's going.
To turn all color codes on: click any empty spot on the layout or the bottom of the switchlist window. This cancels any single selection and shows all colors for the switchlist.
Car Collection Publisher
Copies a car collection to an output folder. Called from Export button in Car Collection Editor.
Publishing a car collection means preparing it for delivery to other users: checking for errors, gathering all the image
files in one place, giving them uniform names, splitting multi-image files into separate parts, creating a new xml
index, and so on.
The job is done in this dialog, called up when you are editing a car collection. It does not modify the original
collection, but makes a new copy in a different location. The new copy is not activated or added to your chooser
tree, although you can drag it into the tree if you'd like to see it. If you edit properties in this dialog, the changes will
apply to the published copy only; an alternative is to edit the properties of the original before publishing.
To publish a car collection:
1. Inspect the Notes box. If errors are reported, cancel the dialog, fix the errors, and try again.
2. Inspect and edit Name and Comments. These should be made presentable for other users. If the comment
box is empty, you should add descriptive information and author name. You might consider doing this to
the original collection instead of here -- cancel this dialog, edit in Car Collection Editor, then publish.
3. Choose an output folder. You do not need a new folder for each collection -- typically you have one output
folder where you put all published collections. Note: if you have already published this collection to that
location, the old version will be overwritten without warning.
4. Inspect the output filename. You should not normally change this. This filename (minus xml extension) is
used as the collection identifier, and is written into layout files; if you change it, then layouts using the
original collection will not recognize the new, and vice-versa.
5. Click Publish. Files are copied, the new published collection is created, and the dialog is dismissed. An
alert informs you of successful publication.
6. If you want to send the collection to another user, zip the files in the output folder. Include the xml file plus
the folder of image files (which has the same name as the xml file).
Dialog controls:
Name
Name of the collection. This can be any name you like.
Changing the name here will affect only the published
collection, not the original.
Comments
Description and author. If this box is blank, please provide
some information to be included in the published version.
Input file
Full pathname of original collection xml file. This file is not
modified by the publish operation.
Output folder
Destination for the published collection. The xml file will
go in this folder, along with a subfolder containing the
image files. To select a new output folder, use the Browse
(...) button.
Output file
Name to be given to the published xml file. This is usually
the collection name plus xml extension. Use caution when
changing this name: you may break existing layouts.
Notes
Errors encountered while processing, if any.
Click to carry out the publish operation. A confirmation
message is displayed on completion.
Publish
Note: no warning is given if the output collection already
exists -- it will be overwritten.
Cancel
Click to abort without publishing.
For more information, see Car Collections.
Cars Window
The Cars Windows shows the full inventory of cars on the layout. Each row shows one car, with its ID, picture, class, load, location, and
other data.
Clicking a row header (left end of row) selects the indicated car on the layout. To find a car on the layout, right-click a row and choose
Zoom To Car.
Information on this page is specific to the Cars Window. See also the general instructions under Ops Windows.
For a more manageable display, the list can be grouped by Train, as shown below. This gives you a tree with collapsible trains -- an
alternative to the Train Tree. To arrange this, choose Group By Box from the context menu, then drag the Train item into the group box.
The Cars Window is for display only, and cannot be edited. It can be sorted on any column except picture.
Cars Window Contents
Items
Car
Class
AAR
Location
Load
Color
CarID
Train
TrainID
Consist
Hidden Notes
Car identifier
General car class
Car class from AAR codes list
Current location of car
Load currently in car, or "Empty"
Color code for car
Internal numeric ID of car
Name of train containing car, if train is named
Internal numeric ID of train containing car
One-word description of train consist
1
h
h
h
h
h
2
Notes
Hidden: "h" in this column means the item is hidden by default at install time. To see it, drag it onto the grid from the Field Chooser.
1. Location is a station name or a track location. Car "in" station means the car is within the bounds of the station; "at" means any car of
the train is in the station; "near" means car is on a neighboring track to the station. If none of these apply, then the track location is given.
2. Consist is one of:
●
●
●
●
●
Switcher: no cars except engine(s) and tender(s)
Freight: freight cars only
Passenger: passenger cars only
Mixed: freight and passenger cars
<class>(s): cut of one or more cars of same type (e.g., "Boxcars") with no engine
Script Central
Script Central is a single dialog for managing scripts of all types on your layout. It is a tabbed dialog, with tabs as listed below. It is modeless, so it stays on the screen
while you work, and provides handy reference material while you are developing or trying to understand a scripted layout.
Script Central Tabs
Script Central has five tabs as follows. Links go to detail pages.
1 - Scripts
Train scripts, master scripts, and script notes
2 - Junction Actions Junction action scripts
Scripts tab
Junction Actions tab
3 - Subroutines
Subroutines and procs available in Scripts folder
Subroutines tab
4 - Reference
Reference data for commands, variables, and other language elements
Reference tab
5 - Settings
Settings and actions applying to all scripts
Settings tab
The first four tabs share the same format -- list on the left, text box on the right -- and support many of the same operations, such as:
●
●
●
●
Click a row in the list, and its contents show up in the text box. In tabs 1-3, the text can be edited and saved.
Right-click a row in the list, and you get a context menu, with commands applying to the selected script.
Double-click a row (or choose Edit from the context menu) to edit in the appropriate editor, depending on the script type.
Click OK or Apply to save changes made to the text. These changes are saved with the layout in memory; they are not saved permanently until you save the
layout. Click Cancel to take down the dialog without saving. Cancel changes to Done after you have saved any change. Note that changing tabs in the
dialog saves your changes quietly.
For details of the individual tabs and their context menus, click links above.
Script Central - Reference Tab
A compact reference to the scripting language. Provides information about commands, wait conditions, system and local variables. See
also Script Central Tabs.
The Reference tab is your best source of information about the details of the language. It is built into the program, so will never be out of
date when new commands are added. Unlike a paper manual, it is always available, and conveniently displayed on your screen as you
work. You can copy and paste from it to save typing.
Script Doc Notes File
Much of the information shown with each reference entry is taken from a text file distributed with the program. The file is named
scr_doc_notes.txt and it resides in the root TP app data folder. If you don't have this file, or your version is out of date, and you have
an internet connection, then a new version of the file is automatically downloaded when you bring up the Reference tab.
List contents:
Type
Name
Description
Value
Command, wait condition, variable, or one of a dozen other types of scripting element. Command names
include subcategory. Function and variable names include "r/w" where value is settable.
Command, variable, or function name with calling sequence when applicable
Brief explanation of the entry
For system variables, functions without arguments, and user variables: current value
Actions:
Click list item
Selects item and displays it in the text window. The text includes data from the list window plus
notes taken from the system doc notes file.
Right-click row
Text window
Brings up context menu, with one command as indicated below.
Text is not editable. It wraps to fit the box.
Context menu:
Refresh
Rebuilds list and updates variable entries to latest values.
Script Editor
The Script Editor is a dialog for developing train scripts, and watching them in action. It provides an editable text
box with special features for script development, along with player buttons for playing, stopping, recording, and
rewinding the script. As the script executes, the active line is highlighted in the text box, so you can follow along
with the action.
To bring up a Script Editor, (a) select a train and choose Train > Script > Edit from the menu; (b) click the
Edit Script button on the Scripts toolbar; (c) double-click a train script entry in the Scripts tab of Script Central.
Each train script has its own Script Editor window. If you have multiple scripts on your layout, you can have multiple
windows showing the different actions in each. The dialog is modeless, so it remains up as you run the layout.
If there are multiple train scripts on the layout, then the buttons in each Script Editor work differently from the
corresponding ones on the Script Toolbar. In the latter,Play, Stop, and Rewind apply to all scripts at once; in the
Script Editor, buttons apply only to the script in the window.
Dialog controls:
The Script Editor is always working on a single script. If you bring it up on a train having no script, it creates an
empty one for you to fill in.
Text box
Editable box for script text. Highlight shows current line. Right-click for
editing or Go To commands.
Play
Begin executing the script at the current line.
Stop
Stop the script and the train. If recording is in progress, stop it.
Rewind
Reset to first line of script, restore train and switch positions to layout
Rewind Point
Record
Begin recording train moves, capturing them starting at the current line.
Buttons
Apply: update scripts on layout (not saved permanently until layout save);
OK: apply and dismiss; Cancel: dismiss without saving -- changes to
Done after any save.
Go To Statement
For debugging and development, Go To Statement is a convenience. Point to any line in the script, right-click and
choose Go To Statement, and that line becomes highlighted, the next to execute when you press Play. This gives
you a way to run through a section of code while you work on it -- start at some line, run the script a ways, stop,
then go back to the starting point using Go To Statement.
There is a catch. This feature goes to the script statement to be executed, but does not reposition the trains. It's up
to you to make sure the trains are in suitable positions when you start playing the script.
Switch Shortcuts
As another convenience for script authors, you can insert text into the script window by choosing a command from a
context menu on the layout. As long as the Script Editor is visible, and you are using the track or edit tool, then
right-click a junction or switch and you get three new commands on the context menu:
Each of these commands inserts a bit of text at the position of the cursor in the text box. What is inserted depends
on what you right-clicked:
Insert junction number
Insert the number of the clicked junction. Need not be a switch.
Insert throw here
Insert a THROW statement with the junction number and its current position; for
switches only
Insert throw alternate
Insert THROW plus junction number plus alternate position; for 2-way switches only
This applies to the Junction Action Editor also, and to the script windows in Script Central -- whenever any of these
is visible on screen, junction context menus can insert into it. If more than one is showing, the frontmost one gets
the insert.
Junction Action Editor
The Junction Action Editor is a dialog for creating and editing junction actions. To bring it up, (a) using the track edit
tool, right-click a junction and choose Action..., or (b) double-click a row in the Junction Actions tab in Script
Central. Either way, the dialog comes up with reference to a specific junction, where there might be one or more
actions defined to trigger on different events.
The dialog is modeless, so it can remain on the screen while you work on the layout. You can move around to
different junctions (or change your selection in Script Central) and change what junction the dialog is showing. The
dialog works on one action at a time, with arrow keys for moving through the list of actions at the junction.
The Junction Action Editor is a good place to develop action scripts, but unlike the Script Editor, it is not a place to
run or test them. There are no Play or Stop buttons in this dialog. To test a junction action, you have to run a
suitable car across the junction.
Junction Action Triggers
A junction action begins execution when some train or car passes across it. You can choose what triggers the
action -- a specific car or train, or a class of them. The list of choices for trigger type is as follows, where the
first column is the name, second tells what kind of argument is required if any, third shows what will actually trigger
the action:
first car of any train
Any Train
Car
AAR
Train
car id
aar code
train id
Train Type
train type
Any Last Car
Last Car Of
Any Car
car with specified id (id = label)
car with aar code matching (or starting with) specified code
first car of train with specified id (id = name or train+no)
train of type Freight, Passenger, Mixed, or Switcher, as
assigned by the program
last car of any train
train id
last car of train with specified id
any car of any train
A trigger has both a type and a trigger direction. Consider a track going horizontally across the screen, with a
junction in the middle: a train can cross it from left to right (W->E) or the other way (E->W). You can specify
whether an action is to be triggered by one or the other or both.
The orientation of the layout is taken into account at the time you assign a direction to a trigger. If travel across the
junction is more or less horizontal, then the choices you have are W-E or E-W; if closer to vertical, they become N-S
or S-N. (If you assign a direction and later rotate the layout, results are unpredictable. If it triggers the wrong way,
change it to the other.)
For additional notes regarding triggers, see Working With Junction Actions.
Dialog controls:
The Junction Action Editor is always working on a single action. If you bring it up on a junction having no action, it
creates an empty one with a default trigger.
Label
Upper left of dialog indicates the junction number; if it is a switch, its
position is also given
Trigger
Choose one: trigger when crossed by car(s) as specified below; or
disabled, do not trigger
When Crossed By:
Type
Controls enabled if trigger is not disabled:
Trigger type, as listed above
Name
Name or identifier or other required argument if any; see note below
Direction
Choose one: E-W, W-E, or Any. Choices change to N-S, S-N depending
on tracks at junction
Take Action
Or Actions:
Arrows
Add
Delete
Buttons
Action script, an editable text box.
Other actions defined at the same junction:
Move through list; dimmed if only one entry
Create a new action at the end of the list
Delete the current action from the list. If there is only one action, this
removes it from the junction.
Apply: update actions on layout (not saved permanently until layout save);
OK: apply and dismiss; Cancel: dismiss without saving -- changes to
Done after any save
Note: The choices offered in the Name drop-down are limited to cars and trains currently sitting on the layout.
You cannot assign a trigger to a car or aar type which is not present. This is a limitation we may remove in future
versions.
On clicking OK, if you have created a new action at a junction, it is displayed with a Junction Action indicator (as
long as edit or track tool is active):
Script Central - Settings Tab
For script-related actions and settings. See also Script Central Tabs.
This tab is a standard dialog, not the list-text style of the others. It has a set of buttons dealing with the Rewind Point, and these
other items:
Trigger on Drag: if checked, means a junction action can be triggered by dragging an appropriate train across the junction
by hand. If unchecked, the train must be driven using the throttle in order for the action to trigger. Default is OFF (unchecked), to
prevent accidental triggerings as you drag trains around the layout. For related info, see Working with Junction Actions and
Junction Action Editor.
Text font size: size in points of the Courier font used in Script Central text windows, Script Editor, Junction Action Editor, and
Schedule Window. Default is 16.
The Rewind Point
A rewind point is a snapshot of train and switch positions. If a rewind point has been saved, then after a session of moving trains
around, you can click Rewind (on the script toolbar or menu) to put the trains and switches back where they started. This is
useful when you are developing or running scripts, since a script relies on trains being in certain locations when it starts up.
There is only a single rewind point associated with a layout, even if there are multiple scripts. This can be set or cleared using
buttons in this Settings tab. If the rewind point is cleared, then it reverts to the initial train and switch positions as they were when
the layout was opened.
Dialog Buttons:
Set
Save the current train and switch positions as the layout's rewind point. This overwrites any
previously-defined point.
Clear
Erase any saved rewind point, and replace it with the initial positions when the layout was
opened.
Save
Save the current train and switch positions to a file, with extension .xml and "_situ" appended to
the filename.
Load
Load a saved situation and position the trains and switches accordingly. This does not change
the layout rewind point.
Script Central - ScriptsTab
For viewing and editing train scripts, master script, and script notes. See also Script Central Tabs.
Script Notes
Script notes are blocks of text you (the script author) can add to Script Central. You might use these to give instructions for a user of your script, or
to provide background info about it, or to jot notes to yourself about what's going on in the scripts. You can add one or more of these to the first
tab of Script Central, edit as desired, and then bring up whenever useful.
List contents:
ID
Script
First Line
Unique program-assigned id for each row.
For train script: script name and owning train; otherwise, item type ("master" or "notes").
First line of script or note.
Actions:
Click list item
Selects item (script or note) and displays it in the text window.
Double-click row
For train or master script: brings up Script Editor for editing and viewing script. For note: does nothing;
editing is done here.
Right-click row
Brings up context menu, commands as listed below.
Text window
Text is editable. Text is in code style: fixed-size font, no wrap. Changes are saved on clicking OK or
Apply or on changing tabs.
Context menu:
Edit in Script Editor
Brings up Script Editor for editing and viewing train or master script; for a note, editing is done in this
tab.
Delete
Deletes item and removes from the list. For a train script, this removes the script from the train.
Enabled
Refresh
Add Note
Add Master Script
Master script only: check to enable automatic run on open, uncheck to disable.
Rebuilds list; sometimes needed if changes have been made externally.
Creates a new, empty note and selects it so you are ready to enter text into it. See Script Notes.
Creates an empty master script if the layout does not have one.
Script Central - Subroutines Tab
For viewing and editing subroutines and procs. See also Script Central Tabs.
This tab shows all the text files located in your TP Scripts folder and subfolders, whether or not they are used by the current layout. If you want to
prevent a file in that folder from appearing in this list, rename it to start with underscore, e.g., "_hiddenfile.txt".
Also shown in the list are any procs defined in code which has been processed by the layout. Usually procs are defined in the master script, and are
processed automatically on layout open, so they appear in the list in this tab.
List contents:
ID
Name
Subfolder
First Line
Unique program-assigned id for each row. Starts with S for subroutine, P for proc.
Name of subroutine file or proc. Subroutine files are in folders under <TP app data dir>\Scripts.
Name of subfolder under Scripts directory
First line of routine.
Actions:
Click list item
Selects routine and displays it in the text window.
Double-click row
For subroutine file: brings up Notepad. For proc: does nothing; editing must be done in code where proc is
defined.
Right-click row
Brings up context menu, commands as listed below.
Text window
Text is editable. Text is in code style: fixed-size font, no wrap. Changes are saved on clicking OK or Apply
or on changing tabs.
Context menu:
Edit in Notepad
Delete
Refresh
Brings up Notepad for editing and viewing subroutine; does nothing for procs.
For subroutine: deletes file, after confirmation. Not applicable to procs.
Rebuilds list; sometimes needed if changes have been made externally
Clock Settings
For setting clock parameters. Called from Settings on Clock context menu.
The TrainPlayer clock has properties you don't find in an ordinary clock: it can run at the speed of your choice, and
with one click it can be reset to a specific time when you want your operating session to begin. These properties
are set in this dialog.
Dialog controls:
Click to start the clock running. Button is dimmed if clock
is already running.
Start
Note: the clock starts automatically whenever it is visible
and you start any train running.
Stop
Click to stop the clock.
Reset
Click to reset clock back to the indicated start time.
Start Time
Time the clock will show on program startup and on reset.
Default is 5AM.
Speed Factor
Clock speed as a multiple of wall clock speed. Default is
6, meaning the TP clock runs 6 times faster than a wall
clock -- one TP hour goes by in ten actual minutes.
For more information, see Clock.
Customize Commands
For arranging commands on toolbars. Called from menu command Tools > Customize.
This tab allows you to add or remove buttons on toolbars. To add a button to a toolbar, locate the command in this
dialog and drag it onto the toolbar where you want it to go. To remove a button from a toolbar, drag it off the toolbar
and drop it anywhere (this only works when the Customize dialog is visible.)
Dialog controls:
Categories
Select a menu to see its commands on the right. Or choose "All
Commands" to see the complete list of commands from all menus.
Note: the "New Menu" item in the list is not useful.
Commands
Locate a command in this list, point to it, press the left mouse
button, and drag the command onto any toolbar. If the command
does not have an icon, the toolbar button will show the command
name.
Customize Toolbars
For choosing toolbars to be displayed. Called from menu command Tools > Customize.
Dialog controls:
Toolbars
Choose which toolbars are to be visible. Most can also be made
visible from View > Toolbars on the menu.
Reset
Reset the selected toolbar to factory settings. This synchronizes
the toolbar with the menu, and positions it in default docking
position.
Reset All
Reset all toolbars to factory settings. This may be necessary after
upgrading to a new version, if toolbar buttons do not seem to be
working as expected.
Customize Keyboard
For assigning keys to menu commands. Called from menu command Tools > Customize.
In this tab, you select a command from the menu and choose a key on the keyboard to execute that command. If
the command already has a key assigned to it, you can change it.
Dialog controls:
Category
Select the menu containing the command you want to
operate by keyboard.
Commands
Select the command you want to attach to a key.
Set Accelerator for
This is non-functional, always set to Default.
Current Keys
Shows the keys(s) currently assigned to the selected
command, if any.
Press New Shortcut
Click this box so it has the focus, then press the key you
want to assign to the command. The key name will echo
in this box.
Assign
Click to complete the assignment. If you do not click
Assign, nothing will change. This button is dimmed if no
key has been entered.
Remove
Click if you want to remove the current key assignment for
the command. This button is dimmed if no key is currently
assigned.
Reset All
Erases all key assignments and resets to factory values.
Customize Menu
For resetting or customizing menus. Called from menu command Tools > Customize.
Dialog controls:
Application Frame Menus
Choose one of the two main menus: Layout
(the menu when a document is open) or
Default; then click Reset to reset the selected
menu to factory content.
Context Menus
Choose Popups, then click Reset to reset all
context menus to defaults.
Menu animations
Choose the action to be taken when you
expand a menu.
Menu shadows
Check if you want menus to have a threedimensional look with shadows.
It may be necessary to reset all menus after you upgrade to a new version, if the menu commands don't seem to be
doing what they should. To reset all menus, click Reset once for each of the three menu choices.
Customize Options
For setting miscellaneous toolbar options. Called from menu command Tools > Customize.
Dialog controls:
Show Screen Tips
Check if you want to see a tooltip whenever the
mouse hovers over a toolbar button.
Show shortcut keys
Check if you want a tooltip to include the command's
keyboard shortcut. For example, with this box
checked the tooltip for File New becomes "New (Ctrl
+N)."
Large Icons
Check if you want larger icons on the toolbars.
Creating a Turntable
Turntables are a little tricky to get right, because the connecting tracks have to be laid precisely. The program helps
by snapping objects into position, but can have trouble in crowded areas. When you're working in an area with a
turntable, it works best to construct the turntable first, before adding the surrounding track. First, zoom in so you
have room to work, and so junctions and tracks don't overlap.
There is a special tool for creating turntables. It works just like the Circle Tool, except that after you size and
position the circle, it automatically adds a bridge track and makes a working turntable.
Two tips about creating turntables: (1) draw the circle first, before adding the connecting tracks, and (2) make sure
either the circle or an end of the bridge track is highlighted when you start or end drawing a connecting track. If the
track doesn't snap to have one endpoint exactly on the circle, the turntable won't work.
If you encounter problems with turntables in published layouts, see Repairing a broken turntable below.
To create a turntable:
1. Choose the Turntable Tool
or Tools > Turntable from the menu.
2.
Draw the circle. Point to the center, press and drag to the desired radius. Press
the shift key to move the circle instead of resizing it.
3.
When you release the mouse button, the bridge track appears automatically, oriented at
a random angle. The Turntable Tool is automatically deselected and the Track Tool selected instead.
4.
Draw a connecting track. Start where you want the far end of the
track, press and drag in toward the circle. When the circle highlights, release. (You can do this in the other
direction if you prefer: start by highlighting the circle, then draw outwards.)
5.
6.
rim.
When you release, the connecting track snaps to be perpendicular to the circle
Test. Double-click anywhere on the rim of the circle. The table should rotate
until the bridge track is aligned with the connector, then stop. (If the table just keeps rotating, double-click
the rim again to stop it, then see Repairing below.)
To make a cross-over:
If you want the engine to be able to drive straight across the turntable, you must take care to make
sure the connecting tracks are aligned. Here's the best way:
1. Draw the first connector, as in steps 4-5 above.
2. Rotate the table until it stops in the aligned position, as in step 6.
3.
Point to the free end of the bridge track, so it highlights with a green square.
(When you are pointing to the bridge track end, only the track end highlights, not the circle.)
4.
Press and drag outwards to form the second connector. You will have to
eyeball where to drop the track end so that it aligns with the bridge -- in this case the program does not
help.
You can draw the other direction if you prefer, starting at the far end and dragging in toward the
circle. Just make sure the bridge end and not the circle is highlighted when you press or release.
To move or resize a turntable:
1. Choose the Edit Tool
2.
.
Click any point on the rim of the turntable or the bridge track. Both are selected and
colored dark blue.
3. Press the rim of the circle and drag. Both the circle and the bridge track move together.
4. Press the shift key while dragging to resize instead of move.
Note that when you are editing, the shift key behaves opposite to the way it works when creating a
new circle or turntable. When dragging a selected circle or turntable without shift, it moves as a rigid
unit; with shift, it resizes, and also allows you to reorient the bridge as you drag.
To delete a turntable:
1. Choose the Edit Tool .
2. Point to the rim of the turntable, so the circle highlights.
3. Press the Del key.
You can also delete a turntable by selecting it or including it in a set of selected objects, then using
Edit Delete or Edit Cut.
Repairing a broken turntable
If you spend any time with the 101 Track Plans, you are likely to encounter some turntables which
need repair. The most common problem is that rotation doesn't stop where it should -- the bridge
comes to a connector and just rolls right on by. This usually means the connector is not positioned
right.
The most common breakage is when the connector is not quite touching the circle. To
repair:
1. Choose the Edit Tool
.
2.
Point to the end of the connecting track closest to the circle, so it highlights with a
green square.
3.
Press and drag until the circle highlights, then release.
4.
On release, the connector snaps perpendicular to the rim.
5. Test the turntable. Should work now.
Other problems are harder to correct. You may find a phantom junction along the rim of a turntable
-- you see a green highlight square where there is no track -- or other problems. In most cases the
best course of action is to delete the turntable and all connecting tracks, and start over.
Scenery Properties: Background
Background fill properties of the selected scenery object(s). Called from Properties on the scenery context menu.
See also: Editing Scenery Properties, General Scenery Properties, Line Properties, Text Properties.
This dialog sets properties of the color or pattern which fills the object. The default is a solid ivory color (shown above). If multiple
objects are selected (including grouped objects), the fill properties chosen in this dialog apply individually to each.
Dialog controls:
Select one of four choices using the radio buttons.
No Fill
Choose this if you do not want the object to be filled. An object with no fill is
transparent.
Choose this to have the
object filled with a solid
color.
Solid
To change the color, click
the colored button to bring
up the Colors dialog.
Choose or adjust the color using either tab of the dialog.
Choose this to fill the object with one of the system-defined hatch patterns.
Choose a pattern from the drop-down choice list:
Hatched
Set the foreground (line) color of the pattern using the color button.
The hatch patterns are provided by system "brushes." They do not offer much
flexibility -- you cannot change the background color or line width, and the patterns
do not stretch or rotate.
Bitmap
Choose this to fill the object with an image from a graphics file. When you do this
other choices appear on the dialog as described below.
Adjusts the degree of transparency of the background fill or pattern.
Transparency
When set to zero (slider at left), the object is completely opaque, and obscures
objects underneath. When set to 100 (slider at right), the object is fully
transparent, as if you had chosen No Fill. Values in between cause the
background to be semi-transparent -- see-through to a given extent.
Note: choosing a non-zero value for transparency adds complexity and slows down
the drawing process. It is not recommended that you use transparency for large
background objects.
Bitmap settings:
When the background choice is set to Bitmap, additional options are available. The image itself comes from a graphics file which must
be created outside of TrainPlayer (or provided by us -- see Scenery Chooser). The chosen image fills the object according to the
following settings.
Choose this to cause the bitmap image to stretch so that it fills
the object.
Stretch
Tile
If Lock Proportions is checked, the image will fill as much of the
object space as possible without distorting; otherwise, the
image will fill the complete space, distorting as necessary.
Choose this to show the image in its native size and
proportions, drawn repeatedly to fill the object space.
Tiled images do not scale or rotate.
Lock proportions
Specifies whether the image can be stretched independently in
both directions (unchecked) or must retain its native proportions
(checked).
This setting is ignored unless Stretch is chosen as the display
mode.
Browse
Click this button to browse your disk for the image file to be
displayed in the object.
Supported graphics formats are bmp, jpg, gif, and png.
A shortcut is available for specifying a bitmap background for a scenery object,
instead of using the Browse button described above. You can right-click an object
and choose Load Bitmap from the context menu, as shown here:
This brings up a file dialog so you can specify an image file. The result is the same
as if you had used Browse.
Transparency note:
This feature allows you to "feather" the look of an image as photographers often like to do. This option can be very useful if you are
attempting to trace over an object to make a copy of it.
NOTE: the Transparency level selected affects both the Line and Text property features associated with an object.
Local Scenery Chooser
The local scenery chooser is for selecting scenery objects and adding them to the layout.
For general information about choosers, see Choosers.
To Add Scenery to the Layout
1. The local scenery tree shows folders of scenery objects residing on your disk. Click a folder to see its contents as icons in the list window.
2. Click an icon to see a larger view in the preview window.
3. To add the selected object to your layout, point to its icon, press the mouse button, and drag the object to a spot on your layout. Alternatively click OK to deposit the
selected object in the center of the layout and take down the dialog.
The scenery chooser is a modeless dialog: it remains on the screen so you can keep adding scenery (unless you clicked OK in step 3). When you are finished, click Done or
Cancel.
Tree Contents
<named folders>
Scenery objects in the named categories (1)
(1) Folders in this tree are those in the Scenery folder in your TrainPlayer app data directory. By default these match those available on the web. However, if you change the arrangement of
files on your disk, the changes will be reflected in the tree.
Tree Menu
Open
Refresh
Find...
Find Next
Properties...
Export Filenames...
Open folder to show subfolders or files
Reload contents from disk
Search for name or filename. See Search.
Go to next hit after Find
Display folder properties
Export text or xml file of folder contents. See Export.
List Menu
Open
Icon View
List View
Add selected scenery object to layout
Show scenery objects as icons
Show scenery objects in list form
Web Scenery Chooser
The web scenery chooser is for downloading folders of scenery objects from the web. You must have a live internet connection while using this chooser.
For general information about choosers, see Choosers.
To Download a Scenery Folder
1. The web scenery tree shows folders of scenery objects available on the web. Click to open a folder containing the types of object you want.
2. The objects in the folder are downloaded to a temporary folder on your disk (called the "cache"), and the list window displays the object images.
3. Click an icon to see a larger image in the preview window.
4. If you like the set and would like to use it in your layouts, click Install. This copies the images from the cache into your local scenery folder, then switches to the Local Scenery
Chooser so you can add them to your layout.
If you work with scenery, chances are you will eventually need bits and pieces from the complete set, so the web scenery chooser provides a handy Install All button. This downloads and
installs the entire collection from the web. This takes a few minutes, but afterwards you will never have to return to this web tab except to check for updates.
As an alternative to icon view, you can choose to view the objects in list form. This displays status icons indicating which objects you do and don't have in your local set, and which are new
on the web.
Tree Contents
Scenery
Named folders of scenery objects
What's New
Recent additions to the web collection; see What's New.
Tree Menu
Open
Refresh
Find...
Open folder to show subfolders or files
Re-download scenery folder. Dimmed on parent or root folder of tree.
Search for name or filename. See Search.
Find Next
Go to next hit after Find
Download All...
Download and install all scenery objects within the selected folder and subfolders.
Download Missing Items...
Clear Download Cache
What's New Settings
Look at all scenery objects within the selected folder and subfolders; if some on the web are not yet
installed on your local machine, download and install those
(on Scenery folder only) Remove local cached files, force re-download
(on What's New folder only) Set cutoff date; see What's New.
List Menu
Open
Icon View
List View
Download selected scenery folder, then switch to local tab
Show scenery objects as icons
Show scenery objects in list form, with status icons (see Status Icons)
Scenery Properties: Line
Line border properties of the selected scenery object(s). Called from Properties on the scenery context menu.
See also: Editing Scenery Properties, General Scenery Properties, Background Properties, Text Properties.
This dialog sets properties of the line bordering the scenery object. If multiple objects are selected, this dialog sets
the same line properties for all. If you do not want the object outlined, set its line width to zero.
Dialog controls:
Color
Color of the
border line.
To change the
color, click the
colored button
to bring up the
Colors dialog.
Choose or adjust the color using either tab
of the dialog.
Width
Width (thickness) of the border line, in
pixels. Set width to zero if you do not want
a border line. Maximum width is 8 pixels.
Style of the border line: solid, dashed,
dotted, etc.
Pattern
Line styles apply only to lines of width 1. If
a different width is chosen, the Pattern
menu is not available. (This may change in
the future).
Scenery Properties: Text
Text properties of the selected scenery object(s). Called from Properties on the scenery context menu.
See also: Editing Scenery Properties, General Scenery Properties, Background Properties, Line Properties.
This dialog is used to add text to an object and specify its style. You may enter a single line or multi-line block of
text to be displayed in the box, aligned left, right, or center. If multiple objects are selected, the text is applied to
each individually. If a grouped object is selected, the text is displayed on top of the group.
Dialog controls:
Show text
Check this box to have text displayed on
the object. In order to see text on the
object, you must both check this box and
enter a text string.
If this box is unchecked, the rest of the
dialog is inactive.
Text
The text string to be displayed on the
object. Enter whatever you want it to say.
Click to
bring up
the Font
dialog to
change the
text font
and style.
Change the
settings so the sample looks the way you
want, then click OK.
Font
The fonts shown in the dialog are those
available on your machine. They may not
display the same way on another machine.
The size you choose is not meaningful in an
absolute sense -- see note below regarding
text sizes.
Note: in the current version, not all features
in the Font dialog are working. For
example, choosing Strikeout or Underline
has no effect.
Color
Click to choose
a text color.
Click the
colored button
to bring up the
Colors dialog.
Choose or
adjust the color using either tab of the
dialog.
Align
Choose Left, Center, or Right to position
the text horizontally within the box.
Specifies how to handle text in a rotated
object.
Rotate text with image
If this box is checked, text is rotated to the
same orientation as the object, as if it were
painted on the rooftop -- this is shown in the
picture above.
If the box is unchecked, text is displayed
horizontally, regardless of whether the
object is rotated -- like a label on a map.
This option applies only to single-line text.
Wrapped text cannot be rotated.
Check this box if you want the text to be
displayed on multiple lines, wrapped to fit
within the box.
This option is incompatible with text
rotation. If you choose to wrap text, the text
will be displayed horizontally.
Wrap Text
When Wrap Text is on, you can manually
enter a carriage return into a text block by
entering the characters "\n" (backslash n).
This will cause a break between lines at the
indicated point. For example, this would
give a two-line note:
line one\nline
two
Track Checker
For testing track and reporting layout condition. Called from menu commmand Tools > Check Track.
The Track (Layout) Check dialog checks your layout for track and train errors. Use this dialog to check for mistakes while you are drawing a layout, or after
the drawing is finished.
Four columns are shown in the list box:
●
●
●
●
Condition: what the line is reporting -- error, external link, required car collection
No.: the track or junction number where the error occurred. This item is blank for conditions other than track errors. Double-clicking on a row has
no effect unless there is a track or junction number associated.
Details: nature of the error, name of the linked file, or other information
Extra: when applicable, an additional bit of information depending on the condition. For example, "superimposed junctions" shows one of the two
junctions in the No. column, the other under Extra.
The dialog not only reports errors, but helps you fix them. When you double-click a numbered item in the list, it zooms in and highlights the track or junction
in error. The dialog is modeless, so it stays up while you fix errors.
In addition to reporting errors, the Layout Check dialog reports if your layout has any links to external layouts, or requires any car collections not normally
installed. This information can be useful if you are planning to publish the layout.
Dialog controls:
Displays errors and external links.
[list box]
If an error has a number in the No. column, you can double-click that line to zoom in and
highlight the error area.
Refresh
Click to repeat the track check, for example after you have fixed an error. The layout is
rechecked and a new list of errors presented.
Repair IDs
Click to repair Duplicate ID errors.
Track Errors
The comprehensive list of errors reported by the track checker are listed here. Many of these are designated "internal," meaning they are program errors a
user should not see unless the layout has been corrupted.
Unspecified error
Object flagged for delete
Invalid object ID
Unretrievable object
Invalid junction number on track
Same junction number on both ends of track
Bad track length
Invalid station number
Object has zero space
Jxn has no tracks
Invalid track number on junction
Superimposed junctions
Invalid radius
Station is missing name
Tracks superimposed
Endpoint on track but no junction
Duplicate ID
internal
internal
internal
internal
internal
internal
usually means there is an invisible track of zero length
track references a non-existent station
track or circle is defined at a point
a junction exists but has no tracks connected to it
junction references a non-existent track
two junctions are very close together
internal
a station has been defined with a blank or empty name
two sections of track share the same line
one track almost meets another but does not connect
two cars or trains have the same ID
Most of these errors are rare. The two most common are illustrated in the diagram above:
●
●
Endpoint on track but no junction (see right-hand red circle in diagram): one track endpoint lies near another track but doesn't quite
touch it. Normally this indicates you meant to create a switch but didn't quite. The fix is to use the Edit tool, pick up the stray end, and drop it
carefully on the other track.
Superimposed junctions (left-hand circle): means two junctions are very close together. Normally this means you meant to have a single
junction but accidentally created two instead. The fix is to move one junction on top of the other, so they fuse into one. In the diagram, the problem
is that there is a tiny piece of stray track; the fix is to delete it.
If you get other errors and can't figure them out, drop us a note and send the rrw file. Most problems can be fixed by editing the rrw file, as a last resort.
Layout Publisher
For copying layout components to an output folder. Called from menu command File > Publish.
Publishing a layout means preparing it for delivery to other users: checking for errors, gathering the layout and
image files in one place, giving the files uniform names, creating a thumbnail image, and other steps.
The job is done in this dialog. It does not modify the original layout, but makes a new copy in a different location.
The new copy is activated and remains open after publishing. If you edit properties in this dialog, the changes will
apply to the published copy only; an alternative is to edit the properties of the original before publishing.
Three files are created when you publish a layout: <name>.rrw, the layout file in xml format; <name>.jpg [.gif, .bmp,
etc.], the background image file in a graphics format; and <name_T>.jpg, a thumbnail image of the background.
To publish a layout:
1. Inspect the Notes box. If errors are reported, cancel the dialog, fix the errors, and try again. If the layout
has links to external files or car collections, you should publish those too.
2. Inspect and edit Name and Comments. These should be made presentable for other users. If the comment
box is empty, you should add descriptive information and author name. You might consider doing this to
the original layout instead of here -- cancel this dialog, edit in Layout Properties, then publish.
3. Choose an output folder. You do not need a new folder for each layout -- typically you have one output
folder where you put all published layouts. If this layout has already been published to the output folder,
you are prompted to confirm overwrite.
4. Inspect the output filename. Keep this name simple but descriptive. Warning: if there are other layouts with
links to this one, changing the filename will break the connections.
5. Click Publish. The new published layout is created, and the dialog is dismissed.
6. If you want to send the layout to another user, zip the three files created in the output folder.
Dialog controls:
Name
Name of the layout. This can be any name you like.
Changing the name here will affect only the published
layout, not the original.
Comments
Description and author. If this box is blank, please provide
some information to be included in the published version.
Input file
Full pathname of original layout file. This file is not
modified by the publish operation.
Output folder
Destination for the published layout. Three new files will
go in this folder. To select a new output folder, use the
Browse (...) button.
Output file
Name to be given to the published layout file. This is
usually the layout name plus rrw extension.
Notes
Errors encountered while processing, list of external links,
if any.
Publish
Click to carry out the publish operation.
Cancel
Click to abort without publishing.
Scripting
You've worked out a particularly elegant sequence of moves in a dense yard, and you'd like to remember it so you
can show it to your fellow operators on club night. TrainPlayer can helpby letting you capture, program, and play
back operations using "scripts," little programs written in a language designed for running trains.
The program is delivered with several pre-scripted layouts. If you want to see scripting in operation, open one of
these, click Play, and watch the show. To go deeper and develop your own scripts, work through this chapter.
About Scripts
Playing a Script
Recording a Script
Developing a Script
Command Reference
Web Layout Chooser
The web layout chooser is for downloading layouts from the web. You must have a live internet connection while using this chooser.
For general information about choosers, see Choosers.
To Download a Layout
The web layout tree shows layouts available for download from the web. The folders you see in the tree may show the entire collection, or a subset of it, depending on the license you
purchased.
1. If a folder has a + sign next to it, click to expand it and show its subfolders; if not, click the folder to show its contents in the list window.
2. Click a layout in the list to see its preview. This requires a short download.
3. If you like the layout and want to use it, click Download to download it and add it to your local collection. The dialog then switches to the Local Layout Chooser so you can open the
layout.
The downloaded version will go into the same folder in your local tree as its folder on the web. For example, in the above illustration, if you clicked Download you would get a copy of
"Benjamin's Room" deposited in your local Layouts folder under Standard\User.
Tree Contents
Demo
Sample layouts for use with free demo version
British
Layouts for UK users
Standard
Large collection of user-submitted layouts
Layouts101
All plans from Linn Westcott's book 101 Track Plans for Model Railroaders
Premium
Large collection of professionally-designed layouts; requires Premium license
Featured Layouts
Contents of special folder on web, updated frequently
What's New
Recent additions to the web collection; see What's New.
Tree Menu
Open
Refresh
Find...
Open folder to show subfolders or files
Always dimmed in this web chooser
Search for name or filename. See Search.
Find Next
Go to next hit after Find
Download All...
Download and install all layouts within the selected folder and subfolders.
Download Missing Items...
What's New Settings
Look at web layouts within the selected folder and subfolders; if some on the web are not yet installed on
your local machine, download and install those
(on What's New folder only) Set cutoff date; see What's New.
List Menu
Open
Refresh Thumbnail
Download selected layout(s), then switch to Local tab. Works over multiple
selection.
Redownload thumbnail image
Web Sound Chooser
The web sound chooser is for downloading sounds from the web. You must have a live internet connection while using this chooser.
For general information about choosers, see Choosers.
To Download a Sound
A web sound chooser shows a subfolder of sounds available on the web; which folder depends on whether you are choosing an engine horn sound or a layout sound.
1. Click the folder in the tree to show the list of sounds it contains.
2. Click a sound in the list to select it.
3. Click the icon on the right to hear the sound.
4. If you like it, click Download to download the sound and add it to your local collection. After the download, the chooser switches to the Local Sound Chooser and highlights the
downloaded sound.
Engine running sounds (steam chuffs, diesel grinds) are available on the web, but not through a chooser. These are
downloaded when you choose Download from the Running menu in Train Properties, shown at right. You only see this choice
on the menu if there are running sounds on the web you do not already have in your local collection.
Tree Contents
Sounds\Loco
Engine horn, bell, whistle sounds. Shown when chooser is called from "Other..." on Horn menu in Train Properties.
Sounds\Layout
Sounds to play when the train passes an area on the layout. Shown when chooser is called from Sound browse button in Station
Properties.
Tree Menu
Open
Refresh
Find...
Open folder to show subfolders or files
Always dimmed in this web chooser
Search for name or filename. See Search.
Find Next
Go to next hit after Find
Download All...
Download and install all sounds within the selected folder and subfolders.
Download Missing Items...
Look at all sounds within the selected folder and subfolders; if some on the web are not yet installed on
your local machine, download and install those
List Menu
Open
Download selected sound and switch to local tab
For more information about sounds, see Horns and Sounds; also Stations.
The Train Toolbar
This page is obsolete. The Train Toolbar has been replaced by the Train Control Bar.
Script Central - Junction Actions Tab
For viewing and editing junction action scripts. See also Script Central Tabs.
This tab shows a list of all junction actions on the layout. If there is more than one action at the same junction, they are listed separately and
given different id's. When this tab is active, a junction on the layout is highlighted to match the selected item in the list.
List contents:
ID
Junction
Trigger
First Line
Unique program-assigned id for each action.
ID of junction where action is attached.
Trigger type, direction, and identifier if any; as specified in Junction Action Editor.
First line of action script.
Actions:
Click list item
Double-click row
Right-click row
Text window
Selects action script and displays it in the text window. The corresponding junction on the layout is
highlighted.
Brings up Junction Action Editor for editing and viewing script.
Brings up context menu, commands as listed below.
Text is editable. Text is in code style: fixed-size font, no wrap. Changes are saved on clicking OK or
Apply or on changing tabs.
Context menu:
Edit in JA Editor
Delete
Enabled
Brings up Junction Action Editor for editing and viewing script.
Deletes action and removes from the list.
Check to enable action, uncheck to disable. When disabled, no cars or trains cause action to trigger.
Refresh
Rebuilds list; sometimes needed if changes have been made externally
About Scripts
Scripting is a means of automating railroad operation. A script is a set of instructions attached to a train, telling it where
and how to travel. You can create a script by typing instructions, or by recording train moves, or a combination of both.
When you run the script, the instructions are executed and the train moves accordingly. While one or more trains is
being run by script, you can be operating others manually.
Several script-related devices are shown in the screen shot below. Under the Train menu is a Script submenu, with
functions duplicated on the Script toolbar. Choosing Edit brings up the Script Editor, where you can enter commands or
watch them execute. As the script runs, status messages are shown in the Schedule window.
All these devices are described in this chapter.
Playing a Script
In a well-scripted layout, you should be able to open the file and simply click Play to start the action. Try this using
one of the demo scripts, then read below about some of the finer points.
Watch the demo
TrainPlayer has a few scripted layouts in the installed set, and a few more on the web. Try the Cerro Azul RR, a
long-time favorite of switchback and mountain railroad fans. To see the layout in action, choose "Cerro Azul with
script" (No. 47) from the Layouts dialog, as shown here.
Whenever you open a layout having a script, you are notified by the word SCRIPTED on the status bar, and an alert
informing you that there is a script:
To play the script, click the
Play button on the dialog. The Schedule window comes up and the script begins
operating. Sit back and watch. If all goes well, a switcher engine will deliver empty hoppers to locations on the
mountainside, and return with two gondolas full of ore.
Edit button. The Script Editor comes up, where you can view the script, edit it, play,
To learn more, click the
stop, or rewind it, watch the commands as they execute. Most scripts have comments at the top describing the
operations to be carried out -- for a challenge, try running through these operations yourself before playing the script.
Check "Don't show this message again" if you do not wish to see this alert on opening a scripted layout. You can
bring it back if you change your mind later; do this using the "Show script announcement" checkbox in the Advanced
Scripting Options dialog.
Stop on the toolbar, or press ESC. To resume where you left off, click Play again. To
To stop the script, click
start over at the beginning, click Rewind, then Play.
The Script Toolbar
After you have seen the Scripted Layout alert a time or two, you can dismiss it and use the
Script toolbar instead. Buttons work as follows:
●
Record: begin recording. Button turns red when recording, green when playing back. Clicking this
button while recording has the same effect as clicking Stop. Button is dimmed if selected train has no
engine, and thus cannot be scripted. If the selected train has no script, Record will create one; if there is a
script, recorded commands will be inserted into the existing script after the current command.
●
●
●
●
Rewind: move all trains, switches, and script back to starting positions. This command applies to all
trains and all scripts. For more information, see Rewind Points.
Stop: when playing back, stop train and script instantly. When recording, stop recording, do not stop
train.
Play: begin playing script at current command. Button is dimmed if no script is available to play.
Edit: open Script Editor window for the script on the selected train. This button is dimmed if the
selected train does not have an engine.
Stop and Play buttons on this toolbar and on the Scripted Layout alert apply to all scripts of the layout -- clicking Play
starts them all. This is different from the corresponding buttons in the Script Editor, which start or stop just the active
script.
When you click Stop, trains do not coast to a stop -- they stop instantly. If you then click Start, the trains will pick up
where they left off, but not instantly -- they come up to speed as usual.
Play a script
If you tried the demo, you basically know how to play a script. This section contains additional notes and details.
To play a script:
1. Open a scripted layout. Before you can play a script, you must open a layout which has one. If a
layout has any scripts at all, it will display SCRIPTED on the status bar. If you do not see this, then there are no
scripts you can play.
2. Locate a scripted train. There can be more than one script per layout, each associated with a
particular train. To see which trains have scripts, view the Train Tree and look for (s) next to a train name.
3. Examine the script. Even if you're not planning to edit a script, you might want to take a look at it. For
one thing, it might begin with comments telling what it is supposed to do. To view the script, click Edit Script in the
alert dialog or on the toolbar, or choose Train > Script > Edit. If the selected train does not have a script, this action
creates a new script. For details about the Script Editor, see "Developing a Script."
4. Rewind. A script will not start correctly unless trains are in the expected positions. The Rewind command
puts them there. If you have moved some trains around, click Rewind to put them in place before playing the script..
5. Play. To begin playing a script, click the Play button on the alert dialog or the toolbar, or choose Train > Script
> Play. The recording light on the toolbar turns green, the Schedule window comes up, and the script begins.
6. Stop. To stop or pause, click Stop on the toolbar or press ESC. Both the script and the train stop
immediately. To resume, click Play, or to start over, click Rewind, then Play.
7. Drive. You can operate trains while a script is running, including operating a scripted train. However, if you
obstruct or tinker with a train being driven by a script, the script is not likely to run correctly afterwards.
Recording a Script
The easiest way to develop a script is by recording. Press Record, operate your layout a while, press Stop, and you
have a playable script, captured as you were driving. Click Rewind, then Play, and you can sit back and admire
your moves. If you have the Script Editor on display, the commands appear as they are being recorded, and
afterwards you can edit them in the same window.
To record a script:
1. Get in position. Put the trains where you want them, then use File Save or Save As to store the
arrangement in the layout file. When you distribute a script, its starting point should match the train positions when
the layout file is opened.
2. Practice. Plan your operating scheme, maybe go through some of the moves, so you can do them
smoothly while recording. You can work out one sequence at a time, record it, then go on to the next.
3. View the window. If you want to follow along, bring up the Script Editor before you start recording.
While you're at it, you might enter comments indicating what operations you plan to carry out. Include car IDs in
these comments so the program can highlight the indicated cars.
4. Begin recording. Click the Record button on the toolbar. It turns red, and the recorder is now running.
But take your time -- this is not a tape recorder, there are no wheels running, it doesn't actually record until you do
something.
5. Operate. Operate as you normally would, using mouse and keyboard. The recorder captures speed and
direction changes, uncouplings, switch throws, and turntable rotations. Recording is not time sensitive, so if you
pause between moves, it will not affect playback.
6. Stop or pause. Click the Stop button on the Script toolbar. Recording will stop. You can then rewind and
play back what you recorded, or click Record again to continue recording where you left off, or both.
7. Save the recording. To save the recorded script, save the layout. There are other methods too,
described below.
8. Edit. The recording mechanism is not perfect, nor probably were your operations. To make repairs or polish
the script, you can edit it by hand, or record over bad sections. Both require some familiarity with the command
language; read on.
Developing a Script
Developing a script by hand is an exercise in programming. It's not for everyone. But the language is not hard to
understand, the program provides tools to help with the job, and if you're a model railroader then you are likely to be
of a do-it-yourself mindset, so why not give it a try? With a little practice you can type out a whole series of
operations in a few minutes.
A script is a series of commands, stored in a text file. Each command carries out an operation you would normally
do with the mouse: sets the speed, changes the direction, throws a switch, etc. Most commands are preceded by a
wait condition telling the command when it should execute, say when the train gets to a certain spot. When the
script runs, it starts at the first line, waits until the first condition is met, executes the first command, goes to the next
line, and so on. A line without a wait condition executes the command immediately.
As an example, say you are operating a loco in a yard, and your job is to pick up a car from the adjacent track. You
would crank up to a slow speed, pull forward past the switch, stop, throw the switch, back up until you couple, then
stop. In a script, this sequence of operations would look like this:
speed 5
after J22 stop
throw J22
reverse
speed 5
on couple stop
The speed command gets the loco underway and accelerates to 5 MPH. After it passes the switch labelled J22, the
stop command is executed, and the loco decelerates to a stop. Switch 22 is then thrown to its alternate position,
the loco goes into reverse, accelerates to 5 MPH, continues on until it couples with something, then stops.
If this makes sense to you, then you're ready to write scripts. Refer to the reference section for details about
command syntax, read the next parts about tools to make the job easier, then start typing some commands into the
Script Editor and see if you can make something happen.
The Script Editor
The Script Editor consists of a few buttons and a text box. The text box is for viewing and editing the script. The
top three buttons are conveniences -- they work the same way as the corresponding buttons on the script toolbar.
The Advanced button brings up a dialog of advanced scripting options, described in a later section.
Each script has its own editor window. When you click Edit Script, the window and script which come up are for the
current train. To see a script for a different train, select the train and click Edit Script again.
Tooltips
In developing a script you will need to know the numbers of tracks,
junctions, turntables, and cars. TrainPlayer 3 makes these available
via tooltips.
To use tooltips:
1. Enable tooltips by making sure Tools > Show Tooltips is checked.
2. If the Run tool is active, you see a tooltip when you hover the
mouse pointer over a car or a switch. If the Track or Edit tool is
active, you also see tooltips over track sections, turntables, and non-switchable junctions.
3. If a tooltip does not show up, it may be because a dialog or other window has the focus. Click anywhere in the
layout window so it becomes active, and try again.
Click To Insert
When developing scripts by hand, you often need to enter
junction or switch numbers and positions. TrainPlayer can
do this for you when you right-click a junction or switch.
With the Script Editor window visible, and the edit cursor
positioned where you want the insertion to go, right-click
and choose one of:
●
●
●
Insert junction number: inserts J followed by the
number of the switch or junction. This is typically used when entering an AT or AFTER condition to cause an
action at a junction.
Insert throw here: inserts THROW followed by the switch number, followed by the current switch position,
then carriage return. This will ensure that the switch goes to its current position when the script executes
that statement.
Insert throw alternate: inserts THROW, switch number, then the other position of the switch, i.e., where it
would be if thrown. This is a shortcut for throwing the switch, then inserting "throw here."
Go To Statement
If you right-click a line in the script text window, the menu includes a command Go To Statement. This means
advance the script pointer to this statement, so the next time you begin playing, it starts here.
This is not quite as handy as it sounds. Moving the script pointer does not move the trains, so unless the trains are
in the right places, starting the script from an arbitrary statement will not work well. However, there is a detail which
can get around this in many cases: if the line you select has a position indicator -- an AT (T,J,D) wait condition
specifying a precise location -- then the train will jump to that location when you choose the command. The train
and script will be in synch, and playback will work as expected.
But there is another detail. This is not a rewind. The train which jumps is the current train, with its current consist of
cars. If you have done some coupling or uncoupling since the script ran past that statement, then jumping back to it
may not restore the original arrangement.
Rewind Points
In the context of TrainPlayer, "rewind" means "set up the trains in preparation for an operating session." Normally
when you open a layout file it is already in this situation -- everything is in the right place to start, so you can just hit
Play. Now suppose you play the script partway through, lose interest, and decide to do a bit of track repair. You
move some track around, then save your changes.
Oops.
At this point the trains are in random positions. If you overwrote the original file, you lost data about where they
were, and you no longer know where the rewind should go. The script will no longer work.
To deal with this, TrainPlayer has the concept of a "rewind point." This is a snapshot of the positions of all movable
objects: trains, switches, and turntables. You can save a rewind point to a file, play with the trains a while, then
retrieve the file to put everything back the way it was. These actions are done with the Save and Load buttons in
the Advanced Scripting dialog.
A rewind point is saved automatically the first time you play or record a script. It is carried around with the layout,
and saved in the layout file. This means you can save the layout with trains in random positions, and you will still be
able to rewind to the initial point.
If you change your mind about the starting locations and want to move them around a little, use the Reset button in
the Advanced Scripting dialog. Reset erases the current saved rewind position, so the next time you begin to play
or record, a new one is created. Caution! If you carelessly erase a rewind point and don't know where the trains
need to go, you could render the script useless.
Advanced Scripting Dialog
Clicking the Advanced button in the Script Editor brings up a dialog of useful buttons and options for script authors.
●
●
●
●
●
●
●
Train and switch positions: click Save to save the current situation of all trains, switches, and
turntables to a file in xml format. Click Load to read and return to a saved situation. This is handy when you
need to return moving objects to where they were at some point in the script, without saving the entire
layout.
Toggle IDs of affected cars: if the comments at the top of a script include any car ID's, then
this button will toggle the display of ID's on those cars. For example, in the block of comments entitled
"Daily Ore Run on the Cerro Azul" (see screen shot at top of page), six cars are identified by their IDs -click the Car IDs button to show or hide labels on those six cars.
Erase starting position: click Reset to erase the rewind point associated with the layout, so that
a new one will be created the next time you start the script. This is an advanced feature, to be used with
caution. For details, see the section about Rewind Points.
Save scripts to layout file: click Update to save modifications you have made to scripts, but
save no other aspects of the layout. For more info, see notes.
Show script announcement on opening layout: display an alert when a scripted
layout is opened. This brings the alert back if you chose "do not show again" at some point in the past.
Echo script comments in schedule window: display in the schedule window all
commented lines as the script runs. This option can also be changed by right-clicking in the schedule
window and choosing "show script."
Use autopause in all playback: act as if "autopause 2" has been inserted at the top of every
script, generating 2-second pauses at stops, reverses, etc.
Notes
1. A situation file saves not only train positions, but also train and car properties. If you change a property of a
car or train -- say its name or label -- then restore a previously-saved situation file, your changes will be lost.
2. What the Save Script button does is take the current set of scripts and implant them into the layout file,
replacing the previous set of scripts while leaving track, train, and other data intact. This is useful during
script development, when you want to save your text edits often, but not keep overwriting the layout file with
trains in random positions.
Script Command Reference
The TrainPlayer Script Language is designed for simplicity and readability. It consists of just a small vocabulary of commands and conditions,
but also allows access to any item on any menu.
An instruction consists of one or two clauses:
[wait-condition] [command]
where a wait-condition pauses script operation for a certain period of time or until a given event occurs, after which the command is executed
and the script proceeds to the next line.
Both parts are optional, but at least one must be present. If a wait condition is not given, the command is executed immediately. It a command
is not given, then once the wait condition is satisfied, the script goes on to the next line.
Blank lines in a script are ignored, as are comment lines beginning with asterisk, double backslash, or pound (* or // or #) followed by at least
one space. Commands in scripts are case-insensitive.
A wait condition starts with AT, AFTER, or ON, followed by a clock time, junction number, station name, or keyword. When a script is running
and a wait condition is encountered, the train continues moving, but the script does nothing further until the given event occurs or the specified
time elapses. When that happens, the script goes on to the next command or next line and continues executing.
Commands
command
action
notes
Forward
set direction to forward; no effect if train is already going forward
Reverse
set direction to reverse; no effect if already in reverse
Speed <mph>
set speed to value in mph; begins moving if stationary
Stop
decelerate to a stop
Uncouple <slot>
uncouple at slot (1=behind first car, 2=behind second, ...)
Uncouple <car>
uncouple between car and engine
Uncouple <car> <car>
uncouple between pair of adjacent cars
Throw <jxn> [pos]
throw switch; if position is specified, throw to that position
Set <var> <value>
set system variable to value
1,2
1,2
1
1,2
1,2,3
1,2,3
1,2,3
4,20
5
<label>:
word ending with colon is a label for goto
6
Goto <label>
jump to statement after label
Autopause <secs>
pause specified number of seconds on certain events
Echo <string>
display string in schedule window
Rotate <ttbl> <jxn>
rotate turntable to specified junction
Train <train>
select specified train
6
7
8
9
21
Wait Conditions
condition
waits until
notes
AT <jxn>
lead car of train crosses junction
10
AT <(t j d)>
lead car of train crosses exact spot (dist d from jxn j on track t)
AT <h:m[:s]>
specified time is shown on layout clock; h:m required, secs optional
AT <station>
lead car of train enters named station
AFTER <jxn>
last car of train crosses junction
AFTER <(t j d)>
last car of train crosses exact spot
AFTER <h:m:s>
specified actual time has elapsed on wall clock
AFTER <station>
last car of train leaves station
ON STOP
train comes to a complete stop
ON COUPLE
train couples with another car
ON THROW <jxn>
specified switch is thrown by any means
ON TABLESTOP
turntable finishes rotating
ON KEY
user presses any key
10, 19
11
12
10
10, 19
11
12
13
14
15
16
17
Definitions
symbol
definition
notes
jxn
number of junction or switch; may be preceded by J
(t j d)
exact position: on track t, d percent of the way from jxn j
h:m:s
hours:minutes:seconds on 24-hour layout clock or wall clock
18
19
11
station
name of a station on the layout
mph
speed in miles per hour; metric not available
slot
car position within train: 1=behind lead car, 2=behind 1, etc.
car
car identifier, as shown in label box of car props or by show car-ids
pos
switch position: 0 or 1 for normal switch, higher for multi-way
var
variable name as found in settings section of registry
value
value of settings variable
label
line of script to which a goto statement may jump
secs
seconds to pause after stop, reverse, couple
string
any string of text; quotes not required
ttbl
number of turntable, as shown by tooltip or properties
Examples
statement
description
at 15:30 speed 10
when clock says 3:30PM, set speed to 10MPH; start train if not moving
after 0:0:10 stop
wait 10 seconds, then stop train
at J35 throw 99 1
when train crosses junction 35, throw switch 99 to the 1 position
on couple forward
after coupling occurs, set train direction to forward
after edville speed 40
after last car of train leaves Edville, accelerate to 40 MPH
uncouple B13
uncouple on side of car B13 closest to engine
uncouple B05 F12
uncouple on side of car B05 closest to car F12
echo "reached harbor dock"
print string in schedule window
autopause 3
from this point on, pause 3 secs after every stop, uncouple, or direction change
set AccelFactor 20
set the global acceleration factor to 20
rotate 321 96
rotate turntable #321 until its bridge track hits junction #96
3
3
20
5
5
6
7
8
9
Notes:
1. Command applies to the train being driven by this script
2. When autopause is in effect, a pause is inserted before and/or after this action
3. Uncouple can be specified by a single integer, giving a "slot position" relative to the lead car. This varies with the train's direction, so is
confusing and not recommended. Better to specify a single car ID -- the car uncouples from whichever neighbor closer to the engine -or ID's of two coupled cars, which uncouple between them.
4. THROW with no position throws a switch to its next position, as when you click it on the layout. To throw to a specific position, use
tooltips to identify the desired position (usually 0 or 1) and include that in the command.
5. SET is an advanced command for changing program preferences from a script. The variable name is any name from hkcu\Software
\TrainPlayer\TrainPlayer\Settings, and the value is whatever value is accepted by that variable. Details are not documented. Most are
true/false (1/0), strings, or numeric values. For more info, write support.
6. GOTO jumps to the named label, which must appear elsewhere in the script. A label is a word followed by a colon on a line by itself.
7. AUTOPAUSE causes a delay of the given number of seconds before and/or after these operations: forward, reverse, stop, uncouple.
The effect remains in effect until another autopause command. To cancel, enter autopause 0 (zero). An advanced preference can be
used to have "autopause 2" in effect for all scripts.
8. ECHO prints a string of text to the schedule window. An advanced preference can be used to automatically echo all comment lines to
this window.
9. ROTATE takes a turntable number and the number of a junction on its rim. It begins rotation of the table until the bridge track hits the
specified junction. Rotate should be followed by ON TABLESTOP if you need to wait until rotation ends before proceeding.
10. A car crosses a junction or track position when its midpoint crosses, not its leading or trailing edge. By the time it crosses, it is too late to
throw that switch, i.e., "AT J35 THROW J35" will not work.
11. AT <TIME> waits until the layout clock reaches the specified hour, whether or not the clock is on display. AFTER <TIME> is a way of
waiting a while in real time before continuing.
12. AT/AFTER <STATION> happens when the lead or last car enters or departs a station. This occurs when the car crosses the rectangular
area of the station. To see station areas and names, click the Station tool. Two-word station names must be surrounded by double
quotes.
13. ON STOP waits until a train has coasted to a stop. This usually follows a stop command, so next command doesn't start while the train
is still decelerating. Has no effect if train is already at a stop.
14. ON COUPLE waits until the current train couples with another. The script is then operating the enlarged train.
15. ON THROW is a way to coordinate activites of two scripts. One can be waiting for a throw of some arbitrary switch, and the other can
throw it when the time comes.
16. ON TABLESTOP waits until a rotating turntable stops. You do not specify a turntable number, so only one can be rotating at a time.
This condition usually follows a rotate command.
17. ON KEY pauses until the user presses any key. This should be preceded by an echo command indicating that the script is waiting for a
key, otherwise the user will wonder why the script it stalled.
18. In most commands and conditions, a junction number may be preceded by J for readability. The exception is in a (t j d) position indicator.
19. (T J D) indicates an exact position on the layout. T is the number of a track section, J a junction at one or the other end of T, and D a
distance, in percent of the length of T. An optional "r" after D can be used to indicate which direction the train should be headed at this
position (used when repositioning a train in a Go To Command action). For example, if the junctions at the end of track 6 are numbers
10 and 12, then (6 10 40) is a point 40% of the way along the track starting at the 10 end. Expression must be enclosed in parentheses.
Values may be separated by space or comma. Junction number must not be preceded by J.
20. A switch position is 0 or 1 for a normal two-way switch, or a higher value for multi-way switches. The value corresponding to a particular
configuration must be determined using a tooltip. Or you can use an insert command to let the program determine the value and insert it
into the script.
21. The TRAIN command was introduced in Version 4.2. It selects a specified train as if you had clicked on it. The argument can be (a) a
train name, (b) a numeric train id (as seen in the Train Properties dialog), or (c) the car-top label of any car, in which case the train
selected is the one containing that car. Examples:
train Broadway Local
selects train named "Broadway Local"
train 44
selects train with id=44
train X68
selects train containing car X68
Menu Commands
The set of commands available for scripting is not limited to the commands listed above. Any command on the menu can be used in a script.
Executing a menu command from a script causes the same action as choosing it from the menu.
To specify a menu command, enter the names as they appear in the menu, starting with a main menu item (File, Edit, etc.), followed by a
submenu item (File Open, Edit Copy, etc.) and a third if the menu goes deeper. If an item at any level consists of more than one word, the item
must be enclosed in quotes.
As a shortcut, you do not need to spell out all the words in full. You may abbreviate a menu item to its first few characters, just enough to
distinguish the command from others. For example, "view toolbars customize" may be shortened to "vi to cu."
Popup menu items are available also, Car, Layout, Switch, Turntable, Track, Circle, Horn, Station.
Many menu commands do not make sense in the context of a script. Some bring up dialogs, which are not scriptable. Some duplicate functions
available using Train Commands. Some are toggle switches, but since a script does not have a way to know the current setting, results are
unpredictable. Context menus often need to reference a point on the layout -- where you right-clicked to bring up the menu -- but since a script
cannot supply this, context menus may do nothing or work unpredictably.
Menu Command Examples
file save
bring up File Save dialog to save the current layout
view "zoom in"
magnify view
view tool cust
bring up Tools Customization dialog
car "add car" reefer
insert a refrigerator car at current insert point of selected train
tools "enable yard mode"
turn on Yard Mode operation
train new
create new four-car train at default location
window "tile horiz"
if multiple document windows are visible, tile them
train freight1
select train Freight1
train speed double
double speed of selected train
Script Editor Advanced Options
For setting advanced scripting options. Called from Advanced button on Script Editor dialog.
This dialog provides tools for use mainly when developing scripts, but some are useful apart from scripts too.
Dialog controls:
Saves a snapshot of the current locations of all trains
and the positions of all switches. This data is saved in a
small xml file, not useful for anything except restoring
with the Load button below. An alternative is to save the
entire layout.
Save situation
The xml file by default is saved alongside the rrw, with
"_situ" appended to the name.
The Save/Load Situation feature is not just for script
authors. Anyone doing operations might find it handy to
save a situation before a series of moves, and later
return to it.
Opens a file saved by the Save button above, and
restore all trains and switches to the saved positions.
Load situation
Cautions: if the layout has been modified since the file
was saved -- for example, tracks deleted -- the results of
the load are unpredictable. Do not load a file saved
from a different layout. If you have made changes in
trains or cars, they will be lost upon loading.
Erases the situation you go to when you rewind a script.
A new one will be established the next time you start the
script.
Erase starting position
The first time you start a script, a snapshot of the
situation is automatically taken so you can later rewind
to it. This snapshot persists between sessions, and is
never deleted or updated by the program. It can
become obsolete if you make changes to track or trains
-- these changes are not saved in the rewind point, and
so will be lost when you rewind.
In short, if rewind does not do what you expect, use the
Erase button.
Updates the scripts portion of the current layout file with
the current text of all scripts.
Save scripts to layout
When you edit a script, the changes are not normally
retained until you save the layout file. This saves not
only the scripts but also the track, trains, switches, etc.
When you are editing scripts, you may wish to save your
edits without overwriting the full layout file; the Update
button serves this purpose.
Turns on or off IDs on cars mentioned among the
comments at the top of the active script.
Toggle IDs
This is useful when you are trying to understand an
annotated script. The script author can mention car IDs
in the instruction comments, so that you can use this
toggle feature to highlight the relevant cars.
Displays an alert whenever you open a layout having
scripts. The alert informs you of this fact and gives you
an opportunity to start or edit.
Show script announcement
If you uncheck this box, you will not see the alert, but
can still tell that scripts are available when you see
SCRIPTED on the status bar.
Selects whether or not to show comments in the
schedule window as a script runs.
Echo script comments
Normally the schedule window shows arrivals and
departures at defined stations. If you check the Echo
Comments box, then all comment lines from the script
will be shown in the window as they are executed. This
gives the script author a way to inform you of what is
happening as the script runs.
If you uncheck this box, no script comments will be
shown in the schedule window, just arrival and
departure data.
Determines whether scripts will automatically employ
autopause while running.
Use autopause in playback
Autopause causes the script to pause when a train is
stopping, reversing, coupling, etc. Checking this box
has the same effect as inserting AUTOPAUSE 2 at the
top of every script, to pause for 2 seconds on each
event.