1
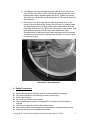
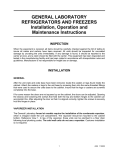
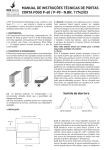
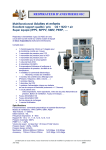
WWW.SCOOTERTEQ.COM 500 Series Power Assisted Bicycles User Manual • 500ZX • 500ZX+ Distributed in Canada by: Valuride Distributors, Inc. 4208 25th ave. Vernon, BC V1T 7G9 Ph: 250-545-6668 Copyright © 2005 Scooterteq Motor Corporation Revised 11/15/2005 -1- Table of Contents 1. 2. 3. 4. Important Instructions .......................................................................................... 3 Assembly Instructions.......................................................................................... 4 Safety Precautions................................................................................................. 5 Operation and Caution Notes ............................................................................. 6 1) Starting:.................................................................................................................. 6 2) Speed Control:...................................................................................................... 6 3) Turning:.................................................................................................................. 6 4) Using Brakes:........................................................................................................ 6 5) Parking:.................................................................................................................. 6 6) Charging the Battery:........................................................................................... 7 4. Vehicle inspection and maintenance .................................................................. 7 1) Each time before riding the vehicle: .................................................................. 7 2) Check frequently: ................................................................................................. 7 3) Brake adjustment: ................................................................................................ 7 5. Battery Care and Maintenance ........................................................................... 7 6. Main Technical Specifications............................................................................ 9 ★ Periodic Maintenance Schedule (A=Adjust) (L=Lubricate (C =Change) .......................................................................................................................... 9 Copyright © 2005 Scooterteq Motor Corporation Revised 11/15/2005 -2- 1. Important Instructions • • Safeguard your battery to insure continued high performance. It should be recharged after each use. The normal full-cycle battery life if it is continuously discharged and recharged is approximately one year, after which the storage capacity of the battery will gradually decline. If it is not fully discharged and is recharged regularly the service life of the battery will be substantially prolonged. Battery performance is influenced by temperature and is generally better in warm temperatures. When the temperature falls below 0C the battery current may decrease by one third. Consequently the travel range on a full charge is reduced in cold environments however full capacity is restored when the temperature reaches 20C. The electric bicycle has been tested with a load of 85kgs at a temperature of 25C, no wind and on a level surface without frequent braking and starting. Under these conditions the normal range using the supplied, new 36V/12Ah battery pack is over 35km on a full charge. • • • • • Frequent braking and starting, riding uphill, traveling against a stiff wind, starting from a standstill and traveling on a muddy or rugged road and carrying one or more persons or heavy goods will consume extra battery power, shortening the travel range. The following procedures can help prolong the range of the bicycle under varying conditions: Ride the bicycle manually before switching on the power supply to reduce current draw at startup. Brake and come to a full stop only when necessary. Use the pedals when going up a steep slope are against a stiff wind. When the instrument voltage indicator glows a low voltage condition is indicated. Switch to manual power and recharge the battery in order to avoid shortening the battery life. If the bicycle is being stored, remove the battery, charge it fully and recharge every 2 months. ★ The bicycle can be used in the rain however it must not be submerged in water or puddles. The controller, motor and other electrical devices may be short circuited if they are immersed in water causing the electrical cables to overheat damaging the electrical circuitry. • The rated load capacity of the bicycle is 85kg. Serious overload can damage the safety and performance of the bicycle including decreased travel range. Do not use chargers or other components other than those approved for use by this company. The company is not responsible for damage Copyright © 2005 Scooterteq Motor Corporation Revised 11/15/2005 -3- caused by the use of products not specifically designed and tested for use with this vehicle. 2. Assembly Instructions a. Remove the Scooterteq electric bicycle from the shipping box by opening the top of the box and removing the front wheel, then cut the front out of the box and roll the bike out by lifting carefully on the front cowling and rolling the bike forward on it's rear wheel. Once the bike is clear of the box have a helper put the kickstand down and rest the bike on the kickstand. Carefully slide the styrofoam block protecting the front forks of the bike down from the front forks and wedge it under the front frame of the bike ahead of the kickstand. b. Install the front wheel using parts provided as follows: From the wheel outward you need 1/2 " spacer, flat washer, Fork bracket, Retainer washer, then nut. This is the same on both sides of the wheel. Be sure retainer washer fits securely into hole on Fork bracket,and then tighten axle nuts securely. c. Remove plastic cowling covering front of handlebars by removing 2 screws on back side of handlebars and gently unclipping the two plastic pieces covering the handlebars. Hold front wheel straight while turning the handlebars until handlebars are at 90 degree angle to the front wheel then tighten the nut on the top of the stem securely with the #14 metric open end wrench provided. Replace plastic cowling over handlebars and refasten with 2 screws. d. Mount the rear trunk, carrier on the back of the bike using the 4 bolts and nuts provided. Bolts go through the bottom of the trunk from the top with the trunk in the open position, The nuts thread on from the underside of the carrier bracket. Tighten securely. e. Remove the pedals from the underseat storage area. The pedal arms are marked on the inside top with a L for left side and an R for right side pedal arm. On the threaded end of the pedals there will be one pedal marked with a stamp, the other pedal will not be marked. The pedal marked with the stamp threads on to the left pedal arm. The pedal without the stamp threads onto the right pedal arm. Tighten pedals securely on pedals being careful not to cross-thread. Attach pedals to pedal shaft on bike with hole in pedal arm lined up with ball in pedal arm shaft. f. Mirrors attach to left and right brake handles by removing hex bolt with Allen key provided. Nut on mirrors should be moved all the way to the top of the threads on the mirror, then thread the mirror into the brake handles where the bolt was removed. adjust mirror as desired and tighten nut on mirror down onto brake handle to secure. Copyright © 2005 Scooterteq Motor Corporation Revised 11/15/2005 -4- g. Front Brakes are set up by adjusting brake cable at # 10 metric nut on front left side of the bike. Loosen nut and slide cable through bolt, while holding brake calipers together against the wheel. Tighten nut securely while cable is in this position leaving clearance of 1/8" between wheel rim and brake pad. h. Rear brake is set up by adjusting the cable at the brake lever on the bottom of the rear band brake. Loosen the #10 metric nut until the cable will slide through the bolt. Pull the brake lever forward while pulling the cable back through the bolt. Tighten the nut securely in this position. Rear brake adjusted properly will lock up the back wheel while riding. Sometimes due to cable stretch rear brake adjustment will be required a second time after the brake handle has been pumped a number of times to remove any slack. Rear Brake Cable Adjustment 3. Safety Precautions ★ ★ ★ ★ ★ Before riding inspect the bicycle carefully to avoid accidents or damage. Pay careful attention to the following in order to avoid injury: Wear bright clothing. Do not drive to close to other vehicles. Obey all traffic laws relevant to the operation of bicycles and motor-assisted bicycles. ★ Use the turn signals at all times when making turns. ★ Use extreme caution at all entrances and intersections and while leaving a stop. ★ Keep both hands on the handlebars at all times. Copyright © 2005 Scooterteq Motor Corporation Revised 11/15/2005 -5- ★ ★ ★ ★ ★ ★ ★ ★ ★ Do not carry passengers aboard the vehicle. Do not brake suddenly in the rain or on slippery or wet surfaces. Clothing: Wear a safety helmet, glasses, gloves and sturdy footwear at all times. Do not wear loose clothing that can impair visibility or become caught on the bicycle. Do not carry cargo in excess of 15kg. Be certain that all cargo is securely fastened. Do not hang objects under the handlebars. When cleaning the bicycle, do not use a direct stream of water. Clean with a cloth to avoid short circuiting electrical components. 4. Operation and Caution Notes 1) Starting: a. Raise the kickstand. b. While seated on the bicycle insert the ignition key and turn it to the ON position. c. Slowly turn the throttle handle inward to start the vehicle. d. Attention: After the starter has been activated, if the rider is not seated firmly on the vehicle it can cause it to lurch forward out of control. DO NOT turn the starter switch until firmly seated with the rear wheel in contact with the ground! e. If the unit is equipped with the extended range power pack it is engaged by switch selection of the backup batteries. 2) Speed Control: a. Turn the throttle handle counterclockwise to accelerate, clockwise to slow down. b. TURN THE HANDLE SLOWLY! c. Units equipped with cruise control allow the selection of low speed or high speed operation after the electric motor has been engaged. 3) Turning: a. Move the turn signal handle to the right or left. The turning indicator will light. b. After completing the turn return the turn signal handle to the OFF position. 4) Using Brakes: a. When the brake handle is activated the vehicle will come to an immediate stop. b. Important: When the brake handle is activated power is immediately cut off to the motor. For safety purposes the throttle grip should be restored to the start position. 5) Parking: a. After vehicle use, turn off the power supply by moving the key to the OFF position. b. Lower the kickstand and insure that the vehicle is firmly in place. c. Insuring that the power supply has been turned off, remove the key. Copyright © 2005 Scooterteq Motor Corporation Revised 11/15/2005 -6- 6) Charging the Battery: a. Insure that the power supply is off. For first use open the seat cushion and remove the charger and cable. Attach the charger connector to the vehicle and the AC connector to a 120V AC power source. b. After the battery is fully charged replace the charger and cable in the storage box beneath the seat or in the rear trunk box for future use. c. If the unit is equipped with the optional extended range power pack this will be charged simultaneously with the main power supply. 4. Vehicle inspection and maintenance Routine inspection and maintenance: 1) Each time before riding the vehicle: a. Inspect the operation of the turn signal indicators, brake indicators and horn. b. Insure that the turning mechanisms are operating properly. c. Insure that all indicator lamps are functioning properly. 2) Check frequently: a. Insure that all mechanical parts are firmly secured. Tighten any parts or bolts that have come loose. b. Insure that all electrical cables are firmly attached or have not come loose. Tighten any loose connectors. c. Check that the tires have not become worn or damaged and that the tread is not less then 2mm deep. 3) Brake adjustment: a. Free travel of the front and rear brake handles should be 10~20mm. b. Brake c. Testing and Adjustment to Performance Requirements After adjustment tighten all screws securely; d. While the brake handles are in the free or open position the front and rear wheels should rotate easily. 5. Battery Care and Maintenance 1) Battery Type Valve regulated sealed lead acid battery with special purpose storage cell designed for manpower operated motor assisted vehicles; high capacity, high energy, low self-discharge, long service life and superior low-temperature performance. 2) Installing the Battery Pack Copyright © 2005 Scooterteq Motor Corporation Revised 11/15/2005 -7- The battery electrolyte is charged during production and can be immediately mounted for use on the vehicle however it is recommended that the user insure that it is fully charged by attaching the charger to the charging input of the vehicle and a 110VAC power source for 4-8 hours. 3) Charging Cycle The battery undergoes three stages during the charging process. a. The first stage is a constant current, limited voltage charge. The charging current is 0.1-0.15A, requiring approximately 6 hours (power input sensing). b. The second stage is the constant voltage charge, the voltage is 44.4V, when the electric current gradually falls to 0.5A for approximately 1-2 hour. c. The third stage is the trickling charge, the electric current falls from .3A to 0A concluding the charging operation. 3) Battery Discharge While the vehicle is operated under electric power when for discharging the batteries, to avoid over discharge, each storage cell (12V) will not discharge below 10.5V. 3) Caution a. In order to avoid damaging the storage cells, do not overcharge, undercharge or allow the batteries to become overly discharged. b. The battery charger must have constant voltage regulation, otherwise it may damage the storage cells. c. When the vehicle is not in use it is necessary to maintain a sufficient charge in the batteries to prevent breakdown of the electrolyte which may damage the storage cells and lower performance. The batteries should be brought to a full charge once a month. d. Do not permit short circuiting of the battery poles. This may damage the batteries or cause a fire. e. Insure that all battery connections are securely fastened to avoid potential fire and reduction of travel. f. Operating ambient temperature: -20 ℃ -50 ℃. Do not expose the storage batteries to flame or a high heat source, do not dispose of the batteries in a fire and do not expose the batteries to prolonged exposure to bright sunlight. g. If the battery casing is broken or ruptured the battery must be immediately replaced. Copyright © 2005 Scooterteq Motor Corporation Revised 11/15/2005 -8- h. The electrolyte is an acid solution. Do not spill it on skin, clothes or expose to the eyes. If exposed to the electrolyte immediately wash thoroughly with clean water. 6. Main Technical Specifications Vehicle Gross Weight: 52kgs Rated Load: 85kgs Overall Dimensions: Maximum Speed: 32km/h Travel Range on Full Charge: 35km, >70km with extended range power pack Slope Climbing Capacity (degrees): 30 with pedal assistance Rated Power: 500W Rated Average Speed: 18km/h Rated Voltage: 36V Rated Efficiency: Charging Time: 4-8 hrs Voltage: 36V Motor Type:36V Brushed DC Battery Type: 12V/12Ah x 3 Deep Cycle Sealed Lead Acid ★ Periodic Maintenance Schedule (A=Adjust) (L=Lubricate (C =Change) For your own safety and to prolong the life and enjoyment of your vehicle please observe the following maintenance schedule (estimated usage shown). Subject Estimated Usage (KM) 200 Motor Bearings Controller Charger Front/Rear Brake Shoes Wheel Bearings Front/RR Shocks Front Fork Bearings Tires Main Side Supports Lubricate Chassis All Screws, Bolts and Nuts 1000 3000 A L A A 5000 8000 12000 C A A A C A A A A A A A A A A A A L A 10000 A A L L A A Copyright © 2005 Scooterteq Motor Corporation Revised 11/15/2005 -9- Copyright © 2005 Scooterteq Motor Corporation Revised 11/15/2005 - 10 -