1
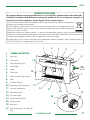
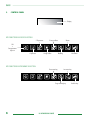
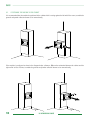
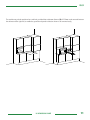
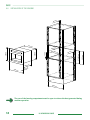
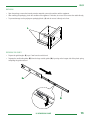
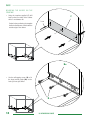
MACCHINA PER CAFFE’ ESPRESSO AD INCASSO AUTOMATICA
AUTOMATIC BUILT-IN ESPRESSO COFFEE MACHINE
CAFETERA EXPRESO ENCASTRADA AUTOMÁTICA
MACHINE À CAFÉ EXPRESSO AUTOMATIQUE À ENCASTRER
AUTOMATISCHE ESPRESSOMASCHINE FÜR DEN EINBAU
Manuale d’uso e manuntenzione
Use and maintenance manual
Manual de uso y mantenimiento
Manuel d’instructions et d’entretien
Benutzer- und Wartungshandbuch
AUTOMATIC BUILT-IN ESPRESSO
COFFEE MACHINE
Use and maintenance manual
SUMMARY
1.
HOW TO USE THIS MANUAL ................................................................................................................... 4
2.
GENERAL WARNINGS.............................................................................................................................. 4
3.
TECHNICAL DATA .................................................................................................................................... 6
4.
GENERAL DESCRIPTION ......................................................................................................................... 7
5.
CONTROL PANEL.................................................................................................................................... 8
6.
MACHINE INSTALLATION ........................................................................................................................ 9
7.
MACHINE OPERATING MODES..............................................................................................................20
8.
PREPARATION OF BEVERAGES ............................................................................................................22
9.
PROGRAMMING ....................................................................................................................................26
10.
ORDINARY OPERATION ........................................................................................................................32
11.
CLEANING.............................................................................................................................................34
12.
LIST OF HAZARDS ...............................................................................................................................35
13.
DISPLAY INDICATIONS ..........................................................................................................................36
14.
MALFUNCTIONS AND RELATIVE SOLUTIONS ........................................................................................38
ENGLISH
READ CAREFULLY
CAREFULLY READ all parts of this booklet before using the appliance.
The espresso coffee machine that you have purchased has been designed and manufactured with innovative methods and technologies which ensure long lasting quality and reliability. This booklet will guide you in discovering the advantages of purchasing
our product. You will find information on how to get the best out of your machine, how to always keep it efficient and what to do
if you should have any problems.
1.
HOW TO USE THIS MANUAL
The manufacturer reserves the right to make any improvements and/or modifications to the product. We guarantee that this
booklet reflects the technical state of the appliance at the time it is marketed. We take this opportunity to invite customers to
make any proposals for improvement of the product or the manual.
2.
GENERAL WARNINGS
• After removing the packaging, check the condition of the appliance. If in doubt, do not use it but contact the retailer directly.
• The packaging material must not be left within the reach of children since it is a potential source of danger. It is advisable to
keep the packaging until after the guarantee has expired.
• Before using the machine, make sure that the mains voltage corresponds to the information on the data plate of the machine.
• The installation must be done in accordance with the safety standards in force and by qualified and trained personnel. Incorrect
installation may be harmful to people, property or animals.
• This appliance is completely safe only if it is connected to an effective grounding system, executed as required by current
safety standards. The electric system must be equipped with a suitable circuit breaker. It is important to have compliance with
these requirements checked. If in doubt, have the system carefully checked by qualified personnel. The manufacturer cannot
be considered responsible for any damage caused by an inadequate electric system.
• It is not advisable to use extensions or electrical adaptors with multiple outlets. If their use is indispensable, use only simple or
multiple plug adaptors and extensions which are compliant with the safety standards in force. Never exceed the power value
in kW indicated on the simple adaptor or on the extensions and the maximum power value indicated on the adaptor.
• The espresso coffee machine is intended for the preparation of hot beverages such as coffee, tea or warm milk. This appliance
is to be used only for its intended purpose. Any other use is considered improper and therefore dangerous. The manufacturer
cannot be responsible for any damage caused by incorrect and unreasonable use.
• When using the electrical appliance several safety standards must be observed:
- do not touch the appliance when hands or feet are wet or damp;
- do not use the appliance in bare feet;
- do not use extensions in rooms where there are showers or baths;
- do not pull on the power cord to disconnect the appliance from the power outlet;
- do not leave the appliance exposed to atmospheric agents (rain, sun, etc.);
- do not allow the appliance to be used by children or the disabled.
• Before any maintenance, disconnect the appliance by unplugging it.
• For daily cleaning, follow the instructions in this manual.
4
use and maintenance manual
ENGLISH
• In case of breakdowns or poor functioning, unplug the appliance. Do not attempt any repairs; call for specialised technical
assistance.
• Any repairs must be done only by the manufacturer or an authorised assistance centre using exclusively original spare parts.
If this requirement is not observed, the safety of the appliance is compromised and the guarantee becomes void.
• If the appliance’s power lead is damaged switch the machine off and change the lead with another that has the same characteristics.
• If you decide you are not going to use the appliance any more it must be disconnected from the electricity mains.
• To ensure the machine works efficiently and properly it is essential to follow the manufacturer’s instructions, having qualified
personnel carry out the periodical maintenance work on it.
• Do not expose your hands or other body parts in the direction of the coffee delivery spouts or in the direction of the steam
and hot water delivery terminals. The steam and the water that exit the nozzle can cause burns.
• When functioning, the steam nozzle becomes overheated and must be handled with caution only in the indicated parts.
• Any unauthorised tampering with any parts of the machine renders any guarantee null and void.
• The appliance must not be used by people (including children) with reduced physical, sensorial or mental capacities or by
people without the experience or knowledge, unless they can be supervised by or receive instructions regarding appliance
use from a person who is responsible for their safety.
• Children must be supervised to make sure they do not play with the appliance.
• The appliance is intended for use at home or in similar situations, such as :
- kitchen personnel area in shops, offices and other work environments;
- agritourism;
- for clients in hotels, motels and other residential environments;
- Bed and Breakfasts.
Any unauthorised work on the machine, indicated by the sealing paint on the screws having
been tampered with, will automatically cause the guarantee to lapse
use and maintenance manual
5
ENGLISH
3. TECHNICAL DATA
Electrical data
power supply
frequency
maximum power abso
power cable length
230 V
240 V
50/60 Hz
50/60 Hz
2100 W
2300 W
2000 mm
2500 mm
Machine consumption at 230V (with the machine already up to
temperature)
operation: coffee
0,05 kWh
operation: coffee + tea
0,08 kWh
operation: coffee + steam
0,11 kWh
operation: coffee + steam + tea
0,13 kWh
- 93/68/EEC (CE marking)
- 2005/32/EC (Energy-using Products)
regulation no.1275/2008 of 17/12/2008)
- 2006/42/EC para. 2.1 (Conformity to the
required specifications for farm and
foodstuffs machinery)
2,5 litres
250 gr
35 coffees
1 litre
coffee hopper capacity
number of 7g/dose coffees
draining tray capacity
maximum hydraulic pressure
- 2006/95/EEC (Low voltage)
- 2004/108/EEC (Electromagnetic
compatibility)
Capacity
water tank capacity
This appliance conforms to the following
European Community Directives:
15 bar
Weight
H380
H460
net weight machine
24 kg
26 kg
gross weight machine
26 kg
28 kg
Dimensions
H380 (mm)
L=595 H=380 P=300 S= 20
H460 (mm)
L=595 H=460 P=300 S= 20
Machine operating conditions
+5°C +40°C
H
temperatures between
P
L
6
S
use and maintenance manual
Machine data
plate side
ENGLISH
INFORMATION FOR USERS
In accordance with the article in Legislative Decree no.15 of July 25th, “Implementation of the 2002/95/EC,
2002/96/EC and 2003/108/EC Directives concerning the reduction of the use of dangerous substances in
electrical and electronic equipment, and the disposal of the associated wastes”.
The crossed-out bin symbol shown on the appliance indicates that at the end of its useful life the product must
be disposed of separately from other wastes.
When the appliance reaches the end of its life, the user must, therefore, take it to a suitable electronic and
electrical waste collection centre, or return it to the retailer when purchasing a new equivalent replacement
appliance, on a one-for-one basis.
Appropriate procedures for separate collection - to have the decommissioned appliance recycled, processed and finally
disposed of in an environmentally-friendly manner - help avoid potential undesirable consequences for the environment and
for health, whilst enabling the materials of which the appliance is made to be recycled.
Illegal disposal by the user renders them liable to the administrative penalties provided for under Legislative Decree no.
22/1997 (articles 50 ff. of Legislative Decree no. 22/1997).
1
4.
1
2
3
4
5
6
7
8
9
10
11
12
13
14
15
16
17
2
3
4
5
GENERAL DESCRIPTION
6
Water tank
Control panel
15
Coffee dispensing spout
Coffee hopper
A
Display
Power cable
14
7
Coffee grounds collection drawer
Guide
Hot water dispenser
Dispensing compartment lights
Connection/release lever
13
12
8
11
10
Water collecting tray
Cup support grille
9
17
16
Steam nozzle/milk foamer
Anti-burn rubber
A
Main switch
Knob for adjustment of coffee grinding
use and maintenance manual
7
ENGLISH
5.
CONTROL PANEL
Display
KEY FUNCTIONS IN DOSE SELECTION
2 Espressos
2 Long coffees
Steam
ON
+
Compartment
light on
1 Espresso
1 Long Coffee
Hot water
Washing
KEY FUNCTIONS IN PROGRAM SELECTION
Decrease key
Increase key
Programming key
8
use and maintenance manual
Confirm key
ENGLISH
6.
MACHINE INSTALLATION
6.1
FOREWORD
The preparation of the machine and its installation must be carried out by qualified personnel.
The user must be sufficiently informed to correctly operate the machine. It is recommended not to carry out any operations on
the machine which may modify or alter its operation.
Possible traces of coffee powder inside the machine are due to the functioning tests done
during the production cycle.
6.2
MATERIAL SUPPLIED
• polystyrene packaging blocks (A)
• 2 machine guides (B) divided into: small inside guide (Bi) large outside guides (Be)
• 1 drilling template (C)
• 6 self-tapping screws (D)
• 2 base supports (E)
• 6 M4x6 screws (F)
• 6 M4 self-locking nuts (G)
• 8 M4x12 screws with welded washer (H)
• 1 plate with fastening pin (I)
• 4 self-tapping screws for fastening the plate (L)
6.3
EQUIPMENT NEEDED
• drill
• 2 mm diameter drill bit
• punch
• philips screwdriver
• allen wrench CH 3
• spanner CH 7
• tape-measure or ruler
6.4
CABINET FEATURES
• The components of built-in cabinets have to be kept together by heat resistant glues (temperature up to 100°C): unsuitable
materials and glues can lead to deformation and ungluing
• The cabinet must allow free passage for the electrical connections
• The cabinet in which the machine is installed must be strong enough to withstand its weight
• The machine must be installed firmly in its niche
• The machine must be fitted inside a tall cabinet or a wall unit with an open back panel to guarantee sufficient aeration at the
back
use and maintenance manual
9
ENGLISH
6.5
POSITIONING THE MACHINE IN THE CABINET
It is recommended that the machine be positioned in the cabinet which is resting against the left wall of the room, to enable the
grounds and powder collection drawer to be removed easily.
If the machine is positioned as shown in the diagram below, a distance (D) must be maintained between the cabinet and the
right wall of at least 250mm, to enable the grounds and powder collection drawer to be removed easily.
D
D
10
use and maintenance manual
ENGLISH
The machine may also be positioned on a wall unit, provided that a minimum distance (D) of 250mm can be ensured between
the cabinet and the right wall, to enable the grounds and powder collection drawer to be removed easily.
D
use and maintenance manual
11
ENGLISH
6.6 INSTALLATION OF THE MACHINE
m
55 m
595
mm
mm
m
55 m
390 mm
mm
300 in
m
556-5
64
370-380 mm
10 mm
338 mm
380 mm
555 m
m
mm
300
m
24 m
600 m
m
The rear of the housing compartment must be open to release the heat generated during
machine operation.
12
use and maintenance manual
ENGLISH
UNPACKING
• Open the package, remove the internal protective materials, extract the machine and the equipment
• After removing the packaging, check the condition of the appliance. If in doubt, do not use it but contact the retailer directly
• To prevent damage use the polystyrene packaging blocks (A) and do not rest it directly on its front
A
PREPARING THE GUIDES
• Prepare the guide lengths (B) up to 5 mm from the end of travel
• Separate the small inside guides (Bi) from the large outside guides (Be) by acting on the longest side of the plastic spring
and pulling the guides outward
Be
Bi
use and maintenance manual
13
ENGLISH
MOUNTING THE GUIDES ON THE
STRUCTURE
• Using the template supplied (C) drill
holes on the inner sides of the cabinet
with a 2 mm diameter bit
C
2 mm
Caution! when positioning the template
the line indicated must coincide with the
outside edge of the cabinet
Be
• Use the self-tapping screws (D) to fix
the large outside guides (Be) on the
holes you have just drilled
D
14
use and maintenance manual
ENGLISH
FIXING THE ATTACHMENT PLATE
• Correctly position the drilling template (C2): match the
red horizontal line M1 with the outer edge of the cabinet,
line up the vertical blue line M2 with the centre line of the
cabinet compartment
• Use a punch to mark the holes: in
the case of a simple plate, refer to
the green holes, for a plate installed
on an omega support, refer to the
brown holes
M2
M1
C2
• Use a drill and a 2 mm bit to make the
holes on the entire surface of the cabinet
in correspondence of the marks that
were made.
use and maintenance manual
15
ENGLISH
L
I1
• Fix the attachment plate (I1) or the prepared omega support plate (I2) using the 4
provided screws (L).
16
use and maintenance manual
ENGLISH
Bi
F
PREPARING THE MACHINE BASE
• With the M4x6 screws (F) and self-locking M4
nuts (G) fix the small inside guides (Bi) to the
base supports (E)
G
E
H
• Join the supports (E) to the base of the machine
with the screws (H)
E
• Attention: before fixing the two components make sure the outside
position of the guides installed on the machine (X) corresponds to
the inside position of the guides fixed on the cabinet (Y)
Y
X
use and maintenance manual
17
ENGLISH
PREPARING THE POSITION OF THE MACHINE
• Before tightening the screws (H) completely check perfect parallelism between the machine base and supports, adjusting the
width and depth by means of the relative slots
H
H
18
use and maintenance manual
ENGLISH
FIXING THE MACHINE
• Reposition the machine inside the cabinet
compartment and check that the lever is
working properly
• If is not attached properly, take the machine
out of the cabinet compartment (you do not
have to release it from the cabinet’s guides)
and modify the position of the plate (I) by
way of the slots (*) until it fastens perfectly
to the machine’s pin
*
I
*
K
• If you find you have to modify the slant of
the machine do so by means of the four
screws (K).
PREPARING THE MACHINE
• Remove the water tank out from its seat, wash it carefully with lukewarm water and return it to its position.
• Position the filter in the tank as per the manufacturer’s instructions or as explained in para. 10.5;
• Fill the tank with potable water in order to completely fill both the upper and lower parts;
• Fill the hopper with coffee beans. Check the amount of coffee from time to time and refill as necessary.
• Plug in the machine using the provided cable. Make sure that the voltage on the data plate is the same as the voltage of the
electrical power supply.
Fill the tank only with cold potable water. Do not use other types of liquids or carbonated
beverages. Operation with other types of liquids may damage the machine.
use and maintenance manual
19
ENGLISH
7. MACHINE OPERATING MODES
Different machine operating modes can be set which, in certain periods of limited machine use, allow you to reduce consumption.
This is done by excluding some functionalities as indicated in the following paragraphs.
The various settings are set in the “Programming” menu as explained in chapter 9.
The technical data shown in chapter 3 provides the consumption levels for the various configurations.
16
A
7.1
TURNING THE MACHINE ON/OFF
• Remove the machine as indicated in par. 10.1 ;
• Turn the main switch ON (16) (the corresponding LED comes on) and the following
message will appear on the display for a few seconds:
*** ***
release sw n.n
• To turn the machine fully on, press key (A);
• Automatic power factor correction, the following message will appear on the display
for a few seconds;
WAIT
MACHINE INIT.
• Wait for the machine to heat up completely, which is signalled by the display:
• Use the machine as explained in chapter 8 after it has been programmed according
to the instructions in chapter 9.
To turn the machine off, set the general switch (16) to OFF .
20
use and maintenance manual
SELECT
ENGLISH
7.2
MACHINE FOR COFFEE ONLY (WITHOUT TEA AND WITHOUT STEAM)
16
ON
A
ON
In this mode, the machine is set up to dispense only coffee but not hot water nor steam.
• Turn on the machine as indicated in par. 7.1 ;
• Press key (A) and wait for the machine to heat up completely (about 2 minutes);
• Enter machine programming and disable the hot water and steam function as explained
in paragraph 9.3.
HOT WATER
---> off <--STEAM
---> off <---
7.3
COFFEE AND TEA MACHINE (WITHOUT STEAM)
16
ON
A
ON
In this mode, the machine is set up to dispense coffee and hot water, but not steam.
• Turn on the machine as indicated in par. 7.1;
• Press key (A) and wait for the machine to heat up completely (about 2 minutes);
HOT WATER
---> ON <---
• Enter machine programming and enable the hot water function as explained in paragraph 9.3.
STEAM
---> oFF <---
7.4
COFFEE AND STEAM MACHINE (WITHOUT TEA)
16
ON
A
ON
In this mode, the machine is set up to dispense coffee and steam, but not hot water.
• Turn on the machine as indicated in par. 7.1;
• Press key (A) and wait for the machine to heat up completely (about 2 minutes);
HOT WATER
---> oFF <---
• Enter machine programming and enable the steam function as explained in
paragraph 9.3.
STEAM
---> oN <---
7.5
MACHINE ON COMPLETELY (COFFEE + STEAM + TEA)
In this mode the machine is completely functional and ready to dispense coffee and hot
beverages with steam and hot water.
• Turn on the machine as indicated in par. 7.1;
16
ON
A
ON
• Press key (A) and wait for the machine to heat up completely (about 2 minutes);
• Enter machine programming and enable both the steam function as well as the hot
water function as explained in paragraph 9.3.
HOT WATER
---> oN <--STEAM
---> oN <---
use and maintenance manual
21
ENGLISH
8. PREPARATION OF BEVERAGES
8.1
DISPENSING COFFEE
SELECT
1) Set up the machine as indicated in chapter 7;
PREPARATION
ESPRESSO
2) Place the cup under the coffee dispensing spout;
3) Press the key for the desired coffee dose for at least 0.5 seconds,
for example 1 Espresso
(the LED comes on);
4) Release the key and wait for dispensing to finish;
5) To interrupt dispensing of the programmed dose ahead of time, press the
key 1 Espresso
again (dispensing can only be interrupted after 5
seconds);
6) Proceed in the same manner to dispense other coffee doses.
To manually dispense a quantity of coffee, hold down the desired key, for example
for at least 5 seconds.
1 Espresso
CONTINUOUS
ESPRESSO
.
To block the dispensing of coffee press the key 1 Espresso again
The system allows a maximum dispensing time of about 60 seconds (dispensing
can only be interrupted after 5 seconds).
Continuous manual coffee dispensing is possible with
the following keys only: 1 Espresso
and 1 long
coffee
.
If a double dose is selected (2 espressos
or 2 long coffees
),
place the two cups under the individual spouts and wait for 2 consecutive coffee cycles
to be completed until the signal appears on the display:
PREPARATION
DOUBLE ESPRESSO
SELECT
• Different sized cups can be used by lowering or raising the coffee dispensing spout as
shown by the arrows in the figure.
• Empty the water frequently that collects in the water collection tray.
• After a long period of not being used, to replace the water that is inside the hydraulic circuit
with fresh water, we recommend dispensing at least 1 coffee/steam/the and throwing it
away.
INDICATIONS
If the no water warning appears on the display, fill the tank as explained in
par.10.4.
If the no coffee warning appears on the display, add coffee beans to the hopper
as explained in par.10.2.
22
use and maintenance manual
LOAD
WATER
GROUND COFFEE
NOT ENOUGH
ENGLISH
8.2
DISPENSING HOT WATER
SELECT
1) Set up the machine as indicated in chapter 7;
PREPARATION
HOT WATER
2) Place the coffee cup under the hot water dispenser;
3) Press the key
comes on);
for at least 3 seconds (the corresponding LED
4) Release the key and wait for the programmed dose to be completely
dispensed;
5) To interrupt dispensing ahead of time, press the key
;
To manually dispense a quantity of hot water, hold down the key
for at
least 5 seconds. To stop dispensing press the key
again.
The system allows a maximum hot water dispensing time of about 60
seconds.
Use care: contact with hot water may be harmful to
persons or property.
8.3
DISPENSING STEAM
1) Set up the machine as indicated in chapter 7;
2) Immerge the steam nozzle in the liquid to heat;
3) Press the key
comes on);
SELECT
for at least 3 seconds (the corresponding LED
4) Release the key and wait for the programmed dose to be completely
dispensed;
5) To interrupt dispensing ahead of time, press the key
PREPARATION
STEAM
.
To dispense manually, hold down the key
for at least 5 seconds.
To stop dispensing press the key again. The system allows a maximum steam
dispensing time of about 60 seconds.
In order not to change the taste of the milk and compromise its organoleptic characteristics, it is advisable
to foam the milk up to a maximum temperature of 65°C
(or when the high temperature makes it uncomfortable
to keep touching the jug).
After heating drinks other than water (milk, chocolate,
etc.), it is advisable to let off a little steam in order to
free up the holes in the nozzle.
use and maintenance manual
23
ENGLISH
8.4
DISPENSING STEAM AND COFFEE/ STEAM AND TEA SIMULTANEOUSLY
The machine enables Steam and Coffee (or Steam and Tea) to be dispensed at the same time.
To do so, simply press first one key and then the other. Warning: it will not work if both keys are pressed at the same time.
8.5
EMPTYING THE GROUNDS DRAWER
After dispensing 11 coffees, the suggestion to empty the grounds drawer will appear
on the display (flashing warning message).
EMPTY
GROUNDS DRAWER
If this operation is not performed, after dispensing 15 coffees, the machine will not
permit further coffee to be dispensed until the drawer is emptied (steady message).
Proceed as follows:
EMPTY
GROUNDS DRAWER
1) Remove the machine as indicated in par. 10.1;
2) Take the grounds drawer out and empty it (A);
3) Put the grounds drawer back in (B);
4) Reposition the machine inside the cabinet compartment.
It is recommended to periodically clean with hot water the grounds drawer and empty the internal grounds collection tray as
explained in cap. 11.
B
A
The grounds may be emptied out more frequently, if desired, and the count is reset to 0.
24
use and maintenance manual
ENGLISH
8.6
WASHING CYCLE
After dispensing 11 coffees, the suggestion to perform a washing cycle will
appear on the display (flashing warning message).
If this operation is not performed, after dispensing 15 coffees, the machine
functionalities will be blocked until the washing cycle is activated (steady
message).
Proceed as follows:
ACTIVATE
GROUP CLEANING
CLEANING
IN PROGRESS
1) Place a jug under the coffee dispensing spout;
2) Press the wash key
for 1 second (the LED comes on);
3) Release the key to activate the washing cycle;
4) Wait for the washing cycle to finish.
The washing cycle can be activated also more
frequently and the count is reset to 0.
Use care: contact with hot water may be harmful to
persons or property.
If water is not supplied during the washing cycle,
seek assistance from Technical Support, as described
in chapter 14.
8.7
CLEANING THE MILK FOAMING NOZZLE
The steam nozzles must be kept clean at all times. Particularly after heating
milk, it is recommended to immerge the milk foaming nozzle in a water jug
and run a delivery. Clean the outside of the nozzle using a cloth dampened
with warm water.
A
To clean the steam nozzle more thoroughly, follow these instructions:
- turn and remove the external plastic lid (A) and wash it with hot
water
- clean inside the nozzle (B) with a cloth dampened in lukewarm
water
- clearing out the exit holes (C) with a small needle (of diameter
0,8mm)
- return the external lid to its original position
Use care: contact with steam may be harmful to
persons, property or animals.
use and maintenance manual
B
C
25
ENGLISH
9. PROGRAMMING
1) Turn the main switch ON
2) Press the key
;
;
3) To access machine programming, press the key
for at least 10 seconds;
4) Briefly press the key
to scroll the main menu;
5) Briefly press the key
to access the submenus;
6) Use the keys
to change the values;
7) Once the language, the water heater and unit temperatures, the programming of the doses and the enabled options have
all been set, confirm using the
key.
..............
PROGRAMMING
LANGUAGE
ENGLISH
ITALIANO
PROGRAMMING
LITERS RESET
LITERS RESET
YES = ok x 3 sec.
PROGRAMMING
LITERS RESET
PROGRAMMING
ENABLING
HOT WATER
---> ON <---
STEAM
---> ON <---
PROGRAMMING
DEFAULT DATA
FACTORY DATA
YES = OK X 3 SEC.
PROGRAMMING
DEFAULT DATA
PROGRAMMING
TEMPERATURES
HOT WATER
100 °c
COFFEE
100 °c
PROGRAMMING
GRINDING TIMES
SELECT
TIME
1 ESP. GRINDING
5,0 SEC.
PROGRAMMING
DOSES
SELECT DOSE
TO PROGRAM
..............
The machine programming must be performed only after having carefully read the instruction
in the manual. If no programming is performed for 60 seconds, you will automatically exit
programming without saving the modifications that were made.
26
use and maintenance manual
ENGLISH
9.1
PROGRAMMING FUNCTION KEYS
Decrease key
Increase key
Programming key
9.2
Confirm key
PROGRAMMING THE DISPLAY LANGUAGE
PROGRAMMING
LANGUAGE
ENGLISH
All the messages on the display are multilingual. To set the desired language, proceed as follows:
1) In the programming menu, change the display language by pushing the key
confirm with the key
;
2) To exit programming, press the key
and
ITALIANO
repeatedly.
PROGRAMMING
LANGUAGE
9.3
PROGRAMMING
LITERS RESET
PROGRAMMING LITRE RESET
To deactivate the warning to replace the Brita filters, proceed as follows:
1) In the machine programming environment, press the key
message appears on the display :
2) To access the litre reset area, press the key
3) To reset the litres, press the key
4) To exit the reset area, press the key
until the following
LITERS RESET
YES = OK X 3 SEC.
;
for at least 3 seconds;
repeatedly.
WAIT
LITERS RESET
SETTING
use and maintenance manual
27
ENGLISH
PROGRAMMING
ENABLING
9.4
PROGRAMMING ENABLING
Based on the operating mode desired by the user, this menu can be used to enable or disable
hot water and steam:
1) In the programming environment, press the key
on the display :
until the following message appears
2) To access the enabling area, press the key
3) Use the key
4) Press the key
5) Use the key
HOT WATER
---> ON <---
;
HOT WATER
OFF = OK
to enable or disable the tea function;
to confirm and go to the next programming phase;
to enable or disable the steam function;
6) To exit programming, press the key
STEAM
---> ON <---
repeatedly.
STEAM
OFF = OK
STEAM
---> OFF <---
9.5
PROGRAMMING
DEFAULT DATA
LOADING DEFAULT DATA
Factory settings can be reset as follows:
1) In the programming environment, press the key
appears on the display :
until the following message
2) To access the loading default data area, press the key
3) To load the default data, press the key
4) To exit programming, press the key
;
FACTORY DATA
YES = ok x 3 SEC.
for 3 seconds;
repeatedly.
WAIT
PROGRAMMING
DEFAULT DATA
28
use and maintenance manual
ENGLISH
9.6
PROGRAMMING OF BOILER AND DISPENSING UNIT TEMPERATURE
The temperature of the coffee unit and the hot water boiler can be modified. To make the modifications, proceed as follows:
1) In the programming environment, press the key
pears on the display :
until the following message
PROGRAMMING
TEMPERATURES
apHOT WATER
100 °C
2) To access boiler temperature programming, press the key
;
3) To modify the boiler temperature (range 95°C-105°C) use the keys
4) To confirm and access the coffee unit temperature programming, press the key
;
5) To modify the coffee dispensing unit temperature (range 95°C-105°C) use the keys
and
confirm with the key
;
and
6) To exit programming, press the key
COFFEE
100 °C
repeatedly.
PROGRAMMING
TEMPERATURES
9.7
PROGRAMMING COFFEE GRINDING TIMES
Adjusting the grinding times makes it possible to dose the quantity of ground coffee to be added
to the coffee dispensing unit. The grinding times can be adjusted for one or all coffee doses.
Remember that the actual quantity of coffee also depends on the grinder adjustment, the type
of coffee and grinder wear.
1) In the programming environment, press the key
on the display :
until the following message appears
2) To access grinding time programming, press the key
3) Press the key to program, example
select
TIME
;
;
4) To modify the grinding times (range 4.5-5.5 seconds) use the keys
5) To exit programming, press the key
PROGRAMMING
GRINDING TIMES
1 esp. GRINDING
5.0 sec
repeatedly.
PROGRAMMING
GRINDING TIMES
1 second = about 1,3 grams the coffee
use and maintenance manual
29
ENGLISH
9.8
DOSE PROGRAMMING
On entry to the dose programming area, the LEDs on the keypad light up on the programmable dose keys (LEDs go out to
indicate that the dose has been programmed). There is no need to program all the doses, as it is possible to select only the
doses desired and then exit.
To reprogram all the doses, so that all 4 LEDs come on, the machine needs to be switched off and on again. Dose keys which
have already been programmed can still be reprogrammed even when the LEDs are off.
Programmable keys
To make the modifications programming, proceed as follows:
1) In the programming environment, scroll the menu using the key
message appears on the display :
2) To access the dosing submenu, press the
until the following
PROGRANNING
DOSES
key;
3) Proceed as indicated in the paragraphs below.
SELECT DOSE
TO PROGRAM
9.8.1 PROGRAMMING COFFEE DOSES
EThe quantity of water for each dose can be modified. The keys to program are only the single short
and long
as
the double doses (short and long) are calculated based on the corresponding dose of the single. The system automatically exits the
programming mode 60 seconds after the last operation has been performed. To make the modifications, proceed as follows:
SELECT DOSE
TO PROGRAM
1) Place the cup under the dispensing nozzle;
2) Press the key of the dose to program, example
;
3) Wait for the coffee to be ground and the subsequent dispensing;
4) To stop dispensing and confirm the dose, press the key
(the associated LED goes out);
again
PROGRAMMING
1 ESPR. DOSE
5) If the long coffee dose needs to be programmed, repeat the procedure, selecting the
key (causing the associated LED to go out);
6) For tea and steam programming, follow the instructions in paragraphs 9.8.2 and 9.8.3 from
point 3). To exit programming mode, press the
key repeatedly.
30
use and maintenance manual
PROGRAMMING
1 LONG DOSE
ENGLISH
9.8.2 PROGRAMMING HOT WATER DOSES
The water dose can be modified based on the cup that is used. To make the modifications,
proceed as follows:
1) In the programming environment, scroll the menu using the key
message appears on the display :
2) To access the dosing submenu, press the
PROGRANNING
DOSES
until the following
SELECT DOSE
TO PROGRAM
key;
3) Place the cup under the hot water dispensing nozzle;
4) Press the key
;
5) Wait for hot water to be dispensed. When the desired amount has been dispensed, confirm
by pressing the key
again;
PROGRANNING
HOT WATER DOSE
6) For steam programming, follow the instructions in the following paragraph.
To exit programming, press the key
repeatedly.
SELECT DOSE
TO PROGRAM
It is possible to program a maximum dispensing of 60 seconds.
9.8.3 PROGRAMMING STEAM DISPENSING
The steam dose can be modified based on the quantity of milk that is normally foamed.
To make the modifications, proceed as follows:
1) In the programming environment, scroll the menu using the key
message appears on the display :
2) To access the dosing submenu, press the
until the following
key;
3) Immerge the steam nozzle in the liquid (milk) to heat;
4) Press the key
PROGRANNING
DOSES
SELECT DOSE
TO PROGRAM
;
5) Wait for steam to be dispensed. When the desired amount has been dispensed, confirm by
pressing the key
again;
6) To exit programming, press the key
PROGRANNING
STEAM DOSE
repeatedly.
It is possible to program a maximum dispensing of 60 seconds.
SELECT DOSE
TO PROGRAM
The doses for a double coffee and for a double long coffee do not
need to be programmed as the system automatically calculates the
programming of these doses.
use and maintenance manual
31
ENGLISH
10. ORDINARY OPERATION
10.1 EXTRACTING THE MACHINE FROM THE CABINET COMPARTMENT
Move to the right the lever (11) located on the bottom of the tray pressing slightly on the machine and then extract it from the
cabinet compartment.
4
1
17
X
11
10.2 ADDING COFFEE TO THE HOPPER
• Extract the machine from the cabinet compartment;
• Remove the lid (4) and fill the hopper with coffee beans.
10.3 ADJUSTMENT OF GRINDING
If you need to change the degree of grinding of the coffee, you can do this
as follows:
• Extract the machine from the cabinet compartment;
• Turn the graduated adjustment knob (17).
The knob (17) must only be used to make adjustments to the grinding when
the grinder is in operation. Dispense a few loads to check the effect of the
new grinding setting. The factory setting for the grinder is marked with an
arrow on the cover. It is aligned with the slit (X) in the coffee bean hopper
and is calibrated for the default grinding time.
Finer
grinding
Coarser
grinding
To adjust grinding we suggest following these tips:
• If coffee is being dispensed too quickly reduce grinding coarseness and/or increase the
amount of coffee ground (see para. 9.6).
• If coffee is being dispensed too slowly increase grinding coarseness and/or decrease the
amount of coffee ground (see para. 9.6).
If the grinding is too fine this could cause the unit filters to become prematurely clogged.
32
use and maintenance manual
ENGLISH
10.4 ADDING WATER TO THE TANK
The lack of water in the tank is indicated by the following signal on the display :
To add water, proceed as follows:
LOAD
WATER
• Extract the machine from the cabinet compartment;
• Remove the lid (1) and fill the water tank with potable water. Do this slowly in order to
allow complete filling of both the upper and lower part.
• Fill the tank only with cold potable water.
• Do not use other types of liquids or carbonated beverages.
• After a long period of not being used remove any water from the tank, clean the tank
internally as described in chapter 11 and refill the tank with fresh water.
• For cleaning purposes, the tank can be removed from the machine by sliding it upwards.
Be careful to put the tank back in properly after cleaning.
10.5 REPLACING THE WATER FILTER IN THE TANK
The water tank is equipped with a BRITA CLASSIC filter that reduces lime scale, impurities and other
substances such as chlorine that alter the taste of the water.
A filter must be used if water hardness is greater than 5°f (French degrees).
Replace the filter after the consumption of more than 50 litres of water (more than 1200 coffees dispensed)
and at least once every 6 months.
To remind the user that the filter must be replaced after consuming 50 litres, a notification to replace
the filter will flash on the display.
REPLACE
To replace the filter, proceed as follows:
WATER FILTER
• remove the wrapper that protects the filter;
• immerge the filter cartridge in cold water and shake it delicately to eliminate any air pockets;
• insert the filter cartridge into position in the tank so that it remains firmly positioned;
• add water to the tank;
• reset the display message as per para. 9.2 .
Failure to use the filter or not replacing it regularly could damage the boilers.
10.6 TURNING LIGHT ON/OFF
To turn the machine compartment light on and off briefly press the ON/OFF key
use and maintenance manual
.
33
ENGLISH
11. CLEANING
For perfect hygiene and efficiency of the unit, a few simple cleaning tasks are required.
• Take out the drainage tray; empty it and clean the tub frequently with hot water;
• Clean the outside body of the machine with a cloth dampened with warm water. Do not use abrasive detergents;
• The water and steam nozzles must be kept clean at all times. In particular,
clean the milk foaming nozzle regularly as explained in paragraph 8.7 ;
1
• Remove the tank from the machine (1) periodically by sliding it upwards
and wash it with hot water;
• Clean the coffee hopper at least once a year. We recommend cleaning it
when the coffee inside it runs out. Proceed as follows:
- remove the hopper lid
- clean the hopper using a cloth dampened in lukewarm water.
Attention, the hopper cannot be removed from its seat.
If a technician must replace the grinders, first secure the machine by disconnecting it
from the electrical mains.
• In addition to emptying the coffee grounds drawer indicated by the machine display,
it is also recommended to periodically empty the machine’s internal coffee powder collection tray, proceeding as follows:
- remove the coffee grounds collection drawer (A)
- take out the internal coffee powder collection tray (B)
- remove the coffee powder and clean the grounds drawer and the hot water collection tray
- put the two components back into place
B
A
Disconnect the machine from the electricity mains before cleaning.
Always use perfectly clean and hygienic cloths for cleaning.
34
use and maintenance manual
ENGLISH
12. LIST OF HAZARDS
The appliance must be connected to an efficient grounding system
If this is not done, the appliance can be a source of dangerous electrical discharges in that it is no longer able to discharge
electricity to earth.
Do not use running water to wash the appliance
The use of pressurized water directly on the machine can seriously damage electrical appliances. Never use water jets to wash
any part of the appliance.
Beware of steam/hot water
Never direct steam or hot water jets directly on parts of the body.
Do not work on the machine when it is supplied with electrical power
Before any intervention on the appliance disconnect it from the electrical mains. Never remove any body panel when the machine
is supplied with electrical power.
Use of the appliance
This espresso coffee machine is intended for the preparation of hot beverages. Any other type of use is considered incorrect and
therefore dangerous. Never allow children or incapacitated persons to use the machine.
Non-observance of the above standards can cause serious harm to people, property or animals.
Never work on the electronic apparatus when the machine is still supplied with electrical energy.
Shut down the machine completely by unplugging it from the mains before carrying out any operation.
The manufacturer declines any responsibility for damage that can occur if the instructions
in this document are not followed.
use and maintenance manual
35
ENGLISH
13. DISPLAY INDICATIONS
INDICATION
CAUSE
SELECT
The machine is ready for another selection
ACTIVATE
GROUP CLEANING
WAIT
HEATING
Select the desired key
11coffees were dispensed (flashing message).
Wash by pressing the key
15 coffees were dispensed (message
proceed as explained in par. 8.6
on steady display; machine operation is
suspended).
Machine not at the proper temperature
and
Wait for the machine to warm up completely
EMPTY
GROUNDS DRAWER
11 coffees were dispensed (flashing message).
Empty the grounds drawer as explained in
15 coffees were dispensed (message
par. 8.5 and in cap. 11
on steady display; machine operation is
suspended).
CLOSE
GROUNDS DRAWER
The grounds drawer is not inserted or not
Insert the grounds drawer completely
completely closed
LOAD
WATER
HOT WATER
DISABLE
STEAM
DISABLE
36
SOLUTION
No water in the tank
Add water to the tank
Hot water is not available
To enable the dispensing of hot water,
proceed as explained in par. 9.3
The steam boiler is off
To enable the dispensing of hot water,
proceed as explained in par. 9.3
REPLACE
WATER FILTER
50 litres of water were consumed since Replace the Brita water filter as explained in
the last reset
par. 10.5 and reset the counter
WAIT
MACHINE INIT.
The unit automatically carries out a cycle and Wait a few seconds for the power factor
returns to its normal resting position
correction cycle to terminate
use and maintenance manual
ENGLISH
SEGNALAZIONE
CAUSA
RIMEDIO
CONTROL
pulses LACKING
Coffee is ground too fine.
Absence the water in the tank.
The tank is incorrectly positioned in place.
Adjust the grind by increasing the coarseness
Check for water in the tank.
Check that the tank is correctly positioned
in place.
Contact Technical Support.
GROUND COFFEE
NOT ENOUGH
The coffee hopper is empty
Grinding time is insufficient
Fill the hopper with coffee
Increase grinding time
Contact Technical Support.
Component alarm
Contact Technical Support.
CONTROL
BOILER PROBE
CONTROL
Boiler overtemp.
CONTROL
boiler HEAT. TOUT
CONTROL
Group probe
CONTROL
Group overtemp.
CONTROL
group HEAT. TOUT
CONTROL
group MOTOR TOUT
use and maintenance manual
37
ENGLISH
14. MALFUNCTIONS AND RELATIVE SOLUTIONS
SITUATION
ACTION
MACHINE
LACKING POWER
1) Check that there is power on the electrical network
2) Check that the plug is correctly connected to the electrical socket
3) Ensure that the general switch is in the ON position and that the key
STEAM DOES
NOT COME OUT OF
THE NOZZLE
1) Clean the steam nozzle with a cloth dampened with warm water and, if necessary, use a small
needle to free the nozzle holes
2) Check that the “Steam” function is active and if necessary proceed as per para. 9.3
NO DISPENSING
1) Reset the programming and load the default data as per para. 9.2
2) Check for water in the tank
3) Check for water in the coffee grounds and powder drawer and, if there is any, contact Technical
Support for assistance
WATER LEAKS
FROM THE MACHINE
Empty the tray
WASHING CYCLE
DISPENSING TOO SLOW
1) Check for water in the tank
2) Check for water in the coffee grounds and powder drawer and, if there is any, contact Technical
Support for assistance
COFFEE IS
TOO COLD
Check the unit’s temperature settings (see para. 9.5)
COFFEE DISPENSED
TOO QUICKLY
Adjust the grind by reducing the coarseness and/or increasing the amount of coffee ground (see
para. 9.6)
COFFEE DISPENSED
TOO SLOWLY
Adjust the grind by increasing the coarseness and/or reducing the amount of coffee ground (see
para. 9.6)
COFFEE GROUNDS
WET AND/OR
NOT COMPACT
Adjust the grind by reducing the coarseness
COFFEE GROUNDS
IN CUP
Adjust the grind by reducing the coarseness
THE COFFEE DOSE
IS NOT CORRECT
1) Check that the doses are programmed correctly
2) Adjust the grind and check the coffee dose
If the problem still persists, contact a Support Centre.
38
use and maintenance manual
has been selected
CAFETERA EXPRESO
ENCASTRADA AUTOMÁTICA
Manual de uso y mantenimiento
Cod. 02000289 Rev. 03 - 06/2010