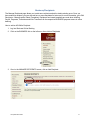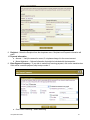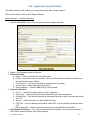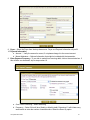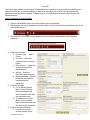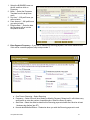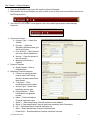
1
Business Online Banking USER’S MANUAL Business Online Banking Table of Contents ACCOUNTS Menu Overview ....................................................................................................... 4 History .......................................................................................................... 5 Online Activity ............................................................................................... 6 Statements .................................................................................................... 8 TRANSACTIONS Menu Transfer Funds.............................................................................................. 9 Create Recurring Transactions...................................................................... 10 Manage Recurring......................................................................................... 11 Member to Member ....................................................................................... 12 BUSINESS Menu Adding a Recipient ........................................................................................ 13 Edit a Recipient ............................................................................................. 15 Delete Recipient............................................................................................ 16 Edit Recipient Payments ............................................................................... 17 Delete Recipient Payments ........................................................................... 18 ACH Single Payment – No existing Recipient ............................................... 19 ACH Single Payment – Existing Recipient..................................................... 21 ACH Single Collection (Debit) – No existing Recipient .................................. 24 ACH Single Collection (Debit) – Existing Recipient ....................................... 26 Payroll ........................................................................................................... 29 Payments (Multiple ACH Credits) .................................................................. 33 Collections (Multiple ACH Debits) ................................................................. 36 CSV Import ................................................................................................... 39 ACH Pass-Thru ............................................................................................ 40 Wire Transfer – No existing Recipient .......................................................... 41 Wire Transfer – Existing Recipient ............................................................... 44 SERVICES Menu Secure Messages ........................................................................................ 46 Update Contact Info ..................................................................................... 48 Stop Payment .............................................................................................. 49 PREFERENCES Menu Account Preferences .................................................................................... 50 Alert Preferences ......................................................................................... 52 Security ........................................................................................................ 54 Subsidiaries ................................................................................................. 56 Mobile .......................................................................................................... 57 APPENDIX Business Online Banking Best Practices .................................................... 58 Overview The Account Overview page displays a summary of accounts associated with your online profile. You can initiate Quick Action transactions, view high-level account information, and access secure messages. Accounts are categorized and displayed by account type (checking, savings, loan, certificate, etc.). From the online banking menu, choose Accounts > Overview. The following information appears for each account on the left side menu: • Account Name – Either the default name for the account in our system or a custom display name (aka nickname) that you have created for the account. To make your accounts easily recognizable, you can assign display names to your accounts from the Preferences > Account menu. Display names can be changed as often as you wish and will be used consistently in account listings and menus. The account name is displayed as a hyperlink which takes you directly to Account History page for the selected account. • Account Number – The account number for the displayed account. • Updated – The date that the displayed balances on the account were last updated. Account Balances – The most relevant summary balances (Available, Current) for the account type. Quick Action Icon – A list of transaction actions you can initiate from the Account Overview page. The following information is also included on the Account Overview page: • Secure Message Link – A hyperlink at the top of the page indicating unread secure messages. Because the Account Overview page is your entry point into online banking, you can conveniently see if you have secure messages or alerts without having to navigate to your secure message mailbox. Click on the link to go directly to the Secure Mailbox page or go to Services > Messages. • Last Logon Date – The last successful login to the online banking system using your user ID and password. This is a security tool you can use to track potentially unauthorized access to your online accounts. If you suspect any unauthorized access, please contact us immediately. You can change the default display order of your accounts from the Preferences > Account menu. Last update 03/10/2014 4 History The Account History page provides access to transactional history for your individual accounts. By default, this page displays the history for the first account in your profile or the account that you selected from the Account Overview page. From the online banking menu, choose Accounts > History. The following options are available for account history: • Account Selection – Using the Account drop-down list, select an account for which you want to display transaction history and click Submit. The page title displays the account nickname, if configured in Account Preferences. • Account Details – The collapsible panel contains all additional account details that are available for the selected account. These details are in addition to the summary details displayed on the Account Overview page. You can expand or collapse the panel by double-clicking anywhere on the Account Details title bar or single-clicking the Expand/Collapse icon on the right side of the panel. • Search Options – As the transaction history for a selected account increases over time, the Search list helps you filter online transactions by a defined parameter. Available parameters include, but are not limited to, check number, range of check numbers, date, date range (time period), transaction amount, amount range, and transaction description. Once you have narrowed the list by selecting one of the search filter parameters and entering the required data, click Submit to display the data. To restore the original online history list, choose Default View from the Search list and click Submit. You can also get a complete list of available history by selecting All Available Transactions from the Search list. • Export Options – You can export your account data into personal financial management and business financial management applications such as: Microsoft® Excel (.xls) or another spreadsheet application Comma separated value file (.csv) Microsoft® Money / Microsoft® Office Accounting (.ofx) Quicken® (.qfx) QuickBooks® (.qbo) Please contact us for a list of supported versions of Quicken and QuickBooks. To easily export any displayed account information (which appears as the default view or as defined by your search filter parameters), choose Export to File from the Display drop-down list. The list name changes to Export and the supported export format drop-down list becomes enabled. Select a supported format from the list and click Submit. You will be prompted to Open or Save the export file. If you choose Open, you must have the application that supports the file format installed on your local machine. • Transaction History – Transaction history is a display of the default history or the selected search parameter for a specific account. You can sort any column by clicking on the column name. • Transaction Images – The magnifying glass icon next to a transaction indicates there may be an image associated with that transaction, such as a check image. Single-click on the magnifying glass icon to view the image. Verify that your browser configuration allows pop-up windows from our site. Last update 03/10/2014 5 Online Activity The Online Activity page is a record of all transactions you have initiated via electronic banking, and is also the landing page you will normally be directed to when you complete an online transaction. You can also use the Quick Action menus (Blue Plus Sign) to quickly view, approve, cancel, and copy your transactions. From the online banking menu, choose Accounts > Online Activity. The Following options are available in Online Activity: • Approve transactions - You can approve or authorize a drafted transaction by selecting the transaction from the list, and then clicking the Approve button on the toolbar. This action will approve the transaction for immediate processing or to be processed during the next available processing time. If you wish to review a transaction before approving it, you can select the transaction from the list, then click the View button on the toolbar. You will be directed to the Transaction Details page where you can review the details of the transaction. At the top of the preview page you will find buttons/options for approving the transaction. You can also select and approve multiple draft-state transactions in a single action by pressing Ctrl + click and clicking the Approve button. • Cancel transactions - You can cancel a drafted or approved transaction by selecting the transaction from the list, then clicking the Cancel button on the toolbar. This action will cancel the transaction if the processing of the transaction has not already started. You can also select and cancel multiple approved or drafted transactions in a single action by pressing Ctrl + click and clicking the Cancel button. Transactions in statuses other than drafted or approved cannot be canceled. • View transactions - You can view any transaction by selecting the transaction from the list, then clicking the View button on the toolbar. You can also double-click directly on the transaction to view it. This action will take you to the Transaction Details page where you can review all the parameters of the original transaction. • Copy transactions – Copy Transaction can be used to edit a transaction that has been Approved (but not yet processed), Canceled, or Drafted. If you edit a transaction to make corrections and it is in an Approved status you MUST cancel the original Approved transaction to avoid duplicate processing. If you are using Copy Transaction to just repeat a transaction, you can do so from any status. Group By Options Online activity can be categorized or grouped by: • Status – All online activity by transaction status, including transactions that have been drafted but not approved, approved transactions and canceled transactions. • Type - The type of transactions you initiated. Created - The date the transaction was initiated. This is helpful in easily locating a transaction when you know the date you submitted and authorized the transaction. Account – All online activity against a specific online account. User Name – All online activity initiated by a specific user. Search Options As the amount of online activity for a selected account grows, the Search drop-down list allows you to easily find specific online activity. You can search for transactions based on a variety of search criteria. The Status drop-down list options change based on the Search drop-down list selection. Active transactions include transactions that have not yet been processed and have not been canceled, generally including both drafted and authorized transactions. Last update 03/10/2014 6 Online Activity Each transaction line in Online Activity includes the status, tracking ID, description, amount, account, date, details, and the user that created the transaction. Additional details are available by double-clicking on the transaction which takes you to the Transaction Details page, or by selecting the transaction, then selecting View the selected transaction from the drop-down list and clicking Submit. The Transaction Details page gives you much more information on the transaction than what is available on the Online Activity page. Print Online Activity The Print button on the toolbar makes it easy to print the results of your search. You can also select and print multiple transactions by pressing Ctrl + click and clicking Print Selected Items on the toolbar. Terms to Know • Active - Any transaction generated online that has been initiated within the last week or is in a status that still allows action to be taken. • Drafted (may be an option) - Any transaction that has been placed in a pending (Drafted) state by the user and can still be either approved or canceled. Authorized - When a transaction, such as funds transfer, has been approved by a user with approval rights, the transaction displays in the Authorized category in Online Activity. Authorized indicates that a user is ready for the Financial Institution to process the transaction. Canceled - When a transaction, such as funds transfer, has been canceled by a user from the Transaction Details page, the transaction displays in the Canceled category in Online Activity. Canceled transactions cannot be restored, so cancel only if you are sure you do not intend to send the transaction for processing. • Processed - When a transaction, such as funds transfer, has been approved by a user with approval rights and then later processed by the financial institution (either by real-time interface or manually processed), the transaction displays in the Processed category in Online Activity. • Other - Any transaction that might have been unsuccessful (processing failure), or does not fall under the previous categories. Last update 03/10/2014 7 Statements The Online Statements page provides an electronic view of your statements. You will be required to enroll for e-statements before gaining access to this page. 1. From the online banking menu, choose Accounts > Statements. 2. Select the Statement you wish to view • Click to view the statement • Click to download the statement 3. Once the image or PDF of the statement is displayed, you can save or print your statement using the menu in the PDF Viewer or using browser print controls. Last update 03/10/2014 8 Transfer Funds The Transfer Funds page enables you to quickly and easily transfer funds between two of your online banking accounts, assuming they are authorized for online funds transfer. You can make: • One-time Immediate Transfer - By selecting today’s date as the Transfer Date, you can make a onetime transfer from one of your online accounts to another of your online accounts to be processed at the next available processing time. • One-time Future-Dated Transfer - By selecting a date in the future as the Transfer Date, you can make a one-time transfer from one of your online accounts to another of your online accounts on the Transfer Date requested. Recurring Transfer - Make a recurring series of transfers based upon your selected criteria. See Creating Recurring Transactions. To make a funds transfer: 1. From the online banking menu, choose Transactions > Funds Transfer. The Transfer Funds page appears. 2. Choose the From Account from which the funds will be withdrawn (debited). 3. Choose the To Account to which the funds will be deposited (credited). 4. Choose the Transfer Date you want the transfer to be made. If you choose a date in the future, the transaction will be stored for processing on the later date. 5. Choose an amount to be transferred. 6. Enter an optional Description or memo to help you in identifying this transaction later. 7. Click Submit, then OK if you are sure you want to proceed. 8. For recurring transfers, select Recurring. Refer to Create Recurring transactions on the next page for assistance on setting up and managing recurring transactions. 9. Review your transaction and click Approve Last update 03/10/2014 , then OK if you are sure you want to proceed. 9 Create Recurring Transactions You have the ability to create a recurring transaction for some types of payments or transfers. A recurring transaction happens on a preset schedule that you determine. Each recurring instance of the transaction is scheduled when the previous instance of the transaction has been processed or completed and is displayed under the Accounts > Online Activity menu. You can review or delete the recurring transaction (i.e. all future instances of the transaction) under the Transactions > Manage Recurring menu. On transactions that can be created as recurring, the Enter Payment (or Transfer) Frequency panel will appear on the page. To expand the panel, you can single-click on the Expand/Collapse icon on the right side of the panel, or double-click anywhere in the panel. To create a recurring transaction: 1. Select the Recurring radio button. The recurring parameters are now available for selection. 2. Select the recurring frequency. The choices are: • Weekly Payment - Select this option if you want a transfer to occur one or more times a week, either every week or every X weeks. • Weekly Example: You receive a direct deposit of your paycheck every other Friday and you want to transfer funds from checking account A to savings account B on Friday every 2 weeks. Monthly Payment - Select this option if you want a transfer to occur one or more times a month, either every month or every X months. When you select Monthly Transfers, you have a second Recur By selection for either Days of the Week or Calendar Days. Days of the Week Example: You have a payment that is due on the last Friday of every month which will end after 24 payments. Calendar Days Example: You receive a direct deposit of your paycheck on the 1st and 15th of every month, and you want to transfer funds from checking account A to savings account B on payday. If you pick a calendar day that extends beyond the number of days in a given month, that instance of the payment or transfer will always occur on the last day of the month. In the example above, although the payment day is the 31st, a February payment would occur on February 28th, and a June payment would occur on June 30th. 3. Select the Start Date – This date will generally be set to the first occurrence of the payment or transfer, but is not required to be. For example, if you establish a monthly payment on the 1st and 15th of every month, and set the start date of the 10th of the month, the first payment would be processed on the 15th, as scheduled. 4. Select the End Date – You can choose 1) No end date, 2) to end after a specified number of occurrences or, 3) to end on a specific date. 5. Click Submit. A confirmation dialog appears. 6. Click OK. You will be directed to the Submit Transaction page and given the opportunity to review your recurring transaction. From the Submit Transaction page, you can Draft (save for later), or Approve the transaction. 7. Review your recurring transaction and click Approve . A confirmation dialog appears. 8. Click OK. You are directed to the Manage Recurring Transactions page. The recurring transaction displays in an Authorized status. Last update 03/10/2014 10 Manage Recurring Transactions The Manage Recurring Transactions page displays recurring payments or transfers that you have created. A recurring transaction happens on a preset schedule that you determine. You can review or delete individual occurrences of each recurring transaction, as they are scheduled, under the Accounts > Online Activity menu. To cancel a recurring transaction: 1. From the online banking menu, choose Transactions > Manage Recurring. The Manage Recurring Transactions page appears. 2. Select the transaction you want to cancel by clicking on the transaction. 3. Click Cancel . A confirmation window opens. 4. Click OK. The transfer status is changed to Canceled. To view a recurring transaction: 1. Select the transaction you want to view by clicking on the transaction. 2. Click View (You can also double-click on the grid). The Transaction Details window appears listing all details of the transaction. 3. Click the Close button at the top right corner to close the window. Last update 03/10/2014 11 Member to Member You can choose to make a single transfer to another member or Quick Link another member's account (for deposit purposes only) to your online login. If you need to create a recurring or future-dated transfer, Quick Linking the account is required. When you select the option to Quick Link the other member's account to your login, it will place that account number in the drop-down menu in the funds transfer option. Enter Transfer Information Enter your transfer values using the fields below. • From Account – Select the account you wish the funds to come out of • Amount – Dollar amount you wish to transfer • Description – Optional Enter Recipient Member Account Information Target account information for your one-time Transfer • To Member Number – Enter the Member Number • To Account Type – Select what type of account you are transferring to • To Account Number – Enter account number • First Three Letters of the Last Name – For Business Accounts, enter the First Three Letters of the Business Name. Once completed, hit the Submit button. Last update 03/10/2014 12 Business/Recipients The Manage Recipients page allows you to add new recipients and edit or delete existing ones. Once you have entered a recipient, you can also add one or more templates for later use (for more information, go to Edit Recipients – Manage and/or Delete Templates). Recipients and saved templates are used when initiating Payroll, Payments, Collections and Wire Transfers from the respective BUSINESS payment menus in online banking. How to add an ACH/Wire Recipient 1. Log into Business Online Banking 2. Click on the BUSINESS link on the left menu, then click on Recipients 3. Once in the MANAGE RECIPIENTS screen, click on Add Recipient Last update 03/10/2014 13 4. On the ADD NEW RECIPIENT screen, enter the recipients information a. Name * - (Required) Enter First and Last name of the individual, or full name of the business, that you wish to pay/debit b. Display Name * - (Required) Enter a “nickname” for this recipient c. International Recipient – Used if the Recipient will be receiving an International Wire d. Individual / Company – Please select the type of Recipient this is. e. Street 1 – (Optional for ACH) Enter street address f. Street 2 – (Optional for ACH) Enter any additional information such as Suite #, etc g. City – (Optional for ACH) Enter City h. State - (Optional for ACH) Select their State of residence i. Postal Code - (Optional for ACH) Enter zip code j. E-mail – (Optional for ACH) Enter email address k. Send E-Mail Notifications - (Optional) If you wish to send emails when an ACH/Wire transaction is initiated, place a check mark in the box. 5. To save this new Recipient without adding it to a template, click the Submit button -OR6. To save and add this Recipient to an ACH or Wire Template Last update 03/10/2014 14 Edit Recipients How to edit a Recipient 1. Log into Business Online Banking 2. Click on the BUSINESS link on the left menu, then click on Recipients 3. Once in the MANAGE RECIPIENTS screen, click on the Recipient you wish to edit then click on icon (Edit Recipient) -OR- double click on the Recipient. 4. The Edit Recipient Screen will appear. Update the recipient and click Submit 5. A confirmation box will appear asking if you are sure you wish to submit the selected recipient. Click OK to submit. Last update 03/10/2014 15 Delete Recipients How to delete an ACH/Wire Recipient 1. Log into Business Online Banking 2. Click on the BUSINESS link on the left menu, then click on Recipients 3. Once in the MANAGE RECIPIENTS screen, click on the Recipient you wish to delete then click on icon (Delete Recipient) 4. A confirmation box will appear asking if you are sure you wish to delete the selected recipient. Click OK to delete. Last update 03/10/2014 16 Edit Recipients – Manage and/or Delete Payments How to manage payments for a Recipient 1. Log into Business Online Banking 2. Click on the BUSINESS link on the left menu, then click on Recipients 3. Once in the MANAGE RECIPIENTS screen, click on the Recipient you wish to edit then click on icon (Edit Recipient) -OR- double click on the Recipient. 4. The Edit Recipient Screen will appear. Select the Template you wish to edit, then click on icon (Edit Payment) under Manage Payments -OR- double click on the Template 5. The Edit Payment screen will appear. Update the Payment Information then click on the Submit button. 6. A confirmation box will appear asking if you are sure you wish to submit the selected recipient. 7. A confirmation box will appear asking if you are sure you wish to submit this payment template. Click OK to submit changes. Last update 03/10/2014 17 How to delete payments for a Recipient 1. Log into Business Online Banking 2. Click on the BUSINESS link on the left menu, then click on Recipients 3. Once in the MANAGE RECIPIENTS screen, click on the Recipient you wish to edit then click on icon (Edit Recipient) -OR- double click on the Recipient. icon 4. The Edit Recipient Screen will appear. Select the Template you wish to delete, then click on (Delete Payment) under Manage Payments 5. A confirmation box will appear asking if you are sure you wish to delete the selected recipient. Click OK to delete. Last update 03/10/2014 18 ACH – Single Payment The Single Payment ACH enables you to easily send money to a single recipient. There are two ways to make an ACH Single Payment: Single Payment – no existing Recipient 1. Select the BUSINESS menu on the left, and then click on Single Payment. 2. Recipient – (No Recipient) should be selected. 3. Recipient Information a. Name * - Enter in the individual or business name b. E-Mail - If you wish to send an email alert, click on the Send E-Mail notification and then enter the email address next to E-Mail. c. To Account * - The Recipients checking/savings/loan account number d. Account Type * - Select what type of account it is e. Routing Number * - Enter the ABA/Routing Transit number 4. Payment Information f. Pay From * - Select the company name you wish to pay from g. From Account * - Select the checking account were the funds will be disbursed from h. Effective Date * - The date the payment will be received. Must be at least 1 business day (before 3pm ET). i. Amount * - Enter the amount you wish to pay the Recipient j. PPD CCD – If you are paying an individual, select PPD. If you are paying a business, select CCD k. Memo/Addendum – Optional information that might be included with the transaction. Last update 03/10/2014 19 5. Enter Payment Frequency – If you wish to make this a recurring payment, click on the maximize box. If this will be a onetime payment, skip to step number 5. l. One-Time or Recurring – Select Recurring m. Frequency – Select if this will be a Weekly or Monthly Payment. Determine if it will initiate every week/month or enter the number of weeks/months. Select the Recur By option. n. Start Date – Select the effective date this this Recurring payment should start. Must be at least 1 business day (before 3pm ET). o. No end date/End after/End on – Determine when you wish the Recurring payment to end. 6. Click Continue. 7. To send the ACH payment, click on the Approve button. It will ask you to “Choose the delivery channel in which you would like to receive the Secure Access Code from your contact preferences below.” 8. Click on the Send button, the screen will change to ask you to enter the Secure Access Code. Once you receive the text message or phone call with the Secure Access Code, enter the code and click the OK button. Your payroll should now be Authorized. Last update 03/10/2014 20 Single Payment – existing Recipient 1. Select the BUSINESS menu on the left, and then click on Recipients. 2. Either double click on the Recipient you wish to make the Single Payment to or click on their name once and then click on the Edit Recipient button. 3. Once the EDIT RECIPIENT screen appears, click on the Add Payment button under Manager Payments. 4. Payment Information a. Payment Type * - Select ACH Single Payment b. Pay From – Select the company name you wish to pay from c. From Account * - Select the account the disbursement will come from d. Amount – Enter the amount you wish to send e. Memo/Addendum - Optional information that might be included with the transaction. 5. Payment Template a. Enter a nickname or description next to Single Payment 6. Recipient Account Information a. If there is an Existing Account already set up, select Existing Account and choose the account number -orb. If this is the first time entering account information for this Recipient, or you are adding a new account, select Enter New Account i. To Account * - Enter Recipients checking/savings/loan account number ii. Account Type * - Select what type of account it is iii. Routing Number * - Enter the ABA/Routing Transit number 7. Once completed click Submit 8. Once the template has been created select the BUSINESS menu on the left, then click on Single Payment Last update 03/10/2014 21 9. Recipient – Select the Recipient from the drop down menu. Recipient and Payment information will prefill 10. Payment Information a. Amount * - Verify the amount is correct, if not please change it to the correct amount. b. Memo/Addendum – Optional information that might be included with the transaction. 9. Enter Payment Frequency – If you wish to make this a recurring payment, click on the maximize box. If this will be a onetime payment, skip to step number 5. a. One-Time or Recurring – Select Recurring Last update 03/10/2014 22 b. Frequency – Select if this will be a Weekly or Monthly Payment. Determine if it will initiate every week/month or enter the number of weeks/months. Select the Recur By option. c. Start Date – Select the effective date this this Recurring payment should start. Must be at least 1 business day (before 3pm ET). d. No end date/End after/End on – Determine when you wish the Recurring payment to end. 10. Click Continue. 11. Click on the Approve button. It will ask you to “Choose the delivery channel in which you would like to receive the Secure Access Code from your contact preferences below.” 12. Click on the Send button, the screen will change to ask you to enter the Secure Access Code. Once you receive the text message or phone call with the Secure Access Code, enter the code and click the OK button. Your payroll should now be Authorized. Last update 03/10/2014 23 ACH – Single Collection (ACH Debit) The Single Collection ACH enables you to easily draft money from a single recipient. There are two ways to make an ACH Single Collection: Single Collection – no existing Recipient 1. Select the BUSINESS menu on the left, and then click on Single Collection. 2. Payor – (No Recipient) should be selected. 3. Payor Information a. Name * - Enter in the individual or business name b. E-Mail - If you wish to send an email alert, click on the Send E-Mail notification and then enter the email address next to E-Mail. c. From Account * - The Payors checking/savings/loan account number d. Account Type * - Select what type of account it is e. Routing Number * - Enter the ABA/Routing Transit number 4. Payment Information a. Pay To * - Select the company name you wish to deposit to b. To Account * - Select the checking account were the funds will be deposited to c. Effective Date * - The date the payment will be debited. Must be at least 1 business day (before 3pm ET). d. Amount * - Enter the amount you wish to debit the Payor e. PPD CCD – If you are debiting an individual, select PPD. If you are debiting a business, select CCD f. Memo/Addendum – Optional information that might be included with the transaction. 5. Enter Payment Frequency – If you wish to make this a recurring debit, click on the maximize box. If this will be a onetime payment, skip to step number 6. Last update 03/10/2014 24 a. One-Time or Recurring – Select Recurring b. Frequency – Select if this will be a Weekly or Monthly debit. Determine if it will initiate every week/month or enter the number of weeks/months. Select the Recur By option. c. Start Date – Select the effective date this this Recurring debit should start. Must be at least 1 business day (before 3pm ET). d. No end date/End after/End on – Determine when you wish the Recurring debit to end. 6. Click Continue. 7. To send the ACH debit, click on the Approve button. It will ask you to “Choose the delivery channel in which you would like to receive the Secure Access Code from your contact preferences below.” 8. Click on the Send button, the screen will change to ask you to enter the Secure Access Code. Once you receive the text message or phone call with the Secure Access Code, enter the code and click the OK button. Your payroll should now be Authorized. Last update 03/10/2014 25 Single Collection – existing Recipient 1. Select the BUSINESS menu on the left, and then click on Recipients. 2. Either double click on the Recipient you wish to debit or click on their name once and then click on the Edit Recipient button. 3. Once the EDIT RECIPIENT screen appears, click on the Add Payment button under Manager Payments. 4. Payment Information a. Payment Type * - Select ACH Single Collection b. Pay From – Select the company name you wish to deposit to c. From Account * - Select the account the deposit will go into d. Amount – Enter the amount you wish to debit e. Memo/Addendum - Optional information that might be included with the transaction. 5. Payment Template a. Enter a nickname or description next to Single Payment 6. Payor Account Information a. If there is an Existing Account already set up, select Existing Account and choose the account number -orb. If this is the first time entering account information for this Recipient, or you are adding a new account, select Enter New Account i. To Account * - Enter Payors checking/savings/loan account number ii. Account Type * - Select what type of account it is iii. Routing Number * - Enter the ABA/Routing Transit number 7. Once completed click Submit 8. Once the template has been created select the BUSINESS menu on the left, then click on Single Collection Last update 03/10/2014 26 9. Payor – Select the Payor from the drop down menu. Payor and Payment information will prefill 10. Payment Information a. Amount * - Verify the amount is correct, if not please change it to the correct amount. b. Memo/Addendum – Optional information that might be included with the transaction. 9. Enter Payment Frequency – If you wish to make this a recurring debit, click on the maximize box. If this will be a one-time debit, skip to step number 19. a. One-Time or Recurring – Select Recurring b. Frequency – Select if this will be a Weekly or Monthly debit. Determine if it will initiate every week/month or enter the number of weeks/months. Select the Recur By option. Last update 03/10/2014 27 c. Start Date – Select the effective date this this Recurring debit should start. Must be at least 1 business day (before 3pm ET). d. No end date/End after/End on – Determine when you wish the Recurring debit to end. 10. Click Continue. 11. To send the ACH debit, click on the Approve button. It will ask you to “Choose the delivery channel in which you would like to receive the Secure Access Code from your contact preferences below.” 12. Click on the Send button, the screen will change to ask you to enter the Secure Access Code. Once you receive the text message or phone call with the Secure Access Code, enter the code and click the OK button. Your payroll should now be Authorized. Last update 03/10/2014 28 Payroll The Payroll page enables you to make ACH batch payments (credits) to numerous payroll recipients at the same time in the form of a batch template. In order to use this page you must first set up recipients and payments and assign them to a batch. To select Payroll, go to the left menu and select Payroll under the Business section. Adding a Recipient to a Payroll Batch 1. Select the BUSINESS menu on the left, and then click on Recipients. 2. Either double click on the Recipient you wish to debit or click on their name once and then click on the Edit Recipient button. 3. Once the EDIT RECIPIENT screen appears, click on the Add Payment button under Manager Payments. 4. Payment Information a. Payment Type * - Select Payroll b. Pay From – Select the company name you for the payroll c. From Account * - Select the account money will be disbursed from d. Amount – Enter the Recipient’s payroll amount e. Memo/Addendum - Optional information that might be included with the transaction. 5. Payment Template a. For an Existing Payroll Batch, click on Existing Batch radio button and select the batch name from the drop down menu b. To create a new Payroll Batch, click on the New Batch radio button and enter the name for the new batch 6. Primary Account Information a. If there is an Existing Account already set up, Last update 03/10/2014 29 select Existing Account and choose the account number -orb. If this is the first time entering account information for this Recipient, or you are adding a new account, select Enter New Account i. To Account * - Enter Recipients checking/savings/loan account number ii. Account Type * - Select what type of account it is iii. Routing Number * - Enter the ABA/Routing Transit number 7. Recipient Employee Information – Optional a. Department – Enter department information b. Employee ID – Enter employee ID 8. Split A Information/Split B Information – If your payroll Recipient would like to split their direct deposit into 2 or 3 different accounts, use this option. a. If there is one additional account, click on Enable Split A. If there are two additional accounts, click on Enable Split A and Enable Split B. b. The dollar amount entered will be the exact amount deposited every time and will automatically be deducted from the Total Amount. c. If there is an Existing Account already set up, select Existing Account and choose the account number –ord. If this is the first time entering account information for this Recipient, or you are adding a new account, select Enter New Account i. To Account * - Enter Recipients checking/savings/loan account number ii. Account Type * - Select what type of account it is e. Routing Number * - Enter the ABA/Routing Transit number 9. Once the information has been completed, click on the Submit button. Your Recipient has now been added to a Payroll Batch. To add more Recipients to this batch, follow these steps again but select Existing Batch and then select the batch name from the drop down menu. To update dollar amounts and submit a Payroll Batch 1. Select the BUSINESS menu on the left, and then click on Payroll 2. Batch * - Select the Payroll Template from the drop down menu 3. Pay from * - Will prefill once you select a batch 4. From Account * - Will prefill once you select a batch 5. Effective Date * - Enter the date the direct deposit will go into the Recipients account Last update 03/10/2014 30 6. Enter Payment Frequency – If you wish to make this a recurring payment, click on the maximize box. If this will be a onetime payment, skip to step number 7. a. One-Time or Recurring – Select Recurring b. Frequency – Select if this will be a Weekly or Monthly Payment. Determine if it will initiate every week/month or enter the number of weeks/months. Select the Recur By option. c. Start Date – Select the effective date this this Recurring payment should start. Must be at least 1 business day (before 3pm ET). d. No end date/End after/End on – Determine when you wish the Recurring payment to end. Last update 03/10/2014 31 7. Pay - Select employees you wish to pay by clicking in the check box under Pay or click the Select All button to pay all employees 8. Notify - If you wish to send email notifications of the direct deposit, click in the check box under Notify 9. Sorted By: - Allows you to sort employee list by Name, Department, Employee ID, Account Number 10. A on top – Allows you to change how the list is sorted 11. Amount – Allows you to change amount deposited for payroll per employee 12. Addenda – Optional information that might be included with the transaction 13. Once you have completed updating the Batch, click on the Submit button 14. To send the ACH debit, click on the Approve button. It will ask you to “Choose the delivery channel in which you would like to receive the Secure Access Code from your contact preferences below.” 15. Click on the Send button, the screen will change to ask you to enter the Secure Access Code. Once you receive the text message or phone call with the Secure Access Code, enter the code and click the OK button. Your payroll should now be Authorized. Last update 03/10/2014 32 Payments (Multiple ACH Credits) 1. Select the BUSINESS menu on the left, and then click on Recipients. 2. Either double click on the Recipient you wish to make the Single Payment to or click on their name once and then click on the Edit Recipient button. 3. Once the EDIT RECIPIENT screen appears, click on the Add Payment button under Manager Payments. 4. Payment Information a. Payment Type * - Select ACH Payments b. Pay From – Select the company name you wish to pay from c. From Account * - Select the account the disbursement will come from d. Amount – Enter the amount you wish to send e. Memo/Addendum - Optional information that might be Included with the transaction 5. Payment Template a. For an Existing Payment Batch, click on Existing Batch radio button and select the batch name from the drop down menu b. To create a new Payment Batch, click on the New Batch radio button and enter the name for the new batch 6. Recipient Account Information a. If there is an Existing Account already set up, select Existing Account and choose the account number orb. If this is the first time entering account information for this Recipient, or you are adding a new account, select Enter New Account i. To Account* - Enter Recipients checking/saving ii. Account Type* - Select what type of account it is iii. Routing Number* - Enter the ABA/Routing Transit number 7. Once completed click Submit To update dollar amounts and submit a Payroll Batch Last update 03/10/2014 33 1. Select the BUSINESS menu on the left, and then click on Payments 2. Batch * - Select the Payments Template from the drop down menu 3. Pay from * - Will prefill once you select a batch 4. From Account * - Will prefill once you select a batch 5. Effective Date * - Enter the date the Payments will go into the Recipients account 6. Enter Payment Frequency – If you wish to make this a recurring payment, click on the maximize box. If this will be a onetime payment, skip to step number 7. a. One-Time or Recurring – Select Recurring b. Frequency – Select if this will be a Weekly or Monthly Payment. Determine if it will initiate every week/month or enter the number of weeks/months. Select the Recur By option. c. Start Date – Select the effective date this this Recurring payment should start. Must be at least 1 business day (before 3pm ET). d. No end date/End after/End on – Determine when you wish the Recurring payment to end. Last update 03/10/2014 34 7. Pay - Select Recipients you wish to pay by clicking in the check box under Pay or click the Select All button to pay all employees 8. Notify - If you wish to send email notifications of the payments, click in the check box under Notify 9. Sorted By: - Allows you to sort Recipient list by Name, Account Number 10. A on top – Allows you to change how the list is sorted 11. Amount – Allows you to change amount paid to Recipients 12. Addenda – Optional information that might be included with the transaction 13. Once you have completed updating the Batch, click on Submit. 14. To send the ACH debit, click on the Approve button. It will ask you to “Choose the delivery channel in which you would like to receive the Secure Access Code from your contact preferences below.” 15. Click on the Send button, the screen will change to ask you to enter the Secure Access Code. Once you receive the text message or phone call with the Secure Access Code, enter the code and click the OK button. Your payroll should now be Authorized. Last update 03/10/2014 35 Collections (Multiple ACH Debits) 1. Select the BUSINESS menu on the left, and then click on Recipients. 2. Either double click on the Recipient you wish to debit or click on their name once and then click on the Edit Recipient button. 3. Once the EDIT RECIPIENT screen appears, click on the Add Payment button under Manager Payments. 4. Payment Information a. Payment Type * - Select ACH Collections b. Pay From – Select the company name you wish to deposit to c. From Account * - Select the account the deposit will go into d. Amount – Enter the amount you wish to debit e. Memo/Addendum - Optional information that might be included with the transaction. 5. Payment Template a. For an Existing Collections Batch, click on Existing Batch radio button and select the batch name from the drop down menu b. To create a new Collections Batch, click on the New Batch radio button and enter the name for the new batch 6. Payor Account Information a. If there is an Existing Account already set up, select Existing Account and choose the account number -orb. If this is the first time entering account information for this Recipient, or you are adding a new account, select Enter New Account i. To Account * - Enter Payors checking/savings/loan account number ii. Account Type * - Select what type of account it is iii. Routing Number * - Enter the ABA/Routing Transit number 7. Once completed click Submit 8. Once the template has been created select the BUSINESS menu on the left, then click on Collections Last update 03/10/2014 36 9. Batch * - Select the Collections Template from the drop down menu 10. Pay To * - Will prefill once you select a batch 11. To Account * - Will prefill once you select a batch 12. Effective Date * - Enter the date the Payments will go into the Recipients account 13. PPD/CCD - If you are paying an individual, select PPD. If you are paying a business, select CCD. 14. Enter Payment Frequency – If you wish to make this a recurring debit, click on the maximize box. If this will be a one-time debit, skip to step number 15. a. One-Time or Recurring – Select Recurring b. Frequency – Select if this will be a Weekly or Monthly debit. Determine if it will initiate every week/month or enter the number of weeks/months. Select the Recur By option. Last update 03/10/2014 37 Start Date – Select the effective date this this Recurring debit should start. Must be at least 1 business day (before 3pm ET). d. No end date/End after/End on – Determine when you wish the Recurring debit to end. 15. Click on the Submit button 16. To send the ACH Collections Batch, click on the Approve button. It will ask you to “Choose the delivery channel in which you would like to receive the Secure Access Code from your contact preferences below.” c. 17. Click on the Send button, the screen will change to ask you to enter the Secure Access Code. Once you receive the text message or phone call with the Secure Access Code, enter the code and click the OK button. Your payroll should now be Authorized. Last update 03/10/2014 38 CSV Import In addition to creating your own batch, you can also import a file to be processed if it has already been created. The CSV file can either be a: • • 2 column (Name, Amount) to update an existing template. Name must exactly match saved Recipient. 5 column (Name, Routing/Transit Number, Account Number, Account Type, Amount). No existing template or batch is required. To import the CSV Formatted File 1. Go to the BUSINESS menu and select Payroll, Payments or Collections depending on the transaction type you wish to perform 2. For either CSV file, click the Browse button, select your file and click on the Open button. a. Account * - Verify the account the funds will be debited/credited b. Pay from * - Select the Subsidiary c. Effective Date * - Select the date you wish the funds to be credited/debited to/from your Recipients. 3. Click on the Submit button 4. To send the Batch, click on the Approve button. It will ask you to “Choose the delivery channel in which you would like to receive the Secure Access Code from your contact preferences below.” 5. Click on the Send button, the screen will change to ask you to enter the Secure Access Code. Once you receive the text message or phone call with the Secure Access Code, enter the code and click the OK button. Your payroll should now be Authorized. Last update 03/10/2014 39 ACH Pass-Thru ACH Pass-Thru allows you to load and submit ACH pass-thru files. A pass-thru file is a fully NACHA formatted file built outside of Business Online Banking. This type of file may contain one or more batches which can be both credit and debit. 1. Select the BUSINESS menu on the left, and then click on ACH Pass-Thru 2. Import * - Click the Browse button, select your NACHA formatted file and click on the Open button 3. Process Date * - Because there may be multiple effective dates in the file, we ask for the date on which you would like your file to be processed. On this date, the transactions are processed according to the effective date or dates in the file. 4. Click on the Submit button 5. To send the Batch, click on the Approve button. It will ask you to “Choose the delivery channel in which you would like to receive the Secure Access Code from your contact preferences below.” 6. Click on the Send button, the screen will change to ask you to enter the Secure Access Code. Once you receive the text message or phone call with the Secure Access Code, enter the code and click the OK button. Your payroll should now be Authorized. Last update 03/10/2014 40 Wire Transfer There are two ways to make a Wire Transfer: Wire Transfer – no existing Recipient 1. Select the BUSINESS menu on the left, and then click on Wire Transfer 2. Beneficiary Information – Fields with * are required to be completed a. Name * - Enter the beneficiaries name b. Street 1 * - Enter the beneficiaries street address c. Street 2 – Enter any secondary street information here if necessary d. City * - Enter beneficiaries city e. State * - Select beneficiaries state f. Postal Code * - Enter beneficiaries zip code g. Send E-Mail Notification – If you wish to send the beneficiary an email when the wire is approved, click on the check box, then next E-Mail enter the beneficiaries email address 3. Payment Information Last update 03/10/2014 41 a. Pay from * - Select the Subsidiary (Business name) you will be paying from b. From Account * - Select Account the money will be debited from c. Payment Date * - Select the date the payment is to be made (today’s date wires must be submitted by 4:45 PM EST) d. Amount * - Enter the amount of the wire transfer e. Description – Optional f. Message to Beneficiary – Optional 4. Beneficiary Financial Institution a. To Account * - Enter beneficiaries account number b. Account Type * - Select if the beneficiary account type c. Routing Number * - Enter beneficiaries routing/transit number d. Name * - Enter beneficiaries Financial Institutions name e. Street 1 * - Enter beneficiaries Financial Institutions street address f. Street 2 - Enter beneficiaries Financial Institutions secondary street if necessary g. City * - Enter beneficiaries Financial Institutions city h. State * - Select beneficiaries Financial Institutions state i. Postal Code * - Enter beneficiaries Financial Institutions zip code 5. Intermediary Financial Institution - An Intermediary Financial Institution may be required if the beneficiary’s financial institution is not a direct Fed Wire participating financial institution and cannot receive the wire transfer a. If an Intermediary Financial Institution is provided to you, click on checkbox next to the User Intermediary Institution b. Routing Number * - Enter Intermediary Financial Institutions routing/transit number c. Name * - Enter Intermediary Financial Institutions name d. Street 1 * - Enter Intermediary Financial Institutions street address e. Street 2 - Enter Intermediary Financial Institutions secondary street if necessary f. City * - Enter Intermediary Financial Institutions city g. State * - Select Intermediary Financial Institutions state h. Postal Code * - Enter Intermediary Financial Institutions zip code 6. Enter Payment Frequency – If you wish to make this a recurring Wire, complete the following steps. If this will be a one-time Wire Transfer, skip to step number 7. a. One-Time or Recurring – Select Recurring b. Frequency – Select if this will be a Weekly or Monthly debit. Determine if it will initiate every week/month or enter the number of weeks/months. Select the Recur By option. Last update 03/10/2014 42 c. Start Date – Select the effective date this this Recurring debit should start. Must be at least 1 business day (before 3pm ET). d. No end date/End after/End on – Determine when you wish the Recurring debit to end. 7. Click on the Submit button 8. To send the Wire Transfer, click on the Approve button. It will ask you to “Choose the delivery channel in which you would like to receive the Secure Access Code from your contact preferences below.” 9. Click on the Send button, the screen will change to ask you to enter the Secure Access Code. Once you receive the text message or phone call with the Secure Access Code, enter the code and click the OK button. Your payroll should now be Authorized. Last update 03/10/2014 43 Wire Transfer – Existing Recipient 1. Select the BUSINESS menu on the left, and then click on Recipients. 2. Either double click on the Recipient you wish to debit or click on their name once and then click on the Edit Recipient button. 3. Once the EDIT RECIPIENT screen appears, click on the Add Payment button under Manager Payments. 4. Payment Information a. Payment Type * - Select Wire Transfer b. Pay from * - Select the Subsidiary (Business name) you will be paying from c. From Account * - Select Account the money will be debited from d. Amount * - Enter the amount of the wire transfer e. Message to Beneficiary – Optional 5. Payment Template a. Single Payment – Enter a template name 6. Beneficiary Financial Institution a. If there is an existing account number select Use Existing Account, otherwise select Enter New Account b. To Account * - Enter beneficiaries account number c. Account Type * - Select if the beneficiary account type d. Routing Number * - Enter beneficiaries routing/transit number e. Name * - Enter beneficiaries Financial Institutions name f. Street 1 * - Enter beneficiaries Financial Institutions street address g. Street 2 - Enter beneficiaries Financial Institutions secondary street if necessary h. City * - Enter beneficiaries Financial Institutions city i. State * - Select beneficiaries Financial Institutions state j. Postal Code * - Enter beneficiaries Financial Institutions zip code Last update 03/10/2014 44 7. Intermediary Financial Institution - An Intermediary Financial Institution may be required if the beneficiary’s financial institution is not a direct Fed Wire participating financial institution and cannot receive the wire transfer a. If an Intermediary Financial Institution is provided to you, click on checkbox next to the User Intermediary Institution b. Name * - Enter Intermediary Financial Institutions name c. Routing Number * - Enter Intermediary Financial Institutions routing/transit number d. Street 1 * - Enter Intermediary Financial Institutions street address e. Street 2 - Enter Intermediary Financial Institutions secondary street if necessary f. City * - Enter Intermediary Financial Institutions city g. State * - Select Intermediary Financial Institutions state h. Postal Code * - Enter Intermediary Financial Institutions zip code 8. Click Submit to save the Template. 9. Once the template has been created select the BUSINESS menu on the left, then click on Wire Transfer 10. Recipient a. Select saved Recipient/Wire Template; all fields will prefill. 11. Review Wire Transfer information 12. Enter wire transfer amount next to Amount * 13. Enter any other optional information next to Description and/or Message to Beneficiary 14. Click on the Submit button 15. To send the Wire Transfer, click on the Approve button. It will ask you to “Choose the delivery channel in which you would like to receive the Secure Access Code from your contact preferences below.” 16. Click on the Send button, the screen will change to ask you to enter the Secure Access Code. Once you receive the text message or phone call with the Secure Access Code, enter the code and click the OK button. Your payroll should now be Authorized. Last update 03/10/2014 45 Secure Messages You can send secure messages to and receive secure messages from our financial institution via the online banking system (Services > Messages). In fact, it is one of the most secure ways you can communicate with us. From this page, you can: • Create a new message • Read selected messages Reply to a message Set message to never expire Delete a message Sort and group messages To create a new message: 1. From the online banking menu, choose Services > Messages. The Secure Mailbox page appears. 2. From the Secure Message toolbar, click New. The message window appears. Please make sure pop-ups are allowed from our site to use this feature. 3. Select a destination from the To drop-down list to route the message to the most appropriate location. 4. Enter a Subject for the message. 5. In some cases, you may be able to attach certain file types to your message to send to us. Click Choose File to select the file you wish to send. 6. Compose your message and click Send. The transport of your message is SSL encrypted and is never sent through public, unsecured communication channels. To read a selected message: 1. Select a message you want to read and click the Read Message toolbar button (or double-click on the message). 2. The message will display in a separate window from which you are able to reply, delete, print, or set to never expire. To reply to message: 1. Select a message to which you want to reply and click the Reply toolbar button (or double-click on the message). 2. The message will display in a separate window from which you are able to reply to the message. To set a message to never expire: 1. Select a message you want to keep and click the Set Message to Never Expire toolbar button (or double-click on the message). A confirmation window opens. 2. Click OK. The date no longer appears in the Expires On column. Your message will be kept until you delete it. To delete a message: 1. Select a message you wish to delete and click the Delete Message toolbar button (or double-click on the message). A confirmation window opens. 2. Click OK. The message is removed from the grid and is permanently deleted. Last update 03/10/2014 46 3. You may select multiple messages at once by holding down the Ctrl key and clicking desired messages. When multiple messages are highlighted, you can then click the Delete Message toolbar button to delete multiple messages. To group messages: 1. On the Secure Mailbox toolbar, click the Group By drop-down arrow. The following options display: • None • Sender Subject Received 2. Choose an option. The grid is grouped according to the selection. Last update 03/10/2014 47 Update Contact Info Please use this page to update your contact information. Once you update your information, please click on Continue to submit your changes. NOTE: Changes apply to this membership only. If you have multiple memberships, be sure to log in to each to apply the necessary changes. Last update 03/10/2014 48 Stop Payment Use the Make a Stop Payment page to place an online stop payment request on a single check or a consecutive series of checks. An online request to stop payment on a check or series of checks does not guarantee that the check will be stopped, as the item may have already been processed and posted to your account. To request a stop payment on a single check: 1. From the online banking menu, choose Services > Stop Payment. The Make a Stop Payment page appears. 2. Choose For a Single Check and enter the following information: • Account – From the drop-down list, select the account against which the check was drawn. • Comments – Provide us any information on why you are requesting the stop payment be made. Number – The number of the specific check to be stopped. Payee – To whom the check was written. Amount – The amount of the check. Date Written – The date the check was written. 3. Click Submit. A confirmation window appears. 4. Click OK. You are directed to the Submit Transaction page where you will be given the opportunity to preview your submitted changes, then draft (save for later) or approve the stop payment. 5. Click Approve. A confirmation window appears. 6. Click OK. You are directed to the Online Activity page. A check box at the bottom of the Submit Transaction page allows the user to make another transaction if they desire to do so. If this box is checked, the system returns to the Make a Stop Payment page – if this box is not checked the system goes to Online Activity. Making stop payments across a range of checks is only advised in extreme cases (stolen check book, etc.), as individual stop payment service fees apply to each check included in the request. To request a stop payment on a range of consecutive checks: 1. From the online banking menu, choose Services > Stop Payment. The Make a Stop Payment page appears. 2. Choose For Multiple Checks and enter the following information: • Account – From the drop-down list, select the account against which the check was drawn. • Comments – Provide us any information on why you are requesting the stop payment be made. Start Number – The first check in the range you are requesting for stop payment. Start Date – The date the first check in the range was written. End Number – The last check in the range you are requesting for stop payment. End Date – The date the last check in the range was written. 3. Click Submit. A confirmation window appears. 4. Click OK. You are directed to the Submit Transaction page where you will be given the opportunity to preview your submitted changes, then draft (save for later) or approve the stop payment. 5. Click Approve. A confirmation window appears. 6. Click OK. You are directed to the Online Activity page. Last update 03/10/2014 49 Account Preferences The Account Preferences page allows you to customize the way your accounts and account information are presented. On this page you can: • Change the default account display order - Smaller order numbers will appear in lists before larger numbers. When accounts are grouped, as on the Account Overview page, your selected order will be honored within the group. • Enter a nickname for each of your accounts - Your nickname will be used in all areas of online banking. Account numbers in online banking are masked for the security of your financial information; however, if you need to reference account numbers often, you may choose to enter the full account number as your nickname, or part of your nickname. • Change the default history amount - Enter the default amount of history presented on the Account History page for each individual account. This reduces page display times for accounts with larger amounts of history. For example, you may want to see the last 50 items for your checking account, but the last 365 days for a loan account. It is possible to enter a default history amount that is greater than the history available for the account. In that case, we will display all available history for the account. The oldest history transaction available will also be displayed at the bottom of the Account History page. • Set text banking account preferences - From the Text Account grid in Account Preferences, you can enable and nickname accounts, as well as set the display order for text banking. To set account preferences: 1. From the online banking menu, choose Preferences > Account. The Account Preferences page appears. 2. Enter the display order for each applicable account. 3. Enter a display name (nickname) for each applicable account. Including the last four digits of the account number in the nickname may be helpful for future reference 4. Enter the number (#) of history items or days to display. 5. From the Type drop-down list, choose Items or Days. 6. Click Submit. A confirmation window opens. 7. Click OK. A success message appears in green at the top of the Account Overview page: You have successfully changed your account preferences. To set text banking account preferences: 1. From the online banking menu, choose Preferences > Account. The Account Preferences page appears. 2. Click Text Accounts. The Text Accounts grid appears. 3. Select check boxes to enable accounts. 4. Enter the display order for each applicable account. 5. Enter a display name (nickname) for each applicable account. The display names for text banking accounts are limited to 4 characters. 6. Click Submit. A confirmation window opens. Last update 03/10/2014 50 7. Click OK. A success message appears in green at the top of the Account Overview page: You have successfully changed your account preferences. Last update 03/10/2014 51 Alert The Alerts page is used to set up notifications that let you know when certain events happen. There are five types of alerts: • Account Alert - Account Alerts are account-based alerts that trigger based on changes to your account details. • Date Alert - Date Alerts are date-based alerts that offer a convenient reminder of important dates or events. History Alert - History Alerts are processed transaction alerts that trigger based on historical transaction details. Insufficient Funds Alert - Insufficient Funds Alerts are triggered when there are insufficient funds in the account on which the check is drawn. Transaction Alert - Transaction Alerts are transaction-based alerts that trigger based on the type of online transactions. The Account criterion will not be selectable when creating an ACH Pass-Thru transaction alert as there is no account associated with this transaction type. Alerts can be delivered to you in the following ways: • Secure Message Notification – An alert will always be delivered to your secure mailbox under the Services > Messages menu. In the case that you fail to receive an email, or miss a notification phone call, you can always confirm and review your alerts in your secure mailbox. • Email Notification – An email notification will be sent when your alert triggers. Phone Notification - You can receive a phone call from our voice banking system when your alert triggers. If you choose to receive a phone call, you should enter the desired time you want to receive the call any day the alert triggers. Text Message Notification (if applicable) – A text message will be sent to your mobile device. Depending on your mobile plan, you may be charged for text messages. Adding New Alerts To create a new alert: 1. From the online banking menu, choose Preferences > Alerts. The Alerts page appears. 2. Click Add Alert and select an alert type. The Alert window appears. 3. Select the appropriate alert criteria including the notification frequency. If you choose to be notified only on the first occurrence, the alert will become inactive after the first trigger. 4. Select your notification preference. If you choose to be notified via phone, text, or email, there will be a secure message sent to your secure online mailbox. 5. Click OK. The window closes and the alert displays on the Alerts page. . Editing Alerts To edit an existing account alert: 1. From the Alerts page, select the alert you want to edit and click the Edit Alert toolbar button or doubleclick on the grid. The Edit Alert window appears. 2. Edit the parameters of the alert and click OK. The window closes. To disable the alert, clear the Enable this Alert check box which will render the alert inactive without deleting the alert. The alert will still display on the Alerts page, but with an Inactive status. Deleting Alerts Last update 03/10/2014 52 To delete an existing account alert: 1. From the Alerts page, select an alert. 2. Click the Delete Alert X toolbar button. A confirmation window appears. 3. Click OK. The window closes and the alert is removed from the page. Date Alerts To create a date alert: 1. On the Alerts toolbar, choose Add Alert > New Date Alert. 2. Select the month and day you want to be alerted. 3. Select a category from the drop-down list. 4. Add an optional note – this can be used to better describe the alert if the category is insufficient. 5. Select the Notification Frequency. 6. Select the Notification Preferences. 7. Click OK. The window closes and the alert displays on the Alerts page. Date alerts are edited and deleted the same way as account alerts. Last update 03/10/2014 53 Security The Security Preferences page lets you change your preferences related to accessing our online banking services. These preferences include: • Changing your password • Changing your login ID Adding and updating secure delivery information Creating a challenge code To make changes, choose Preferences > Security from the online banking menu and click on the tab for the preference you want to change. Changing your Password To change your password: 1. Click the Password tab. 2. Enter your old password. 3. Enter and confirm (re-enter) your new password. Your password must conform to the password requirements displayed on the right side of the page. 4. Click Submit Password Change. Your new Password will be immediately effective for all future logins to online banking. Changing your Login ID To change your login ID: 1. Click the Login tab. 2. Enter your desired login ID. Your login ID must be unique across all users of our online services and conform to the login ID requirements displayed on the right side of the page. 3. Click Submit Login ID Change. Your new login ID will be immediately effective for all future logins to online banking. Managing Your Secure Delivery Information When you are required to securely register your computer or you forget your password and request a new, temporary password, our system will present you with your provided Secure Delivery contact information. When you select an e-mail or phone number, we will deliver a secure access code to your e-mail account or phone (via a telephone call). The Secure Delivery tab is where to manage your preferred delivery contact information and can be edited only when you are strongly authenticated. To add a delivery contact: 1. Click the Secure Delivery tab. 2. Click Add Delivery Contact and select one of the following: • • New E-mail Address • New Phone Number New SMS Text Number 3. Enter the contact information and click OK. The delivery contact is added to the grid. Last update 03/10/2014 54 Creating Your Challenge Code If you have rights to this feature, you may create a challenge code here. The challenge code can be used, in addition to the correct entry of the user ID and password, if you are unable to receive a secure access code by phone or email. Once it is created, you may choose to enter this code instead of receiving a secure access code through the standard authentication process. For your security, you will not be able to register your computer when logging in with the challenge code. Last update 03/10/2014 55 Subsidiaries The Manage Subsidiaries page allows you to add, edit, or remove subsidiary profiles which, when added, become available in the Pay From drop-down lists on all applicable payment pages. If you manage multiple companies with multiple tax identification numbers, creating subsidiaries will make using our cash management payment services easier. A subsidiary is a secondary or alternate company profile that uses defined payment attributes to replace the primary company attributes and are specific to the subsidiary company, including: • Subsidiary Name - The name you choose to identify the subsidiary company profile on the payment pages. • ACH Header - An alternate ACH company name used to send ACH payment types that require the information. Wire Header - An alternate Wire company name used to send Wire Transfer payment types that require the information. Tax ID - An alternate tax identification number (TIN) used to send the tax payment types and other payments that require the information. Subsidiary Address - An alternate company address used to send the transaction for payment types that require the information. To add a subsidiary: 1. From the online banking menu, choose Preferences > Subsidiaries. The Manage Subsidiaries page appears. 2. On the toolbar, click Add Subsidiary. 3. After providing the required information, you will be returned to the Manage Subsidiaries page. 4. If necessary, use the toolbar buttons to edit or delete subsidiaries. Last update 03/10/2014 56 Mobile The Mobile Preferences page allows you to establish your preferences for accessing and using our online banking services on your mobile device. This may include setting up your mobile authorization preferences and enrolling for mobile and text banking access. Authorizing Transfers Over Mobile Devices We require you to enter your Mobile Authorization Code (MAC) to complete and authorize some transactions over your mobile device. If you want to be able to transfer funds over a mobile device, you should establish your MAC from the Mobile Authorizations tab. This code may also be used to approve payments that others may request you to authorize over your phone, once you set up your mobile authorization preferences. Mobile Authorization Preferences Mobile authorization lets you manage your online banking payments and transfers on-the-go using your mobile phone. Once you establish your mobile authorization settings, you will be added to a list of eligible approvers when another user in your company or household wants to send you an authorization request. Mobile authorization workflow is as follows: A user executes a payment, and from the Submit Transaction page, sends a mobile authorization request to one or more eligible approvers. All approvers are displayed. However, only those that are eligible to receive the mobile authorization request would be selectable. To receive the authorization request, the following must be true: • The person executing or drafting the payment must be in the same company or household as the requested approver(s). • The approver(s) must have the rights and limits to approve the payment. The approver(s) have already established the mobile authorization preferences and set a MAC. Clicking Send will 1) draft the payment and 2) send the mobile authorization request to all checked approvers and notification targets. Receiving Approval Notification Emails The drafter can optionally request a notification email if the payment is approved by one of the eligible approvers by entering an email address. Sending Delayed Requests The time next to each phone number allows the drafter to schedule a time that the mobile authorization will be sent. If the time is left at the default value of 6:00 AM, the request will be sent immediately when the Send button is clicked. • One or more eligible approvers will receive the mobile authorization request by phone or email. If the notification target is by email, the approver must log into online banking and go to Accounts > Online Activity to approve the payment. If the request is sent to eligible approvers by phone, the approver can review the transaction details and approve the payment by following the directions and entering the MAC. If multiple eligible approvers are sent the request, only the first to successfully enter his or her MAC will approve the payment. Others that receive the call will get a message indicating that the payment has already been approved upon successful entry of their MAC. • Upon approval by an eligible approver, the status of the payment in Accounts > Online Activity will immediately update from Pending Approval to Authorized. Additionally, the drafter will receive the optional approval notification, if requested. A Mobile Authorization Code should be kept absolutely private and never shared. Last update 03/10/2014 57 Business Online Banking Best Practices Avoid being a victim of a cyberheist or employee fraud. A majority of today’s cyberheists begin with malware that is spread via email attachments. Many of these threats will go undetected by antivirus tools in the first few days after the virus has infected your computer. Basic Business Online Banking Security Our Security Practices: * Out of band authentication at login and ACH/Wire approval * Receive a phone call or text message with a Secure Access Code to be entered in Business Online Banking * Session timeout * The session will timeout after 20 minutes and you will need to enter a password to resume. * If the session is inactive for 40 minutes you will need to sign in with your user name and password. * In the Mobile App the timeout will happen after 20 minutes of inactivity. * Other warnings * If your password is changed, an email will be sent to you. If you did not initiate the password change, please contact us immediately by calling our Business Member Service Center at (888) 200-7845. * Be advised that Business Online Banking will never present you with a maintenance page after entering login credentials. * Business Online Banking does not use pop-up windows to display login messages or errors. They are displayed directly on the login screen. * Business Online Banking never displays pop-up messages indicating that you cannot use your current browser. Set Up Business Online Banking Alerts UFCU recommends activating Business Online Banking alerts when using the ACH and/or Wire modules: To set up alerts in Business Online Banking, go to Preferences>Alerts>select the Add button>select Add Transaction Limits. You will be provided several options for alerts such as when an ACH and/or Wire is: * Authorized * Cancelled * Drafted * Processed Successfully * Processing Failed These alerts are real time and can help you stop fraudulent transactions before the funds leave the credit union. You can be alerted by a phone call, email or text message. These can be changed or updated at any time. Avoid Phishing, Spyware and Malware * Do not open email from unknown sources. Be suspicious of emails purporting to be from a financial institution, government agency, or other organization requesting account information, account verification, or banking access credentials such as usernames, passwords, PIN codes, and similar information. UFCU will never ask you for this information. Opening file attachments or clicking on web links in suspicious e-mails could expose your system to malicious code that could hijack your computer. * Never respond to a suspicious e-mail or click on any link embedded in a suspicious e-mail. Call the purported source if you are unsure who sent an e-mail. Do not use the number in the email itself as this may be fraudulent as well. If you have any questions, call our Business Member Service Center at (888)200-7845. Federally insured by NCUA. Equal Opportunity Lender. Equal Housing Lender. (888) 200-7845 | www.unitedfcu.com Business Online Banking Best Practices (continued) Computer and Browser Safeguards * If an e-mail claiming to be from UFCU seems suspicious, contact us at (888)-200-7845 to see if it is legitimate. * Install anti-virus and spyware detection software on all computer systems. Free software may not provide protection against the latest threats compared with an industry standard product. * Update all of your computers regularly with the latest versions and patches of both anti-virus and antispyware software. * Ensure computers are patched regularly with security patches, particularly operating system and key applications. * Install a dedicated, actively managed firewall, especially if using a broadband or dedicated connection to the Internet, such as DSL or cable. A firewall limits the potential for unauthorized access to your network and computers. * Check your settings and select, at least, a medium level of security for your browsers. * Clear the browser cache before starting any Business Online Banking session to eliminate copies of web pages that have been stored on the hard drive. How the cache is cleared depends on the browser and version you are using. This function is generally found in the browser’s preferences menu. * Do not use public or other unsecured computers for logging into Business Online Banking. * Review account balances and detail transactions regularly (preferably daily) to confirm payment and other transaction data and immediately report any suspicious transactions to United. * Do not use your social security number, or other account or personal information, when creating account nicknames or other titles. * Review historical reporting features of your online banking application on a regular basis to confirm payment and other transaction data. * Never leave a computer unattended while using Business Online Banking. * Never conduct banking transactions while multiple browsers are open on your computer. * Prohibit the use of “shared” usernames and passwords for Business Online Banking. * Limit administrative rights on users’ workstations to help prevent the inadvertent downloading of malware or other viruses. * Dedicate and limit the number of computers used to complete online banking transactions. For computers dedicated to Business Online Banking, do not allow Internet browsing or e-mail exchange and ensure the latest versions and patches of both anti-virus and anti-spyware software are installed. If email is viewed on the PC, set email to display without HTML formatting if possible. * Remove any unneeded software from dedicated systems used to access the credit union’s site * Contact UFCU to delete online user IDs as part of the exit procedure when employees leave your company. * Segregate duties for online cash management services. * Use multiple approvals for monetary transactions and require separate entry and approval users. * Establish transaction dollar limits for employees who initiate and approve online payments such as ACH batches, wire transfers, and account transfers. Federally insured by NCUA. Equal Opportunity Lender. Equal Housing Lender. (888) 200-7845 | www.unitedfcu.com