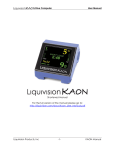
1
™ Air Integrated Dive Computer User Manual ™ Air Integrated Dive Computer Software v1.18 Ultrasonic software v1.11 And T1, U-2 and L1 Transmitters™ Software v3.06 April 22, 2014 Liquivision Products, Inc -1- Manual 1.6; Lynx 1.18; US 1.11; U-2 3.06 ™ Air Integrated Dive Computer User Manual CONTENTS IMPORTANT NOTICES ............................................................................................................................... 8 Definitions..................................................................................................................................................... 9 User Agreement and Warranty ....................................................................................................................... 9 User Manual .................................................................................................................................................. 9 Liquivision Limitation of Liability ............................................................................................................... 10 Trademark Notice ........................................................................................................................................ 10 Patent Notice ............................................................................................................................................... 10 CE ............................................................................................................................................................... 10 LYNX Hardware Features ........................................................................................................................... 11 T1 Tank Transmitter Hardware Features ...................................................................................................... 11 U-2 Tank Transmitter Hardware Features .................................................................................................... 12 L1 Location Transmitter Hardware Features ................................................................................................ 12 LYNX-AI Software Features ....................................................................................................................... 12 GETTING STARTED – BEFORE DIVING YOUR LYNX ..................................................................... 14 Register Your Unit/Activate Your Dive Software (Free) .............................................................................. 14 Unlock The Locator Feature of The LYNX (OPTIONAL, Free, BETA Software) ........................................ 14 Setup Time/Date & Battery Type ................................................................................................................. 15 Read The Manual ........................................................................................................................................ 15 Familiarize Yourself With Tap-Navigation .................................................................................................. 15 GETTING STARTED – FEATURES OF YOUR LYNX UNIT .............................................................. 16 GETTING STARTED – FEATURES OF YOUR T1 TRANSMITTER .................................................. 17 GETTING STARTED – FEATURES OF YOUR U-2/L1 TRANSMITTER .......................................... 18 GETTING STARTED – HOW TO TURN ON/TAP YOUR LYNX ....................................................... 19 General Tapping/Menu Guidelines:.............................................................................................................. 19 GETTING STARTED – SETTING UP A TRANSMITTER PRE-DIVE ................................................ 24 Transmitter Identification/Labels ................................................................................................................. 24 T1/U-2 Tank Transmitter Installation ........................................................................................................... 25 T1/U-2 Tank and L1 Location Transmitter Orientation ................................................................................ 26 Strong signal/weak signal zones of the Transmitters themselves............................................................... 26 The biggest shadow the T1 or U-2 Tank Transmitter faces: YOU! ........................................................... 27 Turning The T1/U-2 Transmitters On/Off .................................................................................................... 28 Turning The L1 Transmitters On/Off ........................................................................................................... 28 Checking Your Transmitter Pre-Dive ........................................................................................................... 29 GETTING STARTED – SETTING UP LYNX PRE-DIVE...................................................................... 30 LYNX Surface Display................................................................................................................................ 30 LYNX Scroll Bar......................................................................................................................................... 30 First, Check Your Battery! ........................................................................................................................... 30 Optimizing Battery Life ............................................................................................................................... 31 SURFACE MENUS...................................................................................................................................... 32 Main Menu .................................................................................................................................................. 32 1. Shut Off .............................................................................................................................................. 33 2. Enter PIN ............................................................................................................................................ 33 3. LOCK / UNLOCK .............................................................................................................................. 34 4. Dive Planning...................................................................................................................................... 34 4.1 Mode (Rec/Tec/Gauge)...................................................................................................................... 35 Rec Mode ....................................................................................................................................................... 35 Tec Mode ....................................................................................................................................................... 37 Gauge Mode .................................................................................................................................................. 38 4.2. Dive Setup (only in Tec Mode) ......................................................................................................... 38 4.2.1. Conservatism ................................................................................................................................. 38 Liquivision Products, Inc -2- Manual 1.6; Lynx 1.18; US 1.11; U-2 3.06 ™ Air Integrated Dive Computer User Manual 4.2.2. PO2 dive........................................................................................................................................ 38 4.2.3. PO2 deco ....................................................................................................................................... 39 4.2.4. Last deco stop ................................................................................................................................ 39 4.3. Gases (only in Rec & Tec Modes)..................................................................................................... 39 4.4. Compute NDL (only in Rec & Tec modes) ....................................................................................... 40 4.5. Runtime (only in Tec mode) ............................................................................................................. 40 4.6. Alarms.............................................................................................................................................. 42 4.6.1. Alarms On/Off ............................................................................................................................... 42 4.6.2. Depth............................................................................................................................................. 42 4.6.3. Time .............................................................................................................................................. 42 4.6.4. Ascent Rate .................................................................................................................................... 42 4.6.5. Descent Rate .................................................................................................................................. 43 4.7. Your Saturation (only in Rec & Tec modes) ...................................................................................... 43 4.8. Simulate Dive ................................................................................................................................... 44 5. Pre-Dive Check (only if you are using one or more transmitters) .......................................................... 44 6. Air Integration ..................................................................................................................................... 45 6.1. Mode ................................................................................................................................................ 45 6.2. Units................................................................................................................................................. 47 6.3. Transmitter ....................................................................................................................................... 47 6.3.1. Set All Units (only with software v1.11 or below) ........................................................................... 47 6.3.2. A0000 You Off ............................................................................................................................... 47 6.3.2.1. Type............................................................................................................................................ 47 6.3.2.2. Serial # ....................................................................................................................................... 48 6.3.2.3. Name .......................................................................................................................................... 48 6.3.2.4. Max ............................................................................................................................................ 48 6.3.2.5. Mid ............................................................................................................................................. 48 6.3.2.6. Low............................................................................................................................................. 48 6.3.2.7. Reserve ....................................................................................................................................... 48 6.3.2.8. Battery ........................................................................................................................................ 49 6.3.2.9. Copy To ...................................................................................................................................... 50 6.4. Advanced ......................................................................................................................................... 50 7. Compass .............................................................................................................................................. 50 7.2. Calibrate ........................................................................................................................................... 50 7.1. Check ............................................................................................................................................... 50 8. Dive Log ............................................................................................................................................. 50 8.1. Log Summary ................................................................................................................................... 51 8.2 Log Detail ......................................................................................................................................... 51 8.3. Depth Graph ..................................................................................................................................... 52 8.4. Temperature Graph ........................................................................................................................... 52 9. Display Settings................................................................................................................................... 52 9.1. Brightness......................................................................................................................................... 52 9.2. Auto Dim ......................................................................................................................................... 52 9.3. Refresh ............................................................................................................................................. 53 9.4. Layout (only affects Gauge mode) .................................................................................................... 53 9.5. Velocity............................................................................................................................................ 54 9.6. Stopwatch DF (only in Gauge Mode) ................................................................................................ 54 9.7 Dark Mode (only in Gauge Mode) ..................................................................................................... 54 9.8. Show Hours ...................................................................................................................................... 55 9.9. Show TTS ........................................................................................................................................ 55 9.10. Show MAX .................................................................................................................................... 56 9.11. Simulate Dive ................................................................................................................................. 56 10. Preferences ........................................................................................................................................ 56 Liquivision Products, Inc -3- Manual 1.6; Lynx 1.18; US 1.11; U-2 3.06 ™ Air Integrated Dive Computer User Manual 10.1. Units............................................................................................................................................... 56 10.2. Log Period ...................................................................................................................................... 56 10.3. Tap Sensitivity................................................................................................................................ 57 10.4. Tap Count ....................................................................................................................................... 57 10.5. Minimum Dive ............................................................................................................................... 57 10.6. Minimum Surface Interval .............................................................................................................. 57 10.7. Status.............................................................................................................................................. 58 10.8 Battery Type .................................................................................................................................... 58 10.9 Battery Meter................................................................................................................................... 58 10.10 Battery Test ................................................................................................................................... 59 10.11 Temperature................................................................................................................................... 59 11. Salinity .............................................................................................................................................. 59 12. Time/Date.......................................................................................................................................... 60 12.1 12h/24h ........................................................................................................................................... 60 12.2 Time ................................................................................................................................................ 60 12.3 Date................................................................................................................................................. 60 12.4 Year................................................................................................................................................. 60 12.5 Calibrate Time ................................................................................................................................. 60 13. Connect to PC.................................................................................................................................... 61 14. Locator PIN ....................................................................................................................................... 61 UNDERWATER MENUS ........................................................................................................................... 63 Main Underwater Menu ................................................................................................................................ 63 1. Switch Gas (only in Tec Mode) ........................................................................................................... 63 2. LOST GAS (only in Tec Mode)........................................................................................................... 64 3. Silence Alarms .................................................................................................................................... 64 4. AI Mode .............................................................................................................................................. 65 5. Locate ................................................................................................................................................. 66 6. Compass .............................................................................................................................................. 67 7. Stopwatch (only in Gauge Mode)......................................................................................................... 68 8. Reset AVG (only in Gauge Mode) ....................................................................................................... 68 9. Dark Mode On/Off (only in Gauge Mode & only if Dark Mode is activated in the Surface Menus) ...... 69 10. Display .............................................................................................................................................. 69 10.1. Brightness....................................................................................................................................... 69 10.2. Auto Dim (only if Auto Dim Mode is activated in the Surface Menus) ............................................ 69 10.3 Layout (only affects Gauge Mode) ................................................................................................... 69 11. Advanced .......................................................................................................................................... 70 12. Stop Simulation ................................................................................................................................. 70 DIVING WITH YOUR LYNX IN REC MODE ........................................................................................ 71 Overview..................................................................................................................................................... 71 Setting Up a Dive In Rec Mode ................................................................................................................... 73 Settings That Will Affect Your Dive ............................................................................................................ 74 Conservatism Settings ............................................................................................................................. 74 Safety Stop .............................................................................................................................................. 74 Oxygen Loading (for enriched air/nitrox dives)........................................................................................ 74 Entering the water........................................................................................................................................ 74 Turning Your LYNX On ......................................................................................................................... 74 Beginning Your Dive .............................................................................................................................. 75 Dive Display................................................................................................................................................ 75 Dive Time ............................................................................................................................................... 75 Depth ...................................................................................................................................................... 75 Air Integration......................................................................................................................................... 76 Air Time ................................................................................................................................................. 76 Liquivision Products, Inc -4- Manual 1.6; Lynx 1.18; US 1.11; U-2 3.06 ™ Air Integrated Dive Computer User Manual TTS (Total Time to Surface) and Max Depth Display .............................................................................. 78 Decompression Information Zone ............................................................................................................ 79 Graphical Decompression Stop Information............................................................................................. 79 Graphical Ascent/Descent Indicators & Alarms ....................................................................................... 80 CNS Loading .......................................................................................................................................... 80 N2 Loading ............................................................................................................................................. 80 Gas.......................................................................................................................................................... 81 Gas/PO2/CNS ......................................................................................................................................... 81 Temperature ............................................................................................................................................ 82 Battery Indicator – LYNX ....................................................................................................................... 82 Battery Indicators – Transmitter(s) .......................................................................................................... 83 “Battery Savings” mode ............................................................................................................................... 83 Exiting the water.......................................................................................................................................... 83 Last dive information................................................................................................................................... 84 Altitude Compensation/Surface Pressure Adjustments ................................................................................. 84 DIVING WITH YOUR LYNX IN TEC MODE ........................................................................................ 86 Overview..................................................................................................................................................... 86 Setting Up a Dive In Tec Mode.................................................................................................................... 87 Settings That Will Affect Your Dive ............................................................................................................ 89 Gas Settings ............................................................................................................................................ 89 Switching Gases ...................................................................................................................................... 90 Switching Gases ALSO Switches The Tank That is Monitored ................................................................ 90 Conservatism Settings ............................................................................................................................. 90 PO2 Settings............................................................................................................................................ 91 Safety Stop/Deco Stops ........................................................................................................................... 91 Oxygen Loading...................................................................................................................................... 91 Entering the water........................................................................................................................................ 92 Turning Your LYNX On ......................................................................................................................... 92 Beginning Your Dive .............................................................................................................................. 92 Dive Display................................................................................................................................................ 92 Dive Time ............................................................................................................................................... 92 Depth ...................................................................................................................................................... 92 Air Integration......................................................................................................................................... 92 TTS (Total Time to Surface) and Max Depth Display .............................................................................. 93 Decompression Information Zone ............................................................................................................ 93 Graphical Decompression Stop Information............................................................................................. 94 Graphical Ascent/Descent Indicators & Alarms ....................................................................................... 94 CNS Loading .......................................................................................................................................... 95 N2 Loading ............................................................................................................................................. 95 Gas.......................................................................................................................................................... 95 Gas/PO2/CNS ......................................................................................................................................... 95 Temperature ............................................................................................................................................ 96 Battery Indicator – LYNX ....................................................................................................................... 96 Battery Indicators – Transmitter(s) .......................................................................................................... 97 “Battery Savings” mode ............................................................................................................................... 98 Exiting the water.......................................................................................................................................... 98 Last dive information................................................................................................................................... 98 Altitude Compensation/Surface Pressure Adjustments ................................................................................. 99 DIVING WITH YOUR LYNX IN GAUGE MODE ............................................................................... 100 Entering the water...................................................................................................................................... 100 Dive Planning........................................................................................................................................ 100 Turning Your LYNX On ....................................................................................................................... 101 Liquivision Products, Inc -5- Manual 1.6; Lynx 1.18; US 1.11; U-2 3.06 ™ Air Integrated Dive Computer User Manual Beginning Your Dive ............................................................................................................................ 101 Diving ....................................................................................................................................................... 101 Dive Display ......................................................................................................................................... 101 Dive Time ............................................................................................................................................. 102 Depth .................................................................................................................................................... 102 Air Integration....................................................................................................................................... 102 Stopwatch ............................................................................................................................................. 103 Maximum Depth ................................................................................................................................... 103 Average Depth ...................................................................................................................................... 103 Time of day ........................................................................................................................................... 104 Temperature .......................................................................................................................................... 104 Battery Indicator – LYNX ..................................................................................................................... 104 Battery Indicators – Transmitter(s) ........................................................................................................ 105 “Battery Savings” Mode ............................................................................................................................ 105 Exiting the water........................................................................................................................................ 106 Last dive information................................................................................................................................. 106 Altitude Compensation/Surface Pressure Adjustments ............................................................................... 107 DIVING WITH YOUR LYNX – AIR INTEGRATION FUNCTIONS ................................................. 108 Overview of the LYNX-AI Ultrasonic Features and Technology................................................................ 108 Setting Up an Air Integrated Dive .............................................................................................................. 109 Positioning Your LYNX To Get The Best Possible Transmitter Signal....................................................... 111 Hand & Wrist Position .......................................................................................................................... 112 Other Computer Position ....................................................................................................................... 112 Dry Suit Cuff......................................................................................................................................... 112 Lynx Strap ............................................................................................................................................ 112 Summary Of Factors That Affect LYNX-AI Range.................................................................................... 113 ORIENTATION: Ultrasonic signals travel farthest with a direct line-of-sight ...................................... 113 DIVING WITH YOUR LYNX – LOCATOR FUNCTIONS ................................................................. 114 Important Notice........................................................................................................................................ 114 Before You can Use the Locator Feature .................................................................................................... 114 Using The Locator Feature......................................................................................................................... 114 For The Locator To Work, The LYNX Must Be Kept Horizontal........................................................... 115 What Your See On Your Locator Screen ............................................................................................... 115 Waiting for/Obtaining your First Data Packet ........................................................................................ 115 How To Navigate When You Get Your First Packet .............................................................................. 116 More Details About What You See On Your Screen .............................................................................. 117 How To Navigate When You Get Your Subsequent Packets .................................................................. 117 Packet Aging ......................................................................................................................................... 118 Troubleshooting The Locator Feature ........................................................................................................ 119 Practice Makes Perfect .......................................................................................................................... 119 Using The Distance Estimate To Get Best Signal Reception .................................................................. 120 Don’t Remain Still… Moving Will Improve Your Signal Reception ...................................................... 121 Locator Operation At Different Distances .............................................................................................. 121 Locator Operation In Face Of Obstructions............................................................................................ 121 Typical Path To Reach Your Target ........................................................................................................... 121 CARING FOR YOUR LYNX and TRANSMITTERS ............................................................................ 122 Sensitive Areas of Your Lynx .................................................................................................................... 122 Sensitive Areas of Your T1 Transmitter ..................................................................................................... 122 Sensitive Areas of Your U-2/L1 Transmitters............................................................................................. 123 Post-Dive Care and Storage of your LYNX and Transmitter(s) .................................................................. 123 Long-Term LYNX and Transmitter Storage ............................................................................................... 124 Replacement Battery Storage ..................................................................................................................... 124 Liquivision Products, Inc -6- Manual 1.6; Lynx 1.18; US 1.11; U-2 3.06 ™ Air Integrated Dive Computer User Manual LYNX and Transmitter Accuracy Testing .................................................................................................. 124 OVERVIEW OF LYNX, T1, U-2 and L1 BATTERY TYPES ............................................................... 125 BATTERY TYPES BY PRODUCT .......................................................................................................... 126 LYNX and T1 Battery Types ..................................................................................................................... 126 U-2 Battery Types ..................................................................................................................................... 127 U-2E – The U-2 Extension Kit ................................................................................................................... 128 L1 Battery Type......................................................................................................................................... 129 SPARE BATTERIES YOU CAN BUY FROM LIQUIVISION ............................................................ 131 BATTERY COMPARTMENT O-RING INFORMATION .................................................................... 132 DETERMINING & OPTIMIZING BATTERY LIFE ............................................................................ 134 How To Determine LYNX or Transmitter Battery Life Remaining ............................................................ 134 Basic Rules For Optimizing Battery Life in your LYNX ............................................................................ 135 Basic Rules For Optimizing Battery Life in your Tank or Location Transmitter ......................................... 136 Detailed Rules For Optimizing Battery Life in your LYNX........................................................................ 136 LYNX Battery Savings Mode: When Your Battery Voltage Drops Below A Critical Level ........................ 136 Estimated LYNX Battery Life Depending On User Settings....................................................................... 137 T1 Transmitter Battery Life ....................................................................................................................... 138 U-2 Transmitter Battery Life...................................................................................................................... 138 L1 Transmitter Battery Life ....................................................................................................................... 138 CHANGING THE LYNX’s or T1’s BATTERY...................................................................................... 139 OPTION– CHANGE O-RING ................................................................................................................... 142 CHANGING THE U-2 or L1 BATTERY ................................................................................................. 144 LYNX PC INTERFACE ............................................................................................................................ 145 PC Drivers: Internet Explorer ..................................................................................................................... 145 PC Drivers: Firefox ..................................................................................................................................... 146 PC Drivers: Google Chrome ...................................................................................................................... 146 Advanced Users........................................................................................................................................... 146 PC Dive Logger: Internet Explorer ............................................................................................................ 147 PC Dive Logger: Firefox ............................................................................................................................ 147 PC Dive Logger: Google Chrome .............................................................................................................. 147 Mac-OSX Dive Logger (all browsers) ....................................................................................................... 147 How To Connect the LYNX PC Interface To Your Computer .................................................................... 148 How To Launch A Dive Log Download ..................................................................................................... 148 How To Install The Liquivision Firmware Updater Onto Your PC ............................................................. 149 PC Firmware Updater: Internet Explorer .................................................................................................. 149 PC Firmware Updater: Firefox ................................................................................................................... 149 PC Firmware Updater: Google Chrome .................................................................................................... 150 Mac-OSX Firmware Updater (all Browsers) ............................................................................................ 150 How To Install the Newest Firmware On Your LYNX ............................................................................... 150 PC: Internet Explorer Firmware Install ..................................................................................................... 151 PC: Firefox Firmware Install ...................................................................................................................... 151 PC: Google Chrome Firmware Install ....................................................................................................... 151 Mac-OSX Firmware Install (all Browsers) ............................................................................................... 152 All Users ...................................................................................................................................................... 153 SUPPORT CONTACTS............................................................................................................................. 154 BIBLIOGRAPHY ....................................................................................................................................... 154 APPENDIX A – PHOTOS GOOD/BAD T1/U-2 POSITIONS .............................................................. 155 Liquivision Products, Inc -7- Manual 1.6; Lynx 1.18; US 1.11; U-2 3.06 ™ Air Integrated Dive Computer User Manual IMPORTANT NOTICES WARNING – DANGERS OF DIVING Scuba diving is a dangerous sport, and can lead to injury, disability or death. Always dive within the limits of your training, skills and experience. Technical diving activities, including decompression diving, mixed gas diving, rebreather diving, wreck and cave diving, all substantially increase the risks of scuba diving. The LYNX dive computer is capable of calculating decompression requirements based on the Bühlmann ZH-L16C algorithm first published in 19901. Decompression is an inexact science. It is possible to follow a decompression plan exactly and still suffer decompression sickness. Following a decompression plan does not, in any way, guarantee the avoidance of decompression sickness. The same profile that gets you out of the water safely one day may cause decompression sickness another day, and lead to temporary or permanent injury or death. You can die while diving. WARNING – ELECTRONICS CAN FAIL – ALWAYS CARRY BACKUP The LYNX dive computer hardware and T1, U-2 and L1 Transmitter hardware will eventually fail, like any electronic equipment whose components mature and age. If they fail during your dive, they can stop providing you with critical information. You must have a plan to handle the failure of the LYNX dive computer or the T1, U-2 or L1 Transmitters during your dive. You should carry backup instruments, including a depth gauge, submersible pressure gauge, digital bottom timer or dive watch, a compass, and have access to decompression tables. Do not risk your life on only one source of information. WARNING – CONDUCT PRE-DIVE CHECKS It is your responsibility to perform all pre-dive checks recommended in this manual, including checking for software updates, running the Pre-Dive Check function to make sure your LYNX is receiving T1, U-2 or L1 Transmitter signals, checking battery voltage to ensure the LYNX dive computer and the T1, U-2 or L1 Transmitters have enough battery life to complete your planned dive and checking that each diver is wearing the T1 or U-2 Transmitter associated with his or her name. WARNING – ALWAYS CHECK FOR SOFTWARE UPDATES The LYNX dive computer software likely still has bugs. We have looked for them and tried to eliminate them, but they can still appear during use. Bugs can cause the units to provide inaccurate or incomplete information, or cause the unit to reset or turn off and stop providing any information at all. You should always check for software updates (http://liquivision.com/downloads/LYNXSoftwareHistory.php) and install all applicable updates, every time you prepare to use the LYNX dive computer. Liquivision Products, Inc -8- Manual 1.6; Lynx 1.18; US 1.11; U-2 3.06 ™ Air Integrated Dive Computer User Manual Definitions “Liquivision LYNX” or “LYNX” refers to the LYNX dive computer only. “Liquivision T1 Transmitter” or “T1 Transmitter” refers to the T1 ultrasonic tank transmitter only. “Liquivision U-2 Transmitter” or “U-2 Transmitter” refers to the U-2 ultrasonic tank transmitter only. “Liquivision L1 Transmitter” or “L1 Transmitter” refers to the L1 ultrasonic location transmitter only. “Tank Transmitters” refers to both or either one of the T1 and U-2 Tank Transmitters. “Location Transmitter” refers to the L1 Location Transmitter. “Transmitters” refers to any or either of the T1, U-2 and L1 Transmitters. “Liquivision LYNX-AI” or “LYNX-AI” stands for “LYNX Air Integrated” and refers to the LYNX dive computer used together with the T1, U-2 or L1 Transmitters. The LYNX can be used in a number of different configurations: “LYNX Stand Alone” or “LYNX SA” refers to the LYNX used as a dive computer only, without a Tank Transmitter. “LYNX Solo Mode” refers to the LYNX used by an individual diver, in conjunction with a Tank Transmitter, to monitor his or her own air. (NTD: can it be used with L1 only?) “LYNX Buddy Mode” refers to the LYNX used by an individual diver to monitor two transmitters, either his or her own Tank Transmitter and a Buddy’s Tank Transmitter OR his or her own Tank Transmitter and an L1 “LYNX Group-4 Mode” refers to the LYNX used by a dive master to monitor up to five Transmitters – one on his or her own tank and up to four other Tank or Location Transmitters. “LYNX Group-9 Mode” refers to the LYNX used by a dive master to monitor up to ten Transmitters – one on his or her own tank and up to nine other Tank or Location Transmitters. User Agreement and Warranty Use of the Liquivision LYNX and the T1, U-2 and L1 Transmitter(s) are subject to the User Agreement and Warranty (“Agreement”) available at the Liquivision website: http://liquivision.com/LYNX_manuals.php . You must read the entire Agreement before using the LYNX and any of the Transmitter(s). If you do not agree with any term of the Agreement, you must not use the LYNX and the Transmitter(s), and you may return the LYNX and the Transmitter(s) to Liquivision or the authorized Liquivision dealer from which you purchased the LYNX and Transmitter(s) for a full refund within 30 days after your date of purchase. If you use the LYNX and the Transmitter(s), you are deemed to have agreed to the User Agreement and Warranty. User Manual You must read this entire User Manual before using the LYNX and the Transmitter(s). Incorrect use of the LYNX and the Transmitter(s) or their accessories could invalidate your Warranty and can cause permanent damage to the LYNX and Transmitter(s) or their accessories. Liquivision Products, Inc -9- Manual 1.6; Lynx 1.18; US 1.11; U-2 3.06 ™ Air Integrated Dive Computer User Manual Liquivision Limitation of Liability The Agreement includes exclusions and limitations of Liquivision’s liability to you. These exclusions and limitations include, but are not limited to, the following: THAT YOU UNDERSTAND AND ACCEPT ALL RISKS ASSOCIATED WITH DIVING, AND THAT IS NOT LIABLE TO YOU OR ANY OTHER PERSON, INCLUDING YOUR HEIRS, EXECUTORS OR PERSONAL REPRESENTATIVES, FOR ANY LOSS, DAMAGE, COST, EXPENSE OR CLAIM ARISING OUT OF, CAUSED BY OR RELATING TO YOUR PERSONAL INJURY OR DEATH WHILE DIVING, EVEN IF YOUR PERSONAL INJURY OR DEATH IS CAUSED, IN WHOLE OR IN PART AND DIRECTLY OR INDIRECTLY, BY THE LYNX AND THE T RANSMITTER( S) OR YOUR USE OF THE LYNX AND THE T RANSMITTER(S), AND REGARDLESS OF WHETHER OR NOT THE LYNX AND THE T RANSMITTER( S) FUNCTIONED PROPERLY OR WERE DEFECTIVE IN ANY WAY. YOU AGREE LIQUIVISION YOU HEREBY IRREVOCABLY WAIVE AND RELEASE LIQUIVISION FROM ANY LIABILITY OR OBLIGATION TO YOU OR YOUR HEIRS, EXECUTORS OR PERSONAL REPRESENTATIVES FOR ANY LOSS, DAMAGE, COST, EXPENSE OR CLAIM ARISING OUT OF, CAUSED BY OR RELATING TO YOUR PERSONAL INJURY OR DEATH WHILE DIVING, EVEN IF YOUR PERSONAL INJURY OR DEATH IS CAUSED , IN WHOLE OR IN PART AND DIRECTLY OR INDIRECTLY, BY THE LYNX AND THE T RANSMITTER(S) OR YOUR USE OF THE LYNX AND THE T RANSMITTER( S), AND REGARDLESS OF WHETHER OR NOT THE LYNX AND THE T RANSMITTER(S) FUNCTIONED PROPERLY OR WERE DEFECTIVE IN ANY WAY. You must read the Agreement for all limitations and exclusions of Liquivision’s liability to you. Trademark Notice Liquivision, the Liquivision logo, LYNX, the LYNX logo, T1 Transmitter, the T1 Transmitter logo, U2 Transmitter, the U-2 Transmitter logo, L1 Transmitter, the L1 Transmitter logo, Find-ConnectDiscover, Dive Enlightened and Be Omniscient are all registered and unregistered trademarks, trade names and service marks of Liquivision Products, Inc. All rights are reserved. Patent Notice U.S. and international patents have been applied for to protect the Liquivision Tap-Based Navigation Technology, the Liquivision Ceramic Pressure Sensor Technology as well as the Liquivision Lynx Technology. The following patents apply to the LYNX and T1 Transmitters: U.S. Patent 8359172 and UK Patent GB2455389, other patents are pending. The LYNX and Transmitters use U.S. Patent RE42218E under license. CE The Liquivision LYNX conforms to the requirements of EN 13319 (including EN 61000) but the outcomes of the tests have not yet been formally accredited by a third party. The Liquivision T1, U-2 and L1 Transmitters conforms to the requirements of EN 250 but the outcomes of the tests have not yet been formally accredited by a third party. Liquivision Products, Inc -10- Manual 1.6; Lynx 1.18; US 1.11; U-2 3.06 ™ Air Integrated Dive Computer User Manual INTRODUCTION – LYNX-AI FEATURES Welcome, and thank you for choosing the Liquivision LYNX-AI dive computer! The LYNX-AI brings you Liquivision’s patented, ground-breaking ultrasonic air-integration technology, along with all the established Liquivision innovations, including an ultra-readable OLED screen and tap-based menu navigation. The LYNX-AI can be used with Air and Nitrox mixes from 21100% O2, and offers a one-gas Rec mode, a three-gas Tec mode as well as Gauge mode. The LYNX allows you to wirelessly monitor your own air supply with digital accuracy and signal stability. It also allows you to monitor Buddy-Air, or the Group-air of up to 9 other divers in your Group, as long as they are all using Liquivision T1 or U-2 transmitters and they are within the transmitter signal range. With a free, BETA software upgrade (subject to applicable terms & conditions), the LYNX-AI also allows you to get directional information about your Buddy’s location, or the location of up to 9 other divers in your Group, as long as they are all using Liquivision T1 or U-2 transmitters and are within the transmitter signal range. You can also get a directional indication of the location of your boat, or any other landmark you have marked with a Liquivision L1 Location transmitter. The software for the directional feature is in BETA release, which means it is experimental and may not function properly or at all. To activate the software upgrade you will have to acknowledge its limitations. LYNX Hardware Features • Color OLED (Organic Light Emitting) Display with large fonts and angled towards the diver. • Liquivision’s patented intuitive tap-based user interface • Liquivision’s patented ceramic pressure sensor technology • Three black custom ultrasonic transducers, to receive signal from any of the Liquivision Transmitters • Tilt-compensated compass • User-changeable lithium battery, with both disposable and rechargeable options available • Maximum depth -200m (656 ft) • Accuracy exceeds the limits of EN13319:2000. Operational from sea level to 8,840m/29,000ft. • Infrared communication with optional PC interface. • The LYNX will function when its internal temperature is between 0 to 40°C (32 to 104°F). If the LYNX’s internal temperature exceeds 40°C/104°F (in direct sunlight, for example) the OLED display could show some visual disturbances. This is not a product failure – the display will return to normal when the unit is cooled down. T1 Tank Transmitter Hardware Features • Ultrasonic signal transmission with a maximum range of 100m/330ft in clear water with unobstructed line-of-sight between the LYNX computer and the T1 transmitter • Robust plastic housing, threaded aluminum base for mounting in first stage high-pressure port • Turns on when senses tank pressure for 30 seconds, turns off after 10 minutes of ambient pressure. • User-changeable lithium battery, both disposable and rechargeable options available Liquivision Products, Inc -11- Manual 1.6; Lynx 1.18; US 1.11; U-2 3.06 ™ Air Integrated Dive Computer User Manual • Maximum depth -200m (656 ft) • Maximum tank pressure of 5150 PSI or 350 BAR U-2 Tank Transmitter Hardware Features • Ultrasonic signal transmission with a maximum range of 100m/330ft in clear water with unobstructed line-of-sight between the LYNX computer and the U-2 transmitter • Black-anodized all-aluminum housing, threaded base for mounting in first-stage high-pressure port • Turns on when senses tank pressure for 30 seconds, turns off after 10 minutes of ambient pressure • User-changeable lithium battery, both disposable and rechargeable options available • Maximum depth -200m (656 ft) • Maximum tank pressure of 5150 PSI or 350 BAR L1 Location Transmitter Hardware Features • Ultrasonic signal transmission with a maximum range of 100m/330ft in clear water with unobstructed line-of-sight between the LYNX computer and the L1 transmitter • Black-anodized all-aluminum housing, looped base for slinging on a carabiner or a dive line • Turns on/off like a dive light – screw top down to turn on, unscrew top to turn off • User-changeable lithium battery, both disposable and rechargeable options available • Maximum depth -200m (656 ft) LYNX-AI Software Features Dive Monitoring Features: • Rec Mode, for single gas diving: allows any mix from 21-40% O2 • Tec Mode, for multi-gas diving: allows up to 3 mixes from 21-100% • Gauge Mode, including stopwatch and resettable average depth 1 • Bühlmann ZH-L16C , with optional Gradient Factors Gas Monitoring Features in REC Mode include tank pressure in PSI/BAR for: • Your own tank, and a calculation of your remaining Air Time • Your Buddy’s tank (if your Buddy has a Tank Transmitter) • A Group of up to 4 divers (if up to 4 other divers have a Tank Transmitter) • A Group of up to 9 divers (if up to 9 other divers have a Tank Transmitter) Gas Monitoring Features in TEC Mode include tank pressure in PSI/BAR for: • Up to three of your own tanks, but there is no calculation of your remaining Air Time for each tank due to the complexity of making such an estimate accurately.\ Gas Monitoring Features in GAUGE Mode include tank pressure in PSI/BAR for: • A Group of up to 4 divers (if up to 4 other divers have a Tank Transmitter) • A Group of up to 9 divers (if up to 9 other divers have a Tank Transmitter) Liquivision Products, Inc -12- Manual 1.6; Lynx 1.18; US 1.11; U-2 3.06 ™ Air Integrated Dive Computer User Manual • If you wish to monitor your own air or your Buddy’s air in Gauge mode, you should set these up as part of the Group-4 or Group-9 modes. Diver Location Monitoring Features available (with free, optional BETA software upgrade) in: • REC Mode, for your Buddy and up to 9 other divers wearing Tank Transmitters • TEC Mode, any of the remaining 7 transmitters can be configured to appear in the Locate feature • GAUGE Mode for up to 9 other divers wearing Tank Transmitters Landmark Location Monitoring Features available (with free, optional BETA software upgrade) in: • REC Mode, any one of “Buddy” or “Group-4”or “Group-9” Transmitters can be set up as a Tank Transmitter to monitor a dive or as a Location Transmitter to monitor a boat, for example. • TEC Mode, any of the remaining 7 transmitters can be configured to appear in the Locate feature • GAUGE Mode, any one of “Group-9”Transmitters can be set up as Tank Transmitter to monitor a diver or as a Location Transmitter to monitor a boat. • Visual alarms • Built-in dive planner • Built-in dive simulator • Large dive log memory including dive depth, time, temperature, descent/ascent rates (viewable on your LYNX) and any gas monitoring data from your own and other diver’s tanks (on your PC/Mac) • Imperial/Metric settings for dive information • Separate PSI/BAR settings for tank pressure information • Windows and Mac downloadable (PC interface hardware sold separately) WARNING Tank Transmitters Serial Numbers 385 and above now transmit in 2 PSI increments. If your Lynx is running V1.07 of the Lynx firmware or an earlier version it will not be compatible with Transmitters S/N 385+, and will show half of the actual pressure. For your Lynx to be compatible with all Tank Transmitters you need to update to V1.10 or above Liquivision Products, Inc -13- Manual 1.6; Lynx 1.18; US 1.11; U-2 3.06 ™ Air Integrated Dive Computer User Manual GETTING STARTED – BEFORE DIVING YOUR LYNX Register Your Unit/Activate Your Dive Software (Free) Your LYNX comes pre-loaded with software. You will be able to interact with your unit on the surface and run dive simulations immediately. However, the software will not run underwater until you register your unit, obtain a free LYNX Unlock PIN code, and enter this code into your LYNX to activate the dive functionality of the software. To register your unit, you must visit: http://www.liquivision.com/activate.php. During registration, you will be asked to enter your LYNX serial number, your real name, address, phone number and a valid email address. You will also be asked to agree and accept the User Agreement and Warranty. Liquivision will then issue you a free LYNX Unlock PIN code that you will be able to enter into your LYNX unit (detailed instructions are available here: Entering Your Free Software Activation PIN, Setting Time/Date & Battery Type). At this time, your LYNX will unlock its diving features. Liquivision requires you to register for two reasons: a) To Mark the Start of Your Warranty Period: the date and time of your registration will be considered the start of your limited warranty period b) To Collect Contact Information For Critical Customer Communications: the contact information you provide will be used to contact customers in the event of a critical software upgrade, hardware upgrade, or recall. If you purchase a second-hand LYNX unit, you must email Liquivision at [email protected] and provide the following information: - LYNX serial number Date purchased Who you purchased your unit from Your address, email and phone number The sentence “I agree and accept the LYNX User Agreement and Warranty” This is required to transfer the balance of the Warranty from the previous owner to yourself. Unlock The Locator Feature of The LYNX (OPTIONAL, Free, BETA Software) During the LYNX registration process above, after obtaining your LYNX Unlock PIN, you will be prompted to either “Unlock The Locator Feature of the LYNX”, or to “Skip This Step”. The LYNX has an optional Locator feature that allows a diver using a LYNX to obtain directional location information (an approximate bearing) towards other divers who are using a Liquivision Tank Transmitter or landmarks marked with a Liquivision Location Transmitter. While we have made every effort to make this a useful feature, its effectiveness is highly influenced by the diver’s ability to “work with the software”, i.e. to keep a LYNX, Transmitter and body orientation that is favorable to signal reception and accuracy. Also, this is the first time such a feature has been introduced to the broad recreational diving market, and so it is, in its nature, very experimental. We simply don’t know how people will want to use or mis-use it. Liquivision Products, Inc -14- Manual 1.6; Lynx 1.18; US 1.11; U-2 3.06 ™ Air Integrated Dive Computer User Manual For this reason, the Locator feature is an optional, free BETA upgrade to the LYNX-AI functionality. The Locator feature is provided through an experimental software in BETA release. To activate it on your LYNX, you must acknowledge that you have read through the proper way of using it, that you understand its limitations, and that you accept that it is not covered by the LYNX warranty in any way. Once you have done so, you will get a Locator PIN from the Liquivision website, similar to the LYNX Unlock PIN. There is absolutely no requirement to unlock the Locator feature of the LYNX. The LYNX will still provide Air Integration functionality, including the option to monitor your own, your Buddy’s or your Group’s tank pressures, and will provide you with remaining Air Time information for your own tank. If you choose to unlock the Locator feature of the LYNX, you will have to enter the Locator PIN you have obtained into your LYNX computer in the Locator PIN menu. The process for entering this PIN is very similar to the one for entering the LYNX Unlock PIN. In fact, after you enter the Locator PIN menu, you can follow the same step-by-step PIN entry instructions as for the LYNX Unlock PIN. Those instructions can be found here: Entering Your Free Software Activation PIN, Setting Time/Date & Battery Type Setup Time/Date & Battery Type Once you have registered and unlocked your LYNX unit, the main screen will still say “NOT Ready To Dive: Edit Your Time/Date, Battery Type”. You will find step-by-step information on how to setup the Time/Date and Battery Type here: Entering Your Free Software Activation PIN, Setting Time/Date & Battery Type It is important to set up the correct battery type for both your LYNX and your transmitter(s) to ensure accurate battery monitoring. Read The Manual Before your first dive with the LYNX, read this manual and make sure you fully understand it. After any period of not using your LYNX, we recommend that you re-read the manual to make sure you fully know and understand how to use it. If you have any questions, refer first to this manual, then to the FAQ on the Liquivision website and finally to your LYNX dealer. If none of this helps, contact Liquivision support at www.liquivision.com/contact.php . Familiarize Yourself With Tap-Navigation Liquivision’s tap-based navigation has what we call a “one beer learning curve”. Sit down on your sofa for half an hour with a beer, and tap through the LYNX menus to familiarize yourself with the tapping interaction and the general menu layouts. Liquivision Products, Inc -15- Manual 1.6; Lynx 1.18; US 1.11; U-2 3.06 ™ Air Integrated Dive Computer User Manual GETTING STARTED – FEATURES OF YOUR LYNX UNIT Ultrasonic Transducers. NOT A BUTTON! Do not push! Battery Compartment Color OLED Display Front Bungee Holes Front Strap Holes Ultrasonic Transducers. NOT A BUTTON! Do not push! Back Strap Holes Back Bungee Holes Infra Red Aperture (for connection to PC Interface) Serial Number & CE Mark HOW TO INSERT THE BUNGEE CORD - We recommend splitting the bungee in two and using two separate pieces to secure your unit, so if one breaks, the other holds. - We recommend heat-sealing the knots at the end of the bungee cord (pull the knot away from the LYNX casing, heat it up lightly, and form the hot plastic into a hard ball that can’t slip back through the bungee hole). Liquivision Products, Inc -16- Manual 1.6; Lynx 1.18; US 1.11; U-2 3.06 ™ Air Integrated Dive Computer User Manual GETTING STARTED – FEATURES OF YOUR T1 TRANSMITTER Screws – DO NOT OPEN – DANGER!!! 200 VOLTS 7/16”-20 threads for high pressure port on a 1st stage Viton® Oxygen compatible O-Ring AS 568A-012 Blank Space Since transmitters look alike, this is for you to put an identifying mark on your T1 transmitter – your name, for example. Use a permanent marker. T1 Serial Number (SN) is engraved on the clear base. This is hard to see once the T1 is mounted on a tank, so the SN is ALSO on the sticker f f Battery Cap CE Marking Year of Manufacture Recycle/dispose safely, do not throw in trash T1 Serial Number: same as on the sticker Overpressure Rivet – this will blow out if the pressure in the transmitter exceeds about 100 PSI. If this happens, the T1 should be returned to Liquivision for repair Transparent base offers visual inspection in case of suspected water entry into housing Green LED flashes during packet transmission Ultrasonic Transducer Ring – DO NOT COVER this area! Do not stick any other stickers onto the narrow part of the T1. It could impair the transmission ability of the transmitter. Liquivision Products, Inc -17- Manual 1.6; Lynx 1.18; US 1.11; U-2 3.06 ™ Air Integrated Dive Computer User Manual G E T T I NG STAR T E D – FE AT UR E S OF Y OUR U-2/L 1 T R ANSM I T T E R Knurled surface, for easy opening/closing of battery compartment Overpressure Rivet – this will blow out if the pressure in the transmitter exceeds about 100 PSI. If this occurs, the U-2 should be returned to Liquivision for repair O-Ring - Viton® Oxygen compatible AS 568A-012 7/16”-20 threads for high pressure port on a 1st stage CE Markings, including: Recycle/dispose safely, do not throw in trash Year of manufacture Location of manufacture U-2 Serial Number (SN) Blank Space Since transmitters look alike, this is for you to put an identifying mark on your U-2 transmitter – your name, for example. Use a permanent marker. L1 Location Transmitter: The L1 Location Transmitter is constructed very similarly to the U-2 Tank Transmitter, other than it has a larger top to accommodate a larger battery, and a looped base that you can pass a carabiner or a line through: L1 Looped Base Dark Red: Transmitter Housing Top Grey: Transmitter Housing Base Battery Compartment: you can access this by unscrewing the Top from the Base. U-2/L1 Ultrasonic Transducer Ring Inside. DO NOT COVER this area! Do not stick any stickers on this part of your transmitter housing. It could impair the transmission ability of your unit. Liquivision Products, Inc -18- Manual 1.6; Lynx 1.18; US 1.11; U-2 3.06 ™ Air Integrated Dive Computer User Manual GETTING STARTED – HOW TO TURN ON/TAP YOUR LYNX LEFT TAP Aim for the center of the unit (but try to avoid the sensor!) DOWN TAP Aim for the center of the unit. Tap on the vertical surface (shown in green) DO NOT tap on the angled surface (shown in red) or the sensor! Plane for “Up” and “Down” Tapping: Your Up and Down taps should follow this imaginary line (parallel to screen) RIGHT TAP Aim for the center of the unit (but try to avoid the sensor!) Plane for “Left” and “Right” Tapping: Your Left and Right taps should follow this imaginary line (parallel to screen) UP TAP Aim for the center & center-left of the unit Please refer to the short video on tapping provided here: www.liquivision.com/videos.php For your first LYNX interactions, hold your LYNX in one hand, and use the other hand to tap it. Once you are familiar with the tapping technique, you will find it easy to tap your LYNX when it is on your wrist. General Tapping/Menu Guidelines: 1) tap “Down” three/five times* to turn the unit on, or to enter into menu mode 2) tap “Down” or “Up” to scroll through menu items 3) tap “Left” or “Right” to enter a menu item *Everywhere in this manual, you will find references to tapping three/five (3/5) times to turn the unit on, or to enter menu mode. The default setting is three times, but you can adjust it to five times if you are concerned about accidental taps causing you to enter menu mode (Preferences -> Tap Count). Liquivision Products, Inc -19- Manual 1.6; Lynx 1.18; US 1.11; U-2 3.06 ™ Air Integrated Dive Computer User Manual Before you can complete a menu action that can cause loss of information, you will be taken to another screen asking you “Are you sure?”. The default answer is “No”. To confirm, you will need to scroll down, and choose “Yes”. The last item in a menu is “Exit”. On the surface, “Exit” will take you to the previous menu. Underwater, “Exit” will take you back to the dive screen. There is also a menu timeout: - if you stay in a surface menu for more than 60 sec., the LYNX will timeout to the surface display. - if you stay in an underwater menu for more than 10 sec., the LYNX will timeout to the dive display. Example: Entering Your Free Software Activation PIN, Setting Time/Date and Battery Type To turn your LYNX on, tap Down three/five times in quick succession. 1. Your LYNX will turn on and you will see this screen: 2. To enter menu mode, tap Down three times in quick succession. 3. Your LYNX will enter menu mode, and you will see this screen: 4. Tap Down once to reach the “Enter PIN” menu. 5. Tap Left to enter the “Enter PIN” menu. You will see a line of nine zeroes, and the first one will have a cursor on it. Liquivision Products, Inc -20- Manual 1.6; Lynx 1.18; US 1.11; U-2 3.06 ™ Air Integrated Dive Computer User Manual 6. Tap Up or Down to change the first zero to the first digit of your PIN code. Tapping Up will bring the numbers 1-2-3-4-5… in sequence. Tapping Down will bring the numbers 9-8-7-6-5…. in sequence. 7. Tap Left to move the cursor to the next zero, and once again tap Up and Down to set the correct value. 8. Repeat this sequence until you have set all digits of the PIN. 9. Once you have entered all the digits of the PIN, tap Left once more. If you enter the correct PIN, you will see the following screen: If you made a mistake in the PIN, you will return to the “Unit Is Locked” main screen, and you will need to repeats Steps 1-9 again. If you did enter the correct PIN, you must now setup the Time and Date (Steps 10-13) and select your Battery Type (Steps 14-19) to fully activate your unit. 10. To enter menu mode, tap Down three/five times in quick succession. 11. Your LYNX will enter menu mode, and you will see this screen: (You may notice that the “Enter PIN” line has disappeared, since you have successfully entered your PIN) Liquivision Products, Inc -21- Manual 1.6; Lynx 1.18; US 1.11; U-2 3.06 ™ Air Integrated Dive Computer User Manual 12. Tap Down ten times to reach the Time/Date item. 13. Tap Left to enter the Time/Date menu. You will see the following list of options. Set up your preferred time format (12h/24h), the time of day, the date and the year. Once you are satisfied with the Time/Date setup, tap Down to “Exit” and tap Left to select it – you will be taken back to the main menu. 14. Once in the main menu, tap Up twice to reach “Preferences”, and tap Left to select. 15. You will now be in the “Preferences” menu. Tap Down seven times until you reach “Battery Type”, then tap Left to select. 16. You will see a list of battery types. The default is “Blue-ER17335M”. This is the battery your unit shipped with. Tap Left to confirm this selection, or tap Up or Down to highlight another option, and then Tap Left to select. If you are using rechargeable batteries: -“White - LFP123A battery”: Tap Down three times, then Tap Left to select. -“Green – ICR16340” battery: Tap Down twice, then Tap Left to select. DISPOSABLE RECHARGEABLE ER 17335M LFP123A ICR16340 1700mAh 530mAh 650mAh Blue White Green Liquivision Products, Inc -22- Manual 1.6; Lynx 1.18; US 1.11; U-2 3.06 ™ Air Integrated Dive Computer User Manual NOTE: You will also have to set up your Transmitter battery. You can find this setting in: Air Integration -> Transmitter -> Battery. For more information, please refer to Overview of Lynx, T1, U-2 and L1 Battery Types. Once you Tap Left to select, you will be automatically taken back to the “Preferences” menu. 17. Back in the Preferences menu, tap Down three times to reach “Exit” and tap Left to select it. 18. Back in the Main menu, tap Down five times to reach “Exit” and tap Left to select it. 19. You will now be back in the main Surface Display and you should see the surface screen. Liquivision Products, Inc -23- Manual 1.6; Lynx 1.18; US 1.11; U-2 3.06 ™ Air Integrated Dive Computer User Manual GETTING STARTED – SETTING UP A TRANSMITTER PRE-DIVE Transmitter Identification/Labels The T1 Transmitter Serial Number is engraved on its base. Once you have mounted it on a first stage regulator, this number will be impossible to access. For this reason, every T1 Transmitter ships with a serial number label wrapped around the top. Before you mount your T1 Transmitter, check that the serial number on the label and the serial number engraved on the bottom match. The U-2 and L1 Transmitter Serial Numbers are only marked on the stickers near their base. Once this is done, it is important to write your name on the transmitter with a permanent marker (see note *** below). This way you can know at a glance that you are mounting YOUR T1 or U-2 Tank Transmitter on YOUR tank. Ultrasonic transmitters have a much greater range both underwater (up to 100m/330 ft) and on land (up to 1m/3.3ft) than existing radio-frequency transmitters. It is possible to accidentally mount your transmitter on your Buddy’s tank, and still see a pressure value appear under the “You” label on your LYNX screen during your Pre-Dive Check. Such a mix-up could be fatal. NOTE: the transmitter label has been selected such that its thickness and properties do not interfere with the vibration of the transmitter which is critical for proper acoustic operation. Do not cover the existing label with tape or other material as this could interfere with the transmitter operation! WARNING Write Your Name on Your Transmitter! It is important to write your name or descriptor on the transmitter label. This way, when you are running your pre-dive check, you can ask another diver to verify that the transmitter on YOUR tank has YOUR name or descriptor on the label. Mixing up transmitters could be fatal! ***A Word On Transmitter Naming: Names vs. Color Codes If you and your Buddy each own a personal Tank Transmitter, it makes sense to each write your name on your transmitter label for quick and easy recognition. If you are a Dive Master, you may have your personal Tank Transmitter with your name marked on the label, and you may be using up to 9 other Tank Transmitters that belong to the dive shop. These should not be marked with student names on the labels, since students change all the time. Instead, some dive masters have suggested using color coding – for example, marking transmitters “Red”, “Blue, “Green”, Liquivision Products, Inc -24- Manual 1.6; Lynx 1.18; US 1.11; U-2 3.06 ™ Air Integrated Dive Computer User Manual and so on, and putting them on tanks marked with red, blue and green tape. At the start of each class, you can give your students a color code using a bandana or a piece of tape on their wetsuit. That way you can make sure the right transmitter is on the right tank and on the right student on the surface. This also makes LYNX setup easier – instead of constantly typing new student names next to each transmitter serial number, you can permanently enter the color you have assigned to that transmitter. Then, when reviewing the Group screen, your students appear as “Red – 2000 PSI”, “Blue – 1750 PSI” and so on. You will know who is who by referring to their bandana or wetsuit tape. T1/U-2 Tank Transmitter Installation 1) Use a First Stage with Two HP Ports Your Tank Transmitter needs to be screwed into a high pressure port on your first stage regulator. It should be mounted on a 1st stage regulator with TWO high pressure ports, so you can also mount an analog submersible pressure gauge (SPG). It is good diving practice to carry backup instruments on any dive. The LYNX and T1 or U-2 Transmitter are two battery powered electronic devices – if any one of the batteries dies, you will lose your tank pressure information. Having an analog SPG on hand will allow you to complete your dive safely. If you are not carrying an analog SPG, in the event of either your LYNX or Tank Transmitter turning off, you will have to abort the rest of your dive immediately and ascent to the surface following proper protocol: respecting maximum ascent rates and the 3 minute Safety Stop at 6ft/1.5m. WARNING Your Must Always Use an Analog Submersible Pressure Gauge (SPG) With Your Transmitter If the LYNX or T1/U-2 Transmitter stop working for any reason at all, you will have no tank pressure information unless you are also using an analog SPG. In the event of equipment failure, you must IMMEDIATELY abort your dive and ascend to the surface following proper protocol. 2) Inspect the T1/U-2 Transmitter O-Ring Your Tank Transmitter has a Viton® O-Ring on the metal base, where it screws into the first stage regulator. The Viton® O-Ring is compatible with Nitrox and O2, while regular O-Rings are not. Always inspect this O-Ring prior to screwing in your first stage. It should be clean and well lubricated with silicone O-Ring grease. If there is dirt, damage or cracking, it should be cleaned or replaced. How to replace O-Ring. You can obtain replacement O-Rings from Liquivision. Otherwise, they are available online from suppliers like McMaster Carr (details below). Viton® T1 metal base O-Ring specs: Fluoroelastomer AS568A #012 (ID 3/8" OD 1/2"). Search for item 9464K17 on www.mcmaster.com T1 metal base with Viton ORing 3) Screw the T1/U-2 Transmitter into the HP Port You can tighten it quite firmly by hand and this should be sufficient. You can use a wrench if you like. It is compatible with a ¾” wrench (18.9mm). 4) T1/U-2 Transmitter/First Stage Compatibility The T1 Transmitter is slightly larger than existing radio-frequency transmitters. However, it has been carefully designed to fit in almost every possible 1st stage hose configuration. If you find that the Liquivision Products, Inc -25- Manual 1.6; Lynx 1.18; US 1.11; U-2 3.06 ™ Air Integrated Dive Computer User Manual transmitter is colliding with another hose, it is usually sufficient to first disconnect the other hose, then install the T1 Transmitter, then re-install the other hose. If the T1 still doesn’t fit, there are adapters made by Omniswivel and XSScuba that can help. See Appendix A for more information. NOTE: If your T1 Transmitter still doesn’t fit your 1st stage, or you are unsatisfied with the fit, you may return the unused and un-dove LYNX-AI to the point of purchase for a full refund within 30 days after purchase. Please see details in the LYNX User Agreement & Warranty. The U-2 has a narrower base than the T1, and is more compact in general. You should not experience any problems with mounting it on your 1st stage. However, you can also use the Omniswivel or XSScuba adapters with the U-2. T1/U-2 Tank and L1 Location Transmitter Orientation The ultrasonic T1, U-2 and L1 Transmitters have a maximum signal range of 100m/330ft. in clear water and with an unobstructed line-of-sight from the Transmitters to the LYNX computer. The actual Transmitter range varies based on a number of factors, including, but not limited to, water turbidity, physical obstructions, ultrasonic noise, air pockets (such as a those found in a drysuit or in a diver’s lungs) and device orientation. We will discuss these factors in more depth in Factors That Affect LYNX-AI Range, but here we will focus on Transmitter orientation on the tank/on the line and relative to the diver. The orientation of the Tank Transmitters on the 1st stage regulator must be carefully considered. In fact, different 1st stage regulators are built with different orientations, such that possible mountings vary based on different 1st stage regulators. The Lynx transmitter will work remarkably well even in a totally random mounting. However, if you intend or expect to get a signal from a great distance away (>50m/165ft), then the orientation and mounting of the transmitter is quite important. Any obstruction between your Tank or Location Transmitter and the receiving LYNX will create a signal “shadow”. Here are some examples that illustrate how the Transmitter signal works and can help you optimize Transmitter placement: Strong signal/weak signal zones of the Transmitters themselves The Transmitters have a ultrasonic transducer, shaped like a tube or a ring, which emits the signal to the LYNX computer. This ring emits ultrasonic waves sideways and at an angle (where it has surface area), but not directly up and down. The first set of pictures, below, shows the approximate position of the ring transducer in the T1, U-2 and L1 Transmitters and the directions in which they emits ultrasonic waves. The second picture zooms out a bit - it shows that you would ideally want to expose the sides of your Transmitter towards any LYNX computers in the water, rather than the top and bottom. Both the first and second pictures are 2D cross sections. The transducer is actually a ring, so it emits its signal all around. The third picture attempts to show the 3D signal toroid or “bagel” – you must imagine that your Transmitter is in the middle of the “bagel”, where the blue marker is. Its signal emanates in ever widening (and weakening) circles all around it. Liquivision Products, Inc -26- Manual 1.6; Lynx 1.18; US 1.11; U-2 3.06 ™ Air Integrated Dive Computer 1a. Transducer Ring in a T1 Transmitter User Manual 1b. Transducer Ring in a U-2 Transmitter 1c. Transducer Ring in an L1 Transmitter Weak Signal Strong Signal Strong Signal Weak Signal 2. Areas of Strong/ Weak Signal 3. Toroidal Signal Emission. Blue dot is T1 Transmitter. Green dots are LYNXes that are well positioned to receive signal. Red dot is a LYNX that is poorly positioned to receive signal, The biggest shadow the T1 or U-2 Tank Transmitter faces: YOU! You are a physical obstruction that the ultrasonic signal has to 1. wrap around. Ultrasound travels well through water and liquids (our body is about 50% water) but not through air. In a wetsuit, the major impediment are your lungs, which are full of air. In a drysuit, your whole outfit is an impediment. For this reason, it is important that your T1 or U-2 Transmitter should be as far away from your body as possible. 1. CORRECT: T1/U-2 Transmitter is pointing up, it is higher than your shoulder and more than 3” away from your head, minimizing signal shadow. 2. INCORRECT: T1/U-2 Transmitter is pointing towards you, it is below your shoulder and touching your body. maximizing signal shadow. For more pictures, please see Appendix A. Liquivision Products, Inc 2. Signal Signal Shadow Shadow -27- Manual 1.6; Lynx 1.18; US 1.11; U-2 3.06 ™ Air Integrated Dive Computer User Manual 3. This is a top-down view, showing how the T1/U-2 Transmitter signal can project straight out to divers located 3. with a clear “line-of-sight” but how it has to wrap around your body to reach the diver right in front of you. This action of “wrapping around” dilutes the signal and shortens the range. For this reason, the diver further away in front of you may not get a signal. IMPORTANT: to get good signal transmission & reception, it is useful to keep moving/rotating around. If the diver in this picture turned 45°, then diver who was in front of him would now be off to his side, and be better placed to receive data. If you ever get a momentary “No Sig” indication from another diver you are monitoring, simply move/rotate around slowly but continuously. This is the best process to recover a signal. Positioning the L1 is simpler – ideally, it should be hanging on a line from your boat, in open water free of obstructions. It should be some 6 feet below the surface and 6 feet off the ground, to limit ultrasonic echoes off the surface and bottom of the ocean or lake. You can also mount the L1 on a rod if you want to mark a spot on the bottom – ideally, the rod should be fairly tall to keep the L1 off the bottom, and the L1 should be unobstructed. Finally, this section only covered how to ensure optimal T1/U-2 and L1 Transmitter signal transmission. It is equally important to know how to position and use your LYNX for optimal signal reception. That information is covered in the Positioning Your LYNX To Get The Best Possible Transmitter Signal section. Turning The T1/U-2 Transmitters On/Off Once your T1 or U-2 Tank Transmitter is screwed onto the second HP port of your 1st stage regulator, and you have adjusted it to optimize its position, you can turn the T1/U-2 Transmitter “On” by opening your tank valve and pressurizing your 1st stage. Your Tank Transmitter turns “On” within 30 seconds of sensing 200 PSI (14 BAR) of pressure. It keeps transmitting until the pressure drops to 100 PSI (7 BAR) or less. It then keeps transmitting for another 10 minutes. This is what we call “Lost Diver Mode”. If a diver is lost, the Locator feature of his Buddy’s LYNX can help the Buddy locate the diver underwater, as long as the diver’s Tank Transmitter keeps transmitting data packets, and Buddy is within the Tank Transmitter’s range. Since your Tank Transmitter keeps transmitting when tank pressure is above 100 PSI (7 BAR), it will keep transmitting between dives until the battery dies! To stop your Tank Transmitter from transmitting between dives, you must shut your tank valve and depressurize your first stage after every dive! This is an important battery saving measure, and a good habit to get into. NOTE: this is different from the operation of competitive radio-frequency transmitters. Turning The L1 Transmitters On/Off Since the L1 is not mounted on a Tank, it is not pressure-activated. Instead, it turns On/Off like a dive light: screw the top down and it turns on, screw the top open slightly, and it turns off. The L1 is specially designed for this mode of activation. It has 2 O-Rings on its base. Liquivision Products, Inc -28- Manual 1.6; Lynx 1.18; US 1.11; U-2 3.06 ™ Air Integrated Dive Computer User Manual When you un-screw it, you should un-screw so one half of the first O-Ring is visible. The second ORing keeps a water tight seal. When you screw it down, both O-Rings seal. Here is an illustration: 1. L1 Transmitter Fully Open – showing 2 O-Rings 2. L1 Transmitter OFF – unscrewed so one O-Ring is sealed, the other O-Ring is visible 3. L1 Transmitter ON – screwed down all the way. Once you screw down your L1 Transmitter top, after about 30 seconds you should hear the first transmission – a quiet “chirp” coming from the transmitter. Checking Your Transmitter Pre-Dive There are two ways to check if your Tank or Location Transmitter is “On” without the need for a LYNX. When a Tank Transmitter is on a pressurized first stage, or when a Location Transmitter is screwed down to the “On” position, it begins to send out data packets every 4 seconds. Each time it sends a packet, it makes a short sound – a “chirp”. The chirping is not very audible underwater due to regulator noise, but it can be heard on the surface in a quiet room, or on a dive boat (if you put your ear next to the transmitter). Also, every time the T1 Transmitter sends a packet, a green LED light flashes inside it. This is visible through the clear plastic on the bottom of the T1 Transmitter. The U-2/L1 Transmitters does not have a clear bottom, but if you hold them in your hand, you can feel the light vibration that accompanies each “chirp”. It is a good idea to get in the habit of putting your ear next to your Transmitter to check for chirping each time you set it up. If it doesn’t chirp, the battery could be dead. The best way to check your Transmitter, and any Transmitters in your dive group, is to run the PreDive Check function on your LYNX (described in detail in the Pre-Dive Check section of this manual). Generally speaking, the Pre-Dive Check allows you to verify the tank pressure and transmitter battery life remaining of any Tank Transmitter present in your dive group, and the signal and battery of any Location Transmitter as long as the Transmitter is “On” and you are within 1m/3.3ft of it. Do not start your dive without running the Pre-Dive Check! WARNING Tank Transmitters Serial Numbers 385 and above now transmit in 2 PSI increments. If your Lynx is running V1.07 of the Lynx firmware or an earlier version it will not be compatible with Transmitters S/N 385+, and will show half of the actual pressure. For your Lynx to be compatible with all Tank Transmitters you must update to V1.10 or above. Liquivision Products, Inc -29- Manual 1.6; Lynx 1.18; US 1.11; U-2 3.06 ™ Air Integrated Dive Computer User Manual GETTING STARTED – SETTING UP LYNX PRE-DIVE LYNX Surface Display When you turn your LYNX on by tapping Down three/five times, it will go to the Surface Display (provided you have unlocked it, set up the Time/Date and Battery Type as per the steps listed here). Max: max depth of last dive - blank Tank Pressure Icon: blank, since Air Integration hasn’t been turned on Air Integration Status: currently “Off”, will show PSI/BAR value when “On” Tank Battery Icon: blank, since Air Integration hasn’t been turned on LYNX Battery Icon Dive Time: length of last dive - blank Surface: time in hours and minutes since you last surfaced - blank No Fly: blank Gas: dive gas currently configured Clock: current time of day Temperature: ambient temperature If you turn Air Integration “On” and turn your personal Tank Transmitter “On”, your surface screen will look like this: Max: max depth of last dive - blank Tank Pressure Icon: shows graphical tank pressure icon Air Integration Status: shows tank pressure in PSI or BAR Tank Battery Icon LYNX Battery Icon Dive Time: length of last dive - blank Surface: time in hours and minutes since you last surfaced - blank No Fly: blank Gas: tank gas currently configured Clock: current time of day Temperature: ambient temperature If you have already dove your LYNX, it will display information about last dive. For more about this, refer to the “Exiting the water” section of the Manual. If you do not access menus, or enter the water, it will go into sleep mode after 5 minutes. It will continue to monitor pressure in sleep mode so it will wake up again once you jump in the water and descend below 1.6m/5ft. LYNX Scroll Bar Once you have entered the Surface Display, you can enter Menu Mode by tapping your unit three/five times again. If the list of menu items exceeds the space on the screen, a Scroll Bar will appear on the left of the screen, indicating where you are in the list. A Scroll Bar at the top of your screen means you are the top of the list, a Scroll Bar at the bottom of your screen means you are at the bottom. First, Check Your Battery! The LYNX displays its battery status, and that of your Transmitter (if you have one), on its surface display so that you can check your battery power before you dive. It is very important to make sure that you have enough battery power left to complete your planned dive. Liquivision Products, Inc -30- Manual 1.6; Lynx 1.18; US 1.11; U-2 3.06 ™ Air Integrated Dive Computer User Manual The battery status is represented graphically with a battery icon. The battery icon starts out green, then it turns yellow and then red. If the battery icon is yellow on the surface, you should change your battery. If the battery icon is yellow underwater, you have enough battery life to complete your dive. If the battery icon is red on the surface, you MUST change your battery immediately. If it turns red during your dive, you should stop your dive and begin your ascent immediately. WARNING You must change your battery immediately when the indicator turns red Lithium batteries sustain high power for a long time, but once the power starts to drop, it does so very fast. A red battery indicator means that the battery power will drop to insufficient power within a few minutes. Optimizing Battery Life The battery life is significantly affected by the Air Integration mode you select and the brightness setting of your display. Learn more about optimizing your LYNX’s battery in the section “Determining & Optimizing Battery Life”. IMPORTANT NOTICE Lynx Firmware v1.11 and above significantly reduce the extent to which your Lynx will drain the battery when turned off. With v1.10 or below, the Lynx is capable of draining a battery in about a week and a half, if the unit sits unused with a battery inside. This standby drain is significantly reduced with v1.11 firmware and above. Liquivision Products, Inc -31- Manual 1.6; Lynx 1.18; US 1.11; U-2 3.06 ™ Air Integrated Dive Computer User Manual SUR FA C E M E NU S Main Menu 1. Shut Off 2. Enter PIN (only if you haven't entered it yet) 3. LOCK / UNLOCK (only if the device has been unlocked) 4. Dive Planning 4.1. Mode (Rec/Tec/Gauge) In Rec mode… In Tec mode… In Gauge mode… 4.2. Dive Setup 4.2 Dive Setup 4.2.1. Conservatism 4.2.1 Conservatism 4.2.2. PO2 dive 4.2.2 PO2 dive 4.2.3. PO2 deco 4.2.3 PO2 deco 4.2.4. Last deco stop 4.2.4 Last deco stop 4.3. Gas 4.3 Gases 4.4. Compute NDL 4.4 Computer NDL 4.5. Runtime 4.5 Runtime 4.6. Alarms 4.6. Alarms 4.6. Alarms 4.6.1. Alarms On/Off 4.6.1. Alarms On/Off 4.6.1. Alarms On/Off 4.6.2. Depth 4.6.2. Depth 4.6.2. Depth 4.6.3. Time 4.6.3. Time 4.6.3. Time 4.6.4. Ascent Rate 4.6.4. Ascent Rate 4.6.4. Ascent Rate 4.6.5. Descent Rate 4.6.5. Descent Rate 4.6.5. Descent Rate 4.7. Your Saturation 4.7 Your Saturation 4.8. Simulate Dive 4.8 Simulate Dive 4.8. Simulate Dive 5. Pre-Dive Check (only if you are using one or more transmitters) 6. Air Integration 6.1. Mode 6.2. Units 6.3. Transmitter 6.3.1. Set All Units (only in v1.11 or previous firmware versions) 6.3.2. A0000 You Off 6.3.2.1.Type 6.3.2.2.Serial # 6.3.2.3.Name 6.3.2.4.Max 6.3.2.5.Mid 6.3.2.6.Low 6.3.2.7.Reserve 6.3.2.8.Battery 6.3.2.9.Copy To 6.4. Advanced 7. Compass 7.1. Check 7.2. Calibrate Liquivision Products, Inc -32- Manual 1.6; Lynx 1.18; US 1.11; U-2 3.06 ™ Air Integrated Dive Computer User Manual 8. Dive Log 8.1. Log Summary 8.2. Log Detail 8.3. Depth Graph 8.4. Temperature Graph 9. Display Settings 9.1. Brightness 9.2. Auto Dim 9.3. Refresh 9.4. Layout 9.5. Velocity 9.6. Stopwatch DF (this setting applies only to Gauge mode) 9.7. Dark Mode (this setting applies only to Gauge mode) 9.8. Show Hours 9.9. Show TTS Show MAX 9.10. Simulate Dive 9.11. 10. Preferences Units 10.1. Log Period 10.2. Tap Sensitivity 10.3. Tap Count 10.4. Minimum Dive 10.5. Minimum Surface Interval 10.6. Status 10.7. Battery Type 10.8. Battery Meter 10.9. 10.10. Battery Test 10.11. Temperature 11. Salinity 12. Time/Date 12h/24h 12.1. Time 12.2. Date 12.3. Year 12.4. Calibrate Time 12.5. 13. Connect to PC 14. Locator PIN 1. Shut Off Choosing this menu option will put your LYNX in Sleep Mode, which is designed to use minimum battery. The LYNX will still wake up when tapped 3/5 times. It will also still keep track of surrounding pressure so it can wake up once you enter the water. 2. Enter PIN This is where you enter the free PIN you receive upon registering your LYNX unit. There is a step-bystep description of the PIN entry process in the Entering Your Free Software Activation PIN, Setting Liquivision Products, Inc -33- Manual 1.6; Lynx 1.18; US 1.11; U-2 3.06 ™ Air Integrated Dive Computer User Manual Time/Date and Battery Type section of the manual. You may be required to re-enter this PIN after a software update, so please keep a written record of it for reference. 3. LOCK / UNLOCK This menu item allows you to lock all your menu settings so they cannot change accidentally due to random shaking e.g. during a bumpy ride to the dive site or knocking around in your backpack. To lock, just select the “LOCK” menu item by tapping on the side of your unit. You will have to enter the lock sequence. It is “123” and you input it in the same way as you input your PIN number (refer to Entering Your Free Software Activation PIN, Setting Time/Date and Battery Type if you have trouble entering the number). The screen will also remind you how to perform the lock sequence. Your LYNX is now locked, and the menu item changes to “UNLOCK” To unlock, just select “UNLOCK” by tapping on the side of your unit. You will have to enter the unlock sequence. It is also “123” and you input it in the same way as you input your PIN number . The screen will also remind you how to perform the unlock sequence. The unlock sequence prevents random unlocking of the unit – it is very improbable that random shakes will input that sequence. When a unit is put in “LOCK” mode, the scrollbar will turn Red. Once you unlock, the scrollbar will turn back into green and you can proceed with your use of the KAON. 4. Dive Planning This whole submenu is devoted to planning your dive – here you can set up your unit for Rec, Tec or Gauge Mode diving, you can enter your gases, set up alarms and compute your No Deco Limit (NDL) or you decompression ascent schedule. Your NDL or decompression schedule computations will match what the LYNX will display during your dive, provided you follow your dive plan precisely. The LYNX offers a 1-gas Rec mode and a 3-Gas Tec mode. Both models utilize the proven Bühlmann model with ZH-L16C M-Values. There are differences between the two modes based on the intended type of diving. From a decompression perspective, the 1-gas Rec mode is optimized for recreational diving: two or three dives completed in short succession, with relatively short (30-60 min) surface intervals, and a primary goal of safely maximizing the no-decompression time for each dive while appropriately penalizing the diver for short surface intervals. This mode operates on the assumption that the diver does not wish to deliberately enter decompression but provides a safe ascent procedure in the event the NDL is accidentally passed. This model generally aligns with the PADI tables. From an air-integration perspective, 1-gas Rec mode gives you the most options: you can track your own air by choosing “Solo” mode in the Air Integration menu, your Buddy’s air by choosing “Buddy” mode, or several divers’ air by choosing “Group 4” or “Group 9” modes. You can also track a Liquivision Products, Inc -34- Manual 1.6; Lynx 1.18; US 1.11; U-2 3.06 ™ Air Integrated Dive Computer User Manual Location transmitter in “Buddy”, “Group 4” and “Group 9” modes by describing a given transmitter as “Location” rather than “Tank”. For more information on this, read the “Air Integration - Mode” section. The 3-gas Tec mode is optimized for nitrox decompression diving: one or two dives completed in a day, with a much longer (2-3 hour) surface interval, and a primary goal of offering safe decompression schedules (with no regard for no decompression limits). It allows the user the freedom to choose from one of three conservatism levels using Bühlmann with gradient factors (100/100, 30/85, 30/75). It aligns with DecoPlanner and similar dive planning tools using the Bühlmann model with gradient factors. From an air-integration perspective, 3-gas Tec mode focuses on your 3 tanks: you can track your own air in up to three tanks if you place a Tank Transmitter on each tank. You do not have the option to monitor anyone else’s gas. However, you can set up any of the remaining 7 transmitters to “Tank” or “Location” to monitor other divers’ location or to obtain a signal from your Location Transmitter. For more information on this, read the “Air Integration - Mode” section. Gauge Mode does not do any decompression calculations and has limited air integration features. The Gauge Mode dive screen has not been re-designed to show your own air (the graphical tank icon) or your Buddy’s air in the top left of the screen. The only way you can see tank pressure information when in Gauge Mode is by selecting “Group-4” or “Group-9” modes. If you want to monitor your own air or your Buddy’s air in Gauge mode, you need to set your tank and your Buddy’s tank as part of the Group tanks. If you wish to use a Location transmitter in Gauge mode, simply describe one of the “Group 4” or “Group 9” transmitters as “Location” rather than “Tank”. For more information on this, read the “Air Integration - Mode” section. 4.1 Mode (Rec/Tec/Gauge) This menu item allows you to select between Rec, Tec or Gauge mode of operation. The default setting is “Rec Mode”, and the default gas is “Air”. Rec Mode In Rec mode, the LYNX functions as a one-gas computer. The default mix is Air. You can set any mix from 21%-40% oxygen, including common mixes such as Air (21%), 32% nitrox or 36% nitrox. The Liquivision Recreational Diving Model in Rec Mode has been carefully tuned to maximize bottom time on both the first dive of the day and on repetitive dives while maintaining diver safety. Liquivision Products, Inc -35- Manual 1.6; Lynx 1.18; US 1.11; U-2 3.06 ™ Air Integrated Dive Computer User Manual DCS risk is carefully managed and in the same ranges as most popular dive tables in use today. Gradient factors control the overall no decompression time and reduction factors are applied during surface intervals to increase safety. In this mode, the LYNX’s primary function is to provide you with your No Decompression Limit (NDL), i.e., the amount of time you can spend diving without incurring any decompression. If you complete your dive within the NDL period, the LYNX will prompt you to complete a Safety Stop for 3 minutes at 5m / 15ft. If, at any time during these 3 minutes, you drop below 6.5m / 21ft, the safety stop counter will turn off and reset. It will begin again once you return to the safety stop depth of 5m / 15ft. Should you continue diving beyond your NDL time – and you should only do this if you have knowledge of decompression diving and sufficient gas to complete the dive safely - the LYNX will start calculating your decompression obligation and indicate the depth and duration of any decompression stops you need to complete to exit the water safely. The unit calculates your NDL or your deco plan using a custom model based on the proven Bühlmann ZH-L16C1 model. This model generally aligns with the PADI tables. If you have a Tank Transmitter set up on your tank, and you have turned the LYNX Air Integration feature “On”, you will be able to track your tank pressure in PSI/BAR and obtain an Air Time value. The Air Time value appears 4 minutes into the dive, and estimates how much dive time you have left based on your breathing rate and current depth. It will reach zero once your tank pressure hits 700 PSI/48 BAR. This normally sufficient to ascend from a no decompression dive recreational diving depth while respecting proper ascent rates and a 3 minute Safety Stop at 6 ft/1.5m, but it will likely not be sufficient gas to complete a decompression schedule. The Air Time feature is not compatible with decompression diving! You must make your own gas calculations if you are planning a decompression dive. WARNING In a No Decompression dive, your remaining Air Time takes precedence over remaining NDL time. If your Air Time is less than your No Decompression (NDL) time, always follow the Air Time value. Start your no decompression ascent before or immediately when Air Time reaches zero (700 PSI/48 BAR). Liquivision Products, Inc -36- Manual 1.6; Lynx 1.18; US 1.11; U-2 3.06 ™ Air Integrated Dive Computer User Manual WARNING The Air Time feature is NOT designed for use with decompression diving. 700 PSI/48 BAR will likely not be enough gas to complete your decompression schedule! You must make your own gas calculations if you are planning a decompression dive, and you must plan to have sufficient gas to complete your decompression safely. Finally, if you have more than one Tank Transmitter set up in Rec mode, on a Buddy’s tank, for example, you will be able to monitor your Buddy’s tank pressure. If you activate the Locate feature (more details in the Unlock The Locator Feature Of The Lynx section), then you will also be able to get a directional indication of your Buddy’s location. Tec Mode In Tec mode, the LYNX allows up to three nitrox gas mixes, each from 21%-100% oxygen. The first mix will be your Dive Gas, the second and third will be Deco Gas 1 and Deco Gas 2. Tec Mode uses the same basic model. Preset gradient factors control the overall decompression calculations but no reduction factors are applied during the surface interval. Using Tec Mode for repetitive recreational diving will yield more aggressive NDL’s after short surface intervals reducing dive safety. Divers should use the mode best suited for their intended dives. In this mode the LYNX assumes you are planning to incur some decompression obligation and gives you control over a number of extra settings, such as your level of Conservatism, your Dive PO2 and Deco PO2 levels, and the depth of your Last Deco Stop (please see the relevant sections of the Dive Setup menu for mode information). You will also have the option to setup and review your Runtime. Please note that when you switch from Rec mode to Tec mode for the first time, you will be prompted to enter your desired level of conservatism with this “Warning” screenshot. Tap Left to exit this screen. You can edit your conservatism by going to “Dive Setup > Conservatism” menu item. The default setting is “2”. For more information on levels of conservatism, please review the “Conservatism” section of the “Dive Setup” portion of this manual. During your dive, the LYNX will begin by displaying your No Decompression Limit (NDL). If you complete your dive within the NDL time, the LYNX will tell you to complete a safety stop for 3 minutes at 5m/15ft. During these 3 minutes, if you drop below 6.5m/21ft, the safety stop counter will turn off and reset. It will begin again once you return to the safety stop depth of 5m/ 15ft. Should you continue diving beyond your NDL time – and you should only do this if you have knowledge of decompression diving and sufficient gas to complete the dive safely - the LYNX will start calculating your decompression obligation and indicate the depth and duration of any decompression stops you need to complete to exit the water safely. The unit calculates your NDL or your decompression plan using Bühlmann ZH-L16C1, with one of three possible levels conservatism (please see the Dive Setup > Conservatism section of the manual for more information). Liquivision Products, Inc -37- Manual 1.6; Lynx 1.18; US 1.11; U-2 3.06 ™ Air Integrated Dive Computer User Manual If you have a Tank Transmitter set up on one, two or three of your tanks, and you have turned the LYNX Air Integration feature “On”, you will be able to track your tank pressure in PSI/BAR for the tank you are currently breathing from. However, you will NOT be given an Air Time value, since it is impossible to calculate this across multiple tanks. If you set up the remaining 7 transmitters available to you in the surface Air Integration menu, and if you activate the Locate feature (more details in the Unlock The Locator Feature Of The Lynx section), then you will be able to monitor 7 other divers or Location Transmitters using the Locate feature underwater. Gauge Mode In Gauge mode, the LYNX acts as a bottom timer and provides information on dive depth and time. It does not keep track of your No Decompression Limit, decompression obligations or tissue saturation. IMPORTANT NOTE ON SWITCHING TO/FROM GAUGE MODE In Gauge Mode, surface off-gassing continues when the device is above water. Once the device is underwater, all deco calculations are suspended. When switching from Gauge Mode to Rec/Tec Mode, the deco information will no longer be accurate, since previous tissue values are used. When you switch out of Gauge Mode, you will see this warning: Tap Left to continue. Here is an example of a situation where this warning may arise: Dive 1: LYNX in Rec or Tec mode, switch to Gauge mode Surface interval – LYNX continues to track your post-Dive 1 tissue saturation Dive 2: LYNX in Gauge mode. LYNX stops tracking your post-Dive 1 tissue saturation. Surface interval Dive 3: LYNX In Rec or Tec mode. LYNX tissue saturation values are wrong!!! LYNX reverts to post-Dive 1 tissue saturation values that were valid at the moment you started Dive 2. It does not account for the ongoing desaturation from Dive 1, not for the added saturation of Dive 2. 4.2. Dive Setup (only in Tec Mode) 4.2.1. Conservatism Your LYNX calculates No Decompression Limits (NDLs) or your decompression times based on the proven Bühlmann ZH-L16C1 algorithm. This menu item allows you to add conservatism to the LYNX decompression calculations using three pre-set levels: Level “0” - standard Bühlmann ZH-L16C with no added conservatism (Gradient Factors 100/100) Level “1” - Bühlmann ZH-L16C with some added conservatism (Gradient Factors 30/85) Level “2” - Bühlmann ZH-L16C with more added conservatism (Gradient Factors 30/75) 4.2.2. PO2 dive Here you can setup the maximum PO2 for your Dive Gas. This will define how deep your Dive Gas will still be considered breathable. The default (and maximum) value is 1.40. You can set it to any value between 1.0-1.40 bar, in 0.05 increments. Liquivision Products, Inc -38- Manual 1.6; Lynx 1.18; US 1.11; U-2 3.06 ™ Air Integrated Dive Computer User Manual 4.2.3. PO2 deco Here you configure the maximum PO2 for your Deco Gas. This will define how deep your Deco Gas will still be considered breathable. The default (and maximum) value is 1.60. You can set it to any value between 1.0-1.6 bar, in 0.05 increments. 4.2.4. Last deco stop Here you can set up the depth of your last decompression stop. The default value is 3m / 10 ft, but you can also set it to 6m / 20ft, so you won’t be affected as much by wave action during your last stop. Please note this will only affect the depth of you last decompression stop if you incur decompression during your dive. This will NOT affect the depth of the safety stop in a No Decompression dive (3 minutes at 5m / 15 ft) 4.3. Gases (only in Rec & Tec Modes) Here you can configure your one gas in Rec Mode, and up to three gases in Tec Mode. Rec Mode The default gas in Rec Mode is “Air”: To modify it, tap Left and the cursor will highlight the gas: Then tap Up to increase the oxygen % to your desired value. The gas will switch from “Air” to 22%, then 23% and so on with each upward tap. The maximum value is 40%. Once you have reached your desired value, say 32%, tap Left again and the value will be set. Liquivision Products, Inc -39- Manual 1.6; Lynx 1.18; US 1.11; U-2 3.06 ™ Air Integrated Dive Computer User Manual Tec Mode The default Dive Gas in Tec mode is “Air”. The default setting for Deco Gas 1 & 2 is “Off” In Tec-Mode you can increase oxygen% up to 100%. You can also increase it in increments of 10. By tapping into the various menu items, you could set up this sample gas setup: Dive Gas: Air Deco Gas 1: Nx 50 Deco Gas 2: O2 4.4. Compute NDL (only in Rec & Tec modes) This computes the No Decompression Limit you can expect at a given depth. The depth values can be provided in feet or metres, depending on the Units you select in the Preferences menu of the LYNX. In Rec Mode, these values will only be affected by the gas you select: In Tec mode, these values will be affected by the gases you select and the level of conservatism. NDL on Air NDL on 36% Nitrox 4.5. Runtime (only in Tec mode) In this section you can enter your dive plan and see what ascent schedule will LYNX compute underwater, assuming that you follow the dive plan precisely. You can configure two types of waypoints: - Normal: where you set a target Depth and a Time spent at that depth, and your LYNX uses this information to create a dive plan - Switch: where you set a target Depth and a Gas you want to switch to at that depth, and your LYNX uses this information to create a dive plan Here’s how you can use this feature. Let’s assume you have set up 3 gases: Dive Gas: 32%, Deco Gas 1: Air, Deco Gas 2: 100% O2. Liquivision Products, Inc -40- Manual 1.6; Lynx 1.18; US 1.11; U-2 3.06 ™ Air Integrated Dive Computer User Manual If you are diving a typical “square” profile, where you descent to a certain depth and stay there for a certain period of time before heading up, all you will need to create is one “Normal” waypoint to get an estimated dive/decompression plan. Ex: “Square” Profile Set up a Normal waypoint at 20m (ca. 65 ft) on 32% for 20 minutes. Your LYNX suggests a switch to O2 at 7m (ca. 23 ft) and a total dive time of 21:59 If you plan to dive a multi-level dive on one gas, you will need to set several “Normal” waypoints to describe your dive and get an estimated decompression plan. Ex: “Multi-Level” Profile You already have a waypoint set up at 20m for 20 mins breathing 32% nitrox. Instead of selecting “Compute Deco”, you “Add” a waypoint at 30m for an additional 10 mins. Then select “Compute Deco”. Your LYNX suggests a switch to O2 at 7m and a total dive time of 32:59. If you plan to dive a multi-level dive with different mixes for each level, you will need to set a “Switch” waypoint to tell your LYNX to plan a gas switch. Let’s say that after 20m for 20 mins breathing 32% nitrox, you would like to spend 10 minutes at 40m (ca. 130 ft) and would like to breathe Air there. Then you would set up two “Normal” waypoints, and add a “Switch” waypoint: As you can see, in this last example, your LYNX provides a dive plan where you breathe 32% during your dive leg at 20m, then descent to 40m and switch to Air. Once you begin your ascent, it recommends that you switch to 32% nitrox at 35m and then to O2 at 7m. Your total dive time is 38:18. A few things to keep in mind… Your LYNX assumes your first waypoint is depth “0” and time “0”. When preparing your dive plan, your LYNX uses the ascent/descent rates configured in the Ascent Rate/Descent Rate submenu of the Alarms menu. For example, if your first waypoint is 20 minutes at Liquivision Products, Inc -41- Manual 1.6; Lynx 1.18; US 1.11; U-2 3.06 ™ Air Integrated Dive Computer User Manual 30m (ca. 100ft), and your Descent Rate Alarm is set to the default of 30 mpm, then your LYNX will assume you spend the first minute of your dive traveling to your target depth, and only spend 19 minutes at the target depth. If you have recently been diving, and are still saturated from those dives, there will be an additional item in the Runtime submenu, which is “Remain. SI”, or “Remaining Surface Interval”. Here you can configure the number of hours and minutes that you plan to stay at the surface, before going on the dive that you are planning. One other thing to remember is that the “Compute Deco” feature might produce unexpected (and wrong) results if you manually enter waypoints that are breaching your decompression ceiling. As an example: if you enter a 90m / 300ft waypoint, after which your decompression should start at 42m / 140ft, but you manually overwrite it by creating next waypoint at 30m / 100ft, then you would get erroneous decompression computations. 4.6. Alarms Your LYNX can display visual alarms when you exceed any of the following parameters: • Maximum depth • Maximum dive time • Maximum ascent rate • Maximum descent rate When the alarm is activated for any parameter, that piece of information will start blinking on your screen for one minute. If you do not correct the situation within one minute, the parameter display will invert (i.e. it will appear as black letters on colored background) until you correct situation causing the alarm. Once you do that, the alarm will turn off. The only exception is a time alarm. It will blink for 1 minute, after which it will go back to normal. The reason for this is that you cannot correct the fact that you exceeded your maximum time. 4.6.1. Alarms On/Off The default setting for Alarms is “On”. Selecting “Off” allows you to turn all the alarms off entirely. If you select “Off”, even if some alarm limits are exceeded, you will not see ANY alarm. The use of this option is discouraged. 4.6.2. Depth Here you can set the depth at which you want your Depth alarm to activate. The default is 30m/100ft. 4.6.3. Time Here you can set the time at which you want the Time alarm to activate. The default is 60 minutes. One use for this feature could be to remind you that your maximum bottom time has been reached. 4.6.4. Ascent Rate Here you can create a set of ascent rate rules. You can set up to 5 different rules. Liquivision Products, Inc -42- Manual 1.6; Lynx 1.18; US 1.11; U-2 3.06 ™ Air Integrated Dive Computer User Manual The first rule is the one with “Start” on the left. This will apply at all depths of your dive, unless you set additional rules. This will also be the default rule for any depths not covered by other rules. If, for example, you set it to 10 meters per minute / 30 feet per minute, and set no other rule, then at any depth, exceeding this ascent rate will cause an alarm. Alternatively, you can add more rules, in the format “Start Depth” - “Maximum Rate”. These additional rules will apply once you get shallower than specified depth. For example, you might choose to limit yourself to 1 meter per minute / 3 feet per minute once you're past your last deco stop, which is planned at a depth of 3 meters / 10 feet. In this case, you would set a rule “Start Depth: 10 feet” and “Maximum Rate: 3 feet per minute”. 4.6.5. Descent Rate This menu works in the same manner as the previous menu – the Ascent Rate menu. In this case, though, a rule is in effect once you're deeper than your specified start depth, and first rule will apply from surface downward, until you reach you next rule's start depth. 4.7. Your Saturation (only in Rec & Tec modes) This menu item displays a screen with your current saturation calculated with the Bühlmann ZH-L16C algorithm1. The information presented here takes into account data from dives you have actually completed (by contrast, the No-Fly information on your Surface Screen is simply a countdown according to the PADI guidelines of “Don’t fly for 12 hours after one day of no-decompression diving, and don’t fly for 24 hours after multiple days of diving or after decompression diving”): Your Saturation screen after a period of no diving • • • • • Your Saturation screen after a deep dive Your current CNS (Central Nervous System) oxygen saturation (refer to Oxygen loading section) OTU (Oxygen Toxicity Units) left for today (refer to Oxygen loading section) Time to full desaturation from inert gases Your Allowed Pressure is a theoretical value, calculated with the Bühlmann ZH-L16C algorithm1, which describes the lowest ambient pressure your body could tolerate without experiencing decompression sickness (DCS). The Altitude value is a translation of the Allowed Pressure into a theoretical Maximum Allowed Altitude, which is based on average pressures at altitudes. As a rule of thumb, if the allowed pressure is 2400m or 8000ft, you should be able to fly on a commercial airliner, as this is the target cabin pressure. However, it is important to remember that a plane cabin can lose pressure for a variety of reasons and this could be a risk factor. Liquivision Products, Inc -43- Manual 1.6; Lynx 1.18; US 1.11; U-2 3.06 ™ Air Integrated Dive Computer User Manual Finally, it is important to remember that all these values – saturation information, time to desaturation, allowed pressure, allowed altitude are theoretical calculations based on the Bühlmann ZH-L16C algorithm1 and are do not monitor or reflect your body’s ACTUAL physiological state. Following this information does not guarantee that you will avoid decompression sickness. 4.8. Simulate Dive This item is here so you can experiment with ascent schedule calculations, gas switches, emergency modes, etc., without getting yourself or your LYNX wet. When you enter “Simulation”, it will open sub-menu asking you for depth and time of the dive, its speed (whether it’s normal – 1x, or faster – 2x, up to 4x faster than normal), and then you can select “Start”. A couple of things to note about the LYNX simulator: • The simulator follows descent and ascent rate limits • It takes a moment to turn on, since the simulation starts at 0m / 0ft but the LYNX considers a dive to start after divers descends below 1.6m / 5.2ft • If the time you set is too short to reach the specified depth, the simulator will just keep descending for the allotted time, and then start ascending without reaching the depth you specified • Please note that the Auto Dim option is not available during a simulation You can stop the simulation at any time by tapping the unit 3/5 times to enter the underwater menus, and choosing “Stop Simulation” (to learn more, refer to the “Stop Simulation” section of the manual.) 5. Pre-Dive Check (only if you are using one or more transmitters) Once your gear is on, and you have pressurized all the 1st stages of any tanks that are equipped with a Tank Transmitter and screwed down/turned on any Location Transmitters (see the Getting Started – Setting Up A Transmitter Pre-Dive section), select “Pre-Dive Check” from the main menu. This will show the transmitter signals from whichever transmitters are currently configured as “On” (see the Air Integration menu item). Any Tank Transmitter will show up with its name, the PSI value, and the battery status. Any Location Transmitter will show up named “Boat”, “SigOK”, and the battery status. Ultrasound travels very far underwater, but on land, in air, it doesn’t travel far. When transmitting in air, the LYNX-AI has a range of around 1m/3.3ft with a good line of sight. Thus, if you want to check the status of any Tank or Location transmitter, make sure you move within range of its transmission and then wait around 10 seconds. A Tank Transmittter should go from “No Sig” in red to a green pressure value (e.g. 3000 PSI) and the battery icon should update. A Location Transmitter will do from “No Sig” in red to “SigOK” in green and the battery icon should update. Any transmitters you have NOT configured on the surface will show “Off” in blue. If you do not see a pressure from a configured Tank Transmitter, the 1st stage that Tank Transmitter is on may not be pressurized, or transmitter battery may be dead. If you do not see a signal from a configured Location Transmitter, it may not be fully screwed down and turned on, or the transmitter battery may be dead. If you do NOT see a signal on land, most likely you will not see it underwater either. Fix any issues BEFORE entering the water! Liquivision Products, Inc -44- Manual 1.6; Lynx 1.18; US 1.11; U-2 3.06 ™ Air Integrated Dive Computer User Manual WARNING Important! Check That Everyone Has The Correct Transmitter! When running pre-dive check, ask another diver to verify that the transmitter on YOUR tank has YOUR name on the label. It is possible for you to get a signal from your transmitter even if it gets mounted on your buddy’s tank and your buddy is standing next to you. Mixing up transmitters could be fatal! 6. Air Integration This is where you can configure all the settings pertaining to Air Integration on your LYNX – it will allow you to decide how many and what kind of transmitters you want to monitor and display on your screen, the parameters of each transmitter (serial number, name of person using it, the max/min pressure of the tank and the type of battery it is using), and the type of units you want to measure pressure in (PSI/BAR). Please note that while you can switch between viewing modes underwater, you can only see transmitters you have configured and turned “On” at the surface, so it is important to do the initial setup properly. Information on how to do this can be found in Getting Started – Setting Up A Transmitter Pre-Dive. 6.1. Mode The Air Integration Modes available to you will vary based on the Dive Mode you select in the Dive Planning menu. Please refer to the chart on the next page to quickly what is available in which mode. One-gas REC mode offers all the Air Integration Modes – Solo, Buddy, Group 4 and Group 9. Three-gas TEC mode only offers Tec-Solo Air Integration Mode. This allows you to monitor your three gases (dive gas and two deco gases). There is no Buddy, Group 4 or Group 9 Air Integration Mode in TEC mode due to the complexity of that type of calculation. Finally, the GAUGE mode display screen hasn’t been customized to show the graphic tank pressure display that is available in REC and TEC modes. For this reason, it doesn’t offer Solo or Buddy Air Integration Modes. However, the grid-like displays of Group 4 and Group 9 Modes are available. If you really want to dive in GAUGE mode and monitor your own or your Buddy’s air, then you can configure you and your Buddy’s tanks to be part of Group 4 or Group 9 Modes. NOTE: the “You” tank transmitter, if turned “On”, will show up in ALL the modes (Solo, Buddy, Group 4, Group 9), but the “Buddy” tank transmitter will only show up in “Buddy” mode. The “Buddy” tank transmitter doesn’t become “Student 1” in Group 4/9 mode, which is a common confusion. “Student 1” is a totally separate setting. If you want “Student 1” to be the same as “Buddy”, you can do so by setting up “Student 1” tank transmitter information to be the same as your Buddy’s. Liquivision Products, Inc -45- Manual 1.6; Lynx 1.18; US 1.11; U-2 3.06 ™ Air Integrated Dive Computer Dive Mode Air Integration Mode REC TEC GGE Directional Location Function Off: Air Integration and Directional Location is off and your LYNX operates very similarly to the stand-alone KAON, providing dive time and decompression information only. NOTE: Setting Air Integration to “Off” turns off the entire AI feature set and you will not see any tank icon displayed on your dive screen. This is different to having AI “On” and your tank transmitter(s) “Off” - then you will see blue inactive tank information on your screen with the word “Off”. Air Integration Solo (Rec): The LYNX monitors your own transmitter only. It shows a graphical tank icon which depletes as you use up your air. Below it there is your tank pressure value in PSI or BAR, and a battery indicator for your tank transmitter battery. The LYNX also shows your Air Time, which is an estimate of how much longer the air in your tank will last for. The one gas mix you have configured before your dive displayed to the lower-right of the tank icon. Solo (Tec): The LYNX Tec Dive Mode allows you to configure up to 3 gas mixes, so Tec-Solo Air Integration Mode allows you to configure up to 3 tanks. Your LYNX monitors the transmitter on the tank you are breathing from. When you switch other gases, it will monitor the tank you switch to, provided that tank has a transmitter. Directional Location: You can locate any other Tank or Location Transmitter you have configured, but you cannot view gas data from other divers’ tank transmitters in Solo Rec or Tec mode. Air Integration Buddy: The LYNX monitors your Tank Transmitter and one other Tank or Location Transmitter. The big tank icon gives you a visual status of your own tank, while your Buddy’s tank pressure is shown in PSI or BAR in the upper left corner, along with a battery indicator for your Buddy’s transmitter battery. If you using a Location transmitter, the corner label will be “Boat”, “SigOK” and the battery icon. Directional Location: Available to locate your Buddy or Boat. Air Integration Group 4: The LYNX monitors your Tank Transmitter and up to four other Tank or Location Transmitters. In this mode, the LYNX displays your dive information at the top of the screen (depth, time, NDL, and your tank pressure in PSI or BAR) and displays other tank names (“Stu1” is for “Student 1”) tank pressures in PSI or BAR and transmitter battery indicators below. If you are running a Location Transmitter, the label will be “Boat”, “SigOK” and the battery icon. Directional Location: Locate up to 4 Tank or Location transmitters. Air Integration Group 9: The LYNX monitors your Tank Transmitter and up to nine other Tank or Location Transmitters. In this mode, the LYNX displays your dive information at the top of the screen (depth, time, NDL, and your tank pressure in PSI or BAR) and displays other tank names (“Stu1” is for “Student 1”) tank pressures in PSI or BAR and transmitter battery indicators below. If you are running a Location Transmitter, the label will be “Boat”, “SigOK” and the battery icon. Directional Location: Locate up to 9 Tank or Location transmitters. Liquivision Products, Inc User Manual SCREEN LAYOUT NDL -46- Manual 1.6; Lynx 1.18; US 1.11; U-2 3.06 ™ Air Integrated Dive Computer User Manual 6.2. Units Select PSI or BAR. If you select PSI, all tank pressures will be displayed in PSI. If you select BAR, all tank pressures will be displayed in BAR. The tank pressure units setting is independent from the Imperial/Metric units selection you can make for all other units in the LYNX in the Preferences-Units menu. This means you can run your LYNX tank pressure in PSI, but get your depth and temperature in meters and Celsius, for example. 6.3. Transmitter This menu allows you to configure each of your transmitters. NOTE: once you have completed this transmitter configuration process, and both your LYNX and Tank or Location Transmitter are “On” and within about 1m/3.3ft of each other, your LYNX should be able to display you Transmitter information during the Pre-Dive Check. There is no “pairing” procedure, like with some other RF transmitters, where you put them close to each other and hope for the best. For the LYNX, just entering the correct transmitter serial number ensures a connection, assuming all devices are “On” and have battery power. 6.3.1. Set All Units (only with software v1.11 or below) PLEASE NOTE: The “Set All Units” option has been removed from the Air Integration menu in v1.12 and later versions of the Lynx firmware as a way to prevent accidental information loss. You can use “Set All Units” to quickly make edits to all the transmitters at the same time: ---: is the default option. Seq: sets all the transmitters numbers in sequence from A0000 (You), A0001 (Student 1), A0002 (Student 2) and so on. Def: restores the default transmitter labels such as “You”, “Buddy”, “Stu1”, “Stu2”, etc… from the transmitter list. This can be convenient if you have edited the labels to names of your students in a week-long class and want to quickly restore them to standard labels. Blk: removes the default transmitter labels such as “You”, “Buddy”, “Stu1”, “Stu 2” from the transmitter list. This can be convenient if you are setting up a list of class participants and prefer to set their names up from a blank slate rather than from a pre-existing setting. On: Sets all transmitters to “On” Off: Sets all transmitters to “Off”. 6.3.2. A0000 You Off This is standard summary description of a transmitter: A0000 YOU OFF “A0000” is a placeholder for the transmitter serial number. The transmitter in the picture on the left has serial number T1-A2007 (circled in red). “YOU” refers to the person using the transmitter. “OFF” is the status of the transmitter. Once this line is highlighted, and you tap the side of your unit, you will open the sub-menu for that specific transmitter and be able to edit its details. Here are the details you can edit: 6.3.2.1. Type Depending on the dive mode and type of transmitter, you can select from “Off”, “Tank” or “Location”. Liquivision Products, Inc -47- Manual 1.6; Lynx 1.18; US 1.11; U-2 3.06 ™ Air Integrated Dive Computer • • • User Manual REC, TEC, and GAUGE modes: the first transmitter in the list is always considered to be your tank transmitter, and only allows you to choose between “Off” or “Tank”. TEC mode: the second and third transmitters are considered to be your Deco Gas 1 and Deco Gas 2 and can only be set to “Off” or “Tank”. All other transmitters can be set to “Off”, “Tank” or “Location” 6.3.2.2. Serial # Here you can set up the serial number of your transmitter. The serial number of a transmitter is shown on its sticker (circled in red on the right). Tap on the left side of the casing to move the cursor over each digit, then tap up/down to edit the digit until you reach the desired value. Once you are done, tap on the left side again to return to the main menu. 6.3.2.3. Name Here you can set up the name you wish this transmitter to have. We recommend that you keep “You” as a default for your own transmitter, but you can set up your Buddy’s to be called “Buddy” or to use your Buddy’s actual name, say “Mark” for example. The following options appear only if you are configuring a Tank Transmitter. They will NOT appear if you are configuring a Location Transmitter. 6.3.2.4. Max 6.3.2.5. Mid 6.3.2.6. Low Max: Full pressure for this tank (default 3000 PSI/200 BAR) Mid: Pressure at which tank icon turns YELLOW in dive screen (default 1500 PSI/100 BAR) Low: Pressure at which tank icon turns ORANGE in dive screen (default is 1000 PSI/66 BAR) Reserve: Pressure at which tank icon turns RED in dive screen (default is 500 PSI/35 BAR) Max Pressure Liquivision Products, Inc Mid Pressure Reached Low Pressure Reached 6.3.2.7. Reserve RESERVE!!! -48- Manual 1.6; Lynx 1.18; US 1.11; U-2 3.06 ™ Air Integrated Dive Computer User Manual 6.3.2.8. Battery It is very important that you set your transmitter to the correct battery type, so that your LYNX computer can accurately predict transmitter battery life. The following chart shows Transmitter batteries, and which ones are compatible with what device: DISPOSABLE ER 17335M ER26300M 1700mAh 3200mAh Blue Blue (FAT) LYNX T1, U-2 U-2 LFP123A 530mAh White LYNX T1, U-2 RECHARGEABLE ICR16340 IMR18350 650mAh 800mAh Green Red LYNX T1, U-2 U-2 IMR26500 3000mAh Red (FAT) U-2E, L1 For more information on battery types and battery life, please refer to: Overview of Lynx, T1, U-2 and L1 Battery Types and Determining & Optimizing Battery Life WARNING Important Note on O-Ring Compatibility Liquivision LYNX, Xen, Xeo and Kaon Computers, T1 Transmitters and Liquivision battery packs sold AFTER June 1, 2013 all contain the same battery cap O-Ring (“new-style O-Ring”) This is a different O-Ring than the battery cap O-Rings provided with the Liquivision Xen, Xeo, Kaon and LYNX computers, T1 Transmitters, or Liquivision battery packs, prior to June 1, 2013 (“old-style O-Rings”). You CAN use a new-style O-Ring on all Liquivision battery caps – the new-style O-Rings are “reverse compatible” You CANNOT use an old-style computer O-Rings on a T1 Transmitter. Doing so will flood your T1 Transmitter battery compartment. Make sure you only use new-style O-Rings on Your T1 Transmitter. For more information, please see: Battery Compartment O-Ring Information Liquivision Products, Inc -49- Manual 1.6; Lynx 1.18; US 1.11; U-2 3.06 ™ Air Integrated Dive Computer User Manual WARNING Important! Make Sure You Set The Correct Battery Type! Your LYNX calculates and displays the remaining life of its own battery, as well as that of any Tank or Location Transmitter whose signal it is set up to receive. To get accurate battery life estimates, you must enter the battery type each device is currently using into the LYNX. To prevent confusion when using many devices, we recommend using the same type of battery across all devices. 6.3.2.9. Copy To Allows you to copy the settings from this transmitter to another transmitter to save time. 6.4. Advanced The Advanced menus include various troubleshooting tools such as the Packet Test, Graphic Test, Phase Test, Locator Test and Message Test. You should only enter these menus on the specific instructions of Liquivision Customer Support. 7. Compass The LYNX features a tilt-compensated digital compass. The compass menu offers you options to Calibrate and Check your compass prior to diving. The compass needs to be calibrated every time you travel to a different latitude, but we recommend calibrating it before each dive. 7.2. Calibrate To Calibrate the compass in the LYNX, take the unit outdoors away from any metal objects, and run enter the Compass-> Calibrate menu. You will be asked to wait a moment, then to rotate the LYNX unit slowly in every direction, twisting it, turning it, over and over until the calibration screen says “Done” and the unit returns to the Compass main menu. This can take about 1 minute. 7.1. Check Then enter the Compass-> Check to verify the functioning of the compass. Twist the LYNX around, tilt it, and make sure that it is within 10° of your analog compass. If not, re-run the calibration process and re-check it. 8. Dive Log The Dive Log keeps track of dives you did with your LYNX, including their depth and temperature profiles. With use of a LYNX PC Interface and related software you can download this information to your desktop or laptop (for more information on this, please read the LYNX PC Interface section of the manual). When you review downloaded dives, you will also be able to see the pressure profile of any tanks that were being monitored during the dive. The number of dives recorded by the Dive Log depends on the Log Period you select. The default setting is 10 seconds and on this setting you will be able to record approximately 1500 hours of dive data if you are tracking one tank, with no gas switches and no decompression. Tracking additional tanks significantly impacts total dive log time: Liquivision Products, Inc -50- Manual 1.6; Lynx 1.18; US 1.11; U-2 3.06 ™ Air Integrated Dive Computer Monitoring: 1 tank transmitter 2 tank transmitters 3 tank transmitters 4 tank transmitters 5 tank transmitters 6 tank transmitters 7 tank transmitters 8 tank transmitters 9 tank transmitters 10 tank transmitters User Manual No. of hours of dive time logged (at 10 second log rate) 1500 hrs 900 hrs 635 hrs 490 hrs 400 hrs 337 hrs 292 hrs 257 hrs 230 hrs 207 hrs To maximize logging time with multiple transmitters, it may be worth setting a less frequent log rate, 60 seconds, for example, and get 6 times the results above. To learn how to change the Log Period, refer to the Log Period section of the manual 8.1. Log Summary In the Log Summary, you will see two things: • a menu item called “Page” • a list of your most recent dives The “Page” menu item allows you to scroll through your dives page by page. At first, it will be showing “1” and the list of dives below it will be your most recent dives. If you set “Page” to “2”, it will bring up the dives that occurred immediately before that. As you increase the Page number, you will see a list of older and older dives. The list of dives will display a short summary of each dive, that is, the date and time of the dive. Scroll down to highlight a particular dive, and you will also see its maximum depth and duration at the bottom of the screen. If you select a particular dive, you will enter its Log Detail page. 8.2 Log Detail In this page, you will see more detailed information on the selected dive. Below is a list of data you will see, in the same order as it will be displayed: ● Dive No – the number of this dive, numbered in the order that it occurred ● Max Depth ● Avg. Depth – this is average depth of your whole dive, so if you have reset average depth during the dive, it won't affect this number ● Duration – dive time, in hours and minutes ● Date – day of the month, month and year of the dive ● Time – the time of day at which you entered the water ● Min. Temp. – minimum temperature over the whole duration of the dive ● Max. Temp. – maximum temperature over the whole duration of the dive ● Surf. Int. – the surface interval since last dive ● CNS start – the central nervous system oxygen saturation, in percent, at the beginning of the dive ● CNS finish – the same value at the end of the dive ● OTU – oxygen toxicity units acquired throughout the duration of this dive Liquivision Products, Inc -51- Manual 1.6; Lynx 1.18; US 1.11; U-2 3.06 ™ Air Integrated Dive Computer ● ● ● ● ● User Manual PSI Start – the PSI value of your tank at the start of the dive, based on the first data packet received by the LYNX from your T1 Transmitter PSI Finish – the PSI value of your tank at the end of the dive PSI Used – the difference between the Start and Finish values Depth Graph – here you will see depth profile of your dive Temp. Graph – here you will see temperature profile of your dive 8.3. Depth Graph The depth graph spans the whole width of the screen, with the start of the dive at the left-most part, and the end of dive at the right-most part. The top of the screen represents the surface of the water, and the bottom of the screen represents the maximum depth reached (this number is also printed on the screen). By tapping, you exit back into the “Log Detail” menu. 8.4. Temperature Graph The temperature graph also spans the whole width of the screen, with the start of the dive at the leftmost part, and the end of dive at the right-most part. There are two numbers printed on the screen, one in the bottom-left – that is temperature represented at the bottom of the graph, and one in the top-left – that is temperature represented at the top of the graph. Note that these values are not necessarily the maximum and minimum temperature values from the dive. The temperature graph screen has a minimum temperature range of 5 degrees Celcius. If the temperature range of the dive was greater than 5 degrees Celsius then the values shown at the top and bottom are the max and min temperature values from the dive. If the temperature range is less than 5 degrees Celsius then the values at the top and bottom of the screen are not the max and min values from the dive, but are there for scale, to define the top and bottom of the graph. By tapping, you exit back to the “Log Detail” menu. 9. Display Settings This is a series of settings you can use to personalize your LYNX’s display. 9.1. Brightness The “Brightness” setting has two levels – Normal and Low (default is Normal). In clear, shallow water, with lots of sunlight, you will need normal brightness to see the display properly. In deeper, darker water, select low brightness to save battery power. Keep in mind that higher brightness burns more battery, so you should select the lowest brightness that meets your needs on a given dive. 9.2. Auto Dim You can use the “Auto Dim” feature to fine-tune the brightness of your display. If you need normal brightness on the surface and lower brightness at depth, you can set your “Auto Dim” setting to the depth at which you want your display brightness to be reduced to Low, as follows: • At the surface, display brightness will be at the setting chosen in the “Brightness” menu ● Once you reach your Auto Dim depth, and below, the brightness will switch to Low ● Between these two, the brightness will decrease linearly with depth (e.g., at half of the Auto Dim depth, it will be halfway between the surface brightness setting, and Low) If you set your Brightness setting to “Low”, the Auto Dim feature will have no effect. The default Auto Dim setting is “Off”. You can adjust it in 10m / 30ft increments. Liquivision Products, Inc -52- Manual 1.6; Lynx 1.18; US 1.11; U-2 3.06 ™ Air Integrated Dive Computer User Manual 9.3. Refresh Your LYNX display refreshes every fraction of a second – this allows it to update the information on the screen. You can either set refresh rate to “Normal” or “Fast”. The default setting is “Normal”. In most cases, you will not notice the screen flicker/refresh when set to “Normal”, but if you do, you can set it to “Fast”. Using the “Fast” setting will shorten the battery life. 9.4. Layout (only affects Gauge mode) In Gauge Mode your LYNX comes with a four underwater display layouts to choose from and you can select your preferred layout in this menu item. STANDARD SIMPLE ALTERNATE LARGE In Rec and Tec mode, the LYNX display varies depending on whether Air Integration is “Off” or, if it is “On”, whether you are in “Solo”, “Buddy”, “Group 4” or “Group 9” mode. You can change this layout in the Air Integration surface menu: Diving within NDL Limit Deco Diving Off Solo Buddy Liquivision Products, Inc -53- Manual 1.6; Lynx 1.18; US 1.11; U-2 3.06 ™ Air Integrated Dive Computer User Manual Group 4 Group 9 9.5. Velocity This setting changes whether or not ascent/descent rates will be displayed. The default velocity display setting is “Off”. When turned “On”, it will show the rate as a number of meters or feet per minute, and an arrow showing whether you are ascending or descending. The velocity is not available in all Air Integration display layouts – the chart below shows when it is available and when not: Air Integration: Off Velocity: Shown Air Integration: Solo Velocity: Shown Air Integration: Buddy Air Integration: Group Velocity: Alternates Velocity: Not Available Because of limited space, the velocity alternates every 4 seconds with the Buddy Air 9.6. Stopwatch DF (only in Gauge Mode) While this setting is visible in the “Display Settings” menu of both Deco Mode and Gauge Mode, the stopwatch is only available when your LYNX is running in Gauge Mode. This setting lets you control whether the stopwatch will be on at the beginning of a new dive in Gauge Mode. The default setting is “Off”. This means that if you want to use Stopwatch during your dive, you will need to turn it “ON” first. If you change this setting to “ON”, the default behavior of the Stopwatch will be to turn on at the start of the dive. Once you turn the Stopwatch “ON”, it will remain on for the remainder of the dive (unless you turn it back off). For details refer to “Stopwatch” section. 9.7 Dark Mode (only in Gauge Mode) While this setting is visible in the “Display Settings” menu of both Deco Mode and Gauge Mode, Dark Mode is only available when your LYNX is running in Gauge Mode. This option enables selecting one Liquivision Products, Inc -54- Manual 1.6; Lynx 1.18; US 1.11; U-2 3.06 ™ Air Integrated Dive Computer User Manual of three low brightness color schemes for the underwater dive screen. The default setting is “None” and the Dark Mode On/Off option is not available in the underwater menu. There are three under water dive screen color schemes available for selection: Dark Mode : Dim (Data in dim green color) Dark Mode: Blank (Nothing is displayed) Dark Mode: Stlth (Data in dim red color) The “Blank” mode was created on the request of cave-diving instructors, who found that the LYNX’s screen shone so brightly that it would illuminate the cave during a lights-out drill. The “Blank” mode allows students to turn off the screen on their LYNX, without interrupting the unit’s functioning. The “Stealth” mode, which features all data in a dim red color, is designed for use at night as red has the least impact on the quality of your night vision. The “Dim” mode, which features all data in a dim green color, can also be used at night to preserve your night vision, or as an ultra-battery-savings measure in low-light conditions. 9.8. Show Hours This setting affects how your total dive time will be displayed. The default setting is “Off”, and you will have the dive time shown as minutes:seconds, with the minutes value exceeding 60 once more than an hour has elapsed. By selecting “On”, you will have the dive time show as hours:minutes:seconds, with the minutes value only reaching 59 before being converted into 1 hour and 0 minutes. Show Hours: OFF Show Hours: ON 9.9. Show TTS Especially when executing a decompression dive, it can be useful to know the Total Time to Surface. The Lynx can make this calculation based on the dive progression so far, the gas mixes entered (if diving in Tec mode) and an optimal ascent schedule. The TTS value, if turned “ON” will cycle every 4 seconds with the Air Time value (and the Max Depth value, described in 9.10 below, if turned “ON”). Liquivision Products, Inc -55- Manual 1.6; Lynx 1.18; US 1.11; U-2 3.06 ™ Air Integrated Dive Computer User Manual 9.10. Show MAX Especially when executing a decompression dive, it can be useful to know the Max Depth achieved during the dive. The MAX value, if turned “ON” will cycle every 4 seconds with the Air Time value (and the TTS value, described in 9.9 above, if turned “ON”). 9.11. Simulate Dive The final item in the “Display” menu is “Simulate Dive”. This is so you can test all your display settings, without getting yourself or your LYNX wet. When you enter “Simulation”, it will open submenu asking you for depth and time of the dive, its speed (whether it’s normal – 1x, or faster – 2x, 4x) and then you can select “Start”. A couple of things to note about the LYNX simulator: • The simulator follows descent and ascent rate limits • It takes a moment to turn on, since the simulation starts at 0m / 0ft but the LYNX considers a dive after divers descends below 1.6m / 5.25ft • If the time you set is too short to reach the specified depth, the simulator will just keep descending for the allotted time, and then start ascending without reaching the depth you specified • Please note that the Auto Dim option is not available during a simulation You can stop the simulation at any time by tapping the unit 3/5 times to enter the underwater menus, and choosing “Stop Simulation” (to learn more, refer to the “Stop Simulation” section of the manual.) 10. Preferences In this menu, you are able to adjust and fine-tune settings of your device. You are probably going to use this menu only once, before you start diving with your LYNX. 10.1. Units Here, you can choose the units in which data will be displayed on your LYNX: - Metric units: meters, meters per minute, Celsius. This is the default setting. - Imperial units: feet, feet per minute, Fahrenheit The units you select here do NOT affect the tank pressure units you select for Air Integration. The Air Integration units (PSI or BAR) can be set in the Air Integration-Units menu. You can thus run your LYNX in metric units for your depth and temperature, but in PSI for your tank pressure. 10.2. Log Period The Log Period is the frequency with which dive data will be saved to memory. The default setting is 10 seconds. Available settings are 1, 2, 5, 10, 30 and 60 seconds. The number of dives recorded by the LYNX’s Dive Log depends on the Log Period you select. The default setting is 10 seconds, and this will allow you to record about 1500 hours of one-gas recreational diving, while monitoring your own tank pressure. This number will be reduced if your LYNX is tracking the pressure of more than one tank: Liquivision Products, Inc -56- Manual 1.6; Lynx 1.18; US 1.11; U-2 3.06 ™ Air Integrated Dive Computer Monitoring: 1 tank transmitter 2 tank transmitters 3 tank transmitters 4 tank transmitters 5 tank transmitters 6 tank transmitters 7 tank transmitters 8 tank transmitters 9 tank transmitters 10 tank transmitters User Manual No. of hours of dive time logged (at 10 second log rate) 1500 hrs 900 hrs 635 hrs 490 hrs 400 hrs 337 hrs 292 hrs 257 hrs 230 hrs 207 hrs To maximize logging time with multiple transmitters, it may be worth setting a less frequent log rate. Setting a 60 second log rate will give you 6 times the dive time logged vs. the chart above. 10.3. Tap Sensitivity You can set Tap Sensitivity to Low or High (the default is High). This allows you to adjust how softly or firmly you must tap your LYNX for it to react. High sensitivity means it will be very sensitive and react to light taps. Low sensitivity means it will be less sensitive and react to stronger taps only. Some divers like to set their Tap Sensitivity to Low when in caves or wrecks to prevent accidental bumps on the surrounding rock or wreck to launch their unit into menu mode. 10.4. Tap Count You can set this either to “3” or to “5”. By choosing either of these, you set the number of taps that will wake up your LYNX from Sleep Mode, and the number of taps that will take you to the menus. The default setting is “3”. Some divers find that the LYNX can wake up at random due to a bumpy ride to a dive site or due to accidental impacts during a dive in a closed environment, for example. In those cases, we recommend changing the setting to “5”. 10.5. Minimum Dive This allows you to control the minimum dive time required for the dive to be classified as an actual dive. If, for example, you set it to 1 minute, then any dive shorter than that will not be logged. You can control this number in increments of 10 seconds. Minimum value is 0, maximum – 600 seconds. The default is 30 seconds. 10.6. Minimum Surface Interval This allows you to set the minimum surface interval before next dive is classified as new dive. If you stay on the surface for shorter time than the specified interval, your next descent will still be considered a part of the previous dive, and both descents will be logged as one dive. You can control this value in increments of 1 minute. Minimum value is 0, maximum – 30 minutes. The default is 5 minutes. Liquivision Products, Inc -57- Manual 1.6; Lynx 1.18; US 1.11; U-2 3.06 ™ Air Integrated Dive Computer User Manual 10.7. Status If you tap into this menu setting, you will see basic information concerning your device, such as type, hardware version, software version, etc. 10.8 Battery Type The type or capacity of the battery is needed to accurately estimate the remaining dive time. There are three battery types available for the LYNX computer: DISPOSABLE RECHARGEABLE ER 17335M LFP123A ICR16340 1700mAh 530mAh 650mAh Blue White Green LYNX LYNX LYNX T1, U-2 T1, U-2 T1, U-2 You can find more information about the different battery types in the section on Overview of Lynx, T1, U-2 and L1 Battery Types 10.9 Battery Meter This menu item allows you to select the battery meter display style: either a battery symbol or a battery voltage value. The default is “Symbol”. This feature is available for the LYNX only. This feature is not available for tank transmitters. Tank transmitter battery voltage is shown as an icon only. LYNX Battery Meter: Symbol LYNX Battery Meter: Voltage Air Integration OFF LYNX battery only is shown in lower right (pink circle) Liquivision Products, Inc -58- Manual 1.6; Lynx 1.18; US 1.11; U-2 3.06 ™ Air Integrated Dive Computer LYNX Battery Meter: Symbol User Manual LYNX Battery Meter: Voltage Buddy Air Integration ON LYNX battery information circled in red. All the other battery icons pertain to Transmitter batteries. Group Air Integration ON LYNX battery information circled in red. All the other battery icons pertain to Transmitter batteries. 10.10 Battery Test This menu item applies to the LYNX dive computer only. It does not apply to the Transmitters. This feature runs a battery test for the selected LYNX battery type and displays the estimated remaining dive time. This test will take approximately 1 minute. During the battery test, you will see the screen light up progressively with white pixels, to provide a battery reading when the unit is at maximum battery consumption. 10.11 Temperature You may notice that your LYNX isn’t displaying the same water temperature as another device you are using. This feature allows you to adjust the Lynx temperature reading to the one you desire. 11. Salinity You can adjust salinity settings here. There are three available modes: ● fresh (1 kg / l, such as freshwater lake or river) ● brackish (1.015 kg / l, such as some estuaries, inland seas, etc.) ● saline (1.020 kg / l, such as open sea) By selecting the correct salinity, you ensure that your displayed depth will be accurate. LYNX, like any other depth gauge or computer, in order to measure depth, measures pressure. Depending on water salinity, there will be a slight variation in pressure at the same depth. If you are unsure of the water salinity, choose the salinity that your dive / decompression tables were calibrated to. Note: certain earlier versions of LYNX software, and Xen, Xeo and Kaon software, use the values 1.012 kg/l for brackish water and 1.025 kg/l for salt water. The difference is very small. Liquivision Products, Inc -59- Manual 1.6; Lynx 1.18; US 1.11; U-2 3.06 ™ Air Integrated Dive Computer User Manual 12. Time/Date In this submenu, you can set all the options connected with time and date. 12.1 12h/24h Choose the one you prefer – the AM/PM type time format, or the 24-hour format. 12.2 Time Time of day, displayed in hours and minutes. 12.3 Date Month and day 12.4 Year Current year. The year should be within period of 2010 to 2025. 12.5 Calibrate Time The Liquivision LYNX uses a silicon oscillator to keep time. Silicon oscillators are far more reliable than quartz crystals, and are used by NASA in outer space. However, they can have a “drift” that can cause your unit to gain or lose time at a predictable rate. Should your LYNX be noticeably gaining or losing time, you can follow our Time Calibration Procedure to correct for your unit’s drift. To perform this procedure, you will need access to the internet and have 48 hours during which you do not need to dive your LYNX. Then, take the following steps: 1. Check that there is no pre-existing time adjustment set up on your unit: a) Make sure your LYNX is at room temperature and has a working battery in it. b) Enter the “Calibrate Time” menu. c) Make sure that the 'Daily' value is 0m00s (if not, set it to zero) d) Exit that menu, and then exit the main menu 2. Match your LYNX’s time to the time provided by the Greenwich Mean Time website: a) On your PC or MAC, go on the internet and visit http://www.wwp.greenwichmeantime.com/ b) Select your time zone c) Make sure that the website is now showing the correct time of day for your area d) On your LYNX, enter the “Ready to Dive” screen and note the time of day in the lower-left e) Then, go to the “Time/Date” menu. Set the hours and minutes to the current time displayed on the website, plus one minute (if the website displays 11:45:21PM, set your LYNX to 11:46PM) f) Move the cursor to the “Exit” item on the menu but DO NOT SELECT IT. The time of day will not be 'set' in your LYNX until you select “Exit” with a left or right tap g) Watch the website time. At the moment that it hits the next minute (i.e. 11:46:00PM), then tap your LYNX with a left or right tap to select “Exit” h) Return to the “Ready to Dive” screen and observe the time of day in the lower left corner of your LYNX, and compare it to the time of day on the website. When the time crosses the next minute on the website, make sure your LYNX crosses that minute virtually simultaneously. i) If they are not synchronized to within 1 second, then go back to step (2d) and repeat steps (2dh) until your LYNX is exactly synchronized with the time provided by the website. Liquivision Products, Inc -60- Manual 1.6; Lynx 1.18; US 1.11; U-2 3.06 ™ Air Integrated Dive Computer User Manual 3. After 48 hours have passed, compare your LYNX’s time to the website once again: a) On your PC or MAC, go on the internet and visit http://www.wwp.greenwichmeantime.com/, select your time zone, and make sure that the website is showing the correct time of day b) On your LYNX, enter the “Ready to Dive” screen and note the time of day in the lower-left c) Focus on the time displayed on your LYNX. When the minute 'flips', immediately observe the website time and record it. For example, your LYNX flips to 11:24pm, and at that exact moment the website time shows 11:26:18pm. d) In this example, your LYNX is slow by 2 minutes, 18 seconds over 48 hours. We need the error over 24 hours, so we divide by two, yielding 1 minute, 9 seconds slow per day. 4. Finally, enter the correct time calibration into your LYNX • • • Go to the “Calibrate Time” menu Enter the correction +1m09s by tapping UPWARDS to speed your LYNX clock up. You can also slow your LYNX down by tapping DOWNWARDs and setting a negative correction, e.g. -1m09s. 13. Connect to PC Tap into this menu item before starting the download of your dive logs in your PC application of choice. Refer to its manual for more information. If you tap into this item accidentally, don't worry – the wait for PC communication will time out after 30 seconds, and you will be back to main menu. For more information on connecting to your PC, downloading your dives or uploading new software onto your LYNX, please refer to the “LYNX PC Interface” section of the manual. 14. Locator PIN In this menu, you can enter the Locator PIN number you have obtained from the Liquivision website during your LYNX Registration process. Entering this PIN and activating the Locator feature is totally optional. Here is why: The Locator feature allows a diver using a LYNX to obtain directional location information (an approximate bearing) towards other divers who are using a Liquivision Tank Transmitter or towards a Location Transmitter. While we have made every effort to make this a useful feature, its effectiveness is highly influenced by the diver’s ability to “work with the software”, i.e. to keep a LYNX, Tank or Location Transmitter and body orientation that is favorable to signal reception and accuracy. Also, this is the first time such a feature has been introduced to the broad recreational diving market, and so it is, in its nature, very experimental. We simply don’t know how people will want to use or mis-use it. For this reason, the Locator feature is an optional, free BETA upgrade to the LYNX-AI functionality. The Locator feature is provided through an experimental software in BETA release. To activate it on Liquivision Products, Inc -61- Manual 1.6; Lynx 1.18; US 1.11; U-2 3.06 ™ Air Integrated Dive Computer User Manual your LYNX, you must acknowledge that you have read through the proper way of using it, that you understand its limitations, and that you accept that it is not covered by the LYNX warranty in any way. Once you have done so, you will get a Locator PIN from the Liquivision website, similar to the LYNX Unlock PIN. There is absolutely no requirement to unlock the Locator feature of the LYNX. The LYNX will still provide Air Integration functionality, including the option to monitor your own, your Buddy’s or your Group’s tank pressures, and will provide you with remaining Air Time information for your own tank. If you choose to unlock the Locator feature of the LYNX, you will have to enter the Locator PIN you have obtained into your LYNX computer in this Locator PIN menu. Once you have entered the correct Locator PIN menu, the process for entering the Locator PIN is very similar to the one for entering the LYNX Unlock PIN. You can find step-by-step instructions here: Entering Your Free Software Activation PIN, Setting Time/Date & Battery Type Once you have unlocked the Locator feature, it will appear in the LYNX underwater menus. You can learn more about how it works by reading the section that describes the Locate underwater menu item. Liquivision Products, Inc -62- Manual 1.6; Lynx 1.18; US 1.11; U-2 3.06 ™ Air Integrated Dive Computer User Manual UNDE R WAT E R M E NU S Main Underwater Menu When in Rec Mode… 1 Switch Gas 2 LOST GAS 3 Silence Alarms When in Tec Mode… 1 Switch Gas 2 LOST GAS 3 Silence Alarms (when Alarms are on & triggered) 4 5 AI Mode Locate (when Alarms are on & triggered) 4 AI Mode 5 Locate (only if AI is turned “ON”) 6 7 8 9 Compass Stopwatch Reset AVG Dark Mode On/Off (only if “Dark Mode” is activated in the Surface Menus) 10 Display 10.1 Brightness 10.2 Auto Dim (only if “Auto Dim” is activated in the Surface Menus) 10.3 Layout 11 Advanced 12 Stop Simulation (only if running simulator) When in Gauge Mode… 1 Switch Gas 2 LOST GAS 3 Silence Alarms (when Alarms are on & triggered) 4 AI Mode 5 Locate (only if AI is turned “ON”) 6 7 8 9 Compass Stopwatch Reset AVG Dark Mode On/Off (only if “Dark Mode” is activated in the Surface Menus) 10 Display 10.1 Brightness 10.2 Auto Dim (only if “Auto Dim” is activated in the Surface Menus) 10.3 Layout 11 Advanced 12 Stop Simulation (only if running simulator) (only if AI is turned “ON”) 6 7 8 9 Compass Stopwatch Reset AVG Dark Mode On/Off (only if “Dark Mode” is activated in the Surface Menus) 10 Display 10.1 Brightness 10.2 Auto Dim (only if “Auto Dim” is activated in the Surface Menus) 10.3 Layout 11 Advanced 12 Stop Simulation (only if running simulator) 1. Switch Gas (only in Tec Mode) This menu item appears only when you are in Tec mode. In the surface menus, you can configure your gas settings (see Gases menu item). When you tap into this submenu, you will see list of gases that are allowed for the depth you’re at. This list is based on: - your max PO2 settings (see Dive Setup menu item), and - your gas settings. A gas set in “Dive” mode will use “PO2 dive” as maximum PO2, while a gas set in “Deco” mode will use “PO2 deco” as maximum PO2 The gases will be listed from one with the lowest content of O2 to the one with the highest. This list will only display gases that are configured as “Dive” or “Deco” gases. If, at the time you enter this menu, there is a “Best Gas” for you to switch to, this gas will be indicated with an asterisk (*). In this example, the computer is recommending a switch to 50% Nitrox: Liquivision Products, Inc -63- Manual 1.6; Lynx 1.18; US 1.11; U-2 3.06 ™ Air Integrated Dive Computer User Manual Finally, there is an option called “Custom Gas”, with which you can configure an additional gas underwater. Doing this while diving is very troublesome, so we highly recommend that you take steps BEFORE the dive to avoid using this option. The best thing is to input the main gases you and your buddies are taking underwater, so that they are ready to switch to in case of an emergency. 2. LOST GAS (only in Tec Mode) This menu item appears only when you are in Tec mode. If you have lost a gas that was to be used later for decompression, it is very important to use this menu option to mark it as “Lost”. This will prevent this Lost Gas from being used in ascent schedule planning. If you fail to do this, your ascent schedule will be wrong, as the LYNX will assume that you can still use that gas. The gases will be listed from the one with the highest content of O2 to the one with the lowest. EXAMPLE: Let’s say you are planning to use Air and Nx50 on your dive, and let’s say your deco time would be 30 minutes on Air and only 20 minutes on Nx50. If you were to lose Nx50, but not mark it as “Lost”, then your LYNX would tell you that your total Time To Surface is 20 minutes, because it would think that you can still use the Nx50. However, as long as you keep your LYNX set to Air throughout your decompression, the LYNX will continuously adjust its calculations, and in effect will keep you decompressing for 30 minutes. 3. Silence Alarms If an alarm is annoying you, and you are confident that you should continue the violation that is causing the alarm, you can switch that alarm off. Choosing the “Silence Alarms” option will cause ALL of the alarms that are on at that moment to be silenced until the end of the dive. Alarms you can silence are: • Depth alarm • Time alarm • Ascent/Descent Rate alarm Other alarms, i.e. deco ceiling alarm and gas-related alarms cannot be silenced. For example, if you have exceeded your maximum depth and time alarm settings, both of these alarms will be on. If you choose to “Silence Alarms”, you will turn both of these alarms off and neither of them will be displayed on this dive anymore – no matter how deep you go or how long you stay there for. However, if you exceed your maximum ascent rate on the same dive, it will still cause an alarm. Keep in mind that the descent and ascent rate alarms are the same alarm – if you silence the descent rate alarm on the way down, you will not see alarm go off if you ascend too fast on the way up! Liquivision Products, Inc -64- Manual 1.6; Lynx 1.18; US 1.11; U-2 3.06 ™ Air Integrated Dive Computer User Manual WARNING Use of the “Silence Alarms” is intended for exceptional circumstances. Ignoring an alarm you have chosen to set means you are exceeding the limits of your dive plan and putting yourself at a very serious risk. 4. AI Mode This menu allows you to switch between different Air Integration Modes - Off, Solo, Buddy, Group 4 and Group 9 Modes – underwater: The Mode you choose will affect the layout of your dive screen once you exit the Air Integration menu: Solo Mode Buddy Mode Group 4 Mode Group 9 Mode It is important to note that while your selection will change the screen layout, it will only display data from the tank transmitters you have set up in the surface “Air Integration” menu. For example, if you only configured your own tank transmitter (turned it “On”, configured the serial number) then you will only have information under the “You” field. All other fields will show “Off” in blue font. You can see an example in the Group 9 picture – only your tank transmitter and the tank transmitters of the first four students have been configured and turned “On” at the surface, while the tank transmitters of Students 5-9 were left “Off”. Also, it is important to note that the “You” tank transmitter, if turned “On”, will show up in ALL the modes (Solo, Buddy, Group 4, Group 9), but the “Buddy” tank transmitter will only show up in “Buddy” mode. The “Buddy” tank transmitter doesn’t become “Student 1” in Group 4 or Group 9 mode, which is a common confusion. “Student 1” is a totally separate setting. If you want “Student 1” to be the same as “Buddy”, you can do so by setting up “Student 1” tank transmitter information to be the same as your Buddy’s. You can get more information on Air Integration in the description of the surface Air Integration menu, as well as in Diving With Your Lynx – Air Integration Functions. Liquivision Products, Inc -65- Manual 1.6; Lynx 1.18; US 1.11; U-2 3.06 ™ Air Integrated Dive Computer User Manual 5. Locate This menu item appears only when Air Integration is turned “On” and the Locator Pin has been entered in the surface menus. It allows you to run the Locator feature, which is an optional, free BETA upgrade to the LYNX-AI functionality. The Locator feature is provided through an experimental software in BETA release. While we have made every effort to make this a useful feature, its effectiveness is highly influenced by the diver’s ability to “work with the software”, i.e. to maintain a LYNX, Tank or Location Transmitter and body orientation that is favorable to signal reception and accuracy. Also, this is the first time such a feature has been introduced to the broad recreational diving market, and so it is, in its nature, very experimental. We simply don’t know how people will want to use or mis-use it. You can use the Locate feature to locate any diver who is using a T1 or U-2 Tank Transmitter, and whose transmitter you have set up for air and location monitoring in the surface menus. You can also use the Locate feature to locate an L1 Location Transmitter. The Locate feature is separate from the Air Integration feature. For example, you may want to use Solo Mode or Buddy Mode for Air Integration, to benefit from the larger dive information screen, but you may want to set up your Lynx to monitor 6 Transmitters in total – yours, your buddy’s, those of three other divers (called Tom, Bob and Stan) and a Location transmitter (called Boat 4) – and all of these would show up in the Locator list. Here is what this looks like: Air Integration Display Modes vs. Locator Lists Solo Mode Buddy Mode Group 4 Mode Group 9 Mode As you can see, the Solo mode display provides much larger dive information than Group 4 or Group 9, while still allowing you to see the Tom, Bob and Stan, as well as the Boat in the Locator list. Buddy mode allows you to retain the big dive display AND see your Buddy’s air. When you enter the Locator list, you see your Buddy, the three other divers and, if you scroll down, the Boat. Group 4 and Group 9 put your dive information at the top of the screen, and allows you to view Tom, Bob, and Stan’s pressure, as well as the Boat’s “SigOK” during your dive, and you can access all of these in your Locator list. NOTE: your Buddy ONLY shows up in Buddy mode. Liquivision Products, Inc -66- Manual 1.6; Lynx 1.18; US 1.11; U-2 3.06 ™ Air Integrated Dive Computer User Manual Once you select whom or what you want to locate, you will see this type of locator screen: Your dive information is in the top ¼ of the screen. The locator information is the bottom ¾ of the screen. The white cone gives you the approximate direction to swim in to locate your Buddy. On the right hand side, the LYNX tells you the “best guess” bearing – about 330° NW. It also gives you a distance estimate to your Buddy – between 0-250m - and your Buddy’s tank pressure – 700 PSI. To get useful data from the locator screen, you must turn your arm so the LYNX is held level. If that is uncomfortable, you can remove the Lynx from your arm entirely and hold it in your hand in front of you. You can get more complete information on how to use and interpret the directional locator screen in the Diving With Your LYNX - Locator Functions section of the manual. If you tap your LYNX three times while in the locator screen, this will pull up the following options: STOP LOCATOR: turns the locator off and returns you to your dive screen. FREEZE LOCATOR: prevents the locator from getting any more data packets from the transmitter, and keeps the direction cone oriented towards the source of the last received packet. Read how you would use this below. CLEAR LOCATOR: clears any data received by the locator so far, allowing you to start the location process anew. LOCATE OTHER: allows you to locate a different diver COMPASS: switches to the compass Uses of the Freeze Feature: The locator feature only works well if the LYNX is held level on your arm in front of you. If you are working underwater, taking pictures, for example, you may want to locate your buddy with your arm held level, then you may need to move your arm to take your picture. The data packets you get with you arm held steady will be high quality and you will want to “freeze” them, so that you don’t dilute them with poor quality data packets that you will receive when you are moving your arm around. 6. Compass This menu item allows you to access the compass underwater ONLY if you have properly calibrated the compass in the surface Compass menu. Your dive data is displayed in the top ¼ of the screen. The compass information is displayed in the bottom ¾ of the screen. It includes a compass dial, a bearing in degrees (here: 345°) and a bearing in words (here: N for North). To exit the compass view, tap your LYNX three/five times on the top and you will return to the underwater menu. You will have the option there to “Stop Compass” and return to your dive screen. Liquivision Products, Inc -67- Manual 1.6; Lynx 1.18; US 1.11; U-2 3.06 ™ Air Integrated Dive Computer User Manual 7. Stopwatch (only in Gauge Mode) This menu item appears only when you are in Gauge mode. The “Stopwatch” is a timer that you can turn on and off, start, pause, and restart during your dive. Here is how it appears in each of the four screen layouts: STANDARD SIMPLE ALTERNATE LARGE If the Stopwatch is “Off”, your LYNX’s underwater menu has an item called “Stopwatch On”. If you select this item by tapping either side of your LYNX unit, you will activate the Stopwatch function and you will see your dive display rearrange itself – it will show the Stopwatch in addition to the information it was previously displaying. When the Stopwatch function is “On” and you return to the underwater menus, you will see a menu item called “Stopwatch”, and this takes you to the submenus that control the use of the stopwatch. Stopwatch Shortcut: if the Stopwatch is “On”, then by tapping three/five times on a SIDE (not the top) of your LYNX, you will be taken directly to the stopwatch sub-menu: - Stop / Start: depending on whether the Stopwatch is running or paused at the moment, this will either say “Stop” or “Start”. Choosing “Stop” will pause the stopwatch if it is running, and “Start” will re-start the stopwatch, if it is paused. Initially, when you turn the Stopwatch on for the first time during your dive, it is paused. - Reset: this will set your Stopwatch count to 0. If the Stopwatch is running, it will keep running – now, counting again from 0. - Off: this will pause the Stopwatch and turn it off. The dive display will return back to normal. If you turn your stopwatch back on later, it will have same count as when you turned it off. Bear in mind, that to make it easier for you to operate the stopwatch, the items in the stopwatch submenu change order: - If the stopwatch is running, first item is "Reset", and second item is "Stop". - If the stopwatch is not running, first item is "Start", and second item is "Start". 8. Reset AVG (only in Gauge Mode) This option is only available in Gauge Mode. It will reset the average depth that has been calculated from the beginning of the dive, and it starts calculating it from this point onwards. Keep in mind, however, that the average depth in your dive log will be average depth over the whole dive. Liquivision Products, Inc -68- Manual 1.6; Lynx 1.18; US 1.11; U-2 3.06 ™ Air Integrated Dive Computer User Manual 9. Dark Mode On/Off (only in Gauge Mode & only if Dark Mode is activated in the Surface Menus) This option is only available in Gauge Mode. This underwater option turns on or off the low brightness color scheme you have pre-selected during your surface dive preparation (please see the “Dark Mode” section for more information). Once you turn Dark Mode “On”, depending on the color scheme you selected on the surface, your screen will either go blank, or will show all data in dim red or dim green. To exit Dark Mode, tap the unit three or five times. This will take you into the underwater menu that will allow you to turn Dark Mode “Off”. 10. Display You can adjust a limited set of display features underwater. 10.1. Brightness The “Brightness” setting has two levels – Normal and Low (default is Normal). In clear, shallow water, with lots of sunlight, you will need normal brightness to see the display properly. In deeper, darker water, select low brightness to save battery power. Keep in mind that higher brightness burns more battery, so you should select the lowest brightness that meets your needs on a given dive. 10.2. Auto Dim (only if Auto Dim Mode is activated in the Surface Menus) This underwater option turns on or off the Auto Dim feature you have pre-selected during your surface dive preparation (please see the “Display Settings - Auto Dim” section for more information). You can use the “Auto Dim” feature to fine-tune the brightness of your display. If you need normal brightness on the surface and lower brightness at depth, you do not need to adjust it manually. Instead, you can set your “Auto Dim” setting to the depth at which you want your display brightness to be reduced to “Low”. By using the “Auto Dim” feature, here’s what will happen: ● At the surface, display brightness will be at the setting chosen in the “Brightness” menu ● Once you reach your Auto Dim depth, and below, the brightness will switch to “Low” ● Between these two, the brightness will decrease linearly with depth (e.g., at half of the Auto Dim depth, it will be halfway between the surface brightness setting, and “Low”) If you set your Brightness setting to “Low”, the Auto Dim feature will have no effect. The default Auto Dim setting is “Off”. You can adjust it in 10m / 30ft increments. 10.3 Layout (only affects Gauge Mode) In Gauge Mode your LYNX comes with a three underwater display layouts to choose from and you can select your preferred layout in this menu item. STANDARD SIMPLE ALTERNATE LARGE In Rec and Tec mode, the LYNX display varies depending on whether Air Integration is “Off” or, if it is “On”, whether you are in “Solo”, “Buddy”, “Group 4” or “Group 9” mode. You can change this setting in the Air Integration surface menu: Liquivision Products, Inc -69- Manual 1.6; Lynx 1.18; US 1.11; U-2 3.06 ™ Air Integrated Dive Computer Diving within NDL Limit User Manual Deco Diving Off Solo Buddy Group 4 Group 9 11. Advanced The Advanced underwater menus include various troubleshooting tools such as the Packet Test, Graphic Test and Phase Test. You should only enter these menus on the specific instructions of Liquivision Customer Support. 12. Stop Simulation This option is displayed only if you are “underwater” in a simulated dive (to learn more about dive simulation, please refer to the “Simulate Dive” section of the manual). In such a case, choosing this will immediately stop simulation, and return back to the surface menus. Liquivision Products, Inc -70- Manual 1.6; Lynx 1.18; US 1.11; U-2 3.06 ™ Air Integrated Dive Computer User Manual DI V I NG W I T H Y OUR LY NX I N R E C M ODE Overview Your LYNX has a wide set of features that can assist you with your dive planning and preparation. The most basic selection is the Mode you wish to use your unit in. The default is Rec Mode, and this is the Mode we will describe in this section. In Rec mode, the LYNX functions as a one-gas computer. The default mix is Air. You can set any mix from 21%-40% oxygen, including common mixes such as Air (21%), 32% nitrox or 36% nitrox. The Liquivision Recreational Diving Model in Rec Mode has been carefully tuned to maximize bottom time on both the first dive of the day and on repetitive dives while maintaining diver safety. DCS risk is carefully managed and in the same ranges as most popular dive tables in use today. Gradient factors control the overall no decompression time and reduction factors are applied during surface intervals to increase safety. In this mode, the LYNX’s primary function is to provide you with your No Decompression Limit (NDL), i.e., the amount of time you can spend diving without incurring any decompression. If you complete your dive within the NDL period, the LYNX will prompt you to complete a Safety Stop for 3 minutes at 5m / 15ft. If, at any time during these 3 minutes, you drop below 6.5m / 21ft, the safety stop counter will turn off and reset. It will begin again once you return to the safety stop depth of 5m / 15ft. Should you continue diving beyond your NDL time – and you should only do this if you have knowledge of decompression diving and sufficient gas to complete the dive safely - the LYNX will start calculating your decompression obligation and indicate the depth and duration of any decompression stops you need to complete to exit the water safely. The unit calculates your NDL or your deco plan using a custom model based on the proven Bühlmann ZH-L16C1 model. This model generally aligns with the PADI tables. Liquivision Products, Inc -71- Manual 1.6; Lynx 1.18; US 1.11; U-2 3.06 ™ Air Integrated Dive Computer User Manual If you have a T1 or U-2 Tank Transmitter set up on your tank, and you have turned the LYNX Air Integration feature “On”, you will be able to track your tank pressure in PSI/BAR and obtain an Air Time value. The Air Time value appears 4 minutes into the dive, and estimates how much dive time you have left based on your breathing rate and current depth. It will reach zero once your tank pressure hits 700 PSI/48 BAR. This is normally sufficient to ascend from a no decompression dive recreational diving depth while respecting proper ascent rates and a 3 minute Safety Stop at 6 ft/1.5m, but it will likely not be sufficient gas to complete a decompression schedule. The Air Time feature is not compatible with decompression diving! You must make your own gas calculations if you are planning a decompression dive. WARNING In a No Decompression Dive, your remaining Air Time takes precedence over remaining NDL time. If your Air Time is less than your No Decompression (NDL) time, always follow the Air Time value. Start your no decompression ascent before or immediately when Air Time reaches zero (700 PSI/48 BAR). WARNING NEVER undergo a decompression dive without proper training. NEVER exceed the LYNX No Decompression Limit unless you are trained in decompression diving. WARNING The Air Time feature is NOT designed for use with decompression diving. 700 PSI/48 BAR will likely not be enough gas to complete your decompression schedule! You must make your own gas calculations if you are planning a decompression dive, and you must plan to have sufficient gas to complete your decompression safely. WARNING Electronics Can Fail – Always Carry Backup The LYNX dive computer hardware and the Tank and Location Transmitter hardware will eventually fail, like any electronic equipment whose components mature and age. If they fail during your dive, they can stop providing you with critical decompression and tank pressure information. You must have a plan to handle the failure of the LYNX dive computer, the Tank or Location Transmitter during your dive. You must always carry backup instruments, including a depth gauge, submersible pressure gauge, digital bottom timer or dive watch, a compass, and have access to decompression tables. Do not risk your life on only one source of information. Liquivision Products, Inc -72- Manual 1.6; Lynx 1.18; US 1.11; U-2 3.06 ™ Air Integrated Dive Computer User Manual WARNING Always Check For Software Updates. The LYNX dive computer software likely still has bugs. We have looked for them and tried to eliminate them, but they can still appear during use. Bugs can cause the unit to provide inaccurate or incomplete information, or cause the unit to reset or turn off and stop providing any information at all. You should always check for software updates (www.liquivision.com/downloads/LYNXSoftwareHistory.php) and install all applicable updates, every time you prepare to use the LYNX dive computer. Setting Up a Dive In Rec Mode Once you have Unlocked your LYNX, and set up the required Time/Date and Battery information, setting up your first dive in Rec mode is very simple. All you need to do is: 1. Set up Metric/Imperial Units. Go to the “Preferences > Units” menu item and make your selection. 2. Set up your dive gas. The default is “Air”. You can change it to any nitrox mix from Air (21%) to 40% oxygen by following the instructions in the “Dive Planning > Gases” section of this manual. 3. Compute your No Decompression Limit (NDL) times. Entering the “Dive Planning > Compute NDL” menu item will create a chart with the amount of time you can spend at a given depth without incurring any decompression. For example, if you select “Air” as your dive gas, your NDL at 15 m (about 45 ft) will be 57 minutes. This can help you plan the amount of gas you take on your dive. 4. Set up your Alarms by accessing “Dive Planning > Alarms”. The default settings are: - Alarms “On” - Depth: 30 metres (100 feet) - Time: 60 minutes - Ascent Rate: 10 metres per minute (30 feet per minute) - Descent Rate: 30 metres per minute (90 feet per minute) 5. Set up Air Integration features. Read the Air Integration surface menu section of this manual. 6. Calibrate Your Compass. This is described in the Compass section of this manual. 7. If you want to use the Locator feature, unlock it. The Directional Location feature can help you locate a T1/U-2 Tank Transmitter or L1 Location Transmitter underwater, as long as the Transmitter in question is within range. This feature is an optional, free BETA upgrade to the LYNX-AI functionality. The Locator feature is provided through an experimental, BETA release, and requires that you acknowledge that you understand its limitations before you can obtain a free PIN to unlock it. Instructions on how to unlock it can be found Unlock The Locator Feature of The LYNX section of this manual. Instructions on how to use it can be found in the description of the underwater Locate menu and the Diving With Your LYNX - Locator Functions section of the manual. Liquivision Products, Inc -73- Manual 1.6; Lynx 1.18; US 1.11; U-2 3.06 ™ Air Integrated Dive Computer User Manual 8. Run a Surface Dive Simulation. This feature, found in “Dive Planning > Simulation” allows you to create a dive simulation for a desired depth and time, at up to 4x normal speed. This lets you: - Double-check all your dive settings (e.g. to catch that you have a depth alarm set to 30 m / 100 ft while you plan to dive to 40 m / 130 ft). - Pre-view the dive screen Layout, and familiarize yourself with the location of key pieces of information. - Practice accessing the Underwater Menus, and familiarize yourself with the options available to you there. 9. Exit all menus, then select “Shut Off – you are now ready to dive! At the bottom of each menu screen there is the option to “Exit”. Keep selecting this until you reach the main menu, then select “Shut Off” at the very top of the main menu. Your unit will go blank. You are now ready to dive! Settings That Will Affect Your Dive Conservatism Settings The conservatism setting of your LYNX will affect the length of your No Decompression Limit (NDL); the more conservative the setting, the shorter your NDL time. In Rec mode, your LYNX is automatically set to run on a more conservative setting and, for your safety, this cannot be changed in Rec mode. Rec Mode uses a custom model based on the proven Bühlmann ZH-L16C1 model. This model generally aligns with the PADI tables. Safety Stop You should always dive within the No Decompression Limit (NDL), unless you have specific training in decompression diving. You should always begin your ascent FIRST based on having sufficient gas remaining and, if you do have sufficient gas remaining, THEN based on staying within the NDL. When you ascend within the NDL limit, you will be asked to complete a safety stop for 3 minutes at 5m / 15ft. If, at any time during these 3 minutes, you drop below 6.5m / 21ft, the safety stop counter will turn off and reset. It will begin again once you return to the safety stop depth of 5m / 15ft. Oxygen Loading (for enriched air/nitrox dives) If you are diving with enriched air/nitrox, your LYNX calculates your CNS (Central Nervous System) and OTU (Oxygen Toxicity Unit) loading. Your current CNS/OTU levels are easy to access through the Your Saturation menu item and the screen looks like this. For a full explanation of CNS/OUT values, please refer to your nitrox training manual. Entering the water Turning Your LYNX On We recommend that you turn your LYNX on yourself before you enter the water to check the remaining battery power and to make sure that all is functioning properly. You can turn it on by tapping the unit in the Down direction 3/5 times. Otherwise, it will turn on automatically few seconds after you take it deeper than 1.6 meters / 5.25 feet. Liquivision Products, Inc -74- Manual 1.6; Lynx 1.18; US 1.11; U-2 3.06 ™ Air Integrated Dive Computer User Manual Beginning Your Dive When you start to descend and go below 1.6 meters / 5.25 feet, your LYNX will turn into dive mode. Dive Display There are two main types of underwater display layouts depending on the type of Air Integration display mode you have chosen: Off/Solo/Buddy and Group 4/Group 9. To see detailed differences between these layouts, please see the Layout section of the manual. Dive Time Dive time is measured in minutes and seconds, starting from the moment your LYNX reaches 1.6 meters / 5.25 feet. It will stop once you surface, and it will reset once you have been on the surface for more than the Minimum Surface Interval. - In Off/Solo/Buddy Modes, the Dive Time is shown in yellow in the upper right hand screen corner. - In Group 4/Group 9 modes, the Dive Time is shown in yellow in the top/center screen corner. Off/Solo/Buddy Group 4/Group 9 Mode The minutes of your dive can be displayed as follows (refer to the “Show Hours” section for details): • minutes:seconds, e.g. 135:00 • hours:minutes:seconds, e.g. 2:15:00 Depth You can set the units in which your Depth is displayed. If you chose metric units, you will see the depth in meters, with one decimal place in smaller font. If you chose imperial units, you will see the depth in feet, with no decimal places. Please refer to the “ Units” section of the manual for details on choosing units. - In Off/Solo/Buddy Modes, the Depth is shown in green in the bottom right of the screen. - In Group 4/Group 9 modes, the Depth is shown in green in the top left of the screen. Off/Solo/Buddy Mode Liquivision Products, Inc Group 4/Group 9 Mode -75- Manual 1.6; Lynx 1.18; US 1.11; U-2 3.06 ™ Air Integrated Dive Computer User Manual Air Integration If you turn the Air Integration feature “On” and have a Tank Transmitter on your own tank, your Buddy’s tank, or tanks of your Group members, you will see air information on your dive screen. - When Air Integration is off, there is NO tank information displayed. - In Solo Mode, your tank information is shown as a graphical tank icon on the middle left side of the screen, with a PSI/BAR tank pressure value below it, as well as your tank transmitter battery icon. The tank and pressure values can be green, yellow, orange or red, depending on the amount of pressure left in the tank. You can set the tank pressure values at which the colors change in the Air IntegrationTransmitter surface menu. You can set the pressure units in the Air Integration – Units surface menu. - In Buddy Mode, your tank information is shown in the same way as in Solo mode, but your Buddy’s name and tank pressure appears on the top left of the screen, in PSI/BAR only (no graphical tank display). Your Buddy’s tank transmitter battery icon is shown immediately beneath the pressure value. Your Buddy’s actual name can be set up in the Air Integration-Transmitter surface menu. Your Buddy’s tank pressure information will change color based on the amount of pressure remaining. You can set the tank pressure values at which the colors change in the Air Integration-Transmitter surface menu and your Buddy’s settings can be different than your own. However, all pressures must be displayed in the same pressure units as you choose for your own tank. - In Group 4/Group 9 modes, your tank information is shown at the top right of the screen, in PSI/BAR only, with your battery icon immediately below that. The rest of the screen is taken up by the Group’s pressure values. In the screenshot below, the four divers are named “Stu 1” for “Student 1”, “Stu 2” for “Student 2” and so on. You can change the names to the students’ actual names in the Air IntegrationTransmitter surface menu. Since students change frequently, it may be a hassle to update the names each time. Instead, some dive masters have suggested using color coding – for example, naming three transmitters “Red”, “Blue, “Green” and putting them on three tanks marked with red, blue and green tape, and then giving the students a color code using a bandana or a piece of tape on their wetsuit. That way you can make sure the right transmitter is on the right tank and you can recognize the right student. Here are the various ways that air pressure is displayed: Off Solo Mode Buddy Mode Group 4/Group 9 Mode Air Time If you have a Tank Transmitter set up on your tank, you have turned the LYNX Air Integration feature “On”, and you are in Solo or Buddy mode, you will be able to track your tank pressure in PSI/BAR and obtain an Air Time value on your screen. The Air Time information is NOT available in Group 4/Group 9 modes. Liquivision Products, Inc -76- Manual 1.6; Lynx 1.18; US 1.11; U-2 3.06 ™ Air Integrated Dive Computer User Manual For the first 4 minutes of the dive, no Air Time information will be displayed. Instead, you will see three bars “---“ on your display. This is because BC inflation from your dive tank and rapid temperature changes on descent can create distortions in the early Air Time readings. Once 4 minutes have elapsed, the Air Time value will appear. It is an estimate of how much dive time you have left based on your breathing rate and current depth. The LYNX estimates your Air Time value by measuring how long it took you to breathe the last 100 PSI/7 BAR. However, it updates your Air Time instantaneously when your depth changes. The Air Time reading will reach zero once your tank pressure hits 700 PSI/48 BAR. This normally sufficient to ascend from a no decompression dive recreational diving depth while respecting proper ascent rates and a 3 minute Safety Stop at 6 ft/1.5m, but it will likely not be sufficient gas to complete a decompression schedule. The Air Time feature is not compatible with decompression diving! You must make your own gas calculations if you are planning a decompression dive. Also, the Air Time feature is an estimate – don’t trust it blindly – favor your raw LYNX pressure value and your analog pressure gauge reading! While we did our best to make sure Air Time is accurate, it is a less reliable value than the LYNX tank pressure information displayed – this is simply because the LYNX tank pressure is the primary data point from which the Air Time calculation is made. If the two values seem to indicate different things, trust the tank pressure value first. Similarly, if the tank pressure the LYNX is displaying does seem to make sense, always refer to your analog pressure gauge! Trust the analog pressure gauge over the LYNX! The reason for this is also simple – you could have mixed up tank transmitters while setting them up at the surface. If you are a 200 lb man and your Buddy is your 120 lb wife, and you mistakenly put your transmitter on her tank (and vice versa), your LYNX pressure value would be much higher than it should be (and hers would be much lower than it should). In this situation, your analog pressure gauge is physically connected to your tank and is the more reliable source of information. Here are the ways that Air Time is displayed in Solo and Buddy modes: Solo Mode Solo Mode with Deco Buddy Mode Buddy Mode - Deco Air Time is NOT available in Group 4 or Group 9 modes, or when Air Integration is “Off”. WARNING In a No Decompression Dive, your remaining Air Time takes precedence over remaining NDL time. If your Air Time is less than your No Decompression (NDL) time, always follow the Air Time value. Start your no decompression ascent before or immediately when Air Time reaches zero (700 PSI/48 BAR). Liquivision Products, Inc -77- Manual 1.6; Lynx 1.18; US 1.11; U-2 3.06 ™ Air Integrated Dive Computer User Manual WARNING The Air Time feature is NOT designed for use with decompression diving. 700 PSI/48 BAR will likely not be enough gas to complete your decompression schedule! You must make your own gas calculations if you are planning a decompression dive, and you must plan to have sufficient gas to complete your decompression safely. WARNING Air Time Is An Estimate! Don’t Trust It Blindly! When in doubt, trust the LYNX pressure value over the Air Time estimate. If in doubt of the LYNX pressure value, trust your analog submersible pressure gauge (SPG). TTS (Total Time to Surface) and Max Depth Display If you turned the “Show TTS” or “Show MAX” features on in the surface Display Settings menu, you will see these values displayed on your screen, alternating with the “Air Time” value, every four seconds. If you turn both on, they will alternate as follows: Air Time – TTS – Air Time – Max – Air Time – TTS and so on, so you see your Air Time value every four seconds. Air Time TTS Max Depth Air Time: you have 31 minutes of Air Time remaining TTS: Since you have no decompression requirement, your TTS is simply the time it would take to ascend safely while respecting ascent rates and safety stops Max Depth: This is the maximum depth you have reached on this dive Liquivision Products, Inc -78- Manual 1.6; Lynx 1.18; US 1.11; U-2 3.06 ™ Air Integrated Dive Computer User Manual Decompression Information Zone - In Off/Solo/Buddy Modes, the NDL (No Decompression Limit) or the decompression information are shown in the center of the screen. - In Group 4/Group 9 modes, the NDL or the decompression information are shown at the top-center of the screen. Off/Solo/Buddy Mode Group 4/Group 9 Mode No Deco: Early in the dive, the NDL value is very large and shown as “---“. Once it is less than one hour, the NDL value is shown in minutes. Planned Deco: Once you run out of NDL time, your LYNX will show the deepest planned deco stop depth. In Off/Solo/Buddy modes, the “hand” symbol….. means “Stop”. In this case, your stop is at 3 meters or 10 feet During Deco: When you reach your deco stop, your LYNX will show your Stop Depth (6m) and your Stop Time (4 mins 30 sec) • NDL – No Decompression Limit is the maximum time you can stay at your current depth before you will incur a decompression obligation. It is displayed in minutes, and rounded down to the nearest minute. You should NEVER exceed this time, unless you have specific training in decompression diving. • Stop Depth Only – This value appears once you run out of NDL time. It is the depth of the deepest stop on your LYNX’s ascent schedule if you were to begin your ascent immediately. • Stop Depth/Time – These values will appear together once you reach your first/deepest decompression stop. The stop time is in minutes:seconds. If you are shallower than this stop, the depth value will blink to remind you to go deeper. Graphical Decompression Stop Information In certain modes, the LYNX provides you with graphical cues to help you execute your decompression plan correctly. In REC Mode, they appear when Air Integration is “Off” or in Solo mode. They are not available in Buddy, Group 4 or Group 9 modes, as the space is taken up by Air Integration information. The following screenshots show the graphical decompression symbols in REC Mode with Air Integration “On”. The large “Up” arrow appears when you need to ascend to your next stop. The small Liquivision Products, Inc -79- Manual 1.6; Lynx 1.18; US 1.11; U-2 3.06 ™ Air Integrated Dive Computer User Manual “Up” arrows and starfish show that you are arriving close to your next stop. Once the starfish shows fully in the box on your screen, it means you have reached your decompression stop depth. If you overshoot your decompression stop, i.e. ascend farther than you should, you will see small down arrows telling you to descend, and the decompression stop alarm will be activated (flashing depth). 1. Large Up Arrow 2. Small Up Arrows & 3. Hold Starfish in box! 4. Small Down Arrows start of Starfish & Stop Alarm Graphical Ascent/Descent Indicators & Alarms The LYNX provides you with a number of graphical cues to help you manage your descent and ascent rates, based on the Alarms you have set up. 1. Descent Rate 2. Descent Rate Alarm 3. Ascent Rate 4. Ascent Rate Alarm CNS Loading Your LYNX offers a visual indicator of Central Nervous System (CNS) oxygen loading when Air Integration is “Off” only. When Air Integration in “On”, the CNS tracker is not visible. However, the CNS information is being recorded and can be reviewed after your dive in the Dive Log. N2 Loading Your LYNX offers a visual indicator of Nitrogen (N2) loading. During the NDL (No Deco Limit) period, the N2 indicator will be green. As you exceed your NDL, the N2 indicator will add yellow and red bars. This means you have excess nitrogen that you must release through decompression. You should not enter decompression unless you have adequate training and sufficient gas reserves to execute a decompression plan! Liquivision Products, Inc -80- Manual 1.6; Lynx 1.18; US 1.11; U-2 3.06 ™ Air Integrated Dive Computer User Manual Gas When AI is “Off” or in “Solo” or “Buddy” mode, your current gas is shown on the bottom left of the screen. Your current gas is NOT shown in Group 4 or Group 9 modes. To check your gas when diving in Group modes, briefly switch to Solo mode. AI Off Solo/Buddy Mode Group 4/9 Mode Gas/PO2/CNS NOTE: None of these alarms are available in Group 4 or Group 9 Air Integration modes. To view gas and gas alarm information while diving in a Group mode, please momentarily switch to Solo mode, and then switch back to Group mode. AI Off Solo/Buddy The gas alarm will be displayed in the lower left corner of the screen, and it will blink when the gas you are breathing is not appropriate for some reason. The most common reason will be that you have exceeded the maximum allowable PO2 for your gas (PO2 is 1.4 in one-gas Rec mode) The PO2 alarm will be displayed in the lower left corner of the screen, and it will flash when you exceed the maximum allowable PO2 given the gas you are breathing. The PO2 setting is 1.4 in Rec Mode. The CNS alarm will be displayed if you have exceeded your CNS limit. For more information on this alarm, please refer to the Oxygen loading section of the manual. Liquivision Products, Inc -81- Manual 1.6; Lynx 1.18; US 1.11; U-2 3.06 ™ Air Integrated Dive Computer User Manual Temperature The current temperature of the surrounding environment is displayed in the lower-left-hand corner, next to the battery indicator. It is displayed either in Celsius or in Fahrenheit, depending on your Units setting (refer to the “Units” section of the manual for details). You will see a “C” or “F” letter next to the temperature value to let you know which units you have selected. Keep in mind that the temperature sensor is inside the LYNX unit, so it can take many minutes for it to adjust to a rapid external temperature change. The LYNX will function when its internal temperature is between - 0 to 40°C (32 to 104°F). If the LYNX’s internal temperature exceeds 40°C/104°F (in direct sunlight, for example) the OLED display could show some visual disturbances. This is not a product failure – the display will return to normal when the unit is cooled down. Battery Indicator – LYNX The battery status is represented graphically with a battery icon. The battery icon starts out green, then it turns yellow and then red. Lithium batteries have a very steep drop-off voltage curve, which means they appear full until the very last moment, when they quickly deplete. Therefore, the battery only turns yellow with about 1-1.5 hours of life left in the battery. - If the battery icon is yellow on the surface, you should change your battery before beginning your next dive. - If the battery icon is yellow underwater, you have enough battery life to complete your dive. - If the battery icon is red on the surface, you MUST change your battery immediately. - If the battery icon turns red during your dive, you should stop your dive and begin your ascent immediately, while following ascent protocols (respect ascent speed, respect the Safety Stop). When Air Integration is “Off” or you are in Solo/Buddy mode, your LYNX battery indicator is in the lower left corner of your screen. In Group 4 and Group 9 modes, your LYNX battery indicator is in the top left of the screen. AI Off Solo/Buddy Mode Group 4/9 Mode WARNING You must change your battery immediately when the indicator turns red Lithium batteries sustain high power for a long time, but once the power starts to drop, it does so very fast. A red battery indicator means that the battery power will drop to insufficient power within a few minutes. Liquivision Products, Inc -82- Manual 1.6; Lynx 1.18; US 1.11; U-2 3.06 ™ Air Integrated Dive Computer User Manual Battery Indicators – Transmitter(s) Transmitter battery information will only appear when Air Integration is “On”. The battery status is represented graphically with a battery icon. The battery icon starts out green, then it turns yellow and then red. Lithium batteries have a very steep drop-off voltage curve, which means they appear full until the very last moment, when they quickly deplete. Therefore, the battery only turns yellow with about 1-1.5 hours of life left in the battery. - If the battery icon is yellow on the surface, you should change your battery before beginning your next dive. - If the battery icon is yellow underwater, you have enough battery life to complete your dive. - If the battery icon is red on the surface, you MUST change your battery immediately. - If the battery icon turns red during your dive, you should stop your dive and begin your ascent immediately, while still following proper ascent protocols (proper ascent speed, respect the Safety Stop). Solo/Buddy Mode Group 4/9 Mode Your Buddy’s transmitter battery icon Your transmitter battery icon Your transmitter battery icon Your Students’ transmitter battery icons The battery life is significantly affected by the Air Integration mode you select and the brightness setting of your display. Learn more about your LYNX’s battery in the section “Overview of Lynx, T1, U-2 and L1 Battery Types”. “Battery Savings” mode In the event that your battery is very low during the dive, your LYNX will go into “Battery Savings” mode. It is a mode that tries to preserve the battery as much as possible, so that the LYNX keeps functioning as long as possible. This mode changes the following things: • • all the information on the display will turn green (the color that is most power-economical) the display brightness will be set to low For more details, please refer to Battery Savings Mode: When Your Battery Voltage Drops Below A Critical Level Exiting the water Once you are shallower than 0.6 meters / 2 feet, your LYNX will go back into surface mode and offer you access to surface menus. However, for next few minutes, it will remain in post-dive mode. You can control length of this period, in menu setting Minimum Surface Interval. This means that if you resume your dive within that period, Liquivision Products, Inc -83- Manual 1.6; Lynx 1.18; US 1.11; U-2 3.06 ™ Air Integrated Dive Computer User Manual it will be counted as continuation of previous dive, instead of a new one. This also means, that all the numbers, such as maximum depth, average depth, dive time, etc. will not be reset. After that, if you decide to dive again, it will be counted as a new dive. Last dive information When on the surface, and not in Sleep Mode, your LYNX will display information about the last dive that you have done. Max: max depth of your last dive Tank Pressure Icon: visual depiction of the last tank pressure received PSI/BAR Value: numerical depiction of the last tank pressure received Tank Battery Icon LYNX Battery Icon Dive Time: duration of your last dive Surface: time in hours and minutes since you last surfaced No Fly: counts down no-fly-time Gas: Gas you currently have set up Clock: current time of day Temperature: ambient temperature Surface – it is time elapsed since your last dive. If it is less than 24 hours, you will see the number of hours and minutes. If it is more than 24 hours, you will see number of days and hours. If it is more than 10 days ago, you will not see any surface interval. Max – is the maximum depth of your last dive, with one decimal place. Depending on your unit settings, it will be either in meters, or in feet, and you will see “m” or “ft” printed after the number. Dive Time – is the total time of the last dive, displayed according to your dive time settings – either as total number of minutes, or as hours:minutes. No-Fly – this is a timer that counts down your “No Fly” time according to the PADI guidelines. The PAD guidelines are as follows: • • Following a single day of no-decompression diving, do not fly for 12 hours Following several days of diving, or following a decompression dive, do not fly for 24 hours Thus you will see either a 12 hour or a 24 hour countdown appear after your dive. NOTE: PADI guidelines do not try to predict your exact tissue saturations or time to desaturation, they are general “rules of thumb” and, as such, have inherent limitations. No guideline or “rule of thumb” can ever guarantee perfect decompression safety. For an estimate of your tissue saturations, see the “Your Saturation” menu item. Altitude Compensation/Surface Pressure Adjustments The LYNX does not have a water sensor that can sense whether it is in the water based on “wetness”. Instead, your LYNX continuously tracks atmospheric pressure to determine the surface pressure at the start of your dive. When it senses a sudden change in ambient pressure, it understands that you have entered the water and that a dive is beginning. Your LYNX can generally distinguish between a sudden change in pressure caused by water entry, vs. other types of sudden changes in pressure, such as a plane taking off, or driving up a mountain. Liquivision Products, Inc -84- Manual 1.6; Lynx 1.18; US 1.11; U-2 3.06 ™ Air Integrated Dive Computer User Manual This method of surface pressure detection has proven quite reliable, but it is always possible to trick your LYNX, for example: • if you place your LYNX in shallow and very stable body of water (such as a bucket full of dive gear being rinsed), your LYNX may assume that current surface pressure is more than it is in reality. If you go diving immediately after this, your depth reading may be distorted. • if you increase ambient pressure very quickly after the LYNX has adjusted for being at altitude (e.g. if you were to skydive with a LYNX), it might go into a phantom dive, as it will assume that you have entered the water. In this highly unlikely case, the only solution is to reset your LYNX by removing the battery (please refer to Changing The LYNX’s Battery for details). You can always check what LYNX assumes as the current surface pressure by going to the “Status” screen (please refer to Status section for details). Liquivision Products, Inc -85- Manual 1.6; Lynx 1.18; US 1.11; U-2 3.06 ™ Air Integrated Dive Computer User Manual DI V I NG W I T H Y OUR LY NX I N T E C M ODE Overview Your LYNX has a wide set of features that can assist you with your dive planning and preparation. The most basic selection is the Mode you wish to use your unit in. The LYNX offers Rec, Tec and Gauge modes. The default is Rec mode, which only allows you to dive with one gas (21-40% oxygen). Should you wish to get decompression information for dives with more than one gas, you should switch your computer to Tec mode. For details on making the switch, please see the Dive Planning > Mode section of the manual. In Tec mode, the LYNX functions as a three-gas computer. You can define one Dive Gas and two Deco Gases, each from 21-100% oxygen. The default mix is Air as a Dive Gas. Default Dive Gas is Air Air as Dive Gas 50% and 100% O2 as Deco Gases In this mode the LYNX assumes you are planning to incur some decompression obligation and gives you control over a number of extra settings, such as your level of Conservatism, your Dive PO2 and Deco PO2 levels, and the depth of your Last Deco Stop (please see the relevant sections of the Dive Setup menu for mode information). You also have extended dive planning options which allow you to plan and view predicted deco stops (Runtime). During your dive, the LYNX will begin by displaying your No Decompression Limit (NDL). If you complete your dive within the NDL time, the LYNX will tell you to complete a safety stop for 3 minutes at 5m/15ft. During these 3 minutes, if you drop below 6.5m/21ft, the safety stop counter will turn off and reset. It will begin again once you return to the safety stop depth of 5m/ 15ft. Should you continue diving beyond your NDL time – and you should only do this if you have knowledge of decompression diving and sufficient gas to complete the dive safely - the LYNX will start calculating your decompression obligation and indicate the depth and duration of any decompression stops you need to complete to exit the water safely. The unit calculates your NDL or your decompression plan using Bühlmann ZH-L16C1, with one of three possible levels of Conservatism, based on common Bühlmann Gradient Factors. If you have a Tank Transmitter set up one, two or three of your tanks, and you have turned the LYNX Air Integration feature “On”, you will be able to track your tank pressure in PSI/BAR for the tank you are currently breathing from. However, you will NOT be given an Air Time value, since it is impossible to calculate this across multiple tanks. Liquivision Products, Inc -86- Manual 1.6; Lynx 1.18; US 1.11; U-2 3.06 ™ Air Integrated Dive Computer User Manual WARNING NEVER undergo a decompression dive without proper training. NEVER exceed the LYNX No Decompression Limit unless you are trained in decompression diving. WARNING Electronics Can Fail – Always Carry Backup The LYNX dive computer hardware and the Tank and Location Transmitter hardware will eventually fail, like any electronic equipment whose components mature and age. If they fail during your dive, they can stop providing you with critical decompression and tank pressure information. You must have a plan to handle the failure of the LYNX dive computer, the Tank or Location Transmitter during your dive. You must always carry backup instruments, including a depth gauge, submersible pressure gauge, digital bottom timer or dive watch, a compass, and have access to decompression tables. Do not risk your life on only one source of information. WARNING Always Check For Software Updates. The LYNX dive computer software likely still has bugs. We have looked for them and tried to eliminate them, but they can still appear during use. Bugs can cause the unit to provide inaccurate or incomplete information, or cause the unit to reset or turn off and stop providing any information at all. You should always check for software updates (www.liquivision.com/downloads/LYNXSoftwareHistory.php) and install all applicable updates, every time you prepare to use the LYNX dive computer. Setting Up a Dive In Tec Mode Once you have Unlocked your LYNX, and set up the required Time/Date and Battery information, setting up your first dive in Tec mode is very simple. All you need to do is: 1. Set up Metric/Imperial Units. Go to the “Preferences > Units” menu item and make your selection. 2. Set the LYNX up in Tec mode. Go to the “Dive Planning > Mode” menu item and select “Tec”. 3. Set up your desired level of Conservatism. Liquivision Products, Inc -87- Manual 1.6; Lynx 1.18; US 1.11; U-2 3.06 ™ Air Integrated Dive Computer User Manual When you switch from Rec mode to Tec mode for the first time, you will be prompted to enter your desired level of conservatism with this “Warning” screenshot. Tap Left to exit this screen. You can edit your conservatism by going to “Dive Planning > Dive Setup > Conservatism” menu item. The default setting is “2”. You can select from the following: Level “0” - standard Bühlmann ZH-L16C with no added conservatism (Gradient Factors 100/100) Level “1” - Bühlmann ZH-L16C with some added conservatism (Gradient Factors 30/85) Level “2” - Bühlmann ZH-L16C with more added conservatism (Gradient Factors 30/75) 4. Set up your PO2 Dive and PO2 Deco values. In the same Dive Setup menu, you will have the option to set up the maximum allowable partial pressure of oxygen in the gas you are breathing, for both your Dive Gas and your Deco Gas. “Dive Planning > Dive Setup > PO2 Dive / PO2 Deco”. The default for your Dive Gas is 1.4, and the default for your Deco Gases is 1.6. 5. Set up the depth of your last decompression stop. If you do not incur any decompression, you will automatically be prompted to complete a Safety Stop for 3 minutes at 5m/15ft and you cannot change this depth. However, if you do enter into decompression, you can control the depth of your last decompression stop – for example, if there are big waves, you may like to have your deco stop well beneath them. The default setting is 3m/10ft and increases in increments of 3m/10ft. 6. Set up your dive gas. The default is “Air”. You can change it to any nitrox mix from Air (21%) to 100% oxygen by following the instructions in the “Dive Planning > Gases” section of this manual. 7. Set up your deco gases, if any. The default is “Off”. You can set Deco Gas 1 and Deco Gas 2 to any nitrox mix from Air (21%) to 100% oxygen by following the instructions in the in the “Dive Planning > Gases” section of this manual. 8. Review your dive plan. In Tec mode, you have two options to prepare for your dive: - Compute NDL - Runtime Entering the “Dive Planning > Compute NDL” menu item will create a chart with the amount of time you can spend at a given depth without incurring any decompression. For example, if you select “Air” as your dive gas, your NDL at 15 m (about 50 ft) will be 57 minutes. This can help you plan the amount of gas you take on your dive. Entering the “Dive Planning > Runtime” menu item allows you to set up a dive plan. For example, you can say that you are planning to dive to 30m/100ft for 20 minutes, and the computer will tell you the total duration of your dive, including any deco stops, based on the gases and level of conservatism you have set up. 9. Set up your Alarms by accessing “Dive Planning > Alarms”. The default settings are: - Alarms “On” - Depth: 30 metres (100 feet) - Time: 60 minutes - Ascent Rate: 10 metres per minute (30 feet per minute) - Descent Rate: 30 metres per minute (90 feet per minute) Liquivision Products, Inc -88- Manual 1.6; Lynx 1.18; US 1.11; U-2 3.06 ™ Air Integrated Dive Computer User Manual 10. Set up Air Integration features. Read the Air Integration surface menu section of this manual. 11. Calibrate Your Compass. This is described in the Compass section of this manual. 12. If you want to use the Locator feature, unlock it. The Directional Location feature can help you locate a T1/U-2 Tank Transmitter or L1 Location Transmitter underwater, as long as the Transmitter in question is within range. This feature is an optional, free BETA upgrade to the LYNX-AI functionality. The Locator feature is provided through an experimental, BETA release, and requires that you acknowledge that you understand its limitations before you can obtain a free PIN to unlock it. Instructions on how to unlock it can be found Unlock The Locator Feature of The LYNX section of this manual. Instructions on how to use it can be found in the description of the underwater Locate menu and the Diving With Your LYNX - Locator Functions section of the manual. 13.Run a Dive Simulation. This feature, found in “Dive Planning > Simulation” allows you to create a dive simulation for a desired depth and time, at up to 4x normal speed. This lets you: - Double-check all your dive settings (e.g. to catch that you have a depth alarm set to 30 m / 100 ft while you plan to dive to 40 m / 130 ft). - Pre-view the dive screen Layout, and familiarize yourself with the location of key information. - Practice accessing the Underwater Menus, and familiarize yourself with the options available. 14. Exit all menus, then select “Shut Off – you are now ready to dive! At the bottom of each menu screen there is the option to “Exit”. Keep selecting this until you reach the main menu, then select “Shut Off” at the very top of the main menu. Your unit will go blank. You are now ready to dive! Settings That Will Affect Your Dive Gas Settings You should only set up the gases you plan to carry on a given dive, as your LYNX will assume you have these gases available to calculate your decompression. For example, if you use the “Runtime” feature to plan a dive to 30m (about 100 ft) with 45 minutes of bottom time on Air with Deco Gases “Off”, your LYNX will recommend 140 minutes of deco, vs. if you plan a 30m dive with 45 minutes of bottom time on Air, with Deco Gas 1 set to 50% nitrox and Deco Gas 2 set to 100% oxygen, your LYNX will recommend 79 minutes of deco (this is assumes default conservatism and PO2 settings). Dive on Air only Liquivision Products, Inc Dive on Air Deco on 50% and 100% -89- Manual 1.6; Lynx 1.18; US 1.11; U-2 3.06 ™ Air Integrated Dive Computer User Manual Should you lose a gas during your dive, you should use the “LOST GAS” option to remove this gas from your gas list, so that your LYNX recalculates your dive plan according to the gases you are actually carrying/breathing. Switching Gases Your LYNX does not automatically switch gases underwater during your dive, however if it detects that there is a 'better' gas for you to breathe on the ascent, it will flash the gas icon in the lower left corner. For example, if you are making the dive described in the previous section (diving “Air” to 30m/100ft, bottom time of 45 minutes, Deco Gas 1 = 50%, Deco Gas 2 = 100%), the “Runtime” surface dive planning feature of your LYNX will suggest that you switch to 50% nitrox at 23m, and your LYNX will flash the “Air” label in your dive screen at 23m/75ft, prompting you to switch. On the other hand, let’s say that you were to switch to 50% nitrox prematurely, just after you left the bottom at 28m/90ft. Then your Gas label on your dive screen would start flashing, alternating with the PO2 warning, to tell you that you are currently breathing a gas that is NOT considered breathable at that depth and that you ought to switch to a gas that is considered breathable. Switching Gases ALSO Switches The Tank That is Monitored Let’s say you have set up Air as your Dive Gas and O2 as your Deco Gas in the Dive Planning – Gases menu, and you want to set up a Tank transmitter on each of those tanks. To do so, you should enter the Air Integration menu, change the setting from “Off” to “Tec-Solo”, and then enter the Transmitter submenu. There you will see that, instead of a list of other people (Buddy, Stu1, Stu2 and so on) you have a list of the gases you have set up in the Dive Planning menu. You should then turn these tanks “On” and verify that the maximum tank pressures are accurate. This is especially important in Tec mode, as you are more likely to have tanks with different maximum pressures on your dive when you have a Dive gas and one or two Deco gases. When you go diving, it is important to understand that when you switch the gas mix you are breathing, the LYNX will also switch the Tank transmitter it is monitoring accordingly. Conservatism Settings The conservatism setting of your LYNX will affect the length of your No Decompression Limit (NDL) or, if you enter into decompression, the depth and duration of your decompression stops. The more conservative the setting, the shorter your NDL time and the more decompression time you will incur. In Tec mode, your LYNX is designed to default to the most conservative setting (Level “2”), but you can adjust this to suit your needs. Here is an example of a dive planned using the “Runtime” feature, where Liquivision Products, Inc -90- Manual 1.6; Lynx 1.18; US 1.11; U-2 3.06 ™ Air Integrated Dive Computer User Manual the key parameters (Air, 30m/100ft, 20 minutes bottom time) are constant, but the level of conservatism has been changed: Conservatism Level 2 ( = GFs 30/75) Most Conservative Conservatism Level 1 ( = GFs 30/85) Conservatism Level 0 ( = GFs100/100) Least Conservative You will see that the total dive time on Level 2 is 30 minutes, while the total dive time on Level 0 is 23 minutes. We recommend that you dive on the default Level 2 setting unless you are familiar with decompression theory in general, the specifics of the Bühlmann ZH-L16C model, including Gradient Factors. You can learn more about these topics by referring to the works listed in our Bibliography. PO2 Settings The Dive PO2 and Deco PO2 menu items allow you to set the maximum allowable partial pressure of oxygen for the gas you are breathing. The default (and maximum) value for your Dive PO2 is 1.40, while the default (and maximum) value for your Deco PO2 is 1.60. Should you exceed those values at any time during your dive, your Gas label in the dive screen will start flashing, and alternating with the PO2 alarm. Safety Stop/Deco Stops If you begin your final ascent within the No Decompression Limit time, you will be asked to complete a safety stop for 3 minutes at 5m / 15ft. If, at any time during these 3 minutes, you drop below 6.5m / 21ft, the safety stop counter will turn off and reset. It will begin again once you return to the safety stop depth of 5m / 15ft. The safety stop is optional. If you skip the safety stop, you will not be penalized. If you exceed the NDL, then your LYNX will automatically start computing your decompression plan and will suggest decompression stops accordingly. It will NOT suggest a mandatory safety stop in this scenario, as the safety requirements should be fulfilled by following the decompression stops. Oxygen Loading During the dive, your LYNX calculates your CNS (Central Nervous System) and OTU (Oxygen Toxicity Unit) loading. Your current CNS/OTU levels are easy to access through the Your Saturation menu item and the screen looks like this. For a full explanation of CNS/OTU values, please refer to your nitrox training manual. Liquivision Products, Inc -91- Manual 1.6; Lynx 1.18; US 1.11; U-2 3.06 ™ Air Integrated Dive Computer User Manual Entering the water Turning Your LYNX On We recommend that you turn your LYNX on yourself before you enter the water to check the remaining battery power and to make sure that all is functioning properly. You can turn it on by tapping the unit in the Down direction 3/5 times. Otherwise, it will turn on automatically few seconds after you take it deeper than 1.6 meters / 5.25 feet. Beginning Your Dive When you start to descend and go below 1.6 meters / 5.25 feet, your LYNX will turn into dive mode. Dive Display There are two main types of underwater display layouts depending on the type of Air Integration display mode you have chosen: Off/ or Tec-Solo. Dive Time The large yellow number in the upper-right-hand corner of your display (here, circled in red) is the Dive Time. Dive time is measured in seconds, starting from the moment your LYNX reaches 1.6 meters / 5.25 feet. It will stop once you surface, and it will reset once you have been on the surface for more than the Minimum Surface Interval. The minutes of your dive can be displayed as follows (refer to the “Show Hours” section for details): • minutes:seconds, e.g. 135:00 • hours:minutes:seconds, e.g. 2:15:00 Depth The green number in the lower-right-hand corner of the display (here, circled in red) is your Current Depth. If you chose metric units, you will see the depth in meters, with one decimal place in smaller font. If you chose imperial units, you will see the depth in feet, with no decimal places. Please refer to the “ Units” section of the manual for details on choosing units. Air Integration When Air Integration is “Off”, there is NO tank information displayed. If you turn the Air Integration feature “On” by selecting the “Tec-Solo” option and are equipped with a Tank Transmitter on one, two or three of your tanks, you will see air information on your dive screen. Your tank information is shown as a graphical tank icon on the middle left side of the screen, with a PSI/BAR tank pressure value below it, as well as your tank transmitter battery icon. Liquivision Products, Inc -92- Manual 1.6; Lynx 1.18; US 1.11; U-2 3.06 ™ Air Integrated Dive Computer User Manual The tank and pressure values can be green, yellow, orange or red, depending on the amount of pressure left in the tank. You can set the tank pressure values at which the colors change in the Air IntegrationTransmitter surface menu. You can set the pressure units in the Air Integration – Units surface menu. Here is how the tank displays would appear on a three gas dive to 40m (130 ft): Air – Dive Gas 50% - Deco Gas O2 – Deco Gas Remember! When you switch gases underwater, the LYNX automatically starts monitoring the transmitter of the new gas. TTS (Total Time to Surface) and Max Depth Display If you turned the “Show TTS” or “Show MAX” features on in the surface Display Settings menu, you will see these values displayed on your screen. If you only selected one of them, it will appear continuously. If you selected both, they will alternate. TTS Max Depth TTS: Your Total Time To Surface including decompression stops and assuming safe ascent rates Max Depth: This is the maximum depth you have reached on this dive Decompression Information Zone The horizontal section in the middle of the screen is reserved for your No Decompression Limit or decompression information. No Deco: Early in the dive, the NDL value is very large and shown as “---“. Once it is less than one hour, the NDL value is shown in minutes. Liquivision Products, Inc -93- Manual 1.6; Lynx 1.18; US 1.11; U-2 3.06 ™ Air Integrated Dive Computer User Manual Planned Deco: Once you run out of NDL time, your LYNX will show the deepest planned deco stop depth and its duration in minutes:seconds. The “Hand” symbol means “Stop” and the “Clock” symbol means “Time”. In this case, you have a planned stop at 3m for 10 seconds. During Deco: When you reach your deco stop, your LYNX will show your Stop Depth (here: 6m) and your Stop Time (here: 1 mins 10 sec) • NDL – No Decompression Limit is the maximum time you can stay at your current depth before you will incur a decompression obligation. It is displayed in minutes, and rounded down to the nearest minute. You should NEVER exceed this time, unless you have specific training in decompression diving. • Stop Depth/Time – These values will appear together once you reach your first/deepest decompression stop. The stop time is in minutes:seconds. If you are shallower than this stop, the depth value will blink to remind you to go deeper. Graphical Decompression Stop Information In TEC Mode LYNX provides you with graphical cues to help you execute your decompression plan correctly. The large “Up” arrow appears when you need to ascend to your next stop. The small “Up” arrows and starfish show that you are arriving close to your next stop. Once the starfish shows fully in the box on your screen, it means you have reached your decompression stop depth. If you overshoot your decompression stop, i.e. ascend farther than you should, you will see small down arrows telling you to descend, and the decompression stop alarm will be activated (flashing depth). 1. Large Up Arrow 2. Small Up Arrows & 3. Hold Starfish in box! 4. Small Down Arrows start of Starfish & Stop Alarm Graphical Ascent/Descent Indicators & Alarms The LYNX provides you with a number of graphical cues to help you manage your descent and ascent rates, based on the Alarms you have set up. Liquivision Products, Inc -94- Manual 1.6; Lynx 1.18; US 1.11; U-2 3.06 ™ Air Integrated Dive Computer 1. Descent Rate 2. Descent Rate Alarm 3. Ascent Rate User Manual 4. Ascent Rate Alarm CNS Loading Your LYNX offers a visual indicator of Central Nervous System (CNS) oxygen loading when Air Integration is “Off” only. When Air Integration in “On”, the CNS tracker is not visible. However, the CNS information is being recorded and can be reviewed after your dive in the Dive Log. N2 Loading Your LYNX offers a visual indicator of Nitrogen (N2) loading. During the NDL (No Deco Limit) period, the N2 indicator will be green. As you exceed your NDL, the N2 indicator will add yellow and red bars. This means you have excess nitrogen that you must release through decompression. You should not enter decompression unless you have adequate training and sufficient gas reserves to execute a decompression plan! Gas Your current gas is shown on the bottom left of the screen, in a slightly different position depending on whether Air Integration is “Off” or in “Tec-Solo” mode. AI Off Tec-Solo Mode Gas/PO2/CNS AI Off Solo/Buddy The gas alarm will be displayed in the lower left corner of the screen, and it will blink when the gas you are breathing is not appropriate for some reason. The most common reason is that you have exceeded the maximum PO2 for the gas you are breathing (1.4 for a Dive Gas and 1.6 for a Deco Gas). Liquivision Products, Inc -95- Manual 1.6; Lynx 1.18; US 1.11; U-2 3.06 ™ Air Integrated Dive Computer User Manual The PO2 alarm will be displayed in the lower left corner of the screen, and it will flash when you exceed the maximum allowable PO2 given the gas you are breathing. The maximum PO2 setting is 1.4 in for your Dive Gas, and 1.6 for your Deco Gases. The CNS alarm will be displayed if you have exceeded your CNS limit. For more information on this alarm, please refer to the Oxygen loading section of the manual. Temperature The current temperature of the surrounding environment is displayed in the lower-left-hand corner, next to the battery indicator. It is displayed either in Celsius or in Fahrenheit, depending on your Units setting (refer to the “Units” section of the manual for details). You will see a “C” or “F” letter next to the temperature value to let you know which units you have selected. Keep in mind that the temperature sensor is inside the LYNX unit, so it may take a moment for it to adjust to a rapid external temperature change. The LYNX will function when its internal temperature is between - 0 to 40°C (32 to 104°F). If the LYNX’s internal temperature exceeds 40°C/104°F (in direct sunlight, for example) the OLED display could show some visual disturbances. This is not a product failure – the display will return to normal when the unit is cooled down. Battery Indicator – LYNX The battery status is represented graphically with a battery icon. The battery icon starts out green, then it turns yellow and then red. Lithium batteries have a very steep drop-off voltage curve, which means they appear full until the very last moment, when they quickly deplete. Therefore, the battery only turns yellow with about 1-1.5 hours of life left in the battery. - If the battery icon is yellow on the surface, you should change your battery before beginning your next dive. - If the battery icon is yellow underwater, you have enough battery life to complete your dive. - If the battery icon is red on the surface, you MUST change your battery immediately. - If the battery icon turns red during your dive, you should stop your dive and begin your ascent immediately, while still following proper ascent protocols (proper ascent speed, respect the Safety Stop). Both when Air Integration is “Off” or you are in “Tec-Solo” mode, your LYNX battery indicator is in the lower left corner of your screen. Liquivision Products, Inc -96- Manual 1.6; Lynx 1.18; US 1.11; U-2 3.06 ™ Air Integrated Dive Computer AI Off User Manual Tec-Solo WARNING You must change your battery immediately when the indicator turns red Lithium batteries sustain high power for a long time, but once the power starts to drop, it does so very fast. A red battery indicator means that the battery power will drop to insufficient power within a few minutes. Battery Indicators – Transmitter(s) Transmitter battery information will only appear when Air Integration is “On”. The battery status is represented graphically with a battery icon. The battery icon starts out green, then it turns yellow and then red. Lithium batteries have a very steep drop-off voltage curve, which means they appear full until the very last moment, when they quickly deplete. Therefore, the battery only turns yellow with about 1-1.5 hours of life left in the battery. - If the battery icon is yellow on the surface, you should change your battery before beginning your next dive. - If the battery icon is yellow underwater, you have enough battery life to complete your dive. - If the battery icon is red on the surface, you MUST change your battery immediately. - If the battery icon turns red during your dive, you should stop your dive and begin your ascent immediately, while still following proper ascent protocols (proper ascent speed, respect the Safety Stop). Tec-Solo Mode Your transmitter battery icon The battery life is significantly affected by the Air Integration mode you select and the brightness setting of your display. Learn more about your LYNX’s battery in the section “Overview of Lynx, T1, U-2, and L1 Battery Types”. Liquivision Products, Inc -97- Manual 1.6; Lynx 1.18; US 1.11; U-2 3.06 ™ Air Integrated Dive Computer User Manual “Battery Savings” mode In the event that your battery is very low during the dive, your LYNX will go into “Battery Savings” mode. It is a mode that tries to preserve the battery as much as possible, so that the LYNX keeps functioning as long as possible. This mode changes the following things: • • all the information on the display will turn green (the color that is most power-economical) the display brightness will be set to low For more details, please refer to Battery Savings Mode: When Your Battery Voltage Drops Below A Critical Level Exiting the water Once you are shallower than 0.6 meters / 2 feet, your LYNX will go back into surface mode and offer you access to surface menus. However, for next few minutes, it will remain in post-dive mode. You can control length of this period, in menu setting Minimum Surface Interval. This means that if you resume your dive within that period, it will be counted as continuation of previous dive, instead of a new one. This also means, that all the numbers, such as maximum depth, average depth, dive time, etc. will not be reset. After that, if you decide to dive again, it will be counted as a new dive. Last dive information When on the surface, and not in Sleep Mode, your LYNX will display information about the last dive that you have done. Max: max depth of your last dive Tank Pressure Icon: visual depiction of the last tank pressure received PSI/BAR Value: numerical depiction of the last tank pressure received Tank Battery Icon LYNX Battery Icon Dive Time: duration of your last dive Surface: time in hours and minutes since you last surfaced No Fly: counts down no-fly-time Gas: Gas you currently have set up Clock: current time of day Temperature: ambient temperature Surface – it is time elapsed since your last dive. If it is less than 24 hours, you will see the number of hours and minutes. If it is more than 24 hours, you will see number of days and hours. If it is more than 10 days ago, you will not see any surface interval. Max – is the maximum depth of your last dive, with one decimal place. Depending on your unit settings, it will be either in meters, or in feet, and you will see “m” or “ft” printed after the number. Dive Time – is the total time of the last dive, displayed according to your dive time settings – either as total number of minutes, or as hours:minutes. No-Fly – this is a timer that counts down your “No Fly” time according to the PADI guidelines. The PAD guidelines are as follows: • Following a single day of no-decompression diving, do not fly for 12 hours • Following several days of diving, or following a decompression dive, do not fly for 24 hours Liquivision Products, Inc -98- Manual 1.6; Lynx 1.18; US 1.11; U-2 3.06 ™ Air Integrated Dive Computer User Manual Thus you will see either a 12 hour or a 24 hour countdown appear after your dive. NOTE: PADI guidelines do not try to predict your exact tissue saturations or time to desaturation, they are general “rules of thumb” and, as such, have inherent limitations. No guideline or “rule of thumb” can ever guarantee perfect decompression safety. For an estimate of your tissue saturations, see the “Your Saturation” menu item. Altitude Compensation/Surface Pressure Adjustments The LYNX does not have a water sensor that can sense whether it is in the water based on “wetness”. Instead, your LYNX continuously tracks atmospheric pressure to determine the surface pressure at the start of your dive. When it senses a sudden change in ambient pressure, it understands that you have entered the water and that a dive is beginning. Your LYNX can generally distinguish between a sudden change in pressure caused by water entry, vs. other types of sudden changes in pressure, such as a plane taking off, or driving up a mountain. This method of surface pressure detection has proven quite reliable, but it is always possible to trick your LYNX, for example: • • if you place your LYNX in shallow and very stable body of water (such as a bucket full of dive gear being rinsed), your LYNX may assume that current surface pressure is more than it is in reality. If you go diving immediately after this, your depth reading may be distorted. if you increase ambient pressure very quickly after the LYNX has adjusted for being at altitude (e.g. if you were to skydive with a LYNX), it might go into a phantom dive, as it will assume that you have entered the water. In this highly unlikely case, the only solution is to reset your LYNX by removing the battery (please refer to Changing The LYNX’s Battery for details). You can always check what LYNX assumes as the current surface pressure by going to the “Status” screen (please refer to Status section for details). Liquivision Products, Inc -99- Manual 1.6; Lynx 1.18; US 1.11; U-2 3.06 ™ Air Integrated Dive Computer User Manual DI V I NG W I T H Y OUR LY NX I N G A UG E M ODE Entering the water Dive Planning WARNING Your LYNX in Gauge Mode acts as a bottom timer – it calculates the duration of your dive, its depth, and other simple parameters. It does not make any decompression calculations, nor does it provide any decompression information. You will need to use other means (tables, desktop decompression planners, dive computers, etc.) to plan your dive. Never attempt to plan a decompression dive without a proper training. Although your LYNX in Gauge Mode does not provide any decompression information, it will be a great tool in assisting you to execute a pre-planned dive. In Gauge Mode, the LYNX offers a limited set of Air Integration features. These are available only if you have turned the LYNX Air Integration feature “On”, and you have set up Tank Transmitters on one or more tanks. Due to screen layout constraints, only Group 4 and Group 9 Air Integration modes are available in Gauge Dive Mode. Solo and Buddy Air Integration modes are not available. However, do not despair! You can still set up just your tank as “You” in Group mode and get your own air information. You can also set up your Buddy’s tank as “Stu1” in Group mode and thus get you Buddy’s tank pressure – you can rename “Stu1” to “Buddy” or to you Buddy’s actual name. In Gauge Mode, you can use the Locator function. The Directional Location feature can help you locate a T1/U-2 Tank Transmitter or L1 Location Transmitter underwater, as long as the Transmitter in question is within range. This feature is an optional, free BETA upgrade to the LYNX-AI functionality. The Locator feature is provided through an experimental, BETA release, and requires that you acknowledge that you understand its limitations before you can obtain a free PIN to unlock it. Instructions on how to unlock it can be found Unlock The Locator Feature of The LYNX section of this manual. Instructions on how to use it can be found in the description of the underwater Locate menu and the Diving With Your LYNX - Locator Functions section of the manual. IMPORTANT NOTE ON SWITCHING TO/FROM GAUGE MODE In Gauge Mode, surface off-gassing continues when the device is above water. Once the device is underwater, all deco calculations are suspended. When switching from Gauge Mode to Rec/Tec Mode, the deco information will no longer be accurate, since previous tissue values are used. When you switch out of Gauge Mode, you will see this warning: Tap Left to continue. Liquivision Products, Inc -100- Manual 1.6; Lynx 1.18; US 1.11; U-2 3.06 ™ Air Integrated Dive Computer User Manual Turning Your LYNX On We recommend that you switch your LYNX on yourself before you enter the water to check the remaining battery power and to make sure that all is functioning properly. You can turn it on by tapping the unit in the “Down” direction three/five times. Otherwise, it will turn on automatically few seconds after you take it deeper than 1.6 meters / 5.25 feet. Beginning Your Dive When you start to descend and go below 1.6 meters / 5.25 feet, your LYNX will turn into dive mode. Diving Dive Display You have three different underwater display layouts to choose from: Standard, Simple, Alternate, and Large. The display layouts menu can be accessed both in surface mode and in dive mode. For more information, please refer to the Surface Menus “Display Settings - Layout” and Underwater Menus “Display - Layout” sections of the manual. STANDARD Stopwatch Dive Time Time of Day Depth Battery Indicator Temperature SIMPLE Depth Stopwatch Dive Time ALTERNATE Stopwatch Depth Temperature Dive Time Battery Indicator Time of Day LARGE Stopwatch Dive Time Time of Day Battery Indicator Liquivision Products, Inc Depth Temperature -101- Manual 1.6; Lynx 1.18; US 1.11; U-2 3.06 ™ Air Integrated Dive Computer User Manual Dive Time One of large numbers on your display is the dive time – its location depends on the display setting you have chosen. Please refer to the screenshots above to locate the time value for each display setting. Dive time is measured in seconds, starting from the moment your LYNX reaches 1.6 meters / 5.25 feet. It will stop once you surface, and it will reset once you have been on the surface for more than 5 minutes. Dive time can be displayed in several ways: The minutes of your dive can be displayed as follows (refer to the “Show Hours” section for details): - minutes:seconds, e.g. 135:00 - hours:minutes:seconds, e.g. 2:15:00 Depth Another one of the large number on the display is your current depth – its location depends on the display setting you have chosen. Please refer to the screenshots above to locate the depth value for each display setting. If you chose metric units, you will see depth in meters, and one decimal place in smaller font. If you chose imperial units, you will see depth in feet, and no decimal places. Please refer to the “Units” section of the manual for details. Air Integration In Gauge Mode, the LYNX offers a limited set of Air Integration features. These are available only if you have turned the LYNX Air Integration feature “On”, and you have set up Tank transmitters on one or more tanks. Due to screen layout constraints, only Group 4 and Group 9 Air Integration modes are available in Gauge Dive Mode. Solo and Buddy Air Integration modes are not available. However, do not despair! You can still set up just your tank as “You” in Group mode and get your own air information. You can also set up your Buddy’s tank as “Stu1” in Group mode and thus get you Buddy’s tank pressure – you can rename “Stu1” to “Buddy” or to you Buddy’s actual name. In Group 4/Group 9 modes, your tank information is shown at the top right of the screen, in PSI/BAR only, with your battery icon immediately below that. The rest of the screen is taken up by the Group’s pressure values. In the screenshot below, the four divers are named “Stu 1” for “Student 1”, “Stu 2” for “Student 2” and so on. You can change the names to the students’ actual names in the Air IntegrationTransmitter surface menu. Since students change frequently, it may be a hassle to update the names each time. Instead, some dive masters have suggested using color coding – for example, naming three transmitters “Red”, “Blue, “Green” and putting them on three tanks marked with red, blue and green tape, and then giving the students a color code using a bandana or a piece of tape on their wetsuit. That way you can make sure the right transmitter is on the right tank and you can recognize the right student. Here are the various ways that air pressure is displayed: Group 4 Mode Group 9 Mode With “Stu 1” changed to “Buddy” Liquivision Products, Inc -102- Manual 1.6; Lynx 1.18; US 1.11; U-2 3.06 ™ Air Integrated Dive Computer User Manual Stopwatch As you begin your dive and your LYNX enters dive mode, the stopwatch will be off. You can activate the stopwatch during your dive by tapping into menu mode and selecting “Stopwatch On”. Turning the stopwatch on will cause the time display to shrink and move, and the stopwatch to take its place. Stopwatch: OFF Stopwatch: ON STANDARD During your dive, you can: ● Turn the stopwatch on and off (that is, display it on your screen, or remove it) ● Start and pause the stopwatch ● Reset the stopwatch Please refer to the “Stopwatch” section of the manual for details. The stopwatch format will match the dive time format you have previously selected, either: total minutes or hours:minutes elapsed. Please refer to the “Show Hours” section of the manual for details. However, the seconds value in the stopwatch is always displayed as a number, in a smaller font. It is never displayed graphically, regardless of the setting you have selected for dive time seconds display. Maximum Depth The label “MAX” refers to the maximum depth you have reached over your entire dive. It is displayed as a single number, without decimal places. It is displayed either in meters or in feet, depending on your Units setting (refer to the “ Units” section of the manual for details). Your maximum depth will reset if you surface for more than 5 minutes. Average Depth The label “AVG” refers to the average depth you have reached over your entire dive. The average depth count starts at the beginning of the dive. You can reset your average depth once you reach the bottom by tapping into the underwater menus and selecting “Reset AVG” (refer to the “Reset AVG” section of the manual for details). In that case, average depth displayed here will be average depth since the last reset. It is displayed as a single number, without decimal places. It is displayed either in meters or in feet, depending on your Units setting (refer to the “Units” section of the manual for details). Your Average Depth will reset if you surface for more than 5 minutes. Liquivision Products, Inc -103- Manual 1.6; Lynx 1.18; US 1.11; U-2 3.06 ™ Air Integrated Dive Computer User Manual Please note that the Average Depth that is saved in the Dive Log is not affected by the reset option – it is average depth over the whole dive. Time of day The time of day is displayed in hours and minutes. You can choose whether you want to have it displayed as a 12-hours (AM/PM) format, or 24-hours (refer to the “Time/Date” section of the manual for details). Temperature This is current temperature of surrounding environment. It is displayed either in Celsius or in Fahrenheit, depending on your Units setting (refer to the “Units” section of the manual for details). You will see a “C” or “F” letter next to the temperature value to let you know which units you have selected. Keep in mind that the temperature sensor is inside the LYNX unit, so it may take a moment for it to adjust to a rapid external temperature change. Battery Indicator – LYNX The battery status is represented graphically with a battery icon. The battery icon starts out green, then it turns yellow and then red. Lithium batteries have a very steep drop-off voltage curve, which means they appear full until the very last moment, when they quickly deplete. Therefore, the battery only turns yellow with about 1-1.5 hours of life left in the battery. - If the battery icon is yellow on the surface, you should change your battery before beginning your next dive. - If the battery icon is yellow underwater, you have enough battery life to complete your dive. - If the battery icon is red on the surface, you MUST change your battery immediately. - If the battery icon turns red during your dive, you should stop your dive and begin your ascent immediately, while still following proper ascent protocols (proper ascent speed, respect the Safety Stop). When Air Integration is “Off” your LYNX battery indicator is in the lower left corner of your screen. In Group 4 and Group 9 modes, your LYNX battery indicator is in the top left of the screen. AI Off Liquivision Products, Inc Group 4 Group 9 -104- Manual 1.6; Lynx 1.18; US 1.11; U-2 3.06 ™ Air Integrated Dive Computer User Manual WARNING You must change your battery immediately when the indicator turns red Lithium batteries sustain high power for a long time, but once the power starts to drop, it does so very fast. A red battery indicator means that the battery power will drop to insufficient power within a few minutes. Battery Indicators – Transmitter(s) Transmitter battery information will only appear when Air Integration is “On”. The battery status is represented graphically with a battery icon. The battery icon starts out green, then it turns yellow and then red. Lithium batteries have a very steep drop-off voltage curve, which means they appear full until the very last moment, when they quickly deplete. Therefore, the battery only turns yellow with about 1-1.5 hours of life left in the battery. - If the battery icon is yellow on the surface, you should change your battery before beginning your next dive. - If the battery icon is yellow underwater, you have enough battery life to complete your dive. - If the battery icon is red on the surface, you MUST change your battery immediately. - If the battery icon turns red during your dive, you should stop your dive and begin your ascent immediately, while still following proper ascent protocols (proper ascent speed, respect the Safety Stop). Group 4/9 Mode Your transmitter battery icon Your Students’ transmitter battery icons The battery life is significantly affected by the Air Integration mode you select and the brightness setting of your display. Learn more about your LYNX’s battery in the section “Overview of Lynx, T1, U-2 and L1 Battery Types”. “Battery Savings” Mode In the event that your battery is very low during the dive, your LYNX will go into “Battery Savings” mode. It is a mode that tries to preserve the battery as much as possible, so that the LYNX keeps functioning as long as possible. This mode changes the following things: • all the information on the display will turn green (the color that is most power-economical) • the display brightness will be set to low For more details, please refer to Battery Savings Mode: When Your Battery Voltage Drops Below A Critical Level. Liquivision Products, Inc -105- Manual 1.6; Lynx 1.18; US 1.11; U-2 3.06 ™ Air Integrated Dive Computer User Manual Exiting the water Once you are shallower than 0.6 meters / 2 feet, your LYNX will go back into surface mode and offer you access to surface menus. However, for next few minutes, it will remain in post-dive mode. You can control length of this period, in menu setting Minimum Dive. This means that if you resume your dive within that period, it will be counted as continuation of previous dive, instead of a new one. This also means, that all the numbers, such as maximum depth, average depth, dive time, etc. will not be reset. After that, if you decide to dive again, it will be counted as a new dive. Last dive information When on the surface, and not in Sleep Mode, your LYNX will display information about the last dive that you have done. Max: max depth of your last dive Tank Pressure Icon: visual depiction of the last tank pressure received PSI/BAR Value: numerical depiction of the last tank pressure received Tank Battery Icon LYNX Battery Icon Dive Time: duration of your last dive Surface: time in hours and minutes since you last surfaced No Fly: counts down no-fly-time You: Confirms this is YOUR tank Clock: current time of day Temperature: ambient temperature Surface – it is time elapsed since your last dive. If it is less than 24 hours, you will see the number of hours and minutes. If it is more than 24 hours, you will see number of days and hours. If it is more than 10 days ago, you will not see any surface interval. Max – is the maximum depth of your last dive, with one decimal place. Depending on your unit settings, it will be either in meters, or in feet, and you will see “m” or “ft” printed after the number. Dive Time – is the total time of the last dive, displayed according to your dive time settings – either as total number of minutes, or as hours:minutes. No-Fly – this is a timer that counts down your “No Fly” time according to the PADI guidelines. The PAD guidelines are as follows: • • Following a single day of no-decompression diving, do not fly for 12 hours Following several days of diving, or following a decompression dive, do not fly for 24 hours Thus you will see either a 12 hour or a 24 hour countdown appear after your dive. NOTE: PADI guidelines do not try to predict your exact tissue saturations or time to desaturation, they are general “rules of thumb” and, as such, have inherent limitations. No guideline or “rule of thumb” can ever guarantee perfect decompression safety. For an estimate of your tissue saturations, see the “Your Saturation” menu item. Liquivision Products, Inc -106- Manual 1.6; Lynx 1.18; US 1.11; U-2 3.06 ™ Air Integrated Dive Computer User Manual Altitude Compensation/Surface Pressure Adjustments The LYNX does not have a water sensor that can sense whether it is in the water based on “wetness”. Instead, your LYNX continuously tracks atmospheric pressure to determine the surface pressure at the start of your dive. When it senses a sudden change in ambient pressure, it understands that you have entered the water and that a dive is beginning. Your LYNX can generally distinguish between a sudden change in pressure caused by water entry, vs. other types of sudden changes in pressure, such as a plane taking off, or driving up a mountain. This method of surface pressure detection has proven quite reliable, but it is always possible to trick your LYNX, for example: • if you place your LYNX in shallow and very stable body of water (such as a bucket full of dive gear being rinsed), your LYNX may assume that current surface pressure is more than it is in reality. If you go diving immediately after this, your depth reading may be distorted. • if you increase ambient pressure very quickly after the LYNX has adjusted for being at altitude (e.g. if you were to skydive with a LYNX), it might go into a phantom dive, as it will assume that you have entered the water. In this highly unlikely case, the only solution is to reset your LYNX by removing the battery (please refer to the Changing The LYNX’s Battery section for details). You can always check what LYNX assumes as the current surface pressure by going to the “Status” screen (please refer to Status section for details). Liquivision Products, Inc -107- Manual 1.6; Lynx 1.18; US 1.11; U-2 3.06 ™ Air Integrated Dive Computer User Manual DI V I NG W I T H Y OUR LY NX – A I R I NT E G R AT I O N F U NC T I ONS Overview of the LYNX-AI Ultrasonic Features and Technology Your Liquivision LYNX is the only recreational dive computer in the world capable of receiving ultrasonic signals from a transmitter. What’s more it, can receive ultrasonic signals from up to ten T1/U-2 Tank or L1 Location transmitters. The ability to receive ultrasonic signals, as against the industry-standard radio frequency (RF) signals, vastly increases the LYNX-AI range: typical RF-based air-integrated dive computers offer a maximum range of 1.5m/6ft, while the LYNX-AI offers a range of up to 100m/330ft. The LYNX-AI range can be affected by a large number of factors, which we will discuss later. Nevertheless, it is fair to say that in the vast majority of open-water conditions, the LYNX range is greater than the “safe” distance between you and your Buddy, or a Dive Master and his/her Group. Also, ultrasonic transmission is more stable than RF – it is not subject to interference from typical sources, such as HID lights, camera strobes or scooters/DPVs. The LYNX’s huge range opens up a whole set of new dive computer applications. While the limited range of RF products made them only relevant to monitor your own tank, the LYNX allows you to monitor your Buddy’s Tank Transmitter, or up to 9 of your Group’s Tank Transmitters within the “safe” distance. The “safe” distance is defined as the distance that you can cover, in an out-of-air situation, on a full exhale, and still make it in time to breathe safely of your Buddy’s regulator – for most people, this should not be more than 6m/20ft. The LYNX can also monitor an L1 Location Transmitter – a Transmitter that is activated without tank pressure - that can be used to mark a specific location, such as a boat or descent line, within its maximum range of 100m/330ft. An L1 Location Transmitter allows you to swim away and return to the marked spot by following a directional location bearing shown on your LYNX screen. Thus the LYNX-AI allows you to do the following things: - Monitor your own Tank Transmitter - Monitor your Buddy’s Tank Transmitter within the “safe” distance of 6m/20ft - Monitor up to a total of 9 Group Tank Transmitters within the “safe” distance of 6m/20 ft - Monitor an L1 Location Transmitter within the whole LYNX-AI range of 100m/330 ft - In an emergency, monitor tank pressure or location of a Lost Diver within the range of 100m/330ft And obtain the following information: - Air Integration: tank pressure in PSI of any diver with a tank equipped with a Tank Transmitter - Air Time: an estimate of how much time you can breathe off your tank before you reach the reserve of 700 PSI/48 BAR. This is only available for your tank. - Locator: a directional indication of the location of any diver equipped with a Tank Transmitter OR a directional indication of the location of a L1 Location Transmitter. Liquivision is the first company to bring ALL these features to recreational divers at a price point that is competitive with most RF-based air-integrated computers, which offer own-air monitoring only. Liquivision has filed patent applications for many aspects of its ultrasonic tank transmitter and receiver technology. Liquivision is also currently the only company to have a license to market a product in the U.S.A. that alerts you about the status of another diver’s body, equipment and environment. Liquivision’s technology patents and license mean that its feature set will be unique for many years. Liquivision Products, Inc -108- Manual 1.6; Lynx 1.18; US 1.11; U-2 3.06 ™ Air Integrated Dive Computer User Manual WARNINGS Limited Signal Range The LYNX-AI has a maximum signal range of up to 100m/330ft in clear water and with an unobstructed line of sight between any LiquivisionTransmitter to the LYNX computer. The actual LYNX-AI range varies based on local conditions and cannot be guaranteed. Factors that can shorten range can include, but at not limited to, water turbidity, physical obstructions, ultrasonic noise or echoes, air pockets or LYNX/Transmitter device orientation. We cannot guarantee un-interrupted or error free signal reception in all conditions! You must always stay within the “safe” distance from your Buddy/dive Group! Although the LYNX-AI can offer additional safety in case of accidental diver separation, this is NOT a reason to change your diving practices. You must still remain close to your Buddy or dive Group. You should always be close enough so that, in an out-of-air situation, you could swim over to your buddy ON A FULL EXHALE and make it in time to breathe safely off his regulator – for most people, this “safe” distance is not more than 6m/20ft. In fact, it can be much less. Setting Up an Air Integrated Dive Once you have Unlocked your LYNX, and set up the required Time/Date and Battery information, you should make sure you have completed the following steps: 1. Physically Set Up Your Tank Transmitter on a tank. The Getting Started – Setting Up A Transmitter Pre-Dive section explains how to set up your Tank Transmitter on a first stage regulator, or an L1 Location Transmitter on a line, in a way that optimizes signal range. It also tells you how to turn your Tank or Location Transmitter “On” and “Off” and how to perform a Pre-Dive Check. 2. Decide Which Dive Mode You Wish To Dive In. The LYNX offers three Dive Modes that allow for slightly different ways of planning and executing your dive from a decompression and gas perspective. Review these short descriptions to choose your Dive Mode, then read the detailed manual section: • Rec Dive Mode is ideal for single-tank recreational diving, with no planned decompression. In Rec mode, all you need to set up is your dive gas (range is from Air to 40% Nitrox) – all other decompression-related parameters are pre-set to appropriate values. The decompression algorithm is focused on optimizing no-decompression (NDL) times on your first and second dives, and assumes that you will do two dives with a fairly short surface interval (less than one hour), which is typical on most recreational dive charters. Your LYNX dive plan will be close to PADI tables and other recreational computers. Read Diving With Your LYNX in Rec Mode and set up the related dive settings. Liquivision Products, Inc -109- Manual 1.6; Lynx 1.18; US 1.11; U-2 3.06 ™ Air Integrated Dive Computer User Manual • Tec Dive Mode is better suited for multi-tank diving, with some planned decompression. In Tec mode, you can set up a Dive Gas and two Deco Gases, all ranging from Air to 100% Oxygen. You can control some decompression-related parameters, such as your Conservatism, your dive and deco gas PO2 settings and the depth of your last deco stop. The decompression algorithm is focused on giving your safe and well-optimized decompression information, rather than on optimizing NDL times, and it will give you best results when you have a fairly long surface interval between dives (two hours or more), as is typical for most decompression dives. Your LYNX dive plan will closely align with DecoPlanner and similar dive planning tools using the Bühlmann model with gradient factors. Read Diving With Your LYNX In Tec Mode and set up the related dive settings. • Gauge Dive Mode provides depth, time and stopwatch information only. It does NOT perform any no-decompression or decompression calculations, nor does it allow you to set up any gases for decompression planning purposes. Your LYNX in Gauge mode can be used as a backup bottom timer, or it can be used to help you execute a pre-planned dive. Read Diving With Your LYNX In Gauge Mode and set up the related dive settings. 3. Understand the Air Integration Options Available in Each Dive Mode. Not all Air Integration options are available in each dive mode. The Air Integration-Mode section of this manual has a chart that explains in detail which options are available in which mode. Briefly, however: • One-gas REC mode offers all the Air Integration Modes, allowing you to track your Solo, Buddy, Group 4 and Group 9 tank pressures. It also allows you to get your own remaining Air Time value. If you unlock the Locator function, as described in the Unlock The Locator Feature of The Lynx section of this manual, you will be able to get a directional location to other divers with a Tank Transmitter or to an L1 Location Transmitter. • Three-gas TEC mode offers Tec-Solo Air Integration Mode only, allowing you to monitor your three tank pressures (dive gas and two deco gases), but NOT your remaining Air Time value, since you can’t calculate it across three tanks. There is no Buddy, Group 4 or Group 9 tank pressure monitoring in Tec-Solo mode, but the Locate function will allow you to locate 7 other Tank or Location Transmitters, providing you set them up in the surface Air Integration menu (entered their serial number and turned them “On” by marking them as either Tank or Location) prior to beginning your dive. • GAUGE mode only offers Group 4 and Group 9 Air Integration Modes, allowing you to monitor group tank pressures and to use the Locator function, if you have unlocked it. If you really want to dive in GAUGE mode and monitor your own or your Buddy’s air, then you can configure you and your Buddy’s tanks to be part of Group 4 or Group 9 Modes. 4. Choose Your Air Integration Mode and Set It Up. Set up your desired Air Integration mode in the Air Integration surface menu by scrolling away from the “Off” option to the option you wish to use: “Solo”, “Buddy”, “Group 4” and “Group 9” (in Rec Dive Mode), “Tec-Solo” (in Tec Dive Mode), or “Group 4” and “Group 9” (in Gauge Dive Mode). Next, select the units you wish your pressure to be displayed in (PSI/BAR) in the Air Integration-Units surface menu. Then, set up each of the transmitters you wish to monitor in the Air Integration-Transmitter surface menu. Liquivision Products, Inc -110- Manual 1.6; Lynx 1.18; US 1.11; U-2 3.06 ™ Air Integrated Dive Computer • • User Manual For Tank Transmitters, set their Type to “Tank”, set up their serial number, update the name associated with them, set their Max/Mid/Low/Reserve pressures and, very importantly, their Battery Type. For Location Transmitters, set their Type to “Location”, set up their serial number, updated the name associated with them (default is “Boat”) and don’t forget to enter the Battery Type you are using. If you only wish to monitor tank pressures, you are now ready to skip ahead to Step 7. Complete The Pre-Dive Check. If you also wish to use the Locator function, continue reading. 5. Calibrate Your Compass. This is described in the Compass section of this manual. You must do this if you wish to access the compass functionality, or if you wish to use the Locator function. 6. If you want to use the Locator feature, unlock it. The Directional Location feature can help you locate another T1 transmitter underwater, as long as the diver is within range. This feature is currently in experimental, BETA release, and requires that you acknowledge that you understand its limitations before you can obtain a free PIN to unlock it. Instructions on how to unlock it can be found Unlock The Locator Feature of The LYNX section of this manual. Instructions on how to use it can be found in the description of the underwater Locate menu and the Diving With Your LYNX - Locator Functions section of the manual. 7. Complete the Pre-Dive Check. This is a very important step! The Pre-Dive Check allows you to verify the tank pressure and transmitter battery life remaining of any T1, U-2, or L1 Transmitter present in your dive group, as long as the Transmitter is “On” and you are within 1m/3.3ft of it. It is extremely important to make sure of this before you start your dive, otherwise you could be missing critical data on your dive. You are now ready to begin an Air Integrated dive! For best AI performance, it is important that you position the LYNX correctly on your wrist and try to avoid factors that reduce LYNX range. Both are explained in more detail below. Positioning Your LYNX To Get The Best Possible Transmitter Signal In the T1/U-2 Tank and L1 Location Transmitter Orientation section, we discussed how to set up your Tank or Location Transmitter for optimal ultrasonic signal transmission. As always, “it takes two to tango” – it is equally important that you also position your LYNX computer for optimal ultrasonic signal reception. Here is how to do so: Liquivision Products, Inc -111- Manual 1.6; Lynx 1.18; US 1.11; U-2 3.06 ™ Air Integrated Dive Computer User Manual Hand & Wrist Position Try to avoid blocking the sensor with your hand – you can improve reception by simply moving your hand downwards. Other Computer Position Ideally, your LYNX should be worn with no devices on that arm. Wearing another device next to the LYNX will obstruct one of the three sensors. If you must wear another device next to your LYNX, make sure it is at least 15cm/6” away on your arm, secured tightly so that it doesn’t drift around during the dive. Dry Suit Cuff Your dry suit cuff could partly obstruct one of the sensors. Keep your LYNX far away from the cuff for best reception. Lynx Strap The LYNX can be attached to your arm with a strap or bungee cord. In some cases, when using a thin wetsuit, the strap may be so long that it curls around the back of the LYNX and obstructs the topmost sensor. This is not ideal. If you routinely use this setup, bungee may be a better option, or you may trim the strap. Liquivision Products, Inc -112- Manual 1.6; Lynx 1.18; US 1.11; U-2 3.06 ™ Air Integrated Dive Computer User Manual Summary Of Factors That Affect LYNX-AI Range This page lists some of the factors that affect the LYNX-AI’s range, and can reduce it from its maximum of 100m/330 ft. This is not an exhaustive list, but it gives some idea of what to look for. ORIENTATION: Ultrasonic signals travel farthest with a direct line-of-sight • • • Location of LYNX on your arm Orientation of your arm relative to your body Orientation of Tank Transmitter on your own and other divers’ tanks, positioning L1 in open water For best results, make the LYNX the only instrument on your arm and hold your arm in front of you at a 45° angle, to minimize obstruction by your own body. The Transmitters have a “dead” zone in line with their main axis – you will get best results if you LYNX computer is aligned with the side of your Transmitters, rather than with their main axis. Finally, if you are leading a dive and all the other divers are behind you, you may lose their signal occasionally – to correct this, turn around periodically. AIR SPACES: Ultrasonic signals travel best by water. Any gas/air pockets will hinder signal transmission. Some examples of air pockets underwater include: • • • Your lungs Air trapped in wetsuit/drysuit, in the buoyancy vest, in the tanks Bubbles caused by divers, boats, marine life For best results, keep a line of sight between your LYNX and Transmitter(s) that is free of air spaces. OBSTRUCTIONS: Sound travels best when there are no obstructions – if you yell across an open field, you will be heard better than if you yell through a wall – the same concept applies to ultrasound under water. Some examples of underwater obstructions include: • • • • • • • Rocks Coral Reefs Wrecks Trees Kelp/Vegetation Turbidity (particles in the water) Your own body, other diver’s bodies For best results, keep a line of sight between your LYNX and Transmitter(s) that is free of obstruction. BACKGROUND NOISE: You can hear better if there is no ambient noise. Underwater noise that can interfere with ultrasonic waves includes: • • • • • • Shrimp snapping has an ultrasonic component Regulator noise, especially on the inhalation, has an ultrasonic component Sonars/fish finders Boat motors Scooters/DPVs Any other source of audible noise could have an ultrasonic component For best results, try to avoid these sources of noise (turn off your boat’s sonar, for example, or stop your scooter for a moment if you lost your Buddy’s signal) ECHOES: The LYNX-AI works best in deep, open water. Shallow water increases ultrasonic echoes from the surface and bottom. Enclosed environments can cause ultrasonic echoes from the walls. Some examples of things that cause echoes or muffle sound: • • • • Water surface Ocean bottom Cave/wreck walls Kelp or underwater vegetation For best results, seek out deep, open water. Liquivision Products, Inc -113- Manual 1.6; Lynx 1.18; US 1.11; U-2 3.06 ™ Air Integrated Dive Computer User Manual DI V I NG W I T H Y OUR LY NX – L OC AT OR F UNC T I ONS Important Notice The LYNX Locator feature allows a diver using a LYNX to obtain directional location information (an approximate bearing) towards other divers who are using a Liquivision Tank Transmitter or towards a Liquivision L1 Location Transmitter. While we have made every effort to make this a useful feature, its effectiveness is highly influenced by the diver’s ability to “work with the software”, i.e. to keep a LYNX, Transmitter and body orientation that is favorable to signal reception and accuracy. Also, this is the first time such a feature has been introduced to the broad recreational diving market, and so it is, in its nature, very experimental. We simply don’t know how people will want to use or mis-use it. For this reason, the Locator feature is an optional, free BETA upgrade to the LYNX-AI functionality. The Locator feature is provided through and experimental software in BETA release. To activate it on your LYNX, you must acknowledge that you have read through the proper way of using it, that you understand its limitations, and that you accept it is not covered by the LYNX warranty in any way. Before You can Use the Locator Feature This section builds on the previous one. In order to use the LYNX Locator function, you must complete the 7 steps involved in Setting Up an Air Integrated Dive (which include instructions on unlocking the Locator feature), familiarize yourself with optimal LYNX position on your wrist (Position Your LYNX To Get Best Possible Transmitter Signal), Transmitter position on your tank or in the water (T1/U-2 Tank and L1 Location Transmitter Orientation) and the Summary of Factors Affecting LYNX-AI range Range. Using The Locator Feature Once you have begun your dive, tap into the underwater menus and select Locate (read that manual section for details on that menu item). You will be prompted to select the person you want to locate: Then, the Locate screen will appear. At this point, you should hold your LYNX in front of your chest, as level as possible. The “Liquivision LYNX” logo should be parallel to the front of your chest. Each sensor should have a line of sight to the horizon: Liquivision Products, Inc -114- Manual 1.6; Lynx 1.18; US 1.11; U-2 3.06 ™ Air Integrated Dive Computer User Manual For The Locator To Work, The LYNX Must Be Kept Horizontal Since it is sometimes hard to tell what is horizontal or level underwater, the Locator feature has a tool to help you do that. The blue dot that moves around the screen tracks your tilt: • If the dot is in the middle circle, near the intersection of the two lines, it will appear as light blue. This means your LYNX is level and will receive packets. • If the dot is in the outside circle, and dark blue, this means your LYNX is NOT level and will NOT receive packets. What Your See On Your Locator Screen The circular area is a sonic radar map. The radar map has two straight lines within it. One has an arrowhead. That line points North. By extension, the other lines point South, West and East. Waiting for/Obtaining your First Data Packet Now, holding your unit horizontal, you will be waiting for the first data packet to be received from the Tank or Location Transmitter you have selected to locate (the “target”). This could take anywhere from a few seconds to as long as a minute. If your target is behind you, you may never receive a packet unless you turn your body… so, if you are not receiving any packets within 30 seconds or so, it is a good idea to slowly rotate on the spot until you receive some data. Liquivision Products, Inc -115- Manual 1.6; Lynx 1.18; US 1.11; U-2 3.06 ™ Air Integrated Dive Computer User Manual How To Navigate When You Get Your First Packet Once you receive your first packet, the LYNX will either show a forward cone, or illuminate the left or right hemisphere. The illuminated area indicates there is a chance that the target is within that sector. In the case of the left hemisphere, it means that the target could be in the directions shown by the arrows, below. The target could be in the direction of the yellow arrow “best heading” but could also be in the direction of the red arrows: Forward Cone Left or Right Hemisphere If the first packet displayed is a cone, then you can already start swimming in that direction, swimming in such a direction that the cone is always in front of you. Continue holding the wrist unit level, in front of your chest, as you swim! If the first packet displayed is a left or right hemisphere, your next action is to rotate your body by 90°, so that the hemisphere is now displayed in front of you. Now you wait for another packet. Again, this could take a few seconds or up to a minute. Once a new packet comes in, it too will illuminate a new area of the map, and any region that overlaps with the previous one will be brighter, indicating a higher chance that the target is in that sector. In the image on the right, the white area is the overlapping area, meaning that the white sector is the most likely direction to the target. The arrows further clarify this: the red arrows show all possible directions to the target, with the yellow arrow being the “best heading” or the most likely direction to the target. Also, in the lower right corner of the screen, you will see the word “Best”. This refers to the direction the yellow arrow is pointing in, and it is followed by a numerical heading (310°) and a cardinal direction (NW). Liquivision Products, Inc -116- Manual 1.6; Lynx 1.18; US 1.11; U-2 3.06 ™ Air Integrated Dive Computer User Manual More Details About What You See On Your Screen Here is a detailed explanation of all the information you have seen on your screen so far: On the right side of the screen, the estimated distance to the target is displayed. This distance is calibrated for underwater operation, so it will only have meaning underwater. The distance estimate is always from “0” to “X”. A strong signal means the target is definitely close. A weak signal doesn't tell you anything; either the target is far away, or the target is close but the signal is blocked or shadowed. The distance estimate goes from 0-6m, 0-10m, 0-15m, 0-25m, 0-50m, 0-75m, 0-100m, 0-250m. The bottom of the screen may show the yellow 'Freeze' indicator. At any time you can freeze the radar map by tapping into the underwater Locate menu, and selecting 'Freeze Map.' This will maintain the map as it is. The unit will continuously rotate the map as you rotate your body, but no new packets will be accepted and no new data displayed. If the map is 'frozen', the yellow 'Freeze' indicator will be illuminated on the bottom of the screen. How To Navigate When You Get Your Subsequent Packets Continuing with our example, as more packets come in, the bright area may get narrower and narrower. Below are a couple of images showing how the map might look after getting three or four packets. The red arrows show possible target directions, the yellow arrow shows the most likely target direction: Liquivision Products, Inc -117- Manual 1.6; Lynx 1.18; US 1.11; U-2 3.06 ™ Air Integrated Dive Computer User Manual The most favorable situation is if the target is generally in front of you, and you get a narrow cone, as shown below: As you rotate slightly, or as the target moves slightly, these highly favorable “front cones” may overlap, creating an even better indication of the target’s direction, as shown below: Packet Aging The radar map will show overlapping hemispheres and cones from the most recent five data packets received from the target's transmitter. For example, if a sixth packet is received, the oldest packet will be discarded. This is important, since the target may be moving and older data may be inaccurate. Similarly, as you move relative to the target, you may not be swimming exactly in the target's direction, therefore the target's angular orientation with respect to you, may change somewhat over time. The accuracy of the LYNX locator function depends on many factors, including operator skill, how the LYNX unit is held, and the underwater environment (obstructions, echoes, air pockets, bottom profile), and also how good a line of sight exists from the wrist unit to the target's transmitter. At times you may feel that the data received isn't accurate and you want to start over with a clean map. In that case, you can tap into the underwater Locate menu and select 'Clear Map.' It will clear the map and start again. When you are finished using the locator function, tap into the underwater Locate menu and select “Stop Locator”. Liquivision Products, Inc -118- Manual 1.6; Lynx 1.18; US 1.11; U-2 3.06 ™ Air Integrated Dive Computer User Manual Troubleshooting The Locator Feature If you enter the radar map, and you wait, and nothing is ever displayed on the map, then: 1. Make sure the wrist unit is horizontal/level and the light blue square is within the inner circle. 2. Make sure you tilt your hand downwards to avoid obstructing the LYNX sensors, keeping your forearm level but bending at your wrist. 3. Make sure all three LYNX sensors have a CLEAR line of sight to the horizon and are not being blocked by your body, your gear, other gauges on your arm. 4. If you still don't get any data after 1 minute, rotate your body slowly by 90 degrees, wait another minute, then rotate 90 degrees again, wait another minute, and keep repeating this until you have done a 360 degree circle. 5. In order for the LYNX to work effectively at long range, everyone's tank transmitter should be mounted in an optimum configuration (above the shoulder line, unobstructed). See the earlier section in the user manual on T1/U-2 Tank and L1 Location Transmitter Orientation. If the target Transmitter is not well oriented, the range will be much reduced. 6. The LYNX system has double the range during your exhalation than during your inhalation. During inhalation through an open-circuit scuba regulator, there is ultrasonic noise which reduces the LYNX range. If you are searching for a target at long range, consider taking a faster inhalation and a slower exhalation, to spend more time during the exhalation which is more favorable for the LYNX. 7. If there are other divers or obstructions in the area, consider swimming a short distance, perhaps 15m/50ft, then repeat the radar map process, and the 360 degree loop. Starting from a different vantage point will possibly work around any obstructions and give you a different line-of-sight to your target. Practice Makes Perfect The LYNX locator function does requires some skill. An unskilled operator may still be able to locate a target. However a skilled operator can find the target faster, and more reliably. If the locator function is very important to you and you think you may use it, you should definitely practice using it. First, you practice on land. The locator is optimized for use underwater, but it will still work on dry land with a very short range of about 0 to 60cm (0 to 2 feet). If practicing indoors, make sure to be away from magnetic sources or iron, and calibrate the compass first and check it against an analog compass, before practicing with the locator. Liquivision Products, Inc -119- Manual 1.6; Lynx 1.18; US 1.11; U-2 3.06 ™ Air Integrated Dive Computer User Manual Place your Tank Transmitter on your tank and pressurize the first stage - the transmitter will turn on within 30 seconds OR if you are using an L1 Location Transmitter, screw the top down to turn it on Then, run a dive simulation on the LYNX wrist unit, and tap into the underwater Locate menu. If you are using a Tank Transmitter for this practice, make sure you configure it as “Buddy” in Buddy mode or as “STU1” in Group mode, so it shows up in the Locate list (if the Tank Transmitter is configured as “You”, it will not show up in the Locate list, since you shouldn’t be attempting to locate yourself :-). If you are using a Location Transmitter for this practice, it will always show up in the Locate list. Then practice in the water. Once you have mastered the use of the locator on land, the best practice is to suspend a tank on a rope from a surface buoy and, while underwater with your Buddy, use the LYNX to try to locate the rope and tank from a distance. Using The Distance Estimate To Get Best Signal Reception The distance estimate on the LYNX locator screen is useful for more than just estimating the distance to the target. If the target is truly in front of you, the signal will be generally stronger, than if the target is behind you. If the target is behind you, the locator screen information will be much less accurate than if the target is generally in front of you. This is because if the target is behind you, then your body is obstructing the signal, and the sound is curving around your body before it hits the wrist unit. This means the sound is coming from a distorted direction if you obstruct it. As you turn your body slowly 360 degrees, observe the distance estimate, as well as the radar map. Pay careful attention to when the distance estimate shows a minimum value. For example: 1. You point North, get a few packets and the distance estimate shows 0-250m 2. You point West, get a few packets and the distance estimate shows 0-75m 3. You point East, get a few packets and the distance estimate shows 0-100m 4. You point South, get a few packets, and the distance estimate shows 0-100m In this case, the best direction is West, since the distance estimate is the smallest, meaning the signal was the strongest. This does NOT tell you that the target is located West of you. Rather, it means that if you point your body to the West, and wait, then the radar map will be the most accurate. Once you get a packet while pointing West, you can orient yourself slightly to the left, then slightly to the right, and get more overlapping packets which will further narrow down the direction to the target. Learning to use the distance estimate as a way of getting the most accurate input from the sonic radar is one area which is best learned with practice. Liquivision Products, Inc -120- Manual 1.6; Lynx 1.18; US 1.11; U-2 3.06 ™ Air Integrated Dive Computer User Manual Don’t Remain Still… Moving Will Improve Your Signal Reception The LYNX locator function relies upon overlapping regions of probability. If you get a left or right hemisphere showing on the radar map, you must rotate your body about 90 degrees. If you remain still, you will keep getting the same hemisphere of probability and you will never narrow in on the target. However, if you get a front cone showing on the LYNX, then you can wait, motionless, and if you keep getting front cones (while remaining motionless), then you have a very good indication that the target is directly in front of you. Locator Operation At Different Distances The LYNX locator function works best when at a distance of 10-50m away from the target (30-165ft). If you are farther than 50m, packets will arrive less often and it will take longer to get a bearing. As you get extremely close to the target (around 20ft/6m), the ultrasonic signal from the Tank or Location Transmitter is so loud that it is difficult for the LYNX to determine the direction. The radar map still does provide information at such close range, but it takes greater skill to interpret it and use it. Locator Operation In Face Of Obstructions The LYNX locator will not work well if there is an obstruction between you and the target. Obstructions can include a wreck, a large boulder, a wall, other divers, thick vegetation, submerged trees, and so on. If you are unable to get a good bearing to the target, swim away from these obstructions and try again. This is particularly true if you are diving in a large group. If you are surrounded by 5 other divers, and a 6th diver has wandered off, then the other five divers are all acting as obstructions. While you might be able to get a bearing to the target despite these obstructions, your best chance is to swim away from the obstructions so that the LYNX has a better line of sight. It is imperative that all three black sensors on the LYNX 'see' the horizon for best operation. If you are wearing a 2nd gauge on the same arm as the LYNX, performance will never be as good as when the LYNX is the only gauge on your arm. Typical Path To Reach Your Target The LYNX gives you the approximate direction to the target, but this direction is subject to many sources of error, including the curved path of sound, echoes, obstructions, and errors in the digital compass bearing. When using the device, you will gradually close in on the target, but the path to the target may not be a direct line. Two situations below show the typical path to the target, based on different underwater visibilities: Typical Path in 15m/50ft visibility Liquivision Products, Inc Typical Path in 5m/15ft visibility -121- Manual 1.6; Lynx 1.18; US 1.11; U-2 3.06 ™ Air Integrated Dive Computer User Manual C A R I NG F OR Y OUR LY NX and T R A NSM I T T E R S The LYNX and T1, U-2 and Location Transmitters are designed to be robust devices. However, it is still possible to damage them, or to shorten their life by improper use or storage. Please follow these steps to care properly for your unit. Sensitive Areas of Your Lynx We have placed several LYNX units in a rock tumbler for 24 hours to see how the casing, glass and black ultrasonic sensors react to repeated acute impacts. The screen and casing were largely unaffected. We measured the sensitivity of the black sensors after this – some worked as before, some had a reduction of sensitivity/range by up to 50 percent. The conclusion we reached is that, while tapping the left/right sides of the unit to navigate the menus is OK, your LYNX sensors should be protected from acute impact. For this reason, please store your LYNX in the carry case provided. Do NOT dump it in your dive bag with other heavy hear that could damage the sensors. Also, do NOT push hard on the sensors – they are NOT a button! LYNX After Rock Tumbler LYNX and T1 in Their Case Case Closed The LYNX casing is made from a robust plastic, designed to protect the internal electronics. This plastic is not fully scratch resistant. We strongly recommend the adhesive casing protector (http://liquivision.com/extras_enlightened_protector.php), which is designed to cover the screen and the plastic casing of the LYNX , to protect them from scratches. Sensitive Areas of Your T1 Transmitter The transmitter is also impact-tolerant, but severe and massive impacts to the upper, narrow part of the transmitter can damage the ultrasonic transducer. Also, do not cover this part of the transmitter in any way, other than the Liquivision sticker provided. Putting any other type of sticker, protector or cover can inhibit the ultrasonic transmission! 200 V! Do Not Open! DO NOT LIFT YOUR TANK USING THE T1 TRANSMITTER! It is NOT a handle! WARNING NEVER OPEN THE BOTTOM OF THE TRANSMITTER – 200 VOLTS! - RISK OF ELECTRIC SHOCK AND DEATH! Liquivision Products, Inc -122- Manual 1.6; Lynx 1.18; US 1.11; U-2 3.06 ™ Air Integrated Dive Computer User Manual Sensitive Electronics! Do Not Touch! Sensitive Areas of Your U-2/L1 Transmitters The sensitive area of your U-2 or L1 Transmitter is in the base of the unit, covered by a potting material. Do not try to uncover the electronics of this section by removing the potting material. You could damage the unit permanently. Also, the 200V capacitors are located in the base of these units. Do not try to open this area as you could get an electric shock. The ultrasonic transmission ring is in the narrow part at the bottom of the transmitter. DO NOT COVER THIS AREA as it could limit the signal. DO NOT LIFT YOUR TANK USING THE U-2 TRANSMITTER! It is NOT a handle! Post-Dive Care and Storage of your LYNX and Transmitter(s) You should turn off your LYNX once you have completed your dive. It will eventually turn off on its own, but you will conserve battery power by turning it off once you are done using it. You should rinse your LYNX in clear (non-salty) water after use, to prevent the accumulation of dried salt in the infrared apertures that communicate with the PC Interface and in the pressure sensor aperture. You should then wipe your LYNX dry and store in its zipper case. Turn off your T1 or U-2 between dives by depressurizing your first stage! The T1 and U-2 keep transmitting as long as they sense pressure. If you don’t depressurize your first stage, they will keep transmitting between dives and burn through battery like crazy. It is best to remove your T1 or U-2 Transmitter from you first stage every time you complete a dive. When you do so, you should rinse it with clear (non-salty) water and wipe it dry. Once it is dry, you should put the protective cap on the threaded part of the Transmitter and store it in its carrying case. Transmitter without protective cap Transmitter with protective cap – ready to store! However, this may not be convenient when you have short breaks between dives. You can then simply remove your entire first stage regulator, including your Transmitter, hoses and regulators, from your tank and place the whole rig carefully in your dive bag LAST, to avoid it being crushed on the bottom. The care for your L1 is very simple: rinse it off with clear (non-salty) water and wipe it dry. Then unscrew it slightly so it stops transmitting. Liquivision Products, Inc -123- Manual 1.6; Lynx 1.18; US 1.11; U-2 3.06 ™ Air Integrated Dive Computer User Manual Long-Term LYNX and Transmitter Storage If you are planning to store your LYNX and Transmitter(s) for more than 1 month, you should remove the battery. In your LYNX, this will only cause you to lose time of day and date information. All other settings and dive logs will remain. There will be no data loss in the Transmitters. We do not recommend removing your battery for shorter storage periods. Every time you open and close the battery compartment, there is a small risk of doing so improperly, opening the possibility of flooding the battery compartment. Replacement Battery Storage You should have at least one spare battery on hand for each Liquivision device you own, to make sure you have the possibility of changing your battery should the situation require you to do so. If you have a LYNX and 10 Transmitters for Group diving, you should have 11 spare batteries on hand. Spare batteries should be stored in a cool, dry place, away from direct sunlight. They should be positioned such that the top and bottom parts of each battery cannot touch each other, so they can’t accidentally cause a short. Ideally, your should store them separate ziplock bags, or in a small enough bag that the batteries remain side-by-side and can’t move around. LYNX and Transmitter Accuracy Testing While we feel confident of the ongoing accuracy, European (CE) regulations require the LYNX units to be periodically checked for the accuracy of its depth and time readings. It is possible to recalibrate your LYNX at the factory. You may contact your dealer regarding LYNX testing every 5 years. Periodically verify the accuracy of your Tank Transmitter pressure sensor by using two other DIGITAL devices to measure tank pressure, such as another T1 or U-2 Tank Transmitter or a digital pressure gauge. The Tank Transmitter is CE certified to be accurate within +/- 200 PSI, but typical accuracy is within +/- 100 PSI based on a reliable digital measure of tank pressure. If the Tank Transmitter reading seems off by more than +/-100 PSI, you may contact Liquivision for recalibration. Liquivision Products, Inc -124- Manual 1.6; Lynx 1.18; US 1.11; U-2 3.06 ™ Air Integrated Dive Computer User Manual O V E R V I E W O F LY NX , T 1, U-2 and L 1 B AT T E R Y T Y PE S Type DISPOSABLE Name ER17335M ER26300M Capacity 1700mAh 3200mAh Color Blue Blue (FAT) Used in: LYNX Used in: T1, U-2 U-2 Liquivision Products, Inc LFP123A 530mAh White LYNX T1, U-2 RECHARGEABLE ICR16340 IMR18350 650mAh 800mAh Green Red LYNX T1, U-2 U-2 IMR26500 3000mAh Red (FAT) U-2E, L1 -125- Manual 1.6; Lynx 1.18; US 1.11; U-2 3.06 ™ Air Integrated Dive Computer User Manual B AT T E R Y T Y PE S B Y PR ODUC T LYNX and T1 Battery Types There are several battery options available for your LYNX and T1 Transmitter: Disposable Battery • Blue wrapper ER17335M WARNING DO NOT RECHARGE! Recharging a disposable battery can cause an explosion! You could get severely hurt! Rechargeable Batteries • White wrapper (with green text) LFP 123A 3.2V (K2 Energy) • • These batteries can ONLY use this white battery charger that is compatible with the LFP (Lithium Iron Phosphate) battery chemistry. Do NOT use the old, black battery charger that was compatible with the Green ICR15340 batteries. Those batteries were Lithium Ion (Cobalt) and used a Lithium Ion (Cobalt) charger. This black charger will not charge your LFP batteries properly and may damage them. • (DISCONTINUED April 2013) Silver wrapper (with green text) LiFeP04 3.2V (Tenergy) • (DISCONTINUED April 2013) Green wrapper ICR16340. • (DISCONTINUED April 2013) Black charger for Green ICR16340 batteries. This is a Lithium Ion (Cobalt) charger that is compatible with Lithium Ion (Cobalt) batteries like the Green ICR 16340. It is NOT compatible with the new LFP batteries! Liquivision Products, Inc -126- Manual 1.6; Lynx 1.18; US 1.11; U-2 3.06 ™ Air Integrated Dive Computer User Manual U-2 Battery Types The U-2 has a larger battery compartment than the T1, which makes it compatible with BOTH the Lynx/T1 batteries above AND the larger capacity disposable and rechargeable batteries below. U-2 Disposable Battery – ER26300M • Blue wrapper ER26300M The battery life of the ER26300M in the U-2 is approximately 2x as long as using an ER17335M in the U-2. WARNING DO NOT RECHARGE! Recharging a disposable battery can cause an explosion! You could get severely hurt! U-2 Rechargeable Batteries – IMR18350 • Red wrapper IMR18350 The battery life of the IMR18350 in the U-2 is approximately 1.5x longer than using a LFP123A in the U-2. • These batteries can ONLY be used with the black LCD charger that can be purchased as part of the U-2 extension kit. Installation of IMR18350: Use the WHITE spacer provided with the batteries: Insert the battery into the spacer Liquivision Products, Inc Insert the spacer with the battery into the battery compartment -127- Manual 1.6; Lynx 1.18; US 1.11; U-2 3.06 ™ Air Integrated Dive Computer User Manual Use of the Lynx/T1 ER17335M and LFP123A batteries in the U-2: You are also able to use the • disposable ER17335M battery as well as the • rechargeable LFP123A battery which you would usually use for the Lynx in you U-2. Installation of ER17335M/LFP123A batteries: Use the BLACK spacer provided with your U-2 Insert the battery into the spacer Insert the spacer with the battery into the battery compartment U-2E – The U-2 Extension Kit If you would like to increase the battery life of you U-2 even further you can purchase a U-2 Extension Kit (sold separately). The U-2 extension kit includes: • Larger metal casing top • 2 rechargeable IMR26500 batteries • LCD charger for IMR26500 batteries U-2 U-2E – U-2 Extension Kit U-2E Rechargeable Batteries – IMR26500 • The battery life of the IMR26500 in the U-2 is approximately 2.5x more than an IMR18350 and 4x longer than an LFP123A • These batteries can ONLY be used with the black LCD charger that is part of the U-2 extension kit. Liquivision Products, Inc -128- Manual 1.6; Lynx 1.18; US 1.11; U-2 3.06 ™ Air Integrated Dive Computer User Manual Installation of IMR26500: It can only be used with the larger battery cap, which is part of the U-2 extension kit (sold separately). Replace the regular U-2 battery top Load the IMR26500 into Screw the transmitter base into with the extended U-2 battery top the battery top the cap L1 Battery Type There is only one type of battery compatible with the L1 – the rechargeable IMR26500. • Here is a picture of the IMR26500 • These batteries can ONLY be used with the black LCD charger that comes with your L1 Installation of IMR26500: Unscrew the L1 top from the bottom Load the IMR26500 into the Screw the transmitter base into battery top the cap WARNING THESE BATTERIES ARE THE ONLY AUTHORIZED BATTERIES Liquivision Products, Inc -129- Manual 1.6; Lynx 1.18; US 1.11; U-2 3.06 ™ Air Integrated Dive Computer User Manual Please note that only Blue ER17335M, White LFP123A and Green ICR16340 batteries are authorized for use with your LYNX or T1. ER17335 batteries (no M) are NOT compatible. Please note that only ER17335M, LFP123A, ICR16340, ER26300M, IMR18350 and IMR26500 batteries are authorized for use with your U-2. Only the batteries contained in Liquivision battery packs have been tested to perform to Liquivision standards. Use of other batteries could lead to inaccurate battery meter readings, and if the battery reading is not accurate, you could be diving your LYNX or Transmitter on an empty battery without knowing it. This could lead your LYNX or Transmitter to turn off unexpectedly leading to a loss of critical dive information. Be Safe! Use Only Approved Batteries! Set Your LYNX/T1/U-2 To The Correct Battery Type To Get Accurate Battery Meter Readings! We strongly recommend always having a spare battery on hand, since spare batteries have a long shelf life and do not require any special storage environment (just dry and away from direct sunlight or heat). Liquivision Products, Inc -130- Manual 1.6; Lynx 1.18; US 1.11; U-2 3.06 ™ Air Integrated Dive Computer User Manual SPA R E B AT T E R I E S Y OU C A N B UY F R OM L I Q UI V I SI ON • • • For the Lynx, T1 and U-2 o Disposable Battery 3-Pack ER17335M 3 disposable ER17335M batteries 3 spare O-rings 1 resealable tube of O-ring lubricant o Charger Kit LFP123A Tenergy Charger AC Adapter with international plug adapters 2 rechargeable LFP123A batteries 5 spare O-rings 1 reseal-able tube of O-ring lubricant o Rechargeable Battery 2-Pack LFP123A 2 rechargeable LFP123A batteries 5 spare O-rings 1 reseal-able tube of O-ring lubricant For the U-2 only o Disposable battery 2-Pack ER26300M 2 disposable batteries (ER26300M) o Rechargeable Battery 2-Pack IMR18350 2 rechargeable IMR18350 batteries White spacer o U-2 Extension Kit Large battery top LCD Charger AC Adapter with international plug adapters 2 rechargeable IMR26500 batteries 2 spare O-rings 1 reseal-able tube of O-ring lubricant o Rechargeable battery 2-pack IMR26500 2 rechargeable IMR26500 batteries For the L1 only o Rechargeable battery 2-pack IMR26500 2 rechargeable IMR26500 batteries You should inspect your LYNX and Transmitter battery cap O-rings with every battery change. Check for cracking, damage or dirt. If you choose to replace an O-ring, always make sure to clean the battery cap properly to remove any residue that may prevent a good seal and to lubricate the new O-ring with silicone O-ring lubricant. Only O-rings contained in Liquivision battery packs can be guaranteed to perform to Liquivision standards. Please see the next page for important information about battery cap O-ring types and compatibility. Liquivision Products, Inc -131- Manual 1.6; Lynx 1.18; US 1.11; U-2 3.06 ™ Air Integrated Dive Computer User Manual B AT T E R Y C OM PA R T M E NT O-R I NG I NF OR M AT I ON This section discusses battery compartment O-Rings – the O-Rings found on the LYNX dive computer and Transmitter battery compartments. This does not provide information on the Viton® O-Ring found on the T1 and U-2 Transmitter metal base. That information can be found in the T1/U-2 Tank Transmitter Installation section. LYNX battery cap O-Ring T1 battery cap O-Ring T1/U-2 metal base with Viton® ORing BATTERY CAP O-RING HISTORY HOW CAN I TELL? Xen, Xeo, Kaon and LYNX computers & Battery Packs Containing O-Rings Sold BEFORE June 1, 2013 Use this type of battery cap O-Ring: You purchased your computer BEFORE June 1, 2013 Buna-N AS568A #017 (ID 11/16" OD 13/16") Search for item 1879U-24 on www.mcmaster.com Your battery pack packaging looks like this (no white dashed line around the edge) ► This O-Ring seals the dive computer battery compartment properly, but does NOT work in a T1 Transmitter. Using it on a T1 Transmitter battery cap will cause the transmitter battery compartment to flood. Flooding is NOT covered by warranty. NOTE: Your battery pack will say it is compatible with T1 Transmitter. This is an error. IGNORE THIS. T1 Transmitters Sold BEFORE June 1, 2013 Use this type of battery cap O-Ring: You purchased your T1 Transmitter BEFORE June 1, 2013 Buna-N AS568A #111 (ID 7/16" OD 5/8") Search for item 9452K23 on www.mcmaster.com Your battery pack packaging looks like this (no white dashed line around the edge) ► This O-Ring seals the T1 Transmitter battery compartment properly, but does NOT work in any of the Xen, Xeo, Kaon or LYNX computers. Using it on any computer battery cap will cause the computer battery compartment to flood. Flooding is NOT covered by warranty. Liquivision Products, Inc U-2 metal base with two redundant O-rings NOTE: Your battery pack will say it is compatible with T1 Transmitter. This is an error. IGNORE THIS. -132- Manual 1.6; Lynx 1.18; US 1.11; U-2 3.06 ™ Air Integrated Dive Computer All Xen, Xeo, Kaon, LYNX computers & T1 Transmitter & Battery Packs Containing O-Rings Sold AFTER June 1, 2013 Use this type of battery cap O-Ring: User Manual You purchased your computer or T1 transmitter AFTER June 1, 2013 Your battery pack packaging looks like this (it HAS a white dashed line around the edge) ► Buna-N A70 (ID 17mm, 2mm width) Search for item 9262K182 on www.mcmaster.com This O-Ring seals ALL the products’ battery compartments properly, regardless of when they were sold. When in doubt, USE THIS ONE! This is what your U-2, U2E or L1 Transmitter base looks like. It contains TWO of the O-Rings listed on the left ► The U-2, U-2E and L1 Transmitters Use this type of battery cap O-Ring: Buna-N AS568A-025 (ID 1.176”, OD 1.316”) Search for item 9452K792 on www.mcmaster.com This O-Ring seals the battery compartments of the U-2, the U2E and the L1 Transmitters Liquivision Products, Inc -133- Manual 1.6; Lynx 1.18; US 1.11; U-2 3.06 ™ Air Integrated Dive Computer User Manual DE T E R M I NI NG & O PT I M I Z I NG B AT T E R Y L I F E How To Determine LYNX or Transmitter Battery Life Remaining You should always check the battery life remaining on the surface, prior to beginning your dive, once your Tank Transmitter(s) are set up on their respective first stage regulators, the first stage regulators are pressurized and the Tank Transmitter(s) are turned on AND once any L1 Location transmitters are turned on by screwing the cap down. You can best check the battery life at this point by entering into a dive simulation. Your LYNX uses more power in dive mode than in surface mode. The LYNX may show a green indicator in surface mode, but a yellow one in dive mode and you can check this by starting a dive simulation. The battery status is represented graphically with a battery icon. The battery icon starts out green, then it turns yellow and then red. Lithium batteries have a very steep drop-off voltage curve, which means they appear full until the very last moment, when they quickly deplete. Therefore, the battery only turns yellow with about 1-1.5 hours of life left in the battery. - A Green battery icon means that you have enough battery power to complete a normal recreational dive. The safest way to perform a long dive (5+ hours) is to insert a fresh battery prior to the start of your dive. - If the battery icon is Yellow on the surface, you should change your battery before beginning your next dive. - If the battery icon is Yellow underwater, you likely have enough battery life to complete your dive. - If the battery icon is Red on the surface, you MUST change your battery immediately. - If the battery icon turns Red during your dive, you should stop your dive and begin your ascent immediately, while still following proper ascent protocols (respect the ascent speed and Safety Stop) WARNING You must change your battery immediately when the indicator turns red Lithium batteries sustain high power for a long time, but once the power starts to drop, it does so very fast. A red battery indicator means that the battery power will drop to insufficient power within a few minutes. The discharge curve of lithium-thionyl-chloride batteries is very flat, with a very sudden drop-off, as shown in the graph below. Liquivision Products, Inc -134- Manual 1.6; Lynx 1.18; US 1.11; U-2 3.06 ™ Air Integrated Dive Computer User Manual This means three things: - It is hard to estimate level of charge: The battery shows a steady voltage for most of its life there is no slow battery voltage decrease that can inform your LYNX or Transmitter about the amount of power that has been used and the amount of power left. - It is hard to estimate the amount of time left. Even if your LYNX or Transmitter knew exactly how much battery power is left, it is still hard for your unit to judge how much dive time is left. Dive time on the LYNX will be greatly affected by user settings such as screen brightness. - Once the battery voltage starts to drop, it drops fast. Your LYNX or Transmitter will stop functioning entirely once the voltage drops below a certain level. For all these reason, it is important to pay attention to the Yellow battery indication - it means there is really very little time left. Basic Rules For Optimizing Battery Life in your LYNX The battery life is significantly affected by the Air Integration mode you select and the brightness setting of your display. - Air Integration “Off” will give you the longest LYNX battery life - Air Integration “Solo” mode will give you medium LYNX battery life - Air Integration “Buddy”, “Group 4”, “Group 9” and “Tec-Solo” modes will give you the shortest battery life Thus, you should ideally use the best Air Integration mode for your needs on a given dive. If, for example, you typically dive in “Buddy” mode with a Buddy who owns a Liquivision Tank Transmitter, and then dive once with another Buddy who does not have a Liquivision Tank Transmitter, rather than dive in “Buddy” mode with your Buddy’s transmitter showing “No Signal”, you should switch your Air Integration mode to “Solo”. This will stop your LYNX from looking for your Buddy’s tank signal and save battery life. Liquivision Products, Inc -135- Manual 1.6; Lynx 1.18; US 1.11; U-2 3.06 ™ Air Integrated Dive Computer User Manual The other important thing is to choose the lowest screen brightness setting you need for your dive. The LYNX has an "Auto-Dim" feature, where the unit uses your chosen brightness setting on the surface, and slowly reduces brightness to Low as you descend to a selected depth. Basic Rules For Optimizing Battery Life in your Tank or Location Transmitter Your Tank Transmitter is turned on when your first stage regulator is pressurized and it senses more than 200 PSI/14 BAR of tank pressure. It keeps transmitting until (A) you de-pressurize your first stage regulator or (B) the tank pressure drops below 100 PSI/7BAR for more than 10 minutes. To preserve Tank Transmitter battery life, you should always close your tank valve after your dive and de-pressurize your first stage regulator. To preserve Location Transmitter battery life, always turn your L1 “Off” after a dive by unscrewing the top slightly so the battery stops connecting. Detailed Rules For Optimizing Battery Life in your LYNX 1. Air Integration Mode. The Air Integration mode has the biggest impact on battery life, as it means the LYNX is constantly checking for data packets from one or more transmitters. For this reason, it is important to use the minimum Air Integration mode you need for a given dive. The most batteryfriendly AI mode is “Off”, followed by “Solo”, then by “Buddy”, “Group 4” and “Group 9” and “TecSolo”. So, if you don’t need to monitor tank pressure on your next dive, turn AI “Off” entirely. If you only need to monitor your own tank, but not your Buddy’s, switch from “Buddy” mode to “Solo” mode. If you are just diving with your Buddy, and not a Group, switch from “Group” to “Buddy” mode 2. Brightness. Brightness has the second effect on battery life. As a general rule, NORMAL brightness gives you HALF the battery life of LOW brightness. The best way to optimize battery life is the “Auto Dim” feature. 3. Refresh rate. The refresh rate changes how fast information is updated on the screen. It has two settings, "Normal" and "Fast". If you can use Normal and you don’t notice anything, that is the best choice. If you use Normal and you find that you can see the screen flickering when you move the unit, then select Fast. Also, if you plan on taking any pictures or video of the LYNX, select Fast. The Fast refresh rate burns about 20% more battery power than Normal. So battery life on "Fast" is reduced by about 20%. 4. Display layout (in Gauge Mode only). The display mode (Standard, Alternate, Simple, Large) has a small effect on battery life. Simple burns the least power. Alternate burns 10-15% more than simple. Standard burns 10% more than alternate. 5. Water temperature. Diving in cold water (water temperature below 12°C / 54°F) shortens the life of your battery. We strongly recommend using conservative brightness settings when diving in cold water to maximize your battery life. LYNX Battery Savings Mode: When Your Battery Voltage Drops Below A Critical Level The LYNX circuit requires a minimum voltage in order to measure the depth properly. In certain cases when using a computationally intensive Air Integration mode, aggressive brightness and extremely Liquivision Products, Inc -136- Manual 1.6; Lynx 1.18; US 1.11; U-2 3.06 ™ Air Integrated Dive Computer User Manual cold water, the voltage of the battery may drop below a critical voltage. Below that critical voltage, it is no longer possible to measure depth accurately. If that happens, the LYNX will automatically switch into “Battery Savings Mode”: all colors will be changed to green, and the brightness will be changed to low. The refresh rate will not be changed. Battery Savings Mode is an emergency mode designed to raise the voltage of the battery to an acceptable level. The unit will remain with green colors and low brightness until the dive ends. When the next dive starts, standard colors and your custom brightness setting will be used. Again if the voltage drops below a critical level, Battery Savings Mode will be entered to raise the battery voltage. If you find that your unit is repeatedly entering into Battery Savings Mode (all green text), then you are diving the battery too close to the end of its life (disposable batteries) or charge (rechargeable batteries). However, entry into Battery Savings Mode does not necessarily mean the battery is nearing the end of its life, especially in very cold conditions. In some cases you could still have 10-20 more hours of dive time remaining in more normal water temperatures, even if you notice a transition into Battery Savings Mode. Estimated LYNX Battery Life Depending On User Settings The following table shows the approximate number of dive hours achieved with different Air Integration settings. These times refer to the total time your LYNX is “On”, including any surface navigation (setting up user settings, “Ready To Dive” screen, and downloading dives) as well as dive time. These times are at room temperature. Battery life could be less in cold water. Blue ER17335M DISPOSABLE LFP 123A RECHARGEABLE Green ICR16340 RECHARGEABLE Fresh battery is inserted in your LYNX, and all diving is done within 3 months All dives within 1 week of charging/All dives within 1 month of charging All dives within 1 week of charging/All dives within 1 month of charging AI Mode: OFF 53h 18.5/15.3h 25/21h AI Mode: Solo 36h 12.5/10.4h 15.5/13h AI Mode: Buddy 23h 8.0/7.0h 10/8.4h As you can see, the LYNX “On” hours on a battery vary from about 23 hours to 53 hours with a disposable ER17335M battery or from 7 hours to 18.5 hours with a rechargeable LFP123A battery. Please note that storing a battery inside a unit also affects the battery life, as the unit uses power even when it is turned off. If you are not going to use your LYNX for one month or more, you should remove the battery during storage. Liquivision Products, Inc -137- Manual 1.6; Lynx 1.18; US 1.11; U-2 3.06 ™ Air Integrated Dive Computer User Manual We recommend using a combination of rechargeable and disposable batteries. You can use rechargeable batteries when you have easy access to a power source and can charge your batteries overnight between dives. This is ecologically friendly and saves money. However, it is useful to have some disposable batteries on hand if you plan to do a dive trip away from a reliable power source, or if you are planning to do some longer deco diving. IMPORTANT NOTICE Lynx Firmware v1.11 and above significantly reduce the extent to which your Lynx will drain the battery when turned off. With v1.10 or below, the Lynx is capable of draining a battery in about a week and a half, if the unit sits unused with a battery inside. This standby drain is significantly reduced with v1.11 firmware and above. T1 Transmitter Battery Life T1 Transmitter battery life is much harder to estimate accurately. However, here is a rough guideline: BLUE, disposable ER17335M: LFP 123A, rechargeable: GREEN, rechargeable ICR16340: 30 hrs 12 hrs per charge 15 hrs per charge U-2 Transmitter Battery Life U-2 Transmitter battery life is much harder to estimate accurately. However, here is a rough guideline: BLUE, disposable ER26300M: BLUE, disposable ER17335M: RED, rechargeable IMR26500: RED, rechargeable IMR18350: LFP 123A, rechargeable: 50 hrs 25 hrs 40 hrs per charge (ONLY WITH U-2E KIT) 15 hrs per charge 10 hrs per charge L1 Transmitter Battery Life L1 Transmitter battery life is much harder to estimate accurately. However, here is a rough guideline: RED, rechargeable IMR26500: Liquivision Products, Inc 11 hrs per charge -138- Manual 1.6; Lynx 1.18; US 1.11; U-2 3.06 ™ Air Integrated Dive Computer User Manual C H A NG I NG T H E LY NX ’s or T 1’s B AT T E R Y Here is a description of the battery change and O-ring change procedure. You can also refer to the short video on correct battery changes provided here: www.liquivision.com/videos.php. Most of the steps are the same for the LYNX and the T1. 1. Make sure your work area is dry and clean. 2. Prepare all your materials: For keeping LYNX & O-ring clean: - Lint-free cloth (e.g. cloth for cleaning your eye/sunglasses) - Glove For battery change: - Spare battery - Coin (to unscrew battery cap) For O-ring change: - Spare O-ring - O-ring lubricant 3. Clean your LYNX or T1 unit - Wash the battery cap area of any salt or other residue - Dry the unit - Wipe off any dust or lint with a lint-free cloth Liquivision Products, Inc -139- Manual 1.6; Lynx 1.18; US 1.11; U-2 3.06 ™ Air Integrated Dive Computer User Manual 4. Unscrew the battery cap with a coin - Gently turn counter-clockwise 5. Continue with your fingers 6. Place the battery cap aside, on its back 7. GENTLY pull the battery holder out - Use your fingers to grab the little screw sticking out of the battery holder - GENTLY pull the battery holder out of the casing - Pulling too hard can break the wires!!! 8. Pull out just enough to access the battery DO NOT pull out all the way! It can break the wires! Liquivision Products, Inc -140- Manual 1.6; Lynx 1.18; US 1.11; U-2 3.06 ™ Air Integrated Dive Computer User Manual 9. Remove the old battery - Lift at the front of the battery, away from the spring 10. Insert new battery - Flat end against the spring in the back - “Bumpy” end in the front 11. Slide battery holder back in CORRECTLY Make sure to insert the holder with the battery facing up by aligning the lower part of the battery holder parallel to the unit’s bottom Gently push the holder all the way into the compartment. DO NOT FORCE IT! It should have a tight but smooth fit. 12A. LYNX Screw in the battery cap 1. Place the cap lightly in the opening 2. First…Turn counterclockwise until it “clicks” – this will help align the threads. 3. Then… turn clockwise to tighten the cap. If something feels wrong, stop and start again. First…. Then…. CLICK! DO NOT force the cap – you could damage the threads! Screw the battery cap on the compartment using your fingers. You can use a coin if you need to, but do it GENTLY so you don’t over tighten and damage the threads. Liquivision Products, Inc -141- Manual 1.6; Lynx 1.18; US 1.11; U-2 3.06 ™ Air Integrated Dive Computer User Manual 12B. T1 Screw in the battery cap 1. Place the cap lightly in the opening 2. Using a coin… press down firmly AND turn at the same time! 3. Screw down as far as you can. The top of the battery cap should be in line with the top of the T1 Transmitter. OPTION– CHANGE O-RING If the O-ring looks dry, cracked or worn, you may like to change the O-ring in the battery cap. If you wish to do this, continue with Step 13. 13. Remove O-ring by squeezing with fingers - Slide your fingers along the sides of the battery holder, squeezing tightly, to make the O-ring stick out a bit - Then, grab the edge of the O-ring and slide it off DO NOT USE PLIERS DO NOT use pliers or any tool to remove the O-ring, because you can scratch the casing plastic and damage it. This can prevent a good O-ring seal in the future. 14. Inspect the new O-ring for dust or defects DO NOT use a dusty O-ring! - If the new O-ring is not clean, wash it with clear water and let it air-dry Liquivision Products, Inc -142- Manual 1.6; Lynx 1.18; US 1.11; U-2 3.06 ™ Air Integrated Dive Computer User Manual 15. Lubricate the new O-ring - Use silicone O-ring lubricant - Apply a tiny amount to a dry O-ring (it will not absorb properly if the O-ring is wet) - Roll the O-ring between your fingers to spread the lubricant - Remove any excess lubricant with your fingers 16. Ease O-ring onto battery cap - Starting at one side, gently ease O-ring over the battery cap 17. Check again for any dust or debris - Remove any debris - If there is something really stuck to the O-ring, better remove it, clean it and start again 18. Also check the casing for dust or debris 19a. LYNX Screw in the battery cap 1. Place the cap lightly in the opening 2. First…Turn counterclockwise until it “clicks” – this will help align the threads. 3. Then… turn clockwise to tighten the cap. If something feels wrong, stop and start again. First…. Then…. CLICK! DO NOT force the cap – you could damage the threads! Liquivision Products, Inc -143- Manual 1.6; Lynx 1.18; US 1.11; U-2 3.06 ™ Air Integrated Dive Computer User Manual Screw the battery cap on the compartment using your fingers. You can use a coin if you need to, but do it GENTLY so you don’t over tighten and damage the threads. 19b. T1 Screw in the battery cap 1. Place the cap lightly in the opening 2. Using a coin… press down firmly AND turn at the same time! 3. Screw down as far as you can. The top of the battery cap should be in line with the top of the T1 Transmitter. C H A NG I NG T H E U-2 or L 1 B AT T E R Y 1. Make sure your work area is dry and clean. 2. Open the Battery Compartment For details, see: U-2 Battery Types, U-2E – The U-2 Extension Kit, L1 Battery Type 3. Check the O-Rings for dust, wear and debris. If For details, see: BATTERY COMPARTMENT Oneeded, change them. RING INFORMATION 4. Close the Battery Compartment For the U-2, you can screw it down til the top aligns with the bottom. For the L1, don’t screw it down all the way – remember, screwing it down turns it “On” and unscrewing it turns it “Off”, like a dive light. See pictures here: Turning The L1 Transmitters On/Off 2. Insert the desired Battery/Spacer Liquivision Products, Inc -144- Manual 1.6; Lynx 1.18; US 1.11; U-2 3.06 ™ Air Integrated Dive Computer User Manual LY NX PC I NT E R FA C E The LYNX PC Interface can be used to download your dives and to update your LYNX software. This requires a few different steps which vary slightly depending on whether you are a PC or a Mac OS X user. 1) PC Users: Install Drivers onto your PC, so your PC knows how to “talk” to the PC interface. 2) All Users: Install the Liquivision Dive Logger onto your PC, so your PC knows how to interpret the dive log data emitted by the LYNX. 3) All Users: Install the Liquivision Firmware Updater onto your PC, so your PC knows how to transmit a Firmware Update to your LYNX 4) All Users: Install Liquivision Firmware Updates onto your LYNX. We will walk you through all these steps in some detail, with links to all the relevant downloads. WARNING Installing new software on your LYNX may reset your unit's memory. This could delete your dive logs and PIN number(s) stored in your unit. For this reason, prior to starting the install, you should make sure: You have downloaded any dive logs, and You have your free LYNX Unlock PIN Code available, and You have your free LYNX Locator PIN Code available (if you chose to agree to its terms) If You Are a PC User You First Need To Install Drivers Onto Your PC Before you can download dive logs or upgrade your LYNX firmware, you need to download and install the appropriate drivers for your PC or Mac. The drivers are made by FTDI. If you are technicallyminded and want more information on them, you can visit www.ftdichip.com. Make sure that your LYNX PC interface is NOT plugged in to your desktop computer. If it is plugged in, then please UNPLUG it before proceeding. PC Drivers: Internet Explorer • Click to download the driver install package: (http://liquivision.com/downloads/EnlightenedDriversSetup.exe) • You will be asked if you want to "Run" or "Save" the program. Click "Run." • The file will download and launch. • The drivers will be installed. You will briefly see a black window pop up and then disappear. • If you do NOT see the black command window pop up for several seconds, then please repeat the process. • Once the black command window has appeared and finished (disappeared), then plug in the LYNX PC interface into your desktop computer. Plug the USB cable into the LYNX PC interface box, and then plug the other end of the USB cable into your PC. The "Found New Hardware" wizard will launch. Click "Do not connect to the Internet", and continue the prompts. At the end, Windows should inform you that your "New Hardware is Ready to Use." Liquivision Products, Inc -145- Manual 1.6; Lynx 1.18; US 1.11; U-2 3.06 ™ Air Integrated Dive Computer User Manual PC Drivers: Firefox • Click to download the driver install package: (http://liquivision.com/downloads/EnlightenedDriversSetup.exe) • You will be asked if you want to save the file. Click "Save File." • The downloads window will pop up (if it does not, go to Tools->Downloads) • The top item in the downloads window will be "EnlightenedDriversSetup.exe". Double click on it. • You will be asked "Are you sure you want to launch EnlightenedDriversSetup.exe"? Click OK. • The drivers will be installed. You will briefly see a black window pop up and then disappear. • If you do NOT see the black command window pop up for several seconds, then please double click on "EnlightenedDriversSetup.exe" for a second time, in the downloads window. • On some computers, anti-virus software will clear the download window automatically. If that is the case on your computer, you will need to browse to your personal downloads folder, and launch EnlightenedDriversSetup.exe from there directly. • Once the black command window has appeared and finished (disappeared), then plug in the LYNX PC interface into your desktop computer. Plug the USB cable into the LYNX PC interface box, and then plug the other end of the USB cable into your PC. The "Found New Hardware" wizard will launch. Click "Do not connect to the Internet", and continue the prompts. At the end, Windows should inform you that your "New Hardware is Ready to Use." PC Drivers: Google Chrome • Click to download the driver install package: (http://liquivision.com/downloads/EnlightenedDriversSetup.exe) • When the download is finished, a tab will appear in the far lower left corner of Chrome. • Left click on the "EnlightenedDriversSetup.exe" tab that appears in the far lower left corner of Chrome. • You will be prompted to run the program, click "Run." • The drivers will be installed. You will see a black command window pop up and then disappear. • If you do not see the black command window, please click on the "EnlightenedDriversSetup.exe" tab on the lower left of the screen, for a second time. • Once the black command window has appeared and finished (disappeared), then plug in the LYNX PC interface into your desktop computer. Plug the USB cable into the LYNX PC interface box, and then plug the other end of the USB cable into your PC. The "Found New Hardware" wizard will launch. Click "Do not connect to the Internet", and continue the prompts. At the end, Windows should inform you that your "New Hardware is Ready to Use." Advanced Users If you are an advanced PC user and would like more information, click: http://www.ftdichip.com/Drivers/D2XX.htm to visit the FTDI's website, and select your OS and install the latest version of the D2XX drivers manually. If You Are a Mac OS X User Please Proceed With The Next Step There is no need to install the driver on your Mac OS X Computer. The drivers will automatically be installed when installing the Dive Logger or the Firmware Updater Then You Can Install the Liquivision Dive Logger Onto Your Computer The Liquivision Dive Logger program allows you to download your dive logs from your LYNX. In order to use it you must have the LYNX PC interface device and if you are a PC user the FTDI drivers must be installed on your computer (as described above). Liquivision Products, Inc -146- Manual 1.6; Lynx 1.18; US 1.11; U-2 3.06 ™ Air Integrated Dive Computer User Manual PC Dive Logger: Internet Explorer • Go to the Enlightened Series Software Downloads page to download the latest Liquivision Dive Logger installation package: ( http://liquivision.com/downloads/ES_SoftwareDownloads.php) • Scroll to the bottom and click on the Dive Logger link under Windows Users. • You will be asked if you want to "Run" or "Save" the program. Click "Run." • The file will download and the install wizard will launch. • Follow the wizard and the Liquivision Dive Logger software will be installed. • The wizard will install a shortcut to the Liquivision Dive Logger on your desktop. To launch the logger, double click on the shortcut. Create a username for yourself, and you’re ready to go! PC Dive Logger: Firefox • Go to the Enlightened Series Software Downloads page to download the latest Liquivision Dive Logger installation package: ( http://liquivision.com/downloads/ES_SoftwareDownloads.php) • Scroll to the bottom and click on the Dive Logger link under Windows Users. • You will be asked if you want to save the file. Click "Save File." • The downloads window will pop up (if it does not, go to Tools->Downloads) • The top item in the downloads window will be "LVDiveLogSetup.exe". Double click on it. • You will be asked "Are you sure you want to launch LVDiveLogSetup.exe"? Click OK. • Follow the wizard and the Liquivision Dive Logger software will be installed. • The wizard will install a shortcut to the Liquivision Dive Logger on your desktop. To launch the logger, double click on the shortcut. Create a username for yourself, and you’re ready to go! PC Dive Logger: Google Chrome • Go to the Enlightened Series Software Downloads page to download the latest Liquivision Dive Logger installation package: ( http://liquivision.com/downloads/ES_SoftwareDownloads.php) • Scroll to the bottom and click on the Dive Logger link under Windows Users. • When the download is finished, a tab will appear in the far lower left corner of Chrome. • Left click on the "LVDiveLogSetup.exe" tab that appears in the far lower left corner of Chrome. • You will be prompted to run the program, click "Run." • Follow the wizard and the Liquivision Dive Logger software will be installed. • The wizard will install a shortcut to the Liquivision Dive Logger on your desktop. To launch the logger, double click on the shortcut. Create a username for yourself, and you’re ready to go! Mac-OSX Dive Logger (all browsers) PLEASE NOTE: The Mac-OS X Dive Logger is only compatible with Snow Leopard, Lion and Mountain Lion (not with Leopard or any earlier versions of Mac OS). • Go to the Enlightened Series Software Downloads page to download the latest Liquivision Dive Logger installation package: (http://liquivision.com/downloads/ES_SoftwareDownloads.php) • Scroll to the bottom and click on the Dive Logger link under Mac OS X Users. • You will be asked if you want to save the file. Click "Save File." • The downloads window will pop up (if it does not, go to Tools->Downloads) • The top item in the downloads window will be “Liquivision-DiveLog.dmg". Double click on it. • It will mount as a drive where you then see the Liquivision Dive Logger. • To install the program drag it into the Applications folder. Liquivision Products, Inc -147- Manual 1.6; Lynx 1.18; US 1.11; U-2 3.06 ™ Air Integrated Dive Computer User Manual • You can then start the program by selecting it from your Applications folder and double-clicking it. Alternatively you can also launch it from your Launchpad. Create a username for yourself, and you’re ready to go! How To Connect the LYNX PC Interface To Your Computer • Connect the USB cable provided to your PC and to the PC Interface • At this point, you should get a message “New Hardware Detected” • Place the LYNX unit on its side, with the PC interface aiming for the eight holes on the backplate • The distance from the PC interface to the LYNX should be 2-4 cm or 1-2 inches How To Launch A Dive Log Download You can download your dive logs onto your Computer, either by using the Liquivision Dive Logger or any other available dive logging program that supports downloading logs from your LYNX bottom timer. To download your dives, first: • Make sure the LYNX FTDI drivers have been installed on your computer (applies to Windows users only) (Instructions). • Make sure the Liquivision Dive Logger has been installed on your computer (Instructions). • Then launch the Dive Logger program by double-clicking on the shortcut on your PC desktop (Windows) or by selecting it in your Applications Folder or your Launchpad (Mac OS X). • Make sure the LYNX PC Interface is properly connected to your computer (Instructions). Then, pretty quickly: • Pick up your LYNX and turn on its wireless transmitting function: o tap it three times to wake it up o tap it three times again to enter menu mode o tap down through the menu options until you reach “Connect To PC” o tap the side of your LYNX to select this option o you will see a message “WAIT FOR PC” • Replace your LYNX in alignment with the PC Interface. Liquivision Products, Inc -148- Manual 1.6; Lynx 1.18; US 1.11; U-2 3.06 ™ Air Integrated Dive Computer User Manual • Return to the Dive Logger Software and turn on its transmitting function: o Select “Computer” from the top menu o Select “Connect” You should see a window like this pop up: The Dive Logger will download all your dives (this will take a few minutes) which will then show up in the right column of the program. Once the dives are downloaded you can assign Dive Locations to each dive and record extra notes. How To Install The Liquivision Firmware Updater Onto Your PC To update the firmware inside your LYNX, you need the LYNX PC interface device, and you need to install a utility called the "Liquivision Firmware Updater." If you do not have a LYNX PC interface and you would like to update the firmware on your unit, your dealer should be able to do it for you. PC Firmware Updater: Internet Explorer • Go to the Enlightened Series Software Downloads page to download the latest Liquivision Firmware Updater installation package: ( http://liquivision.com/downloads/ES_SoftwareDownloads.php) • Scroll to the bottom and click on the Firmware Updater link under Windows Users. • You will be asked if you want to "Run" or "Save" the program. Click "Run." • The file will download and the install wizard will launch. • Follow the wizard and the Liquivision Firmware Updater will be installed. PC Firmware Updater: Firefox • Go to the Enlightened Series Software Downloads page to download the latest Liquivision Firmware Updater installation package: ( http://liquivision.com/downloads/ES_SoftwareDownloads.php) • Scroll to the bottom and click on the Firmware Updater link under Windows Users. Liquivision Products, Inc -149- Manual 1.6; Lynx 1.18; US 1.11; U-2 3.06 ™ Air Integrated Dive Computer • • • • • User Manual You will be asked if you want to save the file. Click "Save File." The downloads window will pop up (if it does not, go to Tools->Downloads) The top item in the downloads window will be "LVFirmwareSetup.exe". Double click on it. You will be asked "Are you sure you want to launch LVFirmwareSetup.exe"? Click OK. Follow the wizard and the Liquivision Firmware Updater will be installed. (If for some reason the downloads window is empty, then browse to the location that Firefox stores downloaded files, and double click on LVFirmwareSetup.exe from there). PC Firmware Updater: Google Chrome • Go to the Enlightened Series Software Downloads page to download the latest Liquivision Firmware Updater installation package: ( http://liquivision.com/downloads/ES_SoftwareDownloads.php) • Scroll to the bottom and click on the Firmware Updater link under Windows Users. • When the download is finished, a tab will appear in the far lower left corner of Chrome. • Left click on the "LVFirmwareSetup.exe" tab that appears in the far lower left corner of Chrome. • You will be prompted to run the program, click "Run." • Follow the wizard and the Liquivision Firmware Updater will be installed. Mac-OSX Firmware Updater (all Browsers) PLEASE NOTE: The Mac-OS X Firmware Updater is only compatible with Snow Leopard, Lion and Mountain Lion (not with Leopard or any earlier versions of Mac OS). • Go to the Enlightened Series Software Downloads page to download the latest Liquivision Firmware Updater installation package: (http://liquivision.com/downloads/ES_SoftwareDownloads.php) • Scroll to the bottom and click on the Firmware Updater link under Mac OS X Users. • You will be asked if you want to save the file. Click "Save File." • The downloads window will pop up (if it does not, go to Tools->Downloads) • The top item in the downloads window will be "Liquivision Loader 3.00.dmg". Double click on it. • It will mount as a drive where you then see the Liquivision Loader (Firmware Updater) .To install this program drag it into the applications folder. • You can then start the program by selecting it from your Applications folder by double-clicking it. Alternatively you can also launch it from your Launchpad. How To Install the Newest Firmware On Your LYNX You should always run the latest and most recent software on your LYNX. You may already have the latest version, which makes an upgrade unnecessary. You can find out which version you are running and whether you need to upgrade by comparing your software version (which you find under Preferences-Status) to the LYNX Firmware History (http://liquivision.com/downloads/LynxSoftwareHistory.php). Some early versions of the software have minor bugs which were fixed in later versions. If you have determined that your software should be upgraded, follow the steps below. For starters: • Make sure the Enlightened FTDI drivers have been installed on your computer (Windows only) (Instructions). • Make sure the Liquivision Firmware Updater has been installed on your computer (Instructions) • Connect the LYNX PC interface to your computer with the included USB cable (Instructions) • Make sure the USB cable is plugged into the LYNX PC interface (see photo below) Liquivision Products, Inc -150- Manual 1.6; Lynx 1.18; US 1.11; U-2 3.06 ™ Air Integrated Dive Computer User Manual • Place the LYNX on the desk, on its side, with the PC interface aiming for the eight holes on the backplate (see photo below) • The distance from the PC interface to the LYNX should be between 2cm and 4cm (1-2 inches). PC: Internet Explorer Firmware Install • Click LYNX Firmware History http://liquivision.com/downloads/LynxSoftwareHistory.php to download the latest firmware. The first file at the top of the page will be the most recent version. • You will be asked if you want to "Open" or "Save" the program. Click "Open." • The file will download and the Liquivision Firmware Updater will automatically launch. • You should see something like this: Click OK, then click UPLOAD. For further instructions, please see the “All Users” section, below. PC: Firefox Firmware Install • Click LYNX Firmware History http://liquivision.com/downloads/LynxSoftwareHistory.php to download the latest firmware. The first file at the top of the page will be the most recent version. • You will be asked to open the file with the suggestion "liquivision.lvp". Click Open then OK. • The Liquivision Firmware Installer should launch and you should see something like this: Click OK, then click UPLOAD. For further instructions, please see the “All Users” section, below. PC: Google Chrome Firmware Install • Click LYNX Firmware History http://liquivision.com/downloads/LynxSoftwareHistory.php to download the latest firmware. The first file at the top of the page will be the most recent version. • When the download is finished, a tab will appear in the far lower left corner of Chrome. Liquivision Products, Inc -151- Manual 1.6; Lynx 1.18; US 1.11; U-2 3.06 ™ Air Integrated Dive Computer User Manual • Left click on the "LYNXFirmware.lvp" tab that appears in the far lower left corner of Chrome. • You will be prompted to open the file, click "Open." • You should see something like this: Click OK, then click UPLOAD. For further instructions, please see the “All Users” section, below. Mac-OSX Firmware Install (all Browsers) • Click LYNX Firmware History http://liquivision.com/downloads/LynxSoftwareHistory.php to download the latest firmware. The first file at the top of the page will be the most recent version. • The first file at the top of the page will be the most recent version. • Download the file onto your Computer • You can then either doubleclick the file. The firmware updater will launch automatically and you should see something like this: • Alternatively you can launch the firmware updater from your Applications and browse for the file on your computer • Then click OK • On the next screen click UPLOAD Liquivision Products, Inc -152- Manual 1.6; Lynx 1.18; US 1.11; U-2 3.06 ™ Air Integrated Dive Computer User Manual All Users Once you click UPLOAD, you should see something like this: After several minutes of further data transfer, the install will finish. If the install succeeded, you should now be able to pick up your LYNX and use it. To verify that the install succeeded, enter the main menu, and go to Preferences->Status, and the software version should be the same as the version that you tried to install (i.e. 1.13 or something like that). Liquivision Products, Inc -153- Manual 1.6; Lynx 1.18; US 1.11; U-2 3.06 ™ Air Integrated Dive Computer User Manual SU PPOR T C ONTA C T S For general information, please visit www.liquivision.com. If you need immediate assistance, we recommend that you contact your LYNX dealer. If you need further help, please contact us via: www.liquivision.com/contact.php . B I B L I O G R A PH Y Baker, Eric C. “Understanding M-Values.” Immersed, Vol. 3, No. 3, Fall 1998. Baker, Eric C. “Clearing Up The Confusion About ‘Deep Stops’.” Bühlmann, A. A., E.B. Völlm, and P. Nussberger. Tauchmedizin: Barotrauma, Gasembolie, Dekompression, Dekompressionskrankheit, Dekompressionscomputer 5th ed. Berlin: Springer Verlag, 2002. ISBN: 3540429794. Bühlmann, A. A. Decompression – Decompression Sickness. Berlin: Springer Verlag, 1984. ISBN: 3540133089. Liquivision Products, Inc -154- Manual 1.6; Lynx 1.18; US 1.11; U-2 3.06 ™ Air Integrated Dive Computer User Manual A PPE NDI X A – PH OT O S G O OD/B A D T 1/U-2 PO SI T I O NS GOOD Tank Transmitter positioning: the transmitter is more than 3” from the diver’s body, it is above the shoulder line and it is pointing vertically BEFORE/AFTER. In the 1st picture, the Tank Transmitter is below the diver’s shoulder and too close to his body. In the 2 nd picture, the Tank Transmitter is above the diver’s shoulder and further away from his body. OPTIMIZATION: release the tank strap, rotate the tank about 15°, raise tank, re-tighten tank strap BEFORE/AFTER. In the 1st picture, the Tank Transmitter is below the diver’s shoulder and too close to his body. In the 2 nd picture, the Tank Transmitter is above the diver’s shoulder and further away from his body. OPTIMIZATION: release the tank strap, rotate the tank about 15°, raise tank, re-tighten tank strap OMNISWIVEL In some cases, it may be impossible to position the Tank Transmitter correctly with the specific shape/type of your 1st stage regulator. If that is the case, it is possible you may be able to use an adaptor, like the ones made by Omniswivel or XSScuba: http://www.xsscuba.com/hose_adapt ers.html - scroll to part 906. Liquivision Products, Inc -155- Manual 1.6; Lynx 1.18; US 1.11; U-2 3.06