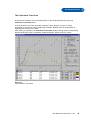
1
CEDEX and INNOVATIS are trademarks of Roche.
Other brands or products names are trademarks of their respective holders.
Cedex Analyzer Operator’s Guide
Software Version 1.6.1
For life science research only.
Not for use in diagnostic procedures.
October 2003
z
z
z
z
z
z
z
z
z
z
z
z
z
z
z
z
z
z
z
z
z
z
z
z
z
z
z
z
z
z
z
z
z
z
z
z
z
z
User Manual
®
Cedex Version 1.6.1
z
z
z
z
z
z
z
z
z
z
z
z
z
z
z
z
z
Version: Cedex 1.6.1. 10/29/03 (MM/DD/YY)
2
User Manual Cedex Version 1.6.1
Contents
Contents
CONTENTS ............................................................................................................3
1
RIGHTS ..........................................................................................................7
Copyright ...........................................................................................................................................7
Disclaimer ..........................................................................................................................................7
Warranty.............................................................................................................................................7
Software License Agreement...........................................................................................................7
General Provisions............................................................................................................................9
FCC Notification ................................................................................................................................9
Safety Instructions ............................................................................................................................9
2
3
INTRODUCTION .......................................................................................... 11
DESCRIPTION OF THE CEDEX SYSTEM .................................................. 13
3.1 The Measurement System .....................................................................................................13
3.2 The Measurement Procedure ................................................................................................14
The Trypan Blue Exclusion Method........................................................................................14
3.3 Data Analysis with the Analysis Software ...........................................................................17
4
INSTALLATION AND OPERATION OF THE CEDEX SYSTEM ................. 19
4.1 Installing the Cedex System..................................................................................................19
Checking the Contents of the Delivery ...................................................................................19
Choosing a Suitable Location for the Cedex System .............................................................20
Connecting Hardware Components and Hardware Key (Dongle)..........................................20
Connecting the Cedex System to the Main Power Supply .....................................................21
Preparing the Measurement System ......................................................................................22
Cleaning the Reagent Containers ......................................................................................22
Filling the Containers and Attaching the Sample Cup to the Sample Port ........................22
4.2 Preparation and Configuration of the Analysis Software by the Cedex Administrator ..23
5
WORKING WITH THE ANALYSIS SYSTEM ............................................... 25
5.1 Analysis System - General Instructions...............................................................................25
Switching on/off the Cedex System ........................................................................................25
Starting the Analysis Software ................................................................................................26
5.2 General instructions on working with the Cedex Workbench ...........................................26
The Login ................................................................................................................................26
The Logout ..............................................................................................................................26
Automatic Log-out...................................................................................................................26
To Shut Down the Cedex Workbench ....................................................................................27
5.3 Starting the Cedex System ....................................................................................................27
Switching on the Cedex System .............................................................................................27
Check the Measurement System and have Samples prepared .............................................28
To Start the Cedex Workbench...............................................................................................28
The Loader-Program...............................................................................................................29
5.4 Description of the Cedex Workbench...................................................................................30
Menu Bar.................................................................................................................................30
The File Menu ....................................................................................................................30
The Specials Menu ............................................................................................................30
The Setup Menu.................................................................................................................31
The Users Menu.................................................................................................................31
The Help Menu...................................................................................................................31
The User Identification area....................................................................................................31
The Data Source Identification area .......................................................................................31
User Manual Cedex Version 1.6.1
3
5.5
5.6
5.7
5.8
6
The Microscope Symbol.................................................................................................... 31
The Floppy Disk Symbol ................................................................................................... 31
The Calculator Symbol ...................................................................................................... 31
The Sample Properties Area.................................................................................................. 32
The Process Parameters Area............................................................................................... 32
The Cell Image Area .............................................................................................................. 32
The Result Data Area............................................................................................................. 32
The Liquid Management Button ............................................................................................. 32
The Emergency Stop Button .................................................................................................. 32
The Traffic Light Symbol ........................................................................................................ 32
Description of Access Rights............................................................................................... 33
Carrying out a Measurement ................................................................................................ 33
Performing a Prime ................................................................................................................ 33
Choosing the Operating Option and Specifying Sample Data............................................... 34
Entering a Comment .............................................................................................................. 35
Defining the Measurement and Analysis (Process) Parameters ........................................... 35
Preparing the Sample and Attaching it to the Sample Port ................................................... 36
To Start Measuring................................................................................................................. 37
End of Measurement.............................................................................................................. 38
Interrupting a Measurement ................................................................................................. 38
Switching off the Cedex System .......................................................................................... 39
Carrying out an LM ShutDown ............................................................................................... 39
THE ANALYSIS RESULTS ......................................................................... 41
6.1 Description of the Analysis Results .................................................................................... 41
The Viable Cell Density Parameter ........................................................................................ 41
The Total Cell Density Parameter .......................................................................................... 41
The Viability Parameter.......................................................................................................... 41
The Total Cell Count Parameter ............................................................................................ 41
The Average Compactness Parameter.................................................................................. 42
The Average Diameter Parameter ......................................................................................... 42
The Aggregate Rate Parameter ............................................................................................. 42
The Standard Deviation Parameter........................................................................................ 42
6.2 Viewing Individual Analysis Results after Completion of the Measurement Process ... 42
6.3 Graphical Display of the Analysis Results.......................................................................... 42
Partial View of Diagrams........................................................................................................ 43
The Aggregate Histogram ...................................................................................................... 44
The Measurement Chart ................................................................................................... 46
The Compactness Histogram Chart .................................................................................. 47
The Diameter Histogram Chart ......................................................................................... 48
The Cultivation Time Chart .................................................................................................... 49
Areas in the Cultivation Time Chart Window..................................................................... 50
The Cultivation Time Chart Diagram............................................................................... 50
The Data Selection Area ................................................................................................. 51
The View Area................................................................................................................. 52
Saving a View ................................................................................................................. 52
Loading a View................................................................................................................ 53
Deleting a View ............................................................................................................... 54
The General Area .............................................................................................................. 54
Printing User-defined Results ......................................................................................... 54
Exporting the Results ...................................................................................................... 54
Entering a Comment ....................................................................................................... 55
Shielding the Cultivation Time Chart Window................................................................. 55
The Extras Area................................................................................................................. 55
The Data Series Area ........................................................................................................ 55
The List of Measurement Series in the Data Series Area............................................... 55
The New Button .............................................................................................................. 55
4
User Manual Cedex Version 1.6.1
Contents
6.4
6.5
6.6
6.7
7
7.1
7.2
7.3
7.4
7.5
8
Display of the Measurement Series in the Diagram ........................................................56
Measurement Series Offset .............................................................................................56
The Details Button ...........................................................................................................57
Grouping Measurement Series ...............................................................................................57
The Selection of Data Series Window ...............................................................................57
The Select Source Area...................................................................................................58
The Buttons in the Selection of Data Series Window ......................................................58
The Selected Measurements Area ..................................................................................59
Exporting the Cultivation Time Chart Data .............................................................................59
The Export Window............................................................................................................59
The Output File Name Area.............................................................................................60
The Output Format Area ..................................................................................................60
The Data Series Mixing Area...........................................................................................60
The Additional Information Area ......................................................................................61
The CSV Options Area ....................................................................................................61
The Export Template Area...............................................................................................61
The Buttons in the Export Template Area........................................................................62
Available Export-Templates for Excel..............................................................................63
The Export Structure Area ...............................................................................................64
The Start Export Button ...................................................................................................65
The Hide Button ...............................................................................................................65
Viewing and Selecting Cell Images.......................................................................................65
Viewing Individual Cell Images ...............................................................................................65
Enlarging a Cell Image............................................................................................................66
Viewing a Cell Image Using the IP ResultViewer ...................................................................66
Excluding Cell Images from the Evaluation Process/Including Excluded Images..................68
Printing the Analysis Results................................................................................................69
Viewing and Evaluating the Data Audit Trail File ................................................................69
Editing Existing Analysis Results/Data Sets .......................................................................70
Viewing Existing Analysis Results/Modifying Measurement Parameters ...............................70
Reprocessing Existing Data Sets............................................................................................71
GENERAL FUNCTIONS OF THE MEASUREMENT SYSTEM.................... 73
Specifying Target Directories for the Analysis Data...........................................................73
Changing your own Password ..............................................................................................73
Viewing your own Access Rights .........................................................................................74
Data Entry Fields for the Data Source Identification Area .................................................74
Specifying your own Default Measurement Parameters ....................................................74
ADMINISTRATOR FUNCTIONS.................................................................. 75
8.1 Administration of User Profiles.............................................................................................75
8.2 Adaptation of the Counting Routine.....................................................................................75
Description of the Individual Parameters ................................................................................76
8.3 Saving the Measurement Data ..............................................................................................78
9
MAINTENANCE OF THE MEASUREMENT SYSTEM ................................ 79
9.1 Cleaning and Maintenance Check List .................................................................................79
9.2 Daily Cleaning and Maintenance...........................................................................................80
Checking the Reagent Containers ..........................................................................................80
Emptying the Waste Container ...............................................................................................80
Cleaning Routines Carried out by the Liquid Management ....................................................80
The Daily Events Area .......................................................................................................81
The Cleaning Area .............................................................................................................82
The Syringe Handling Area ................................................................................................83
Carrying out a Cleaning Routine ........................................................................................83
Interrupting/Terminating a Cleaning Routine .....................................................................84
User Manual Cedex Version 1.6.1
5
Verifying the Success of the Individual Cleaning Stages .................................................. 84
9.3 Syringe Cleaning and Maintenance ..................................................................................... 85
General Cleaning and Maintenance Instructions ................................................................... 85
Removing the Syringe............................................................................................................ 85
Cleaning the Syringe .............................................................................................................. 86
In the Case of Mild Soiling................................................................................................. 86
In the Case of Heavy Soiling ............................................................................................. 86
Assembling and Installing the Syringe ................................................................................... 87
9.4 Maintenance of the Capillary Tubes .................................................................................... 87
9.5 Maintenance of the Syringe Guide and Spindle ................................................................. 87
9.6 Maintenance of the Measurement Chamber (Flowcell), Microscope Optic, 8-Way
Valve and the remaining Hardware Components............................................................... 89
APPENDIX ........................................................................................................... 91
Contact Details ............................................................................................................................... 91
Technical Specifications................................................................................................................ 92
Suppliers ......................................................................................................................................... 93
Material Safety Data Sheets for the Substances used ............................................................... 93
Declaration of Conformance ......................................................................................................... 94
INDEX .................................................................................................................. 95
6
User Manual Cedex Version 1.6.1
Rights
1
1
Rights
Copyright
Cedex® Operating Instructions. Copyright© 2003 innovatis AG. All rights reserved. Operating
instructions and manuals are protected by copyright. No part of this document may be
reproduced, edited or translated without prior written consent of innovatis AG except as
permitted under the terms of the copyright.
Disclaimer
The information in this document is subject to change without prior notice and should not be
construed as a commitment by innovatis AG.
The innovatis AG accepts no responsibility or liability for any errors or inaccuracies the
document or for any damage occurring during delivery, performance or use of this product.
Windows 2000® is a registered trademark of the Microsoft Corporation. All other trademarks are
trademarks or registered trademarks of the respective companies.
Cedex ® is a registered trademark of innovatis AG.
Warranty
Standard warranty applies. The warranty is void under the following conditions:
•
If any software other than the programs supplied with the Cedex system are installed on
the computer (excluding the printer driver and programs authorized by innovatis AG).
•
If damage or malfunction of the Cedex system is caused by abuse, mishandling, improper
use or unauthorized repairs.
•
If unauthorized modifications are made to the Cedex system.
•
If the Cedex system is opened without authorization.
•
If damages occurred during transport are not reported immediately.
•
If damages are caused through equipment or software not supplied by innovatis AG.
•
If the Cedex system is not connected to an earthed power supply or the power supply is
incorrectly polarized.
•
If the instructions for printer installation are not observed.
Software License Agreement
Grant of License
This is a license agreement between you, the purchaser or “licensee” of the Cedex system and
innovatis AG. Innovatis AG grants the licensee the following license on condition that the
licensee accepts all provisions of this agreement. The licensee agrees to be bound by the terms
of this agreement once commissioning or starting the Cedex system.
User Manual Cedex Version 1.6.1
7
The Cedex software is based on the following:
•
application software (to control the hardware components)
•
analysis module (for processing registered images and data analysis)
•
data base module (to archive and process obtained data)
•
graphical user interface for the complete software
•
all technical descriptions and instructions on the use of the software
innovatis AG grants the licensee a non-transferable, non-exclusive sublicense (except as
outlined below) to use a copy of the software and documentation belonging to the Cedex
system in compliance with the terms of this agreement.
Any property and commercial protection rights regarding the software product shall remain with
innovatis AG. The software is only licensed – not sold. No property rights regarding the software
product shall be transferred to the licensee. The software product must be treated as any other
material protected by copyright. However, this shall not apply to the following:
The Licensee may:
•
only use the software on the PC supplied with the Cedex system.
•
only produce copies of the software for internal archiving and backup purposes i.e. on
condition that all property and copyright notices shall be included on the copies.
•
only transfer the software on a permanent basis (excluding leasing and renting) in
conjunction with a transfer of the entire Cedex system, and on condition that the licensee
retains no copies and the recipient accepts to be bound by the terms of this agreement.
The Licensee may not:
•
use the software on more than one computer, workstation or file server in a network or
multiple-user system, except if an additional license for every additional computer or
workstation is purchased from innovatis AG.
•
modify, copy, adapt, reverse engineer, decompile, disassemble or create derivative works
of the software or related documentation (excluding a backup copy).
•
lease or rent the rights on the software and related documentation in any form
whatsoever to a third party.
•
remove property and copyright notices and marks in or on the software, documentation,
containers and devices.
All rights, claims, use and intellectual property rights relating to the software, documentation and
any copies made by the licensee remain with innovatis AG. Unauthorized copying of the
software or documentation, or failure to comply with the limitations outlined above shall
automatically terminate the license.
8
User Manual Cedex Version 1.6.1
Rights
1
General Provisions
The licensee may terminate this license at any time by destroying all copies of the software or
returning all copies to innovatis AG. Innovatis AG may terminate this license if the licensee fails
to comply with all terms and conditions of this license agreement. In such an event, the licensee
agrees to destroy or return all copies of the software. The licensee further agrees to be
responsible for all taxes resulting from this license. Any unauthorized leasing, renting or
transferring (except as outlined above) is illegal.
If any provisions of this license agreement are invalid for whatever reason, this shall have no
effect on the remaining terms hereof. The license agreement is governed by the laws of the
Federal Republic of Germany.
This is the only agreement between innovatis AG and the licensee, and replaces any other
negotiations or prior agreements relating to the software and documentation.
Cedex ® : Reg. U.S. Pat. & TM Off.
FCC Notification
WARNING
CHANGES OR MODIFICATIONS TO THIS UNIT NOT EXPRESSLY APPROVED BY THE
PARTY RESPONSIBLE FOR COMPLIANCE MAY VOID THE USER‘S AUTHORITY TO
OPERATE THE EQUIPMENT.
Note: This equipment has been tested and found to comply with the limits for a Class A digital
device, pursuant to Part 15 of the FCC Rules. These limits are designed to provide reasonable
protection against harmful interference when the equipment is operated in a commercial
environment. This equipment generates, uses and can radiate frequency energy and, if not
installed and used in accordance with the instruction manual, may cause harmful interference to
radio communications. Operating this equipment in a residential area is likely to cause harmful
interference in which case the user will be required to correct the interference at his own
expense.
Safety Instructions
WARNING
IT IS IMPORTANT THAT ALL SAFETY INSTRUCTIONS AND GUIDELINES ARE OBSERVED
TO ENSURE SAFE AND RELIABLE OPERATIONS OF THE CEDEX SYSTEM.
•
Place the device on a dry and sturdy surface, free of vibrations.
•
Prevent the device from getting wet.
•
Protect the device from dust and smoke.
•
Do not expose the device to direct sunlight.
•
Ensure there is sufficient air circulation of the Cedex system during operation (particularly
around the computer and monitor).
•
Operate within a constant temperature range of 50°F – 95°F (10°C – 35°C).
•
The Cedex system should only be used with the supplied devices (measurement system,
computer, monitor) and software.
•
Do not install any additional software on the Cedex computer.
•
Only trained personnel in a controlled laboratory environment are to operate the Cedex
system.
User Manual Cedex Version 1.6.1
9
•
All services and repairs should only be performed by authorized service technicians.
•
Always ensure that there are sufficient reagents in the reagent containers.
•
Empty the waste container often to prevent it from overflowing.
•
Always observe the safety regulations when handling Trypan Blue, detergent, ethanol or
acids and bases.
•
Waste contaminated with tissue cells e.g. sample cups, pipette tips, etc. must be
disposed of according to the recommended rules for handling bio-hazard materials.
•
Any leaks in the liquid management system must be repaired immediately. Contact your
distributor.
•
Always ensure that there is a sample cups attached to the sample port.
•
Only use Cedex Detergent or a detergent with identical specifications for the cleaning
process in the liquid management system (see “Suppliers”, on page 93).
•
Only use sample cups from suppliers specified on page 93 for the conveyance of cell
samples to the sample port.
Other sample cups with other catalogue numbers can cause irreparable damage to the
Cedex!
•
Always wear protective clothing when handling samples, particularly gloves.
•
To prevent damage to the measurement chamber (flowcell), no particle larger than 80 µm
should enter the measurement system.
•
Do not use Microcarriers for this device.
•
Ensure that all utensils required for sample preparation e.g. sample cups, pipette tips,
etc. are stored in a dust-free environment to guarantee precise measurement results.
•
Ensure that the Trypan Blue solution is free of contamination otherwise filter prior to use.
•
Check that the sample cup is free of contamination before use. Only clean sample cups
can guarantee an optimal function of the Cedex.
•
If not in use, keep the Trypan-Blue solution in a refrigerator.
•
Secure your measurement-data frequently (recommended: approx. every after 250
measurements).
NOTES
EVERY CEDEX SYSTEM IS THOROUGHLY TESTED IN THE END CONTROL. ALL
RESULTS OF THIS CONTROL TESTING IS SAVED IN THE SYSTEM FOR POSSIBLE USE
LATER.
THE SOFTWARE AND HARDWARE VERSION OF YOUR CEDEX ANALYSIS SYSTEM CAN
DIFFER FROM THE INFORMATION DESCRIBED HERE, BUT SHOULD NOT MAKE A
DIFFERENCE TO THE OPERATIONAL FUNCTIONS IN GENERAL.
IMPORTANT NOTICE
THE MANUFACTURER IS NOT RESPONSIBLE OR LIABLE FOR ANY PERSONAL OR
OTHER DAMAGE RESULTING FROM IMPROPER USE OR FAILURE TO COMPLY WITH
THE REGULATIONS IN THE OPERATING INSTRUCTIONS.
10
User Manual Cedex Version 1.6.1
Introduction
2
2
Introduction
The Cedex system determines the cell density and viability of cell suspensions fully automatic.
The analysis is based on the Trypan Blue exclusion method whereby cell suspensions are
stained and analyzed. The obtained data allows the evaluation of the overall state of the cell
culture including the calculation of specific consumption needs and proliferation rate, as well as
the documentation of the cultivation process.
The complete procedure from sample preparation to optical recognition under the microscope
and actual cell count is done automatically by the Cedex system. The recognition and
differentiation of cells as either viable or dead is performed under standardized conditions, and
therefore provide very precise and objective results.
These results are evaluated automatically and displayed.
From version 1.5.0/1 on there is a possibility to analyze, display and archive different
measurement results in comparison.
The result data Viable Cell Density, Total Cell Density, Viability, Total Cell Count, Average
Compactness, Average Diameter und Standard Deviation of single measurements (Image) and
overall count (Overall) are supplemented by the Aggregate Rate. This result shows the
percentage of total cells in aggregates (cluster).
The graphical representations of the measurement results (Measurement Chart, Diameter
Histogram, Compactness Histogram) were supplemented by the Aggregate Histogram and the
Cultivation Time Chart. The Aggregate Histogram gives a quick insight of cluster behavior of cell
cultures. The Cultivation Time Chart displays the grows curves and cultivation parameters in a
time dependent manner.
The results of the Cultivation Time Chart can be separately printed out. For further processing
of the results in other programs, data export as DIF (Data Interchange Format, Excelcompatible) and CSV (Comma Separated Values, generally applicable) is possible.
The Cedex 1.6.1 version, apart from adaptation to the Windows 2000 operating system,
consists of a better user-management, through which greater security and thereby better
compatibility of CFR 21, part 11 is provided. Security for access to Cedex was stepped up.
Access is allowed only for authorized persons. The workstation will be automatically blocked
after three consecutive entries of a false password.
Furthermore, image recognition has been upgraded. The new “Std. Cells 5.00“ operator has
replaced the old “Std. Cells 3.0“ operator.
The identification performance was improved by the correction of the programmed code. Dead
cell recognition has been corrected in the “Std. Cells 5.00” operator. This optimized dead cell
recognition results in a change of viability towards slightly lower numbers. Even cell suspension
with low cell densities will only have a resulting difference in viability of maximum 3%.
The analyses functions of the “Std. Cells 5.00” operator are adequate to the “Std. Cells 3.0”
operator. In general the difference will not be recognized.
User Manual Cedex Version 1.6.1
11
12
User Manual Cedex Version 1.6.1
Description of the Cedex System
3
3
Description of the Cedex System
The Cedex system consists of two functional units, the measurement system which manages
the sample handling and preparation and the installed analysis software supplied with the
Cedex system, which controls the measurement system including the sample processing and
analysis of the images.
syringe module with 8-way valve
sample port with sample vial
2.5 mL syringe
switch ON/OFF
tray with 5 reagent containers
(from left to right: Trypan Blue,
detergent, 70% alcohol, distilled
or deionized water, waste)
Figure 1
Components of the measurement system
3.1 The Measurement System
The measurement system consists of two main components, the hardware to capture
microscopic images and the liquid management system.
The measurement chamber (flowcell) is highly sensitive and especially developed to analyze
cell images in a defined volume of cell suspension. The Liquid Management undertakes the
sample staining as well as the filling and cleaning of the measurement chamber including the
cleaning of the entire measurement system.
The precise volume of sample and dye as well as specific cleaning solutions required for each
measurement is transported through the syringe module with the 8-way distribution valve.
The individual components of the liquid management system are easily accessible to allow for
trouble-free maintenance and control.
User Manual Cedex Version 1.6.1
13
3.2 The Measurement Procedure
The determination of viable cells (cells/mL) and cell viability of cell suspensions (the percentage
of viable cells compared to the total number of cells) is a fully automated and highly
standardized procedure based on the manual Trypan Blue exclusion method. A defined volume
of Trypan Blue is aspired by the syringe to the sample cup containing the cell suspension. The
cell suspension and dye are then optimally mixed by controlled pump actions between the
syringe and sample cup and then incubated with the exact same time for each measurement.
This prevents any possible decrease in viability caused by the toxicity of the Trypan Blue.
After the incubation period, the stained cell suspension in the syringe is then transported in
small portions to the calibrated measurement chamber (flowcell) through the capillary tubes and
8-way valve. A set number of microscopic images of the cell sample is taken in the
measurement chamber, and transferred to the analysis software via an integrated interface in
the measurement system.
Once the measurement procedure is completed, a cleaning routine is automatically performed
in the Liquid Management. Only after the cleaning routine is it possible to begin with new
measurements.
The Trypan Blue Exclusion Method
The Trypan Blue exclusion method is based on the principle that viable cells repel dye and do
not stain, and dead or dying cells attract dye and do stain.
NOTE
TRYPAN BLUE HAS A GREATER AFFINITY TO SERUM PROTEINS THAN TO CELLULAR
PROTEINS. IF THE MICROSCOPIC IMAGE HAS A DARK BACKGROUND DUE TO HIGH
QUANTITIES OF STAINED SERUM PROTEINS, THEN CENTRIFUGE THE CELL SAMPLE
AND RE-SUSPENDED IT IN A PROTEIN-FREE MEDIUM OR PHYSIOLOGICAL SALINE
SOLUTION PRIOR TO COUNTING.
Follow the instructions below on manual staining and evaluation of cell suspensions:
1.
Prepare a cell suspension in a balanced salt solution (preferably in HBSS - Hanks’
Balanced Salt Solution).
2.
Transfer 0.5 mL of 0.4% Trypan Blue solution to a test tube. Add 0.3 mL of HBSS and
0.2 mL of the of the cell suspension (dilution factor 1 : 5) and mix thoroughly. Allow to
stand for 5–15 minutes.
IMPORTANT NOTICE
PROLONGED EXPOSURE TO TRYPAN BLUE CAN CAUSE VIABLE CELLS TO STAIN AND
LEAD TO FALSE RESULTS.
3.
Press a cover slip firmly on both chambers of the Neubauer hemocytometer and pipette a
small volume of the prepared cell suspension mixture on the edge of the cover slip,
touching the edge gently with the pipette tip. The chamber will fill up due to capillary
action. Follow the same procedure with the second chamber of the Neubauer
hemocytometer. Ensure that both chambers are not overfilled or underfilled.
14
User Manual Cedex Version 1.6.1
Description of the Cedex System
3
4.
Count the cells in the first chamber using a microscope with a magnifying factor of 100
(objective lens x10 and ocular lens x10). Only cells in the four major corner squares and
the major center square (each containing 16 minor squares) in the chamber are counted,
refer to Figure 2on page 16. Count the unstained (viable) and stained (dead) cells in the
center minor squares and the minor squares on the top and left borders of the major
square. Do not count the cells in the minor squares of the right and lower borders, refer to
Figure 3 on page 16.
5.
Record the two values for the first chamber.
6.
Repeat the same procedure for the second chamber of the Neubauer hemocytometer.
7.
Record the two values for the second chamber.
Repeat the entire procedure if more than 10% of the cells are in clusters. Ensure an even
distribution of cells by gently pumping the cell sample in the pipette a few times or
carefully mixing it. Repeat the entire procedure should less than 200 or more than 500
cells (equivalent to a cell density of 20 – 50 cells in a square) be counted in the 10 major
squares of both chambers with the appropriate dilution.
8.
Repeat the whole procedure with a second sample to verify the results of the first sample.
9.
Calculate the results as follows:
If the cover slip is correctly placed on the hemocytometer, then each major square of a chamber
will have a volume of 0.1 mm3 i.e. 10-4 cm3 . The cell concentration per mL (total cell count) is
calculated as follows:
Total cell count (cells per mL) = average count (viable + dead cells) per square x dilution
factor x 104 (cell count for 10 squares).
Example:
Average count per square = 45 cells.
45 x 5 x 104 = 2.25 x 10⁶ cells per mL.
Total amount of cells in the sample = Cells / mL x original volume (from which the sample
has been taken).
Example:
2.25 x 10⁶ (cells per mL) x 10 mL (original volume) = 2.25 x 10⁷ cells.
Cell viability (%) = viable cells / total cell count (dead + viable) x 100.
Example:
The average count of unstained (viable) cells per square = 37.5.
The total cell count (viable + dead cells) per square = 45 cells.
Calculate cell viability as follows:
37.5 x 5 x 104 viable cells per mL = 1.875 x 10⁶ viable cells per mL
45 x 5 x 104 total cell count per mL = 2.250 x 10⁶ total cell count per mL
1.875 x 10⁶ viable cells per mL / 2.250 x 10⁶ total cell count per mL x 100 = 83.3% viability
User Manual Cedex Version 1.6.1
15
1mm
corner square
Figure 2
Diagram of a chamber of the Neubauer hemocytometer
O = counted cells
∅ = uncounted cells
Figure 3
Corner square (containing 16 minor squares) in a chamber of a Neubauer hemocytometer
Figure 4
Direction and strategy of cell counts
16
User Manual Cedex Version 1.6.1
Description of the Cedex System
3
3.3 Data Analysis with the Analysis Software
The analysis software and its graphical user interface known as the Cedex Workbench is
installed and supplied with the computer as part of the Cedex system. The analysis software
digitizes and analyzes the two-dimensional images captured by the measurement system. The
analysis software recognizes structures, identifies particles, blends out background disorders
and differentiates cells from cell debris and dirt particles. Viable and dead cells are differentiated
according to their degree of Trypan Blue staining.
The image processing is integrated in the Cedex Workbench in such a way that it allows the
user or administrator to check on its function in the Cedex system constantly. The analysis
process cannot be altered during data input to allow for consistent and objective measurement
results.
The Cedex system can register several thousand cells a minute depending on cell density. The
rapid processing of image data allows for a significant increase in random checks which greatly
improves the reliability of the statistical accuracy compared to the manual count.
This analysis method provides information on cell viability and diameter (form).
User Manual Cedex Version 1.6.1
17
18
User Manual Cedex Version 1.6.1
Installation and Operation of the Cedex System
4
4
Installation and Operation of the Cedex System
Follow the instructions to install the hardware components of the measurement system and
prepare the analysis software in the order given below.
Both actions should be done by the system administrator.
All instructions have to be followed in chronological order.
Detailed information is found in the Cedex Administrator Manual.
4.1 Installing the Cedex System
Checking the Contents of the Delivery
IMPORTANT NOTICE
PLEASE NOTIFY THE DISTRIBUTOR IMMEDIATELY IF ANY OF THE SHOCK WATCHES
INDICATE IMPROPER HANDLING DURING TRANSPORT OTHERWISE THE GUARANTEE
IS INVALID.
Ensure that all the items listed below have been delivered:
•
1 x Measurement system
•
1 x PC incl. manual (Windows 2000® and installed Cedex software) and CD burner
•
1 x Keyboard
•
1 x Mouse, 1 x Mouse pad
•
1 x Monitor incl. manual
•
1 x USB hardware key (Dongle)
•
Cords:
1 x VGA cord (not attached to the monitor)
2 x Serial cord to connect syringe/focus control to the PC
1 x Video cable to connect the measurement system to the PC
3 x Connecting cable
•
1 x User Manual incl. License agreement, 1 x Administrator Manual
•
5 x Reagent container (250 mL each)
•
1 x 1000 mL Cedex Detergent (Cat.No. see Suppliers, page 93)
•
1000 x Sample vial (4 mL) (Cat.No. see Suppliers, page 93)
•
Cedex Calibration Beads for the calibration of focus and brightness (Cat.No. see
Suppliers, page 93)
IMPORTANT NOTICE
PLEASE NOTIFY THE DISTRIBUTOR IMMEDIATELY IF THE SERIAL NUMBER ON THE
CEDEX ANALYZER AND THE COMPUTER DO NOT MATCH. MATCHING SERIAL
NUMBERS ARE NECESSARY, AS THEY ARE ESSENTIAL CRITERIA IN THE
CALCULATIONS OF THE CEDEX SOFTWARE.
NOTE
THE SOFTWARE AND HARDWARE VERSION OF YOUR CEDEX ANALYSIS SYSTEM CAN
DIFFER FROM THE INFORMATION DESCRIBED HERE, BUT SHOULD NOT MAKE A
DIFFERENCE TO THE OPERATIONAL FUNCTIONS IN GENERAL.
NOTE
A PRINTER IS NOT INCLUDED IN THE CEDEX SYSTEM. FOLLOW THE INSTRUCTIONS TO
INSTALL A PRINTER IN THE CEDEX ADMINISTRATOR MANUAL.
User Manual Cedex Version 1.6.1
19
Choosing a Suitable Location for the Cedex System
The Cedex system is highly sensitive and consists of top-quality electronic and optical
components. To guarantee optimal and reliable performance of the Cedex system, select the
appropriate location according to the safety regulations described in the first section.
Connecting Hardware Components and Hardware Key (Dongle)
(See Figure 5 and Figure 6.)
Follow the instructions below to connect the hardware components:
1.
Connect monitor, keyboard and mouse to their respective ports on the PC.
2.
Connect one end of the video cable to the Video port of the measurement system.
3.
Connect the other end of the video cable to the Video port of the PC.
4.
Connect one end of the first serial cable to the Focus port of the measurement system.
5.
Connect the other end of the first serial cable to the Focus port of the PC.
6.
Connect one end of the second serial cable to the Syringe port of the measurement
system.
7.
Connect the other end of the second serial cable to the Syringe port of the PC.
8.
Connect the Hardware key (USB-Dongle) to the USB port of the PC (see Figure 6).
NOTE
CHECK THAT YOUR CONNECTIONS ARE CORRECT OTHERWISE AN ERROR MESSAGE
WILL APPEAR: “CAN NOT ACCESS LIQUID MANAGEMENT” OR “SCOPE FUNCTION
DISABLED”.
Figure 5
Cedex connections
20
User Manual Cedex Version 1.6.1
Installation and Operation of the Cedex System
4
USB
Figure 6
PC connections
Connecting the Cedex System to the Main Power Supply
Connect the measurement system, PC and monitor to the main power supply with the cords
enclosed. Observe the technical data.
User Manual Cedex Version 1.6.1
21
Preparing the Measurement System
Cleaning the Reagent Containers
To ensure optimal performance of the measurement system, the reagent containers should be
rinsed with distilled or de-ionized water prior to first use, as well as before every reagent fill-up
(recommended once a week). This prevents a possible contamination with dust or fluff particles.
Filling the Containers and Attaching the Sample Cup to the Sample Port
Avoid running out of reagents during measurements, because it leads to inaccurate
measurement results and damages the syringe and 8-way valve. Always check the volume level
of the individual reagent containers prior to measurement. Rinse all reagent containers well
before refilling, and always have a sample cup attached to the sample port.
Follow the instructions below:
1.
Place the reagent containers in their correct positions on the container tray, refer to
Figure 1 on page 13.
2.
Connect the capillaries to the screwing-lid through the holes. Ensure that the capillary
tubes are not bent and almost reach the base of the containers.
3.
Use the lids to close the reagent containers to avoid dirt-particles getting into contact with
the reagents.
4.
Ensure that the silicone tube and capillary tubes in the waste container only reach about
1cm into the container (remove the lid).
NOTE
THE TUBES SHOULD NOT BE SHORTENED UNDER ANY CIRCUMSTANCES!
5.
Fill 0.2% Trypan Blue solution (on the recommendation of innovatis AG) or 0.4% Trypan
Blue solution in the respective reagent container, refer to Figure 1 on page 13. If
necessary, dilute a more concentrated Trypan Blue solution with buffer (Phosphate
Buffered Saline (PBS), pH 7.4.
Estimate the number of measurements to be determined before preparing the Trypan
Blue volume. To prevent the dye from being contaminated with micro-organisms which
could lead to false measurement results, discard any left over dye solution after five days
and rinse the container well afterwards, see “Cleaning the Reagent Containers” on page
22. Dispose of any remaining Trypan Blue dye according to regulations. For longer
pauses of measurement, store the Trypan-Blue solution in a refrigerator.
NOTE
ENSURE THAT THE APPLIED TRYPAN BLUE SOLUTION IS FREE OF CONTAMINATION,
OTHERWISE FILTER BEFORE USE.
6.
Fill the Cedex Detergent in the respective container.
Only the Cedex Detergent or a detergent with identical specifications should be used for
the cleaning procedures, to prevent damage to the sensitive surface of the Liquid
Management components, see “Suppliers” on page 93.
22
User Manual Cedex Version 1.6.1
Installation and Operation of the Cedex System
4
7.
Fill 70% Ethanol or 70% Isopropyl in the Ethanol container.
8.
Fill distilled or de-ionized water in the water container.
9.
The waste container should be empty when placed in its position and should be checked
often to prevent it from overflowing.
10.
There should always be a sample cup attached to the sample port, even on delivery, refer
to Figure 1 on page 13.
The sample cup is correctly attached when it is in an upright position beneath the sample
port and the capillary tube almost reaches the base of the sample cup.
4.2 Preparation and Configuration of the Analysis Software by
the Cedex Administrator
If the hardware devices are installed and switched on in their correct order, the operating
system of the PC will start automatically. The Cedex administrator has to execute the following
operations, before the analysis software can be used regularly:
•
Securing access rights and defining the administrator password.
•
Creating user profiles and delegating access rights.
•
Defining target directories for the analysis data.
•
Calibrating the measurement system.
Detailed information is found in the Cedex Administrator Manual.
After successfull configuration of a user profile, the access rights of this user can be defined.
Thus the access to the following areas is determined:
•
Sample data
•
Reprocess data
•
Available work areas
•
Default work area
•
Cell Types
•
Users
•
System
Detailed information is found in the Cedex Administrator Manual.
User Manual Cedex Version 1.6.1
23
24
User Manual Cedex Version 1.6.1
Working with the Analysis System
5
5
Working with the Analysis System
The operating instructions and guidelines of the Cedex system are divided into the following
sections:
•
Analysis system - general instructions
•
General instructions on working with the Cedex Workbench
•
Starting the Cedex system
•
Description of the Cedex Workbench
•
Description of access rights
•
Carrying out a measurement
•
Interrupting a measurement
•
Displaying and evaluating the analysis results
•
Viewing and selecting cell images/valid spot checks
•
Printing the analysis results
•
Viewing and evaluating the data Audit Trail file
•
Editing existing analysis results/data sets
•
Switching off the Cedex system
•
General functions of the Cedex system
•
Administrator Functions
5.1 Analysis System - General Instructions
Switching on/off the Cedex System
Switch on the hardware components of the Cedex system always in the order below.
The individual devices have their own switch. Proceed as follows:
11.
Switch on the measurement system.
12.
Switch on the monitor.
13.
Switch on the PC.
Shut down the software and operating system first, before switching off the other devices at
random.
NOTE
IF YOU TRY TO LOGIN DIRECTLY AFTER THE LOGIN WINDOW APPEARS, TWO
WARNING MESSAGES MIGHT FOLLOW. BOTH SHOULD BE CONFIRMED WITH OK.
CONTINUE BY REPEATING THE LOGIN PROCEDURE.
YOU CAN AVOID THE WARNING MESSAGES BY AVOIDING SHORT TIME DELAY
BETWEEN SWITCHING ON THE PC AND LOGGING IN. THE WARNING MESSAGES
APPEAR, BECAUSE THE DIFFERENT HARDWARE DRIVERS NEED TO BE LOADED
PRIMARY TO THE LOG IN.
User Manual Cedex Version 1.6.1
25
Starting the Analysis Software
Follow the instructions below:
1.
Start the operating system by pressing the keys <Ctrl>+<Alt>+<Delete> to login.
2.
Enter Cedex as username and password and confirm by pressing <Enter>. The Cedex
analysis software will then start automatically. The password is case sensitive.
5.2 General instructions on working with the Cedex Workbench
The Login
If the Cedex analysis software has already been started, then proceed as follows:
1.
Enter the username in the Username field.
2.
Enter the password in the Password field (if applicable).
3.
Click on the traffic light symbol or press <Return>.
The Logout
Follow the instructions below:
1.
Click on Logout in the User Identification area.
2.
Click on Yes to confirm.
Alternatively exit with Logout in the File menu. This option allows the present user to logout
without shutting down the software. Logout is also possible during a measurement without
influencing it. Only the original user or administrator can login again during this process. A
message indicates that measurements are in process.
Automatic Log-out
The Administrator can set a time limit, after which a user is automatically logged-out, if the
keyboard or the mouse-button are not being used. The log-out also takes place during a current
measurement. The measurement, however, will thereby not be compromised. In Cedex version
1.5.0, the default setting for Auto logout is 600 seconds. In version 1.5.1 and 1.6.1, default is set
at 0 seconds, i.e. Auto logout is inactive.
Detailled information is found in the Cedex Administrator Manual.
26
User Manual Cedex Version 1.6.1
Working with the Analysis System
5
To Shut Down the Cedex Workbench
Follow the instructions below:
1.
Click on Shut down in the User Identification area.
Alternatively shut down by clicking on
or clicking on Shut down in the file menu.
2.
Click on Yes to shut down the program.
A restart of the analysis software is necessary for the next measurement session.
5.3 Starting the Cedex System
Always start the Cedex system by following the four steps in the order given below:
1.
Switch on the measurement system.
2.
Check the measurement system and have the samples ready.
3.
Start the analysis software and login.
4.
Perform a Prime if new measurements are to be carried out, see “Carrying out a
Measurement" on page 33.
Switching on the Cedex System
The hardware components of the Cedex system must all be switched on before the analysis
software is started, otherwise the software will not be properly initialized. Switch on the
individual devices in the order given below:
1.
Switch on the measurement system.
2.
Switch on the monitor.
3.
Switch on the computer.
These devices can also all be switched on at once with one button i.e. using a multiple contact
plug. First shut down the analysis software and operating system before switching off the other
devices at random.
User Manual Cedex Version 1.6.1
27
Check the Measurement System and have Samples prepared
Accurate measurements results rely on sufficiently filled reagent containers and the optimal
performance of the measurement system. Therefore, check the measurement system with its
reagent containers for possible wear and tear, contamination and correct volume prior to each
set of measurements as follows:
1.
Check the syringe module (2.5 mL syringe and 8-way valve) for wear and tear and
contamination. Clean or renew if required, see “Maintenance of the Measurement
System" on page 79.
2.
Check the Trypan Blue solution for possible contamination and dispose of it if necessary.
Rinse the container well prior to refilling, see “Preparing the Measurement System" on
page 22.
3.
Regularly check if the reagent containers need to be refilled.
4.
Ensure that the capillary tubes are in their correct positions in the containers.
5.
Empty the waste container (if necessary).
6.
A sample cup must always be attached to the sample port, see “Preparing the
Measurement System" on page 22.
7.
Have the cell suspension samples ready for the analysis.
To Start the Cedex Workbench
Follow the instructions below:
1.
Start the operating system and press <Ctrl>+<Alt>+<Delete> to login.
2.
Enter username CedexSA and password CedexSA and confirm with <Enter>. (The
CedexSA user has no access to the desktop and can therefore only use the Cedex
program; for further information ask your Administrator). The Cedex analysis software
starts automatically and the login window appears.
The password is case sensitive.
3.
Enter the username in the Username field.
4.
Enter the password in the Password field (if applicable).
5.
Click on the traffic light symbol to login or press <Return>.
The Cedex Workbench appears after a successful login and the traffic light symbol changes to
green. The administrator or user have access to the functions once they have logged into the
Cedex Workbench. The user normally only has access rights to the routine operations
depending on the configuration. However, access rights may vary according to options chosen
for each user profile. The administrator has unlimited access rights to all functions and can
modify user access rights at any time, see “Modifying the Access Rights of a User Profile" on
page 75.
28
User Manual Cedex Version 1.6.1
Working with the Analysis System
5
The Loader-Program
When the Cedex program is started, the Loader program automatically carries out a system
check-up. Among others, ports and drivers of various Cedex system-components are thereby
checked. Components that are full proof are displayed as green in a list (see Figure 7). The
Loader-Program closes automatically, if no errors were discovered.
(Black)
(Yellow)
(Green)
(Red)
Figure 7
System-check
If the necessary components are not available, or not correctly installed, a corresponding errormessage appears. In this case, please contact your service-technician.
The program can be quit by using the Exit-Button
User Manual Cedex Version 1.6.1
29
5.4 Description of the Cedex Workbench
The Cedex Workbench is divided into the following areas and elements:
•
Menu bar
•
User Identification area
•
Data Source Identification area
•
Sample Properties area
•
Process Parameters area
•
Cell Image area
•
Result Data area
•
Liquid Management button
•
Emergency Stop button
A description of the individual areas and elements is given below.
Menu Bar
The menu bar at the top of the Cedex Workbench has three to five menu items depending on
the user i.e. a normal user or administrator.
•
File menu
•
Specials menu
•
Setup menu
•
Users menu
•
Help menu
The File Menu
The menu items have the following functions:
•
Logout: To logout of the Workbench.
•
Shut down: To shut down the Workbench.
•
Choose Workarea: Choosing a target directories to save the analysis data. It is only
displayed if the user has been delegated access rights.
The Specials Menu
Normally only available to the administrator. The individual menu items have the following
functions:
•
Show IP Result: Each cell recognized by the measurement system is marked as either
dead (red cross) or viable (yellow circle), see “Viewing a Cell Image Using the IP
ResultViewer" on page 66.
•
Calibrate system: Calibration of the analysis system, see “Viewing a Cell Image Using
the IP ResultViewer”, on page 66.
30
User Manual Cedex Version 1.6.1
Working with the Analysis System
5
The Setup Menu
The menu items have the following functions:
•
Language: To define the Cedex system language (only English at present).
•
Change my Password: The user password can be modified.
•
Show my Rights: Displays the access rights of the present user.
•
Cell Types: The analysis mode can be modified to suit specific cell types. Normally only
available to the administrator with possible viewing rights for the user (see Cedex
Administrator Manual).
•
Defaults: To define default measurement parameters, see Cedex Administrator Manual).
The Users Menu
Normally only available to the administrator. The individual menu items have the following
functions:
•
Add: Add user profile.
•
Delete: Delete user profile.
•
Rights: Edit user’s access rights.
•
Change Name: Change username.
•
Delete Password: Delete user password.
The Help Menu
It provides general information on the analysis software and information needed by the support.
The User Identification area
The username continues to be displayed in this area after the login and the user has two
options to choose from: to logout of the Cedex system (Logout) or to shut down the analysis
software (Shut down).
The Data Source Identification area
All relevant sample data is entered into this area (Reactor ID and Sample ID) including the
selected operating mode. The Data Set drop down list is only relevant when editing the analysis
data, see “Choosing the Operating Option and Specifying Sample Data" on page 34.
The Microscope Symbol
Click here to start a new measurement.
The Floppy Disk Symbol
Click here to review measurement data or correct measurement parameters (dilution,
comment, valid images etc.).
The Calculator Symbol
Click here to reprocess existing measurement data.
User Manual Cedex Version 1.6.1
31
The Sample Properties Area
The Cedex system automatically enters the information in this area e.g. username, date, time.
Entering a comment is optional, see “Entering a Comment" on page 35.
The Process Parameters Area
All measurement and analysis parameters are entered in this area – Cell Type, Dilution,
Images (number of images) and the Processtype (processing mode), see “Defining the
Measurement and Analysis (Process) Parameters" on page 35.
The Audit Trail button allows the analysis results and their modifications or changes to be
retraced, see “Viewing and Evaluating the Data Audit Trail File" on page 69.
The Cell Image Area
The actual captured or analyzed cell image of a sample is displayed here.
This button shows the total amount of images in one view, see “Viewing and Selecting
Cell Images”, page 65.
The Result Data Area
The current measurement and analysis data are displayed in this area, see “The Analysis
Results" on page 41.
The Liquid Management Button
The maintenance and cleaning options in the Liquid Management are displayed. It is also
possible to perform a Prime or to display the actual image of the measurement chamber
(flowcell).
The Emergency Stop Button
The measurement procedure can be interrupted in case of emergency and be resumed later.
IMPORTANT NOTICE
ONLY USE THE EMERGENCY STOP BUTTON IN A CASE OF EMERGENCY BECAUSE THE
ACTUAL MEASUREMENT DATA CAN OTHERWISE BE LOST RESULTING IN THE CEDEX
PROGRAM MAYBE HAVING TO BE COMPLETELY RESTARTED.
The Traffic Light Symbol
Clicking on the traffic light symbol confirms any entries made and only switches to green when
all the necessary data are entered. Entries can also be confirmed with <Return>.
Should confirmed entries need to be modified again, click on the traffic light symbol to switch it
back to red.
32
User Manual Cedex Version 1.6.1
Working with the Analysis System
5
5.5 Description of Access Rights
Each user profile can have specific access rights as described below:
•
Sample Data: Access rights to sample data (create, view, change, delete).
•
Reprocess Data: Access rights to recalculate recorded measurements (create, view,
change, delete).
•
allow changing work area: Access rights to change the target directory.
•
Cell Types: Access rights to evaluate Cell Types (create, view, change, delete).
•
Users: Access rights to administer user profiles (create, view, change, delete).
•
System: Access rights to specific system functions (shutting down the Cedex system,
shutting down the Liquid Management, changing the syringe, use of special functions).
5.6 Carrying out a Measurement
Carry out measurements only after having followed the instructions for “Starting the Cedex
System” on page 27.
IMPORTANT NOTICE
AFTER STARTING THE CEDEX SYSTEM ALWAYS PERFORM A PRIME PRIOR TO ANY
MEASUREMENTS.
A number of relevant parameters and entries must be specified on the Cedex Workbench prior
to any measurements. They are as follows:
•
Choosing the operating option and specifying sample data.
•
Entering a comment (optional).
•
Defining the measurement and analysis (process) parameters.
•
Preparing the sample and attaching it to the sample port.
Only when the steps above have been completed can the measurement procedure begin.
Performing a Prime
The capillary tubes and syringe are filled with air prior to each start of the Cedex system or after
its installation. Performing a Prime results in the capillary tubes and 8-way valve being filled
with the appropriate reagents.
All measurements are based on the capillary tubes having a precise amount of reagent volume
in them. Therefore, not performing a Prime would lead to cell samples being incorrectly stained
and consequently leading to false measurement results.
A Prime is not only performed when the Cedex system is set up for the first time but it should
follow after every start of the measurement system i.e. at least once a day prior to the first
measurement. No measurement is possible without performing a Prime first, because an error
message appears “Machine is not ready for measurement”.
User Manual Cedex Version 1.6.1
33
Follow the instructions below to perform a Prime:
1.
Click on Liquid Management on the Cedex Workbench. The Liquid Management
window will appear.
This window is divided into several different functional areas, see “Maintenance of the
Measurement System" on page 79.
2.
Ensure that a clean and empty sample cup is correctly attached to the sample port.
3.
Click on Prime.
The duration period of a Prime procedure is displayed in the Time to finish area. The
following message “System ready” appears when the Prime has been completed.
4.
Click on
to shut the window.
Choosing the Operating Option and Specifying Sample Data
The Cedex Workbench offers three operating options: 1) to carry out a new measurement, 2) to
view existing analysis results and measurement data (modify measurement parameters) and 3)
to reprocess (recalculate) measurements on the basis of existing cell images.
The relevant entry and selection areas for choosing the operating option and specifying the
sample data can be found in the Data Source Identification area on the Cedex Workbench.
Follow the detailed instructions to select the desired operating option and specify the sample
data:
1.
Click on
2.
Enter a clearly defined reactor ID to describe the sample (e.g. the name of the cell
culture) in the Reactor ID area.
You may either choose a reactor ID from the drop down list or enter a new reactor ID. A
new entry is defined by 25 alphanumerical symbols.
3.
Enter a clearly defined sample ID in the Sample ID area (e.g. P001).
(carrying out a measurement).
The sample ID can be freely defined. If the intended measurement is not the first in a row
of measurements i.e. if it has the same reactor ID as a preceding measurement, then the
analysis software automatically enters the consecutive sample ID into the Sample ID
area (e.g. P001, P002, ...). It is not necessary to enter the sample ID manually.
4.
Click on the traffic light symbol to confirm or press <Return>. The traffic light symbol then
changes to green.
This method of entry defines the sample very clearly and automatically allows the Cedex
system to create an appropriate directory structure on the hard disk to save sample data and
images during measurements.
34
User Manual Cedex Version 1.6.1
Working with the Analysis System
5
Entering a Comment
Entering a comment relating to a measurement is optional and only possible once the Data
Source Identification area has been completely filled in and the traffic light symbol is green.
Enter the remarks in Comment on the Sample Properties area.
Defining the Measurement and Analysis (Process) Parameters
The measurement and analysis parameters can be defined in the respective space of the
Process Parameters area on the Cedex Workbench. In principle, all routine measurements
should be carried out using the standardized default settings that are factory-set.
Follow the instructions below to change the settings:
1.
Select the cell type from the Cell Type drop down list (factory set only one option
available: Standard Cells 5.00).
If a new Cell Type has already been created, a selection would have been possible at this
point. Detailed information on this is found under “Creating a New Cell Type" on page 77.
2.
Choose the respective dilution from the Dilution drop down list, or enter a separate
dilution (e. g. 1 : 3; 1 : 6; 1 : 7; etc.).
When a dilution of 1 : 2 is prepared, then 1 part cell suspension is added to 1 part dilution
medium. A dilution of 1 : 3 means that 1 part cell suspension is added to 2 parts of a
dilution medium etc. It may be necessary to dilute samples with very high cell densities
(>1 x 10⁷ Cells / mL) manually prior to measuring.
NOTE
THE DILUTION RATIO ENTERED INDIVIDUALLY OR CHOSEN FROM THE DROP
DOWN LIST ONLY RELATES TO THE RESPECTIVE SAMPLE WHICH WAS DILUTED
MANUALLY AND IS ABOUT TO BE MEASURED. DILUTIONS THAT ARE
INTEGRATED IN THE MEASUREMENT PROCESS AND TAKEN INTO ACCOUNT BY
THE CEDEX SYSTEM ARE CARRIED OUT AUTOMATICALLY AND HAVE NOTHING
TO DO WITH THE ENTERED DILUTIONS.
3.
Select the number of images to be taken of the sample from the Images drop down list.
The default setting is for 20 images (20 images are equal to 10 manual measurements
using the Neubauer hemocytometer). The high amount of random checks allows for a
small margin of deviation and minimizes measurement inaccuracies. High cell density
can reduce the number of cell images taken to 10. The maximum number of images that
can be taken is 30.
4.
Choose the analysis process type from the Processtype drop down list (only one option
available at the moment i.e. Standard). Should another process type be available, then it
can be selected from here.
5.
Click on the traffic light symbol to confirm the entries or press <Return>. The traffic light
symbol will then change to green.
When the traffic light symbol turns to green in the Process Parameter area, the
measurement procedure starts automatically by first checking the measurement chamber
(flowcell) (including the syringe). The actual measurement begins after the respective
message is confirmed.
User Manual Cedex Version 1.6.1
35
Preparing the Sample and Attaching it to the Sample Port
Prepare the sample prior to measuring according to the following instructions:
1.
Transfer 1000 µL (300 µL for Cedex Small Volume) of a well mixed cell suspension to a
sample cup.
The measurement system tolerates volume variations of +/- 10 %. Any greater difference
will lead to inaccurate results and can cause air bubbles to enter the measurement
chamber (flowcell).
A cell density range between 5 x 10⁴ - 1 x 10⁷ Cells / mL can be determined by the
measurement system and any higher density would make a manual dilution necessary.
Cells with a diameter range between 8 µm – 40 µm and cell clusters of up to 10 cells can
be assessed accurately by the measurement system.
2.
Remove the present sample cup from the sample port.
3.
Attach the prepared sample cup containing the cell suspension to the sample port.
The sample cup is correctly attached to the sample port when it is in an upright position directly
beneath it and the capillary tube almost reaches the base of the sample cup.
Figure 8
Attaching the sample cup to the sample port
NOTE
THE SAMPLE VOLUME CAN BE REDUCED TO 300 µL WITH THE OPTIONAL ACCESSORY
SOFTWARE CEDEX SV (CEDEX SMALL VOLUME).
36
User Manual Cedex Version 1.6.1
Working with the Analysis System
5
To Start Measuring
First ensure that the entire measurement system including the sample is ready for
measurements by following the instructions below:
1.
Ensure that the sample cup is correctly attached to the sample port.
2.
Ensure that the reagent containers are sufficiently filled and in their correct positions.
3.
Ensure that the waste container is empty.
4.
Click on Yes to begin the measurement.
Every stage of the measurement procedure is continually displayed in the Process Parameters
area.
The Cell Image area displays in succession the cell images captured by the camera, including
the corresponding analyzed results (Image) and the average values of the images analyzed so
far of the sample (Overall) in the Result Data area, see “The Analysis Results" on page 41.
Figure 9
Cedex Workbench with the final results
User Manual Cedex Version 1.6.1
37
End of Measurement
The cleaning procedure begins immediately after the last image is captured and displayed on
the Process Parameters area. The entire liquid management system is rinsed during this
procedure (Ultra Fast Clean). Once this procedure has been completed, the Process
Parameters area displays Ready and the floppy disk symbol indicates that the next
measurement can begin. If the next measurement belongs to the previous measurements i.e.
the same Reactor ID then the consecutive Sample ID will be automatically entered into the
Sample ID area by the analysis software without further entries being necessary. Click on the
microscope symbol for the next measurement to begin.
When the final measurement in a set of samples has been completed or if there is a longer
pause before the next measurement, then the user should carry out a Standard Clean in the
liquid management system besides the Ultra Fast Clean procedure that is automatically done.
Logout of the Cedex system once the cleaning procedure has been completed to allow the next
user access to the Cedex system, see “Maintenance of the Measurement System" on page 79
and “The Logout" on page 26.
The sample cup of the last measurement should remain attached to the sample port during the
complete cleaning procedure and only be removed for the next measurement.
When the Cedex system is to be shut down after a set of measurements or at the end of the
day, then the complete liquid management system should be cleaned with an LM ShutDown
procedure to maximize the life-span of the Cedex system and guarantee optimal performance.
The entire liquid management system is rinsed with distilled or deionized water during the LM
ShutDown, which is then pumped out, see “Carrying out an LM ShutDown" on page 39.
5.7 Interrupting a Measurement
The EMERGENCY STOP button found at the bottom left corner of the Cedex Workbench can
be activated during the measuring procedure to interrupt the analysis process. Measurements
can resume by clicking on the Run button.
This allows the user to react immediately in an emergency e.g. refilling reagents or emptying the
waste container.
IMPORTANT NOTICE
ONLY USE THE EMERGENCY STOP BUTTON IN A CASE OF EMERGENCY BECAUSE THE
ACTUAL MEASUREMENT DATA CAN OTHERWISE BE LOST RESULTING IN THE CEDEX
PROGRAM MAYBE HAVING TO BE COMPLETELY RESTARTED.
38
User Manual Cedex Version 1.6.1
Working with the Analysis System
5
5.8 Switching off the Cedex System
Switching off the Cedex system at the end of the day or for a longer pause should always be
carried out in this order:
1.
Carry out an LM ShutDown.
2.
Shut down the analysis software.
3.
Shut down the operating system.
4.
Switch off the individual devices at random.
5.
Empty the waste container.
Carrying out an LM ShutDown
All the capillary tubes in the liquid management system are rinsed with distilled or de-ionized
water during an LM ShutDownThe Trypan Blue is withdrawn from the 8-way valve/syringe and
the complete liquid management system replaced with air to prevent the capillary tubes and
measurement chamber (flowcell) from getting damaged.
Follow the instructions below to carry out an LM ShutDown:
1.
Click on Liquid Management in the Result Data area on the Cedex Workbench. The
Liquid Management window will appear.
2.
Click on the LM ShutDown button in the upper left-hand corner of the window. The time
required for the LM ShutDown is then displayed.
3.
Click on
to shut the window.
Refer to “Maintenance of the Measurement System” in “The Daily Events Area" on page 81.
User Manual Cedex Version 1.6.1
39
40
User Manual Cedex Version 1.6.1
The Analysis Results
6
The Analysis Results
The analysis results obtained from a measurement are displayed in the Result Data area on
the Cedex Workbench during and after the analysis process. The obtained data can also be
displayed as a graphic diagram by activating the Diameter Histogram, Compact. Histogram
or Measurement Chart buttons. Each parameter is explained in the next section.
6.1 Description of the Analysis Results
The Result Data area displays two values for each parameter forming two columns: The Image
column relates to the image currently being analyzed and displayed in the Cell Image area and
the Overall column relates to the average value of all the valid images analyzed so far.
Figure 10
Analysis results
The Viable Cell Density Parameter
This parameter indicates the density of viable cells [x10 5 Cells / mL].
The Total Cell Density Parameter
This parameter indicates the total cell density [x10 5 Cells / mL].
The Viability Parameter
This parameter indicates the proportion of viable cells in % to the total amount of cells (viable
and dead cells).
The Total Cell Count Parameter
This parameter indicates the total number of counted cells.
User Manual Cedex Version 1.6.1
41
6
The Average Compactness Parameter
This parameter indicates the average shape variation of viable cells from a sphere, with the
ideal sphere shape equaling >1<. Higher values indicate the extent of variation and therefore
the overall state of the cell culture (e.g. damage caused by shear force etc.).
The Average Diameter Parameter
This parameter indicates the average diameter of viable cells [µm].
The Aggregate Rate Parameter
The Aggregate Rate specifies the percentage of cells (Total Cell Count) present in aggregates
(clusters). The Aggregate Rate is given for each single Image displayed, as well as for the
complete measurement (Overall) while taking the excluded images into consideration.
The Standard Deviation Parameter
This parameter (only Overall column) indicates the standard deviation of the single measured
results of a sample (results per image) compared to the total cell density [x105 Cells / mL]. It
therefore indicates the homogeneity of a sample and if measurement errors exist.
6.2 Viewing Individual Analysis Results after Completion of the
Measurement Process
Once measurements have been completed, the Result Data area displays the analyzed results
of the last cell image (Image) and the average results of all the cell images (Overall). The Cedex
software can also display single cell sample results from a previous set of measurements.
Select the appropriate sample data by clicking on the floppy disk symbol and following the
instructions below:
Select the appropriate cell image using the arrows in the Cell Image area. The chosen image is
then displayed e.g. 17/20 is the 17th image of a set of 20 and the corresponding data is shown in
the Image column on the Result Data area.
6.3 Graphical Display of the Analysis Results
Besides displaying the evaluated analysis values in the Overall column, the Cedex system can
also display graphic diagrams of the results. These diagrams can be displayed once
measurements have been completed i.e. when all single sample images have been analyzed
and evaluated by clicking on the Measurement Chart, Compact. Histogram or Diameter
Histogram buttons in the Result Data area of the Cedex Workbench.
The results displayed in these diagrams are based on valid images taken of the sample. Cell
images that could lead to inaccurate measurement results due to lack of sharpness, air bubbles,
major aggregates, etc. were already excluded from the calculations. Images can be excluded
automatically by the analysis software or manually by the user, see “Viewing and Selecting Cell
Images" on page 65.
42
User Manual Cedex Version 1.6.1
The Analysis Results
Partial View of Diagrams
Certain areas of the chart can be enlarged by following the instructions below:
1.
Place the mouse pointer on the top left hand corner of the area to be enlarged.
2.
Hold the left mouse button pressed down and move it to the lower right hand corner of
the area to be enlarged.
3.
Release the mouse button and the selected area will fill the complete window.
The enlarged area or selected parts of it can now be moved by following the instructions below:
1.
Place the mouse pointer on the desired area in the diagram.
2.
Hold the right mouse button pressed down and move the chart as desired.
Return to the original size of the chart by following the instructions below:
1.
Place the mouse pointer anywhere on the diagram.
2.
Hold the left mouse button pressed down and form a box from the bottom right corner to
the upper left corner.
3.
Release the mouse button. The chart will then be in its original size.
User Manual Cedex Version 1.6.1
43
6
The Aggregate Histogram
The Cedex system offers a throughout evaluation of cell cultures in aggregates. Clusters of up
to 15 cells are displayed.
The Aggregate Histogram button in the Cedex-Workbench is used to call the corresponding
histogram.
The Aggregate Histogram shows the amount of cells of the cell culture available in aggregates
and how many cells the aggregate is composed of. Both the cell amount as well as their
percentage distribution can be displayed.
Figure 11
Aggregate Histogram, Detailed View (partitioned in living and dead cells),
here: number of cells
The identified Number of Cells [#] is displayed on the y-axis. The Aggregate Size in the
amount of cells per aggregate is given on the x-axis. Figure 11 shows for example, that 2.506
living and 666 dead cells of all identified cells respectively are available in aggregates build of
two cells.
The percentages are displayed using the percent button.
44
User Manual Cedex Version 1.6.1
The Analysis Results
Figure 12
The Aggregate Histogram, detailed view (partitioned in living and dead cells),
here: percentage distribution of the cells
The percentage of cells [%] of the Total Cell Count is displayed on the y-axis.
The aggregate size in amount of cells per aggregate is given on the x-axis.
Figure 12 shows for example, that 21,6 % of all living cells and 22,7 % of all dead cells are
available in aggregates build of two cells.
The Total Cell Count (living and dead cells) per aggregate is mapped in the histogram using
the total button. Figure 13 displays for example, that 3.172 cells of the measurement are
available in aggregates build of two cells.
Figure 13
The Aggregate Histogram, total view (sum of living and dead cells),
here: number of cells
The percentage of cells available in the aggregates in relation to the total cell count is displayed
using the percent button.
User Manual Cedex Version 1.6.1
45
6
Figure 14
The Aggregate Histogram, total view (sum of living and dead cells),
here: percentage
The Measurement Chart
Click on the Measurement Chart button to display a Column diagram showing the adjacent
combination of viable cells (green column) and dead cells (red column) as a single image.
Figure 15
Measurement Chart
Any cell image that is declared invalid and excluded from the calculations appears as an empty
space on the chart allowing easy identification of unusual samples. These unusual samples can
then be displayed and the respective cell image(s) evaluated, see “Viewing and Selecting Cell
Images" on page 65.
46
User Manual Cedex Version 1.6.1
The Analysis Results
Two horizontal lines in the diagram show the average number of all analyzed viable cells. The
blue line represents the number of the living and the yellow line the dead cells.
Combine two cell images by clicking on the Combine button below the diagram. The
combination of two images corresponds to the results of a Neubauer hemocytometer.
Return to the standard display by clicking on the Single button.
The Compactness Histogram Chart
Click on the Compactness Histogram button to display a diagram that compares viable cell
shapes to that of a sphere. This diagram shows results that do not relate to individual cell
images. To view results relating to individual cell images, see “Viewing Individual Analysis
Results after Completion of the Measurement Process" on page 42.
Figure 16
Compactness Histogram
The ratio between the cell circumference and the cell area is based on an ideal sphere (4π),
which is equivalent to the value >1< on the abscissa of the histogram. The extent of variation
between the cell shapes and a sphere is reflected in the values being greater than 1. If a
significant number of cells (ordinate) have a value higher than 1, then this could indicate
improper handling of a sample.
Check the state of the cell culture i.e. if the stirring speed is too high or nutrient composition is
incorrect.
User Manual Cedex Version 1.6.1
47
6
The Diameter Histogram Chart
Click on the Diameter Histogram button to display a diagram of viable cell diameters based on
the Average Diameter value of all images in the Overall column.
Figure 17
Diameter Histogram
The Diameter Histogram provides three sliders to define separate diameter-intervals. This
allows you to divide the Diameter Histogram into maximum four parts. The sliders can be
activated by clicking on the corresponding boxes and moved by sliding them. You can also
define the margins of the interval by entering the numerical values on the left hand side of each
slider.
The borders of the first interval are defined by the minimum value and the first numerical value
entered. The next two values define the upper border of the second and third interval
respectively. The fourth interval is defined by the upper border of the third interval and the
maximum value.
The amount of viable cells, their percentage of the total viable cell-number and the viable cell
densities [x105 Cells / mL] are listed in a table for each of the individual intervals respectively.
To obtain full details on viewing the individual cell images, see “Viewing Individual Analysis
Results after Completion of the Measurement Process" on page 42.
48
User Manual Cedex Version 1.6.1
The Analysis Results
The Cultivation Time Chart
Access to the Cultivation Time Chart takes place on the Cedex-Workbench through the
Cultivation Time Chart button.
In the Cultivation Time Chart (cultivation progress / result diagram), growth- or cultureprogresses of cell cultures can be graphically evaluated. Besides, there is the possibility of
exporting and printing out the data.
After clicking on the button, the Cultivation Time Chart window, through which corresponding
buttons call all the functions (Cultivation Progress Diagram, Export and Print), opens.
Figure 18
The Cultivation Time Chart
User Manual Cedex Version 1.6.1
49
6
Areas in the Cultivation Time Chart Window
The Cultivation Time Chart Diagram
In the Cultivation Time Chart window, the grouped data (see “Grouping Measurement Serie“,
Page 57) is displayed in a diagram.
When the mouse pointer is over a measurement point in the diagram, detailed information of the
corresponding measurement series is displayed in the View area (see Figure 19, page 50). The
view area is thereby faded. If, in addition, the mouse pointer is pressed, the graphic
representation can be enlarged or scaled down again by moving the mouse.
In order to enlarge particular areas of the diagram, do the following:
1.
Place the mouse pointer on the top left hand corner of the area to be enlarged.
2.
Hold the left mouse button pressed down and move it to the lower right hand corner of
the area to be enlarged.
3.
Release the mouse button and the selected area will fill the complete window.
In order to display the diagram in its original size, do the following:
1.
Place the mouse pointer anywhere on the diagram.
2.
Hold the left mouse button pressed down and form a box from the bottom right corner to
the upper left corner.
3.
Release the mouse button. The chart will then be in its original size.
Figure 19
Detailed Information in the View area
Information listed in the Detailed Information area:
•
Symbol in the diagram (corresponding to form and color)
•
Term of the selected evaluation (Viable Cell Density, Dead Cell Density, Total Cell
Density, Avg. Diameter, Avg. Compactness, Viability)
•
Value on the y-axis and the appropriate unit
•
Value on the x-axis and the appropriate unit
•
Number of the measurement series in the Data Series table
•
Number of the measurement (Point) in the Data Series table
50
User Manual Cedex Version 1.6.1
The Analysis Results
Variable axis calibration
The cell density on the y-axis of the diagram can be displayed in two variants. Buttons 10^5 and
10^6, determine whether cell density in the unit [10^5 Cells / mL] or [10^6 Cells / mL] should be
displayed on the y-axis. Correspondingly in the diagram, the y-axis calibration and division are
automatically adjusted.
10^5 / 10^6:
Exponent-switchover for the density.
The default value is 10^5.
Buttons [h] and [d] determine whether the time-axis should be displayed in hours [h] or days [d].
Correspondingly in the diagram, the x-axis calibration and division are automatically adjusted.
[h] / [d]:
Time-axis switchover for hours [h] or days [d].
The default value is [d].
Buttons lin or log can be selected to determine whether the y-axis should display linear (lin) or
logarithmic (log) scaling for cell density.
lin / log:
y-axis switchover for linear or logarithmic
scaling for the density data.
The default value is lin.
The Data Selection Area
Which curves should be displayed in the diagram is determined in the Data Selection area.
The following parameters can be selected for this purpose:
•
Viable Cell Density (number of living cells) [Cells / mL)]
•
Dead Cell Density (number of dead cells) [Cells / mL)]
•
Total Cell Density (total number of cells) [Cells / mL)]
•
Viability [%]
•
Avg. Diameter (average diameter of living cells) [µm]
•
Avg. Compactness (average compactness of living cells) without unit
The selection of the parameters is done within the Checkbox.
If only one parameter is selected, its value ([Cells / mL], [%], [µm], numerical value of
compactness without unit) is displayed on the y-axis.
The combination of parameters is only possible for a maximum of two different units since only
two ordinates (left and right) are available. The values for the cell densities [Cells / mL] are
thereby always displayed on the left ordinate.
If display for viability is combined with diameter or compactness, values for the viability appear
on the left ordinate and those for the diameter or the compactness on the right ordinate
respectively. If diameter and compactness are combined together, the left ordinate displays the
diameter-value and the right one the compactness-value respectively.
User Manual Cedex Version 1.6.1
51
6
The View Area
The measurement series grouped by the user for the Cultivation Time Chart (creating a View),
including further information, can be stored. All information about this View is then displayed in
the View area:
Name
Creator
Designed
Modified
Name of the View (user-defined).
User-name of the creator.
Date of creation of this View.
Date of the last modification of this View.
The Save, Load and Delete buttons can save, load or delete a View (grouping of the
measurement series).
Saving a View
The Save button opens the Save a View window, in which the name of the View (the grouping
of the measurement series saved) is set.
Figure 20
The Save a View window
In the entry-row, the user can enter a new name for the View or select an existing one from the
list. The list contains only Views set up by the user himself. There is no possibility of overwriting
Views created by others. By clicking a list-entry, the name is automatically adopted in the entryrow. The entered name can still be modified afterwards. If the selected View-name already
exists, a safety challenge on whether the existing file should be overwritten appears.
If the current View already has a name, this name is automatically adopted in the entry field.
The window can be quit with the Cancel button.
The View-data is stored under the given name using the Save button.
52
User Manual Cedex Version 1.6.1
The Analysis Results
Loading a View
The Load button opens the Load a View window, in which the View-file to be loaded can be
selected.
Figure 21
The Load a View window
Via the Show my files only Checkbox, the display in the Load a View window is limited to
one´s own Views only.
In the list of the Load a View window, the individual name of the View, the creator´s user-name
and the date of the last modification are shown. The window can be quit using the Cancel
button.
The name of the View is automatically adopted in the entry-row at the click of an entry in the list.
The corresponding data is loaded using the Load button.
A progress bar indicates the time course during a loading process.
Figure 22
The Progress bar
There is a possibility of interrupting the loading process using the Cancel button.
If the current user does not have all access rights to the grouped data in a View, a message
calling his attention to this fact follows. He or she can then choose to load only the remaining
data or cancel the entire loading process altogether.
After the loading, the data in the View, the Data Series and the Diagram areas is updated.
User Manual Cedex Version 1.6.1
53
6
Deleting a View
The Delete button opens the Delete a View window that is constructed like the Save a View
window (see Figure 20, page 52). The Save button in this window was replaced by the Delete
button. The selection of the View to be deleted occurs in the list or by entering the name in the
entry-row. Deleting the data in the View is effected by the Delete button and confirming the
safety challenge.
The window can be quit by using the Cancel button.
The General Area
In General area, printing and exporting data can be controlled and comments entered / viewed.
The Hide button fades out the Cultivation Time Chart window.
Printing User-defined Results
The Print button opens the Print Culivation Time Chart window (print-window) that allows
printing out the diagram with the corresponding data.
Figure 23
The Print Cultivation Time Chart window
If the print colored Checkbox is clicked, the colors of the diagram are adopted for colored
printing. If the Checkbox is not clicked, the data is displayed in black and white and is suitable
for a black-and-white printer.
Printer settings are selected using the PrintOptions button.
The Preview button displays a printing preview.
The Print button initiates the printing of the diagram.
The Cancel button can be used to quit the Print Culivation Time Chart window without using
the print-function.
Exporting the Results
The Export button opens the Export window, from which it is possible to export selected data
in various formats (see “Exporting the Cultivation Time Chart Data“, page 59).
54
User Manual Cedex Version 1.6.1
The Analysis Results
Entering a Comment
The Comment button opens the Comment of the View window that offers the possibility of
entering a comment on the current grouping of measurement series (View). The comment is
stored and the window is closed using OK.
Shielding the Cultivation Time Chart Window
The Hide button fades out the Cultivation Time Chart window. The Cedex-Workbench is again
visible. The Cultivation Time Chart button can again fade-in the window without changing it.
The Extras Area
The Fit lowest common value button enables automatic shifting of the zero-point of single
measurement series to each other. A window, in which the data type that should be used is
selected, appears. The following are for selection:
•
Viable Cell Density
•
Dead Cell Density
•
Total Cell Density
By means of this function, an automatic shifting of the zero-point takes place on the x-axis, in
order to be able to compare the measurement series to each other better. The lowest common
value of the measurement series is hereby automatically determined and the graphs in the
diagram shifted to each other such that it falls in on the x-axis in one point. In doing so, the
leftmost point of the graph of all the measurement points is set at value 0. See also
“Measurement Series Offset“, Page 56.
The Data Series Area
The List of Measurement Series in the Data Series Area
In the Data Series area, general data of the measurement series that were selected for the
display in the diagram is listed down in summary. Up to five measurement series can be
grouped together.
In the fields Reactor ID, Sample ID (Start) and Start (Date/Time), data from the first
measurement of each measurement series is used and in the field Sample ID (End), data from
the last measurement of each measurement series.
The New Button
The New button opens the Selection of Data Series window, in which new measurement
series can be grouped (see “Grouping Measurement Series“, page 57). If measurements are
already in the Data Series list, the Security Question window, in which information on whether
all or only the selected measurement series should be deleted must be entered, appears when
the New button is actuated. After selection and confirmation with Yes, new measurement series
can then be selected in the Selection of Data Series window. The newly selected
measurement series can then be adopted in the corresponding row of the Data Series table.
User Manual Cedex Version 1.6.1
55
6
Figure 24
The Security Question window
Display of the Measurement Series in the Diagram
Once a data set has been constructed, the display of the very measurement series in the
diagram can be switched on (On) or switched off by activating or deactivating the corresponding
checkbox in the on / off column respectively.
Measurement Series Offset
In the diagram, measurement series are automatically displayed such that all measurement
series begin at time 0. The measurement series can however then be well compared to each
other, only when the beginning of the exponential growth phase (log-Phase) sets in at the same
time. That´s why it is possible to shift the curves in the diagram.
Behind every measurement series that is displayed in the Data Series list, a button in the Offset
column displays the offset set by the user (the button displays 0 [h], if offset was not set).
Clicking on this button opens the Measurement Offset window. The measurement series offset
can be manually shifted in this window.
Figure 25
The Measurement Offset window
The offset can be separatelly entered for each of the five measurement series by clicking the
button with the corresponding number of the measurement series. Big time differences can be
entered in days [d], small ones in hours [h]. The selection is effected by the activation of the
individual buttons [h] / [d]. The offset that is set causes an immediate shift of the measurement
series in the diagram such that, whether an appropriate position in the diagram was reached
can be directly controlled.
The offset can be set by shifting the slider or by directly entering a numerical value in the Offset
entry-field.
56
User Manual Cedex Version 1.6.1
The Analysis Results
The smallest time unit that can be set is 0.25 hours (15 Minutes).
The Ok button adopts values set in the graphics. If the Cancel button is actuated, the original
offset values are re-set.
The Details Button
The Details button opens the Selection of Measurements window, in order to view or change
the grouping of the corresponding measurement series.
Grouping Measurement Series
The Selection of Data Series Window
The New or the Details button in the Data Series area opens the Selection of Data Series
window. Here, measurement series can be grouped together from the measurements at
disposal.
Figure 26
The Selection of Data Series window
User Manual Cedex Version 1.6.1
57
6
The Select Source Area
In the Select Source area, the desired Workarea (base directory, in which measurement data
are stored), the Reactor ID and the preferred data type (original or reprocessed measurement
data) are selected under Data Set. (It can also be determined later for each measurement in the
Selected Measurements area, whether original or reprocessed data should be used.)
After selecting the Workarea and the Reactor ID, the measurement list in the Sample ID area
is displayed. For a better view, clicking on the bar with arrows can enlarge the Sample ID-List
area.
Entries selected from the Sample ID List can be adopted in the Selected Measurements list
using the Add selected measurements to list button or Drag&Drop. This selection occurs
individually for each measurement series (1 to 5).
The Buttons in the Selection of Data Series Window
Buttons 1, 2, 3, 4, 5 enable switching over between different measuring series.
The Add selected measurements to list button transfers the marked measurements of the
Sample ID list to the Selected Measurements list.
The Review Measurement Data button loads a single marked measurement from the Selected
Measurements list onto the Cedex Workbench. There, this measurement can be viewed in
detail as usual.
The Remove Measurement(s) button removes marked entries from the Selected
Measurements list.
The Ok button closes the Selection of Data Series window and the data is adopted in the Data
series list of the Cultivation Time Chart.
The Selection of Data Series window can be quit using the Cancel button. If the data was
modified, a security question of whether these modifications should really be discarded
appears.
A progress-bar displays the adoption progress. By using the Cancel button in the progress-bar
window, the adoption can be interrupted, whereby the Selection of Data Series window also
fades out.
NOTE
Only measurements already loaded are displayed in the Cultivation Time Chart window
diagram. The Selection of Data Series window must be called once again for loading the rest
of the measurements. The Details button is used for this.
Measurements not adopted are marked with red (9) in the Use column of the Selected
Measurements area. Data that was not at disposal / not found for the adoption, is additionally
marked with an exclamation mark (9 !).
When the mouse pointer is positioned on a measurement in the Selected Measurements list, an
info-window that specifies the Workarea the measurement comes from appears when the right
mouse button is pressed.
As soon as the OK button is actuated, the missing measurements are reloaded and the process
is regularly completed.
58
User Manual Cedex Version 1.6.1
The Analysis Results
The Selected Measurements Area
In the Selected Measurements area, the single measurements that are adopted for each
measurement series in the Cultivation Time Chart are listed. In addition to the measurement
series, Reactor ID, Sample ID, Data Set and Start: Date / Time (when the measurement was
recorded) are listed.
The measurement list is automatically sorted according to the time of recording of each
measurement.
The serial number of a measurement within a measurement series is given in the No.-column.
This number is given under Point in the Detailed Information area for better relation of the
measurement points (see Figure 19, page 50).
The marked status (9) of the Checkbox in the Use column causes the corresponding single
measurement to be displayed in the Cultivation Time Chart. Should it not be desirable to
display a particular single measurement, it can be deactivated by means of a mouse click.
In the Data Set column, there is a possibility of also selecting reprocessed or modified data in
addition to the original data of a measurement. This occurs in the selection of the Drop-Down
list.
If the columns for Reactor ID, Sample ID or Data Set are too narrow to completely display the
entries, the width can be adjusted.
Do as follows:
1.
Position the mouse pointer on the corresponding column dash in the column heading.
2.
Hold the left mouse button pressed down and move the mouse pointer with the column
dash to the required width.
Exporting the Cultivation Time Chart Data
The Export Window
The Export button in the Cultivation Time Chart window opens the Export window.
In this window, one has the possibility of exporting measurement series data currently displayed
in the Cultivation Time Chart window in various ways. One can thereby choose between the
DIF and the CSV formats and, in addition, set further details such as the size and structure of
the data. These export settings can be stored as templates, so that frequently used settings can
quickly be used again.
User Manual Cedex Version 1.6.1
59
6
Figure 27
The Export window
The Output File Name Area
In the entry field of the Output File Name area, the path and the name, under which the export
file should be stored, are entered. The button
in which path or file can be directly selected.
on the right of the entry field opens a window,
The Output Format Area
Here, format for the export file can be selected (DIF, e.g. for Excel or CSV generally usable).
The files automatically and unchangeably receive .dif or .csv file-name extensions.
The Data Series Mixing Area
The distribution or structure of the measurement series for the export file are selected in this
area.
Single file for each data series is used to create a file for each measurement series. The file
name is thereby automatically supplemented with the number of the current measurement
series directly in front of the file-name extension.
Common files for each data series is used to store all the measurement series in a common
file. Besides, how the list should be structured, can be additionally chosen.
60
User Manual Cedex Version 1.6.1
The Analysis Results
One complete list
The measurement series are not separately
listed, but rather all data is grouped together in
a big list. The data is thereby directly attached,
one after the other, according to the sequence
of the Data Series list.
List for each data series, side by side
The single measurement series are listed
beside each other in a data block each. There
is an empty column space between the
measurement series.
List for each data series, among each other The single measurement series are
successively listed in a data block each. There
is an empty row space between the
measurement series.
The Additional Information Area
Whether additional information should be adopted in the export file, can be selected in the
Additional Information area.
•
Add headline (column names): Adding headlines to the data to be (see “The Export
Structure Area”, page 64).
•
Add creation information: Adding further information to the measurement series:
Current User
Date /Time
Device ID
Cedex Version
Export File Name
Series 1
Series 2
Series 3
Series 4
Series 5
View Name
Export Template Name
Name of the user, who created this export
Date / Time of the export
Appliance number of the Cedex System, on which the export
was created
Programme version of the Cedex application
Path / File name of the created export file
Number of data sets of the first measurement series
Number of data sets of the second measurement
Number of data sets of the third measurement
Number of data sets of the fourth measurement
Number of data sets of the fifth measurement
Name of the View used and its creator
Name of the export template used and its creator
The CSV Options Area
Here, options that specify the data transfer in the CSV format can be entered. If the Use IBM
OEM Charset checkbox is activated, the IBM OEM-code is used for the export file; otherwise
the Standard Windows fond is used. If the Use LF instead of CR/LF checkbox is activated, line
feeding in the export file is carried out only as Linefeed (LF, 0AH); otherwise Carriage Return
and Linefeed (CR/LF, 0DH/0AH) are used.
The Export Template Area
Once the options for the data export have been set, they can be saved in an ExportTemplate.
This ExportTemplate can then be called any time for further data exports.
User Manual Cedex Version 1.6.1
61
6
The Buttons in the Export Template Area
Information on name, creator, etc. is listed for a loaded template in the Export Template area.
The Save Button
Templates created can be stored using the Save button. The Save an Export Template
window opens, in which the user can select and modify an existing Export Template name or
enter a new name. If the selected Export Template name already exists, a warning appears with
the question, whether the existing file should really be overwritten. Save stores the Export
Template.
The window can be quit using Cancel without saving the Export Template.
Figure 28
The Save an Export Template window
62
User Manual Cedex Version 1.6.1
The Analysis Results
The Load Button
The Load button opens the Load an Export Template, window, in which the user can select an
existing Export Template for loading.
Figure 29
The Load an Export Template window
Through the Show my files only checkbox, the display in the Load an Export Template
window is limited to the own Export Templates only.
The name is automatically adopted entry row by clicking the desired template in the list.
Likewise, it is also possible to enter the name in the entry row directly.
The use of the button Load results in loading the choosen Export Template.
Using Cancel, the window can be quit without loading an Export Template.
The Delete Button
Stored Export Templates can be deleted using the Delete button. The Delete an Export
Template window, in which the user selects the Export Template to be deleted, opens.
Actuating the Delete button and subsequently OK deletes the Export Template. Only selfcreated templates can be deleted.
Using Cancel, the window can be quit without deleting a template.
Available Export-Templates for Excel
By default, export-templates that take special features of respective Excel versions into account
are put at the disposal of the user Administrator for various Excel variants.
User Manual Cedex Version 1.6.1
63
6
The Export Structure Area
In this area, individual data fields that are available in the Cultivation Time Chart can be
selected for the export.
The left list (Available Data) shows all available data for the export. Selected data from this list
is transfered to the right list (Export Data) using Add. Using Remove, selected data from the
Export Data list can again be removed. Drag & Drop can as well shift the data.
The Move up and Move down buttons move a selected entry in the Export Data list up or
down respectively. This has an effect on the structure / sequence in the export file.
The following data fields are available for export:
Avg. Compactness
Avg. Diameter [µm]
Comment
Creator
Data Series Number
Data Set
Date / Time
Dead Cell Density [10^5 Cells/mL]
Dead Cell Density [10^6 Cells/mL]
Dead Cells
Device ID
Dilution
Group Identifier
Operator Name
Operator Parameter
Reactor ID
Sample ID
Std. Deviation [10^5 Cells/mL]
Std. Deviation [10^6 Cells/mL]
Total Cell Density [10^5 Cells/mL]
Total Cell Density [10^6 Cells/mL]
Total Cells
Total Images
Used Images
Viability [%]
Viable Cell Density [10^5 Cells/mL]
Viable Cell Density [10^6 Cells/mL]
Viable Cells
Workarea
Some data fields are offered in two formats:
•
specification in [10^5 Cells/mL]
•
specification in [10^6 Cells/mL]
Once one of these formats has been included in the Export Data area, all data fields with the
other format are automatically shielded.
Furthermore, date- and time-formats in the Date / Time Format area, characters for the
inversion of strings (text fields) for export in the CSV format in the String Terminator area and
the decimal-point symbol in the Decimal Point area can be selected.
64
User Manual Cedex Version 1.6.1
The Analysis Results
The Start Export Button
The export process is initiated with the Start Export button. A window with progress bars
appears, in which the time progress of the export is displayed. The export procedure can be
interrupted using the Cancel button. After successful export, its termination is displayed. OK
closes the export window.
The Hide Button
The Hide button fades out the Export window and the Cultivation Time Chart window is
displayed again. When the Export window is called again, it appears in an unchanged form with
the same contents.
Transposing an exported file into Excel
Open the exported CSV-file with a double-click on the file-name in Explorer. If Excel is started
earlier and used to open the file, depending on the Excel version, formats will possibly not be
correctly transposed.
6.4 Viewing and Selecting Cell Images
Any single image that could lead to incorrect results during measurements due to debris
particles or air bubbles is automatically recognized as invalid and excluded from all calculations
by the Cedex analysis software. Users can also manually exclude individual images from the
calculations or include images that were automatically excluded by the software.
The Cedex analysis software enables a close view of the single image or an enlarged display
for evaluation.
Viewing Individual Cell Images
Individual images can be viewed on the Cell Image area. Follow the instructions below:
Select the appropriate image using the arrows in the Cell Image area.
Only one image is displayed but an overview of all cell images can be displayed by
clicking on
.
User Manual Cedex Version 1.6.1
65
6
Enlarging a Cell Image
Follow the instructions below:
1.
Select the appropriate image using the arrows in the Cell Image area.
2.
Move the cursor on the indicated image and click on the left mouse button to display an
enlarged image, click on the left mouse button again to return it to normal size.
Click on the right mouse button to open the ResultViewer (see page 67) and display cells that
were identified as either viable or dead, as described in the next section.
Viewing a Cell Image Using the IP ResultViewer
The IP ResultViewer, contrary to the standard display, marks all viable and dead cells of a cell
image. The user then has an idea of how abnormal cell shapes and clusters are evaluated by
the software. The Cedex analysis software offers various options to optimize measurement
results by adjusting the Operator Standard Cells. The Operator can be adjusted for abnormal
cell culture images or for specific internal counting strategies.
Detailed information is found in the Cedex Administrator Manual.
The ResultViewer offers the following information and options:
•
viable: number of viable cells.
•
dead: number of dead cells.
•
Viable Cells button: to mark or unmark viable cells.
•
Dead Cells button: to mark or unmark dead cells.
•
Mark Cells button: viable cells are marked with a uniform yellow circle and dead cells are
marked with a red cross.
•
Outline Cells button: viable cells are marked with a yellow circle, and dead cells with a
red circle. The circle diameter corresponds to the cell diameter.
•
Fill Cells button: presently not available.
•
image enlargement.
•
brightness and contrast settings.
•
navigating a window (scroll bar).
66
User Manual Cedex Version 1.6.1
The Analysis Results
Figure 30
Viewing a cell image using the IP ResultViewer
Follow the instructions below to display the IP ResultViewer:
1.
Select the required cell image using the arrows in the Cell Image area.
2.
Move the cursor on the displayed image in the Cell Image area.
3.
The ResultViewer is displayed by clicking on the right mouse button or clicking on Show
IP Result in the Special menu.
User Manual Cedex Version 1.6.1
67
6
4.
Select the required options for the markings and settings. The image can be enlarged
with the magnifying glass or with the left mouse button, see “The Aggregate Histogram”,
on page 44. Holding the right mouse button pressed down and moving it, results in the
enlarged image being moved within the frame.
5.
Click on Close to shut the window or use the
button.
NOTE
IF SINGLE CELLS ON THE IP RESULT VIEWER ARE NOT MARKED AT ALL OR ARE
MARKED AS DEAD WHEN THEY ARE VIABLE OR VICE VERSA, THEN THIS IS AN
EXCEPTION AND DOES NOT INFLUENCE THE STATISTICAL RELIABILITY OF THE
ANALYZED RESULTS.
Excluding Cell Images from the Evaluation Process/Including Excluded
Images
Follow the instructions below:
1.
Select the required cell image with the arrows in the Cell Image area or click on the
overview button
2.
to display all the single cell images as thumbnails.
Select the mode of the single cell image from the drop down list below the image.
Valid image only refers to cell images included in the calculation process. Excluded image
only refers to cell images manually excluded from the calculation process, and Invalid image
only refers to cell images automatically excluded by the software from the calculation process.
68
User Manual Cedex Version 1.6.1
The Analysis Results
6.5 Printing the Analysis Results
The analysis results obtained by the Cedex system can be printed by clicking on Print results
in the Result Data area.
The printout consists of at least an overview page with all the manufacturer details including all
sample data and analysis parameters entered by the user as well as a tabular and diagram of
the overall results. A more detailed printout is also possible using the Cedex Workbench with
the following printing options:
•
no details, please: Limited printout details on the overall analysis results of the
measured sample, including a tabular displayed in the Result Data area, as well as a
graphic diagram of the Measurement Chart, Compact. Histogram and Diameter
Histogram.
•
2 images per row up to 5 images per row: Limited printout details as above in addition
to a printout of all the single cell images including their six analysis parameters. The
amount of cell images per row determines the number of pages to be printed.
•
print colored: select to optimize output for color printing, otherwise the output is
optimized for a gray scale (mono) printing.
Follow the instructions below to print the analysis results:
1.
Click on Print results in the Result Data area.
The limited printout details are automatically displayed when the Print window appears.
2.
Select the appropriate printing option(s).
3.
Click on Print Options to select and set the printer.
4.
Click on Print to start printing.
Click on Preview to display a preview of the print, or click on Cancel to shut the window and
cancel a print.
6.6 Viewing and Evaluating the Data Audit Trail File
The Cedex software automatically creates a Audit Trail (log) file for each sample and records all
relevant information relating to the sample, allowing the measurement details to be reviewed
and printed.
The Audit Trail file consists of at least the following details:
•
Manufacturer specifications on the device (first 3 rows).
•
Measurement data and settings: displays the date and time of measurements including
the username as well as the Sample ID/Reactor ID and parameters used for the sample
analysis. These entries correspond to data from the Sample Properties, Data Source
Identification and Process Parameters areas including a list of the Cell Type settings
without any results.
User Manual Cedex Version 1.6.1
69
6
If the sample is modified or reprocessed, the Audit Trail file will log these events in chronological
order. This allows all measurement data to be retraced including their modification,
reprocessing and to display the date, time, username and used parameters.
The Audit Trail file data can basically never be overwritten to ensure that all recorded, analyzed
and modified measurement data is documented.
NOTE
SINCE THE AUDIT TRAIL IS SECURED TOGETHER WITH THE RESULT DATA, DELETING
THE RESULT DATA WILL RESULT IN A LOSS OF THE AUDIT TRAIL.
Click on Audit Trail in the Process Parameters area to gain access to the Audit Trail file which
is also available in the archive and reprocess mode.
The Audit Trail file is displayed when the floppy disk symbol is activated after the completion of
a measurement. It is available in the archive mode when the data set is recorded and the traffic
light symbol is green in the Data Source Identification area. It is available in the reprocess
mode when a new data name is set and the traffic light symbol in the Data Source
Identification area is green and a new name for the (reprocessed) data is specified.
NOTE
PLEASE MAKE SURE, THAT THE RESULT DATA AND THE DIRECTORY IS WRITABLE BY
THE APPLICATION.
A READ-ONLY SITUATION CAN OCCUR WHEN COPYING BACK SAVED RESULTS FROM
CD OR NETWORK DRIVE. IN THIS CASE A WARNING BOX WILL INFORM YOU THAT THE
FILES ARE NOT WRITABLE. SELECTING OK WILL LET YOU PROCEED WITHOUT
UPDATING THE AUDIT TRAIL.
6.7 Editing Existing Analysis Results/Data Sets
Besides the analysis of measurements, the Cedex system also allows existing measurement
results or data sets to be reprocessed and modify. These changes are done on existing
software data (image and analysis results) and therefore do not require any adjustments to the
measurement system.
There are two options possible when making changes to the analysis results: Viewing and
possible correction of evaluated measurements and their corresponding results with the floppy
disk symbol or reprocessing existing images with the calculator symbol.
Viewing Existing Analysis Results/Modifying Measurement Parameters
Existing data sets may be viewed and corrected in the archive mode which is available to all
system users. The options in the archive mode are however dependent on specific access
rights of users.
(archive) in the Data Source Identification area on the
Click on the floppy disk symbol
Cedex Workbench to access the archive mode.
70
User Manual Cedex Version 1.6.1
The Analysis Results
The archive mode offers the following options:
•
Entering, modifying or deleting a comment, see “Entering a Comment" on page 35.
•
Correction of the dilution, see “Defining the Measurement and Analysis (Process)
Parameters" on page 35.
•
Re-evaluation of cell images i.e. excluding or including images, see “Viewing and
Selecting Cell Images”, on page 65.
•
Viewing/printing the analysis results, see “The Analysis Results" on page 41 and “Printing
the Analysis Results" on page 69.
Follow the instructions below to work with the archive mode:
(archive).
1.
Click on the operating option
2.
Select the appropriate reactor ID from the Reactor ID drop down list.
3.
Select the appropriate sample ID from the Sample ID drop down list.
If the data set has not yet been reprocessed, then a selection in the Data Set area (only
Original Data available) is not possible. If the selected data has been reprocessed then
a selection between the original data and the reprocessed data is possible.
4.
Click on the traffic light symbol to confirm the entries.
Should confirmed entries need to be changed again, then click on the traffic light symbol
to switch to red.
5.
Make the appropriate modifications.
Should a dilution be corrected or a cell image excluded or included in the evaluation, then
the traffic light symbol in the Process Parameters area will switch to red.
6.
Click on the traffic light symbol to confirm.
7.
Click on Yes to confirm the changes and an appropriate message will appear.
Click on No to delete all changes and return to the previous setting.
8.
Click on OK to shut the window.
All changes can be retraced in the Audit Trail file and reviewed later, see “Viewing and
Evaluating the Data Audit Trail File" on page 69.
Reprocessing Existing Data Sets
Reprocessing existing measurement results/data sets i.e. viewing a set of recorded image data
and evaluating them with new analysis parameters can be done in the reprocess mode which is
only accessible to authorized system users.
User Manual Cedex Version 1.6.1
71
6
The reprocess mode offers the following options:
•
Enter, modify or delete a comment, see “Entering a Comment" on page 35.
•
Correction of the dilution, see “Defining the Measurement and Analysis (Process)
Parameters" on page 35.
•
Change the Cell Type, see “Defining the Measurement and Analysis (Process)
Parameters" on page 35. The Cell Type can only be changed if at least one other Cell
Type is available besides the initial Cell Type Standard Cells, see “Adaptation of the
Counting Routine" on page 75.
A new data set is available once the evaluation has been completed and all the changes
can be retraced in the Audit Trail file and reviewed later, see “Viewing and Evaluating the
Data Audit Trail File" on page 69.
The reprocess mode is activated by clicking on the calculator button
Identification area on the Cedex Workbench.
in the Data Source
Follow the instructions below to reprocess existing data sets with changed analysis parameters:
1.
Click on the operating option
2.
Select the appropriate reactor ID from the Reactor ID drop down list.
3.
Select the appropriate sample ID from the Sample ID drop down list.
4.
Click on the traffic light symbol to confirm. Enter a name for the new data set on request
(reprocess 1, reprocess 2, etc.).
5.
Enter a new name for the data set (the suggested name can be changed). Should
confirmed entries need to be changed again, then click on the traffic light symbol to
switch to red.
6.
Make the necessary changes.
7.
Select the required Cell Type in the Process Parameters area.
8.
Start by clicking on the traffic light symbol in the Process Parameters area.
(reprocess).
The next steps of the reprocessing procedure are the same as for a new measurement. A new
data set is available once the evaluation has been completed.
All the changes can be retraced in the Audit Trail file and reviewed later, see “Viewing and
Evaluating the Data Audit Trail File" on page 69.
NOTE
THE REPROCESSING PROCEDURE CREATES ADDITIONAL DATASETS. ORIGINAL DATA
IS NOT OVERWRITTEN.
72
User Manual Cedex Version 1.6.1
General Functions of the Measurement System
7
General Functions of the Measurement System
The Cedex Workbench offers users with access rights, a row of functions besides the basic
functions of analyzing, modifying and reprocessing of samples and measurement results. These
functions allow easy and user-friendly operations with the Cedex Workbench although some
functions are only available to the administrator e.g. the calibration of the measurement system.
Detailed information is found in the Cedex Administrator Manual.
7.1 Specifying Target Directories for the Analysis Data
A target directory (work area) for the analysis results can only be selected if the user has
specific access rights to this function.
Follow the instructions below to choose a target directory:
1.
Click on the File menu on the Cedex Workbench.
2.
Click on Choose Workarea and the Choose a Workarea list will appear.
3.
Select the appropriate target directory (work area).
4.
Click on OK to confirm.
7.2
Changing your own Password
Users may change their own passwords depending on their access rights. Follow the
instructions below:
1.
Click on the Setup menu on the Cedex Workbench.
2.
Click on Change my Password and the Change password area will appear.
3.
Enter your present password in the first field.
4.
Enter your new password in the second and third fields.
5.
Click on OK to confirm the entry and a message will confirm the entry.
6.
Click on OK to shut the window.
User Manual Cedex Version 1.6.1
73
7
7.3
Viewing your own Access Rights
Follow the instructions below:
1.
Click on the Setup menu on the Cedex Workbench.
2.
Click on Show my rights and the Show rights window will appear.
3.
Click on OK to shut the window.
7.4
Data Entry Fields for the Data Source Identification Area
Every set of sample data is clearly defined using a set of pre-defined fields known as an ID
Mask. The Cedex system has a default ID Mask with three standard fields (Reactor ID, Sample
ID and Data Set type). If an additional ID Mask is required (using different fields), a customized
ID Mask may be created by innovatis AG upon request. Where alternative ID Masks are
available, the user can choose the appropriate mask using the ID Masks sub-menu in the
Setup menu.
7.5
Specifying your own Default Measurement Parameters
The logged in user with specific access rights to certain default measurement parameters (cell
type, process type, dilution, etc.) can determine these during measurements. These parameter
settings are only valid for this user and if all the measurements taken are based on these
default parameters, then only the Data Source Identification area requires to be filled out prior
to measurements. All other entries will be done automatically.
Follow the instructions below:
1.
Click on the Setup menu on the Cedex Workbench.
2.
Click on Defaults and the Defaults area will appear.
3.
Specify the appropriate default measurement parameters.
4.
Click on Save to confirm.
74
User Manual Cedex Version 1.6.1
Maintenance of the Measuremment System
8
Administrator Functions
The following system functions are in principle only available to the system administrator:
•
Administration of user profiles
•
Adaptation to the Operator Standard Cells counting routine.
•
Calibration of the measurement system
8.1
Administration of User Profiles
The user usually has limited access rights. All administration rights relating to user profiles i.e.
creating, deleting, modifying and delegating rights, should remain exclusively with the
administrator.
Detailed instructions of
•
Creating User Profiles
•
Deleting User Profiles
•
Modifying the Access Rights of a User Profile
•
Modifying a Username
•
Deleting a User Password
can be found in the Cedex Administrator Manual.
8.2
Adaptation of the Counting Routine
Normally the Cell Type Standard Cells controls the image recognition making it unnecessary to
modify the counting routine. The Cell Type Standard Cell counting routine which is integrated
into the Cedex system is set to suit all types of standard measurements. However, under certain
circumstances, it may be necessary to adjust this counting routine e.g. for cell cultures with an
extraordinary appearance or for specific internal counting strategies i.e. if certain aggregates or
cell nuclei are to be counted or not.
In this case, the administrator can adjust the image processing and evaluation strategy of the
Cell Type Standard Cells to meet specific requirements. Adjusting the Cell Type Standard
Cells is also known as creating a new Cell Type because a new Cell Type is created or an
existing Cell Type is modified. This can be done by changing certain parameters that are based
on the Cell Type Standard Cells counting routine.
The Cell Type Standard Cells is based on seven parameters and one algorithm. Each
parameter directly influences the image processing and evaluation strategy and therefore the
results. The present software version has only one algorithm (Operator).
User Manual Cedex Version 1.6.1
75
9
Figure 31
Setting Cell Type Standard Cells parameters
Description of the Individual Parameters
Living Cells‘ Appearance
Range [-20, 20], Default 0, Unit [absolute measure].
Defines the sharpness and clarity of viable cells. Increasing this value means that more cells will
be determined as viable cells.
This parameter should be handled with care because it influences the determination of the cell
density and the viability.
The following text describes a situation where a change of this parameter is necessary. A cell
line should be analyzed, where dead cells absorb the Trypan Blue badly. If the default
parameter setting is taken for an analysis, some of the dead cells will be recognized as living
cells. When the parameter Living Cells‘ Appearance is changed towards negative values (in
special situations towards values <-10), the darker objects are more and more recognized as
dead cells. Thus, the measured viability decreases.
If the parameter is changed towards positive values, the amount of objects counted as living
cells will increase. Thus, the measured viability increases. A change towards positive values
could make sense, if due to the condition of the cells or he process media, the optical
appearance has a deficient contrast.
ATTENTION: In standard situations a change of this parameter results in labeling of debris
objects!
In the range [-10, 10] the Std. Cells 5.00 operator behaves similar to the Std. Cells 3.0
operator.
76
User Manual Cedex Version 1.6.1
Maintenance of the Measuremment System
Dead Cells’ Size
Range [40, 250], Default 110, Unit [µm²].
Defines the minimum cross-sectional area of a particle in µm². Increasing this value means that
less particles will be recognized as dead cells.
Dead Cells’ Appearance
Range [-10, 10], Default 0, Unit [absolute measure].
Dead cells have a variety of appearances under the microscope. This can range from sharply
outlined small dark dots to less distinct objects with varying brightness and contrast. This
parameter distinguishes large dark objects which are “typical dead cells” from less distinct
objects. Increasing this value means that there are more deviations from “typical dead cells”
resulting in a higher count of dead cells.
Dead Cells’ Aggregate Minimum
Range [250, 1500], Default 360, Unit [µm²].
Defines the minimum cross-sectional area of a dead cell aggregate (cluster). When this size is
reached, it is then automatically partitioned into single cells.
Dead Cells’ Aggregate Maximum
Range [1500, 5000], Default 2250, Unit [µm²].
Defines the maximum cross-sectional area of a dead cell aggregate (cluster). The dead cell
aggregate area within this range is automatically partitioned into single cells. Any aggregate
larger than the specified maximum area is not taken into account.
Dead Cells’ Aggregate Appearance
Range [-10, 10], Default 0, Unit [absolute measure].
Defines the automatic evaluation of a dead cell aggregate (cluster).The cross-sectional area of
dead cell aggregates are automatically partitioned into single cells. Increasing this value means
that there are more single cells determined in the aggregate.
Minimum Pollution Area
Range [5000, 30000], Default 5400, Unit [µm²].
Defines the minimum cross-sectional area of the pollution size e.g. debris particles, air bubbles
etc. Any pollution size larger than the specified minimum area results in the entire image being
excluded.
Detailed instructions of
•
Modifying a Cell Type
•
Creating a New Cell Type
•
Deleting a Cell Type
can be found in the Cedex Administrator Manual.
User Manual Cedex Version 1.6.1
77
9
8.3 Saving the Measurement Data
Only Cedex user, which have full access to the Windows desktop, can start the burning
software, to save the mesurement data on CD.
Detailed instructions can be found in the Cedex Administrator Manual.
78
User Manual Cedex Version 1.6.1
Maintenance of the Measuremment System
9
Maintenance of the Measurement System
The measurement system should be regularly serviced to guarantee optimal performance and
maximize the life-span of the Cedex system.
This includes the following maintenance procedures:
•
Recurrent manual maintenance and cleaning routines if required.
•
Cleaning routines with the Liquid Management.
•
Syringe cleaning and maintenance.
•
Maintenance of the capillary tubes.
•
Maintenance of the syringe guide and spindle.
•
Maintenance of the measurement chamber (flowcell), the microscope optic and the 8-way
valve. This maintenance routine must be carried out only by an authorized service
technician.
This chapter provides detailed instructions and guidelines for each individual cleaning and
maintenance procedure.
9.1 Cleaning and Maintenance Check List
This check list shows when each cleaning and maintenance routine should be done.
Carry out these routines on a daily basis:
•
Control of the reagent container each time, prior to use (Filling status, contamination)
•
LM ShutDown: Always after the last measurement and before a Cedex system shut
down.
•
Standard Clean: After the final measurement in a set of samples or before a longer
pause.
•
Chamber Clean 2: At least twice a day.
Carry out this routines on a weekly basis:
•
Intensive Clean
•
Change of Trypan Blue solution.
•
Cleaning the reagent containers and refilling them with fresh reagents.
Carry out this routine on a half-monthly basis:
•
Special Intensive Clean: At least twice a month with 0.1 - 1 N HCL instead of von
detergent (see page 82).
Carry out these routines on a regular basis:
•
Removal and cleaning of the syringe.
•
Cleaning routines carried out by the Liquid Management.
•
Cleaning the external surface of the capillary tubes with a lint-free cloth.
•
Calibration of the measurement system after every three months or after any change of
position or vibration of the measurement system.
User Manual Cedex Version 1.6.1
79
9
9.2 Daily Cleaning and Maintenance
The following cleaning and maintenance routines should be carried out on a regular basis or
whenever necessary.
Checking the Reagent Containers
Volume
Always check that the reagent containers are sufficiently filled with reagents to prevent the
syringe and 8-way valve being used under dry conditions and getting damaged which would
lead to incorrect measurement results. Check the volume in the individual reagent containers
and refill if necessary, prior to each measurement, see “Filling the Containers and Attaching the
Sample Cup to the Sample Port" on page 22.
Cleaning
All reagent containers must be cleaned thoroughly with distilled or de-ionized water when the
measurement system is used for the first time and frequently (recommended once a week)
during routine operations. Avoid reagents being contaminated with dust, fluff particles and
especially micro-organisms in the case of the Trypan Blue solution because this can lead to
false measurement results If the Trypan-Blue solution is contaminated, intense areas that make
image-analysis difficult or even impossible can be visible in the image.
If not in use, keep the Trypan-Blue solution in a refrigerator. A replacement of Trypan-Blue after
5 days is recommended.
Detailed information see “Cleaning the Reagent Containers" on page 22.
Emptying the Waste Container
The waste container should be emptied regularly, depending as the frequently of use. Clean the
container thoroughly and replace it (remove lid) so that the silicone tube and capillary tubes
reach about 1 cm into the container.
Cleaning Routines Carried out by the Liquid Management
The Liquid Management plays a key role in the Cedex system. It is necessary in the beginning
for a Prime and at the end for an LM ShutDown prior to shut down. Click on the Liquid
Management button on the Cedex Workbench to activate the procedure. The Liquid
Management is automatically activated after every sample measurement for the Ultra Fast
Clean routine.
During the Ultra Fast Clean (approx. 30 seconds), the entire liquid management system
including capillary tubes, measurement chamber (flowcell) and sample port are rinsed out
thoroughly.
80
User Manual Cedex Version 1.6.1
Maintenance of the Measuremment System
Besides the LM ShutDown and Prime routines, the Liquid Management offers a range of
different cleaning routines and prepares the syringe for removal.
Figure 32
Liquid Management-window
The Liquid Management window is divided into the following areas:
•
Daily events: Daily cleaning routines with Prime before starting with measurements and
LM ShutDown before turning off the system.
•
Cleaning: Additional cleaning routines.
•
Syringe handling: Syringe maintenance.
•
Time to finish: Duration of cleaning routine.
The Daily Events Area
The Prime and LM ShutDown can be activated here, see “Performing a Prime" on page 33.
Carry out an LM ShutDown prior to every shut down of the Cedex system. The liquid
management system is then prepared for an extended pause i.e. overnight or weekend.
An LM ShutDown is automatically preceded by a Standard Clean routine. The 8-way valve is
then rinsed with distilled or de-ionized water to prevent crystallization. Compressed air finally
presses the Trypan Blue solution back into its container, see “Carrying out an LM ShutDown" on
page 39.
Remove the syringe, clean and re-install it if there is a longer pause, see “Syringe Cleaning and
Maintenance" on page 85.
User Manual Cedex Version 1.6.1
81
9
The Cleaning Area
The following cleaning routines are offered:
•
Fast Clean
•
Standard Clean
•
Intensive Clean
•
Chamber Clean 1
•
Chamber Clean 2
Fast Clean and Standard Clean are carried out in the entire liquid management system
including capillary tubes, measurement chamber (flowcell) and sample port, therefore always
ensure that there is a sample cup attached to the sample port to prevent flooding.
Fast Clean (with detergent, and distilled water for approx. 60 seconds): The entire liquid
management system is rinsed with distilled water, then with detergent and finally with distilled
water.
Use this routine in between measurements to remove dirt particles and air bubbles quickly from
the measurement chamber (flowcell).
Standard Clean (with alcohol, detergent, and distilled water for approx. 90 seconds): The
entire liquid management system is rinsed with distilled water, alcohol, detergent and finally with
distilled water again.
This routine removes dirt particles and is used after measuring a set of samples or before a
longer pause.
Intensive Clean (with alcohol, detergent, and distilled water for approx. 20 minutes): The
measurement chamber (flowcell) is thoroughly rinsed with distilled water + alcohol + distilled
water + detergent and finally distilled water. The detergent remains in the measurement
chamber for a longer period to react on resistant particles.
This routine is used on weekly basis to remove heavy and resistant contamination of the
measurement chamber, capillaries tubes, syringe and 8-way valve. Even the tiniest dirt particle
attached to the sensitive measurement chamber can cause the glass wall to become uneven
and result in aggregates building. These particles are not necessarily visible in the microscopic
image (Cell Image) but have a major impact on measurement results.
If measurement values within a sample measurement show large variations, then this could
indicate that the measurement chamber is soiled.
A special Intensive Clean is required twice a month for a thorough cleaning. Therefore a
solution of 0.1 - 1 N HCL is used instead of detergent.
Follow the instructions below:
1.
Remove the reagent container and replace it with an appropriate container with a
0.1 - 1 N HCL solution, taking care that the capillary tube reaches far enough into the
solution.
2.
Start Prime.
3.
Start Intensiv Clean after Prime has ended.
82
User Manual Cedex Version 1.6.1
Maintenance of the Measuremment System
4.
Replace the HCL container with the detergent container at the end of the Intensive
Clean process.
5.
Start Prime again.
6.
Start Standard Clean after Prime has ended.
The Chamber Clean 1 and Chamber Clean 2 cleaning routines are only required for the
measurement chamber (flowcell).
Chamber Clean 1 (with water for approx. 10 seconds): The measurement chamber (flowcell) is
rinsed at high pressure with distilled or de-ionized water being drawn in through the syringe.
Use this routine to remove resistant protein aggregates, fluff particles or other obstructions from
the measurement chamber.
Chamber Clean 2 (with water, detergent, and air for approx. 30 seconds): This routine
intensifies the Chamber Clean 1 procedure. Once the measurement chamber (flowcell) is rinsed
with water / detergent, the remaining liquid in the capillary tubes in between the syringe and
valve head is drawn through the measurement chamber and then pressed back again with
compressed air.
Use this routine twice daily to remove resistant protein aggregates, fluff particles or other
obstructions from the measurement chamber.
The Syringe Handling Area
The syringe plunger position is set here for the manual cleaning process, see “Syringe Cleaning
and Maintenance" on page 85.
Carrying out a Cleaning Routine
The different cleaning routines always have the same starting procedure. Ensure that there is
always a sample cup attached to the sample port.
Follow the instructions below:
1.
Click on Liquid Management on the Cedex Workbench and the Liquid Management
window will appear.
2.
Click on the appropriate button (e.g. Fast Clean) to automatically start the cleaning
routine.
The Cedex system is blocked during the cleaning routine and the duration is continually
displayed on the Time to finish field.
User Manual Cedex Version 1.6.1
83
9
Interrupting/Terminating a Cleaning Routine
Use the EMERGENCY STOP button to interrupt the cleaning routine immediately if any leaks
are detected in the liquid management system, even in the case of the Ultra Fast Clean that is
carried out automatically.
The Intensive Clean procedure can be interrupted to shorten the long detergent phase in the
measurement chamber (flowcell). Click on the Cancel button in the Liquid Management
window which is only activated during the long detergent phase.
IMPORTANT NOTICE
ONLY USE THE EMERGENCY STOP BUTTON IN A CASE OF EMERGENCY BECAUSE THE
CEDEX PROGRAM MAYBE HAVING TO BE COMPLETELY RESTARTED.
Verifying the Success of the Individual Cleaning Stages
The actual image of the measurement chamber (flowcell) can be displayed on the Live image
of the chamber area in the Liquid Management window to confirm the success of the cleaning
stages.
If the Chamber Clean 2 is not done frequently, a message prompting the user to start this
cleaning routine appears on the desktop after approx. 60 measurements.
Figure 33
Prompt for cleaning
84
User Manual Cedex Version 1.6.1
Maintenance of the Measuremment System
9.3 Syringe Cleaning and Maintenance
The syringe is subject to wear and tear and must therefore be regularly serviced and certain
parts renewed to maximize the life-span of the syringe and 8-way valve and to guarantee
optimal performance.
The measurement chamber (flowcell), tubes, syringe and 8-way valve is cleaned during the
Intensive Clean routine carried out by the Liquid Management, see “The Cleaning Area" on
page 82.
The syringe should undergo an intensive cleaning procedure once a week, if the Cedex system
is frequently used, see “Cleaning the Syringe” on page 86.
General Cleaning and Maintenance Instructions
To guarantee optimal performance and maximize the life-span of the syringe, following
instructions and guidelines are recommended:
•
Should the Cedex system not be used for a longer period, then remove the syringe and
clean the plunger and syringe barrel thoroughly before replacing.
•
The Teflon head seal should be renewed regularly depending on the level of use and
syringe maintenance.
•
Renew the entire syringe as soon as three gaps between the compact rings on the
syringe plunger are clearly discolored, taking the basic color of the Teflon head seal into
account.
Removing the Syringe
Follow the instructions below:
1.
Click on Liquid Management on the Cedex Workbench.
2.
Click on Remove Syringe in the Syringe handling area.
The syringe barrel is then moved in a position to allow easy removal.
3.
Unscrew the protective cover.
4.
Hold the syringe barrel by the Luer lock and turn it anti-clockwise to remove it from the 8way valve.
5.
Once the connection is loosened, keep holding the syringe barrel in an upright position
beneath the 8-way valve to prevent it from jamming with the plunger.
6.
Remove the bottom screw that connects the plunger to the syringe module with the other
hand.
7.
Remove the syringe from the syringe module.
User Manual Cedex Version 1.6.1
85
9
Cleaning the Syringe
The syringe should be cleaned according to the level of use and degree of soiling.
In the Case of Mild Soiling
Follow the instructions below:
1.
Remove the plunger from the syringe barrel.
2.
Rinse both parts with distilled or de-ionized water and then with 70% alcohol.
3.
Clean the Teflon head seal of the plunger by wiping it carefully with a lint-free cloth.
4.
Rinse both parts thoroughly with distilled or de-ionized water.
5.
Replace the plunger in the syringe barrel. Both parts must be wet when assembled.
In the Case of Heavy Soiling
The syringe should be cleaned thoroughly once a week, using an intensive cleaning procedure.
This is done with either a weak detergent or an acid/base combination.
IMPORTANT NOTICE
THE SAFTEY REGULATIONS SHOULD BE OBSERVED WHEN HANDLING ACIDS AND
BASES!
Follow the instructions below to clean the syringe with a weak detergent:
1.
Fill a weak detergent (Cedex Detergent) in the syringe.
2.
Allow to stand for 30 minutes.
3.
Rinse the syringe at least 10 times with distilled or de-ionized water.
Follow the instructions below to clean the syringe with an acid/base combination:
1.
Fill 0.1N NaOH in the syringe.
2.
Allow to stand for at least 10 minutes.
3.
Empty the syringe according to regulations.
4.
Rinse the syringe with distilled or de-ionized water.
5.
Fill 0.1N HCl in the syringe.
6.
Allow to stand for at least 10 minutes.
7.
Empty the syringe according to regulations.
8.
Rinse the syringe at least 10 times with distilled or de-ionized water.
86
User Manual Cedex Version 1.6.1
Maintenance of the Measuremment System
Assembling and Installing the Syringe
Rinse a new syringe with 70% alcohol and then with distilled or de-ionized water before
installing it.
Follow the instructions below:
1.
Gently press the plunger into the syringe barrel.
2.
Insert the syringe back onto the syringe module.
3.
Secure the plunger to the syringe module with the screw at the bottom.
Ensure that the syringe barrel and plunger do not get jammed.
4.
Hold the syringe barrel by the Luer lock and turn it clockwise into the port of the 8-way
valve.
5.
Should the Liquid Management window not have opened yet, click on Liquid
Management on the Cedex Workbench.
6.
Click on Reset/Initialize in the Syringe handling area.
The plunger is then correctly positioned and the syringe module initialized.
7.
Ensure that there are no leaks in the liquid management system.
This can be done with one of the cleaning routines in the Liquid Management area.
Interrupt the cleaning procedure immediately with the EMERGENCY STOP button if there
are any leaks in the syringe module, and have them repaired.
8.
Screw the protective cover back on.
IMPORTANT NOTICE
ONLY USE THE EMERGENCY STOP BUTTON IN A CASE OF EMERGENCY BECAUSE THE
CEDEX PROGRAM MAYBE HAVING TO BE COMPLETELY RESTARTED.
9.4 Maintenance of the Capillary Tubes
The capillary tubes are automatically cleaned with every cleaning routine in the liquid
management system. However, the external surfaces of the capillary tubes that reach into the
sample cup and reagent containers should be cleaned often with a lint-free cloth.
9.5 Maintenance of the Syringe Guide and Spindle
The syringe guide and spindle are mounted on either side of the syringe module inside the
casing. They should be lubricated half-yearly (or when necessary more often e.g. conspicuous
noise from the syringe guide) with the supplied lubricant to guarantee optimal performance of
the syringe.
Follow the instructions below:
1.
Remove the syringe, see “Removing the Syringe" on page 85.
2.
Switch off the Cedex system.
3.
Lubricate the top part of the syringe guide and spindle.
User Manual Cedex Version 1.6.1
87
9
4.
Switch on the Cedex system.
5.
Click on Reset/Initialize in the Liquid Management window.
6.
Switch off the Cedex system.
7.
Lubricate the bottom part of the syringe guide and spindle.
8.
Switch on the Cedex system.
9.
Click on Remove Syringe in the Liquid Management window.
10.
Install the syringe, see “Assembling and Installing the Syringe” on page 87.
syringe guide
spindle
Figure 34
Syringe Guide and Spindle
88
User Manual Cedex Version 1.6.1
Maintenance of the Measuremment System
9.6 Maintenance of the Measurement Chamber (Flowcell),
Microscope Optic, 8-Way Valve and the remaining Hardware
Components
The Cedex must be serviced every six month by an authorized service technician. This
service ensures that worn and defective parts are replaced.
The following routines must be carried out every six months:
•
Maintenance of the Syringe Guide and the Spindle
•
Replacement of the fuse (by a service- technician)
•
Inspection of the crimp connections (by a service-technician)
The following routines must be carried out every year:
•
Replacement of the syringe (by a service- technician)
•
Replacement of the 8-way-Valve (by a service- technician)
The following routines must be carried out every two years:
•
Replacement of the bulb (by a service- technician)
•
Replacement of the pump belt (by a service- technician)
•
Replacement (if need arises) of the measurement chamber (by a service- technician)
IMPORTANT NOTICE
ONLY AN AUTHORIZED SERVICE TECHNICIAN IS PERMITTED TO CARRY OUT
MAINTENANCE WHEN THE CEDEX DEVICE IS REQUIRED TO BE OPENED!
User Manual Cedex Version 1.6.1
89
9
90
User Manual Cedex Version 1.6.1
Appendix
Appendix
Contact Details
Information and technical support
innovatis AG
Meisenstr. 96
33607 Bielefeld
Germany
Phone: +49(0)521 2997 295
Fax: +49(0)521 2997 285
email:
[email protected]
[email protected]
[email protected]
[email protected]
internet:
www.innovatis.com
User Manual Cedex Version 1.6.1
91
Technical Specifications
Cedex Measurement System
Method of measurement
Viable/dead cell differentiation
Detectable cell density range
Detectable cell diameter range
Required sample volume
Average measurement period
Magnification of the optical instrument
Chamber height
Material and Diameter of the capillaries
Operating temperature
Operating humidity
Dimensions
Energy requirements
Energy consumption
Automatic Sampler AS20
Number of samples
Average measurement period for 20 samples
Dimensions
Energy requirements
Energy consumption
Power supply
Cedex Computer
Cedex PC
Maximum hard disk storage capacity
Cedex Monitor
Agency Approvals
92
User Manual Cedex Version 1.6.1
Digital image and pattern recognition
Trypan Blue exclusion method
5 x 10⁴ - 1 x 10⁷ cells per mL
8 µm – 40 µm
300 µL or 1000 µL
< 4,0 min
40x
100 µm
Teflon, 765 µm
10°C - 35°C (50°F - 95°F)
20% - 80% relative humidity
(non condensing)
Height: 660 mm (26,0 inches)
Width: 300 mm (12,0 inches)
Depth: 600 mm (23,6 inches)
Weight: 27,0 kg (60,0 Ibs.)
100 - 250 VAC, 50 - 60 Hz
60 W
1 - 20
< 90 min
Height: 170 mm (6,7 inches)
Width: 175 mm (6,9 inches)
Depth: 160 mm (6,3 inches)
Weight: 2,6 kg (5,7 Ibs.)
12 VDC
max. 10 W
Input: 100 - 240 VAC, 47 - 62 Hz
Output: 12 VDC, 2,0 A
Newest PC generation incl. Windows 2000,
Framegrabber card,
Network card 10/100 Mbit, 10BaseT, onboard,
Interface card: 2 x serial (D-sub 9), 1 x parallel
CD-ROM drive CD RW
40 GB corresponds to 30.000 measurements
15" TFT Flatscreen
CE, FCC-A
Appendix
Suppliers
Cedex Detergent ( 3% Mucasol solution) available from:
innovatis AG, Germany :
1 L Cedex-Detergent (solution for use),
Cat. No.: 760 00 00 23
Mucasol (concentrate) available from:
Fisher Scientific, Germany:
Mucasol, Cat. No.: 619 325 01
Omnilab, Germany:
Mucasol, Cat. No.: 9.192 501
BrandTec, USA, Connecticut: Mucasol Cat. No.: 44003B
Concentrated Mucasol is available in 2 liter bottles, 5 liter containers and 60 liter barrels.
Sample cups available from:
innovatis AG, Germany :
Fisher Scientific, Germany:
Omnilab, Germany:
1000 cups, 4 mL, Cat. No.: 6 00 05 00 00
1000 cups, 4 mL, Cat. No.: 9 401 531
1000 cups, 4 mL, Cat. No.: 9.401 531
IMPORTANT NOTICE
The quality of these sample cups is controlled regularly by innovatis AG.
Sample cups with other catalogue numbers cause irreparable damage to the device!
Innovatis AG is not liable or responsible for any damage caused by the use of sample cups
other than those specified above.
Trypan Blue available from:
Sigma-Aldrich, Germany:
6 x 50 mL 0.4% Trypan Blue solution, Cat. No.: 93595
Cedex Calibration Beads (to calibrate focus and brightness) available from:
innovatis AG, Germany:
Cedex Calibration Beads, 20 mL, Cat. No.: 7 60 00 00 16
Density Reference Standard Beads (to check the counting routine):
innovatis AG, Germany:
Cedex Density Reference Standard Beads,
10 mL, Cat. No.: 7 60 00 00 17
Spare parts (e.g. for the Syringe): available from innovatis AG
Accessory device for the Cedex: AS20 (Auto Sampler) available from innovatis AG.
Material Safety Data Sheets for the Substances used
Material safety data sheets for all substances used are available from the appropriate supplier.
User Manual Cedex Version 1.6.1
93
Declaration of Conformance
DECLARATION OF CONFORMANCE
Supplier name:
innovatis AG
Supplier address:
innovatis AG
Meisenstr. 96
33607 Bielefeld
Germany
EMC test:
Berg & Lukowiak
GmbH
32609 Hüllhorst
Löhner Str. 157
Germany
EMC test:
TÜV Rheinland
Product Safety GmbH
Am Grauen Stein
51105 Köln
GERMANY
Declares under our sole responsibility that the following product:
Product series no:
Cedex
Product name:
Cedex-System
Conforms to the following standards:
Normative Standards:
FCC CFR 47, Pt 15, subpart A, clause 15.107 and clause 15.109;
CENELEC EN 55011 : 1998 Class B;
EN 61000-6-3 : 2001; EN 61000-6-2 :2001
Emissions
Classification :
A
radiated and conducted
Product conformance to cited product specifications is based on sample (type) testing, evaluation, or
assessment at Berg & Lukowiak GmbH EMC Services in Hüllhorst, Germany and TÜV Rheinland
Product Safety GmbH in Köln, Germany. This product or family of products is eligible to bear the
appropriate compliance logos and statements.
Marc Stürz
CEO
Dipl.-Ing. Andreas Bittner
Head of production
innovatis AG
Bielefeld, Germany
June 28, 2003
94
User Manual Cedex Version 1.6.1
Index
Index
8
8-way valve ..............................................89
A
Access rights ......................................33, 74
Acid...........................................................86
Additional Information...............................61
Administrator functions.............................75
Aggregate Histogram ...............................44
Aggregate Size.........................................44
Air bubbles .........................................36, 42
Alcohol......................................................82
Analysis parameters.................................35
Analysis process ......................................35
Analysis results ..................................41, 70
Analysis software .....................................23
Archive mode ...........................................70
Area Additional Information......................61
Area CSV Options ....................................61
Area Data Selection .................................51
Area Data Series ......................................55
Area Data Series Mixing ..........................60
Area Export Structure.........................61, 64
Area Export Template ..............................61
Area Extras...............................................55
Area General ............................................54
Area Output File Name.............................60
Area Output Format..................................60
Area Select Source ..................................58
Area Selected Measurements..................59
Area View .................................................52
Audit Trail button ......................................32
Audit Trail file............................................69
Average compactness..............................42
Average diameter .....................................42
B
Base .........................................................86
Buffer ........................................................22
C
Calculator symbol.....................................31
Capillary tube ...........................................36
Capillary tubes..........................................87
Cedex workbench.....................................26
Cell area ...................................................47
Cell clusters..............................................36
Cell densities ............................................35
Cell density...............................................36
Cell image ................................................32
Cell images...............................................65
Chamber Clean 1 .....................................83
Chamber Clean 2 .....................................83
Choose workarea .....................................30
Cleaning and maintenance ......................80
Cleaning area .......................................... 82
Cleaning routine....................................... 83
Combine................................................... 47
Comment ........................................... 35, 55
Compactness histogram .......................... 47
Contact details ......................................... 91
Contents of the delivery ........................... 19
Copyright.................................................... 7
Counting routine ...................................... 75
Cross-sectional area................................ 77
CSV Options ............................................ 61
Cultivation progress ................................. 49
Cultivation Time Chart ............................. 49
D
Daily events area ..................................... 81
Data analysis ........................................... 17
Data entry fields....................................... 74
Data save................................................. 78
Data Series .............................................. 55
Data Series Mixing................................... 60
Data sets.................................................. 70
Data source identification ........................ 31
Data source identification area ................ 74
Dead cells’ aggregate appearance.......... 77
Dead cells’ aggregate maximum ............. 77
Dead cells’ aggregate minimum .............. 77
Dead cells’ appearance ........................... 77
Dead cells’ size........................................ 77
Declaration of Conformance .................... 94
Default measurement parameters ........... 74
Defaults.................................................... 74
Deleting a View........................................ 54
Detailed.................................................... 45
Detailed Information................................. 50
Details, button.......................................... 57
Detergent ................................................. 22
Diameter .................................................. 36
Diameter histogram ................................. 48
Dilution ..................................................... 35
Dongle...................................................... 20
E
Emergency Stop .................... 32, 38, 84, 87
Ethanol..................................................... 23
Excel ........................................................ 65
Excluded images ..................................... 68
Export....................................................... 54
Export Structure................................. 61, 64
Export Template ...................................... 61
Export Window......................................... 59
Export, start ............................................. 65
Exporting the data.............................. 54, 59
Exporting the Results............................... 54
Export-Templates for Excel ..................... 63
User Manual Cedex Version 1.6.1
95
F
Fast Clean ............................................... 82
File menu ................................................. 30
Floppy disk symbol .................................. 31
G
General .................................................... 54
General functions .................................... 73
Graphical display ..................................... 42
Grouping Measurement Series ............... 57
H
Hardware components ............................ 20
HCl........................................................... 86
Help menu ............................................... 31
Hide button .............................................. 55
Hide Button, export.................................. 65
I
ID Masks.................................................. 74
Incubation ................................................ 14
Individual cell image ................................ 65
Installation ............................................... 19
Intensive Clean........................................ 82
Interrupting .............................................. 38
IP ResultViewer ....................................... 66
Isopropyl .................................................. 23
L
Language................................................. 31
License agreement .................................... 7
Lin ........................................................... 51
Liquid Management ........................... 32, 80
List of Measurement Series..................... 55
Live image of the chamber ...................... 84
LM ShutDown .......................................... 39
Loader program ....................................... 29
Loading a View ........................................ 53
Log .......................................................... 51
Login ........................................................ 26
Logout...................................................... 26
M
N
NaOH ....................................................... 86
Neubauer hemocytometer ................. 14, 16
New .......................................................... 55
Number of Cells ....................................... 44
O
Offset........................................................ 56
Operating option................................. 31, 34
Operator ............................................. 11, 75
Output File Name ..................................... 60
Output Format .......................................... 60
P
Parameter ..............................32, 35, 71, 72
Password ................................................. 73
Percent..................................................... 44
Preview .................................................... 54
Prime........................................................ 33
Print.......................................................... 54
Print colored ............................................. 54
Printing ............................................... 69, 71
Printing User-defined Results .................. 54
PrintOptions ............................................. 54
Process parameters................................. 32
Progress bar............................................. 53
Protein aggregate .................................... 83
R
Reactor ID ................................................ 31
Reagent containers.................................. 80
Reagent fill-up .......................................... 22
Reprocess mode ...................................... 72
Reprocessing ........................................... 71
Result data ............................................... 32
Result diagram ......................................... 49
ResultViewer ............................................ 66
Rights ......................................................... 7
S
Main power supply................................... 21
Maintenance .......................... 28, 34, 38, 79
Maintenance check list ............................ 79
Measurement........................................... 33
Measurement chamber...................... 13, 89
Measurement chart.................................. 46
Measurement Offset ................................ 56
Measurement parameter ......................... 70
Measurement procedure ......................... 14
Measurement Series in the diagram ....... 56
Measurement Series offset...................... 56
Measurement system ........................ 13, 22
Menu bar.................................................. 30
Micro-organisms ...................................... 22
96
Microscope optic ...................................... 89
Microscope symbol .................................. 31
Minimum pollution area............................ 77
User Manual Cedex Version 1.6.1
Safety instructions...................................... 9
Safety sheets ........................................... 93
Sample ID ................................................ 34
Sample port.............................................. 36
Sample properties.................................... 32
Samples ................................................... 28
Saving a View .......................................... 52
Select Source........................................... 58
Selected Measurements .......................... 59
Selection of Data Series .......................... 57
Setup........................................................ 74
Setup menu.............................................. 31
Show IP Result......................................... 30
Shut down ................................................ 27
Index
Silicone tube.............................................22
Single .......................................................47
Soiling.......................................................86
Specials menu..........................................30
Sphere......................................................42
Spindel .....................................................89
Spindle .....................................................87
Standard Cells..........................................75
Standard Clean ........................................82
Standard deviation ...................................42
Suitable location .......................................20
Suppliers ..................................................93
Switching off .............................................39
Switching on .............................................27
Syringe .........................................81, 83, 85
Syringe handling.......................................83
System functions ......................................33
T
Total .........................................................45
Total cell count ...................................15, 41
Total cell density.......................................41
Traffic light symbol ...................................32
Trypan Blue ..............................................14
U
Ultra Fast Clean....................................... 80
User identification area ............................ 31
User profile .............................................. 75
Username ................................................ 75
Users menu ............................................. 31
V
Valid image .............................................. 68
Viability..................................................... 41
Viable cell density .................................... 41
Viable cells............................................... 14
View, delete ............................................. 52
View, load ................................................ 52
View, save ............................................... 52
Volume..................................................... 80
Volume variations .................................... 36
W
Warranty .................................................... 7
Waste container....................................... 80
Water ....................................................... 23
Work area ................................................ 23
Workbench............................................... 30
User Manual Cedex Version 1.6.1
97
z
z
z
z
z
z
z
z
z
z
z
z
z
z
z
z
z
z
z
z
z
z
z
z
z
z
z
z
z
z
z
z
z
z
z
z
z
z
Administrator Manual
®
Cedex Version 1.6.1
z
z
z
z
z
z
z
z
z
z
z
z
z
z
z
z
z
Version: Cedex 1.6.1. 10/29/03 (MM/DD/YY)
2
Administrator Manual Cedex Version 1.6.1
Contents
Contents
CONTENTS ........................................................................................................3
1
RIGHTS ......................................................................................................5
Copyright ......................................................................................................................................5
Disclaimer .....................................................................................................................................5
Warranty........................................................................................................................................5
Software License Agreement......................................................................................................5
General Provisions.......................................................................................................................7
FCC Notification ...........................................................................................................................7
Safety Instructions .......................................................................................................................7
2
INTRODUCTION ........................................................................................9
3
INSTALLATION AND OPERATION OF THE CEDEX SYSTEM .............11
3.1 Installing the Cedex System.............................................................................................11
Checking the Contents of the Delivery ..............................................................................11
Choosing a Suitable Location for the Cedex System ........................................................12
Connecting Hardware Components and Hardware Key (Dongle).....................................12
Connecting the Cedex System to the Main Power Supply ................................................13
3.2 Preparation and Configuration of the Analysis Software..............................................13
Starting the Analysis Software ...........................................................................................13
Configuring the Analysis Software.....................................................................................13
Securing Access Rights and Defining the Administrator Password ..................................14
Creating User Profiles and Delegating Access Rights ......................................................15
Description of Access Rights ........................................................................................16
Defining Target Directories for the Analysis Data..............................................................16
Calibrating the Measurement System................................................................................17
4
GENERAL ADMINISTRATOR FUNCTIONS ...........................................21
4.1 Administration of User Profiles........................................................................................21
Creating User Profiles........................................................................................................21
Deleting User Profiles ........................................................................................................21
Modifying the Access Rights of a User Profile...................................................................21
Modifying a Username .......................................................................................................22
Deleting a User Password .................................................................................................22
Automatic Log-out..............................................................................................................22
4.2 Adaptation of the Counting Routine................................................................................23
Description of the Individual Parameters ...........................................................................24
Modifying a Cell Type ........................................................................................................26
Creating a New Cell Type ..................................................................................................26
Deleting a Cell Type...........................................................................................................27
4.3 Using the CD Burner .........................................................................................................28
5
PASSWORD MANAGEMENT..................................................................29
5.1 Access Control at the Operating System Level .............................................................29
5.2 Access Control at the Cedex Level..................................................................................29
5.3 Administration of the New Password Management.......................................................30
The Cedex-Administrator ...................................................................................................30
The BlackList......................................................................................................................30
Specifying Password Characteristics.................................................................................31
Re-Issuing User Names.....................................................................................................31
5.4 The System AuditTrail File ...............................................................................................32
Administrator Manual Cedex Version 1.6.1
3
6
INSTALLING A PRINTER ....................................................................... 33
6.1 Installing a local printer.................................................................................................... 33
6.2 Installing a network printer.............................................................................................. 33
APPENDIX ....................................................................................................... 35
Contact Details .......................................................................................................................... 35
Technical Specifications........................................................................................................... 36
INDEX .............................................................................................................. 37
4
Administrator Manual Cedex Version 1.6.1
1
Rights
1
Rights
Copyright
Cedex® Manuals and Operating Instructions. Copyright© 2003 innovatis AG. All rights reserved.
Operating instructions and manuals are protected by copyright. No part of this document may
be reproduced, edited or translated without prior written consent of innovatis AG except as
permitted under the terms of the copyright.
Disclaimer
The information in this document is subject to change without prior notice and should not be
construed as a commitment by innovatis AG.
The innovatis AG accepts no responsibility or liability for any errors or inaccuracies the
document or for any damage occurring during delivery, performance or use of this product.
Windows 2000 is a registered trademark of the Microsoft Corporation. All other trademarks are
trademarks or registered trademarks of the respective companies.
Cedex® is a registered trademark of innovatis AG.
Warranty
Standard warranty applies. The warranty is void under the following conditions:
•
If any software other than the programs supplied with the Cedex system are installed on
the computer (excluding the printer driver and programs authorized by innovatis AG).
•
If damage or malfunction of the Cedex system is caused by abuse, mishandling, improper
use or unauthorized repairs.
•
If unauthorized modifications are made to the Cedex system.
•
If the Cedex system is opened without authorization.
•
If damages occurred during transport are not reported immediately.
•
If damages are caused through equipment or software not supplied by innovatis AG.
•
If the Cedex system is not connected to an earthed power supply or the power supply is
incorrectly polarized.
•
If the instructions for printer installation are not observed.
Software License Agreement
Grant of License
This is a license agreement between you, the purchaser or “licensee” of the Cedex system and
innovatis AG. Innovatis AG grants the licensee the following license on condition that the
licensee accepts all provisions of this agreement. The licensee agrees to be bound by the terms
of this agreement once commissioning or starting the Cedex system.
Administrator Manual Cedex Version 1.6.1
5
The Cedex software is based on the following:
•
application software (to control the hardware components)
•
analysis module (for processing registered images and data analysis)
•
data base module (to archive and process obtained data)
•
graphical user interface for the complete software
•
all technical descriptions and instructions on the use of the software
innovatis AG grants the licensee a non-transferable, non-exclusive sublicense (except as
outlined below) to use a copy of the software and documentation belonging to the Cedex
system in compliance with the terms of this agreement.
Any property and commercial protection rights regarding the software product shall remain with
innovatis AG. The software is only licensed – not sold. No property rights regarding the software
product shall be transferred to the licensee. The software product must be treated as any other
material protected by copyright. However, this shall not apply to the following:
The Licensee may:
•
only use the software on the PC supplied with the Cedex system.
•
only produce copies of the software for internal archiving and backup purposes i.e. on
condition that all property and copyright notices shall be included on the copies.
•
only transfer the software on a permanent basis (excluding leasing and renting) in
conjunction with a transfer of the entire Cedex system, and on condition that the licensee
retains no copies and the recipient accepts to be bound by the terms of this agreement.
The Licensee may not:
•
use the software on more than one computer, workstation or file server in a network or
multiple-user system, except if an additional license for every additional computer or
workstation is purchased from innovatis AG.
•
modify, copy, adapt, reverse engineer, decompile, disassemble or create derivative works
of the software or related documentation (excluding a backup copy).
•
lease or rent the rights on the software and related documentation in any form
whatsoever to a third party.
•
remove property and copyright notices and marks in or on the software, documentation,
containers and devices.
All rights, claims, use and intellectual property rights relating to the software, documentation and
any copies made by the licensee remain with innovatis AG. Unauthorized copying of the
software or documentation, or failure to comply with the limitations outlined above shall
automatically terminate the license.
6
Administrator Manual Cedex Version 1.6.1
1
Rights
General Provisions
The licensee may terminate this license at any time by destroying all copies of the software or
returning all copies to innovatis AG. Innovatis AG may terminate this license if the licensee fails
to comply with all terms and conditions of this license agreement. In such an event, the licensee
agrees to destroy or return all copies of the software. The licensee further agrees to be
responsible for all taxes resulting from this license. Any unauthorized leasing, renting or
transferring (except as outlined above) is illegal.
If any provisions of this license agreement are invalid for whatever reason, this shall have no
effect on the remaining terms hereof. The license agreement is governed by the laws of the
Federal Republic of Germany.
This is the only agreement between innovatis AG and the licensee, and replaces any other
negotiations or prior agreements relating to the software and documentation.
Cedex ® : Reg. U.S. Pat. & TM Off.
FCC Notification
WARNING
CHANGES OR MODIFICATIONS TO THIS UNIT NOT EXPRESSLY APPROVED BY THE
PARTY RESPONSIBLE FOR COMPLIANCE MAY VOID THE USER‘S AUTHORITY TO
OPERATE THE EQUIPMENT.
Note: This equipment has been tested and found to comply with the limits for a Class A digital
device, pursuant to Part 15 of the FCC Rules. These limits are designed to provide reasonable
protection against harmful interference when the equipment is operated in a commercial
environment. This equipment generates, uses and can radiate frequency energy and, if not
installed and used in accordance with the instruction manual, may cause harmful interference to
radio communications. Operating this equipment in a residential area is likely to cause harmful
interference in which case the user will be required to correct the interference at his own
expense.
Safety Instructions
WARNING
IT IS IMPORTANT THAT ALL SAFETY INSTRUCTIONS AND GUIDELINES ARE OBSERVED
TO ENSURE SAFE AND RELIABLE OPERATIONS OF THE CEDEX SYSTEM.
•
Place the device on a dry and sturdy surface, free of vibrations.
•
Prevent the device from getting wet.
•
Protect the device from dust and smoke.
•
Do not expose the device to direct sunlight.
•
Ensure there is sufficient air circulation of the Cedex system during operation (particularly
around the computer and monitor).
•
Operate within a constant temperature range of 50°F – 95°F (10°C – 35°C).
•
The Cedex system should only be used with the supplied devices (measurement system,
computer, monitor) and software.
•
Do not install any additional software on the Cedex computer.
•
Only trained personnel in a controlled laboratory environment are to operate the Cedex
system.
•
All services and repairs should only be performed by authorized service technicians.
Administrator Manual Cedex Version 1.6.1
7
•
Always ensure that there are sufficient reagents in the reagent containers.
•
Empty the waste container often to prevent it from overflowing.
•
Always observe the safety regulations when handling Trypan Blue, detergent, ethanol or
acids and bases.
•
Waste contaminated with tissue cells e.g. sample cups, pipette tips, etc. must be
disposed of according to the recommended rules for handling bio-hazard materials.
•
Any leaks in the liquid management system must be repaired immediately. Contact your
distributor.
•
Always ensure that there is a sample cups attached to the sample port.
•
Only use Cedex Detergent or a detergent with identical specifications for the cleaning
process in the liquid management system.
•
Only use sample cups from suppliers specified in the Cedex Operating Instructions for
the conveyance of cell samples to the sample port.
Other sample cups with other catalogue numbers can cause irreparable damage to
the Cedex!
•
Always wear protective clothing when handling samples, particularly gloves.
•
To prevent damage to the measurement chamber (flowcell), no particle larger than 80 µm
should enter the measurement system.
•
Do not use Microcarriers for this device.
•
Ensure that all utensils required for sample preparation e.g. sample cups, pipette tips,
etc. are stored in a dust-free environment to guarantee precise measurement results.
•
Ensure that the Trypan Blue solution is free of contamination otherwise filter prior to use.
•
Check that the sample cup is free of contamination before use. Only clean sample cups
can guarantee an optimal function of the Cedex.
•
If not in use, keep the Trypan-Blue solution in a refrigerator.
•
Secure your measurement-data frequently (recommended: approx. every after 250
measurements).
NOTES
EVERY CEDEX SYSTEM IS THOROUGHLY TESTED IN THE END CONTROL. ALL
RESULTS OF THIS CONTROL TESTING IS SAVED IN THE SYSTEM FOR POSSIBLE USE
LATER.
THE SOFTWARE AND HARDWARE VERSION OF YOUR CEDEX ANALYSIS SYSTEM CAN
DIFFER FROM THE INFORMATION DESCRIBED HERE, BUT SHOULD NOT MAKE A
DIFFERENCE TO THE OPERATIONAL FUNCTIONS IN GENERAL.
IMPORTANT NOTICE
THE MANUFACTURER IS NOT RESPONSIBLE OR LIABLE FOR ANY PERSONAL OR
OTHER DAMAGE RESULTING FROM IMPROPER USE OR FAILURE TO COMPLY WITH
THE REGULATIONS IN THE OPERATING INSTRUCTIONS.
8
Administrator Manual Cedex Version 1.6.1
2
Introduction
2
Introduction
The necessary settings of the prepared and fully mounted Cedex system should be done by the
system administrator.
We recommend to constitute the Windows administrator (Operating system operator) as the
system administrator. He/she should establish the rights and access to the system at the
operating system level.
The system administrator should log in to Windows 2000 as Administrator with the valid
password (factory setting: Administrator) and change this password.
Apart from the Cedex user, which is only allowed to perform measurements, the Cedex
administrator should be established, with main responsibilities for the Cedex usage.
The factory setting of the Cedex program has established a Cedex administrator (no password
in the factory setting).
The Cedex administrator is advised to secure his access by a password for reasons of safety.
Cedex user and their necessary rights are customized by the Cedex administrator.
Administrator Manual Cedex Version 1.6.1
9
10
Administrator Manual Cedex Version 1.6.1
Installation and Operation of the Cedex System
3
3
Installation and Operation of the Cedex System
Follow the instructions to install the hardware components of the measurement system and
prepare the analysis software in the order given below.
3.1
Installing the Cedex System
NOTE
THE SOFTWARE AND HARDWARE VERSION OF YOUR CEDEX ANALYSIS SYSTEM CAN
DIFFER FROM THE INFORMATION DESCRIBED HERE, BUT SHOULD NOT MAKE A
DIFFERENCE TO THE OPERATIONAL FUNCTIONS IN GENERAL.
Checking the Contents of the Delivery
IMPORTANT NOTICE
PLEASE NOTIFY THE DISTRIBUTOR IMMEDIATELY IF ANY OF THE SHOCK WATCHES
INDICATE IMPROPER HANDLING DURING TRANSPORT OTHERWISE THE GUARANTEE
IS INVALID.
Ensure that all the items listed below have been delivered:
•
1 x Measurement system
•
1 x PC incl. manual (Windows 2000® and installed Cedex software) and CD burner
•
1 x Keyboard
•
1 x Mouse, 1 x Mouse pad
•
1 x Monitor incl. manual
•
1 x Hardware key (Dongle)
•
Cords:
1 x VGA cord (not attached to the monitor)
2 x Serial cord to connect syringe/focus control to the PC
1 x Video cable to connect the measurement system to the PC
3 x Connecting cable
•
1 x Operating Instructions / 1 x Administrator Manual
•
5 x Reagent container (250 mL each)
•
1 x 1000 mL Cedex Detergent
•
1000 x Sample vial (4 mL)
•
Cedex Calibration Beads for the calibration of focus and brightness
•
1 x License agreement included in the operating instructions
IMPORTANT NOTICE
PLEASE NOTIFY THE DISTRIBUTOR IMMEDIATELY IF THE SERIAL NUMBER ON THE
CEDEX ANALYZER AND THE COMPUTER DO NOT MATCH. MATCHING SERIAL
NUMBERS ARE NECESSARY, AS THEY ARE ESSENTIAL CRITERIA IN THE
CALCULATIONS OF THE CEDEX SOFTWARE.
NOTE
A PRINTER IS NOT INCLUDED IN THE CEDEX SYSTEM. FOLLOW THE INSTRUCTIONS TO
INSTALL A PRINTER VERY CAREFULLY.
Administrator Manual Cedex Version 1.6.1
11
Choosing a Suitable Location for the Cedex System
The Cedex system is highly sensitive and consists of top-quality electronic and optical
components. To guarantee optimal and reliable performance of the Cedex system, select the
appropriate location according to the safety regulations described in the first section.
Connecting Hardware Components and Hardware Key (Dongle)
(See Figure 1 and Figure 2.)
Follow the instructions below to connect the hardware components:
1.
Connect monitor, keyboard and mouse to their respective ports on the PC.
2.
Connect one end of the video cable to the Video port of the measurement system.
3.
Connect the other end of the video cable to the Video port of the PC.
4.
Connect one end of the first serial cable to the Focus port of the measurement system.
5.
Connect the other end of the first serial cable to the Focus port of the PC.
6.
Connect one end of the second serial cable to the Syringe port of the measurement
system.
7.
Connect the other end of the second serial cable to the Syringe port of the PC.
8.
Connect the Hardware key (USB-Dongle) to the USB port of the PC (see Figure 2).
NOTE
CHECK THAT YOUR CONNECTIONS ARE CORRECT OTHERWISE AN ERROR MESSAGE
WILL APPEAR: “CAN NOT ACCESS LIQUID MANAGEMENT” OR “SCOPE FUNCTION
DISABLED”.
Figure 1
Cedex connections
12
Administrator Manual Cedex Version 1.6.1
Installation and Operation of the Cedex System
3
USB
Figure 2
PC connections
Connecting the Cedex System to the Main Power Supply
Connect the measurement system, PC and monitor to the main power supply with the cords
enclosed. Observe the technical data.
3.2
Preparation and Configuration of the Analysis Software
If the hardware devices are switched on in their correct order, the operating system of the PC
will start automatically (see chapter 5.1 “Access Control at the Operating System Level”, page
29). To start the Cedex analysis software, additional steps are necessary.
Starting the Analysis Software
Follow the instructions below:
1.
Start the operating system by pressing the keys <Ctrl>+<Alt>+<Delete> to login.
2.
Enter Administrator as username and Administrator as password or Cedex as
username and Cedex as password (the password is case sensitive) and confirm by
pressing <Enter>. The Windows surface will appear.
3.
Start the Cedex program by double clicking on the corresponding icon.
Configuring the Analysis Software
After successfully carrying out the instructions above, the analysis software must now be
configured and prepared for routine operations. This involves four steps:
1.
Securing access rights and defining the administrator password.
2.
Creating a user profile and delegating access rights.
Administrator Manual Cedex Version 1.6.1
13
3.
Defining target directories for the analysis data.
4.
Calibrating the measurement system.
Securing Access Rights and Defining the Cedex Administrator Password
The Cedex analysis software and its graphical user interface known as the Cedex Workbench
are at first only configured for the administrator.
The administrator password has not yet been set, which means that free access to the software
and all connecting data is possible. Please read chapter 5.2 “Access Control at the Cedex
Level”, page 29 to get more information.
Figure 3
Cedex Workbench in the Administrator Mode
Follow the instructions below to secure access and define the administrator password:
1.
Enter the username Administrator.
2.
Click on the traffic light symbol in the User Identification area.
3.
Click on the Setup menu on the Cedex Workbench.
4.
Click on Change my Password and the Change Password area will appear.
14
Administrator Manual Cedex Version 1.6.1
Installation and Operation of the Cedex System
3
5.
Define the administrator password. Since no password exists, leave the first field vacant.
Enter the new password in the second field and confirm by reentering in the third field
again. The password is case sensitive.
6.
Click on OK to confirm the password. A message will appear to confirm the entry.
After the login, the administrator or any user can change their password anytime by following
the same procedure.
Creating User Profiles and Delegating Access Rights
There are no user profiles installed on the Cedex analysis software as presettings.
Once the administrator password has been defined, provides security for access to the software
and related data. The administrator can login now and create additional user profiles with
specific access rights.
Follow the instructions below to create a user profile:
1.
Click on the Users menu on the Cedex Workbench.
2.
Click on Add and the New User area will appear.
3.
Enter the name for the new user profile in the first field.
4.
Enter a password (optional) for the user profile in the second and third fields or the new
user can set up a password later.
5.
Define the access rights for the user profile and simply choose an existing user profile
from the drop down list as a template. This user profile can then be customized as shown
below.
6.
Click on Create User to confirm the new user profile. A message will appear to confirm
its success.
Follow the same procedure later when adding, modifying or deleting any user profiles.
Once a user profile has been successfully created, further access rights can be included in the
following areas:
•
Sample data
•
Reprocess data
•
Available work areas
•
Default work area
•
Cell Type
•
Users
•
System
Administrator Manual Cedex Version 1.6.1
15
Description of Access Rights
Each user profile can have specific access rights as described below:
•
Sample Data: Access rights to sample data (create, view, change, delete).
•
Reprocess Data: Access rights to recalculate recorded measurements (create, view,
change, delete).
•
allow changing work area: Access rights to change the target directory.
•
Cell Types: Access rights to evaluate Cell Types (create, view, change, delete).
•
Users: Access rights to administer user profiles (create, view, change, delete).
•
System: Access rights to specific system functions (shut down the Cedex system, shut
down the Liquid Management, change the syringe, use of special functions).
Follow the instructions below to customize access rights for a specific user:
1.
Click on the Users menu on the Cedex Workbench.
2.
Click on Rights.
3.
Select the user profile to be modified.
4.
Click on Edit rights and the Setup rights area will appear.
5.
Define the access rights by clicking on the appropriate check boxes.
6.
Click on Save to store the changes.
The user is normally denied access rights to certain areas e.g. administration of user profiles
and sensitive system functions (calibration etc.) and therefore, cannot access all the menus on
the Workbench after login.
However, access rights can be modified any time later by the administrator.
Defining Target Directories for the Analysis Data
The Cedex system automatically creates a target directory (work area) when a measurement is
carried out with the Reactor ID in the directory: D:\Cedex\images where all the analysis data
are saved. Specific target directories can be created with subdirectories of D:\Cedex\images
using Windows Explorer and be delegated to individual users.
16
Administrator Manual Cedex Version 1.6.1
Installation and Operation of the Cedex System
3
Follow the instructions below:
1.
Click on the Users menu on the Cedex Workbench.
2.
Click on Rights.
3.
Select the user profile that is assigned to the target directories.
4.
Click on Edit rights and the Setup rights area will appear.
5.
Click on the Available work areas area and a window similar to that of Windows
Explorer will appear.
6.
Select the appropriate target directory.
7.
Click on Add to include the directory to the list of available target directories.
8.
Click on Close to shut the selection window.
9.
Select a default target directory from the Default work area drop down list.
10.
Click on Save to store the changes.
Follow the same procedure any time later when adding or deleting target directories.
Calibrating the Measurement System
The Cedex system must be calibrated when it is set up for the first time or after its position is
changed. The brightness (light intensity) and focus are optimally set for the objects to be
analyzed. Calibration is carried out with the supplied Cedex Calibration Beads or a highly
concentrated viable cell suspension and takes approximately 15 minutes.
Follow the instructions below to calibrate the measurement system:
1.
Transfer 1 mL of the well mixed beads solution (Cedex Calibration Beads) or the highly
concentrated viable cell culture in the sample cup.
2.
Attach the sample cup to the sample port.
3.
Click on the Special menu on the Cedex Workbench.
If user profiles have already been created, then the Special menu is only available to the
Cedex administrator.
4.
Click on Calibrate the system and the Calibration window will appear.
5.
Click on Start calibration.
Administrator Manual Cedex Version 1.6.1
17
Figure 4
Calibration window
Calibration starts automatically and follows in several stages. At first, the calibrating solution
(Cedex Calibration Beads) is aspired into the measurement chamber (flowcell) (Preparing test
liquid). In the meantime, the microscope stage moves to its lowest position and then to its
highest position and the brightness is set (Checking brightness) and saved in the brightness
histogram.
The complete path of the microscope stage is then scanned (Scanning focus path) and the
obtained image information is analyzed. The focus position is set where the image is most vivid
and the brightness optimal (Checking brightness). The area around the located focus position
is then examined closely (Finding optimal focus) and scanned several times to obtain the
average values.
The brightness is finally set again to the determined focus point. The calibration process ends
with a cleaning routine (Cleaning system).
Every stage (indicated by a flashing button) and its estimated duration (indicated by the blue
progress bar) is displayed on the Calibration Progress area.
The brightness histogram indicates the distribution of brightness within the measurement
chamber (flowcell). The blue cube in the focus histogram indicates the optimal focus position.
The respective value (in the yellow field above the cube) indicates the position determined for
the focus. The yellow field below the yellow line indicates the actual position of the microscope
stage. The value displayed is named quality factor and based on the highest and lowest points
of the brightness histogram.
18
Administrator Manual Cedex Version 1.6.1
Installation and Operation of the Cedex System
3
The calibration result is displayed in the window below.
Figure 5
Calibration result
The values of the previous calibration are also shown as a comparison. Variations in brightness
of +/- 10 and of the focus position of +/- 30 are allowed. Please contact a service-technician
from innovatis AG, if variations between the old and the new values remain constantly high. A
greater variation in brightness is a sign that the lamp’s life cycle is nearing its end.
6.
Click on OK to confirm the result.
7.
Click on
to shut the window.
The analysis system can now start measurements.
Shut down the Cedex system if no measurements are to follow.
NOTE
TO SHUT DOWN THE SYSTEM RESULTS IN AN AUTOMATIC BACK UP THE CURRENT
CEDEX.INI AND CEDEXST.INI FILES FROM THE C:\CEDEX DIRECTORY IN THE D:\CEDEX
DIRECTORY.
THE RESTARTED CEDEX PROGRAM APPLIES THE TEMPORALLY MORE UP TO DATE
VERSIONS OF THE CEDEX.INI AND CEDEXST.INI.
Administrator Manual Cedex Version 1.6.1
19
20
Administrator Manual Cedex Version 1.6.1
General Administrator Functions
4
4
General Administrator Functions
The following system functions are recommended to be only available to the Cedex
administrator:
•
Administration of user profiles
•
Adaptation to the Operator Standard Cells counting routine.
•
Calibration of the measurement system, see “Calibrating the Measurement System" on
page 17.
4.1
Administration of User Profiles
The user usually has limited access rights. All administration rights relating to user profiles i.e.
creating, deleting, modifying and delegating rights, should remain exclusively with the Cedex
administrator.
Creating User Profiles
Detailed instructions can be found under “Creating User Profiles and Delegating Access Rights"
on page 15.
Deleting User Profiles
Follow the instructions below:
1.
Click on the Users menu on the Workbench.
2.
Click on Delete and the Select User to delete list will appear.
3.
Select the user profile to be deleted.
4.
Click on Delete and you will be requested to confirm the entry.
5.
Click on Yes to confirm and a message will confirm the entry.
6.
Click on OK to shut the window.
NOTE
PLEASE PAY ATTENTION TO CHAPTER “RE-ISSUING USER NAMES”, PAGE 31.
Modifying the Access Rights of a User Profile
Detailed instructions can be found under “Creating User Profiles and Delegating Access Rights"
on page 15.
Administrator Manual Cedex Version 1.6.1
21
Modifying a Username
If an existing user is to be replaced by a new user with identical access rights, only the name of
the existing user needs to be changed.
Follow the instructions below:
1.
Click on the Users menu on the Cedex Workbench.
2.
Click on Change name and the Select User to change list will appear.
3.
Select the user profile to be changed.
4.
Click Change and the Change user data area will appear.
5.
Enter the user’s present password in the Actual password field (if applicable).
6.
Enter the new username in the New user field.
7.
Click on Change name and you will be requested to confirm the entry.
8.
Click on Yes to confirm.
NOTE
PLEASE PAY ATTENTION TO CHAPTER “RE-ISSUING USER NAMES”, PAGE 31.
Deleting a User Password
Follow the instructions below:
1.
Click on the Users menu on the Cedex Workbench.
2.
Click on Delete password and the Select User to delete password list will appear.
3.
Select the appropriate user profile.
4.
Click on Delete password and you will be requested to confirm the entry.
5.
Click on Yes to confirm the entry and a message will confirm the entry.
6.
Click on OK to shut the window.
Automatic Log-out
In version 1.50 and higher, the Administrator can set a time limit, after which a user is
automatically logged-out, if the keyboard or the mouse-button are not being used. The log-out
also takes place during a current measurement. The measurement, however, will thereby not be
compromised. In Cedex version 1.5.0, the default setting for Auto logout is 600 seconds. In
version 1.5.1 and 1.6.1, default is set at 0 seconds, i.e. Auto logout is inactive.
22
Administrator Manual Cedex Version 1.6.1
General Administrator Functions
4
Proceed as follows to set the time for automatic log-out:
1.
Login as Administrator in Windows NT with the password Administrator and double
click on the Support folder on the desktop.
2.
Double click on connections to Cedex.ini and the file Cedex.ini will open.
The following text will appear in the section [system] in the file Cedex.ini:
AutoLogoutTime=0, which indicates that the auto logout is inactive.
3.
Replace 0 in the respective row by the number of seconds, after which Auto logout
should be activated (Entries of 0 to 999999999 seconds are allowed.).
IMPORTANT NOTICE
ANY MISTAKES IN THE ENTRY (LIKE ACCIDENTALLY PRESSING THE SPACE KEY)
WILL DISRUPT THE PROGRAM!
4.
Select Save in the File menu to store the modifications.
5.
Close the file Cedex.ini.
6.
Shut down the Windows program.
Begin with measurements by starting the Cedex system in the usual way. Login as described in
the Cedex Operating Instructions with the username Cedex and password Cedex.
4.2
Adaptation of the Counting Routine
Normally the Cell Type Standard Cells controls the image recognition making it unnecessary to
modify the counting routine. The Cell Type Standard Cell counting routine which is integrated
into the Cedex system is set to suit all types of standard measurements. However, under certain
circumstances, it may be necessary to adjust this counting routine e.g. for cell cultures with an
extraordinary appearance or for specific internal counting strategies i.e. if certain aggregates or
cell nuclei are to be counted or not.
In this case, the administrator can adjust the image processing and evaluation strategy of the
Cell Type Standard Cells to meet specific requirements. Adjusting the Cell Type Standard
Cells is also known as creating a new Cell Type because a new Cell Type is created or an
existing Cell Type is modified. This can be done by changing certain parameters that are based
on the Cell Type Standard Cells counting routine.
The Cell Type Standard Cells is based on seven parameters and one algorithm. Each
parameter directly influences the image processing and evaluation strategy and therefore the
results. The present software version has only one algorithm (Operator).
Administrator Manual Cedex Version 1.6.1
23
Figure 6
Setting Cell Type Standard Cells parameters
Description of the Individual Parameters
Living Cells‘ Appearance
Range [-20, 20], Default 0, Unit [absolute measure].
Defines the sharpness and clarity of viable cells. Increasing this value means that more cells will
be determined as viable cells.
This parameter should be handled with care because it influences the determination of the cell
density and the viability.
The following text describes a situation where a change of this parameter is necessary. A cell
line should be analyzed, where dead cells absorb the Trypan Blue badly. If the default
parameter setting is taken for an analysis, some of the dead cells will be recognized as living
cells. When the parameter Living Cells‘ Appearance is changed towards negative values (in
special situations towards values <-10), the darker objects are more and more recognized as
dead cells. Thus, the measured viability decreases.
If the parameter is changed towards positive values, the amount of objects counted as living
cells will increase. Thus, the measured viability increases. A change towards positive values
could make sense, if due to the condition of the cells or he process media, the optical
appearance has a deficient contrast.
ATTENTION: In standard situations a change of this parameter results in labeling of debris
objects!
In the range [-10, 10] the Std. Cells 5.00 operator behaves similar to the Std. Cells 3.0
operator.
24
Administrator Manual Cedex Version 1.6.1
General Administrator Functions
4
Dead Cells’ Size
Range [40, 250], Default 110, Unit [µm²].
Defines the minimum cross-sectional area of a particle in µm². Increasing this value means that
less particles will be recognized as dead cells.
Dead Cells’ Appearance
Range [-10, 10], Default 0, Unit [absolute measure].
Dead cells have a variety of appearances under the microscope. This can range from sharply
outlined small dark dots to less distinct objects with varying brightness and contrast. This
parameter distinguishes large dark objects which are “typical dead cells” from less distinct
objects. Increasing this value means that there are more deviations from “typical dead cells”
resulting in a higher count of dead cells.
Dead Cells’ Aggregate Minimum
Range [250, 1500], Default 360, Unit [µm²].
Defines the minimum cross-sectional area of a dead cell aggregate (cluster). When this size is
reached, it is then automatically partitioned into single cells.
Dead Cells’ Aggregate Maximum
Range [1500, 5000], Default 2250, Unit [µm²].
Defines the maximum cross-sectional area of a dead cell aggregate (cluster). The dead cell
aggregate area within this range is automatically partitioned into single cells. Any aggregate
larger than the specified maximum area is not taken into account.
Dead Cells’ Aggregate Appearance
Range [-10, 10], Default 0, Unit [absolute measure].
Defines the automatic evaluation of a dead cell aggregate (cluster).The cross-sectional area of
dead cell aggregates are automatically partitioned into single cells. Increasing this value means
that there are more single cells determined in the aggregate.
Minimum Pollution Area
Range [5000, 30000], Default 5400, Unit [µm²].
Defines the minimum cross-sectional area of the pollution size e.g. debris particles, air bubbles
etc. Any pollution size larger than the specified minimum area results in the entire image being
excluded.
ATTENTION
The use of the sliders, espectally in combination, can lead to unexpected results.
Administrator Manual Cedex Version 1.6.1
25
Modifying a Cell Type
An existing Cell Type can be modified although it is NOT advisable for data safety. A new Cell
Type based on an existing Cell Type should be created instead.
Follow the instructions below to modify an existing Cell Type (not advisable):
1.
Click on the Setup menu on the Cedex Workbench.
2.
Click on Cell Types.
3.
Select Edit and the Choose Cell Type to edit window will appear.
4.
Select the appropriate Cell Type.
5.
Click on Edit.
6.
Adjust the individual parameters as required by clicking on the
increase or decrease their values.
and
buttons to
Click on Revert just below the individual parameters to delete the adjustments again.
7.
Click on Save to confirm the adjustments.
Click on Cancel to shut the window without saving any changes.
Creating a New Cell Type
A new Cell Type can be created on the basis of an existing Cell Type. The existing Cell Type is
saved under a new name which is then modified.
Follow the instructions below:
1.
Click on the Setup menu on the Cedex Workbench.
2.
Click on Cell Types.
3.
Select New and the Create a new cell type window will appear.
4.
Select the algorithm that the new Cell Type is to be based on from the Choose
algorithm based on field. Only the Standard Cells algorithm is available at present.
5.
Select the new Cell Type based on the existing Cell Type from the Choose the cell type
based on field.
6.
Enter the new Cell Type in the Name of the new cell type field.
7.
Click on Create to establish the new Cell Type.
8.
Adjust the individual parameters by clicking on the
decrease their values.
and
buttons to increase or
Click on Revert just below the individual parameters to delete any changes.
9.
Click on Save to confirm the adjustments.
Click on Cancel to shut the window without saving any changes.
26
Administrator Manual Cedex Version 1.6.1
General Administrator Functions
4
Deleting a Cell Type
Follow the instructions below:
1.
Click on the Setup menu on the Cedex Workbench.
2.
Click on Cell Types.
3.
Select Delete and the Choose cell type to delete window will appear.
4.
Select the Cell Type to be deleted.
5.
Click on Delete and you will be requested to confirm the entry.
6.
Click on Yes to confirm the entry.
NOTE
ALL PARAMETER OF THE MEASUREMENTS ARE STORED IN THE AUDIT TRAIL FILE, SO
DELETED CELL TYPES HAVE NO INFLUENCE TO FURTHER MEASUREMENTS.
ATTENTION
DO NOT DELETE THE CELL TYPE STANDARD CELLS.
Should the Cell Type Standard Cells be accidentally deleted, then it can be recovered by using
the option based on <none>.
Administrator Manual Cedex Version 1.6.1
27
4.3
Using the CD Burner
If you intend to download your data onto CD with the help of the CD-burner then follow these
procedures:
•
Login to Windows as Administrator to access the Windows desktop.
•
Start the burner software by double-clicking on the Easy CD Creator icon on the desktop
or use the Start button and then program, Roxio Easy CD Creator. The Select a Project
window will appear with various types of burning options.
•
Select the data you wish to copy from the directory in the upper split window. The Cedex
data for particular measurements are factory set and stored in the directory
D:\Cedex\images\reactor ID\ sample ID. Mark the files accordingly and drag them into
the window below as in Windows explorer.
•
Start the burner process.
When this process is completed, a message is shown to confirm its success.
When closing Easy CD Creator you will be asked to save the data list. Answer with NO as long
as you have not yet set up a specific data list which you might need later.
28
Administrator Manual Cedex Version 1.6.1
Passwortmanagement
5
5
Password Management
The Cedex program (version 1.6.1) has been equipped with a detailed password management,
thereby providing better compatibility to CFR 21 Part 11 guidelines.
5.1 Access Control at the Operating System Level
We recommend that the system administrator ought be engaged as a Windows administrator
(Operating System Administrator). This person should undertake the configuration of the
settings that regulate access to the system at the operating system level.
The system administrator should login with a valid password as an administrator under
Windows 2000 (factory default: Administrator) and, for security, change this password.
The Security Update 1 application, with which previous Cedex versions were equipped (see
Cedex User Manual), has been replaced in Cedex version 1.6.1 by a new configuration.
In Windows NT, the Administrator and Cedex were both available as users.
The Windows administrator could, with the help of Security Update 1, select whether the
Cedex users should have full access on the desktop or not.
In Windows 2000, this type of configuration has been replaced by installing an additional user:
CedexSA (SA = secure access).
The Windows administrator must now undertake setting whether the Cedex or the CedexSA
user should be given access.
The Cedex user has access rights for the desktop. He/she can use all available applications,
e.g. the CD-burner software.
The CedexSA has no access to the desktop and can therefore only use the Cedex program.
The Windows administrator determines which of the two Cedex accounts will be used. The
account that should not be used must be disabled in the Cedex.ini file.
To provide the CedexSA user with the ability to print or to use a network drive, it is necessary to
allow access to the desktop. the Option Make Unsecure in the Support folder gives the user
this access. After he access is provided, the rights have to be reset by the option Make Secure
in the Support folder.
The security functions of the new password management for the Cedex program can only be
administered over access to the desktop because entries for the Cedex.ini are hereby
undertaken. Access to the desktop is allowed only for the Windows administrator (Operating
System Administrator) or for the Cedex user.
If a Cedex- or CedexSA user registers at the operating system level, the default passwords are
Cedex and CedexSA respectively.
5.2 Access Control at the Cedex Level
For the Cedex program, only the Cedex administrator is installed per default (no default
password installed). For security reasons, the Cedex administrator should secure his/her
access to the Cedex program with a password.
The Cedex administrator installs the Cedex user and gives him/her the necessary rights (see
Cedex User Manual in addition to the above mentioned).
Administrator Manual Cedex Version 1.6.1
29
5.3 Administration of the New Password Management
The new functions for the password-management can be set in the Cedex.ini-file. In order to be
able to undertake the setting, full desktop access must be permitted.
Open the support-folder on the desktop with a double click. Double click on Link to the
Cedex.ini. The Cedex.ini-file opens.
The Cedex-Administrator
Using AdminAsUser in the System area, it can be decided whether the Cedex administrator
undertakes only administrative functions or, in addition, general functions too (e.g. carrying out
or viewing measurements, etc.).
AdminAsUser=0
Administrative functions only
AdminAsUser=1 (default) Administrative functions and general functions
The BlackList
In order to select only passwords that fulfill a specific security-standard, there exists the so
called BlackList. This list contains passwords that are not allowed to be used. Should a user
select a password out of this list, the message “This password is too simple! Choose another
one.“ is displayed.
Selection of whether passwords should be matched with the BlackList can be done in the
Cedex.ini file of the System area.
UseBlackList=0 (default)
At the creation of a password, it is not checked whether this
password is in the BlackList.
UseBlackList=1
At the creation of a password, it is checked whether this
password is in the BlackList.
BlackListIgnoreCase=1 (default) Capital or small letters are not relevant.
BlackListIgnoreCase=0
Passwords that exactly match those in the BlackList will be
rejected.
The BlackList can be freely modified or expanded.
The following should be adhered to:
1.
Only one password for each row.
2.
No backspace before or after the password.
3.
Pay attention to capital and small letters, if BlackListIgnoreCase has value 0.
The BlackList is found in the C:\Cedex directory under Blacklist.txt.
30
Administrator Manual Cedex Version 1.6.1
Passwortmanagement
5
Specifying Password Characteristics
Characteristics of passwords can be specified in the Cedex.ini file of the System area.
The following table shows selectable characteristics of a password:
PasswordExpiration=0 (default)
Passwords never lose their validity.
PasswordExpiration=“X“
Passwords lose their validity after “X“ days (positive whole
number).
Passwords can be falsely entered as often as possible.
PasswordMaxRetry=0 (default)
PasswordMaxRetry=“X“
PasswordMinAlpha=0 (default)
Passwords can falsely be entered “X“ times consecutively,
before this user is denied access. Only the administrator can
reverse denial of access by issuing a new password.
Passwords do not require a minimum number of letters.
PasswordMinAlpha=“X“
Passwords must have at least “X“ letters.
PasswordMinLen=0 (default)
Passwords do not require a minimum length.
PasswordMinLen=“X“
PasswordMinNum=0 (default)
Passwords require a minimum length of at least ”X“
characters.
Passwords do not require a minimum number of digits.
PasswordMinNum=“X“
Passwords must contain at least “X“ digits.
PasswordReuse=0 (default)
Passwords already used can immediately be reused.
PasswordReuse=“X“
Passwords already used can only be reused after ”X“ used,
different passwords (entry of 1 to 25 possible).
NOTE
THE CEDEX ADMINISTRATOR CAN ENTER INCORRECT PASSWORDS WITHOUT LIMITS
AND AN EXTENDET TIME PERIOD AFTER RETRY OF ADDITIONAL 10 SEC. EACH TIME.
Re-Issuing User Names
The following settings determine whether reuse of user names already deleted, is permissible:
ReuseUsernames=1 (default)
Deleted user names can be re-issued.
ReuseUsernames=0
Deleted user names cannot be re-issued.
Administrator Manual Cedex Version 1.6.1
31
5.4 The System AuditTrail File
All important actions carried out by the Cedex program are recorded in the
AuditTrail_<year>_<month>.log file found in the Cedex folder.
The file is drafted every month and indicates the year and the month in which these actions
were carried out.
Example of listed actions:
Date
Time
User
Action
14:27:50
14:27:51
14:27:51
14:27:51
14:27:51
14:27:51
14:27:52
14:31:00
14:31:26
ID
characters
<O>
<I>
<I>
<I>
<I>
<I>
<I>
<S>
<D>
03.06.2003
03.06.2003
03.06.2003
03.06.2003
03.06.2003
03.06.2003
03.06.2003
03.06.2003
03.06.2003
(system)
(system)
(system)
(system)
(system)
(system)
(system)
(system)
Administrator
14:31:26
14:31:26
14:31:26
14:31:41
14:32:03
14:55:47
<D>
<D>
<D>
<N>
<S>
<O>
Administrator
Administrator
Administrator
Administrator
Administrator
(system)
System started
ID of Security device: 1896413025
DeviceID: G007D1018
System type: Cedex (Standard)
Space on drive C: 23420 MB
Space on drive D: 48182 MB
System language: DE
User "Administrator" logged in
Loaded measurement: Workarea:
D:\Cedex\Images
Reactor ID: TEST020916
Sample ID: P008
Data Set: Original data
Saved modified measurement
User logged out by inactivity timeout
System shut down
03.06.2003
03.06.2003
03.06.2003
03.06.2003
03.06.2003
03.06.2003
List of possible ID characters for the auditTrail file:
A
C
D
E
F
H
I
L
M
N
O
Q
R
S
U
V
X
32
AS20 actions
Calibration
Data mode
Errors
Failed security relevant actions
Hints / Information
Internal
Liquid management
Doing measurements
Modifying a measurement
System operations
User actions with less importance
Reprocessing
Security relevant actions
User management
Emergency actions
Comment
Administrator Manual Cedex Version 1.6.1
Installing a Printer
6
6
Installing a Printer
When a printer is installed on the Cedex system, additional software (printer driver) is required
for the PC. The printer therefore should only be installed by authorized personnel i.e. the
system administrator.
6.1
Installing a local printer
Follow the instructions below to install a printer:
1.
Connect the printer to the PC according to the instructions in the printer manual.
2.
Switch on the PC.
3.
Press <Ctrl>+<Alt>+<Delete> after the booting process has ended.
4.
Login as administrator with the password Administrator or with your individual
administrator password.
5.
Install the printer to the Windows 2000® Workstation according to the instructions in the
Windows manual or printer manual.
6.2
Installing a network printer
The installation of a network printer to the Cedex computer is quite involved, making it
necessary for the network administrator to adjust the settings.
The system administrator has to set up the necessary settings in the network and in the Cedex
computer.
Factory setting for the Cedex computer is Windows 2000 with local access for the following
users:
1.
Administrator with the password Administrator
2.
Cedex with the password Cedex
3.
CedexSA with the password CedexSA
For data security only the user Cedex and the user Administrator have access to the Windows
desktop and therefore access to applications of Windows 2000. The user CedexSA is restricted
to the Cedex application.
For set up of a network printer on the Cedex computer the System administrator has to
deactivate the security package in advance following the instructions below:
1.
Start the Cedex computer and login as Administrator to have access to the desktop .
2.
Open the Support folder.
3.
Deactivate the Security Pack with a double-click on MakeUnsecure.
4.
Shut all the windows on the screen and logout.
Administrator Manual Cedex Version 1.6.1
33
5.
Let the network administrator install the network printer as your standard printer for the
local user Administrator, Cedex and / or CedexSA. The respective user has to be
logged in to Windows 2000.
6.
To activate the security pack, the Cedex administrator has to be logged in to Windows
2000.
7.
Open the Support folder.
8.
Activate the Security Pack with a double-click on MakeSecure.
9.
Start the Cedex system as usual after logging out.
After installation the printer, the Cedex result data can be printed out by pressing the button
Print in the Result Data area of the Cedex program (see Cedex User Manual: “Printing the
Analyses Results”).
34
Administrator Manual Cedex Version 1.6.1
Appendix
Appendix
Contact Details
Information and technical support
innovatis AG
Meisenstr. 96
33607 Bielefeld
Germany
Phone: +49(0)521 2997 295
Fax: +49(0)521 2997 285
email:
[email protected]
[email protected]
[email protected]
[email protected]
internet:
www.innovatis.com
Administrator Manual Cedex Version 1.6.1
35
Technical Specifications
Cedex Measurement System
Method of measurement
Viable/dead cell differentiation
Digital image and pattern recognition
Trypan Blue exclusion method
5 x 10⁴ - 1 x 10⁷ cells per mL
8 µm – 40 µm
300 µL or 1000 µL
< 4,0 min
40x
100 µm
Teflon, 765 µm
10°C - 35°C (50°F - 95°F)
20% - 80% relative humidity
(non condensing)
Height: 660 mm (26,0 inches)
Width: 300 mm (12,0 inches)
Depth: 600 mm (23,6 inches)
Weight: 27,0 kg (60,0 Ibs.)
Detectable cell density range
Detectable cell diameter range
Required sample volume
Average measurement period
Magnification of the optical instrument
Chamber height
Material and Diameter of the capillaries
Operating temperature
Operating humidity
Dimensions
Energy requirements
Energy consumption
100 - 250 VAC, 50 - 60 Hz
60 W
Automatic Sampler AS20
Number of samples
Average measurement period for 20 samples
Dimensions
1 - 20
< 90 min
Height: 170 mm (6,7 inches)
Width: 175 mm (6,9 inches)
Depth: 160 mm (6,3 inches)
Weight: 2,6 kg (5,7 Ibs.)
Energy requirements
Energy consumption
Power supply
Cedex Computer
Cedex PC
Maximum hard disk storage capacity
12 VDC
max. 10 W
Input: 100 - 240 VAC, 47 - 62 Hz
Output: 12 VDC, 2,0 A
Newest PC generation incl. Windows 2000,
Framegrabber card,
Network card 10/100 Mbit, 10BaseT, onboard,
Interface card: 2 x serial (D-sub 9), 1 x parallel
CD-ROM drive CD RW
40 GB corresponds to 30.000 measurements
Cedex Monitor
Agency Approvals
36
Administrator Manual Cedex Version 1.6.1
15" TFT Flatscreen
CE, FCC-A
Index
Index
A
Access control .................................. 13, 29
Access rights .................................... 14, 16
Administrator .......................................... 23
Administrator functions........................... 21
Administrator password.......................... 14
Analysis data .......................................... 16
Analysis software ................................... 13
AuditTrail ................................................ 32
B
Beads solution........................................ 17
BlackList ................................................. 30
Brightness .............................................. 17
Brightness histogram.............................. 18
C
Calibrate the system............................... 17
Calibrating ........................................ 17, 21
Calibrating solution................................. 18
CD-Burner .............................................. 28
Cell Type ................................................ 26
Checking brightness............................... 18
Contact details........................................ 35
Contents of the delivery ......................... 11
Copyright .................................................. 5
Counting routine ..................................... 23
Cross-sectional area .............................. 25
D
Dead cells’ aggregate appearance ........ 25
Dead cells’ aggregate maximum............ 25
Dead cells’ aggregate minimum............. 25
Dead cells’ appearance.......................... 25
Dead cells’ size ...................................... 25
Dongle .................................................... 12
F
Focus................................................ 17, 18
Focus histogram..................................... 18
H
Hardware components............................ 12
I
Installation............................................... 11
L
License agreement ................................... 5
M
Main power supply.................................. 13
Minimum pollution area........................... 25
O
Operator.................................................. 23
P
Password characteristics ........................ 31
Password management .......................... 29
Preparing test liquid ................................ 18
Printer ..................................................... 33
R
Rights........................................................ 5
S
Safety instructions .................................... 7
Standard Cells ........................................ 23
Suitable location ..................................... 12
System functions .................................... 16
T
Target directories.................................... 16
U
User profile ....................................... 15, 21
Username ............................................... 22
W
Warranty ................................................... 5
Work area ............................................... 15
Administrator Manual Cedex Version 1.6.1
37