1
ScreenPlay
TM
Display Session Record and
Playback Tool for the AS/400®
Nexgen Products, Inc.
ScreenPlay V3.02
Copyright © 1993-2005, 1998, 2004 Nexgen Products, Inc.
All Rights Reserved.
This manual contains confidential and proprietary materials and information of Nexgen Products,
Inc. and its licensors, which are protected by copyright, patent, unfair competition and trade secret
laws. Disclosure, reproduction, or copy of any portion of this manual is expressly prohibited. Use of
the SCREENPLAY™ software and of this manual is governed by a License Agreement.
ScreenPlay™ is a trademark of Nexgen Products, Inc.
AS/400® and OS/400® are registered trademarks of International Business Machines Corporation
AS/NET™ is a trademark of System Software Associates, Inc.
Microsoft® is a registered trademark of Microsoft Corporation.
Other trademarks are the property of their owners.
2
Nexgen Products, Inc.
ScreenPlay V3.02
Table of Contents
Table of Contents ...............................................................................................................................................3
Introduction.........................................................................................................................................................5
Installation Instructions....................................................................................................................................6
ScreenPlay Main Menu .....................................................................................................................................9
Start Recorder (STRREC)..................................................................................................................................10
End Recorder (ENDREC) .................................................................................................................................11
Work with Session (WRKSSN)......................................................................................................................12
Notes Window ...................................................................................................................................................15
Spooled Files ......................................................................................................................................................16
Edit/Select Spooled File ...................................................................................................................................18
Confirm Delete...................................................................................................................................................21
Change Panel ID/Description Window.........................................................................................................21
Export Window..................................................................................................................................................22
Work with Scenarios (WRKSNO) .................................................................................................................25
Send Window.....................................................................................................................................................28
Work with Scenarios - Panels ..........................................................................................................................30
Work with Scenarios - Inactive Mode.............................................................................................................32
Confirm Save......................................................................................................................................................34
Work with Scenarios - Archived Mode ..........................................................................................................35
Secured ScreenPlay Functions .......................................................................................................................37
System Parameter Maintenance ....................................................................................................................38
Manage Sessions ..............................................................................................................................................41
Copy Workstation Members............................................................................................................................42
Nexgen Products, Inc.
3
ScreenPlay V3.02
The screen images in this manual were all recorded and then exported using
ScreenPlay™.
4
Nexgen Products, Inc.
ScreenPlay V3.02
Introduction
ScreenPlay allows you to record an entire application session, screen by screen, and then save this
“scenario” so that it can be played back later. Using the AS/400 command Start Copy Screen as a
starting point, ScreenPlay adds a complete framework for managing these collected screen images so
that they can be used throughout your organization for testing, training, or auditing.
ScreenPlay allows you to:
•
playback screens exactly as they appeared during the recorder session
•
resequence and delete panels within a scenario
•
include spooled files in a scenario
•
attach notes to individual panels and spooled files
•
identify or cross-reference each scenario with up to three sort values and a description
•
print scenarios with complete panel and spooled file detail including notes
•
export scenarios to a PC document in Rich Text Format using shared folders
•
transmit scenarios to remote sites (if SSA’s AS/NET™ product is installed)
ScreenPlay uses simple AS/400 commands to start and end a recorder session. You can also select
ScreenPlay commands from the main menu.
Nexgen Products, Inc.
5
ScreenPlay V3.02
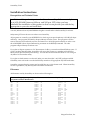
Installation Instructions
Prerequisites and Technical Notes
Installation of this product is protected with a software “key.” You must telephone
us at (630) 300-6000 (between 8:00 a.m. and 5:00 p.m. CST) when you have
scheduled the installation of this product so that we can provide you with the key
appropriate to your site and install date.
Your AS/400 must be at OS/400 V2R3M0 or higher to install and use the ScreenPlay™ software.
Subsystem QCTL must be active in order to use ScreenPlay.
All programs are owned by user SCREENPLAY, which is given special authority *ALLOBJ (all object
authority). One program, SCN110C1, adopts authority from the owner. This program is used to
restore scenarios from archived save files, and must have *ALLOBJ special authority in order to use
the ALWOBJDIF (Allow Object Differences) parameter on the RSTOBJ command. All other
programs adopt authority from their user.
If you plan to Export scenarios to a PC document in a folder, you must have Shared Folders active. If
you do not have Shared Folders, ScreenPlay will export the scenario to a member in file SCWP in
library SPV3F (the ScreenPlay Files library). You can then download the document to a PC using an
AS/400 to PC file transfer utility.
If you plan to Send scenarios to other AS/400s, you must have SSA’s AS/NET product installed.
ScreenPlay users who wish to use the Send facility must have all appropriate AS/NET authorities.
ScreenPlay supports display sessions and spooled files up to 132 columns wide. When ScreenPlay
records a spooled file, any data beyond 132 columns is truncated.
Filenames
All filenames used by ScreenPlay are shown in the following list.
The ScreenPlay programs qualify these file names with the ScreenPlay library names as entered
in System Parameter Maintenance.
SAD
SAM
SAN
SAP
SAS
SCC
SCD
SCDD
SCDL01
SCDL02
SCL
SCLL01
SCM
SCML01
SCML02
SCML03
SCML04
6
PF
PF
PF
PF
PF
PF
PF
PF
LF
LF
PF
LF
PF
LF
LF
LF
LF
SCML05
SCML06
SCML07
SCML08
SCML09
SCML10
SCN
SCNL01
SCP
SCPL01
SCPX
SCPXL1
SCS
SCSL01
SCSL02
SCSL03
SCW
LF
LF
LF
LF
LF
LF
PF
LF
PF
LF
PF
LF
PF
LF
LF
LF
PF
SCWL01
SCWP
SCX
SPA
SPAL01
SP0210O
WSCD
WSCDL01
WSCM
WSCML08
WSCN
WSCNL01
WSCP
WSCPL01
WSCS
WSCSL01
ZSD3
LF
PF
PF
PF
LF
PRTF
PF
LF
PF
LF
PF
LF
PF
LF
PF
LF
PF
Nexgen Products, Inc.
ScreenPlay V3.02
Procedure
1.
Sign on as the Security Officer (QSECOFR).
2.
Create the ScreenPlay user profile, which will own all of the ScreenPlay objects:
CRTUSRPRF USRPRF(SCREENPLAY) TEXT('ScreenPlay Owner Profile')
SPCAUT(*ALLOBJ)
3.
Restore the ScreenPlay software. Enter the following commands:
RSTLIB
RSTLIB
RSTLIB
RSTLIB
SAVLIB(NEXSPLSAVB) DEV(device-name)
SAVLIB(SPV3F)
DEV(*SAVF) SAVF(NEXSPLSAVB/SPV3F)
SAVLIB(SPV3O)
DEV(*SAVF) SAVF(NEXSPLSAVB/SPV3O)
SAVLIB(SPV3SAV) DEV(*SAVF) SAVF(NEXSPLSAVB/SPV3SAV)
NOTE: If you want to use different names for the ScreenPlay libraries, you must first restore
them under their default names and then rename them later, after you have installed the
software key (step 6).
4.
Job description SCNJOBD in library SPV3O has an initial library list of SPV3O, SPV3F, and
ASNET. Change the job description, if necessary (using CHGJOBD), to reflect the names of the
ScreenPlay objects library, ScreenPlay files library, and the AS/NET library on your system. This
job description will be used when scenarios are sent TO your system.
[Note: If AS/NET is not installed on your system and you have no plans to install it, this job
description will not be used. You may delete it and then skip to step 6.]
5.
Move SCNJOBD to a library that is on the initial library list of your ASNET user profile and on
the default user library list: for example, QGPL.
MOVOBJ OBJ(SPV3O/SCNJOBD) OBJTYPE(*JOBD) TOLIB(QGPL)
6.
If you have not yet received instruction from Nexgen on installing the software security key, you
will not be able to proceed past this point. Please call Nexgen at (630) 778-2500 for assistance.
Install the software security key, based on instructions from Nexgen.
NOTE: If you want to rename the ScreenPlay libraries, turn now to the notes at the end of the
installation instructions. Otherwise, proceed to step 7.
7.
Customize ScreenPlay for your site. Start ScreenPlay.
ADDLIBLE SPV3O
STRSP
8.
Select menu option 5, System Parameter Maintenance, and follow the instructions on p. 38 of this
manual.
9.
Set up library lists. Any user on your system may now use ScreenPlay. No special authority is
required. ScreenPlay users must have the ScreenPlay objects library, SPV3O, on their library list
in order to use the Start ScreenPlay command (STRSP). We recommend that you add SPV3O to
Nexgen Products, Inc.
7
ScreenPlay V3.02
your system’s default user library list (QUSRLIBL). Alternatively, you can instruct users to add
SPV3O to their library list each time they use ScreenPlay.
If you Want to Rename the ScreenPlay Library Names
You may use any library names that you wish for ScreenPlay. However, you must enter the new
library names in the System Parameter Maintenance program before you can start ScreenPlay.
A. After restoring the ScreenPlay libraries under their default names, and after installing the
security key, use RNMOBJ to rename the libraries.
B. Perform the following commands:
ADDLIBLE ScreenPlay-object-library-name
ADDLIBLE ScreenPlay-files-library-name
CALL SCN800
This will take you to the System Parameter Maintenance program, described in this manual on
p. 38.
C. Enter the new values for ScreenPlay object, file, and save libraries.
Make any other changes needed to customize your installation of ScreenPlay. Press Enter to save
your changes and then exit System Parameter Maintenance. Return to Installation Instructions
step 9.
8
Nexgen Products, Inc.
ScreenPlay V3.02
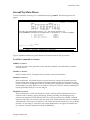
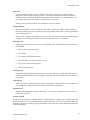
ScreenPlay Main Menu
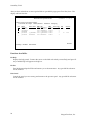
To start a ScreenPlay session, go to a command line and type STRSP. The following menu will
appear.
SP0MNU
***Nexgen Products Inc.***
▒▒▒▒
▒
▒▒▒▒
▒
▒▒▒▒
▒▒▒
▒
▒
▒▒▒
▒▒▒▒
▒ ▒
▒▒▒▒
▒
▒
▒▒▒
▒
▒
▒
CLARKRUS1
▒
▒
▒
▒
▒
1/18/95
TESTSP
17:28:15
▒▒▒ ▒▒▒ ▒▒▒
▒▒▒ ▒ ▒
▒▒▒ ▒▒▒ ▒ ▒
▒ ▒ ▒ ▒
▒
▒
▒ ▒
▒ ▒ ▒ ▒
▒▒▒ ▒▒▒ ▒ ▒
▒▒▒▒ ▒▒▒
ScreenPlay
▒
Copyright 1993-2005 Nexgen Products, Inc. All Rights Reserved. Use
of the SCREENPLAY software and documentation is governed by a license agreement
1. Start Recorder
(STRREC)
2. End Recorder
(ENDREC)
3. Work with Session
(WRKSSN)
4. Work with Scenarios
(WRKSNO)
90. SIGNOFF
Selection or command
===>
F1=Help
F3=Exit
F4=Prompt
F9=Retrieve
F12=Cancel
Type an AS/400 command or type the number of the menu selection, then press Enter.
Available Commands or Actions:
STRREC or Action 1
Starts the recorder. Every panel that comes after this command is recorded until you end the
recorder session.
ENDREC or Action 2
Ends a recorder session. The panels can be worked on in Work with Session.
WRKSSN or Action 3
Work with Session. Work with Session is used to create new scenarios from panels that have
been recorded and to record spooled files from the workstation member. Customization of the
session is possible by changing the order of recorded panels, changing the screen ID, or changing
the description of a panel. If there are no panels in a session, the only two actions available are to
record spooled files using F7, or to exit using F3.
WRKSNO or Action 4
Work with Scenarios. Work with Scenarios is used to perform general maintenance tasks on
scenarios such as sending, copying, displaying, printing, renaming, and changing the way
scenarios are sequenced. In the Inactive mode, save/restore functions are available. Archived
mode provides a list of all scenarios that have been saved. Restore functions are also available in
Archived mode. If there are no scenarios to work with in Work with Scenarios, the only available
function is to exit using F3. (Note that your system administrator can supply an alternate term
for “scenario” but the command will remain as WRKSNO.)
Nexgen Products, Inc.
9
ScreenPlay V3.02
90. SIGNOFF
Ends your AS/400 session.
If you are the System Administrator, you will have two additional options. These are described in
the Secured ScreenPlay Functions section beginning on p. 37 of this manual.
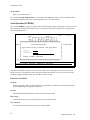
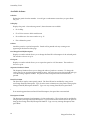
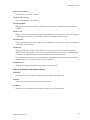
Start Recorder (STRREC)
If you select STRREC or option 1 from the menu, the following window will appear. If, however, you
have already recorded sessions but have not yet created a scenario from them, you will go directly
into Work With Session.
SP0MNU
***Nexgen Products Inc.***
CLARKRUS1
1/18/95
TESTSP
▒▒▒▒
▒▒▒▒ ▒
▒
▒▒▒ ▒▒▒ ▒▒▒ ▒▒▒ ▒▒▒ ▒ ▒ ▒ ▒▒▒ ▒ ▒
▒▒▒▒ ▒
▒
▒▒▒ ▒▒▒ ▒ ▒ ▒▒▒▒ ▒ ▒ ▒ ▒ ▒
▒ ▒
▒
▒
▒
▒ ▒ ▒
▒ ▒ ▒ ▒ ▒
▒▒▒▒▒▒▒▒▒▒▒▒▒▒▒▒▒▒▒▒▒▒▒▒▒▒▒▒▒▒▒▒▒▒▒▒▒▒▒▒▒▒▒▒▒▒▒▒▒▒▒▒▒▒▒▒▒▒▒
▒
NEXG ▒
Start Recorder Window
▒
▒ Type values and text if desired, then press Enter.
▒
▒
Sort #2
▒
Sort #3
▒
Description
▒
▒
▒
F1=Help F3=Exit F12=Cancel
▒
Sele ▒▒▒▒▒▒▒▒▒▒▒▒▒▒▒▒▒▒▒▒▒▒▒▒▒▒▒▒▒▒▒▒▒▒▒▒▒▒▒▒▒▒▒▒▒▒▒▒▒▒▒▒▒▒▒▒▒▒▒
===>
F1=Help
F3=Exit
F4=Prompt
F9=Retrieve
▒
▒
▒
▒
▒
▒
▒
▒
▒
▒
▒
▒
17:28:15
Il 60563 USA
F12=Cancel
Start Recorder Window allows you to enter sort values and a description of the scenario you are
about to record. It is optional to enter data in these fields at this time. If you do not wish to enter
anything simply press Enter and your recorder session will start.
Functions Available:
F1=Help
Displays the help panels. Position the cursor on the field for which you need help and press F1.
Any available help will appear in a help box.
F3=Exit
Exits the Start Recorder Window and does not start the recorder.
F12=Cancel
Cancels the panel you are viewing and does not start the recorder.
Sort Value #2
If a Sort Value #2 is desired, enter up to a 7 digit number.
10
Nexgen Products, Inc.
ScreenPlay V3.02
Sort Value #3
If a Sort Value #3 is desired, enter up to a 7 digit number.
Description field
Type a brief description, if desired, of the scenario you are about to create.
After you press Enter, there will be a brief pause, and the following operating system-generated
display will appear:
Display Messages
Queue . . . . . :
Library . . . :
Severity . . . :
CLARKRUS1
QSYS
00
System:
Program . . . . :
Library . . . :
Delivery . . . :
NEXGEN
*DSPMSG
*NOTIFY
Type reply (if required), press Enter.
From . . . :
CLARK
11/22/94
09:21:48
Cause . . . . . :
Start copy screen has been requested with output to
*NONE. Reply C to prevent copy screen or G to allow it. (C G)
Reply . . .
F3=Exit
F12=Cancel
F10=Display all
F13=Remove all
F11=Remove a message
F16=Remove all except unanswered
Bottom
Press G to go ahead with the copy screen session or press C to cancel it.
From this point on, each time you proceed from one screen to another, the screen image will be
recorded by ScreenPlay.
End Recorder (ENDREC)
When you are ready to stop the recording, you may either:
•
Return to the ScreenPlay main menu by entering STRSP and select option 2, End Recorder, or
•
Go to a command line and enter the command ENDREC.
The ScreenPlay recording session will stop.
Nexgen Products, Inc.
11
ScreenPlay V3.02
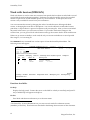
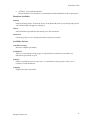
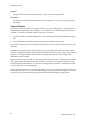
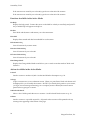
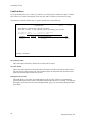
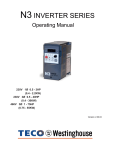
Work with Session (WRKSSN)
Work with Session is used to create new scenarios from panels that have been recorded and to record
spooled files from the workstation member. Each time you end a ScreenPlay session, the recorded
screens are put into an AS/400 member specific to your workstation. At that point, the screen
session is only available for review from your workstation.1
You can customize the session by changing the order of recorded screens, deleting individual
screens, or changing the screen IDs or descriptions. You can also add notes to individual screens,
print them, or export them to a personal computer word processing file. After you have customized
the panels in the session, you will create a scenario. If you need to make more changes to the
scenario later, you can go into Work with Scenarios and copy the scenario back to Work with Session.
If there are no screens available to work with, the only two actions available are to record spooled
files using F7, or to exit using F3.
Enter WRKSSN from a command line or select option 3 from the ScreenPlay Main Menu. The
following screen will appear:
SP0100-01
***Nexgen Products Inc.***
CLARKRUS1
Work with Session
Position to:
Sort #2
0000919
Sort #3
0091919
Select Action and Press Enter.
4=Delete 5=Display 6=Print
Act
Seq
10
20
30
F1=Help F3=Exit
F21=Delete All
Panel ID
SP0MNU
MAIN
STRTRN
F6=Create
1/18/95
TESTSP
13=Change Panel ID/Description
17:31:18
15=Export
Description
TESTSP
17:28:15
System: NEXGEN
TESTSP
17:29:50
F7=Spooled Files
F8=Display All
Bottom
F11=Seq Entry
Functions Available:
F1=Help
Displays the help panels. Position the cursor on the field for which you need help and press F1.
Any available help will appear in a help box.
F3=Exit
Exits Work with Session and returns you to the main menu.
The ScreenPlay System Administrator at your site can work with all workstation sessions
(members), if necessary. That function is described in the Manage Session section of this document.
1
12
Nexgen Products, Inc.
ScreenPlay V3.02
F6=Create
Creates a scenario which consists of all the panels in the current session. Press F6, enter a
description of the scenario, then press Enter. A scenario is created and stored in Work with
Scenarios with an automatically-generated scenario name consisting of a 7 digit number. You
can rename the scenario later in Work with Scenarios, if you wish.
After you have created a scenario, the workstation session is cleared.
F7=Spooled files
Records spooled files. Press F7 and then select either an entire spooled file to be recorded, or
select only certain pages to be recorded by choosing the edit/select action. See the Spooled Files
section starting on p. 16.
After you have added spooled files to the session, they will appear on this screen with sequence
numbers. You can then perform the same actions on them as you can on panels.
F8=Display all
Displays all panels in the current session in sequential order. After pressing F8, these functions
are available:
•
Enter to move to the next panel
•
F1 for Help
•
F3 to return to Work with Session
•
F4 to add notes. See notes window on p. 15
•
F12 to move to the previous panel
•
F21 to delete the panel.
F11=Seq Entry
Toggles the Seq (Sequence) field between open for entry and closed. When the field is open for
entry the sequence numbers can be changed. The panels will be resequenced the next time you
press Enter.
F12=Append
Adds new panels to panels currently in Work with Session. This function is only available if you
are starting the recorder when panels already exist in Work with Session.
F21=Delete all
Deletes all existing panels in Work with Session. You will get a confirmation screen after you
press Enter. See p. 21.
Actions Column
Use this column to perform available actions on selected panels. Type the action number next to the
panel on which you want to perform the action, then press Enter. You may also perform actions on
more than one panel at a time by typing the number of the action next to each individual panel and
then pressing Enter.
Nexgen Products, Inc.
13
ScreenPlay V3.02
Available Actions:
4=Delete
Deletes the panel from the member. You will get a confirmation screen after you press Enter.
See p. 21.
5=Display
Displays the panel. After selecting action 5, these functions are available:
•
F1 for Help
•
F3 or F12 to return to Work with Session
•
F4 to add notes. See notes window on p. 15
•
F21 to delete the panel.
6=Print
Sends the panel to a spooled output file. Panels will be printed with any existing notes
appearing at the bottom of the page.
13=Change Panel ID/Description
Displays a window which allows you to change the Panel ID or Description of the selected panel.
The window is shown on p. 21.
15=Export
Displays a window which allows you to export this panel to a PC document. The window is
shown on p. 22.
Sequence Number Column
The Sequence Number allows you to change the order of panels in a scenario. To change the
order, press F11 to open the Sequence field for entry. Move the cursor into the Seq field and type
over the existing sequence number. The panels will be resequenced the next time Enter is
pressed.
Panel ID Column
The Panel ID is used to name specific panels. The Panel ID can be modified by using action
13=Change Panel ID/Description. Type 13 in the action column next to the panel to bring up the
Change Panel ID/Description Window. Type over any existing Panel ID, then press Enter.
*
If an asterisk appears between Panel Id and Description, this panel has notes attached.
Description Column
The description contains a brief summary of what each panel is. This column can be modified by
using action 13=Change Panel ID/Description. Type 13 in the action column next to the panel to
bring up the Change Panel ID/Description Window. Type over any existing description, then
press Enter.
14
Nexgen Products, Inc.
ScreenPlay V3.02
Position to
Type the sequence number of the panel that you want to position the cursor on, then press Enter.
Description
Type a short description of the scenario that is being created. This field will only appear after
you press F6 to Create.
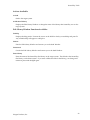
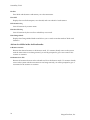
Notes Window
If you press F4 while a recorded panel or spooled file is displayed, you can add or review notes for
that panel. You can enter notes for each sequence number within a scenario. The notes window
appears as follows:
MAIN
AS/400 Main Menu
Select one of the following:
System:
NEXGEN
1. User tasks
2. Office tasks
4. Files, libraries, and folders
▒▒▒▒▒▒▒▒▒▒▒▒▒▒▒▒▒▒▒▒▒▒▒▒▒▒▒▒▒▒▒▒▒▒▒▒▒▒▒▒▒▒▒▒▒▒▒▒▒▒▒▒▒▒▒▒▒▒▒▒▒▒▒▒▒▒▒▒▒▒▒▒▒▒▒▒▒▒▒▒
▒
Notes Window
Panel#
20
▒
▒
▒
▒
▒
▒
▒
▒
▒
▒
▒ F1=Help F3=Exit F12=Cancel Rollup/down
▒▒▒▒▒▒▒▒▒▒▒▒▒▒▒▒▒▒▒▒▒▒▒▒▒▒▒▒▒▒▒▒▒▒▒▒▒▒▒▒▒▒▒▒▒▒▒▒▒▒▒▒▒▒▒▒▒▒▒▒▒▒▒▒▒▒▒▒▒▒▒▒▒▒▒▒▒▒▒▒
F23=Set initial menu
(C) COPYRIGHT IBM CORP. 1980, 1993.
▒▒
▒▒
▒▒
▒▒
▒▒
▒▒
▒▒
▒▒
▒▒
▒▒
▒▒
▒▒
Functions Available:
F1=Help
Displays the help panels. Position the cursor on the field with which you need help and press F1.
Any available help will appear in a help box.
F3=Exit
Exits the notes window and returns you to the panel currently being displayed. NOTE: To save
any text you have entered, press Enter at least once before exiting the notes window.
F12=Cancel
Cancels the panel you are viewing and returns to the previous panel.
Rollup/Rolldown
If there is more than one page of text in the notes window press Page Up (Rolldown) or Page
Down (Rollup) to move through the text.
Nexgen Products, Inc.
15
ScreenPlay V3.02
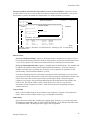
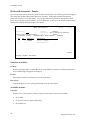
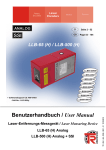
Spooled Files
The spooled files function allows you to include entire spooled files or selected pages of a spooled
file in your ScreenPlay session. If you press F7 from Work with Session, ScreenPlay will display all
of the current spooled files for your user profile. The panel looks like this:
SP0175-01
***Nexgen Products Inc.***
TESTSP
Workstation Spooled Files
Select Action and Press Enter.
1=Include All Pages 2=Edit/Select
Act
__
__
__
F1=Help
SFile
QSYSPRT
QPQUPRFIL
QPQUPRFIL
QPPGMDMP
QPJOBLOG
QPJOBLOG
F3=Exit
User Data
SNbr
0001
0002
0003
0001
S_NEXGEN03 0002
NIGHTUPD
0001
4=Delete
Job
CLARKRUS1
CLARKRUS1
CLARKRUS1
S_NEXGEN03
S_NEXGEN03
NIGHTUPD
1/18/95
CLARKRUS1
17:42:58
5=Display
JNbr
Total Pgs
003824
1
003824
2
003824
2
004832
9
004832
2
004831
4
Seq
Status
Bottom
F12=Cancel
SFile, User Data, SNbr, Job, JNbr, Total Pgs
These fields show the system data for each spooled file: Spooled File Name, User Data, Spooled
File Number, Job Name, Job Number, and Total Pages.
Seq
For spooled files that you have included in your scenario, the Sequence Number column shows
the number that has been assigned to this spooled file. The sequence number will only be
assigned if the Status is *CVT, *PRVCVT, or *CVTDLT.
Status Column
The status column displays the current status of each spooled file. If no actions have been
performed on a spooled file by Workstation Spooled files, then this column will be blank.
Possible statuses:
16
•
*CVT - Converted
The spooled file has been converted to a recorded panel in the current session.
•
*PRVCVT - Previously converted
The spooled file was converted to a recorded panel in a previous Workstation Spooled files
session.
•
*DLT - Deleted
The spooled file has been deleted from the output queue.
Nexgen Products, Inc.
ScreenPlay V3.02
•
*CVTDLT - Converted then deleted
The spooled file was converted to a recorded panel and then deleted from the output queue.
Functions Available:
F1=Help
Displays the help panels. Position the cursor on the field with which you need help and press F1.
Any available help will appear in a help box.
F3=Exit
Exits Workstation Spooled files and returns you to the main menu.
F12=Cancel
Cancels the panel you are viewing and returns to the previous panel.
Available Actions:
1=Include All Pages
Records a complete spooled file.
2=Edit/Select
Allows you to decide how many pages of a spooled file are selected to be recorded. See
Edit/Select Spooled File on p. 18.
4=Delete
Deletes a spooled file from the output queue. A confirmation screen is given to allow you to
confirm or cancel the deletion.
5=Display
Displays the entire spooled file.
Nexgen Products, Inc.
17
ScreenPlay V3.02
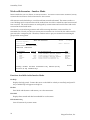
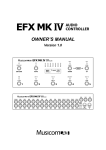
Edit/Select Spooled File
Edit/Select Spooled File is used to select specific pages of a spooled file to be recorded. A single
page or a specific range of pages can be selected. After selecting the desired pages press F6 to exit
Edit/Select Spooled File and record any selected pages. NOTE: If F3 is used to exit Edit/Select
Spooled File, no selected pages will be recorded.
When you choose action 2=Edit/Select, your spooled file will appear as shown in the example below.
Edit/Select Spooled File
File:
QPQUPRFIL
Page/Line
1 / 1
Control:
Columns
1 - 79
*...+....1....+....2....+....3....+....4....+....5....+....6....+....7....+....
5738QU1
V2R3M0
931217
Query . . . . . . .
Library . . . . .
Query text . . . .
Query CCSID . . . .
Query language id .
Query country id .
Collating sequence
F1=Help F3=Exit
F20=Right
.
.
.
.
.
.
.
IBM Query/400
.
.
.
.
.
.
.
.
.
.
.
.
.
.
.
.
.
.
.
.
.
.
.
.
.
.
.
.
F9=Select Page
.
.
.
.
.
.
.
.
.
.
.
.
.
.
.
.
.
.
.
.
.
.
.
.
.
.
.
.
.
.
.
.
.
.
.
NEXGEN
1/18/95
TEST
QGPL
65535
ENU
US
Hexadecimal
F10=Select Range
F12=Cancel
More...
F19=Left
Functions Available:
F1=Help
Displays the help panels. Position the cursor on the field with which you need help and press F1.
Any available help will appear in a help box.
F3=Exit
Exits Edit/Select Spooled File and returns you to Workstation Spooled files. This function DOES
NOT save pages that have been selected.
F6=Exit/Save
Exits Edit/Select Spooled File and saves any selected pages into Work with Session. This
function key is only available if a page or pages have been selected.
F9=Select Page
Selects or deselects the current page as one to be recorded.
F10=Select Range
Displays the range window and allows you to select a range of pages you want to record.
18
Nexgen Products, Inc.
ScreenPlay V3.02
F12=Cancel
Exits Edit/Select Spooled File and returns you to Workstation Spooled Files. This function DOES
NOT save pages that have been selected.
F19=Left
Allows you to see information to the left of the current display.
F20=Right
Allows you to see information to the right of the current display.
Control Field
Type the control character that you wish to use and then press Enter. Available control
characters:
•
T=Top
Allows you to view information at the top of the file currently being viewed.
•
B=Bottom
Allows you to view information at the bottom of the file currently being viewed.
•
Pn=Absolute Paging
Allows you to set defined page. To display page four, type "P4".
•
P+/-n=Relative Paging
Allows you to page forward or backward. To page forward five pages, type "P+5". To page
backward three pages, type "P-3".
•
Wn=Absolute Windowing
Allows you to view information started from defined column. To window to column
twenty, type "W20".
•
W+/-n=Relative Windowing
Allows you to move information to the left or right. To window to the right, type "W+15". To
window to the left type "W-10".
•
n=Absolute Rolling
Allows you to view information started from specific line. Type the number of the line you
want to display.
•
+/-n=Relative Rolling
Allows you to move information up-down through the screen. To roll forward, type "+"
followed by the number of lines you want to roll. To roll backward type "-" followed by the
number of lines you want to roll.
Nexgen Products, Inc.
19
ScreenPlay V3.02
After you have selected one or more spooled files or spooled file pages, press F6 to Exit/Save. The
display will look like this:
SP0175-01
***Nexgen Products Inc.***
TESTSP
Workstation Spooled Files
Select Action and Press Enter.
1=Include All Pages 2=Edit/Select
Act
__
__
__
F1=Help
SFile
QSYSPRT
QPQUPRFIL
QPQUPRFIL
QPPGMDMP
QPJOBLOG
QPJOBLOG
F3=Exit
User Data
SNbr
0001
0002
0003
0001
S_NEXGEN03 0002
NIGHTUPD
0001
F12=Cancel
4=Delete
Job
CLARKRUS1
CLARKRUS1
CLARKRUS1
S_NEXGEN03
S_NEXGEN03
NIGHTUPD
1/18/95
CLARKRUS1
17:44:34
5=Display
JNbr
Total Pgs
003824
1
003824
2
003824
2
004832
9
004832
2
004831
4
Seq
Status
40
*CVT
50
*CVT
Bottom
Functions Available:
F1=Help
Displays the help panels. Position the cursor on the field with which you need help and press F1.
Any available help will appear in a help box.
F3=Exit
Exits Workstation Spooled Files and returns you to the main menu. Any spooled file selections
will be retained.
F12=Cancel
Cancels the panel you are viewing and returns to the previous panel. Any spooled file selections
will be retained.
20
Nexgen Products, Inc.
ScreenPlay V3.02
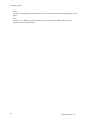
Confirm Delete
If you select action 4 to delete an individual panel or F21 to delete all panels, this screen will appear
to allow you to cancel the delete. The only actions available are to press Enter to delete the recorded
panels or press F12 to cancel the deletion. After performing either action, you will return to Work
with Session.
SP0100-02
***Nexgen Products Inc.***
Confirm Delete
CLARKRUS1
1/18/95
TESTSP
17:45:00
Press Enter to confirm your choices for Delete.
Press F12 to return to the previous panel and change your choices.
Seq
F1=Help
10
20
Panel ID
SP0MNU
MAIN
Description
TESTSP
17:28:15
System: NEXGEN
Bottom
F12=Cancel
Change Panel ID/Description Window
If you select action 13, this window will appear to allow you to change the panel ID or description of
the selected panel.
SP0100-01
***Nexgen Products Inc.***
CLARKRUS1
Work with Session
1/18/95
TESTSP
Position to:
Sort #2
0000919
Sort #3
0091919
Select Action and Press Enter.
4=Delete
▒▒▒▒▒▒▒▒▒▒▒▒▒▒▒▒▒▒▒▒▒▒▒▒▒▒▒▒▒▒▒▒▒▒▒▒▒▒▒▒▒▒▒▒▒▒▒▒▒▒
▒
Change Panel ID/Description
70
Act
Seq
▒
10 ▒ Panel ID
MAIN
20 ▒
30 ▒ Description
System:
NEXGEN
40 ▒
50 ▒ F1=Help F12=Cancel
60 ▒▒▒▒▒▒▒▒▒▒▒▒▒▒▒▒▒▒▒▒▒▒▒▒▒▒▒▒▒▒▒▒▒▒▒▒▒▒▒▒▒▒▒▒▒▒▒▒▒▒
13
70
MAIN
System:
NEXGEN
80
MAIN
System:
NEXGEN
90
MAIN
System:
NEXGEN
100
MAIN
System:
NEXGEN
110
SP0100-01
Work with Session
F1=Help F3=Exit
F21=Delete All
Nexgen Products, Inc.
F6=Create
F7=Spooled Files
F8=Display All
17:45:07
15=Export
▒
▒
▒
▒
▒
▒
▒
More...
F11=Seq Entry
21
ScreenPlay V3.02
Panel ID
The panel ID is used to name specific panels. Type over any existing panel ID.
Description
The description contains a brief summary of what each panel is. Type over any existing panel
description.
Export Window
If you select action 15, a window will appear to allow you to export the panel to a PC document in a
shared folder (if shared folders are available) or to a member in a text file (if shared folders are not
available). In order to use shared folders for the export, you must:
1.
ask the ScreenPlay system administrator to activate the shared folders System Parameter option,
and
2.
have shared folders installed and operational on your AS/400 and on your PC.
If you select the Export function from Work with Scenarios, you can export an entire scenario to one
document.
In either export method, the document will be converted into Microsoft’s Rich Text Format (.RTF),
which is a standard format that can be imported into Microsoft Word or many other word processing
programs. The display attribute characteristics, including high-intensity, reverse image, and
underlining, will be retained.
Exported scenarios are converted to an 8 pt monospace font (Courier New) so that the screens will fit
onto a page without breaking the lines of the screens. Note that if your exported scenarios contain
records longer than 80 characters, you may have to change the font, margins, or orientation in order
to fit all of the lines on one printed page.
For exported spooled files, you should change the page setup of your word processing document to
Landscape orientation. Also, if you have underlining on your spooled files, the display in your word
processor may not show the underlining, but the underlining should appear when printed.
22
Nexgen Products, Inc.
ScreenPlay V3.02
The export window looks like this if ScreenPlay is set to use shared folders. Note that you may
see this window even if you use a PC that has not been configured for shared folders. You can use
this window to create a document in a shared folder or to create a member in a text file.
SP0100-01
Position
Sort #2
Sort #3
Select A
4=Del
Act
15
***Nexgen Products Inc.***
CLARKRUS1
Work with Session
1/18/95
TESTSP
to:
0000919
▒▒▒▒▒▒▒▒▒▒▒▒▒▒▒▒▒▒▒▒▒▒▒▒▒▒▒▒▒▒▒▒▒▒▒▒▒▒▒▒▒▒▒▒▒▒▒▒▒▒▒▒▒
▒
Export Window
▒
▒ Member Name
▒
▒ Copy to Folder 0 (0=No 1=Yes)
▒
▒ Folder Name
▒
▒
▒ F1=Help F12=Cancel
▒▒▒▒▒▒▒▒▒▒▒▒▒▒▒▒▒▒▒▒▒▒▒▒▒▒▒▒▒▒▒▒▒▒▒▒▒▒▒▒▒▒▒▒▒▒▒▒▒▒▒▒▒
80
MAIN
System:
NEXGEN
90
MAIN
System:
NEXGEN
100
MAIN
System:
NEXGEN
110
SP0100-01
Work with Session
F1=Help F3=Exit
F21=Delete All
F6=Create
F7=Spooled Files
▒
▒
▒
▒
▒
▒
▒
▒
▒
▒
F8=Display All
17:45:37
15=Export
More...
F11=Seq Entry
Member Name
For Users with Shared Folders: Specify a document name for the panel to be exported. If you
have displayed the Export Window from Work with Scenarios, specify a document name for the
scenario to be exported. This must be a document that does not already exist in the folder.
For Users without Shared Folders: Specify a member name for the document. This member will
be added to file SCWP in library SPV3F (the ScreenPlay Files library). Your entry must be a
member name that does not already exist in the file. You can then use an AS/400 to PC file
transfer utility to download the member to your PC.
If you have selected action 15 for more than one panel (in Work with Session) or for more than
one scenario (in Work with Scenarios), each one will be exported into a different document in the
folder. Fill in the values for the export window and then press Enter. When the export is
complete, you will get a system message indicating that the document has been added to the
folder or file. The export window values will be cleared out so that you can enter the
information for the next panel or scenario. After the last export has completed, the export
window will close.
Copy to Folder
Enter a 1 and a Folder Name in the next field to copy the panel or scenario to a document in a
folder. Enter a 0 and no Folder Name to copy to a member in file SCWP.
Folder Name
Specify the name of the folder, including its complete path. Example: if you want to place the
document into folder MFG which is within folder TRAINING, you would enter the folder name
as TRAINING/MFG (including the slash, upper case not required).
Nexgen Products, Inc.
23
ScreenPlay V3.02
The export window looks like this if ScreenPlay is not set to use shared folders. You can use this
window to create a member in a text file.
SP0100-01
***Nexgen Products Inc.***
CLARKRUS1
Work with Session
Position to:
Sort #2
0000919
Sort #3
0091919
Select Action and Press Enter.
4=Delete 5=Display 6=Print
Act
15
Seq
10
20
30
40
50
60
70
80
90
100
110
1/18/95
TESTSP
13=Change Panel ID/Description
▒▒▒▒▒▒▒▒▒▒▒▒▒▒▒▒▒▒▒▒▒▒▒▒▒▒▒▒▒
▒
Export Window
▒ 7:28:15
▒
▒ 7:28:15
▒ Member Name
▒ ssion
▒
▒ XGEN
▒ F1=Help F12=Cancel
▒ 7:34:28
▒▒▒▒▒▒▒▒▒▒▒▒▒▒▒▒▒▒▒▒▒▒▒▒▒▒▒▒▒ ssion
MAIN
System:
NEXGEN
MAIN
System:
NEXGEN
MAIN
System:
NEXGEN
MAIN
System:
NEXGEN
SP0100-01
Work with Session
F1=Help F3=Exit
F21=Delete All
F6=Create
F7=Spooled Files
F8=Display All
17:55:21
15=Export
More...
F11=Seq Entry
Member Name
Specify a member name for the document. This member will be added to file SCWP in library SPV3F
(the ScreenPlay Files library). Your entry must be a member name that does not already exist in the
file. You can then use an AS/400 to PC file transfer utility to download the member to your PC.
24
Nexgen Products, Inc.
ScreenPlay V3.02
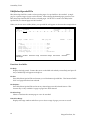
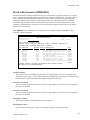
Work with Scenarios (WRKSNO)
Work with Scenarios displays all scenarios on your system that have been created by you or other
users. There are three modes for this program: Active, Inactive, and Archived. The Active mode is
used to perform general maintenance tasks on scenarios such as sending, copying, displaying,
printing, renaming, and exporting. In the Inactive mode, save/restore functions are available.
Archived mode provides a list of all scenarios that have been saved. Restore functions are also
available in Archived mode. If there are no scenarios in Work With Scenarios, the only available
function is to exit using F3.
Enter WRKSNO from a command line or select option 4 from the ScreenPlay Main Menu. The
following screen will appear:
SP0110-01
Scenario Sequence
Position to:
***Nexgen Products Inc.***
Work with Scenarios
CLARKRUS1
Mode:
Select Action and Press Enter.
1=Send 3=Copy 4=Delete 5=Display 6=Print 7=Rename
11=Deactivate 13=Change Description 15=Export
Act
__
__
__
__
__
__
__
__
__
__
Scenario
1000436
1000437
1000438
1000439
1000440
1000441
1000442
1000443
1000444
1000445
1/18/95
TESTSP
Sort #2
4503
4293
4829
4677
4703
4443
4440
4950
4209
4602
Sort #3
623
116
707
295
182
442
223
988
793
Active
8=Display all
Description
Procedure for month end close
Procedure for purchase orders
Description prints for G/L
Training screens for P.O.s
Physical inventory procedures
Test for Mary
How to find an active job
Entering G/L acct codes
Verify accuracy in files
Walkthrough on new DRP mods
F1=Help F3=Exit F11=Fold F15=Scenario Seq
F17=Sort #3 Seq F18=Change Mode
17:46:32
F16=Sort #2 Seq
User
BLUE
WICKS
BLUE
WICKS
ZIESKE
BLUE
BLOOM
BLUE
ZIESKE
BLOOM
More...
Scenario Column
The scenario name is automatically generated as a 7 digit number. However, the field can be
changed by using action 7. The scenario name can be alphanumeric and up to 15 characters long.
Scenario name (or Sort Value #1) is the default sequence for this panel.
Sort Value #2 Column
This is a numeric field that can consist of up to a 7 digit number. All scenarios can be sorted by
the values in this field.
Sort Value #3 Column
This is a numeric field that can consist of up to a 7 digit number. All scenarios can be sorted by
the values in this field.
Description Column
This column contains a brief description of each scenario.
Positioning of cursor
If the scenarios are sorted by name (sort value #1), type the name of the scenario.
Nexgen Products, Inc.
25
ScreenPlay V3.02
If the scenarios are sorted by sort value #2, type the sort value #2 of the scenario.
If the scenarios are sorted by sort value #3, type the sort value #3 of the scenario.
Functions Available in the Active Mode:
F1=Help
Displays the help panels. Position the cursor on the field for which you need help and press F1.
Any available help will appear in a help box.
F3=Exit
Exits Work with Scenarios and returns you to the main menu.
F11=Fold
Displays date created and date last modified for each scenario.
F15=Scenario Seq
Sorts all scenarios by scenario name.
F16=Sort Value #2 Seq
Sorts all scenarios by sort value #2.
F17=Sort Value #3 Seq
Sorts all scenarios by sort value #3.
F18=Change Mode
Displays the Change Mode Window and allows you to switch to another mode of Work with
Scenarios.
Actions Available in the Active Mode:
1=Send
Sends a scenario to another AS/400. See the Send Window description on p. 28.
3=Copy
Copies a scenario into your workstation session. When you press Enter, Work with Session will
be displayed for you to modify the scenario. NOTE: If you already have panels in your session,
you’ll get an error message instructing you to complete (create or delete) the current session
panels before copying in a scenario.
5=Work with Panels
Shows a list of all the panels that are in a scenario. See Work with Panels section on p. 30.
6=Print
Sends a scenario to a spooled output file. All panels in the scenario will be printed with any
existing notes appearing at the bottom of the page.
26
Nexgen Products, Inc.
ScreenPlay V3.02
7=Rename
Displays the Rename Scenario Window. A scenario name can be changed in this window to an
alphanumeric 15-digit name.
8=Display All
Displays all panels of a scenario in sequential order. After choosing action 8, these functions are
available:
•
Enter to move to the next panel
•
F1 for Help
•
F3 to return to Work with Scenarios
•
F12 to move to the previous panel
•
F4 to add notes
11=Deactivate
Sends one or more scenarios to the Inactive mode of Work with Scenarios. A confirmation screen
will appear for the deactivation.
13=Change Description
Displays the Change Description Window which allows you to change the sort value #2, sort
value #3, or the description. Move the cursor into the field you wish to change and type over
any existing field entries.
15=Export
Displays a window which allows you to export the scenario to a PC document. The Export
Window is described on p. 22.
Nexgen Products, Inc.
27
ScreenPlay V3.02
Send Window
If SSA’s AS/NET product is installed, you can use it to send scenarios to another AS/400. Select
action 1 from Work with Scenarios. The Send Window will appear. This window is used to choose
the target location of the scenario to be sent, and optionally to edit the name of the ScreenPlay files
library on the target system. The list of systems in the Send Window comes from the data in
AS/NET Configuration Maintenance.
Note that when your scenario is received on the target system, it will retain the values for Sort#2,
Sort#3, and Description, but the Scenario (Sort#1) value will be assigned by the target system as the
next number in sequence. In addition, the User will become the source system name, rather than
your user profile. The send function is submitted to batch, so the speed with which your scenario is
sent and received will vary depending on the source and target systems.
The screen below is shown with both the Send and the Edit Library Windows open.
SP0110-01
***Nexgen Products Inc.***
Work with Scenarios
CLARKRUS1
1/18/95
TESTSP
17:47:53
Scenario Sequence
Position to:
Mode: Active
▒▒▒▒▒▒▒▒▒▒▒▒▒▒▒▒▒▒▒▒▒▒▒▒▒▒▒▒▒▒▒▒▒▒▒▒▒▒▒▒▒▒▒▒▒▒▒▒▒▒▒▒▒▒▒▒▒▒▒▒▒▒▒▒▒▒▒▒▒▒▒▒▒▒▒▒▒▒
▒ Select Action and Press Enter. 1=Send 2=Edit Send Library
▒
▒
Name
Library
Description
▒
▒
NEXGEN02
SPF
Nexgen AS/400 2
▒
▒ 2 NEXGEN03
SPFTEST
Nexgen AS/400 3
▒
▒
NEXGEN04
SPF
Nexgen AS/400 4
▒
▒
JWDALLAS
SPF
JW Dallas Office
▒
▒
JWAUSTIN
SPF
JW Austin Office
▒
▒
▒
▒
▒
▒
▒
▒
▒
▒
▒▒▒▒▒▒▒▒▒▒▒▒▒▒▒▒▒▒▒▒▒▒▒▒▒▒▒▒▒▒▒▒▒
▒
▒
Edit Library
▒
▒ F3=Exit F12=Cancel Rollup/down
▒
▒
▒▒▒▒▒▒▒▒▒▒▒▒▒▒▒▒▒▒▒▒▒▒▒▒▒▒▒▒▒▒▒▒▒▒▒▒▒▒▒▒▒▒ ▒ Enter Library
SPFTEST
▒
▒
▒
F1=Help F3=Exit F11=Fold F15=Scenario S ▒ F1=Help F3=Exit F12=Cancel ▒
F17=Sort #3 Seq F18=Change Mode
▒▒▒▒▒▒▒▒▒▒▒▒▒▒▒▒▒▒▒▒▒▒▒▒▒▒▒▒▒▒▒▒▒
Send Window Functions Available:
F1=Help
Displays the help panels. Position the cursor on the field for which you need help and press F1.
Any available help will appear in a help box.
F3=Exit
Exits the Send Window and returns you to Work with Scenarios.
F12=Cancel
Cancels the panel you are viewing and returns to the previous panel.
Rollup/Rolldown
If there is more than one page of locations in the Send Window press Page Up (Rolldown) or
Page Down (Rollup) to move through the locations.
28
Nexgen Products, Inc.
ScreenPlay V3.02
Actions Available:
1=Send
Send to the target system.
2=Edit Send Library
Displays the Edit Library Window to change the name of the library that ScreenPlay is in on the
target system.
Edit Library Window Functions Available:
F1=Help
Displays the help panels. Position the cursor on the field for which you need help and press F1.
Any available help will appear in a help box.
F3=Exit
Exits the Edit Library Window and returns you to the Send Window.
F12=Cancel
Cancels the Edit Library Window and returns you to the Send Window.
Enter Library
Enter the name of the ScreenPlay files library on the target system. The default is the ScreenPlay
files library on the home system. If you enter a different name for the library, your change will
remain in place until changed again.
Nexgen Products, Inc.
29
ScreenPlay V3.02
Work with Scenarios - Panels
If you select action 5 from the Active mode of Work with Scenarios, the following screen will appear.
This panel lists all individual panels that are in a scenario. Each panel can then be displayed,
printed, or exported to a PC document. You can also change the panel ID or description of each
panel. If you display a panel from here, you can add notes. At the top of the screen are the scenario
number, the scenario description, and sort value #3.
SP0110-02
***Nexgen Products Inc.***
Work with Scenarios
CLARKRUS1
1/18/95
TESTSP
17:48:40
Position to:
Scenario
0000056
Description How to Change Your Password
Select Action and Press Enter.
Sort #3
200501
5=Display 6=Print
13=Change Panel ID/Description
15=Export
Act
__
__
__
Seq
10
20
30
Panel ID
ASSIST
Description
Request level:
3
System:
NEXGEN
Change Password
Bottom
F1=Help
F3=Exit
F12=Cancel
Functions Available:
F1=Help
Displays the help panels. Position the cursor on the field for which you need help and press F1.
Any available help will appear in a help box.
F3=Exit
Exits Display Scenario and returns you to the main menu.
F12=Cancel
Cancels the panel you are viewing and returns to the previous panel.
Available Actions:
5=Display
Displays one or more panels. After choosing action 5, these functions are available:
30
•
F1 for Help
•
F3 or F12 to return to Work with Panels
•
F4 to add notes
Nexgen Products, Inc.
ScreenPlay V3.02
6=Print
Sends one or more panels to spooled output files. Panels will be printed with any existing notes
appearing at the bottom of the page.
13=Change Panel ID/Description
Displays the Change Panel ID/Description Window (see p. 21) which allows you to change the
panel ID and/or the description. Move into the field you wish to change and type over any
existing panel ID or description.
15=Export
Displays a window which allows you to export this panel to a PC document (see p. 22).
Sequence Number Column
The Sequence Number identifies panels within the scenario.
Panel ID Column
This column is used to name specific panels.
*
If an asterisk appears between Panel Id and Description, this panel has notes attached.
Description Column
The description is a brief summary of what each panel contains.
Positioning of cursor
Type the sequence number of the panel you wish to position the cursor on, then press Enter.
Nexgen Products, Inc.
31
ScreenPlay V3.02
Work with Scenarios - Inactive Mode
Inactive mode lets you save, delete, or restore scenarios. You can not view inactive scenarios, but any
scenarios that are inactive can be reactivated to Active status.
Old scenarios can be backed up to save files and later restored on demand. The inactive mode is a
sort of holding area for scenarios that will be archived into save files or which have just been restored
from save files. The saved scenarios are catalogued by scenario name and save file name and can be
reviewed in the Archived mode.
Note that if you are archiving scenarios and will be restoring them later, create save files of a
reasonable size. Even if you choose to restore just one scenario out of a save file, the whole save file
gets restored to a temporary file. Therefore, it makes sense to put your scenarios into meaningful
groups before saving them.
SP0110-01
Scenario Sequence
Position to:
***Nexgen Products Inc.***
Work with Scenarios
CLARKRUS1
1/18/95
TESTSP
Mode:
17:49:12
Inactive
Select Action and Press Enter.
2=Exclude 12=Activate
Act
__
__
__
__
__
__
Scenario
PAT3
PAT4
PAT6
PAT7
0000063
PAT5
Sort #2
1334
1234
1446
1502
7209
541966
Sort #3
134564
134990
133348
129234
200503
541966
Description
Issue related to 1334
NEXGEN03 FROM PAT BURGESS
Issue related to 1446
NEXGEN03 FROM PAT BURGESS
Financial training 03
Issue from Arizona ofc
F1=Help F3=Exit F11=Fold F15=Scenario Seq
F17=Sort #3 Seq F24=More Keys
F16=Sort #2 Seq
User
BURGESS
BURGESS
BURGESS
BURGESS
BLUE
BURGESS
Bottom
Functions Available in the Inactive Mode:
F1=Help
Displays the help panels. Position the cursor on the field for which you need help and press F1.
Any available help will appear in a help box.
F3=Exit
Exits Work with Scenarios and returns you to the main menu.
F11=Fold
Displays date created and date last modified for each scenario.
F15=Scenario Seq
Sorts all scenarios by scenario name.
32
Nexgen Products, Inc.
ScreenPlay V3.02
F16=Sort Value #2 Seq
Sorts all scenarios by sort value #2.
F17=Sort Value #3 Seq
Sorts all scenarios by sort value #3.
F18=Change Mode
Displays the Change Mode Window and allows you to switch to another mode of Work with
Scenario.
F20=Save All
Allows you to save all scenarios that are not excluded (by action 2) into a save file. You will get a
confirmation screen after you press Enter. See the Confirm Save section on p. 34.
F21=Delete All
Allows you to delete all scenarios that are not excluded (by action 2). You will get a confirmation
screen after you press Enter.
F22=Restore
Displays the Restore window which allows you to restore an entire save file into the inactive
mode of Work with Scenarios. If you have forgotten the name of the save file, or what scenarios
it contains, use Archived mode to view all available scenarios and save files.
If a scenario already exists on the system with the same name as one being restored, you will be
prompted to give a new name for the scenario or scenarios.
F24=More Keys
Displays more function keys that are available in Inactive mode.
Actions Available in the Inactive Mode:
2=Exclude
Excludes one or more scenarios from any functions that will be performed.
4=Delete
Deletes one or more scenarios from the Inactive mode.
12=Activate
Sends one or more scenarios into the Active mode of Work with Scenarios.
Nexgen Products, Inc.
33
ScreenPlay V3.02
Confirm Save
If you press F20 to Save (or to “archive”) scenarios, you will get the Confirm Save panel. Confirm
Save allows you to enter a description of the save file, and to confirm your choices for saving.
Press Enter to continue with the save, or press F12=Cancel to cancel the save.
SP0110-07
***Nexgen Products Inc.***
Confirm Save
CLARKRUS1
1/18/95
TESTSP
17:51:41
Press Enter to confirm your choices for Save.
Press F12 to return to the previous panel and change your choices.
Save Library SPSAV
Save File S950181751
Description Created on 01/18/95 at 17:51:40
Scenario
0000021
0000023
F1=Help
Sort #2
43
12
Sort #3 Description
34 CHANGE TEXT
12 TEST
User
BLOKH
BURGESS
F12=Cancel
Save Library Name
This is the name of the library where the save file will be stored.
Save File Name
This is the name of the file in which the selected scenarios will be saved. The S stands for Save
File, the next two digits are the year, the next three digits are the Julian date, and the last four
digits are the time of day the file was created.
Description of Save File
This field allows you to enter a brief description of the save file. There is an automatically
generated description that consists of the date and time that the file was created. To change the
description, move the cursor into the description field, type over any existing description, then
press Enter.
34
Nexgen Products, Inc.
ScreenPlay V3.02
Work with Scenarios - Archived Mode
Archived mode allows you to restore a single scenario from a save file, or to restore an entire save
file. If a file has been stored on another storage medium (that is, if it has been saved to tape or
cartridge) and deleted from the save file library, the file is listed as not available.
SP0110-09
Save File Sequence
Position to:
***Nexgen Products Inc.***
Work with Scenarios
CLARKRUS1
1/18/95
TESTSP
Mode:
17:52:09
Archived
Select Action and Press Enter.
1=Restore Scenario 14=Restore Save File
Act
__
__
__
__
__
__
Save File
S943221627
S943201427
S943201427
S943201427
S942701801
S942701801
F1=Help F3=Exit
F18=Change Mode
Scenario
DAN12
PAT1
PAT3
PAT4
PAT1
PAT2
F11=Fold
Description
NEXGEN03 FROM DAN
Issue from Office
Issue from Office
NEXGEN03 FROM PAT
Client issue
Client issue
F15=Scenario Seq
MITCHELL
4
5
BURGESS
F16=Save File Seq
Avail
Yes
Yes
Yes
Yes
No
No
More...
Save File
This is the name of the file in which selected scenarios were saved. The S stands for Save File, the
next two digits are the year, the next three digits are the Julian date, and the last four digits are
the time of day the file was created.
Availability Status
This column displays the status of each scenario in the Archived mode. Possible statuses:
Yes - The scenario is available to be restored to the Inactive mode of Work with Scenarios.
No - The scenario is not available to be restored to the Inactive mode of Work with Scenarios.
Positioning of cursor
If the scenarios are sorted by scenario, type the name of the scenario you wish to position the
cursor on.
If the scenarios are sorted by save file, type the name of the save file you wish to position the
cursor on.
Functions Available in the Archived Mode:
F1=Help
Displays the help panels. Position the cursor on the field for which you need help and press F1.
Any available help will appear in a help box.
Nexgen Products, Inc.
35
ScreenPlay V3.02
F3=Exit
Exits Work with Scenarios and returns you to the main menu.
F11=Fold
Displays the save file description, sort value #2, and sort value #3 of each scenario.
F15=Scenario Seq
Sorts all scenarios by scenario name.
F16=Save File Seq
Sorts all scenarios by the save file in which they were saved.
F18=Change Mode
Displays the Change Mode Window and allows you to switch to another mode of Work with
Scenarios.
Actions Available in the Archived mode:
1=Restore Scenario
Restores the selected scenario to the Inactive mode. If a scenario already exists on the system
with the same name as one being restored, you will be prompted to give a new name for the
scenario or scenarios.
14=Restore Save File
Restores all scenarios that are in the selected save file to the Inactive mode. If a scenario already
exists on the system with the same name as one being restored, you will be prompted to give a
new name for the scenario or scenarios.
36
Nexgen Products, Inc.
ScreenPlay V3.02
Secured ScreenPlay Functions
There are two ScreenPlay administrative functions that you may wish to secure from most users:
System Parameter Maintenance and Manage Sessions. As shipped, ScreenPlay designates *PUBLIC
as the System Administrator. To increase security on your system, use System Parameter
Maintenance (see following section) to designate a specific user profile as the System Administrator.
Then, only users with the System Administrator profile can use these two functions.
If you are the System Administrator, the main menu looks like this:
SP0MNU
***Nexgen Products Inc.***
▒▒▒▒
▒
▒▒▒▒
▒
▒▒▒▒
▒▒▒
▒
▒
▒
▒
▒
▒
▒
▒
1/18/95
TESTSP
17:28:15
▒▒▒ ▒▒▒ ▒▒▒
▒▒▒ ▒ ▒
▒▒▒ ▒▒▒ ▒ ▒
▒ ▒ ▒ ▒
▒
▒
▒ ▒
▒ ▒ ▒ ▒
▒▒▒ ▒▒▒ ▒ ▒
▒▒▒▒ ▒▒▒
ScreenPlay
▒
Copyright 1993-2005 Nexgen Products, Inc. All Rights Reserved. Use
of the SCREENPLAY software and documentation is governed by a license agreement
1. Start Recorder
(STRREC)
2. End Recorder
(ENDREC)
3. Work with Session
(WRKSSN)
4. Work with Scenarios
(WRKSNO)
5.
6.
▒▒▒
▒
▒
▒▒▒
▒▒▒▒
▒ ▒
▒▒▒▒
▒
▒
CLARKRUS1
System Parameter Maint
Manage Sessions
90. SIGNOFF
Selection or command
===>
F1=Help
F3=Exit
Nexgen Products, Inc.
F4=Prompt
F9=Retrieve
F12=Cancel
37
ScreenPlay V3.02
System Parameter Maintenance
System Parameter Maintenance allows the System Administrator to customize your copy of
ScreenPlay. User-defined literals, library names, security, and licensee name can all be changed with
this menu option.
Select option 5 from the ScreenPlay Main Menu. The following screen will appear.
SP0800-01
Nexgen ScreenPlay
System Parameter Maintenance
Licensed to
CLARKRUS1
TESTSP
1/18/95
17:52:27
***Nexgen Products Inc.***
Library Controls
Object Library
Files Library
Save Library
AS/NET installed
AS/NET library
SPV3O
SPV3F
SPV3SAV
0 (0=No 1=Yes)
Display Controls
Automatically Display all Notes
Security Controls
Administrator
Images Secured
*PUBLIC
0 (0=No 1=Yes)
PC Support Options
Folders Available 0 (0=No 1=Yes)
1 (0=No 1=Yes)
User-defined Literals
Sort Values
Value #1
Scenario
(Plural)
Scenarios
Value #2
Sort #2
Value #3
Sort #3
F1=Help
F3=Exit
F4=Supply System Defaults
Functions Available:
Enter
Accept any entries you have made to this screen. After pressing Enter, press F3 to Exit.
F1=Help
Displays the help panels. Position the cursor on the field for which you need help and press F1.
Any available help will appear in a help box.
F3=Exit
Ends your System Parameter Maintenance session and returns you to the main menu.
F4=Supply System Defaults
Supplies the system defaults for any fields in which they are available.
Company name
Type your company name as you want it to appear on all panel headers in ScreenPlay.
Object Library
Type the name of the library which contains the objects for ScreenPlay.
38
Nexgen Products, Inc.
ScreenPlay V3.02
Files Library
Type the name of the library which contains the data files for ScreenPlay.
Save Library
Type the name of the library to which scenarios can be saved. This is the library to which
scenarios will be saved from the Inactive mode of Work with Scenarios.
Images Secured
Available actions:
1=Yes
Only the user who created the scenario is able to delete the scenario, change the description, or
change the name.
0=No
Any user is able to delete, change the description, or change the name of any scenario in
ScreenPlay.
Security Administrator
Enter a user profile to be the Security Administrator.
AS/NET Installed
Available actions:
1=Yes
AS/NET is installed and available on your system.
0=No
AS/NET is not installed or not available on your system.
AS/NET Library
Type the name of the library where AS/NET is located on your system.
Sort Value #1
Type the title you want to use for Sort Value #1.
Plural of Sort Value #1.
Type the plural of Sort Value #1.
Sort Value #2
Type the title you want to use for Sort Value #2.
Sort Value #3
Type the title you want to use for Sort Value #3.
Display Notes Automatically
Available actions:
Nexgen Products, Inc.
39
ScreenPlay V3.02
1=Yes
Any time a user displays a panel that contains notes, the notes are automatically displayed on the
panel.
0=No
Any time a user displays a panel that contains notes, the notes stay hidden unless the user
displays the notes by pressing F4.
40
Nexgen Products, Inc.
ScreenPlay V3.02
Manage Sessions
Manage Sessions lets the System Administrator copy sessions from one workstation member to
another, work with panels in any session, clear sessions, and delete workstation members. These
functions are especially useful if you have users who do not always sign on to your system from the
same workstation, or if they use pass through and have a different, automatically-assigned
workstation member each time they sign on.
Select option 6 from the ScreenPlay Main Menu. The following screen will appear. NOTE: If there
are a lot of workstations using ScreenPlay, Manage Sessions will take a while to build its list of
members, and there will be a delay in displaying this screen.
SP0104-01
Position to:
***Nexgen Products Inc.***
Workstation Members
Select Action and Press Enter.
3=Copy 4=Delete 5=Work with Session
Act
3
3
F1=Help
Member Name
BURGESSS1
BURGESSS3
BURGESSS4
CLARKRUS1
CLARKRUS3
DIALUP1
DSP03
ESTINSOS1
ESTINSOS3
ESTINSOS4
HALSTENS1
HALSTENS4
MITCHELLS1
F3=Exit
Number of Panels
7
3
6
15
6
0
10
20
4
3
0
14
10
TESTSP
1/18/95
CLARKRUS1
17:53:07
14=Clear
User
BURGESS
BURGESS
BURGESS
TESTSP
CLARK
URBANIAK
BLOKH
BLOKH
BURGESS
BLOKH
HALSTEN
URBANIAK
F13=Repeat to end of list
Date Created
11/11/94
11/11/94
11/10/94
12/23/94
1/09/95
12/30/94
12/29/94
1/03/95
12/30/94
11/29/94
12/02/94
12/07/94
12/05/94
Last Update
1/09/95
1/08/95
1/08/95
1/18/95
1/09/95
1/09/95
1/08/95
1/08/95
1/16/95
1/08/95
1/08/95
1/08/95
1/08/95
More...
Functions Available:
F1=Help
Displays the help panels. Position the cursor on the field for which you need help and press F1.
Any available help will appear in a help box.
F3=Exit
Ends Manage Sessions and returns you to the main menu.
F13=Repeat to end of list
Repeats the selected action to the end of the list.
Actions Available:
3=Copy
Copies all panels in the selected member to another existing member. See Copy Workstation
Members on p. 42.
Nexgen Products, Inc.
41
ScreenPlay V3.02
4=Delete
Deletes the selected member. You will get a confirmation screen after you press Enter. (Member
will be added back later if this workstation is used again for a ScreenPlay session.)
5=Work with Session
Allows you to work with the panels in the selected member.
14=Clear
Clears all panels from the selected member, but does not delete the member.
Copy Workstation Members
If you select action 3 to copy a member or members, the following screen will appear:
SP0104-03
***Nexgen Products Inc.***
CLARKRUS1
Copy Workstation Members
Type New Member Name, press Enter.
Press F12 to cancel the copy operation.
Member NICKS1
already exists. Replace records?
Member Name
New Name
CLARKRUS1
CLARKRUS3
1/18/95
TESTSP
(0=No
17:54:04
1=Yes)
Bottom
F1=Help
F12=Cancel
Functions Available:
F1=Help
Displays the help panels. Position the cursor on the field for which you need help and press F1.
Any available help will appear in a help box.
F12=Cancel
Cancels the panel you are viewing and returns to the previous panel.
New Name
Enter the name of the workstation member to which you want to copy a session. This must be an
existing workstation member in ScreenPlay. Press Enter to continue the copy operation.
42
Nexgen Products, Inc.
ScreenPlay V3.02
After supplying workstation member names and pressing Enter, you will get a message like the one
shown below. This message will appear in turn for each new member name that you have entered.
System messages will display at the bottom of the screen during the copy. Each time you are
prompted, supply a 0 to cancel the member copy or a 1 to perform the member copy.
After all of the copy operations have completed, you will be returned to the updated listing of
workstation members.
SP0104-03
***Nexgen Products Inc.***
CLARKRUS1
Copy Workstation Members
Type New Member Name, press Enter.
Press F12 to cancel the copy operation.
Member NICKS1
already exists. Replace records?
Member Name
New Name
CLARKRUS1
NICKS1
CLARKRUS3
BURGESSS3
1/18/95
TESTSP
(0=No
17:54:09
1=Yes)
Bottom
F1=Help
F12=Cancel
Nexgen Products, Inc.
43
ScreenPlay V3.02
44
Nexgen Products, Inc.