1
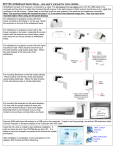
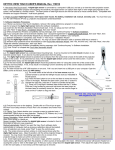
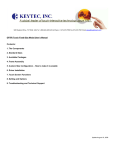
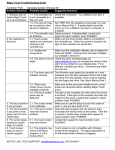
KEYTEC User’s Manual
Revision 110715
ACEeBoard Hardware Installation:
1.
Verify Components before Installation
---- 2
2.
Receiver Installation
---- 2
2.1 Preparation
---- 2
2.2 Installation
---- 2
2.2.1 For whiteboard or projection screen with thick frame mounted on the Stand or
on the wall
2.2.2 For whiteboard or projection screen with a thin frame mounted on the stand
2.2.3 For whiteboard or projection screen with thin frame mounted on wall
2.2.4 For mounting Receivers on the flat surface directly
2.2.5 For mounting the receivers on flat panel displays
2.3 Operation
2.3.1 Connecting USB cable to the computer
2.3.2 Connecting projector or flat panel display to the computer with VGA cable
3.
---- 5
---- 5
---- 5
Digital Pen
---- 6
3.1 Button functions
---- 6
3.1.1. In MINT Interactive mode
3.1.2. In Windows mode
3.2 Digital pen operation
3.2.1 It is rechargeable
3.2.2 Pen tip change
4.
---- 2
---- 3
---- 3
---- 4
---- 4
Specification
---- 6
---- 6
---- 6
---- 6
---- 7
---- 7
1
1. Verify Components before Installation.
Before hardware installation, please check if all components listed below are included in the package. If you have
missing items, please contact your place of purchase.
1
2
3
4
5
6
7
Items
Receivers
Digital Pen
Recharging battery cable
Receiver connection cable
Software CD
Acrylic Plates
Steel Brackets
Quantity
2
1
1
1
1
2
2
Remarks
Left and Right
3.3 ft (1m)
16.5 ft (5m)
Includes calibration and board software
For attaching receivers on whiteboards with thin frames with stand.
For wall mounting or whiteboards with thin frames to be hung on the wall.
2. Receiver Installation.
2.1 Preparation.
ACEeBoard is designed for easy installation. The first step is to place both receivers correctly on the top of your
whiteboard frame or by mounting the receivers on the flat surface.
ACEeBoard consists of 2 receivers, connected by a cable. The left receiver has two cables (one is for the USB cable to
the computer and the other is a cable that connects the left receiver to the right receiver). Right receiver should have only
1 cable that connects to the left receiver. Please keep in mind that it will not work properly if the receivers are positioned
incorrectly.
In order to use the full whiteboard surface as an effective working area, please position each receiver on the upper-left
corner and upper-right corner of your whiteboard frame. Note: The receivers should be mounted at least 1” (2.5 cm)
above the projected image area. They may need to be mounted higher when using on flat panel displays as
described in 2.2.5. This device is designed to support up to 100 inches (4:3 ratio).
2.2 Installation
2.2.1 For whiteboard or projection screen with thick frame mounted on the Stand or on the wall.
This type of whiteboard is the most common type used. It is very easy to attach the receivers on the top of the
whiteboard frame using the double-sided tape included in the box. Acrylic holder and the steel brackets are not needed for
this configuration.
2
2.2.2 For whiteboard or projection screen with a thin frame mounted on the stand.
For this type of whiteboard, the width of its frame is not enough to hold receivers completely. Instead, it is more
convenient for you to use the acrylic holder enclosed in the box. Assemble the acrylic holders with the receivers as
shown below, and then place each receiver correctly on the left and right top corners of whiteboard frame.
2.2.3 For whiteboard or projection screen with thin frame mounted on wall.
When the whiteboard frame is much narrower than the receiver, it is difficult to mount the receivers on the whiteboard
frame. In this case, you may need to use the steel brackets enclosed in the box with following steps:
[step 1] Place receiver onto the top of the steel bracket using double-sided tape.
[step 2] Attach the steel bracket to the back side of the whiteboard.
3
2.2.4. For mounting Receivers on the flat surface directly.
ACEeBoard can be mounted on the flat surface directly without whiteboard as shown below;
[step 1] Place receiver onto the top of the steel bracket using double-sided tape.
[step 2] Attach the steel bracket to the wall using screws or double-sided tape.
2.2.5. For mounting the receivers on flat panel displays.
Although ACEeBoard is designed for using on whiteboard or projection screen, it can also be used on flat panel displays.
The mounting method needs to be modified due to the heat generated from the surface of flat panel displays. In general,
the receivers need to be mounted at about 5” above the display area in order to avoid being interfered by the heat wave in
front of the display.
You may use any proper method to raise and mount the receivers 5” above the display, but KEYTEC can also supply a
simple mounting fixture for this purpose. You may contact us by calling 1-800-624-4289 (USA) or 1-972-272-7555 (Int'l)
or sending email to [email protected] for the information about the mounting fixture described in the following.
The mounting fixture is a piece of acrylic plate with mounting tapes on one side.
Adhere the steel bracket on one end of the acrylic plate.
4
Mount the acrylic plate to the upper corner of the monitor with the steel bracket at about 5” above the top of the monitor.
Adhere the receiver on the top of the steel bracket. Mount the other receiver/steel bracket/acrylic plate on the other
corner of the monitor.
2.3 Operation.
2.3.1 Connecting USB cable to the computer.
Connect USB cable from left receiver to a USB port on the computer. If cable is not long enough, use active USB
extension cable.
2.3.2 Connecting Projector or flat panel display to the Computer with VGA cable.
For software installation, please refer to the software installation guide.
5
3. Digital pen
3.1 Button Functions
The digital pen has 2 buttons executing different functions depending on the working environment.
3.1.1. In MINT Interactive mode (Interactive whiteboard software).
- Lower button (close to pen tip): executes the right click of the mouse.
- Upper button: switching eraser mode to writing mode or vice versa.
3.1.2. In Window mode.
- Lower button: executes the right click of the mouse.
- Upper button: executes the window Exit when you push and hold it for a couple of seconds.
(This function is only available when MINT control is active.)
3.2 Digital Pen operation
3.2.1 It is rechargeable
Use the recharging cable enclosed in the package. Connect the
recharging cable to the end of the digital pen and then connect it to
the computer through a USB port. It takes about 1 hour to
recharge the pen fully. After it is fully charged, it can last 20 hours
under continuous use.
If the pen is idle for 20 seconds from the last click, it will
automatically enter sleep mode to save battery. Pen will
activate again by pressing any buttons or by clicking the pen
tip. If LED light turns red, it's the time to charge the pen.
Press the pen tip or pen button, you should hear a low beep sound which means your digital pen works properly.
6
3.2.2. Pen tip change
When pen tip is worn-out, it can be replaced with new one included in the package..
To remove - Turn the pen-tip to the right or the left 90 degrees and then pull it out carefully.
To insert – Insert the pen-tip into pen cage and turn it to the right or to the left 90 degrees to lock it.
4. Specification
7