1
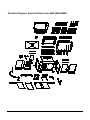
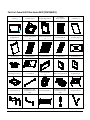
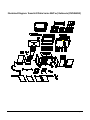
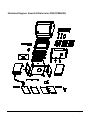
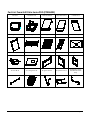
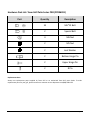
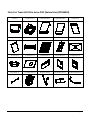
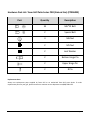
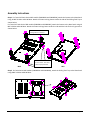
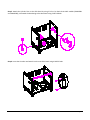
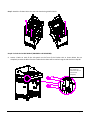
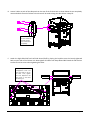
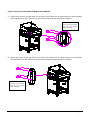
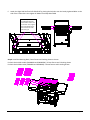
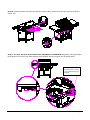
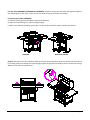
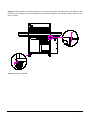
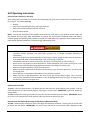
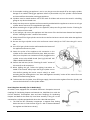
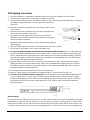
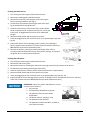
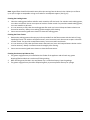
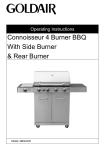
TM Serious Grills. Serious Fans.TM Team Grill Patio Series PRO & MVP User Guide MODELS: PMV06091 (Patio MVP), PMV06094 (Patio MVP with Rotisserie), PPR06091 (Patio PRO – Liquid Propane), PPR06093 (Patio PRO – Natural Gas) IMPORTANT: Keep this User Manual near your grill for future reference. Before you assemble the grill, please fill in the information below. This information is required for all warranty claims. Model Number Serial Number Date Purchased Purchased From CSA Certified All Team Grill products are officially licensed through various licensing entities. Team Grill 125 Nagog Park, Acton, MA 01720 USA Web Site: www.teamgrill.com -- Customer Service: (888) 978-6475 © Copyright 2009 Team Grill – All Rights Reserved Version 100106 FOR OUTDOOR USE ONLY Read this User Guide carefully and be sure your gas grill is properly assembled, installed and maintained. Failure to follow these instructions could result in serious bodily injury, death and/or property damage. This gas grill is intended for outdoor use only and is not intended to be installed in or on recreational vehicles or boats. Note to Installer: Leave this User Guide with the consumer after delivery and/or installation. Note to Consumer: Keep this User Guide in a convenient place for future reference. IMPORTANT: PLEASE DO NOT RETURN THIS PRODUCT TO YOUR RETAILER. Please call the Team Grill Customer Service Department at (888) 978-6475 with any questions about your grill. If you smell gas: 1. Shut off gas to the appliance. 2. Extinguish any open flame. 3. Open lid. 4. If odor continues, immediately call your gas supplier or local fire department. 1. Do not store or use gasoline or other flammable vapors and liquids in the vicinity of this or any other appliance. 2. A liquid propane (LP) cylinder not connected for use shall not be stored in the vicinity of this or any other appliance. Improper installation, adjustment, alteration, service or maintenance can cause property damage, injury or death. Read the installation, operating and maintenance instructions thoroughly before installing, operating or servicing this equipment. FOR OUTDOOR USE ONLY Team Grill Patio Series User Guide Page 2 Table of Contents Important Warnings and Safety Information ....................................................................................................................... 4 The Porcelain-Enamel Finish of Your Team Grill Gas Grill .................................................................................................... 6 Prior to the First Use of Your Team Grill Gas Grill ................................................................................................................ 6 Illustrated Diagram: Team Grill Patio Series MVP (PMV06091) ........................................................................................... 7 Part List: Team Grill Patio Series MVP (PMV06091) ............................................................................................................. 8 Hardware Pack List: Team Grill Patio Series MVP (PMV06091) ........................................................................................... 9 Illustrated Diagram: Team Grill Patio Series MVP w/ Rotisserie (PMV06094) ................................................................... 10 Part List: Team Grill Patio Series MVP w/ Rotisserie (PMV06094) ..................................................................................... 11 Hardware Pack List: Team Grill Patio Series MVP w/ Rotisserie (PMV06094) ................................................................... 12 Illustrated Diagram: Team Grill Patio Series PRO (PPR06091)............................................................................................ 13 Part List: Team Grill Patio Series PRO (PPR06091).............................................................................................................. 14 Hardware Pack List: Team Grill Patio Series PRO (PPR06091) ............................................................................................ 15 Illustrated Diagram: Team Grill Patio Series PRO (Natural Gas) (PPR06093) ..................................................................... 16 Parts List: Team Grill Patio Series PRO (Natural Gas) (PPR06093)...................................................................................... 17 Hardware Pack List: Team Grill Patio Series PRO (Natural Gas) (PPR06093) ..................................................................... 18 Assembly Instructions ......................................................................................................................................................... 19 Grill Operating Instructions ................................................................................................................................................ 29 Select a Proper Location for Your Grill............................................................................................................................ 29 Opening the Front Shelf.................................................................................................................................................. 29 Extending the Side Shelves & Accessing the Side Burner (MVP Model Only) ............................................................... 29 Hanging the Warming Rack (MVP Model Only) ............................................................................................................. 30 Special Instructions for Liquid Propane (LP) Models...................................................................................................... 30 LP Gas Tank Requirements and Instructions .................................................................................................................. 30 Hose & Regulator Assembly (For LP Models Only)......................................................................................................... 32 Hose and Regulator Maintenance: ................................................................................................................................. 33 Attaching the LP Gas Tank............................................................................................................................................... 33 Checking for Leaks .............................................................................................................................................................. 34 Grill Lighting Instructions .................................................................................................................................................... 36 Manual Lighting .............................................................................................................................................................. 36 To Extinguish Your Grill ................................................................................................................................................... 37 Cleaning & Maintenance..................................................................................................................................................... 37 General Cleaning Instructions......................................................................................................................................... 38 Clean Your Grill After Each Use ....................................................................................................................................... 38 Cleaning the Exterior of the Grill .................................................................................................................................... 38 Cleaning the Main Burners ............................................................................................................................................. 39 Cleaning the Side Burner ................................................................................................................................................ 39 Cleaning the Cooking Grates........................................................................................................................................... 40 Cleaning the Flame Tamers............................................................................................................................................. 40 Cleaning the Grease Cup & Grease Tray ......................................................................................................................... 40 Grilling Tips ......................................................................................................................................................................... 41 Cooking Guide ..................................................................................................................................................................... 42 Temperature Settings...................................................................................................................................................... 42 Direct Versus Indirect Cooking........................................................................................................................................ 42 Troubleshooting Guide........................................................................................................................................................ 43 Team Grill Patio Series User Guide Page 3 Important Warnings and Safety Information Read this User Guide carefully, and be sure your gas grill is properly assembled, installed and maintained. Failure to follow these instructions could result in serious bodily injury, death and/or property damage. This gas grill is intended for outdoor use only and is not intended to be installed in or on recreational vehicles or boats. FOR YOUR SAFETY, READ ALL WARNINGS AND INSTRUCTIONS PRIOR TO ASSEMBLING AND OPERATING THIS GRILL. IMPORTANT: The symbols and boxes shown below explain what each symbol means. Please be sure to read and follow every DANGER/WARNING/CAUTION/NOTICE message found in this manual. DANGER indicates a hazardous situation which, if not avoided, will result in death or serious injury. WARNING indicates a hazardous situation which, if not avoided, could result in death or serious injury. CAUTION indicates a hazardous situation which, if not avoided, could result in minor or moderate bodily injury or property damage. NOTICE is used to address important practices not related to injury. For your safety: 1. Do not store a LP gas cylinder under or near this appliance. 2. Never fill the LP gas cylinder beyond 80 percent full. 3. If the information in “1” and “2” above is not followed exactly, a fire causing death or serious injury may occur. Team Grill Patio Series User Guide Page 4 1. Do not try to install this appliance without reading the entire contents of this User Guide. 2. This grill is designed to use liquid propane (LP) gas only. Only use this grill with LP gas and the regulator assembly supplied by the manufacturer. 3. The installation of this product must conform with local codes or, in the absence of local codes, with either the National Fuel Gas Code, ANSI Z223.1/NFPA 54, Natural Gas and Propane, Installation Code, CSA B149.1, or Propane Storage and Handling Code, B149.2, or the Standard for Recreational Vehicles, ANSI A 119.2/NFPA 1192, and CSA Z240 RV Series, Recreational Vehicle Code, as applicable. 4. The LP tank used must conform with the specification for LP gas cylinders of the U.S. Department of Transportation (DOT) or the National Standard of Canada, CAN/CSA-B339, Cylinders, Spheres and Tubes for the Transportation of Dangerous Goods. 5. If an external electrical source is utilized, the outdoor cooking gas appliance, when installed, must be electrically grounded in accordance with local codes or, in the absence of local codes, with the National Electrical Code, ANSI/NFPA 70, or the Canadian Electrical Code, CSA C22.1. 6. Keep any electrical supply cords and the fuel supply hose away from any heated surfaces. 7. This grill is safety certified for use in the United States and Canada only. Never modify it to be used in other locations. Modification may cause serious bodily injury or property loss. 8. This appliance must be located away from combustible surfaces by no less than 36 inches (91 cm) from the back and 36 inches (91 cm) from the sides of this appliance. See Fig. 1. 9. This appliance is for outdoor use only, and shall not be used in a building, garage, shed, balcony, or any other enclosed area. This outdoor cooking gas appliance shall not be used under overhead combustible construction. 10. DO NOT restrict the flow of combustion and ventilation of air to this appliance. 11. Keep the ventilation openings of the cylinder enclosure free and clear from debris. 12. DO NOT use or install this appliance in or on boats or recreational vehicles. 13. Keep the area surrounding this appliance free of combustible materials, gasoline, and all other flammable liquids and vapors. 14. This appliance is not intended for commercial use. 15. The use of alcohol, prescription or non-prescription drugs may impair the user’s ability to properly assemble or safely operate this appliance. 16. DO NOT alter this appliance in any manner. 17. DO NOT use this appliance unless it is fully and properly assembled and all parts are securely fastened. 18. When cooking, fire extinguishing materials should be readily accessible. In the event of a grease fire, do not attempt to extinguish with water. Use a type BC dry chemical fire extinguisher or smother the fire with dirt, and/or baking soda. Turn off the LP gas cylinder or natural gas (NG) supply valve immediately to stop the flow of gas. 19. DO NOT leave the appliance unattended while in use. Take special care to keep children and pets away from the appliance at all times. 20. DO NOT attempt to move the appliance while in use. 21. Always place this appliance on a hard, non-combustible, level surface. 22. Never use this appliance indoors as toxic fumes can accumulate. 23. Always turn off the gas at the LP gas cylinder or NG supply valve when the appliance is not in use. Team Grill Patio Series User Guide Page 5 The Porcelain-Enamel Finish of Your Team Grill Gas Grill Team Grill uses a triple-fired, porcelain-enamel finishing process on its grill lids to perfectly match the colors and logos of your favorite team or brand. This finish is designed to withstand the weather as well as the high-heat environment of a gas grill. Please note that at high temperatures, the color of your grill lid may darken slightly. This is a normal occurrence for porcelain-enameled products and will not damage the finish of your grill. As the grill cools, the color will return to its original shade. With a grill cover and the routine grill care outlined in this User Guide, your grill will retain its beautiful finish for years to come. If you have any questions about your grill, please call the Team Grill Customer Service Department at (888) 9786475. Prior to the First Use of Your Team Grill Gas Grill Before you use your grill for the first time: 1. Remove the cooking grates, warming rack, and flame tamers. Wash them with mild soap and water, and rinse and dry them thoroughly. 2. With the cooking grates, warming rack and flame tamers still removed, light the main burners (as per the lighting instructions in this User Guide), set them to medium heat, and let them burn for 20 minutes with the lid down. This will help to burn off any odors or foreign matter. 3. Extinguish the grill (as per the extinguishing instructions in this User Guide), being sure to turn off the gas at the LP gas cylinder service valve or NG supply valve and let the grill cool completely. Replace the flame tamers, cooking grates and warming rack. 4. The stainless steel cooking grates should be seasoned before the first use. To do this, heat the grill to about 250⁰ F, with the cover closed, and then turn the grill to “OFF.” Spread vegetable oil on the warm cooking grates. Hint: A potato cut in half, poked with a fork as a handle works well to spread the oil. Team Grill Patio Series User Guide Page 6 Illustrated Diagram: Team Grill Patio Series MVP (PMV06091) Team Grill Patio Series User Guide Page 7 Part List: Team Grill Patio Series MVP (PMV06091) 1. Hood x1 2. Firebox Unit x1 3. Right Side Shelf x1 4. Left Side Burner / Shelf x1 5. Left Door x1 6. Right Door x1 7. 24cm Cooking Grate x2 8. 32cm Cooking Grate x1 9. Flame Tamer x3 10. Grease Tray x1 11. Fat Cup x1 12. Base Panel x1 13. Back Panel x1 14. Left Panel x1 15. Right Panel x1 16. Sliding Tank Tray x1 17. Cross Bar x1 18. Locking Castor x2 19.Non-locking Castor x2 20. Bracketing x1 21. Cylinder Fixer x1 22. Regulator x1 (Preassembled to Firebox Unit) 23. Warming Rack x1 24. Ripple Pipe x1 (Preassembled to Firebox Unit) 25. Ignition Stick x1 Team Grill Patio Series User Guide Page 8 Hardware Pack List: Team Grill Patio Series MVP (PMV06091) Part Quantity Description 41 M6*12 Bolt 2 M5*10 Bolt 2 M4*10 Bolt 2 Special Bolt 12 M6 Nut 2 M5 Nut 2 Lock Washer 2 M4 Nut 2 Bottom Hinge Pin 2 Upper Hinge Pin 2 R Pin Replacement Parts Always use replacement parts supplied by Team Grill or an authorized Team Grill parts dealer. To order replacement parts for your grill, please contact our customer service department at (888) 978-6475. Team Grill Patio Series User Guide Page 9 Illustrated Diagram: Team Grill Patio Series MVP w/ Rotisserie (PMV06094) Team Grill Patio Series User Guide Page 10 Part List: Team Grill Patio Series MVP w/ Rotisserie (PMV06094) 1. Hood x1 2. Firebox Unit x1 3. Right Side Shelf x1 4. Left Side Burner/Shelf x1 5. Left Door x1 6. Right Door x1 7. 24cm Cooking Grate x2 8. 32cm Cooking Grid x1 9. Flame Tamer x3 10. Grease Tray x1 11. Fat Cup x1 12. Base Panel x1 13. Back Panel x1 14. Left Panel x1 15. Right Panel x1 16. Sliding Tank Tray x1 17. Cross Bar x1 18. Locking Castor x2 19. Non-locking Castor x2 20. Bracketing x1 21. Cylinder Fixer x1 22. Regulator x1 (Preassembled to Firebox Unit) 23. Warming Rack x1 24. Ripple Pipe x1 (Preassembled to Firebox Unit) 25. Ignition Stick x1 Team Grill Patio Series User Guide Page 11 Hardware Pack List: Team Grill Patio Series MVP w/ Rotisserie (PMV06094) Part Quantity Description 41 M6*12 Bolt 2 M5*10 Bolt 2 M4*10 Bolt 2 Special Bolt 12 M6 Nut 2 M5 Nut 2 Lock Washer 2 M4 Nut 2 Bottom Hinge Pin 2 Upper Hinge Pin 2 R Pin Replacement Parts Always use replacement parts supplied by Team Grill or an authorized Team Grill parts dealer. To order replacement parts for your grill, please contact our customer service department at (888) 978-6475. Team Grill Patio Series User Guide Page 12 Illustrated Diagram: Team Grill Patio Series PRO (PPR06091) Team Grill Patio Series User Guide Page 13 Part List: Team Grill Patio Series PRO (PPR06091) 1. Hood x1 2. Firebox Unit x1 3. Left Side Shelf x1 4. Right Side Shelf x1 5. Left Door x1 6. Right Door x1 7. Warming Rack x1 8. Cooking Grate x2 9. Flame Tamer x2 10. Grease Tray x1 11. Fat Cup x1 12. Base Panel x1 13. Back Panel x1 14. Left Panel x1 15. Right Panel x1 16. Cross Bar x1 17. Locking Castor x4 18. Ignition Stick x1 19. Cylinder Fixer x1 20. Regulator x1 (Preassembled to Firebox Unit) Team Grill Patio Series User Guide Page 14 Hardware Pack List: Team Grill Patio Series PRO (PPR06091) Part Quantity Description 33 M6*12 Bolt 2 Special Bolt 4 M6 Nut 2 M5 Nut 2 Lock Washer 2 Bottom Hinge Pin 2 Upper Hinge Pin 2 R Pin Replacement Parts Always use replacement parts supplied by Team Grill or an authorized Team Grill parts dealer. To order replacement parts for your grill, please contact our customer service department at (888) 978-6475. Team Grill Patio Series User Guide Page 15 Illustrated Diagram: Team Grill Patio Series PRO (Natural Gas) (PPR06093) Team Grill Patio Series User Guide Page 16 Parts List: Team Grill Patio Series PRO (Natural Gas) (PPR06093) 1. Hood x1 2. Firebox Unit x1 3. Left Side Shelf x1 4. Right Side Shelf x1 5. Left Door x1 6. Right Door x1 7. Warming Rack x1 8. Cooking Grate x2 9. Flame Tamer x2 10. Grease Tray x1 11. Fat Cup x1 12. Base Panel x1 13. Back Panel x1 14. Left Panel x1 15. Right Panel x1 16. Cross Bar x1 17. Locking Castor x4 18. Ignition Stick x1 18. Cylinder Fixer x1 19. Natural Gas Hose x1 Team Grill Patio Series User Guide Page 17 Hardware Pack List: Team Grill Patio Series PRO (Natural Gas) (PPR06093) Part Quantity Description 33 M6*12 Bolt 2 Special Bolt 4 M6 Nut 2 M5 Nut 2 Lock Washer 2 Bottom Hinge Pin 2 Upper Hinge Pin 2 R Pin Replacement Parts Always use replacement parts supplied by Team Grill or an authorized Team Grill parts dealer. To order replacement parts for your grill, please contact our customer service department at (888) 978-6475. Team Grill Patio Series User Guide Page 18 Assembly Instructions Step 1. For Team Grill Patio Series MVP models (PMV06091 and PMV06094), attach the Castors to the Base Panel using 16 M6*12 Bolts and 4 M6 Nuts. Attach the 2 Non-Locking Castors under the side of the Sliding Tank Tray as shown below. For Team Grill Patio Series PRO models (PPR06091 and PPR06093), attach the Castors to the Base Panel using 16 M6*12 Bolts and 4 M6 Nuts. Attach the 2 Non-Locking Castors under the side with the hole for the LP gas tank as shown below. For MVP model, attach the locking castors on this end. Use bolts and nuts for the 4 front holes. The other holes only require bolts. MVP PRO Step 2. For Patio Series MVP models (PMV06091 and PMV06094), attach the Sliding Tank Tray to the Base Panel using 8 M6*12 Bolts and 8 M6 Nuts. Team Grill Patio Series User Guide Page 19 Step 3. Attach the two Side Panels to the Back Panel using 4 M6*12 Bolts. Step 4. Join the assembled components of Step 2 and Step 3 by using 5 M6*12 Bolts. Team Grill Patio Series User Guide Page 20 Step 5. Attach the Cylinder Fixer to the Side Panel by using 2 R Pins. For Patio Series MVP models (PMV06091 and PMV06094), also attach the Bracketing to the Base Panel using 2 M5*10 Bolts. Step 6. Insert the Cross Bar and attach it to the two Side Panels using 4 M6*12 Bolts. Team Grill Patio Series User Guide Page 21 Step 7. Attach the Firebox Unit to the two Side Panels using 4 M6*12 Bolts. Step 8. For Patio Series MVP Models (PMV06091 and PMV06094): A. Loosen 2 Bolts on each of the side panels on the front of the Firebox Unit as shown below. Do not completely remove the Bolts from the Firebox Unit as these will be used to hang the side shelves in Step 8C. Loosen these bolts on each side of the Firebox Unit. Do not remove them completely. Team Grill Patio Series User Guide Page 22 B. Loosen 2 Bolts on each of the side panels on the rear of the Firebox Unit as shown below. Do not completely remove the Bolts from the Firebox Unit as these will be used to hang the side shelves in Step 8C. Loosen these bolts on each side of the Firebox Unit. Do not remove them completely. C. Attach the Right Side Shelf and Left Side Burner/Shelf by placing the keyholes over the loosely tightened Bolts on each side of the Firebox Unit. Now tighten all 8 Bolts from Steps 8A and 8B. Extend the side shelves to allow for easier access when tightening the Bolts. Place the keyholes over the half-tightened bolts and allow the shelf to rest on the bolts. Then, tighten each bolt. Repeat for the other shelf on the other side of the grill. Team Grill Patio Series User Guide Page 23 Step 8. For Patio Series PRO Models (PPR06091 and PPR06093): A. Loosen the 2 Bolts on the side panels on the front of the Firebox Unit as shown below. Do not completely remove the Bolt from the Firebox Unit as this will be used to hang the side shelves in Step 8C. Loosen these bolts on each side of the Firebox Unit. Do not remove them completely. B. Loosen the 2 Bolts on the side panels on the rear of the Firebox Unit as shown below. Do not completely remove the Bolt from the Firebox Unit as this will be used to hang the side shelves in Step 8C. Loosen these bolts on each side of the Firebox Unit. Do not remove them completely. Team Grill Patio Series User Guide Page 24 C. Attach the Right Side Shelf and Left Side Shelf by placing the keyholes over the loosely tightened Bolts on the side of the Firebox Unit. Now tighten all 8 Bolts from Steps 8A and 8B. Place the keyholes over the half-tightened bolts and allow the shelf to rest on the bolts. Then, tighten each bolt. Repeat for the other shelf on the other side of the grill. Step 9. Install the Warming Rack, Flame Tamers and Cooking Grates as shown. For Patio Series MVP models (PMV06091 and PMV06094): 3 Flame Tamers and 3 Cooking Grates For Patio Series PRO models (PPR06091 and PPR06093): 2 Flame Tamers and 2 Cooking Grates Team Grill Patio Series User Guide Page 25 Step 10. Install the Grease Tray and secure with the 2 Special Bolts. Position the Fat Cup in the slots under the Grease Tray. Step 11. For Team Grill Patio Series MVP models (PMV06091 and PMV06094) only, attach the Ripple Pipe to the Side Burner as shown using 2 M4*10 Bolts and 2 M4 Nuts. Attach the igniter wire as shown below. Attach the Ripple Pipe to the Side Burner as shown using 2 M4*10 Bolts and 2 M4 Nuts Team Grill Patio Series User Guide Page 26 For LP models (PMV06091, PMV06094 and PPR06091): Install the LP gas tank and attach the regulator. (Refer to the “Attaching the LP Gas Tank” section of this User Guide for proper assembly instructions.) For Natural gas models (PPR06093): A. Feed the natural gas hose through the opening of side panel. B. Attach the hose of the grill to your natural gas supply. C. Refer to the “Natural Gas Supply Connection” section of this manual for proper assembly instructions. LP Models Natural Gas Models Step 12. Remove the Axis Pins, Washers and R Pins from the hood assembly. Attach the Hood to the Firebox unit by inserting 2 Axis Pins through the left and right keyholes of the hood and firebox. Secure the Axis Pins using 2 Washers and 2 R Pins as shown below. Team Grill Patio Series User Guide Page 27 Step 13. Install and secure the Bottom Hinge Pins on the Base Panel with 2 M5 Nuts And 2 Lock Washers, and install the Left and Right Doors by placing them on the Bottom Hinge Pin and sliding the Upper Hinge Pin into place as shown. Step 14. Assembly completed. Team Grill Patio Series User Guide Page 28 Grill Operating Instructions Select a Proper Location for Your Grill After reading this User Manual in its entirety and assembling your grill, you will need to find a suitable location for your grill. This location must be: ▪ ▪ ▪ ▪ Outside Away from any building overhang, awning or umbrella Away from combustible materials and structures On a hard level surface NOTE: The use and installation of this product must conform to local codes. In the absence of local codes, use the National Fuel Gas Code, ANSI Z223.1/NFPA 54, Natural Gas and Propane Installation Code, CSA B149.1, Propane Storage and Handling Code, B149.2. In Canada, the installation of this appliance must comply with local codes and/or Standard CSA-B149.2, Propane Storage and Handling Code. ▪ ▪ ▪ ▪ ▪ ▪ ▪ ▪ Never use this grill inside any building, garage, shed or breezeway, or inside any boat, trailer or recreation vehicle. Improper use could cause possible fire or carbon monoxide poisoning or asphyxiation. Make sure the grill is not positioned under an overhang of a house, garage or other structure and that it is not positioned under a combustible object, such as an awning or umbrella. Combustible materials should never be within 36 inches (1 m) of the back or sides of this grill. Never store or use gasoline or other flammable or volatile substances in the vicinity of this grill or in the vicinity of any other heat-generating appliance, because of the danger of starting a fire. Make sure the grill is placed on a hard and level surface. Make sure there is ample flow of ventilation air around your grill, but never position it in the direct path of a strong wind. Do not operate at temperatures above 600 F (316 C) with the lid closed. Please note that at high-temperatures, the color of your grill lid may darken slightly. This is a normal occurrence for porcelain-enameled products. It will not damage the finish of your grill. As the grill cools, the color will return to its original color. Opening the Front Shelf To open: From the closed position, lift upward and pull the top of the shelf towards you to unlatch. Fold the shelf downward to its fully opened position, exposing the control panel. IMPORTANT: Shelf load should not exceed 10 lbs. To close: Reverse the opening procedure to close the shelf and conceal the control panel. IMPORTANT: When grill is not in use, keep the front shelf closed in order to preserve the look of your grill. Extending the Side Shelves & Accessing the Side Burner (MVP Model Only) To open: Grasp the side shelves from their outer edges and slide them outwards. Lift the cover on the left shelf to expose the side burner. IMPORTANT: The cover of the side burner must be open before lighting the side Team Grill Patio Series User Guide Page 29 burner. DO NOT OPERATE THE SIDE BURNER WITH THE SIDE BURNER COVER IN THE CLOSED POSITION. To close: Reverse the opening procedure. IMPORTANT: When grill is not in use, keep the side shelves closed in order to preserve the look of your grill. Hanging the Warming Rack (MVP Model Only) The warming rack in the Team Grill Patio Series MVP can be removed to create additional clearance for larger foods such as whole turkeys or “beer can chicken.” To remove the rack, simply lift the front of the rack out of its holders and then slide it forward until the back bars are clear from the back of the grill. When not being used, the warming rack can be hung from the two clips mounted on the top of the firebox, located just above the warming rack. To re-insert the warming rack, insert the back bars into the holes in the rear of the firebox and lower the front of the rack into its holders. Special Instructions for Liquid Propane (LP) Models IMPORTANT: Team Grill liquid propane (LP) models are intended for use with liquid propane (LP) gas only. Do not use with natural gas. The conversion to or attempted use of natural gas (NG) in LP models is dangerous and will void your warranty. Failure to follow the safety information outlined in this User Manual may result in serious bodily injury or death, or in a fire or an explosion causing damage to property. LP Gas: ▪ ▪ ▪ ▪ ▪ Is explosive under pressure. Is heavier than air and thus settles in low areas. Is extremely flammable and hazardous if handled improperly. Has no natural odor. An odorant has been added to notify you of any potential leaks. Can cause freeze burns when in contact with skin. LP Gas Tank Requirements and Instructions 1. An LP gas cylinder is required to operate this appliance. The LP gas cylinder is not included with this appliance. 2. Be sure to use only one (1) 20lb (9.1kg) LP gas cylinder with a Type 1 valve with this appliance as required by the American National Standards Institute (ANSI) and the Canadian Standards Steering Committee. 3. The LP gas tank must: a. Be marked “Propane.” b. Be constructed and marked in accordance with the Specifications for LP Gas Cylinders of the U.S. Department of Transportation (D.O.T.) or the National Standards of Canada, CAN/CSA-B339, Cylinders, Spheres and Tubes for Transportation of Dangerous Goods; and Commission, as applicable. c. Not have a capacity larger than 20 lbs (9.1kg) with approximate dimensions of 18” (45.7cm) high and 12” (30.4cm) diameter. Team Grill Patio Series User Guide Page 30 4. 5. 6. 7. 8. 9. 10. 11. 12. 13. 14. 15. 16. d. Be inspected at each re-filling and re-qualified by a licensed professional upon expiration (10 years from date of manufacture), in accordance with local and/or national codes for LP gas cylinders. e. Contain a shut-off valve as specified in the Standard for Compressed Gas Cylinder Valve Outlet and Inlet Connection, ANSI/CGA-V-1977, CSA B96. f. Be arranged for vapor withdrawal. g. Be in upright position. h. Include a collar to protect the cylinder valve. i. Be installed as per assembly instructions for the appliance. j. Include a safety relief device having direct communication with the vapor space of the cylinder at all times. k. Have a listed overfilling protection device (OPD). l. Be provided with a cylinder connection device compatible with the connection for outdoor cooking appliance. Never attempt to attach this appliance to the self-contained LP gas system of a camper trailer, motor home or house. Special care should be taken to avoid dropping or rough handling of the LP gas cylinder. Never use an LP gas cylinder with a damaged body, valve, collar or footing. LP gas cylinders should be filled only by certified LP gas dealers. Always transport filled LP gas cylinders carefully, securely and in the upright position. Special care should be given to protect the valve from accidental damage. Keep the LP gas cylinder in the upright position when connecting it to the appliance. If the LP gas cylinder is tipped after connection to the appliance, shut off the cylinder service valve, disconnect the regulator from the cylinder, and have the cylinder and regulator inspected prior to further use. LP gas cylinders must be stored outdoors in a well-ventilated area, out of the reach of children. LP gas tanks must not be stored in a building, garage or any other enclosed area. Do not store a spare LP gas cylinder under or near this appliance. Never fill the LP gas cylinder beyond 80% full. If the instructions in 11 and 12 are not followed exactly, a fire causing death or serious injury may occur. Do not store the LP gas cylinder in direct sunlight or near a source of heat or combustion. Never store a cylinder where temperatures can reach over 50℃/122℉. Never keep a filled LP gas cylinder in a hot car or car trunk. When storing the grill indoors, the LP gas cylinder must be disconnected, removed and stored outside. Place a dust cap on the cylinder service valve outlet whenever the cylinder is not in use. Only install the type of dust cap on the cylinder service valve outlet that is provided with the cylinder valve. The use of other types of dust caps or plugs may result in leakage of propane from the cylinder service valve. To disconnect the LP gas cylinder, ensure that the LP cylinder service valve is shut off and then turn the regulator hand wheel counter clockwise. Team Grill Patio Series User Guide Page 31 17. If the outdoor cooking gas appliance is not in use, the gas must be turned off at the supply cylinder. Storage of an outdoor cooking gas appliance indoors is permissible only if the cylinder is disconnected and removed from the outdoor cooking gas appliance. 18. Cylinders must be stored outdoors out of the reach of children and must not be stored in a building, garage or any other enclosed area. 19. Always use the pressure regulator and hose assembly provided with the appliance to connect to a LP gas cylinder. Never connect to an unregulated LP gas supply. 20. When connecting the LP gas cylinder to the appliance, always test for gas leaks. See the “Checking for Leaks” section of this manual. 21. If you smell gas, do not use the appliance until the source of the leak has been detected and repaired. See the “Checking for Leaks” section of this manual. 22. Always shut off the LP gas cylinder service valve as well as the burner control valves when the appliance is not in use. 23. Be sure the LP gas cylinder service valve and burner control valve(s) are “OFF” when the grill is not in use. 24. Set a full LP gas cylinder into the well located on the bottom of the appliance and secure in place. 25. Center the probe of the appliance side connection in the cylinder service valve outlet and hold in place. With your other hand, turn the plastic nut clockwise until fully engaged on the cylinder service valve ACME thread. (See Fig.4) DO NOT USE TOOLS. HAND TIGHTEN ONLY. 26. Perform the leak test (see the “Checking for Leaks” section of this manual) on all connections. 27. When lighting the grill, follow the lighting instructions as stated in this manual. Always open the LP gas cylinder service valve before opening the burner control valve(s) to avoid activating the flow limiting device. See “Hose and Regulator Assembly” section of this manual for more details of the flow limiting device. 28. To disconnect the LP cylinder, shut off the gas supply, then unscrew the regulator from the cylinder, and unscrew the bolt which is in the cylinder holder. Hose & Regulator Assembly (For LP Models Only) All models come equipped with a standard Elastomeric Composite Hose and Couplings for Conducting Propane and Natural Gas, CAN/CGA-8.1 or with the Current Standard, Thermoplastic Hose and Hose Couplings for Conducting Propane and Natural Gas CAN1-8.3, listed hose assembly if the grill is to be connected to a cylinder equipped with other than a No. 600 connection. 1. The CGA No 791 connection incorporates a magnetic flow limiting device that acts to limit the flow of gas if a leak is detected between the regulator and the burner valve(s). Team Grill Patio Series User Guide Page 32 2. If the burner valves are open prior to the LP gas cylinder service valve being opened, the connection will interpret this free flow of gas to be a leak. 3. The connections safety feature will reduce gas flow from the regulator to the appliance to a minimal level. 4. Be sure that all burner valves are closed prior to opening the LP gas cylinder service valve to ensure that the connection flow limiting device is not triggered mistakenly. 5. If the connection flow limiting device is triggered mistakenly, close the LP gas cylinder service valve and the burner valves, wait 10 seconds to allow the device to reset, open the cylinder service valve, then open the burner valves and light the grill as per lighting instructions. IMPORTANT: Be sure to protect the hose from dripping grease and any hot surfaces – including the base of the appliance. Serious danger may result if the hose contacts any hot surface. Hose and Regulator Maintenance 1. Inspect the hose before each use of the appliance. If the hose shows signs of cracks, abrasions, cuts or damage of any kind, do not operate the appliance. Replace the hose before using the appliance. For assistance with replacing the hose, call our customer service line at 888-978-4675. 2. Inspect the seal inside the CGA No 791 service valve on the LP gas cylinder when replacing the cylinder or at least once per year. If there is any indication of damage, have the seal replaced by a certified gas dealer before operating the appliance. 3. Do not use tools to tighten the CGA No 791 connection nut onto the LP gas cylinder service valve – hand tighten only. 4. Be sure not to cross thread the connection when tightening the CGA No 791 connection on to the LP gas cylinder service valve. 5. Always perform the “leak test” (See “Checking for Leaks” section of this manual) after attaching the connection to the LP gas cylinder service valve. 6. The regulator shall be installed in such a location that it will not reach a temperature above 130oF (54.4oC). Attaching the LP Gas Tank 1. 2. 3. 4. Only connect the LP gas tank to this grill while outdoors. Turn the LP gas tank valve clockwise to the “OFF” position. Make sure all burner control knobs are in their “OFF” position. Place the LP gas tank into the tank hole on bottom shelf (PRO model) or tank trolley (MVP model), so that the LP gas tank valve faces the front right corner of cabinet. 5. Remove the plastic dust cover from the LP gas tank valve (save for future use). 6. Thread the regulator coupling through the hole in the right side of the grill cabinet. Screw the regulator coupling onto the LP gas tank valve, clockwise, or to the right. Hand-tighten only. NOTE: This connection tightens clockwise and will not allow gas to flow unless the connection is tight. WARNING: Do not use a wrench to tighten the connection. Using a wrench could damage the regulator coupling and could cause a leak. Team Grill Patio Series User Guide Page 33 Checking for Leaks It is important to do a leak check before lighting this grill, as this will ensure that there are no gas leaks. All factory-made connections of the hose and regulator have been thoroughly tested to ensure no gas leaks are present. However, through shipping and handling, certain gas connections may have loosened. As a safety precaution: 1. Check all connections for gas leaks before using the appliance. 2. Check for gas leaks at the LP cylinder valve after each time the cylinder is replaced or at the NG supply valve any time the fitting is reconnected. 3. Perform the leak test in a well-ventilated area, away from any heat, open flame or ignition sources. Do not smoke while checking for gas leaks or anytime you are in the vicinity of the appliance. 4. Never test for gas leaks with a lit match or open flame. 5. Always test for gas leaks outdoors in a well-ventilated area. DANGER: Never use a match or open flame during a leak test. DANGER: Do not ignite burners when leak checking. IMPORTANT: Even if this appliance was assembled for you by someone else, be sure to check for gas leaks. How to Test for Leaks 1. 2. 3. 4. Extinguish any open flame or cigarettes in the area. Turn all grill burner control knobs to the “OFF” position. Connect a full LP gas cylinder to the appliance. In a bowl, create a soap solution of 1 part water with 1 part liquid detergent. 5. Make sure the regulator is tightly connected to the LP gas tank. 6. Slowly turn the hand wheel on LP gas tank counter clockwise, completely opening the LP gas tank valve. WARNING: If you hear a continuous rushing sound, turn the LP gas tank valve “OFF” or “CLOSED” immediately. There is a leak at a connection. Tighten the fitting. Turn the LP gas tank valve to “ON” or “OPEN.” 7. Brush the soap solution over each connection point (including connections to side and rotisserie burners if applicable). 8. Brush the whole fuel hose and look for cracks or frays. 9. Brush the soapy water on the welds around the LP gas tank, LP gas tank valve and bottom ring of the LP gas tank. 10. Brush soapy water on the side burner fuel hose and connections. If bubbles appear anywhere, there is a gas leak. If there is a leak on the connections between the LP gas tank valve, regulator, fuel hose and LP gas tank, turn the LP gas tank valve “OFF” and tighten the connection. Turn the LP gas tank valve back “ON” and recheck with the soap and water solution. If the leak is not on a connection, but on the fuel hose itself, replace the fuel hose. Retest for leaks. Team Grill Patio Series User Guide Page 34 If leak does not stop – do not use this grill. Turn the LP gas tank valve “OFF” immediately and retighten connections. Do not try to repair the leak. It is critical that you replace the leaking part. Call Team Grill Customer Service at (888) 978-6475 to purchase replacement parts. When leak checking is complete, turn the LP gas tank valve “OFF” and rinse all parts with water. Dry with a soft cloth. Team Grill Patio Series User Guide Page 35 Grill Lighting Instructions 1. Ensure the appliance is assembled in accordance with the instructions included in this User Guide. 2. Ensure that the LP gas cylinder or NG supply is properly connected. 3. Inspect the hose before each use. If evidence of abrasion, wear, cuts or any other damage exists, replace the hose before using the appliance. Use only replacement parts from Team Grill. 4. Ensure that there are no gas leaks. See “Checking for Leaks” section of this manual. 5. Ensure that the venturi tubes/burners are properly aligned on the burner control valve orifices. (See Fig. 2) 6. Ensure that the main igniter wires are properly connected. As applicable, ensure that the side burner and rotisserie burner igniter wires are properly connected. 7. Read and understand all instructions as they pertain to this appliance before lighting. 8. Open the lid and make sure the burner control knobs are in the “OFF” position. 9. Slowly open LP gas cylinder service valve or NG supply valve. 10. TO LIGHT THE MAIN BURNERS, SIDE BURNER AND INFRARED SEARING BURNER: Push in the desired burner control knob. While holding the knob in, turn it slowly to the “/ HIGH” position. After the igniter lights the burner, release the knob. To adjust the burner after lighting, turn the knob to the desired setting. If ignition does not occur within 5 seconds or burner goes out, turn burner control knob(s) back to the “OFF” position, wait 5 minutes and repeat the lighting procedure. 11. If ignition does not occur within 5 sec., turn burner control knob(s) to “OFF”, wait 5 minutes and repeat lighting procedure. If any burner will not light, refer to the “Troubleshooting” section of this User Guide. If the problem cannot be resolved, contact our customer service department at 888-978-6475 or a licensed gas technician before using the appliance. 12. Do not operate the main and rotisserie burners at the same time. 13. When on “HIGH” position, the main burners should provide a 1” (2.5cm) flame. (See Fig. 2-1). 14. TO LIGHT THE ROTISSERIE BURNER (if applicable): Push in the burner control knob. While holding the knob in, turn it slowly to the “/ HIGH” position. After the igniter lights the burner, release the knob. To adjust the burner after lighting, turn the knob to the desired setting. If ignition does not occur within 5 seconds or burner goes out, turn burner control knob(s) back to the “OFF” position, wait 5 minutes and repeat the lighting procedure. Manual Lighting If the igniter does not light the burner(s), use a lit match (secured onto the match stick provided inside right cabinet door) to light the burners manually. Access the burners through the cooking grids and heat plates. Position the lit match near the side of the burner while pushing and turning closest burner control knob to the “/ HIGH” position. (See Fig. 2-2) The burner should ignite within 5 seconds. Once the burner has ignited, push Team Grill Patio Series User Guide Page 36 and turn other burner control knobs to the “/ HIGH” position to light the other burners. IMPORTANT: If a burner does not light within 5 sec., turn off all control knobs and the gas supply, wait 5 minutes and repeat. NOTE: Always use the match stick provided when lighting burners with a match. After lighting, observe the burner flame, ensuring that all burners are lit and the flame height matches the illustration above. (See Fig. 2-1) NOTES: 1. To light side or rotisserie burners with a match, position the flame close to the burner and repeat steps above. Do not operate the main and rotisserie burners at the same time. 2. When using the rotisserie burner, remove the warming rack. 3. Always check the burner to confirm that ignition has occurred. To Extinguish Your Grill: 1. Turn the LP gas tank valve or NG supply line to the “OFF” position. 2. Turn all burner control valves to the “OFF” position. This sequence prevents residual gas from being left in the system under pressure. 3. Close the lid of the grill. 4. Disconnect the LP gas tank when this grill is not in use: a. Turn all burner control knobs to the “OFF” position. b. Turn the LP gas tank valve to the “OFF” position. c. Unscrew the regulator coupling from the LP gas tank valve by turning the quick coupling nut counterclockwise. d. Place the LP gas tank valve dust cap provided with the tank back on securely. Cleaning & Maintenance Proper maintenance is required to reduce potential flare-ups and extend the life of your grill. Team Grill also highly recommends using a grill cover to further protect your grill. IMPORTANT: Do not use oven cleaner or other abrasive cleansers. Do not use mineral spirits or cleaners that contain citrus products. IMPORTANT: Do not use a wire brush on the stainless steel or porcelain-enamel surfaces of this grill, as this will cause scratches. IMPORTANT: When cleaning stainless steel surfaces, rub in the direction of the grain to preserve the look of your stainless steel. IMPORTANT: DO NOT USE ACID DETERGENT AND/OR ANTIRUST AGENTS TO CLEAN THE CONTROL PANEL. SUCH STRONG CLEANSERS MAY REMOVE THE PRINTED INSTRUCTIONS. Team Grill Patio Series User Guide Page 37 General Cleaning Instructions 1. All cleaning and maintenance should be performed while the grill is cool and with the fuel supply disconnected. 2. During maintenance: A. Care must be taken not to obstruct the flow of combustion and ventilation air in your grill. B. Ensure after maintenance that the ventilation openings of the cylinder enclosure are free and clear of debris. 3. DO NOT clean any grill part in a self cleaning oven. The extreme heat will damage the finish. 4. Abrasive cleaners will damage this product. 5. Never use oven cleaner to clean any part of your grill. Clean Your Grill After Each Use 1. Turn the grill to “/ HIGH” and leave on for 10-15 minutes with the lid closed. Use hot soapy water and a brush to clean the cooking grates, and then rinse with clean water and wipe dry. IMPORTANT: For stainless steel cooking grates, use a brass wire brush. DO NOT use scrapers or brushes of other metals. IMPORTANT: For porcelain-coated cooking grates, use a non-metallic scrub brush. 2. Turn LP gas tank valve to the “OFF” position, and then turn all burner control valves to the “OFF” position. (This sequence prevents residual gas from being left in the system under pressure.) 3. While the lid is still warm, wipe its inside clean using a wet, soapy, soft rag to remove grease. Rinse clean with water. 4. Once the grill has cooled completely, use a wet, soapy, soft rag to clean the outside of the hood rinse clean with water. 5. When the cooking grates have cooled completely, remove them to brush off the flame tamers. Rinse clean with water. IMPORTANT: For stainless steel cooking grates, use a brass wire brush. DO NOT use scrapers or brushes of other metals. IMPORTANT: For porcelain-coated cooking grates, use a non-metallic scrub brush. 6. Remove the drip tray from the rear and the drip cup from the front inside the cart. Use hot, soapy water and a non-metallic scrub brush or soft rag to wipe them down. Rinse clean with water. 7. Return the drip cup, drip tray and cooking grates to the grill and, when dry, cover with a grill cover. Cleaning the Exterior of the Grill 1. 2. 3. 4. 5. Grill Hood & Cabinet Doors: Clean with warm, soapy water and a soft cloth after each use. Stainless Steel: Clean with specialized stainless steel cleaning products weekly or sooner if needed. Steel: Clean with mild soap and water annually or sooner if needed. Cast Aluminum: Clean with mild soap and water annually or sooner if needed. Plastic: Clean with mild soap and water annually or sooner if needed. Team Grill Patio Series User Guide Page 38 Cleaning the Main Burners 1. Turn off the gas at the LP gas cylinder/main NG valve. 2. Remove the cooking grates and flame tamers. 3. Remove the burners by removing the screws securing the burners to the grill bottom. (See Fig. 9) 4. Lift the burner up and away from the gas valve orifice (See Fig. 9) and disconnect the igniter wire. 5. Clean the inlet (venturi) of the burner with a venturi/bottle brush or compressed air. Inspect the burners for insects and insect nests. A clogged tube can lead to a fire underneath the grill. 6. Remove all food residue and dirt on burner surface. 7. Clean any clogged ports with a stiff wire (such as an opened paper clip). (See Fig.10) 8. Inspect each burner for any damage (cracks or holes). If any damage is found, replace it with new burner. (Contact Team Grill Customer Service at 888-978-6475 to purchase replacement parts.) 9. Reinstall the burners, checking to ensure that the gas valve orifice is correctly positioned inside each burner inlet (venturi) (See Fig. 11) and that the igniter wire is reconnected to the burner. Cleaning the Side Burner 1. 2. 3. 4. 5. 6. 7. 8. Turn off the gas at the LP gas cylinder/main NG valve. Remove the side burner grate. Remove the burner by removing the side burner securing screws from the bottom of the burner. Lift the burner up and away from the gas valve orifice. Clean the inlet (venturi) of burner with a venturi/bottle brush or compressed air. Remove all food residue and dirt from the burner surface. Clean any clogged ports with a stiff wire (such as an opened paper clip). (See Fig. 10) Inspect the burner for any damage (cracks or holes). If damage is found, replace with new burner. (Contact Team Grill Customer Service at 888-978-6475 to purchase replacement parts.) IMPORTANT: Inspect all venturi tubes/burners at least once per year or sooner if: 1. You smell gas. 2. You experience delayed burner ignition. 3. The appliance does not reach proper temperature. 4. The burner makes a “popping” noise. 5. The appliance heats unevenly. 6. The appliance has been stored for a period of more than one month. Team Grill Patio Series User Guide Page 39 Note: A good flame should be blue with some yellow tips coming from the burner holes. Yellow tips on flames up to 1/4 in height are acceptable as long as no carbon or soot deposits appear. (See Fig.12) Cleaning the Cooking Grates 1. 2. 3. Clean the cooking grates before and after each use with a stiff wire brush. For stainless steel cooking grates, use a brass wire brush. Do not use scrapers or brushes of other metals. For porcelain-coated cooking grates, use a non-metallic scrub brush. It is not necessary to fully clean the cooking grates after each use, but a mild soap and water solution can be used as necessary. Always rinse cooking grids thoroughly after cleaning. Do not use commercial grade oven cleaners to clean the cooking grates. Cleaning the Flame Tamers 1. 2. 3. Remove the cooking grates and scrape any built-up residue from the flame tamers with the back of a long handled grill brush. For stainless steel flame tamers, use a brass wire brush. Do not use scrapers or brushes of other metals. For porcelain-coated flame tamers, use a non-metallic scrub brush. It is not necessary to fully clean the flame tamers after each use, but a mild soap and water solution can be used as necessary. Always rinse flame tamers thoroughly after cleaning. Do not use commercial grade oven cleaners to clean the flame tamers. Cleaning the Grease Cup & Grease Tray 1. 2. 3. The grease cup/grease tray is located below the firebox of the appliance and will catch any grease drippings/food residue that is not burnt off during cooking. Wait until the grease/residue in the cup/drawer tray is cooled and empty it into the garbage. The grease cup/grease tray should be emptied regularly to prevent possible flare ups or spillage. Team Grill Patio Series User Guide Page 40 Grilling Tips 1. 2. 3. 4. 5. 6. 7. 8. 9. 10. 11. 12. 13. For LP models, ensure that you have enough propane in the cylinder prior to starting the grill to ensure that you do not run out midway through cooking. Trim excess fat from meat to reduce flare ups caused by grease drippings. Before lighting the burners, spray the cooking grates with non-stick spray or vegetable oil to prevent food from sticking. For best cooking results, always pre-heat the grill before adding food. Do not add salt to meats prior to grilling as it may reduce the “juiciness” of the meat. Never pierce meat with a fork during cooking – always use tongs or a spatula to rotate meat in order to preserve the internal juices. When cooking large cuts of meat over lower temperature settings, brush the meat with vegetable oil prior to placing it on the cooking grates. This will aid in the “browning” of the meat during the cooking process. Use the infrared searing burner on the “high” temperature setting to sear the outside of meat and lock in the juices. Then reduce the heat setting to continue cooking if necessary. When basting foods, wait until approximately halfway through the cooking time to add the sauce. Sauces generally contain sugars and/or oils that may burn easily, so limiting their exposure to flames is recommended. Unless specified differently in recipes, grill with the lid down. This will reduce heat loss and trap the “smoked” flavor within the grill. When using a meat thermometer to check internal temperatures, ensure that the tip of the thermometer is in the center of the thickest part of the meat (for poultry, place the tip of the thermometer in the thickest part of the thigh close to the body). Be sure that the tip of the thermometer is not resting in a fatty deposit or near the bone. This will ensure the most accurate temperature reading. See “Cooking Guide” section of this manual for desired internal temperatures for a variety of commonly grilled cuts of meat. When grilling large cuts of meat or extremely fatty meats, place an aluminum foil pan with approximately 1/2”-1” of water below the cooking grids and under the food. This will serve to catch grease drippings which will prevent flare ups and also serves to provide moisture to the food being cooked. Take care to fill up the pan with water while cooking as needed. Always wait for the grill to cool completely before trying to remove the pan. NOTE: water can be substituted with wine, beer, juice or other liquids for enhanced flavor. Post Grilling “Burn Off:” a. After you are finished cooking, remove all food from the cooking surface. b. Turn all burner control knobs to the “High” position and let the grill operate for 10-15 minutes. This will help to burn any residue off the cooking grids and heat plates. c. After the appliance has cooled, use a stiff wire brush to scrape the residue from the cooking surface. Team Grill Patio Series User Guide Page 41 Cooking Guide Temperature Settings 1. 2. 3. High - Intended for pre-heating of the appliance, searing steaks and other cuts of meat, rotisserie cooking and for burning food residue from the interior of the appliance. Medium - Intended for most grilling, baking and roasting. Low - Intended for cooking fish and other lean foods and for all smoke cooking. Direct Versus Indirect Cooking 1. 2. Direct Cooking - Occurs when the burners directly below the food are on. This method of cooking is ideal for most grill applications.(See Fig. 13) Indirect Cooking - Occurs when the burners directly under the food are not used to cook. Rather, the offset burners are used to create heat. This will significantly reduce flare ups and help to maintain an even temperature for the duration of cooking is best suited for longer duration cooking, like roasts. (See Fig.14) Team Grill Patio Series User Guide Page 42 Troubleshooting Guide Problem Potential Cause Solution Smell of gas. Shut “OFF” LP gas tank valve immediately. Do not use this grill until leak is sealed. See “Checking for Leaks” section for further instructions. Burner will not light Is LP gas tank low/empty? Take LP gas tank to be refilled. or flame is low on “/ HIGH” setting Is fuel hose bent? Straighten fuel hose. Do you see a spark when you turn the burner control knob? Try lighting burner with a match (see “Match Lighting”). Will burner light with a match? If lights with a match, check igniters. The excess flow safety device portion of this grill to the LP gas tank connection may have activated. Turn “OFF” all burner control knobs. Turn “OFF” LP gas tank valve. Disconnect regulator from LP gas tank. Turn all burner control knobs to “/ HIGH.” Wait at least one (1) minute. Turn “OFF” all burner control knobs. Reconnect regulator to LP gas tank. Turn LP gas tank valve “ON” slowly. See “Lighting.” Burners have a yellow or orange flame, in conjunction with the smell of gas. If there is excessive yellow flame, burner openings, ports or burner tubes may be blocked. Clean burners Maintenance”). (see “Cleaning and Flame pattern from burners is erratic Are burners clean? Clean burners Maintenance”). (see “Cleaning and Is LP gas tank valve “OFF?” Turn LP gas tank valve “ON.” Will burner light with a match? If lights with match check igniter. The excess flow safety device portion of this grill to the LP gas tank connection may have activated. Turn “OFF” all burner control knobs. Turn “OFF” LP gas tank valve. Disconnect regulator from LP gas tank. Turn all burner control knobs to “/ HIGH.” Wait at least one (1) minute. Turn “OFF” all burner control knobs. Reconnect regulator to LP gas tank. Turn LP gas tank valve “ON” slowly. See “Lighting.” o o or temperature only reaches 250 F or 300 F on “/ HIGH.” or flame is low when burner control knob is on “/ HIGH” or flames do not run full length of burner tube. Side burner will not light. Team Grill Patio Series User Guide Page 43 Problem Potential Cause Solution Side burner flame is low on “/ HIGH” setting. Is the fuel hose bent? Straighten fuel hose. Flare-ups or grease fires. Was the grill preheated as recommended? Turn all burner control knobs to “/ HIGH” for 5-10 minutes to preheat. Is there a heavy coating of grease on the cooking grates and/or flamer tamer? Clean cooking grates and/or flame tamer (see “Cleaning and Maintenance”). Is there a heavy coating of grease on the drip tray, blocking the flow to drip cup? Pull out drip tray from rear of the grill and clean. Drippings coming into contact with hot flames can cause flare-up. Excessive flareups are typically caused by grease build-up catching fire. Avoid large flare-ups and possible grease fires with regular cleaning and maintenance (see “Cleaning and Maintenance”). Regulator making a humming noise. LP gas tank valve turned on too quickly. Close LP gas tank valve completely and then turn LP gas tank valve “ON” slowly. Flame blows out. High or gusting winds. Always shelter this grill from strong winds. Low on LP gas. Refill LP gas tank. The excess flow safety device portion of this grill to the LP gas tank connection may have activated. Turn “OFF” all burner control knobs. Turn “OFF” LP gas tank valve. Disconnect regulator from LP gas tank. Turn all burner control knobs to “/ HIGH.” Wait at least one (1) minute. Turn “OFF” all burner control knobs. Reconnect regulator to LP gas tank. Turn LP gas tank valve “ON” slowly. See “Lighting.” Inside of lid appears to be “peeling.” This is not faulty porcelain-enamel, this is grease build-up. Clean inside of lid (see “Cleaning and Maintenance”). The color of the grill lid changes color when in use. This is a normal occurrence for porcelain-enameled products. It will not damage the finish of your grill. As the grill cools, the color will return to its original color. If you are still having problems, please call Team Grill Customer Service at (888) 978-6475 or visit our website www.teamgrill.com. Team Grill Patio Series User Guide Page 44