1
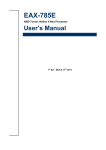
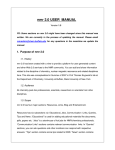
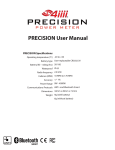
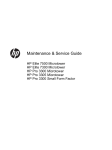
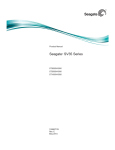
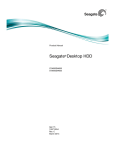
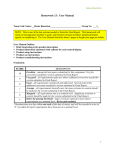
How to Bench Test, Build, and Troubleshoot Your Computer - Tech S...
1 of 9
Tech Support Forum
Tech Support Articles
Videos
Spyware 1st Steps
http://www.techsupportforum.com/forums/f255/how-to-bench-test-bui...
Rules
User Name
Tech Support Forum > Hardware Support > Building
How to Bench Test, Build, and Troubleshoot Your Computer
Site Map
Posting Help
Remember Me?
Password
Register
Rules
Today's Posts
Search
How to Bench Test, Build, and Troubleshoot Your Computer
This is a discussion on How to Bench Test, Build, and Troubleshoot Your Computer within the Building forums, part of the
Tech Support Forum category.
Thread Tools
Search this Thread
__________________
I recommend these:
Windows 7 & 8.1, Office 2013, Photoshop CS6, IE11
Security Essentials, Asus, Dell, Samsung,
Intel, NVidia, Xbox One, Android, Gigabyte
11-13-2014, 11:58 AM
#1
Masterchiefxx17
Microsoft MVP
Moderator
- Hardware Team
- Articles Team
- Microsoft Support
Join Date: Feb 2010
Location: Wisconsin, USA
Posts: 26,750
OS: Windows 7 64bit
Professional (SP1), Windows
8.1 64bit
How to Bench Test, Build, and Troubleshoot Your Computer
The following is an in-depth guide detailing the process that clearly outlines the process of
bench testing building, and troubleshooting your computer. All three sections of this guide will
take a considerable amount of time to complete. Therefore, you should take your time, read
carefully, and understand the guide before moving on or skipping steps. If you become lost at
any point in this guide, require assistance, or have a question, feel free to ask our
knowledgeable Tech Support Forum Hardware Team here.
Before you begin the process, first, protect your computer parts from electrostatic discharge
(ESD) by standing on a non-conductive floor. Likewise, ensure that your workstation is a
non-conductive area. To protect electronic components against ESD from yourself, use a
wrist/ankle strap as seen here. Next, find a flat and clean workstation that you can spend a
large amount of time working on. Avoid work areas such as a kitchen counter, carpeted floors,
outside work benches, and any other location that may cause distraction. Lastly, locate a small
container that can temporarily store screws, motherboard accessories, and other small parts.
» Recent Discussions
BSOD ntoskrnl.exe Help, I'm at a...
We couldn't install Windows in the...
DNS not resolving?
Current Temperatures
Rootkit found by Avast - Internet...
The following guide is written for users with low to moderate computer experience. Therefore,
some terminology or processes will not be explained in full detail. If something does not make
sense or you become confused, contact our Tech Support Forum team using the link above.
Computer re-infected with...
infected
My System
Users who are building a brand new computer will not require any tools other than a screw
driver. All of the necessary components will be included with your accessories.
When following each section, it is recommended that you fully read the entire section before
continuing.
Importing of a csv
Network
[SOLVED] BIOS runs slow, loads...
We thank you for visiting, reading, and using our complete computer guide.
Performing a Computer Bench Test
A bench test is defined as “a test carried out on a machine, a component, or software before it
is released for use, to ensure that it works properly.” Therefore, we strongly recommend
carrying out a bench test when building a brand new system. During a bench test, you can
easily test each module, part by part.
Bench testing can be performed on new and old computers. The following guide is written for
both situations where you would be testing your computer piece by piece. The process
outlined below is the easiest way to bench test your computer. Take your time, have a steady
hand, and have your user manuals nearby for a hassle-free bench test.
1. To begin your bench test, gather the bare essential modules to boot your computer.
Accessory modules such as the CD-ROM, hard drive, and case are not needed for an initial
bench test. The essential modules needed are the motherboard, processor, processor cooler,
thermal paste, video card, memory, and power supply.
» Site Navigation
» Forum
> User CP
> FAQ
> Support.Me
> Steam Error 118
> 10.0.0.2
> Trusteer Endpoint Protection
10-01-2015 01:50
How to Bench Test, Build, and Troubleshoot Your Computer - Tech S...
2 of 9
http://www.techsupportforum.com/forums/f255/how-to-bench-test-bui...
2.Unbox your motherboard and find a safe, non-conductive surface on which to place it. The
motherboard box itself is a great surface to use and it allows the video card to hang over the
side of the box.
3. Next, we need to install the Central Processing Unit (CPU) into the motherboard’s CPU
socket. Lift the metal retention arm, next to the CPU socket, which will lift the entire metal
bracket for the CPU. (Note: Some CPU sockets may have two retention arms.) Take your CPU
and align the golden arrow that is located on one of the corners of the CPU to the golden
triangle on the motherboard’s socket. The CPU should require little force to be placed into the
socket. Then, lower the retention arm down until the CPU is set and the metal retention arm is
in the default location. If the retention arm will not go down, do not force it! Reseat the CPU
in its socket and try again. Also ensure that you are using a compatible CPU and motherboard.
Once the retention arm has been latched under the plastic holder, the black cover that was
preinstalled on the socket will pop off. It is very important that you maintain possession of the
black cover as motherboard warranty claims will require the black cover.
10-01-2015 01:50
How to Bench Test, Build, and Troubleshoot Your Computer - Tech S...
3 of 9
http://www.techsupportforum.com/forums/f255/how-to-bench-test-bui...
4. We now need to install the processor cooling unit. All Intel (Excluding server edition CPUs)
and AMD processors will come with an Original Equipment Manufacturer (OEM) processor
cooling unit. These units will come with thermal paste preinstalled on the cooling unit. To
install these OEM cooling units, remove the plastic cover that protects the thermal paste.
Carefully align the cooling unit over the CPU socket and ensure that the hold down bracket
matches the four holes in the motherboard. Next, press down on the cooling unit on top of the
CPU and push in the four hold down pins into the four holes on the motherboard. Ensure to do
this in an X, i.e. diagonal, pattern, not a square pattern. Finally, locate the fan header on your
motherboard labeled CPU FAN and plug in your CPU cooler into that fan header.
a. When installing a third party cooling unit, follow the included user manual for
installation. Each cooling unit is different for different sockets and they include
back plates for mounting.
b. If you are using a water cooled CPU block, then follow the included user manual
for installation of the CPU cooler unit, pump, fans, etc. A water cooling system and
third party coolers with two fans typically requires you to use both a CPU FAN 1
and CPU FAN 2 header on the motherboard.
5. At this point we have completed the processor installation process. The CPU is located and
held down in its socket with the CPU cooling unit on top.
6. Moving on, we reach the memory installation stage. Although two memory sticks are
recommended for normal computer operation, we will be using just one memory stick for the
initial bench test. By following your motherboard’s user manual, locate Slot 1 of your
motherboard’s memory slots. Lift the retaining clips of the memory slot so they are pulled
back. Line up the notch in both the memory stick and memory slot on the motherboard.
Carefully place the memory stick into Slot 1, with equal force across the memory stick. The
clips will automatically clamp when you have applied sufficient pressure to the stick and the
memory stick is seated correctly.
10-01-2015 01:50
How to Bench Test, Build, and Troubleshoot Your Computer - Tech S...
4 of 9
http://www.techsupportforum.com/forums/f255/how-to-bench-test-bui...
7. Find your video card and remove it from the packaging wrap. Locate the PCI Express x16
slot on your motherboard. This is typically the top largest slot, but consult your motherboard’s
manual. Carefully place your video card into the PCIe x16 slot and ensure that the metal riser
at the end overhangs the edge of the motherboard.
8. Now place your Power Supply Unit (PSU) on your workstation. If you are using a modular
power supply, gather together the additional cables for the motherboard, video card, processor
power, etc. Begin by connecting the main 24pin connector to your motherboard. This
connection is typically located at the right hand side of the motherboard near the memory
slots. Next, locate the 4pin or 6pin (depending on the motherboard) power connection cable
socket for the processor, located in the top left of the motherboard, and connect the processor
connector. The final connection to be made is power to your video card. When supported, the
video card will require a 4pin, 6pin, or 8pin connector. Read and follow the video card manual
on which power connector is needed. Lastly, plug your power supply into a wall outlet using
the included cable.
9. Next, gather together your accessories such as a keyboard, mouse, and monitor. A wired
USB 2.0 keyboard and mouse should be used at this stage to ensure compatible operation.
(Note: Once Windows is installed any wired or wireless keyboard/mouse should be fine to
use.) (Note: Use the USB 2.0 ports on your motherboard when operating the BIOS.) Connect
the wired USB keyboard and mouse to the motherboard’s USB 2.0 ports and connect your
monitor to the video card output connections. If you are not using a video card, then use the
motherboard’s onboard video if available.
10. It is now time to start the system to check for functionality along with compatibility.
Starting the system can be done by two different methods. The first method is to use the
computer case’s power switch. Inside your computer case will be preinstalled wires. Locate the
group of small wires with black connectors on the end. This group will include connectors
labeled Power LED, Power SW, HDD LED, Speaker, etc. In the bottom right of your
10-01-2015 01:50
How to Bench Test, Build, and Troubleshoot Your Computer - Tech S...
5 of 9
http://www.techsupportforum.com/forums/f255/how-to-bench-test-bui...
motherboard you will see a group of metal pins that can hold these case connections. By
following either the motherboard manual or the guide on the motherboard itself, connect the
Power LED, Power SW, and Speaker connectors. (Note: Speaker connectors may not be
present.) Ensure that the positive and negative leads are on the right connections. The second
method is to use a flat head screw driver to quickly touch the Power SW leads. This will send
power through the lead outputting a signal to begin booting. Ensure that the power supply is
connected to a wall outlet and the rear switch is turned on.
This image has been resized. Click this bar to view the full image.
11. If you are successful, you should begin to see a Basic Input/Output System (BIOS) splash
screen on your monitor. This is typically a logo of the manufacturer of your motherboard.
Seeing video on the monitor also ensures that your video card is functioning correctly. You
should also hear a single beep from a speaker whether in the case or on the motherboard, if
present. A single beep indicates that the system is running correctly!
12. If you are not getting a beep code, no signal to the monitor, or the system will not power
on, switch off the power supply and inspect everything step by step. Try swapping to your
second memory stick, see if fans spin on the CPU cooler and video card, and see if LEDs on
the motherboard turn on. If you are still receiving issues during your bench test, contact our
hardware team here.
13. When booting to your system, enter the BIOS by pressing one of the function keys when
the manufacturer’s logo is present. Typically F2, F12 or DEL keys will allow you to enter the
BIOS; check your motherboard’s manual for the correct BIOS key. Allow the system to run for
at least half an hour and monitor CPU temperatures, power supply voltages, and other settings
in the BIOS. Also ensure that the BIOS is reporting correct information like model of the CPU
and video card, along with the correct memory. This is also a great time to setup the date and
time, boot priority, memory speed, etc. Contact our BIOS support, here, to find the best
setup.
This image has been resized. Click this bar to view the full image.
14. Shut down the system and install your additional memory sticks into the correct slots.
Ensure to use Slot 1 and Slot 2 which are typically the same color slot. Normal motherboards
run a dual channel configuration meaning they work best when using matched memory in Slot
1 and Slot 2. Read more about memory here.
15. At this point you can now connect your CD-ROM and hard drive(s). The CD-ROM will
require a SATA power connector from the power supply unit and will need to be connected to
one of the SATA 3.0 ports on your motherboard. The hard drive is the same, requiring power
and a SATA connection to the motherboard. When choosing a SATA connector on the
motherboard stick with the ports labeled SATA1 and SATA2. Plug your hard drive into SATA1.
If you are using an Intel CPU, make sure NOT to use the third party SATA connectors.
10-01-2015 01:50
How to Bench Test, Build, and Troubleshoot Your Computer - Tech S...
6 of 9
http://www.techsupportforum.com/forums/f255/how-to-bench-test-bui...
16. Return to your BIOS and make sure that the new memory and accessories are functioning.
Make sure that the memory is running at the correct speed and the capacity is being read
correctly. Also set the BIOS’s boot priority to boot from the hard drive first and the CD-ROM
second.
17. At this point you have finished your bench test. Congratulations! You have ensured that all
of your components are in working order and they all function properly. The computer is ready
to be assembled into your computer case.
Building your Computer
1. To begin, disassemble the bench test that you have just completed. Remove the video card,
power supply connectors, memory, CD-ROM, hard drive, and case connectors. Do NOT
remove the CPU cooling unit. If the cooling unit is removed for any reason, new thermal paste
will need to be reapplied. To reapply thermal paste, place either a small thin line or a pea sized
drop of thermal paste in the center of the CPU.
2. Next, find the brass standoffs that are included with your computer’s case. (Note: Some
computer cases come with these standoffs preinstalled.) By using a screw driver and the
included adapter, screw the motherboard standoffs into the correct holes. Consult your
computer’s case on where the correct holes are located. This guide represents where the
correct standoffs are located for different motherboard types. Normal sized motherboards are
ATX.
This image has been resized. Click this bar to view the full image.
3. Inside your motherboard’s box, find your I/O rear case shield. In the rear of the case there
will be a large rectangular opening. This location is where your I/O shield will be placed. Firmly
press the I/O shield into place and it should hold by itself.
10-01-2015 01:50
How to Bench Test, Build, and Troubleshoot Your Computer - Tech S...
http://www.techsupportforum.com/forums/f255/how-to-bench-test-bui...
4. After your I/O shield and the correct standoffs are installed, carefully place your
motherboard into the case. Have the case lying flat for the best results. Make sure not to
scratch the bottom of the motherboard on the standoffs and make sure that all of the
standoffs line up with the screw holes in the motherboard. Coming in at an angled approach
line up both the standoffs and rear I/O shield to the motherboard. After the motherboard is
resting on the standoffs, screw in the center screw of the motherboard into the center
standoff. Then install the remaining eight screws into the remaining eight standoffs for ATX
motherboards.
5. With the motherboard in place connect all of the case fans into the motherboard fan
headers. Make sure to reserve CPU fan headers for the CPU ONLY! You can also take the time
to connect the other case connections like power button, activity LEDs, front USB, front audio,
etc. Follow both your motherboard and case manuals to complete this action.
6. Inside your case, remove the rear PCI metal covers that will be used for your video card.
Skip the first cover and unscrew slots 2 and 3 (depending on your video card). Slowly and
carefully place your video card into the case and connect it to the PCIe x16 slot; this PCIe slot
is typically the largest slot closest to the CPU. The metal riser at the end will poke through the
case slots and the bottom tab will fall into the case. Using the two screws that were holding
the metal brackets, screw in the video card to ensure perfect support; this is a crucial step.
This image has been resized. Click this bar to view the full image.
7. Find your memory, and install the memory into Slot 1 and Slot 2. The installation process is
the same as it is in the bench test. Lift the holding clip, line up the notch in both the memory
stick and memory slot and firmly press the memory into place. The hold down clip should
automatically clip to the memory when installed.
8. Install your CD-ROM by removing the front cover in the case. Insert the CD-ROM into the
case from the front and it should slide in. Make sure to screw in the CD-ROM into the metal
cage for better support. Then install your hard drive into the metal cage, and again, use the
included screws for better support in the cage. Consult your case manual on how to install
these items if you are having trouble.
9. Flip the case upright again and grab your PSU. Install your PSU in the bottom of the case.
(Note: Some older cases will have the PSU location at the top of the case.) At this point you
need to choose between the fan taking air from the bottom of the case or from inside the
case. It should be noted that bottom mounted fans on the PSU can suffer if the PC is placed on
a carpeted floor. Screw in the PSU from the rear of the case using the four screws included.
Run the PSU cables to the backside of the case. Using good cable management techniques,
run the cables to your motherboard, CPU, video card, hard drive, CD-ROM, etc., similar to the
bench test.
This image has been resized. Click this bar to view the full image.
7 of 9
10-01-2015 01:50
How to Bench Test, Build, and Troubleshoot Your Computer - Tech S...
8 of 9
http://www.techsupportforum.com/forums/f255/how-to-bench-test-bui...
10. Finally, connect your keyboard and mouse to the rear USB ports. You can also connect the
monitor’s video cable.
11. At this point your computer has reached the same phase as the bench test. It should be
connected with power, all of the components are installed, and it should operate the same in
the BIOS. It is now time to install your Windows operating system.
12. Insert your Windows operating system CD into your CD-ROM. Reboot the computer and
during startup repeatedly press F8 on your keyboard until a menu appears offering options for
a one time boot method. Select your CD-ROM and your Windows installation will begin.
13. Follow the guide on installing Windows. The installation is straight forward and will guide
you through the entire installation. This can take some time and the system will reboot several
times. If you require help on installing Windows, please contact our Microsoft Support team
here.
14. Once Windows is installed it is highly recommended to visit the motherboard
manufacturer’s website to get the latest drivers for video, internet, chipset, memory, etc.
There is an included driver CD if you require Ethernet drivers when first using Windows. The
drivers on the disc will be old and out of date, so always go to the website for the latest
drivers. Install ALL of the Windows updates that are recommended to you and afterwards your
system will be complete. If you are having issues with drivers, contact our Driver Support
team here.
How to Troubleshoot your Computer
When troubleshooting your computer, the first step is to verify and confirm that your issue is
not software related. Hardware can be diagnosed using special software. However, in certain
cases a bench test is required for a full troubleshoot. The following list is in order of the most
common errors for computers.
1. Memory: Memory can be the leading cause for a computer not booting. If the memory
used in the system is not compatible with your motherboard, you will begin to hear a series of
beeps from your motherboard’s speaker. Use one stick of memory in slot 1 to test if either the
memory has failed and/or it is a compatibility issue. If you believe your memory is failing, then
follow this guide here on how to run Memtest86+.
2. Power Supply Units: The next hardware component to have a high rate of failure is the
PSU. PSUs are highly engineered devices that convert AC power to DC. Ensure that all of your
power leads are securely connected to the motherboard by unplugging and plugging in the
connectors again; also try to use a different wall outlet for power. Consult with our power
supply experts on whether or not you have the correct amount of wattage for your system.
Optionally, you can purchase this power supply tester that will help display whether or not the
PSU is in working order.
3. Video Cards: Video cards usually have a low failure rate once installed. They may,
however, be dead on arrival. When testing your video card, check the power leads that
connect it to the PSU. Next, observe the fans on the video card to see if they begin to spin
upon booting. If you are lacking video to your monitor, then check the video cable running to
your monitor. Also ensure that the monitor is in working order.
4. Hard Drives: Like PSUs, hard drives are highly engineered components that can,
unfortunately, fail. Since hard drives store our data, it is crucial to recover the data as soon as
possible. Troubleshoot the drive to ensure it has failed by running a SeaTools test with the help
of this guide here. After you have identified a failed hard drive, use a recovery program such
as Recuva or Paragon-Software Data Recovery to attempt to save data on the drive.
5. Motherboards: Motherboards are the controllers of all of these components. Check for
failure codes on an 80 port display (if available) and listen for beep codes. If there are any
issues with a motherboard, the computer will not display any LEDs and/or will not show any
sign of life and will not boot.
6. CD-ROMS: Testing and troubleshooting a CD-ROM is as simple as using a blank CD to see if
10-01-2015 01:50
How to Bench Test, Build, and Troubleshoot Your Computer - Tech S...
9 of 9
http://www.techsupportforum.com/forums/f255/how-to-bench-test-bui...
the CD-ROM will read. If not, the drive unit may need to be replaced. Additionally, ensure that
your CD-ROM drivers are working within Windows.
7. Processors: Processors have an extremely low failure rate, therefore, this should be the
last item to check and replace. If you are having a beep code representing a processor error,
check to see if the CPU cooling unit is working and is making contact to the processor. You
may also wish to replace the thermal paste as without adequate thermal paste, the processor
can and will overheat.
© 2014 techsupportforum.com
« rebuilding new system AMD Phenom ii x6 1055T | New build or upgrade »
Similar Threads
Thread
How to Bench Test / Troubleshoot Your System
:stop: This guide has been updated! Please see here:
http://www.techsupportforum.com/forums/f255/howto-bench-test-build-and-troubleshoot-your-computer918754.html The purpose of this thread is to
demonstrate an easy way to test your system prior to
complete assembly. If you take the time to...
Thread Starter
linderman
Forum
Motherboards, Bios & CPU
Replies
1
Last Post
08-01-2007 05:15 PM
Posting Rules
You
You
You
You
may
may
may
may
not
not
not
not
post new threads
post replies
post attachments
edit your posts
BB code is on
Smilies are on
[IMG] code is on
HTML code is Off
Trackbacks are Off
Pingbacks are Off
Refbacks are Off
Forum Rules
All times are GMT -7. The time now is 01:19 PM.
Contact Us - Tech Support Forum - Site Map - Community Rules - Terms of Service - Privacy - Privacy Statement - Top
Copyright 2001 - 2014, Tech Support Forum
Windows 7 - Windows XP - Windows Vista - Trojan Removal - Spyware Removal - Virus Removal - Networking - Security - Top Web Hosts
10-01-2015 01:50