1
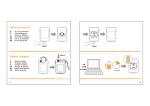
o-synce NAVI2move user manual ENGLISH 1 Content Content ................................................................................................................................................ 1 1 FIRST STEPS........................................................................................................................................... 3 1.1 Downloading and intalling of NaviControlCenter ......................................................................... 3 1.2 Recharging ..................................................................................................................................... 3 1.3 Switching on and off ...................................................................................................................... 3 1.4 Display modes ............................................................................................................................... 4 1.5 Button functions ............................................................................................................................ 4 1.6 Settings .......................................................................................................................................... 4 1.7 General view of the display ........................................................................................................... 5 2 MOUNTING OF BIKE HOLDERS ............................................................................................................. 7 2.1 Options for holder positions.......................................................................................................... 7 2.2 Changing holder options ............................................................................................................... 7 2.3 Fixation of the bike holder ............................................................................................................ 8 2.3.1 Double-leg .............................................................................................................................. 8 2.3.2 Handlebar or stem .................................................................................................................. 8 3 MENU ................................................................................................................................................... 9 3.1 Main menu .................................................................................................................................... 9 3.1.1 Navigation............................................................................................................................... 9 3.1.2 GPS Information ..................................................................................................................... 9 3.1.3 Deleting data .......................................................................................................................... 9 3.1.4 Setting..................................................................................................................................... 9 3.2 Set menus ...................................................................................................................................... 9 3.2.1 Power-mode – Set up background lighting ............................................................................ 9 3.2.2 Time zone – Set up time and date .......................................................................................... 9 3.2.3 Calibration ............................................................................................................................ 10 3.2.4 Units ..................................................................................................................................... 10 3.2.5 Tour ...................................................................................................................................... 10 3.2.6 Totals .................................................................................................................................... 10 3.2.7 Language............................................................................................................................... 10 4 RECORDING & TOUR DATA ................................................................................................................. 11 4.1 Start recording ............................................................................................................................. 11 4.2 Pause and restart recording ........................................................................................................ 11 4.3 Stop recording ............................................................................................................................. 11 2 4.4 Display tour summary ................................................................................................................. 11 5 BACKTRACK – Home tracking function ............................................................................................... 12 6 POI (Point of Interest) – Save and recall landmarks ........................................................................... 12 7 DELETING DATA .................................................................................................................................. 12 8 NAVIGATION AND ROUTING .............................................................................................................. 13 8.1 Route planning (NaviControlCentre software)............................................................................ 13 8.2 Selecting and following a route ................................................................................................... 14 8.3 Skipping a waypoint .................................................................................................................... 14 8.4 Deleting current navigation......................................................................................................... 14 9 Reading out ........................................................................................................................................ 15 3 1 FIRST STEPS 1.1 Downloading and intalling of NaviControlCenter Visit the o-synce website (www.o-synce.com) and download the NaviControlCentre which is found under the section “Software”. Afterwards install the software by double-clicking the downloaded file. If you need a “step-to-step”-guide, you’ll find it on the o-synce website under “Support”. 1.2 Recharging Before the first use theNAVI2move hast to be charged fully. Open the rubber lid on the backside and connect the device by Mini USB to a USB connection of your choice. When the device is fully loaded the symbol of an arrow will appear in the upper left corner of the display. Additionally the battery charge condition will appear completed. 1.3 Switching on and off Press the lower button for 3 seconds until the device is switched on or off. Via remote control: press the upper button for 3 seconds. 4 1.4 Display modes Your Navi2move offers three display modes: a. The navigation mode displays navigation and training facts. b. The data review mode displays a summary of your last tours and the collected data (for example total time, total kilometres). c. The menu allows an individual set up of your device. For switching the display modes, shortly press the lower button. Via remote control: shortly press the upper button. 1.5 Button functions 1.6 Settings In order to change your settings, please enter the menu and select the menu item "settings" (press right button until "settings" is marked and confirm with left button). Choosing your language (default setting is English) Select the menu item "language" and choose your desired language. Confirm with the left button. For further information about the setting menu and how to perform extended settings see chapter 3.2 Set menus on page 9. 5 1.7 General view of the display Battery charge condition indicates the actual charge of the battery. GPS signal strength shows the intensity of the satellite reception. For exact measuring of the altitude at least three bars are needed. The correct position, based on approximate altitude, is already accessible with just two displayed bars. The Navigation arrow indicates the bee line between current position and next waypoint on a planned route. While heading for a POI (see page 12) or during backtracking (see page 12), the navigation arrow will show the beeline to the POI or the direction to the starting point. If „routing“ is not activated, the navigation arrow always points to the north. The user mode symbol indicates which mode has been chosen by the user. Available modes are cycling, hiking or user-defined (see page 10 - 3.2.5 Tour). The turning arrow provides additional information which can be added to a way point while planning the route. The turning arrow shows the exact direction the user has to follow at the next way point (for example bear right as an additional information to an arrow pointing out hard right). The compass rose shows the direction in relation to your position. 6 The selectable route function allows you to choose several functions like bike speed, altitude, journey time or distance to the next waypoint. When riding a route it is recommendable to choose the function distance to the next waypoint (see page 14 – 8.2 Selecting and following a route). The recording status indicades if a route is currently recorded, if it is pausing or if the recording has been stopped. A recording always has to be started manually (see page 11 - 4.1 Start recording). 7 2 MOUNTING OF BIKE HOLDERS Please pay attention to install the device as horizontal as possible. The navigation arrow depends on the electromagnetic compass which only displays the correct direction if it is positioned in the correct angle. For this reason a horizontal montage is absolutely necessary. If your stem is too steep for that, install the device on your handle bar or choose the cockpit solution by using the double legged holder. 2.1 Options for holder positions Bike holder 2H RC can be mounted in three different ways: a. Cockpit solution b. Stem c. Handle bar a c b 2.2 Changing holder options The NAVI2move is delivered with the double-legged holder already fixed to the back plate. For mounting the holder directly onto your stem or handlebar, loosen the four screws on the backside. Exchange the double-legged holder plate with the regular holder plate. Depending on where you want to fix the holder, pay attention to the adjustment of the holder plate. 8 2.3 Fixation of the bike holder 2.3.1 Double-leg Glue both rubber stickers onto the contact surface of the holder plate. Afterwards pull both cable straps through the holes, fix them around the handlebar and tighten them. Cut off the remaining ends of the cable straps. 2.3.2 Handlebar or stem Glue the rubber sticker onto contact surface of the holder plate. Pull both cable wires through their holes and tighten them around the handlebar or stem. Cut off the remaining ends. 9 3 MENU 3.1 Main menu 3.1.1 Navigation In this mode you can recall your planned route (see 8.1 Selecting and following a route page 14) start back-tracking (see 5 Backtrack – home tracking function page 12) choose and head for a POI (see Saving and recalling of landmarks page 12) 3.1.2 GPS Information Shows your current position. 3.1.3 Deleting data Enables you to delete data (see 7 Deleting Data page 12). 3.1.4 Setting Contains all kinds of set menus. 3.2 Set menus 3.2.1 Power-mode – Set up background lighting Backlight Here you can preset how long the background lightning will be switched on when pushing a button. Alternatively the background lightning can be switched off entirely. Auto suspend Here you can preset after which time period of non-use the device will shut down. Alternatively you can set the device to stay permanently powered. 3.2.2 Time zone – Set up time and date Once the NAVI2move has found a GPS satellite for the first time, the time and date of the GPS satellite will be adopted automatically. Nevertheless the time can vary from the real time, depending on the time zone you are in. To adjust the time for your current region, enter the time offset under menu item „Manual“. For example: Displayed time 12:00 - actual time 14:00. Choose UTC +02 for adjusting the time to 14:00. Settings for Germany : Daylight saving time UTC +02 and winter time UTC +01 Automatic: The time which is transferred by the current GPS-satellite is used for time display. Manual: Here you can adapt the GPS time to your regional time zone. 10 3.2.3 Calibration Compass: The electromagnetic compass can be recalibrated if it does not work properly. In the case a recalibration becomes necessary. Please pay attention that you are out of reach of electromagnetic sources during calibration process. For calibration place your device flat on a table. After selecting the calibration function turn your device horizontally in a circle. Offset: The GPS altitude may vary regionally from the actual altitude. With this function you can adjust the offset. Just configure how many meters the actual altitude differs from the displayed altitude. The offset to be entered is the sum you get when subtracting the displayed from the actual altitude. Example: Displayed altitude: 130m, actual altitude: 90m. 90m minus 130m = -40m. -40m is the offset that has to be entered into your NAVI2move. 3.2.4 Units Change between km (metric) and miles (English). 3.2.5 Tour Turing radius: The turning radius defines at what distance to a waypoint the device skips to the next waypoint. The turning radius can be set up individually by the user. Interval: The recording interval defines the distance between two saved waypoints during recording. Hiking mode Presetting of turning radius (20m) and recording interval (10m) for all walkers, hikers and runners Bike mode Presetting of turning radius (40m) and recording interval (20m) for bikers. User mode Individual settings of turning radius and recording interval. 3.2.6 Totals Set up for total data like total kilometres, time or altitude difference uphill and downhill. ODO - total kilometres Time - total time 3.2.7 Language Set up the device language of your menu NAVI2move 11 4 RECORDING & TOUR DATA 4.1 Start recording For saving or displaying data like time, distance or average speed you necessarily have to start a recording. To start a recording enter the navigation mode and hold the right button for 2 seconds (remote switch: lower button). You will see the following pop-up: Start recording by choosing the play-symbol and confirming with the left button (remote control: middle button). The play-symbol will now appear in the lower right corner of the display. Please remind that recording is only possible if you have GPS reception. 4.2 Pause and restart recording For pausing your recording during a tour act the same way as if you would start a recording. Choose the pause-symbol instead of the play-symbol. By confirming the play-symbol, the recording can be restarted without starting a new tour. 4.3 Stop recording For quitting a recording, choose the stop-symbol. The recording will be stopped immediately. A summary of your tour can be found in the data mode. 4.4 Display tour summary Enter the data mode which allows you to see a summary of your last three recordings. You will also find the following totals values: a. Time b. Total kilometres c. Altitude difference, uphill d. Altitude difference, downhill 12 5 BACKTRACK – Home tracking function If you start a recording before beginning a tour, the location where you are currently situated will be saved as your starting point. If you start the backtrack function the navigation arrow will point directly to this starting point. The direct distance (beeline) in between you and the starting point can also be displayed. To find back to your starting point, follow the direction the arrow shows you. The arrow will always guide you in the direct way to your home destination. For starting the backtrack function, enter the menu and select "Back home". In the following list you may choose one out of the latest four staring points. The upper starting point is always the one which has been saved lately. 6 POI (Point of Interest) – Save and recall landmarks On your trip you can recall saved data about important sites, interesting restaurants, e.g. Saving Switch into navigation mode and hold the left button for 2 seconds (remote control: middle button) A pop-up menu with a choice of icons will appear. With the right button (remote control: lower button) select an icon which matches to your POI and confirm by pressing the left button (remote control: middle button). As a confirmation the compass circle will start to blink. Recalling As in the backtrack function, the navigation arrow points straightaway into the direction of your POI. Enter the menu, select "navigation" ->"POI" and choose the POI you want to be guided to. 7 DELETING DATA Through the submenu "clear data" which is located in the main menu you can delete the following data: a. POI b. Home Track (Deletes start point of tracks and all recorded tracks) c. Route Plan d. Totals Please remind that all data of its group will be deleted. By choosing "totals" all data including time, total kilometres, altitude difference uphill and downhill will be deleted. 13 8 NAVIGATION AND ROUTING 8.1 Route planning (NaviControlCentre software) Please remind that you have to plan your routes in advance by using the navigation software NaviControlCentre which can be downloaded in the software section of the o-synce website. Install the NaviControlCentre software on a personal computer and then connect your NAVI2move. Before being able to use the integrated maps of GooglemapsTM and Openstreetmap make sure you are connected to the internet. For route planning, select index card "Route plan". Now you click into the map window and define your waypoints. You also may add additional information or a directional arrow to every single waypoint. The information you enter will be displayed later on your tour. Especially the directional arrow will help you to exactly detect, into which direction you have to turn at the next waypoint. We recommend you, to place waypoints only on junctions where you leave your present road or where you do need some further information. Even though the route planning might seem a little rough and is not always following the exact path (for example in serpentines), the planning is much more effective if you just rely on waypoints where you really have to turn. 14 8.2 Selecting and following a route Enter the menu and select Navigation -> Route Plan. Now choose the waypoint you want to navigate to. You will find your destination point in the upper position of the displayed list. To travel the whole route, you have to confirm your destination point. There are two possibilities of navigation: a. direct – The navigation arrow points from your location directly to your destination point (beeline), similar to POI and back tracking. b. sequence –The navigation starts at the first waypoint and continues to follow every single waypoint that has been saved until you reach your destination point. In the navigation mode where the navigation arrow is displayed it is helpful to use as additional displayed information the distance to the following waypoint. For this reason enter the navigation mode and push the left button repeatedly until the function “distance to waypoint” is selected. 8.3 Skipping a waypoint Enter the navigation mode and hold the right button (remote control: lower button) for 2 seconds. Choose the fifth icon in the now appearing pop-up. The display will skip to the following waypoint. 8.4 Deleting current navigation Enter the navigation mode and press the right button (remote control: lower button) for 2 seconds. Choose the fourth icon in the appearing pop-up. The current navigation will be deleted. 15 9 Reading out By means of the NaviControlCentre you can readout your tour data. Connect the NAVI2move to your personal computer and start the NaviControlCentre. Enter index card „Track“ and click on the downloading symbol Your tour now will be downloaded and displayed in the map window.