1
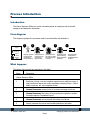
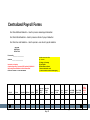
Banner Human Resources
Managing Benefits and Deductions
Training Workbook
Release 8.4 – March 2010
Updated 10/10/2011
_________________________________________________________________________________________________________________
SunGard Higher Education
4 Country View Road
Malvern, Pennsylvania 19355
United States of America
(800) 522 - 4827
Customer Support Center website
http://connect.sungardhe.com
Distribution Services e-mail address
[email protected]
Other services
In preparing and providing this publication, SunGard Higher Education is not rendering legal, accounting, or other
similar professional services. SunGard Higher Education makes no claims that an institution's use of this publication or
the software for which it is provided will insure compliance with applicable federal or state laws, rules, or regulations.
Each organization should seek legal, accounting and other similar professional services from competent providers of
the organization's own choosing.
Trademark
Without limitation, SunGard, the SunGard logo, Banner, Campus Pipeline, Luminis, PowerCAMPUS, Matrix, and Plus are
trademarks or registered trademarks of SunGard Data Systems Inc. or its subsidiaries in the U.S. and other countries.
Third-party names and marks referenced herein are trademarks or registered trademarks of their respective owners.
Revision History Log
Publication Date
Summary
April 2008
New version that supports Banner Human Resources 8.0 software.
September 2008
Updated version that supports Banner Human Resources 8.1 software.
June 2009
Updated version that supports Banner Human Resources 8.2 software.
November 2010
Updated version that supports Banner Human Resources 8.4 software (New Hire/Life Events
Enrollment)
October 2011
Modified version to support LCTCS End User Training.
Notice of rights
Copyright © SunGard Higher Education 2005-11. This document is proprietary and confidential information of SunGard
Higher Education Inc. and is not to be copied, reproduced, lent, displayed or distributed, nor used for any purpose other
than that for which it is specifically provided without the express written permission of SunGard Higher Education Inc.
Table of Contents
Introduction .............................................................................................................. 4
Process Introduction .................................................................................................... 5
Managing Benefits and Deductions ........................................................................... 6
Setting Up Initial Benefits or Deductions........................................................................ 7
Establishing a Benefits/Deductions Record .................................................................... 13
Setting Up Employee Elected Life Insurance Coverage ................................................... 16
Adding a New Deduction ............................................................................................. 18
Changing an Employee’s Deduction Record................................................................... 20
Modifying Benefits/Deductions in Mass ......................................................................... 23
Creating a One-Time Add/Replace Deduction ................................................................ 24
Terminating and Reactivating a Deduction .................................................................... 27
Collecting Information on Deduction Arrears ................................................................. 30
Viewing Benefits/Deductions ....................................................................................... 34
Viewing Employee Changes to Benefits/Deductions ....................................................... 37
Self Check ................................................................................................................. 39
Answer Key................................................................................................................ 40
Managing Life Insurance ......................................................................................... 41
Creating Deductions for Employee-Elected Life Insurance Coverage ................................ 42
Managing Beneficiary and FMLA Coverage.............................................................. 43
Process Introduction for Maintaining Benefit Coverage................................................... 44
Maintaining Beneficiary Coverage ................................................................................ 46
Entering Employee FMLA Information........................................................................... 48
Viewing Benefit Enrollees ............................................................................................ 55
Self Check ................................................................................................................. 57
Answer Key................................................................................................................ 58
Managing 403(b) and 457 Planswith Combined Limits ........................................... 59
Defining Combined Limit Rules .................................................................................... 60
Entering Combined Limit Retirement Benefits ............................................................... 61
Viewing Combined Limit Results after Payroll ................................................................ 63
Self Check ................................................................................................................. 65
Answer Key................................................................................................................ 67
Appendix ................................................................................................................. 68
Banner HCM Query Forms…………………………………………………………………………………………68
Payroll Forms…………………………………………………………………………………………………………..78
Terminology ............................................................................................................... 80
Forms Job Aid ............................................................................................................ 84
Introduction
Course goal
The goal of this workbook is to provide you with the knowledge and practice to accurately
record employee benefits and deductions into the Banner Human Resources system.
Course objectives
In this course you will learn how to maintain
•
benefits and deductions
•
beneficiary and FMLA coverage
•
403(b) and 457 plans with combined limit.
Intended audience
Human Resources Administrators and Benefits Specialists/Administrators.
Prerequisites
To complete this course, you should have
•
completed the Training Services’ web-based training (WBT) tutorial Banner 8
Fundamentals, or have equivalent experience navigating in the Banner system.
© SunGard 2004-2011
Page 4
Managing Benefits and Deductions
Process Introduction
Introduction
The Human Resource Office can record information about an employee such as benefit
categories and deduction information.
Flow diagram
This diagram highlights the processes used to record benefits and deductions.
1
2
3
5
4
Legend
Pay
to
$
= Employee
Pa
y
to
$
= Payroll
= Human
Resource
Office
Employee provides
health insurance
information to
Human Resources
Human Resources
reviews forms for
accuracy and
approves them
Human Resources
files copies of forms
and sends originals
to vendors
Human Resources
records employee
benefit information
into Banner
Payroll generates
the payroll and
benefits/deductions
are taken
What happens
The stages of the process are described in this table.
Stage
Description
Human Resource Office
1
Employee is hired, a current employee experiences a qualifying event, or
open enrollment begins and he/she completes necessary forms. (Select
health insurance, etc. and completes forms).
2
Human Resources reviews forms for accuracy and approves them.
3
Human Resources files copies of forms and send originals to vendors.
Forwards copies to Centralized Payroll.
4
Human Resources records benefit information into Banner.
5
Payroll generates the payroll and benefits/deductions are taken.
© SunGard 2004-2011
Page 5
Managing Benefits and Deductions
Managing Benefits and Deductions
Section goal
The goal of this section is to explain the procedures for entering and maintaining benefit
and deduction information in the Banner Human Resources system.
Section objectives
In this section you will learn how to
•
set up intiital benefits/deductions
•
establish a benefit/deduction record
•
set up employee-elected life insurance coverage
•
modify employee benefits/deductions in mass – Centralized Payroll Function
•
create a one-time add/replace deduction - Centralized Payroll Function
•
terminate/re-activate deductions
•
collect information on deduction arrears
•
view benefits/deductions in Banner
•
view employee changes to benefits/deductions
© SunGard 2004-2011
Page 6
Managing Benefits and Deductions
Setting Up Initial Benefits or Deductions
Introduction
The Employee Benefit/Deduction Set up Form (PDABDSU) is used only for initial setup of
benefit/deductions, and cannot be used for updates or deletions of data. The Employee
Benefit/Deduction Form (PDADEDN) is used for subsequent maintenance of this
information.
Note: Anything that takes away from gross earnings is a deduction; it includes benefits,
taxes, life insurance, etc. Based on the benefit category for the employee class, the
benefits and deductions category is determined on the Employee Form (PEAEMPL). The
person identified in the Key block must first be established as an employee in the system in
PEAEMPL.
Note: The Combined Limits Rule can be defaulted or changed on PDABDSU.
Banner form
© SunGard 2004-2011
Page 7
Managing Benefits and Deductions
Steps
Follow the steps to complete the initial setup of benefit/deductions.
1. Access the Employee Benefit/Deduction Form (PDABDSU).
2. Click the ID Search icon and select a valid ID code for your employee from the
Employee Search Form (POIIDEN).
3. Based on the ID, the system displays values in the remaining fields in the Key
block: Name, Benefit Category, and Default Begin Date fields. DO NOT
ENTER a date in the Default Begin Date. The user MUST enter a date for
each specific benefit / deduction code
Note: You can override the system generated begin date for all of the
employee’s benefits/deductions that have a user-specified begin date or for a
particular benefit/deduction with a user-specified begin date.
Begin dates that are not user-specified are automatically filled with the
appropriate date (as specified on PTRBCAT), i.e., Current Hire, 1st of Next
Month, etc.
4. Click the Next Block icon.
5. Click the Setup checkbox to specify whether the benefit or deduction identified
in the associated Benefits/Deductions field is to be set up for the employee.
Note: If the Quick Setup indicator for the associated benefit or deduction has
been set to Auto on the Benefit Category Rule Form (PTRBCAT) describing the
employee’s benefit category, this check box is automatically selected by the
system. You can set up the benefit or deduction in the current session. If the
Quick Setup indicator for the associated benefit or deduction has been set to
Manual on PTRBCAT, and the benefit or deduction has not been previously set
up, the check box is clear and can be selected. During the current session, you
can select the check box and then set up the benefit or deduction.
6. In the Setup Status field, Previously Setup (benefit/deduction has been set up),
Null (has yet to be setup), or Possible Preclusion (another option for this
benefit/deduction may already have been established) will appear depending on
the status of the deduction.
7. The Benefits or Deductions, Required, Begin Date Indicator, and Default
Exist fields are populated by the system based on all benefits and deductions
that have been assigned as required on PTRBCAT.
© SunGard 2004-2011
Page 8
Managing Benefits and Deductions
8. Review any other benefits/deductions that require set up for the employee. The
system prevents you from checking any item with a Setup Status of Previously
Setup.
Options – Establish Selected Benefits or Deductions
The Establish Selected Benefits/Deductions Information window option is selected to
perform the actual setup activity.
Note: You can specify default or change Combined Limit Rules in the Establish Selected
Benefits/Deductions Information window option menu.
Steps
Follow these steps to perform the actual setup activity.
9. Click Establish Selected Benefits or Deductions from the Options menu.
10. In the Code field, the codes for all benefits/deductions selected in the previous
step are listed.
11. The Setup Status field of each listed benefit/deduction is set to Active unless
another status value has been specified on PTRBCAT. You can select a different
status from the pull-down list. The listed values are Active, Waived, and Exempt.
© SunGard 2004-2011
Page 9
Managing Benefits and Deductions
12. If it applies, enter a new begin date in the Begin Date field to override existing
date.
Notes: The system places values in the Begin Date field in accordance with the
values specified in the Begin Date Indicator field on PTRBCAT.
If the Begin Date Indicator for a particular benefit/deduction was set to user
specified and a begin date was entered on PTRBCAT, the Begin Date field (on
PDABDSU) is set to the specified begin date.
If the value was user specified and no begin date was entered, the begin date
value is set to the current system date.
13. Enter a date that the coverage ends, if necessary, in the End Date field.
14. Enter values or change assigned values for the benefit/deduction Options, if
necessary, in the Options field.
Note: For taxes, this is where you specify filing status and number of
exemptions, or for a medical plan, the plan code.
15. Enter values or change assigned values for the benefit/deduction amounts in the
Amounts field, if necessary. (Use the down-arrow to enter amounts for each of
the Benefit codes).
Note: See the User’s Manual for data required in the Options and Amounts
fields based on the benefit/deduction calculation rule.
16. Repeat Step 2, if necessary, to complete each Benefit/Deduction.
To change or view default Combined Limit Rule Code for the appropriate benefit.
17. Click the Combined Limit Rule Code Selection button and change the rule to
the appropriate rule for the 403(b) or 457 plan.
18. Click the Save icon.
© SunGard 2004-2011
Page 10
Managing Benefits and Deductions
Options – Create Beneficiary Records
The Create Beneficiary Records window option maintains a list of all beneficiaries and
dependents of the employee.
Note: The Beneficiary Form, PDABENE, maintains a list of all beneficiaries and dependents
of the employee. When the employee is entered on PEAEMPL, the system automatically
populates the first block of PDABENE with the employee name and ID. This entry is
automatic and may not be updated or deleted.
Banner form
© SunGard 2004-2011
Page 11
Managing Benefits and Deductions
Steps
Follow these steps to complete the process.
1. Click Create Beneficiary Records from the Options menu.
2. Click the Next Block icon.
3. Enter the sequence number in the Sequence Number field.
4. If the person exists in the system (through PPAIDEN), click the ID Search icon
and select a person’s ID.
Note: This will automatically populate the Name, Gender, and Birth Date
fields.
5. If the person does not exist in the system, manually enter the name of the
person in the Last Name, First Name, and Middle Initial fields.
6. Click the Member Type drop-down arrow and select member type.
7. Click the Relationship to Employee Search icon and select a Relationship
code.
8. Enter the beneficiary’s Social Security Number in the SSN field.
9. Enter the birth date of the beneficiary/dependent in the Birth Date field.
10. Click the Gender drop-down arrow and select a gender.
11. Click the Disabled checkbox if disabled.
12. Click the Marital Status drop-down arrow and select a marital status.
13. Click the Attending College checkbox if the beneficiary/dependent is attending
college.
14. Insert a record and repeat Steps 3 through 13 for every dependent/beneficiary
of the employee.
15. Click the Save icon.
16. Click the Exit icon.
© SunGard 2004-2011
Page 12
Managing Benefits and Deductions
Establishing a Benefits/Deductions Record
Introduction
The Employee Benefit/Deduction Form (PDADEDN) establishes benefits and deductions for
an employee. This is the form that you will use for day-to-day maintenance and changes.
Note: If Combined Limit Code is applied to an employee, it must be present on PDADEDN.
The Payroll Proof process, PHPPROF, has been changed to include an edit function that will
ensure all ‘Combined’ 403(b) and 457 plan deductions carry the same Combined Limit Rule
Code.
Banner form
© SunGard 2004-2011
Page 13
Managing Benefits and Deductions
Steps
Follow the steps to establish benefits and deductions for an employee.
1. Access the Employee Benefit/Deduction Form (PDADEDN).
2. Click the ID Search icon and select an employee ID from Employee Search Form
(POIIDEN).
3. If a Benefit Category did not default in the Benefit Category field for your
employee, click the Benefit Category Search icon and select a category. .
4. Click the Deduction Search icon and select a deduction from the Employee
Deduction Query form (PDIDLST).
5. Enter the date you want the change to take effect in the Query Date field. This
will save you a step in setting up the deduction: the query date will default into
the deduction begin and effective date fields lower in the form.
Note: The Key block must have a valid ID, Benefit/Deduction code and Query
Date entered before moving to other blocks in the form.
6. Click the Next Block icon.
7. Enter the date the deduction was established for the employee in the Begin
Date field.
8. Leave the End Date field blank.
9. Review the Calculation Rule; it is populated by the system.
10. Click the Next Block icon.
11. Review the Effective Date field; it should be the same as the Begin Date field.
12. Click the Status drop down arrow and select a status.
Note: Active, Exempt, Terminated or Waived.
13. Enter free-form text, if required, in the Reference field.
14. View the values displayed under the Options and Amounts sections.
Note: The behavior of fields under the Options and Amounts titles differ based
on the deduction. The Benefit and Deduction Rules Form (PTRBDCA) determines
this behavior based on the calculation rule.
© SunGard 2004-2011
Page 14
Managing Benefits and Deductions
15. View or select a Combined Limit Rule Code from the Combined Limit Rule
Code drop down, if applicable. You should enter a combined limit rule for 403(b)
and 457 plans.
Note: Displays the code originally entered on PTRBDCL and associated with the
specific deduction on PTRBDCA.
16. View the description in the Description field.
Note: Displays a description of the combined limit rule code.
17. View the amount in the Employee Limit field.
Note: Displays the employee limit as set up for the combined limit rule on
PTRBDCL.
18. View the amount in the Employer Limit field.
Note: Employer Limit Displays the employer limit as set up for the combined limit
rule on PTRBDCL.
19. View the amount in the Combined Limit field.
Note: Combine Limit Displays the combined limit as set up for the rule on
PTRBDCL.
20. View the Applicable Gross Limit displays the applicable gross limit as set up
on PTRBDCL, available.
21. Click the Save icon.
22. Click the Exit icon.
© SunGard 2004-2011
Page 15
Managing Benefits and Deductions
Setting Up Employee Elected Life Insurance
Coverage (Both employer and employee setup
is required)
Introduction
The Employee Benefits/Deduction Form (PDADEDN) allows you to assign life insurance
coverage to employee(s).
Banner form
© SunGard 2004-2011
Page 16
Managing Benefits and Deductions
Steps
Follow the steps to assign the employee life insurance coverage.
1. Access the Employee Benefits/Deductions Form (PDADEDN).
2. Assign the employee to the Benefit/Deduction code defined in Topic A Benefits/Deductions day-to-day procedures.
© SunGard 2004-2011
Page 17
Managing Benefits and Deductions
Adding a New Deduction
Introduction
The Employee Benefit/Deduction Form (PDADEDN) allows you to add or change a deduction
amount, change options within a plan (for example, change your medical coverage from
Single to Family), change the number of Federal tax exemptions, or terminate one
deduction, and substitute another, such as changing from a company-operated medical
coverage to an outside HMO.
Banner form
© SunGard 2004-2011
Page 18
Managing Benefits and Deductions
Steps
Follow the steps to add or change a benefit option.
1. Access the Employee Benefit/Deduction Form (PDADEDN).
2. Click the ID Search icon and select an employee ID from the Employee
Search Form (POIIDEN).
3. If a Benefit Category did not default in the field for your employee, select the
Benefit Category Search icon and select a benefit category.
4. Click the Deduction Search icon and select the deduction code of the record
you are adding using the Employee Deduction Query form (PDIDLST).
5. Enter today’s date (or beginning date for the new deduction) in the Query
Date field. Enter the first day of the pay period in which you the
deduction should be withheld.
6. Click the Next Block icon.
7. Enter the date the deduction was established for the employee in the Begin
Date field. Enter the first day of the pay period in which you the
deduction should be withheld.
8. Leave the End Date field blank.
9. Review the Calculation Rule field and the Bond Balance field; they are
populated by the system.
10. Click the Next Block icon.
11. Review the Effective Date field; it should be the same as the Begin Date
field.
12. The Status field is populated with Active by the system.
13. In the Options section, click the Plan button, and select a benefit plan.
Note: This is assuming that the benefit has plans associated with it.
14. Click the Save icon.
15. Click the Exit icon.
© SunGard 2004-2011
Page 19
Managing Benefits and Deductions
Changing an Employee’s Deduction Record
Introduction
Deduction records are created and revised using the Employee Benefit/Deduction Form
(PDADEDN).
Banner form
© SunGard 2004-2011
Page 20
Managing Benefits and Deductions
Steps
Follow the steps to change an employee’s deduction record.
1. Access the Employee Benefit/Deduction Form (PDADEDN).
2. Click the ID Search icon and select an employee ID from the Employee
Search Form (POIIDEN).
3. The Benefit Category field automatically populates.
4. Click the Deduction Search icon and select the Deduction code of the record
you are revising using the Employee Deduction Query form (PDIDLST)
Note: It lists all deductions the employee is eligible for from the benefit
category. The Employee Deduction Query Form (PDIDLST) lists all
deductions assigned to this employee.
5. Click the Next Block icon twice
Note: If this deduction has history, (if it has been processed), the Last Date
Paid field in the Key block will be populated.
© SunGard 2004-2011
Page 21
Managing Benefits and Deductions
Options – New Effective Date
Steps
Follow these steps to complete the process.
19. Select New Effective Date from the Options menu.
20. Enter the date this change is to take place in the New Effective Date field.
Note: The date must be at least one day after the date in the Last Date Paid
field. Recommended to use the first day of the next pay period in which
you do not want the deduction to stop the deduction.
21. Enter the changes to the information when the duplicate of the original
Deduction Information window appears.
22. Click the Save icon.
23. Click the Exit icon.
Notes: Deductions are never pro-rated. If a person changes benefits on the
first day of the month and another person on the last day of the month,
there will be no difference between these employee benefits.
The best practice is to start and change benefits beginning with the first day
of the pay period.
© SunGard 2004-2011
Page 22
Managing Benefits and Deductions
Modifying Benefits/Deductions in Mass –
Centralized Payroll Function
Introduction
The Mass Deduction capability allows for the insertion, update, or termination of deductions
for large groups of employees.
The following factors must be evaluated before implementing the Mass Deduction
Capability.
•
Is the start and end dates consistent with the dates on PTRBCAT?
•
Is the update consistent with the preclusion rules on PTRBDCA?
•
Is the core and contingent process affected by the potential transaction?
•
Is the Last Paid Date consistent with the start date on PTRBDMC?
•
Will all employees in the benefit category be affected by the transaction?
Rules must be specified first on the Benefit/Deduction Mass Change Rules Form
(PTRBDMC).
This process will be a Centralized Payroll Function.
© SunGard 2004-2011
Page 23
Managing Benefits and Deductions
Creating a One-Time Add/Replace Deduction –
This is a Centralized Payroll Function
Introduction
The Employee Benefit/Deduction Form (PDADEDN) is used to replace or add to the amount
of the current deduction for the next pay period.
In the initial phase this will be a Centralized Payroll Function and will require the submission
of a one-time/add replace form to Centralized Payroll.
See appendix for the one-time/add replace form.
Banner form
© SunGard 2004-2011
Page 24
Managing Benefits and Deductions
Steps
Follow the steps to edit the amount of a current deduction.
1. Access the Employee Benefit/Deduction Form (PDADEDN).
2. Click the ID Search icon and select an employee ID from the Employee
Search Form (POIIDEN).
3. If a Benefit Category did not default in the Benefit Category field for your
employee, click the Benefit Category Search icon and select a Benefit
Category.
4. Click the Deduction Search icon and select the deduction code of the record
you are adding using the Employee Deduction Query form (PDIDLST).
5. Enter today’s date in the Query Date field.
6. Click the Next Block icon.
Add or Replace and Arrears tab
© SunGard 2004-2011
Page 25
Managing Benefits and Deductions
Steps
Follow these steps to add or replace deduction information.
1. Click the Add or Replace and Arrears tab.
2. Click the appropriate Add or Replace radio button at the top of the Add or
Replace and Arrears tab.
Note: The Add/Replace function is a one-time add/replace for any
benefit/deduction defined in PTRBDCA. The Add, Replace, Neither radio
group allows a one-time-only override of the employee and employer
amounts for this deduction (i.e., of the amounts in the Employee Amount and
Employer Amount fields below). It indicates whether the amount is to be
added to the employee’s normal deduction or is to replace the normal
deduction. Neither is the default value.
3. To add an additional amount to the standard deduction amount, or replace
an existing deduction amount with a new amount, enter the one-time change
you are making to the amount of the employee's deduction in the Employee
Amount field.
4. Enter the one-time change you are making to the amount of the employer's
deduction in the Employer Amount field.
5. Enter the one-time applicable gross pay amount by which the employee's
year-to-date applicable gross for this deduction should be increased or
decreased in the Applicable Gross field.
6. Click the Pay ID Search icon and select a Payroll Identification Code from
PTRPICT to identify the employee payroll from which the deduction is taken.
7. Click the Save icon.
8. Click on the Deduction tab to return to the Deduction Information block.
9. Click the Save icon.
10. Click the Exit icon.
© SunGard 2004-2011
Page 26
Managing Benefits and Deductions
Terminating and Reactivating a Deduction
Introduction
The Employee Benefit/Deduction Form (PDADEDN) is used to terminate a deduction from
the employee record, and then reactivate it.
Banner form
© SunGard 2004-2011
Page 27
Managing Benefits and Deductions
Steps
Follow the steps to terminate a deduction from the employee record, and then reactivate it.
1. Access the Employee Benefit/Deduction Form (PDADEDN).
2. Click the ID Search icon and select an employee ID from the Employee
Search Form (POIIDEN).
3. The Benefit Category field automatically populates for the employee.
4. Enter the code of the deduction record you are terminating in the
Deduction field.
5. Click the Next Block icon twice to access the Deduction Information block.
Options – New Effective Date (Terminate)
Steps
Follow these steps to terminate a deduction.
1. Select New Effective Date from the Options menu.
2. Enter the date the termination of the deduction is to take place in the New
Effective Date field. You can terminate deductions as of the last paid date.
Note: Benefits that are established, changed, or stopped within the pay
period will apply the last effective dated status for the entire payroll period as
Benefits/Deductions do not prorate during the pay period.
3. Click OK.
© SunGard 2004-2011
Page 28
Managing Benefits and Deductions
4. Click the Status drop-down arrow and select Terminated.
Note: The benefit/deduction will become inactive on the date entered in the
New Effective Date field. The system will populate the End Date field in
the General Deduction Information block.
5. Click the Save icon.
6. Select the Previous Block function.
7. To reactivate the deduction we just terminated, blank out the End Date
field.
Options – New Effective Date (Reactivate)
Steps
Follow these steps to reactivate a deduction.
1. Select New Effective Date from the Options menu.
2. Note: The Create Future Change window appears.
3. In the Create Future Change window, enter the date the reactivation is to
take place in the New Effective Date field.
4. Click OK.
5. Click the Next Block icon.
6. Click the Status drop-down arrow and select Active. .
7. Click the Save icon.
8. Click the Exit icon.
© SunGard 2004-2011
Page 29
Managing Benefits and Deductions
Collecting Information on Deduction Arrears
Introduction
The Employee Benefit/Deduction Form (PDADEDN) is used to collect information on
deduction arrears according to the rule selected for arrears on PTRBDCA. If there is not
enough money in the paycheck to cover deductions, the account goes into arrears. The
user can select each deduction individually to determine which ones go into arrears. The
balance of arrears is dynamically maintained, but can be overridden by the user.
LCTCS will not be using auto deduction arrears.
Banner form
© SunGard 2004-2011
Page 30
Managing Benefits and Deductions
Steps
Follow the steps to collect information on deduction arrears.
1. Access the Employee Benefit/Deduction Form (PDADEDN).
2. Click the ID Search icon and select an employee ID from the Employee
Search Form (POIIDEN).
3. The Benefit Category field automatically populates.
4. Click the Deductions Search icon and select the code of the deduction
record you are selecting for arrears.
5. Click the Next Block icon.
© SunGard 2004-2011
Page 31
Managing Benefits and Deductions
Add or Replace and Arrears tab – this function may be used
to set up installment plan for recoupment/collection
purposes- this will be centralized payroll function
Steps
Follow these steps to collect information on deduction arrears.
1. Select the Add or Replace and Arrears tab.
2. If necessary, override the value in the Active field; this field is automatically
populated if there is a benefit/deduction in an arrears status.
3. Enter dollar amount in the Arrear Balance field.
Note: This field displays the total amount owed by the employee to the
employer. It is updated by the Payroll process, but may also be updated online.
4. Enter dollar amount in the Maximum Recover Amount field.
Notes: This value specifies the maximum amount that can be deducted for an
arrears payment from one paycheck. This will display the total amount owed,
but can be changed to a different amount. Deductions will continue until the
total amount has been recovered
If an arrears balance can be satisfied from one paycheck, the system applies the
change to the next payroll only, and then reverts to the original deduction
record. The total owed will be reduced by $50.00 by the next payroll.
If you want an installment, enter dollars in the Maximum Recover Amount field
otherwise Banner will recover the entire amount from one check.
© SunGard 2004-2011
Page 32
Managing Benefits and Deductions
The balance will now be the reduced amount. The balance will continue to be
reduced until the total has been satisfied.
5. Click the Save icon.
6. Click the Exit icon
© SunGard 2004-2011
Page 33
Managing Benefits and Deductions
Viewing Benefits/Deductions
Introduction
The Deduction Year-to-Date Totals Form (PEIDTOT) allows you to view the year-to-date
totals, life-to-date total and the monthly total for a single benefit/deduction.
Note: All query forms will only show results for your institution.
Banner form
Steps
Follow these steps to view the year-to-date totals, life-to-date total, and the monthly total
for a single benefit/deduction.
1. Access the Benefit/Deduction Year-to-Date Total Form (PEIDTOT).
2. Click the ID Search icon and select a person’s ID.
3. Click the Deduction Search icon and select a deduction.
4. Click the Employer Search icon and select an employer code.
© SunGard 2004-2011
Page 34
Managing Benefits and Deductions
5. Click the Next Block icon.
6. View the information.
7. Click the Exit icon.
Introduction
The Aggregated Benefits/Deductions Totals Form (PEIATOT) allows benefit administrators
to view the cumulative year-to-date, life-to-date, and monthly totals of all
benefits/deductions that are grouped by deduction type for each employee.
Banner form
Steps
Follow these steps to view totals by deduction type for each employee.
1. Access the Aggregated Benefit/Deduction Totals Form (PEIATOT).
2. Enter the ID number or click the ID Search icon and select a person’s ID.
3. Click the Deduction Search icon and select the deduction.
4. Enter the year in the From Year field.
© SunGard 2004-2011
Page 35
Managing Benefits and Deductions
5. Enter the year in the To Year field.
Note: The combination of the information selected in the key block will
determine the information that is displayed. The PEIATOT allows you to display
health and tax related information for an employee.
6. Click the Next Block icon.
7. View the information.
8. Click the Exit icon.
© SunGard 2004-2011
Page 36
Managing Benefits and Deductions
Viewing Employee Changes to
Benefits/Deductions
Introduction
The Employee Deduction History Form (PEIDHIS) displays a record of changes made to the
Employee Deduction Form. Information is displayed by Captured Date and Time with a
secondary sort by Effective Date followed by Deduction Code.
Banner form
© SunGard 2004-2011
Page 37
Managing Benefits and Deductions
Steps
1. Access the Employee Deduction History Form (PEIDHIS).
2. Type an ID number in the ID field. Or, click the ID Search icon to search for
and enter an ID.
3. Click the Next Block icon.
4. View the results displayed.
5. Click the Exit icon.
© SunGard 2004-2011
Page 38
Managing Benefits and Deductions
Self Check
Directions
Use the information you have learned in this workbook to complete this self check activity.
Question 1
Which rule form allows for the insertion or termination of deductions for large groups of
employees?
a. PTRBDMC
b. PTRBDCA
c. PDADEDN
d. PDABENE
e. PEIATOT
Question 2
In the form PDABENE, the Sequence 1 beneficiary should always be the employee.
True or False
Question 3
Which of the following benefits can be set up as Auto on PDABDSU?
a. FICA/social security
b. FICA/old age
c. Standard employer paid life insurance
d. All of the above
e. Only b and c
© SunGard 2004-2011
Page 39
Managing Benefits and Deductions
Answer Key
Question 1
Which rule form allows for the insertion or termination of deductions for large groups of
employees?
A. PTRBCMC
Question 2
In the form PDABENE, the Sequence 1 beneficiary should always be the employee.
True
Question 3
Which of the following benefits can be set up as Auto on PDABDSU?
D. All of the above
© SunGard 2004-2011
Page 40
Managing Benefits and Deductions
Managing Life Insurance
Section goal
The goal of this section is to explain the procedures for managine life insurance information
in the Banner Human Resources system.
Section objectives
In this section you will learn how to
•
create deductions for employee-elected life insurance coverage
•
run the Life Insurance Calculation Process. The Life Insurance Calculation Process
(PDPLIFE) is run by payroll during payroll processing.
© SunGard 2004-2011
Page 41
Managing Benefits and Deductions
Creating Deductions for Employee-Elected Life
Insurance Coverage
Introduction
The Employee Benefits/Deduction Form (PDADEDN) allows you to assign life insurance
coverage to employee(s).
Banner form
Steps
Follow the steps to assign the employee life insurance coverage.
24. Access the Employee Benefits/Deductions Form (PDADEDN).
25. Assign the employee to the Benefit/Deduction code defined in Topic A Benefits/Deductions day-to-day procedures.
© SunGard 2004-2011
Page 42
Managing Benefits and Deductions
Managing Beneficiary and FMLA Coverage
Section goal
The goal of this section is to explain the procedures for entering and maintaining beneficiary
and FMLA coverage in the Banner Human Resources system.
Section objectives
In this section you will learn how to
•
maintain beneficiary coverage
•
track beneficiary information
•
enter employee FMLA information
•
view benefit enrollees.
© SunGard 2004-2011
Page 43
Managing Benefits and Deductions
Process Introduction for Maintaining Benefit
Coverage
About the process
The Human Resource Office can record information about an employee such as beneficiary
information.
Flow diagram
2
3
Employee selects
beneficiaries or
dependencts to
beneficiaryrequired benefits
Human Resources
creates beneficiary
records in Banner
1
Legend
= Employee
= Human
Resource
Office
Human Resources
assigns the
beneficiaries to the
benefits of the
employee in Banner
This diagram highlights the processes used to maintain beneficiary coverage.
© SunGard 2004-2011
Page 44
Managing Benefits and Deductions
What happens
The stages of the process are described in this table.
Stage
Description
Human Resource Office
1
Employee lists beneficiaries or dependents to
beneficiary-required benefits.
2
Human Resources creates beneficiary records in
Banner (Beneficiary Form, PDABENE).
3
Human Resources assign the beneficiaries to the
benefits of the employee in Banner (Beneficiary
Coverage Form, PDABCOV).
© SunGard 2004-2011
Page 45
Managing Benefits and Deductions
Maintaining Beneficiary Coverage
Introduction
The Beneficiary Coverage Form (PDABCOV) allows you to view, add, or delete dependents
and beneficiaries by employee for each benefit.
Banner form
Steps
Follow the steps to complete the process.
1. Access the Beneficiary Coverage Form (PDABCOV).
2. Click the ID Search icon and select the ID of the person who has elected
coverage.
3. Click the Benefit Search icon and select a Benefit code from the Employee
Deduction Query Form (PDIDLST).
4. The plan code will display in the Plan Code field when a Benefit code is
selected. The Query Date will default to the current date.
5. Click the Next Block icon.
© SunGard 2004-2011
Page 46
Managing Benefits and Deductions
6. Click the Sequence Number Search icon and select each sequence number
from the Beneficiary Form (PDABENE).
Note: The employee is always Sequence Number One.
7. Click the Save icon.
8. Repeat these steps for each benefit code.
9. Click the Exit icon.
© SunGard 2004-2011
Page 47
Managing Benefits and Deductions
Entering Employee FMLA Information
Introduction
The Employee FMLA Information Form (PEAFMLA) enables you to enter relevant information
for an employee claiming a leave under The Family and Medical Leave Act (FMLA).
Three new tabs have been created to access the corresponding windows of the Employee
FMLA Information (PEAFMLA):
•
Record Detail
•
Leave Tracking
•
Comments
Before entering information into the Employee Information Form (PEAFMLA), populate the
following forms with relevant data:
•
FMLA Status Validation Form (PTVFMST)
•
FMLA Leave Reason Validation Form (PTVFREA)
•
Beneficiary Relationship Rules Form (PTRBREL)
•
Earning Codes Rule Form (PTREARN)
•
Installation Rules Form (PTRINST)
© SunGard 2004-2011
Page 48
Managing Benefits and Deductions
Banner form
Steps
Follow the steps to enter FMLA information.
1. Access the Employee FMLA Information Form (PEAFMLA).
2. Click the ID Search icon and select the employee taking family leave from the
Employee Search Form (POIIDEN).
3. Click the Leave Period Indicator drop-down arrow and select the type of year
used by your institution for calculation purposes.
Note: The Leave Period Indicator default is based on value selected on
PTRINST; however, it can be changed.
4. Enter the date in the Hours Query Date field.
Note: Displays system date by default. Change the date if you wish to query for
an alternate 12 month work period.
5. View the 12 Month Hours field.
Note: This field displays the total number of eligible work hours based on the
type of year that was selected in the Leave Period Indicator.
6. Click the Next Block icon.
© SunGard 2004-2011
Page 49
Managing Benefits and Deductions
7. The FMLA Units Indicator field is populated but can be overridden.
8. Enter the maximum number of units allowed for FMLA leave in the Maximum
FLMA Units Allowed field.
Example: If the units were expressed in hours, the maximum allowed, based on
12 weeks of leave stipulation, could be entered as 480, assuming a normal week
of 40 hours.
9. Click the Care for Military Member Authorized checkbox if it applies.
10. Click the Spouse Employed checkbox if the employee has a spouse that is
employed by the institution.
Note: If the Spouse Employed box was checked, select the Search function
at the Spouse ID field and select the spouse’s ID from the Employee Search
Form (POIIDEN).
11. Click the Next Block icon.
12. Enter the leave request date in the Leave Request Date field.
13. Enter the date that the leave will begin in the Leave Effective Begin Date
field.
14. Enter the date that the leave will end in the Leave Effective End Date field.
15. Enter the date in the Eligibility Notification Date field.
16. Enter the current date in the Status Date field.
17. Click the Status Search icon, and select a status from the FMLA Status
Validation Form (PTVFMST).
18. Click the Reason drop-down arrow and select the reason that the FMLA leave
has been requested from the FMLA Leave Reason Validation Form (PTVFREA).
19. Click the appropriate Duration radio button.
Note: This indicates if the FMLA leave is full-time, intermittent, or a combination
of both
20. Enter notes in the Duration Notes field regarding the planned duration of the
FMLA leave.
21. Enter the approval ID in the Approval ID field.
22. Enter or select from calendar icon the approval date in the Approval Date field
the FMLA leave was approved.
© SunGard 2004-2011
Page 50
Managing Benefits and Deductions
23. Enter the unpaid status date in the Unpaid Status Date field to indicate the
date that the employee’s status will change to Unpaid Leave.
24. Click the Eligible for Benefit Continuation checkbox if applicable.
25. Click the Medical Certification Received checkbox if one has been received
for the employee’s FMLA leave.
26. Enter the date that medical certification was received in the Received Date
field.
27. Enter the family member name in the Military Member Name field if FMLA
leave is used to care for a family member employed in the armed forces:.
28. Click the Relationship drop-down arrow and select the code from the
Beneficiary Relationship Rules Form (PTRBREL) that best describes the
employee’s relationship with the military member.
29. Enter comment in the Type of Care field to specify the nature of care to be
provided.
30. Click the Military Service Documentation Received checkbox if applicable,
and enter the Military Documentation Date.
31. Click the appropriate radio button for the Scheduled Back to Work Status to
indicate if the employee will be back on a full-time or a part-time basis upon
completion of FMLA leave.
32. Enter the date or click the Scheduled Date Calendar icon to specify when the
employee is due to return back to work.
33. Select the appropriate radio button for the Actual Back to Work Status to
indicate if the employee returned back on a full-time or a part-time basis upon
completion of FMLA leave.
34. Enter the date or click the Calendar icon in the Actual Date field to specify
when the employee returned back to work.
35. Click the Save icon the updated information
Automatically import hours into Leave Usage tab if
PTREARN is set up
36. Click Import Payroll History in the Options menu.
37. Review information. Data can be edited if necessary.
© SunGard 2004-2011
Page 51
Managing Benefits and Deductions
Leave Usage tab
38. Click the Next Block icon or click the Leave Usage tab.
39. View the Maximum Units Allowed field to review the maximum number of
units allowed for FMLA leave.
40. View the Leave Begin Date field to review the start date of the FMLA leave.
41. View the Leave End Date to review the end date of the FMLA leave.
42. View the Total Life to Date Claimed field to review the running total of the
total number of FMLA units claimed.
43. View the Status to review the current status code of the FMLA leave record
from the FMLA Status Validation Form (PTVFMST).
44. Click the Earnings Code Search function and select an earning code from the
Employee Earnings Code Form (PTQEERN) that the FMLA leave will be accrued.
45. View the Units Indicator field.
Note: This displays the units that the leave is tracked for that earning code. All
will be hours.
46. Click the Payroll History checkbox.
47. Enter the begin date in the Begin Date field to indicate the start date for which
the FMLA leave is to be accounted under the particular earning code.
48. Enter the end date in the End Date field to indicate that FMLA leave is to be
© SunGard 2004-2011
Page 52
Managing Benefits and Deductions
accounted under the particular earning code.
49. Enter the number of FMLA units that will be claimed under each earning code in
the FLMA Units Claim field.
50. Repeat steps to add additional earning codes to track the FMLA leave.
51. The FMLA YTD Claimed field will automatically populate with a cumulative total
of the FMLA Units Claimed. The FMLA Units Available field will be recalculated to reflect the remaining FMLA units available for the employee.
52. NOTE: LCTCS has established FMLA earn codes that should be entered
by the HR timekeeper on PHAHOUR as the official record of tracking
FMLA leave.
53. Click the Save icon.
Comments tab
Steps
Follow these steps to complete the process.
54. Click the Next Block icon to access the Comments tab.
55. Enter any comments relevant to the employee’s leave in the Comments field.
© SunGard 2004-2011
Page 53
Managing Benefits and Deductions
History tab
Steps
Follow these steps to complete the process.
56. Click the Next Block icon or click the History tab.
57. View saved history.
58. Note: The information presented is for display only.
59. Click the Exit icon.
© SunGard 2004-2011
Page 54
Managing Benefits and Deductions
Viewing Benefit Enrollees
Introduction
The Benefit Enrollment Report (PDRBFDN) lists employees enrolled in each benefit.
Banner form
Steps
1. Access the Benefit Enrollment Report (PDRBFDN).
2. Click the Next Block icon to access the Printer Control block.
3. Type DATABASE in the Printer field.
4. Click the Next Block icon to access the Parameter Values block.
5. Type the date on which the report is run in the Parameter 01 As of Date
Values field.
© SunGard 2004-2011
Page 55
Managing Benefits and Deductions
6. Enter Y (for all benefits) or N (for not all benefits) in the Parameter 02 All
Benefit Codes Flag Values field. Or, click the Parameter 02 All Benefit
Codes Flag Search icon to search for and select a valid code.
7. (optional) Enter the benefit code(s) to be included in the report in the
Parameter 03 Benefit Code Values field. Or, click the Parameter 03
Benefit Code Search icon to search for and select a valid code.
Note: This is a repeating parameter. It appears only if N (for No) was entered
in Parameter 02.
8. Enter Y (for by plans) or N (for not by plans) in the Parameter 04 Plan Option
Flag Values field. Or, click the Parameter 04 Plan Option Flag Search icon
to search for and select a valid code.
9. Note: The default is Y (by plans).
10. Click the Next Block icon to access the Submission block.
11. (optional) Click the Save Parameter Set as checkbox if you would like to save
these parameters. If you are saving the parameters, enter a name and
description for it in the Name and Description fields.
12. Verify the Submit radio button is selected.
Note: If you would like to run the report later, click the Hold radio button.
13. Click the Save icon to run the report.
To view the results
14. Click the Options menu and select Review Output.
15. Click the File Search icon.
16. Double-click on the .lis file to review the report results.
17. Click the Exit icon to close the Review Output Form (GJIREVO).
18. Click the Exit icon to close PDRBFDN.
© SunGard 2004-2011
Page 56
Managing Benefits and Deductions
Self Check
Directions
Use the information you have learned in this workbook to complete this self check activity.
Question 1
You may define the benefit code(s) to appear in the Benefit Enrollment Report (PDRBFDN).
True or False
© SunGard 2004-2011
Page 57
Managing Benefits and Deductions
Answer Key
Question 1
You may define the benefit code(s) to appear in the Benefit Enrollment Report (PDRBFDN).
True.
© SunGard 2004-2011
Page 58
Managing Benefits and Deductions
How to Set up 403(b) and 457
Plans with Combined Limits
Section goal
The goal of this section is to explain the procedures for maintaining 403(b) and 457 plans
with combined limits the Banner Human Resources system.
Section objectives
In this section you will learn how to
•
define combined limit rules
•
enter combined limit 403(b) and 457 benefits
•
view combined limit results after Payroll.
© SunGard 2004-2011
Page 59
Managing Benefits and Deductions
Defining Combined Limit Rules
Introduction
You may specify Combined Limit rules using the Benefit/Deduction Combined Limit Rules
Form (PTRBDCL). This form identified the employee limit, employer limit, combined limit,
and applicable gross limit. The IRS changes these limits each year and the limits must be
updated each January (Central Payroll will be responsible for updating the annual limit rules
each year). Dollar limits may be established for common deductions or a single deduction
for an annual period.
Benefits and deductions must already be set up and linked. You may view calculation rules
for a benefit/deduction on the Employee Benefit/Deduction Form (PDADEDN).
Note: The Combined Limit amounts do NOT need to equal the Employee Limits plus the
Employer Limits.
Banner form
© SunGard 2004-2011
Page 60
Managing Benefits and Deductions
Entering Combined Limit 403(b) and 457 Plan
Benefits
Introduction
You may enter 403(b) and 457 benefits/deductions for an employee and identify the
Combined Limit rule for the person and benefit using the Employee Benefit/Deduction Form
(PDADEDN). In addition, you may have one Combined Limit rule code for multiple
deductions; however, you cannot have two deductions with two different Combined Limit
rule codes for a person. It is important to remember that an employee can only fall into
one Combined Limit category.
Notes: The Calculation Rule for the 403(b) and 457 plan deduction must be 11, 16, 21, 28,
or 29. Some 403(b) and 457 plans automatically have established defaults on the Employee
Benefit/Deduction Form. Validate the appropriate combined limit rule.
Banner form
© SunGard 2004-2011
Page 61
Managing Benefits and Deductions
Steps
Follow these steps to add 403(b) and 457 plan deductions to an employee record.
1. Access the Employee Benefit/Deduction Form (PDADEDN).
2. Enter an ID number in the ID field. Or click the ID Search icon to search for
and select an ID.
3. Click in the Deduction field.
4. Enter a 403(b) and 457 plan deduction code (e.g., RA1 for the TIAA/CREF
benefit) in the Deduction field. Or click the Deduction Search icon to search
for and select a code.
5. Click the Next Block icon.
6. Review the default values for the deduction amounts.
7. Click the Save icon.
8. Click the Rollback icon to enter another benefit/deduction.
9. Click in the Deduction field.
10. Enter a 403(b) and 457 plan deduction code (e.g., SR1 for Supplemental
Annuity Fidelity) in the Deduction field. Or click the Deduction Search icon to
search for and select a code.
11. Click the Next Block icon.
12. Click the Next Block icon.
13. If default values do not exist, enter them in the Amount fields as appropriate.
14. Click the Combined Limit Rule Code Search icon to search for and select a
combined limit rule code. Or, type a rule code in the Combined Limit Rule
Code field.
15. Click the Save icon.
16. Click the Exit icon.
© SunGard 2004-2011
Page 62
Managing Benefits and Deductions
Viewing Combined Limit Results after Payroll
Introduction
To view the effects of Combined Limit rules for an employee’s 403(b) and 457 plan benefit
contributions, access the Aggregated Benefit/Deduction Totals Form (PEIATOT). This form
lists the employee and employer contributions by year and month. You may view this form
by deduction (e.g., TIAA/CREF Retirement Annuity) or deduction type (e.g., 403b). In
addition, this form may be helpful for determining if and when an employee reached the
maximum Combined Limit amount for a benefit.
Note: A specific date range may be identified to view the benefit/deduction totals. The
totals are displayed on the form by year and the amounts are further detailed by month.
Banner form
© SunGard 2004-2011
Page 63
Managing Benefits and Deductions
Steps
Follow these steps to view combined limit results.
1. Access the Aggregated Benefit/Deduction Totals Form (PEIATOT).
2. Enter an ID number in the ID field. Or click the ID Search icon to search for
and select an ID.
3. Enter either a deduction or a deduction type. In this example, type a deduction
type (e.g., 10 for 403B) in the Deduction Type field.
4. Click the Next Block icon.
5. Review the values that display.
6. Click the Exit icon.
© SunGard 2004-2011
Page 64
Managing Benefits and Deductions
Self Check
Directions
Use the information you have learned in this workbook to complete this self check activity.
Question 1
At a minimum, how often must the employee, employer, and combined limits be updated on
the Benefit/Deduction Combined Limit Rules Form (PTRBDCL)?
A) Daily
B) Weekly
C) Monthly
D) Annually
Question 2
The Combined Limit on the Benefit/Deduction Combined Limit Rules Form (PTRBDCL) will
always equal the Employee Limit plus the Employer Limit?
True or False
Question 3
An employee may fall into multiple Combined Limit categories.
True or False
© SunGard 2004-2011
Page 65
Managing Benefits and Deductions
Question 4
Which item below does not need to be identified in order to view the effects of Combined
Limit using the Aggregated Benefit/Deduction Totals Form (PEIATOT).
A) Employee ID
B) Deduction or Deduction Type
C) Employee Start Date
D) Employer
© SunGard 2004-2011
Page 66
Managing Benefits and Deductions
Answer Key
Question 1
At a minimum, how often must the employee, employer, and combined limits be updated on
the Benefit/Deduction Combined Limit Rules Form (PTRBCL)?
D. Annually. The limits must be updated on at least an annual basis. However
the IRS may provide updated limits throughout the year.
Question 2
The Combined Limit on the Benefit/Deduction Combined Limit Rules Form (PTRBDCL) will
always equal the Employee Limit plus the Employer Limit?
False.
Question 3
An employee may fall into multiple Combined Limit categories.
False.
Question 4
Which item below does not need to be identified in order to view the effects of Combined
Limit using the Aggregated Benefit/Deduction Totals Form (PEIATOT).
C) Employee Start Date.
© SunGard 2004-2011
Page 67
Managing Benefits and Deductions
Appendix
Section goal
The purpose of this section is to provide reference materials related to the workbook.
Banner HCM Query Forms
Banner HCM offers numerous query forms, which can be used as an on-line report to view data. Data cannot be entered or modified on a
query form. In most instances, query results can be extracted into Excel spreadsheets for ease of use/viewing or further manipulation.
Query forms always have the letter ‘I’ as the third character and follow these naming conventions:
•
•
Position Control/Position Budget – N_IXXXX
Payroll, Employment Administration, Benefit Administration – P_IXXXX
The second character varies depending on the module within each system. This is not an all-inclusive list.
Area
© SunGard 2004-2011
Form
Description
Page 68
Managing Benefits and Deductions
Area
Position
Control
Form
NBIBHSP – Position
Budget History Inquiry
Form
Position
Control
NBIBTOT – Position
Budget Totals Inquiry
form
The Position Budget Totals Inquiry Form
provides query access to budget totals for
regular salaries, premium earnings such as
overtime, and fringe benefits. You can access it
from the Personnel Services Budget Menu
(*HRSPSBUDGET) or by selecting Position
Budget Totals from the Options menu of the
Position Definition Form (NBAPOSN).
Position
Control
NBICLSH – Position
Class History Form
The Position Class History Form displays a
history of the changes made to a specified
position class in the Position Class Rule Form
(NTRPCLS). The changes are shown in
descending order by date; that is, the most
current change is shown first, and the
information originally entered for the position is
shown last.
© SunGard 2004-2011
Description
The Position Budget History Inquiry Form
provides query access to position budget totals.
You can access it from the Personnel Services
Budget Menu (*HRSPSBUDGET) or by selecting
Salary Budget History from the Options menu
on the Position Definition Form (NBAPOSN).
Page 69
Managing Benefits and Deductions
Area
Position
Control
Form
NBIJLHS – Labor
Distribution Change
History Form
Description
The Labor Distribution Change History Form
allows you to query and display all Job Labor
Distribution Changes created for a specified
employee and assignment on the Employee
Jobs Form (NBAJOBS).
Additionally, you may document the change by
entering one or more comments as to why the
change occurred, such as a new grant, change
in funding sources, etc. A free-form explanation
can be entered at Change Reason.
This form also reports all details of the labor
distribution changes by Capture Date and lists
specific encumbrance data affiliated with each
Job Labor Distribution.
Position
Control
NBIJLST – Employee
Job Inquiry Form
The Employee Job Inquiry Form lists the
primary, secondary, and overload positions
occupied by a specified employee.
Position
Control
NBIPINC – Position
Incumbent List Form
The Position Incumbent List Form lists position
incumbents by fiscal year as of a user-specified
date. It provides data on past and present
incumbents of each position, future incumbents
by the effective job date, and total occupied
FTEs for each position. Data provided for each
incumbent includes identification number,
name, job begin/end dates, and employee
status.
© SunGard 2004-2011
Page 70
Managing Benefits and Deductions
Area
Position
Control
Form
NBIPLST – Position
List by Position
Classification Form
Position
Control
NBIPORG – Position
List by Organization
Form
The Position List by Organization Form provides
a list of positions defined for a specified
organization. Positions appear in sequence
according to defined Position Number. Position
FTE totals appear for each position.
Position
Control
NBIPOSH – Position
History form
Position
Control
NHIDIST – Labor
Distribution Data
Inquiry Form
The Position History Form displays a history of
the changes made to a specified position via
the Position Definition Form (NBAPOSN). The
changes are shown in descending order by
date; that is, the most current change is shown
first, and the information originally entered for
the position is shown last.
The Labor Distribution Data Inquiry Form
provides query access to all payroll distribution
data for the Finance Document Number, Chart
of Accounts, time frame and FOAPAL elements
entered in the Key Block. The displayed
information specifies the dollar amount
distributed to the FOAPAL, earning and/or
benefit by Employee ID. This form displays
earnings and/or benefit data for the Chart of
Accounts, FOAPAL elements, category, and
date range entered in the Key block. To view
fields that are not currently visible on the
screen, move the horizontal scroll bar beneath
ID or use the Next Field function.
© SunGard 2004-2011
Description
The Position List by Position Classification Form
displays all the positions assigned to a position
classification. Fields displayed include position
number, position title, status, begin/end dates,
type of position, and number of budgeted and
filled FTEs.
Page 71
Managing Benefits and Deductions
Area
Position
Control
Form
NHIEDST – Employee
Distribution Inquiry
Form
Benefits
PDICLST –
Beneficiary Coverage
Inquiry Form
The Beneficiary Coverage Inquiry Form displays
data on all benefits assigned to a particular
beneficiary.
Benefits
PDIDLST – Employee
Deduction Query Form
Benefits
PEIDHIS – Employee
Deduction History
Form
The Employee Deduction Query Form lists the
deductions established for a specified
employee.
The Employee Deduction History Form displays
a record of changes made to the Employee
Deduction Form.
Benefits
PEIDTOT – Deduction
Year to Date Totals
Form
The Deduction Year To Date Totals Form
provides monthly, quarterly, year-to-date, and
life-to-date employee and employer deduction
totals by fiscal, calendar, or plan year.
Benefits
PEIATOT –
Aggregated
Benefits/Deductions
Totals Form
This form displays the cumulative year-to-date
totals, life-to date totals and monthly totals
contributed by the employee and the employer
for all benefits or deductions that are grouped
either by association or by deduction type for
each employee.
© SunGard 2004-2011
Description
The Employee Distribution Inquiry form
provides query access to payroll distribution
data. The form displays payroll distribution
data for the Employee ID, time period, and
category entered in the Key block. In response
to your query, the system displays earnings
and/or benefit data for a particular employee.
Each line specifies the dollar amount distributed
to the FOAPAL by earnings or deduction. The
Home Organization displayed in the Key
block is informational only, and does not
determine what information is retrieved.
Page 72
Managing Benefits and Deductions
Area
Form
Employee
PEIEHIS – Employee
Information History Form
Description
Employee
PEIEPRO – Employee
Information Probationary Period
Query Form
The Employee Probationary Period Query Form
(PEIEPRO) provides probationary period
information by Chart of Accounts (COA) and
Time Sheet Organization codes.
Employee
PEIESUM – Employee
Information Summary View Form
The Employee Summary View Form
(PEIESUM) provides all information related to
an employee including jobs, faculty
assignments, faculty rank and faculty leave
information, plus position budgets all on a
single form.
Employee
PEIFACT – Faculty
Information Information Inquiry
– Faculty
Form
Information that appears on this form defaults
from the Faculty Action Tracking Form
(PEAFACT). PEIFACT only queries information.
Records that appear here are retrieved from
the current values on the Action Window of the
PEAFACT form based on the query date.
The Employee History Form displays specified
changes made to the Employee Form
(PEAEMPL). It maintains data on changes to
leave and benefit categories, and termination
dates and reasons.
Only Approved faculty actions are displayed on
this form. Faculty actions with any other
approval decision do not appear here.
Employee
PEIETOT – Employee
Information Year to Date Totals
– Earnings Form
© SunGard 2004-2011
The Employee Year To Date Totals Form
provides monthly, quarterly, and year-to-date
employee totals by designated fiscal/calendar
year. Data displayed includes hours worked,
gross amount, and net amount.
Page 73
Managing Benefits and Deductions
Area
Form
Employee
PEIJTOT – Job Year to
Information Date Totals Form
– Earnings
Description
The Job Year To Date Totals Form provides
monthly, quarterly, and year-to-date job totals
by either fiscal or calendar year. It displays
data on hours and gross amounts accumulated
for the requested earnings code and all
earnings in a specific assignment.
Employee
PEIFMLA – Employee
Information FMLA Status Inquiry
– Leaves
Form
The Employee FMLA Status Inquiry Form
displays a history of the leaves that a specified
employee has taken under the Family and
Medical Leave Act (FMLA) during the specified
FMLA year.
Employee
PHIACCR – Pay
Information History Leave Accruals
– Leaves
Form
The Pay History Leave Accruals Form displays
an employee's leave accrual history as of a
specified payroll. Data displayed includes each
leave code, hours accrued, hours taken, and a
banked hours indicator. If the Bank Indicator
field is checked, the current accrued hours are
banked hours.
The Employee Leave History Form displays the
leave history of a specified employee. It
includes changes made to an employee’s leave
records on the Employee Leave Balances Form
(PEALEAV) and during payroll runs. Data
displayed includes leave code, effective date,
hours banked, hours accrued, hours taken,
date available, change reason, and ID of the
user who made the change.
Employee
PEILHIS – Employee
Information Leave History Form
– Leaves
Employee
PEIJHIS – Employee
Information Job History Form
– Job
© SunGard 2004-2011
The Employee Job History Form displays data
on each job held by a specific employee.
Page 74
Managing Benefits and Deductions
Area
Employee
Information
– Job
Form
PEISALH – Employee
Salary History Inquiry
Form
Description
The Employee Salary History Inquiry Form
(PEISALH) lists the primary, secondary, and
overload positions occupied by a specified
employee. Related job information from the
Employee Jobs Form (NBAJOBS) defaults here
for each position.
The PEISALH form contains the same
information as the Employee Job Inquiry Form
(NBIJLST), except that PEISALH is intended to
be used by someone who is allowed to have
access to the Annual Salary and the
Appointment Percent of an employee. These
two fields are the only distinction between the
two forms.
Payroll –
Pay Events
PHICHEK – Check
Detail Inquiry Form
The Check Detail Inquiry Form provides the
details of a specified pay event, including
check/Direct Deposit numbers, recipient, gross
and net amounts, earnings codes and rates,
deductions, and hours worked during the pay
period.
Payroll –
Pay Events
PHILIST – Pay Event
List Form
The Pay Event List Form provides a record of all
payroll transactions and adjustments for a
specified employee. Transactions are displayed
in chronological order, with the most recent
transactions appearing first.
© SunGard 2004-2011
Page 75
Managing Benefits and Deductions
Area
Payroll –
Payroll
Processing
Form
PHIDERR – Pay
History Display Errors
Form
Payroll –
Payroll
Processing
PHIJOBS – History
Jobs Inquiry Form
The History Jobs Inquiry Form displays the
history jobs records of employees by pay
event, time sheet organization, and time
sheet/roster indicator. Records are displayed
only for computer-generated pay events. The
total hours and units for specific records are
also displayed.
Payroll –
Payroll
Processing/
Time Entry
Payroll –
Payroll
Processing/
Time Entry
PHIETIM – Web/
Department Employee
Time Inquiry Form
The Web/Department Employee time Inquiry
Form provides a summary of hours entered.
PHITSKY – Time
Sheet Keys Form
The Time Sheet Keys Form (PHITSKY) enables
you to view the pay events, time sheet
organizations, and roster indicators for a
specified person.
© SunGard 2004-2011
Description
The Pay History Display Errors Form (PHIDERR)
displays the errors encountered during payroll
for a specified employee. The Main window
displays the error messages associated with
each pay event. The Disposition Error List
Position Details window displays detailed data
on the position associated with this error
message. To access this window, select
Disposition Error List Position Details from the
Options menu.
Page 76
Managing Benefits and Deductions
Area
Payroll –
Payroll
Processing/
Time Entry
© SunGard 2004-2011
Form
PHITTOT – Time
Sheet Totals Form
Description
The Time Sheet Totals Form (PHITTOT) is a
query form. It enables you to view the total
hours for each payroll by organization and
roster indicator.
The only earnings codes totaled are those
whose Hours or Units Indicator field on the
Earnings Code Rule Form (PTREARN) is set to
Hours.
Page 77
Managing Benefits and Deductions
Centralized Payroll Forms
One Time Additional Deduction – Used to process a missed payroll deduction
One Time Refund Deduction – Used to process a refund of a payroll deduction
One Time Over-ride Deduction – Used to process a over-ride of a payroll deduction
ONE-TIME
ADDITIONAL
DEDUCTION
Processed by____________________
Select Reason for One-Time
NE- New Hire
C- Change in Coverage
N- Not Eligible
R- Retirement enrollment
I- Incorrect deduction code
T- Transfer from BU or Other State Agency
Institution _____________________
Instruction to Complete
Complete Supporting Document (SED) and fax (225)922-2813
Supporting Document Mailed to Vendor Date mailed:
Forward to PAYROLL TO BE PROCESSED
Emplid
Name
© SunGard 2004-2011
Location
E-Class
Position
HIRE
DATE
Coverage
Begin
Date
Deduction
Begin
Date
Page 78
Reason
Deduction
Code
B or
A Tax
Taxable
Gross
Due FROM
EmployEE
Due FROM
EmployER
Managing Benefits and Deductions
SED
FORM
REC'D
YN
LCTCS PAYROLL NOTIFICATION OF FINAL PAY CHECK
Pay period Dates:
Effective Date of Action:
Employee:
EMPLID:
Institution:
/Campus (if applicable):
Final Paycheck Action Taken:
/
/ Termination
/ /Resignation
/ /Retirement
/
/ Other ________
Terminal Leave Payout (only if not transferring to another state agency w/o a break in service)
Effective Date:
Annual Leave (300 hrs max): Hours:
Amount ($):
Sick Leave (200 hrs max at retirement and death only – and only for Unclassified Employees):
Hours:
Amount ($):
1 ½ Compensatory Leave when TERM from (classified) to an unclassified position or leaves employment:
Hours:
Amount ($):
Straight time compensatory leave not eligible for payout.
Exist forms have been completed for payroll deduction to stop (faxed to the vendor and payroll)
yes ( )
no ( )
Action Entered by:
© SunGard 2004-2011
Page 79
Managing Benefits and Deductions
Terminology
Amount
The Amount value is the sum to be deducted per pay period for the specified deduction option. It is established on PTRBDCA.
Amount entry
Specifies whether you must enter data into this field. The content of this field matches the content of the corresponding Amount
Entry field on PTRBDCA. See below for descriptions of each entry:
No Entry – No entry required or allowed in the Amount field
Required - The Amount field must be completed. If an amount is specified on PTRBDCA, it will be displayed.
Optional – You may enter a value in the Amount field, but it is not required.
Begin date
The date the deduction was established for the employee. If the current deduction was established on the Employee Benefit/Deduction
Setup Form (PDABDSU), the Begin Date for that benefit/deduction matches the Begin Date specified on PDABDSU.
Calc rule
Specifies the calculation rule associated with the deduction. It provides formulas that show how a deduction will behave. The rule
determines how the system calculates the employer amount (if any) and the employee amount applied to the deduction. The system
© SunGard 2004-2011
Page 80
Managing Benefits and Deductions
obtains this value from the Benefit/Deduction Rule Form (PTRBDCA), which defines the rules for the deduction. Most enterprises will
have between twenty and thirty calculation rules.
Combined Limit benefit /deduction
Combined Limit benefits/deductions refer to benefits/deductions are linked together to enforce employee, employer, and applicable
gross maximums, as established on the Combined Limits Rule form.
Contingent benefit /deduction
Contingent benefits/deductions refer to benefits/deductions that require enrollment in a predefined, related core benefit/deduction.
Core benefits /deductions
Core benefits/deductions refer to benefits/deductions that are prerequisites that should be satisfied prior to enrollment in a related
contingent benefit/deduction.
Effective date
Represents the date the information currently displayed went into effect, or will go into effect, for payroll purposes. To record the actual
date of coverage, if different from the effective date, use the Coverage Begin Date from the Beneficiary Coverage Form (PDABCOV).
The Effective Date must equal the Begin Date for the initial setup of the benefit/deduction.
End date
Specifies when the deduction terminated.
© SunGard 2004-2011
Page 81
Managing Benefits and Deductions
Last paid
Represents the employee’s last paid date. It is the end of the latest pay cycle for which the employee has been paid, or for which the
payroll extraction process via the Time Processing Report (PHPTIME) has been run. The system does not accept any benefit changes
with an effective date prior to the last paid date.
Options value
Use is determined by the calculation rule assigned to the benefit/deduction. The associated Options Entry field specifies whether you
must enter data into this field. The content of this field matches the content of the corresponding Options Entry field on the
Benefit/Deduction Rule Form (PTRBDCA). See below for descriptions of each value:
No Entry – No entry required or allowed in the Options Value field.
Required – The Options Value field must be completed.
Optional – You may enter a value in the Options Value field, but it is not required.
System – Generated value used for life insurance processing.
Query date
The date that the deduction information is required. The system displays information that was, is, or will be in effect for the deduction
on the specified date. The current date or the query date last used displays, but this date may be updated.
Status
Specifies the standing of the deduction: Active, Terminated, Waived, or Exempt.
Active – The deduction has been established for the employee and the deduction is currently being processed. The effective date
associated with this value must be after the date in the Last Paid field.
© SunGard 2004-2011
Page 82
Managing Benefits and Deductions
Exempt – The deduction has been established for the employee, but the deduction is not being taken. In this case, the system does
not maintain the applicable gross and does not calculate the deduction amount.
Terminated – The employee’s enrollment in this deduction has been terminated. The system places the effective date associated with
this value in the End Date field.
Waived – The deduction has been established for the employee but the deduction is not being taken. The system maintains the
applicable gross, but does not calculate the deduction amount.
System
The value that the system calculates based on a Calc rule. This entry is used primarily for life insurance.
© SunGard 2004-2011
Page 83
Managing Benefits and Deductions
Forms Job Aid
Form
Full Name
Use this Form to...
NBAJOBS
Employee Jobs Form
change employee status.
PCABENE
COBRA Dependent and Beneficiary
Form
set up COBRA employees and beneficiaries.
PCAPERS
COBRA Person Form
PDABCOV
Beneficiary Coverage Form
view, add, or delete dependents and beneficiaries by
employee for each benefit.
PEAEMPL
Employee Form
enter the employee termination or leave of absence info.
PTRBCAT
Benefit Category Rule Form
establish groupings or packages of benefits to manage the
distribution of benefits according to employee eligibility.
PTRBDCA
Benefit/Deduction Rule Form
establish and define the Benefit and Deduction codes used by
the Payroll System.
PTRBDCL
Benefit/Deduction Combined Limit
Rules Form
specify annual dollar limits for combinations of employee
retirement plans, 50+ catch-up contributions, and the 15year rule plan.
© SunGard 2004-2011
maintain data on persons eligible for COBRA benefits.
Appropriate notification, late payment, enrollment end, and
termination notices are run in a background process.
Page 84
Managing Benefits and Deductions
Form
Full Name
Use this Form to...
PTRBDFQ
Benefit Payroll Frequency Rule Form
specify how many times a life insurance premium is taken in
a given month.
PTRBDMC
Mass Change Rule Form
specify rules for mass change and the criteria for including
any benefit or deduction record in the Benefit/Deduction
Mass Change Process (PDPBDMC) can be determined,
controlled, and defined in the Benefit/Deduction Mass Change
Rule Form (PTRBDMC). This rule form gives you the ability to
influence which benefits or deductions should be modified
and what information is to be modified.
PTRBREA
Benefit Deduction Change Reason
Rules Form
define reasons for employee benefit change and associate
those reasons with a change type.
PTRBREL
Beneficiary Relationship Rule Form
establish codes that identify the relationship to an employee
(or other benefactor) that makes a beneficiary eligible for
benefits.
PTRGTAX
Taxable Life Insurance Premium Rule
Form
PTRINST
Installation Rules Form
identify rules that apply throughout your installation and
establish them in the database at an installation level.
PTRLFCH
Life Event Change Rules Form
defines rules to control the Self-Service processing for a
primary group, and each associate benefit or deduction in the
primary group.
PTRLIFE
Life Insurance Calculation Process
Parameter Rule Form
© SunGard 2004-2011
review tax information.
set up parameters to calculate the life insurance amounts.
Page 85
Managing Benefits and Deductions
Form
Full Name
Use this Form to...
PTRLIFI
Life Insurance Rule Form
establish and define life insurance coverage amounts.
PTRLIFI
Life Insurance Rule Form
establish and define life insurance coverage amounts.
PTRPREM
Life Insurance Premium Rule Form
establish life insurance coverage amounts.
PTVDDOC
Benefit Deduction Supporting
Documents Validation Form
define any supporting documentation employees will need to
provide as part of enrollment as a new hire or with a life
event.
PTVDREA
Benefit Deduction Termination Reason
Code
define benefit and deduction termination reasons for your
employer
PTVFMST
FMLA Status Validation Form
identify the statuses that you can assign to leaves claimed
under the Family and Medical Leave Act (FMLA).
PTVFREA
FMLA Leave Reason Validation Form
set up FMLA Leave Reason codes.
© SunGard 2004-2011
Page 86
Managing Benefits and Deductions


![User`s Manual [(LDSP_LCD_99_2)] Label Data](http://vs1.manualzilla.com/store/data/005846764_1-de86383eb41f3d06a08b51e5958ead91-150x150.png)