1
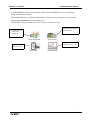
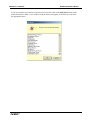
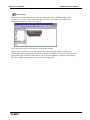
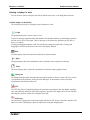
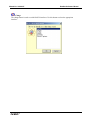
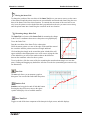
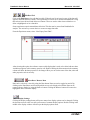
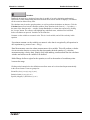
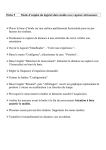
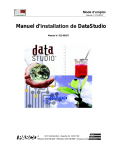
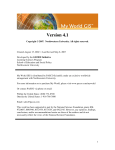
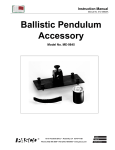
Instruction Manual
Manual No. 012-08107
DataStudio Starter Manual
Manual No. 012-08107
Manual No. 012-08107
DataStudio Starter Manual
Introduction
What is DataStudio?
DataStudio is a data acquisition, display and analysis program. The software works with PASCO
interfaces and sensors to collect and analyze data. You can use DataStudio to create and perform
experiments in General Science, Biology, Chemistry, and Physics for all grade levels.
Interfaces
Depending on the type of computer, the following interfaces are recommended:
SCSI/serial port computers
ScienceWorkshop interfaces
USB-enabled computers
PASPORT USB Link or Xplorer
DataStudio Requirements
To use DataStudio, you need at least the following requirements:
Macintosh - System 7.5 or higher, Free RAM: 8 Mb (16 Mb preferred), Serial, SCSI, or USB port,
CD-ROM drive, 20 MB Free Hard disk space.
Windows - Windows 95, 98 or NT 4.0, Free RAM: 8 Mb (16 Mb preferred), Serial, SCSI, or USB
port, CD-ROM drive, 20 MB Free Hard disk space.
Using DataStudio
DataStudio collects and displays data during the experiment.
Setting up an experiment is a simple matter of plugging sensors into the interface and configuring the
software. DataStudio has many ways to view data, including a digit display, meter, graph, and an
oscilloscope.
There are several ways to use DataStudio:
1. Open a pre-configured experiment.
2. Open a pre-designed workbook.
3. Create an electronic workbook or configure an experiment.
®
3
DataStudio Starter Manual
Manual No. 012-08107
Equipment and Software Setup
Depending on the type of interface, instructions for setting up DataStudio and other equipment can
vary. See the section that applies to your interface.
Starting DataStudio for the first time- PASPORT
If you are using a PASPort sensor, you can connect the equipment at any time. Details for proper
connection can be found in the interface's manual or the sensor's Quick Start Card.
Connecting a PASPORT Sensor should automatically launch the PASPORTAL window:
These are pre-designed
electronic workbooks.
To use, simply highlight
the desired lab and click
Open Selected
Workbook.
Click here to launch
DataStudio and
create an
experiment on your
own.
4
®
Manual No. 012-08107
DataStudio Starter Manual
If the PASPORTAL window does not launch, double-click the DataStudio icon on your desktop to
launch the DataStudio software.
When DataStudio opens, a "Welcome to DataStudio" navigator screen will appear with four options:
Select Create Experiment from the startup screen.
If DataStudio is already running, select “New Activity” from the File menu.
Use this option to open an
existing activity.
Use this option to
create a new
experiment.
Create Experiment
Open Activity
Enter a mathematical
Manually enter
data into a table.
2
expression (e.g. y = x )
Enter Data
®
Graph Equation
5
DataStudio Starter Manual
Manual No. 012-08107
PASPORT Experiment Setup
Connect the desired sensor to a PASPORT interface (e.g. USB Link, Xplorer). DataStudio will
automatically detect the presence of the sensor, and create an appropriate display.
The measurements available will be shown in the Summary panel. In some instances, clicking the
Setup button can access additional measurements or units.
Set the sampling rate for the sensor.
Click the calibrate button to
calibrate the sensor.
Select the unit of measurement.
The Experiment Setup window shows which sensors are connected to the computer. This window also
shows the sampling rate for each sensor and available data types.
Sensors requiring calibration will have a calibrate button, which activates the calibration menu.
6
®
Manual No. 012-08107
DataStudio Starter Manual
If you need to add a sensor that isn't connected to the interface, click on the Add Sensor button in the
Experiment Setup window. A new window listing all sensors will appear, from which you can select
the appropriate sensor.
®
7
DataStudio Starter Manual
Manual No. 012-08107
Starting DataStudio for the first time- ScienceWorkshop
Double-clicking the DataStudio icon on your desktop will launch the DataStudio software.
When DataStudio opens, a Welcome to DataStudio navigator screen will appear with four options:
Use this option to open
an existing activity.
Use this option to
create a new
experiment.
Create Experiment
Open Activity
Enter a mathematical
expression (e.g. y = x 2 )
Manually enter
data into a table.
Enter Data
Graph Equation
ScienceWorkshop Experiment Setup
Click the Setup button to activate the Experiment Setup window. You will use this window to select
sensors and set experimental conditions.
If the software does not immediately recognize the interface, click the Change button and choose
your interface from the list in the Please Choose Data Source window. The Experiment Setup window
will then show the selected interface.
8
®
Manual No. 012-08107
DataStudio Starter Manual
Sensors Panel
The Sensors panel lists all possible sensors. Scroll through the list to find the senor(s) for the
experiment. To select a sensor, double-click the icon in the Sensors panel. The software will
automatically choose the correct available port.
Now connect the physical sensor into the corresponding channel.
When a sensor is selected, an icon will appear in the experiment setup window, with an arrow
indicating the appropriate channel for each sensor. Double clicking the sensor icon in this window will
open up the sensor properties window where you can set measurement(s), calibration and sampling
rate. The available measurements are shown in the summary panel.
®
9
DataStudio Starter Manual
Manual No. 012-08107
Using DataStudio to configure experimentsall interfaces
DataStudio has a variety of tools to assist with configuring experiments. Using the Summary panel
and associated functions helps further define the parameters of the experiment. The displays available
provide a powerful method of data visualization. This section deals with creating data displays and
describes the function of each.
Displaying Data
Summary Panel
The Summary panel lists measurements currently available, any collected
data in the experiment, along with displays.
To display data, the sensor or data must be associated with a display.
Dragging a display type from the bottom area of the summary panel up to a
sensor in the top area of the summary panel will create a display for the
sensor or targeted data set.
Displays can show multiple data types by dragging the sensor or data
run from the data summary column into an open display. Some displays will
be more useful than others depending on the sensors or experimental
conditions.
10
®
Manual No. 012-08107
DataStudio Starter Manual
Creating a display for data
You can create or remove a display from the experiment at any time, even during data collection.
Available displays in DataStudio
The following are the types of displays and a description of each:
Graph
The graph display plots a sensor's data vs. time.
To plot one data type against another, drag the data from the data summary (in the Summary panel) to
the time axis (x-axis) of the graph. The new data type will replace time, producing an XY plot (i.e.
Force vs. Position).
Clicking and dragging a number on the axis will directly change the graph scale. Clicking and
dragging the axis line itself will move the axis in the display window.
Table
The table display shows the numerical coordinates in paired columns.
Digits
The digits display shows the instantaneous value of the data as the experiment is running.
Meter
The meter display shows a pictorial representation of the data using a graphical meter.
Histogram
The histogram display plots data points that are lumped together in 'bins' as counts. The area of a bin
is proportional to the frequency of the specified data range, or the number of times a specified
measurement value has been observed.
FFT
The FFT (Fast Fourier Transform) displays the spectral decomposition of the data. Higher sampling
rates will yield finer definition of the data's frequency spectrum. This display does not store data like
other displays. It shows a 'time-slice' snapshot of the data.
Oscilloscope
The oscilloscope display plots a time-based graph, but like the FFT shows a 'time slice' snapshot. The
data is not stored. This display is ideal for experiments using fast sampling rates.
®
11
DataStudio Starter Manual
Manual No. 012-08107
Workbook
The workbook display is a powerful, self-contained authoring environment. Use this feature to create
guided scientific inquiry or as a lab write-up tool. Workbooks can contain DataStudio displays,
graphics, and text.
Setting Experiment Options
Options
Use the Options button to set sampling options. Clicking the Options button in the Experiment Setup
window will open the Sampling Options.
Manual Sampling Tab
This option is used with experiments that require selecting specific data points (instead of collecting
continuous data). These data points can then be associated with a parameter that is not measured by a
sensor. The associated parameter can be typed in manually.
Clicking the “Keep data values only when commanded”check box will activate manual sampling
mode. If the data that is kept will have associated manually input data, also check the "Enter a
keyboard value when data is kept" checkbox. If the "Prompt for a value" checkbox is checked, when
data is 'kept', DataStudio will prompt the user to manually input the associated data. The remaining
options are for describing the manually input data. You can describe and name the data, prescribe
units, as well as the numerical accuracy.
Delayed Start Tab
A delayed start condition causes DataStudio to monitor and not store any experiment data until a
prescribed condition has been met. The condition can be based on time, or an experimental condition.
Use the Delayed Start tab to select between time and data measurement, then set parameters for the
start condition.
Automatic Stop Tab
An automatic stop condition causes DataStudio to end data collection when a prescribed condition has
been met. The condition can be based on time or an experimental condition. Use the Automatic Stop
Tab to select between time and data measurement, then set parameters for the start condition.
12
®
Manual No. 012-08107
DataStudio Starter Manual
Change
The change button is used to switch PASCO interfaces. Use this button to select the appropriate
interface:
®
13
DataStudio Starter Manual
Manual No. 012-08107
Taking Measurements
Collecting Data
Once the experiment is set up, click the Start button to begin collecting data.
Start button and timer
When the Start button is clicked, it will change into a Stop button. Clicking the Stop button will stop
data collection. The experiment timer displays the current timing condition; either how long data has
been collected, or a countdown set by an initial timing condition.
Keep/Stop button
If the experiment has been configured for Manual Sampling (see Setting Experiment Options) the start
button will change into a Keep/Stop button. Pressing the Keep button during data collection will store
a data point. Clicking the red square to the right of the Keep button will stop data collection.
Display and Analysis Tools
DataStudio provides a complement of features designed to aid with displaying and analyzing data.
Displays may be created or closed at any time before, during or after data collection.
Scale to fit
A graph, FFT, histogram, and meter display can auto-scale using the scale to fit tool. The entire
display will automatically adjust the range so the data fills the display window.
Zoom in, Zoom out, Zoom select
The graph and histogram zoom tools change the view of the display window in order to shrink,
expand, or focus in on a select portion of the data. To use the zoom select tool, click the tool then draw
a box by clicking and dragging around the data area of interest. The graph will zoom in to the area you
selected. The Scale to Fit button will return the data back to the optimal view for all data points.
Smart Tool
The Smart Tool activates a set of cross hairs that displays the coordinate data pair of a specific data
point. As you get closer to a data point, the Smart Tool will "gravitate" towards the data point. The
displayed coordinates appear in parenthesis at the upper right edge of the small box around the cross
hairs. The smart tool may also be used to display the difference between two data points.
14
®
Manual No. 012-08107
DataStudio Starter Manual
Moving the Smart Tool
To change the position of the cross hairs of the Smart Tool, hover your mouse cursor over the center
of the smart tool until the pointer turns into two crossed double arrowheads and a hand. Drag the cross
hairs of the Smart Tool to the desired location. To constrain the movement of the cross hairs to one
axis, hover the pointer over the dashed line that is perpendicular to the axis you want to move along
until the pointer turns into a hand. Drag the cross hairs to the new location.
Measuring change- Delta Tool
The Delta Tool is a feature of the Smart Tool for measuring the change
in the X and Y coordinates between two data points on a graph display.
To use the Delta Tool:
Drag the cross hairs of the Smart Tool to a data point.
Hover the mouse pointer over one of the edges of the small box around
the cross hairs until the pointer turns into a triangle and hand.
Click and drag the triangle to the second data point A dashed box will
appear with the selected data points at two of its corners. Along the sides
of the dashed box you will see the numbers that are the difference
between the coordinate values for the two points.
To resize this box, click the corner of the box containing the arrowheads and drag it to a new data
point. Clicking and dragging any dashed line will also resize the box (constraining movement to only
one dimension).
Note Tool
The note tool allows you to annotate a graph or
histogram. You can also label individual data points.
Statistics Tool
Statistics can be toggled on and off with this button.
Pressing the drop down arrow next to the sigma
symbol will display a list of available statistics.
Show Time Tool
Toggles on and off the time component of the data pair in digits, meter, and table displays.
®
15
DataStudio Starter Manual
Manual No. 012-08107
Edit Data Tool
Click on the Edit Data tool to edit data in a table. When the tool is activated, a copy of the data will
appear in the data summary column. The original data set can never be modified in DataStudio. Using
this tool activates the insert and delete row buttons. These are used to either insert a blank row or
delete a highlighted row in a data table.
Some experiments require manual data collection. This data can be entered into DataStudio for
analysis. The easiest way to enter data is to create an empty data table.
From the Experiment menu, select “New Empty Data Table”.
After selecting this option, the software creates a table display that is ready to be edited with new data.
An indicator appears in the summary panel as well. Double clicking the measurement in the summary
column will allow the data properties to be changed. Here you can set the name of the data, units and
other properties such as accuracy.
Select Data / Remove Data
Data can be selectively viewed by using the Data button. Data sets can be toggled on and off by
clicking on the Data button, and choosing which sets are to be displayed or hidden. Data can be
removed from a display by using the Remove button. Clicking the Remove button will remove the
highlighted data set from the display.
Display Settings
Clicking the display settings button will open a menu where display options can be changed. Clicking
the down arrow next to the icon will open a menu of common display options. Double clicking in the
middle of the display window will also open the display options menu.
16
®
Manual No. 012-08107
DataStudio Starter Manual
Calculator
DataStudio incorporates a calculator feature that is capable of not only calculating mathematical
expressions, but also manipulating data measurements from sensors. Similar to displays, calculations
can be created or deleted at any time.
The calculator may be used to graph equations, as well as perform calculations on data sets. Click the
Calculate button to activate the calculator window. Enter functions in the form of y = f (x) where y =
the name of the function and x = variable. Prompt DataStudio to evaluate the expression by clicking
the "Accept" button. The software will highlight any undefined terms, which need to be defined
before calculation can proceed. Variables can be defined as:
Constant: set the variable to a numeric value. This is a local variable, and will be used only in this
equation.
Experiment constant: set the variable to a numeric value that is recognized by all equations in
the experiment (e.g. mass of cart = 500 g)
Data Measurement: associate a data measurement with a variable. This will perform a calculation on an entire data set to convert the data into another desired quantity (e.g. calculate
momentum using velocity data). Simply click, hold and drag a measurement into the calculator
window and release on the variable to be defined.
Model Range: define a region for the equation, as well as the number of coordinate points
between the range.
Clicking on the buttons below the definition area allows terms to be selected and input automatically
in the correct format. Terms are grouped as:
Scientific (sin (x), cos (x), exp (x), etc.),
Statistical (min (x), avg (x), etc.)
Special (integral (x), derivative (x), etc.)
®
17
DataStudio Starter Manual
Manual No. 012-08107
Fit Tool
Use the fit tool to smooth data on a graph, depending on the relationship of data types.
18
®
Manual No. 012-08107
DataStudio Starter Manual
Using the Workbook
The Workbook is a special
container that can be used for lab writeups, or to create a lab activity.
Workbooks can contain text, graphics,
and data displays. DataStudio's
Workbook can be used to guide a student
through an activity, allowing the student
to perform each step of the activity and
record observations.
To begin creating a workbook, doubleclick the Workbook icon in the Displays
List of the Summary. A blank workbook
page will open.
To turn off the workbook tools, press <Ctrl> + T.
Workbook Tools
Adding a Display to the Workbook
From the display summary, click and drag a display into the Workbook window. The display will
appear in the window.
Add a text block
This tool allows you to create a text block and add text directly into the workbook. Right clicking over
the text block brings up a list of options to format the text. Selecting Always Editable allows students
to type in the box.
Add a Text File
This tool allows you to import a text file directly into the workbook.
®
19
DataStudio Starter Manual
Manual No. 012-08107
Add a Picture
This tool allows you to import a .bmp or .pic graphic into the workbook.
Delete Selected Item
Removes a selected item from the workbook completely.
Add Page / Delete Page
This tool will add a new blank page to your workbook, or delete the current page.
20
®