1
SURFACES
VORTEX LATTICE MODULE
User Manual
August 2009
SURFACES
Vortex-Lattice Module
Document
Title
Page Numbers
VLM.docx
Surfaces – User Manual – Vortex-Lattice Module
Page 2 of 136
SURFACES – Vortex-Lattice Module
INTRODUCTION ............................................................................................................. 5 "Vortex Lattice Methods" Why Should You Care? ..................................................... 6 Current Status ............................................................................................................... 7 1. Orientation of Forces and Moments ........................................................................ 9 2. Force and Moment Nomenclature.......................................................................... 10 3. Project Task List...................................................................................................... 11 4. Creating a Simple Model with SURFACES ............................................................ 14 5. Accomplishing Special Projects with SURFACES ............................................... 44 5.1 Tailoring Wings to Improve Stall Characteristics ........................................................................ 44 5.2 Determine Shear, Moment, and Torsion ....................................................................................... 45 5.3 How to Manage Airfoils in SURFACES.......................................................................................... 45 6. Transformation of Load Vectors from a Global to a Local Coordinate System . 52 6.1 Establishment of a Local Coordinate System .............................................................................. 52 6.2 Transformation of Force Vector in Coordinate System A-BN-C ................................................. 54 6.3 Determination of Moment Vector in Coordinate System A-BN-C................................................ 55 6.4 Determination of Shear and Moment Distribution ....................................................................... 57 6.5 Presentation of Data in SURFACES .............................................................................................. 61 7. Using the Virtual Wind Tunnel ............................................................................... 64 8. Determination of a Trimmed Flight Condition ...................................................... 65 9. Determination of Drag in SURFACES .................................................................... 67 9.1 Introduction...................................................................................................................................... 67 9.2 Basic Drag Coefficient, CDo ............................................................................................................ 73 9.3 Skin Friction Drag Coefficient, CDf ................................................................................................. 75 9.4 Induced Drag Coefficient, CDi ......................................................................................................... 84 9.5 Total Drag Coefficient, CD ............................................................................................................... 85 9.6 Compressibility Modeling ............................................................................................................... 86 9.8 How SURFACES Calculates Do, Df, Di, and D.............................................................................. 87 9.9 Limitations of Drag Estimation Methodologies............................................................................ 87 9.10 Setting up Drag Modeling on Example Aircraft.......................................................................... 88 9.11 Summary of SURFACES Drag Analysis Methodology ............................................................ 101 10. Validation Samples ............................................................................................. 102 Validation 1: 2-D Flat Plate Airfoil ............................................................................ 103 V1.1 Model ............................................................................................................................................ 103 V1.2 Expected Result .......................................................................................................................... 103 V1.3 Results from SURFACES ........................................................................................................... 104 Validation 2: 3-D Properties of Two Wings ............................................................. 106 V2.1 Models .......................................................................................................................................... 106 V2.2 Expected Result .......................................................................................................................... 106 V2.3 Results from SURFACES ........................................................................................................... 107 Validation 3: Warren 12 Wing ................................................................................... 109 V3.1 Model ............................................................................................................................................ 109 V3.2 Expected Result .......................................................................................................................... 110 V3.3 Results from SURFACES ........................................................................................................... 110 Validation 4 : Bertin-Smith 2-D Wing ....................................................................... 111 V4.1 Model ............................................................................................................................................ 111 Document
Title
Page Numbers
VLM.docx
Surfaces – User Manual – Vortex-Lattice Module
Page 3 of 136
V4.2 Expected Result .......................................................................................................................... 111 V4.3 Results from SURFACES ........................................................................................................... 112 Validation 5: Cessna 172 .......................................................................................... 113 V5.1 Model ............................................................................................................................................ 113 V5.2 Expected Result .......................................................................................................................... 113 V5.3 Results from SURFACES ........................................................................................................... 115 V5.4 Comparison of Codes ................................................................................................................. 117 Validation 6: 2-D CL, CD, CM for NACA 23012 .......................................................... 119 V6.1 Model ............................................................................................................................................ 119 V6.2 Expected Result .......................................................................................................................... 119 V6.3 Results from SURFACES ........................................................................................................... 120 Validation 7: F-104 Starfighter ................................................................................. 122 V7.1 Model ............................................................................................................................................ 122 V7.2 Results from SURFACES ........................................................................................................... 122 Validation 8: Ryan Navion ........................................................................................ 124 V8.1 Model ............................................................................................................................................ 124 V8.2 Expected Result .......................................................................................................................... 125 V8.3 Results from SURFACES ........................................................................................................... 127 Validation 9: Comparison to NACA R-1208 ............................................................. 130 V9.1 Introduction ................................................................................................................................. 130 V9.2 Expected Result .......................................................................................................................... 131 V9.3 Results from SURFACES ........................................................................................................... 131 Validation 10: Comparison to NACA TN-1422 ........................................................ 133 V10.1 Introduction ............................................................................................................................... 133 V10.2 Results from SURFACES ......................................................................................................... 133 Document
Title
Page Numbers
VLM.docx
Surfaces – User Manual – Vortex-Lattice Module
Page 4 of 136
INTRODUCTION
Thank you for purchasing SURFACES.
We are certain you will find SURFACES priceless for your aircraft design projects. SURFACES was
developed in real aircraft design environment and is loaded with highly developed tools that give you
answers quickly. We consider the program analogous to an extremely sophisticated airplane calculator.
Create a model of your aircraft and then use SURFACES to extract hard-to-get information about it.
Stability derivatives, loads, performance parameters are just the beginning of your discoveries. You can
extract in a matter of seconds some super complicated parameters that would take a trained aerospace
engineer weeks to calculate using classical methods. Use the extra time to study variations of your design
to make it even better for its intended mission. Whatever the design task, SURFACES will save you
weeks if not months of work.
SURFACES is the ultimate tool for anyone designing subsonic aircraft, whether it be a professional
aerospace engineer or the designer of homebuilt aircraft. SURFACES is not just user friendly, it provides
you with very powerful features to help design your aircraft.
SURFACES uses a Three-Dimensional Vortex Lattice Method (VLM) to solve the airflow around an
aircraft and extract an incredible amount of information from the solution. Plot the flow solution to better
understand how the flow behaves around the airplane.
SURFACES is the perfect solution in any preliminary design environment, or to reverse engineer existing
airplanes. It allows you to quickly extract loads and stability and control data.
SURFACES allows you to swiftly model any aircraft. Do you have a three-view drawing of your favorite
aircraft? Simply import it in to the environment and scale it up. No pencils, rulers, or calculators are
needed for scaling up the model. You do it all from within SURFACES. It’s as easy as clicking a mouse
button.
SURFACES determines most stability derivatives and, when used with the built-in Aircraft Datasheet
feature, allows you to perform very sophisticated dynamic stability analyses. Import stability derivatives
directly from your Vortex-Lattice analyses into an Aircraft Datasheet and plot the aircraft’s Short Period,
Phugoid, Spiral Stability, Rolling Convergence, and Dutch Roll modes. You can even simulate the
dynamic response of the aircraft in real time!
SURFACES allows you to incorporate all the details of your design, such as airfoil properties, wing twist,
dihedral, multiple lifting surfaces, asymmetric geometries, winglets, deflection of control surfaces and high
lift devices. SURFACES even allows you to account for engine forces as functions of angle-of-attack,
airspeed and altitude, whose properties are taken into account when determining trim or stability
derivatives.
SURFACES allows you to extract surface pressures, forces and moments, force and moment
coefficients, distributed loads, section lift coefficients, and create shear, moment and torsion diagrams on
the model.
SURFACES comes with video tutorials. You will be working on your own airplane in 30 minutes or less.
Document
Title
Page Numbers
VLM.docx
Surfaces – User Manual – Vortex-Lattice Module
Page 5 of 136
"Vortex Lattice Methods" Why Should You Care?
By Mike Garton
Some of the latest glider designs are advertised as having computer optimized wings. For instance ads for the
Saphire, Psyko, Laser, and Edge all list it as a design feature. NSP's ad mentions the "LinAir" program, which uses a
form of computational fluid dynamics that we aerospace engineers call "vortex lattice methods" or "simple panel
codes". There is not space here to discuss how these codes work (and perhaps not interest either) but I will briefly
describe what can be done with these programs and what it means for the pilot. If I lose you in technical jargon, just
skip to the last two paragraphs.
A vortex lattice program takes a wing planform, wing-twist, and angle of attack as inputs. Using this information it
calculates the induced velocity field surrounding the wing including the effect of tip vortices. It is somewhat nonintuitive, but the angle of attack of a wing is not simply the angle between your root chord and your tailboom. The
wing "induces" some vertical components of velocity that change the "effective" angle of attack. Generally the
induced angle is smaller at the root of the wing and larger at the wing tips. A tip vortex will add a downward
component to the air above the wing tip. This causes the "effective angle of attack" of most wing tips to be reduced.
This is one form of aerodynamic wash out. A vortex lattice program allows a designer to quantify these effects, before
the plane is built and without the need for a wind tunnel. The use of this tool does not guarantee a good wing. Like
any tool, it still takes wisdom and proper application to get good results. This particular tool is usually reserved for
graduate degreed aerospace engineers with specialization in computational fluid dynamics.
Some of the things a glider designer can do with this program are to: 1. Minimize induced drag (drag do to tip
vortices), 2. Manage which part of the wing will stall first, 3. Given a planform, refine its twist distribution, and 4.
Calculate the local flow direction on the stab including downwash from the wing. In general, the refined wings have
nearly elliptical chord distributions with finite tip chords (no big surprise here). Aerospace Engineers will assert that
elliptical lift distributions DO result in the minimum possible induced drag for low speed wings. At our low Reynold's
numbers, a truly elliptical chord distribution does NOT result in an elliptical lift distribution. At low speeds on a truly
elliptical winged model, the air flow will separate near the wing tip, leading to too little lift in that region and tip stall.
This is why the refined sailplanes tend to have finite tip chords. The nearly elliptical wing has another beneficial
quality. The downwash angle is relatively constant along the span. This means the whole wing is flying at the same
"effective" angle of attack. A constant angle of attack is good because no part of the wing will stall early and the wing
can achieve a high average lift coefficient. When any section of the wing stalls, it will usually propagate sideways and
stall the entire wing. As an example, a straight taper wing with its uneven effective angle of attack will stall at an
average lift coefficient roughly 20% lower than the computer refined four taper wing. I am assuming that the designer
of the four taper wing used the vortex lattice code properly.
So what might a pilot notice in flight when flying one of these planes refined with a vortex lattice code? Most pilots
won't notice the differences. After trimming the plane, an expert pilot should notice that the launch is steeper because
the wing can pull a higher lift coefficient before stalling. The sink rate and glide ratio should be a tweak better as well.
We are only talking a couple percent decrease in drag over the "eye balled" planforms, but every little bit helps. The
plane should be able to fly slower than other planes with the same airfoil and wing loading, again because of the
higher available lift coefficient.
Will the computer refined planes always win? In general, no. In most weather conditions a thermal duration contest is
still 90% pilot 10% airplane. The contest placings usually sort the pilots by skill regardless of what they are flying. If
anyone wants to play with a vortex lattice program, contact me and I can email you directions on how to obtain a
public domain program.
Reprinted from: http://eiss.cnde.iastate.edu/articles/VortexLattice.htm
NOTE: This article available online from the above link and is therefore assumed public (in the public domain). It was not written with
SURFACES specifically in mind, but is reprinted here as the editor of this manual considered it well written and pertinent to anyone
using CFD methods. Great OWL Publishing reprints it here for your convenience, but assumes no responsibilities for it.
Document
Title
Page Numbers
VLM.docx
Surfaces – User Manual – Vortex-Lattice Module
Page 6 of 136
Current Status
Currently, the latest version of SURFACES is 2.8.10.
The following changes have been made to the program since Version 2.86 (or 2.8.6):
REPAIR LOG
ID
Date
Version
Description
Status
1
6/29/09
2.8.7
Selected surfaces deselected when VLM console icon on MDIForm clicked.
Fixed
2
6/29/09
2.8.7
Pitch/Yaw coupled surfaces (e.g. V-tail) reset elevator deflection in the VWT.
Subroutine DOC_Surface_ModifyDeflection not originally designed to handle
coupled surfaces. Revised it to handle such surfaces correctly.
Fixed
3
6/29/09
2.8.7
Controllers tab on VLM console: Pressing the Reset button would not change numbers
in the textboxes. This has been changed.
Fixed
4
6/29/09
2.8.7
Controllers tab on VLM console: Subroutine DOC_Surface_ModifyDeflection is used
when the user presses the Set buttons. The modification in ID2 now allows the user to
enter a elevator+rudder deflection for V-tails
Fixed
5
6/29/09
2.8.7
New functions added: [SDfwd(i)] and [SDaft(i)], which retrieve forward and aft
deflection angles of the selected surface i.
Added
6
7/2/09
2.8.8
Bug in subroutine VLM_PlotStreamlines which would cause a crash if number of
streamlines was 1.
Fixed
7
7/2/09
2.8.8
Improved user information for usage of control deflections in form FormVLM17 (stab
ders).
Added
8
7/3/09
2.8.8
Overflow message generated when zoom in too far
Fixed
9
7/3/09
2.8.8
Recent projects list added
Added
10
7/4/09
2.8.8
Data Analyzer multi-variable regression states the following in the text output “Analysis
assumes X is in Col. 1” and it should say “last column” to match equation template.
Fixed
11
7/4/09
2.8.8
VLM Solution Seeker tool repaired and made visible to user.
Fixed
12
7/5/09
2.8.8
Math object list is now synchronized with the list that appears when the user presses
the “Press to Select Objects for Legend…” button.
Fixed
13
7/5/09
2.8.8
Rotate about vector operations use a left-hand coordinate system (should be righthand)
Fixed
14
7/5/09
2.8.8
Math object list does not recalculate upon opening file
Fixed
15
7/13/09
2.8.9
Pressing Browse… in VWT form and navigating the directory form could crash the
program if the selected drive was inop.
Fixed
Added
Added
16
7/20/09
2.8.9
Drag calculations have been completely scrubbed. Now the user can associated skin
friction drag with both surfaces and vectors (airfoils). Usage of drag has been
improved, simplified and made far more user friendly, but yet more powerful. Function
[CDf], [CDi], [CD], and [CL] were added to allow user to directly extract drag and lift
coefficients from the model and VL solution. User can specify CDf directly for surfaces
or specify transition location on airfoils for mixed laminar-turbulent boundary layers.
Four new features have been added to the VLM Console. These help the user to view
the extent of the prescribed laminar flow on surfaces and the magnitude of skin friction
drag on each surface.
17
7/20/09
2.8.9
A large section on Drag Analysis has been added to VLM.PDF. This is Section 9.
Document
Title
Page Numbers
VLM.docx
Surfaces – User Manual – Vortex-Lattice Module
Page 7 of 136
18
7/27/09
2.8.10
Panel orientation has been made independent of orientation as the program will now
reassign panel corner IDs based on a special algorithm. This means that the user can
use Curves A1 and A2 for surfaces that are no longer parallel to the X-axis. The panels
still have to be aligned to the X-axis, as this is a requirement of the VL method.
However, the user can model circular shapes like an engine nacelle or round fuselage
more easily.
19
7/31/09
2.8.10
User can press F2 to copy viewport info (such as state of zoom) and paste into another
viewport using F3.
Added
20
7/31/09
2.8.10
User can investigate panel orientation in addition to surface A1/B1 curve orientation
(by pressing Ctrl+T).
Added
21
7/31/09
2.8.10
A bug that allowed any number of categories in the Project Properties form was fixed.
Fixed
22
7/31/09
2.8.10
Function [Swet(surf1, surf2, …)] added to extract wetted area.
Added
23
7/31/09
2.8.10
Expanded geometry recognition when user selects a math object referring to the
geometry,
Fixed
2.8.10
User can turn AutoCalc on or off by double-clicking a panel on the status bar. This is
handy for slower computers, as it will prevent math objects from being solved after
each change, which is what happens when AutoCalc is on. It is intended to allow the
user to temporarily turn the feature off, but user must know that while off, the math
objects will not update correctly.
Added
24
8/15/09
Added
Document
Title
Page Numbers
VLM.docx
Surfaces – User Manual – Vortex-Lattice Module
Page 8 of 136
1. Orientation of Forces and Moments
Z
Positive FZ
Positive MY
+
-
Positive MX
Y
X
STABLE MX
STABLE MY
+MX
NEUTRAL MZ
+MY
+MZ
+
-
+
-
-
+
-MX
-MY
-MZ
Z
Positive MZ
Positive FY
-
+
Y
Positive MX
X
STABLE MX
NEUTRAL MY
+MX
STABLE MZ
+MY
+
+MZ
+
-
-
-
-MX
+
-MY
-MZ
Document
Title
Page Numbers
VLM.docx
Surfaces – User Manual – Vortex-Lattice Module
Page 9 of 136
2. Force and Moment Nomenclature
Name
Axial force (along X-axis)
Side force (along Y-axis)
Normal force (along Z-axis)
Rolling moment (about X-axis)
Pitching moment (about Y-axis)
Yawing moment (about Z-axis)
SURFACES Symbol
FX
FY
FZ
MX
MY
MZ
Other names
X
Y
Z
L
M
N
Cx
Cy
Cz
Cl
Cm
Cn
Cx
Cy
Cz
Cl
Cm
Cn
Coefficient of axial force (along X-axis)
Coefficient of side force (along Y-axis)
Coefficient of normal force (along Z-axis)
Coefficient of rolling moment (about X-axis)
Coefficient of pitching moment (about Y-axis)
Coefficient of yawing moment (about Z-axis)
z
x
y
x
y
z
Standard right-handed Aerodynamic
Coordinate System (ACS).
Typical right-handed Stability
Coordinate System (SCS).
Note 1: Positive rotation about an axis is always in the direction of the thumb of the right hand, as can be
seen in the above figure.
Note 2: SURFACES uses a standard right handed Aerodynamic Coordinate System (ACS), which is
conventionally used for other aspects of aircraft aerodynamic analyses. In this coordinate system,
the sign of the lift is positive, when pointing upwards (i.e. towards positive Z), and the sign of the
drag is positive, when pointing backwards (i.e. towards positive X). The user must be cognizant of
the orientation of the axes when interpreting results.
Note 3: SURFACES comes with a routine that will convert stability derivatives to a standard body axes
Stability Coordinate System (SCS). This is typically the default for stability and control related
tools.
Document
Title
Page Numbers
VLM.docx
Surfaces – User Manual – Vortex-Lattice Module
Page 10 of 136
3. Project Task List
A typical project in SURFACES is conducted per the following list:
Model Creation
Task
Description
Remark
1
Define Points
Drop points as required to represent the extremes of the
aircraft.
2
Define Vectors
Draw vectors, parametric curves, or Bezier curves as
needed, using the points. Use parametric or Bezier
curves to represent cambered airfoils.
3
Create Surfaces
Define surfaces by selecting the opposite curves A1 and
A2, and B1 and B2. Only use curves A1 and A2 for
curved surfaces.
Model Preparation
Task
Description
Remark
Select Tools->Trapezoidal Mean
Chord… from the VLM Console.
4
Determine the Trapezoidal Mean
Aerodynamic Chord
Aerodynamic
This tool will determine several important geometric
reference parameters to use with your model, including
the MAC, its location, the wing area, and wing span. It
also allows you to specify the CG location in terms of
%MAC. You must use the Transfer tab on the form to
transfer the calculated values to your model. While not
necessary, it’s recommended you copy the analysis
report and paste as a Remark with your model. Do this
by selecting Edit->Remark… from the Surfaces
Worksheet window.
Select Tools->Horizontal/Vertical Tail Volume… from
the VLM Console.
5
Determine the Horizontal and Vertical
Tail Volumes
Although not necessary for analysis, it is a good idea to
tail volume and compare to other airplanes. Copy and
paste the analysis report into the remark.
Document
Title
Page Numbers
VLM.docx
Surfaces – User Manual – Vortex-Lattice Module
Page 11 of 136
Select Edit->Model
Console.
6
Other model properties
Properties…
from
the
VLM
Try to fill in as many properties as possible. All entries
marked with an asterisk (*) are required for any VortexLattice analyses.
Once your model runs, you can initiate a large number of specific investigations.
Basic Investigations
Task
Description
Remark
Select Tools->Determine Neutral Point… from the
VLM Console.
7
Determine Neutral Point
This is a necessary step as it will determine your aft CG
limit. Always consult the CG location of your design with
a qualified Aerospace Engineer. The CG is typically at
least 8-10% MAC forward of the neutral point.
Select Tools->Determine Neutral Point… from the
VLM Console.
8
Trim Analysis
This tool is helpful to determine required surface
deflections for given weights, airspeed, and yaw angles.
Note that before you can use this tool, you must define
control surfaces using edge deflections and proper
references under the Edit Surface dialogbox (Edge
Deflections and Reference tabs).
Select the Panel Results tab on the VLM Console.
9
Panel Results
Here you can extract various information pertaining to
panels, such as areas, normals, vortex strengths,
velocity over a panel, force generated by a panel,
pressure coefficients, panel lift coefficients, as well as
the center of pressure.
Select the Body Results tab on the VLM Console.
10
Body Results
Here you can extract information about forces and
moments acting on your model.
Document
Title
Page Numbers
VLM.docx
Surfaces – User Manual – Vortex-Lattice Module
Page 12 of 136
Select the Panel Results tab on the VLM Console.
11
Here you can extract a number of information about
strips of panels (chordwise), for instance, forces,
moments and coefficients. Display strip CL (section lift
coefficients) to help you design for delayed tip stall.
Stip Results
You can conduct even more sophisticated analysis per the following task list.
Advanced Investigations
Task
Description
Remark
12
Determine Stability Derivatives
Select Tools->Determine Stability Derivatives… from
the VLM Console.
13
Determine Control Response
Select Tools->Determine Control Response… from
the VLM Console.
14
Determine Loads
Select Results->Force Integrator… from the VLM
Console.
Select Tools->Goal Seek… from the VLM Console.
15
Determine Specific Conditions
With this tool you can calculate AOA, AOY, or Vinf
required to generate a specific load, lift, or even lift
coefficient. Note the result don’t necessarily result in an
aerodynamically balanced model (i.e. MX, MY, or MZ
will be non-zero).
Select Tools->Geometric Goal Seek… from the VLM
Console.
16
Modify Geometry to Satisfy Specific
Conditions
17
Virtual Wind Tunnel
This tool can be used to move points so that specific
conditions are satisfied. The best example of its use is to
move the leading points on a stabilator in the Zdirections at a specific flight condition so the MY is zero.
In other word, determine an ideal angle of incidence of a
stabilator.
Select Virtual WT->Setup and Execute WT Run…
from the VLM Console.
Document
Title
Page Numbers
VLM.docx
Surfaces – User Manual – Vortex-Lattice Module
Page 13 of 136
4. Creating a Simple Model with SURFACES
The following model is designed to allow the novice user to quickly become familiar with SURFACES.
Pay close attention to which options and checks are made in each form below before proceeding to the
next step.
STEP 1: Start a new project by selecting File->New Project…
This will open a small form on which you need to specify the type of project to create. Press the button
labeled ‘Surfaces Worksheet’ to open a blank worksheet. Maximize the window for added convenience.
The move on to create surfaces to represent the wing.
STEP 2: Select Insert->Trapezoidal Surface…
STEP 3: Create the WING using the numbers in the dialog in Figure 4-1a
through 4-1d.
Figure 4-1a: Creating the wing – Entering geometry (Step 3).
Document
Title
Page Numbers
VLM.docx
Surfaces – User Manual – Vortex-Lattice Module
Page 14 of 136
Figure 4-1b: Creating the wing – This tab will help you create geometrically dependent formulas.
Note the selected checkboxes and options (Step 3).
The purpose of the options in Figure 4-1b is to automatically create formulation that calculates wing span,
aspect ratio, wing area, taper ratio, and other for your convenience. There are other ways to create such
formulas, but you will learn these at later time.
Document
Title
Page Numbers
VLM.docx
Surfaces – User Manual – Vortex-Lattice Module
Page 15 of 136
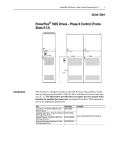
Figure 4-1c: Creating the wing – Setting panel density and picking airfoils for root and tip. Note
that pressing the [Pick Root Airfoil…] or [Pick Tip Airfoil…] buttons will open the Camber Creator
form in Figure 4-1d (Step 3).
You must press each of the buttons in Figure 4-1c to create your airfoils. If an airfoil is not recognized, a
flat plat is assumed. You can also create your own airfoils, but these are stored as text files that are called
shape files. They have the extension .SHP. You can navigate to the /Surfaces/Shape Files folder and
double-click on one such file to open it in Windows Notepad and investigate how simple they are.
Document
Title
Page Numbers
VLM.docx
Surfaces – User Manual – Vortex-Lattice Module
Page 16 of 136
Figure 4-1d: Creating the wing – Picking airfoil. Here select NACA 4416 for the root airfoil and
NACA 4410 for the tip (Step 3).
Document
Title
Page Numbers
VLM.docx
Surfaces – User Manual – Vortex-Lattice Module
Page 17 of 136
NOTE:
This list contains the Math
Objects, which are algebraic
expressions used for
everything in SURFACES.
Figure 4-2: If you followed Steps 1 through 3 correctly, the wing will appear as shown, containing
the selected airfoils, twist, and dihedral (Step 3).
Document
Title
Page Numbers
VLM.docx
Surfaces – User Manual – Vortex-Lattice Module
Page 18 of 136
STEP 4: Select Insert->Trapezoidal Surface… to create the HORIZONTAL TAIL
(HT). Fill in the form using the numbers in the dialog in Figures 3a through
3c.
Figure 4-3a: Creating the HT – Entering geometry (Step 4).
Document
Title
Page Numbers
VLM.docx
Surfaces – User Manual – Vortex-Lattice Module
Page 19 of 136
Figure 4-3b: Creating the HT – This tab will help you create geometrically dependent formulas.
Note the selected checkboxes and options (Step 4).
Document
Title
Page Numbers
VLM.docx
Surfaces – User Manual – Vortex-Lattice Module
Page 20 of 136
Figure 4-3c: Creating the HT – Setting panel density. Note that no airfoils are picked here, so the
resulting airfoil is a flat plate (symmetrical airfoil) (Step 4).
Document
Title
Page Numbers
VLM.docx
Surfaces – User Manual – Vortex-Lattice Module
Page 21 of 136
Figure 4-4: If you followed Step 4 correctly, the wing and HT will appear as shown (Step 4).
Document
Title
Page Numbers
VLM.docx
Surfaces – User Manual – Vortex-Lattice Module
Page 22 of 136
STEP 5: Select Insert->Trapezoidal Surface… one more time and create the
VERTICAL TAIL (VT) by filling the form using the numbers in the dialog in
Figures 5a through 5c.
Figure 4-5a: Creating the VT – Entering geometry. Note the option selected in the “Create Surface
in Plane” frame is now the X-Z plane, rather than the X-Y plane used for the wing and HT (Step 5).
Document
Title
Page Numbers
VLM.docx
Surfaces – User Manual – Vortex-Lattice Module
Page 23 of 136
Figure 4-5b: Creating the VT – This tab will help you create geometrically dependent formulas.
Note the selected checkboxes and options (Step 5).
Document
Title
Page Numbers
VLM.docx
Surfaces – User Manual – Vortex-Lattice Module
Page 24 of 136
Figure 4-5c: Creating the VT – Setting panel density. Note that no airfoils are picked here, so the
resulting airfoil is a flat plate (symmetrical airfoil) (Step 5).
Document
Title
Page Numbers
VLM.docx
Surfaces – User Manual – Vortex-Lattice Module
Page 25 of 136
Figure 4-6: If you followed Step 5 correctly, the wing, HT, and VT will appear as shown in the
completed basic model (Step 5).
When complete your model should look like the one in Figure 4-6; a T-tail design with a straight tapered
wing. You should be aware of that you can also create the surfaces directly by dropping points, stretching
vectors, and inserting surfaces. However, in the interest of time and simplicity, the user can create
trapezoidal surfaces more easily using this tool.
Note that you can hide points, vectors, and surfaces. While this is not necessary, it may clean up the
view. Here let’s hide the points. Do this by clicking somewhere on the black background. This ensures the
workspace (image) has the focus. Then, simultaneously press Shift and P (for Points). This selects all the
points. Then simultaneously press Ctrl and H (for Hide). The resulting image appears in Figure 4-7.
Document
Title
Page Numbers
VLM.docx
Surfaces – User Manual – Vortex-Lattice Module
Page 26 of 136
Figure 4-7: The basic model after the points have been hidden.
As you can see identified by the red box in Figure 4-6, the wing span (Bw) is 18 ft and wing area (Sw) is
45 ft². Similarly, you can see identified by red boxes in Figure 4-7 the horizontal and vertical tail volumes
should be 0.8496 and 0.0826, respectively. Now let’s add weight to the model using the specialized tools
in SURFACES.
STEP 6: Select Edit->Select Surfaces... Press the [Select All] button and
then the [OK] button (see Figure 4-8).
Figure 4-8: Selecting all surfaces simultaneously (Step 6).
Document
Title
Page Numbers
VLM.docx
Surfaces – User Manual – Vortex-Lattice Module
Page 27 of 136
STEP 7: Select Tools->Distribute Weight on Selected Surfaces and Nodes...
Enter 400 in the entry box and press the [OK] button (see Figure 4-9).
Figure 4-9: Enter weight of the selected surfaces, here as 400 lbs (Step 7).
This will distribute a total weight of 400 lbs onto the model based on the area. That is, SURFACES
calculates the total area of the selected surfaces and then computes weight per total area. The weight
property of each surface will then be assigned a number, which is calculated as (weight per total area of
the selected surfaces) x (the area of the surface). As a consequence, the total weight of the wings turns
out to be 293.3 lbs, the HT weighs 58.2 lbs, and the VT weighs 48.5 lbs. Clearly, this adds up to 400 lbs.
You can check weight by selecting surfaces and pressing the F6 button (or by selecting Tools>Properties of Selected Surfaces). The results will be displayed on the Status bar on the bottom of the
main window.
STEP 8: Make sure the CG is visible. Select Tools->Options... Check the ‘Show
CG, Neutral Point, Aerodynamic Center’ checkbox and press the [OK] button
(see Figure 4-10).
Figure 4-10: Confirm the CG checkbox is marked so you can see the CG in the workspace (Step 8).
Document
Title
Page Numbers
VLM.docx
Surfaces – User Manual – Vortex-Lattice Module
Page 28 of 136
Figure 4-11: We can see the CG location (black-white circle) is too far aft.
When completed, your model should look like the one in Figure 4-11. It is immediately evident that the
CG is too far aft. To fix this and to allow us to control the location of the CG, let’s create a ballast point.
STEP 9: Press the X-Y tab on the bottom of the workspace. This
will display the model projected onto the X-Y plane.
STEP 10: Press the sketch-mode icon to display the sketch
toolbar.
STEP 11: Press the Insert a point icon and drop a point
somewhere in front of the wing, near the X-axis, similar to
what is shown in Figure 4-12.
STEP 12: Select the point by clicking on it and press the
Insert a node point icon to convert it to a node. This will
open a dialog box to allow user to enter additional data.
Enter the information shown in Figure 4-13. Once completed,
press the [OK] button.
Document
Title
Page Numbers
VLM.docx
Surfaces – User Manual – Vortex-Lattice Module
Page 29 of 136
This point will
be converted to
a Node.
Figure 4-12: Drop the point (to be converted to a node) in a location similar as shown (Step 11).
Figure 4-13: Information entered with Step 12.
Return to the 3-D view by pressing the X-Y-Z tab (see the bottom of Figure 4-12). When completed your
model should look like the one in Figure 4-14. To see what the true location of the CG is at this point,
locate the math objects Pmac and Xcg in the object list on the left hand side (Pmac is highlighted in
Document
Title
Page Numbers
VLM.docx
Surfaces – User Manual – Vortex-Lattice Module
Page 30 of 136
Figure 4-14). The variable Pmac stores the CG location as a percentage of the Mean Aerodynamic Chord
(Cref, found under the REFERENCE PARAMETERS block in the Math Object list). We see the CG is
located at 13.967% MAC or at 0.47 ft. Often it is necessary to specify directly the location of the CG.
SURFACES comes with a tool to help you accomplish that. The following steps show how to move the
CG to 25% MAC.
Wref variable
Pmac variable
Figure 4-14: The model with ballast point defined.
STEP 13: Click once on the Ballast node to select it. We will move it with a
special tool. Note that SURFACES will only move the selected node or nodes,
when adjusting the CG location. If none are selected a warning message
appears.
STEP 14: Select Tools->Specify a CG Location… Select the option and enter the
value shown in Figure 4-15.
STEP 15: Press the [Adjust] button. Respond to the warning that appears by
pressing [Yes]. Then, press [Close] button to exit the form.
When completed, your node will appear closer to the wing than before, or but SURFACES has
automatically changed its X location from -4 to -3.347556 ft, moving the CG in the process (i.e. to the
25% MAC). Now let’s learn some more details about the model. Let’s determine the neutral point per the
following steps.
Document
Title
Page Numbers
VLM.docx
Surfaces – User Manual – Vortex-Lattice Module
Page 31 of 136
STEP 16: Press the VLM Console icon. This will open the
Vortex-Lattice Method Console shown in Figure 4-16.
Figure 4-15: Specifying a CG location (Step 14).
Figure 4-16: The VLM Console (Step 16).
Document
Title
Page Numbers
VLM.docx
Surfaces – User Manual – Vortex-Lattice Module
Page 32 of 136
Note that when you create a new project, SURFACES has preset values for a multitude of variables.
Among those are the airspeed variables (Vcas, Vtas, Vinf), altitude (Href), and angle-of-attack (AOA).
Naturally, you can change these with ease, but currently Vcas=100 knots, Href=0 ft, and AOA=2°. In
interest of saving time for this demo, let’s assume these will suffice for our analysis.
STEP 17: Select Tasks->Determine Neutral Point… Press the [Analyze] button to
begin, and after a few seconds, once done, review the results in Figure 4-17.
Figure 4-17: Determining neutral point (Step 17).
The full report is displayed below. Note that SURFACES uses two methods to compute the neutral point.
Generally you should pick the neutral point with the lower value of Xneu, here this implies Method 2. Let’s
transfer the resulting value to the variable Xneu in the model, which currently has the initial value 0.
==========================================================================================
NEUTRAL POINT ANALYSIS
==========================================================================================
Filename ........ : SimplePlane(03162009).SRF
Date ............ : 03-16-2009
Time ............ : 21:17:00
ANALYSIS VALUES:
----------------------------------------------------ID
XCG
AOA
CL
CMY
----------------------------------------------------1
7.5032e-01
2.0000° 3.8059e-01 -1.1761e-01
2
1.7503e+00
2.0000° 3.8059e-01 3.2670e-02
3
7.5032e-01
3.0000° 4.6946e-01 -1.5413e-01
4
1.7503e+00
3.0000° 4.6946e-01 3.1248e-02
--------------------------------------------------------------------------------------------------------METHOD 1
----------------------------------------------------Calculates Xneu from the expression:
Document
Title
Page Numbers
VLM.docx
Surfaces – User Manual – Vortex-Lattice Module
Page 33 of 136
Xneu = Xcg - Cref·dCm/dCL
= 0.75032 - (2.534505)·(-0.036512)/(0.088875)
= 1.791557 (66.08247% MAC)
----------------------------------------------------METHOD 2
----------------------------------------------------Calculates Xneu by evaluating changes of CG and AOA on Cm:
Function 1 (degrees): -0.036512·AOA - 0.044590
Function 1 (radians): -2.091979·AOA - 0.044590
Function 2 (degrees): -0.001422·AOA - 0.154126
Function 2 (radians): -0.081474·AOA - 0.154126
Xneu = 1.790844 (66.05433% MAC)
Total time:0h:00m:05s
STEP 18: Press the [Transfer] button and select the option ‘Neutral point
using Method 2’. This displays a notification. Press the [OK] button to close
it. Press the [Close] button on the form to close it as well.
Note the [Copy Report] button in the form in Figure 4-17. It allows you to copy the entire text in the form to
the clipboard. We consider it a good practice to copy and paste it as a comment under Edit->Remark…
in the main worksheet for future reference.
Now let’s trim the aircraft for a level flight. First we must define which surfaces serve as the elevators. To
do that, return back to the worksheet where the model is.
STEP 19: Double-click on one of the two surfaces that serve as the horizontal
tail. This opens the dialog box shown in Figure 4-18. Select the ‘Edge
Deflections’ tab. Set number of chordwise panels on the aft edge to deflect
to 2.
STEP 20: In the same dialog select the ‘Reference’ tab. Check the ‘Surface is
used for Pitch Control’. Press the [OK] button. If a warning appears stating
there’s already a VLM solution in memory, just press the [Yes] button.
STEP 21: Repeat Steps 19 and 20 for the other horizontal surface.
Also, by now, it would be a good idea to save the work. Here, we select File->Save As… and call it
SIMPLE DEMO.SRF. You should do the same.
Document
Title
Page Numbers
VLM.docx
Surfaces – User Manual – Vortex-Lattice Module
Page 34 of 136
Figure 4-18: Setting up elevator functionality (Steps 19-21).
You have now given SURFACES information it can use to automatically deflect the elevators to trim the
model for level flight. You can try the functionality out by displaying the VLM Console and select the
‘Controllers’ tab. For instance, enter -20 in the Pitch control textbox and press the [Set] button to see the
model regenerate with that deflection, as shown in Figure 4-19. Once done, press the [Reset] button to
return the elevators to a neutral deflection (0°) and get ready to trim the model.
Document
Title
Page Numbers
VLM.docx
Surfaces – User Manual – Vortex-Lattice Module
Page 35 of 136
Notice
deflected
elevators
Figure 4-19: Demonstrating elevator functionality.
STEP 22: Select Tasks->Trimmed Level Flight... to display the Trim wizard.
Follow the steps shown in the subsequent list of images.
Document
Title
Page Numbers
VLM.docx
Surfaces – User Manual – Vortex-Lattice Module
Page 36 of 136
STEP 22a:
Press the [Next >>] button.
STEP 22b:
Ensure the selection shown.
Press the [Next >>] button.
We will just trim to a single airspeed, but
multiple airspeeds can also be analyzed.
Document
Title
Page Numbers
VLM.docx
Surfaces – User Manual – Vortex-Lattice Module
Page 37 of 136
STEP 22c:
Ensure the selection shown.
Press the [Next >>] button.
Once complete, the lift generated will be
700 lbs at the airspeed specified in Step
22b.
STEP 22d:
Ensure the selection shown.
Press the [Next >>] button.
Here we allow 30 iterations before a
solution will be declared as unachievable.
If solution is found, the resulting lift will be
700 ±1 lbf and the moment 0 ±1 ft·lbf. As a
rule of thumb, acceptable accuracy is
provided by specifying 1% of the weight.
Here, the accuracy is closer to 0.14%.
Document
Title
Page Numbers
VLM.docx
Surfaces – User Manual – Vortex-Lattice Module
Page 38 of 136
STEP 22e:
Ensure the selection shown.
Press the [Next >>] button.
Note that solution files can be created and
saved using the file name entered as a
seed.
STEP 22f:
Press the [Trim!] button.
Once SURFACES begins to trim, you can follow the progress on the ‘Progress Table’ or ‘Progress Plot’
tabs (see Figure 4-20). The time to trim largely depends on the number of panels in the model and
accuracy desired. The model presented here took 16 iterations and 31 seconds to trim. Press ‘Summary’
tab to read the results for each completed trim speed. In this case, the model will fly level at an AOA of
3.3449° and will require an elevator deflection of -4.3966° (trailing edge up) to balance. The lift generated
is 699.587 lbf and moment about the y-axis (located at the CG) is 0.287698 ft·lbf. The model is
automatically set to the resulting AOA and elevator deflection. Press the [Close] button to exit the form.
Next let’s determine stability derivatives for the model in this particular configuration.
STEP 23: Select Tasks->Determine Stability Derivatives... to display the
Stability Derivatives form. Check and uncheck the boxes shown in Figure 4-21
and press the [Analyze] button.
Document
Title
Page Numbers
VLM.docx
Surfaces – User Manual – Vortex-Lattice Module
Page 39 of 136
Figure 4-20: Trim progress is displayed on the ‘Progress Plot’ tab.
Upon completion you will see the results as shown in Figure 4-22. Without going into too many details, we
can see from values for Cma (-2.119), Clb (-0.105), and Cnb (0.172) that our airplane is statically stable
about all three axes. What we don’t know at this time are its dynamic stability properties. And this is what
we intend to investigate next. First, however, we must transfer these results to the airplane model.
STEP 24: Select the ‘Transfer’ tab. Follow the remaining steps closely.
STEP 25: Press the [Select All] button to select all the derivatives in the
list.
STEP 26: Press the [Deselect Nonrequested] button to deselect the derivatives
that were not calculated.
STEP 27: In addition, uncheck the following variables: CL, CDi, CD, CDa, hcg,
and hn (see Figure 4-23). This will prevent them from being overwritten, but
they already contain algebraic expressions that we don’t want to be deleted.
STEP 28: Press the [Transfer] button. Press [Yes] (in this example) if
prompted to overwrite formulas. Press the [OK] button on the form that
appears to notify you of a successful transfer. Then press the [Close] button
to close the Stability Derivatives form.
Now let’s proceed to the dynamic stability analysis.
Document
Title
Page Numbers
VLM.docx
Surfaces – User Manual – Vortex-Lattice Module
Page 40 of 136
Figure 4-21: Preparing to determine stability derivatives (Step 23).
Figure 4-22: Stability derivatives for the model (Step 23).
Document
Title
Page Numbers
VLM.docx
Surfaces – User Manual – Vortex-Lattice Module
Page 41 of 136
Figure 4-23: Stability derivatives for the model (Steps 24-28).
STEP 28: Press the STAB Console icon. This will open the
Stability Analysis Console shown in Figure 4-29.
It is left as an exercise for the user to press the various icons to experience functionality. The simulation
icons will display the motion of the aircraft in real time.
Longitudinal stability
analysis (report)
Lateral/directional
stability analysis
(report)
Root
locus
analysis tool
Short period and
Phugoid
mode
(plots)
Spiral
convergence, Roll
convergence, and
Dutch roll modes
(plots)
Short period and
Phugoid
mode
(simulation)
Spiral
convergence, Roll
convergence, and
Dutch roll modes
(simulation)
Document
Title
Page Numbers
VLM.docx
Surfaces – User Manual – Vortex-Lattice Module
Page 42 of 136
Press this icon to
display the dutch
roll response.
Figure 4-24: Stability analysis module (Step 29.
You can get a report detailing the properties of the response by selecting View->Show Comparison
Table. The resulting table is shown below. This is but one of many ways to extract information from the
STAB module. Also try Analysis->Create Analysis Report… to get a more detailed dynamic stability
report.
Description
Airspeed
Altitude
Period of oscillation
Damping coefficient
Natural frequency
Damped frequency
Damping Ratio
Time to 0.5 Amplitude
Cycles to 0.5 Amplitude
Time to 0.1 Amplitude
Cycles to 0.1 Amplitude
Symbol
Vtas
Href
T
n
Wn
Wd
Zeta
t½
N½
t0.1
N0.1
Unit
KTAS
ft
sec/cycle
1/sec
cycles/sec
cycles/sec
sec
cycles
sec
cycles
SIMPLE DEMO.SRF
100
0
2.450
-0.0612
2.5648
2.5641
0.0238
11.3324
4.6246
37.6454
15.3626
This concludes the introductory example. This model is also used for a skin friction drag demo in Section
9, so it will be convenient to save it.
Document
Title
Page Numbers
VLM.docx
Surfaces – User Manual – Vortex-Lattice Module
Page 43 of 136
5. Accomplishing Special Projects with SURFACES
5.1 Tailoring Wings to Improve Stall Characteristics
Figure 5-1: A model whose section lift coefficients near the tip are very high (“tip-loaded).
Figure 5-1 shows how SURFACES can be used to help optimize stall characteristics. The yellow line
represents section lift coefficients at stall. These are entered as reference values for curves A1 and A2 for
each surface. The red lines represent section lift coefficients at the flight condition. The image shows the
wing tip stalls long before the inboard part of the wing. Not only would this cause the airplane to a roll at
stall (as one wing tip is prone to stalling before the other one), but more seriously, would result in an
uncontrollable nose pitch-up moment. This situation can be remedied by modifying the wing geometry, for
instance by adding wing washout, increase tip chord, reduce sweep, or using airfoils with a higher max lift
coefficient.
Document
Title
Page Numbers
VLM.docx
Surfaces – User Manual – Vortex-Lattice Module
Page 44 of 136
5.2 Determine Shear, Moment, and Torsion
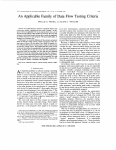
Figure 5-2: Obtaining shear and moment distribution for a lifting surface.
SURFACES comes equipped with a tool that allows you to analyze cantilevered shear and moment
acting on any surface. Figure 5-2 shows the Force Integrator tool as applied to the right wing on the Ryan
Navion model. The bending moments along the right wing are plotted. Note the wing curvature represents
the camber line of the aircraft’s airfoils.
5.3 How to Manage Airfoils in SURFACES
SURFACES allows the user to study the influence of airfoils on flight characteristics. This is done by
specifying the camber line of the airfoil. The program comes with a tool that helps the user to do this more
easily (see Figure 4-1d). The user can define camber lines using four different curves; a parametric, a 4point Bezier curve, a list of points, or a B-spline. In order to do this effectively, the user must keep the
some rules in mind when manipulating or managing curves. The following example, in which a parametric
curve is created, gives an insight into how this is done.
STEP 1: Start a new project. Select File->New…
STEP 2: Go into sketch mode by pressing the
icon.
Document
Title
Page Numbers
VLM.docx
Surfaces – User Manual – Vortex-Lattice Module
Page 45 of 136
STEP 3: Select the point icon
and drop two points. One at 1,3 (point
A) and the other at 9,3 (point B. See Figure 5-3).
Point A
(1,3)
Point B
(9,3)
Figure 5-3: Defining start and end points for a vector in the X-Y plane.
STEP 4: Select the parametric curve icon
and stretch a curve from
point A to point B. Right click to stop (see Figure 5-4).
If you select the X-Y-Z view, you can see that SURFACES has created a third point (see Figure 5-5). This
point is called an alignment point. If you select the vector you’ll see that SURFACES highlights the
vector, but also a line extending from the start point to this third point (see Figure 5-6).
The purpose of this point is to allow you to orient the parametric curve in 3D space. Let us create a simple
parametric curve to demonstrate this better.
STEP 5: Double-click the parametric curve to open the Edit Parametric Curve.
Ignore the form that pops up first by pressing the OK button. See Figure 5-7.
Document
Title
Page Numbers
VLM.docx
Surfaces – User Manual – Vortex-Lattice Module
Page 46 of 136
Parametric curve
Figure 5-4: Creating a parametric curve.
Pay attention to the data in the form in Figure 5-7. You can see that the start point ID is 1 (point A), the
end point ID is 2 (point B), and the alignment point ID is 3 (point C).
STEP 6: In the textbox under the “Parametric Functions” frame labeled P(t),
enter the function: t-t*t. Note you must use the variable ‘t’. This is the
parametric function SURFACES will use to compute the shape of the parametric
curve. See Figure 5-7.
Press the Preview button to see what the curve looks like in 2-dimensions (see Figure 5-7). Note that the
curve should consist of 30 points.
STEP 7: Press the OK button.
If you did everything correctly, you should see a curve identical to the one of Figure 5-8. Note how the
curve has been drawn, aligned to a plane formed by two vectors; one extending from point A to B and the
other from point A to C.
Document
Title
Page Numbers
VLM.docx
Surfaces – User Manual – Vortex-Lattice Module
Page 47 of 136
Point A
Point C:
This point was created
by SURFACES when
the parametric curve
was created.
Point B
Figure 5-5: Points A, B, and C define the parametric curve.
Point A
Point B
Point C
Figure 5-6: Selecting the parametric curve displays how SURFACES uses points to define a plane.
Document
Title
Page Numbers
VLM.docx
Surfaces – User Manual – Vortex-Lattice Module
Page 48 of 136
Figure 5-7: Creating a parametric curve.
STEP 8: Double-click on point C and change its Z-value from 0 to 6. Press the
Apply button. The resulting orientation can be seen in Figure 5-8.
Re-orient the image (CTRL+ mouse center button) to see how the airfoil is still being drawn in the plane
formed by the three points. Now, let us align the curve so it is parallel to the X-Z plane. This is done in
Step 9:
Document
Title
Page Numbers
VLM.docx
Surfaces – User Manual – Vortex-Lattice Module
Page 49 of 136
Figure 5-8: The parametric curve t-t² shown as originally created in the X-Y plane.
Figure 5-9: The parametric curve t-t² shown at an angle.
Document
Title
Page Numbers
VLM.docx
Surfaces – User Manual – Vortex-Lattice Module
Page 50 of 136
STEP 9: Double-click on point C and change its Y-value to 3. Press the Apply
button. The resulting orientation can be seen in Figure 5-9.
Figure 5-10: The parametric curve t-t² shown parallel to the X-Z plane.
Note how the curve is always drawn, as if on an imaginary 2D plane that is oriented in 3D space.
Document
Title
Page Numbers
VLM.docx
Surfaces – User Manual – Vortex-Lattice Module
Page 51 of 136
6. Transformation of Load Vectors from a Global to a
Local Coordinate System
The following derives mathematical formulation to determine shear forces and moments about an
arbitrary axis. The goal is to provide SURFACES with a tool that helps the structural analyst retrieve
aerodynamic loads. However, the formulation is in fact applicable to any load analysis involving a discrete
distribution of elemental loads.
Consider a lifting surface in a 3D coordinate system (from now on referred to as the global coordinate
system). For structural purposes it is desired to determine the shear and moments about an axis, called
the quarter chord. SURFACES allows this to be done quickly and effectively. The analysis requires a
coordinate system to be constructed, which from now on referred to as the local coordinate system.
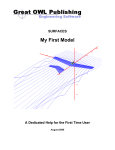
A more descriptive example of this is shown with the typical Vortex-Lattice model in Figure 1. A vector on
the leading edge and along the fuselage have been highlighted (in red). Additionally, the right wing has
been highlighted. With this information, it is now possible to determine the 3D shear and moment
distribution along either vector, due to the discrete elemental forces generated by the right wing. The two
vectors are necessary to create the local coordinate system about which the shear and moments are
resolved. Consequently, they are referred to as the basis of the local coordinate system. This way, one
can analyze loads along vectors of arbitrary orientation.
Figure 1: A typical Vortex-Lattice model.
6.1 Establishment of a Local Coordinate System
Consider the force F generated by an arbitrary panel in the global coordinate system X-Y-Z as shown in
Figure 2.
Document
Title
Page Numbers
VLM.docx
Surfaces – User Manual – Vortex-Lattice Module
Page 52 of 136
Z
F
FZ
FY
X
Y
FX
Figure 2: A force in the global coordinate system.
Consider a local coordinate system, identified by the selection of two vectors, A and B, such that A is not
parallel to B (see Figure 3). These vectors uniquely define a plane (and are thus the basis of the
coordinate system), whose normal is given by the vector C, such that:
C A B
(1)
Z
2
F
A
FZ
C
FY
3
B
X
FX
BN
1
Y
Figure 3: Defining the local coordinate system.
We can now create a local coordinate system, denoted by the vectors A, BN, and C, where BN is given by
BN A C
(2)
Document
Title
Page Numbers
VLM.docx
Surfaces – User Manual – Vortex-Lattice Module
Page 53 of 136
Note that the three vectors form a mutually perpendicular coordinate system. The determination of BN is
necessary as B may or may not be perpendicular to the vector A.
Also note that according to convention, the vector A represents the X-axis of the local coordinate system,
here denoted by the lower case letters x-y-z. The vectors BN and C correspond to the Y and Z axes,
respectively.
Finally, note that the unit vectors for the local coordinate system are denoted as follows:
u AX
uBX
uCX
Unit vector for A:
Unit vector for B:
Unit vector for C:
u AY
u AZ
u BY
u BZ
uCY
uCZ
6.2 Transformation of Force Vector in Coordinate System A-BN-C
The force vector, F, represented as {FX, FY, FZ} or FX i FY j FZ k in the global coordinate system
can now be represented as a force in the local one as {Fx, Fy, Fz} (see Figure 4). This is accomplished
with a simple transformation of the vector F onto the three vectors A, BN, and C using the matrix notation
of Equation (3).
Fx u AX
Fy u BX
F u
z CX
u AZ FX
u AZ FY
u AZ FZ
u AY
u BY
uCY
(3)
Z
x
F
z
A
FZ
Fz
C
Fx
FY
X
Fy
FX
y
BN
1
Y
Figure 4: Transformation of vector F.
Example:
Document
Title
Page Numbers
VLM.docx
Surfaces – User Manual – Vortex-Lattice Module
Page 54 of 136
The force vector
F Fx i Fy j Fz k 10 i - 5 j 10 k is given in a global coordinate system.
Two vectors A and B are given as the basis for our local coordinate system as follows:
A i - j k
B 0.5i - j 0.5k
Determine the components of F in the local coordinate system created by the vectors A and B.
Solution:
Step 1: Determine the vector C from
C A B .
i
j
k
C A B 1 1 1 0.5i j 1.5k
0.5 1 0.5
Step 2: Determine the vector BN from B N A C .
i
j
k
B N A C 1 1 1 2.5i 2 j 0.5k
0 .5 1 1 .5
Step 3: Determine force component per Equation (5). Start by determining the unit vectors and assemble
into the transformation matrix:
u AX
u
BX
uCX
u AY
u BY
uCY
u AZ - 0.57735 - 0.57735 0.57735
u AZ - 0.77152 0.61721 - 0.15430
u AZ 0.26726 0.53452 0.80178
This yields the following force components using Equation (3):
Fx - 0.57735 - 0.57735 0.57735 10 2.8868
Fy - 0.77152 0.61721 - 0.15430 5 12.3443
F 0.26726 0.53452 0.80178 10 8.0178
z
6.3 Determination of Moment Vector in Coordinate System A-BN-C
As stated in the introduction, ultimately, the goal of the analysis presented herein is the determination of
shear forces and moments about an axis due to the cumulative effects of multiple discrete forces. It was
demonstrated in Section 2 how shear forces are transformed to a local coordinate system. The same
methodology can be applied to the generation of moments, but it involves a tranformation about a point,
P, through which the vector A goes. This point will be called the projection point from now on. It is the
projection of the point (xF, yF, zF) on to the vector A (see Figure 6). It is denoted by the point (xP, yP, zP).
Document
Title
Page Numbers
VLM.docx
Surfaces – User Manual – Vortex-Lattice Module
Page 55 of 136
Z
x
F
z
A
FZ
xP, yP, zP
Fz
Fx
C
Q
r
FY
X
Fy
R
1
FX
xF, yF, zF
Y
BN
y
x1, y1, z1
Figure 6: Determination of moment vector M.
The location of this point is obtained using standard vector algebra. The reader is referred to the one
presented on page 31 in Introduction to Vector Analysis, by Davis and Snyder. The method can be
explained using Figure 7, which defines the arbitrary vectors V and W.
W
W
V
W
Figure 7: Projection of vector W onto vector V.
Then, the parallel projection of W onto V is given by:
VW
W||
V
VV
(4)
The perpendicular projection is simply found from:
W W W||
(5)
Using this, we first determine the vector R from the start point of the vector A to the force point, i.e.:
Document
Title
Page Numbers
VLM.docx
Surfaces – User Manual – Vortex-Lattice Module
Page 56 of 136
xF x1
R y F y1
z z
F 1
(6)
The location is then found by referencing Figure 7 and Equation (4) and by writing:
xP x1
AR
A
y P y1
A
A
z z
P 1
(7)
The length of the parallel projection (the rightmost term of Equation (7)) is denoted by the letter r. It will be
used in Section 4 to sort the discrete loads and moments along the vector A. Now, one must determine
the vector from the projection point to the force point, denoted by Q. This vector is given by Equation (8):
xF x p
Q yF y p
z z
p
F
(8)
Then, calculate the disrete moment about the projection point from
i
j
k
M F Q Fx
Fy
Fz
Qx
Qy
Qz
(9)
The moment vector, M, represented as {MX, MY, MZ} is still in the global coordinate system. It can now be
treated as the force in the local one, i.e. as {Mx, My, Mz} using the same transformation as for the force
vector.
M x u AX
M y u BX
M u
z CX
u AY
u BY
uCY
u AZ M X
u AZ M Y
u AZ M Z
(10)
6.4 Determination of Shear and Moment Distribution
Figure 7 shows several loads whose components have been transformed to the local coordinate system
specified by A, BN, and C. Each has associated force and moment components and the parameter r,
which is simply the distance of the projection point from the starting point of vector A (point 1). The
purpose of the parameter r is to allow sorting to take place (say from start towards the end of the vector
A). The sorted components are then used to construct shear and moment diagrams in a standard fashion.
Document
Title
Page Numbers
VLM.docx
Surfaces – User Manual – Vortex-Lattice Module
Page 57 of 136
z
F2
F i
Fi
Fi
F i
Fyi
F1
x
Fzi
ri
y
1
Fxi
Figure 7: Methodology for construction shear and moment diagrams.
z
Fi
FN-2
FN-1
FN
y
yi
yN-2
yN-1
yN
Figure 8: Creation of shear and moment diagrams from discrete forces.
6.4.1 Approximation for Shear in the Z-direction Along the Y-axis Vector
Approximating shear forces is simple, just apply Equation (11),
F
N
Vzi
zi
(11)
i j
6.4.2 Approximation for Moment about X-axis Along the Y-axis Vector
The approximation for the moments is implemented as follows. The moment at N-1 is due to the force FzN
acting at a distance yN – yN-1. Similarly, the moment at N-2 is due to the force FzN acting at a distance yN –
yN-2 and the force FzN-1 acting at a distance yN-1 – yN-2. Writing this in a general form leads to:
Document
Title
Page Numbers
VLM.docx
Surfaces – User Manual – Vortex-Lattice Module
Page 58 of 136
M xi Fzi 1 yi 1 yi ... FzN 2 y N 2 yi FzN 1 y N 1 yi FzN y N yi
N
F
zj
y j yi
j i 1
(12)
6.4.3 Approximation for Torsion About the Y-axis Vector
The approximation for the torsion is implemented as follows. The torsion at N-1 is due to the force FN
acting at an offset distance of xN – xpN, where xp denotes the x value of the projection point. Similarly, the
moment at point N-1 is due to the force FzN acting at a distance xN – xpN and the force FzN-1 acting at a
distance xN-1 – xpN-1. Writing this in a general form leads to:
M yi Fzi xi x pi ... FzN 2 xN 2 x pN 2 FzN 1 xN 1 x pN 1 FzN xN x pN
F x x
N
zj
j
pj
j i
(13)
Example:
A lifting surface is 10 ft long (span) and 2 ft wide (chord). It carries a uniform pressure load of 1 lbf/ft².
Determine the shear in the z-direction, moment about the x-axis, and torsion about the y-axis at y=0.5 ft,
assuming the span to be partitioned into 10, 1 ft wide strips. Note that each strip will carry 2 lbf of load.
z
x
2 ft
10 ft
y
Figure 9: Lifting surface with a uniform pressure distribution.
Document
Title
Page Numbers
VLM.docx
Surfaces – User Manual – Vortex-Lattice Module
Page 59 of 136
z
2 lbf 2 lbf 2 lbf 2 lbf
2 lbf
0.5 ft
Mx
y
6.5 ft
Vz
7.5 ft
8.5 ft
9.5 ft
Figure 10: Discrete forces replace the uniform distribution. Reaction forces are shown in green.
Solution:
N
Shear is determined from Equation (11):
Vi
F 2 2 ... 2 20
i
lb f
i 1
Moment is determined from Equation (12):
M x F2 y2 y1 ... F8 y8 y1 F9 y9 y1 F10 y10 y1
2 1 ... 2 7 2 8 2 9
90 ft lb f
Torsion is determined from Equation (13):
Document
Title
Page Numbers
VLM.docx
Surfaces – User Manual – Vortex-Lattice Module
Page 60 of 136
M y F1 x1 x p1 ... F8 x8 x p 8 F9 x9 x p 9 F10 x10 x p10
2 1 ... 2 1 2 1 2 1
20 ft lb f
The exact value for the shear is determined from V = w·A = (1 lbf/ft²)·(10 ft x 2 ft) = 20 lbf.
Similarly (noticing that the centroid of the force V is at y=5 ft), the moment about a point y = 0.5 ft
(necessitated by the discreteness of the strip solution) is Mx = V·y = (20 lbf)·(5 ft – 0.5 ft) = 90 ft·lbf.
Finally, noticing the the centroid of the force V is at x=1 ft, we find that My = V·x = (20 lbf)·(1 ft) = 20 ft·lbf.
6.5 Presentation of Data in SURFACES
The user selects Results->Force Integrator… from the VLM Console in SURFACES as shown in Figure
11 below.
Figure 11: Selecting the Force Integrator tool.
Once the pertinent surfaces and vectors (corresponding to vectors A and B) have been selected, the user
can press the Integrate button as shown in Figure 12. Selecting the Results tab will display a table with
analysis results. Table 2 details the heading names.
Document
Title
Page Numbers
VLM.docx
Surfaces – User Manual – Vortex-Lattice Module
Page 61 of 136
Figure 12: Force Integrator tool.
Table 2: Heading Names
Heading
XF, YF, ZF
XP, YP, ZP
r
Rx, Ry, Rz
|R|
Qx, Qy, Qz
|Q|
Description
X, Y, and Z-coordinates of the panel force, which is its centroid.
X, Y, and Z-coordinates of the panel force panel force projection onto vector A.
Distance from Point 1 of vector A to XP,YP,ZP.
Components of the vector R, from Point 1 of vector A.
The length of vector R.
Components of the vector Q, from XP, YP, ZP to XF, YF, ZF.
The length of vector Q.
'Panel force (body system) in global coordinate system
i = i + 1: gridCntrl.Col = i: gridCntrl.Text = "Fbx"
i = i + 1: gridCntrl.Col = i: gridCntrl.Text = "Fby"
i = i + 1: gridCntrl.Col = i: gridCntrl.Text = "Fbz"
i = i + 1: gridCntrl.Col = i: gridCntrl.Text = "|Fb|"
'Panel force (airspeed system) in global coordinate system
i = i + 1: gridCntrl.Col = i: gridCntrl.Text = "Fx"
i = i + 1: gridCntrl.Col = i: gridCntrl.Text = "Fy"
i = i + 1: gridCntrl.Col = i: gridCntrl.Text = "Fz"
i = i + 1: gridCntrl.Col = i: gridCntrl.Text = "|F|"
'Panel moment in global coordinate system
i = i + 1: gridCntrl.Col = i: gridCntrl.Text = "Mx"
i = i + 1: gridCntrl.Col = i: gridCntrl.Text = "My"
i = i + 1: gridCntrl.Col = i: gridCntrl.Text = "Mz"
i = i + 1: gridCntrl.Col = i: gridCntrl.Text = "|M|"
'Panel force in global coordinate system
Document
Title
Page Numbers
VLM.docx
Surfaces – User Manual – Vortex-Lattice Module
Page 62 of 136
i = i + 1: gridCntrl.Col = i: gridCntrl.Text = "Ftx"
i = i + 1: gridCntrl.Col = i: gridCntrl.Text = "Fty"
i = i + 1: gridCntrl.Col = i: gridCntrl.Text = "Ftz"
i = i + 1: gridCntrl.Col = i: gridCntrl.Text = "|Ft|"
'Panel moment in global coordinate system
i = i + 1: gridCntrl.Col = i: gridCntrl.Text = "Mtx"
i = i + 1: gridCntrl.Col = i: gridCntrl.Text = "Mty"
i = i + 1: gridCntrl.Col = i: gridCntrl.Text = "Mtz"
i = i + 1: gridCntrl.Col = i: gridCntrl.Text = "|Mt|"
'Panel force in local coordinate system
i = i + 1: gridCntrl.Col = i: gridCntrl.Text = "Vx"
i = i + 1: gridCntrl.Col = i: gridCntrl.Text = "Vy"
i = i + 1: gridCntrl.Col = i: gridCntrl.Text = "Vz"
'Panel moment in local coordinate system
i = i + 1: gridCntrl.Col = i: gridCntrl.Text = "Tx"
i = i + 1: gridCntrl.Col = i: gridCntrl.Text = "Ty"
i = i + 1: gridCntrl.Col = i: gridCntrl.Text = "Tz"
Document
Title
Page Numbers
VLM.docx
Surfaces – User Manual – Vortex-Lattice Module
Page 63 of 136
7. Using the Virtual Wind Tunnel
The Virtual Wind Tunnel (VWT) allows you to analyze you model exactly as if you were to run it in a real
wind tunnel. You can vary several parameters from an initial value to a final value in prescribed steps. For
instance, you can perform an alpha- or a beta-sweep, exactly as you would do it in a real tunnel, but
without the hassle. Before you use the tunnel, you must understand its limitations.
Any good airplane design operates most of its lifetime at airspeeds at which the airflow is relatively
smooth and at a low angles-of-attack (AOA) and yaw (AOY). The lifting surfaces are always sized such
that this is achievable. The primary advantage is that drag is minimum at such conditions and, therefore,
the airplane is the most efficient. Under these circumstances, forces and moments change linearly with
these angles. However, when the airplane slows down before it lands, or for some other extreme
maneuvering, it begins to operate at larger AOAs and AOYs, causing the flow to separate. This will
introduce a nonlinearity into forces and moments. Linear codes, including SURFACES, do not account for
this phenomena.
At this point you may be asking yourself, why then resort to linear analysis if it has this shortcoming? The
answer is as simple as it is resounding. Speed! Accuracy is an additional benefit if your model is well
created. But the primary reason is speed. Linear analysis is extremely fast when compared to nonlinear
analysis. At the time of this writing, using SURFACES one can create and analyze an aircraft in the linear
range with an incredible accuracy in a matter of minutes. The same model may take 4-6 weeks to prepare
for a nonlinear Navier-Stokes solver, and would give one (yes one) AOA, say every 24 hours, if one’s
computer network holds up. And, you should ask the question; But isn’t the Navier-Stokes (N-S) method
more accurate? The answer is yes and no. In fact, in the linear range, it will give a similar answer as the
Vortex-Lattice Method (VLM), it will just take much, much longer to get those answers. The person writing
these words has experienced many times that the VLM has been closer to actual wind tunnel data than
N-S. The strength of N-S solvers is separated flow, but at this time, such tools are better at giving the
aerodynamicist an idea of what the flow field looks like than trustworthy coefficients.
Naturally, it must be emphasized that SURFACES is performing a mathematical simulation when you use
its wind tunnel test tool. The same rule applied to all computer codes that emulate wind tunnels; a real
wind tunnel test always overrides any such calculations (assuming the data was obtained by reliable
means). However, assuming you are using SURFACES to create a mathematical model of your design,
the VWT is a great tool to help you understand the following issues:
(1) The AOA and AOY, the airspeeds, and the rotation rates (P, Q, R) where your math model
breaks down. You will want to know at which AOA the linear assumption breaks down.
(2) Features of your model that, well, still need to be improved before an accurate comparison can
be made of existing wind tunnel. The concept of tuning is well known in the world of finite
elements, flutter, and linear modeling and the like. Tuning is done by making minor changes to
the model un
Document
Title
Page Numbers
VLM.docx
Surfaces – User Manual – Vortex-Lattice Module
Page 64 of 136
8. Determination of a Trimmed Flight Condition
The following derivation details the requirements for a trimmed flight condition. A trimmed flight is defined
as a flight in which the moment about all three axes is zero. For instance, when determining longitudinal
trim (assuming a solution can be found) the following must hold:
CL CL 0 CL CLe e
(1)
Cm Cm 0 Cm Cme e
Where; CL = lift coefficient
CL0 = lift coefficient for zero angle-of-attack and zero elevator deflection
CL0e = lift coefficient for zero angle-of-attack
CLtarget = lift coefficient obtained from the lift equation
CL = lift coefficient change with angle-of-attack
CLe = lift coefficient change with elevator deflection
Cm = pitching moment coefficient
Cm0 = pitching moment coefficient for zero angle-of-attack and zero elevator deflection
Cm0e = pitching coefficient for zero angle-of-attack
Cm = pitching moment change with angle-of-attack
Cme = pitching moment change with elevator deflection
= angle-of-attack
CURR = current angle-of-attack
= deviation from current angle-of-attack
e = elevator deflection
e = deviation elevator deflection
If the coefficient are known, we can write Equation (1) as follows:
C L C Le e C L C L 0
Cm Cme e Cm Cm 0
C L
C
m
C Le C L C L 0
Cme e Cm Cm 0
(2)
The solution protocol is a follows:
STEP 1: Compute:
C Ltarget
2W
V 2 S
STEP 2: Establish a value for and e. Set = CURR and e = 0, to determine CL1 and Cm1.
STEP 3: Set = CURR and e = 0, to determine CL2 and Cm2.
STEP 4: Compute CL and Cm from:
C L1 C L 0 C L 1
C L 2 C L1
C L
C L 2 C L 0 C L 2
2 1
and
C L 0 C L 2 C L 2
Document
Title
Page Numbers
VLM.docx
Surfaces – User Manual – Vortex-Lattice Module
Page 65 of 136
Cm1 Cm 0 Cm 1
Cm 2 Cm1
C m
C m 2 C m 0 C m 2
2 1
and
STEP 5: Compute:
target
and
C m 0 C m 2 C m 2
C Ltarget C L 0
C L
STEP 6: Set = target and e = e CURR -e , to determine CL3 and Cm3.
STEP 7: Set = target and e = e CURR +e , to determine CL4 and Cm4.
STEP 8: Compute CLe and Cme from: C L
e
CL3 CL0
C Cm 0
and C m m 3
e
e
e
STEP 9: Compute the required CL to support the desired lift and knowing that Cm=0 for a balanced
condition we populate the matrix of Equation (2) as follows:
C L
C
m
C Le C L C L 0
Cme e Cm 0
(3)
And solve for the and e, which define the trimmed condition.
SURFACES solves this using an iterative algorithm and can do so about each of the airplane’s three
axes. This is necessary because the deflection of a control surface modifies the geometry which, in turn,
requires a new flow solution. The program comes with an easy to use Trim Wizard that makes this a
breeze. Additionally, you can trim for multiple airspeeds, creating an individual flow solution for each
trimmed condition. This is handy when you want multiple solutions for the same CG location. You can
leave your computer overnight running the trim solutions, and study the solution files the next day.
Document
Title
Page Numbers
VLM.docx
Surfaces – User Manual – Vortex-Lattice Module
Page 66 of 136
9. Determination of Drag in SURFACES
9.1 Introduction
One of the primary advantages of using the Vortex-Lattice Method is speed and accuracy in the
estimation of aerodynamic forces and moments. A prominent of those is drag. Since so many other
factors rely on drag (performance, engine requirements, etc) any tool that allows for a quick and reliable
estimation is priceless. Unfortunately, drag estimation is wrought with challenges.
There are several things that make drag remarkable as an aerodynamic force. Among those is how hard
it is to accurately estimate its magnitude. Drag is a rapidly changing variable, making its estimation harder
and harder as the angle-of-attack increases and air begins to separate and form “separation bubbles”.
Another challenge is the fact that when airspeed increases, compressibility effects contribute more and
more to the total drag.
The shape of a properly designed airplane flying at a low angle-of-attack (high speed) is such that air
flows over it smoothly and its drag is relatively low when compared to other flight conditions. Reducing the
airspeed requires an increase in angle-of-attack, which eventually causes airflow to separate in various
areas (e.g. along trailing edge of wings, fuselage wing juncture, etc.), increasing its drag. Such flow adds
a considerable complexity to analysis work. In fact, it is so complex in nature that even state of the art
Navier-Stokes solvers have a hard time predicting it accurately. Extracting drag from wind tunnel testing
presents challenges as well and requires great expertise,
especially for scaled wind tunnel models. This is so, because the
IMPORTANT!
angle-of-attack at which flow separation begins differs from that of
the full scale airplane. These difficulties must always kept in mind
SURFACES is a symbolic vortex-lattice
when predicting drag using any computer code. The calculation of
solver. It allows the user to create
drag is estimation only, and, as such, must be taken with a grain
mathematical expressions, called Math
Objects or Variables (which are used interof salt. It is the purpose of this section to explain how
changeably), that allow the designer to
SURFACES computes drag and, that way, help you make drag
define own parameters that may be of
predictions that are as useful as possible .
importance to the airplane involved. This
adds an incredible power to the analysis
work. The math objects can use information
As is revealed in the famous Navier-Stokes equations, drag really
directly from the geometry of your model.
has only two causes; pressure and friction, although the multitude
For instance, to calculate wing area you
of specialty drags that abound in aerospace engineering literature
could enter a constant or you could use a
imply otherwise. The SURFACES development team uses these
function like [Saxy(surf1, surf2, …)]. So if
you modify your wing area for some reason,
two drag sources to simplify drag estimation in the program. Drag
the program will automatically update this
estimation involves several parameters; the geometry of the
value.
exposed area (known as the wetted area), aircraft orientation
(e.g. angle-of-attack and angle-of-yaw), and flow physics (density,
airspeed, Reynolds Number and Mach Number). Mathematically, this is represented in the formula:
D f ( geometry, , , ,V , Re, M )
(1)
Where: geometry refers to reference and wetted area1.
M = Mach Number. Stored in the variable MN.
Re = Reynolds Number. Stored in the variable Re.
V = Far-field airspeed. Stored in the variable Vinf.
= Angle-of-attack. Stored in the variable AOA.
1
In SURFACES geometry terms are stored in variables such as ARref, Eref, Sref, and Swet.
Document
Title
Page Numbers
VLM.docx
Surfaces – User Manual – Vortex-Lattice Module
Page 67 of 136
= Angle-of-yaw. Stored in the variable AOY.
= Air density. Stored in the variable rho.
The word geometry is somewhat nebulous here, but it is so on purpose; the user may use geometry in
own drag estimation beyond the variables cited. Also, while most texts on the subject tend to neglect the
contribution of the angle-of-yaw, , this is not done here for two reasons: First, the user must be made
aware of the impact asymmetric flight has on aircraft performance, especially when designing multiengine aircraft for engine-out situations. Second, by using SURFACES this is simply no more complicated
than accounting for angle-of-attack.
So, let’s begin by writing a standard definition of the total drag force:
D 12 V2 S ref C D
(2)
Where: CD = Total drag coefficient, dimensionless. Stored in the variable CD.
D = Drag force in lbf (UK system) or N (SI system).
Sref = Reference area, typically in ft² or m².
V = Far-field airspeed, typically in ft/s or m/s.
= Air density, typically in slugs/ft3 or kg/m3. Stored in the variable rho.
Equation (2) explicitly contains three of the variables mentioned for Equation (1), namely; geometry, ,
and V. Dependency on , , M, and Re is usually handled in the expression for drag coefficient, CD. In
aircraft design, aerodynamicists typically regard the drag coefficient as a function of the lift coefficient, CL
and plot the two on a graph called the drag polar. A typical representation of airfoil data is shown in
Figure 9.1-12. This shows a lift curve, drag polar, and pitching moment curves for several 2D airfoils and
shows two graphs. The left graph shows how the lift coefficient varies with angle-of-attack. The right one
shows how the drag coefficient varies with the lift coefficient. Note that the pitching moment coefficients
are not important in this discussion.
The shape of the drag polar depends on several factors. The first is lift, which depends on the angle-ofattack (and yaw) of the geometry. It is also evident that the CD is always larger than zero, achieving a
certain minimum value at relatively low values of CL. It follows it makes sense to consider the drag as the
sum of some minimum drag, call it CDmin, and additional drag, caused in part by the change in CL. This
additional drag is caused by an increase in flow separation, which increases the pressure drag.
The dip in the drag polar around a CL of 0.2 to 0.5 is referred to as a drag bucket and is typically
associated with laminar flow airfoils. For instance, note how all but two of the airfoils in Figure 9.1-1 (642415 and 23012) display this phenomenon. Exceeding this band of lift coefficients on either side, will result
in a notable change in airflow behavior. First, the location where laminar boundary layer transitions into a
turbulent one on the upper surface moves closer to the leading edge of the airfoil. Second, as the angleof-attack increases more, flow begins to separate near the trailing edges of the wing. This change affects
the distribution of pressure around the airfoil and, therefore, causes a rise in the pressure drag. By the
same token, the transition point on the lower surface will move closer to the trailing edge. This changes
the extent of laminar versus turbulent boundary layer and, therefore, changes the skin friction drag. This
is the second factor to be considered.
The third factor is compressibility effects. This is a high speed phenomenon, but a simple explanation is
that compressibility causes streamlines to align closer together and farther into the flow field than they do
in an incompressible flow. This results in a higher speed over the airfoil than indicated by
incompressibility, which increases the low-pressure on the airfoil and, thus, the rate at which both lift and
2
Reproduced from NACA R-824.
Document
Title
Page Numbers
VLM.docx
Surfaces – User Manual – Vortex-Lattice Module
Page 68 of 136
drag change with angle-of-attack. Compressibility drag is exclusively a pressure drag effect3 and
eventually, if the airspeed increases further, a shockwave will form. SURFACES does not predict
shockwave formation, so results in which shock would have formed in real flow are unreliable. Typically,
shockwaves begin to form when airplanes fly at airspeeds faster than Mach 0.85, but may happen at a far
lower airspeed, for instance if the airplane has thick wings. The theory of compressible flow is beyond the
scope of this discussion, but the interested reader can refer to engineering texts such as References 2, 3,
and 6 for further information. The user must be cognizant of such high speed effects. SURFACES has
been designed to automatically include compressibility corrections if the user chooses to apply them. In
SURFACES, you should apply compressibility corrections for cases when the airspeed exceeds Mach
numbers of the order of 0.3 to 0.5.
SURFACES provides four different methods to model compressibility effects and, if selected,
automatically computes their effects for the user. This will be talked about in greater detail shortly.
Drag Polar (CD versus CL)
Lift Curve (CL versus )
Pitching Moment (CM)
Figure 9.1-1: Drag polar for several 2D airfoils.
From this discussion it makes sense to define the drag coefficient as follows:
3
For instance, see discussion in Aircraft Performance and Design, John D. Anderson, pages 115-116.
Document
Title
Page Numbers
VLM.docx
Surfaces – User Manual – Vortex-Lattice Module
Page 69 of 136
CD CDo CDf CDi
(3)
Where: CD = Total drag coefficient, dimensionless. Stored in the variable CD.
CDo = Basic drag coefficient, dimensionless. Stored in the variable CDo.
CDf = Skin friction drag coefficient, dimensionless. Stored in the variable CDf.
CDi = Induced drag coefficient, dimensionless. Stored in the variable CDi.
Note 1: The form of Equation (3) preserves the idea expressed in most texts on aircraft design.
Note 2: Since SURFACES is symbolic code, the user can enter complicated expressions for each
component. However, SURFACES also provides the user with several tools to help and these will be
discussed in greater detail in this section.
Note 3: Although many aerodynamic texts treat CDo and CDf as if they were constant with respect to and
there is no guarantee this is true in reality. For instance, a change in will move the laminar to turbulent
flow transition point and reshape flow separation regions. Additionally, compressible skin friction
coefficient reduces slightly with Mach Number, whereas the basic drag coefficient increases.
Note 4: Sometimes the basic drag coefficient is lumped together with the skin friction coefficient and
called profile drag. This will not be done here for the simple reason that it adds complexity to keep track of
yet another drag coefficient and hides the contribution of wetted area on the overall airplane drag.
Note 5: The effect of compressibility is accounted for by modifying CDo and CDi using corrections that
pertain to pressure drag only, and using a correction only applicable to skin friction for CDf.
Note 6: SURFACES has internal functions that calculate most of
these coefficients for the user. The user must supply CDo only,
but the other coefficients can be calculated internally if the user
so wishes. All can be displayed as math objects, using the
functions [CDf] for skin friction, [CDi] for induced drag, [CD]
for total drag (calculated per Equation (3)), and [CL] for lift
coefficient. This is already set up in this fashion in the standard
Math Object template . So, when a new project is created, the
formulation is already correctly set up by default. Note that if
these built-in functions are used, a CDi and CL of 0 will be
reported when there is no Vortex-Lattice solution in memory, or if
the user resets the solution (clears it out of memory). Also, a CDf
of 0 will be reported until skin friction coefficient has been
assigned to any of the surfaces.
IMPORTANT!
When you start a new project in
SURFACES (by selecting File->New… and
then Surfaces Worksheet), the program will
load a standard list of math objects, so that
you won’t have to create commonly used
variables each time. The program loads
this
from
a
template
file
called
OBJECTTEMPLATE.INI, which is stored in
the /SURFACES/TEMP/ folder. If you
suspect this template file is corrupt or
accidentally delete it, you can download a
new one from:
www.greatowlpublishing.com.
Note 7: As said earlier, actual change in AOA or AOY will
change CDo, but this change is not to be confused with the
change in induced drag, CDi, whose magnitude depends on the lift coefficient, CL. The change in CDo is
solely due to a change in pressure over the airplane, which is not used directly for lift generation
(although those lines are blurred at times). It depends on the attitude of the airplane (i.e. angular
orientation) in the air4, but this affects the shape and size of flow separation regions. The CDi, on the other
hand, depends on the CL. Induced drag can be defined as the drag created by a wing in excess of what it
would create in an inviscid flow at the same CL. One way the aerodynamicist can estimate a variation in
CDo with AOA and AOY is to wind tunnel test an aircraft with the lifting surfaces removed. See Note 9 for
additional information.
4
For instance, see page 186 of Reference 5.
Document
Title
Page Numbers
VLM.docx
Surfaces – User Manual – Vortex-Lattice Module
Page 70 of 136
Note 8: Figure 9.1-2 shows a schematic of how SURFACES handles drag calculations. First,
incompressible drag coefficients are computed. Second, if compressibility correction is to be included the
coefficients are modified. Third, the coefficients are added to return the total drag coefficient.
Incompressible
CDo
CDo
Basic drag coefficient
CDf
CDf
Skin friction drag coefficient
CDi
CDi
Induced drag coefficient
Compressibility?
Compressibility?
Compressibility?
Yes
No
Yes
No
Yes
No
CDo
CDo
Compressible
basic drag
coefficient
CDf
CDf
Compressible
skin friction drag
coefficient
CDi
CDi
Compressible
induced drag
coefficient
METHODS:
1. Prandtl-Glauert
2.User defined
METHOD:
Frankl-Voishel
METHODS:
1. Prandtl-Glauert
2. Karman-Tsien
3. Laitone
4.User defined
CD
CD
Total drag coefficient
Figure 9.1-2: A schematic showing how SURFACES determines drag coefficients.
Document
Title
Page Numbers
VLM.docx
Surfaces – User Manual – Vortex-Lattice Module
Page 71 of 136
Note 9: Consider Figure 9.1-3, which shows a simplified example of how CDo, CDf, and CDi might vary with
angle of attack only (constant airspeed and altitude). In reality, CDo might show a larger increase with
AOA than displayed, especially at very low and very high AOA, and CDf will likely change as well as the
laminar and turbulent flow regions change, but one should be careful in assuming CDo and CDf remain
constant. Figure 9.1-4 show how the same coefficients build up to form CD.
Note 10: Aerospace engineering literature introduces the casual reader to an assortment of drag types.
There is transonic drag, nacelle drag, external store drag, protuberance drag, interference drag, parasitic
drag, leakage drag, just to name a few. At times it’s not clear whether one is reading about aerospace or
medical science. With that in mind, there are two points that must be emphasized: (A) Textbook authors
are prolific inventors of terms for things that either increase pressure drag or skin friction drag, or a
combination thereof. This leaves the impression that there exist imaginary drag types that only affect
certain airplane features. Only airplanes with nacelles get nacelle drag, only airplanes with protuberances
suffer from protuberance drag, and so on, when in fact these features are simply changing the pressure
field or modifying the boundary layer. While there are probably many who consider this advantageous,
this can also confuse the issue. The confusion does not stem from the names these specialty drags
receive, but a difference in definition between authors, when one author creates a name for a specialty
drag another author doesn’t even mention. (B) SURFACES handles this assortment of drag types in a
simple manner; it ignores them. It only uses the three terms in Equation (3) and leaves it to the user’s to
define as many drag terms as desired, naturally limited by computer resources only.
Figure 9.1-3: Basic drag coefficient plotted for AOA and AOY.
[NOTE THAT THIS APPLIES TO QUADRATIC DRAG MODEL ONLY]
Document
Title
Page Numbers
VLM.docx
Surfaces – User Manual – Vortex-Lattice Module
Page 72 of 136
Figure 9.1-4: Basic drag coefficient plotted for AOA and AOY.
Now let’s look at the three constituent drag coefficients in greater detail.
9.2 Basic Drag Coefficient, CDo
Basic drag is caused by pressure differences integrated over the
entire external surface of the aircraft and always results in a force
that impedes its motion. It includes the effects of interference of
major parts, such as fuselage and wing. It gets larger with
increase in flow separation and, therefore, generally should not
be considered constant, although many do so in interest of
convenience, especially during early concept studies of new
aircraft. SURFACES assumes this coefficient is supplied by the
user and, therefore, the default value for every new project is 0.
The coefficient is stored in the math object CDo. Table 9.2-1
shows some examples of possible user entries for CDo. If
compressibility modeling has been selected, the returned value is
the compressible basic drag coefficient.
IMPORTANT!
Entry is accomplished through the math
object editor, shown in Figure 9.2-1. This is
opened by double-clicking on the variable
in the math object list, in the pane on the
left hand side of the worksheet. Remember
that you can enter an algebraic expression
to account for changes with respect to any
other variable in the program.
Table 9.2-1: Examples of User Entries for CDo.
Example
Formula (entered in the Formula box of Figure 2)
Comment
1
0.001
A constant value, which might be the result of a
prior drag breakdown analysis for an single
engine piston aircraft.
2
0.001+0.05*(AOA*Pi/180)^2
An example of how one could account for
changes in the pressure drag with angle-ofattack.
Document
Title
Page Numbers
VLM.docx
Surfaces – User Manual – Vortex-Lattice Module
Page 73 of 136
0.001+0.05*(AOA*Pi/180)^2+0.02*(AOY*Pi
/180)^2
An example of how one could account for
changes in the pressure drag with angle-ofattack and angle-of-yaw. This is the formula of a
surface and is plotted in Figure 9.2-2 for AOA
ranging from -2° to 12° and AOY ranging from 15° to 15°. Also see Figure 9.2-1.
4
0.001+0.05*(AOA*Pi/180)^2+0.02*(AOY*Pi
/180)^2+0.0009*[SDaft(3)]
An example of how to account for changes in
angle-of-attack and angle-of-yaw, as well as the
deflection of a flap, here assumed to be surface
number 3. When [SDaft(3)] is 35°, a value of
0.0315 is added to the CDo.
5
CDwing+CDfuse+CDldg+CDcool+CDtail+Cdna
celle+Cdprotruberance+CDmisc
Here, the user has independently defined the
extra math objects describing the drag buildup
and is summing them up to return the basic
drag coefficient.
3
*Note that these are just examples of how one might set such formulation up. Your formulation is likely to be different.
Figure 9.2-1: Entering the formula for Example 3 in Table 9.2-1 for the math object CDo.
Document
Title
Page Numbers
VLM.docx
Surfaces – User Manual – Vortex-Lattice Module
Page 74 of 136
Figure 9.2-2: Basic drag coefficient of Example 3 plotted for AOA and AOY.
9.3 Skin Friction Drag Coefficient, CDf
Skin friction is caused by the fluid viscosity as it flows over a
surface. Its magnitude depends on the viscosity of air and the
wetted (or total) surface area in contact with it. The coefficient is
stored in the math object CDf. If compressibility modeling has
been selected, the returned value is the compressible skin
friction drag coefficient .
IMPORTANT!
Note that in this text, the skin friction
coefficient is denoted by Cf and skin friction
drag coefficient by CDf. These are not
interchangeable. Cf is determined for a
laminar or turbulent boundary layer and is
related to the wetted area, Swet. The
coefficient CDf is the equivalent skin friction
drag coefficient for the entire airplane and
is related to the reference area, Sref. For
this reason, the distinction of the two terms
must be kept in mind. The two are related,
as shown in Equation (4).
The analysis of skin friction drag is complicated by a process
called transition, when laminar boundary layer becomes
turbulent (see Figure 9.3-1)5. This results in a mixed boundary
layer, each with own skin friction coefficient. The nature of this
behavior on airfoils is shown in Figure 9.3-2. Airfoils have two
transition points; one on the upper and one on the lower surface.
Each transition point moves forward or aft, as shown in the
figure, when the angle-of-attack of the airfoil changes. Naturally,
the travel is entirely dependent on the geometry and surface roughness of the airfoil.
5
Note that it would be more correct to talk about a transition region. The line indicates a location beyond which transition has been
completed.
Document
Title
Page Numbers
VLM.docx
Surfaces – User Manual – Vortex-Lattice Module
Page 75 of 136
Figure 9.3-1: Mixed Boundary Layer conditions complicate skin friction drag analysis. This image
is discussed in greater detail later.
Figure 9.3-2: The laminar-to-turbulent transition points move around depending on angle-ofattack, airfoil shape, and surface roughness.
SURFACES employs a standard presentation of skin friction, for instance as presented in Reference 1.
The skin friction drag coefficient is defined as follows:
Document
Title
Page Numbers
VLM.docx
Surfaces – User Manual – Vortex-Lattice Module
Page 76 of 136
CDf
2D f
V2 S ref
S
C f wet
S
ref
(4)
Where: Df = Skin friction drag force in lbf (UK system) or N (SI system).
= Air density, typically in slugs/ft3 or kg/m3.
V = Far-field airspeed, typically in ft/s or m/s.
Swet = Wetted area, typically in ft² or m².
CDf = Skin friction drag coefficient, dimensionless.
Cf = Skin friction coefficient, dimensionless. See Equation (15) for more details.
If known, the user can enter an expression for the skin friction drag coefficient or use a combination of
built-in functions in the two following ways:
1. Use any of the built-in functions that extract surface areas or wetted area of surfaces in your own
formulation.
2. Use the built-in function [CDf] directly, but this requires skin friction coefficients to be defined
for the surfaces to be used.
Either method (or a combination thereof) is very handy if you modify the geometry, as they will instantly
update the skin friction drag coefficient. However, the [CDf] method is handier when you are estimating
the skin friction drag of a new design. If you choose to use the built-in function [CDf] you should follow
these steps to properly prepare the formulation (see Section 9.11 for an example setup):
STEP 1: Specify wetted area. Use the math object “Swet” for this purpose. The formula for “Swet” can
be as simple as a number (if you know the value) to an algebraic representation using functions such as
[SA(surf1, surf2,…)]or [Swet(surf1, surf2,…)], which computes the total and wetted area of
the selected surfaces surf1, surf2, and so on, respectively. At computation time the value of “Swet” is
used internally with Equation (4).
STEP 2: Specify skin friction coefficients for each surface. You can do this in two ways. You can
estimate a skin friction drag coefficient using your preferred method and enter for each surface6. Or you
can use SURFACES’ own internal estimation based on a laminar-to-turbulent boundary layer transition
points that you provide. The latter method is probably far easier, but a numerical example of how
SURFACES estimates this is presented later in this section to help clarify the method.
Since SURFACES models are made from infinitely thin surface panels, the program estimates wetted
area by determining the surface area and then doubles the value to get wetted area. Table 9.3-1 shows
some examples of possible user entries for CDf. If a function, such as [Swet(surf1, surf2,…)], is
used to estimate the wetted area, the user can multiply it by a factor to account for surface curvature (for
instance as shown Example 3 in Table 9.3-1).
Table 9.3-1: Example user entries for CDf.
Example
1
6
Formula
Comment
0.025
A constant value, which might be the result of a
prior drag breakdown analysis for an single
engine piston aircraft.
It is possible to enter this for multiple surfaces at a time.
Document
Title
Page Numbers
VLM.docx
Surfaces – User Manual – Vortex-Lattice Module
Page 77 of 136
0.025-0.0001*Re^0.25
This user accounted for changes in skin friction
with Reynolds Number using this formula. It
returns 0.0208 for Re = 3 000 000 and 0.01968
for Re = 8 000 000.
0.025+0.000018*1.05*[Swet(5,6)]
This user is adding the contribution of the
additional wetted area of winglets (surfaces 5
and 6), multiplying the result by a 1.05 to
correct for their curvature. For winglets with 50
ft² additional area, this formula returns 0.0260.
4
0.01*(Cf_lam*Plam+Cf_turb*(100Plam))*Swet/Sref
Here the user is accounting for partial laminar
flow in this estimation. The expression assumes
the Sref will be divided out, leaving Swet
remaining, when incorporated in standard drag
calculations. The variable Plam means the
percentage of laminar flow. Plam = 50 for
laminar flow of up to 50% of wing wetted area.
Note that Swet here is not the same as
[Swet()]. See the discussion to follow for more
information.
5
[CDf]
This formula returns the result of an internal
calculation, in which all surfaces, to which a
skin friction coefficient has been defined, are
summed up using Equation (15).
2
3
*Note that these are just examples of how one might set such formulation up. Your formulation is likely to be different.
Other handy formulations are cited below for the convenience of the user.
Sutherland’s Formula for Viscosity:
When using the UK system the temperature is in °R. In that case the viscosity can be found from7:
734.7
T 216
3.170 10 -11 T 1.5
lbf·s/ft²
(5)
When using the SI system the temperature is in K. In that case the viscosity can be found from8:
1
T 110 .4
1.458 10 -6 T 1.5
N·s/m²
(6)
Where; T = Outside Air Temperature, in °R or K.
= Air viscosity, in lbf·s/ft² or N·s/m².
Reynolds Number:
Re
7
8
VL
(7)
See Equation (2.90) of Reference 7.
See Equation (2.91) of Reference 7.
Document
Title
Page Numbers
VLM.docx
Surfaces – User Manual – Vortex-Lattice Module
Page 78 of 136
Where; L = Reference length (for instance mean aerodynamic chord), in ft or m.
V = Reference airspeed, in ft/s or m/s.
= Air density, in slugs/ft3 or kg/m3.
= Air viscosity, in lbf·s/ft² or N·s/m².
A simple expression, valid for UK system at sea-level conditions only is (V and L are in ft/s and ft,
respectively):
Re 6400VL
(8a)
A simple expression, valid for SI system at sea-level conditions only is (V and L are in m/s and m,
respectively):
Re 68500VL
(8b)
Laminar Flow Skin Friction Coefficient9
This is the classical Blasius solution for a laminar boundary layer on a solid surface.
C flam
1.328
Re
(9)
Turbulent Flow Skin Friction Coefficient10
This is the so-called Schlichting relation, which is found to be in good agreement with experiment.
C fturb
0.455
log 10 Re 2.58
(10)
Turbulent Flow Skin Friction Coefficient – Compressible11
C fturb
0.455
log10 Re
2.58
1 0.144M
2 0.65
(11)
Where; M = Mach Number.
Equation (10) and not (11) is the preferred form in SURFACES as the program will apply correction for
compressibility effect using the Frankl-Voishel scheme. Using Equation (11) could result in the correction
applied twice.
Mixed Laminar-Turbulent Flow Skin Friction Coefficient12
The method below is taken from Reference 8. Also refer to Figure 9.3-1 for the location of the points X0
and Xtr. Of these, the user must specify the location of the transition point, which is used to calculate the
start point of the fictitious turbulent laminar flow. This is required to ensure the boundary layer thickness is
a continuous function. The user is referred to Reference 8 about methods on how to estimate transition
location; however, often drag analysis in SURFACES involves estimating the impact of 25% or 50%
9
See Equation (3.11) in Reference 8.
See Equation (6.53) in Reference 8.
11
See Equation (12.28) in Reference 4.
12
See Section 6.8, pages 162-164 in Reference 8.
10
Document
Title
Page Numbers
VLM.docx
Surfaces – User Manual – Vortex-Lattice Module
Page 79 of 136
transition on the total airplane drag. In other words, the designer is attempting to answer a question like:
“What is the benefit of achieving a partial laminar boundary layer on my design?” The answer may help
direct the designer towards an appropriate airfoil.
X0
X
36.9 tr
C
C
0.625
1
Re
0.375
(12)
Then, the skin friction coefficient is determined as follows:
0.074 X tr X 0
1
Cf
C
Re 0.2
0.8
(13)
Where; C = Reference length (e.g. wing chord).
X0 = Location of the fictitious turbulent boundary layer.
Xtr = Location of where laminar boundary layer becomes turbulent.
Turbulent Flow Skin Friction Coefficient – Compressible13
Note that surface roughness affects Cfturb, but this is typically accounted for through the use of a so called
“cutoff Reynolds Number.” If the actual Reynolds Number exceed the cutoff Reynolds Number, it is used
instead. For more information on the topic, the reader is directed towards texts, such as Reference 4.
1.053
C
Re cutoff 38.21
k
(14)
Where; C = Reference length.
k = Skin roughness value.
The roughness value is based on the values in the following table, which is taken from Reference 4. If
these are not acceptable, the user can also enter own Recutoff value.
Surface Type
Camouflage paint on aluminum
Smooth paint
Production sheet metal
Polished sheet metal
Smooth molded composite
k
0.00040
0.00025
0.00016
0.00006
0.00002
When using the built-in function [CDf], SURFACES uses Equation (15) to calculate the coefficient using
all surfaces for which (Cf)i has been defined:
C Df
13
S
wet
S
ref
C f S wet
S
ref
N
C f i S i
i 1
S wet
(15)
See Equation (12.28) in Reference 4.
Document
Title
Page Numbers
VLM.docx
Surfaces – User Manual – Vortex-Lattice Module
Page 80 of 136
Where (Cf)i = Skin friction coefficient of surface i
N = Number of surfaces
Si = wetted area of surface i (in ft² or m²)
Swet = Wetted area (in ft² or m²)
Of these, the skin friction coefficient of each surface, (Cf)i, needs further explanation. The user must
estimate this value for each surface to be included in the analysis. This brings up an additional question:
How does one handle laminar flow over a surface consisting of two distinct defining airfoils? In order to
shed light on this, the demo aircraft model built in Section 4 will be used.
Consider the wing of the demo aircraft shown in Figure 9.3-2, which consists of two dissimilar airfoils on a
tapered wing planform. The wing span is 18 ft, the root chord (Curve A1) is 3 ft and tip chord (Curve A2)
is 2 ft (see Figure 4-1a). Also, the reference area is 45 ft² (as you will know if you created the model per
the instructions in Section 4). Assume that at the given condition, the airfoil of curve A1 is a true laminar
airfoil which is capable of sustaining 55% laminar flow on upper surface and 35% on the lower. The airfoil
of curve A2 is a turbulent flow airfoil, but still sustains laminar flow to 15% on the upper surface and 15%
on the lower. This airplane is cruising at 100 KTAS (168.8 ft/s) near sea-level, where the air density is
0.002378 slugs/ft3. Determine the skin friction drag coefficient and force acting on the wing due to the
mixed laminar and turbulent regions.
Figure 9.3-2: Example aircraft from Section 4.
One way to tackle this problem is to assume a linear change in laminar transition from A1 to A2. We’ll
calculate the skin friction, using the mixed boundary-layer formulation, as follows:
STEP 1: Start by using Equation (5) to compute the viscosity assuming an atmospheric temperature of
518.67 °R (15 °C):
Document
Title
Page Numbers
VLM.docx
Surfaces – User Manual – Vortex-Lattice Module
Page 81 of 136
734.7
1.5
-7
3.170 10-11 518.67
3.745 10
518.67 216
lbf·s/ft²
STEP 2: Using Equation (7) we compute the Reynolds Number for airfoil 1, using a standard day air
density of 0.002378 slugs/ft3.
Re1
VL 0.002378 168 .83
3215539
3.745 10 - 7
STEP 3: Then compute the Reynolds Number for airfoil 2
Re 2
VL 0.002378 168 .82
2143692
3.745 10 - 7
STEP 4: Using Equation (12) we compute the location of the fictitious turbulent boundary layer on the
upper and lower surfaces of airfoil 1 (noting the different locations of the Xtr on each surface).
0.625
1
Re
0.375
Lower:
X0
X
36.9 tr
C
C
Upper:
1
X0
0.625
36.9 0.55
C
3215539
36.9 0.35
0.625
1
3215539
0.375
0.06948
0.375
0.09216
STEP 5: Repeat for airfoil 2 (noting an equal value for each surface).
1
X0
0.625
36.9 0.15
C
2143692
X0
0.04763
C
Lower:
Upper:
0.375
0.04763
STEP 6: The skin friction coefficient for upper and lower surface of airfoil 1 is determined using Equation
(13) as follows:
Lower:
C
0.074 X tr X 0
1
C
Re 0.2
Upper:
C
f
lower 1
f upper 1
0.8
0.074
1 0.35 0.069480.8 0.002841
0.2
3215539
0.074
1 0.55 0.092160.8 0.002265
0.2
3215539
Call the average of the two the representative skin friction coefficient for airfoil 1, i.e.
C f1
0.002841 0.002265
0.002553
2
STEP 7: Repeat for airfoil 2 (noting an equal value for each side).
Document
Title
Page Numbers
VLM.docx
Surfaces – User Manual – Vortex-Lattice Module
Page 82 of 136
Lower:
Upper:
C
C
f
lower 2
f
upper 2
0.074 X tr X 0
1
C
Re 0.2
0.8
0.074
1 0.15 0.047630.8 0.003677
0.2
2143692
0.00367
The average of the two is of course:
C f 2 0.003677
STEP 8: The representative skin friction coefficient for the total wetted surface is simply the average of
the coefficient for both airfoils, i.e:
Cf
0.002553 0.003677
0.003115
2
STEP 9: Determine wetted area of the wing:
S wet 2 12 3 218 90.0 ft 2
STEP 10: Estimate skin friction drag due to the laminar flow.
D f lam 12 V 2 S wet C f
1
2
0.002378168.82 90 0.003115 9.5 lbf
Note that an equivalent skin friction drag coefficient, which is based on Sref, would be found from Equation
(15):
S
C Df wet
S
ref
C f 90 0.003115 0.006230
45
Also note that the value, 0.003115 (and not 0.006230), is what one could enter as Cf_i for the wing
surface when using the internal generation of CDf in SURFACES (see the red box for each method below
in Figures 9.3-2 and -3). This can be done by one of the two following methods.
Method 1: Surface-by-surface basis
Method 2: Multiple surface entry
Double-click on a surface to open its properties form.
Click on the ‘Tuning’ tab. Enter the skin friction
coefficient for the surface in the textbox in the red
frame.
The user can select any number of surfaces (by
holding Shift while clicking on surfaces) and then
select Modify->Surface Properties…. Enter the
desired value, which will be applied to all selected
surfaces.
Document
Title
Page Numbers
VLM.docx
Surfaces – User Manual – Vortex-Lattice Module
Page 83 of 136
Figure 9.3-2: Method 1
Figure 9.3-3: Method 2
9.4 Induced Drag Coefficient, CDi
The induced drag is caused when the airflow perturbs the flow field as it makes its way around the wingtip
(generating the wingtip vortices) of a 3D wing (see Figure 9.4-1), compared to what would happen to an
infinitely long wing14. An integration of the pressure field over the wing yields a higher drag than would be
obtained if this tip flow did not occur. In other words: the generation of the wingtip vortices induces the
extra drag and the higher the lift, the higher is this additional drag.
The coefficient is stored in the math object CDi. If compressibility modeling has be selected, the returned
value is the compressible induced drag coefficient. SURFACES allows the user to determine the induced
drag using three different methods:
METHOD 1: Surface integration sums the pressure forces acting on each panel and resolves it into a
three orthogonal components and rotates this to the wind axis coordinate system. Using the wing axis
coordinate system, the force in the X-direction is by definition the drag, the force in the Y-direction is the
side force, and the force in the Z direction is the lift.
14
The astute student will recognize that D’Alembert’s 2D paradox that a body in inviscid flow produces no drag does not apply in
3D flow, due to the downwash created by the trailing wake.
Document
Title
Page Numbers
VLM.docx
Surfaces – User Manual – Vortex-Lattice Module
Page 84 of 136
METHOD 2: (CL-CL CDmin)²/(·ARref·Eref) method computes the induced drag based on the current lift
coefficient, the CL where minimum drag occurs (CL CDmin), reference Aspect Ratio (ARref), and reference
span efficiency (Eref).
METHOD 3: Trefftz plane integration uses flow perturbations in an imaginary plane infinitely far behind
the model to determine the induced drag. The location of the plane is a mathematical simplification that
allows one to neglect the x-perturbation from the flow field formulation, as it is theoretically zero that far
from the model. This way, a 3D relationship (volume) can be considered as 2D (plane).
Figure 9.4-1: A 3D wing in airflow.
9.5 Total Drag Coefficient, CD
Once SURFACES has determined the basic, skin friction, and induced drag coefficients, it computes the
total drag coefficient using Equation (3), repeated here for convenience. The coefficient is stored in the
math object CD.
CD CDo CDf CDi
(3)
It should be noted that the coefficients are based on Sref. forces Equation (3) can be rewritten as follows:
CD
2D f
2Do
2Di
2
2
V S ref V S wet V 2 S ref
(16)
For internal consistency, we could thus write;
Document
Title
Page Numbers
VLM.docx
Surfaces – User Manual – Vortex-Lattice Module
Page 85 of 136
CD
2D f Sref
2Do
V 2 Sref V 2 Swet Sref
2
2
V S
ref
22Di
V S
ref
(17)
S
Do D f ref Di
S
wet
Which, is how SURFACES returns the total drag coefficient.
Table 9.5-1: Example user entries for CD.
Example
Formula
Comment
1
CDo+CDf+CDi
Here, the math objects CDo, CDf, and CDi have
already been defined (as it is in the standard
template).
2
[CDo]+[CDf]+[CDi]
This could be a way to account for changes in
skin friction with Reynolds Number.
3
0.0045+0.000023*1.05*[Swet(5,6)]
Here a user is adding contribution of the wetted
area of surfaces 5 and 6, multiplying the result
by a 1.05 to account for curvature.
9.6 Compressibility Modeling
SURFACES allows the user several options in compressibility modeling. Figure 9.6-1 shows the form
used to select compressibility modeling. If no modeling is selected, SURFACES will return the
incompressible coefficients CL, CD, CDo, CDf, and CDi. Otherwise, the values returned will include the
compressibility corrections. The following corrections are included:
Table 9.6-1: Compressibility formulation in SURFACES.
Name
Formulation
CP
Prandtl-Glauert
Karman-Tsien
Laitone
User defined
Remarks
C Po
1 M 2
C Po
CP
C Po
M2
1 M 2
2
1 1 M 2
C Po
CP
M 2 1 0.2M 2
C Po
1 M 2
2
2 1 M
-
C Df C Dfo (0.000162M 5 - 0.00383 M 4 +
Frankl-Voishel
0.0332M 3 - 0.118M 2
0.0204M + 0.996)
Reference
Typically under-predicts experimental
values. Simple enough to be applicable
to most of the coefficients.
Ref. 6,
Equation
(9.36)
Is applied directly to panel pressure
coefficients inside SURFACES and is
thus not applied to CDo. Approaches
Prandtl-Glauert for low Mach Numbers.
Ref. 6,
Equation
(9.40)
Is applied directly to panel pressure
coefficients inside SURFACES and is
thus not applied to CDo.
Ref. 6,
Equation
(9.39)
Is applied directly to panel pressure
coefficient inside SURFACES and also
to CDo.
-
Based on Frankl-Voishel. The
polynomial is obtained by interpolating
the data in the graph on that page.
Ref. 3,
5.1.5.1-15.
Table 9.6-2: Compressibility Modeling in SURFACES.
Document
Title
Page Numbers
VLM.docx
Surfaces – User Manual – Vortex-Lattice Module
Page 86 of 136
When user selects…
CL
CD
CDo
CDf
CDi
…these compressibility models are applied:
None
Prandtl-Glauert
Karman-Tsien
Laitone
User defined
None
None
None
None
None
PrandtlGlauert
PrandtlGlauert
PrandtlGlauert
Frankl-Voishel
PrandtlGlauert
Karman-Tsien
Karman-Tsien
PrandtlGlauert
Frankl-Voishel
Karman-Tsien
Laitone
Laitone
PrandtlGlauert
Frankl-Voishel
Laitone
User defined
User defined
User defined
Frankl-Voishel
User defined
As can be seen from Table 9.6-2, the compressible CDo always uses the Prandtl-Glauert correction when
Karman-Tsien or Laitone are selected for CDi. Frankl-Voishel is always used to correct CDf.
9.8 How SURFACES Calculates Do, Df, Di, and D.
Once SURFACES has determined the constituent drag coefficients is computes the basic drag, skin
friction drag, induced drag, and total drag forces using the following formulation:
Basic Drag Force:
Do 12 V2 Sref CDo
(18)
Skin Friction Drag Force:
D f 12 V2 S wetCDf
(19)
Induced Drag Force:
Di 12 V2 S ref CDi
(20)
Total Drag Force:
D 12 V2 Sref CD
(21)
9.9 Limitations of Drag Estimation Methodologies
Figure 9.9-1 shows what a true drag polar might look like for a real airplane. This data might have been
collected in flight or wind tunnel testing. The figure also shows a “simulated” drag polar, using a standard
second order polynomial representation (also known CL-squared method). This is represented by an
equation such as:
CD = CDo + CDf + (CL - CL CDmin)²/·AR·e
Document
Title
Page Numbers
VLM.docx
Surfaces – User Manual – Vortex-Lattice Module
Page 87 of 136
CD = CDo + CDf + (CL - CL CDmin)²/·AR·e
CD
True drag polar (from flight
testing or wind tunnel
testing).
“Simulated” drag polar
(e.g. from k·CL-CLCDmin)²
methodology
CL
CL CDmin
Range of
“reasonable”
CD
predictions.
Figure 9.9-1: Typical drag polar.
The user should realize that the CL² method is only a representation that works over a range of CLs. It
becomes increasingly inaccurate if CL is too low or too high. Analysis done using that drag model will only
be reliable within that range. For instance, predictions based on the red curve in Figure 9.9-1 would
indicate less performance at higher AOA than the airplane would display in reality. However, there might
also be a scenario in which the simulated curve indicated less drag, and therefore better performance
than the real airplane would be capable. The point is that the user must understand the limitations of any
prediction made.
9.10 Setting up Drag Modeling on Example Aircraft
One of the advantages in using SURFACES is the geometric information can be utilized directly when
determining aerodynamic parameters. For instance, consider the balance a designer must find between
lift and drag. A large wing area results in a lower stalling speed, but greater drag and structural weight.
Being able to evaluate such parameters on the fly, as one modifies the wing (and thus its area) is
priceless to the aircraft designer. This section will show how to use geometric relations in drag modeling.
The model created in Section 4 will be used in a Step-by-Step procedure.
Generally, the user should prepare models for geometric relations after they have been constructed, in
order to prevent relations to become corrupt as a consequence of adding and deleting geometric entities
during the construction phase. At any rate, it is a good practice to check for errors in the assignment of
geometric references before solving.
STEP 1: Open the demo airplane project from Section 4. Select File->Open… and
navigate to find the file SIMPLE DEMO.SRF. Double-click to open.
STEP 2: Select the X-Y-Z view and orient the airplane similar to what is
shown in Figure 9.10-1.
Document
Title
Page Numbers
VLM.docx
Surfaces – User Manual – Vortex-Lattice Module
Page 88 of 136
Figure 9.10-1: The model if Step 2 was followed.
Let’s define the basic drag coefficient as follows:
CDo = 0.001+0.05*(AOA*Pi/180)^2+0.02*(AOY*Pi/180)^2
Let’s define the skin friction drag coefficient as
follows:
CDf = [CDf]
And let’s define the induced drag coefficient as
follows:
CDi = [CDi]
Now, let’s enter these:
STEP 3: Open the VLM Console. From the
Edit
menu
select
Reference
Drag
Modeling… (See Figure 9.10-2). This
opens the dialog box shown in Figure
9.10-3.
Enter
the
above
drag
coefficients and other information as
shown in the figure. When done, press
the [OK] button to store the entered
information and close the form.
Figure 9.10-2: Select Reference Drag
Document
Title
Page Numbers
VLM.docx
Surfaces – User Manual – Vortex-Lattice Module
Page 89 of 136
Modelling… from the VLM Console.
This step tells SURFACES how to compute our three crucial drag coefficients. We will now set up the skin
friction modeling for the surfaces and tell SURFACES how exactly to compute the skin friction drag.
Figure 9.10-3: Step 3 calls for this form to be filled out as shown.
Document
Title
Page Numbers
VLM.docx
Surfaces – User Manual – Vortex-Lattice Module
Page 90 of 136
STEP 4: Go back to the worksheet
select
Edit->Select
Surfaces…
press the [Select All] button in
form that opens up and then press
[OK] button (see Figure 9.10-4).
all the surfaces are selected.
and
The
the
the
Now
Figure 9.10-4: A quick selection of all surfaces.
STEP 5: Then select Modify->Surface
Properties… Select the option ‘Use
Curve A1 and A2 skin friction drag’ as
shown in Figure 9.10-5. Press [OK].
This step tells SURFACES to calculate the skin
friction drag using information we have yet to enter
for the A1 and A2 curves of the surfaces.
First, let’s assume the HT and VT are to be
designed using laminar flow airfoils capable of
sustaining 50% laminar flow. Let’s also assume the
wing will sustain laminar flow as discussed in the
example of Section 9.3.
Figure 9.10-5: A quick selection of all surfaces.
Document
Title
Page Numbers
VLM.docx
Surfaces – User Manual – Vortex-Lattice Module
Page 91 of 136
STEP 6: Select all the vectors as shown in Figure 9.10-6. Make sure you use
the rubberband when selecting the centerline vectors as there are really
three vectors (or airfoils) there; two belonging to the HT root and one to
the VT tip. The following assumes you did this correctly.
There are 3
vectors here!
Figure 9.10-6: A1 and A2 curves have been selected for all surfaces to be included.
STEP 7: Select Tools->Distribute Laminar Transition for Selected Vectors…
from the worksheet.
This opens the form shown in Figure 9.10-7. As said earlier, we are assuming here that the airfoils can
sustain 50% laminar flow on the upper and lower surfaces. This case is often checked by aircraft
designers and is especially prepared here for quick entry. You can simply press the buttons labeled [0%],
[25%], and [50%] to set up these special cases. This assumes a constant transition (i.e. independent of
AOA) throughout the operational range, which is not necessarily true, but handy for quick-studies.
STEP 8: Press the [50%] button to fill in the textboxes in the form. Select
the option ‘Smooth molded composite’ for surface type. Press the [OK] button
to accept the editing.
SURFACES is equipped with a handy tool to help you visualize your work. Let’s turn it on.
STEP 9: Open the VLM Console. Select the ‘Panel Results’ tab find and check
the option ‘Upper surface laminar region’ (see Figure 9.10-8). View the
results in Figure 9.10-9).
Document
Title
Page Numbers
VLM.docx
Surfaces – User Manual – Vortex-Lattice Module
Page 92 of 136
Figure 9.10-7: Entering laminar-to-turbulent transition information for the selected vectors.
Figure 9.10-8: Display laminar-turbulent regions.
Document
Title
Page Numbers
VLM.docx
Surfaces – User Manual – Vortex-Lattice Module
Page 93 of 136
Figure 9.10-9: Image shows the laminar flow region (green) on the HT and VT. Note that when you
select to enter the skin friction coefficient directly (see Cf_i in Figure 9.10-5), rather than using the
A1/A2 curves, SURFACES won’t know the extent of laminar flow and, thus, will not plot the green
areas as shown here.
Note that at computation time, SURFACES will compare the actual AOA to the ones filled in Figure 9.10-7
and estimate the transitions at that angle-of-attack. If the AOA is less than the value AOA1, it will use the
transition values entered for the low angle-of-attack condition. If the AOA is larger than AOA2 then it will
use the values entered for the high angle-of-attack condition. Now let’s set up the mixed boundary-layer
conditions on the wing.
STEP 10: Select the wing tip vectors as shown in Figure 9.10-10.
STEP 11: Select Tools->Distribute Laminar Transition for Selected Vectors…
from the worksheet. Enter the information shown in Figure 9.10-11.
STEP 12: Select the wing root vectors as shown in Figure 9.10-12. Again, make
sure you use the rubberband when selecting the centerline vectors as there
are two vectors there. The following assumes you did this correctly.
STEP 13: Select Tools->Distribute Laminar Transition for Selected Vectors…
from the worksheet. Enter the information shown in Figure 9.10-13.
Document
Title
Page Numbers
VLM.docx
Surfaces – User Manual – Vortex-Lattice Module
Page 94 of 136
Figure 9.10-10: Selecting the wing tip vector in Step 10.
Figure 9.10-11: Entering transition information for the wing tip in Step 11.
Document
Title
Page Numbers
VLM.docx
Surfaces – User Manual – Vortex-Lattice Module
Page 95 of 136
There are 2
vectors here!
Figure 9.10-12: Selecting the wing root vector in Step 12.
Figure 9.10-13: Entering transition information for the wing root in Step 13.
Document
Title
Page Numbers
VLM.docx
Surfaces – User Manual – Vortex-Lattice Module
Page 96 of 136
Now, only one thing remains. The wetted area for all the surfaces involved must be accounted for, or
SURFACES won’t be able to compute the skin friction drag coefficient. Let’s do this.
STEP 14: In the math objects list under the Objects tab tab on the pane in
left hand side of the worksheet, find the variable Swet. It should be in a
block of variables under the title “REFERENCE PARAMETERS”. Double-click on it
to open the variable editor (see Figure 9.10-1) and enter the function
[Swet(1,2,3,4,5)] (the order of the arguments doesn’t matter here). This will
calculate the wetted area of the selected surfaces. Press [OK] when done. .
Figure 9.10-14: Editing variable Swet.
That’s it. The model is ready to be used for drag estimation. The model with the entered laminar flow
regions is shown in Figure 9.10-15. The reported skin friction drag coefficient for the entire aircraft is
0.00907, but this yields a skin friction drag of a 38 lbf. But there is more. SURFACES allows us to take a
closer look at some other details about the skin friction drag. From the VLM Console’s Panel Results tab
you can select to have the program display the resulting skin friction drag coefficients or forces on each
surface. For instance, Figure 9.10-16 shows that each half of the HT is generating 2.6 lbf of skin friction
drag, while the VT produces some 3.9 lbf (remember that the airplane modeled is small, perhaps UAV
sized). Additionally, it is of interest in noting that by setting the transition of all airfoils to 0% (turbulent
airfoils) CDf jumps to 0.01179 and skin friction drag to 49.4 lbf; i.e. by almost 30%!
Document
Title
Page Numbers
VLM.docx
Surfaces – User Manual – Vortex-Lattice Module
Page 97 of 136
Figure 9.10-15: The model displaying the extent of laminar flow regions after Step 15 has been
completed (green panels). Note the magnitude of the CDf for the entire aircraft is 0.00907. This
generates a skin friction drag of 38.02 lbf.
Furthermore, now that we have defined the drag for the airplane, we can learn a number of performance
related things about it. This is done by creating the drag polar for the full airplane, but this is shown in
Figure 9.10-17. It was obtained by running the Virtual Wind Tunnel (note that elevator deflection was set
to 0°). Another interesting performance parameter obtained from the same VWT run is the L/D curve in
Figure 9.10-18. From it we learn that the expected maximum L/D is 16.4 at an AOA of 6°.
We have just taken the first steps into a world of information about our design.
Document
Title
Page Numbers
VLM.docx
Surfaces – User Manual – Vortex-Lattice Module
Page 98 of 136
Figure 9.10-16: Displaying the skin friction drag on component basis.
Document
Title
Page Numbers
VLM.docx
Surfaces – User Manual – Vortex-Lattice Module
Page 99 of 136
Figure 9.10-17: Drag polar generated by the Virtual Wind Tunnel for the example aircraft.
Figure 9.10-18: Variation of L/D with AOA, as generated by the Virtual Wind Tunnel.
Document
Title
Page Numbers
VLM.docx
Surfaces – User Manual – Vortex-Lattice Module
Page 100 of 136
9.11 Summary of SURFACES Drag Analysis Methodology
Basic drag coefficient
Skin friction drag
coefficient
Induced drag
coefficient
Textbook representation
CDo
CDf
CDi
SURFACES representation
CDo
CDf
CDi
Formulation allowed
User entry only
User entry or internal
formulation
User entry or internal
formulation
Internal formulation
No
Yes
Yes
-
[CDf]
[CDi]
Depends on user entry.
[CDf] returns the skin
friction coefficient by
summing up skin friction
coefficients assigned to
selected surfaces. The
function calculates the
area of the surface and
multiplies with the user
entered skin friction
coefficient.
[CDi] returns the induced
drag using one of three
modeling techniques;
surface integration, k·CL²
method, or Trefftz plane
integration.
Yes
Yes
Yes
Yes
No
Yes
No
No
No
Yes
Yes
No
No
No
No
Yes
No
Yes
Yes
Yes
Yes
Internal function name
How does it work?
Affected by
compressibility
Built-in compressibility
Can use Frankl-Voishel
Can use Prandtl-Glauert
Can use Karman-Tsien
Can use Laitone
Can use User Defined
References:
1. Aircraft Performance and Design. Anderson, John D., McGraw-Hill, 1999.
2. Convair Performance Methods.
3. USAF DATCOM. Hoak, D. E. et al, Flight Control Division, Air Force Flight Dynamics Laboratory,
1970.
4. Aircraft Design: A Conceptual Approach. Raymer, Daniel P., AIAA Education Series1989.
5. Aerodynamics, Aeronautics, and Flight Mechanics. McCormick, Barnes W., John Wiley & Sons,
1979.
6. Modern Compressible Flow. Anderson, John D., McGraw-Hill, XXXX.
7. Airplane Aerodynamics and Performance. Roskam, Jan, DARcorporation, 1997.
8. Boundary Layers. Young, A. D., AIAA Education Series, 1989.
Document
Title
Page Numbers
VLM.docx
Surfaces – User Manual – Vortex-Lattice Module
Page 101 of 136
10. Validation Samples
Document
Title
Page Numbers
VLM.docx
Surfaces – User Manual – Vortex-Lattice Module
Page 102 of 136
Validation 1: 2-D Flat Plate Airfoil
V1.1 Model
A high aspect ratio (AR=20) wing model was constructed to obtain 2-D pressure coefficients for
comparison to theoretical data. The model has a wing span of 20 units and a chord of 1 unit. The Angleof-Attack is 10° at an airspeed of 10 unit/sec and density of 1 mass unit/length3. The Cp at the center of
the model was obtained for 2, 5, 10, and 15 chord wise panel density. Each of the two surfaces has 34
span wise panels.
Figure 1-1: High aspect ratio wing used to evaluate the 2-D Cp.
V1.2 Expected Result
Is obtained from the book Aerodynamics, Aeronautics, and Flight Mechanics, by Barnes W. McCormick.
The data is obtained from Figure 3.17 on page 87.
Document
Title
Page Numbers
VLM.docx
Surfaces – User Manual – Vortex-Lattice Module
Page 103 of 136
V1.3 Results from SURFACES
Figure 1-2: 2-D Cp for various panel densities from SURFACES compared to exact theory.
Document
Title
Page Numbers
VLM.docx
Surfaces – User Manual – Vortex-Lattice Module
Page 104 of 136
Data from Figure 3.17
X
0.02
0.03
0.03
0.03
0.04
0.04
0.05
0.07
0.10
0.13
0.17
0.21
0.26
0.34
0.39
0.46
0.54
0.60
0.68
0.74
0.79
0.86
0.92
0.97
CP
4.88
4.47
4.22
4.01
3.45
3.23
2.93
2.52
2.06
1.77
1.54
1.35
1.16
0.96
0.85
0.75
0.64
0.55
0.47
0.41
0.33
0.27
0.18
0.08
Figure 1-2: 2-D Cp from Figure 3-17 of reference document.
Document
Title
Page Numbers
VLM.docx
Surfaces – User Manual – Vortex-Lattice Module
Page 105 of 136
Validation 2: 3-D Properties of Two Wings
V2.1 Models
Two moderately high aspect ratio wing models were constructed to compare results from the VLM to a
standard 3-D aerodynamic analysis. The models have a wing span of 10 ft and a chord of 1 ft. One model
has a 0° leading edge sweep and the other 35°. The angle of attack is 10° at an airspeed of 100 KCAS
(168.8 ft/s) and density of 0.002378 slugs/ft3. Each of the two surfaces has 32 spanwise and 8 chord-wise
panels.
Figure 2-1: The two 3-D wing models.
V2.2 Expected Result
The following parameters are given:
Airspeed
Wing area
Aspect Ratio
V = 168.8 ft/s (M = 168.8/1116 = 0.151)
S = 10 x 1 = 10 ft²
AR = b² / S = 10²/10 = 10
Assume a 2-D lift curve slope of
CL 2 D 0.1063 per deg (for NACA0009, from Theory of Wing
Sections, by Abbott and Doenhoff). Start by computing a 3-D lift curve slope from Method 1 of USAF
DATCOM Section 1, page 1-7.
2 AR
C L
2
AR 2 2 tan 2 C / 2
4
1
2
2
Where; AR = Wing Aspect Ratio = 10
= Mach number parameter (Prandtl-Glauert) = (1-M2)0.5 = 0.989
= Ratio of 2D lift curve slope to 2 = 0.1063 x (180/)/(2 = 0.96934
c/2 = Sweepback of mid-chord = 0° and 35°
Document
Title
Page Numbers
VLM.docx
Surfaces – User Manual – Vortex-Lattice Module
Page 106 of 136
c/2 = 35°
c/2 = 0°
2 AR
C L
AR 2 2 tan 2 C / 2
1
4
2
2
2
2
2 10
2
2 AR
C L
2 10
100 0.9892
0
1
4
2
0.96934 0.989 2
2
5.068 per rad 0.08846 per deg
4.286 per rad 0.07480 per deg
CL 10 CL 0.8846
The total lift of the wing is
CL 10 CL 0.7480
The total lift of the wing is
L 12 V 2 SC L
1
2
100 0.9892 tan 2 35
1
4
0.969342
0.9892
The lift coefficient at 10° is thus:
The lift coefficient at 10° is thus:
AR 2 2 tan 2 C / 2
1
4
2
2
L 12 V 2 SC L
0.002378 168.82 100.8846
299.7 lb f
1
2
0.002378 168.82 10 0.7480
253.4 lb f
Induced drag is found from the standard relation
Induced drag is found from the standard relation
0.8846 0.02491
CL2
CDi
AR
10
0.7480 0.01781
CL2
CDi
AR
10
Di 12 V 2 SC Di
Di 12 V 2 SC Di
2
1
2
2
0.002378 168.82 100.02491
8.4 lb f
Lift to drag ratio:
1
2
0.002378 168.82 100.01781
6.0 lb f
L
0.8846
35 .5
D 0.02491
Lift to drag ratio:
L
0.7480
42 .0
D 0.01781
V2.3 Results from SURFACES
Document
Title
Page Numbers
VLM.docx
Surfaces – User Manual – Vortex-Lattice Module
Page 107 of 136
Summary for wing with 0° leading edge sweep*:
Parameter
Lift curve slope
Lift coefficient
Induced drag coefficient
Lift force
Induced drag force
Lift-to-drag ratio
Symbol
CL
CL
CDi
L
Di
L/Di
Classic Method
0.0885
0.885
0.0249
300 lbf
8.4 lbf
35.5
SURFACES
0.0860
0.845
0.0227
286 lbf
7.7 lbf
37.2
Classic Method
0.0748
0.748
0.0178
253 lbf
6.0 lbf
42.0
SURFACES
0.07365
0.723
0.0166
245 lbf
5.6 lbf
43.5
*Span efficiency for both cases is unrealistically assumed to be 1.
Summary for wing with 35° leading edge sweep*:
Parameter
Lift curve slope
Lift coefficient
Induced drag coefficient
Lift force
Induced drag force
Lift-to-drag ratio
Symbol
CL
CL
CDi
L
Di
L/Di
*Span efficiency for both cases is unrealistically assumed to be 1.
Printout from SURFACES:
Document
Title
Page Numbers
VLM.docx
Surfaces – User Manual – Vortex-Lattice Module
Page 108 of 136
Validation 3: Warren 12 Wing
V3.1 Model
The Warren-12 wing is a standard Vortex-Lattice model used to check the accuracy of vortex lattice
codes. It provides a ready check case for the evaluation of any new or modified code, as well as a check
on the panel scheme layout. This wing is known as the Warren 12 planform, and is defined, together with
the “official” characteristics from previous calculations, in Fig. 3-1 below.
For the results cited, the reference chord used in the moment calculation is the average chord (slightly
nonstandard, normally the reference chord used is the mean aerodynamic chord) and the moment
reference point is located at the wing apex (which is also nonstandard).
“Published” Data:
AR = 2.83
LE = 53.54°
Cref = 1.00
XCG = 0.00
Swing = 2.83
CL = 2.743 / rad
CM = -3.10 / rad
Figure 3-1: Warren-12 planform
Document
Title
Page Numbers
VLM.docx
Surfaces – User Manual – Vortex-Lattice Module
Page 109 of 136
Figure 3-2: Warren-12 planform VL results
V3.2 Expected Result
The following results are expected:
CL = 2.743 / rad
CM = -3.10 / rad
V3.3 Results from SURFACES
The following results where obtained from SURFACES for 6 chordwise by 16 spanwise panels on each
wing (total of 192 panels):
CL = 2.790 / rad
CM = -3.174 / rad
The following results where obtained from SURFACES for 8 chordwise by 24 spanwise panels on each
wing (total of 384 panels):
CL = 2.776 / rad
CM = -3.152 / rad
The following results where obtained from SURFACES for 16 chordwise by 36 spanwise panels on each
wing (total of 1296 panels):
CL = 2.767 / rad
CM = -3.139 / rad
Document
Title
Page Numbers
VLM.docx
Surfaces – User Manual – Vortex-Lattice Module
Page 110 of 136
Validation 4 : Bertin-Smith 2-D Wing
V4.1 Model
Calculations for a highly swept back, high aspect ratio wing is provided in the text Aerodynamics for
Engineers by Bertin and Smith. This wing has detailed calculations shown in Example 6-2 (page 198) in
the text. The model in the text was recreated using SURFACES. Additionally, a comparison to another
VLM code (Tornado) is made.
Figure 4-1: The Bertin-Smith swept back wing.
V4.2 Expected Result
Is obtained from the book Aerodynamics for Engineers, by Bertin and Smith. The data is obtained from
the calculations on page 202, but the resulting lift curve slope is:
CL = 0.05992 / ° = 3.433 / rad
Document
Title
Page Numbers
VLM.docx
Surfaces – User Manual – Vortex-Lattice Module
Page 111 of 136
V4.3 Results from SURFACES
The following results where obtained from SURFACES for 1 chordwise by 4 spanwise panels on each
wing (total of 8 panels):
CL = 0.06011 / ° = 3.442 / rad
SURFACES yields a difference of 0.26%. Another VLM code, called Tornado, considers the same
problem. In his Master Thesis, “A Vortex Lattice MATLAB Implementation for Linear Aerodynamic Wing
Applications” the author of Tornado, Mr. Tomas Melin, reports a lift curve slope of 3.450 /rad using
Tornado. The difference using that code is 0.5%.
It can be seen that both codes are very close to the theoretical calculations in the source, but
SURFACES yields less difference than Tornado. It should also be noted that the calculations in the
source only carries 4 significant digits through the calculations – SURFACES uses a double floating point
accuracy.
Summary:
Parameter
Lift curve slope
Symbol
CL
Bertin-Smith
3.433
TORNADO
3.450 (0.50%)
SURFACES
3.442 (0.26%)
Document
Title
Page Numbers
VLM.docx
Surfaces – User Manual – Vortex-Lattice Module
Page 112 of 136
Validation 5: Cessna 172
Comparison of Several Codes
V5.1 Model
A model of the Cessna 172 was constructed to compare stability derivatives from SURFACES to other
VLM codes (AVL, VIRGIT, TORNADO) and the panel code CMARC, as well as published Cessna data.
The model has the camber line of the NACA 2412 airfoil of the Cessna 172. Additionally, it has a 1°30’
angle-of-incidence at the root of the wing and –1°30’ at the tip, and a 1°44’ dihedral like the original
airplane. A sweep of parameters was performed at an airspeed of 178.9 ft/s, at an altitude of 4921 ft ( =
0.002054 slugs/ft3), and at a weight of 2207 lbs.
Figure 5-1: A Model of the C-172
V5.2 Expected Result
Range for CL:
The following parameters are given:
Wing area
Aspect Ratio
S = 174 ft²
AR = b² / S = 36.08²/174 = 7.48
Assume a 2-D lift curve
slope of
CL 2 D 0.107 per deg (for NACA 2412, from Theory of Wing
Sections, by Abbott and Doenhoff, page 478).
Compute a 3-D lift curve slope from Method 1 of USAF DATCOM Section 1, page 1-7.
Document
Title
Page Numbers
VLM.docx
Surfaces – User Manual – Vortex-Lattice Module
Page 113 of 136
2 AR
C L
AR
2
2
2
2
tan 2 C / 2
1
4
2
Where; AR = Wing Aspect Ratio = 7.48
= Mach number parameter (Prandtl-Glauert) = (1-M2)0.5 1
= Ratio of 2-D lift curve slope to 2 = 0.107 x (180/)/(2 = 0.97572
c/2 = Sweepback of mid-chord = 0°
2 AR
CL
tan 2 C / 2
1
4
2
2 7.48
4.74 per rad 0.08267 per deg
7.482
1 4
2
0.975722
2
AR
2
2 2
Range for Cn:
Consider the following check for Cn. The height, root, and tip chord of the fin is 5.50 ft, 4.25 ft, and 2.30
ft, respectively. The leading edge sweep is 40°. The airfoil is a NACA 0009 airfoil, whose properties are
discussed in Validation Sample 2. Using this data we compute the following lift curve slope for the fin:
Fin area
Aspect Ratio
Sfin = ½ · (4.25 + 2.30) · 5.50 = 18.01 ft²
AR = bfin² / Sfin = 5.50²/18.01 = 1.679
Assume a 2-D lift curve slope of
CL 2 D 0.1063 per deg (for NACA0009, from Theory of Wing
Sections, by Abbott and Doenhoff).
Compute a 3-D lift curve slope from Method 1 of USAF DATCOM Section 1, page 1-7.
2 AR
C L
2
AR 2 2 tan 2 C / 2
1
4
2
2
Where; = Mach number parameter (Prandtl-Glauert) = (1-M2)0.5 1
= Ratio of 2D lift curve slope to 2 = 0.1063 x (180/)/(2 = 0.96934
c/2 = Sweepback of mid-chord 28°
Document
Title
Page Numbers
VLM.docx
Surfaces – User Manual – Vortex-Lattice Module
Page 114 of 136
2 AR
C L
2
AR 2 2
2
tan 2 C / 2
1
2
2 1.679
4
2
1.679
tan 28
4
1
2
2
0.96934
12
10.54947
2.197 per rad 0.03835 per deg
2 3.00019 1.28271 4
2
If one considers the fin at a = 1°, the fin lift coefficient is given by
C L 1 C L 0.03835 . The total
lift of the fin at V = 178.9 ft/s and = 0.002054 slugs/ft is found to be
3
L fin 12 V 2 SC L
1
2
0.002054178.92 18.010.03835 22.7 lb f
Assuming a tail arm from reference point of 16.0 ft, the total moment is found to be 363.2 ft·lbf, which
yields a Cn of:
Cn
1
2
N
V 2 Sb
1
2
363 .2
0.00176
0.002054 178 .9 2 174 36 .17
Since N equals 0 ft·lbf at = 0°, Cn can be found to be:
C n
C n 0.00176
0.00176 per 0.1006 per rad
1
From this, a reasonable Cn for this plane should be of the order of 0.03-0.17, depending on the
contribution of other components of the airplane.
V5.3 Results from SURFACES
The following results where obtained from SURFACES and compared to that of other VLM codes. The
data is obtained from the Tornado manual, pages 34-38. All the stability derivatives presented below are
evaluated at = 0.
TABLE 5-1: Stability Derivatives at = 0:
TEST
15
AVL
VIRGIT
CMARC
TORNADO
SURFACES
NOTE
CL
4.6
4.98
5.25
5.214
5.2763
5.128/5.1803
1
CD
0.13
0
-0.005
0.086
-0.022
0.051/0.146
2
CY
-
0
0
0
0
0
-
15
Comparison data is obtained from Airplane Flight Dynamics and Automatic Flight Controls, by Jan Roskam. Appendix C, page
592.
Document
Title
Page Numbers
VLM.docx
Surfaces – User Manual – Vortex-Lattice Module
Page 115 of 136
Cl
-
0
0
0
0
0
-
Cm
-0.89
-0.33
-0.85
-1.432
-1.498
-1.148/
3
Cn
-
0
0
0
0
0
-
CL
-
0
0
0
0
0
-
CD
-
0
0
0
0
0
-
CY
-0.31
-0.26
-0.24
-0.104
-0.3
-0.370/-0.341
4
Cl
-0.089
0.33
0.007
0.063
0.025
-0.0479/-0.045
5
Cm
-
0
0
0
0
0
-
Cn
0.065
0.092
0.1
0.042
0.12
0.117/0.0911
6
CLp
-
0
0
0
0
0
-
CDp
-
0
0
0
0
0
-
CYp
-
-0.066
-0.1
-0.015
-0.039
-0.110
7
Clp
-0.47
-0.325
-0.52
-0.995
-0.526
-0.510/-0.508
7
Cmp
-
0
0
0
0
0
-
Cnp
-0.03
-0.007
-0.01
-0.133
-0.006
-0.0056/0.018
7
CLq
-
9.41
9.3
9.003
10.18
7.894/9.111
8, 9
CDq
-
0
0
0
0.128
0.432/0.256
8, 10
CYq
-
0
0
0
0
0
-
Clq
-
0
0
0
0
0
-
Cmq
-12.4
-14.43
-15
-17.155
-14.96
-12.156/14.3
8, 9
Cnq
-
0
0
0
0
0
-
CLr
-
0
0
0
0
0/0.0029
-
CDr
-
0
0
0
0
0
-
CYr
0.21
0.209
0.23
0.45
0.271
0.296/0.306
7, 9
Clr
0.096
0.021
0.008
0.195
0.009
0.101/0.0926
7, 9
-
Cmr
-
0
0
0
0
0
Cnr
-0.099
-0.075
-0.095
-0.212
-0.11
-0.115/-0.119
All derivatives are per radian.
NOTES:
(1) There is a known difference in input geometry, which will likely cause numerical discrepancies. It is not
known if the other VLM codes included washout, dihedral, and wing camber like the SURFACES
model.
(2) A value of zero is expected at CL = 0 only if the airfoil of the wing is symmetrical (flat plate).
(3) The different values are primarily due to the different reference locations, but also due to possible
power effects. For instance, SURFACES and VIRGIT use 29.5% of MAC, Tornado uses 31.9% MAC.
AVL and CMARC reference points are unknown. SURFACES has the reference point located 2 ft
below the wing plane and does not account for power effects – it is unknown where the other codes
place the vertical location of the reference point, or if propeller normal force is accounted for.
(4) Note that for SURFACES the standard coordinate system is used with the Angle-of-Yaw (positive
beta) coming from the left, rather than the right. Consequently, a sign change is added to compare to
Document
Title
Page Numbers
VLM.docx
Surfaces – User Manual – Vortex-Lattice Module
Page 116 of 136
the other codes.
(5) SURFACES evaluated a restoring dihedral effect for the C-172 – the only one of the above codes.
(6) [Deleted]
(7) The rate of roll and yaw derivatives are obtained with respect to P·Bref/(2·Vinf). For that reason,
derivatives with respect to P or R are multiplied by the factor 2·Vinf/Bref.
(8) The rate of pitch derivative is obtained with respect to P·Cref/(2·Vinf). For that reason, derivatives with
respect to Q are multiplied by the factor 2·Vinf/Cref.
(9) Differences are most likely due to modeling differences and differences in location of reference point.
(10) A change in lift should be associated with a change in drag. It is not known why Tornado and
SURFACES are the only codes to display a value here.
V5.4 Comparison of Codes
Table 5-1 prompts some interesting questions – for instance, how do the codes compare? Table 5-2
displays one such comparison. Here, a grade from 1 (worst) to 5 (best) is assigned to those stability
parameters that can be compared to the source. The parameters are compared by computing difference
using:
difference
PCODE PSOURCE
PSOURCE
Then, the code with the largest difference scores 1 and the code with the smallest one 5. A total of 30
derivatives are considered in Table 5-1, of which 12 have a value from the source document (Airplane
Flight Dynamics and Automatic Flight Controls, by Jan Roskam). The highest total score a code can receive is 5
x 12 = 60. The lowest total score is 12. The scores for the 5 codes are compared in Table 5-2:
Document
Title
Page Numbers
VLM.docx
Surfaces – User Manual – Vortex-Lattice Module
Page 117 of 136
Table 5-2: Comparison of Several VLM Codes and the Panel Code CMARC.
CL
CD
Cm (CMy )
CY
Cl (CMx )
Cn (CMz )
Cl , P (CMx, P)
Cn, P (CMz, P)
Cm, Q (CMy, Q)
CY, R
Cl , R (CMx, R)
Cn, R (CMz, R)
TOTAL SCORE
Number of 1s
Number of 2s
Number of 3s
Number of 4s
Number of 5s
AVL
VIRGIT
CMARC
5
3
2
4
1
4
2
4
4
5
4
2
40
2
2
5
2
4
3
4
5
2
4
2
5
40
3
5
3
1
2
5
1
1
1
1
1
1
25
TORNADO SURFACES
1
1
1
5
3
1
3
3
3
3
3
4
31
4
4
4
3
5
2
5
2
5
2
5
3
44
1
3
1
5
2
0
5
1
3
3
7
1
1
0
2
4
0
6
1
1
0
2
2
3
4
Table 5-2 shows that SURFACES scores highest (44 points). CMARC scored worst (25 points). Two
codes never scored worse than 2, VIRGIT and SURFACES. On the other hand, AVL, CMARC, and
TORNADO all have at least one worst score. The most frequent low score (1) was received by CMARC, 7
times. The most frequent high score (5) was received by SURFACES, 4 times. In fact, SURFACES was
the only code to correctly compute a restoring dihedral effect for the Cessna 172.
Document
Title
Page Numbers
VLM.docx
Surfaces – User Manual – Vortex-Lattice Module
Page 118 of 136
Validation 6: 2-D CL, CD, CM for NACA 23012
V6.1 Model
A high aspect ratio (AR=20) wing model was constructed to perform a 3-D similarity evaluation to a
standard 3-D aerodynamic analysis. The model has a wing span of 20 ft and a chord of 1 ft. An angle
sweep of attack from –8° through 8° at an airspeed of 100 ft/sec and density of 0.002378 slugs/ft3 was
performed. The model has 16 chordwise and 60 spanwise panels. The panels form the camber line of the
NACA 23012 airfoil. The purpose of this validation is to demonstrate how SURFACES simulates airfoil
properties.
Figure 6-1: 3-D wing model with a 23012 airfoil
V6.2 Expected Result
The following parameters are given:
Airspeed
Wing area
Aspect Ratio
V = 100 ft/s
S = 20 x 1 = 20 ft²
AR = b² / S = 20²/10 = 20
The 2-D lift curve slope of
Cl 0.1051 per deg , Cl0 0.1233 , and Cm 0.00020 0.01198 is
obtained from interpolation (for NACA 23012, from Theory of Wing Sections, by Abbott and Doenhoff).
Compute a 3-D lift curve slope from Method 1 of USAF DATCOM Section 1, page 1-7.
Document
Title
Page Numbers
VLM.docx
Surfaces – User Manual – Vortex-Lattice Module
Page 119 of 136
AR Cl
C L
AR 2 2 tan 2 C / 2
4
1
2
2
2
Where; AR = Wing Aspect Ratio = 20
= Mach number parameter (Prandtl-Glauert) = (1-M2)0.5 1
= Ratio of 2D lift curve slope to 2 = 0.1051 x (180/)/(2 = 0.95840
c/2 = Sweepback of mid-chord = 0°
2 AR
C L
AR 2 2 tan 2 C / 2
4
1
2
2
2
2 20
400
0
2
1 2 4
2
0.95840 1
5.472 per rad 0.09551 per deg
Compute zero lift angle for the 2D airfoil using: Cl0 0 Cl
Compute lift at zero angle for the 3D wing using:
0
Cl0
Cl
0.1233
-1.173
0.1051
CL0 0 CL 1.173 0.09551 0.1121
Compute pitching moment for 3D wing:
Cm Cl x
x
C m
Cl
Cm
CL x CL
Cl
0.01198
0.09551
0.1051
0.01089
C
m 3 D
V6.3 Results from SURFACES
Summary:
Parameter
Lift curve slope
Lift coefficient intercept
Moment coefficient
16
Symbol
CL
CL0
CM
Experiment16
0.1051 (2-D value)
0.1233
0.00020· - 0.01198
Classical Method
0.0955
0.1121
Surfaces
0.0943
0.1194
0.00016· - 0.01888
Theory of Wing Sections, by Abbott & Doenhoff, graph on page 498.
Document
Title
Page Numbers
VLM.docx
Surfaces – User Manual – Vortex-Lattice Module
Page 120 of 136
Figure 6-2: 3-D wing model with a 23012 airfoil camber line.
Figure 6-3: 3-D wing model with a 23012 airfoil camber line.
Document
Title
Page Numbers
VLM.docx
Surfaces – User Manual – Vortex-Lattice Module
Page 121 of 136
Validation 7: F-104 Starfighter
V7.1 Model
A model of the Lockheed F-104 Starfighter was constructed to compare selected stability derivatives from
SURFACES to that presented in the text Flight Stability and Automatic Control, by Robert C. Nelson. The
data can be found in Appendix B of the text, on page 253.
W = 16300 lbs
S = 196.1 ft²
CMAC = 9.5 ft
M = 0.257 at S-L
CG at 7% MAC
Figure 7-1: 3-D Vortex-Lattice model of the F-104 Starfighter
V7.2 Results from SURFACES
Summary:
Parameter
Lift coefficient
Drag coefficient
Lift curve slope
Drag curve slope
Moment slope (CMy)
Side force slope (CFy)
Dihedral effect (CMx)
Weathercock stability (CMz)
Source17
0.735
0.263
3.44
0.45
-0.64
-1.17
-0.175
0.50
Symbol
CL
CD
CL
CD
CM
CY
Cl
Cn
SURFACES
0.71718
0.17519
3.36
0.6620
-0.756
-1.12
-0.156
0.491
%Difference
2.4%
33.5%
2.4%
45.8%
18.1%
4.3%
10.9%
1.8%
All derivatives are per radian. At M=0.257
17
Flight Stability and Automatic Control, by Robert C. Nelson.
Note that V = 0.257 x 1116 ft/s = 286.8 ft/s. Therefore, Lift is ½ ·0.002378·286.8² ·196.1·0.735 = 14097 lbf. This is the same lift
SURFACES generated to get the given lift coefficient.
19
Using the surface integration method
20
This is highly dependent on drag model. Here, CD = (0.0009474· -0.0004737)*180/, which at = 12.6 becomes 0.656.
18
Document
Title
Page Numbers
VLM.docx
Surfaces – User Manual – Vortex-Lattice Module
Page 122 of 136
Figure 7-2: A Starfighter in flight
Image from http://www.starfighters.net/gallery/1999gallery/1999gallery.html
Document
Title
Page Numbers
VLM.docx
Surfaces – User Manual – Vortex-Lattice Module
Page 123 of 136
Validation 8: Ryan Navion
V8.1 Model
A model of the Ryan Navion was constructed compare to the analysis of Example Problem 2.1 found in
Robert C. Nelsons “Flight Stability and Automatic Control”, on pages 53-58. The VL model was based on
the three-view in Figure 8-1.
Figure 8-1. A three-view drawing of the Ryan Navion.
The reference document determines several parameters for the Navion in Problem 2.1. The calculation of
selected parameters is repeated in Section V8.1 for convenience.
Document
Title
Page Numbers
VLM.docx
Surfaces – User Manual – Vortex-Lattice Module
Page 124 of 136
Figure 8-2. A Ryan Navion in flight – Photographer unknown.
Figure 8-3. The SURFACES Vortex-Lattice model of the Ryan Navion.
V8.2 Expected Result
The stick-fixed neutral point is estimated from Equation (2.37) in the reference document, here written
using variables more consistent with this document:
C M f
CL
X NEU
X
d
AC
VHT t 1
CREF CREF CLw
CLw d
Document
Title
Page Numbers
VLM.docx
Surfaces – User Manual – Vortex-Lattice Module
Page 125 of 136
Where (note that numerical values are obtained from the document);
CREF = Reference wing chord = 5.7 ft
CLw = Slope of wing lift coefficient = 4.3 per rad
CLt = Slope of HT lift coefficient = 3.91 per rad
CMf = Slope of fuselage moment coefficient = 0.12 per rad
d/d = Variation of downwash with angle-of-attack = 0.45
VHT = Horizontal tail volume = 0.66
XAC = Aerodynamic center of wing-body combination = 1.425 ft
= Tail efficiency = 1
X NEU 1.425 0.12
3.91
1 0.45 0.552
10.66
C REF
4 .3
5.7
4 .3
Note that the reference document (which is a First Edition) states the Xneu is at 0.37, but in conversation
with the author (R. C. Nelson) it was confirmed this was an error that had been corrected for later editions
of the book.
Note that the planform properties of the VL model were determined using SURFACES’ built in tool, which
printed out the following analysis report:
MEAN AERODYNAMIC CHORD ANALYSIS
Surface chord, root ..............
Surface LE, root .................
.................
Cr = 7.200 ft
Xr = 0.000 ft
Yr = 0.000 ft
Surface chord, tip ...............
Surface LE, tip ..................
.................
Ct = 4.022 ft
Xr = 0.806 ft
Yr = 16.446 ft
Surface
Surface
Surface
Surface
ft²
half span ................ Bhalf =
span .....................
B =
half area ................ Shalf =
total area ...............
Stot
16.446 ft
32.893 ft
92.28 ft²
= 184.56
Surface
Surface
Surface
Surface
Surface
LE sweep angle ...........
aspect ratio .............
taper ratio ..............
Mean Aerodynamic Chord ...
MAC location .............
.............
2.805°
5.8621
0.5586
5.761 ft
0.365 ft
7.447 ft
GLE
AR
TR
Cmac
Xmac
Ymac
=
=
=
=
=
=
This information can be used when calculating the CG and neutral point locations as percentages of the
Mean Aerodynamic Chord (MAC). For instance, the CG located at Xcg = 2.0465 ft becomes 100·(2.04650.365)/5.7 = 29.5% MAC.
Document
Title
Page Numbers
VLM.docx
Surfaces – User Manual – Vortex-Lattice Module
Page 126 of 136
Figure 8-4. Computing the neutral point.
The neutral point was estimated by computing the slope of the CMY curve for two different values of Xcg;
1.85 ft and 2.0465 ft. The corresponding values of CMY for two angles-of-attack (AOA1 and AOA2) was
evaluated (SURFACES provides a tool to make this simple, shown in Figure 8-4). The resulting Xneu is
2.721 ft. This corresponds to:
X NEU
2.721 0.365 41 .3% MAC
100
C REF
5 .7
V8.3 Results from SURFACES
Summary (note that values from Nelson and Schmidt appear to be from the same source):
Ryan Navion
Source/
Symbol
Air density
Outside Air Temperature
Speed of sound
Altitude
Far field speed
Mach Number
Baseline AOA
Reference span
21
22
OAT
ao
H
Vinf
M
AOA
Bref
Flight Stability
and Automatic
Control, R. C.
Nelson
VLM using
SURFACES
Panel Method
21
using CMARC
(DWT)
Introduction to
Aircraft Flight
Dynamics, Louis
22
V. Schmidt
3
0.002378 slugs/ft
518.69 °R
1116 ft/s
0 ft
178 ft/s
0.159
0.88°
0.76°
33.40 ft
-
0.6°
Source: http://www.aerologic.com/stab/corr.html.
Document is cited in footnote 1.
Document
Title
Page Numbers
VLM.docx
Surfaces – User Manual – Vortex-Lattice Module
Page 127 of 136
Reference wing chord
Reference wing area
Reference aspec ratio
Reference weight
Center of gravity (along X-axis)
Cref
Sref
ARref
W
5.70 ft
184.0 ft²
6.06
2750 lbs
Xcg
0.295 Cref
Neutral point (along X-axis)
Xneu
0.552 Cref
Moment of inertia about X-axis
Moment of inertia about Y-axis
Moment of inertia about Z-axis
Product of inertia about X-axis
Product of inertia about Y-axis
Product of inertia about Z-axis
Lift coefficient for = 0°
Slope of lift coefficient
Lift coefficient
Parasitic drag coefficient
Ixx
Iyy
Izz
Ixy
Ixz
Iyz
CLo
CLA
CL
CDo
0.375
4.44
0.41
0.0390
Total drag coefficient
CD
0.05
CDA
0.33
e
CXA
CYA
CZA
CMXA
CMA
CMZA
CXB
CYB
CZB
CLB
CMB
CNB
CXTA
CYTA
CZTA
CLTA
CMTA
CNTA
CXU
CYU
CZU
CLU
CMU
CNU
CXP
CYP
CZP
CLP
CMP
CNP
CXQ
CYQ
CZQ
CLQ
CMQ
0.85
0.330
-4.850
-0.683
-0.564
-0.0740
0.0710
1.7000
-4.36
-0.1000 (?)
-0.41
-0.0575
-9.96
Slope of drag coefficient at = 0°
Span efficiency (Oswald’s)
AOA DERIVATIVES
AOY DERIVATIVES
d(AOA)/dt DERIVATIVES
U-DERIVATIVES
P-DERIVATIVES
Q-DERIVATIVES
23
23
0.295 Cref
0.25 Cref
(2.0465 ft)
0.413 Cref
0.38 Cref
(2.721 ft)
1048 slugs·ft²
3000 slugs·ft²
3530 slugs·ft²
0.329
4.722
0.406
0.039
0.04952 (from
quadratic drag
polar)
0.258 (quantic fit
at = 0.88°)
0.85
0.268
0
-4.935
0
-0.584
0
0
-0.5065
0
-0.07723
0
0.07639
Not predicted
Not predicted
Not predicted
Not predicted
Not predicted
Not predicted
Not predicted
Not predicted
Not predicted
Not predicted
Not predicted
Not predicted
0
0
0
-0.44
0
-0.0652
0
0
-8.99
0
-12.98
-
5.15
0.415
-
4.44
0.415
-
-
0.051
-
0.330
-0.8721
-6.87
-0.683
-9.96
From analysis on page 54 of Reference document.
Document
Title
Page Numbers
VLM.docx
Surfaces – User Manual – Vortex-Lattice Module
Page 128 of 136
CLQ
CXR
CYR
CZR
CLR
CMR
CNR
R-DERIVATIVES
0.1070
-0.1250
0
0
0.4059
0
0.1374
0
-0.1557
-
-
Additional comparison based on a table from the source http://www.aerologic.com/stab/corr.html.
CMARC
(DWT)
Perkins &
Hage
Etkin
Datcom
SURFACES
Wind
Tunnel
Flight Test
-0.732
-
-
-
-
-0.732°
-
-
Elevator
deflection, de
8.28
-
-
-
-
-
-
-
CL
0.271
-
-
-
-
0.269
-
-
CD
-
-
-
-
-
-
-
-
CL
5.23
4.36
4.25
4.54
5.5
4.722
4.52
6.04
CD
-
-
-
-
-
-
-
-
CM
-0.91
-.83
-.715
-0.545
-1.24
-0.584
-0.95
-
CMq
-6.99
-9.6
-9.75
-9.5
-12.98
-12.98
-
-
CMde
-2.99
-3.0
-4.91
-4.91
-6.58
-
-
-
d/d
0.428
-
-
-
-
-
-
-
CLde
0.66
-
-
-
-
-
-
-
CMde
-1.68
-
-
-
-
-
-1.42
-1.42
Angle of
attack,
24
24
Seckel
Seckel E. “Stability and Control of Airplane and Helicopters”, Academic Press, 1964.
Document
Title
Page Numbers
VLM.docx
Surfaces – User Manual – Vortex-Lattice Module
Page 129 of 136
Validation 9: Comparison to NACA R-1208
V9.1 Introduction
This validation compares SURFACES analysis to the swept back wing featured in the NACA report R1208. In the report a highly swept back, high aspect ratio wing compares three numerical methods to
wind tunnel test results. In this validation sample, a similar approach will be taken and the section lift
coefficients from SURFACES will be compared to the wind tunnel test results. The wing planform is
shown in Figure 9-1.
Figure 9-1: The swept-back wing wind tunnel tested per NACA R-1208. Inserted image shows the
SURFACES VL model.
Three VL models were generated; one has 16 spanwise panel per wing side, the second one has 32
spanwise panels, and the third has 64 spanwise panels per side. The comparison takes place at 4.7°
angle of attack, per the NACA report..
Document
Title
Page Numbers
VLM.docx
Surfaces – User Manual – Vortex-Lattice Module
Page 130 of 136
V9.2 Expected Result
Figure 9-2: Original graph of spanwise loading from NACA R-1208.
V9.3 Results from SURFACES
The comparison of the numerical to the experimental data shows a close agreement, but also that the
accuracy improves with number of panels.
Figure 9-3: Comparing spanwise loading from SURFACES to experimental data from NACA R1208.
Document
Title
Page Numbers
VLM.docx
Surfaces – User Manual – Vortex-Lattice Module
Page 131 of 136
Figure 9-4: Comparing lift curve from SURFACES to experimental data from NACA R-1208.
Figure 9-5: Comparing moment curve from SURFACES to experimental data from NACA R-1208.
The experimental data shows the well known early tip stall phenomena of swept back wings,
caused by spanwise flow near the tips. This is reproduced here to remind the user that all inviscid
codes (vortex-lattice, doublet-lattice, panel-codes, etc) do not model this viscous phenomena
accurately because the mathematical solution forces the flow to stay attached.
Document
Title
Page Numbers
VLM.docx
Surfaces – User Manual – Vortex-Lattice Module
Page 132 of 136
Validation 10: Comparison to NACA TN-1422
V10.1 Introduction
This validation compares SURFACES analysis to two of the three tapered and twisted wings featured in
the NACA report TN-1422. This report compares several aerodynamic properties of three wings obtained
in wind tunnel tests. In this validation sample the section lift coefficients, lift curves, and moment curves
for two of these wings (from hereon referred to as WING 2 and WING 3) from SURFACES will be
compared to the wind tunnel test results. The general planform shape is shown in Figure 10-1, and is
reproduced from the original document.
Figure 10-1: The general shape of the wind tunnel model tested per NACA TN-1422.
V10.2 Results from SURFACES
The comparison of the numerical to the experimental data shows a close agreement.
Document
Title
Page Numbers
VLM.docx
Surfaces – User Manual – Vortex-Lattice Module
Page 133 of 136
Figure 10-2: Match for the lift curve for the twisted and untwisted wings.
Document
Title
Page Numbers
VLM.docx
Surfaces – User Manual – Vortex-Lattice Module
Page 134 of 136
Figure 10-3: Match for the pitching moment for the twisted wing. Note the deviation at higher
values of the lift coefficient, which is caused by viscous effects.
Figure 10-4: Lift distribution at stall for the twisted wing.
Document
Title
Page Numbers
VLM.docx
Surfaces – User Manual – Vortex-Lattice Module
Page 135 of 136
Figure 10-5: Lift distribution at stall for the untwisted wing.
Document
Title
Page Numbers
VLM.docx
Surfaces – User Manual – Vortex-Lattice Module
Page 136 of 136