1
Testooj user’s manual
October 25, 2007
A testing tool developed by:
Alarcos Research Group
Department of Information Systems and Technologies
University of Castilla-La Mancha
Project leader: Macario Polo Usaola (macario.polo(at)uclm.es)
1
1
Introduction
testooj is a tool, developed in Java, for testing Java programs. It allows to main
functionalities:
1) Generation of test cases based on regular expressions.
2) Execution of test cases to perform different types of result analysis.
testooj is a useful tool, easy-to-use. The test case generation functionality is appropriated both for practitioners and for researchers. In our opinion, the second one is
more research-oriented.
2
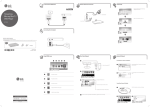
Launching testooj
testooj can be launched: (1) double-clicking the testooj3Eclipse.jar file; (2)
opening a console and executing the command java -jar testooj3Eclipse.jar.
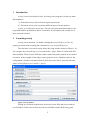
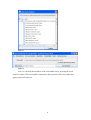
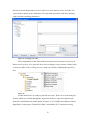
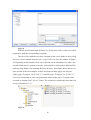
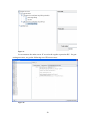
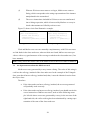
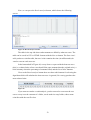
The first time is executed, testooj shows the setup window shown in Figure 1. In
our example, the testooj3Eclipse.jar is saved in the c:/paper folder of a Microsoft Windows machine. The user must fulfil the window with some paths required for its normal
execution. In the example of the figure, testooj proposes a set of default values for the
configuration, which are calculated from its home directory (this is, from the directory
where testooj3jEclipse.jar is saved: c:/paper).
Figure 1. Set up window
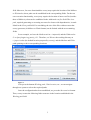
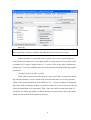
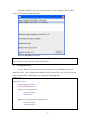
During its execution, both the user and testooj create files and saves results in
several folders. These ones will be saved in several folders under the Working path
2
field. Moreover, for some functionalities testooj may require the location of the MuJava
or JUnit tools, whose paths can be established in the corresponding fields. For the test
case execution functionality, testooj may require the location of more test files (besides
those of MuJava), what can be established in the Additional test files field. The class
path, required generating or executing test cases for classes with dependencies, is established in the Class path field. For concluding, the size of the files with test cases that
testooj generates (in MuJava or JUnit formats) can be limited with the two remaining
fields.
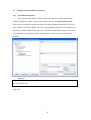
In our example, we have the MuJava tool at c:/mujava06, and the JUnit tool at
C:\eclipse\plugins\org.junit4_4.3.1. Therefore, we’ll leave the working directory at
c:/paper/results (the default location proposed by testooj), and the MuJava and JUnit
paths pointing to their corresponding locations:
Figure 2
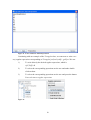
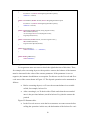
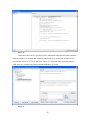
If we press the buttons Working path, JUnit location, etc., we can navigate
through our system to select the required paths.
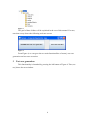
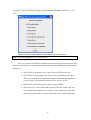
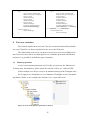
Once the configuration has been established, we press the Save and exit button.
Then, testooj creates the following folder structure in the location established in the
Working path field:
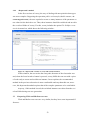
3
Figure 3
The goal of these folders will be explained in the rest of this manual. For now,
note that testooj shows the following welcome screen:
Figure 4
From Figure 4, we can go to the two main functionalities of testooj: test case
generation and test case execution.
3
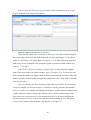
Test case generation
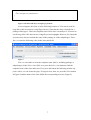
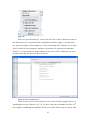
This functionality is launched by pressing the left button of Figure 4. Then, tes-
tooj shows the next window:
4
Figure 5
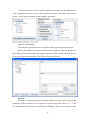
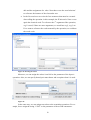
Let us see two important fields in this window:
•
Class path: testooj shows here the class path established in the setup
window (Figure 2). testooj uses this field for looking the class under test
(CUT). If the CUT requires additional libraries or folders, this is the
place where these values must be established.
•
Select class: with this button, we can navigate through the classes of our
class path to find the class under test. Alternatively, we can write the full
name of the class under test in the corresponding text box.
Let us suppose we want to generate test cases for the following class, which
represents the famous triangle-type problem of Bertrand Myers:
package paper;
public class Triangulo
{
public int i, j, k;
public int tipo;
public static final int ESCALENO=1, ISOSCELES=2, EQUILATERO=3, NO_TRIANGULO=0;
5
public Triangulo()
{
}
public void setI(int v) throws IllegalArgumentException {
if (v<=0) throw new IllegalArgumentException();
i=v;
}
public void setJ(int v) throws IllegalArgumentException {
if (v<=0) throw new IllegalArgumentException();
j=v;
}
public void setK(int v) throws IllegalArgumentException {
if (v<=0) throw new IllegalArgumentException();
k=v;
}
/**
*
* @return 1 if scalene; 2 if isosceles; 3 if equilateral; 0 if not a triangle
*/
public int getTipo() {
if (i==j) {
tipo=tipo+1;
}
if (i==k) { tipo=tipo+2; }
if (j==k) { tipo=tipo+3; }
if (i<=0 || j<=0 || k<=0) {
tipo=Triangulo.NO_TRIANGULO;
return tipo;
}
if (tipo==0)
{
if (i+j<=k || j+k<=i || i+k<=j) {
tipo=Triangulo.NO_TRIANGULO;
return tipo;
} else {
tipo=Triangulo.ESCALENO;
return tipo;
}
}
if (tipo>3) {
tipo=Triangulo.EQUILATERO;
return tipo;
} else if (tipo==1 && i+j>k)
{
tipo=Triangulo.ISOSCELES;
return tipo;
} else if (tipo==2 && i+k>j)
{
tipo=Triangulo.ISOSCELES;
return tipo;
} else if (tipo==3 && j+k>i)
{
tipo=Triangulo.ISOSCELES;
6
return tipo;
}
return Triangulo.NO_TRIANGULO;
}
}
Figure 6. The Bertrand Myers triangle-type problem
In our computer, this class is in the following location: C:\Documents and Settings\Maco\Mis documentos\codigoExperimentos. Note that the class is included in a
package called paper. Thus, the compiled code of this class is actually at C:\Documents
and Settings\Maco\Mis documentos\codigoExperimentos\paper. However, the classpath
we must write does not include the name of the package or of the subpackages. Therefore, we write the following value in the class path field:
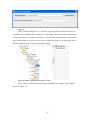
Figure 7
Now, we can either to write the complete name (this is, including package or
subpackages) in the Select class field, or to press the Select class button to find the
compiled code of the class under test. If we press the button the following window appears: with it, we can locate the paper.Triangulo class; then, we press the Select button
in Figure 8 and the name of the class fulfils the corresponding text box (Figure 9).
7
Figure 8
Figure 9
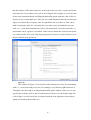
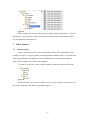
Now, we can load the members of the class under test by pressing the Load
members button. The list of public constructors and operators of the class under test
appear on the left-side tree:
8
Figure 10
Note: if the CUT has static methods that return an object of the CUT, testooj considers
these operations as factory methods, and adds them to the Constructors node.
In this moment we can already write a regular expression for generating test
cases for the class under test. Let us suppose that we can generate test cases that: create
an instance of Triangulo, assign values to 1, 2 or the 3 sides in any order; calculate the
triangle type. Test cases with this structure can be generated with the following regular
expression:
Triangulo.[setI|setJ|setK]+.getTipo
Then, what we must write in the Regular expression field is a expression matching with this structure. testooj considers the first operation in the tree as the operation
called A; the second operation is B, the third one is C… testooj is capable of manipulating classes with an arbitrary number of operations; however, in a test session it only can
deal with a maximum of 50 operations. Thus, if the class under test has more than 50
operations, the following window is shown, and the user must remove those operations
which will not be used in the regular expression:
9
Figure 11. A class with more than 50 operations
Continuing with our example of the Triangulo class, we want now to write a testooj regular expression corresponding to Triangulo.[setI|setJ|setK]+.getTipo. We can:
1)
To write directly the desired regular expression, which is
A[C|D|E]+B.
2)
To select the corresponding operations on the tree and make double
click on them.
3)
To select the corresponding operations on the tree and press the button
Pass selection to regular expression.
Figure 12
10
If we press now the Get test templates button, testooj shows in the right-side tree
a set of templates that, later, can be used to generate test cases. Note that, in the text are
below, testooj says the number of test templates generated.
Figure 13. Test templates
Test templates proceed from the expansion of the regular expression wirtten.
Before generating test cases, the tool user must assign test values to the parameters of the operations involved in the regular expression. This is made selecting FileÆ
JUnit assertions in the menu bar. The following screen is shown:
Figure 14
For now, it is important to know that this window is used to assign values to the
parameters of the operations. Let us suppose we want to assign the values 0, 1, 2, 3 and
5 to the parameter of the three set operations of Triangulo. Then, we use the tree on the
11
left side to locate the parameter of setI, click on it, write the first value (0) in the Test
value text box and press the Add button. We repeat this procedure with the remaining
values and the remaining parameters.
Figure 15. Assigning test values
This configuration of the class under test can be saved, in order to recover it in
future uses of testooj. If we press the Save and exit button, testooj creates a folder in the
constraints folder of its working directory with a set of files containing this specification:
Figure 16
At this moment we are ready to generate test cases. There are several strategies
for this, which are selected through the AlgorithmsÆ Select algorithm option in the
menu bar, which shows the menu shown in Figure 17. For further descriptions of these
algorithms, see the paper: Grindal M, Offutt J, and Andler SF, Combination testing
12
strategies: a survey. Software Testing, Verification and Reliability, 2005(15): p. 167199.
Figure 17. Selection of the combination algorithm for test case generation
Note: the default algorithm is All combinations.
Now, we can press the Build file button in the main testooj screen to generate the
test cases. Note that you can select the format of the test cases through the radio buttons
(Figure 18):
•
Build JUnit file generates one or more files with JUnit test cases.
•
Build MuJava file generates one or more files with MuJava test cases.
These test cases are also understood by the second main functionality of
testooj, which is presented in Section 4 (Test case execution).
•
Build JUnit & MuJava generates the two types of files.
•
Build states file creates a file with a special JUnit file. In this case, test
case contain instructions to leave a trace of the execution on a file, that
can be later interpreted by testooj to perform reverse engineering tasks.
13
Figure 18
When we press the Build file, testooj leaves the file or files with the test cases at
the Working directory specified in the configuration window (Figure 1). In this example, since the number of test templates is 39 (see the bottom side of Figure 13), we have
fixed 5 values for each parameter, and have selected the All combinations algorithm
(Figure 17), testooj generates a huge number of test cases (3615!). When the test cases
are generated, they are shown in the next screen:
Figure 19. Test cases generated
Each test case can be seen from the previous screen. In this example, the user is
watching the test case called test_TS_18_24: this is, the test case number 24 of the 18th
test template (remind that test templates can be seen in the main screen of testooj). Note
14
that the instance of the class under test, in the code of the test cases, is referred with the
word obtained. If you observe the code of the Triangulo class (Figure 6), you’ll see that
all the setter operations throw and IllegalArgumentException when the value of the parameter is less or equal than zero. Thus, the user could instrument the test case shown in
Figure 19 to throw that exception, since its right behaviour is to throw it. This can be
made selecting the Must fail with check box: note that testooj surrounds the test case
with a try…catch block and adds two JUnit’s fail instructions: one at the end of the try,
and another one in a generic catch block. If the test case throws the expected exception,
it is catched in the catch (java.lang.IllegalArgumentException ex) and, for this test case,
JUnit would show the green bar.
Figure 20
The window in Figure 15 can be also used to instrument testooj for surrounding
with try…catch bocks many test cases. For example, to say that the right behaviour of
Triangulo is the throwing of an IllegalArgumentException with the value zero, we can
specify that, with the value 0, that exception must be thrown (see the bottom right side
of next figure). testooj lists all the exceptions declared in the signature of the method
which is selected in the left-side tree.
15
Figure 21
With the specification made in Figure 21, all test cases with a value zero will be
prepared to catch the corresponding exceptions.
The file or files with the test cases is written on the results folder of the working
directory (in our example, this one was c:/paper), once we close the window of Figure
20. Depending on the number of test cases, this task can be immediate or to take a few
seconds. Each time we generate test cases, testooj builds a folder and an additional file
under the temp folder of its working directory directory. Next figure shows the two sessions created in the two examples we have developed in these pages: the first one
(folder paper.Triangulo_20-10-2007_17-0 and file paper.Triangulo_20-10-2007_170.session) corresponds to a test case generation session of the paper.Triangulo class,
executed on October 2007, 20, at 17 hours. The second one contains the same data, but
it was performed at 17,15.
Figure 22
16
With these data, the testooj user can reproduce a test session by the FileÆ Rebuild test file option of the menu bar:
Figure 23. Rebuilding test sessions
Note: Test session files may use a huge space on disk. If you won’t rebuild test files,
you can remove the contents of the session folder.
3.1
Writing the oracle
testooj allows to write the test oracle in a generic way, and then to use it for
many test cases. Let us change the example for this section. Now, we’ll use an Account
class, that simulates a banking account. It has the following code:
package paper;
public class Account
{
protected String mNumber;
protected double mBalance;
public Account(String number)
{
mNumber=number;
mBalance=0.0;
}
public Account(String number, double amount)
{
mNumber=number;
mBalance=amount;
}
17
public void deposit(double amount) throws IllegalArgumentException
{
if (amount<=0) throw new IllegalArgumentException();
mBalance+=amount;
}
public void withdraw(double amount) throws IllegalArgumentException
{
if (amount<=0) throw new IllegalArgumentException();
mBalance-=amount;
}
public void transfer(double amount, String targetAccount) {
this.withdraw(amount);
Account target=new Account(targetAccount);
target.deposit(amount);
}
public void transfer(double amount, Account targetAccount) {
this.withdraw(amount);
targetAccount.deposit(amount);
}
public String toString() {
return mNumber + "/" + mBalance;
}
public double getBalance() {
return mBalance;
}
}
Figure 24. Source code of a banking Account
Let us generate some test cases to check the right behaviour of this class. Thus,
for example, after executing deposit with a positive amount, the balance of the instance
must be increased in the value of the amount parameter. If the parameter is zero or
negative, the instance should throw an exception. For this we use the Precode and Postcode areas of the screen shown in Figure 15. The deposit operation can be annotated as
follows:
•
Before executing deposit, we’ll save the account balance in a variable
called, for example, balancePre.
•
After executing it, we’ll check with a JUnit oracle that the account balance is the previous balance (saved in balancePre) plus the amount deposited.
Figure 25 illustrates this:
•
In the Precode area we write the Java sentences we want execute before
calling the operation: in this case, the declaration of the balancePre vari-
18
able and the assignment of a value. Note that we use the word obtained
to reference the instance of the class under test.
•
In the Postcode area we write the Java sentences that must be executed
after calling the operation: in this example, the JUnit oracle. Note we use
again the obtained word. To reference the 1st argument of the operation,
arg1 is used; if there are more arguments, we would use arg2, arg3, etc.
If we want to reference the result returned by the operation, we could use
the word result.
Figure 25. Writing the oracle
Moreover, we can assign the values 0 and 100 to the parameter of the deposit
operation. Also, we can specify that deposit must throw and exception when 0 is used:
Figure 26
In the same way, we can assign test values to the remaining operations. For example, let us assign the string “12345” to the parameter of the second constructor:
19
Figure 27
Let us return to the main screen. If we write the regular expression BC+ for generating test cases, we get the following set of JUnit test cases:
Figure 28
20
3.2
3.2.1
Dealing with non-primitive data types
Recommended method
The Account class shown in Figure 24 has an operation which takes a nonprimitive parameter: public void transfer(double amount, Account targetAccount).
With testooj is possible to create test values for these parameters from the JUnit assertions window. In the next figure, the user is assigning this parameter a new instance of
Account, on which 1000 monetary units are deposited: note the test value written and,
very important, note that the check box labelled Use values as described has been
checked.
Figure 29
Note: To assign values to non-primitive parameters, always check the Use values as
described check box.
For this example, testooj generates two test cases. One of them is shown in
Figure 30.
21
Figure 30
Obviously, the transfer operation can be annotated with an oracle that considers
both the instance of account that sends the transference, as well as the instance of the
account that receives it. This is shown in Figure 31: note that in the precode and postcode areas we reference the target account with the arg2 word.
Figure 31
22
3.2.2
“Deprecated” method
In the first versions of testooj, the way of dealing with non-primitive data types
was more complex. Supposing the operation public void transfer(double amount, Account targetAccount), the user required to create so many instances of the parameter as
test values he/she desired to use. Then, these instances should be serialized and saved in
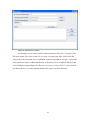
the serialized folder of testooj. For this, testooj includes the option FileÆ Object creation in its menu bar, which shows the following window:
Figure 32. “Deprecated” window to create and serialize instances
In this window, the user writes the class path, the name of the class under test
and, when the Load members button is pressed, testooj fulfils the text area with a piece
of code ready to create and serialize an instance. In our opinion, the recommended
method in the previous subsection is more comfortable and easy than this one; moreover, this deprecated method requires that of the complex parameter to be serializable.
Anyway, if this method is used, the serialized instances are taken from the serialized folder during test case generation.
3.3
Comparing JUnit and MuJava test cases
JUnit and MuJava test cases are very similar, but they have some important dif-
ferences:
23
(1)
Whereas JUnit test cases return a void type, MuJava ones return a
String, which corresponds to the string representation of the instance
manipulated in the test method.
(2)
The assert instructions included in JUnit test cases are transformed
into a String expression, which is later used by MuJava or testooj to
check what mutants are killed by each test case.
Figure 33 shows a brief but illustrative example:
// JUnit
public void testDeposit()
{
Account o=new Account();
o.deposit(1000);
assertTrue(o.getBalance()==1000);
}
// Mujava/tesooj
public String testDeposit()
{
Account o=new Account();
o.deposit(1000);
return "" + o.getBalance();
}
Figure 33. A JUnit test case (left) and its corresponding one for MuJava/testooj
JUnit and MuJava test cases are mutually complementary: with JUnit test cases
we find faults in the class under test; when no faults are found, MuJava test cases provide us with a very good measure of the coverage reached on the class under test (if we
have mutants).
Note: testooj leaves the source code of the MuJava files at the testset folder of MuJava.
3.4
An important note about the MuJava oracle
MuJava test cases generated by testooj return a String. The value of this string is
a call toe the toString() method of the class under test. In the example of the Triangulo
class, note that it has no toString() method and, thus, it uses the inherited version from
the Object class.
Therefore:
•
If the class under test has a toString() method, the test cases generated
will probably work correctly.
•
If the class under test has not a toString() method, you should rewrite the
return instruction of MuJava test cases, such as in the following example: left side shows a test case generated by testooj; in the test case of the
right-hand side, the call to toString has been substituted by a string representation of the state of the class under test.
24
public String testTS_1_1() {
try {
paper.Triangulo obtained=null;
obtained =new paper.Triangulo();
int arg1=(int) 0;
obtained.setI(arg1);
int arg2=(int) 0;
obtained.setJ(arg2);
int arg3=(int) 0;
obtained.setK(arg3);
int result3=obtained.getTipo();
return obtained.toString();
}
catch (Exception ex) {
return ex.toString();
}
}
public String testTS_1_1() {
try {
paper.Triangulo obtained=null;
obtained =new paper.Triangulo();
int arg1=(int) 0;
obtained.setI(arg1);
int arg2=(int) 0;
obtained.setJ(arg2);
int arg3=(int) 0;
obtained.setK(arg3);
int result3=obtained.getTipo();
return obtained.i+"." + obtained.j
+ "." + obtained.k + "." + obtained.tipo;;
}
catch (Exception ex) {
return ex.toString();
}
}
Figure 34
4
Test case execution
This section explains how to use the Test case execution functionality included
in testooj. Therefore, we do not explain here how to use the JUnit tool.
The functionality of test case execution in testooj uses test cases in MuJava format. These test cases can be executed against a set of mutants generated with MuJava
and, then, it is possible to do different types of analysis.
4.1
Mutant preparation
testooj is not a mutant generation tool. For this, you must use the MuJava tool.
To know more about MuJava, please check the web site of Prof. A.J. Offut at XXX
In this example we will use testooj to do mutation testing on the Triangulo class.
We’ll suppose we already have a set of mutants of Triangulo on the corresponding MuJava folder: in our example, this location is at c:/mujava06/result:
Figure 35. Some of the mutants generated by MuJava
25
Now, we press the Test case executor button of the welcome screen of testooj
(Figure 4) and the following screen appears:
Figure 36. Main screen of the Test case executor
In the test file combo box, testooj shows the list of .class files contained both in
the testset folder of MuJava and in the Additional test files path (Figure 1). For this example, we will select a file called MujavaTriangulo_1.class, which has been generated
with testooj for the Triangulo class, using the regular expression ACBDE and the test
values 0, 1, 2, 3 and 5.
In the Full CUT name (including package) field, we must write the complete
name of the class under test (in this example, paper.Triangulo). The Versions directory
field contains the path to the folder where the different mutants (or versions) of the class
under test can be located. In this example, this path points to the result folder of the MuJava root directory.
Now, we can press the Search button to make that testooj looks for the mutants
of paper.Triangulo. As we saw in Figure 35, MuJava correctly generated the mutants;
however, testooj is not capable of finding them because it requires that the mutants have
a folder structure similar to its package structure: this is, if the complete name of the
class under test is edu.uclm.esi.Foo, the mutants must be in a directory fulfilling the
structure edu/uclm/esi/Foo. testooj can create this structure using the FileÆOrganize
versions folder option in the menu bar, which looks as in Figure 37.
26
Figure 37
In the window of Figure 37 we press the Organize folders button and, then, testooj builds the adequate folder structure for each mutant. The result of this organization
is shown in Figure 38: compare it to Figure 35 to note that, under the folder corresponding to each mutant, testooj has created a paper folder and, inside it, it has put the source
and the compiled code of the corresponding mutant.
Figure 38. Folder organization required by testooj
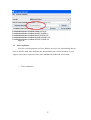
Now, testooj can find the mutants by pressing the Search button. The result is
shown in Figure 39.
27
Figure 39. testooj loads the mutants from the Versions directory field
4.2
Execution of test cases
Note the preparation we have made in the previous epigraph, and note the differ-
ent values we have in Figure 39: here, we can also establish the class path variable,
which will be required if the class under test needs additional libraries or directories. In
the example of Figure 39, the class path is pointing to the testset folder of MuJava. Additionally, we must add the place where the compiled code of the class under test is located which is C:\Documents and Settings\Maco\Mis documentos\codigoExperimentos.
Thus, we add this path to the class path field:
Figure 40
Now, test cases can be executed against the original class and against the mutants:
•
For executing test cases against just a mutant, double click on that mutant.
•
For executing test cases against a set of mutants, make a multiple selection and press the Execute selected button: in Figure 41, the test cases in-
28
cluded in the MujavaTriangulo_1.class test file will be executed against
the six files highlighted in the list box.
Figure 41
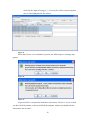
When the Execute selected button is pressed, the following two warnings may
appear:
Figure 42
Figure 43
In general, there is no problem with these advertences. However, if you see that
you don’t kill any mutant, or that you kill all the mutants, maybe you should take the
advertences into account.
29
During the execution of test cases against the program, the window shows a progress bar and some messages:
•
In the area pointed by the arrow, testooj reports about the current action
it is executing.
•
In the are below, testooj reports about the last error occurred during the
execution of test cases. In general, these errors are not important, since
they may mean that the fault introduced in the mutant causes, for example, an infinite loop (in this case, testooj reports of dead threat). Thus, in
general, these messages do not require your attention, excepting when
the message announces that a expected library is not found (you should
add it to the class path) or when you select a test file prepared for a class
under test different to that you have selected (for example, you try to
execute the test cases in the MBisectOK.class file shown in Figure 36,
which contains test cases for a Bisect class, against the Triangulo class).
Figure 44. Test case are executing
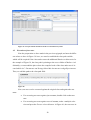
While test cases are executing, testooj fulfils the table in the bottom side of
Figure 44: each cell specifies the result of executing the test case in the column against
the mutant included in the row: in Figure 45 we see that the test case testTS_1_1 has
been successfully executed against the AOIS_101 mutant.
30
Figure 45
As we have mentioned some paragraphs ago, some mutants may cause infinite
loops and, therefore, when a test case reaches it, the execution of the test case would
never finish. To avoid this, and to recognize these mutants as killed mutants, testooj can
be instrumented to consider a mutant is killed after a certain number of milliseconds
(Figure 46): although there are several ways of setting up the time out, we recommend
to use only the first one with no remoting. The other options have not been tested
enough.
Figure 46. Setting up the timeout
4.3
Result analysis
During the execution of test cases, testooj generates a set of files under its temp
folder, which can be later utilized to analyze the results. For this, press the Result analysis button: if nothing happens, testooj reports us about the necessity of selecting the
original version of the class under test (Figure 47).
Figure 47
Therefore, click on the original version and press the Set as original button, as
shown in Figure 48.
Figure 48
31
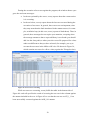
Now, we can press the Result analysis button, which shows the following
screen:
Figure 49. Result analysis window
The table in the top side shows what mutants are killed by what test cases. The
table can be saved in CSV or HTML formats with the Save as button. The Save time’s
table produces a similar table, but now it also contains the time (in milliseconds) devoted to execute each test case.
In the bottom half of Figure 49, testooj shows a report with the best test cases
(this is, a reduced suite of test cases that kill the same mutants than the original suite), a
brief summary about the percentage of mutants killed, and the list of alive mutants.
Close to the Result analysis button there are three radio buttons for selecting the
algorithm which will calculate the best test cases: in general, Decreasing produces the
most reduced suite.
Figure 50
If you want to remake a result analysis, you do not need to reexecute the test
cases: testooj uses the contents of a folder, saved under its temp folder, whose name
coincides with the test file class.
32
Figure 51
Thus, simply select the test class (in this example, MujavaTriangulo_1.class) in
the list box, write the name of the class under test and press the search button. Then,
you can make the result analysis.
5
5.1
Other features
Mutant mixing
Due to a research work we have started and which will be published in a few
months (we hope), testooj is capable of mixing MuJava mutants: this is, it can take two
mutants generated by the MuJava tool and mixing them in just a mutant, with two
faults. These mutants are called 2-order mutants.
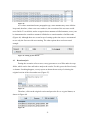
To do this, we need to create a folder called mix under the MuJava directory:
Figure 52
Then, from the Test executor window, select N-order mutationÆ Open mix window in the menu bar. The following window appears:
33
Figure 53. Mutant mixer window
Let us suppose you want to build 2-order mutants for the paper.Triangulo class:
fill-in the name of the class in the Full cut name (including package) field, fill-in the
class path (if the class path is not established in the Set up window of Figure 1 and if the
class under test requires additional libraries or directories to be compiled) and press the
Search button corresponding to the Directory of source versions. The Versions list widget shows the list of 1-order mutants found in the source versions directory:
34
Figure 54
Now, click on the original version and press the Set as original button. Now,
press the Mix button and, after a few seconds, the text area in the bottom part of the
window will show a message. You will also note that the Mix button is released.
If you go now to the folder pointed by the Directory of target versions, you’ll
see the following:
Figure 55
As you see, testooj has created a folder called as the class under test and, under
this folder, a folder containing a 2-order mutant. The highlighted 2-order mutant of
35
Figure 55 corresponds to the mutant proceeding from the mixing of the 1-order mutants
AORB_6 and LOI_53.
Now, you need to compile these mutants. For this, press the Compile button. testooj compiles them one by one, showing a progress bar during this process. Usually, it
takes only a few seconds:
Figure 56
Note the difference with Figure 55 where the mutants have been compiled:
Figure 57
Now, you are ready to execute test cases against 2-order mutants. Simply, in the
test case executor window, select the mix folder instead of the result folder:
36
Figure 58
5.2
States definition
Also for research purposes we have added to testooj a new functionality that al-
lows to describe with state machines the desired behaviour of class instances. Let us
suppose you want to represent with a state machine the behaviour of accounts:
--- To be continued ---
37