1
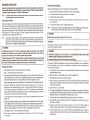
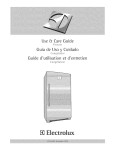
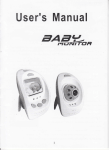
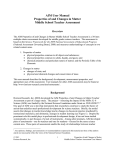
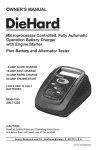
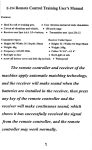
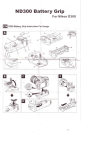
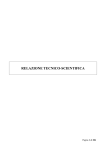
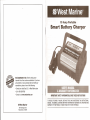
~ West Marine®
15 Am p Portable
Smart Battery Charger
OurCommitment to You: There's nothing more
important to us than customer satisfaction. If you have
any questions or your purchase does not meet your
expectations, please do one of the following:
• Contact your local Boat U.S. or West Marine store
• Call1-800-BOATING
• Contact us at www.westmarine.com
.
"
.. USER'S
MANUAL·:."
....
•. ' •..." ,... '._........•,."q .."." ":·:w.,. : •................•....
": >:.:,' :;:::..:~.:.::;,::'<::
.·&\VjRRANTY
0·"··**·~H''''n**'*'···''
..···;;i.im;;
••
..:~.:..."..•..
" ••••••..•••.
.... "':,"
,
;;;;;>.::.:
INFQRNlATI()N;;·mim1;
.
IMPORTANT SAFETY INFORMATION, SAVE THESE INSTRUCTIONS
TO REDUCE THE RISK OF INJURY, USER MUST READ AND UNDERSTAND THIS INSTRUCTIONAL
MANUAL. THIS MANUAL CONTAINS IMPORTANT INFORMATION REGARDING THE OPERATION AND
~ West Marine·
500 Westridge Drive
Watsonville, CA 95076
WARRANTY OF THIS PRODUCT. PLEASE RETAIN FOR FUTURE REFERENCE.
Figure
lA
IMPORTANT SAFETY INSTRUCTIONS
Figure
18
ADAPTER (8)
WARNINGS
1.
RISK OF EXPLOSIVE GAS MIXTURES -
WORKING IN VICINITY OF A LEAD-ACID
~
BATTERY IS DANGEROUS.
GROUNDING
MEANS
BATTERIES GENERATE EXPLOSIVE GASES DURING NORMAL BATTERY OPERATION. FOR THIS REASON, IT IS OF
UTMOST IMPORTANCE THAT EACH TIME BEFORE USING YOUR CHARGER, YOU READ THIS MANUAL AND
FOLLOW THE INSTRUCTIONS EXACTLY.
2.
To reduce risk of battery explosion, follow these instructions
and manufacturer
of any equipment
these products and on engine.
3.
This equipment
employs
and those published
you intend to use in vicinity
parts (switches,
by the battery manufacturer
of battery. Review cautionary
relays, etc.) that produce
arcs or sparks.
Therefore,
markings
on
if used in a
garage or enclosed area, the unit MUST be placed not less than 18 inches above the floor.
DANGER-
Battery Safety
1.
Use of an attachment
If a properly grounded outlet is not available, a temporary adapter (like the adapter shown in Figure1 B) may be used to
connect this plug to a two-pole receptacle. The temporary adapter should be used ONLY until a properly grounded outlet
can be installed by a qualified electrician.
not recommended
or sold by the battery charger manufacturer
may result in a risk of fire,
electric shock, or injury to persons.
2.
To reduce risk of damage to electric plug and cord, pull by plug rather than cord when disconnecting
3.
An extension cord should not be used unless absolutely necessary. Use of an improper extension cord could result
in a risk of fire and electric shock, and will void warranty.
charger.
The green-colored rigid ear or tab extending from adapter must be connected to a properly grounded outlet. MAKE CERTAIN
IT IS GROUNDED. If necessary, replace original outlet cover plate screw with a longer screw that will secure adapter ground
tab to outlet cover plate and connect to grounded outlet.
WARNING
If an extension cord must be used, make sure:
NEVER alter AC cord or plug. If it will not fit, have a proper
a. that pins on plug of extension cord are the same number, size, and shape as those of plug on charger;
connection
b. that extension cord is properly wired and in good electrical condition; and
Note:
c. that wire size is AWG#16 (16 gauge) for 100 feet and AWG#14 for distances over 100 feet.
4.
Do not operate charger with damaged cord or plug -
take to a qualified technician for replacement of the plug or
cord immediately.
5.
Do not operate charger if it has received a sharp blow, been dropped, or otherwise
damaged in any way. Call
Technical Support toll-free at (800) 618-5178.
6.
Do not disassemble charger; take it to a qualified service technician when service or repair is required. Incorrect reassembly may result in a risk of electric shock or fire, and will void warranty.
7.
To reduce risk of electric shock, unplug charger from outlet before attempting
off controls without unplugging will not reduce this risk.
8.
Do not expose charger to rain, snow or use when wet.
2.
Fresh water and soap should be nearby in case battery acid contacts skin, clothing, or eyes.
3.
Wear complete eye protection and clothing protection. Avoid touching eyes while working with a battery. Acid, acid
5.
6.
electrician.
Improper
Use of an adapter is not allowed in Canada. If a grounding type receptacle is not available, do not use
this appliance until the proper outlet has been installed by a qualified electrician.
Ensure battery to be charged is 12 volt nominal lead acid type.
If it is necessary to remove battery from vehicle to charge, or to clean terminals, always remove grounded terminal
from battery first. Make sure all accessories in the vehicle are off, so as not to cause an arc.
3. Clean battery terminals. Do not allow corrosion to come in contact with eyes.
4. Add distilled water in each cell until battery acid reaches level specified by battery manufacturer. This helps purge
6.
excessive gas from cells. Do not overfill. For a battery without cell caps (maintenance free), carefully follow
manufacturer's charging instructions.
Study all battery manufacturer's specific precautions, such as removing or not removing cell caps while charging, and
recommended rates of charge.
Area around battery should be well ventilated while battery is being charged. Gas can be forcefully blown away by
7.
using a piece of cardboard or other nonmetallic material as a fan.
Make sure the initial charging rate does not exceed battery manufacturer's
requirement.
Charger Location
1.
Locate charger as far away from battery as cables permit.
NEVER place charger directly above battery being charged; gases from battery will corrode and damage charger.
If battery acid contacts skin or clothing, wash immediately with soap and water. If redness, pain or irritation occurs,
seek immediate medical attention.
3.
NEVER allow battery acid to drip on charger when reading gravity or filling battery.
4.
NEVER operate charger in a closed-in area or restrict ventilation
NEVER smoke or allow a spark or flame in vicinity of battery or engine.
5.
Marine batteries must be removed and charged onshore.
Be extra cautious to reduce the risk of dropping a metal tool onto battery. This might cause sparks or short-circuit
6.
Do not set a battery on top of charger.
flood eye with cold water (Eye Wash Station) for at least 15
the battery or other electrical part, which can cause an explosion.
7.
Remove personal metai items such as rings, bracelets, necklaces and watches when working with a lead-acid
battery. A lead-acid battery can produce a short-circuit current high enough to cause a severe burn.
8.
Use charger for charging a LEAD-ACID battery only. It is not intended to supply power to a low-voltage
electrical
system other than in a starter-motor application. Do not use the battery charger for charging dry-cell batteries that
are commonly used with home appliances. These batteries may burst and cause injury to persons and damage
9.
by a qualified
2.
particles or corrosion may get into eyes. Immediately
minutes and seek medical attention immediately.
4.
outlet installed
shock.
1.
2.
5.
Another person should be within range of your voice or close enough to come to your aid when you work near a leadacid battery.
may result in an electric
Preparing to Charge
any maintenance or cleaning. Turning
Personal Safety
1.
Before using an adapter as illustrated, make certain that the center screw of outlet plate is grounded.
property.
NEVERATTEMPT TO CHARGEA FROZEN BATTERY.
Power Cord Safety
Charger should be grounded to reduce risk of electric shock. Charger is equipped with an AC cord having equipmentgrounding conductor and a grounding plug. The plug must be plugged into a properly installed and grounded 110/120 volt AC
outlet in accordance with all local codes and ordinances (see Figure 1A)
in any way.
DC Connection Precautions
1.
Connect and disconnect DC output clamps only after removing AC cord from electric outlet.
2.
Never allow clamps to touch each other.
3.
Attach clamps to battery chassis as indicated in "Battery Installed in Vehicle" steps 5 and 6, and in "Battery Outside
of Vehicle" steps 2, 4 and 5. This charger is not designed for marine onboard charging applications.
Follow these steps when the battery is installed
reduce risk of a spark near the battery:
in a vehicle. A spark near the battery
may cause an explosion.
'>CTABLE
1.
Position AC and DC cords to reduce risk of damage by moving engine parts.
2.
Stay clear of fan blades, belts, pulleys, and other parts that can cause injury to persons.
3.
To
Check polarity of battery posts. The RED POSITIVE (POS, P,+) battery post usually has larger diameter than the BLACK
Determine which post of battery is grounded (connected) to the chassis. If NEGATIVEpost is grounded to chassis (as
in most vehicles), see 5. If POSITIVE post is grounded to the chassis, see 6.
5.
1
Features
2
Do not connect clip to carburetor, fuel lines, or sheet-metal
frame or engine block.
'
body parts. Connect to heavy gauge metal part of the
For positive-grounded vehicle, connect NEGATIVE (BLACK) clamp from battery charger to NEGATIVE (NEG, N, -)
ungrounded post of battery. Connect POSITIVE (RED) clamp to vehicle chassis or engine block away from battery.
Do not connect clip to carburetor, fuel lines or sheet-metal
frame or engine block.
7.
When disconnecting
8.
Do not charge the battery while the engine is operating.
9.
See operating instructions for length of charge information.
body parts. Connect to a Ileavy gauge metal part of the
)
charger, disconnect AC cord, remove clamp from vehicle chassis, and then remove clamp from
battery terminal.
Follow these steps when the battery
has been removed
from a vehicle.
A spark near the battery
may cause an
explosion. To reduce risk of a spark near the battery:
1. Check pOlarity of battery posts, the Positive posts (marked POS,P, +) usually has a larger diameter than the Negative
-i.
2.
3.
4.
5.
battery post (marked NEG, N,
Attach a 24-inch (minimum length) 6 AWG insulated battery cable to the Negative battery post (marked NEG, N, -).
Connect the Positive (RED) battery clamp to the Positive battery post (marked POS, P, + or red).
Stand as far back from the battery as possible, and do not face battery when making final connection.
Carefully connect the NEGATIVE(BLACK) charger clamp to the free end of the battery cable connected to the negative
terminal.
6.
7.
Set the charge rate to appropriate setting according to battery size.
When disconnecting charger, always do so in reverse sequence of connecting procedure and break first connection
A marine (boat) battery must be removed and charged onshore. Tocharge it onboard requires equipment
specially designed for marine use. This unit is NOTdesigned for such use.
SAVE THESE INSTRUCTIONS
Charge Rate Selection
4
4
Automatic Float Charging
5
Equalizing
Care and Maintenance
5
6
Troubleshooting
7
INTRODUCTION
Thank you for selecting the West Marine 15 Amp Portable Smart Battery Charger. With proper
care and use, it will give you years of dependable service. This battery charger has a high charge
rate of up to 15 amps, and low charge rate of 2 amps. It is designed for charging only 12 volt leadacid, maintenance-free, marine deep cycle and gel batteries.
West Marine Battery Chargers feature 3-stage, high-efficiency charging technology, built-in
microprocessor control that ensures fast, safe and complete charging of serviceable batteries.
Charge Curve
3 STAGE
device may not cause harmful interference, and (2) this device must accept any interference received, including
interference that may cause undesired operation.
This equipment has been tested and found to comply with the limits for a Class B digital device, pursuant to part
15 of the FCC Rules. These limits are designed to provide reasonable protection against harmful interference in
a residential installation. This equipment generates, uses and can radiate radio frequency energy and, if not
installed
and used
communications.
in accordance
with
the
instructions,
may cause
harmful
interference
to
radio
However, there is no guarantee that interference will not occur in a particular installation. If
equipment does cause harmful interference to radio or television reception, which can be determined by turning
the equipment off and on, the user is encouraged to try to correct the interference by one or more of the
following measures:
• Reorient or relocate the receiving antenna.
• Increase the separation between equipment and receiver.
• Connect the equipment into an outlet on a circuit different from that to which the receiver is connected.
• Consult the dealer or an experienced radio/TV technician for help.
BATTERY CHARGING
STAGE 2 - ABSORPTION
CHARGE
AMPERAGE
VOLTAGE
This device complies with part 15 of the FCC rules. Operation is subject to the following two conditions: (1) this
4
Charging the Battery
while as far away from battery as practical.
Note:
2
Operating Instructions
For negative-grounded
vehicle, connect POSITIVE (RED) clamp from battery charger to POSITIVE (POS, P, +)
ungrounded post of battery. Connect NEGATIVE(BLACK) clamp to vehicle chassis or engine block away from battery.
6.
Introduction
Controls and Indicators
NEGATIVE(NEG, N, -) post.
4.
OF CONTENTS
I STAGE 3 - FLOAT CHARGE!
i
I
I
I
..,
MAINTENANCE
o
MOOE
o
Stage One - Bulk Charge at 15 amps delivers maximum charging amperage to "wake up" any
serviceable 12 volt battery and allows for quick engine starting in just 3% minutes (based on a
midsize vehicle battery at 50% charge level). When battery reaches a maximum safe
predetermined voltage, the charger will automatically signal a "beep" and move into Stage 2 of
the charging process.
Stage Two - Absorption Charge maintains the maximum possible charge at a constant, safe,
predetermined voltage. During this phase, the charging voltage remains constant, while the
actual charging current is reduced to allow for the maximum proper internal chemical energy
transfer. At the end of Stage 2, the charger will automatically move into Stage 3 charge mode.
Stage Three Float Charge voltage is automatically maintained and reduced to a
predetermined level while current is adjusted for a safe, effective battery charge. At the conclusion
of Stage 3, the unit will BEEPsignaling the completion of the charging cycle.
The Automatic Float Chargefeature is ideal for maintaining a battery. It automatically tops off battery
as needed, to keep battery fully charged all the time.
FEATURES
INDICATORS:
• This unit has three charge rate settings, accessed by the Charge Rate Selector button:
large (.375") 3-Character Digital Display in the upper left of the control panel indicates the
various conditions and/or status codes:
a) 2 amps: smaller batteries, as in personal watercraft, snowmobiles, motorcycles, etc.
Status Codes are described in the following chart and on side of the charger.
b) 10 amps: mid-sized batteries, as in small cars and boats
c)
15 amps: automobiles and light trucks and boats
When connected
• Manual Temperature Compensation
Disconnect
to an AC outlet,
AC to charger
digital
display
shows circulating
pattern
to indicate
power is on.
after use.
CODES
• Battery type selection
INTERNAL SHORTED CELL BATTERY - Cannot be charqed,
bad battery.
Reillace
• Digital diagnostics
BAD BATTERY CONNECTION - Check battery connection
• Digital display
BATTERY VOLTAGE TOO LOW TO ACCEPT CHARGE - Bad battery. Reillace
INTERNAL OPEN CELL - Bad battery. Battery needs to be replaced
• 3-stage, high-frequency switch mode automatic rapid charging
SULFATED CONDITION - Battery needs to be reconditioned
• Spark resistant reverse polarity and short circuit protection for user
battery.
or
for 24 to 48 hours. See owner's
OVERTIME CONDITION - Battery is not fully charged after 18 hours of continuous
Battery may have internal
• Lightweight, high efficiency design
damage
and needs to be replaced
BATTERY CHARGE RATE IS SET TOO LOW - Set charqer
• Cables and clamps self-stored
DVERHEATED CONDITION - Disconnect
ample
• Microprocessor control (Digital Smart Control)/High frequency power
charger
or
and allow to cool for 30 minutes,
to system positive.
CHARGER STANDBY
• Equalization function
BATTERY FULLY CHARGED, CHARGER IN MAINTENANCE MODE
For additional
information
Ensure red ctip connects
on these codes, refer to your owner's
manual.
Controls and Indicators
DIGITAL READOUT CIRCULATING
CONTROLPANELLED INDICATORS:
WET -
GElWET1,
GEL
Float
_
Temp
Volts
Equal/ztI
'GM
AGM -
,.
;WET
'c~r
t'
'GEL
AGM
3 'F
Ii
II
~~f'
,gs'F
2A
~
,eM'
'144
\kI1/.~
t
Amvs
lights when battery type selector is on WET battery type
lights when battery type selector is on GELbattery type
lights when battery type selector is on AGM battery type
Float Charge -
lights when automatic charge monitoring is active
'1.1;1,·I"·lrl~"_
BUTTON(BELOWTHE DIGITALDISPLAY):
FUNCTIONBUTTONS(FROMRIGHTTO LEFT):
Battery Type -
Equalizing -
a recessed button used to start the equalization process.
Allows the user to select wet battery, gel battery or AGM battery.
2/10/15 Charge Rate Selector - Allows the user to select the charge rate based on battery size.
This selection and actual battery charge rate are monitored by the microprocessor and will stop
charging if the rate is too fast or too slow for battery size or condition.
Temp Manual selection for current environmental temperature. Suggested settings are:
Cold: 32-60° F; Warm: 60-85°; Hot: 85-104°.
Voltage Display seconds.
Enables a check that measures the battery voltage and displays it for 3
I
\
J
)
2
manual.
check for
ventilation.
REVERSE POLARITY CONNECTION - Check to ensure correct polarity.
PATTERN
manual.
charging.
to hiqher charqe rate. See owner's
• Compensates for low AC from extension cord use
CONTROL PANEL
batte. ,.
or
3
itit
when completed.
PROPERTYDAMAGE,
SERIOUS
INJURY
AND/OR
DEATH.
5.
To
view
battery
voltage,
press
the
Voltage
Display
button.
may
rapidly
while
being
charged,
remember
to
refill
(only
withyou
distilled
water)
after the
4
amp
limited
current.
that
in
order
to
push
the
recessed
will
need
avoltage
small
8.
WET
Push
battery
the
Battery
is
selected.)
Type
Selector
Switch
until
"WET"
is
displayed.
(This
mode
will
only
work
ifpin
2.
The
charger
monitors
the
battery
and
tops
itrestarts
offbattery
as
needed.
i bubble
Notes:
5Note
•Equalizing
Remove
or
disconnect
the
vehicle's
battery
when
equalizing.
O.
Push
the
Equalize
button
at
any
time
and
will
automatically
begin
to
equalize
ina
1.
Keep
the
AC
power
and
battery
connected
after
battery
is can
fully
charged.
pushing
Voltage
Display
button.
This
will
trigger
the
Voltage
Display
indicator
button.
If2.
3.
battery
The
Float
size
Charge
is
not
known,
indicator
charge
lights.
at
the
2 the
amp
rate.
9.
Choose
the
correct
charge
rate
and
start
charging.
check
the
battery
by
(unsealed/vented)
"000."
After
AC
batteries.
power
interruption,
charging
at
2You
amp
ratebutton
automatically.
Charging can be terminated by pressing the Charge Rate selector repeatedly until 1
the
display
shows
a
danger
of
explosion.
Make
sure
there
are
no
flammable
sources
near
the
recharging
sight.
1.WARNING
Doreal
not
use
this
mode
on
sealed
or
valve
regulated
batteries.
This
mode
is only
meant
for
wet
5.
3.
Wear
Open
safety
the
battery
glasses,
cap,
gloves
if"Charging
removable.
and
protective
clothing.
process
causes
the
release
of
hydrogen
and
oxygen.
An
accumulation
ofequalized.
these
presents
The
frequency
at
which
the
equalization
process
needs
tomanufacturer's
be
run
depends
on
the
usegases
of
the batteries
battery.
4.
6.
Remove
Fill
the
battery
battery
with
from
distilled
vehicle.
water
MAKE
according
SURETHATTHE
to
the
BATTERYHAS
instructions.
GOODVENTILATION.
Since
T
he
7.
Follow
the
steps
in
the
the
Battery"
section
on
page
4
of
this
manual.
Automatic
Float
Charging
is
ideal
for
maintaining
a
fully
charged
battery.
Equalizing
is
the
process
by
which
the
fluid
in
each
of
a
battery's
cells
is
This
process
Automatic
WARNING
Float
Charging
•
NEVERTRY
TO
EQUALIZEA
GEL
OR
AGM
CELL.
THE
RESULTINGEXPLOSIONCOULD
CAUSE
rging
if
the
selected
he
steps
outlined
in
OPERATING
INSTRUC
TIONS
rging
and
stage
actual
changes.
battery
re
Charge
Rate
Selector
When
the
battery
is fully
charged,
the charging
g
AC
power.
tions"
at
the
front
ofisbutton.
manual.
equalization
process
and
the
voltage
is back
normal.
or
ballpoint
pen.
occurs
after
charging
isthis
complete.
The
battery
more
should
the
battery
be
equalized.
iscomplete
used,
the
more
undercharged
itto
becomes;
thus
the
frequently
the
low
for
battery
size
or
oarge
n
again
10advance
amps
will
turn
and
ons"
atcharge
the
front
rate. ifof
To
rate
automatically
will
ns
are
understood
rn
OFF
the
4.
The
display
shows
charge
current
whenclamps
topping
off
battery
and more
returns
to "FUL"
06",
the
Red
(Positive)
and
Black
(Negative)
are
incorrectly
teduced
sounds
a
beep
~ctedcharge
rate
does
notcondition.
display
at the
full selected
rate
is when
thethe
battery
is
ty.
current.
ront
this
manual
und
aof
beep
and
button
and
the
charge
current.
To
battery
on
ground
in
ety
Instructions"
plied.
Select
the
ode;
the
unit
sounds
Cector
outlet.
The
charger
tion
to
the
battery
Ensure that all installatio,
and carefully followed by
"Important Safety Instm
Note:
For a battery located
an environmentally s,
Charge Rate Selection
After charger clamps are co
will show a circulating patt
proper charge current rate
charger will begin charging
the charge rate to 10 amp
charger output and the dis
Note:
The only time the sel,
nearly full and-charg,
return to 2A, press t,
complete and "FUL" i,
it WARNING
If Digital Display shows
terminals is bad. Follow t
this manual to disconnec
If Digital Display shows"
connected to battery term
at the front of this manua
Charging the Battery
1. Press Battery Type se
Note:
The default sele,
2. Press Charge Rate Se
and the charging curre
Charge Rate Selector
Chargeroccasionally so
3. Pressing the Charge
pressing once more a
OFF the charger outp
charge rate are monito
rate is too fast or too
As the battery nears f
charge rate.
4. Pressing the Charge R
a beep, displays "000
view the battery volta
display the battery vol
5. The display shows "FU
6. Follow the steps out
to disconnect.
]
11. Every hour, the temperature should be checked by touching the battery. If the battery is hot to
the touch, stop the charging and allow the battery to cool.
12. The voltage rises, but does not go over 15.3v to 16.2v (2.55-2.7v per cell) depending on
ambient temperature, it will automatically adjust.
13. The "WET" LEDflashes while the charger is in equalize mode.
TROUBLESHOOTING
Display Indications/Common
Solutions
No Functions
• Check and make sure the charger is plugged into a live 110/120 volt AC outlet.
14. The digital readout will show "FUL" when the equalization process is complete.
• Follow the steps outlined in the Operating Instructions section.
F01 -
CARE AND MAINTENANCE
With proper care and minimal maintenance,the West Marine 15 Amp Portable Smart Battery Charger
will provide years of dependable service. For maximum performance, manufacturer recommends:
• After each use, clean the battery charger clamps cause corrosion of the copper clamps.
Problems/Possible
be sure to remove any battery fluid that will
Internal
Shorted Cell Battery
If the battery being charged has an internal shorted cell, the F01 will show. We recommend taking
your battery to a certified battery service center for evaluation.
F02 -
Bad Battery Connection
or Battery
Voltage Too Low to Accept Charge
When F02 appears, the most common cause is poor connection to battery.
• Follow the steps outlined in "Important Safety Instructions" at the front of this manual to
disconnect AC cord and clamps, clean battery terminal and reconnect.
• Clean the outside case of the charger with a soft cloth and, if necessary, mild soap solution.
• Do not allow liquidto enter the charger. Do not operate when charger is wet.
• Keep the charger cords loosely coiled during storage to prevent damage to the cords.
• If the situation persists, we recommend taking your battery to a certified automotive service
center for evaluation.
Lt WARNINGS
F03 -
• Do not use charger
Support toll-free
if cords or clamps
have been damaged
call
Technical
parts in this unit.
• Do not open the unit. In the event of malfunction,
testing
and repair.
• Perform care and maintenance
Battery
Appears when the battery is highly sulfated and cannot accept normal charge current.
• Follow the steps in "Equalizing" to equalize the battery.
at (800) 618-5178.
• There are no user-serviceable
professional
WARRANTY.
in any way -
Sulfate or Unchargeable
it must be returned
to manufacturer
for
OPENING THE UNIT WILL VOID THE MANUFACTURER'S
ONLY after unit is disconnected
from any power source.
• If the situation persists after reconditioning and equalizing, we recommend taking your battery to
a certified automotive service center for evaluation.
F04 -
Overtime
Condition
Appears when charging time exceeds 18 hours. You may be using a charge current rate too low for
a large battery. Select higher charge rate to charge the battery.
F05 -
Overheated
Condition
The ventilation grill that prevents the air from flowing in and out of the charger may be blocked.
• Follow the steps outlined in "Important Safety Instructions" at the front of this manual to disconnect
AC cord and clamps, allow the unit to cool for 30 minutes and reconnect.
• Make sure there is ample ventilation before resuming operation.
F06 -
Reverse Polarity
The connections to the battery's POSITIVEand NEGATIVEterminals are incorrect. Follow the steps
outlined in "Important Safety Instructions" at the front of this manual to disconnect AC cord and
clamps and reconnect to battery with correct polarity.
Charging a Very Cold Battery
If the battery to be charged is very cold (in temperatures below freezing - O°C/ 32°F), it cannot
accept a high rate of charge. The initial charge rate will be low. The charge rate will increase as the
battery warms. Never attempt to charge a frozen battery.
6
7