1
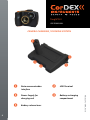
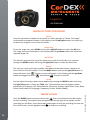
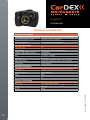
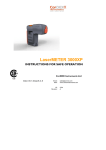
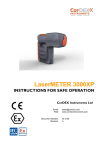
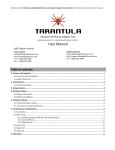
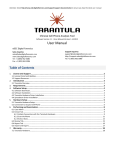
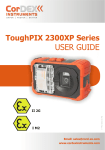
TC7000 II
ToughPIX
USER MANUAL
ToughPIX II
Explosion Proof
Digital Camera
Ref.ID 2341-MAN, Rev.A
User Manual
ToughPIX II
USER MANUAL
Congratulations – You are the owner of the second generation of
ToughPIX digital camera designed and certified specifically for use in
hazardous (explosive) atmospheres.
Please ensure that the certification matches or exceeds the
hazardous area characteristics that will be clearly displayed on site.
ToughPIX II is certified ATEX/IECEx as follows:
- Ex d IIB+H2 T6 Gb / II2G Gb T6
Whilst in a hazardous area, do not attempt to change batteries or download images,
these tasks should only be undertaken after returning to a safe area.
Ref.ID 2341-MAN, Rev.A
2
ToughPIX II
USER MANUAL
Contents
1.
2.
Getting To Know Your ToughPIX II
P.4
Camera Charging/Docking Station
P.6
3.
Overview
P.7
4.
Package Contents
P.7
5.
Battery Charging
6.
Getting Started
- Turning the Power On/Off
- Mode Selection
P.8
7.
Taking Pictures
P.9-10
- Optical Zoom
- Digital Zoom
- Flash
- Scene
- Self-timer
- Delete
- Image Size
- Anti shake
- Macro
- Setup
8.
Taking Videos
P.10
9.
Downloading Files
P.11
P.8
11.
3
Technical Information
P.12
Ref.ID 2341-MAN, Rev.A
10.
CorDEX CONNECT™P.11
ToughPIX II
USER MANUAL
GETTING TO KNOW YOUR TOUGHPIX II
❶
❷
❸
❹
❶
Power button ❸
❷
Shutter button
❹Lens
4
Ref.ID 2341-MAN, Rev.A
Flash light
ToughPIX II
USER MANUAL
GETTING TO KNOW YOUR TOUGHPIX II
❾
❾
❼
❶
❷
❺
❽
❻
❹
❸
❶ LCD Screen
❹ Mode
❷ Left/Scene
❺ Menu Button
❸ Playback
❻ Down / Self Time ❾ W/T (Zoom in/Zoom out)
5
❼ Up/Delete
❽ Right/Flash
Ref.ID 2341-MAN, Rev.A
ToughPIX II
USER MANUAL
CAMERA CHARGING / DOCKING STATION
❶
❹
❸
❷
❶
Data communication
❷
interface
❺
USB Terminal
❺
6
Battery release lever
Ref.ID 2341-MAN, Rev.A
❸ Power Supply for ❹ Battery recharging
charging unitcompartment
ToughPIX II
USER MANUAL
OVERVIEW
The SLR style ToughPIX II incorporates a 16 Megapixel sensor with 16GB memory
and High Definition video capability. Close up and wide area photography is
simple with crisp and clear images using the built-in macro feature, anti-shake
technology, 3x optical and 4x digital zoom.
Package Contents
1. Check the contents of your ToughPIX II. The shipping case should include the following items:
• Explosion proof digital
camera
• USB Communication Wand
• Docking / Charging Station
• CorDEX CONNECT™ Software
• Removable / Rechargeable Battery
• Neck Strap
• Hard Carry Case
Ref.ID 2341-MAN, Rev.A
7
ToughPIX II
USER MANUAL
BATTERY CHARGING
Battery charging must only be carried out in a safe area using the docking/charging
station supplied. Never open the battery compartment or attempt to download data
within a hazardous environment.
The battery is charged using the docking station supplied (See Page 6).
•
•
• •
•
•
•
•
•
Open the battery compartment of the camera and remove the retaining plug.
Remove the battery from the battery compartment of the camera.
Plug in the charging unit to a mains circuit and plug the jack from the charging unit into the docking station.
Insert the battery into the battery charging compartment on the docking station.
The charging light on the charging unit will flash green to show that the battery in charging.
When the battery is fully charged the charging unit light will stop
flashing and will show constant green.
Remove the battery from the charging compartment
Insert the battery pack into the camera paying careful attention to the
orientation of the pack
Insert the retaining plug and ensure that this is tightly secured.
GETTING STARTED
Turning the Power On/Off
Use the power button on the top of the camera to turn the camera on and off. If there is
insufficient battery power a red icon will appear on the display and the camera will automatically power off after a few seconds. Press the shutter button to take a photo.
8
Ref.ID 2341-MAN, Rev.A
Mode Selection
ToughPIX II has three operating modes, Camera
Video
and Playback
.
Camera mode is the default from Power On and pressing the MODE button will toggle
between Camera and Video mode. Press the Playback button to review photos and
videos.
ToughPIX II
USER MANUAL
TAKING PICTURES
Optical Zoom
You can magnify your subject up to 3 times using the optical zoom by pressing the T and
W buttons to zoom in and out.
Digital Zoom
You can magnify your subject up to 4 times further using the digital zoom by pressing the
T and W buttons to zoom in and out. An icon in the display will show whether you are
using optical or digital zoom.
Flash
In low light conditions it is recommended to use the built-in flash. Use the flash/right
button to toggle through the four flash modes:
Force flash
Auto AUTO
Red eye reduction
No flash
Scene
Scene is selected using the left button and toggles through several setting options: Auto,
Night Portrait, Night Scenery, Portrait, Scenery, Beach, Sport, High Sensitivity
9
Ref.ID 2341-MAN, Rev.A
Self-timer
Self timer is selected using the down button to toggle through 4 self-timer options: 2 sec,
5 sec, 10 sec or Off
ToughPIX II
USER MANUAL
TAKING PICTURES CONTINUED
Delete
Press the up button to delete the last photo or video captured. A “Delete This Image”
confirmation message will appear in the display, use the left/right buttons to choose yes
to delete the image or no to cancel the delete
Image Size
To set the image size, press MENU and use the right/left button to select the MP icon.
The image size menu will appear in the display and the up/down buttons will select the
required image size.
Anti-Shake
This function prevents blurring of the photo as a result of hand shake. It is accessed
through the MENU button and using the right/left button to select the Hand icon.
Macro
The macro or close-up function enables clear photos to be taken within a distance of
15cm to 45cm from the subject. Press the MENU button and use the right/left button to
select the macro icon
The macro menu will appear in the display and the up/down
button will toggle the macro
and distance
function on and off.
Setup
You can adjust the many camera setup options by pressing the MENU button and using
the right/left button to select the TOOL icon. The setup menu on the display enables
adjustment of: Exposure, ISO, White Balance, Sharpness, Quality, Digital Zoom, Date, Beep
Sound, Auto Power Off, Language, Frequency, Format, Default Setting.
Press the MODE button to select video mode
Press and release the shutter button
to start recording. The elapsed time will appear on the top right of the display and the
recording icon will flash. Press the shutter button again to stop the recording and save the
file in AVI format. Use the playback mode to view your recording.
10
Ref.ID 2341-MAN, Rev.A
TAKING VIDEOS
ToughPIX II
USER MANUAL
DOWNLOADING FILES
Photo and video file can only be downloaded using the docking/charging station supplied.
These files may then be transferred to any PC with a USB connection
•
•
•
Connect one end of the USB cable to an available USB port on your computer
Connect the other end of the USB cable to the USB terminal on the docking
station
Remove the battery pack from the camera (see page 8) and gently place the camera onto the Data Communication Interface on the docking station
•
•
•
•
•
From the Windows desktop, double click on My Computer.
Look for a new ‘removable disk’ icon. This ‘removable disk’ is actually the
memory (or memory card) in your camera. (Typically, the camera will be
assigned drive letter ‘e’ or higher)
Double click on the removable disk and locate the DCIM folder.
Double click on the DCIM folder to open it to find more folders. Your recorded images and video clips will be inside these folders.
Copy & Paste or Drag-N-Drop image and video files to a folder on your computer.
•
Double-click the ‘untitled’ or ‘unlabeled’ disk drive icon on your desktop.
iPhoto may automatically launch
Windows Users
Mac Users
CorDEX CONNECT™ is a reporting and analysis software package that can be downloaded
at no charge from our website www.cordexinstruments.com. It is compatible with all our
products that output data or images through a USB
connection.
11
Ref.ID 2341-MAN, Rev.A
CorDEX CONNECT™
ToughPIX II
USER MANUAL
TECHNICAL INFORMATION
Certificate Information
ATEX / IECEx Certificate No:
TRAC13ATEX0046X / IECEx TRC 13.0016x
ATEX / IECEx Certificate Types
Ex d IIB+H2 T6 Gb / II2G Gb T6
Ambeint Temperature
-4°F to 1112°F (-20°C to +600°C )
General Information
Image download
9Hz
Image Storage
320 x 240 uncooled microbolometer
Standard image capture reslution
16 Megapixel
Zoom
3 x optical, 4 x digital
Screen size
2.7 inches
Additional features
Anti shake, auto focus, macro, face recognition
Tripod mount
1/4 inch 20 TPI
Detailed information
Body Material
Anodised aluminium with anti-static over mould
Lens & LCD material
Armoured Glass
Weight
900g
IP
54
Electrical information
Battery Type
Removable & Rechargeable
Capacity
1100mAh
Cell type
NiMH
Ref.ID 2341-MAN, Rev.A
12
All other brand and product names are
trademarks of CorDEX Instruments Limited.
Ref.ID 2341-MAN, Rev.A
Copyright © 2011, CorDEX Instruments Limited.