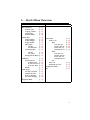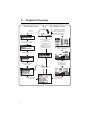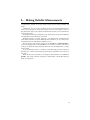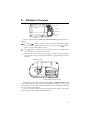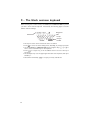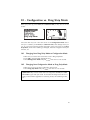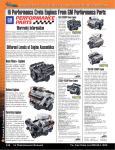
1
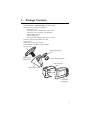
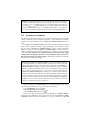
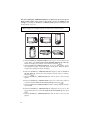
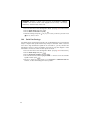
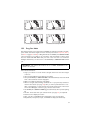
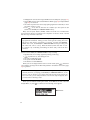
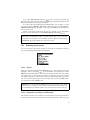
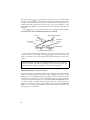
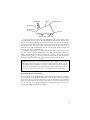
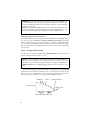
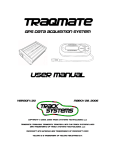
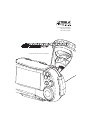
1749 14th Street
Santa Monica, CA 90404
Tel: (310) 452-0030
Fax: (310) 452-0078
G-tech Firmware version 2.0 Manual
WARNING: Always obey all local and federal laws when using this device. This
device is not intended for street or highway use. Use only in designated
areas, closed courses and racetracks.
WARNING: Weather conditions severely impair controllability of a vehicle especially at high speed. Use this device with caution and emphasis on
safety.
WARNING: Don’t take your eyes off of the road. G-TECH/Pro COMPETITION will record your results for viewing after the run. This device is
designed as a test tool to measure performance and safety characteristics
of a given vehicle. Use it for that purpose only.
Please wear your seat belt at all times.
Thank you for purchasing G-TECH/Pro COMPETITION. Your choice to acquire
G-TECH/Pro COMPETITION is a sign that you are serious about performance. Since
performance is important to you it’s important to us. That’s why G-TECH/Pro
COMPETITION is such an incredible technological breakthrough.
RISC Microprocessor, Dedicated Digital Signal Processing hardware, 2 MegaBytes
of Flash memory, GOLD plated circuitry, Four Precision Accelerometers, Graphics
LCD display, Intuitive user interface, datalogging and data download and sophisticated
algorithms are only some of the features designed to insure impeccable accuracy and
unprecedented versatility for your performance measurements.
To truly benefit from your new G-TECH/Pro COMPETITION it’s best to learn
about its operation. We have tried to make this booklet as simple and concise as
possible.
Please drive safely.
Jovo Majstorovic, President.
Tesla Electronics Inc. reserves the right to make changes to this document and the product
or products it describes without notice.
Tesla Electronics Inc. shall not be liable for technical or editorial errors or omissions
made herein; nor for incidental or consequential damages resulting from the furnishing,
performance, or use of this material.
Tesla Electronics Inc. shall not be liable in any way for any incidental or consequential
damages to the vehicle, driver, passengers, and or other involved parties or property
occurring while using G-TECH/Pro COMPETITION.
2
Contents
1 Package Contents
5
2 Quick-Setup Guide
6
3 Gtech Menu Overview
7
4 Graphical Overview
8
5 Mounting Instructions
5.1 Bracket Installation . . . . . . . . . . . . .
5.2 Removing the Bracket . . . . . . . . . . . .
5.3 Permanent Installation of the Bracket . . .
5.4 Installing the G-TECH/Pro COMPETITION
.
.
.
.
.
.
.
.
.
.
.
.
.
.
.
.
.
.
.
.
.
.
.
.
.
.
.
.
.
.
.
.
.
.
.
.
.
.
.
.
.
.
.
.
.
.
.
.
.
.
.
.
9
.
9
. 10
. 10
. 10
6 Making Reliable Measurements
11
7 How Does it Work?
12
7.1 Gs, Speed, Distance, and Power . . . . . . . . . . . . . . . . . . . . 12
7.2 RPM . . . . . . . . . . . . . . . . . . . . . . . . . . . . . . . . . . . 12
8 Hardware Overview
13
9 The Gtech onscreen keyboard
14
10 Configuration vs. Drag Strip Mode
10.1 Changing from Drag Strip Mode to Configuration Mode
10.2 Changing from Configuration Mode to Drag Strip Mode
15
. . . . . . . 15
. . . . . . . 15
11 Calibration
16
11.1 RPM Calibration . . . . . . . . . . . . . . . . . . . . . . . . . . . . . 16
11.2 Accelerometer Calibration . . . . . . . . . . . . . . . . . . . . . . . . 17
12 Vehicle Data
12.1 Switching between vehicles . . . .
12.2 Vehicle weight . . . . . . . . . . .
12.3 Engine Redline . . . . . . . . . . .
12.4 Shiftlights . . . . . . . . . . . . .
12.4.1 Shiftlight activation . . . .
12.4.2 Set Shiftpoint . . . . . . .
12.5 Cornering Lights . . . . . . . . . .
12.5.1 Setting Cornering G Limits
12.5.2 Cornering Light activation
12.6 Change Vehicle Name . . . . . . .
.
.
.
.
.
.
.
.
.
.
.
.
.
.
.
.
.
.
.
.
.
.
.
.
.
.
.
.
.
.
.
.
.
.
.
.
.
.
.
.
.
.
.
.
.
.
.
.
.
.
.
.
.
.
.
.
.
.
.
.
.
.
.
.
.
.
.
.
.
.
.
.
.
.
.
.
.
.
.
.
.
.
.
.
.
.
.
.
.
.
.
.
.
.
.
.
.
.
.
.
.
.
.
.
.
.
.
.
.
.
.
.
.
.
.
.
.
.
.
.
.
.
.
.
.
.
.
.
.
.
.
.
.
.
.
.
.
.
.
.
.
.
.
.
.
.
.
.
.
.
.
.
.
.
.
.
.
.
.
.
.
.
.
.
.
.
.
.
.
.
.
.
.
.
.
.
.
.
.
.
.
.
.
.
.
.
.
.
.
.
20
20
20
21
21
21
21
22
22
23
23
3
13 Run
13.1
13.2
13.3
13.4
Parameters
Reaction Time Measurement . .
Staging and Rollout Settings . .
The Speedmark . . . . . . . . .
The Distance (end of run) Marks
.
.
.
.
.
.
.
.
.
.
.
.
.
.
.
.
.
.
.
.
.
.
.
.
.
.
.
.
.
.
.
.
.
.
.
.
.
.
.
.
.
.
.
.
.
.
.
.
.
.
.
.
.
.
.
.
.
.
.
.
.
.
.
.
.
.
.
.
.
.
.
.
.
.
.
.
24
24
25
26
26
. . . . .
Battery
. . . . .
. . . . .
. . . . .
.
.
.
.
.
.
.
.
.
.
.
.
.
.
.
.
.
.
.
.
.
.
.
.
.
.
.
.
.
.
.
.
.
.
.
.
.
.
.
.
.
.
.
.
.
.
.
.
.
.
.
.
.
.
.
.
.
.
.
.
.
.
.
.
.
.
.
.
.
.
.
.
.
.
.
.
.
.
.
.
.
.
.
.
.
.
.
.
.
.
27
27
27
27
27
28
15 Driving with the Gtech
15.1 Continuous Mode . . . . . . . . . . . . . . . .
15.1.1 Tachometer and Shiftlights . . . . . . .
15.1.2 Acceleration Indicators . . . . . . . . .
15.2 Drag Run Mode . . . . . . . . . . . . . . . . .
15.3 Reviewing stored results . . . . . . . . . . . . .
15.3.1 Results . . . . . . . . . . . . . . . . . .
15.3.2 Horsepower and Torque vs RPM Graph
15.3.3 RPM vs Time Graph . . . . . . . . . .
15.3.4 Speed vs Time Graph . . . . . . . . . .
15.3.5 Braking Distance Graph . . . . . . . . .
15.3.6 Gs vs time graph . . . . . . . . . . . .
.
.
.
.
.
.
.
.
.
.
.
.
.
.
.
.
.
.
.
.
.
.
.
.
.
.
.
.
.
.
.
.
.
.
.
.
.
.
.
.
.
.
.
.
.
.
.
.
.
.
.
.
.
.
.
.
.
.
.
.
.
.
.
.
.
.
.
.
.
.
.
.
.
.
.
.
.
.
.
.
.
.
.
.
.
.
.
.
.
.
.
.
.
.
.
.
.
.
.
.
.
.
.
.
.
.
.
.
.
.
.
.
.
.
.
.
.
.
.
.
.
.
.
.
.
.
.
.
.
.
.
.
29
29
29
30
31
33
33
33
36
36
38
39
14 Gtech Setup
14.1 Setting Date and Time . .
14.1.1 Replacing the Clock
14.2 Firmware Version . . . . .
14.3 Reset to Defaults . . . . .
14.4 Serial Port Settings . . . .
.
.
.
.
16 Managing Stored Data
40
16.1 Reviewing Stored Runs . . . . . . . . . . . . . . . . . . . . . . . . . 40
16.2 Renaming Stored Runs . . . . . . . . . . . . . . . . . . . . . . . . . 40
16.3 Deleting Stored Runs . . . . . . . . . . . . . . . . . . . . . . . . . . 40
17 Downloading Stored Runs
41
18 Troubleshooting
42
18.1 Checking and troubleshooting calibration . . . . . . . . . . . . . . . . 42
4
1 – Package Contents
Your G-TECH/Pro COMPETITION box contains the following items:
• One G-TECH/Pro COMPETITION performance meter
• One mounting mechanism consisting of:
–
–
–
–
–
–
•
•
•
•
One
One
One
One
One
One
One
One
One
One
suction cup
large nut for creating suction cup vacuum
small nut for mounting clip adjustment
mounting bracket
mounting clip
permanent mounting stem with four screws
12V cigarette lighter DC power cable
manual
serial communications cable
120VAC to 12VDC wall power adapter
Suction Cup
Large (Vacuum) Nut
Suction Cup
Release Tab
Small (Tensioning) Nut
Mounting Clip
Mounting Bracket
G-tech/PRO
Comptetion
5
2 – Quick-Setup Guide
To get the most out of this product, we recommend reading the entire manual
carefully. For a quick overview on how to get up and running, read the rest of this
page.
• Install bracket on windshield. (See page 9 for instructions.)
• Connect G-TECH/Pro COMPETITION to 12V automotive power using the
cigarette adapter power cord and go to Drag Strip Mode (See page 15 for
info.)
• Follow accelerometer calibration instructions when they pop up on the screen,
shortly after you first power up your G-TECH/Pro COMPETITION. To start
⇒ Configuration Mode ⇒
⇒ Calibration ⇒
calibrating press
⇒ Accelerometers ⇒
⇒ Calibrate Axes ⇒
. Then follow instructions on the screen. For more help see page 17.
• You are now ready to show realtime Gs and measure run speeds and times.
• Set engine redline. From the main configuration menu choose Vehicle Data
⇒ Engine Redline ⇒
and follow instruction on the screen. For
⇒
extra help see page 20.
• Calibrate RPMs. From the main configuration menu choose Calibration ⇒
⇒ RPMs ⇒
and follow instructions. For some vehicles, turning
on the lights and rear window defroster helps. For more help see page 16.
• You are now ready to measure accurate RPMs.
⇒ Shiftlights ⇒ Set
• Set shiftlight shiftpoint. Choose Vehicle Data ⇒
and follow instruction on the screen. When done, select
Shiftpoint ⇒
to activate Shiftlights. For extra help see page 21.
ON ⇒
• You are now ready to use your shiftlights.
⇒ Vehicle Weight ⇒
• Enter vehicle weight. Choose Vehicle Data ⇒
and follow instructions. For more help see page 20.
• Your G-TECH/Pro COMPETITION can now measure HP and Torque.
⇒ Set Date and Time ⇒
• Set time and date. Choose Gtech Setup ⇒
and follow instructions. For more help see page 27.
• Your G-TECH/Pro COMPETITION can properly keep track of stored runs.
. Position your
• To do a quarter mile run, Choose Drag Strip Mode ⇒
car on a level track. Have the G-TECH/Pro COMPETITION in its bracket and
. Wait for the
running in Drag Strip Mode. Stop the vehicle and press
blinking red light. Launch at will, the G-TECH/Pro COMPETITION will detect
the start.
and choose the desired results from the menu and
• After the run, press
. After viewing, select Exit at the end of the menu and choose to
press
save, rename, or discard the most recent data. For more information, see page
31. Also see the chart on page 8 for an overview storing and reviewing runs.
6
3 – Gtech Menu Overview
CONFIGURATION MODE MENUS
Run Parameters
Reaction time
Staging / Rollout
Speed Mark
Distance Marks
Vehicle Data
Choose Vehicle
Vehicle Weight
Engine Redline
Shift Lights
On/Off
Set Shiftpoint
Cornering Lights
On/Off
Set Limits
DRAG STRIP MODE MENUS
(p. 24)
(p.
(p.
(p.
(p.
24)
25)
26)
26)
(p. 20)
(p.
(p.
(p.
(p.
20)
20)
21)
21)
Stored Runs
Run1
View this run
Rename this run
Delete this run
Download to PC
(p. 21)
(p. 21)
(p. 22)
Accelerometers
(p. 17)
RPMS
(p. 16)
Gtech Setup
(p. 27)
Set Date and Time
Firmware Version
Reset to Defaults
Serial Port Settings
Drag Strip Mode
(p.
(p.
(p.
(p.
(p. 40)
(p.
(p.
(p.
(p.
40)
40)
40)
41)
View this run
Rename this run
Delete this run
Download to PC
(p. 16)
Calibrate Axes
(p. 17)
X-Y-Z Gs Screen (p. 42)
Erase Cal. Data (p. 42)
(p. 40)
Run2
(p. 23)
(p. 22)
Change Vehicle Name (p. 23)
Calibration
(p. 40)
Select a run
Etc...
Delete all
Download all to PC
(p. 40)
(p. 41)
Configuration Mode
(p. 15)
Exit
(p. 29)
27)
27)
27)
28)
(p. 31)
7
4 – Graphical Overview
REVIEWING A RUN
RECORDING A RUN
Press OK when the vehicle
is stationary on level road
to stage. If you did not choose
the reaction time feature in
setup, the tree is skipped.
Press m to
go to the
main menu
select stored runs and press
OK to revisit saved data
Select Save this run, then
press OK.
Once the run is saved,
the Gtech returns to the
starting screen.
If memory is full, you will
be asked to free up space
by deleting other runs.
After countdown, start accelerating
to start recording data
Select a run and press
OK
Gtech keeps recording
as long as your car is
accelerating, then
automatically stops
Select the run of choice,
then press OK.
Choose Exit and press OK
after viewing data.
Choose: view this run,
then press OK.
8
Press OK to view your
results and graphs
of your new run
5 – Mounting Instructions
The G-TECH/Pro COMPETITION comes supplied with a custom designed vacuum
mounting system. Once properly installed on a vehicle windshield it will stay solidly
in place for months, or quickly allow itself to be removed and stored. The suction
cup and bracket parts are made of the highest quality UV proof plastics.
Large nut
Small nut
5.1
Bracket Installation
Main mounting
bracket body
• Make sure the suction cup is inserted into the mounting bracket.
• Tighten (+) the smaller (tensioning) nut until it is snug (this may require
tightening (+) the large (vacuum) nut a few turns.
• Back off (–) the large nut until it is snug against the small nut.
• Insert ball of the clip into the mounting bracket. Make sure it goes all the way
in. This should be a snug fit.
• Gently place the mounting bracket on your vehicle windshield, in such a position
that it does not interfere with driving visibility.
• Push the large nut (not the main bracket body!) and suction cup stem against
the window to squeeze as much air as possible out from under the suction cup.
The mounting bracket should now stay up on the windshield.
NOTE: A typical mistake is to press on the outer bracket parts when first putting
the suction cup to the windshield. This will not expel enough air. Press down
holding the large nut only! This pushes down directly on the center of the suction
cup and will lead to a rock solid attachment. If the bracket is not stable, the
G-TECH/Pro COMPETITION results will not be accurate.
• Choose the preferred orientation for the clip and match up the grooves of the
bracket and suction cup.
9
• Tighten (+) the large nut as far as it will go. When using a brand new mounting
bracket, try tightening the large nut again after about one minute.
• At this point the bracket should be secure. The large nut alone will make for a
tight fit. If the clip still moves too easily, first make sure the large nut has gone
as far as it can. If more is needed, back off (–) the small nut a few turns until
the clip resists twisting. Do not over-tighten this last step. The goal is to keep
the G-TECH/Pro COMPETITION from changing orientation. More tension is
not necessary.
NOTE: Do not try to rotate the clip when tension is applied to the small nut.
Please loosen it first by following these directions:
• Reduce the tension on the small nut by rotating it clockwise (the positive (+)
direction).
• Re-orient the clip.
• Apply tension by rotating the small nut counter-clockwise (the negative (–)
direction).
5.2
Removing the Bracket
• Completely back off the large nut by rotating it in the counter clockwise (–)
direction. Take it all the way back against the small nut.
• Pull the large release tab on the suction cup.
5.3
Permanent Installation of the Bracket
Your G-TECH/Pro COMPETITION is supplied with a permanent mounting stem
which can be attached to a part of your vehicle other than the windshield. Holes
must be drilled on a relatively flat surface within the vehicle. Screw the stem into
place, do not over tighten. Remove the large and small nuts from the section cup and
place the mounting bracket over the attached stem. Screw the large nut part-way
down, then fully screw on the small nut. Next attach the clip to the bracket and
screw down the large nut until it is snug. Do not over-tighten. Lock down the clip
position by backing off the small nut.
5.4
Installing the G-TECH/Pro COMPETITION
Insert the power cord into the G-TECH/Pro COMPETITION DC jack and then snap
the G-TECH/Pro COMPETITION into the clip. Finally, plug the cigarette adapter
into your vehicle’s 12V cigarette lighter socket. The G-TECH/Pro COMPETITION
can be freely removed and inserted while powered on.
10
6 – Making Reliable Measurements
There are many variables involved in any car performance measurement including
air temperature, altitude, oil viscosity, wind, fuel type, driver’s timing, humidity and
others.
Additionally, cars are not like computers, given the exact same parameters they
will not come up with the exact same results. Even if it was possible to have all
the elements the same in two separate measurements it’s likely to have performance
variations up to 10%.
Considering the amount of variables it’s very important to average several different
runs preferably in both directions of the wind.
Measuring speed of a moving vehicle is a very difficult task. Professional test
track drivers encounter the same difficulties with variables as you do, after all they
are dealing with same unpredictable elements you are.
We are proud to say that the accuracy of the G-TECH/Pro COMPETITION is
close to the equipment that costs $10,000 or more. However in order to achieve that
accuracy you should do what professional drivers who use this equipment do: average
several results.
If you are making five runs, for example, you should average top three and ignore
the worst two. Use the same principle, proportionately, regardless of how many runs
you make.
Make sure that the track that you are doing the measurements on is as level as
possible. Any incline or decline will upset the measurement. All standard tests are
made on level ground.
11
7 – How Does it Work?
7.1
Gs, Speed, Distance, and Power
At the heart of G- TECH/Pro is a precision 3-axis accelerometer, a sensor that
measures acceleration also known as G-Force. G-Force is what’s keeping you in your
seat and if it wasn’t for that seat you would be accelerating to the ground at 1 G (32
feet per second per second).
Acceleration is measured in Gs and is one of the key things the G-TECH/Pro
COMPETITION is measuring. You can see this when you position the unit horizontally, it will show 0.00G’s on the X acceleration bar. If you position it vertically it
will show 1.00G’s. The G-TECH/Pro COMPETITION measures your speed and distance travelled by integrating forward (the forward direction is chosen automatically)
acceleration over time. Basically, if you know how fast you are accelerating for a
certain time period you’ll know how much your speed changed after that time period.
So if you start off from zero speed then you’ll know what your speed is after every
time period. These time periods are very small (a few thousandths of a second) and
that’s how G-TECH/Pro COMPETITION maintains its accuracy. However, if you
don’t start from zero speed your measurement won’t be correct because you won’t
have a good reference point. Consequently, it’s very important to start all of your
measurements from an absolute standstill.
Distance is measured in the same fashion, if you know how fast you are going for
a certain time period you will know what is the distance travelled during that time
period.
The G-TECH/Pro COMPETITION measures horsepower though the formula:
speed × acceleration × the weight of the vehicle. The more accurate the vehicle
weight you enter, the better your measurement. The G-TECH/Pro COMPETITION
measures delivered horsepower, sometimes also called Rear Wheel Horsepower. This
horsepower includes the loss of power through the drivetrain which is usually 10-15%.
Rear Wheel Horsepower is what most people are interested in because that is what
they experience when driving. The use of Flywheel Horsepower measurement is often
used in advertising, but not very realistic when it comes to accelerating your vehicle.
The horsepower that G-TECH/Pro COMPETITION measures also includes vehicle
aerodynamic drag. This means that if you tape over your headlights and grill, remove
rear view mirrors and windshield wipers to reduce your drag, you will measure a
Horsepower increase even though you didn’t make any changes to the engine. After
adding an aftermarket spoiler you will likely find a decrease in measured horsepower,
since you increased the drag losses on your vehicle.
7.2
RPM
RPM is measured directly from electrical engine noise found in the cigarette lighter
voltage. No extra is installation needed.
12
8 – Hardware Overview
Shiftlights
Light Sensor
LCD Display
OK Button
Menu Button
Navigation
Buttons
The user interacts with the G-TECH/Pro COMPETITION through three types of
buttons:
The menu (
) button is generally used to go between the graphical display
will also
screens and the menus screens. Once you are in a menu, pressing
bring you back up to the previous menu.
The
button is used to move from screen to screen, to confirm entered
data, or to abort a 1/4 mile run at any time.
The navigation keys or arrow keys ( , , , ) are used to move up and down
in menu lists or move cursors back and forth on graphs and when entering
numbers.
DC Power Jack
Serial Communications Port
The CD power jack on the backside of the G-TECH/Pro COMPETITION accepts
either the 12V cigarette lighter cord or the 12V AC wall adapter cord. The Serial
communications port accepts the supplied serial cable. This is used when transferring
data to and from a PC computer.
A fuse is enclosed in the tip of the 12V cigarette lighter adapter. Failed fuses
must be replaced with a 1 AMP rated standard fuse.
13
9 – The Gtech onscreen keyboard
When choosing file or vehicle names, the G-TECH/Pro COMPETITION will present
you with a small onscreen keyboard. Please study the following figure to become
familiar with the workings.
Backspace
Entered text
Accept
changes
and Exit
• The top line of the screen contains the text to be edited.
to cancel out of the editing mode, discarding any changes
• Press
• Use the G-TECH/Pro COMPETITION arrow navigation keys ( ,
move a cursor around the keys on the keyboard.
to accept a key, it will be added to the line of text at
• Press
the screen.
• The backspace key is at the upper right hand side of the keyboard,
sented by <.
to accept your newly entered text.
• Select Enter followed by
14
you made.
, , ) to
the top of
and repre-
10 – Configuration vs. Drag Strip Mode
When you power up your G-TECH/Pro COMPETITION you may see one of two
screens:
Main setup screen.
Main Drag Strip screen
The screen with only text is the main screen of the Configuration Mode and allows you to calibrate your G-TECH/Pro COMPETITION, enter settings about your
car, etc. The screen with the graphical tachometer is the main screen of the Drag
Strip Mode, which shows realtime g’s, shiftlights, measures and graphs vehicle performance, etc.
10.1
Changing from Drag Strip Mode to Configuration Mode
• Make sure you see the main tachometer screen in Drag Strip Mode.
to enter the Drag Strip Mode menu
• Press
, then wait for a few seconds.
• Select Configuration Mode and press
10.2
Changing from Configuration Mode to Drag Strip Mode
• Make sure you are in the main configuration menu screen.
, then wait for a few seconds
• Select Drag Strip Mode and press
QUESTION: Why all these modes? We have designed the G-TECH/Pro COMPETITION to grow with your needs. In the future this design leaves us free to
easily produce firmware upgrades for road racing modes, off-road driving modes,
etc.
15
11 – Calibration
The G-TECH/Pro COMPETITION internal sensors and instruments need to be calibrated for your vehicle and local environment.
IMPORTANT: Calibration is an essential procedure. Without calibration, your
G-TECH/Pro COMPETITION will not give correct results. Calibration is done
in the Configuration Mode. See page 15 on how to activate the Configuration
Mode.
The G-TECH/Pro COMPETITION requires separate calibrations for RPM and Gs.
After you finish the procedure, which will take about two minutes, the G-TECH/Pro
COMPETITION stores the calibrations in its permanent FLASH memory.
11.1
RPM Calibration
The G-TECH/Pro COMPETITION analyzes signals from your engine to measure
RPM. Since every car is different, you will need to perform a quick calibration procedure for your vehicle. Every time you move the G-TECH/Pro COMPETITION to
a different vehicle, you will need to repeat this procedure. (See section 12.1 on page
20 about saving RPM calibrations for multiple vehicles.) RPMs are used in various
graphs on the G-TECH/Pro COMPETITION and are also an essential part for Torque
calculations.
TIP: For more consistent RPM calibration results, turn on your headlights and
rear window defroster during the calibration procedure.
Plug the G-TECH/Pro COMPETITION into the cigarette lighter and be sure to
be in Configuration Mode (see page 15) and follow these steps:
•
•
•
•
•
•
Have your car parked and running in Neutral
Turn on your G-TECH/Pro COMPETITION in the Configuration Mode
Select Calibration and press
Select RPMs and press
Rev the engine to the suggested RPM level and hold it, then press
Wait for the next screen and rev the engine to the suggested RPM level and
hold it, then press
The G-TECH/Pro COMPETITION is now able to sense RPM’s over the entire
range of your engine. To test the results, go back to the main Drag Strip Mode
tachometer screen and watch the RPM gauge while you rev your engine.
16
NOTE: The suggested RPM levels to rev to during calibration are calculated as
a function of the engine redline you entered for the car. If are do not want to,
or cannot, rev to the suggested levels, you can always change them using the
arrow keys ( , , , ) during calibration. For the best possible results, the two
calibration points should have a lot of RPMS between them. For a typical car,
if you can rev to 1500 and 5000, this is preferable to 2000 and 4000 RPMs.
11.2
Accelerometer Calibration
This section describes how to calibrate the accelerometers which are used to measure
vehicle acceleration, speed, horsepower and torque. This calibration is absolutely
essential for accurate results from your G-TECH/Pro COMPETITION performance
meter.
The G-TECH/Pro COMPETITION accelerometers are calibrated against the earth’s
gravity, which is defined as exactly 1 G (pronounced gee). The calibration requires
that you hold the G-TECH/Pro COMPETITION very still in various orientations.
When you first turn on your G-TECH/Pro COMPETITION, it will remind you to
calibrate immediately. Please follow the directions on the screen, or follow the steps
below. To reduce vibrations we recommend that you do not have your engine
running while performing the procedure. Turn your ignition only to the point required for powering up the cigarette lighter. Alternatively, perform the calibration
indoors with the 120V power adapter.
NOTE: The G-TECH/Pro COMPETITION is a precision instrument and needs
to be calibrated twice. To ensure maximum accuracy it has a built in precision
thermometer which corrects for any variations in temperature. The G-TECH/Pro
COMPETITION is intelligent and will let you know when it is time to calibrate.
Expect to calibrate twice within the first hour of initial power-up and, depending on regional conditions, again on a very cold or hot day. After that, the
G-TECH/Pro COMPETITION will be ready for any condition! Each calibration
should take less than 30 seconds. We recommend completing calibration quickly,
so the temperature does not change too much during the procedure. If you ever
decide to do extra calibrations not requested by the G-TECH/Pro COMPETITION, be sure to erase all calibration data first, and follow the directions in the
manual as if calibrating for the very first time.
Plug the G-TECH/Pro COMPETITION into the cigarette lighter and be sure to
be in Configuration Mode (see page 15) and follow these steps:
• Select Calibration, then press
• Select Accelerometers, then press
• Select Calibrate Axes, then press
In the next six steps you will basically hold the G-TECH/Pro COMPETITION as
, hold still until the G-TECH/Pro COMinstructed on the LCD display, press
PETITION collects some data, and move on to the next orientation. If you find
17
that the G-TECH/Pro COMPETITION does not proceed to the next step, but
blinks a black square in the center of the screen, you are not holding it still
enough. Try bracing the G-TECH/Pro COMPETITION against something like the
steering wheel of your car.
TIP: Finishing your calibration quickly will ensure more accurate results.
1
2
3
4
5
6
1 Hold the G-TECH/Pro COMPETITION in front of you so you can read the text
on the display. The arrows on the screen should be pointing up at the sky.
Hold it as straight up as possible. Then hold still and press
• Hold the G-TECH/Pro COMPETITION still. If you see a black square, you are
not holding still enough. Try bracing against a fixed object. When the data is
accepted, the message for step 2 will appear.
2 Rotate the G-TECH/Pro COMPETITION 180 degrees so that the arrows in
the text point up, and the text reads normally. Hold as vertical as possible,
then press
• Hold the G-TECH/Pro COMPETITION still until the text for the next step
appears.
3 Rotate the G-TECH/Pro COMPETITION so the text on the screen reads top
to bottom and the arrows on the screen point up, then press
• Hold the G-TECH/Pro COMPETITION still until a message displays that data
was collected.
4 Rotate the G-TECH/Pro COMPETITION by 180 degrees so the text on the
screen reads bottom to top and the arrows on the screen point up, then press
• Hold the G-TECH/Pro COMPETITION still until the text for the next step
appears.
18
5 Now hold the G-TECH/Pro COMPETITION so the screen is level and pointing
when ready.
up to the sky, and press
• Hold the G-TECH/Pro COMPETITION still until the text for the next step
appears.
6 Finally, hold the G-TECH/Pro COMPETITION overhead, with the screen
when ready.
level and facing the ground, and press
• Hold the G-TECH/Pro COMPETITION still until the text for the main configuration menu appears.
(then repeat) until
The calibration is now completed. Select exit and press
you are in the main setup menu.
Once the G-TECH/Pro COMPETITION warms up while you are in Drag Strip
Mode, a message will ask you to do another calibration. The G-TECH/Pro COMPETITION senses when the temperature has increased enough to warrant a second
calibration. The G-TECH/Pro COMPETITION likes to have at least two calibrations,
one at a cold temperature (when you first start the unit up) and one at a high temperature (after a long warm-up period, or after sitting in the sun for a while). After
the second calibration, the G-TECH/Pro COMPETITION will have full temperature
compensation for its entire internal sensor system.
19
12 – Vehicle Data
In order to measure horsepower and to have properly functioning lights, the GTECH/Pro COMPETITION needs to know a few things about your vehicle. You
can store this type of data for up to four vehicles.
12.1
Switching between vehicles
If you plan to use the G-TECH/Pro COMPETITION with more than one car, you will
have to enter several settings (RPM calibration, shiftpoint, and vehicle weight,
engine redline) for each vehicle. To make it easy to switch back and forth between
vehicles you can store settings in four different vehicle profiles.
When you first use your G-TECH/Pro COMPETITION, all the settings have been
saved in a profile called no name. When you are ready to move to another car you
should first give the vehicle a name, to avoid confusion. To do this, see section 12.6
on page 23. To select a new vehicle:
•
•
•
•
Go to the main menu of the Configuration Mode. (See page 15 for instructions.)
Choose Vehicle Data and press
Choose Choose Vehicle and press
A list of four vehicle names will appear, with a ∗ mark in front of the currently
active profile.
then wait a few seconds.
• Choose the vehicle of your choice and press
Any vehicle data which is entered after this point are kept under the newly chosen
vehicle. When you are ready to go back to the first car, simply follow the steps above
again and choose the profile for that vehicle. All data is saved in non-volatile memory
and retained when the G-TECH/Pro COMPETITION is unplugged.
NOTE: Date, time, and accelerometer calibration are the same for all vehicles.
You do not have to reprogram these settings for every vehicle.
12.2
Vehicle weight
To get accurate horsepower and torque measurements, you must enter your vehicle
weight into the G-TECH/Pro COMPETITION. Vehicle weight includes the weight of
the car, and any passengers and additional equipment. To learn more about how
horsepower is measured, please read section 7.1 on page 12.
To enter the vehicle weight into the G-TECH/Pro COMPETITION please do the
following:
•
•
•
•
Go to the main menu of the Configuration Mode. (See page 15 for instructions.)
.
Choose Vehicle Data, then press
Select Vehicle weight from the menu, then press
Use the
arrow keys to move the cursor back and forth, and use the
arrow keys to increase and decrease the numbers.
to store the gross vehicle weight in the G-TECH/Pro COMPETI• Press
TION memory.
20
NOTE: Most cars don’t show vehicle weight on the sticker inside the doorjamb,
they show GVWR (Gross Vehicle Weight Rating) From this one you have to
subtract 180 Lb for every missing person. So, if it’s a car for 5 and there is
only a driver you have to subtract 4 times 180. The cheapest way to accurately
weigh a car is at a local truck scale. Then add the weight of passengers and
other equipment and enter this into your G-TECH/Pro COMPETITION.
12.3
Engine Redline
In order for the tachometers to be properly drawn on the Gtech screens, you must
enter your engine redline (maximum engine RPMs). RPMs above redline will be
drawn as a dark area on the G-TECH/Pro COMPETITION tachometers. To enter
the redline:
•
•
•
•
Go to the main menu of the Configuration Mode. (See page 15 for instructions.)
.
Choose Vehicle Data, then press
Select Engine Redline from the menu, then press
Use the
arrow keys to move the cursor back and forth, and use the
arrow keys to increase and decrease the numbers.
to store the Engine Redline in the G-TECH/Pro COMPETITION
• Press
memory.
12.4
Shiftlights
When the engine revs within 500 RPM of the shiftpoint, the lights activate as follows:
500 RPM under redline
250 RPM under redline
At Redline
12.4.1
1 light
2 lights
4 lights blinking
Shiftlight activation
This action allows the turning on or off of the shiftlight. Cars with automatic transmissions do not necessarily benefit from a shiftlight. To turn the shiftlights on and
off:
•
•
•
•
Go to the main menu of the Configuration Mode. (See page 15 for instructions.)
Choose Lights and press
Choose Shift Lights and press
Select on or off and press
to activate or deactivate. The active choice is
shown with a ∗.
12.4.2
Set Shiftpoint
For proper operation of the shiftlights, a shiftpoint must be set. This point should
be set lower than your engine redline (see above). A small mark will be drawn on
the G-TECH/Pro COMPETITION tachometers indicating the shiftpoint. To set the
shiftpoint:
21
•
•
•
•
Go to the main menu of the Configuration Mode. (See page 15 for instructions.)
.
Choose Vehicle Data, then press
Select Shiftpoint Redline from the menu, then press
Use the
arrow keys to move the cursor back and forth, and use the
arrow keys to increase and decrease the numbers.
to store the Shiftpoint in the G-TECH/Pro COMPETITION mem• Press
ory.
Remember to calibrate RPMs for proper shiftlight operation (see Section 11.1 on
page 16).
12.5
Cornering Lights
During Continuous Mode operation (the mode with the dial tachometer gauge) the
G-TECH/Pro COMPETITION lights can be set to illuminate when the lateral Gs
exceed a set limit. This feature is useful when driving around closed tracks. The
best lap times can only be achieved when a driver pulls maximal lateral Gs in the
corners. In the past, the only way to judge was from what the driver can feel. The GTECH/Pro COMPETITION now makes it possible to receive realtime visual feedback
on cornering performance. The G-TECH/Pro COMPETITION cornering lights starts
to blink at a preset G limit. The blinking becomes faster as more lateral Gs are pulled.
Finally, the light blinks very rapidly, when the Maximum G setpoint is exceeded.
IMPORTANT: Since accurate lateral Gs can only work when the G-TECH/Pro
COMPETITION has had a chance to ‘learn’ its orientation, at least one run
(2 second or longer) must be performed on level ground after the G-TECH/Pro
COMPETITION has been mounted. Changing the orientation of the bracket
requires this procedure to be repeated.
12.5.1
Setting Cornering G Limits
They key is to place these two setpoints correctly. The maximum lateral G limit must
be determined on a skidpad which has a road surface comparable to the racetrack.
The minimum level should be set so the driver has ample warning that the maximum
limit is approaching. The setpoints will be entirely up to the car and the driver.
WARNING: Be extremely careful with the maximum G limit. Many variables can
affect this limit. Tire pressure, temperature, and wear, banked corners, slippery
road conditions, aerodynamic down force, are only some examples. Always be
mindful that the G-TECH/Pro COMPETITION is only one of many tools at the
driver’s disposal and that driving decisions should never be based on one single
indicator. Once you have set your G limits, test the behavior of the cornering
light on the skidpad.
To set the upper and lower G limits for the cornering light:
• Go to the main menu of the Configuration Mode. (See page 15 for instructions.)
22
•
•
•
•
Choose Vehicle Data, then press
Select Gtech Lights, then press
Select Cornering, then press
follow the instructions on the screen.
These limits are stored for each vehicle. By default the cornering lights feature is
deactivated. To turn this feature on and off, please see Sec. 12.5 on page 22
WARNING: There is a slight delay between the time when the G-TECH/Pro
COMPETITION first senses large lateral Gs and when the cornering light activates. The delay is necessary for technical reasons having to do with rejecting
bumps and other rapid shocks during driving. Become familiar with the feel of
the cornering lights on a familiar track and in a familiar vehicle.
12.5.2
Cornering Light activation
This action allows the turning on or off of the cornering lights.
•
•
•
•
12.6
Go to the main menu of the Configuration Mode. (See page 15 for instructions.)
Choose Lights and press
Choose Cornering Lights and press
Select on or off and press
to activate or deactivate. The active choice is
shown with a ∗.
Change Vehicle Name
To easily keep track of your vehicle settings, you can enter a vehicle name using
the G-TECH/Pro COMPETITION onscreen keyboard (See Sec. 9 on page 14.) The
vehicle name is also saved with every stored run to help you keep your data straight.
To change the name of a vehicle:
•
•
•
•
Go to the main menu of the Configuration Mode. (See page 15 for instructions.)
Choose Vehicle Data and press
Choose Change Vehicle Name and press
The onscreen keyboard will appear with the current vehicle name in the top
row. Use the keyboard to change the name. Your vehicle name may be up to
15 characters long. Any additional characters will not be saved.
to accept.
• Choose enter on the keyboard, and press
23
13 – Run Parameters
The G-TECH/Pro COMPETITION recreates the drag strip experience in every detail,
including how deep you stage your vehicle behind the starting line and what kind of
starting lights you want to react to.
13.1
Reaction Time Measurement
A good reaction time can be as important as a properly tuned vehicle when it comes
to winning races at the track. The G-TECH/Pro COMPETITION will help you tune
both your car and your driving performance with its Reaction Time feature.
NHRA (National Hot Rod Association) tracks are outfitted with a ‘tree’ of lights
consisting of a vertical tower of a red light topped by a green light, topped by three
amber lights. At Amateur races, the amber lights will come on one by one at 0.5
second intervals. Half a second later a green light comes on. If the vehicle crosses
the starting line before the green light, the red light comes on and the driver is
disqualified.
DEFINITION: Reaction time is defined as the amount of time between the last
amber light and the time when the front tire crosses the starting line. This time
increases when the car is staged farther behind the starting line. This so-called
rollout distance must be set (covered in the next section) for the reaction time
measurement to be accurate.
For the countdown ’tree’ described above, a perfect reaction time is 0.500 seconds.
Any time less than that results in a foul and disqualification. Countdown or Full
’trees’ are typical for open race nights and amateur events, and offer a certain level
of anticipation. Professional drag racers do not have this advantage. They encounter
the pro ’tree’ where all three amber lights come on at once. 0.400 seconds later the
green light comes on. The G-TECH/Pro COMPETITION allows a choice between
four types of trees to practice with:
•
•
•
•
•
Go to the main menu of the Configuration Mode. (See page 15 for instructions.)
Choose Start Parameters and press
Choose Reaction Time and press
Select one of the choices (see the table below) and press
The active choice will have a ∗ in front of it.
Tree type
Full Tree
Full Tree
Pro Tree
Pro Tree
No tree
Description
Countdown of 3 Amber Lights followed by green
Countdown of 3 Amber Lights followed by green
Three simultaneous Amber Lights followed by green
Three simultaneous Amber Lights followed by green
Gtech waits until Gs are pulled
Time interval
0.500 second
0.400 second
0.500 second
0.400 second
none
Please see Section 15.2 on page 31 on how to use the reaction time feature at the
track once it has been set up. Please read the next section to set up rollout, which
is absolutely essential for accurate reaction time measurements.
24
13.2
Staging and Rollout Settings
At an NHRA certified drag strip timing and speed are measured with a series of light
beams. Near the starting line there are three light beams. The first beam, or pre
stage beam merely connected to a light bulb on top of the ’tree’ and tells the driver
is within a foot or so of the second beam. Since it is not in any way related to the
E.T. (Elapsed Time) measurement, we won’t discuss it further.
The second beam, or stage beam, is the important one. When it is blocked by
the front wheel, the car is considered staged. When it becomes unblocked the E.T.
timer starts. The stage beam is the true starting line of any drag race. Because the
beam is a few inches off the ground the front wheel of the car can roll back and forth
by quite a bit while blocking the beam, typically between 8 to 12 inches. It depends
mainly on wheel diameter and exact beam shape and position.
DEFINITION: Rollout is defined as the distance a vehicle moves before it unblocks the stage beam and starts the E.T. timer. A long rollout is called a
shallow stage and leads to higher quarter mile speeds, shorter E.T., and longer
reaction times. A short rollout is called a deep stage, and leads to lower quarter
mile speeds, longer E.T., and shorter reaction times.
Consider a shallow stage, where the leading edge of the front wheel is barely
blocking the stage beam. When the accelerator is pressed, this car rolls 14 inches
before the beam is unblocked. This can be considered a 14 inch running start and the
car is already going 4 miles per hour before the stage beam is unblocked. Compare
this to the same car when staged very deeply, with the trailing edge of the front tire
barely blocking the beam. In this case there is very little rollout, and no running start
to speak of. The deep stage will lead to a slower quarter mile and longer E.T. every
time.
The G-TECH/Pro COMPETITION starts the E.T. timer in exactly the same way
as the track. First you enter your rollout distance:
•
•
•
•
Go to the main menu of the Configuration Mode. (See page 15 for instructions.)
.
Choose Start Parameters, then press
Select Staging / Rollout from the menu, then press
Use the
arrow keys to move the cursor back and forth, and use the
arrow keys to increase and decrease the numbers.
to store the rollout distance in the G-TECH/Pro COMPETITION
• Press
permanent memory.
During any run made from then on, the G-TECH/Pro COMPETITION will not
start its E.T. timer until the car has rolled exactly the selected number of inches. During launch, the G-TECH/Pro COMPETITION is capable of keeping track of movements of less than an inch and is very accurate at measuring rollout.
The G-TECH/Pro COMPETITION rollout distance is limited to a maximum of
16 inches, because at NHRA endorsed tracks the E.T. timer is always started by a
third beam, the guard beam, placed 16 inches behind the staging beam. This beam
prevents cars with very low chassis parts from cheating and getting an unreasonably
long rollout and head start. If you don’t know your exact rollout, we recommend 10
inches, which is the G-TECH/Pro COMPETITION default and typical for most cars
25
at most tracks. When doing a true comparison between runs, be sure the rollout is
always the same. For tuning purposes, we recommend the very shortest rollout, since
this is the truest measure of a car’s performance, regardless of staging.
13.3
The Speedmark
This function alerts you when the vehicle hits a given speed. It is especially useful
in 0-60-0 and 0-100-0 tests. Only one LED illuminates for half a second when the
speed is reached. To choose the speed of the speedmark:
•
•
•
•
Go to the main menu of the Configuration Mode. (See page 15 for instructions.)
Choose Lights and press
Choose Speed Mark and press
You can set the speed in MPH using the arrow keys. Press
when complete.
To turn the speedlight off, set the speed to zero, or set it to a speed you know
you will never reach within your run.
13.4
The Distance (end of run) Marks
The LED indicators can be set to fire a single LED (diagonally opposite from the
speedmark) for half a second every time the vehicle passes a given distance. This is
useful when doing a run on a closed track as an end of run indicator. There are three
fixed marks which can be selected, 60 ft, 1/8 mile and 1/4 mile. All, some, or none
of these marks can be activated:
•
•
•
•
26
Go to the main menu of the Configuration Mode. (See page 15 for instructions.)
Choose Lights and press
Choose Distance Marks and press
Select a distance and press
to activate or deactivate. distance marks
have. Active marks are shown with a ∗.
14 – Gtech Setup
14.1
Setting Date and Time
For every run stored in the G-TECH/Pro COMPETITION the time and date are
stored in memory. To set time and date:
•
•
•
•
Go to the main menu of the Configuration Mode. (See page 15 for instructions.)
Choose Gtech Setup and press
Choose Set Date and Time and press
Use the left and right arrow keys to select between day, month, and year. Use
up and down arrow keys to increase or decrease the numbers. The day of the
week will automatically update.
to accept the changes and move to the set time screen.
• Press
• Use the left and right arrow keys to select between hours, minutes, seconds,
and AM/PM. Use up and down arrow keys to increase or decrease the numbers.
when finished.
• Press
14.1.1
Replacing the Clock Battery
When the G-TECH/Pro COMPETITION is not connected to power, the clock runs
from a long lasting lithium battery (type CR2032). The battery should last several
years, but a time will come when a message appears on the screen asking you to
replace the battery.
Open the G-TECH/Pro COMPETITION by removing the four phillips screws with
a small screwdriver. You will see the battery (about the size of a quarter) on the
circuit board.
The easiest way to remove the battery is to push the battery out to the side with
a toothpick. The new battery (available at any camera shop, and at most drugstores)
should be replaced with the plus (smooth) side facing up, and the minus side (rounded
side) facing down toward the circuit board.
14.2
Firmware Version
You can check the version of your G-TECH/Pro COMPETITION internal software as
follows:
•
•
•
•
14.3
Go to the main menu of the Configuration Mode. (See page 15 for instructions.)
Choose Gtech Setup and press
Choose Firmware Version and press
When you are done reading, press
Reset to Defaults
If you want to erase everything ever entered into your G-TECH/Pro COMPETITION ,
including stored runs, RPMs and accelerometer calibrations, vehicle data, etc. please
do the following:
27
WARNING: Resetting to default values will return the G-TECH/Pro COMPETITION to the state in which it was shipped from the factory. All settings,
calibrations, and stored data will be lost.
•
•
•
•
14.4
Go to the main menu of the Configuration Mode. (See page 15 for instructions.)
Choose Gtech Setup and press
Choose Reset to Defaults and press
Read the warnings and press
only if you are sure you want to proceed. Press
at any time to abort.
Serial Port Settings
The default serial communications speed is set at 115,200 bytes per second and with
today’s computers that speed should nearly always be attainable. While occasional
errors due to high transmission speeds will be corrected for, you may find that the
PC software reports too many transmission errors due to long cable lengths or older
PC hardware. In this case lower the serial speed as follows:
•
•
•
•
Go to the main menu of the Configuration Mode. (See page 15 for instructions.)
Choose Gtech Setup and press
Choose Serial Port Settings and press
The current baud rate will be highlighted with a ∗. Choose one of the available
speeds and then press
• Be sure to select the same speed on your G-TECH/Pro COMPETITION PC
software, or data downloading will not be possible.
28
15 – Driving with the Gtech
The Drag Strip Mode has two principal modes of operation:
• Continuous Mode, which includes
–
–
–
–
Realtime RPM display
Realtime X and Y acceleration
Continuously active shiftlights
Cornering lights, which are triggered by lateral Gs
• Drag Run Mode, which includes
Realtime display of:
–
–
–
–
–
RPMs
60 ft and 1/8 mile time and 0-60mph time
Shiftlights
Horsepower
Torque
Post-run display of:
– 1/4 and 1/8 mile speed and time, 60ft, 330ft, 1000ft, and 0-60mph
times
– HP and TQ vs rpm, speed vs time, braking distance, rpm vs time, and
Gs vs time graphs
Before you can use any of these modes with accurate results, you must calibrate both
the RPMs (see page 16) and the accelerometers (see page 17).
15.1
Continuous Mode
When you first power up your G-TECH/Pro COMPETITION, it will automatically
enter Continuous Mode. The LCD display shows the following screen:
Engine Redline
Tachometer
X Acceleration
Y Acceleration
15.1.1
Primary
Acceleration
Tachometer and Shiftlights
The tachometer shows engine RPMs. Its redline indicates the engine redline you
selected for the currently selected vehicle (see page 21) during setup. If the shiftlights
are turned on (see page 21 they will activate at the selected setpoint (see page 21
29
WARNING: the shiftlights on the G-TECH/Pro COMPETITION are extremely
bright. Do not look directly into the shiftlights when they are illuminated. Shiftlights are meant to be seen from your peripheral vision while your eyes are on
the road!
15.1.2
Acceleration Indicators
In Continuous Mode, the G-TECH/Pro COMPETITION shows X and Y acceleration.
When the car is stationary, both bargraphs should show no readout and the numerical
display shows 0.00g (or very close to 0.00g) when the car is stopped and the engine
turned off. If the numbers are not zero, you must perform at least a 2 second
run launched from level ground. A run of any length will cause the G-TECH/Pro
COMPETITION to automatically level and orient it’s internal acceleration sensors.
NOTE: During Drag Run Mode you can orient the G-TECH/Pro COMPETITION in any position you like. Just before the run, the G-TECH/Pro COMPETITION will sense its orientation with respect to the vehicle. After the run,
the G-TECH/Pro COMPETITION will remember the orientation for accurate G
display during Continuous Mode .
The Continuous Mode display shows you vehicle acceleration in an intelligent way.
The larger of the two appears in black, and the smaller in grey. The larger acceleration
is also displayed numerically and its direction is indicated with an arrow. A few
examples are shown in the following picture. Each acceleration bar ranges from 0 to
1G.
If the cornering lights are activated (see section 12.5 on page 22 about activation)
you will find that the LED lights will start to blink slowly when the lateral G magnitude
reaches a preset limit (see section 12.5.1 on page 22 on setting these limits). The
blink rate will increase until the light becomes solid at a second preset limit.
NOTE: Since accurate lateral Gs can only work when the G-TECH/Pro COMPETITION has had a chance to ‘learn’ its orientation, at least one run (2 second
or longer) must be performed on level ground after the G-TECH/Pro COMPETITION has been mounted. Changing the orientation of the bracket requires
this procedure to be repeated.
30
Right turn with forward acceleration
Braking with some turning
15.2
Left turn with some braking
Acceleration in a straight line
Drag Run Mode
First make sure that your accelerometers and RPMs are calibrated, and that your shiftpoint redline and vehicle weight have been entered (see sections 11.2, 11.1, 12.4.2,
and 12.2 on pages 17 and 20). In Drag Run Mode the G-TECH/Pro COMPETITION
can be mounted in your vehicle in any orientation. We recommend a position which
does not interfere IN ANY WAY with your view of the race track. For maximum
shiftlight effectiveness, aim the screen of the G-TECH/Pro COMPETITION toward
you.
ACCURACY: The quarter mile must be run on a LEVEL SURFACE for the
results to be accurate.
Follow these instructions:
• Stage your vehicle on a track which is straight and level for the entire length
of the run.
• Allow yourself sufficient extra distance for braking.
• Have your G-TECH/Pro COMPETITION in Continuous Mode, the screen should
show a dial tachometer and two bargraphs.
.
• While your vehicle is stationary, press
• When a red light starts blinking, launch at will. If you previously activated a
reaction time feature (see page 24) then you will be presented with a ’tree’.
After a random delay of a few seconds, the tree will activate both on the screen
and via the LED lights. Launch to get your best reaction time.
• The G-TECH/Pro COMPETITION triggers automatically when you start pulling
Gs.
• The E.T. timer stars when your selected rollout (see page 25) is completed.
• Reaction time is displayed if active.
• 60 ft, 1/8 mile, and 0-60mph times will display as the run progresses.
• Elapsed time, horsepower, torque, and RPMs are displayed continuously.
31
• Shiftlights will activate when engine RPMs reach the shiftpoint (see page 21.)
• Single LEDs may fire when selected Distance Marks (page 26) and Speed Mark
(page 26) are activated.
• The timer stops when the vehicle stops pulling significant forward Gs, or when
the vehicle comes to a stop.
at any time to abort the run. Results up to that point are still
• Press
stored in the G-TECH/Pro COMPETITION memory.
Data, such as speed, distance, RPMS, and Gs are stored over a hundred times
per second from about 1 second before the completion of rollout to about 1 second
after the stop of forward acceleration.
NOTE: The G-TECH/Pro COMPETITION stops taking data when it stops sensing significant forward Gs. Taking your foot off the gas and coasting will cause
the timer to stop about 1 second later. If, however, you brake hard IMMEDIATELY after a run, the G-TECH/Pro COMPETITION will keep recording until
the vehicle has come to a stop. With this method, brake test data are easily collected. By accelerating and braking the driver easily controls the data
collection.
Causes for the G-TECH/Pro COMPETITION to stop recording:
•
•
•
•
•
Significant Gs are not being registered (cruising or full stop).
is pressed at any time during the run.
The time exceeds 50 seconds.
The speed exceeds 300 MPH.
The distance exceeds 4000 feet.
and review
When your car has stopped and it is safe to review results, press
your results by choosing from the Run Analysis Menu. Consult the next section (page
33) for guidance.
WARNING: Even though your new run is in memory, it has not yet been permanently stored. If you unplug your G-TECH/Pro COMPETITION now, or the
power in your car wavers for any reason, data from the most recent run may be
lost. To be safe, you can always continue on to the next step and properly save
your data before reviewing it later.
When you are finished reviewing the results, choose Exit at the end of the Run
as a shortcut. The following menu appears:
Analysis Menu, or press
Run filename
32
If you select Save this run and press
, the run will be saved using the
filename at the top of the screen. This automatically generated filename contains the
Date, quarter mile time, and quarter mile speed.
If you don’t like this automatically generated filename, you can edit it, or enter
your own by selecting Rename, then save. which brings you to the G-TECH/Pro
COMPETITION keyboard (see page 14. Once you select Enter from the keyboard,
the file will be saved.
Finally, if you feel the most recent run was not a success, you can immediately
.
choose to not save the data by choosing Delete this run and pressing
TIP: Don’t feel pressured to enter a custom filename after a run if you want
to quickly save your data. You can always rename or delete the run from the
Stored runs (see page 40)menu at a later point in time.
15.3
Reviewing stored results
For any run (either a run you just recorded, or one which was recalled from memory)
you can study results using the Run Analysis Menu:
15.3.1
Results
At the top of the Run Analysis Menu, Results gives you a quick overview of the run’s
to see information you might find on official
highlights. Select it and press
NHRA drag strip timing tickets. The first screen gives the quarter mile time, speed,
and reaction time. If the run did not complete a full quarter mile, or the reaction
time feature (see page 24) was turned off, some of these items may display zero. This
also counts for the second page, which shows 60’, 330’ 1/8 mile and 1000’ times,
1/8 mile speed, and the 0-60mph time.
NOTE: For the most accurate 0-60mph time, set your rollout to zero inches
(see section 13.2 on page 25.) For nonzero rollouts the time will be relative not
to zero MPH, but to however fast the car is moving when it is fully rolled out.
15.3.2
Horsepower and Torque vs RPM Graph
This selection will show you information about Horsepower and Torque information
for data from the gear which produced the maximum horsepower. After you select
33
this option and press
, a screen with text will appear. First, your vehicle weight
will appear, since horsepower measurement derived from Gs require this figure to be
accurate. The number is there to remind you, especially when reviewing stored runs,
exactly under what conditions the data were taken. The other information on the
screen displays the RPM levels during which maximum horsepower and torque were
measured.
again to view a graph of Horsepower and Torque vs RPM, as meaPress
sured in the gear where maximum horsepower was attained.
Cursor
Max Horsepower Mark
RPM value
at cursor
HP & Torque
axis
RPM Axis
HP and TQ values at cursor
The maximum values of both horsepower and torque are marked with a small
vertical line. Use the left and right arrow keys ( and ) to move the cursors back and
forth. The numbers on the screen display exact numerical information at the cursor
position.
Gear Detection: The G-TECH/Pro COMPETITION automatically analyzes run
data for geartshifts. HP and Torque graphs are only plotted for a single gear
during which the maximum horsepower of the entire run was logged.
Optimal Driving Style for HP measurement
A typical quarter mile run is usually driven for the fastest time. This means starting
in first gear, shifting somewhere near engine redline, engaging second gear at a high
RPM level, etc. The typical RPM versus time graph for such a run might look like the
following graph on upper left. In this run we deliberately went very close to redline in
every gear. Second and third gear only revved between 5000 and 7000 RPMs in this
run, and it resulted in a decent quarter mile time for this car. The HP and Torque
graphs were not ideal for this run, since the RPM axis only spanned from 5000-7000
RPMs. To cover a larger range of RPM, like one would do with a chassis dyno, our
driving style has to be different.
34
B
Upper Left: Typical Quarter Mile Run.
Lower Left: HP run in second gear.
Lower Rigth: HP run in third gear.
D
C
A
A: pre-launch rev up
B: First gear max. RPM
C: Second gear max. RPM
D: Third gear max. RPM
C
A
D
D
B
A
B C
Counting Gears: A first instinct for the graphs above would be to count each
peak in RPM as a gear. That holds true for many cars with automatic transmissions, but for almost all manual transmissions there is an additional peak due
to revving the engine before dropping the clutch at launch. The peaks marked
with A in the graphs above should therefore not be counted as gears, but only
as a pre-launch rev up.
The next graph (lower left) was from a run designed to get a long RPM range
out of second gear. We did not rev up as high on the pre-launch. We only revved
to 4000 rpm in first gear, and then engaged second gear at about 2500 rpm and
floored the accelerator. We kept it floored until engine redline in second gear, then
shifted to third. We could have stopped the run here, but chose to finish our quarter
mile, but not at full throttle. Even though the quarter mile time was two seconds
longer, we got very nice data for HP and Torque in second gear. The G-TECH/Pro
COMPETITION automatically plotted only results for second gear, since we drove so
that second gear experienced the maximum horsepower output.
The last graph (lower right) shows RPM data for a run designed to explore a large
RPM range in third gear. We shifted very quickly through first and second gear, never
exceeding 4000 RPM. We engaged the car into third gear at 2500 RPM and floored
the accelerator. At this point the engine was pretty bogged down. The quarter mile
took over 20 seconds, and we had to go a little past the quarter mile mark at the
track to reach redline in third gear. The result were very nice HP and Torque curves
for third gear.
TIPS: Make your HP runs as smooth as possible. Avoid over-revving before
launch, excessive wheelspin, etc. Simply get into the gear for which you want
to do the run as quickly and smoothly as possible. Avoid ‘power shifting’ and
‘double clutching’. Simply engage and disengage the gears smoothly. Vehicles
with automatic transmissions will have to manually select a gear for best re-
35
sults. For maximum horsepower you must FULLY depress the accelerator when
the gear for the HP measurement is engaged. An engine which is not getting
the maximum amount of fuel will not produce maximum horsepower. For very
powerful engines, wheelspin MUST be avoided during HP runs. Since the GTECH/Pro COMPETITION measures power through acceleration, all available
engine power MUST connect properly with the road.
15.3.3
RPM vs Time Graph
The third item on the Run Analysis Menu, RPM vs time, replays the RPMs as they
were collected during a run. When the graph is first selected, the replay is real-time.
to
In other words, a 15 second run takes about 15 seconds to replay. Press
quickly finish the graph.
Milestones
Cursor
RPM and time
values at cursor
RPM axis
Time axis
Milestone information
As the data are graphed, RPM and time values are printed at the bottom of the
graph. Once a milestone is reached (such as 60’, 330’, 1/8mi, 60mph mark, 1000’ and
1/4mi) the milestone result is displayed below the graph. A single LED illuminates
at the point where the shiftlight triggered during the run. This last feature shows if
gears were shifted at the proper shiftpoint. Tickmarks on the vertical axis indicate
1000RPM increments, and tickmarks on the time axis indicate 1 second.
Once the graph has completed, use the left and right navigation keys ( and ) to
move the cursor back and forth to study the data in more detail. Milestones marks
and the shiftlight will update with cursor movement.
to return to the Run Analysis Menu.
When finished, press
15.3.4
Speed vs Time Graph
The fourth item on the Run Analysis Menu, Speed vs time shows exactly when
certain speeds were reached.
36
Milestones
Cursor
Maximum speed
Speed axis
Speed at end
of rollout
Time axis
Speed and time at cursor
A typical graph for a quarter mile run with braking test is shown above. Speed
increases steadily as time goes on. During gearshifts the speed keeps constant, since
there is no power being applied to the wheels at that time. After the maximum speed,
the brakes were applied, and during a period of hard acceleration the speed comes
back down to zero. At the very right of the graph, the car is stationary again. If
brakes were not applied immediately after the run, the graph would only show the
increasing values on the left hand side.
Tickmarks on the vertical axis indicate 10mph increments, and tickmarks on the
time axis indicate 1 second. Hashmarks on the graph itself indicate milestones of
10mph, 20mph, 30mph, etc. Once the graph has completed, use the left and right
navigation keys ( and ) to move the cursor back and forth to study the data in
to return to the Run Analysis Menu.
more detail. When finished, press
NOTE: The speed at zero time (leftmost point in the graph) is not at zero
MPH. This is due to the choice of a 12 inch rollout for this run. The E.T. timer
was started after the completion of rollout, at which point the car was already
moving at several MPH. If you want the graph to start at zero speed, then set
your rollout to zero inches. See section 13.2 on page 25 for more discussion.
Measuring 0-60-0 or 0-100-0 times
If you maximum speed was 60mph and was followed by hard braking, you can simply
move the cursor on the Speed vs time graph to the far right where the speed first
goes back to zero to first read off the time to get the 0-60-0 time. As mentioned
above, the result will be most accurate if the rollout is set to zero inches (see page
25.) It also helps to set the speedmark light to 60mph (see page 26) so you are
alerted when 60mph is reached while driving.
37
WARNING: Some cars need more than a quarter mile to reach 100mph, and
your local dragstrip may not be long enough for a 0-100-0 test. Ramp up your
testing from 0-60-0 to 0-70-0 and so forth. Make sure there is enough distance
to come to a full stop.
NOTE: While performing 0-100-0 tests at your local dragstrip, beware that some
tracks have a slight incline after the quarter mile mark to aid deceleration. This
may lead shorter braking times and better than official 0-100-0 times.
Measuring rolling acceleration intervals
Beside the 0-60mph time, auto magazines often list 20-40mph times, 40-60mph times,
etc. You can use your G-TECH/Pro COMPETITION Speed vs time graph to make
these measurement right at the track! Example: to measure a 40-60 time, simply
move the cursor to the 60mph hashmark, and write down the time below the graph.
Now move the cursor to the 40mph mark, write down the time again, and subtract
the two times.
15.3.5
Braking Distance Graph
The fifth item on the Run Analysis Menu, Braking distance shows speed versus
distance during the braking portion of a run.
NOTE: In order to perform a brake test, you must brake hard immediately at
the end of your acceleration run. Please read the note on page 32 for more
information. If you did not start applying brakes soon enough, the G-TECH/Pro
COMPETITION will have stopped logging data before the car came to a full
stop.
A typical braking distance graph is shown below. The vertical axis indicates speed
in MPH and the horizontal axis distance in feet. The distances are relative to the
start of the run. In the figure above, the cursor indicates 1526 feet travelled since
the start of the run. Hashmarks on the graph indicate 10mph intervals.
Milestones
Cursor
Maximum Distance
Speed axis
Distance axis
Speed and distance at cursor
38
To measure a typical braking distance, such as 60-0, first use the arrow keys (
and ) to move to the end very right hand side of the graph. Write down the distance
in feet for this endpoint. Now move the cursor back to the 60mph hashmark, and
write down the distance in feet at this point. Finally, subtract the two distances to
get the 60-0mph braking distance in feet. Repeat the process for other MPH values
if necessary.
15.3.6
Gs vs time graph
The sixth and last item on the Run Analysis Menu, Gs vs time shows forward
acceleration (in Gs) versus time (in seconds) during the entire run.
The graph below shows a typical data for a quarter mile run without a brake
test. Tickmarks on the time (horizontal) axis indicate seconds, tickmarks on the
acceleration (vertical) axis indicate 0.1G. One G is equal to 9.81 meters/sec2 or
32.19 ft/sec2 .
Cursor
G axis
Time axis
Gs and time at cursor
Use the arrow keys ( and ) to explore the data. Numerical information at the
cursor position is displayed below the graph. The spikes in the graph shows above
occur during shifts when energy stored in the drive train and flywheel are suddenly
‘dumped’ as the clutch reconnects. The smooth data between the spikes are the
sustained Gs which indicate what your engine and drivetrain are capable of. When a
brake test is performed, the graph will be followed by a portion of negative Gs.
to return tot the Run Analysis Menu.
Press
39
16 – Managing Stored Data
16.1
Reviewing Stored Runs
The chart on page 8 will give a clear overview of recalling stored runs. Follow these
commands to review stored runs:
•
•
•
•
•
Go to the main menu of the Configuration Mode. (See page 15 for instructions.)
.
Choose Stored Runs, then press
Choose Select a run, then press
A list of stored runs appears. Select any one of them and press
Finally, choose View this run and Press
During a brief delay the data are recalled from permanent memory. After this
point the G-TECH/Pro COMPETITION behaves the same way as if a run had just
been completed, described in Sec. 15.3 on page 33.
The only difference is that Exit returns to the previous menu. Pressing
repeatedly will move back up through the menus back to Continuous Mode.
16.2
Renaming Stored Runs
To change this filename of a saved run:
•
•
•
•
•
Go to the main menu of the Configuration Mode. (See page 15 for instructions.)
.
Choose Stored Runs, then press
Choose Select a run, then press
A list of stored runs appears. Select the one of choice and press
Finally, choose Rename this run and Press
The run name will appear at the top of the screen, and can be edited using the
G-TECH/Pro COMPETITION onscreen keyboard (See Sec. 9 on page 14. When
finished, select enter to accept the change.
16.3
Deleting Stored Runs
Once stored runs are deleted, there is NO POSSIBLE WAY to recover the data. It is
always recommended to download stored data to a PC computer before deleting. To
delete all runs:
• Go to the main menu of the Configuration Mode. (See page 15 for instructions.)
.
• Choose Stored Runs, then press
• Choose Delete All, to delete all stored runs and reformat the storage space,
then press
To delete a single run instead, ignore the last item above, and continue on:
• Choose Select a run, then press
• A list of stored runs appears. Select any one of them and press
• Finally, choose Delete this run and press
and follow the confirmation
instruction on the G-TECH/Pro COMPETITION screen.
40
17 – Downloading Stored Runs
This process is very similar to deleting runs. To perform a successful download,
• start up the G-TECH/Pro COMPETITION PC data analysis program and activate the download screen.
• Make sure the communication speed on the PC program and the G-TECH/Pro
COMPETITION are identical (see page 28).
• Connect your G-TECH/Pro COMPETITION to one of your computer’s com
ports using the supplied serial cable.
• Power up the G-TECH/Pro COMPETITION with 120V adapter.
• Select the correct serial port on the PC application.
• On the G-TECH/Pro COMPETITION, go to the main menu of the Configuration Mode. (See page 15 for instructions.)
.
• Choose Stored Runs, then press
• Choose Download all to PC, to copy all stored runs, then press
• The G-TECH/Pro COMPETITION screen will indicate that a transfer is in
progress and the computer will show the progress of the transfer. Refer to the
PC analysis software manual to save the data to the PC hard drive.
When the transfer is complete, the G-TECH/Pro COMPETITION will return to
the current menu. To download a single run only, follow the steps described above
for deleting a single run, but select Download this run. The computer application
will automatically detect if one or more runs are incoming.
41
18 – Troubleshooting
18.1
Checking and troubleshooting calibration
This should not normally be necessary, but if your G-TECH/Pro COMPETITION is
giving unreasonable results, improper accelerometer calibration is the first thing to
check. The G-TECH/Pro COMPETITION is only as accurate as its accelerometers.
To check that the G-TECH/Pro COMPETITION is measuring acceleration correctly,
do the following:
•
•
•
•
Go to the main menu of the Configuration Mode. (See page 15 for instructions.)
Choose Calibration and press
Choose Accelerometers and press
Choose Show X-Y-Z Gs and press
The screen which appears gives you live output of what the three accelerometers
on the G-TECH/Pro COMPETITION are measuring, the magnitude of the total
acceleration (should always be very close to 1.000G if you are holding still), and the
current internal temperature in special G-tech units (not Fahrenheit or Celsius).
A typical vector screen might look something like this:
X +1.001
Y +0.003
Z -0.005
Mag +1.001 Temp 216
The most important thing is the Mag or magnitude reading. No matter how the
G-TECH/Pro COMPETITION is oriented, magnitude vector should always be very
close to 1.000 (within less than 1 percent). The digits will jitter around a little, due
to vibrations. These small variations are normal. To be thorough, you can hold the
G-TECH/Pro COMPETITION in the 6 successive calibration orientations and check.
The other values, X, Y, Z, and Temp, will be of use when troubleshooting via our
website (www.gtechpro.com) or customer support line 1-310-452-0030.
If you find that Mag is not close to 1.000, the first thing you should try is to
calibrate one more time. It may be that your G-TECH/Pro COMPETITION is much
hotter than the hottest temperature you last calibrated at (say it was sitting in a hot
car). You will get the highest accuracy if you calibrate at the temperature at
which you will be using your G-TECH/Pro COMPETITION.
If re-calibrating once still does not improve things, you can completely erase both
of your calibrations and start from scratch. To erase all accelerometer calibrations:
•
•
•
•
•
Go to the main menu of the Configuration Mode. (See page 15 for instructions.)
Choose Calibration and press
Choose Accelerometers and press
Choose Erase Calibration Data and press
Press
to erase, or press
to cancel.
Now you will have to follow the complete calibration procedure again. If your
G-TECH/Pro COMPETITION is hot, you can calibrate immediately, and then let it
sit unplugged for an hour or so, or hold it in front of your car AC vent for some time,
and do a cold calibration.
42