1
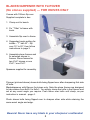
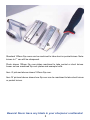
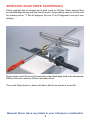
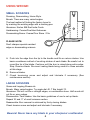
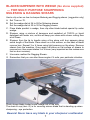
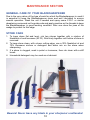
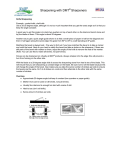
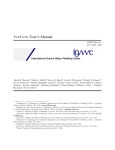
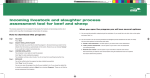
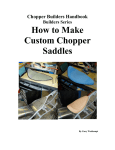
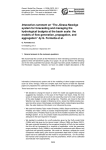
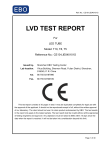
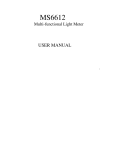
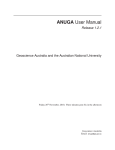
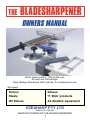
BLADESHARPENER
THE
OWNERS MANUAL
Photo shows knife in 100mm flip over.
All parts will interchange.
Note: Wedge attachment (left of photo) for multipurpose use.
We Supply:
Knives
Steels
Oil Stones
Gloves
‘F. Dick’ products
All Abattoir equipment
EZESHARP PTY LTD
ABN 86 074 324 995
MANUFACTURERS OF THE BLADESHARPENER
1
BLADESHARPENER WITH FLIPOVER
(No stones supplied) — FOR KNIVES ONLY
Comes with 100mm flip over.
Supplied complete in box.
1. Clamp unit to bench.
2. Fix “T Bar” to frame with
knob.
3. Assemble flip over to frame.
4. Suggested angle setting for
knives - “T” bar 40° - flip
over 15° to 20°, then follow
instructions to page 3.
5. Assemble stone frames and
fix selected stones in
frames. Stone frames for
two 8”x2” stones or one
8”x2” / one 9”x3”.
Spanners supplied for assembly.
Flipover (pictured above) shows knife being flipped over after sharpening first side
of knife.
Bladesharpener with flipover for knives only. Note the stone frames are designed
to take stones from 8x2x1 to 9x3x1. You simply clamp the knife in the flipover and
set at any exact angle you require. Push stone over knife until sharp, as per
instruction in manual - page 4.
Photo shows knife being flipped over to sharpen other side while retaining the
same exact angle and edge.
Beware! Never leave any blade in your sharpener unattended.
2
A
B
Standard 100mm flip overs can be machined to take short or pocket knives. Note:
knives to 7” can still be sharpened.
Photo shows 100mm flip over plates machined to take pocket or short knives.
Lower set are machined flip over plates and example knife.
Item ‘A’ pictured above shows 100mm flip over.
Item ‘B’ pictured above shows how flip over can be machined to take short knives
or pocket knives.
Beware! Never leave any blade in your sharpener unattended.
3
KNIFE SHARPENING INSTRUCTION (for most knives)
1. Set tee-bar at 40 degrees. Set main frame dial at 15 to 20 degrees.
2. Mix a stiff mix of detergent-water to lubricate stone. Apply with sponge. Or use
kerosene and light oil mix.
3. Smear all screw threads and allen screws with vaseline.
4. Soak stone in water first so the mix will not soak in stone.
5. Clamp blade in flip-over or wedge. Don’t over tighten allen screws.
6. Smear rough side of stone with mix and with rod resting on tee bar rod, just
push stone over blade from handle to point. If the blade is curved just follow
the curve as you go down the blade. ‘Count’ the strokes it takes to get a burr
on the under side of the knife or blade.
7. When you feel the burr from above process turn or flip blade over and stroke
or sharpen the blade with the same amount of strokes you used in 6. Use the
mix as required.
8. Turn or flip blade so burr is up.
9. Turn stone over so fine side is down and facing the blade. You are now going
to hone the blade edge and remove the burr.
10. Very lightly run the fine stone from the handle to the point 8 times.
11. Turn blade over so burr is up and stroke 8 times as in 10.
12. Turn blade over so burr is up and stroke 6 times.
13. Turn blade over so burr is up and stroke 6 times.
14. Turn blade over so burr is up and stroke 4 times.
15. Turn blade over so burr is up and stroke 4 times.
16. Turn blade over so burr is up and stroke 2 times.
17. Turn blade over so burr is up and stroke 2 times.
18. Turn blade over so burr is up and stroke 1 times.
19. Turn blade over so burr is up and stroke 1 times.
The blade is now finished.
When using a steel you steel at the same angle you have created in the above
process.
We recommend a good quality fine stone for the honing and burr removal process.
★★★
To touch up knives each day leave the main frame setting as before and using very
fine stone hone a few strokes each side of knife as required.
★★★
For sharpening shears and knives etc. using the Wedge Attachment please go to
that page in the manual. Use same settings as for flip over.
Beware! Never leave any blade in your sharpener unattended.
4
SERRATED EDGE KNIFE SHARPENING
Fitting supplied with all sharpeners to take round or flat files. Photo shows fitting
for serrated edge knives and how the file works. Angle setting same as for flip over
for ordinary knives. “T” Bar 40 degrees, flip over 15 to 20 degrees or use your own
settings.
Photo shows round file to suit the serration of serrated edge knife to be sharpened.
Different files are used for different serration sizes.
The round fitting shown in photo will take a flat file as well as a round file.
Beware! Never leave any blade in your sharpener unattended.
5
USING WEDGE:
SMALL SCISSORS
Dressing, Dressmaking, Home Style.
Bevels: There are many varied angles.
The best method of finding the factory bevel is
by marking the existing edge with a marking pen.
Abrasives. Norton IB8 Red India Comb.
Hairdressing: Coarse/Fine/Hard Arkansas.
Dressmaking/Home: Coarse/Fine Stone / File.
PLEASE NOTE:
Don’t sharpen special serrated
edge on dressmaking scissors.
A. Push into the edge from the tip to the handle and life on return strokes. Use
basic countdown method of counting strokes of each blade. Be careful not to
round the tip of the blade. Continue until the burr is raised along entire edge.
Stop. Remove blade. Re-mount mating blade being careful to close scissors
at this stage.
B. Remove blades.
C. Check tensioning screw and adjust and lubricate if necessary (See
maintenance section).
LARGE SCISSORS
Grass and Lopping Shears etc.
Bevels: Many varied angles. Try angle dial 40. T Bar height 70.
Abrasives: Flat mill cut file or straight edges, or combination stone. Half round mill
cut file or wavy edges.
Disassemble. Face blades. Use the basic guidelines of use to set up blade.
Repeat ‘B’ and ‘C’ of small scissors section.
Reassemble. Burr removal is achieved by firmly closing blades.
Check tension screw and adjust and lubricate if necessary.
Beware! Never leave any blade in your sharpener unattended.
6
BLADESHARPENER WITH WEDGE (No stone supplied)
— FOR MULTI PURPOSE SHARPENING
MULESING & DAGGING SHEARS
Here’s a tip or two on how to sharpen Mulesing and Dagging shears. (suggestion only)
A. Set T bar on 70.
B. Set the wedge dial at 24 to 28 for Mulesing shears.
Set the wedge dial at 30 to 32 for Dagging shears.
C. Place blade parallel in wedge, then clip other blade behind special lip under
wedge.
D. Sharpen using a mixture of kerosene and neatsfoot oil 70/30% or liquid
detergent with water mix, as this will keep your stone with a keen cutting face
at all times.
E. Sharpen from the tip to handle using a fine stone until burr appears along
entire length of the blade. Place stone on a flat surface, on the back of blade
remove burr. Repeat 3 or 4 times using light pressure on the stone. Remove
shears from the machine. Once again rub stone on flat surface of shears to
remove burr, then cross blades 3 or 4 times (very important as this makes sure
that no burr remains).
F. Use same method for Dagging Shears.
G. Remember that you can alter these angles if it suits your particular situation.
A
Photo shows blade tucked under wedge out of the way.
The chain & cup (item ‘A’) is for covering scissor blade that is standing up when
sharpening - eye protection.
Beware! Never leave any blade in your sharpener unattended.
7
USING WEDGE:
TIN SNIPS
Suggested Angle Dial 70
T Bar height 90
Abrasive - Use flat mill cut file
Release blades and close blades
firmly to cut off the burr.
PLANES, CHISELS, BUZZER AND HAT CUTTER BLADES
All bevels depend on the type of material you are cutting.
CHISEL AND PLANE BLADES
Shoulder Bevel - Suggested Angle Dial 40.
T Bar Height 60.
Edge Bevel Angle Dial 20 T Bar Height 60.
Mount chisel as shown to keep blade square.
BUZZER BLADES
Single Bevel - Suggested Angle Dial 10.
T Bar Height 65.
Abrasives - Combination Stone/Arkansas
NOTE: Use of a wooden wedge as shown will keep the clamp face square.
This is important on narrow blades, especially chisels.
Beware! Never leave any blade in your sharpener unattended.
8
HOW IT WORKS
The “Bladesharpener” works by clamping the blade to be sharpened in a rotatable vice-like
clamping jig with degree angle adjustments. An oil stone, file or diamond stone can be used
resulting in no loss of temper in the blade being sharpened. The ‘T’-bar guides the stone at
a very accurate and steady angle in relation to the blade being sharpened.
Infinite angle adjustments together with the ‘T’-bar, gives the operator total control over
movement, pressure and angle. This degree of control and safety, and the ability to sharpen
such a wide range of blades, to either factory specifications or to create a variation to suit
the work or individual make the “Bladesharpener” totally unique.
The “Bladesharpener” takes the guess work out of sharpening by providing control and
repeatability of the correct sharpening angle (the true secret of sharpening).
ABRASIVE OPTIONS
Any 8”x2”x1” or 9”x3”x1” oil stones.
ALUMINIUM OXIDE – called India Stones or Wheatstone cuts a fine finish with shallow
scratches.
SILICON CARBIDE (Carborundum) – A fast cutting stone.
WASHITA (Soft Arkansas) – Natural stone for fast cutting and relatively fine sharpening.
HALLS BLACK OR WHITE ARKANSAS (Extra fine) – This extra hard natural stone is used
for precision polishing on already sharp edges or for intricate tools for the professional.
DIAMOND STONES – Various shapes and sizes can be accommodated.
MOVEMENTS AND PRESSURE
Experimentation will find the best method for each blade. The simplest but very efficient
method of push and lift on the return stroke, and counting the strokes works well. With this
plus attention to the pressure used, you can’t go wrong. Basically you start heavy on
pressure and strokes, and gradually lighten pressure and reduce the strokes as you near
the goal of a sharp edge. All blades can be sharpened this way. Finish by using the weight
of the stone just gliding over the stone. This method is called countdown. The countdown
is used to finish a blade that has a correct and even bevel but has lost it’s edge. The edge
can be restored quickly by the countdown method.
CROSSING BLADES
This is a method of burr removal for scissors type blades. After sharpening, the burr needs
to be returned or removed. This is done by crossing the blades. Close the blades carefully
but at the same time trying to stop the newly sharpened (with burr on) blades from touching
each other. There is usually enough slack in the tensioning screw to allow this. Once you
have the blades closed, press the blades together with your thumb and index finger. Open
the blades. Wipe off the burr with a piece of clean cloth. Repeat the blade crossing. Wipe,
then work the blades normally.
Beware! Never leave any blade in your sharpener unattended.
9
MAINTENANCE SECTION
GENERAL CARE OF YOUR BLADESHARPENER
Due to the very nature of the type of work for which the Bladesharpener is used it
is essential to keep the Bladesharpener clean and well lubricated to ensure
smooth operation. Wash the unit if needed and spray some C.R.C. or similar
dewatering compound on the guide rods and apply vaseline on the threads to keep
the Bladesharpener in good working condition. After use close the jaws of the
wedge to protect its thin edge.
STONE CARE
1. To keep stone flat and level, rub two stones together with a mixture of
Neatsfoot oil and kerosene (30:70). Rub firmly together until hollow of stone is
removed.
2. To keep stone clean, with a keen cutting edge, use a 30% Neatsfoot oil and
70% Kerosene mixture or detergent and water mix on the stone when
sharpening.
3. If a stone is clogged, soak in petrol or kerosene, then rub clean with a stiff
brush.
4. Household detergent may be used as a lubricant.
Beware! Never leave any blade in your sharpener unattended.
10
THE
BLADESHARPENER
MADE BY:
EZESHARP PTY LTD
ABN 86 074 324 995
TRADE ENQUIRIES WELCOME
PO BOX 7309, CAIRNS 4870 Q. AUSTRALIA
WEB SITE: www.ezesharp.com.au
EMAIL: [email protected]
PHONE: (07) 4056 6416
FAX: (07) 4056 5945
INT. PHONE: +617 4056 6416
INT. FAX: +617 4056 5945
We supply all brands of knives, steels, diamond and oil
stones and abattoir equipment at competitive prices.
Please enquire.
11