1
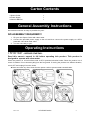
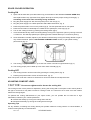
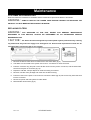
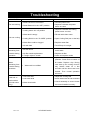
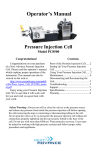
Space Cooler Model Series: AC100 & AC200 Owner’s Manual READ AND SAVE THESE INSTRUCTIONS 5000788 Conforms to UL STD 507 Cert. to CSA STD C22.2 No.113 CAUTION: Before using this product, read this manual and follow all safety rules and operating instructions. Failure to comply with instructions could result in personal injury and/or property damage. IMPORTANT: For replacement parts or operating questions go to www.culer.com or call 1-‐800-‐320-‐6478. Rev. 1/15 AC100/200 series 1 Table of Contents SECTION PAGE 1. Safety Information …………….……………………………………………………….…….…….. 2 2. Carton Contents……………………………………………………………………….….…….…... 4 3. General Assembly Instructions ……………………………………….……………………....….. 4 4. Operation Instructions…………………………………….……………..……………..……....….. 4 5. Maintenance………………………………………………………………….………………....….. 6 6. Storage…………………………..…………………………………………….……………......…... 7 7. Troubleshooting…………………………..…………………………………….…………..…..……8 8. Parts List… ……………………….……………………….….…………….................................. 9 9. Warranty ……………..……………………………………………….………...……………..…..... 9 Safety Warnings READ AND SAVE THESE IMPORTANT SAFETY INSTRUCTIONS SAVE THIS MANUAL FOR FUTURE REFERENCE. READ ALL INSTRUCTIONS BEFORE USING THIS APPLIANCE. Read and understand this instruction manual and all labels on the Space Cooler before using. Safety is a combination of common sense, staying alert and knowing how this product works. Use the product only as described in this manual. To reduce the risk of personal injury or damage to the Space Cooler, use only recommended accessories. Understanding Safety Terminology DANGER: If safety information is not followed, someone will be seriously injured or killed. WARNING: If safety information is not followed, someone could be seriously injured or killed. CAUTION: If safety information is not followed someone may be injured. When using this product follow basic safety precautions including the following: WARNING: To reduce the risk of fire, electric shock, or injury: 1. Make sure that the power source complies with the electrical requirements of the product. 2. Do not store outdoors. (See storage section) 3. Do not use this product with a damaged or missing filter. 4. To reduce the risk of personal injury, the product should not be used as a toy or placed where children can reach it. Close supervision is necessary when any appliance is used near children. Rev. 1/15 AC100/200 series 2 5. Use this product only as described in this manual. Any other use may cause electrical shock, fire, and injury to people or animals. WARNING: DO NOT USE THE ON-OFF BUTTONS AS A MEANS OF DISCONNECTING POWER WHEN SERVICING THIS PRODUCT. ALWAYS DISCONNECT THE POWER CORD. 6. Disconnect the power cord before moving or performing any maintenance on the product. 7. This product shall not be used in potentially dangerous conditions, such as flammable, explosive or chemically loaded atmospheres. 8. Do not use or store near hazardous materials. 9. If the product is not working correctly, has missing parts, has been dropped, damaged or dropped in water, call an authorized service center for evaluation, adjustment or repair. WARNING: IMPROPER CONNECTION OF THE EQUIPMENT-GROUNDING CONDUCTOR CAN RESULT IN A RISK OF ELECTRICAL SHOCK. CHECK WITH A QUALIFIED ELECTRICIAN OR SERVICE PERSON IF YOU ARE IN DOUBT AS TO WHETHER THE OUTLET IS PROPERLY GROUNDED. DO NOT MODIFY THE PLUG PROVIDED WITH THE PRODUCT IF IT WILL NOT FIT THE OUTLET; HAVE A PROPER OUTLET INSTALLED BY A QUALIFIED ELECTRICIAN. DO NOT USE A THREE-PRONG TO TWO-PRONG ADAPTER. IMPROPER CONNECTION MAY CREATE A RISK FOR ELECTRICAL SHOCK. 10. To protect against electrical shock, do not immerse unit, plug, or cord in water or spray with liquids. 11. Keep the power cord away from heated surfaces. 12. Do not leave the product unattended when it is plugged in. Turn off the product before unplugging. 13. Do not operate the product with a damaged power cord, plug, or if the product is damaged in any manner. Call an authorized customer service center for evaluation, adjustment or repair. 14. Do not run cord under carpets. Do not cover cord with throw rugs, runners, or similar coverings. Do not route cord under furniture or appliances. Place power cord away from traffic area and where it will not be tripped over. 15. Do not insert or allow any foreign objects to enter the intake or exhaust air openings, as it may cause mechanical, electrical, or fire damage to the product. 16. Do not block or tamper with the cooling nozzles, as it may reduce or impede the functionality or performance of the product. Call an authorized customer service center for evaluation, adjustment or repair. 17. Never place the product where it may fall into a water reservoir (example: bathtub or pool), or anything containing an electrically conductive substance. 18. This product must be grounded. If it should malfunction or break down, grounding provides a path of least resistance for electric current to reduce the risk of electric shock. Plug into an appropriate ground fault circuit interrupter (GFCI) protected outlet that is properly installed and in accordance with all local codes and ordinances. 19. Do not hang or mount the product on a wall or ceiling. 20. Grasp plug and remove from the receptacle or other outlet device. Do not unplug by pulling on power cord. 21. Risk of fire. Do not replace the provided power supply device. Only use certified power supply rated for this product. Discard product if the attachment plug is damaged. Rev. 1/15 AC100/200 series 3 Carton Contents Pack List QTY. 1.Space Cooler 1 2.Power Supply 1 3.Owner’s Manual 1 General Assembly Instructions We made this section as easy as possible for you!!! NO ASSEMBLY REQUIRED!!! 1. Fill your new Space Cooler with clean water 2. Connect the provided power supply to the unit and then connect the power supply to a GFCI protected 120v 60Hz rated outlet. 3. You are now ready to go!!! Operating Instructions IMPORTANT-BEFORE STARTING: Read this owner’s manual in full before operating this product. This product is designed to operate with clean water. Place the product on a level surface near a GFCI protected electrical outlet. Place the product out of reach of children. Do not insert anything into the fan guards. If moving the product to a different location, turn it OFF and unplug it from the outlet. ! Clean and clear any dirt or dust from the space cooler to prevent water contamination. Cooling Dial Rev. 1/15 AC100/200 series 4 SPACE COOLER OPERATION Cooling ON 1. Open and fill water tank (use clean water only) to the bottom of the fill basket. DO NOT OVER FILL, then replace water cap. (Important: Fully tighten tank cap to ensure proper cooling function)(fig. 1). Overfilling could cause water streaming during shutdown. 2. Plug the power supply DC Jack into the power port on the unit (fig. 2). 3. Plug the power supply into a GFCI protected 120v 60Hz rated outlet. (fig. 3). 4. Press the power button to turn on the product (fig 4). The fan speed will start on low speed. 5. Press the fan button incrementally to increase the fan speed (low, med, high) (fig 5). 6. Turn on the cooling function by pressing the cooling button (fig 6). 7. It’s recommended to fully close the Cooling Dial by turning to the right then open it by turning to the left 1-2 full turns. This will help speed up the priming process. Please allow up to 1 minute for priming. 8. Once atomization is visible, adjust to your desired comfort level by turning the cooling dial left or right in very small increments. (Refer to ADJUSTING COMFORT LEVEL section, to get optimal cooling performance) (fig. 6). 9. The cooling port(/s) can be rotated up to 90º from center in the left or right directions (fig. 7). 10. The cooling port(/s) can be tilted up to 30º from center vertically (fig. 8). Cooling OFF 1. The cooling function can be turned off by pressing the cooling button (fig. 6). 2. Pressing the power button will turn off all functions. (fig. 4). Note: The space cooler will continue to atomize for a short time while the unit depressurizes ADJUSTING COMFORT LEVEL CAUTION: Do not over tighten and/or loosen the cooling dial. The cooling function of this product is adjusted by turning the cooling dial on the space cooler control panel to the right or to the left. It may take a minute for cooling to start. It is normal for air to come out of the nozzles before the cooling begins. To optimize the cooling effectiveness of your space cooler, you can operate the unit with low or high atomization, based on your comfort preference. ! Increase the density by turning the cooling dial to the left. ! Decrease the density by turning the cooling dial to the right. Operating Tips For dry climates, increasing the cooling density will provide maximum cooling results. In humid climates, a reduced cooling density is recommended. Rev. 1/15 AC100/200 series 5 Maintenance CUSTOMER RESPONSIBILITIES Read and follow the maintenance schedule and the maintenance procedures listed in this section. WARNING: ALWAYS UNPLUG THE POWER CORD BEFORE MOVING OR SERVICING THE PRODUCT. DO NOT IMMERSE THE PRODUCT IN WATER! REPLACING FILTERS WARNING: ANY SERVICING OF THIS UNIT, EXCEPT FOR GENERAL MAINTENANCE DESCRIBED IN THIS SECTION, SHOULD BE PERFORMED BY AN AUTHORIZED SERVICE REPRESENTATIVE. CAUTION: The filters have been designed to provide optimal system performance by catching any debris that may enter the supply lines throughout use. Semi annual replacement of both the air and water filters ensures the life of your system. 1. Remove the filter access doors to locate the air and water filters (fig 9). 2. The filters are connected to the system via “Push-In” connectors for ease of service. 3. Push the connector ring and pull out the air filter hose from the push-in connector, and the water filter hose from the push-in connector (fig 10). 4. Dispose of old filter. Always dispose of waste according to local law. 5. Remove new filter from package and insert into the filter housing. 6. Push the hose into the push-in connectors to connect the filters (fig.10). Be sure to fully insert the hose into the connector. 7. Reconnect power and test system for water leaks. 8. Reinstall filter access door (fig.9). Rev. 1/15 AC100/200 series 6 Storage CAUTION: DO NOT USE GASOLINE, THINNER, ALCOHOL, SOLVENTS OR OTHER HARSH CLEANNERS OR CHEMICALS TO CLEAN THE PRODUCT. THEY WILL DAMAGE THE PRODUCT. • Clean the space cooler with a soft cloth and mild soap solution. • Dry all parts completely. • Store the product in a clean and dry place. • DO NOT STORE SPACE COOLER WITH WATER IN THE SYSTEM EMPTYING WATER TANK • Unplug the product from the power supply. • Remove the water tank fill cap. • Carefully turn the product over to allow water to drain out • Replace fill cap and hand tighten. • Plug the product in and run cooling function until the cooling can no longer be seen. CLEANING BASKET FILTER • Remove fill cap and carefully remove any debris CONDITIONING WATER TANK Conditioning the water tank ensures that the cooling system will operate at optimal levels throughout the life of the system. It is suggested that the tank be conditioned at an interval of every 4th filling or once/month; whichever comes first. • Completely drain water tank. (See Emptying Water Tank) • Fill tank with CLEAN WATER. • Add a few drops unscented chlorine bleach to the water tank (approximately 5 drops per gallon of clean water). • Replace cap and hand tighten. • Run system for 5 minutes with high density cooling then adjust to your personal comfort level. • The system is conditioned and ready for operation. Rev. 1/15 AC100/200 series 7 Troubleshooting PROBLEM CAUSE 1. Power cord is not connected Fan not running 2. Power Button is in the “OFF” position 1. Cooling button is in off position Unit not cooling Water streaming from CORRECTION 1. Connect power cord 2. Depress & release the power button one time 1. Depress & release the cooling power button one time 2. Water tank is empty 2. Fill tank with clean water 3. Cooling Dial is in the ”CLOSED” position 3. Open Cooling Dial (turn to the left) 4. Water filter could be clogged 4. Replace water filter 5. Air tank leak 5. Tank fill cap is not tight 1. Check all filter hose connections 1. Air flow is low for air leaks nozzle/s during 2. Air filter needs replacement 2. Replace air filter operation 3. Foreign object in nozzle 3. Order and replace nozzle 1. Open tank cap to release pressure. Drain tank to bottom of Water fill basket. Replace Cap. During streaming from nozzle/s during 1. Water tank is overfilled shutdown next start up the cooling function may stream water for a few seconds until the lines have been cleared. Then normal operation will return. Mist is not balanced on both nozzles (AC200 series 1. Low water flow 1. Adjust the Cooling Dial 2. Low water level 2. Check water level and fill if needed 3. Check assembly to ensure hoses 3. Water hose leaks are routed installed correctly. only) Rev. 1/15 AC100/200 series 8 Parts Reorder List No. Part No. Description QTY 1 AM15PMMR-1-002 Air/Water Filter 2 2 AM15PMMR-1-003 Air Filter Access Door 1 3 AM15PMMR-1-004 Water Filter Access Door 1 4 AM15PMMR-1-005 Power Supply 1 5 AM15PMMR-1-006 Fill Cap 1 Warranty 1 FULL YEAR WARRANTY The space cooler is warranted for one year from the date of purchase against defects in materials and workmanship. At our discretion, parts that prove to be defective will either be repaired or replaced, or the whole product will be replaced. In either case, a copy of your proof of purchase will be required. In case that any mechanical or electrical repairs are required during the warranty period, send your complete product, postage or freight prepaid to the Culer customer service center near you. Call the number below to get the nearest service center. This warranty does not include the air or water filters, which are expendable parts that can wear out from normal use within the warranty period. This warranty applies for only 90 days if this product is ever used for commercial or rental purposes. The serial number, model number and manufacturing date code can be found on the label attached to the back of the unit. You should record these numbers and the date of purchase and keep in a safe place for future reference. MODEL NUMBER: XXXXX MFG DATE CODE: XXXX SERIAL NUMBER: XXXXXX DATE OF PURCHASE: XX-XX-XX Thank you for your purchase!!! Rev. 1/15 AC100/200 series 9