1
MEGAFLASHROM
SCC+
SD
USER’S MANUAL
[DESCRIPTION]
MegaFlashROM SCC+ SD is a combo cartridge with a
SD card reader, an improved MegaFlashROM SCC+ and
512K RAM (optional)
Each device is located in a subslot, so the cartridge
must be inserted in a primary slot. It will not work in a
slot expander.
OPFXSD is the software you must use to operate the
cartridge. You can find it in the “FLASH” section of:
www.msxcartridgeshop.com
[MINIMUM REQUIREMENTS]
MSX computer with at least one free Slot
64K RAM (MSX-DOS, FAT12, 16MB partitions) or
128K (MSX-DOS 2/Nextor, FAT16, up to 4GB
partitions)
[FEATURES]
8192 KB (64 Mbits) flashROM memory
Sound chips: SCC-I and PSG
Mapper: ASC8, ASC16, Konami, Konami SCC,
linear 48K/64K
Compatible with microSD/SDHC cards in FAT12 or
FAT16
Two micro SD slots
High transfer speed.
Recovery mode: Let’s you configure the cartridge
easily.
[WORKING]
Insert the MegaFlashROM SCC+ SD cart in one slot
while the computer is turned off.
Turn the computer on and the disk operative system
will boot. If you need to reinstall the cartridge software
check INSTALATION section.
[MSX with 128K RAM or more]
With this configuration you can use Nextor (MSX-DOS
2), FAT16 and partitions up to 4 GB.
When using an MSX2 or higher, MultiMente –a file
explorer- will boot automatically. It is installed by
default in the ROM disk of the cartridge. Check
MULTIMENTE section.
[MSX with less than 128K RAM]
With this configuration you can’t use Nextor or
MultiMente, only MSX-DOS 1, FAT12 and partitions up
to 16 MB.
Execute OPFXSD from command line by selecting the
ROM or DSK and needed options.
[After flashing the cartridge]
Once the ROM is stored the cartridge will behave as if it
were the original one and won't be erased even if the
computer is turned off.
ESC key or the one configured through /T option must
be pressed while computer is booting to avoid the
execution of the game.
If it doesn’t work, you can erase the cartridge using the
recovery mode. Press CURSOR UP while booting and
select F1 option.
RESET key can be hold on pressed for 5 seconds to
disable MegaFlashROM SCC+ temporarily if previous
system would fail for any reason.
[PSG]
The PSG included in the cartridge is mapped to ports
#10-#12.
Internal MSX PSG
Port #A0
MegaFlashROM PSG
Port #10
Port #A1
Port #A2
Port #11
Port #12
[NEXTOR]
You can find detailed information, latest versions and
tools at: http://www.konamiman.com/msx/msxe.html#nextor
[Boot keys]
The boot time configuration of Nextor can be modified
by keeping pressed some special keys while the system
is booting.
These keys and their behavior are:
1: Force boot in MSX-DOS 1 mode (TR: Z80 mode).
2: Force boot in MSX-DOS 1 mode (TR: R800 mode).
3: Force boot to the BASIC prompt.
4: (Turbo R only) Boot in R800-ROM mode, assign the
largest mapper found as the primary mapper and free
the 64K allocated for the R800-DRAM mode.
CTRL: Assign only one drive to each Nextor kernel
with a device-based driver.
SHIFT: Prevent MSX-DOS kernels from booting. This
isuseful to disable the internal floppy disk drive.
R: Disable Nextor when the cartridge is in slot 1.
F: Disable Nextor when the cartridge is in slot 2.
[MultiMente]
MultiMente is a file explorer/shell that works on MSX2
or higher with at least 128K RAM. It allows to load
ROMs and DSK easily into the cartridge without using
OPFXSD from command line.
[Basic keys]
Q: Exit
Cursors: Navigate
SPACE: Select file
1-9: Change current drive letter (1 = A:, 2 = B:…)
RETURN: Depends on the selected file/folder.
Folder: Enter folder.
.ROM: Load the ROM in the cartridge.
.DSK: Load the DSK in the cartridge as disk 1.
.FD1 to .FD9: Load the file as disk 1 to 9.
.OPF: Load a multiROM file.
BS: Exit current folder (similar to CD..)
C: Copy
D: Delete
SHIFT+RETURN: Install MGSDRV.
CTRL+RETURN: Install MicroCabin BGM driver.
[OPTIONS]
/X
Executes the game stored in the cartridge.
OPFXSD KLORE2.ROM /X <- Stores the ROM
and executes it
OPFXSD /X <- Executes whatever is stored in
the cartridge
/E
Patchs Konami ROMs to simulate that they are
executed in an European computer
OPFXSD USAS.ROM /E <- Shows the texts in
English in a Japanese computer
/J
Patchs the Konami ROMs to simulate that they
are executed in a Japanese computer
OPFXSD NEMESIS3.ROM /J <- Shows the
texts in Japanese in an European computer
/8
Enables the R800 CPU when executing the ROM
or turbo mode of Panasonic WX/WSX/FX models.
/Hxx
Changes the Frequency when executing the ROM.
It won't have any effect if the game change it
again during its execution.
/H50 <- 50 Hz
/H60 <- 60 Hz
/RCxx
Simulates a Konami cart inserted in another slot.
OPFXSD NEMESIS2.ROM /RC743<-Simulates
Penguin Adventure
/Kx
Forces the execution of the ROM with a Konami
mapper
/K4 <- Konami
/K5 <- Konami SCC
/Ax
Forces the execution of the ROM with a ASCII
mapper
/A8 <- ASC8
/A16 <- ASC16
/L
Indicates that the ROM has no mapper and works
in #0000-#FFFF area as 48K or 64K roms.
/M
Manual mode. OPFXSD won't indentify the ROM
mapper automatically.
/C
Erases the ROM stored in MegaFlashROM SCC+.
/C1 Fully erases the cartridge (MegaFlashROM
and SD kernel)
/Sxx
Forces the slot where the cartridge is placed:
/S1 = Slot 1
/S13 = Slot 1, subslot 3
/T[rc]
Fixes the key which will avoid the execution of
the ROM stored in the cartridge. ESC acts in that
way by default. To select the desired key it is
necessary to select the file and column of the key
matrix
/T64 <- File 6, Column 4 = CODE
/T82 <- File 8, Column 2 = INS
[See keyboard matrices]
/N
Inverts the logic of the key that avoids the
execution of the ROM (Pressed / Not pressed)
/O
Creates a MULTIROM with the games inside the
MULTIROM.OPF file
[See MULTIROM section]
/F
Executes the game by using a "soft reset”.
/P
Patchs a Konami ROM to use the PSG of the
cartridge. So the sound balance of SCC and PSG
is constant and perfect.
/P1 Clone internal PSG using the external one.
/Dx
Loads a DSK (x=1 to 9)
/I
Installs cartridge’s software
/U
Disables subslots and set MegaFlashROM SCC+
as unique device available.
/1
Write the ROM at x1 speed instead of x4.
[See DSK]
[See INSTALATION]
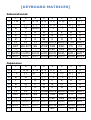
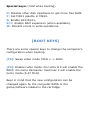
[KEYBOARD MATRICES]
International:
0
1
2
3
4
5
6
7
8
9
10
7
6
5
4
7&
6^
5% 4$
;:
]}
[{
\|
B
A
DEAD / ?
J
I
H
G
R
Q
P
O
Z
Y
X
W
F3
F2
F1 CODE
RET SELECT BS STOP
→
↓
↑
←
3
2
1
0
3# 2@
1!
0)
=+
-_
9(
8*
.>
,<
`~
'"
F
E
D
C
N
M
L
K
V
U
T
S
CAPS GRAPH CTRL SHIFT
TAB ESC
F5
F4
DEL INS HOME SPACE
NUM4 NUM3 NUM2 NUM1 NUM0 NUM/ NUM+ NUM*
NUM. NUM, NUM- NUM9 NUM8 NUM7 NUM6 NUM5
Japanese:
7
6
5
4
3
2
1
0
0
7'
6&
5% 4$ 3#
2"
1!
0
1 ;+
[{
@` ¥| ^~
-=
9)
8(
2
B
A
_
/?
.>
,<
]}
:*
3
J
I
H
G
F
E
D
C
4
R
Q
P
O
N
M
L
K
5
Z
Y
X
W
V
U
T
S
6
F3
F2
F1 KANA CAPS GRAPH CTRL SHIFT
7 RET SELECT BS STOP TAB ESC
F5
F4
→
↓
↑
←
8
DEL INS HOME SPACE
9 NUM4 NUM3 NUM2 NUM1 NUM0 NUM/ NUM+ NUM*
10 NUM. NUM, NUM- NUM9 NUM8 NUM7 NUM6 NUM5
11
NO
YES
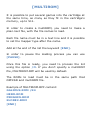
Azerty:
0
1
7
7è
M
6
6§
$*
5
5(
^¨
4
4'
<>
3
3"
-_
2
2é
º)
1
1&
9ç
0
0à
8!
2
B
Q
DEAD = + / :
.;
#£ Ù%
3
J
I
H
G
F
E
D
C
4
R
A
P
O
N
?,
L
K
5
W
Y
X
Z
V
U
T
S
6
F3
F2
F1 CODE CAPS GRAPH CTRL SHIFT
7 RET SELECT BS STOP TAB ESC
F5
F4
→
↓
↑
←
8
DEL INS HOME SPACE
9 NUM4 NUM3 NUM2 NUM1 NUM0 NUM/ NUM+ NUM*
10 NUM. NUM, NUM- NUM9 NUM8 NUM7 NUM6 NUM5
Russian:
0
1
2
3
4
5
6
7
8
9
10
7
&6
VЖ
IИ
6
%5
*:
FФ
5
4
3
¤4 #3 "2
HХ -^Ъ =_
?/
<, @Ю
OО [{Ш RР PП
KК
JЙ
ZЗ ]}Щ
QЯ
NН |~Ч CЦ
F3
F2
F1 РУС
RET SELECT BS STOP
→
↓
↑
←
2
!1
$0
BБ
1
+;
(8
>.
0
)9
'7
\Э
AА
UУ WВ SС
TТ
XЬ
DД
LЛ
MМ GГ
EЕ
YЫ
CAPS GRAPH CTRL SHIFT
TAB ESC
F5
F4
DEL INS HOME SPACE
NUM4 NUM3 NUM2 NUM1 NUM0 NUM/ NUM+ NUM*
NUM. NUM, NUM- NUM9 NUM8 NUM7 NUM6 NUM5
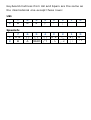
Keyboard matrices from UK and Spain are the same as
the international one except these rows:
UK:
2
7
B
6
A
5
£
4
/
3
.
2
,
1
`
0
'
6
]}
A
5
[{
DEAD
4
\|
/?
3
=+
.>
2
-_
,<
1
9(
;:
0
8*
'"
Spanish:
1
2
7
ñÑ
B
[INSTALATION]
In case you need to reinstall part of the software, follow
these steps.
OPFXSD nextor.rom /I:
Install SD kernel. Needed to use the SD interface.
Note: this process must be done using another storage
device different from the SD reader in the cartridge.
You can also use RECOVERY mode to install the
kernel.
OPFXSD dskrom.rom /I1:
Installs the diskROM used to load DSKs. Needed to run
DSKs.
OPFXSD romdisk.dsk /ID:
Installs a ROM drive. The ROM drive enables you to put
a diskimage into the flashrom. It will be mounted as an
extra readonly drive. The ROM drive is always available
(unless erased), even when not cards are inserted. It
can be used to boot from or store files that you use
regularly.
OPFXSD recovery.rom /I34:
Installs RECOVERY program.
Note: Update only when the cartridge maker tells you
to do it.
[See RECOVERY]
[RECOVERY]
Recovery mode let’s you to configure the cartridge in a
easy way, without using other disk interfaces.
In order to enter the recovery menú, hold CURSOR UP
while booting. The available options are:
F1: Erase MegaFlashROM.
This will erase the ROM stored in the MegaFlashROM
SCC+. It is useful if the ROM is corrupted and can’t be
disabled by pressing ESC.
F2: Erase SD kernel
Erasing the SD kernel the SD reader will be disabled
and the MSX will not identify it as a disk interface.
F3: Erase ROM disk
Erase the disk image installed as ROM disk (A:)
F4: Install SD kernel
Let’s you reinstall the SD kernel, so the SD interface
will work again. You must format a SD card and copy
in it KERNEL.DAT file.
F5: Show SD card information
Shows information about the card and its partitions.
Pressing LEFT and RIGHT you can change SD card slot.
N: Disable RAM expansion
Only available in the 512K RAM version.
ESC: Exit recovery menu.
[DSK –flashing method-]
This is the old method for loading DSKs. It has
been replaced with the native support of Nextor
for DSKs emulation. The new method will be used
by default when loading a DSK from MultiMente.
Check [DSK from SD] for more information.
A DSK file is a disk image that contains the information
of the sectors of a real disk.
It is possible to load and run up to 9 disk images of 720
KB. These files can be loaded and changed
independently. It is not necessary to previously erase
the former ones. Since the DSK are stored on
flashROM memory, they will be read only.
In order to load a DSK you must use /D option,
followed by the number of disk you want to select (from
1 to 9)
In example: OPFXSD undead.dsk /D1
In games with several disks, you can change the disk
by holding the desired number key when the disk is
accessed (i.e.: after pressing space after a change disk
dialog in a game)
Pressing number 0 the disk access will be redirected to
the next disk interface, probably the floppy disk. In this
way you can save game data.
Special keys: (hold while booting)
D: Disable other disk interfaces to get more free RAM.
P: Set MSX1 palette in MSX2.
S: Enable SCC/SCC+
R/F: Enable RAM expansion (when available).
W: Discard errors in write operations.
[BOOT KEYS]
There are some special keys to change the computer’s
configuration when booting.
[F5]: Swap video mode 50Hz <-> 60Hz
[F4]: Enable turbo mode. On turbo R it will enable the
R800. On some Panasonic machines it will enable the
turbo mode (5.37 MHz)
Bear in mind that the new configuration can be
changed again by the computer BIOS or the
game/software loaded in the cartridge.
[DSK new]
This new method loads the DSKs directly for the SD
card. No need to flash them in the cartridge. So it is
possible to read and write to them.
The disk image files must not be fragmented, that is,
their contents must be placed across consecutive
sectors in the device.
In order to switch to a different DSK, you must press
the appropriate key (1-9) while the computer is trying
to read the file; this will emulate a disk change.
Alternatively, you can also press the GRAPH key when
the computer is trying to read the file. The caps led will
lit and the computer will freeze until you release GRAPH
and press the appropriate DSK number.
Nextor will boot in disk emulation mode if it finds a file
named NEXT_DSK.DAT in the root directory of a
primary partition. This file is created when you press
RETURN on a .DSK or .FD1….FD9 file
To disable the disk emulation mode (that is, to boot
normally even if a NEXT_DSK.DAT file exists), keep the
0 (zero) key pressed while the computer boots. You
will have to manually delete or rename the
NEXT_DSK.DAT file to prevent the disk emulation mode
to be entered again in the next system boot.
[MULTIROM]
It is possible to put several games into the cartridge at
the same time, as many as they fit in the cartridge's
memory, up to 511.
In order to create a multiROM, you need to make a
plain-text file, with the file names to load.
Each file name must be in a text line and it is possible
to set the mapper type after the name.
Add at the end of the list the keyword [END].
In order to pause the loading process you can use
[PAUSE].
Once this file is ready, you need to process the list
using the option /O. If you don’t specify a multiROM
file, MULTIROM.OPF will be used by default.
The ROMs to load must be in the same path that
OPFXSD and multiROM file.
Example of MULTIROM.OPF content:
GALIOUS.ROM /K4
HERO.ROM
PENGUIN.ROM
KLORE2.ROM
[END]
Command to make the multiROM using the default
MULTIROM.OPF file:
OPFXSD /O
Command to make the multiROM
multiROM file:
OPFXSD FILENAME.EXT /O
specifying
the
After booting the cartridge a menu will be show with
the games in the cartridge. Before running the game it
is possible to change the video and CPU modes.
Controls:
Cursor keys / Joystick
Space / Fire
TAB / Fire 2
ESC
Move
Select
Enter / Exit configuration
Exit multiROM
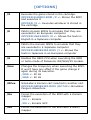
[STAFF]
Hardware
Kazuhiro Tsujikawa
Manuel Pazos
Software
Manuel Pazos (Guillian)
Armando Pérez (Ramones)
Néstor Soriano (Konamiman)
English translation
Francis Álvarez (SaebaMSX)
Artwork
Nova706