1
ME Series Modified Sine Wave Inverter/Chargers Owner’s Manual Disclaimer of Liability The use of this manual and the conditions or methods of installation, operation, use, and maintenance of the ME Series inverter/charger is beyond the control of Magnum Energy, Inc. Therefore, this company assumes no responsibility and expressly disclaims any liability for loss, damage, or expense whether direct, indirect, consequential, or incidental that may arise out of or be in anyway connected with such installation, operation, use, or maintenance. Due to continuous improvements and product updates, the images shown in this manual may not exactly match the unit purchased. Restrictions on Use The ME Series inverter/charger may only be used in life-support devices or systems with the express written approval of Magnum Energy. Failure of this inverter can reasonably be expected to cause the failure of that life-support device or system, or to affect the safety or effectiveness of that device or system. If the ME Series inverter fails, it is reasonable to assume that the health of the user or other persons may be endangered. Copyright Notice Copyright © 2012 by Magnum Energy, Inc. All rights reserved. Permission to copy, distribute, and/or modify this document is prohibited without express written permission from Magnum Energy, Inc. Document Information Description – ME Series Owner’s Manual Part Number and Revision – 64-0002 Rev B Date Published – August 2012 This entire manual is available for download—with many of the diagrams available in color—under the Document Library tab at: www.magnumenergy.com Contact Information Magnum Energy, Inc. 2211 West Casino Rd. Everett, WA 98204 Phone: 425-353-8833 Fax: 425-353-8390 Web: www.magnumenergy.com Statement of Appreciation Thank you from all of us at Magnum Energy for purchasing this ME Series inverter/charger. We understand that you have many purchasing options in the marketplace, and are pleased that you have decided on a Magnum Energy product. This ME Series inverter/charger was proudly assembled and tested in the United States in our Everett, Washington, facility. At Magnum, we are committed to providing you with quality products and services, and hope that your experience with us is pleasant and professional. Record unit’s model & serial number in case you need to provide this information in the future. Model: Serial Number: ME2000 (-15B/-20B) N1 ME2012 (-15B/-20B) B1 ME2512 C1 ME3112 D1 Magnum Energy® is a registered trademark of Magnum Energy, Inc. Page i © 2012 Magnum Energy, Inc. Safety Information IMPORTANT SAFETY INSTRUCTIONS SAVE THESE INSTRUCTIONS THIS MANUAL CONTAINS IMPORTANT INSTRUCTIONS FOR THE ME SERIES INVERTER/CHARGER THAT SHALL BE FOLLOWED DURING THE INSTALLATION AND OPERATION OF THIS PRODUCT. Before using the ME Series, read all instructions and cautionary markings. Also, be sure to review the individual manuals provided for each component of the system. The installation instructions are for use by qualified personnel only. Do not perform any installation or servicing other than that specified in this owner’s manual unless you are qualified to do so. Incorrect installation or servicing may result in a risk of electric shock, fire, or other safety hazard. Safety Symbols The following safety symbols have been placed throughout this manual to indicate dangerous and important safety instructions. WARNING: This symbol indicates that failure to take a specified action could result in physical harm to the user. CAUTION: This symbol indicates that failure to take a specified action could result in damage to the equipment. Info: This symbol indicates information that emphasizes or supplements important points of the main text. Safety Precautions • • • • • • • • • • • • • • • All electrical work must be performed in accordance with local and national electrical codes. This product is designed for indoor/compartment installation. It must not be exposed to rain, snow, moisture, or liquids of any type. Use insulated tools to reduce the chance of electrical shock or accidental short circuits. There are no user-serviceable parts contained in this product. This unit is provided with integral protection against overloads. Live power may be present at more than one point since an inverter utilizes both DC (batteries, PV, etc.,) and AC (utility or generator) power. To reduce risk of electric shock, ensure all DC and AC wiring is disconnected prior to installing or performing maintenance on the inverter. Turning off the inverter will not reduce this risk, the inverter must be totally disconnected from all sources. Use Class 1 wiring methods for field wiring connections to terminals of a Class 2 circuit. Listed or labeled equipment shall be installed and used in accordance with any instructions included in the listing or labeling. Always verify proper wiring prior to starting the inverter. Use only copper wires with a minimum temperature rating of 75°C. AC wiring must be no less than 10 AWG (5.3 mm²) gauge copper wire. Battery cables should be no less than #4/0 AWG (107.2 mm²) for 12-volt systems. Crimped and sealed copper ring terminal lugs with a 5/16 hole should be used to connect to the DC terminals on the inverter. Torque all AC wiring connections and DC cable connections to the required torque values. The inverter must be properly installed, see Section 2.2 “Mounting the Inverter” in this manual. Overcurrent protection for the battery supply is not provided as an integral part of this inverter. Overcurrent protection of the battery cables must be provided as part of the system installation. Refer to Section 2.4 DC Wiring for more information. © 2012 Magnum Energy, Inc. Page ii Safety Information • • Overcurrent protection for the AC output wiring is not provided as an integral part of this inverter. Overcurrent protection of the AC output wiring must be provided as part of the system installation. Refer to Section 2.5 AC Wiring for more information. The AC output neutral conductor and the DC negative conductors are not connected (bonded) to the inverter chassis. Both the input and output conductors are isolated from the enclosure and each other. System grounding, if required, is the responsibility of the system installer and must comply with local and national electrical codes and standards. Refer to the Section 2.6 Grounding Inverters for more information. Battery Safety • Use insulated tools and be very careful when working around batteries, they can produce extremely high currents if short-circuited (e.g., dropping a metal tool across the battery terminal), which could cause a fire or explosion. • Read and follow the battery manufacturer’s safety precautions before installing the inverter and batteries. Always verify proper polarity and voltage before connecting the batteries to the inverter. Once the batteries are connected to the inverter, ensure the maintenance and charging requirements (i.e., charge voltage and charge rate) provided by the battery manufacturer are followed to extend the life of the batteries and to prevent damage to the batteries while charging. • Wear eye protection such as safety glasses, and avoid touching your eyes and face when working with batteries to keep any fluid/corrosion on the battery from coming in contact with eyes and skin. Have plenty of fresh water and soap nearby and thoroughly wash in case battery acid contacts skin, clothing, or eyes. In the event of exposure to the eyes, flood them for at least 15 minutes with running water and seek immediate medical attention. Baking soda neutralizes lead acid battery electrolyte and vinegar neutralizes spilled NiCad and NiFe battery electrolyte; depending on your battery type, keep a supply on hand near the batteries. • Remove all jewelry such as rings, watches, bracelets, etc., when installing or performing maintenance on the batteries and inverter. A battery can produce a short-circuit current high enough to weld metal jewelry, causing severe burns. • Never work alone. Always have someone within the range of your voice or close enough to come to your aid when working around batteries. • Use proper lifting techniques when working with batteries. • Never use old or untested batteries. Check each battery’s label for age, type, and date code to ensure all batteries are identical. • Batteries are sensitive to changes in temperature. Install batteries in a stable environment. • Batteries can produce explosive gasses, so install batteries in a well-ventilated area. For compartment or enclosure installations, always vent batteries from the highest point to the outside. Design the battery enclosure to prevent accumulation and concentration of hydrogen gas in “pockets” at the top of the compartment. • Provide at least one inch of air space between batteries to provide optimum cooling. • Never smoke or allow a spark near batteries. • To prevent a spark at the battery and reduce the chance of explosion, always connect the cables to the batteries first. Then connect the cables to the inverter. • • Never charge a frozen battery. The battery bank should be installed in a clean, dry, ventilated environment where they are protected from high and low temperatures. If installed in a vehicle/boat, the batteries must be mounted upright (if using liquid batteries) and securely fastened. The location must be fully accessible and protected from exposure to heat producing devices, and away from any fuel tanks. Page iii © 2012 Magnum Energy, Inc Safety Information CONSIGNES DE SÉCURITÉ IMPORTANTES CONSERVER CES INSTRUCTIONS CE MANUEL CONTIENT DE IMPORTANTES POUR LA SÉRIE ME ONDULEUR/CHARGEUR QUI DOIVENT ETRE SUIVIES PENDANT L’INSTALLATION ET FONCTIONNEMENT DE CE PRODUIT. Avant d’utiliser la série ME, lire toutes les instructions etles mises en garde. Aussi, n’oubliez pas depasser en revue les différents manuels fournispour chaque composant du système. Lesinstructions d’installation sont pour une utilisationpar du personnel qualifié. Ne pas effectuer une installation ou d’entretien autres que ceux spécifiés dans ce manuel, sauf si vous êtes qualifié pour le faire. Une mauvaise installation ou d’entretien peut entraîner un risque de choc électrique, un incendie ou autre danger pour la sécurité. Symboles de sécurité Les symboles de sécurité suivants ont été placéstout au long de ce manuel pour indiquer des conditions dangereuses et les consignes de sécurité importantes. AVERTISSEMENT: Ce symbole indique que le défaut de prendre une action spécifiée pourraitcauser des dommages physiques à l’utilisateur. ATTENTION: Ce symbole indique que le défaut de prendre une action spécifiée peut entraîner des dommages à l’équipement. Info: Ce symbole indique une information qui met l’accent ou des suppléments points importants du texte principal. Consignes de sécurité • • • • • • • • • • • • • • • Tous les travaux électriques doivent être effectués en conformité avec les codes locaux et Ce produit est conçu pour l’installation / du compartiment intérieur. Il ne doit pas être exposé à la pluie, la neige, l’humidité ou des liquides de tout type. Utiliser des outils isolés pour réduire le risque de choc électrique ou courts-circuits accidentels. Il n’ya pas de pièces réparables par l’utilisateur de ce produit. Cet appareil est fourni avec une protection intégrale contre les surcharges. Puissance en direct peuvent être présents à plus d’un point depuis un onduleur utilise à la fois DC (piles, PV, etc) et AC (utilitaire ou générateur) d’alimentation. Pour réduire le risque de choc électrique, assurez-vous que tout le câblage DC et AC est débranchée avant l’installation ou la maintenance sur le variateur. Mise hors tension de l’onduleur ne réduira pas ce risque, l’onduleur doit être totalement déconnectée de toutes les sources. Utiliser des méthodes de câblage classe 1 pour les connexions de câblage sur le terrain aux bornes d’un circuit de Classe 2. En vente ou de l’équipement étiqueté doit être installé et utilisé conformément aux instructions figurant dans la liste ou l’étiquetage. Toujours vérifier le câblage avant de commencer l’onduleur. Utilisez des fils de cuivre seulement avec une cote de température minimale de 75°C. AC câblage ne doit pas être inférieure à 10 AWG (5.3 mm²) de cuivre de calibre câblage. Les câbles de batterie ne doit pas être inférieur à #4/0 AWG (107.2 mm²) pour 12-volt systèmes. Frisées et scellé cosses en cuivre anneau des bornes avec un trou de 5/16 doit être utilisé pour se connecter à des bornes de courant continu sur l’onduleur. Couple de serrage de tous les AC connexions de câblage et DC connexions de câble pour les valeurs de couple requises. L’onduleur doit être correctement monté, voir le montage de la section onduleur dans le chapitre Installation de ce manuel. Protection contre les surintensités pour l’alimentation de la batterie n’est pas fourni en tant que partie intégrante de cet inverseur. La protection contre les surintensités des câbles de batterie doivent être fournis dans le cadre de l’installation du système. Se reporter à la Section 2.4 DC Câblage pour plus d’informations. © 2012 Magnum Energy, Inc. Page iv Safety Information • • La protection contre les surintensités pour le câblage de sortie CA n’est pas fourni en tant que partie intégrante de cet inverseur. Protection contre les surintensités du câblage de sortie CA doit être fournie dans le cadre de l’installation du système. Reportez-vous à la section 2.5 “Câblage ca” pour plus d’informations. Le conducteur de courant alternatif de sortie neutre et les conducteurs à courant continu négatives ne sont pas connectés (servitude) au châssis inverseur. La fois l’entrée et des conducteurs de sortie sont isolés de l’enceinte et l’autre. La terre du système, si nécessaire, est de la responsabilité de l’installateur du système et doit se conformer à des codes locaux et nationaux et les normes électriques. Reportez-vous aux Section 2.6 Les onduleur à la terre pour plus d’informations. Sécurité de la batterie • • • • • • • • • • • • • • Utiliser des outils isolés et être très prudent lorsque vous travaillez près des batteries, elles peuvent produire des courants extrêmement élevés si en court-circuit (par exemple, échapper un outil métallique à travers la borne de la batterie), ce qui pourrait provoquer un incendie ou une explosion. Lisez et suivez les consignes de sécurité du fabricant de la batterie avant d’installer l’onduleur et des batteries. Toujours vérifier la polarité et la tension avant de brancher les batteries à l’onduleur. Une fois que les batteries sont connectées à l’onduleur, assurer la maintenance et les exigences de charge (c.-à-tension de charge et taux de charge) fournis par le fabricant de la batterie sont suivies pour prolonger la vie des batteries et pour éviter d’endommager les batteries pendant la charge. Porter des lunettes de protection tels que des lunettes de sécurité, et évitez de toucher vos yeux et le visage lorsque l’on travaille avec des piles de garder tout fluide / corrosion sur la batterie d’entrer en contact avec les yeux et la peau. Ayez suffisamment d’eau fraîche et de savon à proximité et se laver dans le cas d’acide contact avec la peau de la batterie, les vêtements ou les yeux. Dans le cas d’exposition pour les yeux, les inonder pendant au moins 15 minutes à l’eau courante et consulter immédiatement un médecin. Le bicarbonate de soude neutralise l’acide de plomb électrolyte de la batterie et le vinaigre neutralise renversé NiCad et NiFe batterie à électrolyte; en fonction de votre type de batterie, gardez sous la main près des batteries. Enlevez tous les bijoux tels que bagues, montres, bracelets, etc, lors de l’installation ou la maintenance sur les batteries et l’onduleur. Une batterie peut produire un court-circuit assez de courant élevé pour souder les bijoux en métal, provoquant de graves brûlures. Ne jamais travailler seul. Toujours avoir quelqu’un au sein de la gamme de votre voix ou suffisamment près pour vous venir en aide lorsque vous travaillez près des batteries. Utiliser des techniques de levage appropriées lorsque vous travaillez avec des piles. Ne jamais utiliser de piles usagées ou non testés. Vérifiez l’étiquette de chaque batterie à l’âge, le type et le code de date afin d’assurer toutes les batteries sont identiques. Piles sensibles aux changements temporaires, installer dans un environnement stable. Les batteries peuvent produire des gaz explosifs, etc installer les piles dans un endroit bien ventilé. Pour les installations compartiment ou une enceinte, toujours évacuer les piles du plus haut point à l’extérieur. Concevoir le boîtier de piles pour éviter l’accumulation et la concentration de gaz d’hydrogène dans “poches” en haut du compartiment. Fournir au moins un pouce de l’espace aérien entre les batteries pour fournir un refroidissement optimal. Ne jamais fumer ou laisser une étincelle près des batteries. Pour éviter une étincelle à la batterie et de réduire le risque d’explosion, toujours connecter les câbles aux batteries en premier. Ensuite, connectez les câbles à l’onduleur. Ne jamais charger une batterie gelée. La banque de la batterie doit être installé dans un endroit propre, sec, aéré et où ils sont protégés contre les températures élevées et basses. S’il est installé dans un véhicule / bateau, les batteries doivent être monté en position verticale (si vous utilisez des piles liquides) et solidement fixés. L’emplacement doit être pleinement accessible et protégé contre l’exposition à la chaleur la fabrication de dispositifs, et loin de toute réservoirs de carburant. Page v © 2012 Magnum Energy, Inc Table of Contents 1.0 Introduction ..................................................................................1 1.1 1.2 1.3 1.4 2.0 Installation ...................................................................................8 2.1 2.2 2.3 2.4 2.5 2.6 2.7 2.8 2.9 3.0 Pre-Installation.......................................................................................... 8 Mounting the Inverter ...............................................................................11 Wiring the Inverter - General Requirements .................................................13 DC Wiring ................................................................................................14 AC Wiring ................................................................................................21 Grounding Inverters ..................................................................................34 Inverter Notification Requirements ..............................................................37 Final Inspection ........................................................................................38 Functional Test .........................................................................................38 Operation ....................................................................................40 3.1 3.2 3.3 3.4 3.5 3.6 3.7 3.8 3.9 3.10 4.0 Features and Benefits ................................................................................. 2 How an Inverter/Charger Works................................................................... 5 What Appliances will run from a Modified Sine Wave Inverter ........................... 6 Appliances and Run Time ............................................................................ 7 Inverter Mode ..........................................................................................40 Standby Mode ..........................................................................................41 Battery Charging ......................................................................................41 Transfer Time ...........................................................................................43 Battery Temperature Sensor Operation ........................................................43 Protection Circuitry Operation .....................................................................44 Inverter Startup .......................................................................................45 Factory Default Values ...............................................................................46 Inverter Fan Operation ..............................................................................47 Using a Remote with the ME Series Inverter .................................................47 Maintenance and Troubleshooting ...............................................48 4.1 4.2 4.3 4.4 4.5 Recommended Inverter and Battery Care .....................................................48 Storage for Mobile Installations...................................................................48 Troubleshooting ........................................................................................49 Performing an Inverter Reset......................................................................50 Performing a Power Reset ..........................................................................50 Appendix A - Specifications and Optional Equipment ...........................51 A-1 A-2 Inverter/Charger Specifications ..................................................................51 Optional Equipment and Accessories............................................................52 Appendix B - Battery Information .......................................................53 B-1 B-2 B-3 B-4 B-5 B-6 Battery Battery Battery Battery Battery Battery Location .......................................................................................53 Types ...........................................................................................53 Temperature .................................................................................53 Bank Sizing ..................................................................................53 Bank Sizing Worksheet ...................................................................54 Wiring Configurations .....................................................................55 Appendix C – Inverter/Charger Terminology.......................................57 Limited Warranty ................................................................................59 How to Receive Repair Service ............................................................59 © 2012 Magnum Energy, Inc. Page vi List of Figures Figure Figure Figure Figure Figure Figure Figure Figure Figure Figure Figure Figure Figure Figure Figure Figure Figure Figure Figure Figure Figure Figure Figure Figure Figure Figure Figure Figure Figure Figure Figure Figure Figure Figure Figure Figure Figure 1-1, Power Switch, Status LED, and Accessory Connection Ports ................................................2 1-2, Electrical Connection Points ...........................................................................................3 1-3, Left Side Features (ME2012, ME2512, ME3112) ................................................................4 1-4, Left Side Features (ME2000 Series) ................................................................................5 1-5, AC Waveforms .............................................................................................................6 2-1, Simplified Installation Diagram for Permanent Installations ................................................9 2-2, Approved Mounting Positions ....................................................................................... 11 2-3, ME Series Dimensions and Side Reference ..................................................................... 12 2-4, DC and Battery Temperature Sensor Wiring ................................................................... 15 2-5, Battery Hardware Installation ...................................................................................... 17 2-6, Inverter DC Hardware Installation ................................................................................ 17 2-7, Battery Temperature Sensor ........................................................................................ 19 2-8, AC Terminal Block ...................................................................................................... 22 2-9, AC Wiring for Single In - Single Out (30 A) Configurations ............................................... 25 2-10, AC Wiring for Single In - Single Out (60 A) Configurations ............................................. 26 2-11, AC Wiring for Single In - Dual Out Configurations ......................................................... 27 2-12, AC Wiring for Dual In - Single Out Configurations ......................................................... 28 2-13, AC Wiring for Dual In - Dual Out Configurations ............................................................ 29 2-14, AC Wiring for ME2000 Models..................................................................................... 32 2-15, AC Wiring for ME2000-15B/-20B Models ...................................................................... 33 2-16, Neutral-to-Ground Connection (Inverter Mode) ............................................................. 36 2-17, Neutral-to-Ground Connection (Standby Mode)............................................................. 36 2-18, Large Ground Wire Connected to ME Series .................................................................. 37 2-19, Warning Label .......................................................................................................... 37 2-20, AC Voltage Checks .................................................................................................... 39 2-21, AC Voltage Checks (ME2000 model) ............................................................................ 39 2-22, AC Voltage Checks (ME2000-15B/-20B models) ............................................................ 39 3-1, Power Flow - Inverter Mode ......................................................................................... 40 3-2, Power Flow - Standby Mode ......................................................................................... 41 3-3, Automatic 4-Stage Charging Graph ............................................................................... 42 3-4, BTS Temperature to Charge Voltage Change .................................................................. 43 3-5, Power Switch and Status Indicator................................................................................ 45 4-1, Performing an Inverter Reset ....................................................................................... 50 B-1, Series Battery Wiring .................................................................................................. 55 B-2, Parallel Battery Wiring ................................................................................................ 55 B-3, Series-Parallel Battery Wiring....................................................................................... 55 B-4, Battery Bank Wiring Examples (12-volt) ........................................................................ 56 List of Tables Table Table Table Table Table Table Table Table Table Table 1-1, 2-1, 2-2, 2-3, 2-4, 2-5, 3-1, 3-2, 3-3, 4-1, Page vii Typical Appliance Power Consumption ...............................................................................7 Recommended DC Wire/Overcurrent Device for Rated Use ................................................ 16 DC Wire Size For Increased Distance .............................................................................. 17 AC Input/Output Wiring Configurations (ME2012, ME2512, and ME3112 models).................. 24 AC Input/Output Wiring Configurations (ME2000 models) .................................................. 31 Equipment Grounding Conductor Sizing .......................................................................... 34 Inverter Battery Turn On/Off Levels................................................................................ 44 Inverter/Charger Default Values .................................................................................... 46 Inverter Compatibility Level .......................................................................................... 47 Basic Troubleshooting ................................................................................................... 49 © 2012 Magnum Energy, Inc. Introduction 1.0 Introduction Congratulations on your purchase of the ME Series inverter/charger from Magnum Energy. The ME Series is a modified sine wave inverter designed especially for mobile applications. Powerful, yet simple to operate, this inverter/charger will provide you with the years of trouble-free performance you have come to expect from Magnum Energy, all backed by our limited 3-year warranty. Installation is easy. Simply connect the inverter’s output to your distribution circuits or electrical panel, connect your AC to the inverter’s easy-to-reach terminal block, connect the batteries, and then switch it on for power. Info: This is a sizable manual and much of it is fairly technical. Terms may be used throughout the manual that are unfamiliar to you. Refer to the Inverter/Charger Terminology glossary in Appendix C for clarification. The ME Series inverter/chargers provide the following: • 2000, 2500, or 3100-watt models in a small footprint – less area needed for installation • Modified Sine Wave output • Automatic Power Factor Corrected (PFC) multi-stage battery charging • RS485 standard communication protocol • Remote and Network ports (easy connection for optional accessories) • Inverter-mounted ON/OFF switch with LED indicator • 30 amps per leg AC pass-thru capability • DC terminal covers with 360 degree connection • Field-serviceable for qualified personnel – tested repair kits available • Automatic battery temperature compensation (using battery temperature sensor) – for optimum charging even during extreme temperature changes • Overcurrent, over-temperature, and high/low battery voltage protection The following accessories are also available for use with the ME Series inverter/charger: • ME-AGS-N (Automatic Generator Start Module - Network version) – automatically starts/ stops your generator. • ME-ARC50 (Advanced Remote Control) – easy to read LCD display panel that enables advance inverter and accessories set up, control, and troubleshooting. • ME-BMK (Battery Monitor Kit - with Shunt) – provides precise DC voltage/current measurements and provides information on your battery’s State of Charge (SOC) condition. • ME-RC50 (Standard Remote Control) – easy to read LCD display panel that enables standard inverter and accessories set up, control, and troubleshooting. Regulatory Compliance The ME Series inverter/charger is designated as a Standalone power inverter with an internal battery charger. It can be connected to shorepower/utility grid (or to a generator) to allow the inverter batteries to be charged, and to power inverter loads while connected. The ME series is not a grid-interactive (also known as utility-interactive) inverter and does not have the capability to export (or sell) power back into the utility grid. The ME Series has been tested and listed to UL 458, 5th Edition (Power Converters/Inverters and Power Converter/Inverter Systems for Land Vehicles and Marine Crafts) for use in the US; and is also certified to CSA C22.2 No. 107.1-01 (General Use Power Supplies) for use in Canada. It has been tested and certified to these product safety standards by Intertek Testing Services (known as ETL), which is a Nationally Recognized Testing Laboratory (NRTL). NRTL’s are qualified organizations that meet Occupational Safety and Health Administration (OSHA) regulations to perform independent safety testing and product certification. © 2012 Magnum Energy, Inc. Page 1 Introduction 1.1 Features and Benefits The ME Series inverter/charger is designed to allow easy access to wiring, circuit breakers, and controls. Its die cast baseplate with one-piece aluminum cover ensures maximum durability with minimum weight, as well as cooler, more efficient operation. The front of the ME Series is equipped with the following features (see Figures 1-1 and 1-2): 1 Power ON/OFF Switch – a momentary pushbutton switch that alternately turns the inverter on or off. 2 Status LED Indicator – this green LED illuminates to provide information on the inverter or charger operation. 3 Stack/Accessories Connection Port (red label) – a RJ11 port that accepts optional accessories. Info: The stacking feature is NOT available with the ME Series. 4 Network Connection Port (green label) – a RJ11 port that accepts optional network capable accessories (e.g., Auto Gen Start or Battery Monitor). 5 Remote Connection Port (blue label) – a RJ11 port that allows an optional remote control to be connected. 6 BTS Connection Port (yellow label) – RJ11 port that accepts the remote Battery Temperature Sensor (BTS). 1 Power ON/OFF Switch 2 Status LED Indicator 3 Stack/Accessories Port 4 Network Port 5 Remote Port 6 Battery Temp Sensor Port (Charging/Inverting) (red label – RJ11 connection) (green label – RJ11 connection) (blue label – RJ11 connection) (yellow label – RJ11 connection) Figure 1-1, Power Switch, Status LED, and Accessory Connection Ports Page 2 © 2012 Magnum Energy, Inc Introduction 7 DC Equipment Ground Terminal – this connection is used to tie the exposed chassis of the inverter to the DC grounding system. This terminal accepts CU/AL conductors from #14 to #2 AWG (2.1 to 33.6 mm2). 8 AC Input/Output Connections – two 3/4” knockouts provided with cable-clamp strain reliefs to allow and hold the AC input and output field wiring. 9 Intake Air Vents – ventilation openings to pull in air to help keep the inverter cool for peak performance. 10 Positive DC Terminal – provides 360 degree connection point for the positive (+) cable from the battery bank; provided with a Kep or Flange nut on a 5/16-18 bolt to hold the battery cable to the DC terminal. 11 Negative DC Terminal – provides 360 degree connection point for the negative (–) cable from the battery bank; provided with a Kep or Flange nut on a 5/16-18 bolt to hold the battery cable to the DC terminal. 12 Mounting Flange – used to secure the inverter to a shelf or wall. Intake Air Vents (and on right side) 9 8 10 AC Input/ Output Connections Positive (+) DC terminal (under cover) 11 7 Negative (-) DC terminal DC Equipment Ground Terminal (under cover) 12 Mounting Flange Figure 1-2, Electrical Connection Points © 2012 Magnum Energy, Inc. Page 3 Introduction The left side of the ME Series is equipped with the following features (see Figures 1-3 and 1-4): 13 Exhaust Air Vents – ventilation openings that allow heated air to be removed by the internal cooling fan. 14 Model/Serial Number Label – includes model/serial number information, date of manufacture, and inverter and charger specifications. See the ME specifications in Appendix A for more information and the different models that are available. 15 16 17 AC Access Cover – provides access to the internal AC wiring terminal block (see Figure 2-8). This terminal block is used to hardwire all inverter AC input and output wiring connections. Remove the two screws to access the AC wiring terminal block. The ME2000 models do not have the AC wiring terminal block. Input Circuit Breaker (CB3) – this circuit breaker protects the unit’s internal charger wiring and pass-thru relay while in Standby mode. This circuit breaker will pop out when it opens. Press in to reset. This input circuit breaker is not branch-circuit rated, therefore, branch-circuit rated breakers must be installed in the inverter’s input wiring. Output Circuit Breakers (CB1 & CB2) – these circuit breakers are branch-rated, but are only provided on the ME2000-15B, ME2000-20B, ME2012-15B, and ME2012-20B models. They allow the inverter AC loads to be connected directly to the inverter’s output without requiring an inverter sub-panel. These circuit breakers pop out when they open. Press in to reset. They can also be manually pulled out to disconnect the inverter’s loads. CAUTION: Inverter models without the output circuit breakers (CB1 and CB2) must have branch-rated circuit breakers installed in the inverter’s output wiring. CAUTION: The inverter’s internal AC transfer relay is rated for 30 amps per leg. The pass-thru current must be no greater than 30 amps per leg or damage to the relays may occur. Model/Serial Number Label 14 AC Access Cover 15 13 Exhaust Air Vents (back side) Output Circuit Breakers (only available on -15B, -20B output breaker models) 17 16 AC Input Circuit Breaker Figure 1-3, Left Side Features (ME2012, ME2512, ME3112) Page 4 © 2012 Magnum Energy, Inc Introduction AC Access Cover 16 17 15 AC Input Circuit Breaker AC Output Circuit Breakers (on -15B, -20B output breaker models only) Note: ME Series inverter shown above is a -15B or -20B model. Models without AC output breakers (CB1 & CB2) use carriage bolts to fill the breaker openings. Figure 1-4, Left Side Features (ME2000 Series) 1.2 How an Inverter/Charger Works An inverter takes direct current (DC) from your batteries and turns it into alternating current (AC). It also takes alternating current (when connected to an onboard generator or to utility power) and transforms it into direct current to charge your batteries. These two modes of operation associated with this inverter/charger are referred to in this document as: • Inverter Mode: When the inverter is properly connected to batteries and turned on, the direct current (DC) from the batteries is transformed into a modified sine wave alternating current (AC). This AC is similar to the voltage provided by a utility for your home, and is used to power the electrical appliances (i.e., AC loads) connected to the inverter’s output. • Standby Mode: When an external source of AC power (e.g., utility power or onboard generator) is connected and qualified on the inverter’s AC input, it operates in Standby mode. In Standby mode, the unit operates as a battery charger to convert the incoming AC power into DC power to recharge the batteries; and at the same time, automatically closes an internal AC transfer relay to pass the incoming AC power directly to the inverter’s output to continue powering the connected electrical appliances. © 2012 Magnum Energy, Inc. Page 5 Introduction 1.3 What Appliances will run from a Modified Sine Wave Inverter Today’s inverters come in two basic output waveforms: modified sine wave (a modified square wave—see Figure 1-5) and pure sine wave. Modified sine wave inverters approximate a pure sine waveform and will run most appliances and electronics without any problems. These inverters are less expensive, and therefore, offer a viable alternative to more expensive pure sine inverters. The output of the ME Series is a modified sine wave which will run most electronic and household items, including but not limited to: TV, VCR, satellite dish receiver, computers, and printers. Some devices such as rechargeable power supplies for phones, drills, and other like items may not run, and could even be at risk for damage from modified sine wave inverters. 1.3.1 Output Waveform The inverter’s output waveform is the shape of the wave that alternating current makes as its voltage rises and falls with time (see Figure 1-5 below). The three basic output waveforms are: • Modified Sine Wave – Also referred to as a “quasi sine wave” or a “modified square wave”. This output looks like a one-step staircase and the waveform changes its width to continually provide the correct RMS output voltage regardless of the battery voltage. Most loads that run from a sine wave will also run from a modified sine wave. However, things such as clocks and furnace controllers may have trouble. • Sine Wave – An AC waveform that looks like rolling waves on water. It rises and falls smoothly with time. The grid puts out a sine waveform. Any plug-in AC equipment will operate from a sine wave output inverter. Square Wave – The simplest AC waveform. Some types of equipment behave strangely when powered from a square wave inverter. • VOLTAGE 200 160 Square Wave 120 80 40 0 40 80 Sine Wave Modified Sine Wave 120 160 200 TIME Figure 1-5, AC Waveforms Page 6 © 2012 Magnum Energy, Inc Introduction 1.4 Appliances and Run Time The ME Series inverter/charger can power a wide range of household appliances including small motors, hair dryers, clocks, and other electrical devices. As with any appliance using batteries for power, there is a certain length of time that it can run—this is called “run time.” Actual run time depends on several variables, including: the size and type of appliance, the type of batteries installed in your application, as well as the battery’s capacity and age. Other factors such as the battery’s state of charge (SOC) and temperature can also affect the length of time your appliances can run. Appliances such as TVs, VCRs, stereos, computers, and lights can all be successfully powered by your inverter. Depending on your inverter capacity, electrical appliances that use larger loads such as coffee pots and hair dryers can be used for short durations. However, loads that are used for longer periods (stoves, water heaters, etc.) can quickly drain your batteries and are not recommended for inverter applications. All electrical appliances are rated by the amount of power they consume (See Table 1-1). The rating is printed on the product’s nameplate label, usually located on its chassis near the AC power cord. Even though it is difficult to calculate exactly how long an inverter will run a particular appliance, the best advice is trial and error. Your ME Series inverter has a built-in safeguard that automatically protects your batteries from over-discharge. Info: For optimum performance, a minimum battery bank of 200 AH is recommended for moderate loads (<1000W) and greater than 400 AH for heavy loads (≥1000W). Table 1-1, Typical Appliance Power Consumption Device Load Device Load Blender 400W Coffee Maker 1200W Computer 300W Color TV 150W Drill 500W Hair Dryer 1000W Hot Plate 1800W Iron 1000W Light (Flo) 10W Light (Inc) 100W Microwave 1000W Refrigerator 500W © 2012 Magnum Energy, Inc. Page 7 Installation 2.0 Installation WARNING: Installations should be performed by qualified personnel, such as a licensed or certified electrician. It is the installer’s responsibility to determine which safety codes apply and to ensure that all applicable installation requirements are followed. Applicable installation codes vary depending on the specific location and application of the installation. CAUTION: Review the “Important Product Safety Information” on pages ii-v before any installation. CAUTION: The inverter is heavy. Use proper lifting techniques during installation to prevent personal injury. The simplified system diagram shown in Figure 2-1 should be reviewed to assist you in planning and designing your installation. This drawing is not intended to override or restrict any national or local electrical codes. This drawing should not be the determining factor as to whether the installation is compliant, that is the responsibility of the electrician and the onsite inspector. 2.1 Pre-Installation Before installing the inverter, read the entire installation section to determine how you are going to install your ME inverter/charger. The more thorough you plan in the beginning, the better your inverter needs will be met. 2.1.1 Unpacking and Inspection Carefully remove the ME Series inverter/charger from its shipping container and inspect all contents. Verify the following items are included: • • • • • • • The ME inverter/charger Red and black DC terminal covers with Phillips screws AC access cover with two Phillips screws Two 5/16” Kep or Flange nuts (installed on the DC terminals) Battery Temperature Sensor Warning label ME Series Owner’s Manual If items appear to be missing or damaged, contact your authorized Magnum Energy dealer or Magnum Energy. If at all possible, keep your shipping box. It will help protect your inverter from damage if it ever needs to be returned for service. Save your proof-of-purchase as a record of your ownership; it will also be needed if the unit should require in-warranty service. Record the unit’s model and serial number in the front of this manual in case you need to provide this information in the future. It is much easier to record this information now, instead of trying to gather it after the unit has been installed. 2.1.2 Required Tools and Materials Hardware/Materials • Strain-reliefs, and appropriate fittings • 1/4” mounting bolts and lock washers • Electrical tape • Wire ties Tools • Miscellaneous screwdrivers • Pliers • Wire strippers • Drill and drill bits • Pencil or marker • Multimeter • Level • 1/2” wrench Page 8 © 2012 Magnum Energy, Inc Installation Shore Power 120/240 VAC Output Generator Power 120/240 VAC Output ME-AGS-N Auto Gen Start Controller (Magnum Accessory) tor or Genera Flux Capacit ME-RC50 AC Transfer Switch ME-ARC50 PWR FAULT CHG SELECT INV ON/OFF CHARGER ON/ OFF INVERTE R SHORE AGS METER SETUP TECH Remote Controls (Magnum Accessories) Main Panel OFF OFF OFF OFF ON ON ON OFF ON OFF OFF ON ON OFF OFF ON ON ON OFF ON ON OFF ON ON OFF ON ON ON OFF OFF ON OFF ON ON ON OFF OFF ON ON OFF 30A OFF ME Series Inverter/ Charger OFF OFF 120/240 VAC power to inverter OFF 30A ON OFF Sub-Panel 120 VAC Inverter power (or 120/240 VAC pass-thru power) to Sub-panel DC Overcurrent protection (Breaker or Fuse/Switch) DC Shunt ME-BMK Battery Monitor with shunt (Magnum Accessory) 120 VAC 240 VAC 120 VAC BTS Battery Bank ME-SBC Smart Battery Combiner (Magnum Accessory) Figure 2-1, Simplified Installation Diagram for Permanent Installations © 2012 Magnum Energy, Inc. Page 9 Installation 2.1.3 Locating the Inverter Only install the inverter in a location that meets the following requirements: Clean and Dry – The inverter should not be installed in an area that allows dust, fumes, insects, or rodents to enter or block the inverter’s ventilation openings. This area also must be free from any risk of condensation, water, or any other liquid that can enter or fall on the inverter. The inverter uses stainless steel fasteners, plated copper busbars, and a power-coated aluminum base. The internal circuit boards are conformal coated. All of this is done to help fight the harmful effects of corrosive environments. However, the inverter’s life is uncertain if used in the above types of environments, and inverter failure under these conditions is not covered under warranty. Info: If the inverter is installed in an area where moisture may occur, we recommend putting silicone dielectric grease compound into the electrical ports (Items 3-6 as shown in Figure 1-1). Before installing the cables, or if leaving any ports open, squirt a liberal amount into each port. Silicone dielectric compound makes an effective moisture and corrosive barrier to help protect and prevent corrosion to the RJ11 connections. Cool – The inverter should be protected from direct sun exposure or equipment that produces extreme heat. The ambient temperature around the inverter must not exceed 77°F (25°C) to meet power specifications. Ventilation – In order for the inverter to provide full output power and avoid over-temperature fault conditions; do not cover or block the inverter’s ventilation openings, or install this inverter in an area with limited airflow. The inverter uses two fans to provide forced-air cooling, these fans pull in air through the intake vents (see Figure 1-2, Item 9) and blow out air through the exhaust vents (see Figure 1-3, Item 13). Allow at the minimum an airspace clearance of 6” (15.2 cm) at the intake and exhaust vents, and 3” (7.6 cm) everywhere else to provide adequate ventilation. If installed in an enclosure, a fresh-air intake opening must be provided directly to the front side (intake vents) of the inverter, and an exhaust opening on the back side (exhaust vents) of the inverter. This allows cool air from the outside to flow into the inverter, and heated air to exit the inverter and the enclosure. When mounted in an enclosed compartment, airflow must be ≥ 100 cfm in order to maintain no more than a 68°F (20°C) rise in compartment temperature. CAUTION: Do not mount this inverter in a zero clearance compartment, nor cover or obstruct the ventilation openings—overheating may result. Safe – Keep any flammable/combustible material (e.g., paper, cloth, plastic, etc.) that may be ignited by heat, sparks, or flames at a minimum distance of 2 feet (61 cm) away from the inverter. WARNING: The ME Series inverter/charger is not ignition-protected. Do not install this inverter in any area that contains extremely flammable liquids like gasoline or propane. Close to the battery bank – The inverter should be located as close to the batteries as possible. Long DC wires tend to loose efficiency and reduce the overall performance of an inverter. However, the unit should NOT be installed in the same compartment as the batteries, or mounted where it will be exposed to gases produced by the batteries. These gases are corrosive and will damage the inverter; also, if these gases are not ventilated and allowed to collect, they could ignite and cause an explosion. Accessible – Do not block access to the inverter’s remote control and accessory ports, as well as the inverter’s controls and status indicator. Also allow enough room to access the AC and DC wiring terminals and connections, as they will need to be checked and tightened periodically. See Figure 2-3 for the ME Series’ inverter/charger dimensions. Away from sensitive electronic equipment – High-powered inverters can generate levels of RFI (Radio Frequency Interference). Locate any electronic equipment susceptible to radio frequency and electromagnetic interference as far away from the inverter as possible. Page 10 © 2012 Magnum Energy, Inc Installation 2.2 Mounting the Inverter The inverter base can reach a temperature up to 90°C (194°F) and should be mounted on a noncombustible surface*. This surface and the mounting hardware must also be capable of supporting at least twice the weight of the inverter. To meet regulatory requirements, the ME Series must be mounted in one of the following positions, as shown in Figure 2-2: • • • above or under a horizontal surface (shelf or table) or, on a vertical surface (wall) with the DC terminals to the right or, on a vertical surface (wall) with DC terminals toward the bottom, MP-HOOD (inverter hood) installed on the top, and either the ME-CB (Conduit Box) or MMP Series (single inverter) enclosure installed on the inverter’s bottom. Info: The ME-CB, MMP and MP Series enclosures prevent material from falling out the bottom in the event of an internal fire, and also allow sufficient ventilation to prevent the inverter from overheating under normal operating conditions. The MP-HOOD inverter hood helps prevent items from falling inside causing damage to the inverter. Info: Magnum provides a backplate for mounting the inverter. These backplates also provide the ability to mount either the MMP Series enclosure (PN: BP-MMP) or the MP Series Enclosure (PN: BP-S single plate, or BP-D dual plate). After determining the mounting position, refer to the physical dimensions as shown in Figure 2-3, or use the base of the inverter as a template to mark your mounting screw locations. After marking the mounting screw locations, mount the unit with appropriate mounting hardware. * Noncombustible surface – A surface made of material that will not ignite, burn, support combustion, or release flammable vapors when subjected to fire or heat as per the ASTM E136 standard. For the most part, these are materials that are largely comprised of inorganic matter such as stone, steel, iron, brick, tile, concrete, slate, and glass. Avoid common building materials such as gypsum board, painted surfaces, wall coverings, and all types of wood. SHELF OR TABLE MOUNTED (UP SIDE DOWN) 30 30 SHELF OR TABLE MOUNTED (RIGHT SIDE UP) WALL MOUNTED (DC TERMINALS ON THE BOTTOM*) *WHEN THE INVERTER IS MOUNTED IN THIS POSITION, THE MP-HOOD (INVERTER HOOD ON TOP), AND THE ME-CB (CONDUIT BOX ON BOTTOM) OR MP/MMP SERIES ENCLOSURES MUST BE USED (DC WALL MOUNTED TERMINALS TO THE RIGHT) Figure 2-2, Approved Mounting Positions © 2012 Magnum Energy, Inc. Page 11 Installation 8" (20.3 cm) 6 ƙ" (16.8 cm) 30 30 30 ME2012/ME2512/ME3112 models (left side shown) ME2000 model (left side shown) Note: ME2000 models have the same dimensions as those shown below. 13 ¾" (34.9 cm) Right side 4 ƚ" (12.4 cm) 4 ƚ" 2" (12.4 cm) (5.1 cm) 12" (30.5 cm) Top side Back side Left side Front side 12 ƙ" (32.1 cm) Keyhole slots (x4) and mounting holes (x4) accept up to 9/32" (7 mm) screw/bolt Figure 2-3, ME Series Dimensions and Side Reference Page 12 © 2012 Magnum Energy, Inc Installation 2.3 Wiring the Inverter - General Requirements This section describes the requirements and recommendations for wiring the ME Series inverter/ charger. Before wiring the inverter/charger, read all instructions. All wiring should meet all local codes and industry standards, and be performed by qualified personnel such as a licensed electrician. The NEC (National Electric Code, ANSI/NFPA 70) for the United States and the CEC (Canadian Electrical Code) for Canada provide safe wiring standards. The NEC/CEC list requirements for wire sizes, overcurrent protection, and installation methods/standards. Inverter/charger systems involve power from multiple sources (e.g., inverter, generator, utility power, batteries, etc.) which makes the wiring more hazardous and challenging. The input and output AC and DC circuits are isolated from the inverter chassis. The inverter system grounding is the responsibility of the installer in accordance with the NEC/CEC and local codes. WARNING: Ensure the sources of DC power (i.e., batteries) and AC power (utility power or AC generator) are de-energized (i.e., breakers opened, fuses removed) before proceeding—to prevent accidental shock. 2.3.1 Protecting Wire – Conduit Box The AC and DC wires to and from the inverter must be protected as required by code. This can be done by using jacketed wires or by feeding the wires through conduit. Magnum offers a DC conduit box (ME-CB), a single inverter enclosure (MMP Series), and a multiple inverter enclosure (MP Series) that include the necessary AC and DC inverter breakers that allow both the AC and DC conduit to be connected to the inverter. Info: The strain reliefs can be removed and replaced with 3/4” grommets if you are using either the ME-CB conduit box, MMP or MP enclosure, and the AC wires are individual conductors (i.e., not jacketed). 2.3.2 • • • • • • 2.3.3 Wiring Requirements All conductors that are at risk for physical damage must be protected by tape, or placed in a raceway. Always check for existing electrical, plumbing, or other areas of potential damage prior to making cuts in structural surfaces or walls. Do not mix AC and DC wiring in the same panel unless specifically approved/designed for both AC and DC wiring. Where DC wiring must cross AC or vice-versa, try to make the wires 90° to one another at the crossing point. Both AC and DC overcurrent protection must be provided as part of the installation. The inverter requires a reliable negative and ground return path directly to the battery. Use only copper wires with a minimum temperature rating of 75°C. Wire Routing Before connecting any wires, determine all wire routes to and from the inverter. Conductors passing through walls, bulkheads, or other structural members must be protected to minimize insulation damage, such as chafing. During installation, always avoid placing conductors near sources of chafing caused by vibration or constant rubbing. Typical routing scenarios include: • • • • • • • 2.3.4 • AC input wiring from utility power source to the inverter AC input wiring from an onboard generator (optional) to the inverter DC input wiring from the batteries to the inverter AC output wiring from the inverter to the coach’s AC main panel or to dedicated circuits Battery Temperature Sensor cable from the inverter to the batteries Remote control cable (optional) to the inverter Ground wiring to and from the inverter Torque Requirements Torque all AC wiring connections to 16 in lbf (1.8 N-m). Torque DC cable connections from 10 to 12 ft lbf (13.6 to 16.3 N-m). © 2012 Magnum Energy, Inc. Page 13 Installation 2.4 DC Wiring This section describes the inverter’s required DC wire sizes, the recommended disconnect/ overcurrent protection, and how to make the DC connections to the inverter and the battery bank. Refer to Figure 2-4 when connecting the DC wires. WARNING: Even though DC voltage is “low voltage”, significant hazards may be present, particularly from short circuits of the battery system. CAUTION: The inverter is NOT reverse polarity protected, which means that if the negative and positive battery voltage is connected backwards to the inverter, the inverter will likely be damaged. You should verify the correct voltage polarity using a voltmeter BEFORE connecting the DC wires. CAUTION: Before wiring the DC cables, review the safety information at the beginning of this manual and the instructions below to ensure a safe and long-lived system. Info: DO NOT connect the battery cables to the inverter until all wiring is complete. • • • • • • • • • The DC positive and negative cables connected to the inverter from the battery bank should be tied together with wire ties or electrical tape approximately every 6 inches (153mm). This helps improve the surge capability and reduces the effects of inductance, which improves the inverter waveform and reduces the wear of the inverter’s filter capacitors. Crimped and sealed copper ring terminal lugs with a 5/16” hole should be used to connect the DC wires to the inverter’s DC terminals. The battery bank voltage MUST match the DC voltage required by the inverter (i.e., 12-volt battery bank for a 12-volt inverter), or the inverter may be damaged. To ensure the maximum performance from the inverter, all connections from the battery bank to the inverter should be minimized. The exceptions are the DC overcurrent disconnect in the positive line, and a shunt in the negative line. Any other additional connection will contribute to additional voltage drops and these extra connection points may loosen during use. All wiring to the battery terminals should be checked periodically (once a month) for proper tightness. The torque requirement for the DC terminals is between 10 to 12 ft lbf (13.6 to 16.3 N-m). If you don’t have a torque wrench, ensure all DC terminals are tight and cannot move. Be aware that overtightening or misthreading the nuts on the DC terminals can cause the bolts to strip and snap/break off. Make sure cables have a smooth bend radius and do not become kinked. Long cable runs should follow existing wire runs if possible. A brief spark or arc may occur when connecting the battery cables to the inverter DC terminals; this is normal and due to the inverter’s internal capacitors being charged. Color code the DC cables/wires with colored tape or heat shrink tubing: RED for positive (+), WHITE for negative (–), and GREEN (or bare copper) for DC ground to avoid polarity problems. Page 14 © 2012 Magnum Energy, Inc Installation ME Series Inverter/Charger front view BTS BTS Inverter’s DC Negative Connection Inverter’s DC Positive Connection Inverter’s Equipment Ground Wire Battery Temp Sensor Cable MMP enclosure – for single inverter installations (includes DC disconnect breaker, DC shunt for battery monitor, and inverter DC busbars). Battery Bank’s Equipment Ground Wire Battery Bank’s Negative Cable Battery Bank’s Positive Cable DC System Grounding point [Electrode Conductor (i.e., ground busbar)] 12-volt Battery Bank Figure 2-4, DC and Battery Temperature Sensor Wiring © 2012 Magnum Energy, Inc. Page 15 Installation 2.4.1 DC Wire Sizing It is important to use the correct DC wire to achieve maximum efficiency from the system and reduce fire hazards associated with overheating. Always keep your wire runs as short as practical to help prevent low voltage shutdowns and keep the DC breaker from nuisance tripping (or open fuses) because of increased current draw. See Table 2-1 to select the required minimum DC wire size (and corresponding overcurrent device) based on your inverter model. The cable sizes listed in Table 2-1 for your inverter model are required to reduce stress on the inverter, minimize voltage drops, increase system efficiency, and ensure the inverter’s ability to surge heavy loads. If the distance from the inverter to the battery bank is greater than 5 feet (1.5m), the DC wire size will need to be increased. Longer distances cause an increase in resistance, which affects the performance of the inverter. Continue to use the overcurrent device previously determined from Table 2-1, and then refer to Table 2-2 to determine the minimum DC wire size needed for various distances based on your inverter model. 2.4.2 DC Overcurrent Protection DC overcurrent protection is not included in the inverter and must be provided as part of the installation. This requirement is needed in order to comply with electrical code regulations and for safety reasons. The DC overcurrent protection device must be installed in the positive DC cable line, it can be a fuse or a circuit breaker, and it must be DC rated. It must be correctly sized according to the size of DC cables being used, which means it is required to open before the cable reaches its maximum current carrying capability, thereby preventing a fire. The NEC requires both overcurrent protection and a disconnect switch. If a circuit breaker is used as the overcurrent protection device, it can also be used as the required DC disconnect. If a fuse is used as an overcurrent device, a Class-T type or equivalent is recommended. This fuse type is rated for DC operation, can handle the high short-circuit currents, and has a time delay that allows for momentary current surges from the inverter without opening the fuse. However, because the fuse can be energized from both directions, if it is accessible to unqualified persons the NEC requires that it be installed in such a manner that the power must be disconnected on both ends of the fuse before servicing. Use Table 2-1 to select the DC overcurrent device needed based on the recommended minimum wire size for your particular inverter model (may not meet all local code or NEC requirements). Table 2-1, Recommended DC Wire/Overcurrent Device for Rated Use In Free Air Minimum DC Wire Size (rating)2 Maximum DC Fuse Size3 DC Grounding Electrode Wire Size4 267 amps #2/0 AWG (67.4 mm2) 300 amps 300 amps with time delay #6 AWG (13.3 mm2) ME2512 333 amps #4/0 AWG (107.16 mm2) 400 amps 400 amps with time delay #6 AWG (13.3 mm2) ME3112 413 amps #4/0 AWG (107.16 mm2) 400 amps 400 amps with time delay5 #6 AWG (13.3 mm2) Inverter Model Maximum Continuous Current1 ME2000/ ME2012 Note1 – Maximum continuous current is based on the inverter’s continuous power rating at the lowest input voltage with an inverter inefficiency factored in. Note2 – Copper wire rated with 90°C (194°F) insulation at an ambient temperature of 30°C (86°F), with a multiple cable fill factor (0.8) de-rating (if needed). Note3 – The next larger standard size overcurrent device may be used if the de-rated cable ampacity falls between the standard overcurrent devices found in the NEC. Note4 – Per the NEC, the DC grounding electrode conductor can be a #6 AWG (33.6 mm2) conductor if that is the only connection to the grounding electrode and that grounding electrode is a rod, pipe, or plate electrode. Note5 – May not allow continuous operation at full rated power as defined by the NEC. Page 16 © 2012 Magnum Energy, Inc Installation Table 2-2, DC Wire Size For Increased Distance (in free air) Minimum Recommended DC Wire Size (one way)* Inverter Model 5 feet or less ME2000 #2/0 AWG (67.4 mm ) #4/0 AWG (107.16 mm ) #4/0 AWG (107.16 mm2) x2 ME2012 #2/0 AWG (67.4 mm2) #4/0 AWG (107.16 mm2) #4/0 AWG (107.16 mm2) x2 ME2512 #4/0 AWG (107.16 mm2) #4/0 AWG (107.16 mm2) x2 not recommended ME3112 #4/0 AWG (107.16 mm2) #4/0 AWG (107.16 mm2) x2 not recommended 5 to 10 feet 2 10 to 15 feet 2 * Copper wire rated with 90°C (194°F) insulation at an ambient temperature of 30°C (86°F) 2.4.3 DC Cable Connections Do not put anything between the DC cable ring lug and the battery terminal post or the flat metal part of the inverter’s DC terminal. When connecting the DC cable to the battery or inverter DC terminals, the cable should be placed directly against the inverter or battery terminals. Incorrectly installed hardware causes a high resistance connection, which could lead to poor inverter/charger performance and may melt the cable and terminal connections. Follow the examples in Figures 2-5 and 2-6 to connect the DC cables and stack the hardware correctly. Tighten the terminal connections from 10 to 12 ft lbf (13.6 to 16.3 N-m). CAUTION: The DC terminal and Kep nuts are made of stainless steel, which has a high likelihood of seizure. To help prevent the bolt and nut from seizing—causing the bolts to strip or snap/break-off—the use of anti-seize lubricant is highly recommended. Info: If antioxidant grease or spray is used, apply it after all the connections have been made and are properly tightened. Info: A 1/2-inch wrench or socket is used to tighten the 5/16 SAE Kep nuts. nut split washer flat washer CAUTION : Ensure nothing is placed between the DC terminal and the ring lug. Battery Temperature Sensor battery cable (with ring lug) CAUTION : Ensure nothing is placed between the cable ring lug and the battery post. battery post Figure 2-5, Battery Hardware Installation © 2012 Magnum Energy, Inc. Inverter DC terminal (5/16 -18" bolt, 5/8" usable length) 5/16-18" Flange or Kep nut battery cable (with ring lug) Figure 2-6, Inverter DC Hardware Installation Page 17 Installation 2.4.4 Wiring the DC Overcurrent Protection Device A fuse/disconnect or circuit breaker must be provided in the DC positive line between the battery and the inverter to protect the DC wiring system. Mount the fuse block (or circuit breaker assembly) as near as practical to the batteries. For maximum protection, install it within 18 inches (45 cm) of the battery. 1. Open the fuse disconnect (or open the circuit breaker) and connect a short cable (same rating as the battery cables) to one end of the fuse block. 2. Connect the short cable to the positive battery terminal. 3. Connect the positive cable (RED) from the inverter to the fuse/disconnect (or circuit breaker) assembly. DO NOT connect the positive cable to the inverter at this time. 4. Securely tighten the fuse/disconnect (or circuit breaker) connection lugs. Once the entire installation is complete and all connections are verified, close the fuse disconnect (or circuit breaker) to provide power to the inverter. 2.4.5 Wiring the Battery Bank WARNING: Lethal currents will be present if the positive and negative cables attached to the battery bank touch each other. During the installation and wiring process, ensure the cable ends are insulated or covered to prevent touching/shorting the cables. Info: DO NOT connect the DC wires from the battery bank to the inverter until: 1) all DC and AC wiring are completed, 2) the correct DC and AC overcurrent protection have been installed, and 3) the correct DC voltage and polarity have been verified. Info: For the ME Series inverter/charger to perform optimally, a minimum battery bank of 200 AH is recommended for moderate loads (<1000W) and greater than 400 AH for heavy loads (≥1000W). Depending upon the voltage of the batteries you use in the installation (6 or 12 VDC), the batteries must be wired in series, parallel, or series-parallel to provide the correct voltage (see Appendix B – Battery Information for guidance on wiring batteries together). The interconnecting DC wires must be sized and rated exactly the same as those that are used between the battery bank and the inverter. Place the batteries as close as practical to the inverter, preferably in an insulated and ventilated enclosure. Allow adequate space above the batteries to access the terminals and vent caps (as applicable). Also, allow at least 1” (2.5 cm) of space between the batteries to provide good air flow. DO NOT mount the batteries directly under the inverter. CAUTION: Install batteries in a well ventilated area. Batteries can produce explosive gases. For compartment/enclosure installations, always vent batteries to the outside. Info: To ensure the best performance from your inverter system, batteries should be of the same size, type, rating, and age. Do not use old or untested batteries. Page 18 © 2012 Magnum Energy, Inc Installation 2.4.6 Battery Temperature Sensor Installation and Wiring The Battery Temperature Sensor (see Figure 2-7) provides the inverter with precise battery temperature information to automatically adjust the ABSORB and FLOAT charge voltage set points. This allows the batteries to be correctly charged under extreme temperature changes. If the temperature sensor is NOT installed and the batteries are subjected to large temperature changes, battery life may be shortened. The BTS provided may be extended to a maximum length of 40 feet (12 m) using a RJ11 connector (female to female) and a standard phone cable with RJ11 connectors. However, your inverter to battery cable length shouldn’t exceed the recommended distance shown in Table 2-2. To install the BTS: 1. Attach the ring terminal end of the Battery Temperature Sensor to the negative battery terminal; see Figure 2-5 for proper connection to the battery terminal. 2. Route the sensor’s cable to the inverter following existing wire runs. 3. Connect the RJ11 connector end of the BTS cable to the yellow-labeled BTS Port on the inverter (see Figure 1-1, Item 6). FRONT VIEW ~2" (~5.1 cm) ~1" (~2.54 cm) ~¾” (~1.9 cm) 0.375" diameter Cable (~.95 cm) (~1.3 cm) ~½” SIDE VIEW Figure 2-7, Battery Temperature Sensor © 2012 Magnum Energy, Inc. Page 19 Installation 2.4.7 Wiring the Inverter to the Battery Bank CAUTION: The inverter is NOT reverse polarity protected. If this happens, the inverter will be damaged and will not be covered under warranty. Before connecting the DC wires from the batteries to the inverter, verify the correct battery voltage and polarity using a voltmeter. If the positive terminal of the battery is connected to the negative terminal of the inverter and vice versa, severe damage will result. If necessary, color code the cables (with colored tape); red for positive (+), and marked white for negative (–) to avoid polarity confusion. Info: The DC overcurrent device (e.g., circuit breaker or fuse) must be placed in the positive (red) DC cable line between the inverter’s positive DC terminal and the battery’s positive terminal (red); as close to the battery as possible. DC Ground Wire Route an appropriately sized DC grounding wire (green or bare wire) from the inverter’s DC Equipment Ground Terminal (see Figure 1-2, Item 7) to a dedicated system ground. Recommended tightening torque is 45 in lbf (5.1 N-m). Refer to Section 2.6 for grounding information and sizing the DC ground wires. DC Negative Wire Route an appropriately sized DC negative wire (marked white) from the negative terminal of the battery bank to the inverter’s Negative DC Terminal (see Figure 1-2, Item 11). Info: If installing a battery monitor such as Magnum’s ME-BMK, install a DC shunt inline with the negative battery cable. DC Positive Wire Mount the circuit breaker or fuse assembly as near as practical to the batteries and leave open (i.e., no power to inverter). WARNING: DO NOT close the DC circuit breaker or connect the fuse to connect battery power to the inverter at this time. This will occur in the Functional Test after the installation is complete. CAUTION: If connecting live battery cables to the inverter DC terminals, a brief spark or arc may occur; this is normal and due to the inverter’s internal capacitors being charged. Route and connect an appropriately sized DC positive wire (red) from the inverter’s Positive DC Terminal (see Figure 1-2, Item 10) to one end of the circuit breaker (or DC fuse block). Connect a short wire (same rating as the DC wires) to the other side of the DC circuit breaker (or one end of the fuse/disconnect assembly), and the other end of the short wire to the positive terminal of the battery bank (see Figure 2-1 for reference). This is essential to ensure even charging and discharging across the entire battery bank. Ensure the DC wire connections (on the batteries, inverter, and DC circuit breaker/fuse lugs) are flush on the surface of the DC terminals, and the hardware (lock washer and nut) used to hold these connections are stacked correctly (Figures 2-5 and 2-6). Verify all DC connections are torqued from 10 to 12 ft lbf (13.6 to 16.3 N-m). Once the DC connections are completely wired and tested, coat the terminals with an approved anti-oxidizing spray. Attach the red and black terminal covers over the inverter’s DC connectors, and then secure them in place with the supplied screws. If the batteries are in an enclosure, perform a final check of the connections to the battery terminals, and then close and secure the battery enclosure. Page 20 © 2012 Magnum Energy, Inc Installation 2.5 AC Wiring This section provides information on how to make the AC connections to the inverter using the correct AC wire size and the corresponding overcurrent protection. 2.5.1 Pre-AC Wiring Requirements CAUTION: Before installing any AC wiring, review the safety information and cautionary markings at the beginning of this manual and the directions below to ensure a safe and long-lived system: • Always use properly rated circuit-breakers. If using an electrical sub-panel, circuit breakers can only be moved from the main electrical panel to the sub-panel if the breakers are also listed to be installed in the sub-panel. • AC wiring must be no less than #12 AWG (3.3 mm2) gauge copper wire and be approved for the application (i.e., RV or marine wiring). • DO NOT connect the inverter’s output to an AC power source. This could cause severe damage to the inverter and is not covered under warranty. • The wire sizes recommended in this manual are based on the ampacities given in Table 310.17 (in free air) of the National Electrical Code. ANSI/NFPA 70, for 75ºC (167ºF) copper wire based on an ambient temperature of 30ºC (86ºF). WARNING: To reduce the risk of fire, do not connect this inverter to an AC load center (circuit breaker panel) having multi-wire branch circuits connected. 2.5.2 AC Wire Size and Overcurrent Protection The AC input and output wiring must be sized per the local electrical safety code requirements to ensure the wire’s ability to safely handle the inverter’s maximum load current. The AC wiring must be protected from short circuits and overloads by an overcurrent protection device and have a means to disconnect the AC circuits. AC overcurrent protection is not included in the inverter and must be provided as part of the inverter installation. The AC overcurrent protection device must be a circuit breaker or a fuse/disconnect and be properly sized and branch circuit rated for the wire it is protecting and the appliances being powered. Info: When wiring the AC input and output circuits, we highly recommend a full system Inverter Bypass Switch. This simple item provides a convenient way to isolate the inverter for battery maintenance, and it could save you hours of downtime—if you ever need to service your inverter—by enabling you to continue to power your AC loads without any re-wiring. Because we think it is an essential part of an inverter system, every Magnum panel (MMP/MP Series) is equipped with an Inverter Bypass Switch. When the inverter is in Standby mode, the full AC continuous pass-thru capacity of the ME Series inverter/charger is 30 amps for each AC leg1 (AC HOT 1 and AC HOT 2). For a 30-amp continuous pass-thru capability, each AC HOT input to the inverter requires a 30-amp continuous duty rated breaker², which corresponds to a minimum cable size of #12 AWG (in free air). However, the AC HOT 1 and AC HOT 2 may be combined to obtain a 60-amp pass-thru capability² (see Figure 2-10). When tying the AC HOT 1 and HOT 2 together for a 60-amp continuous pass-thru capability, the AC input to the inverter requires a 60-amp continuous duty rated breaker, which corresponds to a minimum cable size of #8 AWG in conduit. If you are using other circuit breakers/wire sizes, refer to the appropriate electrical codes for sizing requirements. CAUTION: The inverter’s internal AC transfer relay contacts are rated for 30 amps per leg, the pass-thru current must be no greater than 30 amps per leg or damage to this relay may occur. Note1 – On -15B and -20B models, the pass-thru current is limited by the inverter’s output breaker size. Note² – The -15B and -20B models have a single AC input and cannot be configured for a 60-amp pass-thru capability. © 2012 Magnum Energy, Inc. Page 21 Installation 2.5.3 Recommended GFCIs (Ground Fault Circuit Interrupters) Some electrical safety codes require the use of GFCI’s. In compliance with UL standards, Magnum Energy has tested the following GFCI outlets and find that they function properly when connected to the inverter’s AC output: • Shock SentryTM #XGF15V-SP • Leviton Smart Lock #8899-A • Hubbel #GF520EMBKA CAUTION: Ground Fault Circuit Interrupters (GFCIs) shall be installed in the recreational vehicle wiring system to protect all branch circuits. 2.5.4 AC Terminal Block Connections (ME2012, ME2512, and ME3112) The ME2012, ME2512, and ME3112 models have a six-pole AC terminal block and one AC ground terminal to connect the inverter’s AC input and output wiring. This terminal block (see Figure 2-8) allows a service/distribution panel (main panel) to be wired to the inverter’s input, and also allows a dedicated panel (sub-panel) between the inverter’s output wiring and the AC loads. To access and view the AC terminal block and ground terminal, remove the two Phillips screws holding the AC wiring access cover plate (see Item 15, Figure 1-3). Each connection on the AC terminal block is rated to accept one #14 to #6 AWG (2.1 to 13.3 mm2) CU stranded wire, or two #12 AWG (3.3 mm2) CU stranded wires. The connection uses a M3.5 slotted head screw, and the maximum tightening torque is 16 in lbf (1.8 N-m). Info: One of the AC wiring configurations [SI/SO (60A), Figure 2-10] uses a #6 AWG (13.3 mm2) CU wire to carry 60 amps, and splits to two wires to allow 30 amps for each leg (i.e., AC HOT1 and AC HOT2). IDEAL Industries Inc. (www.idealindustries. com) manufactures a crimp connector (PN: 412) and a separate insulator (PN: 417) that allow up to two #8 AWG (8.4 mm2) wires, with one #6 AWG (13 mm2) wire to be connected together. Info: To comply with ABYC requirements for marine installations, the AC terminal has a stainless steel wire protector to prevent wire damage from the set-screw. Info: The inverter’s NEUT IN and NEUT OUT terminals are electrically isolated from each other while inverting. This is related to the neutral-ground bonding requirement and helps to prevent ground-loops (see Section 2.6.3 for more information). The AC ground terminal can accept one #14 to #6 AWG (2.1 to 13 mm2) CU stranded wire. It uses a slotted head screw and has a recommended maximum tightening torque of 45 in lbf (5.1 N-m). For multiple ground wires, use a pressure or mechanical connector to attach the single wire from the AC ground terminal to the input and output ground connections. HOT 1 OUT HOT 2 IN HOT 2 OUT HOT 1 IN NEUT OUT NEUT IN AC GROUND (In & Out) Figure 2-8, AC Terminal Block Page 22 © 2012 Magnum Energy, Inc Installation 2.5.5 AC Conductor Wiring (ME2012, ME2512, and ME3112 models) The following steps are basic guidelines for installing and connecting the AC wiring to and from all ME Series inverters (except ME2000 Series model inverters—for instructions on wiring ME2000 Series model inverters, refer to Section 2.5.7). Before proceeding, refer to Table 2-3 to determine your AC wiring configurations. WARNING: Before making any AC connections, make sure the inverter is disconnected from the battery and there is no other source of live power connected to the inverter. Wiring the Inverter AC Input 1. Remove the two Phillips screws on the AC Access Cover (see Figure 1-3, Item 15) to access the internal AC Terminal Block (see Figure 2-8). 2. Route the wires (hot, neutral, and ground) from the AC electrical main panel through one of the strain relief clamps to the AC INPUT. Tighten the strain relief clamp securely on the wires. Always leave a little extra slack in the wiring. 3. Connect the hot wire (black) from the main panel’s dedicated breaker to the HOT 1 IN terminal. Tighten the HOT 1 IN terminal to 16 in lbf (1.8 N-m). Info: You must connect to the HOT 1 IN terminal if you want to use the battery charger. Info: Depending on the AC wiring configuration, you may need to connect a wire to the HOT 2 IN terminal, refer to your configuration drawing (Figure 2-9 to 2-13). 4. Connect the neutral (white) from the main panel’s neutral busbar to the NEUT IN terminal. Tighten the NEUT IN terminal to 16 in lbf (1.8 N-m). Wiring the Inverter AC Output 1. Route the wires (hot, neutral, and ground) from the inverter’s AC OUTPUT to the AC electrical sub-panel (or outlets, if using the output breaker versions) through the other strain relief clamp. Tighten the strain relief clamp securely on the wires. 2. Connect the hot (black) wire from the HOT 1 OUT terminal to the sub-panel main breaker (or to the hot connections on the outlets, if using the output breaker versions). Tighten the HOT 1 OUT terminal to 16 in lbf (1.8 N-m). Info: Depending on the AC wiring configuration, you may need to connect a wire to the HOT 2 OUT terminal, refer to your configuration drawing (Figure 2-9 to 2-13). 3. Connect the neutral (white) from the NEUT OUT terminal to the sub-panel’s neutral busbar (or to the neutral connection on the outlets, if using the output breaker versions). Tighten the NEUT OUT terminal to 16 in lbf (1.8 N-m). Wiring the Inverter AC Ground 1. Combine the ground (green) wire from the main panel’s ground busbar and the ground (green) wire from the sub-panel’s ground busbar (or the ground connection on the outlets, if using the output breaker versions). After these grounds are combined, connect them to the AC GROUND terminal. Tighten the AC GROUND terminal to 16 in lbf (1.8 N-m). AC Wiring Inspection 1. Verify all wire runs are secured. If installed in a mobile installation, use wire ties or other nonconductive fasteners to prevent chafing or damage from movement and vibration. 2. Verify strain reliefs or grommets are in place to prevent damage to the wiring where it passes through walls/bulkheads or other openings. 3. After verifying all AC connections are correct and all inverter AC terminal screws are torqued to 16 in lbf (1.8 N-m), replace the AC wiring access cover and the covers on the main electrical/ distribution panel. © 2012 Magnum Energy, Inc. Page 23 Installation 2.5.6 AC Wiring Configuration (ME2012, ME2512, and ME3112 models) The following table provides the different wiring configurations for installing and connecting the AC conductors into and out of the ME2012, ME2512, and ME3112 model inverters (see Figures 2-9 to 2-13 for installation diagrams showing these configurations). Refer to Table 2-4 (and Figures 2-14 & 2-15) for the ME2000 models. Table 2-3, AC Input/Output Wiring Configurations SI/SO (30A) Single In/ Single Out (30A) SI/SO (60A) Single In/ Single Out (60A) SI/DO Single In/ Dual Out DI/SO Dual In/ Single Out DI/DO Dual In/ Dual Out 120 VAC @ ≤30 amps @ ≤15 amps per leg (-15B models); or ≤20 amps per leg (-20B models). 120/240 VAC (or 2 separate legs of 120 VAC) @ ≤30 amps per leg 120/240 VAC (or 2 separate legs of 120 VAC) @ ≤30 amps per leg Do not want to Want dedicated install a separate charging and inverter sub-panel. dedicated passInverter pass-thru thru while the capability limited AC source is on. on each leg by Requires a separate inverter model used. sub-panel. May need to power 240 VAC loads when AC source is on (requires 120/240 VAC source). Requires a separate inverter sub-panel. AC Source1 Required 120 VAC @ ≤30 amps 120 VAC @ >30 amps (60 amps maximum). Reason to Use Have an 120 VAC source that is ≤30 amps. Requires a separate inverter sub-panel. Have an 120 VAC source that is >30 amps. Requires a separate inverter sub-panel. Appropriate Models ME2012 ME2512 ME3112 ME2012 ME2512 ME3112 ME2012-15B ME2012-20B ME2012 ME2512 ME3112 ME2012 ME2512 ME3112 Maximum Input Breaker Required Minimum Wire Size (AWG) 30A (single pole) 60A (single pole) 30A (dual pole) 30A (dual pole) #10 AWG (In & Out) #6 AWG (In & Out); Hot input and output must be split to two #10 AWG For full charging and pass-thru -15B=45A SP -20B=60A SP -15B In=#8 (split to #12 x2) -20B In=#6 (split to #10 x2) -15B Out=#12 x2 -20B Out=#10 x2 #10 AWG (In & Out) #10 AWG (In & Out) Maximum Inverter Pass-thru capacity 3600W (30A @ 120 VAC) 7200W (60A @ 120 VAC) -15B models: 15A/leg (30A max.); -20B models: 20A/leg (40A max.) 3600W (30A @ 120 VAC) 7200W (2 legs of 30A @ 120/240 VAC or 2 legs of 30A @ 120 VAC)2 Wiring Diagram Figure 2-9 Figure 2-10 Figure 2-11 Figure 2-12 Figure 2-13 Note1: AC source is from either the utility/grid power (i.e., shorepower) or an AC generator. Note2: If two legs of 30A @ 120 VAC are used, they must be from the same source (i.e., have a common neutral). Page 24 © 2012 Magnum Energy, Inc Installation AC Terminal Block (AC input and output wiring) ME Series Inverter AC NEUT IN (from Main Panel) AC HOT 1 IN (from Main Panel) AC HOT 1 OUT (to Sub-Panel) AC NEUT OUT (to Sub-Panel) AC GROUNDS (to/from both panels) SINGLE IN / SINGLE OUT (30A) wiring In mobile installations: neutral is typically not connected to ground in the main panel. ON ON OFF ON OFF ON ON OFF OFF ON ON OFF ON OFF ON ON OFF OFF OFF OFF ON ON OFF ON ON OFF ON ON OFF OFF 30 OFF OFF Maximum 30-amp breaker (single pole) required to inverter AC input 120 VAC Main Panel (Utility Power/Generator Input) 120 VAC Sub-Panel and Outlets (Inverter Loads) Figure 2-9, AC Wiring for Single In - Single Out (30A) Configurations © 2012 Magnum Energy, Inc. Page 25 Installation AC Terminal Block (AC input and output wiring) ME Series Inverter AC NEUT IN (from Main Panel) AC HOT 1 IN (from Main Panel) AC HOT 2 IN (from Main Panel) AC HOT 1 OUT (to Sub-Panel) AC HOT 2 OUT (to Sub-Panel) AC NEUT OUT (to Sub-Panel) AC GROUNDS (to/from both panels) SINGLE IN / SINGLE OUT (60A) wiring In mobile installations: neutral is typically not connected to ground in the main panel. ON ON OFF ON OFF ON ON OFF OFF ON ON OFF OFF OFF ON OFF ON ON OFF OFF OFF OFF ON ON OFF ON ON OFF ON ON OFF ON OFF OFF 60 ON OFF Maximum 60-amp breaker (single pole) required to inverter AC input 120 VAC Main Panel (Utility Power/Generator Input) 120 VAC 120 VAC 120 VAC Sub-Panel and Outlets (Inverter Loads) Figure 2-10, AC Wiring for Single In - Single Out (60A) Configurations Page 26 © 2012 Magnum Energy, Inc Installation AC Terminal Block (AC input and output wiring) Has optional 15-amp or 20amp branch-rated circuit breakers (on side of unit). ME2012-15B or ME2012-20B Inverter AC NEUT IN (from Main Panel) AC HOT 1 IN (from Main Panel) AC HOT 2 IN (from Main Panel) AC HOT 1 OUT AC HOT 2 OUT AC NEUT OUT (x2) AC GROUNDS (to/from both panels) SINGLE IN / DUAL OUT wiring In mobile installations: neutral is typically not connected to ground in the main panel. ON 120 VAC 120 VAC Direct from inverter (Inverter Loads) OFF ON OFF ON OFF OFF ON OFF OFF ON OFF OFF ON ON OFF ON OFF ON OFF ON 30 ON ON OFF ON OFF Maximum breaker size required to inverter AC input depends on model used. ME2012-15B: 45-amp breaker (single pole); ME2012-20B: 60-amp breaker (single pole). These breaker sizes allow full charging and full pass-thru capability for your inverter model. Main Panel (Utility Power/Generator Input) Figure 2-11, AC Wiring for Single In - Dual Out Configurations © 2012 Magnum Energy, Inc. Page 27 Installation AC Terminal Block (AC input and output wiring) ME Series Inverter AC NEUT IN (from Main Panel) AC HOT 1 IN (from Main Panel) AC HOT 2 IN (from Main Panel) AC HOT 2 OUT (to Sub-Panel) AC NEUT OUT (to Sub-Panel) AC GROUNDS (to/from both panels) DUAL IN / SINGLE OUT wiring In mobile installations: neutral is typically not connected to ground in the main panel. ON ON OFF OFF ON OFF OFF ON ON OFF ON OFF OFF ON OFF ON OFF ON ON OFF ON ON OFF ON OFF 30 ON ON OFF ON OFF 30 OFF OFF Maximum 30-amp breaker (double pole) required to inverter AC input 120 VAC Main Panel (Utility Power/Generator Input) 120 VAC Sub-Panel and Outlets (Inverter Loads) Figure 2-12, AC Wiring for Dual In - Single Out Configurations Page 28 © 2012 Magnum Energy, Inc Installation AC Terminal Block (AC input and output wiring) ME Series Inverter AC NEUT IN (from Main Panel) AC HOT 1 IN (from Main Panel) AC HOT 2 IN (from Main Panel) AC HOT 1 OUT (to Sub-Panel) AC HOT 2 OUT (to Sub-Panel) AC NEUT OUT (to Sub-Panel) AC GROUNDS (to/from both panels) DUAL IN / DUAL OUT wiring In mobile installations: neutral is typically not connected to ground in the main panel. ON ON OFF OFF OFF OFF OFF ON OFF ON OFF ON OFF ON ON OFF ON ON OFF ON OFF ON OFF ON ON ON OFF ON ON OFF OFF 30 OFF ON OFF 30 ON OFF Maximum 30-amp breaker (double pole) required to inverter AC input Main Panel (Utility Power/Generator Input) 240 VAC only in standby 120 VAC 120 VAC Sub-Panel and Outlets (Inverter Loads) Figure 2-13, AC Wiring for Dual In - Dual Out Configurations © 2012 Magnum Energy, Inc. Page 29 Installation 2.5.7 AC Conductor Wiring (ME2000 models) The ME2000 is a new model in the ME Series family. It offers a cost-effective alternative to the ME2012 while still providing the same features. This model has a slightly smaller height, but otherwise has the same footprint as the other ME Series inverters. The ME2000 uses wire leads to connect the AC wires and can be wired in a single in-single out configuration, as well as a single in-dual out configuration (-15B & -20B). The following steps are basic guidelines for installing and connecting the AC wiring into and out of the inverter. Refer to Table 2-4 to determine your AC wiring configurations before beginning. WARNING: Before making any AC connections, make sure the inverter is disconnected from the battery and all AC power is disconnected from the inverter. Wiring the Inverter AC Input 1. Remove the two Phillips screws on the AC Access Cover (see Figure 1-3, Item 15) to access the internal AC wiring. 2. Route the wires (hot, neutral, and ground) from the AC electrical main panel through one of the strain relief clamps to the AC INPUT. Tighten the strain relief clamp securely on the wires. Always leave a little extra slack in the wiring. 3. Connect the AC hot in wire (black) from the main panel’s dedicated breaker to the inverter’s (black) HOT IN wire using field wiring leads. 4. Connect the AC neutral in wire (white) from the main panel’s neutral busbar to the inverter’s (white) NEUTRAL IN wire using field wiring leads. Wiring the Inverter AC Output 1. Route the wires (hot, neutral, and ground) from the inverter’s AC OUTPUT to the AC electrical sub-panel (or outlets, if using the output breaker versions) through the other strain relief clamp. Tighten the strain relief clamp securely on the wires. 2. Connect the inverter’s HOT 1 OUT (blue) wire to the sub-panel main breaker (or, to the hot connections on the outlets if using the output breaker versions) using field wiring leads. Info: Depending on the AC wiring configuration, you may need to connect a wire to the inverter’s HOT 2 OUT (orange) wire (see Figure 2-15). 3. Connect the inverter’s NEUTRAL OUT (white w/black) wire to the sub-panel’s neutral busbar (or to the neutral connections on the outlets, if using the output breaker versions - see Figure 2-15) using field wiring leads. Wiring the Inverter AC Ground 1. Combine the ground (green) wire from the main panel’s ground busbar and the ground (green) wire from the sub-panel’s ground busbar (or the ground connection on the outlets, if using the output breaker versions). After these grounds are combined, use field wiring leads to connect them to the inverter’s AC GROUND (green) wire. AC Wiring Inspection 1. Verify all wire runs are secured. If installed in a mobile installation, use wire ties or other nonconductive fasteners to prevent chafing or damage from movement and vibration. 2. Verify strain reliefs or grommets are in place to prevent damage to the wiring or conduit where it passes through walls/bulkheads or other openings. 3. After verifying all AC connections are securely fastened, replace the AC wiring access cover and the covers to the main electrical/distribution panel. Page 30 © 2012 Magnum Energy, Inc Installation 2.5.8 AC Wiring Configuration (ME2000 models) The following table provides the different wiring configurations for installing and connecting the AC conductors into and out of ME2000 model inverters (see Figures 2-14 and 2-15 for installation diagrams showing these configurations). Table 2-4, AC Input/Output Wiring Configurations (ME2000 models) Models ME2000 ME2000-15B ME2000-20B AC Source1 Required 120 VAC @ <30 amps 120 VAC @ <30 amps @ <15 amps per leg (-15B models); or <20 amps per leg (-20B models). Reason to Use Have an 120 VAC source that is <30 amps. Requires a separate inverter sub-panel. Do not want to install a separate inverter sub-panel. Inverter pass-thru capability limited by model used. Wiring Configurations SI/SO (30A) Single In/Single Out (30A) SI/DO Single In/ Dual Out Maximum Input Breaker Required 30A (single pole) Minimum Wire Size #12 AWG (In & Out) -15B models: 30A (single pole); -20B models: 30A (single pole) #12 AWG (In) #12 AWG x2 (Out) Maximum Inverter Passthru capacity 3600W (30A @ 120 VAC) -15B models: 15A/leg (30A max.); -20B models: 20A/leg (30A max.) Wiring Diagram Figure 2-14 Figure 2-15 Note1: AC source is from either utility power or an onboard generator. © 2012 Magnum Energy, Inc. Page 31 Installation AC Wiring Compartment (AC input and output wiring) ME2000 Series Inverter BLACK AC HOT IN WHITE AC NEUT IN GREEN AC GROUND AC GROUND WHITE w/ BLACK AC NEUT OUT BLUE AC HOT 1 OUT SINGLE IN / SINGLE OUT (30A) wiring In mobile installations: neutral is typically not connected to ground in the main panel. ON ON OFF ON OFF ON ON OFF OFF ON ON OFF ON OFF ON ON OFF OFF OFF OFF ON ON OFF ON ON OFF ON ON OFF OFF 30 OFF OFF Maximum 30-amp breaker (single pole) required to inverter AC input Main Panel (Utility Power/Generator Input) 120 VAC 120 VAC Sub-Panel and Outlets (Inverter Loads) Figure 2-14, AC Wiring for ME2000 Models Page 32 © 2012 Magnum Energy, Inc Installation AC Wiring Compartment (AC input and output wiring) BLACK Has optional 15-amp or 20amp branch-rated circuit breakers (on side of unit). AC HOT IN WHITE ME2000-15B/-20B Inverters AC NEUT IN GREEN AC GROUND AC GROUND (x2) WHITE w/ BLACK AC NEUT OUT WHITE w/ BLACK AC NEUT OUT BLUE AC HOT 1 OUT ORANGE AC HOT 2 OUT SINGLE IN / DUAL OUT wiring In mobile installations: neutral is typically not connected to ground in the main panel. ON 120 VAC 120 VAC Direct from inverter (Inverter Loads) OFF OFF ON OFF ON OFF OFF ON OFF ON ON OFF ON ON OFF OFF ON ON 30 OFF ON OFF ON OFF ON OFF Maximum 30-amp breaker (single pole) required to inverter AC input. Main Panel (Utility Power/Generator Input) Figure 2-15, AC Wiring for ME2000-15B/-20B Models © 2012 Magnum Energy, Inc. Page 33 Installation 2.6 Grounding Inverters The inverter/charger should always be connected to a permanent, grounded wiring system. An inverter system that is properly grounded will limit the risk of electrical shock, reduce radio frequency noise from the inverter, and minimize excessive surge voltages induced by lightning. This is done by ensuring there is a well-defined, very low-resistance path from the electrical system to the grounding system. This low-resistance path helps stabilize the electrical system voltage with respect to ground and carries fault currents directly to ground if the electrical system malfunctions. The ME Series inverter/charger uses both AC and DC power; however, the AC electrical system is isolated from the DC electrical system by an internal transformer. Although this inverter/charger has two electrical systems, each must be properly grounded and connected to a common point. For proper grounding, each electrical system must connect all exposed metal parts of equipment and one of the current carrying conductors together at a common point. This common point of each electrical system is then connected to the common ground reference. This connection to the common ground reference should only be made at one point in each electrical system; otherwise, parallel paths will exist for the currents to flow. These parallel current paths would represent a safety hazard and are not allowed in installations wired per the NEC/CEC. 2.6.1 Equipment Grounding The inverter case and all other non-current carrying exposed metal surfaces in the entire electrical system that may be accidentally energized must be grounded. The equipment-grounding conductor must be sized to safely carry the maximum ground-fault current likely to be imposed on it from where a ground-fault may occur. In accordance with the NEC, use Table 2-5 to size the equipmentgrounding conductors. This table requires that the equipment-grounding conductor be sized according to the rating of the overcurrent device protecting the circuit. CAUTION: The connections and wiring for the equipment-grounding conductor must be continuous to allow fault currents to properly operate overcurrent devices. Where equipment is removed and this disconnects the bonding connection between the grounding electrode conductor and exposed conducting surfaces, a bonding jumper must be installed while the equipment is removed. AC Side – Where the AC output from the inverter is connected to an AC load center, there should be an equipment grounding conductor connected between the inverter case and the grounding point in the AC load center. The AC equipment grounding conductor is sized per Table 2-5, and is connected to the inverter’s AC equipment grounding terminal as shown in Figure 2-8 (or a grounding wire for the ME2000 models). DC Side – Since the currents on the DC side are higher than the AC side (10 times at 12 volts, 5 times at 24 volts), the equipment grounding needs are different. The DC equipment grounding conductor is sized per Table 2-5, and connected to the DC equipment grounding terminal on the inverter as shown in Figure 2-18. Table 2-5, Equipment Grounding Conductor Sizing Page 34 Rating of Overcurrent Device Minimum Size of Copper Ground Wire 15 amp #14 AWG (2.1 mm2) 20 amp #12 AWG (3.3 mm2) 30-60 amp #10 AWG (5.3 mm2) 100 amp #8 AWG (8.4 mm2) 200 amp #6 AWG (13.3 mm2) 300 amp #4 AWG (21.1 mm2) 400 amp #3 AWG (26.6 mm2) © 2012 Magnum Energy, Inc Installation 2.6.2 Grounding on Boats When installing the ME Series inverter/charger on a boat, there are several considerations that must be followed when grounding to ensure a safe installation, prevent galvanic corrosion, and adhere to American Boat and Yacht Council (ABYC) standards. Ensure a Safe Ground Connection When AC on the boat is being supplied by shorepower (also referred to as “utility power”), the onboard neutral should be connected to safety ground on the dock. Consequently, neutral and safety ground should not be connected anywhere on the boat when shorepower is present. When AC on the boat is being supplied by the ME Series inverter, the inverter’s output neutral is connected to safety ground through an internal relay using its neutral to ground connection (see Figure 2-16). The DC ground terminal on the ME Series must also be connected to the boat’s safety ground bus. This ensures that both the inverter’s AC and DC ground terminals are connected to the boat’s safety ground bus as a safety measure to provide protection against faults, and to provide a path for AC fault currents while the boat is connected to shorepower. Preventing the Risk of Corrosion The inverter’s AC and DC ground terminals must be connected to the boat’s safety ground to provide an important safety feature. However, this ground connection introduces the risk of galvanic corrosion and/or electrolysis of the boat’s underwater metallic hardware. Two possible solutions are typically used to maintain the correct onboard grounding requirements while greatly reducing (if not eliminating) the risk of galvanic corrosion. These solutions would be either using a galvanic isolator, or an onboard isolation transformer. Galvanic isolators allow high AC voltage faults to pass, but block low voltage corrosion/electrolysis currents from conducting. Marine isolation transformers enable the shorepower to be connected to one side of the transformer while the boat’s AC wiring system is connected to the other side. Since transformers do not allow DC currents to pass, the problem with galvanic corrosion is eliminated. ABYC Inverter/Charger Grounding Requirements1 • DC Grounding Connections: 1) The DC grounding conductor (equipment ground) shall be: a) connected from the metallic case or chassis of the inverter/charger to the engine negative terminal or its bus; b) and, an ampacity equal to that of the DC positive conductor (under certain conditions, this conductor may be one size smaller—refer the ABYC standard). 2) The inverter/charger’s negative battery terminal and DC grounded conductor (negative cable) shall not be connected to the inverter case or chassis at the inverter/charger itself. • AC Grounding Connections: 1) The AC grounding conductor (green) shall be connected to the inverter/charger in a manner so that the AC ground connection will not be disconnected in servicing. This conductor is in addition to and independent of the DC grounding conductor. 2) The neutral for AC power sources shall be grounded only at the following points: a) The shorepower neutral is grounded only through the shorepower cable and not grounded on board the boat. b) The inverter neutral shall be grounded at the inverter and the output neutral shall be disconnected from ground when the inverter is operating in charger/pass-through mode. c) On systems using an isolation transformer or a polarization transformer, the inverter neutral (and the transformer secondary neutral) may be grounded at the AC main grounding bus instead of at the inverter. Note1: See the ABYC standard for complete AC/DC grounding requirements. © 2012 Magnum Energy, Inc. Page 35 Installation 2.6.3 Neutral to Safety Ground Bonding The recommended standards for safely wiring mobile and marine installations require that the neutral and safety ground be connected at the AC source; whether it is an inverter, utility power, or a generator. This is to establish a specification that maximizes the possibility that a circuit breaker will activate if a hot-wire-to-ground fault occurs. These standards also require that the AC neutral be connected to safety ground (often called a “bond”) in one, and only one, place at any time. The single bond is established in order to make the electrical panel’s neutral line safe, by connecting it to ground. Without this bond, the neutral can have up to 60 VAC with respect to ground. On the other hand, if more than one bond is established, currents can circulate between neutral and ground and cause “ground-loop” currents. These ground-loops can trip GFCIs, cause an electric shock hazard, and may be the reason for other annoying side effects. In applications where you are using an inverter as one of your AC sources along with another AC source (e.g., utility power or generator) there is the potential of having multiple connections (bonds) between neutral and ground. Therefore, you must ensure that the inverter does not also connect the neutral-to-ground while the other AC source is actively powering the inverter loads. This can be prevented if your inverter is equipped with automatic neutral-to-ground switching. WARNING: In most electrical systems, the neutral-to-ground bond is located in the main utility power service entrance panel. Remove any bond downstream from the inverter to prevent multiple bonds. If there is an inverter sub-panel—separate from a main electrical panel—it should have a removable wire that allows the neutral bus to be unbonded from the ground busbar. All ME Series inverter/chargers have automatic neutral-to-ground switching to specifically work in multiple source applications. The ME Series inverters use an internal relay that automatically connects the AC neutral output terminal to the vehicle/boat’s ground while inverting (Inverter mode) to provide the neutral-to-ground bond; as shown in Figure 2-16. However, when an external AC source (e.g., utility power or a generator) is qualified, another neutral-to-ground connection is introduced in the system. When the ME Series is connected to this external AC source and goes into Standby mode, the internal relay automatically opens the neutral-to-ground connection, as shown in Figure 2-17. This design keeps two neutral-to-ground connections from occurring at the same time, thereby preventing an electrical shock hazard between the vehicle/boat’s neutral and the external AC source’s neutral. Inside ME Series Inverter /Charger (Inverter Mode) NEUT IN Neu-Gnd Relay (K1) Inside ME Series Inverter/Charger (Standby Mode) NEUT IN NEUT OUT NEUT OUT GROUND Figure 2-16, Neutral-to-Ground Connection (Inverter Mode) Page 36 Neu-Gnd Relay (K1) GROUND Figure 2-17, Neutral-to-Ground Connection (Standby Mode) © 2012 Magnum Energy, Inc Installation 2.6.4 Connecting a Large DC Ground Wire Marine installations require the DC ground wire to be the same size or one size smaller than the negative cable. Use the following steps to allow a larger ground wire to be connected. WARNING: Fire and Shock Hazard – disconnect all AC and DC sources before working in the AC wiring compartment. 1. Locate and remove the AC Access Cover plate (see Figure 1-3, Item 15) on the side of the ME Series inverter. 2. Locate the DC Equipment Ground Terminal (see Figure 1-2, Item 7). 3. Within the AC wiring area, locate the hex nut on the backside of the DC ground terminal. After locating the hex nut, use a 7/16” wrench/nut driver to remove the hex nut, bolt, lock washer and DC ground terminal, and then remove them from the chassis. 4. Reverse the removed bolt, and place it back in the chassis hole to attach a correctly sized ground cable with a ring terminal to the ME Series chassis, as shown in Figure 2-18. Note: Ring terminal must have a hole size ≥1/4”. 5. Place the washer and nut on the bolt, over the ground cable, and securely tighten the nut [from 4 to 5 ft lbf (5.4 to 6.8 N-m)]. Replace the AC Access Cover plate and secure. 2.7 DC ground terminal bolt/nut, reversed and tightened Figure 2-18, Connecting a Large DC Ground Wire Inverter Notification Requirements A warning label as shown in Figure 2-19 is provided to inform all personnel that an inverter is installed in your electrical system. Affix this label in a clearly visible location at the electrical panel that is being powered by the inverter. This is because it might be falsely assumed that the panel is no longer “hot” after the AC power has been shut off, when power may actually still be available due to the inverter automatically powering the panel. This electrical system is equipped with an Automatic Generator Starting (AGS) device and/or an inverter. Disconnect all AC and DC power to the AGS and/or inverter before performing any service to the electrical system. Failure to do so can result in shock causing serious injury or death. PN: 62-0002 Rev A Figure 2-19, Warning Label © 2012 Magnum Energy, Inc. Page 37 Installation 2.8 Final Inspection 1. Verify all cable runs are secured with wire ties or other non-conductive fasteners to prevent chafing, or damage from movement and vibration. 2. Verify strain reliefs or grommets are in place to prevent damage to the wiring where it passes through walls, bulkheads, or other openings. 3. Verify all AC connections are correct and torqued to a maximum of 16 in lbf (1.8 N-m). 4. Replace the covers on the main electrical/distribution panel. 5. Replace the chassis access cover. 6. Verify the inverter’s front panel switch is in the OFF position. Info: If required by code, have the installation inspected by an electrical inspector. 2.9 Functional Test After all electrical connections to the inverter, batteries, AC source, and sub-panel have been completed, follow these steps to test the installation and the inverter operation. CAUTION: Use a multimeter to verify the correct DC voltage for your particular inverter model (i.e., 12-volt battery bank for a 12-volt inverter), and to ensure the polarity of the battery voltage is correct (battery positive connected to inverter positive, and battery negative connected to inverter negative). 1. Apply battery power to the inverter by closing the DC circuit breaker or inserting a fuse. The inverter will remain OFF, but the green status indicator on the front of the inverter will quickly blink once to indicate that DC power has been connected and is ready to be turned on. 2. Prior to turning on the inverter, make sure all AC loads (e.g., appliances) are NOT connected to the inverter’s output or any AC outlets powered by the inverter. 3. Lightly press and release the inverter’s ON/OFF switch to turn the inverter ON. Verify the inverter’s status indicator is blinking—indicating the inverter is ON. 4. Connect a small light bulb no larger than 75 watts to the inverter output and verify it comes on and shines normally. DO NOT connect anything but a light bulb until all wiring and voltages are confirmed to be correct. Info: The inverter’s AC output voltage will not be correct until a load greater than 5 watts (5 watts is the default setting) is connected to the inverter; or, when the Search mode is turned OFF with a remote display (ME-RC50). 5. Check the AC output voltage of the inverter by connecting an AC voltmeter to the output terminals (see Figure 2-20) and verify the correct output voltages. Info: For the ME2000 models, remove the field wiring leads in order to get a good connection and reading with the AC voltmeter (see Figures 2-21 and 2-22). For the ME2000-15/-20 models you must check the HOT1 OUT and HOT2 OUT wires in Single In - Dual Out configurations. 6. Press and release the inverter’s ON/OFF switch to turn the inverter off. The inverter’s status indicator and the connected load should go off. 7. Apply AC power to the inverter’s AC input. After the AC input power is qualified (approx. 15 secs), the incoming AC power transfers through the inverter to the inverter’s AC output and powers the light bulb. Verify that the inverter’s status indicator and the light bulb come on. 8. Even though the light bulb is on, the inverter is currently disabled (off). Press and release the ON/OFF switch on the inverter to enable (turn-on) the inverter. 9. Disconnect the incoming AC power to the inverter. Verify the light bulb remains on and is now powered by the inverter. If the inverter passes all the previous steps, the inverter is ready for use. If the inverter fails any of the steps, refer to the Troubleshooting section. Page 38 © 2012 Magnum Energy, Inc Installation AC Terminal Block AC Output 120 Vac (± 5%) 30 30 Neutral to Ground < 0.5 Vac Figure 2-20, AC Voltage Checks AC Wiring Compartment BLACK WHITE GREEN Neutral to Ground < 0.5 Vac 3 0 WHITE W/BLACK AC Output 120 Vac (± 5%) BLUE Figure 2-21, AC Voltage Checks (ME2000 model) AC Wiring Compartment BLACK WHITE Neutral to Ground < 0.5 Vac GREEN AC Output 120 Vac (± 5%) .WHITE w./ BLACK 2 0 AC Output 120 Vac (± 5%) 2 0 3 0 .WHITE w./ BLACK BLUE ORANGE Figure 2-22, AC Voltage Checks (ME2000-15B/-20B models) © 2012 Magnum Energy, Inc. Page 39 Operation 3.0 Operation The ME Series inverter has two normal operating routines; Inverter mode, which powers your loads using the batteries, and Standby mode, which transfers the incoming AC power (e.g., utility power or a generator) to power your loads and also uses this incoming power to recharge the batteries. This inverter also includes an extensive protection circuitry to shut down the inverter under certain fault conditions. 3.1 Inverter Mode When the ME Series is first powered up, it defaults to the OFF mode. The momentary Power ON/ OFF Switch (see Figure 1-1, Item 1) must be lightly pressed to turn the inverter ON. Subsequently, pressing this switch alternately turns the inverter OFF and ON. OFF – When the inverter is OFF, no power is used from the batteries to power the AC loads, and the status LED will be OFF. If AC power from an external source (utility power or generator) is connected and qualified on the inverter’s AC input, this AC input power will pass through the inverter to power the AC loads. However, if this AC power is lost, the AC loads will no longer be powered because the inverter is OFF. When the inverter is turned ON, it operates either by “searching” or “inverting”, depending on the connected AC loads. Searching – When the inverter is first turned ON, the automatic Search feature is enabled. This feature is provided to conserve battery power when AC power is not required. In this mode, the inverter pulses the AC output looking for an AC load (e.g., electrical appliance). Whenever an AC load (greater than 5 watts) is turned on, the inverter recognizes the need for power and automatically starts inverting. When there is no load (or less than 5 watts) detected, the inverter automatically goes back into Search mode to minimize energy consumption from the battery bank. When the inverter is “searching”, the inverter’s green LED flashes (fast). Info: The factory default value for the Search feature is 5 watts, it can be turned off or adjusted from 5 to 50 watts using a remote display. Inverting – When a load greater than 5 watts is connected to the inverter output, the ME Series “inverts” the DC power from the battery and supplies 120 VAC power to your sub-panel. The inverter’s green LED flashes once every 2 seconds (medium flash) to indicate it is inverting. The amount of time the inverter can be inverting and providing power is directly related to the amount of AC loads that are connected, and the capacity of the battery bank. Refer to Figure 3-1 to see the flow of power from the DC input to the AC output while in the Inverter mode. CB2 (optional) AC Hot Transfer Relay AC HOT 2 IN AC HOT 1 IN AC HOT 2 OUT AC HOT 1 OUT 0 VAC AC NEUTRAL OUT 120 VAC CB1 (optional) CB3 (30A) AC NEUTRAL IN INV OUT 120 VAC AC GROUND Neutral-Ground Transfer Relay AC DC IN DC NEGATIVE DC DC POSITIVE FET Bridge Power Transformer Figure 3-1, Power Flow - Inverter Mode Page 40 © 2012 Magnum Energy, Inc Operation 3.2 Standby Mode Magnum Energy’s ME Series features an automatic transfer relay and an internal battery charger when operating in Standby mode. Standby mode begins whenever AC power (utility power or generator) is connected to the inverter’s AC input. Once the AC voltage and frequency of the incoming AC power is within the AC input limits, an automatic AC transfer relay is activated. This transfer relay passes the incoming AC power through the inverter to power the AC loads on the inverter’s output. This incoming power is also used to activate a powerful internal battery charger to keep the battery bank charged in case of a power failure. Refer to Figure 3-2 to see the flow of power from the AC input to the DC and AC output while in Standby mode. AC IN AC HOT 2 IN 240 VAC 120 VAC 120 VAC CB2 (optional) AC Hot Transfer Relay AC HOT 1 IN AC HOT 2 OUT AC HOT 1 OUT 240 VAC AC NEUTRAL OUT 120 VAC CB1 (optional) CB3 (30A) AC NEUTRAL IN AC OUT 120 VAC AC GROUND Neutral-Ground Transfer Relay AC DC OUT DC NEGATIVE DC DC POSITIVE FET Bridge Power Transformer Figure 3-2, Power Flow - Standby Mode 3.3 Battery Charging The ME Series is equipped with a PFC (Power Factor Corrected) and PI (Proportional-Integral) multistage battery charger. The PFC feature controls the amount of power used to charge the batteries to obtain a power factor as close as possible to 1 (or unity). This causes the battery charger to look like a resistor to the line (forces the charge current wave shape to mirror the voltage wave shape). The PI feature allows the charger voltage and current to change independently. These two features maximize the real power available from the AC power source (i.e., utility or generator), which translates into less power wasted and greater charging capabilities than most chargers today. When an AC source is connected to the AC input, the inverter begins monitoring for acceptable AC voltage. Once the AC voltage is accepted, the AC transfer relay closes and the charge mode begins. After the charge mode begins, the inverter’s battery voltage is monitored to determine the charging stage. If the battery voltage is low (≤12.8 VDC), the charger begins Bulk charging. If the battery voltage is high (>12.8 VDC), the charger will skip the Bulk and Absorb charge stages and go directly to Float charging. However, if the incoming AC power is lost but returns within 2 minutes the charge mode returns to the charge stage it was in prior to losing AC input—regardless of the battery voltage. The multi-stage charger in the ME Series can use up to five different charging stages to help monitor and keep the batteries healthy. The five stages include an automatic 4-stage charging process (see Figure 3-3): Bulk, Absorb, Float, and Full Charge; and a manual Equalization (EQ) Charge stage. The automatic 4-stage charge process provides complete recharging and monitoring of the batteries without damage due to overcharging. The EQ stage (requires a remote display to enable) is used to stir up stratified electrolyte and to try to reverse battery plate sulfation that may have occurred. While charging, the unit may go into Charger Back-off protection, which automatically reduces the charge current to the batteries. This is caused by: 1) the internal temperature is too hot—the charger automatically reduces the charge rate to maintain temperature; or, 2) the AC input voltage falls below 90 VAC—the charger will stop charging to help stabilize the incoming AC voltage. © 2012 Magnum Energy, Inc. Page 41 Operation The Charge mode provides up to four separate charging stages: Bulk Charging, Absorb Charging, Float Charging, and Full Charge (see Figure 3-3). Bulk Charging: This is the initial stage of charging. While bulk charging, the charger supplies the battery with constant current. The charger will remain in bulk charge until the absorption charge voltage (determined by the battery type selection*) is achieved. The inverter’s green LED stays ON (solid) to indicate bulk charging. Absorb Charging: This is the second charging stage and begins after the absorb voltage has been reached. Absorb charging provides the batteries with a constant voltage and reduces the DC charging current in order to maintain the absorb voltage setting. The inverter’s green LED flashes once every second (medium flash) to indicate absorption charging for 2 hours (determined by the Battery AmpHrs selection*), then switches to float charging. Float Charging: The third charging stage occurs at the end of the absorb charging time. While float charging, the charge voltage is reduced to the float charge voltage (determined by the battery type selection*). In this stage, the batteries are kept fully charged and ready if needed by the inverter. The inverter’s green LED flashes once every 8 seconds (slow flash) to indicate float charging. The Float Charging stage reduces battery gassing, minimizes watering requirements (for flooded batteries), and ensures the batteries are maintained at optimum capacity. Full Charge (Battery Saver™ mode): The fourth stage occurs after four hours in the Float Charging stage. The Full Charge stage is designed to keep batteries fully charged over long periods and prevent excessive loss of water in flooded batteries, or drying out of GEL/AGM batteries. In this stage, the charger is turned off and begins monitoring the battery voltage; if the battery voltage drops low (12.7 VDC or less), the charger automatically initiates another four hours in float charge. Info: If the battery voltage falls to the re-bulk voltage (12.1 VDC) or lower, the unit will begin another bulk charge. * These settings in the ME Series are changeable and leave the factory with default values (see Table 3-2, Inverter/Charger Default Values). These default values are adequate for most installations, however, if you determine that some of the values need to be changed for your particular system, a remote control may be purchased to adjust these settings. Bulk Charging Absorb volts DC Voltage Time DC Current Absorb Charging Increased Voltage Max Charge Rate Constant Current Constant Voltage Float Charging Float volts Reduced Voltage Monitored Voltage Goes to Full Charge after 4 hours in Float Charge Absorb Time Reduced Current Full Charge Monitored Current No Current Figure 3-3, Automatic 4-Stage Charging Graph Page 42 © 2012 Magnum Energy, Inc Operation 3.4 Transfer Time While in Standby mode, the AC input is continually monitored. Whenever AC power falls below the VAC dropout voltage (80 VAC, default setting), the inverter automatically transfers back to Inverter mode with minimum interruption to your appliances—as long as the inverter is turned on. The transfer from Standby mode to Inverter mode occurs in approximately 16 milliseconds. While the ME Series is not designed as a computer UPS system, this transfer time is usually fast enough to hold them up. However, the VAC dropout setting has an effect on the ability of the loads to transfer without resetting. The lower this setting, the longer the effective transfer will be and therefore, the higher the probability for the output loads to reset. This occurs because the incoming AC voltage is allowed to fall to a level that is so low that when the transfer does occur, the voltage on the inverters output has already fallen to a level low enough to reset the loads. The disadvantage of a higher VAC dropout setting is that smaller generators (or large generators with an unstable output) may nuisance transfer. This commonly happens when powering loads that are larger than the generator can handle—causing the generator’s output voltage to constantly fall below the inverter’s input VAC dropout threshold. Info: When switching from Inverter mode to Standby mode, the inverter waits approximately 15 seconds to ensure the AC source is stable before transferring. 3.5 Battery Temperature Sensor Operation The plug-in Battery Temperature Sensor (BTS) is used to determine the battery temperature around the batteries. This information allows the multi-stage battery charger to automatically adjust the battery charge voltages for optimum charging performance and longer battery life. When the BTS is installed, if the temperature around the BTS is below 77°F (25°C) the absorb and float charge voltage increases, and if the temperature around the BTS is higher than 77°F (25°C), the absorb and float charge voltage decreases. See Figure 3-4 to determine how much the charge voltage changes (increases or decreases) depending on the temperature reading of the BTS. For example, the nominal absorb charge voltage for a flooded battery at 77°F (25°C) on a 12-volt model is 14.6 VDC. If the battery temperature is 95°F (35°C), the absorb charge voltage would decrease to 14.3 VDC (14.6 VDC – 0.3 change). If the temperature sensor is NOT installed, the charge voltages will not be automatically adjusted because of temperature, but will be maintained at a temperature of 77°F (25°C). The life of the batteries may be reduced if they are subjected to large temperature changes when the BTS is not installed. Change to battery charging voltage Info: When the BTS is connected, the battery charger uses a value of 5mV/°C/Cell from 0-50°C to change the charge voltage based on temperature. Temperature Compensation using BTS 12VDC units 0.75 +0.75V +0.6V 0.6 0.45 +0.45V +0.3V 0.3 +0.15V 0.15 No Change0 -0.15 -0.15V -0.3V-0.3 -0.45V -0.45 -0.6V-0.6 -0.75V -0.75 0C 0 32F no BTS connected 5C 5 41F 10C 10 50F 15C 15 59F 20C 20 68F 25C 25 77F 30C 30 86F 35C 35 95F 40C 45C 50C 40 45 50 104F 113F 122F Temperature reading from BTS Figure 3-4, BTS Temperature to Charge Voltage Change © 2012 Magnum Energy, Inc. Page 43 Operation 3.6 Protection Circuitry Operation The inverter is protected against fault conditions, and in normal usage it will be rare to see any. However, if a condition occurs that is outside the inverter’s normal operating parameters, it will shut down and attempt to protect itself, the battery bank, and your AC loads. If there is a condition that causes the inverter to shut down, it may be one of the following conditions [also refer to the Troubleshooting section (Section 4.3) to help diagnose and clear the fault condition]: • Low Battery – The inverter will shut off whenever the battery voltage falls to the LBCO (Low Battery Cut Out) level to protect the batteries from being over-discharged. After the inverter has reached the LBCO level and turned off, the inverter will automatically restart after one of the following conditions: 1. AC Power is applied and the inverter begins operating as a battery charger. 2. Battery voltage rises to the LBCI (Low Battery Cut In) level. Refer to Table 3-1 to determine the LBCO and LBCI levels for your inverter model. • High Battery – In the event the battery voltage approaches the HBCO (High Battery Cut Out) level, the inverter will automatically shut down to prevent the inverter from supplying unregulated AC output voltage. The inverter’s status LED turns off when a high battery fault condition occurs. The inverter will automatically restart when the battery falls to the HBCI (High Battery Cut In) level. Refer to Table 3-1 to determine the HBCO and HBCI levels for your inverter model. Info: High battery voltage may be caused by excessive or unregulated voltage from the solar panels or other external charging sources. • Overload – During inverter and standby operation, the inverter monitors current levels. In the event of a short-circuit or an overload condition for more than a few seconds, the inverter will shut down. To start operating after this fault, the inverter would need to be restarted (turned back on) after the inverter’s AC loads are reduced/removed. • Over-temperature – If internal power components begin to exceed their safe operating temperature level, the inverter will shut down to protect itself from damage. The inverter’s status LED turns OFF to indicate the over-temperature fault condition. The inverter will automatically restart after the units cool down. • Internal Fault – The inverter continually monitors several internal components and the processor communications. If a condition occurs that does not allow proper internal operation, the inverter will shut down to protect itself and the connected loads. The inverter will need to be reset to start operating again (refer to Section 4.4 for information on resetting the inverter). Table 3-1, Inverter Battery Turn On/Off Levels Inverter Model Inverter battery turn ON/OFF Levels ME2000/ME2012 ME2512 ME3112 HBCO >15.8 VDC >15.8 VDC >15.8 VDC HBCI 15.5 VDC 15.5 VDC 15.5 VDC LBCI ≥12.5 VDC ≥12.5 VDC ≥12.5 VDC LBCO* (1-minute delay) 10.0 VDC (9.0-12.2 VDC) 10.0 VDC (9.0-12.2 VDC) 10.0 VDC (9.0-12.2 VDC) LBCO (immediate) 8.5 VDC 8.5 VDC 8.5 VDC *adjustable with remote control Page 44 © 2012 Magnum Energy, Inc Operation 3.7 Inverter Startup Power ON/OFF Switch – The inverter can be turned on and off by lightly pressing and releasing the Power ON/OFF switch on the front of the inverter (see Figure 3-5). When the inverter is first connected to the batteries, or when its automatic protection circuit has turned the inverter off, the ON/OFF switch will need to be pressed to start the unit (or reset per Section 4.4). Once the inverter has been turned on, pressing the Power ON/OFF switch alternately turns the inverter on and off. WARNING: The Power ON/OFF control switch does not turn on or off the charger feature, or remove pass-thru power. If AC power (utility power or generator) is connected and qualified on the AC input, this AC power will also be available on the AC output and is not controlled by the Power ON/OFF switch. Status LED Indicator – The status indicator is a green LED (Light Emitting Diode) that provides information on the operational mode of the inverter. Watch this indicator (see Figure 3-5) for at least 10 seconds to determine the inverter’s operational condition from the information below: • Off – Indicates the inverter is off; there is no AC power (inverter, utility power, or generator) at the inverter’s output terminals. If the LED stays off after pressing the ON/OFF switch, there is a fault condition such as: low battery, high battery, overload, over-temperature, or an internal fault. Refer to the Troubleshooting section to help diagnose/clear the fault. • Slow flash (blinks on once every 8 seconds) – Indicates float charging; the inverter is in Standby mode (the external AC power that is connected to the inverter’s input is passing through the inverter and is powering the AC loads connected to the inverter’s output). • Medium flash (blinks on once every second): When AC power is not connected to inverter input – Indicates the inverter is on and using energy from the battery. The inverter is either: 1) Inverting – providing full power to the loads connected to the inverter; or, 2) Searching – conserving power and waiting for a load to be turned on that meets or exceeds the search watts parameter (5 watts is the inverter default setting). When AC power is connected to inverter input – Indicates absorb charging; the inverter is in Standby mode (the external AC power that is connected to the inverter’s input is passing thru the inverter and is powering the AC loads connected to the inverter’s output). • On (solid) – Indicates bulk charging; the inverter is in Standby mode (the external AC power that is connected to the inverter’s input is passing thru the inverter and is powering the AC loads connected to the inverter’s output). Power ON/OFF pushbutton switch Charging/Inverting Status LED indicator Figure 3-5, Power Switch and Status Indicator © 2012 Magnum Energy, Inc. Page 45 Operation 3.8 Factory Default Values The ME Series inverter/charger uses default values for the adjustable settings (Table 3-2) that are adequate for most installations. If operating parameters need to be changed from the default values, an optional remote control/display can be used to make those changes. To help you determine if you need the a remote display, information on the inverter/charger settings that can be changed is provided below. The settings, once programmed, are saved in the remote’s non-volatile memory and are preserved until changed—even if DC power to the inverter is lost (as long as the remote is connected). For information on the full range of settings for each function in your remote, refer to its owner’s manual at www.magnumenergy.com. • Shore Max/Input Amps: This setting ensures the inverter AC loads receive the maximum current available from the external AC input (utility power or generator). When the total current used to power the AC loads and to charge the batteries begins to approach this setting, the current that was used for charging the batteries will automatically be reduced. • Search Watts: This setting allows you to turn off the power-saving Search mode circuitry or adjust the power level at which the inverter will “wake up” and start inverting. • LowBattCutOut: This setting determines when the inverter will turn off based on low battery voltage. The inverter turns off automatically after the battery voltage has been below this setting for more than one minute. This protects the batteries from overdischarge and the AC loads from unregulated power (brown-outs). • Batt AmpHrs/Absorption Time: This setting allows the user to input the battery bank size in amp hours or to set the absorption time, which tells the charger how long to charge the batteries in the Absorb Charge stage. • Battery Type: Sets the type of batteries being used in the system; this information tells the charger what voltage level to use to charge the batteries. • Charge Rate: This setting can be used to turn off the charger, limit the amount of current that the charger can use (leaving more current available to power loads); or, to ensure small battery banks are not overheated because of a too high charge rate. • VAC Dropout: Sets the minimum AC voltage that must be present on the AC input before the unit transfers from Standby mode to Inverter mode. This protects the AC loads from utility power outages and brown-outs. Using a remote control/display also provides the following features: • allows you control to enable an equalize charge for certain battery types • displays inverter/charger’s operating status • provides fault information for troubleshooting Table 3-2, Inverter/Charger Default Values Adjustable Settings Default Values Shore Max/Input Amps 30 Amps Search Watts 5 Watts LowBattCutOut 10 VDC (one min. delay), 8.5 VDC (no delay) Batt AmpHrs/Absorption Time 600 AmpHrs (Absorb Time = 120 minutes) Battery Type Flooded – Liquid Lead Acid (Absorb 14.6 VDC, Float 13.4 VDC) Charge Rate 100% VAC Dropout 80 VAC Page 46 © 2012 Magnum Energy, Inc Operation 3.9 Inverter Fan Operation The inverter contains two internal cooling fans that are automatically controlled. The speed of these fans is determined either by the internal temperature of the inverter or by the load on the inverter. The inverter’s fans will come on under the conditions listed below: • Fans run full speed if the internal transistors (FETS) or the power transformer reaches 80°C degrees Celsius (176°F), or the inverter is running at 100% of its rated load. • Fans run medium speed if the internal transistors (FETS) or the power transformer reaches 60°C (140°F), or the inverter is running at 50% of its rated load. • Fans run low speed when the inverter is running at 25% of its rated load. The fans shut down when none of the above conditions are met, or if the battery voltage is below 9.5V (12-volt systems). Whenever the inverter is first connected to the battery, the fans will come on for about one second. Info: The inverter’s fans will not come on based on temperature sensed by the optional Battery Temperature Sensor. 3.10 Using a Remote with the ME Series Inverter The ME Series inverter—when connected to a remote control display (i.e., ME-RC, ME-ARC)—has many advanced features. The inverter and remote communicate with each other to allow these advanced features to be set up or enabled. However, the remote may have a later/newer software revision than the inverter, so some of the features and functionality in the remote may not be available with your inverter. Use the steps below to determine what remote menus/features are available with your inverter: 1. Obtain your inverter’s software revision. Note: To view the inverter’s software revision level, push the TECH button on your remote and access the Revisions menu. 2. Use the chart below to determine the inverter’s compatibility level (L1, L2, L3 or L4) based on your inverter’s software revision. Table 3-3, Inverter Compatibility Level INV/CHG Models Level 1 (L1) Level 2 (L2) Level 3 (L3) Level 4 (4) ME2000 (-xxB) ≥ Rev 2.6 ≥ Rev 3.6 ≥ Rev 4.2 ≥ Rev 5.4 ME2012 (-xxB) ≥ Rev 2.6 ≥ Rev 3.6 ≥ Rev 4.2 ≥ Rev 5.4 ME2512 ≥ Rev 2.6 ≥ Rev 3.6 NA ≥ Rev 5.4 ME3112 ≥ Rev 2.6 ≥ Rev 3.6 NA ≥ Rev 5.4 3. After determining the inverter’s compatibility level, refer to the remote’s compatibility matrix (find it online at: magnumenergy.com under the Service and Support tab) to determine which remote features/settings you can use based on your inverter’s compatibility level. Note: If your inverter’s compatibility level is the same or greater than the ‘Inverter Model/Level Required’ on the remote compatibility matrix on our website, then your inverter can support the device setting/feature you want. If your inverter does not have the required compatibility level for a feature/setting you want, contact Magnum Energy to determine if there is a software upgrade option for your inverter. © 2012 Magnum Energy, Inc. Page 47 Maintenance and Troubleshooting 4.0 Maintenance and Troubleshooting The following information is provided to help you keep your ME Series inverter/charger in optimum operational condition. 4.1 Recommended Inverter and Battery Care The ME Series inverter/charger is designed to provide you with years of trouble-free service. Even though there are no user-serviceable parts, it is recommended that every 6 months you perform the following maintenance steps to ensure optimum performance and extend the life of your batteries. WARNING: Prior to performing the following checks, switch OFF both the AC and DC circuits. • Visually inspect the batteries for cracks, leaks, or swelling—replace if necessary. • Use baking soda to clean and remove any electrolyte spills or buildups. • Check and tighten all battery hold down clamps (if applicable). • Clean and tighten all battery terminals and connecting cables [10 to 12 ft lbf (13.6 to 16.3 N-m)]. • Check and fill battery water levels (Liquid Lead Acid batteries only). • Check individual battery voltages (load test those that have a voltage difference of more than 0.3 VDC from each other)—replace if necessary. • Check all cable runs for signs of chafing—replace if necessary. • Check the inverter’s cooling vents—clean as necessary. • Check and tighten the inverter’s internal AC terminal block connections [16 in lbf (1.8 N-m)]. 4.2 Storage for Mobile Installations When placing the RV, boat, or truck into storage, it is recommended that you perform the following to ensure the system is properly shut down (or properly configured for storage). This is especially important for maintaining the batteries. • Perform the recommended maintenance steps listed in Section 4.1. • Fully charge the batteries. • Connect AC power (if available) and verify the breaker to the inverter’s input is switched ON (to allow battery charging). • Verify the inverter is switched OFF. • Switch OFF all unnecessary AC and DC loads. • Disable the AGS (if installed) when the RV, boat, or truck is in a confined storage area. WARNING: If an AGS were to start and run the generator for an extended period of time in a confined area, a potentially fatal level of carbon monoxide (CO) could accumulate. Page 48 © 2012 Magnum Energy, Inc Maintenance and Troubleshooting 4.3 Troubleshooting The ME Series inverter/charger is a fairly simple device to troubleshoot. The following chart is designed to help you quickly pinpoint the most common inverter failures. Table 4-1, Basic Troubleshooting Symptom Possible Cause N o o u t p u t p o w e r. Inverter is switched OFF Inverter LED is OFF Battery voltage is too low. The battery voltage level has dropped below the Low Battery Cutout (LBCO) set-point for more than one minute. Recommended Solution Switch the inverter ON. Check fuses/circuit-breakers and cable connections. Check battery voltage at the inverter’s terminals. Your batteries may need to be charged, this fault condition will automatically clear when the battery voltage exceeds the LBCI voltage. The battery voltage is too high. The inverter automatically resets and resumes operation when the battery voltage drops to the HBCI voltage or lower. This condition usually only occurs when an additional charging source (alternator, solar panels, or other external charging sources) is used to charge the battery bank. Reduce or turn off any other charger to the inverter batteries to allow the voltage level to drop. Over-temperature condition: The internal temperature of the inverter has risen above acceptable limits; caused by loads too great for the inverter to operate continuously, or by lack of ventilation to the inverter. When the unit has cooled, it will automatically reset and resume operation. Reduce the number of electrical loads that you are operating, this will avoid a repeat over-temp shutdown if the cause was too many loads for the ambient conditions. Check ventilation around the inverter, ensure cool air is available to pass-thru the inverter (refer to the ventilation requirements in Section 2.1.3). AC overload condition: The inverter Reduce the AC loads connected to the inverter, or remove has turned off because the connected all AC output wiring and restart the inverter. loads are larger than the inverter’s output capacity, or the output wires are shorted. Internal fault: This fault occurs when To clear this fault, an inverter reset is required. Remove an internal fault is detected. DC power to the inverter, or press and hold down the power switch on the inverter for 15 seconds (until the green Status LED comes on). If this fault does not clear, the unit will need to be serviced. N o o u t p u t p o w e r. Unit is in Search mode, which means Turn on a load greater than 5 watts to bring inverter to Green LED is flashing. load is too small for Search mode full output power, or turn off search with remote. circuit detection. Low output or surge Loose or corroded battery cables. power. Green LED is Low batteries. flashing. Loose AC output connections. Clean and tighten all cables. Recharge or replace batteries. Tighten AC output connections. Battery cables are the wrong length Verify recommended cable lengths and gauges from the or gauge. manual. Replace cables as necessary. L o w c h a r g i n g ra t e Charge rate set too low. when connected to AC Low AC voltage (< 90 VAC). power. Adjust charge rate or SHORE settings on remote. Check AC input wiring. Low charging rate when Generator output is too low to power Reduce the load, increase the generator’s RPMs. using a generator. both load and charger. Check the SHORE settings (if remote connected). C h a r g e r d o e s n o t Loose or corroded battery cables. charge. Defective batteries. While charging, the DC charge voltage is higher or lower than expected. Clean and tighten battery cables. Replace batteries. Wrong charger settings. Adjust the charger settings, ensure the unit is not in charger standby. Wrong AC input voltage. Verify proper AC input voltage and frequency. If the Battery Temperature Sensor This is normal; see Section 3.5 (Battery Temperature (BTS) is installed, the DC voltage will Sensor Operation) for more information. increase or decrease depending on the temperature around the BTS. © 2012 Magnum Energy, Inc. Page 49 Maintenance and Troubleshooting 4.4 Performing an Inverter Reset Certain faults require the inverter to be reset. To perform an inverter reset (also known as a soft reset), press and hold the Power ON/OFF button (see Figure 4-1) for approximately fifteen (15) seconds until the Charging/Inverting Status LED comes on and flashes rapidly. Once the rapid flashing has begun, release the Power ON/OFF button. The Status LED will go off after the button is released. After the inverter reset is completed, press the Power ON/OFF button to turn the inverter ON. Some older inverter models do not allow an inverter reset. If the inverter reset fails, you will need to perform a power reset using the procedure below. In either case, if an internal fault does not clear, the inverter will require repair at a Magnum Authorized Service Center (ASC). Info: The Power ON/OFF pushbutton is a small momentary type switch which operates by lightly pressing and releasing. Be careful not to apply too much force when pushing or the switch might break. 1. Press and hold the Power ON/OFF pushbutton. 2. Watch the Charging/Inverting Status LED, after approximately 15 seconds it should come on and flash rapidly to indicate the inverter has reset. The Status LED will go off after the pushbutton is released. Figure 4-1, Performing an Inverter Reset 4.5 Performing a Power Reset To 1. 2. 3. perform a power reset (also known as a hard reset): Remove all AC power (utility or generator power) to the inverter. Open all the inverter DC disconnects (or disconnect the positive battery cable to the inverter). Ensure the inverter(s) and the remote are disconnected from all AC and DC power (the remote display will be blank). 4. After the inverter(s) has been disconnected from all power for 30 seconds, reconnect the inverter DC disconnects (or reconnect the positive battery cable) and resume operation. Info: If DC disconnects are not used, there may be a momentary spark when the positive battery cable is connected to the inverter’s terminal. This is normal and indicates that the inverter’s internal capacitors are being charged. Page 50 © 2012 Magnum Energy, Inc Appendix A - Specifications and Optional Equipment Appendix A - Specifications and Optional Equipment A-1 Inverter/Charger Specifications Models ME2000 (-15B, -20B) ME2012 (-15B, -20B) ME2512 ME3112 Inverter Specifications Input Battery Voltage Range 9 to 16 VDC 9 to 16 VDC 9 to 16 VDC 9 to 16 VDC Absolute Maximum DC Input 25 VDC 25 VDC 25 VDC 25 VDC AC Output Voltage Accuracy 120 VAC ±5% (≤ continuous power) Output Frequency and Accuracy Continuous Power Output (at 45°C) 60 Hz ± 0.1 Hz 2000 VA 2000 VA 2500 VA 3100 VA 17 A 17 A 21A 26 A 1 msec Surge Current (amps AC) 60 60 100 120 100 msec Surge Current (amps AC) 37 37 45 50 3700 3700 5000 6000 Continuous AC Output Current 5 sec Surge Power (real watts) 30 sec Surge Power (real watts) 3450 3450 4500 4800 5 min Surge Power (real watts) 3100 3100 3500 3950 30 min Surge Power (real watts) Rated Input Battery Current Inverter Efficiency (peak) 2400 2400 2900 3500 266 ADC 95% 266 ADC 95% 333 ADC 91% 413 ADC 90% 23 watts 25 watts HBCO/HBCI (High Battery Cut Out/In) ≥15.8 VDC LBCO/LBCI (Low Battery Cut Out/In) 9.0 VDC (adj)/12.5 VDC Series Stacking 120/240 VAC No Transfer Time 16 msecs Search Mode (typical) No Load (120 VAC output, typical) 5 watts 20 watts 20 watts Waveform Modified Sine Wave Charger Specifications Continuous Output at 45°C Input Current - Rated Output (AC amps) 100 ADC 100 ADC 120 ADC 160 ADC 15 15 18 22 Charger Efficiency 85% AC Input Frequency Range 50 to 70 Hz AC Input Voltage Range 60 to 140 VAC (120 VAC nominal) Power Factor > 0.95 General Features and Capabilities Transfer Relay Capability Five-stage Charging Capability Single leg in at 30 amps Battery Temperature Compensation Internal Cooling Yes, 15 ft Battery Temp Sensor standard 0 to 120 cfm variable speed drive using dual 92 mm brushless DC fan Overcurrent Protection Yes, with two overlapping circuits Over-temperature Protection Corrosion Protection Safety Listings Yes, on transformer, MOSFETS, and battery PCB’s conformal coated, powder coated chassis/top, and stainless steel fasteners ETL listed to UL/cUL 458, and CSA C22.2 # 107.1-01 Warranty Dual Branch-Rated Output Breakers Two input legs at 30 amps each, or combine for 60 amps* Bulk, Absorb, Float, Equalize (requires remote), and Battery Saver™ 3 years parts and labor Optional on ME2000 (15 or 20 amp breakers) or ME2012 (15 or 20 amp breakers) Environmental Specifications Operating Temperature -20°C to +60°C (-4°F to 140°F) Non-operating Temperature -40°C to +70°C (-40°F to 158°F) Operating Humidity 0 to 95% RH non-condensing Physical Specifications Unit Dimensions (h x w x d) 13.75” x 12.65” x 7.0” (17.8 cm) Shipping Dimensions (h x w x d) Mounting 13.75” x 12.65” x 8.0” (34.9 cm x 32.1 cm x 20.3 cm) 19” x 15” x 13” (48.3 cm x 38.1 cm x 33 cm) Shelf (top or bottom up) or wall (no uncovered vents on top or bottom) Unit Weight 37 lb (16.8 kg) 37 lb (16.8 kg) 41 lb (18.6 kg) 46 lb (20.9 kg) Shipping Weight 45 lb (20.4 kg) 46 lb (20.9 kg) 51 lb (23.1 kg) 56 lb (25.4 kg) Max operating altitude 15,000’ (4570 m) Specifications @ 25°C (unless otherwise noted) - Subject to change without notice. * The pass-thru capability on each leg of the -15B and -20B models is limited by the output breaker size on each output. © 2012 Magnum Energy, Inc. Page 51 Appendix A - Specifications and Optional Equipment A-2 Optional Equipment and Accessories The following Magnum Energy components are available for use with the ME Series inverter/charger. Some of these items are required depending upon the intended use of the inverter. MMP Series Enclosures The MMP175-30, MMP175-60S, MMP250-30D, and MMP250-60S enclosures are for single inverter applications. The MMP Series enclosures have been specifically designed to combine all of the major components required for a renewable energy system—inverter/battery disconnect, AC overcurrent protection, grounding connections, and a full system inverter bypass switch as a convenient way to isolate the inverter for battery maintenance—into a single, easy to install pre-wired enclosure. Smart Battery Combiner The Smart Battery Combiner (ME-SBCTM) is designed to monitor and charge a second battery using a portion of the current that is charging the main battery. The ME-SBC eliminates a significant voltage drop, and provides automatic turn-on and turn-off based on adjustable voltage set-points. This allows different batteries to be charged from a single charging source, and prevents overcharging/undercharging. Remote Switch Adapters The ME-RSATM and ME-RSA-MTM pigtail adapters allow the inverter to be remotely switched on and off – with or without the ME-RC50 remote display. Basic Remote Control The ME-RC50 Remote Control Panel is simple to use; an LCD screen and “at a glance” LEDs display complete inverter/charger status. Soft keys provide simple access to menus and a rotary encoder knob allows you to scroll through and select a wide range of settings such as: Inverter ON/OFF, Charger ON/OFF, Shorepower Breaker Setting, AGS Control, as well as Meter, Setup and Tech menus. Advanced Remote Control The ME-ARC50 Remote Control Panel uses an LCD screen and “at a glance” LEDs to provide operating information and allow advanced features to be configured (requires Magnum inverters with advanced configurable features). This LCD remote control also provides advanced monitoring/ troubleshooting and includes a FAVS button to access your favorite features quickly. Auto Generator Start Controller The ME-AGS-N Automatic Generator Start controller (Network version) is designed to automatically start your generator based on low battery condition or high temperature. The AGS controller includes an input voltage jumper (for 12, 24, and 48-volt battery banks) and a 4-position DIP (Dual In-line Package) switch which provides the ability to change the relay timing configurations to allow compatibility with a wider range of generators. Adjustable settings when using the MEARC50 include starting the generator based on: Battery Voltage, Time Of Day, Battery ‘State of Charge’ or High Temperature. Battery Monitor Kit The ME-BMK Battery Monitor Kit is a single battery bank amp-hour meter that monitors the condition of the battery and provides information to let you know how much energy you have available and let you plan your electrical usage to ensure the battery is not being over-discharged. The ME-BMKNS version does not include a DC shunt—order the ME-BMK to receive a 500A/50mv DC shunt. Fuse Block/Fuses The Magnum Fuse/Fuse-blocks are used to protect the battery bank, inverter, and cables from damage caused by DC short circuits and overloads. They include a slow-blow fuse with mounting block and protective cover. The 125 and 200-amp models use an ANL type fuse and the 300 and 400-amp models use a Class-T fuse. Page 52 © 2012 Magnum Energy, Inc Appendix B - Battery Information Appendix B - Battery Information B-1 Battery Location Periodic maintenance (e.g., checking connections, cleaning, watering) on batteries is required. Locate the batteries in an accessible location to perform this maintenance. Batteries must be mounted in a clean, dry, ventilated environment where they are protected from high and low temperatures. The battery bank should be located as close to the inverter as possible without limiting access to the inverter’s disconnects. Longer battery cable runs tend to lose efficiency and reduce the overall performance of an inverter. To ensure optimum performance, a ventilated battery enclosure is recommended. Two feet (61 cm) of clearance above the batteries is recommended for access to the battery terminals and removable caps (lead acid battery types). WARNING: Be very careful when working around batteries, they can produce extremely high currents if they are short-circuited. Read the important safety instructions at the beginning of this manual and the precautions from the battery supplier before installing the inverter and batteries. CAUTION: Do not mount the batteries beneath the inverter (or in the same compartment). Batteries emit corrosive fumes which could damage the inverter’s electronics. Never locate dedicated batteries near a vehicle/home fuel tank containing gasoline or propane. B-2 Battery Types Batteries are available in different sizes, amp-hour ratings, voltage, and chemistries. They are also available for starting applications (such as an automobile starting battery) and deep discharge applications. Only the deep cycle types are recommended for inverter applications; using a starting battery in an inverter (deep cycle) application will greatly shorten their useful life. Choose the batteries best suited for the inverter installation and cost. Use only the same battery type for all batteries in the bank. For best performance, all batteries should be from the same lot and date. This information is usually printed on a label located on the battery. B-3 Battery Temperature Battery performance of lead-acid type batteries is greatly affected by extreme temperatures. When a lead-acid type battery is cold, its effective amp-hour capacity is reduced. When determining the battery requirements needed for the inverter system, realize that the battery capacity will be reduced if they will be installed in a climate where extremely cold temperatures are expected. In this type of environment, the batteries should be located in a heated area. At the minimum, the batteries should be installed in an insulated enclosure; which will keep the batteries warmer as they are being charged. The battery bank should also be protected from high temperatures, which will shorten battery life. In high heat situations the battery room/enclosure should be ventilated to bring in cooler air and exhaust the hotter air. The performance of the battery bank/inverter system will substantially increase by monitoring and preventing extreme temperatures around the batteries. B-4 Battery Bank Sizing The size of the battery bank determines how long the inverter will power the AC loads without recharging. The larger the battery bank, the longer the run time. Size your battery bank to the systems AC load requirements and length of time required to run from the batteries. In general, the battery bank should not be discharged more than 50%. Additional DC charging devices such as solar, wind, hydro, etc., can provide longer run times by recharging the batteries in the absence of AC utility power or generator power. Info: For the ME Series inverter/charger to perform optimally, a minimum battery bank of 200 AH is recommended for moderate loads (<1000W) and greater than 400 AH for heavy loads (≥1000W). © 2012 Magnum Energy, Inc. Page 53 Appendix B - Battery Information B-5 Battery Bank Sizing Worksheet Complete the steps below to determine the battery bank size required to power your AC loads: 1. Determine the daily power needed for each load a) b) c) d) e) List all AC loads required to run; and List the Watt-Hours for each load (see Table B-1 for common loads/wattage); and multiply by how many hours per day (or a fraction of an hour) each load will be used; and multiply by how many days per week you will use the listed loads; and divide by seven = Average Daily Watt-Hours Per Load. Average Daily Watt-Hours Per Load AC load Watt-Hours (x) hours per day (x) days per week (÷7) = total power 2. Determine the total power needed each day for all the loads. • Add the Average Daily Watt-Hours Per Load together = Total Daily Watt-Hours. Total Daily Watt-Hours 3. Determine the battery Amp-Hour capacity needed to run all the loads before recharging. (inverter battery voltage) Multiply this by how many days the loads will need to run without having power to recharge the batteries (typically 3 to 5 days of storage) = Storage Amp-Hours. (days of storage) • Divide the Total Daily Watt-Hours by the nominal battery voltage of the inverter (i.e., 12, 24 volts); and ÷ ___ = x ___ = 4. Determine how deeply you want to discharge your batteries. Divide the Storage Amp-Hours by 0.2 or 0.5 to get the Total Amp-Hours: a) 0.2 = Discharges the batteries by 20% (80% remaining), this is considered the optimal level for long battery life; or b) 0.5 = Discharges the batteries by 50% (50% remaining), this is considered a realistic trade-off between battery cost and battery life. Total Amp-Hours Additional compensation: Low battery temperature: If the batteries are installed in a location that will be exposed to low temperatures, the available output will be less. In these instances, you will need to determine the lowest temperature the battery bank will experience and multiply the Total Amp-Hours by the Multiplier below. Temperature 80F/27C 70F/21C 60F/15C 50F/10C 40F/4C 30F/-1C 20F/-7C Multiplier 1.00 1.04 1.11 1.19 1.30 1.40 1.59 Inverter efficiency: When the inverter is used in a back-up power application the inverter efficiency will not be a large concern; however if the inverter is the primary AC source for the calculated load, the Total AmpHours should be multiplied by 1.2 to factor in an average 80% inverter efficiency. Page 54 © 2012 Magnum Energy, Inc Appendix B - Battery Information B-6 Battery Wiring Configurations The battery bank must be wired to match the inverter’s DC input voltage. In addition, the batteries can be wired to provide additional run time. The various wiring configurations include: B-6.1 Series Wiring Wiring batteries in series increases the battery bank’s output voltage. A series connection combines each battery in a string until the total voltage matches the inverter’s DC requirement. Even though there are multiple batteries, the capacity remains the same. In Figure B-1 below, two 6 VDC/200 AH batteries are combined into a single string resulting in a 12 VDC, 200 AHr bank. Series Battery Wiring combines battery voltage: 6 VDC (200 AH) 6 VDC (200 AH) 12 VDC @ 200 AH 200 AH @ 6 VDC + 200 AH @ 6 VDC = 200 AH @ 12 VDC Figure B-1, Series Battery Wiring B-6.2 Parallel Wiring Wiring batteries in parallel increases the battery bank’s amp-hour capacity, which allows the AC loads to operate for a longer time. A parallel connection combines the number of batteries in the string to increase overall battery capacity; however, the voltage remains the same. In Figure B-2 below, two 12 VDC/100 AH batteries are combined into a single 12 VDC, 200 AH battery bank. 12 VDC (100 AH) 12 VDC @ 200 AH 12 VDC (100 AH) Parallel Battery Wiring combines battery capacity: 100 AH @ 12 VDC + 100 AH @ 12 VDC = 200 AH @ 12 VDC Figure B-2, Parallel Battery Wiring B-6.3 Series-Parallel Wiring A series/parallel configuration increases both voltage (to match the inverter’s DC requirements) and Amp-Hour capacity (to increase run-time for operating the loads) using smaller, lower-voltage batteries. In Figure B-3 below, four 6 VDC/200 AH batteries are combined into two strings resulting in a 12 VDC, 400 AH battery bank. Series/Parallel Battery Wiring combines battery voltage and capacity: 6 VDC (200 AH) 6 VDC (200 AH) 12 VDC @ 400 AH 6 VDC (200 AH) 6 VDC (200 AH) 200 AH @ 6 VDC + = 200 AH @ 12 VDC 200 AH @ 6 VDC + = 400 AH @ 12 VDC 200 AH @ 6 VDC + = 200 AH @ 12 VDC 200 AH @ 6 VDC add voltage and capacity together add voltage add capacity in series in parallel Figure B-3, Series-Parallel Battery Wiring © 2012 Magnum Energy, Inc. Page 55 Appendix B - Battery Information overcurrent protection String (12 VDC @ 100 AH) to 12 VDC inverter (total capacity = 100 AH) 12 VDC battery (100 AH) 12-volt battery bank (one string of one 12-volt battery) overcurrent protection Series String (6 VDC + 6 VDC) 6 VDC battery (200 AH) to 12 VDC inverter (total capacity = 200 AH) 6 VDC battery (200 AH) 12-volt battery bank (one string of two 6-volt batteries wired in series) overcurrent protection Parallel String (100 AH + 100 AH) 12 VDC battery (100 AH) to 12 VDC inverter (total capacity = 200 AH) 12 VDC battery (100 AH) 12-volt battery bank (parallel two 12-volt batteries) Parallel String (200 AH + 200 AH) overcurrent protection Series String (6 VDC + 6 VDC) 6 VDC battery (200 AH) 6 VDC battery (200 AH) Series String (6 VDC + 6 VDC) 6 VDC battery (200 AH) 6 VDC battery (200 AH) to 12 VDC inverter (total capacity = 400 AH) 12-volt battery bank (two strings of two 6-volt batteries wired in series and connected in parallel) Figure B-4, Battery Bank Wiring Examples (12-volt) Page 56 © 2012 Magnum Energy, Inc Appendix C - Inverter/Charger Terminology Appendix C – Inverter/Charger Terminology The following is a glossary of terms with which you may not be familiar. They appear in the various descriptions of inverter and battery charger operation. Absorbtion Stage – In this second stage of three stage charging, the batteries are held at a constant voltage (the absorb voltage setting) and the battery is charged to its maximum capacity. AC (Alternating Current) – Electrical current that varies with time (i.e., utility power). The rate at which the voltage changes polarity is the frequency in Hertz (Hz). Ampacity – The ampacity of a wire is its current carrying capacity with reference to the crosssectional area of the conductors, the temperature rating of the insulation and the ambient temperature. Automatic Transfer Relay (inside the inverter) – An automatic switch that switches between Inverter and Standby mode depending on availability of AC input power. If AC is present, the unit will be a battery charger and pass power thru the inverter. When the AC goes away, the unit becomes an inverter. Bulk Charge Stage – The first stage in three stage charging. In this stage, a constant current is fed to the batteries and as they accept the current the battery voltage will rise. CEC (Canadian Electrical Code) – The guidelines and acceptable practices for electrical installations in Canada. Current (Amps) – The amount of electricity flowing through a conductor. DC (Direct Current) – Electrical current that does not vary with time (i.e., battery voltage). Deep Cycle – A deep cycle occurs when a battery is discharged to less than 20% of its capacity (80% depth-of-discharge). Deep Cycle Battery – A battery designed to be routinely discharged to 20% of its maximum capacity without damage. This type of battery is recommended for use with an inverter system. Derating – As an inverter (or charger) is used above its normal temperature, it’s capacity to power loads (or charge) continuously is decreased. Digital Volt Meter (DVM): • True RMS – A voltmeter that incorporates a RMS converter to read true RMS for any waveform shape. • Averaging Type – A voltmeter that requires a sine wave waveform shape to provide an accurate reading. Efficiency – Usually given as a percentage, efficiency is the ratio of the output to the input. The efficiency changes with power output levels of any inverter. Electrolyte – Typically a mixture of water and sulfuric acid that is used in lead-acid batteries; it is commonly referred to as battery acid. Equalization – Controlled “overcharging” of the battery causing it to bubble and mix. This helps reduce stratification. Float Stage – During the third stage of three stage charging, the voltage and current are reduced to a level that will trickle charge or maintenance charge the battery. This assures the battery remains fully charged even while sitting. Fuse or Disconnect – When current exceeds a preset limit the fuse or disconnect will fail before the wiring or equipment it is protecting. Disconnects are also called circuit breakers. These are usually reset and can act as a switch to turn off power to equipment for servicing. Grid (The grid) – Also called the utility grid, this refers to the public power distribution system. Impedance – Slows the electrical flow of Alternating Current (AC) LED (Light Emitting Diode) – A light made up of semi-conducting material. Line Tie – Term used when the inverter is connected to public power or the “grid” system. Load(s) – An electrical item that draws power (i.e., lights, radio, refrigerator, etc.) to work. © 2012 Magnum Energy, Inc. Page 57 Appendix C - Inverter/Charger Terminology Locked Rotor Amps – The current drawn by an electric motor with the shaft or rotor stopped and locked in position. This can be used to determine if an inverter has enough surge current to start a motor. If the inverter is capable of producing more amperage than the locked rotor amps rating of a motor, it will most likely start the motor easily. NEC (National Electric Code) – The guidelines and acceptable practices for electrical installations in the USA. Off Grid – Not connected to public power in any way. Pass Through Current – The amount of current the inverter can safely pass directly from the AC input to the AC output. Photovoltaic (PV) – Solar powered. Resistance (Ohms) – Slows the electrical flow of Direct Current (DC) RMS (Root Mean Square) – A measure of AC voltage that provides the equivalent heating value across a resistor as would a DC source of the same voltage. Sellback, or Selling Back To The Grid or Utility-Interactive – Some inverters have the capability to take energy stored in batteries, or from solar panels, and put it back into the utility grid. The local public utility company can compensate you for using this energy. Shorepower – The process of providing shoreside electrical power to a boat while its main and auxiliary engines are turned off. The source for shorepower may be grid power from an electric utility company, or from an external remote generator. Stacking: • Series – Two inverters operating together to produce twice the power and voltage of a single inverter. Required when operating 240 VAC loads and separate 120 VAC loads from either inverter. • Parallel – Two inverters operating together to provide twice the continuous capacity on a single output circuit. Required when a single load is too large for one inverter. Stratification – Over time, a battery’s electrolyte (liquid) tends to separate. The electrolyte at the top of the battery becomes watery while at the bottom it becomes more acidic. This effect is corrosive to the plates. Sulfating – As a battery discharges, its plates become covered with lead sulfate. During recharging, the lead sulfate leaves the plates and recombines with the electrolyte. If the lead sulfate remains on the plates for an extended period of time (over two months), it hardens, and recharging will not remove it. This reduces the effective plate area and the battery’s capacity. Temperature Compensation – Peak available battery voltage is temperature dependent. As ambient temperatures fall, the proper voltage for each charge stage needs to be increased. A Battery Temperature Sensor (BTS) automatically re-scales charge-voltage settings to compensate for ambient temperatures. Voltage – The pressure that causes electrical flow in a circuit. Watts – Measure of power output or utilization. Watts = Volts x Amps. Page 58 © 2012 Magnum Energy, Inc Appendix D - Warranty & Service Limited Warranty Magnum Energy, Inc., warrants this ME Series inverter/charger to be free from defects in material and workmanship that result in product failure during normal usage, according to the following terms and conditions: 1. The limited warranty for the product extends for 36 months beginning from the product’s original date of purchase. Note: The normal 3-year warranty on this ME inverter is extended to 5 years if it was ordered with and installed on one of Magnum’s MP or MMP panel systems. To be eligible for the 5-year warranty extension, a proof-of-purchase is required at the time of repair/service showing that the ME inverter and the MP or MMP panel system were purchased at the same time. 2. The limited warranty extends to the original purchaser of the product and is not assignable or transferable to any subsequent purchaser. 3. During the limited warranty period, Magnum Energy will repair or replace at our option any defective parts, or any parts that will not properly operate for their intended use, with factory new or remanufactured replacement items if such repair or replacement is needed because of product malfunction or failure during normal usage. The limited warranty does not cover defects in appearance, cosmetic, decorative or structural parts or any non-operative parts. Magnum Energy’s limit of liability under this warranty shall be the actual cash value of the product at the time the original purchaser returns the product for repair, determined by the price paid by the original purchaser. Magnum Energy shall not be liable for any other losses or damages. 4. Upon request from Magnum Energy, the original purchaser must prove the product’s original date of purchase by a dated bill of sale, itemized receipt. 5. The original purchaser shall return the product prepaid to Magnum Energy in Everett, WA. After the completion of service under this limited warranty, Magnum Energy will return the product prepaid to the original purchaser via a Magnum-selected non-expedited surface freight within the contiguous United States and Canada; this excludes Alaska and Hawaii. 6. This limited warranty is voided if: • the product has been modified without authorization • the serial number has been altered or removed • the product has been damaged from abuse, neglect, accident, high voltage or corrosion • the product was not installed and operated according to the owner's manual How to Receive Repair Service If your product requires warranty service or repair, contact either: 1. An Authorized Service Center, which are listed on the Magnum Energy website under the Service and Support tab (www.MagnumEnergy.com), or 2. Magnum Energy, Inc. at: Telephone: 425-353-8833 Fax: 425-353-8390 Email: [email protected] If returning the product directly to Magnum Energy for repair, you must: • return the unit in the original, or equivalent, shipping container • receive a Return Materials Authorization (RMA) number from the factory prior to the return of the product to Magnum Energy for repair • place RMA numbers clearly on the shipping container or on the packing slip When sending your product for service, please ensure it is properly packaged. Damage due to inadequate packaging is not covered under warranty. We recommend sending the product by traceable or insured service. BEFORE RETURNING ANY UNIT TO MAGNUM ENERGY INC., A RETURN MATERIAL AUTHORIZATION (RMA) NUMBER IS REQUIRED. © 2012 Magnum Energy, Inc. Page 59 Magnum Energy, Inc. 2211 West Casino Rd. Everett, WA 98204 Phone: 425-353-8833 Fax: 425-353-8390 Web: www.magnumenergy.com ME Series Owner’s Manual (PN: 64-0002 Rev B)
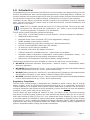
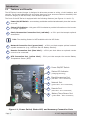
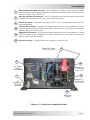
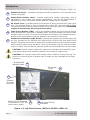
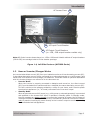
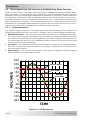
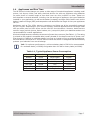
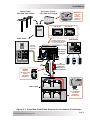
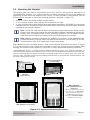
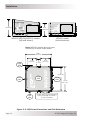

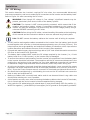
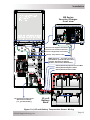
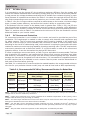
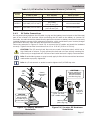
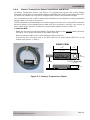

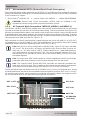
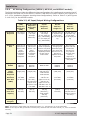
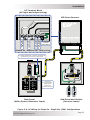
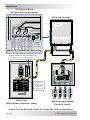
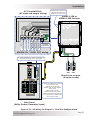

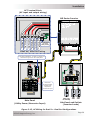
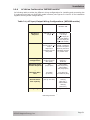
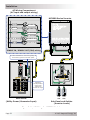

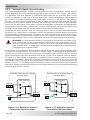
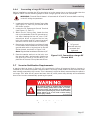
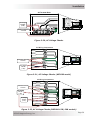
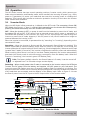
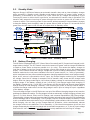
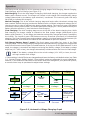
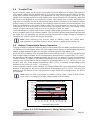
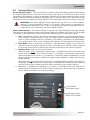
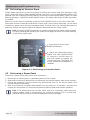
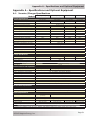
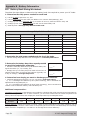

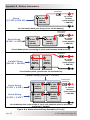

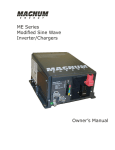


![Roostloggers [Titley] - An Introductory Manual](http://vs1.manualzilla.com/store/data/005649014_1-8c618e497bb2550a491bca85d50a292e-150x150.png)