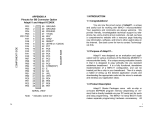
1
ROBOBUG
Users Manual
by
Keith L. Doty
Copyright by Mekatronix 1999
Version 01
MEKATRONIX™
Gainesville, Florida
ROBOBUG™ USERS MANUAL
www.mekatronix.com
08/12/99
Technical questions: [email protected]
AGREEMENT
This is a legal agreement between you, the end user, and Mekatronix™. If you do not agree to the terms of this
Agreement, please promptly return the purchased product for a full refund.
1.
Copyright Notice. Mekatronix™ hereby grants to any individuals or organizations permission to reproduce and
distribute copies of this document, in whole or in part, for any personal or non-commercial educational use only.
This copyright notice must accompany any copy that is distributed.
2.
Copy Restrictions. Other than cases mentioned in Copyright Notice, no part of any Mekatronix™ document
may be reproduced in any form without written permission of Mekatronix™. For example, Mekatronix™ does
not grant the right to make derivative works based on these documents without written consent.
3.
Software License. Mekatronix™ software is licensed and not sold. Software documentation is licensed to you
by Mekatronix™, the licensor and a corporation under the laws of Florida. Mekatronix™ does not assume and
shall have no obligation or liability to you under this license agreement. You own the diskettes on which the
software is recorded but Mekatronix™ retains title to its own software. The user may not rent, lease, loan, sell,
distribute Mekatronix™ software, or create derivative works for rent, lease, loan, sell, or distribution without a
contractual agreement with Mekatronix™.
4. Limited Warranty. Mekatronix™ strives to make high quality products that function as described. However,
Mekatronix™ does not warrant, explicitly or implied, nor assume liability for, any use or applications of its
products. In particular, Mekatronix™ products are not qualified to assume critical roles where human or animal
life may be involved. For unassembled kits, you accepts all responsibility for the proper functioning of the kit.
Mekatronix™ is not liable for, or anything resulting from, improper assembly of its products, acts of God,
abuse, misuses, improper or abnormal usage, faulty installation, improper maintenance, lightning or other
incidence of excess voltage, or exposure to the elements. Mekatronix™ is not responsible, or liable for, indirect,
special, or consequential damages arising out of, or in connection with, the use or performances of its product or
other damages with respect to loss of property, loss of revenues or profit or costs of removal, installation or reinstallations. You agree and certify that you accept all liability and responsibility that the products, both
hardware and software and any other technical information you obtain has been obtained legally according to the
laws of Florida, the United States and your country. Your acceptance of the products purchased from
Mekatronix™ will be construed as agreeing to these terms.
2
MEKATRONIX™
Gainesville, Florida
ROBOBUG™ USERS MANUAL
www.mekatronix.com
08/12/99
Technical questions: [email protected]
MANIFESTO
Mekatronix™ espouses the view that personal autonomous physical agents will usher in a whole new industry, much
like the personal computer industry before it, if modeled on the same beginning principles:
• Low cost,
• Wide availability,
• Open architecture,
• An open, enthusiastic, dynamic community of users sharing information.
Our corporate goal is to help create this new, exciting industry!
WEB SITE: http://www.mekatronix.com
Address technical questions to [email protected]
Address purchases and ordering information
http://www.mekatronix.com/distributors
to
an
authorized
Mekatronix
Distributor
DISCLAIMER
While MEKATRONIX™ has placed considerable effort into making these instructions accurate, MEKATRONIX™
does not warrant the results and the user assumes the risks to equipment and person that are involved.
3
MEKATRONIX™
Gainesville, Florida
ROBOBUG™ USERS MANUAL
www.mekatronix.com
08/12/99
Technical questions: [email protected]
TABLE of CONTENTS
1.
2.
IN A HURRY TO GET ROBOBUG™ MOVING?....................................................7
SAFETY AND HANDLING OF ROBOBUG™ ........................................................7
2.1 ROBOBUG™’s Static Sensitive Parts ....................................................................7
2.2 Caution for Biological Organisms ...........................................................................7
2.3 Holding, Carrying, and Transporting ROBOBUG™...............................................7
2.4 Storage .....................................................................................................................8
3. ROBOBUG™ OVERVIEW........................................................................................8
3.1 What Can ROBOBUG™ DO? ................................................................................8
3.2 Operating Environment for ROBOBUG™..............................................................8
3.3 Physical Orientation.................................................................................................9
3.4 Sensors for ROBOBUG™ .....................................................................................10
3.5 Switches .................................................................................................................11
3.6 Batteries .................................................................................................................11
3.7 Recharger ...............................................................................................................11
3.8 Installing or Replacing ROBOBUG™’s Batteries (IMPORTANT: NiCads only)12
3.9 Serial Communication ...........................................................................................13
3.10 Where is ROBOBUG™ During Program Development? .................................14
3.11 Halting a Moving ROBOBUG™......................................................................14
4. ROBOBUG™ SET-UP..............................................................................................14
4.1 Getting ROBOBUG™ Ready ................................................................................14
4.2 Unpacking an Assembled ROBOBUG™ ..............................................................14
4.3 Computer Requirements ........................................................................................15
4.3.1 Entry Level System (DOS) ............................................................................15
4.3.2 A Windows95 System....................................................................................15
4.4 COM Port Problems to Avoid ...............................................................................15
4.5 Serial Communication between Host Computer and ROBOBUG™ ....................15
4.6 Plugging MB2325 into the Host Computer ...........................................................16
4.7 Connecting the Host computer to ROBOBUG™ ..................................................16
4.7.1 Verify proper operation..................................................................................16
4.8 Software Language Support...................................................................................16
5. SERIAL COMMUNICATION WITH YOUR ROBOBUG™ ROBOT ...................17
5.1 Serial Cable Setup..................................................................................................17
6. IF YOU DO NOT HAVE A C COMPILER..............................................................18
7. INSTALLATION OF ICC11 AND ROBOBUG™ SOFTWARE.............................18
8. INSTALLATION OF ICC11 FOR WINDOWS........................................................19
8.1 IDE Compiler and Linker Setup for ROBOBUG™ ..............................................19
8.2 IDE Setup for Downloading into a Robot..............................................................20
8.3 Integrating ROBOBUG™ Software with ICC11 for Windows.............................21
9. COMPILE AND EDIT ON IDE ................................................................................21
10. DOWNLOADING USING IDE ................................................................................21
11. EXECUTION OF ROBOT CODE ON IDE .............................................................22
12. INSTALL ICC11 FOR DOS......................................................................................22
12.1 Setup ICC11 DOS with seticcbg.bat..................................................................23
4
MEKATRONIX™
Gainesville, Florida
ROBOBUG™ USERS MANUAL
www.mekatronix.com
08/12/99
Technical questions: [email protected]
12.2 Generate ROBOBUG™ Library Object Files....................................................23
12.3 Integrate ROBOBUG™ Software with ICC11 DOS or WINDOWS Versions.24
13. COMPILE A ROBOBUG™ PROGRAM IN DOS...................................................25
13.1 Example DOS Compilation of a ROBOBUG™ C Program .............................26
14. PCBUG11 DOWNLOAD OF A PROGRAM INTO ROBOBUG™ ........................26
15. COMPILE AND LOAD COMMAND UNDER DOS ..............................................27
16. EXECUTE A LOADED ROBOBUG™ PROGRAM IN DOS.................................28
17. ROBOBUG™ SOFTWARE REFERENCE(IVAN ZAPATA COAUTHOR) .........28
17.1 Overview of the ROBOBUG™ Software Library .............................................28
17.2 ROBOBUG™ Control and Walking Functions.................................................29
17.2.1 ROBOBUG™ Leg Identification Scheme .....................................................29
17.2.2 Walking controller .........................................................................................29
17.3 Servo Control Functions ....................................................................................31
17.4 Calibrating the Legs ...........................................................................................32
Leg Lift-Servo............................................................................................................32
Leg Swing-Servo........................................................................................................33
17.5 Other Macro / Symbol Definitions.....................................................................33
17.6 Analog Port Routines.........................................................................................34
18. PROGRAMMING ROBOBUG™ TO WALK( IVÁN ZAPATA) ...........................34
18.1 Types of walking gaits .......................................................................................34
18.1.1 Tripod Walk ...................................................................................................35
18.1.2 “One Leg at a Time” Metachronal Wave.......................................................35
18.1.3 “Two Legs At A Time” Metachronal Wave ..................................................35
18.1.4 The Oar Gait ..................................................................................................36
18.2 Sample program to produce a simple walk........................................................36
18.3 A Program that Develops a Sequence of Walks ................................................37
19. PROGRAMMING BEHAVIOURS...........................................................................37
19.1 Scope..................................................................................................................37
19.2 Some Possible Behaviors..................................................................................37
19.3 Advice on Developing Behaviors ......................................................................38
19.3.1 Vulcan Mind Meld.........................................................................................38
19.3.2 Virtual Mind Meld© ......................................................................................38
19.3.3 Relative calibration of sensors of the same type............................................38
19.3.4 Adjusting to Ambient Conditions ..................................................................39
19.3.5 Create simple behaviors.................................................................................39
19.3.6 Build on simple behaviors .............................................................................39
19.4 Integrating Behaviors .........................................................................................40
20. ROBOBUG™ TROUBLESHOOTING GUIDE .......................................................40
21. CONCLUSION..........................................................................................................42
LIST of FIGURES
Figure 1. Top view of ROBOBUG™. The optional ARGOS pan-tilt head mounts on the front of the robot, shown at
the left of the picture. .......................................................................................................................................... 9
Figure 2. This diagram illustrates the ROBOBUG™ leg numbering and naming scheme and identifies the
corresponding servo numbers for each leg. The lower numbered servo moves the leg up and down while the
5
MEKATRONIX™
Gainesville, Florida
ROBOBUG™ USERS MANUAL
www.mekatronix.com
08/12/99
Technical questions: [email protected]
higher numbered servo swings the leg back and forth. The direction of the arrow indicates the front of the
robot as you look down from the top................................................................................................................. 10
Figure 3 This figure illustrates the arrangement of ROBOBUG™’s switches and CHARGE indicator light............ 10
Figure 4 MB2325 Communications Board ................................................................................................................. 13
Figure 5. This diagram illustrates the serial connection between a personal computer, the communications board
(MB2325) and a ROBOBUG™. ....................................................................................................................... 13
Figure 6 This Photograph shows the gray serial cable from a PC COM port mating with the D-25 connector on the
communications board (com-board = MB2325 = the exposed circuit board sitting on the white boxes). The
multicolored 6-wire serial cable attaches to the male header on the com-board and into the serial slot on the
ROBOBUG™ plate. Note the same color orientation of both ends of the 6-wire cable for the configuration
pictured............................................................................................................... Error! Bookmark not defined.
Figure 7 The libbugmake which generates libbug.a library object file for the ROBOBUG™ robot............... 24
Figure 8 Listing of the batch file installbg.bat that integrates ROBOBUG™ software into the appropriate iccbg
directories.......................................................................................................................................................... 25
Figure 9 The compbg.bat file for compiling ROBOBUG™ code. Note that the .c extension must be omitted from
the source code file name when using this command. ....................................................................................... 26
Figure 10. This diagram illustrates the ROBOBUG™ leg numbering and naming scheme and identifies the
corresponding servo numbers for each leg. The lower numbered servo moves the leg up and down while the
higher numbered servo swings the leg back and forth. The direction of the arrow indicates the front of the
robot as you look down from the top................................................................................................................. 29
Figure 11. This portion of the calbug.h file defines three positions for the right-middle leg servos, servos 6 (lift
servo) and 7 (swing servo). Two of the values indicate the extremities of motion and a third an intermediate
value dictated by the leg structure and desired motion pattern.......................................................................... 32
Figure 12. Elevated view of ROBOBUG™ showing the rear legs in center position for both the lift-servos and
swing-servos. During calibration, position the legs as shown and then take the reading of the center position of
each lift-servo and swing-servo center position................................................................................................. 33
Figure 13. The tripod walk used by ants and other insects for fast and efficient walking is both statically and
dynamically stable. ............................................................................................................................................ 35
Figure 14. A single-leg metachronal gait swings each leg in sequence, from back-to-front, first on one side and then
on the other. The red colored leg indicates the leg currently swinging. ............................................................ 35
Figure 15. A two-legged metachronal gait swings two legs at a time and consists of two simultaneous single leg
metachronal patterns out of phase by five leg positions. ................................................................................... 35
Figure 16. A two-legged gait that swings the four contralateral outside legs metachronally, alternating with an oar
sweep by the contralateral middle legs. ............................................................................................................. 36
LIST of TABLES
Table 1 Primitive Behaviors ....................................................................................................................................... 37
6
MEKATRONIX™
Gainesville, Florida
ROBOBUG™ USERS MANUAL
www.mekatronix.com
08/12/99
Technical questions: [email protected]
1. IN A HURRY TO GET ROBOBUG™ MOVING?
If reading manuals is not your “thing” and you really want to see ROBOBUG™ walk, then
download walks.s 19 into ROBOBUG™ and watch it walk! If you cannot implement this
sentence, you clearly must do some more reading!
1. To obtain quick satisfaction and ideas about walking and programming walks, read Sections
17 and 18.
2. If you have purchase ICC11 WINDOWS with IDE, read Sections 7, 8, 9, 10, 11, 17 and 18.
3. If you have purchase ICC11 DOS, read Sections 7, 12, 13, 14, 15, 16, 17 and 18.
For ideas about programming ROBOBUG™ behaviors consult Section 19.
Do read the rest of the manual. It contains important information about the care and treatment of
your robot, software installation, troubleshooting tips, etc. that will answer typical questions.
2. SAFETY AND HANDLING OF ROBOBUG™
2.1 ROBOBUG™’s Static Sensitive Parts
Some of ROBOBUG™’s components are static sensitive. These are located on the printed circuit
boards. Do not touch these boards without being properly grounded. Static discharge can destroy
these parts.
2.2 Caution for Biological Organisms
Most individuals find ROBOBUG™, exciting, enjoyable, amusing, and fascinating.
ROBOBUG™’s small size minimizes any threat to organic life, although pets and small children
might find ROBOBUG™ either an interesting playmate or an alien to avoid. A child’s hands,
feet, and mouth probing ROBOBUG™ may lead to minor injury to both child and robot, so, to
eliminate adverse reactions with pets, children, or nervous adults, be sure ROBOBUG™ operates
under supervision by someone who knows how to turn it off. Remember, ROBOBUG™ is an
autonomous machine and, as such, becomes “out of control” once set in motion. An optional
add-on IR remote control package can be purchase separately to allow you to override
ROBOBUG™’s autonomous mode.
2.3 Holding, Carrying, and Transporting ROBOBUG™
ROBOBUG™’s small size and portability make it ideal for safe demonstrations and
presentations of machine intelligence algorithms. Porting ROBOBUG™ from desk-top platform
to floor and back, the most frequent carrying operation, requires handling ROBOBUG™
carefully.
Caution!
Do not carry or pickup ROBOBUG™ by a leg! Firmly grasp his underbelly or
back near the center.
7
MEKATRONIX™
Gainesville, Florida
ROBOBUG™ USERS MANUAL
www.mekatronix.com
08/12/99
Technical questions: [email protected]
To transport ROBOBUG™ for long distances, place it securely padded into a suitably sized box.1
Do not expose ROBOBUG™ to extreme cold or heat in an automobile during winter and
summer for more than a few hours. Although ROBOBUG™ has survived a hot automobile for
12 hours in 40° C, such treatment cannot help but reduce its lifetime.
ROBOBUG™ has flown in airline luggage compartments across the Atlantic, ridden in
automobiles, passed around in a class of electrical and computer engineering students, and used
by middle school students for schools science projects, all without ill effects! The following
caution, however, is our official advisement.
Caution: ROBOBUG™ should not be exposed to moisture, or continuous high humidity
(>80%), or high temperatures, 40° C (100°F), or low temperatures, 5°C (40°F).
2.4 Storage
Place ROBOBUG™ in a labeled (don’t forget where “he” is), enclosed, sealed, padded box in an
office or home environment when storing for extended periods of time.
3. ROBOBUG™ OVERVIEW
This section provides the user general orientation to ROBOBUG™ .
3.1 What Can ROBOBUG™ DO?
ROBOBUG™ provides an entry-level platform for the development and testing of machine
intelligence and autonomous behavior algorithms for a walking robot. ROBOBUG™ can help
individuals interested in ethology (animal behavior) to visualize different insect walking gaits
that are difficult to observe while watching real insects scurry across the floor!
Of course, by adding sensors you can program your ROBOBUG™ to do many other things. You
can program it to walk around and report on its environment. You can get the robot to seek out a
person or another robot. You can program it to hide from something such as moving objects or
light. You can program it to behave like different insects with which you are familiar, etc.
The modest beginning represented by ROBOBUG™ and other MEKATRONIX robots to follow
will lay the groundwork and develop the technical infrastructure for a new mechanical species to
serve mankind. The arrival of this new species will tremendously affect social, political,
religious, philosophical, scientific, engineering, and mathematical interests. To our children’s
children, these days will seem primitive indeed.
3.2 Operating Environment for ROBOBUG™
ROBOBUG™ is designed to operate in an office or home environment with smooth tiled floors.
Although ROBOBUG™ can handle short pile rugs, he spends more energy overcoming rug
1
An accessory ROBOBUG™ carrying case will be offered soon.
8
MEKATRONIX™
Gainesville, Florida
ROBOBUG™ USERS MANUAL
www.mekatronix.com
08/12/99
Technical questions: [email protected]
friction than tile friction and his operational lifetime on a battery charge reduces considerably.
Shag rugs and extremely rough surfaces are inimical to ROBOBUG™ and should be avoided.
In general, operating environments comfortable to lightly clothed humans will probably be
suitable for ROBOBUG™. However, we reiterate the previous caution on environmental
constraints.
Caution: ROBOBUG™ should not be exposed to moisture, or continuous high humidity (80%),
or high temperatures, 40° C (100°F), or low temperatures, 5°C (40°F).
3.3 Physical Orientation
The optional ARGOS pan-tilt head mounts at the front of ROBOBUG™ (Figure 1). The switches
and charge light mount on the top near the tail of the robot. Figure 2 illustrates the naming and
Figure 1. Top view of ROBOBUG™. The optional ARGOS pan-tilt head mounts on the front of the robot, shown at
the left of the picture.
number of ROBOBUG™’s six legs. Each leg is actuated by two servos, yielding twelve leg
servos in total. A lift-servo moves the leg up and down and the swing-servo moves the leg back
and forth. Servos 2 and 3 constitute the pan and tilt servos on the optional ARGOS pan-tilt head.
Servo numbers 0 and 1 are reserved for future use.
The right front leg (RF) is assigned the number 0 (Figure 2). Successive leg numbers are assigned
in clockwise order looking down on the robot. For the first letter in ROBOBUG™’s leg naming
convention, R means right and L left. For the second letter, F means front, M middle, and R rear.
Figure 2 also lists the servo numbers for the lift and swing servos of each leg in that order.
9
MEKATRONIX™
Gainesville, Florida
ROBOBUG™ USERS MANUAL
www.mekatronix.com
08/12/99
Technical questions: [email protected]
Front of ROBOBUG™
Servos 14&15
LF 5
0 RF Servos 4&5
Servos 12&13
LM 4
1 RM Servos 6&7
Servos 10&11
LR 3
2 RR Servos 8&9
Figure 2. This diagram illustrates the ROBOBUG™ leg numbering and naming scheme and identifies the
corresponding servo numbers for each leg. The lower numbered servo moves the leg up and down while the higher
numbered servo swings the leg back and forth. The direction of the arrow indicates the front of the robot as you look
down from the top.
3.4 Sensors for ROBOBUG™
The standard ROBOBUG™ kit does not include sensors. The optional ARGOS pan-tilt head
provides a movable platform on which you can mount different sensors: IR detectors,
photoresistors and sonar. Check with your Mekatronix distributor for details. Optional pushbutton foot sensors can also be mounted on each leg. These switches tell the robot if the foot is
actually making contact with the ground.
Front of RoboBug
Figure 3. This figure illustrates the arrangement of ROBOBUG™’s switches and charge indicator light.
10
MEKATRONIX™
Gainesville, Florida
ROBOBUG™ USERS MANUAL
www.mekatronix.com
08/12/99
Technical questions: [email protected]
3.5 Switches
ROBOBUG™ control switches on the top plate near the back provide easy access. The layout of
the switches can be determined from Figure 3.
The red RESET button resets the MC68HC11E2 microcomputer. The ON/OFF switch provides
power. The visible green CHARGE LED lights when the AC adapter output plug is inserted into the
charge jack.
In DOWN-LOAD mode the DOWN-LOAD/RUN mode switch permits the user to download programs
using PCBUG11 or ICC11 WINDOWS IDE. In RUN mode, a press of the reset button will invoke
the start-up program the user has loaded into ROBOBUG™.
3.6 Batteries
ROBOBUG™ requires five C-Cell Nickel-Cadmium rechargeable batteries to drive the legs and
a 9v rechargeable battery for the electronics.
Warning!
Only use nickel-cadmium batteries. Alkalines, for example. will produce too much
voltage and may damage the electronics.
The C-cells fill the “belly” of the robot. The polarity is marked on the robot. Be sure to put all 5
C-cell batteries in the same, correct polarity orientation. The negative terminals all face the front
and the positive terminals all face the tail.
Warning!
Incorrect installation of the batteries will destroy the computer
and other electronics!
ROBOBUG™ can run autonomously on a smooth tile floor for about 15 minutes on a fully
charged battery pack. This time depends critically upon how fast the robot walks, how long it
walks, whether it pauses during a walk and the capacity of the C-cells you have put into the
robot. Higher capacity C-cells will last longer. NiCad batteries sustain useful power until just
before they become fully discharged. So, if you see ROBOBUG™ really slowing down, it is time
to recharge or put in freshly charged replacements!
3.7 Recharger
The charging technique is known as a trickle charge. This means that a small current is
constantly applied to the batteries. Because this is a low level current the robot can be left
charging indefinitely. While the robot is not moving around plug it into the charger. This will
keep the batteries charged. Be sure to use only a Mekatronix approved AC adapter.
11
MEKATRONIX™
Gainesville, Florida
ROBOBUG™ USERS MANUAL
www.mekatronix.com
08/12/99
Technical questions: [email protected]
ROBOBUG™’s charger must be at 12 volts and be able to supply 500 milliamps. Lower voltages
will not charge the batteries and higher voltages my damage the electronics. The charger plugs
into the receptacle next to the power switch.
Recommendation: During program development and high usage times, keep ROBOBUG™
connected to the charger whenever possible. This will insure fresh batteries during
experimentation.
Caution: If the output DC voltage of the AC adapter exceeds 12 volts, the 1/4 watt charging
resistors will act like a fuse and burn out and char a spot on the underside of the top plate. The
smoke and smell are unpleasant and potentially hazardous, so be careful.
3.8 Installing or Replacing ROBOBUG™’s Batteries (IMPORTANT: NiCads only)
C-CELLS
1. Turn ON/OFF switch to OFF.
2. Unplug charger.
3. Slide out the rear battery door retainer clip (Part Number: RBGBD-05) from the top and
remove rear battery door (Part Number: RBGBB-03) with the + sign on it. The gate is spring
loaded, so it will tend to pop away.
4. Slide old batteries out from the opening, if there are any in the cavity.
5. Insert five C-cell NiCad batteries into the cavity, negative terminal first, as labeled on the
battery. Failure to do this procedure correctly may destroy all the electronics.
6. Place the rear battery door (Part Number: RBGBB-03) with its metal contact point against the
positive terminal of the last battery. Hold the door correctly and firmly in place as you slip the
battery door retainer clip (Part Number: RBGBD-05) back into its slot. The clip will lock the
door into place. The C-cells are now installed.
NINE VOLT BATTERY
1. Turn ON/OFF switch to OFF.
2. Unplug charger.
3. Slide out the rear battery door retainer clip (Part Number: RBGBD-05) from the top and
remove rear battery door (Part Number: RBGBB-03) with the + sign on it. The gate is spring
loaded, so it will tend to pop away.
4. Slide old 9volt battery from the spine just above the C-Cell “belly” cavity. Use the Velcro
strip to pull the battery out and unsnap.
7. Snap the new battery on to the clip.
WARNING!
DO NOT TOUCH THE BATTERY TERMINALS TO THE WRONG SNAP
BUTTONS OR YOU WILL REVERSE THE POLARITY AND POSSIBLY
DESTROY THE ELECTRONICS!
12
MEKATRONIX™
Gainesville, Florida
08/12/99
ROBOBUG™ USERS MANUAL
www.mekatronix.com
Technical questions: [email protected]
8. Insert the Velcro strip with a portion hanging out. Slip the 9volt NiCad battery into the spinal
cavity, leaving enough Velcro hanging out to be able to pull the battery out next time you
service it.
9. Place the rear battery door (Part Number: RBGBB-03) with its metal contact point against the
positive terminal of the last battery. Hold the door correctly and firmly in place as you slip the
battery door retainer clip (Part Number: RBGBD-05) back into its slot. Push the Velcro end
up against the 9volt battery and out of the way of the clip. The clip will lock the door into
place. The 9volt battery is now installed.
3.9 Serial Communication
The MB2325 serial communications board shown in
(Figure 4) permits the user to download and upload
code and data to ROBOBUG™ via a 6-wire serial
communications link. The 6-wire communications line
connects into the MB2325 bidirectional serial
communications board at one end (lower-right corner in
(Figure 4) and to ROBOBUG™’s serial interface at the
other (Figure 5). The MB2325 D-connector plugs
directly into a COM port of your personal computer 25
pin D-connector or through a serial cable. If your
computer serial connector only has a 9 pin Dconnector, you will need to acquire a 25 to 9 pin plug
converter.
25-pin DConnector to
Host Computer
6-Pin Serial
Connection to
TALRIK™
Diode D1
Figure 4 MB2325 Communications Board
Personal
Computer
COM
Port
Serial Cable
6-wire Serial
Ribbon Cable
ROBOBUG
D-25
MB2325
LF
LM
LR
Figure 5. This diagram illustrates the serial connection between a personal computer, the communications board
(MB2325) and a ROBOBUG™.
13
MEKATRONIX™
Gainesville, Florida
ROBOBUG™ USERS MANUAL
www.mekatronix.com
08/12/99
Technical questions: [email protected]
3.10 Where is ROBOBUG™ During Program Development?
You will probably spend considerable time developing and testing programs to run on
ROBOBUG™. During the initial phases of this process the user will undoubtedly make many
changes and run many variations of the programs. This procedure can be expedited by mounting
ROBOBUG™ on a test platform that elevates the legs off the floor or desktop so that the legs
move freely without touching any surface. To maintain fresh batteries during these long
development sessions, keep ROBOBUG™ connected to the charger. Also, keep the serial
communications cable to ROBOBUG™ connected to minimize plugging and unplugging it.
When the user is ready to test ROBOBUG™ on the floor, disconnect both the charger and the
serial communications cable from ROBOBUG™.
3.11 Halting a Moving ROBOBUG™
Chasing down a moving ROBOBUG™ takes more skill than transporting it. A recommended
procedure is to chase it from behind and reach down to turn the ON/OFF switch OFF. If you have
mounted sensors, you can also program the robot to stop on certain sensed conditions that can be
artificially generated.
4. ROBOBUG™ SET-UP
You may find that the ROBOBUG™ Assembly Manual provides useful nomenclature and
diagrams depicting the various components and structures and you may need to refer to it from
time to time.
4.1 Getting ROBOBUG™ Ready
This section tells you how to unpack and prepare ROBOBUG™ for operation. If you bought a
ROBOBUG™ kit you will have already read the ROBOBUG™ Assembly Manual and put it
together and you can skip the next section.
4.2 Unpacking an Assembled ROBOBUG™
1.
Carefully unwrap ROBOBUG™ from the bubble wrap being careful not to catch
wires or drop the robot.
2.
Visually inspect the robot for any obvious damage.
3.
Make sure that no cables have become disconnected from the robot during shipment. If
cables have disconnected, it is usually obvious how to reconnect them as they were.
4.
If you have this manual the presumption is that you have downloaded it and the
distribution software package from the distributor from whom you purchased the kit.
5.
You may have also purchased the following (recommended)
•
A wall plug adapter for recharging the robot ,
•
An MB2325 serial communications board and cable,
•
5 C-Cell Nickel Cadmium rechargeable batteries,
•
9volt Nickel Cadmium rechargeable battery,
•
ARGOS pan-tilt head with sensors.
14
MEKATRONIX™
Gainesville, Florida
ROBOBUG™ USERS MANUAL
www.mekatronix.com
08/12/99
Technical questions: [email protected]
4.3 Computer Requirements
Program development for the ROBOBUG™ can be performed on either a DOS system or a
WINDOWS system. The latter is recommended for greater utility and productivity..
4.3.1 Entry Level System (DOS)
The following computer system will meet all the basic hardware support for developing
ROBOBUG™ programs and applications.
286-PC or later processor running under DOS with several Megs of available hard disk space
and 1 Meg of RAM.
2. An available serial port. We will assume that COM1 is used. See the next section about COM
port problems to avoid.
3. 1.44 Meg floppy
1.
4.3.2 A Windows95 System
The following hardware offers a more efficient and easier to use working environment.
1. A high speed (100MHz or better) computer running Windows 95
2. Some modems work and some do not with PCBUG11. You may need to disconnect your
modem (see the section titled COM Port Problems to Avoid, page 15).
3. A mouse on COM2
4. A printer
5. Access to the Internet, especially the World Wide Web,
6. Windows terminal (terminal.exe)
4.4 COM Port Problems to Avoid
AVOID THE FOLLOWING PROBLEM ALTOGETHER WITH THE PURCHASE OF THE
ICC11 WINDOWS IDE (Integrated Development Environment).
Motorola’s freeware Pcbug11 uses the serial port in a manner that does not permit sharing the
serial interrupt. Therefore, the port that communicates with the robot should not share the same
interrupt with any other system resource. For example, COM1 and COM3 share the same
interrupt in DOS, as do COM2 and COM4. So, if the robot is connected to COM1, nothing else
should be connected to COM1 or COM3 or use their interrupts. We have seen some extreme
instances when the internal modem of a computer had to be removed to get Pcbug11 running,
because the modem used the same interrupt as the robot COM port and disrupted the robot serial
communication.
4.5 Serial Communication between Host Computer and ROBOBUG™
This section assumes ROBOBUG™ has fully charged batteries and the processor functions.
Without either of these prerequisites, the user cannot begin.
The MB2325 serial communications board generates the proper voltage conversions that permit
the user to download and upload code and data to ROBOBUG™ via a 6-wire serial
15
MEKATRONIX™
Gainesville, Florida
ROBOBUG™ USERS MANUAL
www.mekatronix.com
08/12/99
Technical questions: [email protected]
communications link. Whenever testing programs on ROBOBUG™, the user will connect the
host computer with ROBOBUG™ via this interface. Rather than duplicate this interface circuit
on each robot, Mekatronix™ chose to make a single external interface for the host computer.
This approach has a twofold advantage, 1) removal of this circuitry from the robot platform saves
battery energy and reduces printed circuit board cost, 2) only one MB2325 board is required per
computer instead of one per robot. In multiple robot systems, or swarm systems, this approach
yields an increasing cost advantage.
4.6 Plugging MB2325 into the Host Computer
The MB2325 serial communications board (Figure 4) has a 25-pin, female, type D-connector. On
most computers COM1 is a 25-pin male D-connector. If your computer has a 9-pin connector
you will need a 9- to 25-pin converter (available at most computer and electronics stores). When
the MB2325 is plugged into the COM1 port of the host computer D1 will light. This light lets
you know that the serial port on the host computer is working. If D1 does not light, something is
wrong with the serial port of the host computer and the robot will not be able to communicate
with it.
4.7 Connecting the Host computer to ROBOBUG™
After the MB2325 is connected to the computer, take the 6-pin rainbow colored cable and insert
either end onto the only 6-pin male header (J2) on the MB2325. On the back of the robot is a 6pin rainbow cable with a male connector. Connect this male header to the female connector on
the other end of the cable coming from the computer. This end is also a keyed connector. Now,
place the DOWN-LOAD / RUN switch to the DOWN-LOAD position. Turn the ON/OFF switch to ON. At
this point the red LED on the robot’s top board should light. Press and momentarily hold RESET
(the red button) on the robot. With RESET pressed, D2 on the MB2325 should light. If D2 does
not come on, reverse the 6-wire connector at one end only and try again. D2 should now light
with RESET pressed. When RESET is released, D2 on the MB2325 turns off.
4.7.1 Verify proper operation
The lights on the MB2325 let you know that the basic connections are working. If the POWER-ON
light does not light when the power switch is turned to ON, the robot may not be charged. If the
batteries are charged, check battery and power connections to the circuit boards. Particularly,
check underneath the robot to verify the battery cable has not come undone from the power
connector. If the lights on the MB2325 board do not function as specified, check that no other
programs or devices are using the serial port.
4.8 Software Language Support
ROBOBUG™ programs can be developed with Image Craft C (ICC11), the compiled version of
C for the MC68HC11 or with Motorola MC68HC11 Assembly Language. Motorola MC68HC11
Assembly Language is freeware and is supplied at no charge.
ICC11 augmented with the appropriate Mekatronix library files is sold by authorized Mekatronix
distributors (www.mekatronix.com/distributors) and is the preferred programming language for
16
MEKATRONIX™
Gainesville, Florida
ROBOBUG™ USERS MANUAL
www.mekatronix.com
08/12/99
Technical questions: [email protected]
extensive program development on ROBOBUG™ and is the language of choice for other
Mekatronix™ robots. The compiler comes in a DOS and a WINDOWS version. The DOS
version, which costs less, is very hard and tedious to use with ROBOBUG™ and is not
recommended.
5. SERIAL COMMUNICATION WITH YOUR ROBOBUG™ ROBOT
Serial communication between your PC and the robot may be established several ways, through
1.
2.
3.
Serial Cables, a
900 MHZ radio communication link (option), or
IR communication link (option).
Through the serial communication link between your robot and personal computer you can
1.
Download executable “.s19” object files from your PC to the robot,
2.
Download data and commands from the PC to the robot, and
3.
Upload data from the robot to the PC.
5.1 Serial Cable Setup
The radio and IR serial links are options. Refer to their respective manuals. The standard option,
serial communication between robot and PC through cables, is described here, assuming a
WINDOWS environment for both the DOS and the WINDOWS version of ICC11 compiler.
1. On Windows95 open an MSDOS window for the DOS version and IDE for the WINDOWS
version of the C-Compiler.
2. If you are using the ICC11 DOS compiler, then execute seticcbg.bat. Assuming a DOS
prompt, set the current directory by typing: cd <path to iccbg>
3. Connect one end of a C2325, a 6-wire serial communications cable, to the Mekatronix
MB2325 serial communications board. There is only one 6-pin male header on the MB2325,
just below the two LEDs. Connect the other end of this cable to the serial port (J54 male
header) on the MSCC11. Corresponding pins of the 6-pin headers on the MB2325 and the
ROBOBUG™ plate, match from left-to-right as oriented in the diagram. Thus, the leftmost
pin at one end connects by wire to the leftmost pin at the other end.
4. The MB2325’s 25-pin female D-connector can connect directly to your Personal Computer
COM port or via a serial cable. Make such a connection. This setup establishes a link from
ROBOBUG™ to your PC. Check to make sure diode D1 lights when you connect the
MB2325 to your PC via the serial cable or directly into its serial port. The advantage of using
a serial cable between the MB2325 and COM port now becomes obvious, you can easily see
the LED status lights on the MB2325. Refer to Figure 3 for switch and connector locations.
5. Important: Do not connect the serial cable to a COM port that is already being used.
17
MEKATRONIX™
Gainesville, Florida
ROBOBUG™ USERS MANUAL
www.mekatronix.com
08/12/99
Technical questions: [email protected]
6. Flip the DOWNLOAD/RUN switch to DOWNLOAD.
7. Turn on ROBOBUG™ power with the ON/OFF switch flipped to ON. If the robot does not
“twitch” when you turn power on, check batteries and battery connections before going
further.
8. Press the red push-button RESET switch. LED D2 lights when you hold RESET down. D2 is the
LED closest to the edge of the Mb2325 com-board. If it does not light, reverse the C2325 6pin connector to the MB2325 and try again.
9. With the physical serial communication link in place, download a program using either the
IDE Terminal program (WIN95), or PCBUG11 (DOS). Refer to Sections 10 and 14 for
download procedures.
Alert!
PCBUG11 is archaic freeware that is extremely slow and will not execute on many new
computers. Mekatronix does not support PCBUG11. If you choose to use PCBUG11 and cannot
get it to work we highly recommend purchase of ICC11 IDE from Mekatronix which downloads
about 10-30 times faster!
You now have a successful serial communication link between your robot and personal
computer.
6. IF YOU DO NOT HAVE A C COMPILER
If you did not purchase ICC11 from an authorized Mekatronix distributor
(www.mekatronix.com/distributors) and you do not have your own C compiler for the
MC68HC11 family of computers, you can program in Assembly language. You can assemble
your programs using the Motorola freeware Assembler located in the directory ASSEMBLER on the
ROBOBUG™ software distribution disk. The Motorola Assembler will generate S19 files from
your assembly language programs. S19 files are ASCII files that the Motorola boot loader can
read and convert to MC68HC11 machine code. The download process for S19 files is described
in Section 5 of this manual.
Assembly language programming is beyond the scope of this manual. A good, readable
beginning textbook for learning MC68HC11 assembly language programming is:
Microcomputer Engineering, Gene H. Miller, Prentice Hall, 1993, ISBN 0-13-584475-4
7. INSTALLATION OF ICC11 AND ROBOBUG™ SOFTWARE
If you purchased the ICC11 software this section provides guidance in its installation and
integration with the ROBOBUG™ software. Be sure to refer to your ICC11 manual for
installation particulars for the ICC11 system. The IDE environment makes the WINDOWS
version a sweet tool for programming your Mekatronix robots and makes life much easier than
18
MEKATRONIX™
Gainesville, Florida
ROBOBUG™ USERS MANUAL
www.mekatronix.com
08/12/99
Technical questions: [email protected]
the DOS version. Mekatronix highly recommends the WINDOWS version. Experience has
shown it is well worth the additional cost.
Note: In typed commands to your computer, angle brackets indicate parameters for which you
must substitute the appropriate information. Do not actually type the angle brackets. For
example, <enter> means “Press the Enter key on the keyboard ; <filename> means “Type
the filename alphanumeric key sequence on the keyboard and the path to it, if necessary.”
Summary of Installation Process
1.
Insert ICC11 diskette and install ICC11, or download from an authorized Mekatronix
distributor (www.mekatronix.com/distributors) web site.
2.
Remove ICC11 diskette, insert the most recent version of the ROBOBUG™ Distribution
Software diskette and install, or download from an authorized Mekatronix web site and
install. Installation essentially means copying files into appropriate directories in c:\iccbg.
8. INSTALLATION OF ICC11 FOR WINDOWS
Insert ICC11 diskette and install ICC11, or download from an authorized Mekatronix distributor
(www.mekatronix.com/distributors) web site. You will see an executable file such as
v51win.exe. Execute it and follow directions. Specify c:\iccbg as your root directory. Let
the installation update your DOS Config file. Reboot. Put the ICC11 icon shortcut on your
desktop.
After installation you should observe the following file directory structure
•
c:\iccbg
• Bin
• Examples
• Include
• Lib
• Libsrc
8.1 IDE Compiler and Linker Setup for ROBOBUG™
Once you setup the IDE environment, you will not have to change it from invocation to
invocation, since it remembers its most recent state.
1.
Double click on ICC11 icon to enter the Integrated Development Environment (IDE ).
2.
Under OPTIONS in the menu bar select COMPILE.
3.
In COMPILER select the Linker tab.
4.
In the Linker setup window enter the following:
a. Text section:
b. Stack:
c. Data Section:
d. Additional Libraries:
0xf800
0x00ff
0x0000
libbug
19
MEKATRONIX™
Gainesville, Florida
ROBOBUG™ USERS MANUAL
www.mekatronix.com
08/12/99
Technical questions: [email protected]
(You may wish to use the Setup Wizard to save this configuration under the name ROBOBUG.)
If you specified c:\iccbg as your root during installation, then
e. Library Path: c:\iccbg\Lib
will be the default.
5.
Select Preprocessor under COMPILER:
If you specified c:\iccbg as your root during installation, then
Include Paths:
c:\iccbg\include
will be the default.
6.
Close COMPILER window.
Continue immediately to the next section.
8.2 IDE Setup for Downloading into a Robot
1.
Select TARGET on main menu bar.
2.
Select Bootstrap Download Mode.
3.
Select TARGET on main menu again.
Verify that Bootstrap Download Mode has a check mark by it and then
4.
Select Terminal.
A window opens up. Expand it to fill your screen. At the bottom you will see several
selection buttons. You will address those next.
5.
Select Bootstrap Options. The HC11 window opens.
6.
In Bootloader Programming select "Internal EEPROM".
7.
Set HW echo mode to "normal".
8.
Set baud rate to default (1200)
9.
Close HC11 window.
You are now ready to edit, compile and download programs to your robot from the IDE.
20
MEKATRONIX™
Gainesville, Florida
ROBOBUG™ USERS MANUAL
www.mekatronix.com
08/12/99
Technical questions: [email protected]
8.3 Integrating ROBOBUG™ Software with ICC11 for Windows
Integrating ROBOBUG™ software amounts to copying files into iccbg directory at the
appropriate places. Refer to Section 12.3 and Figure 7.
9. COMPILE AND EDIT ON IDE
1.
Select File in the menu bar and click on Open.
Browse to select the source code file of interest, for example, c:\iccbg\bgcode\walks.c, and
open it.
A window opens which allows you to edit the program. In the example case, the program needs
no editing, but normally you would edit your program at this time. Refer to the ICC manual for
details on editor commands.
2.
Use Window on the menu bar to tile the Status and Editor windows (ALT-T).
3.
Select Compile in menu bar and then select Compile to Executable.
The compiler compiles the program in the currently active edit window. If no edit window is
open, no compilation is possible.
4.
Watch the Status window. A successful compile ends with the word SUCCEEDED,
otherwise note errors and correct your program in the edit window and repeat Steps 3 and 4.
10. DOWNLOADING USING IDE
You must carry out the setup in Sections 8.1 and 8.2 before downloading any files into the robot.
Your setup will be in the state that you left it in at the end of your previous IDE session.
Connect your PC, serial cable, MB2325 communications board and the six-wire Mekatronix
serial cable C2325 to the robot as described in Section 5.
Open up IDE by double clicking on your ICC11 icon.
1.
2.
3.
Select Target in the menu bar.
If Bootstrap Download Mode is checked, select Terminal and skip Step 3. Otherwise
select Bootstrap Download Mode and do Step 3.
Select Target again and click Terminal.
You now have the terminal window open.
4.
If necessary, select Browse to find the .s19 file of interest. Select the desired .s19 file.
5.
Flip the robot’s Download/Run switch to Download.
21
MEKATRONIX™
Gainesville, Florida
6.
ROBOBUG™ USERS MANUAL
www.mekatronix.com
08/12/99
Technical questions: [email protected]
Press the robot’s red Reset button.
Make sure diode D2 on the MB2325 board lights when reset is held down and goes off when
reset is released.
7.
Select Bootstrap Download in the IDE Terminal window.
8.
Select OK on the IDE message.
9.
The .s19 file loads into the robot.
You are now ready to execute the code on the robot.
11. EXECUTION OF ROBOT CODE ON IDE
The IDE terminal simulator (Terminal) accepts robot serial output directly! This allows you to
monitor robot IO while the robot remains connected to the PC, a very convenient feature of IDE.
Execute Program Procedure
1.
Download .s19 file into robot from Terminal window (refer to Section 10).
2.
Flip robot Download/Run switch to Run.
3.
Press robot red Reset button.
CAREFUL PROGRAM WILL START IMMEDIATELY!
Your program will start to run. If your program transmits serial output, it will appear on the
terminal simulator of IDE that you currently have open. If your robot produces IO to the
Terminal screen, you may have to press reset several times or hold it down for a second to get
clean communication.
12. INSTALL ICC11 FOR DOS
Insert ICC11 diskette and install ICC11, or download from an authorized Mekatronix distributor
(www.mekatronix.com/distributors) web site. You will see an executable file such as
v51win.exe. Execute it and follow directions. Specify c:\iccbg as your root directory. Let
the installation update your DOS Config file. Reboot. There is no IDE for DOS.
After installation you should observe the following file directory structure
•
c:\iccbg
• Bin
• Examples
• Include
• Lib
• Libsrc
22
MEKATRONIX™
Gainesville, Florida
ROBOBUG™ USERS MANUAL
www.mekatronix.com
08/12/99
Technical questions: [email protected]
12.1 Setup ICC11 DOS with seticcbg.bat
Always execute seticcbg.bat in c:\iccbg after opening a DOS window. Do not execute it more
than once in an opened DOS window:
c:\iccbg>iccbg<enter>
The DOS batch file seticcbg.bat is listed below:
PATH %PATH%;c:\iccbg\bin
set ICC11_INCLUDE=c:\iccbg\include
set ICC11_LIB=c:\iccbg\lib
set ICC11_LINKER_OPTS=-btext:0xf800 –bdata:0x0000 –lbg -dinit_sp:0x00FF -dheap_size:0
Refer to the ICC11 Manual for explanations about the linker options, the last line.
12.2 Generate ROBOBUG™ Library Object Files
1.
This step should not be necessary and should only be done if you truly understand what’s
taking place.
If you wish to modify libbug.a, after execution of seticcbg.bat, change the directory to
Libsrcbg and execute libbugmake. If you have the ROBOBUG™ library source code
(separate purchase of ROBOBUG™ Education software package) the batch file will actually
recompile before constructing the library file, otherwise it will only collect the object files
already there into the library,
c:\iccbg>cd Libsrcbg
c:\iccbg\Libsrcbg>libbugmake <enter>
This will make the ROBOBUG™ library archive libbug.a that holds object versions of the
standard ROBOBUG™ support C files. This library Libbug.a must be stored in the iccbg
Lib directory. The paths assume that you installed the system in c:\iccbg. If you placed it
differently you will have to change the paths in the PATH command.
Note: Unless you change the ROBOBUG™ library files, you so not need to execute
libbugmake. Ask your authorized Mekatronix distributor about obtaining the ROBOBUG™
source code library files (www.mekatronix.com/distributors).
A listing of libbugmake appears in Figure 6.
NOTE
The source code for
icc11 -c vectors.c, serial.c, mobgdr.c, analog.c, irbg.c
23
MEKATRONIX™
Gainesville, Florida
08/12/99
ROBOBUG™ USERS MANUAL
www.mekatronix.com
Technical questions: [email protected]
does not come with the ROBOBUG™ distribution software. It is available in the
ROBOBUG™ Education package.
echo off
echo This script file makes a library
ROBOBUG Routines
echo Title
Make ROBOBUG Libraries
echo Programmer
Keith L. Doty
echo Date
August, 1999
file
for
the
icc11 -c -e vectors.c
icc11 -c -e analog.c
icc11 -c -e servobg.c
icc11 -c -e swingctl.c
icc11 -c -e irbg.c
del ..\lib\libbug.a
ilib -a libbug.a servobg.o
ilib -a libbug.a analog.o
ilib -a libbug.a vectors.o
ilib -a libbug.a swingctl.o
ilib -a libbug.a irbg.o
ilib -t libbug.a
copy libbug.a ..\lib\*.*
Figure 6 The libbugmake which generates libbug.a library object file for the ROBOBUG™ robot.
After installing ICC11 and the ROBOBUG™ Distribution Software, the user can write C
programs, compile them and download their S19 file output to ROBOBUG™ to test, debug, and
run. A convenient method for initial testing of programs on ROBOBUG™ is to place
ROBOBUG™, with charge plug engaged, next to the host computer on an elevated platform with
the legs suspended in the air. Leave enough space for the legs to move freely up-and-down and
back-and-forth so they do not contact any physical surface. After you develop confidence in your
program’s operation, you will typically make a closely monitored trial run on the floor.
Remember that ROBOBUG™ is autonomous and the behavior you expect may not arise!
12.3 Integrate ROBOBUG™ Software with ICC11 DOS or WINDOWS Versions
Insert the ROBOBUG™ Distribution Software Diskette into your floppy drive or open up the
directory into which you downloaded it from the web. In DOS or Windows95 execute
installbg [<path to iccbg file>]<enter>
If no parameter is entered for <path to iccbg file> the default is c:\iccbg. The
installbg.bat batch file integrates the ROBOBUG™ software with the ICC11 software. The
installbg.bat listing appears in Figure 7.
After installation of the ROBOBUG™ software, you will see four new directories under iccbg:
•
assembler
libsrcbg
pcbug11
bgcode
24
MEKATRONIX™
Gainesville, Florida
ROBOBUG™ USERS MANUAL
www.mekatronix.com
Technical questions: [email protected]
@echo off
: noargument
if "%1"=="" goto noargument
copy
copy
copy
copy
copy
copy
copy
copy
seticcbg.bat %1
BGReadme.txt %1
BGProg.txt %1
IDEsetup.txt %1
copy binbg\*.* %1\bin\*.*
copy includebg\*.* %1\include\*.*
copy libbug\*.* %1\lib\*.*
if not exist %1\libsrcbg md %1\libsrcbg
copy libsrcbg\*.* %1\libsrcbg\*.*
if not exist %1\bgcode md %1\bgcode
copy bgcode\*.* %1\bgcode\*.*
md %1\pcbug11
copy pcbug11\*.* %1\pcbug11\*.*
md %1\assembler
copy assembler\*.* %1\assembler\*.*
08/12/99
seticcbg.bat c:\iccbg
BGReadme.txt c:\iccbg
BGProg.txt c:\iccbg
IDEsetup.txt c:\iccbg
copy binbg\*.* c:\iccbg\bin\*.*
copy includebg\*.* c:\iccbg\include\*.*
copy libbug\*.* c:\iccbg\lib\*.*
if not exist c:\iccbg\libsrcbg
md c:\iccbg\libsrcbg
copy libsrcbg\*.* c:\iccbg\libsrcbg\*.*
if not exist c:\iccbg\bgcode md c:\iccbg\bgcode
copy bgcode\*.* c:\iccbg\bgcode\*.*
md c:\iccbg\pcbug11
copy pcbug11\*.* c:\iccbg\pcbug11\*.*
md c:\iccbg\assembler
copy assembler\*.* c:\iccbg\assembler\*.*
: end
goto end
Figure 7 Listing of the batch file installbg.bat that integrates ROBOBUG™ software into the appropriate iccbg
directories.
Further, you will notice three new text files, BGReadme.txt, BGProg.txt and IDEsetup.txt
along with the batch file that sets up ICC11 DOS for the ROBOBUG, namely, seticcbg.bat.
13. COMPILE A ROBOBUG™ PROGRAM IN DOS
Operational Procedure During Program Development
Keep ROBOBUG™ jacked up so the legs suspend above the desktop and are free to move
without touching anything. While ROBOBUG™ is on the desk, keep the charge jack plug in
for continual recharging to enable hours of uninterrupted coding pleasure!
1.
On Windows95 open an MSDOS window or boot up in a DOS only machine. Assuming
a DOS prompt, set the current directory by typing
cd <path to iccbg>\iccbg
Fill the path parameter <path to iccbg>\ with the path to iccbg. If you placed the iccbg
compiler files in the root, then the default path is c:\iccbg. We suggest you put your
ROBOBUG™ programs into the bgcode directory. Discussions in this manual assume
ROBOBUG™ application code is placed in bgcode.
Execute seticcbg.bat.
2.
The computer is now in the iccbg directory and the DOS prompt is c:\iccbg>.
25
MEKATRONIX™
Gainesville, Florida
Type:
ROBOBUG™ USERS MANUAL
www.mekatronix.com
08/12/99
Technical questions: [email protected]
compbg <filename> <enter>
to compile a C source file in the bgcode directory. The path to <filename> defaults to the
bgcode directory, if no path is given for the filename. Do not put the .c extension on
<filename>. The path to <filename> can also be explicitly specified or established
previously by PATH. Figure 8 lists the batch file compbg.bat.
echo off
echo * This script assumes
echo *
1) ICC11 is root,
echo *
2) You are executing this command from the root, and
echo *
3)The code to be compiled is in bgcode, a subdirectory of ICC11.
echo *
echo * Do not put the .c suffix on the file to be compiled.
pause
cd bgcode
icc11 –e –v –l -m %1.c
cd ..\
Figure 8 The compbg.bat file for compiling ROBOBUG™ code. Note that the .c extension must be omitted from
the source code file name when using this command.
13.1 Example DOS Compilation of a ROBOBUG™ C Program
Assume the current directory is iccbg and that seticcbg.bat was executed after the DOS
window was opened and the directory changed to iccbg.
Type:
compbg walks <enter>
to compile the sample program walks.c found in the bgcode directory.
14. PCBUG11 DOWNLOAD OF A PROGRAM INTO ROBOBUG™
NOTICE
The following method for downloading is not supported by Mekatronix and is
provided only as a convenience for our customers. Because of the extreme age of
the PCBUG11 freeware, the downloading technique described here may or may
not work. Many subtle errors and lockups arise between PCBUG11 and a
WINDOWS environment. For this reason, Mekatronix makes no claim about the
usefulness of this procedure. If you have troubles with this method, Mekatronix
strongly urges you to purchase the ICC11 WINDOWS version from a Mekatronix
distributor.
If you boot your system in a strictly DOS environment, you will have a higher probability of
success with the download procedure described below. With these cautions in mind, at your own
risk you can try the procedure while operating in an MSDOS WINDOW in WIN95 environment.
26
MEKATRONIX™
Gainesville, Florida
ROBOBUG™ USERS MANUAL
www.mekatronix.com
08/12/99
Technical questions: [email protected]
On some PCs you will be successful. Just note, however, that PCBUG11 appears to permanently
lockup the COM port, even after you close it, and you might have to reboot your entire system to
get the COM port back for other programs!
Download Procedure
1.
Open a DOS WINDOW or boot up in DOS and change directory to c:\iccbg
2.
Each time you create a new DOS WINDOW in WIN95 or just after boot you must
execute seticcbg.bat only once.
3.
Establish the physical serial communications link (Refer to Section 5).
4.
Flip the DOWNLOAD/RUN switch to DOWNLOAD.
5.
Turn on ROBOBUG™ power with the ON/OFF switch flipped to ON. Make sure the red
LED Power-On light shines. If not check batteries and battery connections before going
further.
6.
Press the red push-button RESET switch. LED D2 lights when you hold RESET down. D2 is
the LED closest to the edge of the Mb2325 com-board. If it does not light, reverse the C2325
6-pin connector to the MB2325 and try again.
7.
Use the batch file loadbg to download a Motorola S19 code file. This batch file invokes
PCBUG11. See the format for loadbg below:
loadbg<sp><filename><sp><COM_PORT_NUMBER><enter>
In the batch command format, <sp> means space. The current directory must be iccbg. For
example,
Type:
loadbg walks 1<enter>
If the ROBOBUG™ serial cable is connected to COM1, then execution of loadbg.bat will
download the Motorola S19 file walks.s19 from the bgcode directory via COM1 to the
ROBOBUG™'s EEROM. The serial communications will be via COM1 on your PC. Therefore,
the cable from the MB2325 board should be connected to COM1 on your PC. The default is
COM1 if you do not specify the COM_PORT_NUMBER. If you use COMn, replace 1 by n in the
above command.
15. COMPILE AND LOAD COMMAND UNDER DOS
The batch file clbg.bat has the same command format as loadbg.bat and simply combines
and loadbg.bat in a single convenient command. DOS must be in the iccbg
directory for recognition of this command.
compbg.bat
27
MEKATRONIX™
Gainesville, Florida
ROBOBUG™ USERS MANUAL
www.mekatronix.com
08/12/99
Technical questions: [email protected]
clbg<sp><filename><sp><COM_PORT_NUMBER><enter>
16. EXECUTE A LOADED ROBOBUG™ PROGRAM IN DOS
This procedure assumes you have already downloaded an ".s19" file into ROBOBUG™ without
error.
Do not do this procedure on a Table, unless ROBOBUG™ 's legs can move freely without
touching any surface. Otherwise, ROBOBUG™ may start up and walk off the table!
1. Turn ROBOBUG™ power switch to ON, if it is not there already.
2. Flip DOWNLOAD/RUN Switch to RUN
3. Press RESET.
4. Watch ROBOBUG™ GO!
To stop ROBOBUG™, run it down and flip the ON/OFF switch to OFF. Turn it on again to set it in
motion once again. If you wish ROBOBUG™ to not execute a program when you turn power on,
just flip the DOWNLOAD/RUN switch to DOWNLOAD before turning on power.
17. ROBOBUG™
COAUTHOR)
SOFTWARE
REFERENCE(IVAN
ZAPATA
This section is designed as a quick reference to your ROBOBUG™ (ROBOBUG™) robot
distribution software that integrates with ICC11. This section assumes that you have a working
knowledge of ANSI C, and will guide you through the drivers and subroutines provided by
Mekatronix, which allow you to write ROBOBUG™ software ranging from the simplest of
programs to advanced algorithms.
This document contains the information you need to know to program a standard ROBOBUG™
robot. Other ROBOBUG™ modules, such as the ROBOBUG™ Education and the ARGOS™
software packages, utilize extra libraries and modules. In order to program these features, refer to
the appropriate documents.
17.1 Overview of the ROBOBUG™ Software Library
The ROBOBUG™ software library is made up of a number of C source files, include files, and
macro and symbol definitions. Almost any ROBOBUG™ program you write will require the
following include files and C files.
Include
hc11.h
mil.h
servobg.h
Symbol definitions specific to the HC11 (I/O ports, registers, etc.).
Macro definitions for simplified register manipulation.
Functions for servo commands.
28
MEKATRONIX™
Gainesville, Florida
swingctl.h
calbug.h
vectors.h
analog.h
bgbase.h
ROBOBUG™ USERS MANUAL
www.mekatronix.com
08/12/99
Technical questions: [email protected]
Walker controller functions.
Macro definitions for calibrated servo positions.
Interrupt vector specification in vectors.c.
Specifies analog function analog.c. (for ARGOS and user sensors)
Collection of the above header files into one header file.
C Files
1. servobg.c
2. swingctl.c
3. vectors.c
4. analog.c
Servo control functions
Leg control functions
Memory mapping of interrupt vectors.
Analog initialization and read functions
17.2 ROBOBUG™ Control and Walking Functions
This section explains the leg number and naming scheme and the functions that will enable you
to write your own walking gaits for ROBOBUG™.
17.2.1 ROBOBUG™ Leg Identification Scheme
ROBOBUG™ has 6 legs with two servos on each leg. One servo lifts the leg up or moves it
down and the other servo swings the leg back and forth. The right front leg (RF) is assigned the
number 0 (Figure 2 ). Successive leg numbers are assigned in clockwise order looking down on
the robot. For the first letter in ROBOBUG™’s naming convention, R means right and L left. For
the second letter, F means front, M middle, and R rear. Figure 2 also lists the servo numbers for
the lift and swing servos in that order.
Front of RoboBug
Servos 14&15
LF 5
0 RF Servos 4&5
Servos 12&13
LM 4
1 RM Servos 6&7
Servos 10&11
LR 3
2 RR Servos 8&9
Figure 9. This diagram illustrates the ROBOBUG™ leg numbering and naming scheme and identifies the
corresponding servo numbers for each leg. The lower numbered servo moves the leg up and down while the higher
numbered servo swings the leg back and forth. The direction of the arrow indicates the front of the robot as you look
down from the top.
17.2.2 Walking controller
Three user subroutines comprise the walking controller:
init_bug(),
set_swing_speed(speed), and
swing_leg(leg_number, phase, direction).
init_bug()
29
MEKATRONIX™
Gainesville, Florida
ROBOBUG™ USERS MANUAL
www.mekatronix.com
08/12/99
Technical questions: [email protected]
To initialize the software leg controller, init_bug() must be called at the beginning of the
program, or any time the controller needs to be reset. There are no parameters to this
subroutine. This routine also initializes the analog and infrared routines.
Example Initialize the controller and reset all the servos to the middle position.
init_bug();
set_swing_speed(speed)
Through the set_swing_speed(speed) subroutine, the stance speed of all the legs is specified.
The parameter speed may be an integer between 1 and 42, where 1 is the slowest and 42 the
fastest speeds. However, the speed function is non-linear, and speeds greater than about 15
have little noticeable effect. Speeds for individual legs may not be specified.
Example Make the speed of the legs very slow.
set_swing_speed(1);
swing_leg(leg_number, phase, direction)
A call to swing_leg will cause a leg to start swinging in the forward or backward direction
until another swing_leg command is given, or until all servos are ordered to stop. The
parameters to this subroutine are:
leg_number: Specifies which of the six legs we wish to start. The legs are numbered 0 (right
front leg) through 5 (left front leg). The numbering follows clockwise when looking at the
robot from the top.
phase: Specifies the time delay for the leg to start swinging, relative to a common timing
signal T for all the legs. A leg completes one cycle in T seconds. The phase parameter may
have any integer value between 0 and 99. A phase of 50 means that the leg will lift off
precisely 0.50*T seconds after a leg with 0 phase. Thus, to set two legs to swing with
maximally different phases, one must be started with a phase of 0, and the other with a phase
of 50. A phase of 75 lifts the leg 0.75T after a leg with 0 phase. Essentially, then, the phase
parameter specifies a percentage of the common leg cycle time T.
direction: Legs can be specified to swing forward or backward. The direction parameter may
be a 1 (forward swing) or -1 (backward swing).
Example Make the rear right leg (leg #2) swing forward, with a delay of 180 degrees.
swing_leg(2, 50, 1);
30
MEKATRONIX™
Gainesville, Florida
ROBOBUG™ USERS MANUAL
www.mekatronix.com
08/12/99
Technical questions: [email protected]
17.3 Servo Control Functions
Several servo functions provided by the ROBOBUG™ library permit you to control individual
servos or to turn the servos on and off as a group. The advanced programmer can use these
routines to develop unusual walking patterns and leg action.
init_servos()
Must be called once to initialize the servo controller. If the walking controller above is used,
this routine need not be invoked. There are no paramaters to this routine.
all_servos_off()
Disables the position signals going to the servos. The servos will act as though there were no
power connected to them. There are no paramaters to this routine.
Example Turn off the control signal to the servos.
all_servos_off();
all_servos_on()
Enables the position signals going to the servos. Only needs to be called if all_servos_off()
was previously called. There are no parameters to this routine.
Example Turn on all the control signals after turning them off.
all_servos_on();
bugservo(position)
Tells one of the servos to go to the position specified. The position parameter may be one of
the 3-letter names defined in the header file calbug.h. These names indicate the leg position
and leg to be moved using this format (Note that names must always be in caps):
R M U
Side of the bodyLeg location
R = Right side
F = Front leg
L = Left side
M = Middle leg
R = Rear leg
New position of leg
U = All the way up
W = Waist-level
D = All the way down
Example Move the left rear leg all the way back:
F = Forward
C = Center
B = Back
bugservo(LRB);
servo(servonumber, setpoint)
Serves the same purpose as bugservo above, with slightly different parameters. servonumber
specifies a specific servo (0-15), and setpoint is the desired position of the servo, which may
be an integer value between 1200 and 4900. The servo numbers can be obtained from
calbug.h, as well as the position extremes (symbols ending with “_A”).
31
MEKATRONIX™
Gainesville, Florida
ROBOBUG™ USERS MANUAL
www.mekatronix.com
08/12/99
Technical questions: [email protected]
Example Move servo #12 (middle left leg lifting servo) so that it lifts the leg all the way up.
servo(12,
2080);
// Values obtained from calbug.h
or
servo(LEFTMIDL, LMU_A); // Name constants from calbug.h
17.4 Calibrating the Legs
Because of slight variations in servos, code from one robot may or may not work perfectly on
another. It may be necessary to adjust some values to a particular bug to achieve optimum
walking gaits. To calibrate the legs, download calibrat.s19 to the bug and run it. Connect the
bug to a PC’s serial port and on the PC start a terminal program like HyperTerm or use the IDE
Terminal window. Follow the on-screen prompts. After the last leg has been calibrated, the
program will show all calibration values. Print out this screen or write the values down, then
open calbug.h () with a text editor, and change all the values ending in “_A” to the new ones
given by the program.
#define RIGHTMIDL 6
#define
#define
#define
#define
#define
#define
RMU_A 3950
RMU (RMU_A >> 1) | (RIGHTMIDL << 12)
RMW_A 3000
RMW (RMW_A >> 1) | (RIGHTMIDL << 12)
RMD_A 1800
RMD (RMD_A >> 1) | (RIGHTMIDL << 12)
#define
#define
#define
#define
#define
#define
#define
RIGHTMIDS 7
RMF_A 3200
RMF (RMF_A >> 1) | (RIGHTMIDS << 12)
RMC_A 3140
RMC (RMC_A >> 1) | (RIGHTMIDS << 12)
RMB_A 2150
RMB (RMB_A >> 1) | (RIGHTMIDS << 12)
Figure 10. This portion of the calbug.h file defines three positions for the right-middle leg servos, servos 6 (lift
servo) and 7 (swing servo). Two of the values indicate the extremities of motion and a third an intermediate value
dictated by the leg structure and desired motion pattern.
Leg Calibration Positions
You will specify six positions for each leg during the calibration routine, three for the lift-servo
and three for the swing-servo. Two of the three points for a servo calibrate the extreme motions
you will permit for that servo and the third point will be a center position.
Leg Lift-Servo
The software calibrated center position for a lift-servo equals the Pulse-Width-Modulation
(PWM) that places the servo in the position illustrated in Figure 11. The leg lift mechanism
limits the extreme-up and extreme-down positions of a lift-servo. Choose the calibrated or
software PWM values of these limits so that the legs move to a position just shy of the
32
MEKATRONIX™
Gainesville, Florida
ROBOBUG™ USERS MANUAL
www.mekatronix.com
08/12/99
Technical questions: [email protected]
mechanical limits. This will prevent the servo from jamming and possibly damaging the leg
mechanics or the servo.
This bar is parallel
to the ground for
the center position
of the lift-servo.
The axis of a lift-servo parallels
the axis of the robot at the center
position of a swing-servo. Both
axes project out of the page here.
Figure 11. Elevated view of ROBOBUG™ showing the rear legs in center position for both the lift-servos and
swing-servos. During calibration, position the legs as shown and then take the reading of the center position of each
lift-servo and swing-servo center position.
Leg Swing-Servo
Figure 11 also illustrates the calibrated position for the center position of a swing-servo. The
normal to the plane of motion of the lift-servo mechanism is parallel to the center axis of the
robot when the swing-servo is in its center position.
To get the legs to provide maximum force while walking, the forward and back PWM limits of
the swing-servos must be carefully set. For instance, the front and rear legs should not swing any
farther than about ±45 degrees from the center position, so their forward and back extremes
should be set close to those points. The middle leg’s forward PWM set point should be very
close to the center position (about 15 degrees), and its back set point should be about 60 degrees
away from this or, equivalently, 45 degrees back from the center reference.
17.5 Other Macro / Symbol Definitions
The files hc11.h and mil.h contain symbol and macro definitions that facilitate accessing and
manipulating the HC11’s memory-mapped registers. All register names are consistent with the
names given in Motorola’s M68HC11 Reference Manual (M68HC11RM/AD). For instance, to
write to PORTB, you do not need to specify its memory address, instead you use the reference
symbol PORTB. These two files assume that your chip’s register base is at 0x1000. If you are
not sure what this means, don’t worry about it; if you’ve changed your register base for some
reason, you’ll need to modify the constant _IO_BASE in hc11.h.
Three macros that perform MC68HC11 register operations in ICC11 are defined in mil.h:
33
MEKATRONIX™
Gainesville, Florida
ROBOBUG™ USERS MANUAL
www.mekatronix.com
08/12/99
Technical questions: [email protected]
CLEAR_BIT(REG_NAME, MASK)
Will set to zero all the bits in REG_NAME which correspond to ones in MASK.
Mathematically equivalent to: (REG_NAME AND (NOT(MASK))).
SET_BIT(REG_NAME, MASK)
Will set to one all the bits in REG_NAME which correspond to ones in MAKS. Equivalent
to: (REG_NAME OR MASK)
CLEAR_FLAG(REG_NAME, MASK)
Will write a one to the bits in REG_NAME which correspond to ones in MASK. Generally,
this is only used when clearing interrupt flags.
17.6 Analog Port Routines
To make use of ROBOBUG™’s analog ports, you must include the file analog.h in your
program. The following routines are available for controlling the analog ports. The C code for
these routines are in analog.c:
init_analog()
Turns on the analog to digital converter. This function must be called once in your program
before using any of the analog ports.
analog(int port)
Returns the value at the analog port corresponding to port.
Example Load the value at analog port 3 into the variable senx:
senx = analog(3);
18. PROGRAMMING ROBOBUG™ TO WALK( IVÁN ZAPATA)
This is a brief tutorial on how to produce different walks on ROBOBUG™ using the supplied
standard software package. You need to have ICC11 installed on your PC, the ROBOBUG™
libraries copied into the proper ICC11 subdirectories, and a ROBOBUG™ connected to your
PC’s serial port. After you have successfully written and run walking programs, you may want to
run the leg calibration program as described in Section 17.4. This will help you to refine the leg
movements to their optimal patterns. You may run the calibration program at any time.
18.1 Types of walking gaits
In the following figures, a black leg denotes a leg on the ground and pushing the bug forward
(stance phase), and a red leg designates a leg off the ground and swinging forward (swing phase).
The arrow on the body indicates the front of the bug. The diagrams exaggerate the leg positions
and do not indicate their true, relative phase relationships.
34
MEKATRONIX™
Gainesville, Florida
ROBOBUG™ USERS MANUAL
www.mekatronix.com
08/12/99
Technical questions: [email protected]
18.1.1 Tripod Walk
The tripod gait provides great static and dynamic stability and appears to be the fastest and most
efficient walk used by 6-legged animals. The front and back legs from one side and the middle
leg from the opposite side always move in unison. There should be at least 3 legs on the ground
at all times to provide maximum stability, i.e., one set of legs should not be lifted until the other
set is on the ground.
Figure 12. The tripod walk used by ants and other insects for fast and efficient walking is both statically and
dynamically stable.
18.1.2 “One Leg at a Time” Metachronal Wave
The metachronal wave is reminiscent of the way a centipede would walk. A “wave” starts
Figure 13. A single-leg metachronal gait swings each leg in sequence, from back-to-front, first on one side and then
on the other. The red colored leg indicates the leg currently swinging.
at the back leg on each side, in such a way that after each leg is planted on the ground, the leg in
front of it is picked up and swung forward. Only one leg should be off the ground at a time.
18.1.3 “Two Legs At A Time” Metachronal Wave
This is an interesting walk, and you can think of it as two metachronal waves moving up each
side of the body with a delay between them.
Figure 14. A two-legged metachronal gait swings two legs at a time and consists of two simultaneous single leg
metachronal patterns out of phase by five leg positions.
35
MEKATRONIX™
Gainesville, Florida
ROBOBUG™ USERS MANUAL
www.mekatronix.com
08/12/99
Technical questions: [email protected]
18.1.4 The Oar Gait
This Oar Gait (Figure 15) is a fascinating and extremely stable walk. Four legs are on the ground
at all times and the leg pattern keeps the bug level during the gait. You can think of it as the bug
alternating the rowing of the middle to legs while it does metachronal waves moving up each
side of the body on the outside legs only.
Figure 15. A two-legged gait that swings the four contralateral outside legs metachronally, alternating with an oar
sweep by the contralateral middle legs.
18.2 Sample program to produce a simple walk
The tripod walk gait is the type of pattern most six-legged insects use to walk. In it, three of the
legs move in unison at all times. Here is a program that will cause ROBOBUG™ to walk using
this same pattern, with an explanation of each part following:
#include <bgbase.h>
void main(void)
{
init_bug();
set_speed(2);
swing_leg(0,
swing_leg(1,
swing_leg(2,
swing_leg(3,
swing_leg(4,
swing_leg(5,
//Tripod Gait for ROBOBUG
//Must be present
//Must be present
0, 1);
50, 1);
0, 1);
50, 1);
0, 1);
50, 1);
}
The first four lines of the program (from #include… to init_leg…) must always be present for
any ROBOBUG™ program you write.
The statement, set_speed(2), sets a slow walking speed. The slowest possible speed is 1, and the
fastest is about 15, though this number can be as high as 42 (values from 15 to 42 do not produce
a significant increase in walking speed).
The next 6 statements tell each leg to start swinging in the forward direction, and at a certain
time. To make a leg swing backwards, change the last parameter from 1 to –1. To change the
time when each leg swings, make the second parameter smaller (swing earlier – minimum is 0)
or larger (swing later – maximum is 99). The first parameter specifies which leg you want to
control. The legs are numbered starting from 0 (front right leg), and increase clockwise when
looking at the robot from the top.
36
MEKATRONIX™
Gainesville, Florida
ROBOBUG™ USERS MANUAL
www.mekatronix.com
08/12/99
Technical questions: [email protected]
Compile, download, and run the program as outlined in Sections 9, 10, 11, for example. As the
ROBOBUG™ program executes, watch the pattern the legs trace. Play with the numbers in the
program to create new patterns. Each pattern is called a “gait”, and a few of them are described
later. You can (of course!) come up with your own, novel walking gaits. You will quickly learn
which gaits work and which ones do not.
18.3 A Program that Develops a Sequence of Walks
The program walks.c takes ROBOBUG through a sequence of walks. Download walks.s19
and execute the program. Can you identify the different gaits?
19. PROGRAMMING BEHAVIOURS
When you first get your ROBOBUG™ we recommend that you write simple programs to
become more familiar with the robot and its features while, at the same time, building your
confidence in program development. The next section suggests coding experiments to help you
do just that.
19.1 Scope
Programming behaviors is what autonomous mobile robots is all about, or, at least a substantial
part of what it is all about! Without being technical, a behavior is whatever the robot does. The
emphasis is on action! From the engineering viewpoint, you want to program behaviors that
produce useful results. Make a robot vacuum cleaner, or a robot valet. With an artistic eye, you
want to program behaviors that esthetically please or excite. Why not make ROBOBUG™
dance? From the scientific perspective you can inquire about the scope of machine intelligence
and test your theories on a real robot! Out of intellectual curiosity and the creation urge, you
might want to develop physically embodied animats, artificial animals. Develop your own
ecology with predator robots that drain the prey robots’ batteries and prey robots that hide and
avoid predator robots and seek battery recharging stations as food sources. Or, you can tailor a
robot to enter many of the robot contests around the world. Many of these contests require
manipulation and sensors not supplied with ROBOBUG™. But, with one or more MSCC11
single chip computers controlling the additional sensors and servo driven manipulation devices, a
ROBOBUG™ can often be expanded to meet some walking contest requirements.
19.2 Some Possible Behaviors
ROBOBUG™ programs provide the basic hardware interrupt and device driver routines for the
robot. These allow the user to access the sensor readings (optional) and drive the leg servos. With
these routines, the user can program an unlimited number of behaviors. A representative set, but,
by no means, an exhaustive set, of primitive set of behaviors, from which more complex ones
can be developed, are listed in Table 1.
Table 1 Primitive Behaviors
ROBOBUG™
ROBOBUG™
ARGOS™
ARGOS/FEET SWITCHES
37
MEKATRONIX™
Gainesville, Florida
Submissive Crouch
Aggressive Stance
Tilt Front/Back
ROBOBUG™ USERS MANUAL
www.mekatronix.com
Metachronal Gaits
Turning/Spinning
Backup
08/12/99
Technical questions: [email protected]
Predator Tracking
Light/Dark Taxis
Wall following
Collision Avoidance
Edge Detection
Climb one step
19.3 Advice on Developing Behaviors
The following advice is based on several years experience teaching engineering students to
program autonomous robot behaviors.
19.3.1 Vulcan Mind Meld
To effectively program a behavior for ROBOBUG™, or, quite possibly, any autonomous robot,
and to gain insight into the problems encountered by your robot, you should play Vulcan to the
robot and imagine performing a Vulcan mind meld with it. All you Trekkie fans know what this
means. But, to be specific, try to perceive the universe as the robot does with its limited
capabilities. As you imagine yourself one with the robot, play out different sensations and
responses. Help yourself by actually recording robot sense data and examine typical responses, or
responses to special environmental conditions of interest in the behavior you are developing. The
mind meld will help prevent the common error of asking the robot to respond to environmental
conditions it cannot detect with its sensors! While this statement is so totally obvious, it is also a
difficult self-discipline to psychologically enforce. Why? Humans typically interact with each
other or intelligent animals, expecting and perceiving sophisticated behavior and sensory
performance. These expectations seem to subconsciously creep into our agenda when working
with autonomous machines, often with disappointing results! Autonomous robots have no where
near the sensory and behavioral capabilities of an insect, let alone higher animals.
19.3.2 Virtual Mind Meld©2
To assist in perceiving the universe as the robot does, you can write programs to generate
computer graphic displays that depict the robot’s perception in any sense that makes
communication with the robot easier. Robot Rorschach tests, color maps…a virtual robot
environment. This process we coin as a Virtual Mind Meld. The robot portrays its reality in the
computer graphics medium to create a virtual reality to bridge the species communication barrier.
19.3.3 Relative calibration of sensors of the same type
Manufacturing tolerances, circuit tolerances, and mounting variations make it possible for two
instances of the same type of sensor to respond differently to the same stimulus. Behaviors,
therefore, should not be programmed to depend upon two sensors of the same type producing
identical responses to the same stimulus. Instead, program sensors of the same type to relatively
calibrate themselves in some fixed environment. For example, place a cardboard box in front of,
and parallel to, an ARGOS sensor head mounted on a ROBOBUG™. Measure the response of
the two front IR detectors. Note the differences in the readings. If there are none, that’s great! In
general, however, they will differ somewhat.
2
Virtual Mind Meld©Mekatronix™
38
MEKATRONIX™
Gainesville, Florida
ROBOBUG™ USERS MANUAL
www.mekatronix.com
08/12/99
Technical questions: [email protected]
Program the robot’s behaviors to respond to relative sense stimuli, not absolute sense
measurements. This will make the robot behave more organically and robustly to uncertain,
dynamic environments.
19.3.4 Adjusting to Ambient Conditions
A programmed behavior will often be brittle, not flexible or adaptive, if that behavior depends
upon specific magnitudes of robot sensor readings. Brittle behaviors fail when the environment
changes from the environment in which the behavior was developed. The smaller the change that
causes the failure, the more brittle that behavior is. For example, the IR detectors on the ARGOS
sensor head will detect white objects at larger distances than dark objects. Suppose a collision
avoidance algorithm sets a threshold value of the IR as an indication of an impending collision. If
this threshold is determined experimentally with light colored obstacles, then dark colored
obstacles will not be detected and the robot will bump into them. On the other hand, if the
threshold is set for dark colored obstacles, the robot will end up spinning in circles in a light
colored environment because it detects threats everywhere. The solution is not to pick an average
color threshold, but rather, program the robot to adjust its threshold downward if it has not
detected a large IR reading for some specified time, or, to adjust the threshold upward if it detects
large IR readings too frequently. The difficulty, of course, is determining exactly what the
“specified time” should be or what “too frequently” means! The easy, but difficult to implement,
answer is to let the robot learn these parameters based upon some performance criteria.
Robot behaviors and sensors, therefore, should adjust to ambient conditions. Biological
organisms perform this function fantastically well. The human eye adjusts to bright sunlight or a
darkened cathedral with dimly lit candles. This procedure is easier to state then execute, but
serves as a general principle.
19.3.5 Create simple behaviors
The beginning robot practitioner usually formulates behaviors too complicated to implement
directly. With experience, the virtue of simple, direct behaviors becomes apparent. Complex
behaviors should be broken down into sequences of simple, primitive behaviors. If this can be
done, the chances of successful implementation are high. If not, there is little value in trying to
implement such behaviors directly.
19.3.6 Build on simple behaviors
As the user accumulates a repertoire of primitive behaviors, complex behaviors open up. Perhaps
the easiest way to generate complex behaviors is simply to sequence a collection of primitive
behaviors. For example, wall following might be decomposed as follows: 1) detect a “large”
object, 2) approach the object until “near”, 3) turn until the robot front-to-rear axis aligns
“parallel” with the “surface” of the obstacle, 4) move “parallel” to the obstacle surface. At each
instant of time a particular behavior in the sequence is invoked based on the current state of the
robot and its sensory inputs. Of course, the programmer will have to establish to the robot’s
perception the meaning of such terms as “large”, “near”, “surface”, and “parallel”. Remember to
Vulcan Mind Meld!
39
MEKATRONIX™
Gainesville, Florida
ROBOBUG™ USERS MANUAL
www.mekatronix.com
08/12/99
Technical questions: [email protected]
19.4 Integrating Behaviors
More complex behaviors may require the combination of primitive behaviors in a way not well
understood. Artificial neural network activation, opinion guided reaction, non-linear dynamics,
and fuzzy logic all offer techniques for integrating behaviors. Each technique offers specific
advantages and specific difficulties. Discussion of such issues is beyond the scope of this
manual. The reader’s attention is brought to this matter to encourage investigation into these
possibilities.
20. ROBOBUG™ TROUBLESHOOTING GUIDE
To check out your robot, download the program file walks.s19 in the bgcode directory in the
distribution software and run it. This program actually has three different walk gaits which
execute in sequence. The duration of each gait is the same and can be controlled by the constant
DURATION. This program will verify operation of the twelve leg servos.
Is the Problem Hardware or is the Problem Software?
Engineers point their finger at the software and the programmers fault the hardware! The reality,
unfortunately, is that determining the causes of an error or malfunction can be frustratingly
difficult. Problems can arise from either or both sources. When you encounter an intractable
debugging problem, the fault almost invariably stems from a false assumption about the working
state of your robot and your program. Systematic testing of both hardware and software, on an
incremental basis, can greatly reduce errors and help you to isolate causes of errors when they do
occur…and they will occur, that is a promise!
Note. In the troubleshooting guide below, you should always keep in mind that problems may
have multiple causes and only some highly probable ones are mentioned.
Check Battery Voltage
Many hardware and apparent software problems with your ROBOBUG™ robot result from
uncharged or low batteries. Under low battery conditions, loaded programs often become corrupt
or the robot processor resets every time the servos pull large amounts of current from the
batteries, for example, when the servos make substantial changes in speed or direction, as in
starting and stopping.
Symptoms of Low Battery Voltage
As the batteries become low the red power LED (if installed) blinks when the motors pull large
currents. This warning should be heeded and the batteries charged or exchanged for fresh ones. A
more radical symptom occurs when the batteries drain too low to support current demands of
starting and stopping the servos. The processor rapidly resets and restarts your program each time
the motors demand current. In such cases, ROBOBUG™ stutters and possibly collapses and does
little else.
IMPORTANT! When troubleshooting first check to make sure that your batteries are fully
charged and the red power LED lights (If installed) when the ON/OFF switch is flipped to ON.
40
MEKATRONIX™
Gainesville, Florida
ROBOBUG™ USERS MANUAL
www.mekatronix.com
08/12/99
Technical questions: [email protected]
The numbered items below indicate the most common problems encountered their possible
causes and associated fixes.
1. Nothing happens when I turn the robot power switch on. Check all batteries. Check
battery connection to the computer printed circuit board. Make sure it is inserted correctly.
Check the power switch and power circuit wiring.
2. My program does not compile. Refer to Section 9 (WINDOWS) or 13 (DOS) and redo the
instructions appropriate for your case. In the DOS version be sure you execute seticcbg.bat
each time you open a new DOS Window or start up in DOS. If that does not work, you might
want to repeat the whole installation procedure in Sections 7, 8 (WINDOWS) or 12(DOS).
3. My program compiles with errors. Here you must use your program debugging skills.
Program debugging is beyond the scope of this manual.
4. My program compiles, but does not download. Check batteries. Make sure hardware is
operational. Refer to Section 8.2 (IDE setup), 10 (IDE), 14 (DOS-PCBUG11) 15 (DOS).
4.1. Be sure the Download/Run switch is in the Download position.
4.2. Verify that the robot is connected to the right COM port.
4.3. Check and verify all the physical connections between your PC, the Communications
Board (MB2325) and the ROBOBUG™. Diode D1 should be on when the Com-board is
connected with your PC. LED D2 should light when the reset button on ROBOBUG™ is
held down.
5. My program downloads, but nothing happens when I press the reset button.
5.1. Check to make sure you have switched the DOWNLOAD/RUN switch to RUN and that the
power switch is ON.
5.2. Press the reset button several times. Sometimes the switch does not make proper
connection.
5.3. Your program may actually be running, but program logic errors prevent any
observable robot behavior. This is a tough one. Download and run a working program
such as walks.s19 to verify all ROBOBUG™’s hardware functions. If you are
successful, then the problem must be in your program.
5.4. If you cannot successfully run walks.s19 but you have before, then check battery
connections. More remote, unplug the battery pack and check the reset button with an
multi-meter for switch closure (short circuit) when the button is pressed. Replace the
switch if it does not operate properly.
5.5. If the switch works, check continuity of the wiring to the reset button and repair if
necessary.
41
MEKATRONIX™
Gainesville, Florida
ROBOBUG™ USERS MANUAL
www.mekatronix.com
08/12/99
Technical questions: [email protected]
6. My program downloads, but when I press the reset button the robot just jerks and
stutters.
6.1. Check for weak batteries. Weak batteries can cause the processor to reset every time the
motors demand current. Weak batteries can also corrupt your program. Replace
batteries with fresh ones or recharge batteries.
6.2. Your program may be syntactically correct but possesses logic errors, causing the robot
to behave radically. If you believe your code to be correct, download and run
walks.s19 to verify, or not, all ROBOBUG™’s hardware. If the hardware checks out,
the problem is in your program.
7. Power LED Does Not Light when the ON/OFF switch is flipped to ON (IF INSTALLED ON
YOUR ROBOBUG™).
7.1. Batteries are not charged. Recharge or replace with fresh ones.
7.2. Battery door in front or back has come loose.
7.3. One or more of the wires to the battery connector have broken away from the connector
pin. Resolder the wire(s) to the connector and reseat connector.
7.4. One or more wires in the power circuit involving the LED have broken loose. Resolder.
If none of the above work, but you can download programs and run the robot, then the red
LED power-on indicator must be replaced (extremely unlikely!).
Comments on the IR System (Argos Option)
IR Detector Connectors: Black (Gnd) wire fits the pin next to the edge of the can
We have intentionally connected the IR detectors incorrectly and have not observed any damage
to the detectors. Of course, they do not function when connected incorrectly and we recommend
avoid doing so.
IR Emitters Shine
How can you tell if the IR emitters emit IR? Run ARGOS (separate option) test program
argostst.c.
21. CONCLUSION
Enjoy your ROBOBUG™ and email us about your successes, surprises and exceptional, or
interesting, behaviors and programs that you would like to share.
42