1
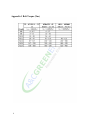
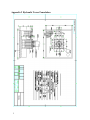
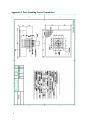
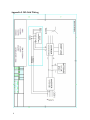
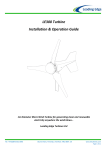
INSTALLATION MANUAL
Talon10
featuring
Contents
2
Prior to installation and operation, it is important that you
thoroughly read this manual to ensure proper performance and
safety.
3
1. Statement from A&C Green Energy
For contents described in this specification, A&C Green Energy can not ensure its completeness
and accuracy. For the any installations which lay beyond normal installation sites, A&C Green
Energy will not make any instruction or guarantee.
A&C Green Energy is not responsible for any damage and/or injury caused under the following
situations:
* Damage caused by any inappropriate operation
* Damage caused by lightning, typhoon and other force majeure
* Damage occurred after the warranty has expired
Notice: All installation instructions & drawings are valid only within the warranty period.
Note: Proper installation depends on the safety precautions and attention of the installer. Please
follow common sense guidelines for correct operation, technique and installation. A&C Green
Energy will not be responsible for any inappropriate operation which may cause any property
damage or personal injury. All risks will be assumed by the end-user and his designated
installer.
Please note: the annual electricity output from the wind generator is determined by the local
wind resources and other factors, such as the installation elevation of wind generator,
environmental temperature, maintenance, terrain and density of periphery buildings. A&C
Green Energy can not make any guarantee for the actual power output and energy generated by
the wind generator.
This product specification is a general installation guide only and cannot be used as a special
maintenance guide.
4
2. Summary
2.1 Information
We have improved this product specification, but at the same time, A&C is improving its
products unremittingly. There may be some undocumented differences between the product you
received and this specification.
Please use original Talon parts. Do not refit the original assembled wind generator;
otherwise it may void the repair warranty.
2.2 Mark Illustrations
Within this guide, please pay close attention to the following tips and warnings:
Warning: means there are risks that may cause personal injury, or perhaps death.
Caution: means there are risks that may cause wind turbine, equipment or property
damage.
Advice: helpful installation & maintenance hints from the manufacturer.
2.3 Applications for Use
•
•
Off-grid application: The electricity generated by the wind turbine can be stored into
batteries. Through an off-grid inverter, the DC can be changed into stable AC for offgrid power supply.
On-grid application: The electricity generated by the wind turbine can be rectified into
DC. Through an on-grid inverter, the DC can be converted into stable AC and feed the
local utility grid.
5
2.4 Structure and Main Property
This turbine is composed of pitch blade, permanent magnet generator, rotary body (including
the slip ring and mechanical braking device), tower, braking switch, electric controller, battery
bank, inverter, cable, etc.
6
2.5 Technical Specifications
2.6. Output Power and Performance Curves
•
Variable Pitch Technology allows the Talon series of wind turbine generators
to maintain a peak power output up to the maximum working speed of 56 mph.
7
2.7 Wind Turbine Features
2.7.1 Blades: With a tip-speed ratio exceeding 0.4 and a noise lower than 65db, the blades have
been aerodynamically optimized for better performance. The blades have passed extensive wind
tunnel tests. Made of special purpose gel-coat resin and reinforced FRP, each Talon blade set is
highly durable and will guarantee safe operation under a wind speed of up to 2 times the rated
wind speed.
2.7.2 Generator: Made of strong magnet material, and a good quality shaft, the generator
housing has adopted the F-grade insulation and IP54 protection, as well as a maintenance free
design. All this has contributed to over a 30,000 hour lifespan. The motor shell has been
aluminum coated with power generating efficiency of over 90%.
2.7.3 Variable Pitch Technology:
When the wind speed is below 7 mph (3m/s), the turbine blade angle remains static and the
angle (X1) formed between the blade and turbine plane is B° (X1=B°). This is the ideal angle
for the blades to begin their rotation. As long as the wind speed reaches 7 mph, the blades will
begin to rotate. While rotating, the outermost edge of the blade will be driven by the centrifugal
force generated by the rotation of the blade to tilt toward the turbine plane. As the wind speed
increases, the blade angle (X1) will then decrease to 0° so that the blade is parallel with the
turbine plane. At this angle, the turbine has nearly reached its rated output power. When the
wind speed is between 20 mph - 55 mph (9m/s - 25m/s), the blade angle (X1) will stay near 0°
with slight fluctuations in order to maintain it’s rated power. When the wind speed is between
55 mph - 112 mph (25m/s - 50m/s), the wind will draw the blade by the centrifugal force, so the
angle (X1) will continue to decrease to a negative angle (X1 = -B°) [B° and -B° are not the
same]. Under this negative angle, the blade angle will produce a resistance on the rotation of
turbine blades to slow down the turbine, thus protecting it from over-speed operation. The
maximum rotation of the turbine will be no more than 300 RPM.
8
3. Safety Rules
•
•
•
•
•
•
•
•
•
•
Do not allow the turbine to run without a load, or at continual high speeds.
If applicable, check the guyed tower and guy wires regularly to ensure proper tension.
Do not stand under a wind turbine during high winds.
When the wind speed is over 24m/s, manually shut down the wind turbine.
If there is an unprecedented vibration or strange noise being detected during turbine
operation, stop the wind turbine for inspection.
Wire the wind turbine separately and do not mix with any other cable; power the lights by DC
and other household appliance by inverted AC; the refrigerator should be connected with a
switch on-delay socket.
When wiring the wind turbine system, connect the battery bank first, then the output cable of
the generator; in disassembling the turbine system, please disconnect the output cable of the
generator before cutting off the battery line. (See appendix 5)
Set the switch of the electric box at “off”. Only switch “on” as the battery is nearly charged
fully or a strong wind is approaching. Do not touch this switch under high RPM: switch it off
only during light winds.
The battery bank should be kept away from fire, heat, and direct sunlight. Any harmful gasses
from the battery charging and discharging should be exhausted on a timely basis.
Keep the rotor balanced to eliminate any vibration: In the case that the blades become
unbalanced, the wind generator must be shut down for a check. Once the trouble has been
eliminated, the unbalanced torque should be no larger than 0.02N.m.
•
Do not touch the breaker panel “off” switch when the wind turbine is rotating fast.
•
The electric breaker can only be turned off when the turbine is stopped or rotating slowly!
•
Keep the battery far away from heat or fire.
•
All harmful gas emitted during the charging process should be discharged outdoors.
•
To prevent a short circuit, please use a well insulated tool to wire the batteries.
•
The Talon wind turbine must be assembled by a qualified person with relevant training and
equipment. Non-qualified personnel should not perform any aspect of turbine installation or
operation.
Refer to this manual for site selection, installation and maintenance.
Installation should not occur under extreme weather conditions: thunderstorm, heavy rain, heavy
mist, sand storm, gusting wind, etc.
•
•
9
4. Preparation
4.1 Foundation Construction for a Hydraulic Tower (as shown in Appendix 2)
1. Dig a 2.6m × 2.6m square pit that is 1.2m deep
2. Construct a steel frame grid basket. The proper construction of this reinforcement is crucial to
the strength of the tower base. Pay attention to align the position of hydraulic pump with the
turbine tilt-up direction. Make sure to let the orientation of the turbine foundation fixing plate
and those of the hydraulic pump accord with the construction layout, even minimal deviation
may cause the failure of turbine installation.
3. Concrete mixing ratio is 1:2.2:3.5 (cement:sand:pebble)
4. Fill the hole with a 4” concrete base and put the steel frame grid basket into the bottom.
5. Fix two layers of boxed boards into the pit and put the steel frame in, fix the position of
ground bolts by upper and lower hole plates at a stipulated depth.
6. Pour the concrete
7. Wait around 100 hours to allow the foundation to set. During this period do not touch it or
attempt to install the wind turbine.
8. Refill the soil and stone. Tamp it.
4.2 Foundation Construction for a Freestanding Tower or Monopole (as shown in Appendix 3)
1. Dig a 2.6m × 2.6m square pit that is 1.2m deep
2. Construct a steel frame grid basket. The proper construction of this reinforcement is crucial to
the strength of the tower base. Follow the construction layout in Appendix 3.
3. Concrete mixing ratio is 1:2.2:3.5 (cement:sand:pebble)
4. Fill the hole with a 100mm concrete base and put the steel frame grid basket into the bottom.
5. Fix two layers of boxed boards into the pit and put the steel frame in, fix the position of
ground bolts by upper and lower hole plates at a stipulated depth.
6. Pour the concrete
7. Wait around 100 hours to allow the foundation to set. During this period do not touch it or
attempt to install the wind turbine.
8. Refill the soil and stone. Tamp it.
4.3 Installation Preparation
1. Check the components with the packing list. If you encounter any packaging discrepancies,
contact your Talon reseller immediately.
2. After battery purchase, fill the batteries with water and carry out the initial charge according
to the technical regulations specified by the battery manufacturer.
3. To protect against wind and rain, place the charge controller and inverter into a weatherresistant box.
4. Prepare a suitably long cable that is 6㎡ in cross section with a current intensity of around
4A/m ㎡. If the cable is rather long, enlarge the cross section properly.
5. Select an open site, with no obvious wind barriers (trees, buildings, etc.) and the air can flow
freely without turbulence. The distance between the turbine and controller, inverter, and
battery bank should be no longer than 50m.
6. The turbine should be installed when the wind is not strong, below grade 2.
10
5. Installation
5.1 Tower Installation
5.1.1 Installation and Assembly of a Hydraulic Tower
1. Dig a hole to the drawing specifications, found in Appendix 2 of this manual.
2. Lay out the rebar frame. Align the foundation screw bolts with the positioning disk.
3. Attention - The center lines of the tower positioning disk and the hydraulic top plate need to
be aligned before the concrete is poured.
4. After the concrete has been poured and allowed to set for at least 100 hours, place both the
tower base and hydraulic pushing rod base onto the exposed bolts emerging from the
concrete.
5. Place the included nuts and washers, and then tighten.
6. Connect the pushing rod of the hydraulic tower to the base of the pushing rod.
7. Attention - Place the adjusting nuts before installing the base.
8. Align the center of the tower, the center of the base hinge and the center of the hydraulic
base.
9. Connect the hydraulic hose to the hydraulic piston.
10. Connect the hydraulic piston to the hydraulic pump.
11
11. Start the hydraulic pump and SLOWLY raise the tower.
12. Once the tower is in position, tightly bolt the tower base into place using the included
fasteners.
13. Shut off the hydraulic pump, disconnect the hydraulic pushing rod and level the tower.
Tower should be tilted up around 30°before switching on the hydraulic pump.
5.1.2 Installation and Assembly of a Free-Standing Tower
1. Dig a hole to the drawing specifications, found in Appendix 3 of this manual.
2. Lay out the rebar frame. Align the foundation screw bolts with the positioning disk.
3. After the concrete has been poured and allowed to set for at least 100 hours, place the tower
base and onto the exposed bolts emerging from the concrete.
4. Place the included nuts and washers, and then tighten.
5. Connect the upper and lower tower rods together by plug-in or butt-joint.
6. Tighten the flange bolts.
7. Lay the tower down, with the base near the foundation.
8. Put a bracket beneath the tower about 1 1/2 feet from the tower top to support it.
9. Insert the cable and steel rope of the winch into the tower bottom and draw at least 18 inches
of them out from the tower top by using a steel wire (¢2~3 mm).
10. Free-standing tower specifications can be found in Appendix 4 of this manual.
12
5.2 Wind Turbine Body Installation
5.2.1 Assembly of a Generator with a Rotary Body
1. Affix the attached wiring disk to the top of the tower.
2. Wire the three tower cables onto the three terminals of the wiring disk.
3. Connect the output cable of the turbine with the terminal end. Then connect the tower cable
with controller.
4. Fix the vibration absorber onto the tower top flange by 8 ×M16×60 bolts and washers.
5. Lift the turbine and connect the vertical shaft flange with the vibration absorber by
8×M16×60 external bolts.
13
5.2.2 Turbine Assembly
1. Once the turbine body has been connected to the tower rod, lift the turbine body so that the
blade hub is facing upward. (see figures below)
2. Short-connect the three output cables to lock the rotation of the blade hub.
3. Assemble the three blades onto their respective positions of the blade hub by 12 M16×110
hex bolts (with big washer, spring washer and nuts). The blades should match the hub, so
follow the A, B &C that are on these pieces. The torque of the bolts should be 180~210Nm.
Short-connect the cables to prevent hub rotation.
14
5.2.3 Assembly of the Centrifugal Hammers
Hold the centrifugal hammer downward.
Affix each centrifugal hammer onto each blade hub, using the four included M12×20 hexagon
bolts and spring washers. (as shown below)
15
5.2.4 Winch Installation
Install the winch at the tower bottom with the provided bolts. Connect it with the steel wire from the
turbine main body. (see below)
16
5.3 Erecting the Wind Turbine
5.3.1 Crane Installation of a Free-Standing Tower
1. Screw two positioning pins into the feet bolts diagonally.
2. Lift the rotary body and the tower top by a flexible hanging belt, aiming at the positioning
pin, move the belt to let the tower sit onto the foundation accurately, put on the flat washer
and spring washer, screw on the M24 nuts.
3. Screw off the positioning pin, put the flat washer, spring washer and screw onto the nuts.
4. Adjust the perpendicularity of the tower against the ground into 0.002×height(m)by
screwing the 24 nuts of the tower base flange, keep this perpendicularity and tighten all the
nuts diagonally with each upper and lower nuts of the same pair being tightened
simultaneously.(see figures below)
During the installation, please short-connect the three output cables first in order to prevent the
rotation of blades, fix the turbine by rope.
5.3.2 Gin Pole Installation of a Free-Standing Tower
If a crane is not available for the tower installation, a gin pole (or holding rod) method should be
considered. For detail please refer to a tower consultant in your area.
17
6. System Electric Wiring
The wiring diagram for different types of turbines may vary. The wiring diagrams attached in
appendices 6 and 7 are only valid for the turbines, controllers and inverters from A&C Green Energy.
6.1 Battery Bank Connection
1. Connect the batteries into the battery bank, the “+” pole and “-” pole on both end of the battery
bank is marked by red and black color respectively. The battery lines and guide cables should be
6mm² (9 gauge copper wiring) in cross section area. All connection points should use wire
connecting clips to ensure firm connection and proper conductivity. Connecting wire between
batteries and the input/output wires of the battery group should be 6mm² (9 gauge), “+” pole is
marked by red color; “-” pole is marked by black (or yellow, or blue) color. In order to prevent
acid corrosion, put a layer of protective grease on the connecting clips.
2. Connect the three phase output wires of the generator to the connectors of the electric controller
& inverter box respectively.
3. Connect the controller with the battery bank (note the“+”“-”)
4. Connect the controller with dump load box using 10mm² (7 gauge) cable, if necessary.
5. Connect the braking signal terminal of controller with the K1/K2 of the braking controller using
2.5 mm² (12 gauge) cable.
6. Connect the “+”pole of the charger for the braking battery with either live wire of the inverter;
connect “-”pole with the output zero line of the inverter; the cable should be 4 mm²(11-gauge)
in cross section.
7. Connect the push rod terminal of the braking controller with the input terminal of the push rod at
the bottom of the tower using 2.5 mm²(12 gauge) cable.
6.2 Off-Grid Supply System
6.2.1 System Diagram (see appendix 6)
6.2.2 System Brief
The off-grid wind generator powers the load through a battery bank, and the electricity will be
stored in the batteries after being converted into stable DC by the controller.
18
1. Wire the turbine, controller, battery bank and dump load following the depiction in Section
6.1. Connect the input terminal of the inverter with the “+” “-” of battery bank. Connect the
load with the output (AC220V) terminal of the inverter. For details, refer to the controller and
inverter users manuals.
2. The off-grid turbine system can be used upon the completion of all wiring and connections,
based on the user manual of the turbine, controller and inverter. Only after reaching a certain
level of charge from the controller, will the batteries begin to power the load through the
inverter.
3. Much of the electricity, from the off-grid turbine, will be stored into the batteries.
Periodically refill the batteries to maintain their lifespan. Adjust the load consumption based
on the local wind condition and power generation status.
4. The voltage level of the batteries should match those of the wind turbine. The inverter output
voltage level should also be consistent with that of the wind turbine’s voltage. The inverter
capacity should satisfy the peak power of the load.
6.3 Grid-Tie Supply System
6.3 1 System Diagram (wiring diagram see appendix 7)
6.3.2 System Brief
An on-grid turbine system consists of a wind turbine, grid-tie controller, dump load box, inverter
and utility/electric system (the “grid”). The turbine will convert the kinetic power of wind into
unstable AC, which is then rectified into DC by the grid-tie inverter. It will be converted into
stable AC. Then it can either be used by the load (appliances and household electronics) or fed
back into the power grid.
6.3.3 Wiring of an Grid-Tie Wind Turbine System
1. Wire the turbine system based on the turbine grid-tie controller and inverter manuals.
2. The on-grid inverter efficiently feeds the AC220V/AC380 grid, but it needs a dump load, a
power-off automatic shut-down, etc.
3. For safety, the capacity of the controller’s dump load should be 2-3 times that of the rated
capacity of the turbine and load.
19
7. Operation Manual
7.1 Testing Examination
1. Check the tightness of the blades, turbine rotor, nose cone, generator, rotary body and
centrifugal hammers.
2. Check to see if the installation angle of each blade and centrifugal hammer is proper.
3. Check the connection and torque of the tower and foundation bolts
4. Try to turn the turbine to see if there is any generator shaft resistance. The blades should be
free to spin without friction.
7.2 Checking the Generator Output Line
1. Open the nacelle window to see if the output cable and brush have a good connection.
2. Using a multimeter, check for good conductivity between the terminals and slip ring.
3. Check the tightness between the three turbine output cables and power cable to see if the
terminal has been fixed or whether the cables or steel wires have become twisted.
7.3 Check the Inner Braking Mechanism
1. Check the connection of the steel rope with the winch. Ensure the limiting disk and stroke
switch assemblies are correct.
2. Start the system and release the brake; agitate the winch by hand in a counter-clockwise
direction to loosen the steel rope to see if the turbine is about to spin.
7.4 Checking the Electric System
Check all electrical equipment including controller, battery bank, inverter and dump load. Make sure
they have been properly connected and are in good working order.
7.5 Trial Operating
1. The turbine should be static before the trial test.
2. Start the turbine and check the flexibility of how the turbine tracks the wind direction: when
the wind speed reaches 4m/s, the turbine should be able to track the wind direction.
3. The turbine will begin to rotate when the wind speed has exceeded 4m/s, the rotation speed of
the turbine will be a slightly higher during the first several startups, becoming gradually
normal.
4. During the trial running period, the turbine should remain stable with little vibration. The
voltage of the three output cables should be identical. The blade will change its position when
the wind speed has exceeded the rated speed. The peak output power of the turbine should be
no larger than 1.5 times that of the rated power.
5. During the trial running of the turbine, maintain and operate the turbine following the
depiction of the operating manual, the controller, batteries, inverter should be able to power
the load or feed the grid normally.
6. If the turbine has passed the above trial run, it is ready normal operation.
20
7.6 Normal Operation
1. The turbine system should be put into service only after all of all its components have passed
the trial test.
2. The turbine should be serviced only by an authorized professional. Call your Talon reseller
should you need help finding a technician.
7.7 Shut-Down Methods
1. Automatic shut down: The controller will detect the signal from the turbine system,
including the output voltage of generator and working time of the dump load box. If either of
the two signals exceeds the normal range, the controller will shut down the turbine
automatically.
2. Manual shut down: The turbine can be shut down by the braking switch on either the
controller or the electric/manual winch, if necessary, for maintenance, approaching storm,
etc). After the braking switch has been triggered, the turbine blades will change angles
gradually, slowing the rotation of the turbine.
3. During the normal shut down of the turbine, there is no need to turn off the turbine controller
and inverter. When the turbine is being shut down for a long time, the controller and inverter
should be turned off, in order to save the power of the batteries and protect the turbine.
4. Restart and System Shut-Down Recovery:
• In the case of manual shut down, please press the manual dump load and then loosen the
steel rope of the electric winch manually before the restarting the wind turbine.
• In the case of the electric shut down, just engage the turbine system by controlling the
electric winch by hand.
For any shut-down reason, the inverter must be switched off before the controller. For the start-up
of the electric system, follow the same procedure.
21
8. Maintenance
8.1 Routine Check
1.
2.
3.
4.
5.
6.
7.
If there is abnormal vibration or noise, shut down the turbine for further inspection.
Check the flexibility of the Variable Pitch mechanism the strong winds.
Check that the voltage balance of the 3 phase output is even.
Check the working status of the controller and inverter.
Check if the batteries have been fully charged.
Open the nacelle window; check if the spline shaft has been well lubricated and clean.
Open the nose cone, check if the joint bearing is clean and has been lubricated.
8.2 Maintenance After the First 1,000 Hours
8.2.1 Check all nuts and bolts, and tighten them in accordance with the stipulated torque.
Checking emphasis is as follows:
• Tower foundation/base bolts
• Linkup flange bolts of tower rods
• Bolts between the vertical shaft flange and the tower top
• Rotor hub nuts
• Blade bolts
• Air flow diversion cover bolts
• Bolts between the generator and nacelle
• Round nut on the vertical shaft bearing
• Main tail pin bolts
8.2.2 Check welding positions of the tower rod to ensure that there are no cracks of flaws.
• Root part
• Linkup flanges
• Tower top flange
• Rotor hub
8.2.3 Check hand-turning and winch-driving tail folding action (tail fold to 45°~60°) to see
whether there are any blocking phenomena. Check whether the tail vane can retract easily
after releasing. If there are any unusual conditions, please ascertain the reasons and
eliminate the breakdowns.
8.2.4 Check whether the blade bolts are loose or missing. Check whether the bolts to the air
flow diversion cover are loose or missing. Tighten if necessary.
8.2.5 Generator output cable check
• Check to see if the three power output cable has been fixed firmly inside the
nacelle, if the sheath has been damaged.
• Check if the wire has been connected firmly with the brush, and had good
conductivity.
• Check if the contact of six electric brushes with slip ring is firm and smooth,
Replace if there is any damage from overheating.
• Check to ensure balanced voltage on the three phase cable.
8.2.6 Lubricate the Key Position
•
Open the nacelle window, clean and lubricate the spline shaft.
•
Open the nose cone, clean and lubricate the joint bearing.
22
8.3 Checking After Heavy Winds
After strong wind (>25m/s), repeat the procedures in 8.2.1, 8.2.2, 8.2.3, 8.2.4, 8.2.5.
8.4 Routine Maintenance (every 3,000 hours)
1. Repeat every check and maintenance process detailed in section 8.2.
2. Check the technical conditions of the rotor.
3. Checking the contour of the blades, with emphasis on the tips and front edges, to see
whether there are any cracks or damage.
4. Check the blades to detect any changes which can result in unbalanced deformation,
translocation or change of setting angle.
5. Clean the electricity conveying slip ring and electric brushes, polishing the
conducting contact face. Any worn electric brush should be replaced by a new one.
The contact area between the brush and slip ring should reach 95% or more.
8.5 Maintenance
1. Lubricate the blade hub, joint bearing and spline hub every year.
2. The spring position inside the rotary body should be checked every year, replacing
any damaged springs.
3. Check the fasteners and brushes regularly.
4. Check the steel rope regularly, replacing any damaged rope.
2
9 Troubleshooting
3
Appendix 1 Bolt Torque (Nm)
4
Appendix 2 Hydraulic Tower Foundation
5
Appendix 3 Free-Standing Tower Foundation
6
Appendix 4 Free-Standing Tower Specifications
7
Appendix 5 Off-Grid Wiring
8
Appendix 6 Grid-Tie Wiring
9
Limited Warranty Information
A&C GREEN ENERGY 5 YEAR LIMITED WARRANTY
Talon wind turbines, electronics, and associated equipment manufactured by/for A&C
Green Energy, Inc. are warranted against defects in design, material, and
workmanship, under normal use for which intended, for five years after installation
and as set forth below.
Parts: For a period of Five (5) Years from the original date of purchase of product
(“Parts Warranty”), A&C Green Energy will supply replacement parts in exchange for
parts determined to be defective.
Labor: For a period of Five (5) Years from the original date of purchase of product
(“Labor Warranty”), A&C Green Energy will, at its option, repair or replace this
Product, should it be deemed defective.
Proper Registration: Your registration must be completed within 30 calendar days
of your dated receipt in order to validate this Limited Warranty. You may complete
registration
by
filling
out
the
online
registration
form
online
at
http://www.acgreennergy.com/registerwarranty or by completing the mail-in
registration card as stated on the A&C Green Energy Registration Form and mailing it
to:
A&C Green Energy
P.O. Box 941122
Plano, TX 75094
Upon your registration you shall receive a confirmation via email to inform you that
your product has been properly registered. Both proper registration and a dated
proof of purchase are required prior to obtaining warranty service.
Instructions: To obtain warranty service, simply call (800) 963-7973.
When calling ensure to have all proof of purchase documentation and service
material available including all serial and part numbers to help us quickly assist you.
Repair/Replacement Warranty: This Limited Warranty shall apply to any repair,
replacement part or replacement product for the remainder of the original Limited
Warranty period or for Five (5) years whichever is longer. Any parts or product
replaced under this Limited Warranty will become the property of A&C Green Energy.
This limited warranty covers only the hardware components packaged with the
Product. It does not cover technical assistance for hardware or software usage and
it does not cover any software products whether or not contained in the Product; any
such software is provided “AS IS” unless expressly provided for in any enclosed
software Limited Warranty. Please refer to the End User License Agreements
included with the product for your rights and obligations with respect to the
software.
This Limited Warranty only covers product issues caused by defects in material or
workmanship during ordinary consumer use; it does not cover product issues caused
by any other reason or use. This includes but is not limited to acts of God, misuse,
limitations of technology, or modification of any part of the product. This Limited
10
Warranty does not cover products sold “AS-IS” or “WITH ALL FAULTS” or
consumables (such as fuses or batteries). This Limited Warranty is invalid if the
factory-applied serial number has been altered or removed from the product. This
Limited Warranty is valid only in the United States.
This limited warranty does not cover:
1) Towers, equipment, materials, or supplies not manufactured by/for A&C Green
Energy;
2) A&C Green Energy equipment that has been modified or altered without prior
factory approval;
3) Damage or loss of function sustained during periods with wind speeds exceeding
50 m/s (110 mph)
4) Repairs performed by other than authorized A&C Green Energy service personnel;
5) Acts of God; or
6) Incidental or consequential damages.
Pursuant to this Limited Warranty, A&C Green Energy, will, at its option (1) repair
the product using new or refurbished parts or (2) replace this product with a new or
refurbished product. For the purposes of this Limited Warranty “refurbished” means
a product or part that has been restored to its original specification. In the event of
a defect the above represents your exclusive remedies.
LIMITATIONS ON DAMAGES: A&C GREEN ENERGY SHALL NOT BE LIABLE FOR
ANY INCIDENTAL OR CONSEQUENTIAL DAMAGES FOR BREACH OF ANY EXPRESS OR
IMPLIED WARRANTY ON THIS PRODUCT.
DURATION OF IMPLIED WARRANTIES: EXCEPT TO THE EXTENT PROHIBITED BY
APPLICABLE LAW, ANY IMPLIED WARRANTY OF MERCHANTABILITY OR FITNESS FOR
A PARTICULAR PURPOSE ON THIS PRODUCT IS LIMITED TO THE DURATION OF THIS
WARRANTY.
INSURANCE:
Mailing Address:
A&C Green Energy
PO Box 941122
Plano, TX 75094
Shipping Address:
A&C Green Energy
1108 Summit Ave., Ste 8
Plano, TX 75024
972-516-0692
This Agreement is not a contract of insurance; however, the obligations hereunder are
fully insured by A&C Green Energy’s insurance company.
Some states do not allow the exclusion or limitation of incidental or consequential
damages, or allow limitations on how long an implied warranty lasts, so the above
limitation or exclusions may not apply to you. This Limited Warranty gives you legal
rights and you may have other rights which vary from state to state.
11
Talon Warranty Registration Card
Talon Model: ______Talon10_________________________________
Serial Number: ____________________________________________
Where was this unit purchased?_______________________________
Purchase Date: ________________
Purchaser Information:
Name: ___________________________________________________
Address: _________________________________________________
City: ____________________ State: _________ Zip: ___________
Phone: ______________________
Email: _____________________
Keep this half for your personal records
-----------------------------------------------------------------------------------
Talon Model: ______Talon10_________________________________
Serial Number: ____________________________________________
Where was this unit purchased?_______________________________
Purchase Date: ________________
Purchaser Information:
Name: ___________________________________________________
Address: _________________________________________________
City: ____________________ State: _________ Zip: ___________
Phone: ______________________
Email: _____________________
Mail or fax this half to A&C Green Energy at fax# 972-516-0697