1
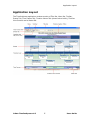
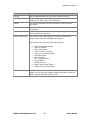
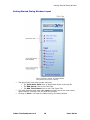
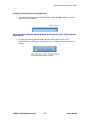
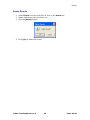
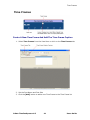
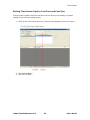
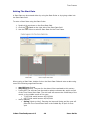
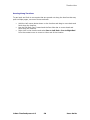
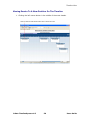
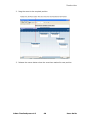
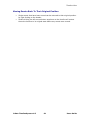
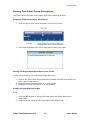
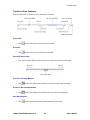
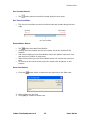
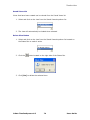
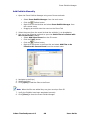
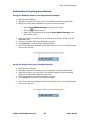
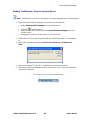
inData TimelineXpress v4.5
Timelines on the Fast Track
Timeline Design and Presentation Software
User Manual and Reference Guide
First Edition May 2004
Table of Contents
inData is a registered trademark of inData Corporation.
DepositionDirector is a registered trademark of inData Corporation.
DocumentDirector is a registered trademark of inData Corporation.
TimeCoder is a trademark of inData Corporation.
TrialDirector is a registered trademark of inData Corporation.
TimelineXpress is a trademark of inData Corporation.
Internet Explorer is a trademark of Microsoft Corporation.
PowerPoint is a registered trademark of Microsoft Corporation
Windows is a registered trademark of Microsoft Corporation.
CaseMap is a registered trademark of CaseSoft.
iBlaze is a registered trademark of Summation Legal Technologies.
Summation Blaze is a registered trademark of Summation Legal Technologies.
Summation is a registered trademark of Summation Legal Technologies.
All other product names and logos are trade and service marks of their respective
companies.
Information in this document is subject to change without notice. This
documentation may not be copied, photocopied, reproduced, translated, or reduced
to any electronic medium or machine-readable form without the written consent of
inData Corporation
©2004 by inData Corporation. All rights reserved.
Printed in the United States
Documentation written and compiled by Nick Rundle.
inData Corporation.
1325 North Fiesta Boulevard
Suite #4
Gilbert, Arizona 85233
1-800-828-8292
Visit inData on-line: http://www.indatacorp.com
inData TimelineXpress v4.5
ii
Users Guide
Table of Contents
Introducing TimelineXpress 4.5 ............................................... 6
Application Layout.................................................................... 7
Getting Started Dialog Window ................................................ 9
Getting Started Dialog Window Layout ......................................... 10
Closing The Getting Start Dialog Window ...................................................11
Stop the Getting Started Dialog Window Showing Each Time TimelineXpress Is
Launched ..............................................................................................11
Open An Existing Timeline...................................................... 12
Saving A New Timeline ........................................................... 13
Saving Changes To An Existing Timeline ................................ 14
Design Schemes ..................................................................... 15
Selecting A Design Style ............................................................... 15
Changing The Color Schemes For A Design Style .......................... 17
Changing The Color Scheme When Using One Band (top) .............................17
Changing The Bottom Band Color Scheme When Using Two Bands ................19
Custom Background Graphics ....................................................... 20
Events .................................................................................... 21
Create A New Event And Add The Event Caption........................... 21
Setting Event Caption Text Font and Font Size ............................. 23
Using Date Only Events ................................................................ 24
Using Dates And Time Events ....................................................... 27
Adding Event Popup Descriptions ................................................. 29
Setting Event Popup Description Text Font and Font Size............. 30
Adding An Icon To An Event ......................................................... 31
Setting Event Text Font Colors ..................................................... 32
Setting Event Background Contrast Colors ................................... 34
Set The Band ................................................................................ 36
Adding Linked Exhibits To Events ................................................. 37
Editing Events .............................................................................. 38
Hide Events Without Deleting ....................................................... 39
Delete Events ............................................................................... 40
Time Frames........................................................................... 41
Create A New Time Frame And Add The Time Frame Caption ....... 41
Setting Time Frame Caption Text Font and Font Size.................... 43
Setting The Start Date .................................................................. 44
Setting The End Date .................................................................... 46
Setting Start Time And End Time .................................................. 48
Entering A Start Time..............................................................................49
Entering An End Time .............................................................................50
Adding Time Frame Popup Description ......................................... 51
Setting Time Frame Popup Description Text Font and Font Size ... 52
Set The Band ................................................................................ 53
Editing Time Frames ..................................................................... 54
Deleting Time Frames................................................................... 55
Timeline View......................................................................... 56
Adjusting The Time Scale ............................................................. 57
Scaling Out............................................................................................57
Resetting To Its Original Time Scale ..........................................................57
inData TimelineXpress v4.5
iii
Users Guide
Table of Contents
Panning Along Timelines ..........................................................................58
Moving Events To A New Position On The Timeline....................... 59
Moving Events Back To Their Original Position ............................. 61
Time Scale Gaps ........................................................................... 62
Inserting Gaps .......................................................................................62
Removing Gaps ......................................................................................64
Viewing Attached Document And Photo Exhibits .......................... 65
Viewing Attached Multimedia Exhibits.......................................... 66
Viewing Event Popup Descriptions ............................................... 67
Viewing An Event Popup Description..........................................................67
Moving The Popup Description Box On The Screen ......................................67
Closing A Popup Description Box...............................................................67
Zooming In And Out Of Attached Exhibits .................................... 68
Opening The Attached Exhibits Viewer .......................................................68
Zooming In ...........................................................................................69
Zooming Out .........................................................................................69
Viewing Time Frame Start And End Dates..................................... 70
Viewing The Start Date............................................................................70
Viewing The End Date .............................................................................70
Viewing Time Frame Popup Descriptions...................................... 71
Viewing A Time Frame Popup Description ...................................................71
Moving The Popup Description Box On The Screen ......................................71
Closing A Popup Description Box...............................................................71
Timeline View Controls ................................................................. 72
Zoom Out..............................................................................................72
Zoom In................................................................................................72
Zoom In/Out Slider.................................................................................72
Zoom To Fit Page Button .........................................................................72
Zoom To No Overlap Button .....................................................................72
Pan Back Button.....................................................................................72
Pan Forward Button ................................................................................73
Pan Time Line Slider ...............................................................................73
Event Walker Button ...............................................................................73
Save View Button ...................................................................................73
Saved Views List ....................................................................................74
Delete View Button .................................................................................74
Timeline Views ............................................................................. 75
Creating Views .......................................................................................75
Loading Views ........................................................................................75
Deleting Views .......................................................................................76
Events Exhibits Manager Overview......................................... 77
Opening The Events Exhibit Manager ........................................... 77
View Events Attached Exhibits As A Detailed List ......................... 78
View Events Attached Exhibits As Thumbnails.............................. 79
Add Exhibits Manually .................................................................. 80
Add Exhibits Using Drag-drop Methods ........................................ 82
Using The Windows Explorer And Event Exhibit Manager ..............................82
Using The Drag Directly Onto The Event Method .........................................82
Adding TrialDirector Item to Current Event .................................. 83
Removing Attached Exhibits ......................................................... 84
Viewing Attached Exhibits ............................................................ 85
inData TimelineXpress v4.5
iv
Users Guide
Table of Contents
Annotating Attached Exhibits ....................................................... 86
Opening The Events Exhibits Manager .......................................................86
Draw An Arrow.......................................................................................87
Draw An Ellipse ......................................................................................88
Highlight An Image .................................................................................89
Removing Annotations ............................................................................89
Zooming In And Out Of Attached Exhibits .................................... 90
Opening The Events Exhibits Manager .......................................................90
Zooming In ...........................................................................................91
Zooming Out .........................................................................................91
Closing The Events Exhibits Manager .........................................................91
Attached Exhibit File Types .......................................................... 92
Importing Files....................................................................... 94
Exporting As Image File ......................................................... 95
Full Screen Presentation Window ........................................... 97
Opening The Full Screen Presentation Window ............................ 97
Closing The Full Screen Presentation Window .............................. 97
Print Preview.......................................................................... 98
Printing Timelines .................................................................. 99
Printing Events List .............................................................. 101
Printing Time Frames List..................................................... 102
TimelineXpress Preferences ................................................. 103
Application Integration ........................................................ 104
TrialDirector Integration ............................................................ 105
DocumentDirector Integration ................................................... 107
Integrating With CaseMap .......................................................... 108
Integrating With PowerPoint...................................................... 109
Add A New Timeline Slide ...................................................................... 110
Insert TimelineXpress Onto The Current Slide ........................................... 112
Launching TimelineXpress From Within PowerPoint .................................... 114
Integrating With Summation iBlaze ........................................... 115
Summation Preview Chronology Of Events ............................................... 117
Saving Chronology Of Events ................................................................. 118
Launching TimelineXpress From Within Summation iBlaze .......................... 119
Keyboard Shortcuts .............................................................. 120
Automated Updates .............................................................. 121
Manually Checking For Available Updates................................... 121
Advanced Settings ...................................................................... 122
inData TimelineXpress v4.5
v
Users Guide
Introduction
Introducing TimelineXpress 4.5
Create Great looking timelines from concept to presentation in minutes.
TimelineXpress™ comes with professionally created design schemes that will have
the appeal and impact you want.
Easy - Choose a design scheme, add events and time frames. Then present
or print your timeline. It's really that easy.
Interactive - Interactive timelines help others to comprehend your
chronology of events better than printed timelines alone.
Integration - Integrates with TrialDirector™(v4.5 or higher) Summation
iBlaze™, PowerPoint™, CaseMap™ and more...
Expandable - Event significance can be expanded with event pop-up detail
panels. The story unfolds on your cue.
Zoomable - To focus attention on a specific sequence of events zoom in, or
zoom out to show the big picture. Pan across time, exploring each event
Linkable - Documents, photos, video, and other demonstratives can be
linked to any event. Events become more significant and memorable when
documented or enriched by images, video and sound.
Printable - Print your timelines! Whether you need them small or super-size,
the details will be crisp and professional.
Shareable - Post your timeline to a web page or email a copy to a colleague.
TimelineXpress™ can output your timeline for almost any use.
Analyze - See your documents 'story' unfold before you. Loading a document
list into TimelineXpress ™ will let you see your documents set in proper time
frame.
Color Coding - Set the text color or the event background color for issue
tracking and highlighting significant facts and events
Presentation Window - Present timelines with TimelineXpress's fully
interactive integrated presentation window
Event Walker - Loading events individually by one click of a button helps to
hold the jury's attention to focus on what's important
Export As Image File - Timelines can exported to an image file format,
including *.pdf, *.jpg, *.tif, *.bmp and more...
Print Event Lists and Time Frame Lists - Print out list of Events or Time
Frame list that make up the timeline for analysis and review
Save to HTML File - Save to HTML File allows you to embed your fully
interactive timeline inside a HTML page.
inData TimelineXpress v4.5
6
Users Guide
Application Layout
Application Layout
The TimelineXpress application window consists of Title Bar, Menu Bar, Toolbar,
Events Tab, Time Frames Tab, Timeline Viewer Tab (shown active below), Timeline
View Controls and a Status Bar.
inData TimelineXpress v4.5
7
Users Guide
Application Layout
Component
Description
Title Bar
The Title Bar displays the Title of the current Timeline
Menu Bar
The Menu Bar provides the following menus to use while in
Timeline: File, Edit, View, Tools and Help.
Toolbar
The Toolbar provides you with shortcuts to perform menu
commands.
Events Tab
Event Tab allows the adding, editing and deleting of events to
the timeline
Time Frames Tab
The Time Frames Tab allows the adding, editing and deleting of
Time Frames to the timeline
Timeline View Tab
The Timeline View Tab displays the timeline and has the
Timeline View Controls located at the bottom,
The Timeline View Controls allow the following:
Zoom fit the page Button
Zoom In Button
Zoom Out Button
Zoom In/Out Scroll Bar
Zoom to no overlap button
Pan Back Button
Pan Scroll Bar
Pan Forward Button
Event Walker
Saved View list
Save Current View Button
Delete Current View Button
Status Bar
The Status Bar shows the file path for the current timeline
design, the current open timeline, NUM lock status, CAPS lock
status, System Date and System Time.
inData TimelineXpress v4.5
8
Users Guide
Getting Started Dialog Window
Getting Started Dialog Window
When the TimelineXpress is launched for the very first time, the Getting Started
Dialog Window is also launched.
If the Getting Started Dialog Window is not visible
1. Select Getting Start Dialog... from the View Menu
inData TimelineXpress v4.5
9
Users Guide
Getting Started Dialog Window
Getting Started Dialog Window Layout
The Quick Start Links area provide shortcuts:
The Quick Start Guide links to Quick Start Guide in the help file
The Add Events links to the Event Tab
The Add Time Frames links to the Time Frame Tab
The Most Recently Used area under Open provides links to the most recent
open timelines. Clicking a link will open the timeline
Clicking on More... will open the Open Existing Timelines Window
inData TimelineXpress v4.5
10
Users Guide
Getting Started Dialog Window
Closing The Getting Start Dialog Window
1. To close the Getting Started Dialog Window, click the [X] located on the top
right side of the window
Stop the Getting Started Dialog Window Showing Each Time TimelineXpress
Is Launched
1. To Stop the Getting Started Dialog Window being shown every time
TimelineXpress is launched, click the check box located at the bottom of the
window
inData TimelineXpress v4.5
11
Users Guide
Saving a New Timeline
Open An Existing Timeline
1. Select Open... from the File Menu or click the
Toolbar button
2. Browse to where the timeline is located, by default, timelines are saved to a
directory called My Timelines
3. Select the timeline
4. Click [Open]
inData TimelineXpress v4.5
12
Users Guide
Saving a New Timeline
Saving A New Timeline
1. Select Save As... from the File Menu or click the
Toolbar button
2. Browse to where the timeline is to be saved, by default, timelines are saved
to a directory called My Timelines
3. Enter a name for the timeline in the File name field
4. Click [Save]
inData TimelineXpress v4.5
13
Users Guide
Saving Changes to an Existing Timeline
Saving Changes To An Existing Timeline
1. Select Save ... from the File Menu or click the
timeline will be saved in its current state.
inData TimelineXpress v4.5
14
Toolbar button. The
Users Guide
Design Schemes
Design Schemes
TimelineXpress provides professionally designed and varied schemes which create
high quality image timelines. Each design style has several color options to select
from and the ability to add a custom background graphic. Design styles are either
standard or wide width.
Selecting A Design Style
1. Select Design Schemes from the View Menu or click the
to open the Design Style Selection window
inData TimelineXpress v4.5
15
Toolbar button
Users Guide
Design Schemes
2. Click the down arrow located on the right side of the Current Design Style
to view available styles
3. Select a design scheme from the list, the new design will be shown in the
Design Style Preview window
4. Click [Ok] to keep the changes or [Cancel] to keep the existing design
scheme
inData TimelineXpress v4.5
16
Users Guide
Design Schemes
Changing The Color Schemes For A Design Style
The Color Scheme for a Design Style can be changed:
Changing The Color Scheme When Using One Band (top)
1. Select a Background Graphic from the Color Scheme drop down list:
inData TimelineXpress v4.5
17
Users Guide
Design Schemes
A timeline for example would look like:
inData TimelineXpress v4.5
18
Users Guide
Design Schemes
Changing The Bottom Band Color Scheme When Using Two Bands
1. Select a Background Graphic from Bottom Band Color Options (when
present), to change the bottom band color scheme.
2. Click [Ok] to keep the changes or [Cancel] to keep the existing scheme.
A timeline would look something similar to below:
inData TimelineXpress v4.5
19
Users Guide
Design Schemes
Custom Background Graphics
Custom backgrounds can be used for both the top band and bottom band (when
present)
1. Select the Custom Background Graphic button
window.
to open the browse
2. Browse to the location of the image file that is to be used for the background.
3. Select the image and click [Open].
4. Click [Ok] to keep the changes or [Cancel] to keep the existing scheme.
Note: Custom Background Graphics for the bottom band is set in the same
manner. Events have to placed on the bottom band for the bottom band to show
when viewing a timeline.
inData TimelineXpress v4.5
20
Users Guide
Events
Events
Create A New Event And Add The Event Caption
1. Select Events from the View Menu or click on the Events tab
inData TimelineXpress v4.5
21
Users Guide
Events
2. Select the Events Display Size from the Minimum Event Display Size Selection
list. When the text is added to the Event Caption and it is more than the
selected size can display, TimelineXpress will attempt to use the next Display
Size up if available. By default Medium is selected, the available sizes are:
Small
Medium
Large
Largest
3. Set the Font Name and Font Size
4. Click the [Add] button or press [Insert] to add a new event to the events
list
5. The Caption field for the new event will become active, ready for the event
caption to be entered
6. Enter the event caption text (press Ctrl + [Enter] to add a new line)
7. Press [Enter]
inData TimelineXpress v4.5
22
Users Guide
Events
Setting Event Caption Text Font and Font Size
The events caption text font and font size can be set, this setting is a global setting
for all the event captions text
1. Click on the Event Caption Preview, a blue box will appear to show it is active
2. Set the Font Name
3. Set the Font Size
inData TimelineXpress v4.5
23
Users Guide
Events
Using Date Only Events
Events can be created using only Dates. When this option is selected to create
events (active by default) a default time of 12:00:00PM is automatically assign to all
of the events. To set Use Dates Only preference:
1. Select Preferences from the View Menu
2. Select the Use Dates Only from the Timeline Creator Date and Time Options
3. Click [Save]
inData TimelineXpress v4.5
24
Users Guide
Events
A date can be entered either by using the Date Picker or by typing a date into the
date field.
To enter a date using the Date Picker:
1. Double click anywhere on the date field
located on the right side of the Date Field
2. Click the
3. Use the Date Picker to select a date for the Event
When typing a date double click on the date field and enter a date using one of the
following supported formats:
mm/dd/yyyy format
mm/dd/yy format. The year for the date will be translated to this century
? wild card. The wild card can be used to replace unknown day and/or month
of the events date. The wild card will assume the middle day of the month, or
the middle month of the year:
??/03/2004 would become 06/03/2004
06/??/2004 would become 06/06/2004
Yearly Seasons
Spring [March to May]. Entering the keyword Spring and the year will
place the event in the middle day of April for that year
Summer [June to August]. Entering the keyword Summer and the
year will place the event in the middle day of July for that year
Fall [September to November]. Entering the keyword Fall and the year
will place the event in the middle day of October for that year
inData TimelineXpress v4.5
25
Users Guide
Events
Winter [December to February]. Entering the keyword Winter and the
year will place the event in the middle day of January for that year
Month segments
Early. Entering the keyword Early and the month will place the event
on the 5th day of the specified month
Mid. Entering the keyword Mid and the month will place the event on
the 15th day of the specified month
Late. Entering the keyword Late and the month will place the event on
the 25th day of the specified month
Yearly Quarters
1st Quarter [January to March]. Entering the keywords 1st Quarter
and the year will place the event in the middle day of February for that
year
2nd Quarter [April to June]. Entering the keywords 2nd Quarter and
the year will place the event in the middle day of May for that year
3rd Quarter [July to September]. Entering the keywords 3rd Quarter
and the year will place the event in the middle day of August for that
year
4th Quarter [October to December]. Entering the keywords 4th
Quarter and the year will place the event in the middle day of
November for that year
inData TimelineXpress v4.5
26
Users Guide
Events
Using Dates And Time Events
A time can be assigned to an Event Date. The Use Dates and Times Property must
be set on the timeline preferences. This is a global property, which affects Time
Frames.
1. Select Preferences from the View Menu
2. Select the Use Dates and Times from the Timeline Creator Date and Time
Options
3. Click [Save]
inData TimelineXpress v4.5
27
Users Guide
Events
Note: When this option is selected the time field becomes visible and default
time of 12:00:00PM is automatically assigned to the event.
A time can be entered either by using the Time Setter Tool or by typing a time into
the Time field. Time is stored in HH:MM:SS AM/PM format
To enter a date using the Time Setter Tool
1. Double click anywhere on the Time field,
located on the right side of the Time field.
2. Click the
3. Highlight the part of the time that is to be set (HH or MM or SS)
4. Use the up control to increase the time or the down control to decrease the
time
5. Highlight the next part of the time to be set and adjust it
When typing a time, double click on the Time field and enter a time using one of the
following supported formats:
H:M:S - Will be converted to standard time adding either AM or PM
HH:MM:SS AM
HH:MM:SS PM
HH:MM:SS - Where the hours can be entered under the 24 hour clock format
and will be converted to standard time adding either AM or PM
H.M.S - Will be converted to standard time adding either AM or PM
HH.MM.SS - Where the hours can be entered under the 24 hour clock format
and will be converted to standard time adding AM or PM
inData TimelineXpress v4.5
28
Users Guide
Events
Adding Event Popup Descriptions
Event Popup Description are optional. The event popup description can then be
viewed in presentation mode by clicking the small paper clip icon located on the
Event title bar
To add an Event Popup Description:
1. Double click in the Description field
2. Enter the description and press [Enter]
3. The Description will appear Event Popup Description preview window
inData TimelineXpress v4.5
29
Users Guide
Events
Setting Event Popup Description Text Font and Font Size
The events popup description text font and font size can be set, this setting is a
global setting for all the event popup description text
1. Click on the Event Popup Description Preview, a blue box will appear to show
it is active
2. Set the Font Name
3. Set the Font Size
inData TimelineXpress v4.5
30
Users Guide
Events
Adding An Icon To An Event
Icons are optional and can be used as visual aid to identify the event. The icon
appears on the bottom left side of the event.
To add and Icon to an Event:
1. Double click in Icon field
located on the right side of the Icon field.
2. Click the
3. Select an icon from the dropdown list
inData TimelineXpress v4.5
31
Users Guide
Events
Setting Event Text Font Colors
By default the event caption text font color is set to black when created. The color
can be changed and used to color code and emphasize particular events. Colored
fonts are placed on a white background.
To check that setting the color will be applied to the text:
1. Select Preferences from the View Menu
2. Select the Caption Text from the Apply Event Color Selection To...
options
3. Click [Save]
inData TimelineXpress v4.5
32
Users Guide
Events
To set the font color:
1. Double click in Color field
located on the right side of the color field.
2. Click the
3. Select an font color for the event from the dropdown list
inData TimelineXpress v4.5
33
Users Guide
Events
Setting Event Background Contrast Colors
By default the event caption background color is set to white when created. The color
can be changed and used to color code and emphasize particular events. White fonts
are placed on colored backgrounds.
To check that setting the color will be applied to the background
1. Select Preferences from the View Menu
2. Select the Background from the Apply Event Color Selection To... option
3. Click [Save]
To set background contrast color
1. Double click in Color field
located on the right side of the color field.
2. Click the
3. Select a background color for the event caption from the dropdown list
inData TimelineXpress v4.5
34
Users Guide
Events
inData TimelineXpress v4.5
35
Users Guide
Events
Set The Band
The event can appear either on a top or bottom band. By default top band is
selected, if bottom band is selected, the chronological time line moves to the middle
and time events are displayed on either side:
1. Double click in Band field
located on the right side of the Band field.
2. Click the
3. Select Top or Bottom from the dropdown list
inData TimelineXpress v4.5
36
Users Guide
Events
Adding Linked Exhibits To Events
Exhibits can Linked to events and then managed using the Event Exhibits Manager
1. Double click in Link To field
located on the right side of the Link To field to open the Event
2. Click the
Exhibits Manager.
3. Exhibits can be added to each event, using the [Add] button, or Drag-drop
method from Windows Explorer
4. Click [Close] when finished.
A full detailed explanation of the Event Exhibits Manager can be found under Here
inData TimelineXpress v4.5
37
Users Guide
Events
Editing Events
1. Select Events from the View Menu or click on the Events tab
2. Select the Event field that is to be edited
3. Edit the Field
4. Click anywhere out side of the edited field, the Edit will be applied.
inData TimelineXpress v4.5
38
Users Guide
Events
Hide Events Without Deleting
When a new Event is created, by default it is tagged to be visible.
To hide an Event(s) when in Timeline View or Presentation mode without deleting,
uncheck the box located on the left of the Event Caption Field
Note: To show the Event after hiding, recheck the Show/Hide Event Checkbox
inData TimelineXpress v4.5
39
Users Guide
Events
Delete Events
1. Select Events from the View Menu or click on the Events tab
2. Select the Event(s) from the Event List
3. Click the [Delete] button
4. Click [Ok] to delete the events
inData TimelineXpress v4.5
40
Users Guide
Time Frames
Time Frames
Create A New Time Frame And Add The Time Frame Caption
1. Select Time Frames from the View Menu or click on the Time Frames tab
2. Set the Font Name and Font Size
3. Click the [Add] button to add a new Time Frame to the Time Frame list
inData TimelineXpress v4.5
41
Users Guide
Time Frames
4. The Caption field for the new Time Frame will become active, ready for the
Time Frame caption to be entered:
5. Enter the caption event and press [Enter]
inData TimelineXpress v4.5
42
Users Guide
Time Frames
Setting Time Frame Caption Text Font and Font Size
The time frame caption text font and font size can be set, this setting is a global
setting for all the event captions text
1. Click on the Time Frame Preview, a blue box will appear to show it is active
2. Set the Font Name
3. Set the Font Size
inData TimelineXpress v4.5
43
Users Guide
Time Frames
Setting The Start Date
A Start Date can be entered either by using the Date Picker or by typing a date into
the Start Date field.
To enter a Start Date using the Date Picker:
1. Double click anywhere on the Start Date field
located on the right side of the Start Date field
2. Click the
3. Use the Date Picker to select a Start Date for the Time Frame
When typing a Start Date, double click on the Start Date field and enter a date using
one of the following supported formats:
mm/dd/yyyy format
mm/dd/yy format. The year for the date will be translated to this century
? wild card. The wild card can be used to replace unknown day and/or month
of the Time Frame Start Date. The wild card will assume the middle day of the
month, or the middle month of the year:
??/03/2004 would become 06/03/2004
06/??/2004 would become 06/06/2004
Yearly Seasons
Spring [March to May]. Entering the keyword Spring and the year will
place the Time Frame Start Date in the middle day of April for that
year
inData TimelineXpress v4.5
44
Users Guide
Time Frames
Summer [June to August]. Entering the keyword Summer and the
year will place the Time Frame Start Date in the middle day of July for
that year
Fall [September to November]. Entering the keyword Fall and the year
will place the Time Frame Start Date in the middle day of October for
that year
Winter [December to February]. Entering the keyword Winter and the
year will place the Time Frame Start Date in the middle day of January
for that year
Month segments
Early. Entering the keyword Early and the month will place the Time
Frame Start Date on the 5th day of the specified month
Mid. Entering the keyword Mid and the month will place the Time
Frame Start Date on the 15th day of the specified month
Late. Entering the keyword Late and the month will place the Time
Frame Start Date on the 25th day of the specified month
Yearly Quarters
1st Quarter [January to March]. Entering the keywords 1st Quarter
and the year will place the Time Frame Start Date in the middle day of
February for that year
2nd Quarter [April to June]. Entering the keywords 2nd Quarter and
the year will place the Time Frame Start Date in the middle day of May
for that year
3rd Quarter [July to September]. Entering the keywords 3rd Quarter
and the year will place the Time Frame Start Date in the middle day of
August for that year
4th Quarter [October to December]. Entering the keywords 4th
Quarter and the year will place the Time Frame Start Date in the
middle day of November for that year
inData TimelineXpress v4.5
45
Users Guide
Time Frames
Setting The End Date
A End Date can be entered either by using the Date Picker or by typing a date into
the End Date field.
To enter an End Date using the Date Picker:
1. Double click anywhere on the End Date field
located on the right side of the End Date field
2. Click the
3. Use the Date Picker to select a End Date for the Time Frame
When typing a End Date double click on the End Date field and enter a date using
one of the following supported formats:
mm/dd/yyyy format
mm/dd/yy format. The year for the date will be translated to this century
? wild card. The wild card can be used to replace unknown day and/or month
of the Time Frame End Date. The wild card will assume the middle day of the
month, or the middle month of the year:
??/03/2004 would become 06/03/2004
06/??/2004 would become 06/06/2004
Yearly Seasons
Spring [March to May]. Entering the keyword Spring and the year will
place the Time Frame End Date in the middle day of April for that year
Summer [June to August]. Entering the keyword Summer and the
year will place the Time Frame End Date in the middle day of July for
that year
inData TimelineXpress v4.5
46
Users Guide
Time Frames
Fall [September to November]. Entering the keyword Fall and the year
will place the Time Frame End Date in the middle day of October for
that year
Winter [December to February]. Entering the keyword Winter and the
year will place the Time Frame End Date in the middle day of January
for that year
Month segments
Early. Entering the keyword Early and the month will place the Time
Frame End Date on the 5th day of the specified month
Mid. Entering the keyword Mid and the month will place the Time
Frame End Date on the 15th day of the specified month
Late. Entering the keyword Late and the month will place the Time
Frame End Date on the 25th day of the specified month
Yearly Quarters
1st Quarter [January to March]. Entering the keywords 1st Quarter
and the year will place the Time Frame End Date in the middle day of
February for that year
2nd Quarter [April to June]. Entering the keywords 2nd Quarter and
the year will place the Time Frame End Date in the middle day of May
for that year
3rd Quarter [July to September]. Entering the keywords 3rd Quarter
and the year will place the Time Frame End Date in the middle day of
August for that year
4th Quarter [October to December]. Entering the keywords 4th
Quarter and the year will place the Time Frame End Date in the middle
day of November for that year
inData TimelineXpress v4.5
47
Users Guide
Time Frames
Setting Start Time And End Time
A Start Time and End Time can be assigned to a Time Frame Date. The Use Dates
and Times Property must be set on the timeline preferences. This is a global
property, which affects Events.
1. Select Preferences from the View Menu
2. Select the Use Dates and Times from the Timeline Creator Date and Time
Options
3. Click [Save]
inData TimelineXpress v4.5
48
Users Guide
Time Frames
Note: When this option is selected the Start Time and End Time fields become
visible and default time of 12:00:00PM is automatically assign to the event.
Entering A Start Time
A Start time can be entered either by using the Time Setter Tool or by typing a time
into the Start Time field. Time is stored in HH:MM:SS AM/PM format
To enter a Start Time using the Time Setter Tool
1. Double click anywhere on the Start Time field,
located on the right side of the Start Time field.
2. Click the
3. Highlight the part of the time that is to be set (HH or MM or SS)
4. Use the up control to increase the time or the down control to decrease the
time
5. Highlight the next part of the time to be set and adjust it
6. Press [Enter] to set the Time
When typing a time, double click on the Start Time field and enter a time using one
of the following supported formats:
H:M:S - Will be converted to standard time adding either AM or PM
HH:MM:SS AM
HH:MM:SS PM
HH:MM:SS - Where the hours can be entered under the 24 hour clock format
and will be converted to standard time adding either AM or PM
H.M.S - Will be converted to standard time adding either AM or PM
HH.MM.SS - Where the hours can be entered under the 24 hour clock format
and will be converted to standard time adding AM or PM
inData TimelineXpress v4.5
49
Users Guide
Time Frames
Entering An End Time
An End Time can be entered either by using the Time Setter Tool or by typing a time
into the End Time field. Time is stored in HH:MM:SS AM/PM format
To enter an End Time using the Time Setter Tool
1. Double click anywhere on the End Time field,
located on the right side of the End Time field.
2. Click the
3. Highlight the part of the time that is to be set (HH or MM or SS)
4. Use the up control to increase the time or the down control to decrease the
time
5. Highlight the next part of the time to be set and adjust it
6. Press [Enter] to set the Time
When typing a time, double click on the End Time field and enter a time using one of
the following supported formats:
H:M:S - Will be converted to standard time adding either AM or PM
HH:MM:SS AM
HH:MM:SS PM
HH:MM:SS - Where the hours can be entered under the 24 hour clock format
and will be converted to standard time adding either AM or PM
H.M.S - Will be converted to standard time adding either AM or PM
HH.MM.SS - Where the hours can be entered under the 24 hour clock format
and will be converted to standard time adding AM or PM
inData TimelineXpress v4.5
50
Users Guide
Time Frames
Adding Time Frame Popup Description
Time Frame Popup Description are optional. The Time Frame Popup Description can
then be viewed in presentation mode by clicking the middle of the Time Frame bar
To add a Time Frame Popup Description:
1. Double click in the Description field
2. Enter the description and press [Enter]
3. The Description will appear Time Frame Popup Description preview window
inData TimelineXpress v4.5
51
Users Guide
Time Frames
Setting Time Frame Popup Description Text Font and Font Size
The time Frame popup description text font and font size can be set, this setting is a
global setting for all the event popup description text
1. Click on the Time Frame Description Preview, a blue box will appear to show it
is active
2. Set the Font Name
3. Set the Font Size
inData TimelineXpress v4.5
52
Users Guide
Time Frames
Set The Band
The Time Frame can appear either on a top or bottom band. By default top band is
selected.
1. Double click in Band field
located on the right side of the Band field.
2. Click the
3. Select Top or Bottom from the dropdown list
inData TimelineXpress v4.5
53
Users Guide
Time Frames
Editing Time Frames
1. Select Time Frames from the View Menu or click on the Time Frames tab
2. Select the Time Frame field that is to be edited
3. Edit the Field
4. Click anywhere out side the edited field, the Edit will be applied.
inData TimelineXpress v4.5
54
Users Guide
Time Frames
Deleting Time Frames
1. Select Time Frames from the View Menu or click on the Time Frames tab
2. Select the Time Frames(s) from the Time Frames List
3. Click the [Delete] button
4. Click [Ok] to delete the events
inData TimelineXpress v4.5
55
Users Guide
Timeline View
Timeline View
The Timeline View is extremely feature rich interactive view of a timeline, which
includes:
inData TimelineXpress v4.5
56
Users Guide
Timeline View
Adjusting The Time Scale
1. Place the mouse anywhere on the Timeline Ruler.
2. Hold the Left Mouse button down and drag side-ways to Zoom In on period of
time Scale.
3. Once the Time Scale Range has been reached, release the mouse button.
4. Depending on the number of Events and whether or not a Time was set, The
events will become more spread out. Use the Pan controls or the mouse to
scroll along the time line to view the Events.
Scaling Out
To Scale out again either use the
controls.
button or the
slider located on the viewer
Resetting To Its Original Time Scale
Double clicking the left mouse button anywhere on the timeline will restore the entire
timeline to its original state before any events were moved.
inData TimelineXpress v4.5
57
Users Guide
Timeline View
Panning Along Timelines
To pan back and forth to see events that are spaced out along the timeline that may
span multiple pages, use one of these methods:
Hold the Left mouse button down on the timeline and drag to move back and
forth along the timeline.
Use the Pan Back, Pan Forward and the Pan slider bar to move aback and
forth along the timeline.
Right click on the timeline and select Pan to Left End or Pan to Right End
from the context menu to move to either end of the timeline
inData TimelineXpress v4.5
58
Users Guide
Timeline View
Moving Events To A New Position On The Timeline
1. Clicking the left mouse button in the middle of the event header
inData TimelineXpress v4.5
59
Users Guide
Timeline View
2. Drag the event to the required position
3. Release the mouse button when the event has reached its new position
inData TimelineXpress v4.5
60
Users Guide
Timeline View
Moving Events Back To Their Original Position
Single events that have been moved can be returned to their original position
by right clicking on the header.
Double clicking the left mouse button anywhere on the timeline will restore
the entire timeline to its original state before any events were moved.
inData TimelineXpress v4.5
61
Users Guide
Timeline View
Time Scale Gaps
Once a timeline is created, there may be long periods of time between events. When
either viewing or printing, it maybe desirable to remove the empty time periods by
inserting Gaps
When a Gap is Present, clicking anywhere in the middle of it reveals its the Start and
End dates:
Inserting Gaps
1. Select Preferences from the View Menu
2. Adjust the Timeline Gaps by moving the slider. Moving the slider up towards
the more will increase the number of Gaps that will be calculated onto the
timeline view
inData TimelineXpress v4.5
62
Users Guide
Timeline View
inData TimelineXpress v4.5
63
Users Guide
Timeline View
Removing Gaps
1. Select Preferences from the View Menu
2. Adjust the Timeline Gaps by moving the slider. Moving the slider up towards
the less will decrease the number of Gaps that will be calculated onto the
timeline view
inData TimelineXpress v4.5
64
Users Guide
Timeline View
Viewing Attached Document And Photo Exhibits
Events that have linked document and photo exhibit(s) attached have an icon, such
as , located on the left hand side of the Event header. To view the attached
document and photo exhibits from within the Timeline View.
1. Click the icon of the event header that the exhibit(s) are to be viewed
2. The Exhibit Viewer will be Launched:
If the are more than one exhibit attached, use either the
or
buttons to scroll
back and forth the attached exhibits. Alternatively by entering the page number in
the page number text field
into the viewer
, the corresponding exhibit will be loaded
inData TimelineXpress v4.5
65
Users Guide
Timeline View
Viewing Attached Multimedia Exhibits
Events that have linked multimedia exhibit attached have an icon, such as ,
located on the left hand side of the Event header. To view the attached multimedia
exhibit from within the Timeline View.
1. Click the icon of the event header that the exhibit are to be viewed
2. The Multimedia Exhibit Viewer will be Launched:
Multimedia Viewer Controls Overview:
inData TimelineXpress v4.5
66
Users Guide
Timeline View
Viewing Event Popup Descriptions
The Events can have Event Popup Descriptions attached to them, to view them
Viewing An Event Popup Description
1. Click the icon of the Event header that the Popup Description is to be viewed
2. The Popup Description Box will be launched for that event
Moving The Popup Description Box On The Screen
It may be necessary to move the Popup Description box.
1. Click on the Event Popup Description Header and hold down either the left or
right mouse button.
2. Drag the Popup Description Box to its new location
3. Release the Popup Description in its new position
Closing A Popup Description Box
Either:
Click the [X] located on the top left hand side of the Popup Description
Header Box
Double click the center of the Popup Description Header Box
inData TimelineXpress v4.5
67
Users Guide
Timeline View
Zooming In And Out Of Attached Exhibits
The Exhibit Viewer window has built in Zoom in and Out controls.
Opening The Attached Exhibits Viewer
1. Click the icon of the event header that the exhibit(s) are to be viewed
2. The Exhibit Viewer will be Launched:
inData TimelineXpress v4.5
68
Users Guide
Timeline View
Zooming In
Either:
button and hold down until the desired Zoom has been
Select the
achieved
Hold the left Mouse button down and drag over the area of the Exhibit that is
to be magnified
Zooming Out
Either:
button and hold down until the desired Zoom out has been
Select the
achieved
Double click the left Mouse button anywhere on the item and the Exhibit will
be returned to its original size
inData TimelineXpress v4.5
69
Users Guide
Timeline View
Viewing Time Frame Start And End Dates
The Start and End times for a Time Frame can be viewed when in the timeline view
or presentation mode:
Viewing The Start Date
1. Click and hold the left mouse button down over the start of the Time Frame,
the Start time will be shown
2. Release the Mouse button when finished viewing the Start Date
Viewing The End Date
1. Click and hold the left mouse button down over the End of the Time Frame,
the End time will be shown
2. Release the mouse button when finished viewing the End Date
inData TimelineXpress v4.5
70
Users Guide
Timeline View
Viewing Time Frame Popup Descriptions
The Time Frames can have Event Popup Descriptions attached to them.
Viewing A Time Frame Popup Description
1. Click the right mouse button anywhere on the Time Frame
2. The Popup Description Box will be launched for that Time Frame
Moving The Popup Description Box On The Screen
It may be necessary to move the Popup Description box.
1. Click on the Time Frame Popup Description Header and hold down either the
left or right mouse button.
2. Drag the Popup Description Box to its new location
3. Release the Popup Description in its new position
Closing A Popup Description Box
Either:
Click the [X] located on the top left hand side of the Popup Description
Header Box
Double click the center of the Popup Description Header Box
inData TimelineXpress v4.5
71
Users Guide
Timeline View
Timeline View Controls
The Timeline View is feature rich in interactive controls:
Zoom Out
The
button will zoom out the time line scale
Zoom In
The
button will zoom in the time line scale
Zoom In/Out Slider
The Zoom In/Out Slider button will zoom in and out the time line scale
Zoom To Fit Page Button
The
button will adjust the timeline to fit the events onto one page
Zoom To No Overlap Button
The
button will adjust the timeline with no events overlapping
Pan Back Button
The
button pans the timeline back along the time scale
inData TimelineXpress v4.5
72
Users Guide
Timeline View
Pan Forward Button
The
button pans the timeline forward along the time scale
Pan Time Line Slider
The Pan tine line slider moves the timeline back and forward along the time
scale
Event Walker Button
The
button activates Event Walker.
Clicking the Event Walker the first time clears the all the events off the
timeline
Left mouse clicking on the Event Walker button will add an event at a time
and move the Timeline to that event
Right mouse clicking on the Event Walker button will remove an event at a
time
To restore all the events at any one time, double click anywhere on the
timeline
Save View Button
1. Click the
button which is located on the right side of the Status bar
2. Enter a Name for the View
3. Click [Ok] to create the saved view
inData TimelineXpress v4.5
73
Users Guide
Timeline View
Saved Views List
Views that have been created can be viewed from the Saved Views list
1. Select and click on the view from the Saved Views dropdown list
2. The view will automatically be loaded when selected
Delete View Button
1. Select and click on the view from the Saved Views dropdown list located on
the Status Bar to make it active
2. Click the
button located on the right side of the Status Bar
3. Click [Yes] to delete the selected view
inData TimelineXpress v4.5
74
Users Guide
Timeline View
Timeline Views
TimelineXpress views are snapshots of the timeline. Views can be used during
presentation and can be printed
Creating Views
1. Adjust the timeline as required
2. Click the
button which is located on the right side of the Status bar
3. Enter a Name for the View
4. Click [Ok] to create the saved view
Loading Views
Views that have been created can be viewed
1. Select and click on the view from the Saved Views dropdown list located on
the Status Bar
2. The view will automatically be loaded when selected
inData TimelineXpress v4.5
75
Users Guide
Timeline View
Deleting Views
1. Select and click on the view from the Saved Views dropdown list located on
the Status Bar to make it active
2. Click the
button located on the right side of the Status Bar
3. Click [Yes] to delete the selected view
inData TimelineXpress v4.5
76
Users Guide
Event Exhibits Manager
Events Exhibits Manager Overview
The exhibits can be added and managed to events using the Event Exhibits Manager
Opening The Events Exhibit Manager
Select Event Exhibit Manager from the tools menu
Click the
Toolbar button
Right Click on the timeline and select Event Exhibit Manager from the
context menu
Dragging an exhibit onto the Link To field for the event on the Event Tab
inData TimelineXpress v4.5
77
Users Guide
Event Exhibits Manager
View Events Attached Exhibits As A Detailed List
The attached exhibit list can be views as detailed list.
To view the attached exhibits as a detailed list do one of the following
Select Detail from the view Menu
Enter [F6]
Click the
Toolbar button select Detail
inData TimelineXpress v4.5
78
Users Guide
Event Exhibits Manager
View Events Attached Exhibits As Thumbnails
The attached exhibit list can be viewed as thumbnails.
To view the attached exhibits as thumbnails, do one of the following
Select thumbnail from the view Menu
Enter [F5]
Click the
Toolbar button and select thumbnail
inData TimelineXpress v4.5
79
Users Guide
Event Exhibits Manager
Add Exhibits Manually
1. Open the Event Exhibits Manager using one of these methods:
Select Event Exhibit Manager from the tools menu
Click the
Toolbar button
Right Click on the timeline and select Event Exhibit Manager from
the context menu
Dragging an exhibit onto the event on the Event Tab
2. Select the event from the event list that the exhibit(s) is to be added to
3. Use one of the following methods to open the Select file to be linked with
the current event window:
Select Add linked items from the File menu
Click the [Add] button
Toolbar button
Click the
Right click anywhere in the Event list and select Add Files to be
linked to the Current Event from the context menu
4. Navigate to the file(s)
5. Select the file(s)
6. Click [Open] to add the files to the Event
Note: When the files are added they are given a unique Item ID
7. Verify the Exhibits have been associated correctly
8. Click [Close] to close the Event Exhibit Manager
inData TimelineXpress v4.5
80
Users Guide
Event Exhibits Manager
9. The Events that have attached exhibits will have an icon on the left hand side
of the event title bar
inData TimelineXpress v4.5
81
Users Guide
Event Exhibits Manager
Add Exhibits Using Drag-drop Methods
Using The Windows Explorer And Event Exhibit Manager
1. Open Windows Explorer
2. Navigate to the where the files are to be attached reside and select them
3. Open the Event Exhibits Manager using one of these methods:
Select Event Exhibit Manager from the tools menu
Click the
Toolbar button
Right Click on the timeline and select Event Exhibit Manager from
the context menu
4. Drag the Exhibit(s) on the Event in the Event list that the exhibit(s) will be
associated with
5. Verify the Exhibits have been associated correctly
6. Click [Close] to close the Event Exhibit Manager
7. The Events that have attached exhibits will have an icon on the left hand side
of the event title bar
Using The Drag Directly Onto The Event Method
1. Open Windows Explorer
2. Navigate to the where the files are to be attached reside and select them
3. Drag the Exhibit(s) onto the Event, the Exhibit Manager will automatically
open with the exhibits attached to the Event.
4. Verify the Exhibits have been associated correctly
5. Click [Close] to close the Event Exhibit Manager
6. The Events that have attached exhibits will have an icon on the left hand side
of the event title bar
inData TimelineXpress v4.5
82
Users Guide
Event Exhibits Manager
Adding TrialDirector Item to Current Event
Note: TrialDirector versions 6.5 and above no longer integrate with TimelineXpress.
1. Open the Event Exhibits Manager using one of these methods:
Select Event Exhibit Manager from the tools menu
Click the
Toolbar button
Right Click on the timeline and select Event Exhibit Manager from the
context menu
Dragging an exhibit onto the event on the Event Tab
2. Select the event from the event list that the TrialDirector Item is to be added
to
3. Right click anywhere and select Link Current Event to a TrialDirector
Item
4. Type in the Object ID, Clip ID or TrialDirector command sequence
5. The Events that have attached exhibits will have an icon on the left hand side
of the event title bar
inData TimelineXpress v4.5
83
Users Guide
Event Exhibits Manager
Removing Attached Exhibits
1.
2.
3.
4.
Open the Event Exhibits Manager
Select the event from the event list that the exhibit(s) are attached
Select the exhibit(s) from the exhibit list that are to be removed
Select addition files that are to be removed by holding down the [Ctrl] key
and clicking on the required file(s)
5. Select Remove from the File Menu, or Click the [Delete] button, or Click
the
Toolbar button. The exhibits will be removed from the list
6. Click [Yes] to remove the Exhibits or [No] to cancel.
inData TimelineXpress v4.5
84
Users Guide
Event Exhibits Manager
Viewing Attached Exhibits
To view attached exhibits from within the Events Exhibits Manager
1.
2.
3.
4.
Open the Event Exhibits Manager
Select the event from the event list
Select attached Exhibit from the attached exhibits list
Right click and select View Item from the context menu, the following window
will appear
If the are more than one exhibit attached, use either the
or
buttons to scroll
back and forth the attached exhibits. Alternatively by entering the page number in
the page number text field
into the viewer
, the corresponding exhibit will be loaded
inData TimelineXpress v4.5
85
Users Guide
Event Exhibits Manager
Annotating Attached Exhibits
The annotation tools on the View Item Toolbar can be used to draw arrows, ellipses,
and create image highlights. To add Annotations to Attached Exhibits:
Opening The Events Exhibits Manager
1.
2.
3.
4.
Open the Event Exhibits Manager
Select the event from the event list
Select attached Exhibit from the attached exhibits list
Right click and select View Item from the context menu, the following
window will appear
inData TimelineXpress v4.5
86
Users Guide
Event Exhibits Manager
Draw An Arrow
To draw an arrow pointing to an important point on an item, select the Arrow tool.
Position the cursor, where you want the head of the arrow to appear. Drag the
cursor away from the head in any direction to the length you want the line of the
arrow to be.
inData TimelineXpress v4.5
87
Users Guide
Event Exhibits Manager
Draw An Ellipse
To circle or place an ellipse around an important point on an item, select the Ellipse
tool. Click and drag the cursor to draw an ellipse around the area.
inData TimelineXpress v4.5
88
Users Guide
Event Exhibits Manager
Highlight An Image
To highlight an important point on an item, Click and drag the cursor in a rectangle
around the area you want to highlight.
Removing Annotations
1. Hold the [Ctrl] down and right mouse click on the annotation that is to be
removed
inData TimelineXpress v4.5
89
Users Guide
Event Exhibits Manager
Zooming In And Out Of Attached Exhibits
The View Item window has built in Zoom in and Out controls.
Opening The Events Exhibits Manager
1.
2.
3.
4.
Open the Event Exhibits Manager
Select the event from the event list
Select attached Exhibit from the attached exhibits list
Right click and select View Item from the context menu, the following
window will appear
inData TimelineXpress v4.5
90
Users Guide
Event Exhibits Manager
Zooming In
Either:
button and hold down until the desired Zoom has been
Select the
achieved
Hold the left Mouse button down and drag over the area of the item that is to
be magnified
Zooming Out
Either:
button and hold down until the desired Zoom out has been
Select the
achieved
Double click the left Mouse button anywhere on the item and the item will be
returned to its original size
Closing The Events Exhibits Manager
To close the Events Exhibits Manager, either
Select Close from the file Menu
Click the [Close] Button
inData TimelineXpress v4.5
91
Users Guide
Event Exhibits Manager
Attached Exhibit File Types
The following is a partial list of file types that can be used as attached exhibits:
File Extension
Description
Item type
.TIF
Group 3 Tagged Image File Format
IMAGE
.TIF
Group 4 Tagged Image File Format
IMAGE
.TIF
LZW Compressed TIFF
IMAGE
.TIF
Huffman Compressed TIFF
IMAGE
.TIF
Packbits Compressed TIFF
IMAGE
.TIF
Multi-Page TIFF
IMAGE
.BMP
Windows OS/2 Bitmap
IMAGE
.JPG
Joint Picture Experts Group (JPEG)
IMAGE
.GIF
CompuServe Graphics Interchange
IMAGE
.ICO
Icon File
IMAGE
.PCT
Macintosh Pict
IMAGE
.PCX
Zsoft Paintbrush
IMAGE
.PNG
Portable Network Graphics
IMAGE
.TGA
Truvision Targa
IMAGE
.MSP
Microsoft Paint
IMAGE
.WMF
Windows Meta File
IMAGE
.WPG
Word Perfect Bitmap
IMAGE
.MPG
Motion Picture Experts Group (MPEG-1)
MULTIMEDIA
.MPEG
Motion Picture Experts Group (MPEG-1)
MULTIMEDIA
.M2P
Motion Picture Experts Group (MPEG-2) ¤
MULTIMEDIA
.MPG
Motion Picture Experts Group (MPEG-2) ¤
MULTIMEDIA
.MP2
Motion Picture Experts Group (MPEG-2) ¤
MULTIMEDIA
.MPA
MPEG Elementary Audio Stream
MULTIMEDIA
.MP4
MPEG Video - ISO Standard ¤
MULTIMEDIA
.MP3
MPEG Audio Layer-3
MULTIMEDIA
.AVI
Audio Video Interleave
MULTIMEDIA
.WMA
Microsoft Windows Media Audio ¤
MULTIMEDIA
.WMV
Microsoft Windows Media Video ¤
MULTIMEDIA
.ASF
Microsoft Advanced Streaming Format
MULTIMEDIA
.WAV
Windows Waveform Sound
MULTIMEDIA
.MOV
Apple Quicktime ¤
MULTIMEDIA
.MID
Musical Instrument Digital Interface (MIDI)
MULTIMEDIA
inData TimelineXpress v4.5
92
Users Guide
Event Exhibits Manager
.TLF
TimelineXpress File ¤
OTHER
.PPT
Microsoft PowerPoint Presentation ¤
OTHER
.DOC
Microsoft Word Document ¤
OTHER
.XLS
Microsoft Excel Spreadsheet ¤
OTHER
.PDF
Adobe Portable Document format ¤
OTHER
.HTM
Internet Explorer Web page ¤
OTHER
.HTML
Internet Explorer Web page ¤
OTHER
.TXT
ASCII Text Transcript ¤
OTHER
.ASC
ASCII Text Transcript ¤
OTHER
.V1
ASCII Text Transcript ¤
OTHER
.AMI
Amicus Text Transcript ¤
OTHER
.CO
Cult 3D Object ¤
OTHER
.SVG
Adobe Scalable Vector Graphic ¤
OTHER
.SWF
Macromedia Flash Movie ¤
OTHER
¤ Requires DirectShow compatible Codec
¤ WMV/WMA 8 Requires Media Player 7.1 or higher
¤ Quicktime and MPEG4 files require Quicktime player v6 or higher, plays back
through Quicktime player
¤ Requires Associated program to be installed and plays back through parent
application or browser plug-in
All other product names and logos are trade and service marks of their respective
companies.
inData TimelineXpress v4.5
93
Users Guide
Importing Files
Importing Files
Any ASCII Text Delimitated file that has recognizable Date, Event and Description
fields that match up to TimelineXpress's Event Date, Event Caption Field and Event
Description fields can be used.
1. Select Import... from the File Menu
2. Browse to the file that is to be imported and select it
3. Click [Open]
4. Using the Import Wizard, TimelineXpress will attempt to match the nearest
available fields in the import file to the following available TimelineXpress
fields
Event Date
Event Caption
Event Description
5. Click [Import], the fields will be loaded into TimelineXpress
inData TimelineXpress v4.5
94
Users Guide
Exporting As Image File
Exporting As Image File
The following formats are supported for exporting a timeline as an Image:
Adobe Portable Document Format (*.pdf)
JPEG - JFIF Compliant (*.jpg)
Tagged Image File Format (*.tif)
Truevision Targa (*.tga)
Windows or OS/2 Bitmap (*.bmp)
Zsoft Paintbrush (*.pcx)
Note: When the image type is to be a *.pdf, the *.pdf file resolution, paper size
and color quality are dependent on the capabilities of your default printer. For best
results, select a color printer as your default printer.
1. Select Export as Image File... from the File Menu
2. Set the Save Image of property by selecting either:
Current Timeline View and selecting the view from the views dropdown
list
Entire Timeline
3. Set the Image Type
4. Set the Image Size
5. Click [Save]
inData TimelineXpress v4.5
95
Users Guide
Exporting As Image File
6. Browse to where the Image is to be saved and enter a File name
7. Click [Save] to create the Image File
inData TimelineXpress v4.5
96
Users Guide
Full Screen Presentation Window
Full Screen Presentation Window
TimelineXpress has an integrated Full Screen Presentation Window for presenting
timelines
Opening The Full Screen Presentation Window
1. Select Show Full Screen from the View Menu or click the
or pressing the [5] key
Toolbar button
Note: The Full Screen Presentation Window has the same controls and
interactivity as when viewing a timeline in Timeline View.
Closing The Full Screen Presentation Window
1. Press the [Esc] key to exit from the Full Screen Presentation Window
inData TimelineXpress v4.5
97
Users Guide
Printing Preview
Print Preview
TimelineXpress Print Preview allows you to see the layout of the timeline and views
before printing. This feature is particularly useful when you wish to make
adjustments to the timeline for printing purposes
Select Print Timeline Preview... from the File Menu
2. If the preview is acceptable, press the
inData TimelineXpress v4.5
98
Toolbar button to print
Users Guide
Printing Timelines
Printing Timelines
TimelineXpress allows you to print the Current Timeline View, A Saved Timeline
View, or the Entire Timeline
1. Select Print from the File Menu or click the
Toolbar button or right click
anywhere on the timeline and select Print from the context Menu
2. Select the Printer and Set the Printer Properties as required
3. From the Print What Select either:
Current Timeline View, then select the View to be printed from the
dropdown list, the current active view is selected by default
Entire Timeline
4. Set the Pages to Print, by accepting the default number or entering a
of pages wide Property
number for the Fit to
5. Set the Page Size Properties
6. Set the Scaling Property, changing this property will effect the layout and
detail shown when printed
7. Set the Orientation Properties by selecting either:
Portrait
Landscape
8. Check include pages that show no events if the print is to show the entire
view, including empty pages
9. Check Save to PDF file if PDF is the required print format
10. Click the [Preview] button Before printing
inData TimelineXpress v4.5
99
Users Guide
Printing Timelines
11. Adjust the Printing properties if necessary until the preview is acceptable, for
example, adjusting the scale will produce the following effect
12. Click [Print] button to print the Timeline
inData TimelineXpress v4.5
100
Users Guide
Printing Events List
Printing Events List
TimelineExpress allows you to print the list of events
1. Select Print Events List from the File Menu
2. Select the Printer and Set the Printer Properties as required. Note: The list
is always Landscape
3. Select the Print range
4. Select the Number of Copies
5. Click [Ok]
inData TimelineXpress v4.5
101
Users Guide
Printing Time Frames List
Printing Time Frames List
TimelineExpress allows you to print the list of Time Frames
1. Select Print Time Frames List from the File Menu
2. Select the Printer and Set the Printer Properties as required. Note: The list
is always Landscape.
3. Select the Print Range
4. Select the Number of Copies
5. Click [OK]
inData TimelineXpress v4.5
102
Users Guide
TimelineXpress Preferences
TimelineXpress Preferences
To Set TimelineXpress preferences
1. Select Preferences from the View Menu
2. Set the following options as required
Timeline Creator Date and Time options
Use Dates and Times
Use Dates Only
Timeline Gaps
Popup Fade-in timing from 0 to 1 second (Millisecond increments)
Popup Opacity - Transparent to Opaque
Apply Event Color Section To...
Caption Text
Background
3. Click [Save] to keep the changes
inData TimelineXpress v4.5
103
Users Guide
Application Integration
Application Integration
TimelineXpress integrates with a number of 3rd party applications. Integrating with
other applications commonly used by attorneys and their staff, creates a powerful
analytical and presentation tool.
Using Timelines with TrialDirector (v4.5 or higher)
TrialDirector and TimelineXpress integrate effortlessly for dynamic presentaions.
However, TrialDirector versions 6.5 and above are no longer compatible with TimelineXpress.
Using Timelines with DocumentDirector (v4.5 or higher)
A Timeline can be added and displayed to DocumentDirector Item Viewer using
Microsoft Object Linking and Embedding (OLE) technology.
Microsoft PowerPoint
TimelineXpress seamlessly integrates with Microsoft PowerPoint. Using one ActiveX
control, a fully functional TimelineXpress session can be embedded within a
PowerPoint slide. When presenting the slide show, the TimelineXpress items appear
just the way you saved it and are immediately displayed.
Summation
TimelineXpress seamlessly integrates with Summation iBlaze providing a means to
create powerful timelines using Summations iBlaze Database.
CaseMap
TimelineXpress gives you the ability to import and use CaseMap comma-delimited
fact report files to create timelines.
inData TimelineXpress v4.5
104
Users Guide
Application Integration – TrialDirector
TrialDirector Integration
Note: The latest versions of TrialDirector and TimelineXpress are no longer
compatible.
A TimelineXpress file can be loaded into TrialDirector (v4.5 or higher must be
installed) the same way as any other TrialDirector item. Adding timelines to
TrialDirector creates a powerful, enhanced, interactive presentation tool.
Timelines can be presented full screen:
inData TimelineXpress v4.5
105
Users Guide
Application Integration – TrialDirector
Timelines can be presented along side other exhibits:
inData TimelineXpress v4.5
106
Users Guide
Application Integration – DocumentDirector
DocumentDirector Integration
The DocumentDirector Item Viewer uses Microsoft Object Linking and Embedding
(OLE) technology to display TimelineXpress files. TrialDirector Suite v4.5 or higher
must be installed on your computer.
An TimelineXpress file can be added by
Drag and Drop Timeline files into the Case
Manually Import Items
Note: See the TrialDirector Suite Help Files for further information on how to
add OLE files to DocumentDirector. The latest versions of TrialDirector and TimelineXpress
are no longer compatible.
inData TimelineXpress v4.5
107
Users Guide
Application Integration – DocumentDirector
Integrating With CaseMap
TimelineXpress gives you the ability to import and use CaseMap comma-delimited
fact report files to create timelines.
1. Select Import from the File Menu
2. Browse to the location of the CaseMap Text file is located
3. Select it and Click [Open]
4. The fields should automatically matched, adjust them by using the dropdown
list for each field if necessary
5. Click [Import]
6. The selected fields will be imported to build the timeline
inData TimelineXpress v4.5
108
Users Guide
Application Integration – PowerPoint
Integrating With PowerPoint
The Integration of TimelineXpress with PowerPoint is a very simple process. After
Linking, TimelineXpress is added as a menu item to PowerPoint
1. Select Register TimelineXpress for use with PowerPoint from the Start |
Programs | inData TimelineXpress | TimelineXpress Tools
2. Click [Ok] to complete the process
inData TimelineXpress v4.5
109
Users Guide
Application Integration – PowerPoint
Add A New Timeline Slide
1. Launch PowerPoint
2. Select Add New Timeline Slide from the TimelineXpress PowerPoint Menu
3. Navigate to the Timeline and Click [Open]
4. Press [F5] to run the PowerPoint Slide with TimelineXpress Embedded
inData TimelineXpress v4.5
110
Users Guide
Application Integration – PowerPoint
Note: Currently, only one Timeline can be embedded during one PowerPoint
session.
inData TimelineXpress v4.5
111
Users Guide
Application Integration – PowerPoint
Insert TimelineXpress Onto The Current Slide
1. Launch PowerPoint
2. Select Insert TimelineXpress into Current Slide from the TimelineXpress
PowerPoint Menu
3. Navigate to the Timeline and Click [Open]
4. Press [F5] to run the PowerPoint Slide with TimelineXpress Embedded
inData TimelineXpress v4.5
112
Users Guide
Application Integration – PowerPoint
Note: Currently, only one Timeline can be embedded during one PowerPoint
session.
inData TimelineXpress v4.5
113
Users Guide
Application Integration – PowerPoint
Launching TimelineXpress From Within PowerPoint
1. Launch PowerPoint
2. Select Launch TimelineXpress Designer... from the TimelineXpress Menu
Option
inData TimelineXpress v4.5
114
Users Guide
Application Integration – Summation iBlaze
Integrating With Summation iBlaze
The Integration of TimelineXpress with Summation iBlaze is a very simple process.
1. Make Sure that both TimelineXpress and Summation iBlaze are both installed
first
2. Select Register TimelineXpress for use with Summation iBlaze from the
Start | Programs | inData TimelineXpress | TimelineXpress Tools
Summation iBlaze will be launched:
3. Select the Manage Script Add Ons option from the Script menu:
inData TimelineXpress v4.5
115
Users Guide
Application Integration – Summation iBlaze
4. Select TimelineXpress 4 from the Registered Adds Ons list:
5. Click the
Add Ons menu:
button to add the TimelineXpress 4 to the iBlaze Case
6. Click [Ok].
7. Once the Case Add Ons are added under Summations Case Explorer, "Case
Tools", the first item listed will be TimelineXpress. Click the to expand the
submenu, to see a list of available associated TimelineXpress features:
inData TimelineXpress v4.5
116
Users Guide
Application Integration – Summation iBlaze
Summation Preview Chronology Of Events
TimelineXpress takes Summations Chronology of Events from the currently open
case and creates a Timeline from the fields.
If TimelineXpress tab and Preview Chronology of Events is not visible
1. Select TimelineXpress from Case Tools
to expand the TimelineXpress submenu
2. Click the
3. Double click on Preview Chronology of Events
4. Use the Timeline Viewer Controls to:
Zoom in and out of the timeline using the zoom scroll bar
Zoom out of the timeline
Zoom in on the timeline
Zoom timeline where all events fit on page
Zoom timeline where no events overlap
Pan back along the timeline
Pan forward along the timeline
Pan back and forth along the timeline using the pan scroll bar
Walk events, adding events and removing events one at a time
inData TimelineXpress v4.5
117
Users Guide
Application Integration – Summation iBlaze
Saving Chronology Of Events
To save a Timeline from within Summation iBlaze:
1. Select TimelineXpress from Case Tools
to expand the TimelineXpress submenu
2. Click the
3. Double click on Saving Chronology of Events...
4. Browse to where the timeline is to be saved, by default, timelines are saved
to a directory called My Timelines
5. Enter a name for the timeline in the File name field
6. Click [Save]
inData TimelineXpress v4.5
118
Users Guide
Application Integration – Summation iBlaze
Launching TimelineXpress From Within Summation iBlaze
To launch TimelineXpress from within Summation iBlaze:
1. Select TimelineXpress from Case Tools
to expand the TimelineXpress submenu
2. Click the
3. Double click on Timeline Presentation Designer
inData TimelineXpress v4.5
119
Users Guide
Keyboard Shortcuts
Keyboard Shortcuts
Below is a table of the TimelineXpress Keyboard Shortcuts using the 10-key pad and
arrow keys.
Keyboard Shortcut
Description
[9] Key
Zoom Fit to Page
[5] Key
Zoom To Fit No Overlap
[8] Key
Zoom In On Timeline
[2] Key
Zoom Out On Timeline
[4] Key
Pan Zoomed Timeline Towards Start
[6] Key
Pan Zoomed Timeline Towards End
[+] Key or [Up Arrow] Key
Zoom In On Timeline
[-] Key or [Down Arrow] Key
Zoom Out On Timeline
[Left Arrow] Key
Pan Zoomed Timeline Towards Start
[Right Arrow] Key
Pan Zoomed Timeline Towards End
[Shift] + [Left Arrow] Key
Accelerated Pan Zoomed Timeline Towards Start
[Shift] + [Right Arrow] Key
Accelerated Pan Zoomed Timeline Towards End
inData TimelineXpress v4.5
120
Users Guide
Automated Updates
Automated Updates
Periodically inData releases free updates to TimelineXpress
Manually Checking For Available Updates
1. Select inData TimelineXpress | TimelineXpress Update from Start |
Programs
2. Click [Next] when the following window appears:
3. If there are updates available they will be downloaded and installed. No
registration is required.
inData TimelineXpress v4.5
121
Users Guide
Automated Updates
Advanced Settings
1. Select inData TimelineXpress | TimelineXpress Update from Start |
Programs
2. Click [Advanced]
3. From this dialog box this following can be set
Use Default proxy server. Use this setting if you do not know what
your proxy server settings are.
Specify proxy server information. If you need to connect through a
proxy server and you know what your settings are then use this option
to set the proxy server settings. Refer to your Network Administrator
for further information
Check Interval (days). The time interval of how often an automated
check is made to the update server is made. A check can be made
manually anytime by following the Manually checking for Available
Updates
inData TimelineXpress v4.5
122
Users Guide