1
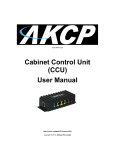
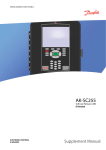
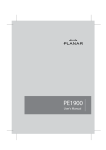
EDGE-108M USB GSM Modem
User Manual
Includes both SMS and Voice call alert setup
instructions
Help Version updated till firmware 404i
Copyright © 2012, AKCess Pro Co., Ltd..
EDGE 180M USB Modem Manual
What is the EDGE-180M USB modem used for on the unit?
The USB modem is used to send SMS, Voice Call and MMS alerts directly from the base
unit to a mobile phone or to a list of mobile phones.
Please see below or each separate manual for each of these notifications and the steps
for setting them up in the units web interface.
Mobile Service Provider SIM Card
You will need to purchase a SIM card from your local mobile service provider that you will
install in the USB modem. This SIM card will provide the mobile connection that enables
the base unit to send the SMS, MMS, or Voice alerts to your mobile phones.
Note on SIM: If the SIM card you purchased requires a PIN number, then you will need
to contact your service provider and have them provide you with the instructions for
disabling the PIN code on the SIM card. Otherwise it will not work on the base unit.
To install the EDGE-180M USB as a modem, please plug in EDGE-180M USB modem to
USB port on the back of the unit using the USB extension cable provided with the
modem.
EDGE-180 Panel Description:
SIM Card gold contact should face down
PWR LED.........To indicate Power ON / OFF
SIM.........SIM card insert
ANT........Antenna SMA
NET…….Linked to Network
Ear phone Jack..4 contacts 2.5 mm diameter for voice communication (not used when
connecting to your base unit).
Audio Cable for Voice Call Alerts (AKCP)
When setting up Voice Call Alerts on the base unit you will need to connect the custom
AKCP Audio cable from this jack on the modem to the base unit. This cable is shipped
with the modem.
-2-
EDGE 180M USB Modem Manual
Connecting the USB modem to your PC. You can download the drivers for this from
this link here; http://homepage.seed.net.tw/web/lightspeed/
Note: It is always a good idea to first test out the modem on your PC to ensure the SIM
card is working and can connect before setting it up on your base unit.
Connecting the EDGE-180M USB Modem to the securityProbe 5E,
5ES, or 5ES-X20/X60 and 5ESV, 5ESV-X20/X60 base units
Very Important Note: Before connecting the EDGE-180M USB modem to your base
unit you need to insure that your unit is running firmware version 404f or above or it will
not work. You can download the latest firmware from our web site after setting up your
support page. If you’re not sure how to do this please contact [email protected].
You will first physically connect the USB modem to the base units USB port located on
the back of the unit using the USB extension cable provided with the modem.
-3-
EDGE 180M USB Modem Manual
Next connect the opposite end of the USB cable (female end) to the male USB connector
on the EDGE-180M modem as shown above.
Next you will connect the Audio In and Audio Out from the Audio Cable included with the
USB modem as shown above.
See the next page for important details about the two types of audio cables.
-4-
EDGE 180M USB Modem Manual
IMPORTANT NOTE: There are two types of audio cables for the EDGE-180M modem.
The “mono” type as shown above and the “stereo” type as shown below.
You need to use the “mono” type audio cable if your base unit is a securityProbe 5E, 5EX20 or 5E-X60 (above).
You need to use the “stereo” type audio cable if your base unit is a securityProbe 5ES,
5ES-X20, 5ES-X60, 5ESV, 5ESV-X20 or 5ESV-X60 (above).
Now you will connect the opposite end of the audio cable into the audio jack on the
EDGE-180M modem as shown above. The picture also shows where you would insert
your local service provided GSM SIM card.
-5-
EDGE 180M USB Modem Manual
NOTE: It is always a good idea to test the SIM card in mobile phone or on your PC to
ensure the SIM is working properly before installing the modem on your base unit.
Setting up the EDGE-180 GSM Modem in the base units web
interface
SMS Alerts – SMS Action
You need to first log in to the units web interface as the Administrator then navigate to the
Notifications page, then the Action page, then click on the “Create” button as shown
above.
Note: If the screen images appear too small, just use your Zoom feature in your pdf
viewer to zoom in on them.
In the next screen you will select the SMS action from the Select an Action Type drop
down list as shown above, then click the Next button.
-6-
EDGE 180M USB Modem Manual
In the next screen you will name your action and add your mobile phone number, or your
list of mobile phone numbers that your SMS alert will be sent to. You can add multiple
numbers in the call list. There is no limit to the amount of numbers you can add, however
the more numbers you had the longer it will take to finish sending the alert out as the
SMS action will call to the first number and after finishing will call to the second number
and so on.
IMPORTANT NOTE: If you setup multiple SMS actions or alerts in the same notification
this will cause the “SMS Queue Full” error.
For example; If you have multiple mobile numbers and you setup each SMS action to
send to only one number then this will cause this problem.
If you are using your current notification setting like this it causes the securityProbe to
connect to the phone number an equal amount of times for each action (for example; one
notification has 20 SMS actions, meaning the device needs to call out and connect to
service provider 20 times). This causes the SMS queue to be full causing the error.
What you need to do is change the setting to send one SMS action to send the SMS
message to multiple numbers, this will decrease the number of connections to the service
provider.
After you have finished adding the mobile numbers to the call list click the “Next” button
as shown above.
-7-
EDGE 180M USB Modem Manual
In the next screen of the SMS action wizard will show the SMS message that will be sent.
Or you can click on the “Customized” button and edit the text that will be sent. After your
finished click on the “Next” button.
In the screen above you will select the modem port from the drop down list. For the
EDGE-180M USB modem you will choose “USB Modem”. You should also note the
wording “(Not Connected)” is hidden after the USB Modem. This means that the unit
does detect the modem is connected to the USB port. If you see this wording after the
USB Modem, then there is a problem with the connection. You should check the cable or
try connecting the modem directly to the USB port.
You can leave the port speed as Auto and disregard the Delay Times settings, then
choose the EDGE-180M from the Initialization String drop down list and click “Next” as
shown above.
-8-
EDGE 180M USB Modem Manual
On the next screen you can setup the Maximum Times to Resend which is 5. You can
also set the Resend Intervals and the Resend on Server Timeout in case there was a
problem connecting to the GSM service. Clicking on the “Finish” button will save your
new SMS action and complete the wizard.
You will now see the new SMS action in the action list as shown above and you can test
it to make sure it is working correctly by first highlighting the action, then clicking on the
“Test Action” button.
You can then navigate to the Summery page and check the Syslog for the entry
regarding the successful test message.
Now that you have your SMS action completed you can link this action to any sensor
connected to your base unit using the “Link Sensor to Action Wizard”.
Setting up the EDGE-180 GSM Modem in the base units web
interface
Voice Call Alerts – Telephone Call Action
You need to first log in to the units web interface as the Administrator then navigate to the
Notifications page, then the Action page, then click on the “Create” button as shown
above.
Note: If the screen images appear too small, just use your Zoom feature in your pdf
viewer to zoom in on them.
-9-
EDGE 180M USB Modem Manual
In the next screen you will select the Telephone Call action from the Select an Action
Type drop down list as shown above, then click the Next button.
In the next screen you will name your action and add your phone number, or your list of
phone numbers that your Voice Call alert will be sent to. You can add multiple numbers in
the call list. There is no limit to the amount of numbers you can add, however the more
numbers you had the longer it will take to finish sending the alert out as the voice action
call to the first number and after finishing will call to the second number and so on.
After you have finished adding the mobile numbers to the call list click the “Next” button
as shown on the previous page.
- 10 -
EDGE 180M USB Modem Manual
In the next screen shown above there are multiple settings for your voice call. What you
can do is adjust each of these to your liking, then save the alert and use the “Test Action”
feature with your audio cable connection disconnected from the unit so this will play out
the speaker on the unit so you can listen and adjust the voice call.
You have the option of adjusting the Speaker Volume, the Sound either text to speech or
play a WAV file. You can also adjust the Speed and Pitch of the voice call. After you have
finished adjusting these settings click the “Next” button as shown above.
- 11 -
EDGE 180M USB Modem Manual
You can also choose to play a custom WAV file when the phone call is received by chooseing the
“WAV file in the Sound in the call option as shown above.
After choosing the WAV file option you will then see the screen shown above where you
can add your custom WAV sound by clicking on the “Add Your Own Sound” button, then
browsing to the file and clicking on the “Add File” button.
- 12 -
EDGE 180M USB Modem Manual
After clicking on the Next button the next screen shown above will allow you to setup how
the phone call will be acknowledged. If you did choose the WAV file option then you
would need to turn On the Recipient Acknowledgement option and select whether to
have the WAV file played after the acknowledgment or have it played when the
connection is established.
You can now set the Dial Out Procedure of the phone call alert by either leaving the
default set to have the modem dial each number in the call list, or you can choose to
have it dial until the first acknowledgement, or dial continuously until each of the calls has
been acknowledged.
You can also set the voice call to retry the calls up to 5 times and the acknowledgement
time out. After setting up these options you would click on the “Next” button to continue.
IMPORTANT NOTE: When acknowledging a voice call alert you need to press the #1 key
on your phone and hold it around a second.
- 13 -
EDGE 180M USB Modem Manual
In the next screen of the wizard you will select the USB modem from the drop down list
(noting the (Not Connected) is hidden.
Then choose the EDGE-180M modem from the Voice Modem Chipset drop down list and
clicking the “Next” button to continue as shown in the screen shot above.
In the next screen shown above we can add up to 5 re notify attempts and add the
intervals between each of them. We can then click on the “Finish” button to complete the
voice call action wizard which will save our new action and add it to the actions list as
shown in the next screen.
- 14 -
EDGE 180M USB Modem Manual
You will now see the new Telephone Call action in the action list as shown above and
you can test it to make sure it is working correctly by first highlighting the action, then
clicking on the “Test Action” button.
You can then navigate to the Summery page and check the Syslog for the entry
regarding the successful test message as shown below.
And finally now that you have your telephone call alert setup and tested you can link your
new alert to any sensor connected to the unit using the “Link Sensor to Action” Wizard
located in the Notifications page.
Please contact [email protected] if you have any further technical
questions or problems setting up your modem or your alerts.
Thanks for Choosing AKCess Pro!
- 15 -