1
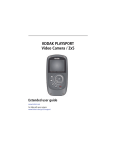
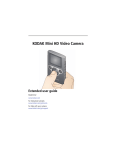
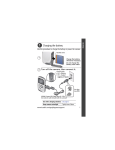
SSU Multiple Subjects Support for
KODAK PLAYSPORT Video Camera
Quick Guide to PACT TE Taping and Downloading
See user’s manual in camera bag
Or www.kodak.com/go/support
for detailed information
1
SSU Multiple Subjects Support for KODAK PLAYSPORT Video Camera
Front view
Watertight door *
Microphone
IR Receiver
Video
Recording
light
Lens
HDMI™ Out
Camera Reset button
USB, 5V DC In
* Watertight door latches
must be tightly closed
and latched.
Door Latch
to open
to close/seal
2
Product features
Back view
Power button/Charging light
Watertight door
Ambient light sensor
Mode
(Video/Still)
Review
Delete
SD/SDHC Card
(optional accessory)
Settings
Record/OK
Share
• Volume (during playback)
• Digital zoom (during capture)
• Turn on the Glare shield
• View previous/next picture or video
ii
www.kodak.com/go/support
Product features
Understanding the status icons
Video length
Recording
Recording
Zoom
Playback
Video/picture
number
Volume
Elapsed time
1
Setting up your camera
Charging the battery—ALWAYS MAKE SURE
YOUR CAMERA IS CHARGED!!
Use this procedure to charge the battery or power the camera with AC power. Charge
the battery as often as you like—you can’t over-charge—but always fully charge
before using.
IMPORTANT: The battery is not removable.
Charging light:
• Blinking = charging
• Steady On = charged
(approx. 4.5 hours)
Yours may differ.
KODAK Camera USB Cable, Micro B /
5-Pin (Use only the cable included with
this camera.)
See other charging solutions
see page 2
Keep doors watertight
see page i
www.kodak.com/go/support
1
Setting up your camera
Charging using USB
IMPORTANT: The battery charges when the computer is on and awake; so disable your
computer’s hibernation, sleep, and standby modes.
Charging light:
• Blinking = charging
• Steady On = charged
(approx. 5 hours)
KODAK Camera USB Cable, Micro B /
5-Pin (Use only the cable included with
this camera.)
Keep doors watertight
2
see page i
www.kodak.com/go/support
Setting up your camera
Inserting an SD or SDHC Card
YOU WILL RECEIVE A SD CARD FOR YOUR TAPING NEEDS. IT MUST BE RETURNED TO SSU.
CAUTION:
A card can only be inserted one way; forcing it may cause damage.
Inserting or removing a card while the camera is on may damage the
video/pictures, the card, or the camera.
1
Turn off the camera.
2
Insert the card until it clicks.
To remove the card, press
and release it, then pull it
out.
Optional accessory
IMPORTANT: When you turn on the camera, it checks to see if a card is inserted. If so, new
pictures/videos are stored on the card. If no card is inserted, new pictures/videos are stored
in the camera’s internal memory. If pictures/videos are detected in internal memory and a
card is inserted, the camera prompts you to move the pictures to the card (and erase those
in internal memory).
4
www.kodak.com/go/support
2
Using your camera
Turning on the camera
Setting the date/time
Language
to change.
OK to accept.
Date/Time
At the prompt, press OK.
to change current field.
for previous/next field.
OK to accept.
Change date/time later see page 14
www.kodak.com/go/support
5
Using your camera
Recording videos, taking pictures
When you turn on the camera, it’s ready
to record.
Start/stop recording.
Zoom in/out.
Turn on the Glare Shield (if enabled in the
Settings menu) to improve LCD viewability.
YOUR CAMERA HAS BEEN SET TO THE
PROPER MODE—DO NOT CHANGE
IT!
Adjusting the LCD to improve viewability
The camera has the ability to sense the light level in your environment and adjust LCD
brightness so it’s easier to see. LEAVE THE LCD setting at AUTOMATIC.
To
Do this
Result
1 Press the Settings button .
2 Press
to choose LCD Brightness & Glare Shield,
Conserve
battery
power
then press OK.
3 Press OK to uncheck Automatic.
4 Press to highlight LCD Brightness, then
to
The LCD stays
relatively dim to
save power.
change the setting to Low.
5 Press
to choose Done, then press OK.
www.kodak.com/go/support
7
Using your camera
Playing videos
1
Review.
2
Previous/next video/picture.
3 OK Play/Pause.
(Press and hold to Stop.)
Adjust video volume (or
magnify a picture).
Delete video/pictures.
While playing a video, press:
OK Play/Pause.
Play fast-forward.
Play in reverse. (Press again to fast-reverse.)
While paused, press:
Play in slow motion. (Press again to play even slower.)
Play in reverse slow motion. (Press again to play even slower.)
Use the optional remote control see page 17
8
www.kodak.com/go/support
Using your camera
Transferring, sharing online, editing
1
Connect the camera.
(It turns on
automatically.)
2
If this is the first time you’ve
connected to this computer, follow
the prompts to install the KODAK
Share Button App.
3
Follow the on-screen instructions to
transfer and share videos.
KODAK Camera USB Cable,
Micro B / 5-Pin (Use only the
cable included with this camera.)
WINDOWS OS-based computers: Install ARCSOFT MEDIAIMPRESSION for KODAK
Software to help organize and edit videos.
MACOS-based computers: Use the SD Card reader that is supplied with the camera.
It looks like this. Place the USB end in the MAC and insert the SD.
www.kodak.com/go/support
9
Use the following directions to select the one
or two segments of the same video to upload
into TASK 3 of your PACT TE.
The video will download to the computer desk
as a Quicktime video when saved. If given an
opetion of hwo to save the video always
choose Quicktime.
Upload the video into your portfolio as a FILE
ATTACHMENT not an image
12
www.kodak.com/go/support
Viewing on a TV—This may help you decide what sections to use
If you have an HD television, use an HDMI cable—and get the richest playback
experience. (Cables may be sold separately.)
HDMI Cable
AV Cable
NOTE: Set your TV’s input setting to HDMI or AV, according to your TV’s specifications.
Set Video Output (NTSC/PAL)
see page 14
Purchase cables
www.kodak.com/go/accessories
www.kodak.com/go/support
13
EDITING--Using the Trim Video feature
Use the Trim Video feature to remove an unwanted video start and/or finish, leaving
only the desired portion.
1 Press the Review button , then
to find a video to trim.
Optional: Play, then pause the video at the desired new start point.
2 Press the Settings button
3 Press
.
to choose Trim Video, then press OK.
An instruction screen appears. After you read it, press OK.
4 When prompted, press
to move the Start marker to the new position, then
press OK.
Press
to move the End marker to the new position, then press OK.
NOTE: If you need to make adjustments, press
to move it. When finished, press OK.
to highlight the Start or End marker, then press
5 When prompted, choose Go Back, Preview Trimmed Video, or Save As New. (The
original video is not altered.)
To add to other Task sections:
Using the Make Picture feature
You can choose a single frame from a video, then make it into a picture. (Size and
quality depend on video resolution.)
1 Press the Review button , then
to find a video from which you want to
extract a single video frame. Play, then pause the video at the desired frame.
2 Press the Settings button
3 Press
.
to choose Make Picture, then press OK.
An instruction screen appears. After you read it, press OK.
4 Follow the prompts to save the picture. (The original video is not altered
16
www.kodak.com/go/support