1
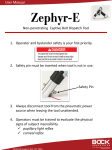
USER MANUAL
Captive Bolt Stunner
WWW.TEDSTUNNER.COM
814-342-4385
1
v8
This tool is for animal euthanasia.
Authorized Users Only
ALWAYS point in a safe direction.
2
When TED Arrives... Immediately
Safety First!
1. Read this User Manual.
2. Charge the Batteries.
3. Purchase Fuel, Oil (Paslode) and Spray Oil (Triflow)
3
Note the packed location of the components
Safety First!
AC
120v
Adapter
Batteries
(Charge before use)
Subject
Adapters
Safety Glasses
Recommended
Charger Base
DC
12v
Adapter
4
Read the Hitachi manual
Safety First!
5
TED with Safety Pin in place
Safety First!
Trigger
LED
• Green: ready
• Red: charge battery
Activator
Safety Pin
Subject Adapter
6
Safety Pin mechanically locks TED
Safety First!
Activator
Safety Pin
Restricts movement of the Activator
7
Safety Pin stored in TED
Safety First!
Safety Pin
8
Subject Adapter determines Bolt Travel
Safety First!
#1
#2
#3
Subject Adapter must always be used!
•Subject Adapter #1 max bolt travel
•Subject Adapter #2 will decrease bolt travel by 1/8”
•Subject Adapter #3 will decrease bolt travel by 1/4”
9
Push Subject Adapter onto Activator over o-ring
Safety First!
Subject Adapter
Safety Pin
10
Snap metering valve onto new canister
Safety First!
Push #2
Push #1
• Once snapped down, do not
attempt to remove metering valve.
• Metering valve remains snapped
down for the life of the canister.
• Canister provides 1000 stuns (approx.)
• Label canister and record the
number of stuns.
11
White nozzle slides & snaps into black receiver
Safety First!
12
Batteries and charging equipment
Safety First!
• Green LED: ready
• Red LED: charge battery
13
Oil Captive Bolt
Safety First!
1. Spray recommended oil in Vent Port.
2. Spray two, 1 second bursts.
14
Ensure fuel system is primed
Safety First!
• The TED may NOT fire on the first attempt, immediately after loading the
fuel canister. This is NORMAL.
• Prime the fuel delivery by dry firing the TED several times.
1. Install fuel canister and battery.
2. Remove Safety Pin from Activator.
3. Press Subject Adapter on a scrap cardboard box.
4. Listen for internal fan start-up.
5. Squeeze trigger.
6. Repeat from step 3, several times to confirm operation.
15
Target subject
Safety First!
• An “X” is made from the
base of the ear to the inside
of the eye.
• Note closed wound shown.
1. Remove Safety Pin from Activator (& store).
2. Locate TED on subject as shown.
3. Push TED until Activator contacts cap screws.
4. Immediately squeeze trigger.
Contact
Push 1/2”
• Remove TED from subject to allow for recycle.
<1
second
- Note: Activator resets, audible fan vents combustion chamber.
• TED is reset and immediately ready for the next stun.
16
If bolt does not fully cycle use Locating Pin
Safety First!
Locating Pin
• The bolt must be fully retracted for the TED to fire.
• During shipping or transport the bolt may be jolted
from the starting position.
• Use the Locating Pin to gently push the bolt into
the starting position. Note resistance when starting
position is reached.
17
Daily clean up recommended
Safety First!
1. Remove battery and fuel canister.
2. Wipe stunner with disinfectant.
3. Apply several drops of light oil to inside of Activator.
4. Cycle Activator to confirm smooth operation.
5. Insert Safety Pin in Activator.
6. Confirm Locating Pin is stored in stunner.
7. Return all components to case.
8. Lock case.
18
Deep cleaning TED
Safety First!
1. The recycling bolt may draw contamination into TED.
2. Locate the small vent port shown below.
3. Spray disinfectant in this port.
4. “Dry fire” TED to force disinfectant past internal components.
5. Repeat
19
Exposing bolt for cleaning
Safety First!
1. Ensure the battery and fuel canister are removed.
2. Remove Subject Adapter from Activator.
3. Descend bolt by forcefully shaking TED in direction of bolt travel.
4. Repeat shaking until bolt is visible.
5. Clean and disinfect the exposed bolt.
6. Use Locating Pin to return bolt into starting position.
20
Safety interlocks
Safety First!
1. Bolt fully retracted (use Locating Pin).
2. Fuel canister snapped in place (confirm sufficient level).
3. Battery snapped in place (confirm sufficient charge).
4. Safety Pin removed from Activator.
5. Activator fully depressed.
6. Confirm green LED.
21
Compatible Fuel: Paslode preferred
Safety First!
22
Compatible Oil
Safety First!
23