1
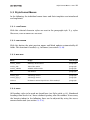
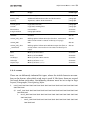
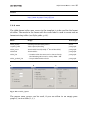
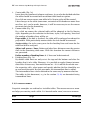
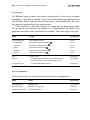
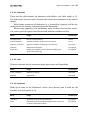
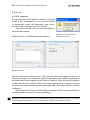
Manual journal template | Version 2.2.1 Data Collection and Structuring with DG_journal_template (Version 2.2.1) De Gruyter is glad to welcome you as an author. Your work will be printed from a PDF file created by you. In order to help you with compilation your document, we offer this template1. The most important settings can be found in our Style Guide2 which will help you with the styling of your manuscript. In addition to that, we have generated a sample file using this template. The aim of this sample file is to demonstrate the usage of the style formats as it conforms to our requirements with respect to structure, typography and layout. Please read the instructions3 carefully as to avoid extra work for you and us. Please do not hesitate to turn to your De Gruyter contact immediately if you have any queries or problems, or if you need to clear up any options or variations. Before creating your final PDF file please send us 20-30 representative sample pages that have been completed using our instructions. These pages should contain all of the used heading categories, the Table of Contents, as well as examples of the References and, if applicable, the Index. Your De Gruyter contact will then discuss the corrections and further procedures with you. If you do not create a print file but a manuscript with this template, no sample pages must be submitted. We look forward to working with you. De Gruyter Publishers || 1 Template-file:DG_journal_template.dotm | version: 2.2.1 | 09.2015 2 Style guide inside pages | © 2015 De Gruyter | version 2.2.1 | 04.2015 3 Manual journal template | © 2015 De Gruyter | version 2.2.1 | 09.2015 Manual journal template | Version 2.2.1 Contents 1 1.1 1.2 1.3 1.4 1.5 1.6 System Requirements | 1 Macro Security | 1 Installing Fonts | 2 Printer Setup | 2 Embedding Fonts in the PDF File | 3 Generating the Print File | 3 Logo files | 3 2 Layout and Structure of a Journal Article | 5 3 Creating the Word Files | 6 4 Gather and Check Content | 9 5 Manuscript Markup with Style Formats | 10 5.1 The DEGRUYTER Menu Bar | 10 5.2 Allocation of Style Formats | 10 5.3 Style Format Menus | 11 5.3.1 CLEAR FORMAT | 11 5.3.2 PRINT PREVIEW | 11 5.3.3 META DATA | 11 5.3.4 HEADS | 11 5.3.5 TEXT | 12 5.3.6 LISTINGS | 13 5.3.7 FIGURE | 14 5.3.8 TABLE | 15 5.3.9 LINGUISTIC EXAMPLE | 16 5.3.10 BOX | 18 5.3.11 EQUATIONS | 18 5.3.12 footnotes | 19 5.3.13 LINKS | 19 5.3.14 REFERENCES | 19 5.3.15 TOC | 20 5.3.15.1 INSERT TOC | 20 5.3.15.2 UPDATE TOC | 21 5.3.16 List of Contributors (LOC) | 21 5.3.17 TOOLS | 21 IV | Contents 5.3.17.1 5.3.17.2 5.3.17.3 5.3.17.4 5.3.17.5 5.3.17.6 5.3.17.7 5.3.17.8 5.3.18 LINE NUMBER ON/OFF | 21 PARAGRAPH NUMBER ON/OFF | 21 MARGIN NUMBER ON/OFF | 21 ADJUST HEADING INDENT | 21 SHOW/HIDE SHORTTITLES | 22 LANGUAGE SETTING | 23 COPYRIGHT SETTING | 23 DOI setting | 24 info | 24 Index | 25 Manual journal template | Version 2.2.1 1 System Requirements The full functionality of the manuscript template only runs under Windows with MS WORD versions 2007 and higher. Working with Word for Mac or Open Office is possible to a limited extent. You can import the paragraph styles and character styles of De Gruyter in your file. Please use the support of your office software. 1.1 Macro Security In order to be able to use the template it is necessary to allow the use of macros. Fig. 1: Macro settings (Word 2010) Please follow the instructions below to activate the macros in word: Tab. 1: Macro activation in Word Word 2007 – – – – Office Symbol (top left) Word-Options | Popular | Show developer tab in ribbon (tick box) In Ribbon: Developer Tools | Macro Security… choose Enable all macros Word 2010 – File | Options | Security Center | Settings… – choose Activate all macros Word 2013 – File | Options | Trust Center | Settings… – choose Activate all Macros 2 | System Requirements 1.2 Installing Fonts DG Meta Science was designed for the manifold requirements of the publisher; it contains about 2500 characters (see Style guide, p. 6). It is an OpenType-Font (OTF). The special characters can be inserted via Insert | Symbols or the four-digit UNICODE and Alt + C. The technical documentation of the font Fig. 2: If one or more of these can be found in the font folder. fonts are not available an error The following fonts must be available and inmessage pops up. stalled in order for the template to work: – DG Meta Science – DG Meta Serif Science and – DG Icons You will get these from De Gruyter. New fonts can be added in the item Fonts | File | Install New Font. 1.3 Printer Setup The page settings of the two journal formats are recognized by Word as userdefined formats, which sometimes leads to problems. During the creation of PDF files, a page setting that is in a format preset by the system may be changed using similar values causing wrapping changes. To avoid this from the outset it is useful to define the formats in the print settings. To do this, in the system settings choose Printer, open the settings for the PDF printer and Insert the two new paper formats. It is therefore important that you decide at the earliest possible date for an appropriate PDF-Printer and work with them (see 6). It you have the software “Adobe Acrobat Distiller” (not to be confused with “Adobe Acrobat Reader”) or the free “PDFCreator” (http://www.pdfforge.org/ pdfcreator) at one's disposal, it recommend to define the De Gruyter book formats in the print settings of your PDF printer. Embedding Fonts in the PDF File | 3 Fig. 3: Example for Adobe PDF settings 1.4 Embedding Fonts in the PDF File In order to create an error-free PDF file the De Gruyter fonts must also be installed at your printer. Thus they are integrated into the PDF file created and can be displayed on any computer. Proceed as follows: 1. Select a postscript printer (e. g. Adobe PDF), click on Properties. 2. In the default settings select Standard and click on edit. 3. In the FONTS directory tick the box Embed All Fonts. Alternatively, this setting can be changed directly in Word on Word Options | Save, by ticking the box Embed Fonts in File. 4 | System Requirements 1.5 Generating the Print File In the print menu please select a virtual printer and save the file. Please make sure that the fonts are embedded. 1.6 Logo files Along with the template file two logo images are supplied. These are required for: dg-logo.eps is used in the running titles by-nc-nd_word.eps necesssary for the copyright line if the work is under Creative Commons licence 2 Layout and Structure of a Journal Article Along with the template you will receive a style guide and sample pages of a detailed description of typography and layout. The font sizes, line spacing and fonts can also be found here. Frontmatter Pages I-IV: The first four pages of the front matter are produced by the publisher Article Starting with the first page of article, the page numbering is continuously Arabic. The page numbering begins with an Arabic 1. All subsequent articles start on a new right-hand page. The articles are continuously paginated within a volume. Book Review After the articles use the document type BOOK REVIEW for reviews. How to generate these files, see Chapter 3 Creating the Word Files. 3 Creating the Word Files Before contents are gathered or an existing manuscript is edited, Word files must be created using DG_journal_template and specifying the document type. To do this, proceed as follows: 1. Save the template DG_JOURNAL_TEMPLATE.DOTM in the same directory that you will use for the Word files of your article/journal. This ensures that the Word files can easily access the macros and that you can see the necessary menu bar. 2. Open the template with a double click. The file opens as the Word document Document1.docx and a window opens where you need to specify the document settings. 3. Insertion of existing text: by Copy and Paste or Insert | Contents. 1 Warning: Never open the template using the drop-down menu that can be reached by a click on the right mouse key or by the Word menu File |Open …« as „.dotm“-file as these cannot be processed by the system. Creating the Word Files | 7 Fig. 4: Document settings The following document types are available: Document Document type Document subtype Front matter Table of Contents List of Contributors Article Book Review 8 | Creating the Word Files In addition to the options above the following languages are available. They are defined by the style formats and are necessary for the automatic hyphenation at line breaks: – German (Germany) – English (UK) – English (USA) Apart from that, you can switch between German and English in the dialog language for the menus. Both settings you can change later via TOOLS | LANGUAGE SETTING (see section 5.3.17.6). Please select between FILE IMPORT and INSERT SAMPLE TEXT. FILE IMPORT allows you integrating and editing an existing manuscript (details see chapter 4 and 5). The function INSERT SAMPLE TEXT generates a sample text with basic elements of the document and can be overwritten if required. At last you choose the book format. Available formats are small (155 × 230 mm) and large (210 × 280 mm). In the following dialog the information for the journal will be filled. They are necessary for creating the running head in the document. Fig. 5: Journal settings (DOI SETTING) These fields can be left blank. It is possible to add the information later under menu bar TOOLS | DOI SETTING (see section 5.3.17.8). By a click on OK a document with the selected properties will be created. 4 Gather and Check Content When the new document is created, then can be inserted the text. We recommend the following workflow: 1. Delete the running head in the existing manuscript (page numbers, running title). All section breaks should be deleted (find with “^b”). If not, conflicts can be arisen with the template, when the text of the manuscript is inserted. Section breaks should be newly set in the target file. 2. Copy and paste your manuscript content with the word buttons Paste | Paste Special | Paste | Use this format | Formatted Text (rtf). It is important to choose formatted text, so that the character formats are not. 3. Assign the paragraphs with the format styles (see chapter 5.2). If your manuscript is already well-structured, then it is recommended that to use Find and Replace (shortcut CTRL + F or Home | Editing | Replace) in order to change frequently occurring format style globally (Home | Editing | Replace | Format | Style – e. g. text body with indent paragraph or text body without indent PARAGRAPH_IGNORE_INDENT). Fig. 6: menu Find and Replace: CTRL + F or Home | Editing | Replace | Format | Style Attention: With FORMAT FOOTNOTES all footnotes (e. g. inserted by copying) will be automatically 1 formatted in the De Gruyter style throughout the document. 5 Manuscript Markup with Style Formats 5.1 The DEGRUYTER Menu Bar Upon opening the Word file, the additional ribbon tab DEGRUYTER appears at the right of Home with all the templates needed for consistent markup. Fig. 1: ribbon DEGRUYTER 5.2 Allocation of Style Formats The Template distinguishes between two kinds of styles: paragraph styles and character styles. Paragraph styles ( ) should be assigned as follows: 1. Click into the paragraph (do not marks any characters). 2. Select the correct paragraph style in the DEGRUYTER ribbon above (marked with ( ). Character styles ( ) should be assigned as follow: 1. Highlight the characters, words or paragraphs to be changed. 2. Assign the character style by mouse click on the corresponding menu item in the DEGRUYTER menu bar (marked with ). 3. Character styles can be set back to standard text using the first item in the menu bar, CLEAR FORMAT. In addition, in the menu is found the format type macro ( ). This indicates either styles that are combined with additional Word actions (e. g. during creation of the boxes) or the opening of forms for larger actions (e. g. by the creation of the toc). Style Format Menus | 11 5.3 Style Format Menus In the following the individual menu items and their templates are introduced and explained. 5.3.1 CLEAR FORMAT With this selected character styles are reset to the paragraph style. E. g. styles like ITALIC, BOLD or SMALLCAPS are reset. 5.3.2 PRINT PREVIEW With this button the print preview opens and Word updates automatically all fields. This function is needed, e. g. for boxes (see section 5.3.10). 5.3.3 META DATA Name Usage Format type article_author Author(s) of the article paragraph article_title Title of the article paragraph article_subtitle Subtitle of the article paragraph DOI doi number paragraph article_type article typ, level 1 paragraph article_type_2 article typ, level 2 paragraph address Institute or university address of the author/s paragraph 5.3.4 HEADS All heading styles to be used are found here (see Style guide, p. 13). Numbered headings from levels 1 to 5 have a defined spacing after the number. If necessary the hanging indent in the following lines can be adjusted by using the ADJUST HEADING INDENT tool (see section 5.3.17.4). 12 | Manuscript Markup with Style Formats If there are several headings right below each other, or if the heading starts on a new page, the space before must be removed (Page Layout | Paragraphs | Line Spacing | Before 0 pt). Name Usage Format type head1 Heading level 1 paragraph head2 Heading level 2 paragraph head3 Heading level 3 paragraph head4 Heading level 4 paragraph head5 Heading level 5 and all further levels paragraph front_matter_title Unnumbered heading in the front matter area paragraph front_matter_title_toc Table of Contents heading paragraph back_matter_title Unnumbered heading in back matter area paragraph back_matter_subtitle Subtitle in back matter area paragraph sub_reference_title Third level heading for back matter or references in chapters paragraph 5.3.5 TEXT (see Style guide, p. 14 f.). Name Usage Format type paragraph Body text, indented paragraph para_ignore_indent Body text without indention (after headings, figures, tables, enumerations, boxes…) paragraph abstract Abstract paragraph keywords Keywords paragraph dateline Heading in first line of paragraph to mark the words Abstract and Keywords character article_dedication Dedication, Editor communication paragraph quotation Quotation, motto, insertion paragraph quotation_source Author or source of the quotation, last line, right paragraph verse Verse paragraph Style Format Menus | 13 Name Usage Format type acknowledgement Acknowledgement paragraph article_note Additional information at the end of the article paragraph signing Signature, author of the Foreword paragraph section_head Legal text, first line paragraph section Legal text, running lines paragraph line number Line number character margin number Paragraph number character reviewer reviewer Absatz review_bibl_data Bibliographical information (use for the 1. review and when a new review is started on the top of a page) Absatz review_DOI DOI Absatz review_bibl_data _continuous Bibliographical information with De Gruyter bar (from 2. Absatz review, when a new review is not started on the top of a page) italic Mark up of text: italics character bold Mark up of text: bold character smallcaps Mark up of text: SMALL CAPITALS character subscript Mark up of text: subscript character superscript Mark up of text: superscript character 5.3.6 LISTINGS There are six differently indented list types, where the initial character or number can be chosen, after which a tab stop is used. If, like here, there are several list levels below each other, the following distance must be set to 0pt in Page Layout | Paragraphs | Line Spacing | After. 1. LIST1_text text text text text text text text text text text text text text text text text text text a) LIST2_text text text text text text text text text text text text text text text text text text i. LIST3_text text text text text text text text text text text text text text text text text – LIST4_text text text text text text text text text text text text text text text text 14 | Manuscript Markup with Style Formats * LIST5_text text text text text text text text text text text text text text text SYMBOL_LIST has been predefined with a preliminary n-dash. – SYMBOL_LIST_text text text text text text text text text text text text text text text text text 5.3.7 FIGURE (see Style guide, p. 18) Name Usage Format type insert figure Opens window to select a figure; figure is automatically macro inserted and a sample caption is automatically created; style formats are assigned figure Figure paragraph caption_figure Figur caption macro inline_figure Figure in body text character The follow criteria are for creation a figure or graphic: Criteria file format eps, ems, tif, jpeg resolution pixel graphic (photo), black-white (grayscale image), color 2280 pixel max. height 1441 pixel max. width line drawing, combination pixel graphic + line drawing 6079 pixel max. height 3843 pixel max. width font sans serif –Arial font size 8 pt additional formatting bold, italic (please avoid upper cases or small caps) line width black lines: min. 0,15 mm (ca. 0,5pt) gray lines: min. 0,25 mm (ca. 0,7 pt) color/area only grayscales – gradation of black 20 %-steps (Please avoid shades and blends) attention scanned images – risk of Moiré-effect (https://en.wikipedia.org/wiki/Moir%C3%A9_pattern) screenshots – risk of low resolution Style Format Menus | 15 Criteria further information 5.3.8 instructions for delivery of image data http://www.degruyter.com/page/59 TABLE The table format style TABLE_LAYOUT in the template is to be used for the layout of tables. The macro in the menu with the same label is used to create new or format existing tables (see Style guide, p. 19). Name Usage Format type table_layout Creating and formatting tables macro caption_table Table caption/heading paragraph st table_head Text in table head (usually 1 line of the table) paragraph table text Text in tables paragraph table_list * list where the character can be chosen freely; the following tab has to be set by STRG + Tab paragraph table_symbol_list – list predefined with n-dash paragraph a b c Fig. 7: Macro table_layout The macro TABLE_LAYOUT can be used, if you are either in an empty paragraph (1.) or in a table (2., 3.). 16 | Manuscript Markup with Style Formats 1. 2. 3. Create table (Fig. 7a) Insert here the number of columns and rows; it can also be decided whether the table should be created with or without table head or caption. By a click on CREATE TABLE a new table in De Gruyter style will be created. Later changes to the table (more rows, extension of the header on more than one line, etc.) can be made, however, it will be necessary to use the macro one more time for the formatting. Format table (Fig. 7b) By a click on FORMAT the selected table will be adapted to the De Gruyter style; depending on the selection in the form, styles, cell spacing, lines and the number of heading lines will be set. Page width: if the box is checked, the table will be enlarged or reduced to page width. With particularly narrow tables the tick should be removed. Assign styles: the styles TABLE_HEAD for the heading lines and TABLE for the table text will be assigned. Adjust cell spaces + lines: Before and after lines distances must be greater than in the remaining table rows. With this function the correct distances are generated. Define number of heading lines: 0–3 lines can be determined. Dividing lines (Fig. 7c) By default table lines are only set at the top and the bottom and after the heading line(s) of a table. However, it is possible to apply thinner intermediate lines if necessary. You mark the row or – if it is not for the whole row – the respective cells, select INSERT and specify whether the line should be TOP or BOTTOM of the mark. By click on FORMAT the intermediate line is added. The intermediate lines can be deleted in the same way by REMOVE selection. The tables in this document, e. g. in the section 5.3.10, are formatted using intermediate lines. 5.3.9 LINGUISTIC EXAMPLE Linguistic examples are realized as invisible tables. The macro LINGUISTIC EXAMPLE helps you creating such a table. It is located under TABLE | LINGUISTIC EXAMPLE. Name Usage Format type linguistic example create an invisible table macro The macro can be used, if you are in an empty paragraph. You will be asked for the number of columns and rows. Choose the right amount corresponding to the current linguistic example. The invisible table should be assigned as follow: 1. Show the formatting marks Show | Hide with the button graph) or the shortcut STRG + shift + *. (see Home | Para- 2. 3. Select the first column. The menu Table Tools will appear at ribbon. Set the column width of the first column to 7 mm at Table Tools | Layout | Cell Size | Column Width. 4. Select the second column and set the column width to 4 mm. All further column width can be freely chosen. Use the format style PARA_IGNORE_INDENT for the text inside the cells. 18 | Manuscript Markup with Style Formats 5.3.10 BOX The different types of boxes are created using macros. If you are in an empty paragraph, a new box is created, if not, the selected paragraph will be moved into the box. Before and after the box the space is set automatically. The symbols appear automatically in the outer margin. If the symbol is in the inner margin, e. g. when text has been moved, then use the button PRINT PREVIEW (see section 5.3.2). Word updates all fields in this document and also corrects the display of symbols. Then close page view again. Name Usage create empty box Box without symbol Format type macro 1 … information … Box with symbol information … question … Box with symbol question 2 macro … notice … Box with symbol notice 3 macro … attention … Box with symbol attention 4 macro 5 macro … lesson … Box with symbol lesson box Text in boxes paragraph box_list * list where the character can be chosen freely, the tab after has to be set with STRG + Tab paragraph box_symbol_list – list predefined with n-dash paragraph 5.3.11 macro EQUATIONS These format styles are used for the structured mark up of equations. Name Usage Format type formula_block Equation line paragraph formula_inline Equation in body text character chemical_structure Structural formula character Style Format Menus | 19 5.3.12 footnotes These are the style formats for footnotes and utilities (see Style guide, p. 17). The item INSERT FOOTNOTE starts a macro that inserts new footnotes in the correct format. With FORMAT FOOTNOTES all footnotes (e. g. inserted by copying) will be formatted in the De Gruyter style throughout the document. When using apparatus, the numbering must be done via FOOTNOTE_INDICATOR, and a quad (en-space) must be inserted between number and text. Name Usage Format type insert footnote Inserts a new footnote macro format footnotes Formats footnotes in the entire document macro footnote_indicator Reference number in footnotes and utilities character footnote Body text in footnotes paragraph apparatus Body text in utilities; text is automatically placed at the end of the page paragraph 5.3.13 LINKS Character formats for the structured mark up of notes and hyperlinks. Name Usage Format type cross_reference References in text character weblink Hyperlinks character 5.3.14 REFERENCES Mark up of items in the References. heading (see Style guide, p. 21). HEADS | BACK_MATTER_TITLE is used for the Name Usage Format type reference Standard mark up for all references paragraph intro Introductory text, without hanging indent, also used in other back matter listings paragraph 20 | Manuscript Markup with Style Formats 5.3.15 TOC 5.3.15.1 INSERT TOC For the creation of the table of contents (see Style guide, p. 39). Analogously, it can only be created in documents using the document type FRONTMATTER and the subtype TABLE OF CONTENTS. These file must be saved in the same folder as the other documents. With INSERT TOC, the following menu appears: Fig. 10: Error message with wrong documents Fig. 11: INSERT TOC The file selection is done in tab 1. Note that the files only appear in the list if they are not open. It is important that the documents are ordered according to the order they should appear in the Table of Contents. They are listed according to their file name or number. If this is not the required order, it can be changed by using the arrow buttons on the right-hand side. Thereafter all files must be reselected. With GENERATE TOC in tab 2 the table of contents will be created and be formatted according to the De Gruyter guidelines. 3 The table of contents will be inserted exactly at the same position where the cursor is located. Please note that you move the cursor to the correct position of the table of contents. Style Format Menus | 21 5.3.15.2 UPDATE TOC If a Table of Contents already exists, it can be updated by using this function. Only those documents will be used, which were selected before by INSERT TOC. If additional files need to be added, perform INSERT TOC again. 5.3.16 List of Contributors (LOC) The List of Contributors is an optional part of front matter or back matter. Create a new document with the template and choose in the start window the document type FRONTMATTER or BACKMATTER and the document subtype LIST OF CONTRIBUTORS. For the entries use the format style CONTRIBUTOR at the ribbon DEGRUYTER | LOC. 5.3.17 TOOLS 5.3.17.1 LINE NUMBER ON/OFF This function inserts or deletes line numbers on the current page (see Style guide, p. 15) with a number range interval of 5. The numbers conform to underlaid raster lines of 40 lines and not to the actual number of lines. 5.3.17.2 PARAGRAPH NUMBER ON/OFF This function inserts or deletes paragraph numbers on the current page (see Style guide, p. 15). Only paragraphs defined with the style format PARAGRAPH ARE counted. 5.3.17.3 MARGIN NUMBER ON/OFF This function works as for paragraph numbers, but here differently formatted marginal numbers are inserted (see Style guide, p. 15). 5.3.17.4 ADJUST HEADING INDENT When paragraph numbers reach two digits, the second line of a heading may not correctly aligned with the first text line. This function goes through all headings of the document and correct the indention. 22 | Manuscript Markup with Style Formats 5.3.17.5 SHOW/HIDE SHORTTITLES Running titles (see Style guide, p. 16) are generated automatically when the document is created. The De Gruyter Logo appears on each page inside. – 1st page of the article: journal name year; volume (issue): page (see Style guide, p. 34) – from the 2nd page: small format: left = ARTICLE_AUTHOR, right = ARTICLE_TITLE large format: left + right = ARTICLE_AUTHOR, ARTICLE_TITLE The half-title in the table of content is different from the articles (see Style guide, p. 39): journal | year | volume | issue If ARTICLE_TITLE or ARTICLE_AUTHOR are too long, and thus the running title in the header results in two lines, or they contain characters that are not allowed (like the asterisk for the corresponding author) they need to be changed. Call up the macro SHOW SHORT TITLES. Below the two elements the text appears in contrasting color again. This text can be changed as required. The corrected version will appear in the header. With the macro HIDE SHORT TITLES these paragraphs will be hidden again. article_author*, article_author2, cle_author4, article_author5 article_author3, arti- article_author et al. article_title sample text: this heading is too long sample text sample text sample text sample text shortened heading Attention: Unfortunately, for the reference function (StyleRef), with which the headers are generated, Word does not adopt formatting such as bold or superscript. If these formatting are necessary, you need to adjust your text and formatting directly in the header. Please note that this change affects the entire document and you may need to insert section breaks to view varying text in the header. Style Format Menus | 23 5.3.17.6 LANGUAGE SETTING With LANGUAGE SETTING the document and dialog language can be changed. Available are, just as in the start menu: – German (Germany) – English (UK) – English (USA) respectively, German and English for the dialog language. Fig. 12: Language selection 5.3.17.7 COPYRIGHT SETTING With COPYRIGHT SETTING a dialog is called up for setting of the copyright line and the Creative Commons licence (see Style guide p. 31 f.). Max Müller 2014 Logo and licence text Fig. 13: Dialog for the copyright line Here the information for the copyright line is to be entered (see Style guide p. 31/32). © 2014 Max Müller, published by De Gruyter. This work is licensed under the Creative Commons Attribution-NonCommercial-NoDerivs 3.0 Licence. 24 | Manuscript Markup with Style Formats If no copyright line is necessary, remove the checkmark on INSERT COPYRIGHT LINE, and no further details are required. If the content is not under CC licence, remove the checkmark on INSERT CREATIVE COMMONS LOGO. Neither the logo nor the licence text will be added to the copyright line. This information can be changed later via TOOLS | COPYRIGHT SETTING. 5.3.17.8 DOI setting With DOI SETTING the dialog for journal settings is called up again (see Fig. 5 in chapter 3) and the information can be corrected. 5.3.18 info INFO shows the current template version. Index apparatus 19 article 5, 7 book review 5, 7, 13 box 18 content – file import 8 copyright line 23 dialog language 8, 23 document setting 7 DOI setting 8, 24 equations 18 figures 14 – criteria 14 – insert 14 find and replace 9 fonts 2 front matter 5, 7 manuscript markup 10 margin number 21 menu bar 10 notes 19 paragraph number 21 PDF – create 2 – settings 2 print settings 2 references 19 review 5, 7, 13 ribbon 10 running titles – shorten 22 sample text 8 style format – character 10, 13 – paragraph 10 style guide 5 heads 11 interlinear type 16 journal information 8 journal settings 8 language setting 8, 23 line number 21 linguistic example 16 links 19 list of contributors (loc) 7, 21 lists 13 table 15 – create 16 – format 16 table of contents (toc) – front matter 7 – insert 20 – update 21 text 12 update fields 11, 18 utilities 19 weblinks 19 macro 1, 10 macro security 1