1
Agilent 33502A
2-Channel Isolated
Amplifier
User’s/Service Guide
Agilent Technologies
Notices
© Agilent Technologies, Inc. 2009
Warranty
No part of this manual may be reproduced in
any form or by any means (including electronic storage and retrieval or translation
into a foreign language) without prior agreement and written consent from Agilent
Technologies, Inc. as governed by United
States and international copyright laws.
The material contained in this document is provided “as is,” and is subject to being changed, without notice,
in future editions. Further, to the maximum extent permitted by applicable
law, Agilent disclaims all warranties,
either express or implied, with regard
to this manual and any information
contained herein, including but not
limited to the implied warranties of
merchantability and fitness for a particular purpose. Agilent shall not be
liable for errors or for incidental or
consequential damages in connection with the furnishing, use, or performance of this document or of any
information contained herein. Should
Agilent and the user have a separate
written agreement with warranty
terms covering the material in this
document that conflict with these
terms, the warranty terms in the separate agreement shall control.
Manual Part Number
33502-90001
Edition
First Edition. October 2009
Printed in Malaysia
Agilent Technologies, Inc.
3501 Stevens Creek Blvd.
Santa Clara, CA 95052 USA
Microsoft® and Windows® are U.S. registered trademarks of Microsoft Corporation.
Software Updates/Licenses
Periodically, Agilent releases software
updates to fix known defects and incorporate product enhancements. To search for
software updates and the latest documentation for your product, go to the product page
at:
Technology Licenses
www.agilent.com/find/33502A
Restricted Rights Legend
A portion of the software in this product is
licensed under terms of the General Public
License Version 2 ("GPLv2"). The text of the
license and source code can be found at:
www.agilent.com/find/GPLV2
This product utilizes Microsoft Windows
CE. Agilent highly recommends that all Windows-based computers connected to Windows CE instruments utilize current
anti-virus software. For more information,
go to the product page at:
www.agilent.com/find/33502A
2
The hardware and/or software described in
this document are furnished under a license
and may be used or copied only in accordance with the terms of such license.
U.S. Government Restricted Rights. Software and technical data rights granted to
the federal government include only those
rights customarily provided to end user customers. Agilent provides this customary
commercial license in Software and technical data pursuant to FAR 12.211 (Technical
Data) and 12.212 (Computer Software) and,
for the Department of Defense, DFARS
252.227-7015 (Technical Data - Commercial
Items) and DFARS 227.7202-3 (Rights in
Commercial Computer Software or Computer Software Documentation).
Safety Notices
CAUTION
A CAUTION notice denotes a hazard. It calls attention to an operating procedure, practice, or the like
that, if not correctly performed or
adhered to, could result in damage
to the product or loss of important
data. Do not proceed beyond a
CAUTION notice until the indicated
conditions are fully understood and
met.
WA R N I N G
A WARNING notice denotes a
hazard. It calls attention to an
operating procedure, practice, or
the like that, if not correctly performed or adhered to, could result
in personal injury or death. Do not
proceed beyond a WARNING
notice until the indicated conditions are fully understood and
met.
33502A User’s/Service Guide
Safety Information
Do not defeat power cord safety ground feature. Plug in to a grounded (earthed) outlet.
Do not use product in any manner not specified by the manufacturer.
Do not install substitute parts or perform
any unauthorized modification to the product. Return the product to an Agilent Technologies Sales and Service Office for service
and repair to ensure that safety features are
maintained.
Safety Symbols
Earth Ground
Chassis Ground
Risk of electric shock
WA R N I N G
Main Power and Test Input Disconnect: Unplug instrument from
wall outlet, remove power cord,
and remove all cables from all terminals before servicing. Only
qualified, service-trained personnel should remove the cover from
the instrument.
WA R N I N G
Line and Current Protection
Fuses: For continued protection
against fire, replace the line fuse
and the current-protection fuse
only with fuses of the specified
type and rating.
Additional Notices
Waste Electrical and
Electronic Equipment (WEEE)
Directive 2002/96/EC
This product complies with the WEEE Directive (2002/96/EC) marking requirement.
The affixed product label (see below) indicates that you must not discard this electrical/electronic product in domestic
household waste.
Product Category: With reference to the
equipment types in the WEEE directive
Annex 1, this product is classified as a
"Monitoring and Control instrumentation"
product.
Do not dispose in domestic household
waste.
To return unwanted products, contact your
local Agilent office, or see
www.agilent.com/environment/product
Refer to manual for additional safety information
33502A User’s/Service Guide
for more information.
3
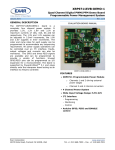
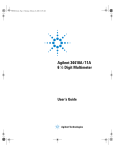
The Front Panel at a Glance
The Agilent 33502A is a two-channel, isolated amplifier. Both channels can either
propagate a signal directly or with 5x amplification. The channel inputs are on the rear
panel of the amplifier, and the outputs are either on the front panel, as shown here, or
on the rear panel (Option 001 only). The main front panel features are shown below.
1
2
3
4
5
6
7
4
On/Off Switch and power LED
USB Port (transfer files to and from memory stick)
Six Front Panel Softkeys
Channel 1 Output Connector
Channel 1 On/Off Switch
Channel 2 On/Off Switch
Channel 2 Output Connector
33502A User’s/Service Guide
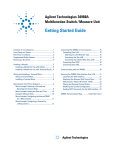
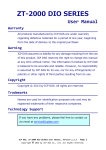
The Rear Panel at a Glance
The rear panel of the amplifier is shown below.
1
2
3
4
5
6
7
8
Channel 1 Input Connector
Channel 1 Output Connector (Option 001 only)
Channel 2 Output Connector (Option 001 only)
Channel 2 Input Connector
USB Interface Connector
LAN Interface Connector
AC Power Connector
Chassis Ground Screw
WA R N I N G
For protection from electrical shock, the power cord ground must not be defeated.
33502A User’s/Service Guide
5
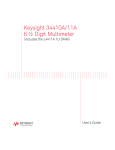
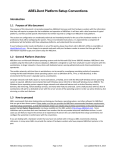
The Display at a Glance
By default, the front panel display shows the amplifier’s
status. Channel 1 information is shown in yellow, and channel
2 information is shown in green. If the thermal sensor in the
amplifier detects a high temperature, the channel goes into
overload protection mode, and the channel status is
surrounded by a border, as shown on channel 1 below.
Notice the Error annunciator in the upper right corner of the
display. This is an example of an annunciator, a short string of
text that appears to indicate a specific condition.
Channel 1 Status
Shown in yellow
Channel 2 Status
Shown in green
Softkey Labels
Shown at the bottom of the screen.
For further information, see Chapter 2, “Features and
Functions”.
6
33502A User’s/Service Guide
In This Guide…
1
Quick Start
In this chapter you prepare the amplifier for use and
become familiar with the most common front- panel
operations.
2
Features and Functions
In this chapter you will find a detailed description of the
amplifier’s capabilities and operation. This chapter presents
both front- panel and remote interface operation of the
instrument.
Refer to the Agilent 33502A Programmer’s Reference Help
for a detailed description of the SCPI commands.
3
Remote Interface Configuration
This chapter describes how to connect the amplifier using a
remote interface.
4
Service Information and Typical Characteristics
This chapter lists typical characteristics of the the Agilent
33502A amplifier.
33502A User’s/Service Guide
7
8
33502A User’s/Service Guide
Contents
Contents
1
Quick Start
11
Basic Amplifier Operations 12
Preparing the Amplifier for Use
Using the Front Panel 13
12
Basic Amplifier Troubleshooting 15
If the Amplifier Does Not Turn On 15
2
Features and Functions
19
SCPI Programming Introduction
20
Front Panel Features 21
Front Panel Display 21
Displayed Messages 21
Front Panel Main Menu 22
Utility Menu 23
File Menu 24
System Menu 25
I/O Config Menu 26
Annunciators 27
Turning the Display Off 27
Front Panel Alphanumeric Character Entry 28
Error Conditions 28
Reading the Error Queue 29
Mass Memory (MMEMory) Subsystem
Power-On and Reset State
3
30
31
Remote Interface Configuration
Configuring the USB Interface
33
35
Configuring the LAN Interface 36
Configuring LAN Parameters 37
33502A User’s/Service Guide
9
Contents
DHCP 37
IP Address 37
Subnet Mask 38
Default Gateway 38
Host Name 39
DNS Server 40
Instrument Unexpectedly Goes into Remote 40
Setting up a LAN connection from the Front Panel 41
Setting up a LAN connection from the Remote Interface
4
Service Information and Typical Characteristics
42
45
Service Information 46
Verifying Amplifier Functionality 46
Gain, Flatness, and Full Power Bandwidth Tests 47
Output Current Tests 48
Internal Switching Tests 49
Types of Service Available 50
Extended Service Contracts 50
Obtaining Repair Service (Worldwide) 50
Repackaging for Shipment 51
Cleaning Instructions 51
To Order Replaceable Parts 52
Typical Characteristics
53
Typical Characteristics 54
General Characteristics 54
Input Configuration 56
Output Configuration 57
Index
10
59
33502A User’s/Service Guide
Agilent 33502A 2-Channel Isolated Amplifier
User’s/Service Guide
1
Quick Start
This chapter gives you a quick overview of the 33502A
amplifier’s front panel and basic features. The examples will
help you become familiar with your amplifier and its basic
operation.
Basic Amplifier Operations 12
Preparing the Amplifier for Use 12
Using the Front Panel 13
Basic Amplifier Troubleshooting 15
If the Amplifier Does Not Turn On 15
To Adjust the Carrying Handle 16
To Rack Mount the Amplifier 17
Agilent Technologies
11
1
Quick Start
Basic Amplifier Operations
This section introduces the basics of the 33502A amplifier, and how to use it.
Preparing the Amplifier for Use
To verify that your 33502A amplifier is ready for use:
1 Check the list of supplied items.
The following accessories are shipped standard with the 33502A amper:
• Power cord for country of destination
• Agilent 33502A Product Reference CD
• Agilent Automation Ready CD (IO Libraries Suite)
The following printed (hardcopy) manual is optionally available:
• Agilent 33502A User’s/Service Guide
If the 33502A was ordered with option 0B0 (delete printed manuals), a
hardcopy manual is not included with the instrument. However, all
manuals, online help, and other documentation are provided in electronic
form on the Agilent 33502A Product Reference CD.
Before installing the instrument, verify that you have received these
items with your instrument. If anything is missing, please contact your
nearest Agilent sales office or Agilent authorized reseller .
2 Inspect the unit.
When you receive your amplifier, inspect it for any obvious damage that
may have occurred during shipment. If there is damage, notify the
shipping carrier and nearest Agilent sales office or Agilent authorized
reseller immediately.
Until you have verified that the amplifier is functional, save the shipping
carton and packing materials in case the unit has to be returned.
3 Connect the power cord and turn on the amplifier.
The front-panel display will light up while the amplifier performs its
power-on self-test. The amplifier powers up with DC coupling and 1 M
impedance on both channels.
12
33502A User’s/Service Guide
Quick Start
1
Using the Front Panel
The front panel includes two buttons that turn the channels on and off. This
is the default configuration, and the amplifier also has an orderable
configuration with the output connectors in the back (Option 001).
When you turn a channel on, the number on the button illuminates, as
shown below for channel 1.
33502A User’s/Service Guide
13
1
Quick Start
The front panel also includes six softkeys at the bottom of the display that
allow you to select various functions and options. Each softkey selects the
option shown on the front panel display immediately above the softkey.
14
33502A User’s/Service Guide
Quick Start
1
Basic Amplifier Troubleshooting
This section covers basic troubleshooting and general use.
If the Amplifier Does Not Turn On
Use the following steps to help solve problems you might encounter when
turning on the amplifier. If you need more help, call Agilent support for
service. See Chapter 4, “Service Information,” starting on page 46
1 Verify that there is AC power to the amplifier.
First, verify that the power cord is firmly plugged into the power module on
the rear panel and that the amplifier’s Power switch is in the “On” position.
Ensure that the power source the amplifier is plugged into is energized.
2 Check whether the LED below the power switch is illuminated.
If it is illuminated and yellow, the amplifier is receiving power and you
should try to turn the power on again. When you turn the amplifier on, the
LED should be illuminated and green. If the amplifier still does not come up,
or if the LED does not light up in the presence of known-good power, your
amplifier is in need of repair.
33502A User’s/Service Guide
15
1
Quick Start
To Adjust the Carrying Handle
To adjust the position, grasp the handle by the sides and pull outward.
Then, rotate the handle to the desired position.
Bench-Top Viewing Positons
Carrying Position
16
33502A User’s/Service Guide
Quick Start
1
To Rack Mount the Amplifier
You can mount the 33502A in a standard 19–inch rack cabinet using the
available rack–mount kits. Instructions and mounting hardware are
included with each kit. Any Agilent System II (half-width, 2U height)
instrument of either the 272.3 mm or the 348.3 mm depth can be rack
mounted side–by–side with the 33502A. For example, a 33502A and a
33210A, or two 33502As, can be mounted side–by–side, as shown below.
You must remove the carrying handle, and the front and rear rubber
bumpers, before rack mounting an instrument.
To remove each bumper, stretch a corner and slide it off.
To remove the handle, rotate it to the vertical position and pull the ends outward.
To rack mount a single amplifier, order adaptor kit 5063-9240
To rack mount two instruments side-by-side, order lock-link kit
5061-6769 and flange kit 5063-9212
33502A User’s/Service Guide
17
1
18
Quick Start
33502A User’s/Service Guide
Agilent 33502A 2-Channel Isolated Amplifier
User’s/Service Guide
2
Features and Functions
SCPI Programming Introduction 20
Front Panel Features 21
Front Panel Display 21
Displayed Messages 21
Front Panel Main Menu 22
Utility Menu 23
File Menu 24
System Menu 25
I/O Config Menu 26
Annunciators 27
Turning the Display Off 27
Front Panel Alphanumeric Character Entry 28
Error Conditions 28
Reading the Error Queue 29
Mass Memory (MMEMory) Subsystem 30
Power-On and Reset State 31
Agilent Technologies
19
2
Features and Functions
SCPI Programming Introduction
The Agilent 33502A complies with the syntax rules and conventions of SCPI
(Standard Commands for Programmable Instruments). For complete SCPI
command syntax information, refer to the Agilent 33502A Programmer’s
Reference Help. This is a standard Windows help system, provided on the
Agilent 33502A Product Reference CD-ROM that came with your
instrument.
Throughout this guide, the following
conventions are used for SCPI command syntax for remote interface
programming:
SCPI Language Conventions.
• Braces ( { } ) enclose the parameter choices for a given command string.
The braces are not sent with the command string.
• A vertical bar ( | ) separates multiple parameter choices for a given
command string.
• Triangle brackets ( < > ) indicate that you must specify a value for the
enclosed parameter. The brackets are not sent with the command string.
• Some parameters are enclosed in square brackets ( [ ] ). This indicates
that the parameter is optional and can be omitted. The brackets are not
sent with the command string. If you do not specify a value for an optional
parameter, the instrument chooses a default value.
SCPI Language Version. You can determine the SCPI version to which your
instrument adheres by sending a command from the remote interface.
• You can query the SCPI version from the remote interface only.
• Remote Interface Operation: The SYSTem:VERSion? query returns the
SCPI version in the form “YYYY.V”, where “YYYY” represents the year of
the version, and “V” represents a version number for that year (for
example, 2009.0).
20
33502A User’s/Service Guide
Features and Functions
2
Front Panel Features
Front Panel Display
The Agilent 33502A provides an alphanumeric display to indicate the status
of the channels and the amplifier’s overall configuration. The display also
includes a menu section at the bottom that allows you to configure the
instrument and perform certain operations.
Displayed Messages
The center of the display shows the status of each channel, as shown below.
The bottom of the screen is reserved for six softkey labels. Each label
describes the function of the softkey immediately below it. A sample menu is
shown below.
33502A User’s/Service Guide
21
2
Features and Functions
Front Panel Main Menu
The structure of the main menu is shown below. Four of the buttons allow
you to configure the channels, and the rest of the menu options fall under
the Utility menu.
22
Channel
1 2
Selects the channel to configure.
Direct
Amplified
Specifies whether the selected channel should go directly
through the 33502A, or whether it should get 5x
amplification. If you select Amplify, the Impedance and
Coupling softkeys (below) become active.
Impedance
50 1M
Specifies whether the selected channel should have 50 or
1,000,000 ohms of input impedance.
Coupling
AC DC
Allows you specify whether the channel should be AC or DC
coupled.
Utility
Allows you to configure the instrument, view errors and
manipulate files on the mass memory subsystem.
33502A User’s/Service Guide
Features and Functions
2
Utility Menu
The Utility menu is the largest part of the front panel menu system. It is
shown in detail below.
View Errors
Allows you to view the instrument’s error queue. Errors are
cleared from the queue as they are displayed on the screen.
I/O Config
Allows you to configure local area network (LAN) settings.
System Menu Allows you to run a self-test on the amplifier, select the help
language, and configure the display and beeper.
File
Allows you to manipulate files and folders in the mass
memory subsystem, including internal storage and USB.
Help
Presents a menu of help topics and access to help on the most
recently displayed message(s).
33502A User’s/Service Guide
23
2
Features and Functions
File Menu
The features under the front panel File menu are shown below.
24
Action
Allows you to specify the action you want to perform. You can
create a new folder, and you can also delete, copy or rename a
file or folder.
Path \ File
Allows you to specify the file or folder on which you want to
perform the action.
(Perform
Action)
The label on this softkey will change to one of the four choices
shown, depending on what is selected by the Action key above.
When you press this softkey, that action will be performed.
33502A User’s/Service Guide
Features and Functions
2
System Menu
The features under the front panel System menu are shown below.
About
Displays information about the amplifier and its firmware.
Run Self Test
Runs a self-test on the amplifier.
Help Lang
Allows you to specify whether you want the help to appear in
English, French, German, Japanese, Korean, or Chinese.
NISPOM
Secure
Allows you to secure the amplifier to National Industrial
Security Program Operating Manual (NISPOM)
specifications.
Options
Allows you to configure the display and beeper.
33502A User’s/Service Guide
25
2
Features and Functions
I/O Config Menu
The features under the front panel I/O Config menu are shown below.
26
LAN
Enables or disables the amplifier’s LAN connection.
LAN Settings
Allows you to configure the amplifier’s local area network
(LAN) settings.
LAN Reset
Resets the amplifier’s LAN settings to factory defaults and
resets the connection.
33502A User’s/Service Guide
Features and Functions
2
Annunciators
There are two annunciators on the amplifier’s front panel.
• RMT The amplifier is operating in the remote interface mode. Pressing
any softkey or the two channel enable keys will bring the instrument back
to local mode unless a remote local lockout or SYSTem:LOCK command
has been issued.
• Error A hardware error or remote interface error has been detected, and
a message is in the error queue.
Turning the Display Off
For security reasons, you may want to disable the front panel display. When
disabled, the entire front panel display goes dark. Pressing any key will
re-enable the display.
• Front Panel: Press Utility > System > Options > Display Off/On to turn the
display off. Press any softkey to turn it back on.
• Remote Interface Operation: The following command turns off the display:
DISPlay OFF
The following command queries the display setting:
DISPlay?
The query returns 0 (OFF) or 1 (ON).
Sending a DISPlay:TEXT “<string>” command when the display is turned
off will keep the display off with the exception of displaying the
“<string>”.
33502A User’s/Service Guide
27
2
Features and Functions
Front Panel Alphanumeric Character Entry
In some menus, such as I/O configuration, you can manually enter a number
or alphanumeric string. Use the softkeys shown below to edit the text.
Moves the cursor one character to the left, in this case from
the N to the U.
Moves the cursor one character to the right, in this case from
the N to the K.
Next
Character
Changes the selected character to the next character in the
list of characters. In this case, it would change the N to O.
Previous
Character
Changes the selected character to the next character in the
list of characters. In this case, it would change the N to M.
Delete
Character
Deletes the selected character. In this case, it would delete
the N and bring the K next to the U.
DONE
Finishes text editing.
Error Conditions
When the front panel ERROR annunciator turns on, one or more command
syntax or hardware errors have been detected. A record of up to 20 errors
can be stored in the instrument’s error queue.
• The amplifier displays a message and beeps once each time a command
syntax or hardware error is generated.
• Each remote interface I/O session (USB or LAN) has its own
interface–specific error queue.
• A special global error queue holds all power–on and hardware– related
errors (for example, over–temperature).
• Errors are retrieved in first–in–first–out (FIFO) order. The first error
returned is the first error that was stored. Errors are cleared as you read
them. Once you have read all of the interface–specific errors, the errors in
the global queue are retrieved.
• Errors are cleared as you read them. When you have read all errors from
the interface–specific and global error queues, the ERROR annunciator
turns off and the errors are cleared.
28
33502A User’s/Service Guide
Features and Functions
2
• If more than 20 errors have occurred, the last error stored in the queue
(the most recent error) is replaced with
–350,”Error queue overflow”.
No additional errors are stored until you remove errors from the queue. If
no errors have occurred when you read the error queue, the instrument
responds with
+0,“No error”.
• The front panel reports errors from all I/O sessions as well as the global
error queue.
• Both the interface–specific and global error queues are cleared by the
*CLS (Clear Status) command and when power is cycled. The errors are
also cleared when you read the error queue. The error queue is not cleared
by a Factory Reset (*RST) command or an Instrument Preset
(SYSTem:PRESet) command.
Reading the Error Queue
You can read the error queue either from the front panel, or from the remote
interface.
• Front Panel Operation: Press
UTILITY > VIEW ERRORS
Scroll through the errors using up and down arrows, and then press DONE
to finish.
Remote Interface Operation: The following command reads and clears one
error from the error queue in first-in, first-out order.
SYSTem:ERRor?
Refer to the Agilent 33502A Programmer’s Reference Help for a complete
description and syntax for this command.
33502A User’s/Service Guide
29
2
Features and Functions
Mass Memory (MMEMory) Subsystem
The 33502A amplifier includes a mass memory subsystem that allows you to
manipulate files and folders on the amplifier’s internal memory or on a USB
stick attached to the front of the amplifier. The most common use of the
mass memory subsystem is to document attributes of the amplifier. For
example, you may choose to store a file on the 33502A that lists the tests
that use the amplifier, which signals are attached to which channels, and
the configured state of each channel.
The SCPI commands used on the mass memory subsystem are all under the
MMEMory node. Specifically, the mass memory subsystem uses the
following commands:
MMEMory:CATalog[:ALL]? [<folder>]
MMEMory:CDIRectory <folder>
MMEMory:COPY <file1>,<file2>
MMEMory:DELete <filename>
MMEMory:DOWNload:DATA <data>
MMEMory:DOWNload:FNAMe <filename>
MMEMory:MDIRectory <folder>
MMEMory:MOVE <file1>,<file2>
MMEMory:RDIRectory <folder>
MMEMory:UPLoad? <filename>
See the Agilent 33502A Programmer’s Reference Help for details on these
commands.
30
33502A User’s/Service Guide
Features and Functions
2
Power-On and Reset State
The following tables show the factory default settings.
Channel Configuration
Coupling
Impedance
Output State
Path
Factory Setting
DC
1,000,000 ohms
OFF
AMPLifier
System–Related Operations
Beeper State
Display State
Error Queue
Mass Memory Folder
System Version
Factory Setting
ON
ON
Cleared at Power–On.
Not cleared by a front panel or
remote interface Reset command
INTernal
2009.0
Input/Output Configuration
Factory Setting
Enable Interfaces: 1
LAN
USB
LXI Identification State
LAN Settings: 2
DHCP
IP Address
Default Gateway
DNS Server
Host Name
LAN Services1
Telnet Prompt
Telnet Welcome Message
Enabled
Enabled
OFF
ON
169.254.5.2
0.0.0.0
0.0.0.0
A-33502A-nnnnn3
Enable All
“33502A>”
“Welcome to Agilent 33502A
2-Channel Isolated Amplifier”
1 Interface enable or LAN service changes take effect only after you cycle power.
2 LAN setting changes require a LAN restart. From SCPI you must cycle power.
3 Where nnnnn represents the last 5 digits of the instrument serial number.
33502A User’s/Service Guide
31
2
32
Features and Functions
33502A User’s/Service Guide
Agilent 33502A 2-Channel Isolated Amplifier
User’s/Service Guide
3
Remote Interface Configuration
Configuring the USB Interface 35
Configuring the LAN Interface 36
Configuring LAN Parameters 37
DHCP 37
IP Address 37
Subnet Mask 38
Default Gateway 38
Host Name 39
DNS Server 40
Instrument Unexpectedly Goes into Remote 40
Setting up a LAN connection from the Front Panel 41
Setting up a LAN connection from the Remote Interface 42
Agilent 33502A Web Interface 43
Agilent Technologies
33
3
Remote Interface Configuration
This chapter tells how to configure the Agilent 33502A for remote interface
communication. For additional information, refer to the:
• Agilent 33502A Programmer’s Reference Help for information on
programming the instrument using SCPI commands. This help file is
found on the Agilent 33502A Product Reference CD–ROM.
• Agilent USB/LAN/GPIB Connectivity Guide for interface configuration
and troubleshooting information. This manual is found on the Agilent
Automation–Ready CD–ROM or at www.agilent.com/find/connectivity.
The Agilent 33502A supports USB and LAN interfaces. Both interfaces are
enabled at power on. The front panel Remote annunciator turns on
whenever there is activity on the remote interface.
• USB Interface There is nothing to configure on your instrument for a
USB connection. Just connect the amplifier to your PC using the USB 2.0
cable included with the instrument. Be sure to use the USB port on the
amplifier’s rear panel for USB connectivity; the USB port on the front
panel is for a USB drive.
• LAN Interface By default, DHCP is enabled on the instrument, which
may enable network communication over the LAN interface
(10BaseT/100BaseTx). You may need to set several configuration
parameters as described in the LAN configuration sections that follow.
NOTE
34
To configure and verify an interface connection between the 33502A and your PC, use the
Agilent IO Libraries Suite (E2094M Agilent IO Libraries for Windows) or an equivalent. For
more information about Agilent's I/O connectivity software, go to
www.agilent.com/find/iolib.
33502A User’s/Service Guide
Remote Interface Configuration
3
Configuring the USB Interface
For the USB interface, no configuration parameters are required to set up
the amplifier. Connect the USB port on the rear panel of your amplifier to a
USB port on your computer. Note that it may take several seconds for the
computer to recognize and establish a connection to the amplifier.
• Remote Interface Operation: The following command enables the USB
remote interface:
SYSTem:COMMunicate:ENABle ON,USB
The following command queries the state of the USB interface:
SYSTem:COMMunicate:ENABle? USB
This query returns a “0” (disabled) or a “1” (enabled).
Refer to the Agilent 33502A Programmer’s Reference Help for complete
description and syntax for these commands.
33502A User’s/Service Guide
35
3
Remote Interface Configuration
Configuring the LAN Interface
By default, LAN connectivity with DHCP (Dynamic Host Configuration
Protocol) is enabled on the 33502A. In many cases you can simply let DHCP
assign the necessary parameters for a LAN connection. However, you can
also turn off DHCP and set parameters manually.
LAN Parameters You may manually set the following parameters, as
described in the subsections that follow. Following these descriptions are
procedures for setting up a LAN configuration from the front panel and the
remote interface.
• IP Address (the address to enter to start the Web UI or to identify the
amplifier in the Agilent IO Libraries instrument setup menu)
• Subnet Mask
• Default Gateway
• DNS Server
• Host Name
• LAN Services (Visa LAN, Sockets, Telnet, Agilent Web Server)
NOTE
The IP Address, Subnet Mask, Default Gateway, and DNS Server parameters use
“dot-notation” addresses. Dot–notation addresses (“nnn.nnn.nnn.nnn” where “nnn” is a
byte value) must be expressed with care:
Most computers interpret byte values with leading zeros as octal numbers. For example,
“255.255.020.011” is actually equivalent to decimal “255.255.16.9” not “255.255.20.11”
because the computer will interpret “.020” as “16” expressed in octal, and “.011” as “9”.
However, the amplifier assumes that all dot–notation addresses are expressed as decimal
byte values and strips all leading zeros from these byte values. Thus, attempting to set an IP
address of “255.255.020.011” will become “255.255.20.11” (a purely decimal expression).
Be sure to enter the exact expression, “255.255.20.11”, in your computer web software to
address the instrument. To avoid confusion, use only decimal expressions of byte values (0
to 255), with no leading zeros.
36
33502A User’s/Service Guide
Remote Interface Configuration
3
Configuring LAN Parameters
DHCP
DHCP is a protocol for automatically assigning a dynamic IP address,
subnet mask, and default gateway to a device on a network, and is typically
the easiest way to configure your amplifier for remote communication using
the LAN interface.
• Changing the DHCP setting will cause an automatic LAN restart.
• When DHCP is enabled (factory setting), the amplifier will try to obtain
an IP address from a DHCP server. If a DHCP server is found, it will
assign a dynamic IP address, subnet mask, and default gateway to the
instrument. The DHCP server may also assign the DNS address, and may
change the specified host name if a manually specified host name is
already in use.
• When DHCP is disabled or unavailable, the amplifier will use the static
IP address, Subnet Mask, and Default Gateway during power–on.
• If a DHCP LAN address is not assigned by a DHCP server, then a static
IP will be assumed after approximately 1 minute.
• If Auto–IP is enabled, a dynamic (rather than static) IP address will be
assigned by the server at power–on.
IP Address
An Internet Protocol (IP) Address is required for all IP and TCP/IP
communications with the instrument. If DHCP is enabled (factory setting),
the specified static IP address is not used. However, if the DHCP server fails
to assign a valid IP address, or if DHCP and Auto–IP are both off, the
currently configured static IP address will be used.
• Changing the IP address will cause an automatic LAN reset.
• The factory–set default IP Address is “169.254.5.2”.
• If you are planning to use a static IP address on a corporate LAN, contact
your network administrator to obtain a fixed IP address to be used
exclusively for your instrument.
• The IP address is stored in non–volatile memory, and does not change
when power has been off, after a Factory Reset (*RST) command, or after
an Instrument Preset (SYSTem:PRESet) command.
33502A User’s/Service Guide
37
3
Remote Interface Configuration
Subnet Mask
The amplifier uses the Subnet Mask to determine whether a client IP
address is on the same local subnet. When a client IP address is on a
different subnet, all packets must be sent to the Default Gateway. Contact
your network administrator to determine whether subnetting is being used
and for the correct Subnet Mask.
• Changing the Subnet Mask setting will cause an automatic LAN reset.
• The default Subnet Mask for the 33502A amplifier is “255.255.0.0”.
• A value of “0.0.0.0” or “255.255.255.255” indicates that subnetting is not
being used.
• The Subnet Mask is stored in non–volatile memory, and does not change
when power has been off, after a Factory Reset (*RST) command, or after
an Instrument Preset (SYSTem:PRESet) command.
Default Gateway
A Default Gateway address allows the amplifier to communicate with
systems that are not on the local subnet. Thus, this is the Default Gateway
where packets are sent which are destined for a device not on the local
subnet, as determined by the Subnet Mask setting. Contact your network
administrator to determine if a gateway is being used and for the correct
address.
• Changing the Default Gateway setting will cause an automatic LAN
reset.
• The default for the amplifier is “0.0.0.0” (no gateway, and subnetting is
not being used).
• The Default Gateway is stored in non–volatile memory, and does not
change when power has been off, after a Factory Reset (*RST) command,
or after an Instrument Preset (SYSTem:PRESet) command.
38
33502A User’s/Service Guide
Remote Interface Configuration
3
Host Name
The Host Name is the host portion of the domain name, which is translated
into an IP address.
• Changing the Host Name will cause an automatic LAN reset.
• The default Host Name for the amplifier is “A–33502A–nnnnn”, where
nnnnn is the last five digits of the instrument’s serial number
representation.
• If Dynamic Domain Name System (DNS) is available on your network and
your amplifier uses DHCP, the Host Name is registered with the Dynamic
DNS service at power–on.
• The Host Name is stored in non–volatile memory, and does not change
when power has been off, after a Factory Reset (*RST) command, or after
an Instrument Preset (SYSTem:PRESet) command.
33502A User’s/Service Guide
39
3
Remote Interface Configuration
DNS Server
The Domain Name Service (DNS) is an Internet service that translates
Domain names into IP addresses. Contact your network administrator to
determine if DNS is being used and for the correct address.
• If you change the DNS address, you must cycle power on the amplifier to
activate the new setting.
• The default DNS Address for the amplifier is “0.0.0.0”.
• The DNS Server address is stored in non–volatile memory, and does not
change when power has been off, after a Factory Reset (*RST) command,
or after an Instrument Preset (SYSTem:PRESet) command.
Instrument Unexpectedly Goes into Remote
If your 33502A unexpectedly goes into remote mode, it is likely because you
have the instrument configured to the LAN on someone else’s host
controller. Operations on that host controller can query your instrument
causing it to go into remote mode. To prevent this, do any of the following:
• Disconnect the instrument from the LAN.
• Disable the LAN interface from the front panel (Utility menu).
40
33502A User’s/Service Guide
Remote Interface Configuration
3
Setting up a LAN connection from the Front Panel
To begin setting up a LAN connection, press Utility > I/O > LAN Settings.
NOTE
If you disable or re–enable the LAN interface, or any of the LAN services, you must cycle
the power on the instrument to activate the new configuration. Other settings are activated
by a LAN restart when you exit the LAN menu.
• The following submenus are displayed:
• Modify Settings – Change most LAN settings (described below).
• LAN Services – Enable or disable VXI-11, Sockets, Telnet or Web. If you
disable or re–enable any of the LAN services, you must cycle the power
on the instrument for the change to take effect.
• Set to Defaults – Set LAN Settings back to their factory default settings.
• Cancel Changes – Cancel settings changes.
• Apply Changes – Apply settings changes and restart the LAN interface.
• DONE – Apply settings changes and restart the LAN interface.
• If you choose Modify Settings, there are either three or six softkeys,
depending on whether DHCP is enabled.
• DHCP – Enabled or Disabled
• Host Name – (Only shown if DHCP is enabled) Change the amplifier’s
host name. This must be an string of alphanumeric characters plus
dashes (“-”), up to 44 characters, with the first character a letter.
• IP Address – (Only shown if DHCP is disabled) Set IP address in dot
notation using softkeys.
• Subnet Mask – (Only shown if DHCP is disabled) Set subnet mask in dot
notation using softkeys.
• Gateway – (Only shown if DHCP is disabled) Set gateway in dot notation
using softkeys.
• DONE – Return to the previous menu level.
• MORE – (Only shown if DHCP is disabled) Opens an additional menu
that allows you to enter DSN, WINS and host name information.
33502A User’s/Service Guide
41
3
Remote Interface Configuration
Setting up a LAN connection from the Remote Interface
Use the following SCPI commands to configure the LAN interface.
NOTE
If you disable or re–enable the LAN interface, you must cycle the power for the change to
take effect. You must also cycle power when you disable or re–enable any of the LAN
services, or change any LAN settings from the remote interface using SCPI commands.
• To enable or disable the LAN remote interface:
SYSTem:COMMunicate:ENABle {OFF|0|ON|1},LAN
• To enable or disable the use of DHCP for the LAN interface:
SYSTem:COMMunicate:LAN:DHCP {OFF|0|ON|1}
• To assign the LAN a static IP address:
SYSTem:COMMunicate:LAN:IPADdress “<address>”
• To assign a LAN Subnet Mask:
SYSTem:COMMunicate:LAN:SMASk “<mask>”
• To assign a LAN Default Gateway:
SYSTem:COMMunicate:LAN:GATEway “<address>”
• To assign a LAN Host Name:
SYSTem:COMMunicate:LAN:HOSTname “<name>”
• To assign the LAN a static DNS address:
SYSTem:COMMunicate:LAN:DNS “<address>”
Query forms of these commands are also available. Refer to the Agilent
33502A Programmer’s Reference Help for complete command description and
syntax.
42
33502A User’s/Service Guide
Remote Interface Configuration
3
Agilent 33502A Web Interface
The 33502A provides a built–in Web Interface. You can use this interface
over LAN for remote access and control of the amplifier using a
Java–enabled Web browser, such as Microsoft® Internet Explorer.
To access and use the 33502A Web Interface:
1 Establish a LAN interface connection from your computer to the
amplifier.
2 Open your computer’s Web browser.
3 Launch the 33502A Web Interface by entering the IP address
(http://156.140.xxx.yyy) of your amplifier, or its fully–qualified host
name (http://myamplifier.location.companyname.com), in the browser
address field. The following welcome screen appears.
4 For further information, click Help with this Page and follow the
instructions in the Web Interface Help.
33502A User’s/Service Guide
43
3
44
Remote Interface Configuration
33502A User’s/Service Guide
Agilent 33502A 2-Channel Isolated Amplifier
User’s Guide
4
Service Information and Typical
Characteristics
Service Information 46
Verifying Amplifier Functionality 46
Gain, Flatness, and Full Power Bandwidth Tests 47
Output Current Tests 48
Internal Switching Tests 49
Types of Service Available 50
Extended Service Contracts 50
Obtaining Repair Service (Worldwide) 50
Repackaging for Shipment 51
Cleaning Instructions 51
Replaceable Parts List 52
To Order Replaceable Parts 52
Typical Characteristics 53
General Characteristics 54
Input Configuration 56
Output Configuration 57
Dimensions 58
Agilent Technologies
45
4
Service Information and Typical Characteristics
Service Information
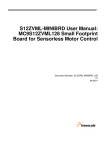
Verifying Amplifier Functionality
This simple procedure allows you to verify that your 33502A amplifier is
functioning properly. To begin, set up the amplifier in the following
configuration, which includes a function generator and a digital multimeter
(DMM) connected via shielded BNC cable.
You will use this configuration for each of the tests described in this section.
46
33502A User’s/Service Guide
Service Information and Typical Characteristics
4
Gain, Flatness, and Full Power Bandwidth Tests
1 Configure the function generator to generate a sine wave with high
impedance load.
2 Configure the DMM for AC voltage with 10 Hz bandwidth or less.
3 Configure the 33502A for 1 M input impedance, with the channel turned
on and amplified. You will need to repeat the test for both channels.
4 For each of the combinations shown in the following table, measure V1
(the unamplified signal from the function generator) and V2 (the
amplified signal from the 33502A). Calulate V2/V1 and record the
information in the table shown below.
5 Compare your values of V2/V1 to the typical values for operation shown in
the two columns on the right side of the table.
Coupling
Frequency (Hz)
VRMS (V)
V1
V2
V2/V1
Typical Low Typical High
DC
1,000
2
4.995
5.005
AC
1,000
2
4.995
5.005
DC
10
2
4.995
5.005
AC
10
3.5
4.950
5.05
DC
40
3.5
4.950
5.05
DC
100,000
3.5
4.750
5.25
33502A User’s/Service Guide
47
4
Service Information and Typical Characteristics
Output Current Tests
.
CAUTION
To avoid causing a false result by overheating the 33502A, be sure to disconnect the
DMM from the amplified output of the 33502A until you are ready to take the
measurements. When you do connect to take the measurement, do not stay connected
for more than 10 seconds, and disconnect the amplified output from the DMM
immediately upon taking the measurement by turning off the output of the 33502A.
1 Configure the function generator to generate a 1 kHz, 1 VRMS square or
sine wave with high impedance load.
2 Configure the DMM for AC current.
3 Configure the 33502A for 1 M input impedance, with the channel turned
on and amplified. You will need to repeat the test for both channels.
4 Connect the output of the amplifier to the DMM for less than 10 seconds
and measure the current from the amplifier. Disconnect the amplified
output from the DMM by turning off the output of the 33502A.
5 The current should typically be between 250 and 480 mA.
48
33502A User’s/Service Guide
Service Information and Typical Characteristics
4
Internal Switching Tests
1 Configure the function generator to generate 1 VDC into a high
impedance load.
2 Configure the DMM for DCV.
3 For each of the 33502A configurations shown in the following table,
measure Vout (the amplified signal).
4 Compare your values of Vout to the typical values for operation shown in
the two columns on the right side of the table.
Output
Impedance
Coupling
Vout
Typical Low Typical High
Amplify, Off
1 M
DC
0
0.02
Direct, On
1 M
DC
0.95
1.05
Amplify, On
1 M
DC
4.75
5.25
Amplify, On
1 M
AC
0
0.02
Amplify, On*
50
DC
2.3
2.3
* Skip this test if the DC source does not have 50 output impedance.
33502A User’s/Service Guide
49
4
Service Information and Typical Characteristics
Types of Service Available
If your instrument fails during the warranty period, Agilent Technologies
will repair or replace it under the terms of your warranty. After your
warranty expires, Agilent offers repair services at competitive prices.
Extended Service Contracts
Many Agilent products are available with optional service contracts that
extend the covered period after the standard warranty expires. If you have
such a service contract and your instrument fails during the covered period,
Agilent Technologies will repair or replace it in accordance with the contract.
Obtaining Repair Service (Worldwide)
To obtain service for your instrument (in–warranty, under service contract,
or post–warranty), contact your nearest Agilent Technologies Service
Center. They will arrange to have your unit repaired or replaced, and can
provide warranty or repair–cost information where applicable.
To obtain warranty, service, or technical support information you can
contact Agilent Technologies at one of the following telephone numbers:
In the United States: (800) 829–4444
In Europe: 31 20 547 2111
In Japan: 0120–421–345
Or use our Web link for information on contacting Agilent worldwide:
www.agilent.com/find/assist
Or contact your Agilent Technologies representative.
Before shipping your instrument, ask the Agilent Technologies Service
Center to provide shipping instructions, including what components to ship.
Agilent recommends that you retain the original shipping carton for use in
such shipments.
50
33502A User’s/Service Guide
Service Information and Typical Characteristics
4
Repackaging for Shipment
If the unit is to be shipped to Agilent for service or repair, be sure to:
• Attach a tag to the unit identifying the owner and indicating the required
service or repair. Include the model number and full serial number.
• Place the unit in its original container with appropriate packaging
material for shipping.
• Secure the container with strong tape or metal bands.
If the original shipping container is not available, place your unit in a
container which will ensure at least 4 inches of compressible packaging
material around all sides for the instrument. Use static–free packaging
materials to avoid additional damage to your unit.
Agilent suggests that you always insure shipments.
Cleaning Instructions
Before cleaning the amplifier, remove power from the amplifier. Clean the
outside of the instrument with a soft, lint–free, slightly dampened cloth. Do
not use detergent. Disassembly is not required or recommended for cleaning.
Be sure that the amplifier is dry before restoring power.
33502A User’s/Service Guide
51
4
Service Information and Typical Characteristics
Replaceable Parts List
This section contains information for ordering replacement parts for your
instrument. The parts lists include a brief description of each part with the
applicable Agilent part number.
No operator serviceable parts inside; refer servicing to service
trained personnel.
To Order Replaceable Parts
You can order replaceable parts from Agilent using the Agilent part number.
To order replaceable parts from Agilent:
• Contact your nearest Agilent Sales Office or Service Center.
• Identify the parts by the Agilent part number shown below.
• Provide the instrument model number and serial number.
Part Number
Description
34401-86020
Bumper Kit
34401-45021
Handle
33220-84101
Cover
33502-88001
Keypad
2090-0977
Display
1250-2110
Front Panel BNCs
33502-80001
Front Panel Kit
33502-66502
Front Panel PCA
1252-8483
USB Connector
1253-4669
LAN Connector
53200-61608
Line Filter
33250-68501
Fan
33502-80002
Power Supply Kit*
* The fuses used in the power supply are 3.15A / 250V radial-leaded, time
lag fuses. If the fuse blows, replace the entire power supply assembly.
52
33502A User’s/Service Guide
Service Information and Typical Characteristics
4
Typical Characteristics
These characteristics apply when using the 33502A amplifier in an
environment that is free of electromagnetic interference and electrostatic
charge.
When using the amplifier in an environment where electromagnetic
interference or significant electrostatic charge is present, measurement
accuracy may be reduced.
Specifications are subject to change without notice. For the latest
specifications, see the product datasheet on the Web. Firmware updates may
also be available on the Web. Start at the product page:
www.agilent.com/find/33502A
33502A User’s/Service Guide
53
4
Service Information and Typical Characteristics
Typical Characteristics
General Characteristics
Power Supply:
100V/120V/ 220V / 240V ± 10%
Power Line Frequency:
50–60 Hz ± 10%,
400 Hz ± 10%.
Automatically sensed at power–on, 400 Hz defaults to 50Hz.
Power Consumption:
100 VA peak (typical value depends on configuration and load)
Operating Environment:
Full accuracy for 0 °C to 55 °C
Full accuracy to 80% R.H. at 40°C Non–condensing
Storage Temperature:
–30 °C to 70 °C
Operating Altitude:
Up to 3000m
Bench Dimensions (WxHxD):
261.2mm x 103.8mm x 303.2mm
Weight:
3.1 kg (6.8 lbs)
EMC Tested to:
Complies with European EMC Directive for test and
measurement products.
● IEC/EN 61326-1
● CISPR Pub 11 Group 1, class A
● AS/NZS CISPR 11
● ICES/NMB-001
Complies with Australian standard and carries C-Tick mark.
This ISM device complies with Canadian ICES-001.
Cet appareil ISM est conforme à la norme NMB-001 du
Canada.
Safety:
Complies with European Low Voltage Directive and carries
the CE-marking.
Conforms to UL 61010-1, CSA C22.2 61010-1, and IEC
61010-1:2001.
Acoustic Noise:
54
Normal operating mode SPL 35 dB(A)
33502A User’s/Service Guide
Service Information and Typical Characteristics
Display:
4.3" Color TFT WQVGA (480x272), LED backlight
Remote Interfaces:
10/100Mbit LAN
USB 2.0 Standard
Language:
SCPI – 1994.0
IEEE–488.2
LXI Compliance:
LXI Class C, Version 1.0
Number of Channels:
2
Channel to Channel Ground Connection:
Not connected in BYPASS ON.
Connected with both channels OFF or in Gain of 5x
Floating Voltage:
±42 Vpk to earth
33502A User’s/Service Guide
4
55
4
Service Information and Typical Characteristics
Input Configuration
Input Coupling:
AC Coupling
Programmable
DC Coupling
Default, Programmable
Input Impedance
1M
Default, Programmable
50
Programmable
Input Voltage Range
Maximum Voltage Range
±5 Vpk for gain of 5X
±30 Vpk for bypass
Damage Level
±10 Vpk for 50 input
±35 Vpk for 1 M input
Input Path
Programmable gain of 5x, bypass (1x), or off state
Input Gain 5X
5x, Fixed, Non-Inverting.
Gain Accuracy2
±0.1% @ 1kHz
Flatness DC coupling1
0.1% : DC - 10 kHz
1% : DC - 40 kHz
5% : DC - 100 kHz
Flatness AC coupling1
0.1% : 30Hz - 10 kHz
1% : 10Hz - 40 kHz
5% : 3Hz - 100 kHz
Small Signal Bandwidth1
> 300 kHz (-3dB)
Full Power Bandwidth1
100 kHz @ 50 Vpp output
Input Bypass
Bandwidth for 50 system
> 300 MHz (-3dB)
Maximum current
0.2 Apk
Noise
Input referred noise
56
< 40nV/ rt-Hz @ 1 kHz
33502A User’s/Service Guide
Service Information and Typical Characteristics
4
Output Configuration
Output Current
200 mA.
(150 mA for continuous output from -8 V to +8 V)
DC Output Resistance
<2
Max Output Level 1
±25 Vpk
Output DC Offset
< 10 mV
Output Slew Rate
> 20 V/s
THD + N 1
< 0.01% @ 10 kHz, 40 Vpp
Aberrations (overshoot/undershoot)1
< 5% for waveforms with < 3 V input step or non-slewing
output
Transition time 1
(Final value ±1% of step size)
2.5 s + 50 ns/V of output step
Channel to channel isolation for gains of
5x
>75 dB
Capacitive load for no oscillation
< 1nF
Output Protection
Continuous short circuit protection.
Thermal overload shutdown.
Over temperature status flag.
1For all loads >250 and <400 pF of capacitance.
2Measured with >= 1 M load and 1 M input selection.
33502A User’s/Service Guide
57
4
Service Information and Typical Characteristics
Dimensions
All dimensions are shown in millimeters
58
33502A User’s/Service Guide
Index
Index
A
F
Agilent Web Server, 36
Amplifer
Failure to Turn On, 15
Amplifier
Preparing for Use, 12
Rack Mounting, 17
Supplied Items, 12
Annunciators, 27
Factory Settings, 31
Front Panel Display, 21
H
Host Name, 36, 39
I
IP Address, 37
B
Bumper Removal, 17
L
C
LAN Interface, 34, 36
LAN Services, 36
Carrry Handle, 16
Changing Digits Displayed, 28
Character Entry, 28
Configuring
LAN, 36
USB, 35
Connectors on Rear Panel, 4, 5
D
Default Gateway, 36, 38
Default Settings, 31
DHCP, 36
Display, 21
Character Entry, 28
Turn Off, 27
Display Annunciators, 27
DNS Server, 36, 40
E
Error Conditions, 28
Errors
reading, 29
33502A User’s/Service Guide
M
Safety Symbols, 3
SCPI
Language Conventions, 20
Language Version, 20
Service Information, 46
Settings
Default, 31
Sockets, 36
Subnet Mask, 36
System II Rack Mounts, 17
T
TCP/IP, 37
Telnet, 36
Troubleshooting, 15
Turn Off Display, 27
Menu
Utility, 23
Messages Displayed, 21
U
P
V
Power On State, 31
Prepare for Use, 12
Visa LAN, 36
R
Rack Mounting, 17
Rear Panel Description, 4, 5
Remote Annunciator, 34
Remote I/O
introduction, 34
unexpected, 40
Remote Interface Configuration, 34
Rubber Bumper Removal, 17
USB Interface, 34, 35
Utility Menu, 23
W
Waste Electrical and Electronic Equipment
Directive, 3
Web Browser, 43
S
Safety Information, 3
Safety Notices, 2
59