1
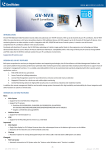
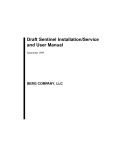
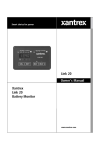
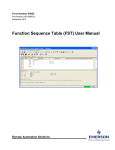
Infinity/Sales Terminal
Interface Manual
Version 4.21
October 2002
BERG COMPANY, LLC
Copyright © 1995-2002 by Berg Company, LLC. All rights reserved.
No part of this publication may be reproduced, transmitted, transcribed, stored in a retrieval system,
or translated into any language in any form by any means without the written permission of Berg
Company, LLC, Madison, Wisconsin.
Trademarks
Infinity, All-Bottle, Laser and TAP 1 are registered trademarks of Berg Company, a Wisconsin
Limited Liability Corporation.
All-Bottle ID is a trademark of Berg Company, a Wisconsin Limited Liability Corporation.
Other brand and product names may be trademarks or registered trademarks of their respective
companies.
Berg Part Number: 5201441
Revision 4.21
Printed in U.S.A.
Disclaimer of Limited One Year Warranty
Warranties and
Berg Company, LLC, (BERG) warrants that all its Control Systems (SYSLiabilities TEMS) will remain free from defects in materials and workmanship for a
period of one (1) year from the date of original installation. BERG’S obligation
under this Warranty shall be limited to the repair or replacement (at BERG’S
option) of the SYSTEM or its defective part(s) during the warranty period. This
Warranty is not assignable and is for the benefit of the original end-user
purchaser only. BERG neither assumes nor authorizes anyone to assume on its
behalf any obligations not covered by the Warranty.
THIS WARRANTY IS EXCLUSIVE AND IS IN LIEU OF ALL OTHER
WARRANTIES, ORAL OR WRITTEN, EXPRESS OR IMPLIED, INCLUDING THE WARRANTIES OF MERCHANTABILITY AND FITNESS FOR
ANY PARTICULAR PURPOSE.
CONDITION AND EXCLUSIONS
No defect (failure) caused by misuse, abuse, improper installation, lack of
normal care or maintenance, accident or Act of God is covered by the foregoing
Warranty. Said Warranty is limited to repair or replacement (at BERG’S option)
only and does not include any labor or transportation charges or compliance
with any Federal, State or local laws, codes or regulation. Notice of any
claimed breach of said Warranty must be promptly given to the authorized
dealer from whom the System was purchased or leased. Upon request, all
Systems or parts which are claimed to be defective must be made available for
inspection by and/or return to (at BERG’S option) such authorized dealer and/
or BERG. No repair or replacement under said warranty will extend the original
warranty period.
LIMITATION OF LIABILITY
IN NO EVENT SHALL BERG BE LIABLE UNDER ANY TORT, CONTRACT OR OTHER LEGAL THEORY FOR ANY LOSS, COST, EXPENSE
OR INCIDENTAL OR CONSEQUENTIAL DAMAGES OF ANY KIND IN
CONNECTION WITH THE DESIGN, SALE, USE, REPAIR AND/OR
REPLACEMENT OF ANY SYSTEM OR PART THEREOF, EXCEPT AS
SPECIFICALLY NOTED ABOVE.
BERG COMPANY
Disclaimer of Other Warranties and Liabilities
While all reasonable care has been taken in preparation of this product, it is
provided “as is,” without warranty as to performance or fitness except as
expressly stated above. The entire risk as to the quality of output developed
with this product is assumed by the user.
Berg Company does not warrant that the software or system will meet any
particular requirements of the user, other than as expressly stated above, and
specifically denies any liability for incidental or consequential damages
resulting from the use of this software or system.
Berg Company also specifically denies all liability for any technical or editorial
omissions in its product documentation, and for any incidental or consequential
damages resulting from the furnishing, performance or use of its documentation.
Contents
Getting Started
1-1
Interface System Components ..................................................................... 1-2
Installation Game Plan and Checklist ........................................................... 1-4
Gather Hardware Information ....................................................................... 1-6
Gather PLU and Modifier Information ........................................................ 1-10
Assign PLUs to Brands and Cocktails ........................................................ 1-12
Installation
2-1
Connect the ECU(s) to the Sales Terminal(s) .............................................. 2-2
Install a 2 to 1 Switcher (for POS terminals) ................................................ 2-4
Install a Duplex Switcher (for ECR terminals) .............................................. 2-6
Install a TAP 1 Parallel ECR Multiplexer....................................................... 2-8
Install Interface Software at a New Site ..................................................... 2-10
Upgrade Existing Interface Software .......................................................... 2-12
Uninstall Interface Software ....................................................................... 2-14
Drivers
3-1
About Options ............................................................................................... 3-2
About Modifiers ............................................................................................ 3-4
Enter Default Driver Settings (Options and Modifiers) ................................. 3-6
Enter Non-Default Driver Settings (Options and Modifiers) ....................... 3-10
Send Driver Settings (Options and Modifiers) to ECUs ............................. 3-12
Load a Driver .............................................................................................. 3-14
Driver Test .................................................................................................. 3-16
Enable or Disable a Driver ......................................................................... 3-17
Remove a Driver ........................................................................................ 3-18
Show Driver Status ..................................................................................... 3-19
Example PLU & Modifier Configurations
4-1
Example #1: Size, Price Level and Brand PLUs .......................................... 4-2
Example #2: Size and Brand PLUs .............................................................. 4-4
Example #3: Price Level and Brand PLUs ................................................... 4-6
Example #4: Brand PLUs ............................................................................. 4-8
Interface Specifications
5-1
Troubleshooting
6-1
Index
ii Infinity/Sales Terminal Interface Manual
SECTION
1
Getting Started
Creating a link between the ECUs that comprise Berg’s Infinity beverage control
system and the sales terminal of an ECR or POS system isn’t difficult. However,
each Interface installation requires a certain amount of preparation. The general
guidelines provided in this section can help you take the necessary steps to make
each installation run as smoothly as possible.
Interface System Components ....................................................... 1-2
Installation Game Plan and Checklist ............................................. 1-4
Gather Hardware Information ......................................................... 1-6
Gather PLU and Modifier Information ......................................... 1-10
Assign PLUs to Brands and Cocktails .......................................... 1-12
Interface System Components
Interface is a communication link that allows rapid transfer of drink information from a Berg
ECU to a sales terminal. Sharing sales information already generated by a Berg ECU can
significantly reduce a bartender’s labor and time spent per drink. Once Interface software and
necessary hardware is installed, drink information for each pour is translated into a numerical
code and sent to the sales terminal. (These numerical codes are collectively referred to as PLU/
Modifier strings.) The sales terminal then rings up all drinks poured exactly as if someone were
pressing the sales terminal keys.
Infinity Software
Interface Software
Sales Terminal
Manages all aspects of beverage dispensing for an Infinity
system. You use Infinity software to enter PLUs for each drink
so the ECU(s) can send correct sales information to the sales
terminal.
The software that provides communication between a sales
terminal and the ECUs in an Infinity system. Interface software
is packaged with Infinity software on the Infinity installation
CD. You use Interface to define settings for the specific driver
file associated with your sales terminal and to send the driver file
to the ECUs so they can communicate with the sales terminal.
The generic term used in this manual to refer to your ECR or
POS system. For a list of makes and models of both ECR and
POS systems that work with the Berg system, see the Interface
Specifications section.
Driver
A computer file included with Interface software that knows
how to communicate with the hardware of your specific sales
terminal. The type of system you have determines the driver you
need. POS drivers support two-way communication between the
ECU and sales terminal. ECR driver communication is limited to
one-way from the ECU to the sales terminal.
Interface Equipment
The equipment necessary to link an Infinity system ECU with a
sales terminal will vary depending on the sales terminal and type
of ECU. It may be just a single cable connecting the sales
terminal to the ECU(s). Or you may need to install other
hardware (such as circuit boards) in the ECU(s) and/or the sales
terminal.
ECU
1-2 Infinity/Sales Terminal Interface Manual
A box containing circuit boards that controls the operation of
dispensers connected to it. You use Interface software to send
a driver file to the ECU(s) so drink information can be sent in
the correct format to the sales terminal.
Station or Group
Options
Specific features of the Interface driver file that you can
customize for your own Infinity/sales terminal setup.
PLU
Stands for Price Look Up. The location in the sales terminal
where the specific price of an item is stored. The PLUs used by
your sales terminal must be assigned to the brands and cocktails
in use at the ECU for the correct sales information to be sent for
every drink.
NLU
Stands for Number Look Up. Used by some sales terminals
instead of the term PLU.
Modifier
Interface software is
accessed through the
Infinity Manager
program and is used to
configure and send driver
files to the ECUs.
Stations and groups are defined with Infinity software. A station
consists of one or multiple ECUs and a group is made up of
multiple stations or other groups. You select a station or group
when you send driver files to the ECUs.
A numerical code linked to a PLU to give the sales terminal
additional information about a drink. Your sales terminal may or
may not use modifiers.
The Interface driver files are
sent to and reside on the ECUs.
The driver files send sales
information to the sales
terminal for each pour.
The sales terminal rings up
pours using sales information
received from the ECUs. The
PLUs and modifiers sent from
the ECUs must match those
defined at the sales terminal.
Infinity Station
BERG
BERG
BERG
Computer
running Infinity
and Interface
software
Sales Terminal
Getting Started 1-3
Installation Game Plan and Checklist
We’ve provided a checklist to help each Interface installation go as smoothly as possible. The
most important thing you can do to prepare for a successful installation is learn all you can about
the specific sales terminal requirements at each site. To help you locate information quickly,
related tasks are grouped throughout the manual.
Getting Started ! 1.
Contact the local sales representative for your sales
terminal. Discuss your installation plans and describe
necessary hardware to order for the terminal. See Gather
Hardware Information.
! 2.
Set an installation date when the sales terminal
representative can be present.
! 3.
Order software and specific cables for your sales terminal
from Berg. Check for correct software serial number and
EPROM version numbers.
! 4.
Assemble the tools:
! 5.
Meet with the sales terminal representative and determine
the sales terminal PLUs and any required modifiers. See
Gather PLU Information.
Installation ! 6.
Install necessary hardware both at the sales terminal and
the ECU with the help of the sales terminal representative.
Make cable connections. See Connect the ECU(s) to the
Sales Terminal(s).
small standard screwdriver
3/16” nut driver
small needlenosed pliers
Phillips screwdriver (#2 pt)
Infinity tools (loopback tester)
! 7.
Install Interface software as part of an Infinity software
installation. See Install Interface Software at a New Site
and Interface Software Basics.
! 8.
Assign the correct PLUs. See Assign PLUs to Brands and
Cocktails (in the Getting Started section).
Drivers ! 9.
Select options affecting Interface performance. See About
Options and Enter Driver Settings.
! 10. Enter PLU modifiers (if necessary for your sales terminal).
See About Modifiers and Enter Driver Settings.
1-4 Infinity/Sales Terminal Interface Manual
! 11. Load the driver file to the Infinity stations or groups. See
Load a Driver in the Drivers section.
! 12. Test each station or group and verify drinks are ringing
properly at the sales terminal with each pour. See Driver
Test.
Getting Started 1-5
Gather Hardware Information
Hardware setup differs somewhat depending on the sales terminal. At a minimum, you need to
order the correct cables to connect the ECU to the sales terminal. Some sales terminals require
additional hardware in the ECU and/or in the sales terminal. Check local wiring and fire codes for
any additional cable requirements (plenum cabling, conduit, etc.).
EPROM Version
in ECUs
Verify the version number of the EPROMs in the ECUs. You
need version 2.13 or later in Infinity ECUs, version 1.08 or later
in TAP 1 ECUs and version 3.0 or later in 1544 Infinity ECUs to
support Interface.
Cables
If your sales terminal is an ECR type, a circuit board must be
installed in the sales terminal. The circuit board vendor supplies
a cable with the board. Berg offers the cables listed in the
Interface Specifications section of this manual.
If your sales terminal is a POS type and is not listed in the
specifications, check with the sales terminal representative to see
if a specific cable is required. Berg PN 8007993 is a cable that
works as a generic choice. Before ordering a generic cable,
verify with the sales terminal representative and Berg that the
cable works for your system.
TAP 1 ECUs
Sales Terminal
1-6 Infinity/Sales Terminal Interface Manual
A circuit board with a pigtail must be added to TAP 1 ECUs to
provide a connection for the sales terminal. This circuit board
must be installed by Berg company. If you didn’t order TAP 1
ECUs with the required circuit board, contact the Berg
Company.
Contact the local sales representative for the sales terminal.
Verify the sales terminal is capable of supporting a Berg liquor
dispenser interface and arrange a time when you can get together
to install the interface. Check the Interface Specifications section
of this manual for specific requirements that may be listed for
your sales terminal. If the sales terminal representative doesn’t
know or can’t find out what configuration is required by the
sales terminal, check with Berg.
Ordering
Specifications
If you or the sales terminal representative need to order
additional hardware components, be sure to order them well in
advance. Some parts may take several weeks to arrive.
For more detailed information specific to the ECR/POS type
you need to install see the Interface Specifications section.
Getting Started 1-7
Auto Switchers
If you need to connect more than one ECU to a sales terminal,
Berg offers auto switchers and cables to connect ECUs to the
switcher. The maximum distance from the sales terminal to any
single ECU is 50 ft.
2 to 1 Switcher
The 2 to 1 switcher is used for POS terminals. It can be used
with Infinity, TAP 1 or 1544 Infinity ECUs and connects two
ECUs to one sales terminal. You can use additional switchers to
connect more ECUs to one sales terminal, but if the ECUs are
heavily used, you may experience noticeable delays. Berg can’t
precisely control the switching speed of the switcher, so if two
pour requests occur at the same time, one of them will be
delayed anywhere from a fraction of a second up to 2 seconds.
Duplex Switcher
The duplex switcher is used for ECR terminals. It can be used
with Infinity, TAP 1 or 1544 Infinity ECUs and connects two
ECUs to one sales terminal. However, the Duplex switcher can’t
be cascaded, so the limit is two ECUs per sales terminal. The
duplex switcher connects one ECU to the sales terminal for the
length of time it takes to send an entire drink code. Then it
switches to the other ECU. The time needed to send a drink code
is dependent on the number of key presses in the code and the
timing requirements of the sales terminal.
1-8 Infinity/Sales Terminal Interface Manual
TAP 1 Parallel
Multiplexer
Using the TAP 1 Multiplexer, you can connect the partitions of
one TAP 1 ECU to multiple sales terminals using an ECR
interface. The maximum distance from the TAP 1 ECU to the
Multiplexer is 50 ft and the maximum distance from the
multiplexer to any sales terminal is also 50 ft. In the event
multiple pour requests reach the ECU at about the same time, all
will pour immediately and each PLU will be sent to the
appropriate sales terminal. By combining a Multiplexer with a
duplex switcher, an Infinity ECU can share a sales terminal with
one of the TAP 1 partitions.
BERG PN
ITEM DESCRIPTION
8005740
2 to 1 switcher, port adapter, two 15 ft adapter
cables to connect switcher to ECUs
8005736
2 to 1 switcher
8005734
port adapter
8005735
15 ft adapter cable
8005766
Duplex switcher, two 6 ft molded cables to connect
switcher to ECUs
8005753
Duplex switcher
8004924
6 ft molded cable
8005749
TAP 1 Parallel ECR Multiplexer, one 6 ft molded
cable to connect multiplexer to TAP 1 ECU
8005764
TAP 1 Parallel ECR Multiplexer
Getting Started 1-9
Gather PLU and Modifier Information
Since the purpose of Interface software is to configure an Infinity system ECU to provide price
information to a sales terminal, it is essential that the PLUs and modifiers used by the sales
terminal be correctly identified. You don’t need to be an expert in sales terminals to perform this
task; a sales terminal representative will help you. However, you do need to know the right
questions to ask to get the information needed.
What are PLUs?
"
A PLU is a numerical code that points to the exact price of
an item stored in the sales terminal.
"
Depending on the sales terminal configuration, a unique
PLU may be assigned to every brand of drink or to every
pour of a different portion size or price level of that brand.
"
Infinity software accepts any number between 1 and 32,767
as a PLU. (If you need higher numbers, check with Berg to
see if your driver supports PLUs to 65,535.)
"
A modifier is a numerical code that can be linked to a PLU
to convey additional information about a specific drink.
"
Modifiers may pass drink information such as price level,
portion size, complimentary, canceled or cocktail status
when that information is not conveyed with a unique PLU.
"
The numerical codes for any “bookend” key presses required
by the sales terminal to signal the start or end of a
transaction or the start or end of the PLU are modifiers.
"
Modifiers can be 1 or 2 numerical codes to allow for two key
presses for each modifier (e.g., pressing an Enter key after
each function key). Each numerical code can be any number
from 0 to 255.
Modifier Order
"
Modifiers can occur before or after the PLU. The order of
the key presses required by the sales terminal determines
where a modifier fits in the PLU/Modifier string. You must
specify the modifier order so sales information can be sent
correctly.
How Interface software
uses PLUs and Modifiers
"
Interface uses PLUs and modifiers to send a string of sales
information to the sales terminal when a drink is poured with
an Infinity system ECU.
What are Modifiers?
1-10 Infinity/Sales Terminal Interface Manual
Modifier Worksheet
PLU/Modifier
Order
PLU/Modifier
List
Record PLUs on the Getting
Ready for Infinity Worksheets
from the Infinity Installation/
Service /User Manual.
Select items from the list and
record them in the order
required by the sales terminal.
Transaction Bookends
PLU Bookends
Begin
Begin
End
End
PLU
Cancel Modifier
Comp Modifier
Price Level Modifier
Size Modifier
Type Modifier
For help with this form see
About Modifiers in the
Drivers section.
Price Level Modifier
Size Modifier
Tap Size Modifier
A
1
1
B
2
2
C
3
3
4
Comp Modifier
Cancel Modifier
Comp
Cancel
5
Paid
Regular
6
Add to
PLU
Type Modifier
Add to
PLU
7
8
Brand
Cocktail
Getting Started 1-11
Assign PLUs to Brands and Cocktails
You can assign PLUs to brands and cocktails at the same time you enter a brand’s prices and
portions or you can go back and enter or change them at any time. Interface software must be
installed before PLUs can be entered.
# To assign PLUs to brands and cocktails:
1. Run Manager.
2. Pull down the Pouring menu and click Prices and
Portions....
3. Select the Product Type.
4. Select the brand's Prices and Portions you want to give a
PLU. (If you haven't defined any other price/portion
categories, Standard is the only choice.)
5. Click Modify....
Beer prices,
portions and PLUs
1-12 Infinity/Sales Terminal Interface Manual
Liquor, Wine and
Mixer prices,
portions and PLUs
PLUs
"
Depending on your driver,
Infinity accepts numbers to
32,767 or 65,535 as a PLU.
"
Depending on the sales
terminal, the PLU may be the
same for every size at a
certain price level or it may be
different.
6. Click a Price Level tab that has PLUs you want to enter or
change.
7. Type the correct PLU for each Size listed on the tab. Sizes
1-3 correspond to the three possible portion sizes (small,
regular and large) for All-Bottle 7 and Laser dispensers.
Sizes 1-8 correspond to the eight possible sizes on TAP 1
taps if alternate sizes are enabled. (If you don't use alternate
sizes don't worry about sizes 5-8.) Sizes 1-4 correspond to
the four possible portions (small, regular, large and special)
for 1544 Infinity ECU dispensers.
8. Repeat steps 6 and 7 for any Price Level tab that needs
PLUs.
Defaults
"
There are no factory default
PLUs.
"
If you click Save As Default
after you've entered prices,
portions and PLUs, only the
prices and portions on all tabs
become the defaults for that
product type. PLUs are not
saved as defaults.
9. Click OK to save your entries on all tabs. Click Cancel to
exit the screen without saving.
10. Repeat steps 3-9 for every brand that needs PLUs.
11. Click Close to exit the Prices and Portions Setup screen.
Getting Started 1-13
SECTION
2
Installation
Refer to this section for help with the following hardware and software
installation tasks:
Connect the ECU(s) to the Sales Terminal(s) ................................. 2-2
Install a 2 to 1 Switcher (for POS terminals) .................................. 2-4
Install a Duplex Switcher (for ECR terminals) ............................... 2-6
Install a TAP 1 Parallel ECR Multiplexer ....................................... 2-8
Install Interface Software at a New Site ...................................... 2-10
Upgrade Existing Interface Software .......................................... 2-11
Uninstall Interface Software ........................................................ 2-12
Connect the ECU(s) to the Sales Terminal(s)
Before you attach the cables connecting an ECU to a sales terminal, be sure any additional
hardware components have been installed in the ECUs and/or the sales terminal. If you're
connecting more than one ECU to a single sales terminal, see Install a 2 to 1 Switcher (for POS
terminals) or Install a Duplex Switcher (for ECR terminals) in this section.
To connect the ECU(s) to the sales terminal(s):
1. Unplug the ECU.
2. Connect one end of the interface cable to the appropriate
port on the back of the Infinity, 1544 Infinity or TAP 1 ECU
and tighten the cable hold-downs.
3. Connect the other end of the interface cable to the sales
terminal and tighten the cable hold-downs.
4. Program the sales terminal.
5. Repeat steps 1-4 for each ECU you're connecting to a sales
terminal.
Note
! Avoid sharp objects, heat sources, high moisture areas, and
anything that may damage the cable. Also, avoid high
current devices (transformers, dishwashers, blenders, etc.).
2-2 Infinity/Sales Terminal Interface Manual
See the Specifications section for the specific port to connect your sales terminal.
Infinity ECU front panel
A circuit board with a
pigtail must be added to a
TAP 1 ECU by Berg
engineers to provide a
connection for the sales
terminal.
1544 Infinity ECU back panel
Installation 2-3
Install a 2 to 1 Switcher (for POS terminals)
You can use a 2 to 1 switcher to connect two ECUs (TAP 1, Infinity or 1544 Infinity) to a single
sales terminal that uses serial communication. The switcher routes two serial communications
channels to one port. With additional switchers, you can connect 3 or more ECUs to a single sales
terminal. However, if you connect 3 or more ECUs that are heavily used, you may experience
noticeable delays between a pour request (button push) and the subsequent pour.
# To install a 2 to 1 switcher:
1. Unplug the ECUs and the sales terminal.
2. Install the 2 to 1 switcher (PN 8005736) within 15 ft of each
ECU.
3. Attach one end of a 15 ft adapter cable (PN8005735) to an
IN port on the switcher. Attach the other end to the J902 port
of an Infinity ECU, the POS pigtail of a TAP 1 ECU or the
J3B port of a 1544 Infinity ECU.
4. Attach another 15 ft adapter cable to the second IN port on
the switcher. Attach the other end to the J902 port of an
Infinity ECU, the POS pigtail of a TAP 1 ECU or the J3B
port of a 1544 Infinity ECU.
5. Attach the port adapter (PN 8005734) to the OUT port on
the switcher.
6. Attach one end of the sales terminal interface cable (ordered
from Berg or the sales terminal provider) to the port adapter.
Attach the other end to the sales terminal.
7. Plug in the ECUs and the sales terminal.
Notes
! The maximum distance from the sales terminal to any ECU
is 50 ft.
! The 2 to 1 switcher is a generic, off the shelf device which
Berg modifies to decrease switching delays. Since Berg
engineers do not control the origin or design of the switcher,
they can't precisely control the switching speed. If two pour
requests occur at the same time, one of them will be delayed
anywhere from a fraction of a second up to two seconds.
2-4 Infinity/Sales Terminal Interface Manual
Infinity ECU
TAP 1 ECU
The picture above shows a TAP 1 ECU and an Infinity
ECU connected via the switcher to an ECR terminal.
The switcher can also connect two TAP 1 ECUs or
two Infinity ECUs or two 1544 Infinity ECUs to a ECR
terminal.
Installation 2-5
Install a Duplex Switcher (for ECR terminals)
You can use a duplex switcher to connect two ECUs (TAP 1, Infinity or 1544 Infinity) to a single
sales terminal that uses parallel communication. The switcher routes two parallel
communications channels to one port. The limit is two ECUs connected to one sales terminal
using the duplex switcher (you can't cascade this switcher).
# To install a duplex switcher:
1. Unplug the ECUs and the sales terminal.
2. Install the duplex switcher (PN 8005753) within 6 ft of each
ECU.
3. Attach one end of a 6 ft molded cable (PN8004924) to an IN
port on the switcher. Attach the other end to the J903 port of
an Infinity ECU, the ECR pigtail of a TAP 1 ECU, or the
J5A port of a 1544 Infinity ECU.
4. Attach another 6 ft molded cable to the second IN port on
the switcher. Attach the other end to the J903 port of an
Infinity ECU, the ECR pigtail of a TAP 1 ECU, or the J5A
port of a 1544 Infinity ECU.
5. Attach the sales terminal interface cable (supplied by the
provider of the board installed in the sales terminal) to the
OUT port on the switcher.
6. Plug in the ECUs and the sales terminal.
Notes
! The maximum distance from the sales terminal to any ECU
is 50 ft.
! The duplex switcher connects one ECU to the sales terminal
for as long as it takes to send an entire drink code. Only after
it sends the entire packet of sales information does it switch
to the other ECU. The time needed to send a drink code is
dependent on the number of key presses in the code and the
timing requirements of the sales terminal.
! You must have TAP 1 EPROM version 1.09 or later to use
the duplex switcher.
2-6 Infinity/Sales Terminal Interface Manual
Infinity ECU
TAP 1 ECU
The picture above shows a TAP 1 ECU and an Infinity
ECU connected via the switcher to a POS terminal.
The switcher can also connect two TAP 1 ECUs or
two Infinity ECUs or two 1544 Infinity ECUs to a POS
terminal.
Installation 2-7
Install a TAP 1 Parallel ECR Multiplexer
You can use a multiplexer to connect the partitions of a TAP 1 ECU to multiple sales terminals
that use parallel communication. The limit is eight partitions connected to eight sales terminals
using the multiplexer.
# To install a multiplexer:
1. Unplug the TAP 1 ECU and the sales terminals.
2. Install the multiplexer (PN 8005764) within 6 ft of the TAP 1
ECU.
3. Attach one end of a 6 ft molded cable (PN8004924) to the
multiplexer. Attach the other end to the ECR pigtail of the
TAP 1 ECU.
4. Attach the sales terminal interface cable (supplied by the
provider of the boards installed in the sales terminals) from
each sales terminal to the multiplexer.
6. Plug in the ECUs and the sales terminal.
Notes
! The maximum distance from the TAP 1 ECU to the
multiplexer is 50 ft. The maximum distance from the
multiplexer to any sales terminal is 50 ft.
! In the event multiple requests reach the TAP 1 ECU at the
same time, there will be no delay. All taps will pour
immediately. During the pours, each PLU will be sent to the
appropriate sales terminal.
! You must have TAP 1 EPROM version 1.09 or later to use
the multiplexer.
! The TAP 1 ECU must be divided into partitions using
Infinity software to use the multiplexer.
2-8 Infinity/Sales Terminal Interface Manual
This could be a
1544 Infinity ECU
The picture above shows a TAP 1 ECU connected via the
multiplexer to eight ECR terminals. Note that one of the
multiplexer outputs is connected to the ECR terminal via a
parallel duplex switcher. This is not part of the multiplexer
package and is only shown as an example.
Installation 2-9
Install Interface Software at a New Site
Interface software is packaged with Infinity software on the Infinity installation CD. You don't
need to perform a separate installation for Interface; simply respond to the setup prompts
regarding Interface during your Infinity installation. Once installed, Interface menus become
part of Infinity's Manager program.
# To install Interface software at a new site:
1. Follow the steps outlined in Install Infinity Software at a
New Site in the Software Installation section of the Infinity
Installation/Service and User Manual.
Interface Type
"
In most cases, you can find
the name of your terminal,
software package or POS
system and select it. If you
find both the sales terminal
and the software package,
select the software package.
"
If you've installed a Postech
interface board on your POS
terminal, select Postech
board. If you've installed
some other interface board,
select Berg Parallel.
"
Finally, if none of the above
apply, select Berg Generic.
2. When prompted, select the appropriate POS/ECR Interface
Type for the sales terminal. This determines which driver file
is loaded to the ECUs for communication with the sales
terminal. (Click Help for a description of each type.)
3. Once the software is installed, run Manager to access
Interface menu items.
4. The first time you run Manager after installing Interface,
you'll have a chance to load drivers to the ECUs.
Click Yes to load drivers. This is just a convenient way to
automatically communicate with the ECUs and load the
drivers. You can still change your default options and
modifiers later and send any changes to the ECUs.
Click No if you prefer not to load the drivers at this time.
You can load them later using the Load Driver... menu item.
2-10 Infinity/Sales Terminal Interface Manual
Upgrade Existing Interface Software
You upgrade Interface software as part of an Infinity software upgrade. Upgrading is easy and
allows you to keep your currently defined options and modifiers.
# To upgrade existing Interface software:
1. Follow the steps outlined in Upgrade Existing Infinity
Software in the Software Installation section of the Infinity
Installation/Service and User Manual.
2. When prompted, select the appropriate POS/ECR Interface
Type for the sales terminal. This determines which driver
file is loaded to the ECUs for communication with the sales
terminal. (See Install Interface Software at a New Site in this
section for a description of each type.)
3. Once the software is installed, run Manager to access
Interface menu items.
4. The first time you run Manager after installing Interface,
you'll have a chance to load drivers to the ECUs.
Click Yes to load drivers. This is just a convenient way to
automatically communicate with the ECUs and load the
drivers. You can still change your default options and
modifiers later and send any changes to the ECUs.
Click No if you prefer not to load the drivers at this time.
You can load them later using the Load Driver... menu item.
Installation 2-11
Uninstall Interface Software
If you uninstall Infinity software, Interface software is automatically uninstalled also. See
Uninstall Infinity Software in the Software Basics section of the Infinity Installation/Service and
User Manual. If you want to remove Interface features from your Infinity software, perform this
task.
# To disable Interface:
1. Remove drivers from every ECU. See Remove a Driver in
the Drivers section.
2. Insert the Infinity CD in the CD drive. (Use the same CD
used to install Infinity or the serial numbers won't match.)
3. If the setup program doesn't automatically start, cllick Start.
Click Run. Type e:\setup (where e is the CD drive letter),
and click OK.
4. Follow the instructions on your screen. Click Next to
continue through the setup process or Back to return to a
previous screen. Click Cancel to stop the setup process.
5. Click Configure on the Setup Options screen.
6. Click Next to accept the path of the database. To select a
different path, type it in the entry field or click Browse.
7. Click Next to verify the operation. The Configuration
screen appears.
8. Click Features.
2-12 Infinity/Sales Terminal Interface Manual
9. Uncheck the Enable Interface field.
10. Click OK to save your entry and return to the
Configuration screen.
11. Click Finish to exit the Configuration screen.
12. Remove the CD from the CD drive.
The next time you run Manager, Interface will not apear in
the main menu.
Installation 2-13
SECTION
3
Drivers
The appropriate driver file must be downloaded to the ECUs if they are to
communicate with a sales terminal. The driver file gives the ECUs the necessary
format for sending sales information to a specific terminal. After you download
the driver to the ECUs in your stations and/or groups, it’s a good idea to test the
interface to verify correct drink information is passed to the sales terminal when
you pour drinks. To edit or download drivers or driver settings to a station or
group if password protection is enabled, you must have an Infinity access level
of 1 or 2.
About Options ................................................................................. 3-2
About Modifiers .............................................................................. 3-4
Enter Default Driver Settings (Options and Modifiers) ................. 3-6
Enter Non-Default Driver Settings (Options and Modifiers) ....... 3-10
Send Driver Settings (Options and Modifiers) to ECUs ............... 3-12
Load A Driver ............................................................................... 3-14
Driver Test..................................................................................... 3-16
Enable or Disable a Driver ............................................................ 3-17
Remove a Driver ........................................................................... 3-18
Show Driver Status ....................................................................... 3-19
About Options
You can customize the way specific pouring needs are met by selecting appropriate options.
These options alter the way communication occurs between the ECUs and the sales terminal. You
can establish default options for the system, and then change them for a particular station or
group if you need to. For help with entering options, see Enter Default Driver Settings (Options
and Modifiers) in this section.
Transaction Mode
This option (used only by NCR) requires the operator to be
signed in at the mainframe computer before Infinity can pour. In
most cases, Berg recommends not selecting transaction mode.
The sales terminal can better handle this option.
Wait For Release
Wait For Release means the ECU sends pour information to the
sales terminal and then waits for approval (or release) before
initiating a pour. (This communication occurs in hundredths of
seconds.) Waiting for release ensures the drink isn't poured
without ringing up at the sales terminal. ECR terminals do not
send an approval, so this feature is not available if you're using
an ECR compatible driver.
Pour Without Release
Pour without release lets the ECU pour a drink without waiting
for approval (or release) from the sales terminal. You may want
to select Pour Without Release if the sales terminal is slowing
down the pouring of drinks at a specific station or group. If you
select this option and communication errors occur between the
ECU and sales terminal, drinks may pour without being rung up
at the sales terminal.
Send After Pour
Send After Pour tells the ECU to pour a drink and then send
sales information to the sales terminal. You may want to select
this option so dispensers begin pouring immediately upon
pressing the dispenser button or tilting the bottle. This is
especially useful with ECR systems where it may take a second
or two to ring up the pour. Note that this option may affect the
handling of cancelled pours.
Timeout Value
For all POS drivers, Timeout Value is the maximum number of
seconds the ECU waits for sales terminal release of a drink code.
(If you select Pour Without Release or Send After Pour, the
timeout value becomes irrelevant for POS drivers.) Berg sets a
factory default timeout value for each driver. Leave this value set
at the default initially (typically 3 seconds). The ideal Timeout
Value may vary from sales terminal to sales terminal. If you set it
too low, drinks may ring at the sales terminal but never pour at
Infinity (the ECU gives up waiting for approval and abandons
the pour).
3-2 Infinity/Sales Terminal Interface Manual
Setting the Timeout Value lower will not speed up the pouring
of a drink after its request. It simply describes how long the
ECU waits for the sales terminal to respond. It does not dictate
how fast the sales terminal responds.
If you repeatedly have problems with drinks ringing at the sales
terminal but not pouring on Infinity, increase the Timeout Value.
This should solve the problem. If it doesn't, you might consider
using the Pour Without Release option.
Timeout Value and
the ECR Interface
If you're using an ECR compatible driver, the Timeout Value is a
calculated numerical code representing a particular combination
of the Key Press Time and Key Delay Time. (Key Press Time
controls how long the simulated key press lasts and Key Delay
Time is the interval between key presses.)
Use only the specific Timeout Values calculated by Berg. The
default Timeout Value of 25.70 should work for most sales
terminals, but you may be able to increase the speed with which
the sales terminal rings up drinks by using a lower value. To
determine an appropriate lower value use the following
procedure:
1.
Start with the first Timeout Value at the top of the
following table and test the interface.
Key Press Time (ms)
Key Delay Time (ms)
Time Out Value
100
100
25.70
90
90
23.13
80
80
20.56
70
70
17.99
60
60
15.42
50
50
12.85
40
40
10.28
30
30
7.71
20
20
5.14
2.
If pours ring correctly, go to the next Timeout Value
in the table and test the interface again. Repeat this
step until you reach a Timeout Value that no longer
rings correctly.
3.
Move back up the table 2 lines and use that Timeout
Value.
Drivers 3-3
About Modifiers
Modifiers distinguish one drink from another if separate PLUs are not used for this purpose. If
the sales terminal you selected at Interface installation doesn't use modifiers, the modifier fields
are disabled on the Driver Settings screen. (ECR terminals do not use modifiers). However, you
may still be using comp or cancel increments to the PLU if the sales terminal supports them. For
help with entering modifiers, see Enter Default Driver Settings (Options and Modifiers) in this
section.
Modifier Order
Bookends
The string of modifiers sent in a drink code to the sales terminal
must be arranged in a particular order. Some sales terminals
require the PLU first, or a size modifier first and price level
modifier second, and so on. Learn from the sales terminal
representative the order required by the sales terminal so you
can enter it correctly in Interface software. The Driver Settings
screen includes a Show Example button that can help you
double-check the modifier order. After you've added the
modifiers you want to the Current Modifier Order list, click
the Show Example button. You'll see an example string of sales
information using the modifiers in the order you've entered
them. Make sure that order matches the order required by the
sales terminal.
Bookends describe the codes that may be required by the sales
terminal to signal the beginning and/or end of a transaction or
PLU. For example, if the sales terminal requires a key press
before you ring up a drink and one after you've rung up the
drink, you'll need to enter the codes for those key presses as
Transaction Bookends. You don't have to include bookend
modifiers in the modifier order list, since their position in the
drink code is already defined.
Size and Price Level
Modifiers
If the sales terminal doesn't use separate PLUs to identify the
size and/or price level of a brand, you need to determine the size
and/or price level modifiers the sales terminal uses. Learn from
the sales terminal representative what the modifiers are.
Interface software accepts modifier codes from 1 to 255. You
can enter 2 codes for each modifier if necessary. You must
include the size and/or price level modifier in the Current
Modifier Order list before you can enter the modifiers.
Size Placekeeper for
Cocktails
If your sales terminal uses size modifiers, a number is sent to the
sales terminal in the drink code that defines the drink as small,
medium or large. Since a cocktail doesn't usually have a size
modifier, its drink code is shorter than that of other pours. If your
sales terminal requires all drink codes to be the same length, you
can tell Interface to insert a "placekeeper" in a cocktail drink
3-4 Infinity/Sales Terminal Interface Manual
code to make it the same length as other pours. If your sales
terminal can handle drink codes of variable length, don't use the
placekeeper. This avoids sending unnecessary information to the
sales terminal.
Comp and Cancel
Modifiers
Your sales terminal may use modifiers to identify comp or
canceled drinks. If so, find out what the modifiers are and the
order they appear in the drink code. You must include the comp
and/or cancel modifier in the Current Modifier Order List
before you can enter the modifiers.
Comp and Cancel
Increments (Add to PLU)
Your sales terminal may derive separate PLUs for comp or
canceled drinks using increments rather than identifying these
pours with modifiers. For example, using a comp increment of
1000 means all PLUs under 1000 are regular drinks and all PLUs
over 1000 are comp drinks. If you want to enter a comp or cancel
increment, do not include the comp or cancel modifier in the
Current Modifier Order list. Simply enter the increment in the
Add to PLU box under Comp Modifier or Cancel Modifier on
the Auxiliary Modifiers tab. If you define both comp and cancel
increments, they are both added to the base PLU of a canceled
comp drink.
Type Modifier
A type modifier may be required by your sales terminal to
distinguish a cocktail pour from a typical brand pour. If so, learn
what the modifiers are and the order they appear in the drink
code. You must include the type modifier in the Current
Modifier Order list before you can enter the modifiers.
Drivers 3-5
Enter Default Driver Settings (Options and
Modifiers)
Driver settings include options you can select for Interface's performance and any PLU
modifiers that may be required by the sales terminal. The driver settings available to you depend
on your type of driver. If you have questions about options or modifiers see About Options or
About Modifiers in this section. Once you've entered your options and modifiers, you can save
them as your default settings. Saving as defaults does not send the settings to the ECU(s).
# To enter default driver settings:
1. Run Manager.
2. Pull down the Interface menu and click Settings.....
Your Tabs May Look
Different
"
Depending on your driver, you
may not have access to tabs
for features not supported by
your sales terminal.
"
Some features you see may
not be supported by your
sales terminal.
"
Some features for your driver
may appear on the Options
tab if you don't see other
tabs.
NCR only
"
Select Transaction Mode
only if you want the bartender
to be signed in at an NCR
terminal's mainframe
computer before Infinity will
pour.
"
Enter the PLU Key modifier
required by your sales
terminal.
3-6 Infinity/Sales Terminal Interface Manual
3. Select a Pour Communication option. See About Options in
this section if you need help.
Com m unication Option
Wait For Release
Pour Without Release
Send After Pour
Effe ct
The ECU sends drink information to the
sales terminal and w aits for approval
(release) before pouring the drink.
The ECU sends drink information to the
sales terminal before pouring a drink, but
doesn't w ait for sales terminal approval to
start the pour.
The ECU pours the drink before sending
drink information to the sales terminal.
4. Enter a new Timeout Value only if you've already tested the
default one.
5. Click the Modifiers tab if your sales terminal requires any
PLU modifiers.
Load Defaults
"
Use this button to view the
default options and modifiers
for your driver type. If you
haven't saved any defaults,
the defaults displayed are
Berg's.
Show Example
"
Click this button after you've
completed the Current
Modifier Order list. You'll see
an example drink code using
the modifiers in the order
you've placed them. Make
sure the order of the
modifiers meets the
requirements of the sales
terminal.
6. Select a modifier from the Modifier List and click <Add to
move the modifier to the Current Modifier Order list.
The modifier is added to the list above PLU. If you want the
modifier after PLU, select the modifier and drag it to the
desired position or use the Up and Down buttons. Continue
adding modifiers to the Current Modifier Order list as
required by the sales terminal. Verify the modifiers appear in
the list in the correct order.
7. Enter any Transaction Bookends required by the sales
terminal. The Begin code signals the start of a transaction
and the End code completes the transaction.
8. Enter any PLU Bookends that signal the Beginning and
End of a PLU if the sales terminal requires them.
Drivers 3-7
9. Click the Size and Price Levels tab if the sales terminal
requires size or price level modifiers.
Two Valued Modifiers
"
Select this feature if the sales
terminal requires 2 codes for
each modifier.
Modifiers as
Hexadecimal
"
Select this feature if you want
to enter and view the modifier
codes in hexadecimal rather
than decimal format. This
doesn't change the codes—it
may be more convenient if the
sales terminal codes are
documented in hexadecimal.
"
Selecting this feature does not
affect increments added to the
PLU or the Timeout Value.
10. Type in the Price Level Modifiers and/or Size Modifiers.
Interface accepts modifiers from 1-255.
11. Select Size Placekeeper for Cocktails only if the sales
terminal requires it.
12. Click the Auxiliary Modifiers tab if the sales terminal
requires comp, cancel or type modifiers or increments.
13. Type in the Comp, Cancel and/or Type Modifiers.
Interface accepts modifiers from 1-255.
3-8 Infinity/Sales Terminal Interface Manual
Read ECUs
"
Use this button to view the
options and modifiers already
loaded to the ECUs in a
station or group.
14. If the sales terminal requires a PLU increment to signal
comp or cancel drinks instead of a modifier, enter the
increment in the Add to PLU box.
The increment plus the PLU should not exceed the PLU
limit for your driver (either 32,767 or 65,535). The comp or
cancel modifier should not be included in the Current
Modifier Order list if you're using comp or cancel
increments.
15. Click Save as Defaults to save your entries on all tabs as
your default settings.
OR
Manual Send
"
To send the driver settings on
the screen to a specific station
or group (rather than the
whole system) click Manual
Send....
Click OK to save your entries as your default setttings AND
send them to all ECUs that have a driver loaded (this doesn't
load the driver).
If you're defining default settings before you've loaded any
drivers, you don't need to send the settings to the ECUs from
this screen. When you load drivers to the ECUs, your default
settings are automatically loaded.
16. Click Close to exit the Driver Settings screen.
Note
! If you have a specific station or group that needs non-default
settings, see Enter Non-Default Driver Settings (Options and
Modifiers) in this section.
Drivers 3-9
Enter Non-Default Driver Settings (Options and
Modifiers)
You may have a specific station or group that needs settings other than your default settings. You
can enter the non-default settings and send them directly to the specific station or group without
affecting your default settings. Do not perform this operation while drinks are being poured.
# To enter non-default driver settings:
1. Run Manager.
2. Pull down the Interface menu and click Settings.....
Read ECUs
"
To view the settings currently
loaded at the station or group,
click Read ECUs....
3. Click Load Defaults if you want to view your default
settings on all tabs.
4. Enter the changes you want to make to your default settings.
If you need help, see About Options, About Modifiers or
Enter Default Driver Settings (Options and Modifiers) in
this section.
5. Click Manual Send.
3-10 Infinity/Sales Terminal Interface Manual
TAP 1 Partitions
"
You can't send different
settings to partition 1 and
partition 2 of the same TAP 1
ECU. Although you can select
a single partition when you
send settings, the settings will
be sent to all partitions of the
TAP 1 ECU.
6. Select the name of the Station or Group where you want to
send the settings you've entered.
7. Click OK. (Click Cancel to exit the send process.)
Wait while communication with the ECU(s) occurs.
8. Click Close to exit the Driver Settings screen.
Drivers 3-11
Send Driver Settings (Options and Modifiers) to
ECUs
Default driver settings are automatically sent to an ECU when a driver is loaded at the ECU for
the first time. Perform this task if you need to send non-default settings to a station or group. Do
not perform this operation while drinks are being poured.
# To send driver settings to ECUs:
1. Run Manager.
2. Pull down the Interface menu and click Settings.....
Read ECUs
"
To view the settings currently
loaded at the station or group,
click Read ECUs....
3. Enter the driver settings you want on all tabs. (Click Load
Defaults if you want to view your default settings.) If you
need help, see About Options, About Modifiers or Enter
Default Driver Settings (Options and Modifiers) in this
section. The entries you see on the screen for all tabs are the
ones that will be sent to the ECU(s).
4. Click Manual Send.
3-12 Infinity/Sales Terminal Interface Manual
TAP 1 Partitions
"
You can't send different
settings to partition 1 and
partition 2 of the same TAP 1
ECU. Although you can select
a single partition when you
send settings, the settings will
be sent to all partitions of the
TAP 1 ECU.
5. Select the name of the Station or Group where you want to
send the driver settings.
6. Click OK. (Click Cancel to exit the send process.)
Wait while communication with the ECU(s) occurs.
7. Click Close to exit the Driver Settings screen.
Drivers 3-13
Load a Driver
A driver is a computer file included with your Interface software that knows how to
communicate with the specific hardware of your sales terminal. Each sales terminal interface
requires a unique driver. You should have selected the appropriate driver for your sales terminal
when you installed Interface software. If you said Yes to the automatic loading of drivers (when
running Manager after installing Interface), you don’t need to perform this task. Do not perform
this task while drinks are being poured. If you’re installing drivers in your stations or groups for
the first time, test the driver. See Driver Test in this section.
# To load a driver:
1. Run Manager.
2. Pull down the Interface menu and click Load Driver.....
3. Select the name of the Station or Group where you want to
load a driver.
4. Click Continue....
A confirmation screen lists
the driver version, whether
a driver is currently loaded,
and whether default settings
(options and modifiers) for
the driver will be loaded.
5. Click OK to confirm loading of the driver. (Click Cancel to
cancel loading the driver.)
3-14 Infinity/Sales Terminal Interface Manual
Wait while communication with the ECU(s) occurs. A
message informs you when the procedure is complete.
6. Click Close to exit the Load Driver screen.
Note
! If you’re installing drivers in your stations or groups for the
first time, follow the test procedure outlined in Driver Test in
this section.
Drivers 3-15
Driver Test
When you load a driver to a station or group for the first time, it's a good idea to test each station
to verify correct drink information is ringing at the sales terminal.
# To test the driver at a station:
Pour W/O Release
1. Load the driver to the station. See Load a Driver in this
section.
It's a good idea to set the Pour
Communication option to Pour
Without Release for testing.
2. Pour drinks at the station. Verify the correct price is ringing
at the sales terminal for each drink poured.
You can then reset to Wait for
Release or Send After Pour
when you've finished testing.
3. If the station isn't ringing up drinks properly, try to determine
the source of the problem:
Is communication between the ECU and sales terminal
failing?
Check all hardware and cable connections.
Are drinks ringing at the sales terminal, but at the wrong
price?
POSTest
To check the output of the
driver, use the POSTest utility
found on the Infinity installation
disk.
Verify you've entered PLUs into Infinity that match the
PLUs at the sales terminal. Re-enter PLUs if necessary. If
your sales terminal uses modifiers, verify you've entered
modifiers that match the sales terminal's.
Run E:\tools\postest\setup.exe
(where E is your CD drive).
Are you having trouble with timing?
Check the default or station options you've set and adjust
them if necessary.
See the Troubleshooting section for detailed help with
specific problems.
4. Once the station is ringing up drinks correctly, save any
changes you've made to options and modifiers as your
defaults.
5. Install the driver to any remaining stations.
6. Test each station individually, making any necessary
changes. Make sure each station is pouring and ringing up
drinks correctly.
3-16 Infinity/Sales Terminal Interface Manual
Enable or Disable a Driver
Once you've loaded a driver to a station or group, you can disable it if you need to and then reenable it at any time. If you want to completely remove the driver from the ECUs in the station or
group, see Remove a Driver in this section.
# To enable or disable a driver:
1. Run Manager.
2. Pull down the Interface menu and click Enable/Disable.....
"
The Unknown field is selected
if Show Actual is not
selected. (The software has no
way of knowing the current
driver enable status unless it
communicates with the ECU.)
"
The Unknown field may also
be selected if the drivers in
some ECUs within a group
you've selected are enabled
and others are disabled.
3. Select the name of the Station or Group with drivers you
want to enable or disable.
4. Select Show Actual if you want the software to
communicate with the ECUs to determine their current
status. Wait while the communication occurs.
TAP 1 Partitions
"
If you change the driver
enable status of a TAP 1
partition, you are changing the
status for all partitions of that
ECU.
5. Select Enabled to enable the driver in the station or group
you have selected.
OR
Select Disabled to disable the driver in the station or group
you have selected.
6. Click Run to send the enable or disable message to the
ECUs.
Wait while the communication occurs. A message informs
you when the procedure is complete.
7. Click Cancel to exit the Enable/Disable Driver screen.
Drivers 3-17
Remove a Driver
When you remove a driver from a station or group, the ECUs in the station or group no longer
have the capacity to send drink information to the specific sales terminal associated with the
driver. Do not perform this operation while drinks are being poured.
# To remove a driver:
1. Run Manager.
2. Pull down the Interface menu and click Remove Driver.....
3. Select the name of the Station or Group with drivers you
want to remove.
4. Click Continue....
A confirmation screen lists
the currently loaded drivers
in the station or group.
5. Click OK to confirm unloading of the driver. (Click Cancel
to cancel unloading the driver.)
Wait while communication with the ECU(s) occurs. A
message informs you when the procedure is complete.
6. Click Close to exit the Remove Driver screen.
3-18 Infinity/Sales Terminal Interface Manual
Show Driver Status
Use this feature of Interface software to find out if drivers are loaded and enabled at the ECUs in
a station or group.
# To show driver status:
1. Run Manager.
2. Pull down the Interface menu and click Show Status.....
3. Select the name of the Station or Group whose driver status
you want to view.
4. Click Run.
Wait while communication with the ECU(s) occurs.
A status screen lists the
currently loaded drivers and
their enable status.
5. Click OK after viewing the driver status.
6. Click Close to exit the Show Status screen.
Drivers 3-19
SECTION
4
Example PLU & Modifier
Configurations
To help you become more familiar with the different ways sales terminal may be set
up to work with PLUs we’ve put together four examples. Each example illustrates a
different combination of PLUs and modifiers. Before you tackle your first Interface
installation, it might be helpful to study these examples.
Example #1: Size, Price Level and Brand PLUs ............................ 4-2
Example #2: Size and Brand PLUs ................................................. 4-4
Example #3: Price Level and Brand PLUs ..................................... 4-6
Example #4: Brand PLUs ............................................................... 4-8
Example #1: Size, Price Level and Brand PLUs
This example demonstrates what your worksheet looks like if you have unique PLUs for every drink. This
format has no need for size or price level modifiers because every size pour of every brand at every price
level has its own PLU. This example configuration works well for the Infogenesis, Micros 4700 or any other
sales terminal that does not use modifiers.
(If you’re using this format, but you also want to define an increment or some other modifier, see the other
examples in this section.)
PLU/Modifier
Order
Since we’re not sending any
modifiers in this example, we
don’t have to add anything to
the Current Modifier Order
list.
PLU
Brand Name: ________________
Price/Portion Category: !Standard !____________
Product Type: !Liquor !Wine
!Mixer
Price Level A
Siz e
Portion
Price
Price Level B
P LU
Siz e
1 (S)
1
2 (R)
3 (L)
Portion
Price
Price Level C
P LU
Siz e
1 (S)
4
1 (S)
7
2
2 (R)
5
2 (R)
8
3
3 (L)
6
3 (L)
9
!Use as default prices and portions for this product type
4-2 Infinity/Sales Terminal Interface Manual
Portion
Price
P LU
Leave zeros in the fields
you’re not using to define
modifiers.
Transfer the PLUs from the Getting Ready for Infinity Worksheet to the correct Prices and
Portions Setup screen using Manager software. Take care to enter each PLU in the correct space,
both on the worksheet and in Infinity.
Example PLU & Modifier Configurations 4-3
Example #2: Size and Brand PLUs
In this example, no distinction is made in the PLU for drinks at different price levels. A large, happy hour
whiskey has the same PLU as a large dinner whiskey. Since no distinction is made for price in the PLU, the
sales terminal receives that information in the form of a price level modifier. That means, in addition to
entering all your PLUs on the worksheet, you need to fill out the price level modifier boxes and determine if
the modifier should be sent before or after the PLU.
PLU/Modifier
Order
PLU Bookends
Begin
The PLU/Modifier Order list from
the worksheet provides the
sequence for the Current
Modifier Order list.
PLU
Price Level Modifier
Comp Modifier
End
40
You may or may not have Begin
and End PLU Bookends and a
Comp Modifier.
Comp Modifier
Setting just
one of these
two results
in variable
length
strings.
Price Level Modifier
Comp
Price level B has no modifier in
this case. (This results in
variable length strings.)
A
33
26
Paid
B
Add to
PLU
0
C
31
Brand Name: ________________
Price/Portion Category: !Standard !____________
Product Type: !Liquor !Wine
!Mixer
Price Level A
Siz e
Portion
Price
Price Level B
P LU
Siz e
1 (S)
1
2 (R)
3 (L)
Portion
Price
Price Level C
P LU
Siz e
1 (S)
1
1 (S)
1
2
2 (R)
2
2 (R)
2
3
3 (L)
3
3 (L)
3
!Use as default prices and portions for this product type
4-4 Infinity/Sales Terminal Interface Manual
Portion
Price
P LU
Leave zeros in the fields
you’re not using to define
modifiers.
Transfer the PLUs from the Getting Ready for Infinity Worksheet to the correct Prices and
Portions Setup screen using Manager software. Take care to enter each PLU in the correct space,
both on the worksheet and in Infinity.
Example PLU & Modifier Configurations 4-5
Example #3: Price Level and Brand PLUs
If your sales terminal does not distinguish small, regular and large pours with separate PLUs, but it does
distinguish price levels, use this example to fill out your worksheet. Note that in this configuration a small
dinner vodka has the same PLU as a large dinner vodka. That means you have to find out what size modifiers
the sales terminal uses to ring these drinks at different prices. Enter the PLUs in the correct spaces, fill out the
size modifier boxes and determine whether the size modifier goes before or after the PLU.
Size Modifier
Tap Size Modifier
1
1
88
PLU/Modifier
Order
91
2
2
89
3
The PLU/Modifier Order list from
the worksheet provides the
sequence for the Current
Modifier Order list.
PLU
Size Modifier
Cancel Modifier
92
We’ve entered Size Modifiers for
Infinity and TAP 1 dispensers.
(We’re not using the Alt Sizes
feature of TAP 1.)
3
90
93
4
94
Cancel Modifier
Transaction Bookends
Cancel
Begin
39
You may or may not have
Transaction Bookends and a
Cancel Modifier.
26
Regular
End
Add to
PLU
Brand Name: ________________
Price/Portion Category: !Standard !____________
Product Type: !Liquor !Wine
!Mixer
Price Level A
Siz e
Portion
Price
Price Level B
P LU
Siz e
1 (S)
1
2 (R)
3 (L)
Portion
Price
Price Level C
P LU
Siz e
1 (S)
2
1 (S)
3
1
2 (R)
2
2 (R)
3
1
3 (L)
2
3 (L)
3
!Use as default prices and portions for this product type
4-6 Infinity/Sales Terminal Interface Manual
Portion
Price
P LU
Leave zeros in the fields
you’re not using to define
modifiers.
Transfer the PLUs from the Getting Ready for Infinity Worksheet to the correct Prices and
Portions Setup screen using Manager software. Take care to enter each PLU in the correct space,
both on the worksheet and in Infinity.
Example PLU & Modifier Configurations 4-7
Example #4: Brand PLUs
This example is for sales terminals with a limited number of PLUs. Every brand has its own PLU, but no
distinction is made for size or price levels. Every brandy, no matter what size or price level, has the same
PLU. That means this terminal probably uses modifiers with every PLU to provide more information about
the pour. After you’ve entered the PLUs on the worksheet, find out what modifiers are used and fill out the
modifier boxes. Determine what order the modifiers take in the PLU/modifier string and enter the order in the
modifier order boxes.
PLU/Modifier
Order
Price Level Modifier
A
7
B
8
C
The PLU/Modifier Order list
from the worksheet provides
the sequence for the
Current Modifier Order
list.
Price Level Modifier
Size Modifier
PLU
Type Modifier
We’ve entered modifiers for
price levels, sizes and type
of drink in this case.
9
Size Modifier
Tap Size Modifier
1
1
2
10
Type Modifier
2
2
3
3
Brand
11
3
4
20
Cocktail
12
21
4
13
Brand Name: ________________
Price/Portion Category: !Standard !____________
Product Type: !Liquor !Wine
!Mixer
Price Level A
Siz e
Portion
Price
Price Level B
P LU
Siz e
1 (S)
1
2 (R)
3 (L)
Portion
Price
Price Level C
P LU
Siz e
1 (S)
1
1 (S)
1
1
2 (R)
1
2 (R)
1
1
3 (L)
1
3 (L)
1
!Use as default prices and portions for this product type
4-8 Infinity/Sales Terminal Interface Manual
Portion
Price
P LU
Leave zeros in the fields
you’re not using to define
modifiers.
You may or may not have
comp and cancel drink
increments.
Transfer the PLUs from the Getting Ready for Infinity Worksheet to the correct Prices and
Portions Setup screen using Manager software. Take care to enter each PLU in the correct space,
both on the worksheet and in Infinity.
Example PLU & Modifier Configurations 4-9
SECTION
5
Interface Specifications
Interface Specifications
When you install Infinity plus Interface software, you’ll see a list of all makes and models confirmed to be
supported. However, Berg does not control these companies’ decisions nor are we always even aware of
them. Firmware and hardware may change without notice. You are cautioned and encouraged to verify the
information with the sales terminal provider and with Berg before ordering. The following are specifications
for makes and models which have unique requirements. For any parallel/ ECR interface not listed, use the
Berg Parallel ECR interface. For any POS interface not listed, use the Berg Generic POS interface. For
the latest set of interfaces supported see our website: www.berg-controls.com/interface.html.
POS Interfaces
ECU Connections
Infinity ECU/POS connection:
TAP 1 ECU/POS connection:
1544 ECU/POS connection:
RS232C J902
Additional interface card required
POS
BERG Generic POS Interface
Interface cable:
Sales terminal connection:
Berg Sales Terminal Interface Cable (PN 8007993) or
supplied by sales terminal manufacturer
Depends on sales terminal
Casio QT-2000 Series POS Interface
Interface cable:
Berg Interface Cable Assy (PN 8007969)
Casio QT-7000 Series POS Interface
Interface cable:
Sales terminal connection:
Berg Sales Terminal Interface Cable (PN 8007993)
Contact Casio. Supports pre-checking. C.A.R.S.
software 3.3 or later.
Comtrex PCS 5000, Super Sprint POS Interface
Digital Dining POS Interface
Interface cable:
Berg Sales Terminal Interface Cable (PN 8007993)
Ibertech Aloha POS Interface
Interface cable:
Sales terminal connection:
Use standard null modem cable
RJ-45 connector
Infogenesis 4683 POS Interface
Interface cable:
Sales terminal connection:
Berg Infogenesis Interface Cable Assy (PN 8007985)
25 ft. (7.6m)
Personality Card
25-pin connector
Infogenesis 4695 Touchscreen POS Interface
Interface cable:
Sales terminal connection:
5-2 Infinity/Sales Terminal Interface Manual
Berg Sales Terminal Interface Cable (PN 8007993)
25 ft. (7.6m)
Personality Card
9-pin connector
PLU numbers 1-255 only
Micros 2700 POS Interface
Interface cable:
Sales terminal connection:
Berg Micros 4700 Interface Cable Assy (PN 8007986)
25 ft. (7.6m), one per station
Contact Micros
Micros 3700, 9700 POS Interface
Interface cable:
Sales terminal connection:
Berg Sales Terminal Interface Cable (PN 8007993)
25 ft. (7.6m), one per station
Contact Micros
Micros 4700 POS Interface
Interface cable:
Sales terminal connection:
Berg Micros 4700 Interface Cable Assy (PN 8007986)
25 ft. (7.6m), one per station
UWS2 or UWS 3 terminal
Liquor Dispenser System Interface running
at 2400 baud (not North American)
Micros 8700 POS Interface
Interface cable:
Sales terminal connection:
Berg Sales Terminal Interface Cable (PN 8007993)
25 ft. (7.6m), one per station
North American Liquor Dispenser System running
at 9600 baud
Microsale POS Interface
Interface cable:
Sales terminal connection:
Berg Sales Terminal Interface Cable (PN 8007993)
25 ft. (7.6m)
Contact Microsale. Supports pre-checking. Software
version 3.3 or later.
NCR 2760 POS Interface
Interface cable:
Sales terminal connection:
Berg NCR 2760 Interface Cable Assy (PN 8007991)
25 ft. (7.6m)
Interface hardware configured as a beverage dispenser
running at 2400 baud, no parity, one stop bit
NCR 9-pin ASYNC cable (NCR ID 1139-C002-0280)
Panasonic 7500 Plus, 7700 Plus POS Interface
Interface cable:
Sales terminal connection:
Supplied by sales terminal manufacturer
Use cable to 8-pin modular port supplied by Panasonic
PDQ Restaurant Systems POS Interface
Pixel Point POS Interface
Interface cable:
Sales terminal connection:
Berg Sales Terminal Interface Cable (PN 8007993)
25 ft. (7.6m)
Contact Pixel Point. Supports pre-checking.
Posera Maitre D’ POS Interface
RDC POSitouch POS Interface
Interface cable:
Sales terminal connection:
Berg Sales Terminal Interface Cable (PN 8007993)
25 ft. (7.6m)
Contact RDC. Requires special PLU bookend setup.
Interface Specifications 5-3
Remanco POS Interface
Interface cable:
Sales terminal connection:
Berg Remanco Interface Cable Assy (PN 8007987)
25 ft. (7.6m)
Port 2 of a 1460A terminal running Series-L
(Release 10) or Series-M (Release 11) software
Remanco Vision POS Interface
Interface cable:
Sales terminal connection:
Berg Sales Terminal Interface Cable (PN 8007993)
25 ft. (7.6m)
25 pin CBDS port (Computerized Beverage
Dispensing System). Supports pre-checking.
Royal Alpha 587-CX, CMX 482 Plus POS Interface
Samsung 650/6500/6540 POS Interface
Interface cable:
Sales terminal connection:
Berg Samsung 6500/6540 Interface Cable Assy
(PN 8007996)
9-pin female connector
Samsung 1000 POS Interface
Interface cable:
Sales terminal connection:
Berg Interface Cable Assy (PN 8007970)
9-pin female connector
SeQL POS Interface
Interface cable:
Sales terminal connection:
Berg Sales Terminal Interface Cable (PN 8007993)
25 ft. (7.6m)
Contact SeQL. Supports pre-checking.
Sharp 4500 Series, 880, 5700 with Maitre D’ POS Interface
Squirrel POS Interface
Interface cable:
Sales terminal connection:
Berg Sales Terminal Interface Cable (PN 8007993)
Uses special adapter from Squirrel with standard 9-pin
to 9-pin cable. Supports pre-checking.
System 3 POS Interface
Interface cable:
Sales terminal connection:
Berg Sales Terminal Interface Cable (PN 8007993)
25 ft. (7.6m)
Contact System 3.
TEC America FS 3600 POS Interface
Interface cable:
Sales terminal connection:
Berg Sales Terminal Interface Cable (PN 8007993)
25 ft. (7.6m)
Contact TEC America.
Trim-POS Flashpoint POS Interface
Interface cable:
Sales terminal connection:
5-4 Infinity/Sales Terminal Interface Manual
Cable supplied by Trim-POS
Contact Trim-POS. Supports pre-checking.
ECR Interfaces
ECU Connections
Infinity ECU/ECR connection:
TAP 1 ECU/POS connection:
1544 ECU/POS connection:
PARALLEL J903
Additional interface card required
ECR
Berg Parallel ECR Interface
Interface cable:
Sales terminal connection:
Supplied by interface board manufacturer
contact Postech, Inc. (608) 271-0658
Depends on sales terminal
Casio TK5100, TK-6000, PCR-365 ECR Interface
Micros 2000 Series 400395 ECR Interface
NCR 1101 ECR Interface
Omron RS 3010, RS4841/4341, RS4541 ECR Interface
Panasonic JS-5000 ECR Interface
Postech, Inc. ECR Interface
Royal Alpha 587 ECR Interface
Samsung 240, 550, 4900, 4915, 4940, 5100, 5140 ECR Interface
Sharp ER-3220, ER-3310, ER-4230M, ER-A330 ECR Interface
(cont.) Sharp ER-A460S, ER-A470, ER-A550S, ER-A570, ER-A610 ECR Interface
TEC America CRS 3000, FS 1450-1, FS 1650, MA 1350, ECR Interface
(cont.) TEC America MA 1350-F, MA1400, MA 1450-1, MA 516-100 ECR Interface
Uniwell UX-43F ECR Interface
Supported EPROMs
Infinity EPROM:
TAP 1 EPROM:
1544 EPROM:
2.13 or later*
1.08 or later
3.00 or later
*There are several features of Interface software which require an Infinity EPROM of 2.15 or later:
Options
! Send After Pour
If you attempt to use these features with an
! Size Placekeeper on Cocktails
Infinity EPROM Version 2.13 or earlier, you
may get warning messages at the bottom of
Modifiers
the screen telling you changes you made were
! Comp drinks (with modifier or PLU
ignored. This simply indicates you don’t have
increment)
an Infinity EPROM that can utilize that
! Type of drink (normal brand pour or
particular feature.
cocktail)
! Tray total (may also require hardware
modification or extra hardware)
Interface Specifications 5-5
SECTION
6
Troubleshooting
Drinks ring at the sales terminal without pouring
# Is the Timeout Value set too low?
# Is the sales terminal sending ACK?
Drinks ring at the wrong price
# Do the PLUs assigned to the Berg ECU brands match the
PLUs at the sales terminal?
# Do the modifiers entered as driver settings for the Berg
ECUs match the modifiers used at the sales terminal?
# Try manually entering PLUs at the sales terminal.
Drinks won't ring at the sales terminal
POSTest
To check the output of the
driver, use the POSTest utility
found on the Infinity installation
disk.
Run E:\tools\postest\setup.exe
(where E is your CD drive).
# Are all cables securely connected between the ECU and the
sales terminal?
# Have you disabled the Interface software?
# Have you enabled Pour Without Release and there is no
check in the terminal or the terminal is busy?
I get an error message that doesn't help
# Press Alt + D (Diagnostics) for a popup window with
additional information. Record this information and call
Berg for assistance.
I get an error message that says my access level is denied
# Is your access level entered correctly in Infinity software?
6-2 Infinity/Sales Terminal Interface Manual
Index
Symbols
2 to 1 switcher
description 1-8
install 2-4
A
send to ECUs 3-12
Duplex switcher
description 1-8
install 2-6
E
Auto switchers
description 1-8
install 2 to 1 switcher 2-4
install duplex switcher 2-6
install TAP 1 parallel ECR multiplexer 2-8
ECU
connect to sales terminal 2-2
definition 1-2
send driver settings to 3-12
Enable a driver 3-17
Example configurations 4-2
B
G
Begin and end PLU bookends
how to enter on worksheet 1-10
Begin and end transaction bookends
how to enter on worksheet 1-10
Berg Generic Interface
specifications 5-2
Bookends 3-4
Group
definition 1-3
H
Hardware
definition 1-2
gather information 1-6
C
Cables
ordering information 1-6
Cancel increment
how to enter on worksheet 1-10
Canceled drink modifier
how to enter on worksheet 1-10
Complimentary drink increment
how to enter on worksheet 1-10
Complimentary drink modifier
how to enter on worksheet 1-10
D
Disable a driver 3-17
Driver
definition 1-2
enable/disable 3-17
load to ECUs 3-14
remove from ECUs 3-18
show status 3-19
test 3-16
Driver settings
enter default 3-6
enter non-default 3-10
Index-2 Infinity/Sales Terminal Interface Manual
I
Increments 3-5
Infinity software
definition 1-2
Infogenesis Interface
specifications 5-2
Installation
2 to 1 switcher 2-4
connect ECU(s) to sales terminal(s) 2-2
duplex switcher 2-6
Interface software 2-10
TAP 1 parallel ECR multiplexer 2-8
upgrade Interface software 2-11
Installation game plan/checklist 1-4
Interface software
definition 1-2
how to uninstall 2-12
install at a new site 2-10
upgrade 2-11
L
Load a driver 3-14
M
R
Micros 4700 Interface
specifications 5-2
Micros 8700 Interface
specifications 5-3
Modifier
definition 1-3
Modifier order 3-4
gather information about 1-10
how to enter on worksheet 1-10
Modifier Worksheet
instructions for 1-11
Modifiers
description of each 3-4
enter default 3-6
enter non-default 3-10
gather information about 1-10
send to ECUs 3-12
Multiplexer. See TAP 1 parallel multiplexer
Remanco Interface
specifications 5-3
Remove a driver 3-18
S
NLU 1-3
Sales terminal
connect to ECU 2-2
definition 1-2
Send after pour 3-2
Serial communication
install 2 to 1 switcher 2-4
Show driver status 3-19
Size modifiers
how to enter on worksheet 1-10
Size placekeeper for cocktails 3-4
Software
how to uninstall 2-12
install at new site 2-10
upgrade at existing site 2-11
Station
definition 1-3
O
T
Options
definition 1-3
description of each 3-2
enter default 3-6
enter non-default 3-10
send to ECUs 3-12
TAP 1 parallel ECR multiplexer
install 2-8
TAP 1 parallel multiplexer
description 1-9
Timeout value 3-2
Tools 1-4
Transaction mode 3-2
Troubleshooting 6-1
Type modifier 3-5
how to enter on worksheet 1-10
N
P
Parallel communication
install duplex switcher 2-6
Parallel Interface
specifications 5-4
PLU
definition 1-3
PLU and Modifier Worksheet
example configurations 4-2
PLUs
assign to brands and cocktails 1-12
gather information about 1-10
Pour without release 3-2
Price level modifiers
how to enter on worksheet 1-10
Price levels 1-12
W
Wait for release 3-2
Index-3