1
ZCP 7.0 (build 28890)
Plataforma de
Colaboração Zarafa
Manual do Administrador
Plataforma de Colaboração Zarafa
ZCP 7.0 (build 28890) Plataforma de Colaboração Zarafa
Manual do Administrador
Edição 7.0
Copyright © 2011 Zarafa BV.
The text of and illustrations in this document are licensed by Zarafa BV under a Creative Commons
Attribution–Share Alike 3.0 Unported license ("CC-BY-SA"). An explanation of CC-BY-SA is available
4
at the creativecommons.org website . In accordance with CC-BY-SA, if you distribute this document or
an adaptation of it, you must provide the URL for the original version.
All trademarks are the property of their respective owners.
Disclaimer: Although all documentation is written and compiled with care, Zarafa is not responsible for
direct actions or consequences derived from using this documentation, including unclear instructions
or missing information not contained in these documents.
The Zarafa Collaboration Platform (ZCP) combines the usability of Outlook with the stability and
flexibility of a Linux server. It features a rich web-interface, the Zarafa WebAccess, and provides
brilliant integration options with all sorts of clients including all most popular mobile platforms.
1
Most components of ZCP are open source, licensed under the AGPLv3 , can therefore be
2
downloaded freely as ZCP's Community Edition .
Several closed source components exist, most notably:
• the Zarafa Windows Client providing Outlook integration,
• the Zarafa BES Integration providing Blackberry Enterprise Server connectivity,
• the Zarafa ADS Plugin providing Active Directory integration, and
• the Zarafa Backup Tools.
These components, together with several advanced features for large setups and hosters, are only
3
available in combination with a support contract as part of ZCP's Commercial Editions .
Alternatively there is a wide selection of hosted ZCP offerings available.
This document, the Administrator Manual, describes how to install, upgrade, configure and maintain
ZCP on your Linux server. In addition various advanced configurations and integration options are
discussed.
4
http://creativecommons.org/licenses/by-sa/3.0/
http://www.gnu.org/licenses/agpl-3.0.html
2
http://www.zarafa.com/content/community
3
http://www.zarafa.com/content/editions
1
1. Introduction
1.1. Intended Audience .......................................................................................................
1.2. Architecture ..................................................................................................................
1.3. Components ................................................................................................................
1.4. Protocols and Connections ...........................................................................................
1.4.1. SOAP ...............................................................................................................
1.4.2. Secure HTTP (HTTPS) ......................................................................................
1.5. ZCP Editions and Licensing ..........................................................................................
1.5.1. The evaluation subscription ................................................................................
1.5.2. The ZCP Community Edition ..............................................................................
1.5.3. Commercial Editions of ZCP ..............................................................................
1.5.4. Active and non-active users ...............................................................................
1
1
1
2
4
4
4
4
4
4
5
5
2. Installing
7
2.1. System Requirements .................................................................................................. 7
2.1.1. Hardware Recommendations ............................................................................. 7
2.1.2. Supported Platforms .......................................................................................... 7
2.1.3. Dependencies ................................................................................................... 8
2.2. Installation ................................................................................................................... 9
2.2.1. Installing ZCP with a Package Manager ............................................................ 10
2.2.2. Installing with the Install Script ......................................................................... 10
2.2.3. Manually Installing Packages ............................................................................ 11
2.3. Troubleshooting Installation Issues .............................................................................. 12
2.3.1. Server processes ............................................................................................. 12
2.3.2. WebAccess ..................................................................................................... 12
3. Upgrading
3.1. Preparing ...................................................................................................................
3.2. Creating backups .......................................................................................................
3.3. ZCP7 dependencies ...................................................................................................
3.4. Performing the Upgrade on RPM based distributions ....................................................
3.5. Performing the Upgrade on Debian based distributions .................................................
3.5.1. Pre 6.40 upgrade steps ...................................................................................
3.5.2. From 6.40 to 7.0.0 and higher ..........................................................................
3.6. Finalizing the upgrade ................................................................................................
15
15
15
16
16
17
18
19
20
4. Configure ZCP Components
4.1. Configure the Zarafa Server ........................................................................................
4.2. Configure language on RPM based distributions ..........................................................
4.3. Configure language on Debian based distributions .......................................................
4.4. User Authentication ....................................................................................................
4.4.1. The DB Authentication Plugin ...........................................................................
4.4.2. The Unix Authentication Plugin .........................................................................
4.4.3. The LDAP Authentication Plugin .......................................................................
4.5. Autoresponder ............................................................................................................
4.6. Storing attachments outside the database ....................................................................
4.7. SSL connections and certificates .................................................................................
4.8. Configure the License Manager ..................................................................................
4.9. Configure the Zarafa Spooler ......................................................................................
4.9.1. Configuration ...................................................................................................
4.10. Configure Zarafa Caldav ...........................................................................................
4.10.1. SSL/TLS ........................................................................................................
4.10.2. Calendar access ............................................................................................
4.11. Configure Zarafa Gateway (IMAP and POP3) .............................................................
4.11.1. SSL/TLS ........................................................................................................
21
21
22
22
23
23
23
24
24
25
26
28
28
29
29
30
31
32
34
iii
Plataforma de Colaboração Zarafa
4.11.2. Important notes ..............................................................................................
4.12. Configure Zarafa Quota Manager ..............................................................................
4.12.1. Setup server-wide quota ................................................................................
4.12.2. Setup quota per user .....................................................................................
4.12.3. Monitoring for quota exceeding .......................................................................
4.12.4. Quota warning templates ................................................................................
4.13. Configure Zarafa Indexer ..........................................................................................
4.13.1. Enabling indexing service ...............................................................................
4.13.2. Users, companies and servers .......................................................................
4.13.3. Indexer configuration ......................................................................................
4.13.4. CLucene configuration ...................................................................................
4.13.5. Attachments ..................................................................................................
34
34
34
34
35
35
36
36
36
37
38
39
5. Configure 3rd Party Components
5.1. Configure the Webserver ............................................................................................
5.1.1. Configure PHP ................................................................................................
5.1.2. Configure Apache ............................................................................................
5.1.3. Apache as a HTTP Proxy ................................................................................
5.2. Configure ZCP OpenLDAP integration .........................................................................
5.2.1. Configuring OpenLDAP to use Zarafa schemas .................................................
5.2.2. Configuring ZCP for OpenLDAP .......................................................................
5.2.3. User configuration ............................................................................................
5.2.4. Group configuration .........................................................................................
5.2.5. Addresslist configuration ..................................................................................
5.2.6. Testing LDAP configuration ..............................................................................
5.3. Configure ZCP Active Directory integration ..................................................................
5.3.1. Installing the Zarafa ADS Plugin and schema files .............................................
5.3.2. Configuring ZCP for ADS .................................................................................
5.3.3. User configuration ............................................................................................
5.3.4. Group configuration .........................................................................................
5.3.5. Addresslist configuration ..................................................................................
5.3.6. Testing Active Directory configuration ................................................................
5.4. ZCP Postfix integration ...............................................................................................
5.4.1. Configure ZCP Postfix integration with OpenLDAP .............................................
5.4.2. Configure ZCP Postfix integration with Active Directory ......................................
5.4.3. Configure ZCP Postfix integration with virtual users ...........................................
5.5. Configure Z-Push (Remote ActiveSync for Mobile Devices) ...........................................
5.5.1. Compatibility ....................................................................................................
5.5.2. Security ...........................................................................................................
5.5.3. Installation .......................................................................................................
5.5.4. Mobile Device Management .............................................................................
5.5.5. Upgrade ..........................................................................................................
5.5.6. Troubleshooting ...............................................................................................
41
41
41
41
42
43
43
43
44
45
45
46
47
47
49
49
50
51
51
52
52
53
55
57
57
57
57
59
59
59
6. Advanced Configurations
6.1. Running ZCP components beyond localhost ................................................................
6.2. Multi-tenancy configurations ........................................................................................
6.2.1. Support user plugins ........................................................................................
6.2.2. Configuring the server ......................................................................................
6.2.3. Managing tenant (company) spaces ..................................................................
6.2.4. Managing users and groups .............................................................................
6.2.5. Quota levels ....................................................................................................
6.3. Multi-server setup .......................................................................................................
6.3.1. Introduction .....................................................................................................
6.3.2. Prepare / setup the LDAP server for multi-server setup ......................................
61
61
62
62
62
65
65
66
67
67
68
iv
6.3.3. Configuring the servers ....................................................................................
6.3.4. Creating SSL certificates ..................................................................................
Zarafa Windows Client Updater ...................................................................................
6.4.1. Server-side configuration ..................................................................................
6.4.2. Client-side configuration ...................................................................................
6.4.3. MSI Options ....................................................................................................
Running ZCP Services with regular user privileges .......................................................
Single Instance Attachment Storage ............................................................................
6.6.1. Single Instance Attachment Storage and LMTP .................................................
Single Sign On with ZCP ............................................................................................
6.7.1. NTLM SSO with ADS ......................................................................................
6.7.2. NTLM SSO with Samba ...................................................................................
6.7.3. SSO with Kerberos ..........................................................................................
6.7.4. Up and running ...............................................................................................
Tracking messages with Zarafa Archiver ......................................................................
6.8.1. Archive on delivery ..........................................................................................
6.8.2. Archive on send ..............................................................................................
70
70
73
74
74
76
77
78
78
78
79
81
81
85
85
85
85
7. Managing ZCP Services
7.1. Starting the services ...................................................................................................
7.1.1. Stopping the services ......................................................................................
7.1.2. Reloading service configuration ........................................................................
7.2. Logging options ..........................................................................................................
7.3. Security logging ..........................................................................................................
7.3.1. Logging items ..................................................................................................
7.3.2. Configuration ...................................................................................................
7.4. Zarafa statistics monitoring .........................................................................................
7.5. Soft Delete system .....................................................................................................
87
87
87
88
88
88
89
91
92
92
6.4.
6.5.
6.6.
6.7.
6.8.
8. User Management
95
8.1. Public folder ............................................................................................................... 95
8.2. General usage of Zarafa-admin tool ............................................................................ 95
8.3. Users management with DB plugin .............................................................................. 97
8.3.1. Creating users with DB plugin .......................................................................... 97
8.3.2. Non-active users .............................................................................................. 97
8.3.3. Updating user information with DB plugin .......................................................... 98
8.3.4. Deleting users with DB plugin ........................................................................... 98
8.3.5. Configuring ‘Send as’ permissions .................................................................... 98
8.3.6. Groups ............................................................................................................ 99
8.4. Users management with UNIX plugin ........................................................................ 100
8.4.1. Creating users with Unix plugin ...................................................................... 100
8.4.2. Non-active users ............................................................................................ 100
8.4.3. Updating user information with Unix plugin ...................................................... 100
8.4.4. Deleting users with Unix plugin ....................................................................... 101
8.4.5. Configuring ‘Send as’ permissions .................................................................. 101
8.4.6. Groups with Unix plugin ................................................................................. 102
8.5. User Management with LDAP or Active Directory ....................................................... 102
8.5.1. The Zarafa user synchronization principle ........................................................ 103
8.5.2. User management from ADS .......................................................................... 105
8.5.3. User management from OpenLDAP ................................................................ 109
8.6. LDAP Condition examples ........................................................................................ 111
8.7. Zarafa Feature management ..................................................................................... 112
8.7.1. Globally enabling features .............................................................................. 112
8.7.2. Per-user en- or disabling features ................................................................... 112
8.8. Resource configuration ............................................................................................. 113
v
Plataforma de Colaboração Zarafa
8.9. Mailbox Storage Relocator ........................................................................................
8.9.1. Prerequisites ..................................................................................................
8.9.2. Invokation ......................................................................................................
8.9.3. Updating LDAP/ADS ......................................................................................
8.9.4. Configuration .................................................................................................
114
115
115
115
115
9. Performance Tuning
9.1. Hardware Considerations ..........................................................................................
9.1.1. Memory usage ...............................................................................................
9.1.2. Hardware considerations ................................................................................
9.1.3. More Memory is More Speed .........................................................................
9.1.4. RAID 1/10 is faster than RAID 5 .....................................................................
9.1.5. High rotation speed (RPMs) for better database performance ............................
9.1.6. Hardware RAID .............................................................................................
9.2. Memory Usage setup ................................................................................................
9.2.1. Zarafa’s Cell Cache (cache_cell_size) .......................................................
9.2.2. Zarafa’s object cache (cache_object_size) ................................................
9.2.3. Zarafa’s indexedobject cache (cache_indexedobject_size) .......................
9.2.4. MySQL innodb_buffer_pool_size ...........................................................
9.2.5. MySQL innodb_log_file_size .................................................................
9.2.6. MySQL innodb_log_buffer_size .............................................................
9.2.7. MySQL query_cache_size .........................................................................
9.3. Setup of modules on different servers ........................................................................
119
119
119
119
119
120
120
120
120
121
121
121
121
121
121
122
122
10. Backup & Restore
10.1. Softdelete cache .....................................................................................................
10.2. Full database dump ................................................................................................
10.2.1. SQL dump through mysqldump .....................................................................
10.2.2. Binary data dump via LVM Snapshotting .......................................................
10.2.3. Attachments backup .....................................................................................
10.3. Brick-level backups .................................................................................................
10.3.1. Backup format .............................................................................................
10.3.2. Backup process ...........................................................................................
10.3.3. Restore process ...........................................................................................
123
123
123
124
124
124
124
125
125
126
11. BlackBerry Enterprise Server
11.1. Prerequisites ...........................................................................................................
11.1.1. Software ......................................................................................................
11.1.2. Authentication Preparation ............................................................................
11.2. Installation steps .....................................................................................................
11.3. BES Errors .............................................................................................................
129
129
129
129
130
131
12. Appendix A; Pre-5.2x upgrade strategies
12.1. Database upgrades from 4.1 or 4.2 .........................................................................
12.2. Upgrades from 5.0 to 5.1x and up ...........................................................................
12.3. Important changes since 4.x and 5.x ........................................................................
133
133
134
134
13. Appendix B; LDAP attribute description
135
vi
Introduction
The Zarafa Collaboration Platform (ZCP) is an open source software suite capable of replacing
Microsoft Exchange. It’s architecture is very modular, makes use of standards wherever possible, and
integrates with common open source components.
This document explains how to perform the most common administrative tasks with ZCP.
Importante
Although we, Zarafa, try our best to keep the information in this manual as accurate as possible,
we withold the right to modify this information at any time, without prior notice.
1.1. Intended Audience
This manual is intended for system administrators responsible for installing, maintaining, and
supporting the ZCP deployment.
Readers of this manual will benefit from prior experience with:
• Linux system administration
• Setting up MTA’s (we use Postfix in this manual)
• LDAP servers like OpenLDAP or Microsoft Active Directory
• Managing a MySQL installation
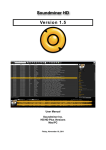
1.2. Architecture
In accord with the UNIX philosophy, ZCP consists of components that each take care of a well
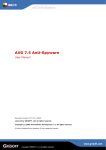
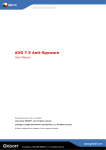
defined task. See Figura 1.1, “Zarafa Collaboration Suite Architecture Diagram” which describes
the relationships between the components and the protocols used. This diagram describes a simple
setup as used by most of our customers. Only the most commonly used components are shown in the
diagram.
The top part of the diagram shows the clients: software appliances by which users access their data.
Some of these appliances are desktop applications, some are mobile applications.
In between “The Internet” and the “Zarafa Server”, the infrastructure components of Zarafa (blue) and
some common infrastructure components (grey) can be found. These components are needed to
facilitate communication between the Zarafa Server and various clients. Microsoft Outlook does not
need any special infrastructure, but communicates directly with the Zarafa Server using the Zarafa
Windows Client.
The Zarafa Server is basically serving MAPI calls, while storing data in a MySQL database. For user
authentication several methods are available (and discussed in this document), most common are
servers that implement LDAP (e.g.: OpenLDAP, or Microsoft Active Directory).
The next section briefly describes each of ZCP’s components.
1
Capítulo 1. Introduction
Figura 1.1. Zarafa Collaboration Suite Architecture Diagram
1.3. Components
Installations of the Zarafa Collaboration Platform (ZCP) may consist of the following components:
2
Components
• Zarafa Server (zarafa-server) — The server process accepts connections for all clients
through SOAP (HTTP), and stores the data in an SQL database.
• Zarafa License Manager (zarafa-licensed) — The licensed process checks which features
will be available dependent on the license chosen for the Community, Standard, Professional or
Enterprise edition.
• Zarafa Windows Client — The Zarafa client provides access to Outlook through an interface
known as MAPI. The connections with the server are handled by SOAP.
• Zarafa WebAccess (zarafa-webaccess) — A full featured web interface (with an Outlook look
and feel) that enables users to collaborate from any computer with an internet connection.
• Zarafa Delivery Agent and Zarafa Spooler (zarafa-dagent, zarafa-spooler) — The tools
which serve the email communication with the outside world. The dagent delivers mail from the Mail
Transport Agent (MTA) to a Zarafa user. The spooler sends mail waiting in the outgoing queue to the
specified MTA.
• Zarafa Admin (zarafa-admin) — The command line administration tool is used to manage
users, user information and groups.
• Zarafa Gateway (zarafa-gateway) — Optional service to provide POP3 and IMAP access to
Zarafa users.
• Zarafa Monitor (zarafa-monitor) — Service which monitors user stores for quota exceeds.
• Zarafa Caldav (zarafa-caldav) — Optional service that provides iCal and CalDAV support.
CalDAV is recommended due to speed and less data transfer.
• Zarafa Backup Tools (zarafa-backup, zarafa-restore) — A brick-level backup tools to
create simple backups of stores and to restore (part of) those backups on a later point in time. This
part is only available in Zarafa commercial editions.
• Zarafa Indexer — Optional service to provide full text indexing. This offers fast searching through
email and attachments.
• Apache — Serves web pages of the WebAccess to the users browser.
• PHP — The WebAccess is written in this programming language.
• PHP-MAPI extension — Module for PHP to enable use of the MAPI layer. Through this module,
MAPI functions are made accessible for PHP developers. This effectively means that MAPI web
clients can be written. The WebAccess is such a client.
• Python-MAPI extension — Module for Python to enable use of the MAPI layer. Through this
module, MAPI functions are made accessible for Python developers.
1
For connectivity with mobile devices we recommend using Z-Push (see Seção 5.5, “Configure Z-Push
(Remote ActiveSync for Mobile Devices)”), an open-source implementation of the ActiveSync protocol.
For older mobile devices, and mobile devices that do not support the ActiveSync protocol we ship the
Zarafa WebAccess Mobile (zarafa-webaccess-mobile) which provides basic web interface with
limited functionality. Please note that this component is deprecated and will probably be removed from
future version of ZCP.
1
http://z-push.sourceforge.net
3
Capítulo 1. Introduction
1.4. Protocols and Connections
All applications which directly connect to the Zarafa Server use MAPI in SOAP to do so (see the
Architecture Diagram). Even the WebAccess uses MAPI in SOAP (provided by the PHP-MAPI
extension) to connect to the Zarafa Server.
The Zarafa Windows Client is a standard Microsoft Windows compatible MAPI provider. It connects to
the server (MAPI in SOAP) over the HTTP(S) protocol.
1.4.1. SOAP
SOAP is an abbreviation of Simple Object Access Protocol. It is a protocol to exchange data and make
Remote Procedure Calls between applications over a network or Internet for that matter.
SOAP is based on XML and HTTP 1.1 (port 80, or port 443 in case of HTTPS). Because of these
standards it is possible to connect transparently through proxies, allowing connectivity over most
networks without modifications.
1.4.2. Secure HTTP (HTTPS)
The Zarafa Windows Client has the possibility to connect to the server over HTTP secured with SSL
(HTTPS). When a MAPI profile from Outlook is created, it is possible to set the connection to use
HTTPS. All connections over the network will then be encrypted, making eavesdropping virtually
impossible.
The Zarafa Server must be configured to also accept SSL connections. By default this is disabled,
because it requires the creation of SSL certificates. When the server certificate is created, SSL
connections can be directly accepted from a client. As an extra option other Zarafa components (like
the Zarafa Delivery Agent and the Zarafa Spooler) can also connect over HTTPS to the server and
authenticate using the Zarafa Server’s private key.
1.5. ZCP Editions and Licensing
1.5.1. The evaluation subscription
When using an evaluation version, a period of time is available to test ZCP with full functionality. It is
possible to continue using the current database when a valid commercial subscription is installed.
An evaluation version can be requested on http://www.zarafa.com/serial_request.
1.5.2. The ZCP Community Edition
2
The Zarafa Collaboration Platform community edition is licensed under the Affero GPLv3 . This edition
can be used with for up to three users with the proprietary Zarafa Windows Client (for connecting
with Microsoft Outlook). The WebAccess, IMAP gateway and mobile synchronisation can be used for
unlimited users.
2
http://www.zarafa.com/content/affero-gplv3
4
Commercial Editions of ZCP
Nota
To have Outlook support in the community edition the proprietary License Manager component
must be running. A subscription is not needed though.
1.5.3. Commercial Editions of ZCP
Standard, Professional, Enterprise and Hosted editions require a commercial subscription. It will be
mentioned in this document whenever a feature or component only available is with a commercial
edition.
1.5.4. Active and non-active users
ZCP subscriptions are on a per-named-user basis. A base subscription is a subscription for a fixed
number of users, which can be extended by adding extra Client Access Licenses; i.e. having a base
subscription for 10 users and a CAL for 10 users, is functionally equivalent to having a 20-user base
subscription.
Subscriptions are based on named users; i.e. 10 named users can be added in a system with 10
licensed users. However, there are also users which do not add to this user count, these are socalled ‘non-active’ users: they cannot login. An example of a non-active user is an ‘info’ or ‘helpdesk’
user. This is a user in the respect that it can receive email and has all the standard folders, but it is
not allowed to login. Other users will open the ‘info’ store as a delegate store and retrieve email from
there.
Each subscription automatically allows an extra amount of non-active users. The amount of non-active
users is 150% of the ‘active’ user count allowed by the subscription, with a minimum of 20 non-active
users. The number of non-active users was increased as of versions 6.40.8 and 7.0.0 to allow the
creation of non-active archive userstores (Prior to ZCP 6.40.8 the maximum amount of non-active
users was 50%).
Examples:
• Subscription: 10 users
• Active users: 10
• Non-Active users: 20
• Subscription: 400 users
• Active users: 400
• Non-Active users: 600
If not all active user accounts are used, it’s possible to use them as non-active accounts instead.
Nota
Users are set ‘active’ or ‘non-active’ at the time of creation. It is only possible to convert active
users to non-active users or vice-versa in ZCP version 6.40 and later: In earlier version the user
must deleted and re-created as a different type.
5
Capítulo 1. Introduction
In LDAP setups the non-active flag of users can be controlled through the
ldap_nonactive_attribute configuration directive. When using the DB back end, it’s possible
to specify the non-active flag with the -n option when using zarafa-admin to create users. The
Unix user plugin uses the unix-shell of the user as specified in /etc/passwd to determine if the store
should be a non-active store.
6
Installing
2.1. System Requirements
2.1.1. Hardware Recommendations
To give an estimate on the resource use of ZCP we have created the table below. These are merely
guidelines, giving a rough estimation on what hardware is required. In this table we assume the CPU
is under low load from other applications.
Tabela 2.1. Hardware Recommendations
Size of all mailboxes
CPU*
Memory
Harddisk
Raid level
< 5 GB
Dual Core
1 GB
SATA, SAS
RAID1
> 5 - < 10 GB
Dual Core
2 GB
SAS
RAID1
> 10 - < 20 GB
Dual Core
2 GB
SAS
RAID1
> 20 - < 50 GB
Quad Xeon
4 GB
SAS
RAID1
> 50 GB - < 100GB
Quad Xeon
> 4 GB
SAS
RAID1
> 100GB - < 250 GB
Quad Xeon
16 GB
SAS
RAID10
> 250 GB
2 x Quad Xeon
32 GB
SAS
RAID10
2.1.2. Supported Platforms
ZCP consists of a large variety of components: some back-end components that are run on Linux
platforms, and components that can be installed on the computers of end-users. In this section we list
the different platforms that we support.
At the start of each general release cycle (like 6.x.x or 7.x.x) we decide what plaforms we support.
Usually that means the current release of that platform and the most recent previous release. During
the major release cycle supported platforms can be added but not removed.
Please use the x86_64 or 64bit packages if 64bit hardware and OS are available. It is recommended
to run on 64bit whenever possible.
Importante
Support for the ia64 architecture will be dropped in the ZCP-7.x.x cycle
Tabela 2.2. Supported platforms for ZCP’s back-end components
OS Release
Supported CPU Architectures
RHEL 5
i386, x86_64, ia64*
RHEL 6
i686, x86_64
SLES 10
i586, x86_64, ia64*
SLES 11
i586, x86_64, ia64*
Debian 5.0 (Lenny)
i386, x86_64, ia64*
Debian 6.0 (Squeeze)
i386, x86_64
7
Capítulo 2. Installing
OS Release
Supported CPU Architectures
Ubuntu 8.04 LTS (Hardy)
i386, x86_64
Ubuntu 10.04 LTS (Lucid)
i386, x86_64
Besides these packages that are build and shipped by us, there are several platforms supported by
1
2
3
4
community build packages. For example Fedora , Mandriva, Gentoo , Arch Linux and OpenBSD .
We also have packages in the Canonical Partner Repository. Please have a look at our wiki page on
5
this topic for more information.
Tabela 2.3. Supported platforms for ZCP’s Windows Client, Migration Tool and ADS Plugin
MS Windows Release
Supported CPU Architectures
Windows Server 2003
32bit, 64bit
Windows Server 2008
32bit, 64bit
Windows XP
32bit, 64bit
Windows Vista
32bit, 64bit
Windows 7
32bit, 64bit
These are the supported Microsoft Windows platforms the components that require a Windows
platform, namely: the Windows Client, the Migration Tool and the ADS Plugin.
Nota
The Migration Tool is currently not available for 64bit platforms.
Supported browsers by ZCP’s WebAccess
Officially we support Mozilla Firefox 3.0 up to the latest version and Internet Explorer version 6 to 9.
We recommend Firefox as it is more secure and performs better.
Supported Microsoft Outlook versions
Our Zarafa Windows Client is officially compatible with Outlook 2000, 2002/XP, 2003, 2007 and 2010.
We recommend Outlook 2003 and 2007.
Nota
Outlook 2010 is still missing some features. For the progress of Outlook 2010 support, see http://
www.zarafa.com/wiki/index.php/Zarafa_Outlook_2010_Support.
2.1.3. Dependencies
In order to build or install ZCP back-end components a bunch of requirements have to be met. These
are the main dependencies of ZCP:
1
https://fedoraproject.org/wiki/Zarafa
http://en.gentoo-wiki.com/wiki/Zarafa
3
http://aur.archlinux.org/packages.php?ID=31174
4
http://openports.se/mail/zarafa/zarafa
5
http://www.zarafa.com/wiki/index.php/Install_Zarafa_from_Ubuntu_Repository
2
8
Installation
• MySQL, without MySQL the Zarafa Server cannot run. No need to run on the same machine as
the Zarafa Server, therefor not a package dependency. MySQL version 4.0 or lower will not work
correctly. ZCP is tested with MySQL 4.1, 5.0 and 5.1.
• Apache or any other webserver that supports PHP. ZCP is tested with Apache 2.0 and 2.2.
• PHP, standalone as CGI or, preferably, as a webserver module. ZCP is tested with PHP 4.3.x and
the latest 5.x release.
• Catdoc and Poppler-utils, for indexing text documents and pdf files.
• Libicu library that provides robust and full-featured Unicode and locale support.
• SMTP server of choice. ZCP is tested with Postfix, Exim, Sendmail and Qmail.
• LDAP server of choice (optional for user management). ZCP is tested with OpenLDAP, eDirectory
and Microsoft Active Directory.
Most of these dependencies are resolved automatically by the package manager of the Linux
rd
distribution that ZCP is being installed on. This allows the 3 party components used by ZCP to
be installed and upgraded automatically through the package manager of the distribution. Some
dependencies in the table above are runtime dependencies, these have to be installed manually as
they do not necessarily have to run on the same machine.
The default method of deploying ZCP is installing the packages on one of the Linux distributions we
support, allowing the 3rd party components used by ZCP to be installed automatically through the
rd
package manager of the distribution. In this case the 3 party components are upgraded in a standard
way according to that distribution.
Nota
If you’re using Debian or Ubuntu and you’re starting with a fresh install of your server, you can
use tasksel to easily install the entire LAMP (Apache, MySQL, PHP) stack. This will provide all
the packages which are required for the Zarafa installation script to complete successfully.
2.2. Installation
There are roughly 4 ways to install ZCP: (1) through a distribution’s package manager, (2) using
our install script, (3) manually installing packages, and (4) from source. In this section each of these
methods is explained along with its pros and cons.
Nota
In the community edition the package zarafa-licensed is not needed, though in order to have
Outlook support in the community edition, it is necessary to run the zarafa-licensed daemon.
Nota
The Multi User Calendar inside the package zarafa-webaccess-muc is a feature not available
in the community edition. A valid subscription is needed.
9
Capítulo 2. Installing
Nota
The shared libraries which provide the user plugins are installed in /usr/lib64/zarafa,
instead of the /usr/lib/zarafa location. This path has to be adjusted in the server.cfg
configuration file. Set the plugin_path to /usr/lib64/zarafa, so the server can find the
user plugin files.
2.2.1. Installing ZCP with a Package Manager
ZCP is found in the Canonical Partner Repository for the Ubuntu distribution. This means ZCP can be
installed and updated on Ubuntu 8.04LTS and 10.04LTS with the distribution’s package manager. The
Canonical Partner Repository has to be uncommented in /etc/apt/sources.list.
2.2.2. Installing with the Install Script
When downloading ZCP from the http://www.zarafa.com/ website (either the community edition or a
commercial edition) a tarball is presented containing the following:
• the packages (RPMs or DEBs depending on the distribution)
• the install.sh and uninstall.sh scripts (and an additional helpers.inc file)
• a folder named windows containing Windows specific binaries
• a folder named browsers containing the Firefox Drag&Drop plugin
The install.sh script will automatically execute the actions described under Manual Installation
below. Thus, it will:
• check package dependencies
• install packages
• check MySQL database access
• ask for configuration options
The installation script is invoked with:
sh ./install.sh
After running install.sh, the server should be ready to start. Proceed with creating stores as
explained by the script.
In case the install.sh script is invoked with the -config parameter, it will not install any software
but ask the configuration options only.
sh ./install.sh -config
The install.sh script always configures the server to use the DB user plugin. If another user base
is neccesary, please read Capítulo 4, Configure ZCP Components for information on how to configure
the server.
10
Manually Installing Packages
Nota
If an older version of ZCP is installed, please read Capítulo 3, Upgrading. The install.sh
script is not usable in this case.
2.2.3. Manually Installing Packages
Please use the packages for the distribution used. See the distribution list in Seção 2.1.2, “Supported
Platforms”. For other distributions it is possible to use the packages for a distribution that is the most
similar, but keep in mind Zarafa cannot support those installations.
Nota
Do not mix packages of different distributions! Choose one distribution, and use only those
packages. If this rule is not honored, errors will occur!
2.2.3.1. RPM based distributions
Use the following command to install the ZCP packages on RPM based distributions:
rpm -Uvh <package file>
Replace <package file> with the packages found in the tarball. Start with libvmime, libical
and zarafa (in this order) then install the other packages. The package manager might find
unresolved dependencies, try to install packages for these dependencies as normal would be done for
that distribution (yum -i on Red Hat, zypper -i on OpenSUSE/SLES).
2.2.3.2. DEB based distributions
On DEB based distributions (most commonly Debian and Ubuntu) use:
dpkg -i <package file>
To install the correct dependencies for ZCP apt-get or an equivalent tool can be used.
For MySQL, use:
apt-get install mysql-server
For Apache with the needed PHP support, use:
apt-get install apache2-mpm-prefork libapache2-mod-php5
If the Zarafa packages fail to install because of dependencies, please use the following command to
install these dependencies:
apt-get -f install
If Apache with PHP support is installed after the Zarafa packages have been installed, please use the
following command to automatically update the PHP configuration:
11
Capítulo 2. Installing
dpkg-reconfigure zarafa
2.2.3.3. Installing from Source
ZCP is not officially supported by Zarafa when build from source, yet in some situations — i.e. using
ZCP on unsupported environments, or when preparing patches for ZCP — it is very useful to install
from source. Since most of ZCP is distributed under an open source license (AGPLv3), it is in one’s
right to build ZCP from source.
How to exactly install ZCP from source is beyond the scope of this document. The procedure is also
6
slightly different for each distribution and subject to change. Please have a look at our wiki (search for
‘from source’) for the latest information regarding installation from source.
2.3. Troubleshooting Installation Issues
2.3.1. Server processes
Make sure at least MySQL 4.1 is installed. The server will only run with this version of the database
server or a more recent version.
If errors when loading libraries occur or connecting to MySQL fails, the errors are printed in the log.
Always check if the service was started correctly.
When an invalid configuration option is present in a configuration file, the service will not start. The
wrong options will be printed on the console.
2.3.2. WebAccess
To correctly see the WebAccess, the following PHP-extensions are needed:
• gettext
• session
• iconv
• xml
Some distributions deliver support for these extension by default through the PHP package. For SuSE
distributions, these modules are provided by separate RPMs, eg:
php5-gettext-5.2.8-37.4.x86_64.rpm
php5-iconv-5.2.8-37.4.x86_64.rpm
Versions may differ for newer versions of SUSE.
For Red Hat Enterprise Linux and Debian-based distributions, these modules are provided by the
normal php package which was already installed because of dependencies.
If you’re experiencing problems with sending attachments, make sure the webserver is able to create
files under the WebAccess/tmp directory. If a user is directly logged off when he tries to login to the
WebAccess, make sure PHP is configured with:
6
http://wiki.zarafa.com/
12
WebAccess
register_globals = off
If a distribution in combination with SELinux is used, an error message while logging in may appear
when using the WebAccess. The default message suggests that the entered password is wrong
or the Zarafa server is not running. When SELinux is enabled, it is blocking the connection from
the webserver to the Zarafa server. The SELinux Zarafa policy to allow this can be found on http://
www.zarafa.com/wiki/index.php/Zarafa_Selinux_policy.
or SELinux can be disabled by using the following command:
setenforce permissive
When it is chosen to disable SELinux, /etc/sysconfig/selinux also has to be edited, to disable it
for after reboots too.
More SELinux information can be found on http://fedora.redhat.com/docs/selinux-faq.
13
14
Upgrading
3.1. Preparing
Before upgrading to a new version of ZCP, it is recommended to make a backup of the database and
the configuration files.
Nota
When upgrading a licensed version of ZCP to a new major release, like from 6.40.x to 7.0.x, the
1
license key has to be converted. Converting subscription keys is performed on our portal .
First stop the MTA server running on your server. Should there be errors during the upgrade no e-mail
will get lost. In case of postfix, run:
/etc/init.d/postfix stop
Now stop the running services, so the database is not in use anymore:
/etc/init.d/zarafa-spooler stop
/etc/init.d/zarafa-server stop
/etc/init.d/zarafa-licensed stop
And the optional services too, if they were started:
/etc/init.d/zarafa-dagent stop
/etc/init.d/zarafa-gateway stop
/etc/init.d/zarafa-ical stop
/etc/init.d/zarafa-indexer stop
/etc/init.d/zarafa-monitor stop
Importante
When the attachments are kept in the database, an upgrade to 6.30.x or later will grow the
database storage file by the combined size of all attachments (as stored in the “lob table”). During
the upgrade a temporary table to store all attachments is created and removed, since it is not
possible to shrink the database storage file it will grow by the combined size of the attachments
stored in it.
Information on migrating the attachments from the database to the file system can be found on
2
our wiki .
3.2. Creating backups
Now create backups of the database and configuration files. Make a copy of the /etc/zarafa
directory, which contains the configuration files.
1
2
https://portal.zarafa.com/
http://www.zarafa.com/wiki/index.php/Store_attachment_outside_of_the_database
15
Capítulo 3. Upgrading
cp -r /etc/zarafa /etc/zarafa.bck
To backup the MySQL database a mysqldump can be executed:
mysqldump --single-transaction -p zarafa > zarafa.sql
or the complete mysql data directory can be copied:
/etc/init.d/mysqld stop
cp -r /var/lib/mysql /var/lib/mysql.bck
3.3. ZCP7 dependencies
After the backup is successfully created, the Zarafa packages can be upgraded. There are some new
dependencies that need to be resolved before the packages can be updated.
Tabela 3.1. ZCP7 dependencies
Distribution
Dependencies
Debian 5
libboost-filesystem1.35.0, libboost-system1.35.0, libicu38,
w3m, python-mysqldb
Debian 6
libboost-filesystem1.42.0, libboost-system1.42.0, libicu44,
w3m, python-mysqldb
RHEL5
libicu, w3m, MySQL-python
RHEL6
boost-filesystem, boost-system, libicu, w3m, MySQLpython
SLES10
libicu, w3m, python-mysql
SLES11
libicu, w3m, python-mysql
Ubuntu 8.04
libicu38, w3m, python-mysqldb
Ubuntu 10.04
libboost-filesystem1.40.0, libboost-system1.40.0, libicu42,
w3m, python-mysqldb
3.4. Performing the Upgrade on RPM based distributions
After the backups have been created the upgrade can be performed similarly to how a package would
be installed manually. For RPM based installations use the following command:
rpm -Uvh <package name>
Nota
In the community edition the package zarafa-licensed is not needed. Only when Outlook
integration is used the zarafa-licensed daemon is required.
16
Performing the Upgrade on Debian based distributions
After the new packages are installed, the example configuration files found in the /usr/share/
doc/zarafa/example-config directory can be checked for new configuration options. The new
3
changes can also be found in the Release Notes .
3.5. Performing the Upgrade on Debian based distributions
Unpack the tarball: tar zxvf zcp-7.0.0rc1-26667-debian-6.0-i386-free.tar.gz
Install the libvmime0 that comes with Zarafa:
dpkg -Bi libvmime0_0.9.2*
Install libical that comes with Zarafa:
dpkg -Bi libical0_0.44*
Install the python-mapi packages that comes with Zarafa:
dpkg -i python-mapi*
For Debian based installations run the following command to upgrade the ZCP installation:
dpkg -Bi <package name>
Depending on the set of 6.x packages you may have installed, this command may end with errors
on the “zarafa” and “zarafa-licensed” packages. Due to the big split and renaming of packages some
conflicts are not directly resolvable by “dpkg”. If you receive any errors during the upgrade of these
packages, a second try installing these packages using:
dpkg -i <package name>
or run the following command:
apt-get install -f
which should resolve everything properly.
When prompted about changed zarafa configuration files it depends greatly on you current situation
what the best option is.
Nota
In the community edition the package zarafa-licensed is not needed. Only when Outlook
integration is used the zarafa-licensed daemon is required.
After the new packages are installed, the example configuration files found in the /usr/share/
doc/zarafa/example-config directory can be checked for new configuration options. The new
4
changes can also be found in the Release Notes .
3
4
http://doc.zarafa.com/trunk/Release_Notes/en-US/html/_config_file_changes.html
http://doc.zarafa.com/trunk/Release_Notes/en-US/html/_config_file_changes.html
17
Capítulo 3. Upgrading
3.5.1. Pre 6.40 upgrade steps
There are some configuration changes in 6.40 and higher versions to support new features in the
Global Address Book, like contacts, dynamic groups and security groups. Especially when using the
LDAP user plugin, the server will not start correctly without any changes to the LDAP configuration
file being made. If the DB or Unix plugin is in use, no changes are required to the configuration files.
However, it may be helpful to view them to configure new options.
5
Please check the upgrade page on our wiki for up-to-date upgrade details.
To correctly support contacts from Microsoft Active Directory, the ldap_user_unique_attribute
config field must be changed from objectSid to objectGuid. Since this is the unique identifier
for users, changing this without updating the database will make the Zarafa server delete all users,
and recreate the new detected users. This is not wanted, so it’s required to use the db-upgradeobjectsid-to-objectguid.pl script found in /usr/share/zarafa/doc/ directory. This script
will detect the LDAP settings from the existing /etc/zarafa/server.cfg file and change the
database to the new unique id. After the script, it’s required to update the LDAP configuration file to
use the new unique attribute. Make sure the Zarafa server process is not running when using this
script.
Nota
When using OpenLDAP there is no need to change the ldap_user_unique_attribute.
The send-as options in LDAP are the opposite from 6.30 as of 6.40 and 7.0. This change is done
to support groups for the sendas permissions. If the send-as options for users are used, the ldapswitch-sendas.pl script must be run. This script will update the LDAP or ADS server with the
current send-as information and switches it to the 6.40 format.
cd /usr/share/doc/zarafa
chmod 755 ldap-switch-sendas.pl
./ldap-switch-sendas.pl
In 6.40, send-as permissions are set on the user. Example: A non-active user info@company exists
and some users need to send with that address in the from header. The users are added on the
info@company object in the send-as attribute list.
In the LDAP configuration, the separate search base options for each object are combined in one
search filter option named ldap_search_base. All other old search_base options should be
removed. Also, all scope options should be removed.
Next, object types must be defined. This normally done by means of the objectClass attribute.
Every user object must be defined by it’s objectClass.
Lastly, the old per object search filters may be emptied since they are double. It is still advisable to use
zarafaAccount in the user filter, so the options are still available.
To protect the server from deleting users a safe mode option is available in the server.cfg. Enabling
this option will disable all delete and create actions of users and groups.
Add the following option in the /etc/zarafa/server.cfg to enable safe mode:
5
http://www.zarafa.com/wiki/index.php/Upgrading_to_6.40/
18
From 6.40 to 7.0.0 and higher
user_safe_mode = yes
Check the server logfile after starting the Zarafa Server for detection of user changes. If no users are
recreated or deleted the configuration file is correct and user_safe_mode can safely be disabled.
Importante
It’s strongly advised only to use the safe_mode after the upgrade. When the upgrade is
successfully done, the safe_mode should be disabled. Running a production system with
safe_mode enabled can result in performance issues.
3.5.2. From 6.40 to 7.0.0 and higher
Due to the amount of data that needs to be converted when upgrading to ZCP 7.0 and the probable
long amount of time that will take, the server will by default refuse to upgrade the database.
To upgrade the database it’s recommended to use the zarafa7-upgrade tool that comes with the
zarafa-server package in ZCP 7.0. This upgrade tool will perform the necessary upgrade steps and will
keep you informed about the progress. The zarafa7-upgrade tool can be found in /usr/share/doc/
zarafa and requires the python-mysqldb or MySQL-python package, as well as the python-mapi
packages. That last one can be found in the ZCP tarball.
Restart the Zarafa-server to convert the database to latest revision.
/etc/init.d/zarafa-server start
Check the logfile /var/log/zarafa/server.log for the progress of this update
tail -n 20 /var/log/zarafa/server.log
When the database is in the correctly converted into the latest 6.40 layout, the Zarafa-server will
automatically stop and warn that the update should be executed manually with zarafa7-upgrade script.
Run the script zarafa7-upgrade to convert the database layout and make the database unicode
ready.
To run the upgrade tool use:
python /usr/share/doc/zarafa/zarafa7-upgrade
On Debian and Ubuntu the file first needs to be unzipped:
gunzip /usr/share/doc/zarafa/zarafa7-upgrade.gz
python /usr/share/doc/zarafa/zarafa7-upgrade
This script will convert all database tables to UTF-8 to be fully unicode compatible and will convert the
database tables to new ZCP 7.0 layout. The script will report the progress of the update.
Alternatively the server can be forced to upgrade the database by starting it with the --force-databaseupgrade option.
19
Capítulo 3. Upgrading
Importante
Using the --force-database-upgrade option is not recommended as it has no progress indication
and it can not be interrupted.
Nota
When upgrading from older versions of ZCP, for example ZCP 6.30.x, the Zarafa-server will first
upgrade the database to the ZCP 6.40 layout and after this update the upgrade script can be
executed.
3.6. Finalizing the upgrade
After the new configuration options have been checked, the services can be started again:
/etc/init.d/zarafa-server start
/etc/init.d/zarafa-spooler start
/etc/init.d/zarafa-licensed start
The optional services can also be started again:
/etc/init.d/zarafa-dagent start
/etc/init.d/zarafa-gateway start
/etc/init.d/zarafa-ical start
/etc/init.d/zarafa-indexer start
/etc/init.d/zarafa-monitor start
Nota
In the community edition the package zarafa-licensed is not needed, though in order to have
Outlook support in the community edition, the zarafa-licensed daemon has to run. Since
upgrades usually include a changed php-mapi extension, the webserver has to be restarted as
well:
/etc/init.d/apache2 restart
or
/etc/init.d/httpd restart
ZCP 7.0 has a new improved IMAP/POP3 gateway. The new gateway offers better compatibility and
higher performance by using additional information which is stored in the database and in the Zarafa
attachment directory. As this addition information will use more diskspace and is only used when users
are connecting over IMAP, the IMAP/POP3 features are by default disabled.
When users should have access to IMAP or POP3 this features has to manually enabled. Read more
about enabling/disabling features in Seção 8.7, “Zarafa Feature management”.
20
Configure ZCP Components
Most ZCP and 3rd party components are configured by a configuration file. This section explains most
common options that are set to get these components up and running. It is important to note that
components usually have to be restarted to make use of updated configuration files, read more about
this in the Capítulo 7, Managing ZCP Services.
In short, after modifications have been made to a component’s configuration file, that component has
to be restarted with:
/etc/init.d/zarafa-<component name> restart
4.1. Configure the Zarafa Server
The Zarafa Server component is configured by a system-wide configuration file, usually located here:
/etc/zarafa/<component name>.cfg
When installing ZCP an example of this file is put here:
/usr/share/doc/zarafa/example-config/<component name>.cfg
The options and their default values are explained both by the in-line comments of the example file
and in the following manual page:
man <component name>.cfg
For example:
man zarafa-server.cfg
If a line is not present, the default setting will be assumed. For most basic setups the defaults of the
example file will work fine. In this chapter we only explain the basic configuration option of Zarafa
Server.
The Zarafa Server needs a MySQL database to function, and therefor needs to know how to connect
to the MySQL server and the authentication credentials for its database. It will create a database and
the tables it needs at first start.
Make sure that the MySQL user that the Zarafa Server uses to connect to the database has all
privileges, including the right to create a new database. The privilege to create databases could be
revoked after the database has been created by the server. Also make sure to give the user enough
permissions to connect from localhost to this database, or --if the Zarafa server connects over the
network to the MySQL database-- allow it to connect from the IP-address from which the Zarafa
Server will connect.
For example the following MySQL statement grants all privileges to user “zarafa” with password
“password” from localhost:
GRANT ALL PRIVILEGES ON zarafa.* TO
'zarafa'@'localhost' IDENTIFIED BY 'password';
21
Capítulo 4. Configure ZCP Components
To configure the Zarafa Server to use the MySQL server the options starting with mysql in the
zarafa-server.cfg need to be set. Once this is setup the Zarafa Zerver should start normally.
4.2. Configure language on RPM based distributions
After the creation of new users the Zarafa Server will automatically create the actual mailbox. This
mailbox is by default created in the language of the Linux server. When another language is required
the following configuration file has to be changed:
/etc/sysconfig/zarafa
Change the option ZARAFA_USERSCRIPT_LOCALE to the correct language, for example
nl_NL.UTF-8 or fr_FR.UTF-8.
In order to use this language setting make sure the language packs are installed. Red Hat and SuSE
based systems contain all language packs by default, but Debian and Ubuntu based systems do not
contain these packages.
The option ZARAFA_LOCALE in the /etc/sysconfig/zarafa file can be used to start the Zarafa
Server component in the correct language. This language setting is used to set the default options, like
the Public Folder name to the correct language.
The WebAccess GUI language can be set at the login screen. This can be configured per user login.
Importante
When upgrading from an earlier ZCP version, please review the language settings as from ZCP
7.0.0 the locale has to be set in UTF-8.
4.3. Configure language on Debian based distributions
After the creation of a new users the Zarafa Server will automatically create the actual mailbox. This
mailbox is by default created in the language of the Linux server. When another language is required
the following configuration file has to be changed:
/etc/default/zarafa
Change the option ZARAFA_USERSCRIPT_LOCALE to the correct language, for example
nl_NL.UTF-8 or fr_FR.UTF-8.
In order to use this language setting make sure the language packs are installed. Red Hat and SuSE
based systems contain all language packs by default, but Debian and Ubuntu based systems do not
contain these packages.
To install a language pack on Debian and Ubuntu based systems, use the following command (this
example is for the Dutch -nl pack):
apt-get install language-pack-nl
The option ZARAFA_LOCALE in the /etc/default/zarafa file can be used to start the Zarafa
Server component in the correct language. This language setting is used to set the default options, like
the Public Folder name to the correct language.
22
User Authentication
The WebAccess GUI language can be set at the login screen. This can be configured per user login.
For non-English WebAccess languages the appropriate language-packs need to be installed as well.
Importante
When upgrading from an earlier ZCP version, please review the language settings as from ZCP
7.0.0 the locale has to be set in UTF-8.
At some debian distributions the entry in /etc/apache2/envvars needs to be set to force the locale, else
locale specific characters might not be displayed correctly in the webaccess.
## The locale used by some modules like mod_dav
# export LANG=C
## Uncomment the following line to use the system default locale instead:
. /etc/default/locale
4.4. User Authentication
Another important configuration option for the Zarafa Server is the user_plugin. This setting
determines which back-end is used for managing users and groups. There are four options, namely
db, unix and ldap and ldapms.
By default the db plugin is used as it does not require any further configuration. The ldap plugin is
used most in larger setups as it proves to be most flexible and integrates nicely with an organization’s
the existing infrastructure.
The ldapms plugin is required when configuring a multi-server Zarafa environment. Multi-server
support is only available in the Enterprise edition.
More information on managing users can be found in Capítulo 8, User Management.
4.4.1. The DB Authentication Plugin
This plugin uses the Zarafa MySQL database to store user and group information. The zarafaadmin tool can be used to manage users.
The DB plugin supports only basic user and group information. For more advanced configurations, we
advise to use the LDAP plugin.
For more information about user management with the zarafa-admin tool, see Capítulo 8, User
Management.
4.4.2. The Unix Authentication Plugin
The Unix plugin is used on a server which has all its user information setup in the /etc/passwd file.
Group information will be read from /etc/group. Passwords are checked against /etc/shadow, so
the zarafa-server process must have read access to this file (this process is normally run as root,
so usually that is not a problem).
Since the unix files do not contain enough information for Zarafa, there are some properties of a user
that will be stored in the database. These properties are the email address, overriding quota settings,
and administrator settings. The zarafa-admin tool has to be used to update these user properties.
All other user properties are done using the normal unix tools.
23
Capítulo 4. Configure ZCP Components
A configuration file, /etc/zarafa/unix.cfg, exists for this plugin. The default set by this file are
usually enough, in-line comments explain each option. In this configuration file the uid range of users
wanted in the Zarafa server needs to be defined. The same goes for the groups.
Non-active users are appointed by a specific shell, default /bin/false. These users cannot login,
but the stores can be opened by other users. An administrator should setup the correct access rights
for these stores.
For an overview of all configuration options of the unix authentication plugin, use:
man zarafa-unix.cfg
4.4.3. The LDAP Authentication Plugin
The LDAP plugin is used for coupling any LDAP compliant server with the Zarafa Server. This way, all
users, groups and membership information can be retrieved ‘live’ from an LDAP server.
The LDAP plugin support next to the default users, groups and companies also the following object
types:
• Contacts — External SMTP contacts which can be used as members of distribution lists
• Addresslists — Sub categories of the Global Address Book, based on a specified LDAP filter
• Dynamic groups — Dynamically created groups, based on a specified LDAP filter. Therefore LDAP
plugin is the recommended user plugin for ZCP.
The Zarafa Server needs two configuration directives in the server.cfg configuration file to use the
LDAP backend, namely:
user_plugin = ldap
user_plugin_config = /etc/zarafa/ldap.cfg
The defaults for OpenLDAP and for Active Directory can be found in the /usr/share/doc/zarafa/
example-config directory. Based on these examples the /etc/zarafa/ldap.cfg file should be
adjusted to configure the LDAP authentication plugin.
More details about configuring the LDAP plugin with OpenLDAP, see Seção 5.2, “Configure ZCP
OpenLDAP integration” or Seção 5.3, “Configure ZCP Active Directory integration” for Active Directory.
4.5. Autoresponder
ZCP contains an autoresponder that can be used when a user is out of the office to reply automatically
to all incoming e-mails. The autoresponder will automatically be spawned whenever an e-mail is
delivered by zarafa-dagent to a store that has the ‘Out of Office’ option turned ON.
Users can manage the autoresponder of their own store as well as of stores to which one has at least
secretary rights. Note that this includes public folders. Please refer to the User manual on how to
manage these settings.
To prevent autoresponder loops (e.g. when sending automated responses to an automated response,
which in turn sends an automated response, etc), the autoresponder will only send one autoresponse
message per day for any unique sender e-mail address. The autoresponder will also not respond in
any of the following cases:
• Sending an out-of-office message to yourself.
24
Storing attachments outside the database
• Original message was to mailer-daemon, postmaster or root.
• Original message was from mailer-daemon, postmaster or root.
Furthermore, the autoresponder is configured by default to respond only to e-mails in which the user
was explicitly mentioned in the ‘To’ header. This means that e-mails that were received because the
user was in the ‘Cc’ header or because the user was in a distribution group, are not responded to.
Most behaviour can be configured by editing the file /etc/zarafa/autorespond. This file contains
the following settings, which will be used for all autorespond messages server-wide:
AUTORESPOND_CC=0
Set this value to ‘1’ to allow autoresponding to messages in which the recipient was only stated in the
‘Cc’ header.
AUTORESPOND_NORECIP=0
Set this value to ‘1’ to autorespond to all messages, even if the recipient is not stated in any header
(for example when the email was directed at a mailing list or group)
TIMELIMIT=$[24*60*60]
Sets the minimum number of seconds between autoresponses to the same e-mail address
The following settings normally do not need to be modified:
SENDDB=${TMP:-/tmp}/zarafa-vacation-$USER.db
(file which stores the last date of sending per email address)
SENDDBTMP=${TMP:-/tmp}/zarafa-vacation-$USER-$$.tmp
(temporary file used during update of the database)
SENDMAILCMD=/usr/sbin/sendmail
(command used to send actual vacation message)
SENDMAILPARAMS="-t -f"
(parameters used to send actual vacation message)
If an alternate autoresponder is required, please refer to the zarafa-dagent manual page which
describes how to use an alternate script (using the -a option).
4.6. Storing attachments outside the database
Since ZCP version 6.0 it is possible to save the attachments outside the database. The default method
is to save the attachments inside the database, like older versions of ZCP.
For first time installations, the attachment storage method should be selected before starting the
server for the first time as it is not easy to switch the attachment storage method later on.
25
Capítulo 4. Configure ZCP Components
To change the attachment storage location, edit the following option in the /etc/zarafa/
server.cfg.
attachment_storage = files
attachment_path = /var/lib/zarafa
For upgrades, a script exists that copies the attachments from the database to the file storage. This
script can be found in /usr/share/doc/zarafa, and is named db-convert-attachments-tofiles. This script is run as follows:
db-convert-attachments-to-files <mysqluser> <mysqlpass> <mysqldb> <destination path> [delete]
It is only possible to convert from database storage to file storage. The <delete> switch is optional.
If this parameter is given, the attachments are also removed from the database. Keep in mind that
during the conversion the storage of the attachments on the harddisk will double. The amount of
storage in MySQL used by ZCP can be looked up the with the following MySQL statements:
mysql> use zarafa;
mysql> show table status;
Check the data_length column for the lob table. This contains the number of bytes needed for the
attachment storage.
To select this new storage method, change the attachment_storage option in the server.cfg file
and point the attachment_path option to the folder where the attachments should be stored. After
changing this option zarafa-server needs to be started once with the --ignore-attachmentstorage-conflict parameter.
Advantages of attachments outside the database are:
• MySQL does not save the large binary blobs in the database. This improves the general read and
write access.
• Attachments will not cause cache purges of MySQL.
Disadvantages of attachments outside the database are:
• A MySQL dump of the database is not enough for a full recovery.
• Remote storage of attachments requires a new system, like folder mounted through NFS or Samba.
In most cases it is advisable to store attachments apart from the database, especially in setups with
more then 50 users.
Importante
It is very important, when choosing to store the attachments outside the database, to update the
backup strategy accordingly.
4.7. SSL connections and certificates
The Zarafa Server is capable of directly accepting encrypted SSL connections.
This feature may already be available when the HTTPS Apache server is setup to proxy these
connections to the Zarafa Server.
26
SSL connections and certificates
However, having native SSL connections to the server has an interesting advantage: Zarafa
components running beyond localhost can login using their SSL certificate.
This section will describe how to setup certificates to add native SSL connections to Zarafa.
First, we will create the directory to contain the certificate and setup the permissions, since it contains
our private key.
mkdir /etc/zarafa/ssl
chmod 700 /etc/zarafa/ssl
If Zarafa is run as another user, as described in the Running as non-root user section, do not forget to
chown the directory as well.
Now we are ready to create a Certificate Authority (CA). This CA will be used to create the server
certificate and sign it. We provide a ssl-certificates.sh script in the /usr/share/doc/
zarafa directory, which uses the openssl command and the CA.pl script from OpenSSL.
Depending on the distribution used this script can be installed in different directories. The script
will try to find it on its own. If it is not found, either OpenSSL is not installed, or the script is in an
unknown location, and location of the script has to be provided manually. Normally, the sslcertificates.sh script can be run without problems.
cd /etc/zarafa/ssl
sh /usr/share/doc/zarafa/ssl-certificates.sh server
The parameter server is added, so the name of the new certificate will be called server.pem. When
the CA is not found in the default ./demoCA directory, it needs to be created. By pressing enter, the
creation of the new CA is started.
Enter a password (passphrase) when asked for. This is the password used later on to sign certificate
requests. Then certificate information should be entered. Do not leave the Common Name field blank,
otherwise the creation will fail.
Now that we have a CA, we can create self-signed certificates. The ssl-certificates.sh script
will automatically continue with this step. Enter a password for the request, and enter the certificate
details. Some details need to be different from those typed when the CA was created. At least the field
Organizational Unit Name needs to be different. The challenge password at the end may be left
empty.
This step created a Certificate Request, that needs to be signed by the CA that was created in the first
step of the script. Type the password of the CA again when asked for. The details of the certificate will
be shown, and asked for acceptance. Accept the certificate.
As the last step, the public key of this certificate will be offered. Since the server certificate just was
created the public key of this certificate is not needed.
Now that the the CA certificate and the server certificate have been created, SSL can be enabled in
the server.cfg file, which is normally disabled. The port 237 is set for SSL connections. This port
number can be changed if necessary.
server_ssl_enabled = yes
server_ssl_port = 237
The CA certificate must be set in the server_ssl_ca_file setting. The server certificate and
password must be set in the server_ssl_cert_file and server_ssl_cert_pass options.
server_ssl_ca_file = /etc/zarafa/ssl/demoCA/cacert.pem
27
Capítulo 4. Configure ZCP Components
server_ssl_key_file = /etc/zarafa/ssl/server.pem
server_ssl_key_pass = <password>
Restart the zarafa-server process, and now it’s possible to connect directly to the SSL port. Create
a new Outlook profile, and mark the SSL connection option. Set the port to 237. The connection to the
server has now been encrypted.
4.8. Configure the License Manager
Nota
With the ZCP community edition the License Manager is not needed.
The License Manager (zarafa-licensed) expects /etc/zarafa/license to contain a file named
base which simply holds the license key. To install a license key, use the following command:
mkdir -p /etc/zarafa/license
echo <license key> > /etc/zarafa/license/base
<license key> should be replaced with a valid license key obtained from Zarafa or one of its
partners.
Nota
The license key consists only of numbers and capital letters.
If an extra CAL (Client Access License) is also available, the license key can be added with:
echo 'CAL key' > /etc/zarafa/license/cal1
If more than one CAL are available, please install one CAL per file in the license directory. The
filename of the CAL is of no importance. Sub-folders in the /etc/zarafa/license folder are not
allowed.
4.9. Configure the Zarafa Spooler
The Zarafa-spooler sends email from the global outgoing queue to a SMTP server, which sends the
email to the correct address.
When an email message is sent from Outlook or WebAccess, the message is placed in the Outbox
folder, and a submit message is sent to the Zarafa server. The server notifies the Zarafa spooler to
send the email to the SMTP server. The spooler will now start to convert the message to a normal
email message. When the conversion is complete, a connection to the supplied SMTP server is
created, and the email is sent to the SMTP server.
The spooler will send the email, and after the mail is sent, will move the mail automatically to the
user’s Sent Items folder.
If at any time an error was found, the user will be notified with an ‘Undeliverable’ message. The
message will contain an error description on which error was found. Often, the user can retry to send
the message.
28
Configuration
Nota
Both external and internal emails will be sent via the MTA.
4.9.1. Configuration
The Spooler is configured the same as the server. Options in the spooler configuration file are the
name or ip-address of the SMTP server, where to find the Zarafa server, and logging options.
smtp_server
The name or IP-address of the SMTP server, which will send the email to the destination. This server
may also be given as an argument when starting the spooler.
server_socket
The UNIX socket of the Zarafa server. The spooler will use this socket to create a connection to the
server. This value should be the same as set in the server configuration file. The default value is /
var/run/zarafa.
[logging]
The spooler has the same configuration options as the server to configure logging options.
For an overview of all the configuration options of the zarafa-spooler, use:
man zarafa-spooler.cfg
4.10. Configure Zarafa Caldav
Zarafa Caldav is a component that enables users to view their calendar data by clients that support
the Caldav standard, like Sunbird or Evolution. This component connects with the Zarafa Server using
MAPI over HTTP.
Caldav and iCal push and retrieve complete calendars. Sunbird and other clients support both
retrieving and pushing, while Evolution does only support retrieving of calendars.
The Zarafa Caldav component can be configured using a configuration file in the same fashion as
the Zarafa Server. It supports both plain and SSL/TLS secured connections. To increase security it is
recommended to enable secure Caldav connectivity exclusively.
The configuration options are:
server_bind
IP address to bind to. 0.0.0.0 for any address. Default value: 0.0.0.0
ical_enable
Enable plain service with value yes. Default value: yes
29
Capítulo 4. Configure ZCP Components
ical_port
The plain service will listen on this port for incoming connections. Default Value: 8080
icals_enable
Enable secure service with value yes. Default value: no
icals_port
The secure service will listen on this port for incoming connections. Default value: 8443
server_socket
The http address of the Zarafa Server. Default value: http://localhost:236/zarafa
Importante
It is not advised to specify the UNIX socket here. In default configuration the Zarafa Caldav
will then be trusted by the zarafa-server (as set in its local_admin_users configuration
setting). Unless Zarafa Caldav is specified to run as an untrusted user, it always authenticates
users even if they provide no or wrong credentials!
ssl_private_key_file
The file that contains the private key used for encrypting the ssl connections. The absolute path to the
file should be used. Default value: /etc/zarafa/privkey.pem
ssl_certificate_file
The file that contains the certificate for the server. The absolute path to the file should be used. Default
value: /etc/zarafa/cert.pem
ssl_verify_client
Enable client certificate verification with value yes. Default value: no
ssl_verify_file / ssl_verify_path
The file or path to the files to verify the clients certificate with. The absolute path should be used for
both options (no default).
[logging]
The Caldav component has the same configuration options as the server to configure logging options.
4.10.1. SSL/TLS
As mentioned before the Zarafa Caldav component supports SSL/TLS, for this the OpenSSL library is
used.
30
Calendar access
The private key (for encryption) and the certificate (for authentication) file can be set in the
configuration file with ssl_private_key_file and ssl_certificate_file.
The Zarafa Caldav component can also authenticate the calendar clients that try to connect
to it verifying the client certificates using one or more verification files. This can be set with
ssl_verify_client, ssl_verify_file and ssl_verify_path. Certificates can be self-signed
or signed by a trusted certificate authority.
The following command generates an RSA key of 2048 bytes:
openssl genrsa -out /etc/zarafa/privkey.pem 2048
This command creates a self-signed test certificate valid for 3 years:
openssl req -new -x509 -key /etc/zarafa/privkey.pem -out /etc/zarafa/cert.pem -days 1095
If a .cer file and a .key file are already present, you can create a .pem file from these using the
following command:
cat my_server.key > my_server_combined.pem
cat my_server.cer >> my_server_combined.pem
And then use the my_server_combined.pem file for ssl_private_key_file or
ssl_certificate_file. Please make shure first the .key file is processed, and then the .cer
file.
4.10.2. Calendar access
Calendar folders served by the Zarafa Caldav component as accessed by URLs:
Tabela 4.1. CALDAV and iCal URLs
URL
Calendar
http://server:8080/ical/
user’s own default calendar via ical (not
recommended)
http://server:8080/caldav/
user’s own default calendar
http://server:8080/caldav/<otheruser>
Other-user’s calendar
http://server:8080/caldav/<user>/
<calendar>
user’s self created calendar in user’s (own) store
http://server:8080/caldav/<user>/
<calendar>/<subcal>
user’s self created subcalendar in a self created
calendar
http://server:8080/caldav/public/
<calendar>/
Calendar folder in the public folder.
Tabela 4.2. CALDAV and iCal URLs for MAC OSX iCal client
URL For MAC OSX iCal client
Calendar
http://server:8080/caldav/
User’s calendar list
http://server:8080/caldav/<otheruser>
Other-users calendar list
31
Capítulo 4. Configure ZCP Components
URL For MAC OSX iCal client
Calendar
http://server:8080/caldav/public
Public folders list
Nota
The <other user> or <user>/<calendar> is only reachable if the correct permissions are
available.
Nota
The Mac OS X iCal client is fully tested and supported up to 10.5.6. Additional information
regarding client side setup can be found in the Zarafa User Manual.
4.11. Configure Zarafa Gateway (IMAP and POP3)
The Zarafa IMAP & POP3 Gateway enables users to view mail stored on the Zarafa Server with an
IMAP or POP3 client. For example Mozilla Thunderbird or a mobile device with Microsoft Pocket
Outlook. To access the user data, the Zarafa Gateway itself connects to the Zarafa Server with MAPI.
POP3 can only retrieve the mail in the Inbox from the server. IMAP on the other hand displays all
folders that can contain mail, such as Drafts and Deleted Items. All sub-folders are shown as in
Microsoft Office Outlook or the Zarafa WebAccess.
The Zarafa IMAP & POP3 Gateway can be configured with a configuration file. The configuration
options are:
server_bind
IP address to bind to. 0.0.0.0 for any address. Default value: 0.0.0.0
imap_enable
Enable IMAP service with value yes. Default value: yes
imap_port
The IMAP service will listen on this port for incoming connections. Default Value: 143
imaps_enable
Enable secure IMAP service with value yes. Default value: no
imaps_port
The secure IMAP service will listen on this port for incoming connections. Default value: 993
pop3_enable
Enable POP3 service with value yes. Default value: yes
32
Configure Zarafa Gateway (IMAP and POP3)
pop3_port
The POP3 service will listen on this port for incoming connections. Default value: 110
pop3s_enable
Enable secure POP3 service with value yes. Default value: no
pop3s_port
The secure POP3 service will listen on this port for incoming connections. Default value: 995
imap_only_mailfolders
Enable only mailfolders to be shown with value yes. Default value: yes
server_socket
The http address of the Zarafa server. Default value: http://localhost:236/zarafa
Importante
It is not advised to specify the UNIX socket here. In default configuration the Zarafa Gateway
will then be trusted by the zarafa-server (as set in its local_admin_users configuration
setting). Unless Zarafa Gateway is specified to run as an untrusted user, it always authenticates
users even if they provide no or wrong credentials!
ssl_private_key_file
The file that contains the private key used for encrypting the ssl connections. The absolute path to the
file should be used. Default value: /etc/zarafa/privkey.pem
ssl_certificate_file
The file that contains the certificate for the server. The absolute path to the file should be used. Default
value: /etc/zarafa/cert.pem
ssl_verify_client
Enable client certificate verification with value yes. Default value: no
ssl_verify_file / ssl_verify_path
The file or path to the files to verify the clients certificate with. The absolute path should be used for
both options (no default).
[logging]
The gateway has the same configuration options as the server to configure logging options.
33
Capítulo 4. Configure ZCP Components
4.11.1. SSL/TLS
The Zarafa Gateway supports SSL/TLS using the OpenSSL library. For more information see
Seção 4.10.1, “SSL/TLS”, as the options are exactly the same for these two components.
4.11.2. Important notes
IMAP and POP3 are provided for backward compatibility and will not provide the same experience
like clients that support MAPI (Microsoft Outlook or our WebAccess). IMAP/POP3 clients use these
protocols for mails only (where MAPI does mail, calendar and contacts).
Setting the Out of Office message is not possible with IMAP or POP3 clients.
Rules set in Microsoft Outlook do not work using the Zarafa IMAP & POP3 Gateway. Some clients can
set rules but these rules are not related to the rules set by a MAPI enabled client.
Deleting a mail using IMAP will mark the mail for deletion. This is not shown in Microsoft Outlook and
Zarafa WebAccess. The mail will be deleted when the client expunges the folder. Some clients allow
to expunge folders manually and some have settings when to expunge a folder. Other clients expunge
the folder automatically when a mail is deleted.
Moving mail to a different folder with IMAP is done by copying the mail to the new folder and mark the
originating mail for deletion. As long as the the original mail is not expunged from its folder, the mail
will be shown in both folders as stated above.
4.12. Configure Zarafa Quota Manager
Users can collect a lot of email, while disk space can be limited. The Zarafa Quota Manager can be
used to set server-wide or user specific space quotas. The Zarafa Quota Manager knows three levels:
warn, soft and hard quota. When one of the levels will be reached, the user receives an email with the
quota sizes and which quota level was reached.
The quota settings can be configured server-wide in the server.cfg or per user via the user plugin.
When a user reaches the warning quota level, the user will receive an email with a warning and quota
information. As the user reaches the soft quota limit, the user will not be able to sent email until the
size of the store is reduced. When the hard quota limit is reached, email can also not be delivered to
that user anymore.
4.12.1. Setup server-wide quota
The server-wide quota can be configured in the configuration file of the server:
quota_warn = 100
quota_soft = 150
quota_hard = 200
The values are all in megabytes. These values will be honored for all users present in the server.
When the values are set to 0, that particular quota level is disabled.
4.12.2. Setup quota per user
By using the zarafa-admin tool, the user quota can be set for a specific user. Example:
Set the quota of the user John with the settings: Warning level to 80 Mb, soft level to 90 Mb and hard
level to 100 Mb.
34
Monitoring for quota exceeding
zarafa-admin
-u john
--qd 0
--qw 80
--qs 90
--qh 100
Nota
Set user quota with zarafa-admin does not work with LDAP. With LDAP the properties are
stored in the LDAP server per user. See the Capítulo 8, User Management for more information.
4.12.3. Monitoring for quota exceeding
The zarafa-monitor program checks every hour (by default) for users who have exceeded a quota
level and sends emails to a user when the warning or soft quota limit is exceeded. Global quota
settings can be set in the server configuration. User specific levels can be set via zarafa-admin
when using the db or unix plugin, or by editing the LDAP values as described in the User Management
section.
To start the zarafa-monitor, use:
/etc/init.d/zarafa-monitor start
or
zarafa-monitor -c /etc/zarafa/monitor.cfg
The zarafa-monitor will daemonise, so the prompt will almost immediately return. Use -F to start it
in the foreground. More information about the configuration options can be found in the manual page:
man zarafa-monitor.cfg
4.12.4. Quota warning templates
When working with the zarafa-monitor, it is possible to modify the contents of the email which will be
sent out when a user or company exceeds its quota. For each quota level a separate quota template
can be specified, these can be configured with the following options:
• userquota_warning_template
• userquota_soft_template
• userquota_hard_template
• companyquota_warning_template
By default the templates are stored in /etc/zarafa/quotamail, in each of these templates certain
variables are provided which will be substituted for the real value before the email is sent:
• ZARAFA_QUOTA_NAME - The name of the user or company who exceeded his quota
• ZARAFA_QUOTA_COMPANY - The name of the company to which the user belongs
• ZARAFA_QUOTA_STORE_SIZE - When a user exceeds his quota, this variable contains the total
size of the user’s store. When a company exceeds its quota this variable contains the total size of all
stores, including the public store within the company space.
35
Capítulo 4. Configure ZCP Components
• ZARAFA_QUOTA_WARN_SIZE - The quota warning limit for the user or company.
• ZARAFA_QUOTA_SOFT_SIZE - The quota soft limit for the user or company.
• ZARAFA_QUOTA_HARD_SIZE - The quota hard limit for the user or company.
Nota
Variables containing a size always include the size unit (B,KB,MB,GB) as part of the variable.
4.13. Configure Zarafa Indexer
The zarafa-indexer service, introduced in ZCP 6.40, offers full text searching capabilities for the
Zarafa Server. The service will periodically index all mails, and optionally their attachments, from the
server. When searching for a particular mail, the required time to find the requested emails will be
seriously reduced. When attachment indexing is enabled, it is even possible to index the contents of
attached files (for common file types).
4.13.1. Enabling indexing service
To start the indexing service execute the following command:
/etc/init.d/zarafa-indexer start
To enable the full-text searching, edit the /etc/zarafa/server.cfg configuration file:
index_services_enabled = yes
During searching the zarafa-server will connect with the zarafa-indexer service. To set the
connection path change the following configuration option:
index_services_path = file://var/run/zarafa-indexer
4.13.2. Users, companies and servers
By default the indexing service will index the mail from all users in all companies on all Zarafa servers
within the Zarafa environment. To disable the indexing of mails from specific users, the following
configuration options in /etc/zarafa/indexer.cfg can be used:
index_block_users
=
All user names which should not be indexed should be added to this configuration option. Each name
must be separated with a single SPACE character. Similarly all users from specific companies can be
excluded from indexing:
index_block_companies
=
Again all companies which should be excluded must be separated with a single SPACE character.
For multiserver installations the filter works reversed. Each server which must be indexed must be
configured using the option:
36
Indexer configuration
index_allow_servers
=
If this option is empty, all servers within the environment will be included by the indexing service. All
server names must be separated by a single SPACE character.
Nota
Normally only a single zarafa-indexer instance is needed for a multiserver environment.
For performance it is possible to run multiple instances on multiple servers. By using using
index_allow_servers correctly it is possible to divide the tasks over the different zarafaindexer instances.
4.13.3. Indexer configuration
During indexing the index file for each store is stored on the harddisk. The location of these files can
be configured in /etc/zarafa/indexer.cfg:
index_path
=
/var/lib/zarafa/index/
Beneath this folder a subfolder will be created for each Zarafa server within the environment. Beneath
these folders, each store will receive its own folder containing the index files.
Importante
Files and folders within this index path should not be touched while the indexer is running. If a
store must be re-indexed, the zarafa-indexer must be halted first before deleting the folder
for that particular store.
The zarafa-indexer service can use streaming synchronization offered by the zarafa-server
for fast synchronization of messages at the expense of higher memory consumption. To enable
streaming, ensure that the configuration option is enabled:
index_sync_stream
=
yes
If this option is enabled, the enhanced ICS option in /etc/zarafa/server.cfg must be enabled as
well:
enable_enhanced_ics = yes
These options are both enabled by default, and normally there is no reason to disable them. The
indexing interval can be configured in /etc/zarafa/indexer.cfg:
index_interval
=
5
This interval should be provided in minutes. When this value is increased the delay between receiving
the mail and its visibility in search results will also be increased. The indexing of stores can be divided
over multiple threads when working on a multiserver environment. The number of index threads can
be configured by changing the configuration value:
index_threads
=
1
37
Capítulo 4. Configure ZCP Components
Each thread will only index the stores from a single Zarafa server. The number of threads will
thus never exceed the number of servers within the multiserver environment. For single server
environments, this value should be kept at 1.
4.13.4. CLucene configuration
The zarafa-indexer uses the open source CLucene library for indexing and searching all messages in
the stores. CLucene can be configured through the following configuration parameters:
By changing the maximum field length, the maximum number of words from a single message which
will be indexed can be controlled. All words above the maximum will be discarded.
index_max_field_length
= 10000
This value is used to control the amount of required memory during the indexing process. When
index_max_field_length value is increased, the more memory will be required during indexing.
The merge factor indicates the number of index file segments per store before CLucene merges the
segments into a single file.
index_merge_factor
= 10
A low value will cause less memory to be used during indexing, but the increased IO access to disk
causes the indexing process to be slower, while searching will be faster. A high value will speed up the
indexing process while searching will be slower.
For batch indexing, the index_interval option is set to a high value. In that case, set
index_merge_factor to a high value (> 10) as well. For more interactive indexing, where the
index_interval is set to a low value, the index_merge_factor should be set to a low value (<
10).
The maximum buffered documents controls the maximum number of documents kept in memory
before CLucene writes them into a new index file segment on the harddisk.
index_max_buffered_docs = 10
Larger values will increase memory usage but makes the indexing process faster. Larger values also
mean that less index segments will be written to disk, which controls how often the segments will be
merged (also depending on the index_merge_factor configuration option).
The minimum number of messages in a single store which are indexed in memory before the index
writer flushed the index to disk as a new index file is controlled using the index_min_merge_docs
option:
index_min_merge_docs
= 10
Creating new index file segments often increases IO access to disk but reduces the amount of
memory required during the indexing process.
The maximum number of documents which can exist in a index file segment, can be controlled by the
index_max_merge_docs option:
index_max_merge_docs
38
= 2147483647
Attachments
When a segment contains index_max_merge_docs documents, it will no longer be merged with
other index segments. This will limit the total size of an index file segment but will trigger more index
file segments to be created. For batch indexing (when index_interval is set to a high value), the
index_max_merge_docs should be set to a high value as well (>10000). For interactive indexing
(when index_interval is set to a low value), set index_max_merge_docs to a low value
(<10000).
The fraction of terms in the “dictionary” which should be stored in memory is controlled by the
index_term_interval configuration option.
index_term_interval
= 128
Smaller values use more memory, but make searching slightly faster, while larger values use less
memory and make searching slightly slower. Searching is typically not dominated by dictionary lookup,
so tweaking this is rarely useful.
All CLucene writers and searchers are cached to optimize performance at the expense of memory.
The time (in seconds) the objects will be kept in cache is controlled by the index_cache_timeout
option:
index_cache_timeout
= 0
If set to 0 caching will be disabled.
4.13.5. Attachments
Optionally the contents of attachments can be indexed as well. When this is enabled, when searching
through the body of a message, the contents will be searched through as well.
To enable indexing of attachments can be done in /etc/zarafa/indexer.cfg:
index_attachments
= yes
Indexing of attachments is done through parsing the attachments to plain text and indexing the
text into the main index for the email. The required time to parse and index a particular attachment
depends on the actual size of the attachment. To prevent large attachments adding latency to the total
indexing time, the configuration option index_attachment_max_size can be used to prevent large
attachments to be indexed. The value provided to this configuration option must be set in kilobytes.
To parse the attachments to plain text a separate configuration script must be provided. By default this
script is installed to /etc/zarafa/scripts/attachments_parser but the exact location can be
configured using the configuration option index_attachment_parser.
The script attachments_parser will use the file attachments_parser.db to decide how the
attachment should be parsed to plain text. Within this file is a list containing the command to parse
each attachment type to plain text. This file can be edited to control the way attachments are parsed
and to add or remove support for particular attachment types.
The layout of each line is as followed:
<mime-type>;<extension>
`<command>`
Each line can have as many mime-types and extensions as needed, each mime-type and extension
must be separated using semi-columns. The command must read /dev/stdin for the attachment
39
Capítulo 4. Configure ZCP Components
data and must return the plain text through /dev/stdout. Some tools cannot parse attachment data
from a stream, and require the data to be provided as file. To store the attachment in a temporary file,
the script zmktemp can be used. That script will write all attachment data in a temporary file and print
the location of the file to /dev/stdout.
Attachments which cannot be parsed (for example images), the command echo -n can be used.
After editing the command, it is advisable to test it to see if the desired output is returned. Testing the
command can be done by executing the following command on the command line:
cat <attachment> | <command>
The resources used by the attachments_parser during the parsing of a single
attachment can be restricted by limiting the total memory and CPU time usage. To control
the maximum amount of memory the script can use is controlled by the configuration option
index_attachment_parser_max_memory. By default this value is set to 0, to disable any memory
consumption restriction. If a restriction should be applied, the maximum number of bytes should be
provided. The best restriction size depends on the maximum attachment size which can be provided
rd
to the script (configured using index_attachment_max_size) and the 3 party tools used to parse
the attachments.
To prevent the script to take too much time, the configuration option
index_attachment_parser_max_cputime can be used. By default this value is set to 0, to
disable any CPU time restriction. If a restriction should be applied, the maximum number of seconds
rd
should be provided. The best restriction depends on the 3 party tools used to parse the attachments.
If either of these limits is exceeded the script will be canceled and the attachment will not be indexed.
Nota
The zarafa-indexer will utilize the Single Instance Attachments feature, and keep parsed
attachments in its cache. This will reduce the required indexing time for attachment which have
been delivered to multiple users on the same server. The lifetime of this cache is controlled by the
index_cache_timeout configuration option discussed earlier.
40
Configure 3rd Party Components
5.1. Configure the Webserver
Normally, the Zarafa package will configure PHP on the system automatically. In most situations this
chapter can be skipped and continued with Seção 5.1.2, “Configure Apache”.
5.1.1. Configure PHP
PHP is needed in order to use WebAccess. The PHP-MAPI extension is installed in the default
directory of distribution:
• Red Hat Enterprise Linux: /usr/lib/php5/modules/
• SLES / OpenSUSE: /usr/lib/php/extensions/
• Debian: /usr/lib/php5/20060613/
• Ubuntu: /usr/lib/php5/20060613/
If a different directory for PHP-extensions has been selected, move the mapi.so* files to this
location, eg:
mv /usr/lib/php/mapi.so* \
/usr/local/lib/php/
To find the PHP-extensions location, use the following command:
php-config --extension-dir
After the PHP-extension is in the correct directory, add it to the php.ini configuration file. Add the
following line to the php.ini if it does not already exist:
extension = mapi.so
Common places for the php.ini file are:
/etc/php.ini
/etc/php5/apache2/php.ini
With the phpinfo() function it is possible to check whether the module will be loaded correctly.
Search for the ‘MAPI’ part to check for the module. The phpinfo can also be viewed by running php i on the command line if php cli is installed.
5.1.2. Configure Apache
To correctly load the recently added mapi.so extension, the webserver needs to be restarted. The
following example shows how to restart Apache2:
/etc/init.d/apache2 restart
41
Capítulo 5. Configure 3rd Party Components
or
/etc/init.d/httpd restart
The website files are by default installed in the WebAccess directory. Make sure the webclient’s login
page can be opened by browsing to the correct url:
http://<ip-address server>/webaccess/
If the login page is not shown, the webserver needs to be configured to let it access the correct
directory. The following example shows a configuration for Apache2:
Alias /webaccess /usr/share/zarafa-webaccess/
<Directory /usr/share/zarafa-webaccess/>
AllowOverride None
Order allow,deny
Allow from all
</Directory>
Make sure the correct directory holding the PHP WebAccess files is typed. The following command
will tell apache2 to reread its config file:
/etc/init.d/apache2 reload
The WebAccess should now be visible. If it still does not show up, please see Seção 2.3,
“Troubleshooting Installation Issues” for more information.
5.1.3. Apache as a HTTP Proxy
The transmitted data between the client and server is compressed XML, wrapped in HTTP packets.
The use of HTTP allows packets to be forwarded a proxy (or a webserver with built-in proxy
functionality, for example Apache version 2).
The following lines are an example of how Apache can be configured to forward incoming connections
on port 80 to the Zarafa Server on port 236. When the Apache server also accepts HTTPS
connections, the proxyed connections can also be encrypted. The proxy and proxy_html modules
of Apache need to be loaded.
<IfModule mod_proxy.c>
ProxyPass /zarafa http://127.0.0.1:236/
ProxyPassReverse /zarafa http://127.0.0.1:236/
</IfModule>
This means that URLs that begin with /zarafa will be forwarded to localhost on port 236, where
the Zarafa Server listens for incoming connections. These lines can be placed globally, or within a
VirtualHost declaration.
Nota
Keep in mind that using the HTTP proxy has some performance overhead, so for larger setups
it’s not recommended to use this.
42
Configure ZCP OpenLDAP integration
5.2. Configure ZCP OpenLDAP integration
In several network infrastructures OpenLDAP is used as the directory server, keeping track of various
bit of information, most notably: users and their permissions. ZCP integrates with LDAP servers, and
supports OpenLDAP in particular.
Zarafa doesn’t include a LDAP server in the product, so if there’s not yet a LDAP server available in
the environment, one has to be setup or the non-LDAP user plugin has to be used. Please read the
documentation of the used Linux distribution on how to setup an OpenLDAP server.
Connections to OpenLDAP servers run over port 389 or 636 (SSL). For best speed and reliability,
it is always best to install an OpenLDAP server on the same physical host as the Zarafa Server that
replicates with the main LDAP server. Besides performance improvements it also allows the Zarafa
Server to run even when the main LDAP server goes down.
In the follow paragraphs the configuration will be explained. Check the location of the the configuration
files, before changes are made.
OpenLDAP configuration is usually located in /etc, depending on the used distribution it is:
• Red Hat Enterprise Linux: /etc/openldap
• SUSE: /etc/openldap
• Debian & Ubuntu: /etc/ldap
Through out this guide we use: /etc/openldap
5.2.1. Configuring OpenLDAP to use Zarafa schemas
To configure openldap to use Zarafa LDAP schemas, the following configuration directives need to be
added to /etc/openldap/slapd.conf:
include
/etc/openldap/schema/zarafa.schema
Copy the schema file to the ldap directory:
cp /usr/share/doc/zarafa/zarafa.schema /etc/openldap/schema/zarafa.schema
Nota
Most recent Linux distributions use OpenLDAP in dynamic configuration mode.
For more information about installing the Zarafa schema on an OpenLDAP
server with dynamic configuration, see http://www.zarafa.com/wiki/index.php/
OpenLdap:_Switch_to_dynamic_config_backend_%28cn%3Dconfig%29.
5.2.2. Configuring ZCP for OpenLDAP
To integrate ZCP with an OpenLDAP server change the following option in the ldap.cfg
configuration file:
Specify in the ldap_host option the ip-address or server name of the LDAP server.
ldap_host = localhost
43
Capítulo 5. Configure 3rd Party Components
At the moment ZCP doesn’t support the configuration of multiple LDAP servers.
By default the plain LDAP protocol will be used. For configuring secure LDAP, change the
following settings. A howto for configuring OpenLDAP with SSL certificates can be found on http://
wiki.zarafa.com.
ldap_port = 389
ldap_protocol = ldap
The Zarafa Server will only read from the OpenLDAP server. The specified bind user should at least
have read access on the LDAP server.
ldap_bind_user = cn=Manager,dc=example,dc=com
ldap_bind_passwd = secret
ldap_authentication_method = bind
The authentication method can be set to password, so the Zarafa Server will compare the encrypted
password from the LDAP server with the encrypted password the user filled in during the login.
For this method the specified bind user has to be an administrative user in OpenLDAP and have read
access on the password attribute.
The LDAP search base (base DN) that the search for the different objects should start at. This should
be the ‘root’ of the LDAP directory which contains the users, groups and contacts.
ldap_search_base = dc=example,dc=com
ldap_object_type_attribute = objectClass
ldap_user_type_attribute_value = posixAccount
ldap_group_type_attribute_value = posixGroup
ldap_contact_type_attribute_value = zarafa-contact
ldap_company_type_attribute_value = zarafa-company
ldap_addresslist_type_attribute_value = zarafa-addresslist
ldap_dynamicgroup_type_attribute_value = posixGroup,zarafa-dynamicgroup
Based on the type attribute the Zarafa Server will create an object in the database, so it’s get listed in
the Global Address Book. Make sure that the values are always unique for one type of object.
5.2.3. User configuration
Normally a user store is created for each object in the LDAP directory that has the user type attribute
as mentioned in the previous section. An additional search filter can be specified to limit store creation
to a subset of the objects that have the user type attribute. For example:
ldap_user_search_filter = (zarafaAccount=1)
All user related fields can be mapped by the following options:
ldap_user_unique_attribute = uidNumber
ldap_user_unique_attribute_type = text
ldap_fullname_attribute = cn
ldap_loginname_attribute = uid
ldap_emailaddress_attribute = mail
ldap_emailaliases_attribute = zarafaAliases
44
Group configuration
ldap_password_attribute = userPassword
ldap_isadmin_attribute = zarafaAdmin
ldap_nonactive_attribute = zarafaSharedStoreOnly
The unique user attribute is the mapping between a mailbox in the database and the actual user in
LDAP. Make sure this field is never changed as the Zarafa Server will perceive that as a user being
deleted (and created), and will therefore orphan the user’s store.
The email aliases are shown in the Global Address Book details and can be used for resolving email
aliases in Postfix. However it is not possible to deliver email to email aliases.
Extra user information, like addresses, phone numbers and company information can be mapped by
an extra configuration file:
!propmap /etc/zarafa/ldap.propmap.cfg
The specified attributes for users will also be used for contacts.
5.2.4. Group configuration
The groups can be filtered by an extra search filter as well.
ldap_group_search_filter =
ldap_group_unique_attribute = gidNumber
ldap_group_unique_attribute_type = text
For the membership relationships between groups and users, each group object has a group member
attribute. This can be configured by:
ldap_groupmembers_attribute = memberUid
The Zarafa Server will by default use the unique user attribute as value of the group member attribute.
This can be changed by the group member’s relation attribute.
ldap_groupmembers_attribute_type = text
ldap_groupmembers_relation_attribute = uid
Groups can be flagged as security groups by the security group attribute. Security groups are
available in the Global Address Book when creating a new email and setting permissions. To achieve
this the attibute (here zarafaSecurityGroup) must be set to 1. When the zarafaSecurityGroup
attribute is set to 0, the group will be a distribution group. Distribution groups are only available in
the Global Address Book when creating a new email but cannot be used for configuring mailbox
permissions.
ldap_group_security_attribute = zarafaSecurityGroup
ldap_group_security_attribute_type = boolean
5.2.5. Addresslist configuration
Addresslists are groups of users that match a custom condition. These addresslists are shown as subfolders in the Global Address Book.
45
Capítulo 5. Configure 3rd Party Components
Figura 5.1. Addresslists in Global Adress Book
Change or add in ldap.cfg the following configuration settings for the addresslist objects:
ldap_addresslist_search_filter =
ldap_addresslist_unique_attribute = gidNumber
ldap_addresslist_unique_attribute_type = text
ldap_addresslist_filter_attribute = zarafaFilter
ldap_addresslist_name_attribute = cn
See Seção 8.5, “User Management with LDAP or Active Directory” for more information on how to
administer address lists.
5.2.6. Testing LDAP configuration
After the LDAP configuration is done, the changes can be activated by reloading the Zarafa Server.
/etc/init.d/zarafa-server reload
To test whether users and groups will be listed correctly using the LDAP configuration, use:
zarafa-admin -l
for users, and for groups:
zarafa-admin -L
If no users or groups are shown, please check the Zarafa server log file for errors. Setting the
log_level to 6 in the /etc/zarafa/server.cfg will display all LDAP queries send to the server
and possible errors.
Nota
The first time the zarafa-admin -l is done, all mailboxes will be created. This can take some
time, so be patient.
More information about other available LDAP attributes can be found in the man page.
man zarafa-ldap.cfg
46
Configure ZCP Active Directory integration
5.3. Configure ZCP Active Directory integration
5.3.1. Installing the Zarafa ADS Plugin and schema files
ZCP provides an installer for extending the Active Directory schema and installing an Active Directory
snap-in for managing the Zarafa specific attributes.
The Zarafa ADS plugin is only available in the commercial editions of ZCP and can be downloaded on
https://portal.zarafa.com.
The Zarafa ADS Plugin should be installed on the Active Directory server which is the schema master
as a local administrator user.
5.3.1.1. Windows 2000 Server
When the installation is run on a Windows 2000 Server, the setup requires write access to update the
Active Directory Schema. To get the write access the registry key "Schema Update Allowed" must be
enabled.
To edit the registry key, perform the follow steps:
1. Click Start, click Run, and then in the Open box, type: regedit Then press ENTER.
2. Locate and click the following registry key:
HKEY_LOCAL_MACHINE\SYSTEM\CurrentControlSet\Services\NTDS\Parameters
3. On the Edit menu, click New, and then click DWORD Value.
4. Enter the value data when the following registry value is displayed:
Value Name: Schema Update Allowed
Data Type: REG_DWORD
Base: Binary
Value Data: Type 1 to enable this feature, or 0 (zero) to disable it.
5. Quit Registry Editor.
Now the Zarafa Active Directory installer can be executed. For more information take a look at: http://
support.microsoft.com/kb/285172
Nota
Don’t forget to switch the registry key back after the installation.
5.3.1.2. Windows 2003/2008 Server
For Windows 2003 and 2008 Server it’s possible to step through the setup by clicking the next button.
If the Zarafa ADS Plugin is installed, it is possible to edit the Zarafa specific attributes. For editing a
user go to users and computers, select a user and get the properties. The Zarafa tab should be
available if the installation is successfully completed.
47
Capítulo 5. Configure 3rd Party Components
Figura 5.2. Zarafa user tab
Figura 5.3. Zarafa group tab
48
Configuring ZCP for ADS
5.3.2. Configuring ZCP for ADS
To integrate ZCP with an Active Directory server change the following option in the ldap.cfg
configuration file:
Specify in the ldap_host option the ip-address or server name of the Active Directory server.
ldap_host = 192.168.0.100
At the moment ZCP does not support specifying multiple Active Directory servers here. However, it is
possible to point the ldap_host to an Active Directory load balancer.
By default the plain LDAP protocol will be used. For configuring secure LDAP, change the following
settings:
ldap_port = 636
ldap_protocol = ldaps
1
A guide for configuring Active Directory with SSL certificates can be found in an article on our wiki .
The Zarafa Server only reads from (and never writes to) the LDAP or Active Directory server.
Therefore the specified bind user should at least have read access on the LDAP server.
ldap_bind_user = cn=administrator,cn=users,dc=example,dc=com
ldap_bind_passwd = secret
ldap_authentication_method = bind
The LDAP search base (base DN) specifies a branch that the Zarafa Server with limit itself to. This
should be the ‘root’ of the LDAP directory which contains the users, groups and contacts.
ldap_search_base = dc=example,dc=com
By the following type attributes the Zarafa Server knows what objects to create in the database and
what to list in the Global Address Book. Make sure these values are all unique.
ldap_object_type_attribute = objectClass
ldap_user_type_attribute_value = User
ldap_group_type_attribute_value = Group
ldap_contact_type_attribute_value = Contact
ldap_company_type_attribute_value = ou
ldap_addresslist_type_attribute_value = zarafa-addresslist
ldap_dynamicgroup_type_attribute_value = zarafa-dynamicgroup
5.3.3. User configuration
which have specified user type attribute an additional search filter can be specified. For
example:
ldap_user_search_filter = (zarafaAccount=1)
1
http://www.zarafa.com/wiki/index.php/Configure_Active_Directory_with_SSL
49
Capítulo 5. Configure 3rd Party Components
All user related fields can be mapped by the following options:
ldap_user_unique_attribute = objectGUID
ldap_user_unique_attribute_type = binary
ldap_fullname_attribute = cn
ldap_loginname_attribute = sAMAccountName
ldap_emailaddress_attribute = mail
ldap_emailaliases_attribute = otherMailbox
ldap_password_attribute =
ldap_isadmin_attribute = zarafaAdmin
ldap_nonactive_attribute = zarafaSharedStoreOnly
The unique user attribute is the mapping between a mailbox in the database and the actual user. Make
sure this field can never be changed, otherwise a user deletion will be triggered by the Zarafa Server.
The email aliases are shown in the Global Address Book details and can be used for email aliases in
Postfix. However it’s not possible to deliver email to email aliases.
Extra user information, like addresses, phone numbers and company information can be mapped by
an extra configuration file:
!include /etc/zarafa/ldap.propname.cfg
The specified attributes for users will also be used for the contacts.
Importante
The attribute otherMailbox is by default not indexed in Active Directory. It’s required to index
this attribute in Active Directory, otherwise the Active Directory server will have a high CPU load
during search queries on this attribute. For more information about indexing attributes in Active
Directory, see http://go.microsoft.com/fwlink/?LinkId=46790.
5.3.4. Group configuration
The groups can be as well filtered by an extra search filter.
ldap_group_search_filter =
ldap_group_unique_attribute = objectSid
ldap_group_unique_attribute_type = binary
For the membership relationships between groups and users, each group object has a group member
attribute. This can be configured by:
ldap_groupmembers_attribute = member
ldap_groupmembers_attribute_type = dn
By the security group attribute group can be specified as security groups in Active Directory.
Security groups will only displayed when settings permissions and are not default available in the
Global Address Book.
ldap_group_security_attribute = groupType
50
Addresslist configuration
ldap_group_security_attribute_type = ads
5.3.5. Addresslist configuration
Addresslists are groups of users that match a custom condition. These addresslists are showed as
subfolders of the Global Address Book.
Figura 5.4. Addresslists in Global Adress Book
Change or add in ldap.cfg the following configuration settings for the addresslist objects.
ldap_addresslist_search_filter =
ldap_addresslist_unique_attribute = cn
ldap_addresslist_unique_attribute_type = text
ldap_addresslist_filter_attribute = zarafaFilter
ldap_addresslist_name_attribute = cn
See the Seção 8.5, “User Management with LDAP or Active Directory” for more information on how to
administer address lists.
5.3.6. Testing Active Directory configuration
After the LDAP configuration is done, the changes can be activated by reloading the Zarafa Server.
/etc/init.d/zarafa-server reload
To test users and groups will be listed, use:
zarafa-admin -l
and
zarafa-admin -L
If no users or groups are shown, please check the Zarafa server log file for errors. Setting the loglevel
to 6 in the /etc/zarafa/server.cfg will display all LDAP queries by the Zarafa server and
possible errors.
The first time the zarafa-admin -l is done, all mailboxes will be created. This can take some time,
so be patient.
More information about the other available LDAP attributes can be found in the man page.
51
Capítulo 5. Configure 3rd Party Components
man zarafa-ldap.cfg
See Capítulo 8, User Management for Zarafa user management with Active Directory.
5.4. ZCP Postfix integration
ZCP does not include it’s own MTA, but can be integrated all established MTAs found in modern Linux
distributions. Although ZCP support most Linux MTAs, we advise to use Postfix.
In order to deliver an email into a user’s mailbox, the zarafa-dagent is executed. Messages are
passed to the zarafa-dagent from the standard input or by the LMTP protocol.
A few examples of the ZCP Postfix integration are described in the following sections. Keep in mind
that Postfix is very flexible, so many different configurations are possible, most of which are beyond
the scope of this document.
Nota
Configuring antispam and antivirus scanning is beyond the scope for this manual. On the internet
many example configurations are available for the most common MTAs and scanners.
5.4.1. Configure ZCP Postfix integration with OpenLDAP
The Postfix MTA can connect to an OpenLDAP server to resolve primary mail addresses and aliases
of users and groups. The Postfix package in most Linux distributions has LDAP support enabled by
2
default. To read more about Postfix LDAP support see the LDAP README on the Postfix website.
All Postfix configuration files can be found in /etc/postfix directory. The main configuration file is
logically called main.cf
By default Postfix will only accept incoming emails from localhost. To accept emails from the complete
network, configure the following option:
inet_interfaces = all
In order to make Postfix aware of the local emaildomains, add the following line to the main.cf.
virtual_mailbox_domains = example.com, example.org, example.net
Postfix will now see the configured domains as it’s local email domains, however to accept incoming
emails Postfix will do a recipient check. Add the following lines to the main.cf to have Postfix use
LDAP for looking up (valid) recipients:
virtual_mailbox_maps = ldap:/etc/postfix/ldap-users.cf
virtual_alias_maps = ldap:/etc/postfix/ldap-aliases.cf
virtual_transport = lmtp:127.0.0.1:2003
All incoming emails are delivered to the LMTP service of the zarafa-dagent. The delivery needs
to be done on the primary mail address of a user. For resolving the primary mail address of the user,
create the file /etc/postfix/ldap-users.cf and add the following lines:
2
http://www.postfix.org/LDAP_README.html
52
Configure ZCP Postfix integration with Active Directory
server_host = localhost
search_base = ou=Users,dc=example,dc=com
version = 3
scope = sub
query_filter = (mail=%s)
result_attribute = mail
For lookups of mail aliases create the file /etc/postfix/ldap-aliases.cf and add the following
lines:
server_host = localhost
search_base = ou=Users,dc=example,dc=com
version = 3
scope = sub
query_filter = (zarafaAliases=%s)
result_attribute = mail
The search base of users and aliases need to match the search base of the LDAP server. After the
configuration files have been changed Postfix need to be restarted:
/etc/init.d/postfix restart
Make sure the zarafa-dagent is run as a daemon and started at boot time.
For RPM based distributions use:
chkconfig zarafa-dagent on
/etc/init.d/zarafa-dagent start
For Debian based distributions enable the zarafa-dagent by setting the option DAGENT_ENABLED to
yes in the file /etc/default/zarafa-dagent. To enable the zarafa-dagent at boot time use:
update-rc.d zarafa-dagent defaults
Nota
It is advised to enable logging of the zarafa-dagent when running in LMTP mode for
monitoring purposes. Enable the logging options in the zarafa-dagent in /etc/zarafa/
dagent.cfg.
5.4.2. Configure ZCP Postfix integration with Active Directory
The Postfix can resolve primary mail addresses and aliases of users and groups from the Active
Directory server. The Postfix package in most Linux distributions has LDAP support enabled by
3
default. To read more about Postfix LDAP support see the LDAP README on the Postfix website.
All Postfix configuration files can be found in /etc/postfix directory. The main configuration file is
logically called main.cf.
By default Postfix will only accept incoming emails from localhost. To accept emails from the complete
network, configure the following option:
3
http://www.postfix.org/LDAP_README.html
53
Capítulo 5. Configure 3rd Party Components
inet_interfaces = all
In order to make Postfix aware of the local emaildomains, add the following line to the main.cf:
virtual_mailbox_domains = example.com, example.org, example.net
Postfix will now see the configured domains as it’s local email domains, however to accept incoming
emails Postfix will do a recipient check. This recipient check can be done on the Active Directory
server. Add the following lines to the main.cf
virtual_mailbox_maps = ldap:/etc/postfix/ldap-users.cf
virtual_alias_maps = ldap:/etc/postfix/ldap-aliases.cf
virtual_transport = lmtp:127.0.0.1:2003
All incoming emails are delivered to the LMTP service of the zarafa-dagent. The delivery needs
to be done on the primary mail address of a user. For resolving the primary mail address of the user,
create the file /etc/postfix/ldap-users.cf and add the following lines:
server_host = 192.168.0.100
search_base = ou=Users,dc=example,dc=local
version = 3
bind = yes
bind_dn = cn=zarafa,ou=Users,dc=example,dc=local
bind_pw = secret
scope = sub
query_filter = (&(objectClass=person)(mail=%s))
result_attribute = mail
For lookups of mail aliases create the file /etc/postfix/ldap-aliases.cf and add the following
lines:
server_host = 192.168.0.100
search_base = ou=Users,dc=example,dc=local
version = 3
bind = yes
bind_dn = cn=zarafa,ou=Users,dc=example,dc=local
bind_pw = secret
scope = sub
query_filter = (&(objectClass=person)(otherMailbox=%s))
result_attribute = mail
Active Directory has the possibility to create distribution groups which can be used as email
distribution list in ZCP. To use integrate Postfix with distribution groups, Postfix 2.4 or higher is
required.
Nota
Some linux distributions (like RHEL 4 and 5) do not include Postfix 2.4 or higher. Packages of
newer versions of Postfix are usually available as community contributed packages. In case of
4
RHEL 4 and 5 these packages can be found here .
4
http://www.linuxmail.info/postfix-rpm-packages
54
Configure ZCP Postfix integration with virtual users
To support distribution groups add the following line to the virtual_alias_maps:
virtual_alias_maps = ldap:/etc/postfix/ldap-aliases.cf, ldap:/etc/postfix/ldap-groups.cf
Create a new file /etc/postfix/ldap-group.cf and insert the LDAP group configuration in there:
server_host = 192.168.0.100
search_base = ou=groups,dc=example,dc=local
version = 3
bind = yes
bind_dn = cn=zarafa,ou=Users,dc=example,dc=local
bind_pw = secret
query_filter = (&(objectclass=group)(mail=%s))
leaf_result_attribute = mail
special_result_attribute = member
The search base of users, aliases and groups need to match the search base of the Active Directory
server. After the configuration files have been changed Postfix need to be restarted:
/etc/init.d/postfix restart
Make sure the zarafa-dagent is run as a daemon and started at boot time.
For RPM based distributions use:
chkconfig zarafa-dagent on
/etc/init.d/zarafa-dagent start
For Debian based distributions enable the zarafa-dagent by setting the option DAGENT_ENABLED to
yes in the file /etc/default/zarafa-dagent. To enable the zarafa-dagent at boot time use:
update-rc.d zarafa-dagent defaults
Nota
It is advised to enable logging of the zarafa-dagent when running in LMTP mode for
monitoring purposes. Enable the logging options in the zarafa-dagent in /etc/zarafa/
dagent.cfg.
5.4.3. Configure ZCP Postfix integration with virtual users
If no OpenLDAP or Active Directory Server is available, Postfix can be configured with virtual users in
a hash map. In this section we explain how.
By default Postfix will only accept incoming emails from localhost. To accept emails from the complete
network, configure the following option:
inet_interfaces = all
All Postfix configuration files can be found in /etc/postfix directory. The main configuration file is
logically called main.cf
In order to make Postfix aware of the local email domains, add the following line to the main.cf:
55
Capítulo 5. Configure 3rd Party Components
virtual_mailbox_domains = example.com, example.org, example.net
Postfix will now regard these domains as it’s local email domains. In order to accept incoming emails
Postfix will also need to validate the recipient. Add the following lines to the main.cf config file in
order to have Postfix look up recipient from a hash map:
virtual_mailbox_maps = hash:/etc/postfix/virtual
virtual_alias_maps = hash:/etc/postfix/virtual
virtual_transport = lmtp:127.0.0.1:2003
The file /etc/postfix/virtual should contain all email addresses and aliases of a user, in the
following structure:
#Emailaddress or alias
[email protected]
[email protected]
[email protected]
[email protected]
[email protected]
primary mailaddress of user
[email protected]
[email protected]
[email protected]
[email protected]
[email protected], [email protected]
The left column contains the email address or alias, the right column contains the primary email
addresses on which the message should be delivered.
After all users and aliases are added to this file, a hash map needs to be created. The following
command will create the actual hash map /etc/postfix/virtual.db.
postmap /etc/postfix/virtual
All incoming emails are delivered to the zarafa-dagent over LMTP using the primary mail address
of as specified in the hash map.
After changing the configuration files restart Postfix by its init script:
/etc/init.d/postfix restart
For RPM based distributions use:
chkconfig zarafa-dagent on
/etc/init.d/zarafa-dagent start
For Debian based distributions enable the zarafa-dagent by setting the option DAGENT_ENABLED to
yes in the file /etc/default/zarafa-dagent. To enable the zarafa-dagent at boot time use:
update-rc.d zarafa-dagent defaults
Nota
It’s advised to enable logging of the zarafa-dagent when running in LMTP mode for
monitoring purposes. To alter logging options for the zarafa-dagent, adjust the configuration
file: /etc/zarafa/dagent.cfg.
56
Configure Z-Push (Remote ActiveSync for Mobile Devices)
5.5. Configure Z-Push (Remote ActiveSync for Mobile
Devices)
This chapter describes how to configure the Z-Push software to bridge ZCP with ActiveSync enabled
PDAs and smartphones.
Z-Push is available as an open source project on Sourceforge - http://z-push.sourceforge.net
In this manual only the server part of Z-Push is discussed, please refer to our User Manual for
instruction on configuring mobile devices.
Mobile phones, smartphones and PDAs can be synchronized because Z-Push emulates the
ActiveSync functionality of a MS Exchange server on the server side, allowing mobiles to synchronize
via over-the-air ActiveSync (AirSync). Using Z-Push most mobiles can synchronize without installing
any additional software on the device.
Z-Push needs to be installed on a web server. It is highly recommended to use Apache.
5.5.1. Compatibility
Z-Push allows users with PDAs and smartphones to synchronise their email, contacts, calendar items
and tasks directly from a compatible server over UMTS, GPRS, WiFi or other GSM data connections.
The following devices are supported by Z-Push:
• Windows Mobile 5, 6, 6.1 and 6.5
• Nokia E/N-series with Mail for Exchange (M4E)
• Nokia E-series with built in ActiveSync (Nokia Mail 2)
• Sony Ericsson with RoadSync
• Apple iPhone
• Android Cupcake or Donut with third party tools like Nitrodesk Touchdown
• Android Eclair with Contacts and Calendar synchronization or third party tools
• other ActiveSync compatible devices
For detailed information about the devices and their compatibily status, please consult the Mobile
Compatibility List at http://z-push.sourceforge.net/compatibility
5.5.2. Security
To encrypt data between the mobile devices and the server, it’s required to enable SSL support in the
web server. Configuring Apache with SSL certificates is beyond the scope of this document, though
many howtos can be found online.
Keep in mind that some mobile devices require an official SSL certificate and don’t work with self
signed certificates.
5.5.3. Installation
Download the latest Z-Push software from http://z-push.sourceforge.net/download
To Install Z-Push, simply untar the Z-Push tar to the webroot with:
57
Capítulo 5. Configure 3rd Party Components
tar zxvf z-push-<version>.tar.gz -C /var/www/html
The -C option is the destination where the files need to be installed. In the following table the default
webroot directories of where some distributions lets the Apache webserver search for files.
Tabela 5.1. Webroot directories
Distribution
Default webroot
Red Hat Enterprise Linux
/var/www/html
SUSE
/srv/www/htdocs
Debian and Ubuntu
/var/www
Make sure that the ‘state’ directory is writeable for the webserver process, so either change the owner
of the ‘state’ directory to the UID of the apache process, or make it world writeable:
chmod 755 /var/www/z-push/state
chown apache:apache /var/www/z-push/state
The user and group name of Apache will differ per Linux distribution. The table below shows an
overview of the user and group names of the Apache process.
Tabela 5.2. User and groupnames per distribution
Distribution
Apache username
Groupname
Red Hat Enterprise Linux
apache
apache
OpenSuSE and SLES
wwwrun
www
Debian and Ubuntu
www-data
www-data
Now, Apache must be configured to redirect the URL Microsoft-Server-ActiveSync to the
index.php file in the z-push directory. This can be done by adding the line to the httpd.conf file
Alias /Microsoft-Server-ActiveSync /var/www/html/z-push/index.php
Make sure that the line is added to the correct part of the Apache configuration, taking care of virtual
hosts and other Apache configurations.
Importante
It is not possible simply rename the Z-Push directory to Microsoft-Server-ActiveSync.
This will cause Apache to send redirects to the PDA, which will definitely prevent proper
synchronization.
Lastly, make sure that PHP has the following settings:
php_flag
php_flag
php_flag
php_flag
magic_quotes_gpc = off
register_globals = off
magic_quotes_runtime = off
short_open_tag = on
Set this in the php.ini or in a .htaccess file in the root directory of Z-Push. If not setup correctly,
the PDA will not be able to login correctly via Z-Push.
Reload Apache to activate these changes.
58
Mobile Device Management
5.5.4. Mobile Device Management
Users can remote wipe own mobile devices from the ZCP Webaccess without interaction of the
system administrator. The Mobile Device Management (MDM) plugin can be downloaded at: http://
www.zarafa.com/integrations/mobile-device-management-plugin
The system administrator can remote wipe devices from the command line using the z-push-admin
tool.
5.5.5. Upgrade
Upgrading to a newer Z-Push version follows the same path as the initial installation.
When upgrading to a new minor version e.g. from Z-Push 1.4 to Z-Push 1.4.1, the existing Z-Push
directory can be overwritten when extracting the archive. When installing a new major version it
is recommended to extract the tarball to another directory and to copy the state from the existing
installation.
Importante
It is crucial to always keep the data of the state directory in order to ensure data consistency on
already synchronized mobiles.
Without the state information mobile devices, which already have an ActiveSync profile, will receive
duplicate items or the synchronization will break completely.
Please also observe the published release notes of the new Z-Push version. For some releases it is
necessary to e.g. resynchronize the mobile.
5.5.6. Troubleshooting
General configuration
Most of the difficulties are caused by incorrect Apache settings. The Apache setup can be tested using
a webbrowser like Firefox pointing it to:
http://<server>/Microsoft-Server-ActiveSync
If correctly configured, a window requesting username/password should be displayed. Authenticating
using valid credentials should display Z-Push information page, containing the following message:
A Z-Push information page should be displayed, containing the message:
*GET not supported*
This is the z-push location and can only be accessed by Microsoft ActiveSync-capable devices.
Verify the PHP and/or Apache configuration if an error is displayed.
Synchronization problems
If synchronization problems are encountered, a debug.txt file has to be created in the root directory
of Z-Push. This file should be writeable by the Apache server process.
touch /var/www/z-push/debug.txt
59
Capítulo 5. Configure 3rd Party Components
chmod 777 /var/www/z-push/debug.txt
The debug.txt file will collect debug information about the synchronisation.
To obtain a complete synchronization log the file wbxml.php has to be edited and the parameter
WBXML_DEBUG set to true:
define('WBXML_DEBUG', true);
Importante
The debug.txt logfile contains sensible data and should be protected so it can not be
downloaded from the internet.
To protect the debug.txt logfile, a .htaccess has to be created in the z-push root directory,
containing:
<Files debug.txt>
Deny from All
</Files>
Log messages
• Repeatedly “Command denied: Retry after sending a PROVISIONING command”:
Most probably the mobile device does not support provisioning. The LOOSE_PROVISIONING
parameter should be enabled in the configuration. If the messages continues, the ActiveSync
profile should be reconfigured on the device. If this does not help, the PROVISIONING could be
disabled completely in the config file (applies to all devices!). More information can be found at: http://
www.zarafa.com/wiki/index.php/Z-Push_Provisioning
• Exceptions for Meeting requests cause duplicates if accepted on the mobile:
Please update to Z-Push 1.4 or later. In order to fix existing duplicates, the ActiveSync profile on the
mobile has to be recreated or at least the calendar has to be resynchronized completely (disabling
calendarsync and enabling it afterwards).
60
Advanced Configurations
This chapter describes how to configure special setups that go beyond most common installations of
ZCP.
6.1. Running ZCP components beyond localhost
When using the SSL connection with certificates it will not only be possible to encrypt the connection,
but Linux services will also be able to login using a client SSL certificate.
Repeat the certificate creation script to create certificates for client programs like the zarafaspooler, zarafa-monitor, zarafa-gateway, zarafa-dagent and zarafa-admin. It’s
possible to create one certificate for all these programs, or a certificate can be created for each
program separetely. These clients can then login on the SSL connections with their certificate as
authentication.
sh /usr/share/doc/zarafa/ssl-certificates.sh client
Again, when entering the certificate details, at least make the Organizational Unit Name different from
the other certificates. Also, do not forget to fill in the Common Name field.
When asked for the creation of the public key, enter y and press enter. Now a new certificate called
client.pem and a public key called client-public.pem are present. As an example, the
configuration options needed to edit on the dagent.cfg file are as follows:
server_socket = https://name-or-ip-address:237/zarafa
sslkey_file = /etc/zarafa/ssl/client.pem
sslkey_pass = ssl-client-password
Importante
For the zarafa-admin tool to function correctly in a multi-server set-up, a admin.cfg file is
required in the ZCP configuration directory, usually /etc/zarafa/. It also should contain the
options mentioned above.
Enter the correct name or IP-address in the server_socket option. If Another port number for the SSL
connections on the server is used, enter the right port number as well. Replace the password with the
password used while creating the certificate.
Copy the client-public.pem file to the server location:
mkdir /etc/zarafa/sslkeys
mv client-public.pem /etc/zarafa/sslkeys
Now the client knows the private key, and the server knows the public key. The client can login with
this key to the server from anywhere on the network or internet.
Nota
Be careful with the client.pem file. Anybody who has this private key can login to the Zarafa
server and will be the internal SYSTEM user, who can do anything without restriction.
61
Capítulo 6. Advanced Configurations
6.2. Multi-tenancy configurations
This section will provide information regarding the multi-tenancy functionality which was introduced in
Zarafa 6.10. The feature is available in all editions, but only officially supported in the Enterprise and
Hosted editions.
Multi-tenancy mode enables organisations to run multiple organisations on a single ZCP server where
the members of the different organisations won’t see each other.
6.2.1. Support user plugins
Multi-tenancy support can only be enabled when using the DB or LDAP plugin. Currently it’s not
possible to use the Unix plugin. When using the DB plugin, the zarafa-admin tool can be used to
manage tenants (companies), while with the LDAP plugin all information will come directly from LDAP
or Active Directory.
The preferred user plugin for multi-tenancy setups is the LDAP plugin.
6.2.2. Configuring the server
The following configuration options in server.cfg will be used when enabling the multi-tenancy
support.
enable_hosted_zarafa
When set to true it’s possible to create tenants within the Zarafa instance and assign all users and
groups to particular tenants. When set to false, the normal single-tenancy environment is created.
createcompany_script
Location of the createcompany script which will be executed when a new tenant has been created.
deletecompany_script
Location of the deletecompany script which will be executed when a tenant has been deleted.
loginname_format
See Seção 6.2.2.2, “Configuring login name” for more details about this configuration option.
storename_format
See Seção 6.2.2.3, “Configuring store name” for more details about this configuration option.
6.2.2.1. Enabling Multi-tenancy
To enable multi-tenancy support in Zarafa change the following configuration option in server.cfg:
enable_hosted_zarafa = yes
6.2.2.2. Configuring login name
The loginname of a user must be unique in order to correctly allow the login attempt. When enabling
multi-tenancy support in Zarafa, having an unique loginname can become difficult as the number of
62
Configuring the server
companies (tenants) increases. It is easier when the loginname contains the companyname as well, to
ensure all loginnames are unique.
The way the companyname is ‘attached’ to the username to create the loginname can be configured
with the loginname_format configuration option in server.cfg. This configuration option can
contain the following variables:
• %u - The username
• %c - The companyname to which the user belongs
As separation character between the username and companyname a character should be chosen that
does not appear inside the username or companyname itself. Valid characters for example are @ and
\.
Some example loginname_format for a user named "John Doe" who is member of "Exampleorg":
• %u > john
• %u@%c > john@exampleorg
1
• \\%c\%u > \\exampleorg\john
Although having a loginname that contains a %c is mandatory for the DB plugin, it is optional for the
LDAP plugin. Managing unique loginname_s is easier in LDAP because it is possible to use the email
address as the _loginname attribute. See the LDAP configuration file for more information about the
loginname attribute.
Nota
When passing a username to the zarafa-admin tool it should be formatted as configured.
For example if the loginname_format configuration value includes company name variable
(%c), the company name should be passed to the zarafa-admin tool everytime a username is
needed.
6.2.2.3. Configuring store name
When relations between multiple tenants (companies) are allowed, it is possible that users share their
store with users from other tenants. To easily differentiate stores from different tenants, the store name
can be formatted to contain the tenant’s name (companyname) to which the user/store belongs.
In server.cfg the configuration option storename_format is provided for exactly this purpose. In
the format different variables are provided which can be used to different kinds of information.
• %u — The username
• %f — The fullname of the user
• %c — The companyname, name of the tenant, to which the user belongs
Some examples for a user named ‘John Doe’ who is member of the tenant ‘Exampleorg’:
• %u > john
• %f > John Doe
• %f (%c) > John Doe (Exampleorg)
63
Capítulo 6. Advanced Configurations
6.2.2.4. Configuring the LDAP plugin
When using the DB plugin no additional configuration is required. For the LDAP plugin there are
several configuration options that might require changes.
For a multi-tenancy LDAP setup it’s necessary to have the different company in the LDAP tree and
below every company container the users, groups and contacts within that specific company. It’s not
possible to assign a user to a specific company by an LDAP attribute.
See the screenshot below for an example LDAP structure.
Figura 6.1. LDAP tree multi-tenant environment
Change the following lines in the LDAP configuration file, to configure the multi-tenancy support.
ldap_company_unique_attribute = ou
ldap_companyname_attribute = text
ldap_company_scope = sub
Test the settings by using zarafa-admin --list-companies and zarafa-admin -l.
If no companies or users are shown, please check the Zarafa server log file for errors. Setting the
loglevel to 6 in the /etc/zarafa/server.cfg will display all LDAP queries by the Zarafa server
and possible errors.
With multi-tenancy support enabled it’s not only possible to have different organizations on a single
server, but also more advanced settings can be configured, like cross-organization mailbox delegation,
different administrator levels and organization quota levels.
See the zarafa-ldap.cfg man page for more detailed information about these multi-tenancy LDAP
features.
man zarafa-ldap.cfg
6.2.2.5. Public stores
Once the server has been correctly started, stores can be created. There are two type of stores:
Private and public stores. There can only be one public store per company space. When creating a
company, the public store will be created simultaneously. If for some reason the public store for the
specific company is not created, the public store can be created manually by executing the following
command:
/usr/bin/zarafa-admin -s -I <tenant>
Replace <tenant> with the name of the tenant (company) for which the public store should be
created. When the -I option is not used, the public folder will be created for a single-tenancy
environment (And will not be accessible when multi-tenancy Zarafa is enabled). The public folder is by
default available for all users within a tenant (company).
64
Managing tenant (company) spaces
6.2.3. Managing tenant (company) spaces
Nota
Management of tenant (company) spaces through zarafa-admin is only available when using
the DB plugin. When the LDAP plugin is used, all administration needs to be done through the
LDAP or Active Directory server.
To create a company space use the following command:
/usr/bin/zarafa-admin --create-company <companyname>
To delete a company space use the following command:
/usr/bin/zarafa-admin --delete-company <companyname>
To change a company space use the following command:
/usr/bin/zarafa-admin --set-company <companyname>
This command can be combined with the option --qw for setting the quota warning level for the
specified company space.
To control the view privileges for company spaces the following commands can be used:
/usr/bin/zarafa-admin --add-view <viewer> -I <companyname>
/usr/bin/zarafa-admin --del-view <viewer> -I <companyname>
/usr/bin/zarafa-admin --list-view -I <companyname>
The <viewer> is the companyname which receives or looses permission to view company
<companyname>. With the view privileges the Global Address Book can be shared between multiple
organizations or use cross organization mailbox delegation.
/usr/bin/zarafa-admin --add-admin <admin> -I <companyname>
/usr/bin/zarafa-admin --del-admin <admin> -I <companyname>
/usr/bin/zarafa-admin --list-view -I <companyname>
The <admin> is the loginname of the user who receives or looses admin privileges over the company
<companyname>.
6.2.4. Managing users and groups
When using the DB plugin users and groups should be created using the zarafa-admin tool. For
details about using the zarafa-admin tool see man zarafa-admin. The user- or group name
that should be given to the zarafa-admin tool depends on the loginname_format configuration
option.
For example, when loginname_format is set to %u@%c creating a user for tenant exampleorg
would be:
/usr/bin/zarafa-admin --c john@exampleorg ...other options...
And creating a new group for tenant exampleorg would be:
65
Capítulo 6. Advanced Configurations
/usr/bin/zarafa-admin -g group@exampleorg ...other options...
6.2.5. Quota levels
When using a multi-tenancy installation there are 2 types of quota, namely the quota for the tenant
(company) and the quota for the individual user. The quota for the tenant is checked over the total
store size of all users within that tenant plus the public store.
At this time only the warning quota can be configured for a tenant, this means it is not possible to set
the soft or hard quota to limit the tenant’s email capabilities.
Just like the user quota, there are multiple levels for tenant quota, and there is even a new level for the
user quota. A summary of the possible quota levels which can be set in a multi-tenancy environment:
1. Tenant (company) quota:
a. Global company quota: Configured in /etc/zarafa/server.cfg and affects all
tenants within the system.
b. Specific company quota: The quota level for a tenant configured through the plugin
(LDAP or zarafa-admin tool).
2. User quota:
a. Global user quota: This is configured in /etc/zarafa/server.cfg and affects all
users from all tenants.
b. Company user quota: This is the default quota level for all users within a tenant, and is
configured through the plugin at tenant level.
c.
Specific user quota: This is the quota level for a specific user, and is configured through
the user plugin.
As mentioned above the Global company quota and Global user quota can be configured
in the /etc/zarafa/server.cfg file, in there the options quota_warn, quota_soft and
quota_hard for the user quota, and the options companyquota_warn for the tenant quota.
To configure the Specific company quota the zarafa-admin tool can be used when using the
DB plugin. The following command will set the various quota levels over the tenant:
zarafa-admin --update-company <tenant> --qo y --qw <warningquota>
To configure the Specific user quota the zarafa-admin tool can be used when using the DB
plugin. The following command will set the various quota levels over the user:
zarafa-admin -u <user> --qo y --qh <hardquota> --qs <softquota> --qw <warningquota>
To configure the Company user quota the zarafa-admin tool can be used when using the DB
plugin by using the --update-company argument. The following command will set the various user
default quota levels over the tenant:
zarafa-admin --update-company <tenant> --udqo y --udqh <hardquota> --udqs <softquota> --udqw
<warningquota>
When using the LDAP plugin, the attributes which control the quota levels can be configured in /etc/
zarafa/ldap.cfg.
66
Multi-server setup
6.3. Multi-server setup
This chapter will provide information regarding the multi-server functionality which was introduced in
Zarafa 6.30.
Nota
In order to use this feature a valid Zarafa Enterprise license key is necessary and a running
zarafa-licensed is required.
6.3.1. Introduction
The ZCP multi-server feature gives the possibility to distribute ZCP over multiple servers. In this
situation the Zarafa-user-stores are divided over several servers, but still acting as one central system.
The users, groups and tenants (companies) have to be managed in a LDAP or Active Directory server.
Figura 6.2. Multiserver environment on one location
The multi-server support can also be used to support larger number of users or to spread mailboxes
over different geographical locations, see Figura 6.3, “Multiserver environment on two locations”.
Figura 6.3. Multiserver environment on two locations
67
Capítulo 6. Advanced Configurations
The mailbox of a user is always stored on only one server. It’s not possible to synchronize mailboxes
over multiple servers.
When accessing mulitple mailboxes, that are located on different servers, the client will make a
connection to the different multi-server nodes. See the flowchart Figura 6.4, “Multiserver environment”.
Figura 6.4. Multiserver environment
User John is located on Node 1 and the user Mary is located on Node 2. John has read access on the
mailbox of Mary.
1. John starts his Outlook client, which connects to Node 1.
2. The Zarafa Server Node 1 checks the Home Server attribute in the central LDAP server.
3. The Home Server of user John is returned to the Zarafa Server.
4. John’s mailbox is located on Node 1, so the mailbox will be directly loaded.
5. John sends a request to the Zarafa Server to open the mailbox of Mary.
6. The Zarafa Server Node 1 checks the Home Server attribute of Mary in the central LDAP server.
7. The Home Server of user Mary is returned to the Zarafa Server
8. A redirect request is send back to the client
9. The client setup a connection to Node 2 to open the mailbox of Mary.
6.3.2. Prepare / setup the LDAP server for multi-server setup
The Zarafa multi-server version can only be used with the LDAP user plugin.
In a multi-server setup the Zarafa Server will not only request user and group information from the
LDAP server, but also information about the different multi-server nodes will be requested.
1. Setup the LDAP server using Seção 5.2, “Configure ZCP OpenLDAP integration” or Seção 5.3,
“Configure ZCP Active Directory integration” in this manual.
68
Prepare / setup the LDAP server for multi-server setup
2. Add in the LDAP structure a folder or organization unit for each Zarafa Server node in the multiserver setup.
Figura 6.5. Setup directory with all the multi-server nodes
3. Add all the multi-server nodes to this directory or organization unit. In Active Directory the
Computer template can be used for this. When using OpenLDAP a custom LDAP object can be
created, with the device and ipHost objectClass.
4. Every multi-server node should have a common name, FQDN or ip-address and the Zarafa
server details. Make sure the FQDN can always be resolved by the clients.
Figura 6.6. LDAP server attributes
5. The ZarafaContainsPublic attribute can only be set for one multi-server node. At the moment
there is not support for multiple Public Folders on different nodes.
6. The Zarafa LDAP configuration needs to be extended with some extra multi-server configuration
options. An example configuration file for the multi-server setup can be found in the /usr/
share/doc/zarafa/example-config directory. The files ldapms.*.cfg are the specific
multi-server configuration files. The following LDAP configuration entries need to be configured for
a multi-server setup:
ldap_server_type_attribute_value = zarafa-server
ldap_user_server_attribute = zarafaUserServer
ldap_server_address_attribute = ipHostNumber
ldap_server_http_port_attribute = zarafaHttpPort
ldap_server_ssl_port_attribute = zarafaSslPort
ldap_server_file_path_attribute = zarafaFilePath
ldap_server_search_filter =
ldap_server_unique_attribute = cn
7. Every created Zarafa user in the LDAP server needs to be assigned to a Zarafa server node. This
can be set by using the ZarafaUserServer attribute. The attribute should contain the unique server
name.
69
Capítulo 6. Advanced Configurations
In a multi-tenancy situation, all created tenants (companies) in LDAP needs to be updated with the
zarafaCompanyServer attribute. Use the server name as well for this.
6.3.3. Configuring the servers
The following configuration options in server.cfg are provided for Multi-server support.
enable_distributed_zarafa
Enable multi-server environment. When set to true it is possible to spread users and companies over
multiple servers. When set to false, the single-server environment is created.
server_name
The unique server name used to identify each node in the setup. This server name should
be correctly configured in the DNS. This server name should be the same as the value of the
zarafaUserServer attribute.
To enable multi-server support in Zarafa change the following configuration options in server.cfg:
user_plugin = ldapms
enable_distributed_zarafa = yes
server_name = <servername>
server_ssl_enabled = yes
Nota
An upgrade from single server to multi-server support is not a simple task. Please check with the
Zarafa Support if migration is possible for the setup used.
6.3.4. Creating SSL certificates
In a multi-server setup it’s required to configure SSL support, because clients like the zarafadagent, zarafa-admin, zarafa-monitor need a SSL certifcate to login to the different multiserver nodes.
It’s required to first create server side certificates, so the Zarafa Server is able to accept SSL
connections. For the SSL authentication of the Linux clients, like the zarafa-dagent, a private and
public key need to be created.
Follow the steps below to create both the server and client certificates.
1. First, create the directory which will contain the certificates.
mkdir /etc/zarafa/ssl
chmod 700 /etc/zarafa/ssl
2. Create the server certificate, by using the ssl-certificates.sh script in the /usr/share/
doc/zarafa directory, which uses the openssl command and the CA.pl script. Before a server
certificate can be created a root CA is required. If no root CA is found, the script will first create an
own CA.
cd /etc/zarafa/ssl/
sh /usr/share/doc/zarafa/ssl-certificates.sh server
70
Creating SSL certificates
3. Enter a password (passphrase) if you want to use a password for the server key. If a password is
set, then this password is needed later on to sign certificate requests. Then enter the certificate
information. Give extra attention to the Common Name. This has to be the fqdn of the server.
The challenge password at the end may be left empty. At the end of the certificate creation the
certificate need to be signed against the CA. Accept twice the question for the signing and fill the
password of the CA again when asked for.
4. In the last step, the script will ask if it should display the public key of this certificate. This is not
necessary, since the certificates have already been created.
5. After completing the ssl-certificates.sh script, the server certificate is created in the current
directory. The root CA certificate can be found in the same directory or in the default SSL directory
of the Linux distribution. On Ubuntu the root CA will be created as ./demoCA/cacert.pem, on
RedHat the root CA will be created as /etc/CA/cacert.pem. Edit the following lines in /etc/
zarafa/server.cfg.
server_ssl_enabled
server_ssl_port
server_ssl_ca_file
server_ssl_key_file
server_ssl_key_pass
sslkeys_path
=
=
=
=
=
=
yes
237
/etc/zarafa/ssl/demoCA/cacert.pem
/etc/zarafa/ssl/server.pem
<ssl-password>
/etc/zarafa/sslkeys
6. After a restart of the Zarafa-server, the server should accept HTTPS connections. Please check
the server logfile for any errors.
7. If the server certificates are successfully created, the client certificates can be created by the
following steps:
cd /etc/zarafa/ssl
sh /usr/share/doc/zarafa/ssl-certificates.sh client
8. Fill in all the information, like the server certificate. On some linux distributions the Common Name
may not be the same as in the server certificate. At the end of the creation it’s required to sign
again the certificate against the CA and create a public key for the certificate.
9. Two client certificates are created: client.pem and client-public.pem. The client.pem is
the private key and will be used by a client (like dagent or spooler). The client-public.pem is
the public key which is used by the server.
10. Move the public key to the /etc/zarafa/sslkeys directory.
mv /etc/zarafa/ssl/client-public.pem /etc/zarafa/sslkeys
11. Restart the zarafa-server on all nodes to activate the new certificates:
/etc/init.d/zarafa-server restart
12. To test the client SSL certificates change the following lines in the /etc/zarafa/dagent.cfg.
server_socket = https://127.0.0.1:237/zarafa
sslkey_file = /etc/zarafa/ssl/client.pem
sslkey_pass = <ssl-client-password>
71
Capítulo 6. Advanced Configurations
When the certificates have been set up email can now be delivered by using the ssl socket with
the dagent’s private-key, in this test case on localhost.
zarafa-dagent -v -c /etc/zarafa/dagent.cfg <username_on_this_node>
Subject: test email
Test
<ctrl-d>
When connecting through ssl the dagent will verify the private against the root CA. On Red Hat
based systems generated hashed file names have to created of the root certifcates:
yum install openssl-perl
cp /etc/CA/cacert.pem /etc/pki/tls/certs/zarafa-ca.pem
c_rehash
This way the dagent is able to verify the private-key against the CA bundle. On Debian based
systems this step can be ignored.
13. If the test case is successful, it is possible to change the following value in the dagent.cfg back to:
server_socket = file:///var/run/zarafa
14. Deploy all certificates to the different multi-server nodes:
scp -r /etc/zarafa/ssl /etc/zarafa/sslkeys root@node2:/etc/zarafa/
Remember to copy the root CA to the different nodes if this file is placed outside the directories
that have just been copied.
15. Repeat the above steps to configure the server.cfg and dagent.cfg on all the different
nodes. On Red Hat based nodes also add the root CA to the CA bundle. When done test remote
delivery width:
zarafa-dagent -v -c /etc/zarafa/dagent.cfg <username_on_other_node>
Subject: test email
Test
<ctrl-d>
This delivery should not result in any delivery errors, otherwise please check created certificates.
It’s now possible to deliver email from a central MTA to the different multiserver nodes.
The client SSL certificates can be used for the following tools to connect to a remote Zarafa-server:
zarafa-dagent
zarafa-spooler
zarafa-backup, zarafa-restore
zarafa-admin
For advanced multi-server environments and the best Zarafa configuration for a specific setup, the
Zarafa Professional Services are open for advise and support.
72
Zarafa Windows Client Updater
6.4. Zarafa Windows Client Updater
ZCP contains a mechanism that allows Zarafa Windows Clients to update themselves to the latest
version.
Nota
The Zarafa Windows Client Updater is only available to those running the ZCP Professional or
Enterprise edition.
Figura 6.7. Auto-update structure
Restrictions:
• The auto update mechanism does not support the ability to downgrade the client to a certain
version, it will always update the Zarafa Windows Client to the highest version available.
• The Zarafa Windows Client Updater is not available for Windows 2000 or earlier releases.
73
Capítulo 6. Advanced Configurations
6.4.1. Server-side configuration
The Zarafa Windows Client Updater can be enabled by setting the following setting to yes in the
server.cfg of the zarafa-server:
client_update_enabled = yes
When a zarafa-server is upgraded, it will copy the latest updated client installer to the path which
is specified in the server configuration file server.cfg, As shown below.
client_update_path = /var/lib/zarafa/client
The updates at the client update folder follow a naming convention. The Zarafa Server will work only
with those updates that adhere to this convention:
zarafaclient-<major version>.<minor version>.<update number>-<build number>.msi
For example zarafaclient-6.40.0-19050.msi is a valid name of an update.
Based on this naming convention the Zarafa Windows Client Updater finds out if an update of the
client is available. If a suitable version is available for a client, zarafa-server will send the update
to the client machine to update itself with the latest client version.
By default clients communicate with the server over HTTP on port 236 (HTTPS on port 237), unless
a non-default port is specified in the server.cfg. Clients send a request to download a virtual file,
which provides the most current version of the client available on the server.
The client communicates with the server using an encrypted message format. This prevents misuse of
this mechanism for any malicious intent.
Nota
If the default profile is set to use encryption via port 237, the root CA certificate needs to be
installed on the desktop used.
6.4.2. Client-side configuration
The Zarafa Windows Client’s auto-update mechanism consists of an application to start the autoupdate process by the name of ZarafaLaunchUpdater.exe and a windows service known as
ZarafaUpdaterService.exe.
74
Client-side configuration
Figura 6.8. Auto-update structure
The Launch Updater application will be launched at Windows' startup. The command to run the
application is placed in the registry here:
HKEY_LOCAL_MACHINE\Software\Microsoft\Windows\CurrentVersion\Run.
This application will find out client’s current version from the following registry key.
HKEY_LOCAL_MACHINE\Software\Zarafa\Client\Version
This is a new registry key introduced for updater mechanism, it will contain the version of the Zarafa
Windows Client installed on the machine.
The Launch Updater application will read default Outlook profile from the registry to gather the
credentials needed to connect to the Zarafa Server. It informs the Zarafa Server which version of the
Zarafa Windows Client is running, the Zarafa Server responds with a newer Zarafa Windows Client in
case that exists.
6.4.2.1. Zarafa Updater Service
The zarafa updater service runs as a local system account. Therefore, it has all the needed privileges
to install the Zarafa Windows Client on the desktop.
75
Capítulo 6. Advanced Configurations
Figura 6.9. Services
The zarafa updater service will wait on a pipe for Zarafa launch updater application to send it the
current version of the client and the details of the Zarafa Server to connect to. If there is a suitable
update, the service downloads it to c:\windows\temp\zarafaclient.msi. The zarafa updater
service launches this update for installation in a silent mode.
Although, the entire update process is silent, logs can be generated for troubleshooting. To generate
logs the updater service startup parameter needs to have -v option, similarly for the launcher the
registry key needs to have the variable --v. The Updater service log will be written in the All
users\Application data\ directory and the Launch updater log will be written in the <user>
\Application data\ directory.
Nota
The client will only find updates successfully if the default Outlook profile is configured to work
with a Zarafa Server, and if updates are available at that server. Even with the setting to `prompt
for the profile to be used' the Zarafa Windows Client Updater will succeed provided the (greyed
out) drop-down menu specifies the profile configured for Zarafa. Please refer to the User manual
on how to configure Outlook profiles.
6.4.3. MSI Options
If you rather push the zarafa client installation from your Windows Domain server, you probably want
the installation not to install the Zarafa Updater Service. The following options can be used to achieve
that:
ADDDEFAULT="Client"
This will make the installer only install the Outlook Client part, and not the Updater Service. To
install this feature too, add Updater to this option.
APPDIR=D:\Zarafa\Client
To change the default installation path, use the APPDIR variable. Leave this option to normally
install in the "Program Files" directory.
76
Running ZCP Services with regular user privileges
/q
Make the installation quiet. No graphical interface will be shown. To show progress of the
installation, use the modifier b (for basic gui) or r (for reduced gui). If you show the full gui (f
modifier), it will be interactive.
Run msiexec to see a list of other options that can be used. For a typical automated installation, use
the following command:
msiexec /i zarafaclient-en.msi ADDDEFAULT=Client /q
Nota
For an automated installation, you must use the zarafaclient-en.msi file. This installer contains the
English language only, and is specially created for this feature.
6.5. Running ZCP Services with regular user privileges
Normally the Zarafa services are run as root. Since version 5.0 there is the option to change the user
the service runs as, and still start the services as root. However, there are several things to do before
the services can correctly run as a non-root user.
If the log_method is set to file, make sure this directory and file is writable by the user or group the
service will be running as. When a logrotate happens, by sending the service the HUP signal, a new
file is created, which will be owned by the user the service is running under.
The service should still be started as root since it will create a pid file under the system location /var/
run, and will open the network sockets which most likely have a number under 1024, which may only
be opened as root.
The following example shows how to configure the zarafa-server to run as user zarafa and
group zarafa:
addgroup --system zarafa
adduser --system ---home /dev/null ---no-create-home \
--ingroup zarafa \
--disabled-password --gecos 'Zarafa services' \
--shell /bin/false zarafa
mkdir /var/log/zarafa
chown zarafa:zarafa /var/log/zarafa
chown zarafa:zarafa /etc/zarafa/report
Nota
The addgroup and adduser tools may have different syntax on different distributions.
Edit the run_as_user and run_as_group options in the server.cfg file, and set them both to
zarafa. Make sure the local_admin_users option still contains root as an administrative user,
so the zarafa-admin tool can still be used. Otherwise su or sudo has to be used each time the
zarafa-admin tool is started.
77
Capítulo 6. Advanced Configurations
6.6. Single Instance Attachment Storage
Since ZCP 6.30 the Zarafa Server provides Single Instance Attachment Storage to avoid redundant
storage of attachments. This feature, as its name implies, only keeps one copy of each attachment
when a message is sent to multiple recipients within the same server. This mechanism, thus,
minimizes the disk space requirements and remarkably enhances delivery efficiency when messages
with attachments sent to large distribution lists.
Let’s assume the following situation: user A belongs to a Zarafa server; he sends a message with 10
MB of attachments to 30 users that reside on the same server. In a normal situation 30 copies of the
files would be saved on the database, leading to an inefficient usage of the storage space (310 MB
of data). With single instance attachment store, only one copy of each attachment is saved on the
database (only 10 MB of data in this example) and all the 30 users can access the attachment through
a reference pointer.
6.6.1. Single Instance Attachment Storage and LMTP
To use the Single Instance Storage it’s required to use the LMTP delivery method executed from the
virtual_transport in Postfix.
With the aforementioned setup, externally received email with an attachment sent to multiple internal
users will be processed efficiently by saving the attachment only once.
The usage of virtual_transport in Postfix will deliver only one email with a list of the internal
users to the dagent instead of one email per internal user. Without virtual transport option, Single
Instance can not know that the attachment is similar in the email item(s).
Nota
Single instance attachments are accessible between tenants (companies) as well (even when
the tenants cannot view each other), the handling of single storage will be transparent. Thus,
considering the example above, if user A sends the message to 30 users of tenant1 and 50 users
of tenant2, provided that the tenants reside on the same server, only one copy of the attachments
is saved.
Nota
Single instanced attachments will be handled per server, when sending an email with attachment
to multiple Zarafa users spread over multiple servers, each server will get its own Single instance
attachment.
6.7. Single Sign On with ZCP
This chapter will describe how to set up a Single Sign On environment with ZCP, so users
can authenticate without entering their password. ZCP supports both the NTLM and Kerberos
authentication protocol. The Kerberos support is available from ZCP 6.40.2 and higher.
Both methods will be described in the following sections.
78
NTLM SSO with ADS
6.7.1. NTLM SSO with ADS
6.7.1.1. Installing Linux software
The following software needs to be installed:
• winbind
• kinit
Depending on the linux distribution used, this comes through various package names. On Debian use:
apt-get install krb5-user winbind
krb5-user will also install the Kerberos library configuration files in /etc. The package winbind
depends on samba-common which will therefore be installed as well. On Red Hat Enterprise Linux
both the krb5-workstation and the samba-common package are required for this.
To enable NTLM SSO with ZCP set the following option in /etc/zarafa/server.cfg:
enable_sso
= yes
6.7.1.2. ADS: Specific network setup
The following prerequisites have to be met before proceeding:
• Every server must have a DNS name, so their IP-addresses can be found by DNS.
• The time of all servers must be in sync. Time cannot lag for a few minutes.
This document has the following names as example:
• FQDN of the Windows ADS server: ADSERVER.ADSDOMAIN.LOCAL. Therefore, the windows server
is named: ADSERVER, the realm is ADSDOMAIN.LOCAL, and the domain name is ADSDOMAIN.
Workstations can therefore either join the domain using the ADSDOMAIN or ADSDOMAIN.LOCAL
name.
• FQDN of the Linux server is LINUXSERVER.LOCAL. This name does not matter much, as long as it
is handled by the DNS server.
6.7.1.3. Configuring the Kerberos library
First we are going to configure the Kerberos library. The configuration file is /etc/krb5.conf. Under
the libdefaults section, set:
default_realm = ADSDOMAIN.LOCAL
Under the realms section, add the windows realm:
[realms]
ADSDOMAIN.LOCAL = {
kdc = 192.168.0.100
admin_server = 192.168.0.100
password_server = 192.168.0.100
default_domain = ADSDOMAIN.LOCAL
79
Capítulo 6. Advanced Configurations
}
Here, 192.168.0.100 is the IP-address of the Windows ADS domain server.
Now that the Kerberos library is configured, it is possible to login using kinit on the linux server:
kinit Administrator
This will ask for a password:
Password of [email protected]:
Type the administrator password there, and a Kerberos ticket should be provided by the ADS server.
6.7.1.4. Joining the ADS domain
First we’ll configure samba. Edit the /etc/samba/smb.conf file, and add/set the following options:
[global]
realm = ADSDOMAIN.LOCAL
use kerberos keytab = true
security = ads
With this ticket we can join the Windows domain, without typing the password again:
net ads join -S ADSDOMAIN -U Administrator
This command may also be different for different versions of Samba. If this command asks for a
password, something goes wrong and it should be killed with Ctrl-C.
When all goes well, the following line is printed to the screen:
Joined 'LINUXSERVER' to realm 'ADSDOMAIN.LOCAL'
or some other success message.
Now it’s required to restart the winbind daemon, because it keeps too many items cached:
/etc/init.d/winbind restart
And that’s it. To test if authentication actually worked, try the following command:
ntlm_auth --username=john
Where john is a user on the ADS server.
The program will asks for a password. After entering the password, it should say:
NT_STATUS_OK: Success (0x0)
If this step does not work, try restarting winbind, check the DNS names, check with strace what
ntlm_auth tries to do, check with tcpdump if there is actual traffic on the network from ntlm_auth
to the domain server and other lowlevel debugging tools.
80
NTLM SSO with Samba
6.7.2. NTLM SSO with Samba
6.7.2.1. Installing Linux software
The following software needs to be installed on the ZCP server:
winbind
Depending on the Linux distribution used, this comes through various package names. On Debian
use:
apt-get install winbind
On Red Hat Enterprise Linux the samba-common package is required for this.
To enable NTLM SSO with ZCP set the following in the /etc/zarafa/server.cfg file:
enable_sso
= yes
6.7.2.2. Joining the domain
Now the server need to join the Samba domain by executing the following command:
net rpc join
Finish by typing the Administrator password. If successful the prompt should give:
Joined domain <DOMAIN>
The SSO configuration is now done. To test if authentication actually worked, try the following
command:
ntlm_auth --username=john
Where john is a valid Samba user.
The program will asks for a password. After entering the password, it should say:
NT_STATUS_OK: Success (0x0)
If this step does not work, try restarting winbind, check the DNS names, check with strace what
ntlm_auth tries to do, check with tcpdump if there is actual traffic on the network from ntlm_auth
to the domain server and other lowlevel debugging tools.
6.7.3. SSO with Kerberos
6.7.3.1. Requirements and Conventions
• The server that runs ZCP must have the MIT Kerberos software installed.
• ZCP version 6.40.2 or higher needs to be installed for SSO with Outlook.
81
Capítulo 6. Advanced Configurations
• Every server must have a DNS name, so their IP-addresses can be found by DNS. It is also
required that all servers have a PTR record.
• The time of all servers must always be in sync with each other.
This document has the following names as example:
• FQDN of the Windows Active Directory Server: ADSERVER.ADSDOMAIN.LOCAL. Therefore the
windows server is named: ADSERVER, the realm is ADSDOMAIN.LOCAL, and the workgroup name is
ADSDOMAIN.
• FQDN of the Zarafa Server is ZARAFA.LINUXDOMAIN.LOCAL.
In this example the Zarafa Server is placed in a different domain. This is no requirement, but this
makes the document a bit more clear on how to create the Kerberos principal.
6.7.3.2. Active Directory configuration
Create two Kerberos principals in Active Directory, one for SSO with WebAccess and one for SSO with
Outlook.
1. Add a new user httpd-linux to the Active Directory (this user will be used to create the
principal for SSO with WebAccess, username may differ).
2. Add a new user zarafa-linux to the Active Directory (this user will be used to create the
principal for SSO with Outlook, username may differ).
3. Make sure that the option Password never expires is enabled.
4. On the account properties for these users, enable: Use DES encryption types for this account.
5. After setting this account property it is strongly advised to reset the password for these users.
On the Active Directory Server install the Windows Support tools which include the ktpass.exe
program. The Support tools can be found on the Windows Server install cd or can be downloaded
from the Microsoft website.
Nota
When creating a keytab on Windows Server 2008 be sure to specify RC4-HMAC-NT as the
crypto, -mapop set +desonly must be left out.
Execute the following command to create the keytab file for the Apache webserver:
ktpass.exe -princ HTTP/[email protected]
-mapuser EXAMPLE\httpd-linux -crypto DES-CBC-MD5 -ptype KRB5_NT_PRINCIPAL
-mapop set +desonly -pass <password> -out c:\keytab.apache
Execute the following command to create the keytab file for the Zarafa Server:
ktpass.exe -princ zarafa/[email protected]
-mapuser EXAMPLE\zarafa-linux -crypto DES-CBC-MD5 -ptype KRB5_NT_PRINCIPAL
-mapop set +desonly -pass <password> -out c:\keytab.zarafa
• Copy the file keytab.apache to /etc/httpd/conf/ on the Linux server.
82
SSO with Kerberos
• Copy the file keytab.zarafa to /etc/zarafa/ on the Linux server.
6.7.3.3. Kerberos configuration
Open the file /etc/krb5.conf and insert the following lines:
[libdefaults]
default_realm = ADSDOMAIN.LOCAL
[realms]
ADSDOMAIN.LOCAL = {
kdc = adserver.adsdomain.local
admin_server = adserver.adsdomain.local
}
[domain_realm]
.adsdomain.local = ADSDOMAIN.LOCAL
adsdomain.local = ADSDOMAIN.LOCAL
Configuring ZCP for Kerberos SSO with Outlook
Add the following line to the [libdefaults] section of /etc/krb5.conf:
default_keytab_name = /etc/zarafa/keytab.zarafa
6.7.3.4. Zarafa Server configuration
To enable Outlook SSO with ZCP set the following in the server.cfg file:
enable_sso = yes
If the hostname of the Linux server (see the hostname command) does not equal the FQDN of the
Linux server, the server_hostname variable will need to be changed in the server.cfg file:
server_hostname = zarafa.linuxdomain.local
Restart the zarafa-server to activate all changes.
service zarafa-server restart
6.7.3.5. Apache configuration (for SSO with WebAccess)
Install the mod_auth_kerb Apache module, e.g. for Red Hat:
yum install mod_auth_kerb
Open the file /etc/httpd/conf.d/auth_kerb.conf. Add the following lines at the end of this file:
Alias /webaccess /usr/share/zarafa-webaccess
<Directory /usr/share/zarafa-webaccess>
AuthType Kerberos
AuthName "Kerberos Login"
KrbMethodNegotiate On
KrbMethodK5Passwd Off
KrbServiceName HTTP
83
Capítulo 6. Advanced Configurations
KrbAuthRealms ADSDOMAIN.LOCAL
Krb5KeyTab /etc/httpd/conf/keytab.apache
require valid-user
</Directory>
Set the filesystem permissions of the keytab file to 400 and change the owner to the Apache user:
chmod 400 /etc/httpd/conf/keytab.apache
chown apache:apache /etc/httpd/conf/keytab.apache
Restart Apache to activate all changes, e.g. for Redhat:
service httpd restart
6.7.3.6. WebAccess configuration
To setup a Single Sign On environment for Zarafa Collaboration Platform, it’s necessary to make a
trust between the Apache webserver and the Zarafa Storage Server. The trust is necessary to handle
the Webaccess authentication by the Apache webserver, not by the Zarafa Storage Server anymore.
To create this trust, add the running Apache user to the following line in the /etc/zarafa/
server.cfg:
local_admin_users = root apache
To configure the Zarafa WebAccess for Single Sign On change the following option in the
config.php file:
define("LOGINNAME_STRIP_DOMAIN", true);
Nota
In this configuration we assume the Zarafa WebAccess is installed on the same server as the
Zarafa Storage Server.
Restart the Zarafa-server processes to activate this change, e.g. for Red Hat:
service zarafa-server restart
6.7.3.7. Browser configuration
Before Single Sign On can be used in a browser, configure the following settings:
Firefox
1. Type in the addressbar about:config
2. Filter on auth
3. Change the options: network.negotiate-auth.trusted-uris and network.negotiateauth.delegation-uris to .testdomain.com
Internet Explorer
1. Go to Tools > Internet options > Advanced
84
Up and running
2. Make sure the option Enable integrated Windows authentication is enabled
3. Add the url of the Zarafa Server (http://zarafa.linuxdomain.local) to the Local Intranet sites �Restart
the browser and open the WebAccess via the FQDN (http://zarafa.linuxdomain.local/webaccess).
If the configuration is done correctly, the user will be logged in to the WebAccess without typing
the username and password.
6.7.4. Up and running
Now that SSO seems to work with the Linux server, it will automatically be used by zarafa-server.
Now log on to a Windows workstation on the domain and create a new Outlook profile for the user just
logged on, but leave the password field empty. Outlook should create the profile without the password.
6.8. Tracking messages with Zarafa Archiver
This section provides information on how to track all incoming and outgoing messages using Zarafa’s
Archiving technology. This can be useful in more strict e-mail environments where it’s important to be
able to see what has been sent and received regardless of what the owner of the messages has done
with them.
6.8.1. Archive on delivery
Archive on delivery is the process of making sure each message that is received will also be placed in
each attached archive. If the message can not be archived it will not be delivered. Instead it will result
in a temporary failure, causing the MTA to retry the deliver the message at a later time.
Archive on delivery is implemented by the zarafa-dagent process and can be controlled with the
archive_on_delivery configuration option in the dagent configuration file.
When a message is archived with the archive on delivery method, it will become a regular archive
entry, meaning the normal rules apply. This means that if a user moves the message in the primary
store, the message will also move in the archive. This includes moving to the trash folder.
Importante
When a message is deleted from the primary store, the message is not deleted from the archive.
Instead it is moved to the special Deleted folder in the archiver.
6.8.2. Archive on send
Archive on send is the process of making sure each message that is being send by the spooler will
also be placed in each attached archive. If the message not be archived it will not be send. Instead it
will return a failure message to the user.
Archive on send is implemeted by the zarafa-spooler process and can be controlled with the
archive_on_send configuration option in the spooler configuration file.
Importante
E-mail that is sent directly to an SMTP server (usually when using an IMAP account) will not
be archived directly because the zarafa-spooler is not involved in the send process in this
situation.
85
Capítulo 6. Advanced Configurations
When a message is archived with the archive on send method, it becomes a detached archive. This
means it has no reference to the original message in the primary store. There’s also no message in
the primary store that will contain a reference to the archived message.
Nota
Unless disabled, message in the sent items folder are archived as any other message. This
causes extra storage is required because those message have also been archived by the
spooler.
86
Managing ZCP Services
7.1. Starting the services
There are 7 services that can be run:
• zarafa-server, the server process
• zarafa-spooler, sends outgoing email to an SMTP server
• zarafa-monitor, checks for quota limits
• zarafa-gateway, provides POP3 and IMAP access
• zarafa-ical, provides iCal and CALDAV access for clients that use this type of calendar
• zarafa-licensed, needed when using any closed source zarafa module with zarafa-server
• zarafa-indexer, provides a full text indexing service for quick searching through email and
attachments
• zarafa-dagent, runs as a service when using local mail transfer protocol (LMTP, see Seção 5.4,
“ZCP Postfix integration”)
The zarafa-server and zarafa-spooler processes are mandatory to run Zarafa. The zarafamonitor, zarafa-gateway, and zarafa-ical services are optional. To start a service, type:
/etc/init.d/zarafa-<servicename> start
Replace <servicename> with the service that needs to start. To start the zarafa-server, type:
/etc/init.d/zarafa-server start
This script will start the server. The init.d scripts can start, stop and restart the services. If the
init.d script cannot be used, the server needs to be started manually. It is possible to explicitly tell
the zarafa server where the configuration file is, using the -c switch:
/usr/bin/zarafa-server -c /etc/zarafa/server.cfg
The zarafa-server will daemonise, so prompt will almost immediately return. Use -F to start it in
the foreground. The -F switch can also be used for programs like daemontools that monitor services.
7.1.1. Stopping the services
To stop a service, type:
/etc/init.d/zarafa-<servicename> stop
Most services will stop almost immediately. The zarafa-spooler may take up to 10 seconds to
stop. The zarafa-server may take up to 60 seconds to stop.
87
Capítulo 7. Managing ZCP Services
7.1.2. Reloading service configuration
Some options can be modified and reloaded by the service in a live environment. The options that
can be reloaded are described in the manual page of the service configuration file. Example: for the
zarafa-server, type the following command to get the configuration manual page:
man zarafa-server.cfg
In the reloading chapter are all the options that can be reloaded for that service. To make a service
reload the configuration file, type:
/etc/init.d/zarafa-<servicename> reload
7.2. Logging options
Each component allows the log method to be chosen in its configuration file. Two ways of logging
methods are supported: file and syslog.
Normally, all ZCP components log to their respective file located in /var/log/zarafa. This directory
is created when the packages are installed. When this directory is not present, or not writable under
the running user, services will not be able to open their log file and will print the log messages to the
standard output.
Log messages of the server can be configured. The following options need to be altered in the
configuration file:
log_method
How to log the messages. file sends the messages to a file. On Linux systems, syslog sends the
messages to the default maillog through syslog.
log_file
When the log_method is set to file, this is the variable that defines the name of file. The server
needs write access to the directory and file.
log_level
Increase the level of messages that will be logged. Level 6 is the highest level.
log_timestamp
1 or 0; This will enable or disable a timestamp, when using a file as the log method.
Logging of other services than zarafa-server are configured in a same manner as the server.
7.3. Security logging
In ZCP version 7.0 and 6.40.7 a feature for additional security logging was added. Based on this
logging auditing can be done on the Zarafa-server. This logging will contain startup messages, user
authentications and access actions on delegate stores.
88
Logging items
7.3.1. Logging items
7.3.1.1. Startup
When the server is (re)started, the following message will be printed in the security log:
zarafa-server startup by user uid=0
The following tag is possible in the startup line:
uid
The unix user id used to start the server (not necessarily the user the server will be running as)
7.3.1.2. Signals
When the server receives a signal, the following message will be printed in the security log:
zarafa-server signalled sig=15
The following tag is possible in the signal line:
sig
The signal the server received. See man 7 signal for a list of most common signal IDs.
7.3.1.3. Authentications
When a user (not the internal SYSTEM user) logs in, the following message will be printed in the
security log:
Correct authentication:
authenticate ok user='john' from='127.0.0.1' method='User supplied password'
program='apache2'
Incorrect authentication:
authenticate failed user='john' from='127.0.0.1' program='apache2'
Only with sso logins:
authenticate spoofed user='john' requested='test' from='192.168.50.178'
method='kerberos sso' program='OUTLOOK.EXE'
The following tags are possible in the authentication line:
user
The username sent to the zarafa server.
requested
The name in the MAPI profile to open the store of, user tag will be the actual authenticated user.
(SSO only)
from
Unix socket or IP-address the connection to the server was made to.
89
Capítulo 7. Managing ZCP Services
method
Method the user was validated with, one of the following: socket, certificate, password, ntlm sso or
kerberos sso.
program
The program being used to login with.
7.3.1.4. Sharing actions
When a user accesses objects that are not within it’s own store, a message will be logged. This also
means that when a user is using the Public store, messages will be logged.
The following message will be printed in the security log:
Allowed sharing action:
access allowed objectid=387538 type=3 ownername='test' username='constant' rights='view'
Denied sharing action:
access denied objectid=387538 type=3 ownername='test' username='constant' rights='view'
The following tags are possible in the sharing line:
objectid
The object being acted on.
type
The MAPI type of the object (only store, folder and message possible).
ownername
The owner of the store the objectid is in (not necessarily the user that actually created that object)
username
The user performing the action on the object.
rights
The action being performed.
Nota
For the Public store the ownername will be SYSTEM in single-tenancy mode, and the
company name in multi-tenancy mode.
Possible actions in rights:
read
Reading the object.
create
Creating a new object
edit
Editing an existing object (eg altering properties, but also adding/removing of recipients and
attachments)
90
Configuration
delete
Deleting (softdelete) or moving the object
create folder
Creating a new folder
view
Reading the folder hierarchy / contents tables
folder permissions
Altering the permissions on a folder
owner
submitMessage/finishMessage/abortSubmit, sending email actions in someone else’s store is
never permitted unless you’re the owner.
admin
Unused, will never actually be printed
7.3.1.5. Log parsing
When a user is accessing a delegate store or folder an entry is written to the audit.log. To have a more
userfriendly overview of the delegate folders are accessed, the audit.log can parsed.
The following command will parse the logfile and make the output more userfriendly:
perl /usr/share/doc/zarafa/audit-parse.pl < /var/log/zarafa/audit.log
The script will display now the exact foldername which is access in the delegate store:
access allowed rights='view' type='folder' objectid='store\27\IPM_SUBTREE\Calendar'
username='john' ownername='mary'
In this example the user john has opened the Calendar of user mary.
7.3.1.6. Not logged
Only "toplevel" objects rights are checked, so you won’t see actions on attachments, recipients or
msg-in-msg objects.
7.3.2. Configuration
In the /etc/zarafa/server.cfg the following options are added:
audit_log_enabled = no
audit_log_method = syslog
audit_log_file = audit_log_level = 1
audit_log_timestamp = 0
By default the audit logging is disabled. When enabled, the default is to log through syslog since this
can be configured to send the messages to an external syslog server. The syslog authpriv facility
will be used to send the messages to.
91
Capítulo 7. Managing ZCP Services
7.4. Zarafa statistics monitoring
The statistics and server status can be checked with the Zarafa-stats tool. The Zarafa-stats tool offers
the following options:
• --system Gives information about threads, SQL and caches
• --session Gives information about sessions and server time spent in SOAP calls
• --users Gives information about users, store sizes and quotas
• --company Gives information about companies, company sizes and quotas
• --top Shows top-like information about sessions and server resource usage
To use the zarafa-stats tool use for example the following command:
zarafa-stats --top
Last update: Tue Mar 29 13:40:18 2011
Sess: 1
Sess grp: 1
Users: 1
SQL/s SEL:
0 UPD:
0 INS:
0 DEL:
SOAP calls: 6
VERSION
USERID
7,0,0,24874 SYSTEM
tableQueryRows
IP/PID
4527
Hosts: 1
0
CPU: 0%
QLen:
Threads(idle): ()
APP
TIME
zarafa-spooler 0:00
QAge:
CPUTIME CPU
0:00
0
NREQ
6
TASK
The --top overview gives every second status information about CPU usage, connected clients,
active threads, queue length and SQL queries. When the server has a high queue length and age the
amount of threads should be normally increased.
7.5. Soft Delete system
If a user deletes emails, calendar items or complete folders, there are by default moved to the
Deleted Items folder.
When the items are removed from the Deleted Items, the items still will not be fully removed from
the database. Rather, they are marked as deleted, so the user does not see the items. Even when a
user deletes items with <SHIFT> <delete> they are not removed from the database, but marked as
deleted.
This makes restoring of items quick and easy from Outlook: choose Extra from the menu bar in
Outlook menu, and click on Restore deleted items. Items are grouped by the folder they were deleted
from. Most items will appear in the Deleted Items folder as they have been removed from that location.
Soft deletes always remain in the database, until they are purged. When an item will be purged is set
by the softdelete_lifetime configuration value. The default value is 30 (days).
In this example, the value is set to 30. This means that deleted items will be purged from the database
30 days after they were deleted. When this option is set to 0 (zero), the items will never be removed
from the database.
Purges can also be triggered with the following command:
zarafa-admin --purge-softdelete <days>
<days> denotes the number of days that recently removed items are kept. When 0 (zero) all removed
items are purged.
92
Soft Delete system
For performance reasons a manual purge of the softdelete system is advisable for larger ZCP
environments. This can be simply configured by a cron job.
93
94
User Management
8.1. Public folder
Once the server has been correctly started, stores can be created. There are two type of stores:
Private and public stores. There can only be one public store. It can be created with the following
command:
/usr/bin/zarafa-admin -s
The public store is the folder every user can always open. After installation and configuration of the
server a public store needs to be created before private stores can be made. If ZCP is configured for
multi-tenancy, a public store will be automatically created per company.
When using multi-server support, the Public store can only be created on the multi-server node which
has the ZarafaContainsPublic attribute enabled. Currently the Public Store can be created on only
one server. See Seção 6.3.2, “Prepare / setup the LDAP server for multi-server setup” for more
information.
Nota
The Public store is by default accessible and writable for all users. Please review the permissions
before start using the Zarafa system.
8.2. General usage of Zarafa-admin tool
ZCP offers the zarafa-admin administration tool for managing user and groups. When using the
DB plugin the tool can be used to create or delete users and groups. When using the unix or ldap
plugin the tool can’t be used for creation of users and groups, but the tool can still be used to get more
information about users and groups.
All available users or groups can be displayed by using the following commands:
zarafa-admin -l
zarafa-admin -L
To display more information of a specific user, use:
zarafa-admin --details
Username:
Fullname:
Emailaddress:
Active:
Administrator:
Address book:
Last logon:
Last logoff:
Quota overrides:
Warning level:
Soft level:
Hard level:
Current store size:
Groups (1):
john
john
John Doe
[email protected]
yes
no
Visible
03/25/11 19:50:29
03/25/11 19:50:29
no
1024 MB
2048 MB
3072 MB
462 MB
95
Capítulo 8. User Management
Everyone
Sales team
To display more information of a specific group, use:
zarafa-admin --details sales --type group
Groupname:
sales
Fullname:
sales
Emailaddress:
Address book:
Visible
Users (1):
Username
Fullname
Homeserver
----------------------------------------------john
John Doe
mary
Mary Jones
When a user is deleted the mailbox of the user will be still kept in the database. Use the following
command to retrieve a list of stores without a user, and users without a store:
/usr/bin/zarafa-admin --list-orphans
Stores without users:
Store guid
Store size
Guessed username
Last modified
----------------------------------------------------------------------------------------------CAC27E6D70BB45B0B712B760AE6BA0A8
steve
2010/03/22 14:22
2334KB
Users without stores:
Username
----------------------------jane
It can be decided to remove the store from the database or hook the store to another user to be able
to access it once again. To remove the store from the database, an action which is irreversible, use the
following command:
/usr/bin/zarafa-admin --remove-store <store-guid>
To hook the store to another user, use the following command:
/usr/bin/zarafa-admin --hook-store <store-guid> -u <user>
The user given with the -u option will now have the new store attached to it. Re-login with the
webaccess or create a new profile in Outlook to access the store.
Importante
When a store is hooked to a user that already has a store attached to it, the original store will be
orphaned. This original store can be found using the list-orphans options of the zarafaadmin command.
96
Users management with DB plugin
Nota
In ZCP 6.30.6 and earlier versions, the store of the user was moved to the “Deleted Stores” folder
in the public store after a user deletion. This folder is only available for administrative users.
Administrators can browse the folders or delete the deleted stores completely by removing the
corresponding folder from the “Deleted stores” folder. This is relevant for all user plugins.
More information about all options of the zarafa-admin can be found in the man-page.
man zarafa-admin
8.3. Users management with DB plugin
By default the DB plugin will be used as user management plugin. Below will be described how to
manage users with the zarafa-admin command. For user management with the LDAP user plugin,
please see Seção 8.5, “User Management with LDAP or Active Directory”.
At the moment ZCP doesn’t provide a graphical or webbased user management interface, however
there are different 3rd party product that provide webbased management of the Zarafa system.
8.3.1. Creating users with DB plugin
To create a new user, use the following command:
/usr/bin/zarafa-admin -c <user name> -p <password> \
-e <email> -f <full name> -a <administrator>
The fields between <> should be filled in as follows:
• User name: The name of the user. With this name the user will log on to the store.
• Password: The password in plain text. The password will be stored encrypted in the database.
• Email: The email address of the user. Often this is <user name>@<email domain>.
• Full name: The full name of the user. Because the full name will contain space characters, and
maybe other non-alphanumeric characters, the name should be entered with qoutes ('').
• Administrator: This value should be 0 or 1. When a user is administrator, the user will be allowed
to open all Zarafa stores of any user. It is also possible to pass 2 as administrator level, this will
make the user a system administrator who can create/modify/delete companies.
All fields except the email address are case sensitive.
The password can also be set using the -P switch. The password is then not given at the command
prompt, but asked for by the zarafa-admin tool. The password is not echoed on the screen and
needs to be typed twice for verification.
8.3.2. Non-active users
A non-active user cannot login to ZCP, but email can be delivered to this user, and the store can
be opened by users with correct permissions. Non-active users can especially used for functional
mailboxes, resources and rooms.
97
Capítulo 8. User Management
To create a non-active user, use the following command:
zarafa-admin -c <user name> -P -e <email> -f <full name> -n 1
Nota
In ZCP version 6.30 and earlier it’s not possible to switch an active user to non-active and vice
versa. Switching the non-active value will trigger a mailbox deletion.
8.3.3. Updating user information with DB plugin
The same zarafa-admin tool can be used to update the stores and user information. Use the
following command to update:
/usr/bin/zarafa-admin -u <user name> [-U <new user name>] \
[-p <new password>] [-e <email>] \
[-f <full name>] [-a <0|1>]
All the changes are optional. For example, only the password for an existing user may be updated,
leaving the other user information the same as it was.
8.3.4. Deleting users with DB plugin
To delete a user from the server, use the following command:
/usr/bin/zarafa-admin -d <user name>
The user will be deleted from the database. However the store will be kept in the database, but is not
accessible. See Seção 8.2, “General usage of Zarafa-admin tool” for more information about handling
orphant stores.
8.3.5. Configuring ‘Send as’ permissions
ZCP supports two kinds of send delegation:
Send on Behalf permissions
If a user grants the appropriate permission to another user, the latter can send items ‘on behalf of’
the other user. In this case an email or meeting request will be sent with the following “from” field:
<delegate> on behalf of <user>. This setting can only be set from the WebAccess or Outlook client.
Send As permissions
If the system administrator gives the rights to user B to ‘send as’ user A, the receiver of an email will
not see that user B sent the email. The receiver will only see the email address of user A in the “from”
field.
Setting up sendas delegation with zarafa-admin is only applicable with the DB or UNIX plugin.
For setting up LDAP or Active Directory see Seção 8.5, “User Management with LDAP or Active
Directory”.
Add a user to the list of the delegate being updated as a ‘send as’ user. The delegate can now send
mails as the updated users' name, unless the updated user set the delegate as a user based delegate.
This option is only valid with the -u update action.
98
Groups
zarafa-admin -u <delegate> --add-sendas <user>
For example:
zarafa-admin -u helpdesk --add-sendas john
Remove a user from the list of the delegate being updated as a ‘send as’ user. This option is only valid
with the -u update action.
zarafa-admin -u <delegate> --del-sendas <user>
List all users who are in the list of the delegate.
zarafa-admin --list-sendas helpdesk
Send-as list (1) for user helpdesk:
Username
Fullname
----------------------------john
John Doe
Nota
With the DB plugin sendas permissions can not be configured on groups.
Nota
When both the "send on behalf of" and "sendas" permissions are configured on the same user,
the email will always be sent with "on behalf of".
8.3.6. Groups
The server supports groups. Users can belong to any number of groups. Every user always belongs
to the special group Everyone. Defining security settings on folders and items are the same for both
users and groups.
For example, the group Everyone has read access to the Inbox of Peter. At this point, every user may
read the email in Peter’s Inbox, because all users are a member of the group Everyone.
When a new Zarafa user is created, only the free/busy information is open for read access for the
group Everyone by default.
8.3.6.1. Creating groups with the DB plugin
By using the zarafa-admin tool, groups can be created and users can be added or removed from
groups. In the following example, a user john is created, a group administration is created, and the
user john is added to the group administration.
zarafa-admin -c john -p secret -f “John Doe” -e “[email protected]”
zarafa-admin -g administration
zarafa-admin -b john -i administration
Using the options -l or -L, a list of users or groups can be listed from the server.
99
Capítulo 8. User Management
All created users will be member of the group “Everyone”, this can not be changed. Groups created
with DB plugin can be used both for configuring permissions and sending emails to a specific group.
8.4. Users management with UNIX plugin
When integrating ZCP with the default users and groups of the Linux server, some of the user
administration has to be done via the default Linux usermanagement tools, like the useradd tool and
the Zarafa specific user administration has to be done with the zarafa-admin tool.
8.4.1. Creating users with Unix plugin
To create a new user, use the default adduser command.
useradd <username> -c "Full name"
passwd <username>
As the emailaddress of user can’t be specified in the adduser command, the default email address
will be <username>@default_domain. The default domain is specified in the /etc/zarafa/
unix.cfg.
This email address can be changed by using the zarafa-admin tool.
zarafa-admin -u <username> -e <email address>
8.4.2. Non-active users
A non-active user cannot login to ZCP, but email can be delivered to this user, and the store can
be opened by users with correct permissions. Non-active users can especially used for functional
mailboxes, resources and rooms.
To create a non-active user with the unix plugin, make sure the login shell of the user is set to /
bin/false. The login shell for non-active users can be configured as well in the /etc/zarafa/
unix.cfg.
Nota
In ZCP version 6.30 and earlier it’s not possible to switch an active user to non-active and vice
versa. Switching the non-active value will trigger a mailbox deletion.
8.4.3. Updating user information with Unix plugin
Changing user information when using the unix plugin can be done for some information with the
default Linux user management tools and for other information with the zarafa-admin tool.
The following information has to be changed in the /etc/passwd file or with default Linux user
management tools:
• Username
• Password
• Fullname
100
Deleting users with Unix plugin
• Mailbox type (active or non-active)
• Group membership
The following other information has to be changed and configured with the zarafa-admin tool.
• Email address
• Administrator flag
• Quota
• Sendas permissions
8.4.4. Deleting users with Unix plugin
To delete a user from the server, use the following Linux command:
userdel <username>
The user will be deleted from the database. However the store will be kept in the database, but is not
accessible. See Seção 8.2, “General usage of Zarafa-admin tool” for more information about handling
orphant stores.
8.4.5. Configuring ‘Send as’ permissions
ZCP supports two kinds of send delegation:
Send on Behalf permissions
If a user grants the appropriate permission to another user, the latter can send items ‘on behalf of’
the other user. In this case an email or meeting request will be sent with the following “from” field:
<delegate> on behalf of <user>. This setting can only be set from the WebAccess or Outlook client.
Send As permissions
If the system administrator gives the rights to user B to ‘send as’ user A, the receiver of an email will
not see that user B sent the email. The receiver will only see the email address of user A in the “from”
field.
Add a user to the list of the delegate being updated as a ‘send as’ user. The delegate can now send
mails as the updated users' name, unless the updated user set the delegate as a user based delegate.
This option is only valid with the -u update action.
zarafa-admin -u <delegate> --add-sendas <user>
For example:
zarafa-admin -u helpdesk --add-sendas john
Remove a user from the list of the delegate being updated as a ‘send as’ user. This option is only valid
with the -u update action.
zarafa-admin -u <delegate> --del-sendas <user>
101
Capítulo 8. User Management
List all users who are in the list of the delegate.
zarafa-admin --list-sendas helpdesk
Send-as list (1) for user helpdesk:
Username
Fullname
----------------------------john
John Doe
Nota
With the Unix plugin sendas permissions can not be configured on groups.
Nota
When both the "send on behalf of" and "sendas" permissions are configured on the same user,
the email will always be sent with "on behalf of".
8.4.6. Groups with Unix plugin
The server supports groups. Users can belong to any number of groups. Every user always belongs
to the special group Everyone. Defining security settings on folders and items are the same for both
users and groups.
For example, the group Everyone has read access to the Inbox of Peter. At this point, every user may
read the email in Peter’s Inbox, because all users are a member of the group Everyone.
When a new Zarafa user is created, only the free/busy information is open for read access for the
group Everyone by default.
8.4.6.1. Creating groups with the Unix plugin
Groups can be created and users can be added or removed from groups by the default Linux
usermanagement tools. In the following example, the group administration is created and the user john
is added to the group administration.
groupadd administration
usermod -a -G administration john
Using the options -l or -L, a list of users or groups can be listed from the server.
All created users will be member of the group “Everyone”, this can not be changed. Groups created
with unix plugin can be used both for configuring permissions and sending emails to a specific group.
8.5. User Management with LDAP or Active Directory
The Zarafa-server features a system whereby the administrator of a server can specify an LDAPbased server to retrieve user, group and company information. This means that user management
can be simplified for installations and standard LDAP administration tools can be used for user
management. Also, using an LDAP server makes it possible to integrate Zarafa into an existing
environment.
102
The Zarafa user synchronization principle
Various LDAP server systems are supported, and Zarafa will communicate with any standard LDAP
protocol version 3 or later server. This means Zarafa works in combination with industry-standard
solutions as Microsoft Active Directory, OpenLDAP and eDirectory.
This chapter describes loosely how Zarafa uses the LDAP server as a source for user, group, contact
and company information. In most cases, the particular setup used will require other options and
settings than those described in this document. It is therefore assumed that the reader has a good
understanding of how LDAP trees work, and how they are configured in their network.
For more information, please refer to the example configurations and manual pages available on all
systems on which Zarafa is installed.
8.5.1. The Zarafa user synchronization principle
In any Zarafa server, there is a database holding the actual data needed while running Zarafa. Apart
from the actual folder and item data, the database also holds information on data access rights, user
settings, and user meta-data set for users and groups. A lot of this data refers to a specific user ID.
For example, an ACL (Access Control List) for the ‘inbox’ for user A will be stored in the database as
a record in the ACL table. This record holds the actual access rights for the objects, and the user ID to
whom the access control entry has been assigned.
The user ID stated above is therefore a reference to a user ID within the Zarafa database. This ID is
stored in the ‘users’ table, along with a reference to the ID of the user in the external user database (in
this case, an LDAP server). For example, user ‘A’ may have user ID 5 in the Zarafa system, and may
refer to the item (dn=cn=user,dc=example,dc=com) on the LDAP server.
Keeping a list of users in this way also solves the problem of creating the store for a user; There is
no way to trigger a store creation event on the Zarafa server whenever a user is added in the LDAP
server. The ‘users’ table provides a convenient way to track which users are new to the system
and therefore require a new store. The same goes for deleting users, as the user store needs to be
removed when the user is deleted.
So, the ‘users’ table in Zarafa is almost exclusively a mapping between the user ID which is used
internally in Zarafa, and an external reference to a user in the LDAP database. Naturally, when any
new users are added or users are removed from the LDAP server, this table must be kept in-sync with
the changes.
There are many ways of keeping the ‘users’ table synchronised with the LDAP server, but Zarafa has
chosen by default for a ‘just-in-time’ approach. This means that any time a user is requested from the
system, it is first checked in the LDAP server for existence, and then it is checked in the ‘users’ table
for existence. If the user does not exist locally on the Zarafa server, then the user is created on-the-fly,
before returning the information to the caller.
This means that for users and administrators, the synchronisation seems to be real-time; never will
there be a delay between adding or removing users from the LDAP server and the users showing up
in Zarafa.
Because all Zarafa components use the same MAPI interface to connect to the server backend, a
situation can’t arise with any of the Zarafa tools where the user database is out-of-sync. For example,
delivering an email to a user that was just created will never fail due to the user not existing in the
Zarafa users table.
To optimise this synchronisation with very large Global Address Books in LDAP, there is a optional
setting sync_gab_realtime in the server.cfg configuration file. When this option is set to no there is
no real-time synchronisation between the LDAP directory and the Zarafa-server. In this case all Global
Address Book entries will be retrieved from the cache of the Zarafa-server. This is especially useful for
setups which have large addressbooks (more than 10000 entries in the addressbook).
103
Capítulo 8. User Management
Synchronisation between the LDAP and Zarafa server need to be forced with the following command:
zarafa-admin --sync
This command can be executed on daily or hourly basis from a cronjob.
8.5.1.1. Add/Remove events
The mechanism above creates a situation in which there are six events that can be signaled:
• User creation
• Group creation
• Company creation
• User deletion
• Group deletion
• Company deletion
These six events can be coupled to a script (which will be described later) so that system
administrators can perform specific actions on their servers with these events. By default, Zarafa will
only perform the absolute necessary actions during these events; ie store creation and removal. Any
other events can be scripted by the system administrator. This means that by default, no actions are
performed during group creation and group deletion.
8.5.1.2. Group membership
Zarafa synchronises users, groups and companies so that it can assign user ID’s to them, but the
group membership for users is never stored on the Zarafa server. This means that group membership
changes are real-time also, and the Zarafa server will query group membership for a user or a user
list for a group directly from the LDAP server. How the mapping between group members and users is
done will be discussed later.
8.5.1.3. LDAP server dependency
Due to the fact that the Zarafa ‘users’ database doesn’t actually hold the user or group information,
but only a reference to the LDAP server, the Zarafa server cannot function without a running and
accessible LDAP server. If the LDAP server goes down while Zarafa is running, Zarafa tools will not be
able to perform any actions, as almost all server-side actions require some kind of interaction with the
LDAP server. For example, just opening an email requires a query to the LDAP server for the groups
that the current user has been assigned to. Only after fetching this information, can Zarafa determine
whether the current user has the access rights to open the message.
When using OpenLDAP as an LDAP source, it’s recommended to use LDAP replication to guarantee
that an LDAP server is available at all times by running an OpenLDAP server on the same machine as
Zarafa. This will make sure that the local LDAP server will always be reachable, and Zarafa will always
keep running as normal.
8.5.1.4. Setting up the LDAP repository
While in principle almost any LDAP repository can be used with Zarafa, this chapter describes how
Zarafa requests the data from the server and how that data is used within the Zarafa server and tools.
104
User management from ADS
The following information is required from the LDAP server:
• User details (name, email address, etc)
• Contacts (name, email address)
• Group details (name of group)
• Company details
• User/Group relationships (group membership)
• Company members (users and group membership)
• Company relationships (cross-company view and administrator permissions)
The objects that are classified as users, contacts, groups, dynamic groups, addresslists or companies
and the attributes that contain the data can be configured within the Zarafa configuration files, so
Zarafa can meet the LDAP schema needs. However, here are some pointers to keep the LDAP
repository clean and easy-to-manage:
• Always use some sort of graphical user interface for user and group management. There are many
1
LDAP configuration tools. (For example, phpLDAPadmin for OpenLDAP as a web based interface)
• If there are users that will be using Zarafa, while other users will not, try to group these users into
separate ‘folders’. An OU record or any other dc-type object can be used to create these folders.
• If Microsoft Active Directory is run, make sure that the real users are in a separate LDAP folder
so that Zarafa doesn’t need to import the standard users like ‘Administrator’ and ‘Guest’ into the
database. It is also possible to filter the users using an LDAP search query, but these search
queries can become unsatisfactorily large when using ADS.
As a general rule, always use the LDAPS (SSL) protocol while contacting the LDAP server. When SSL
is not used, information will be transmitted clear-text over the wire. This opens possibilities to sniffing
user (and administrator!) passwords from the network wire. Zarafa supports connecting through
LDAP via SSL and a certificate specified in /etc/ldap/ldap.conf which is compatible with both
Microsoft Active Directory as OpenLDAP servers. Zarafa does not yet currently support STARTTLStype encryption. More information about setting up Active Directory with SSL support can be found on
http://wiki.zarafa.com.
8.5.2. User management from ADS
8.5.2.1. Creating users using ADS
New users can be created by using the default user creation wizard of Active Directory. When creating
the user make sure the default email address of the user is always unique.
To configure Zarafa specific information for the user, select the Zarafa tab of the user in Active
Directory.
105
Capítulo 8. User Management
Figura 8.1. Zarafa user tab
8.5.2.2. Creating groups using ADS
In Active Directory both security and distribution groups can be created. The security groups can be
used for settings permissions and sending emails. Distributions groups can only be used for sending
emails and will not be displayed when setting the security permissions on a folder.
ZCP 6.40 and higher versions have support for nested groups.
The groups can be created by using the default group creation wizard in Active Directory.
8.5.2.3. Creating contacts using ADS
The Global Address Book can be extended with contacts. Contacts are external SMTP addresses
which are showed in the Global Address Book and can be used as members of distributionlist.
106
User management from ADS
Figura 8.2. Contact creation wizard
8.5.2.4. Configuring sendas permissions using ADS
Sendas permissions can be configured both on users and contacts. The users or groups that should
be able to sendas a specific address, need to be added in the sendas privilege list of the user or
contact.
To check wether the permissions are correctly set, use:
zarafa-admin --list-sendas <username>
For example:
zarafa-admin --list-sendas helpdesk
Send-as list (1) for user helpdesk:
Username
Fullname
----------------------------john
John Doe
The users that have the sendas permissions, should now be able to add the other address in the
‘FROM’ field and ‘sendas’ this account.
Since ZCP 6.40 the sendas system is changed:
• Configuring the ‘sendas’ permissions is the other way around than previous Zarafa versions.
‘Sendas’ permissions now have to be configured on the user which is select as the FROM address.
107
Capítulo 8. User Management
• See Seção 3.5.1, “Pre 6.40 upgrade steps” for converting the sendas permissions.
• Groups can now also be used for setting sendas permissions.
8.5.2.5. Setup addresslists in ADS
Addresslists are subsets of the Global Address Book that match a specific criteria. For example, you
can create an address list that contains all users in Manchester and another that contains all users in
Stuttgart.
Figura 8.3. Addresslists in the Address book
To setup an addresslist in Active Directory it’s required to have the Zarafa ADS plugin installed.
1. Select a folder in the Active Directory tree from the Users and Group console
2. Create the new addresslist by Action > New > Zarafa Addresslist
3. Insert the name of the addresslist
4. Open the properties of the new created addresslist
5. Add a search filter for the address, see Seção 8.6, “LDAP Condition examples” for example
condition queries.
8.5.2.6. Hide information from Global Address Book with ADS
From ZCP 6.40 it’s possible to hide users, contacts or groups from the Global Address Book. Hiding
information from the Global Address Book can be done by the checkbox Hide from addressbook
option in the Zarafa tab in Active Directory .
108
User management from OpenLDAP
Figura 8.4. Hide a user from the Global Address Book using Active Directory
Nota
The internal System user and the Everyone group can be made hidden in the /etc/zarafa/
server.cfg.
8.5.3. User management from OpenLDAP
8.5.3.1. Creating users using OpenLDAP
Users and groups can be created by using a standard OpenLDAP administration for example
phpldapadmin or the Windows tool ldapadmin.
To configure Zarafa specific information for the user, the objectClass zarafa-user has to add to the
user. Adding this objectClass enables you to add Zarafa attributes to the user, like quota settings,
sendas permissions, mailbox type.
109
Capítulo 8. User Management
8.5.3.2. Creating groups using OpenLDAP
Created groups in OpenLDAP will be used by default as security groups in ZCP. The security groups
can be used for settings permissions and sending emails. Distributions groups can only be used for
sending emails and will not be displayed when setting the security permissions on a folder.
To switch a group to a distribution group the attribute zarafaSecurityGroup has to be set to 0.
8.5.3.3. Creating contacts using OpenLDAP
The Global Address Book can be extended with contacts. Contacts are typically external SMTP
addresses and can be used as members of distributionlist.
Contacts must have the same unique attribute as users. Please check the
ldap_unique_user_attribute in the ldap.cfg for the correct attribute.
8.5.3.4. Configuring sendas permissions using OpenLDAP
Sendas permissions can be configured both on users and contacts. The users or groups that should
be able to sendas a specific address, need to be added in the sendas privilege list.
To check wether the permissions are correctly set, use:
zarafa-admin --list-sendas <username>
For example:
zarafa-admin --list-sendas helpdesk
Send-as list (1) for user helpdesk:
Username
Fullname
----------------------------john
John Doe
The users that have the sendas permissions, should now be able to add the other address in the
‘FROM’ field and ‘sendas’ this account.
Since ZCP 6.40 the sendas system is changed:
• Configuring the ‘sendas’ permissions is the other way around than previous Zarafa versions.
‘Sendas’ permissions now have to be configured on the user which is select as the FROM address.
• See Seção 3.5.1, “Pre 6.40 upgrade steps” for converting the sendas permissions.
• Groups can now also be used for setting sendas permissions.
Nota
When using groups for the sendas permissions, make sure the
ldap_sendas_attribute_type is set to dn. See the following LDAP configuration:
ldap_sendas_attribute = zarafaSendAsPrivilege
ldap_sendas_attribute_type = dn
ldap_sendas_relation_attribute =
110
LDAP Condition examples
8.5.3.5. Setup addresslists in OpenLDAP
Addresslists are subsets of the Global Address Book that match a specific criteria. For example, you
can create an address list that contains all users in Manchester and another that contains all users in
Stuttgart.
To setup an addresslist in OpenLDAP, follow these steps:
1. Create an Organisation Unit for all the addresslists in the LDAP tree.
2. Create a new LDAP object and add the objectClass zarafa-addresslist
3. Set the cn attribute to the unique name of the addresslist
4. Create a condition query in the zarafaFilter attribute, see Seção 8.6, “LDAP Condition
examples” for example condition queries.
Figura 8.5. Addresslists in LDAP
After restarting the zarafa-server, the addresslists should be visible in the global addressbook.
8.5.3.6. Hide information from Global Address Book with OpenLDAP
From ZCP 6.40 it’s possible to hide users, contacts or groups from the Global Address Book.
Hiding information from the Global Address Book can be done by setting the zarafaHidden attribute
in OpenLDAP to 1 on a specific object.
Nota
The internal System user and the Everyone group can be made hidden in the /etc/zarafa/
server.cfg.
8.6. LDAP Condition examples
For both addresslists and dynamic groups a LDAP filter need to specified. For example, the Global
Address Book contains Dutch and German users. It is possible to view these users per country by
creating two addresslists in the LDAP tree. All German users have the domain example.de in the mail
address, and all the Dutch have example.nl.
In this situation, the condition (mail=*@example.de) is used for the addresslist German, and
(mail=*@example.nl) for the addresslist Dutch.
Any combination with LDAP attributes are applicable. This following example selects everyone that is
a Zarafa administrator and has the character p in the cn value.
(&(cn=*p*)(zarafaAdmin=1))
111
Capítulo 8. User Management
This example selects all users with mailaddress [email protected] or [email protected].
(|([email protected])([email protected]))
8.7. Zarafa Feature management
Some features within ZCP can be disabled. By default, all features are disabled. Enabling can be
done globally or on a per-user basis. When a feature has been globally disabled, you may enable the
feature in a per-user basis too. Currently the only features that can be controlled are ‘imap’ and ‘pop3’.
If the ‘pop3’ feature is disabled, users won’t be able to login using the POP3 protocol. The same goes
for the ‘imap’ feature, but this has an extra effect aswell. When a user receives email when the ‘imap’
feature is enabled, the original email and some other imap optimized data will also be saved in the
Zarafa database and attachment directory. This will make the IMAP services provided by the zarafagateway more reliable. On the other hand, it will also use more diskspace. Disabling the ‘imap’ feature
will thus save diskspace.
The following table will show when a user can use IMAP or POP3.
Tabela 8.1. Access control overview
Service enabled
for user
Service disabled
for user
Nothing
configured for user
Service listed in
disable_feature in
server.cfg
Service not listed in
disable_feature in
server.cfg
8.7.1. Globally enabling features
To enable a specific feature, edit the disabled_features setting in your server configuration:
disabled_features = imap pop3
8.7.2. Per-user en- or disabling features
Managing the feature per user depends on the user plugin which is used. For the db and unix plugin
the zarafa-admin tool has to be used to control the features:
zarafa-admin -u john --enable-feature imap
zarafa-admin -u john --disable-feature pop3
For Active Directory or OpenLDAP setups (using the ldap or ldapms user plugin), the features will be
managed from two LDAP attributes zarafaEnabledFeatures and zarafaDisabledFeatures.
Make sure the latest schema file or Active Directory plugin is installed, before using these attributes.
These multi-valued attributes can contain any string, but only the features Zarafa knows about will
actually be provided through the system.
112
Resource configuration
Figura 8.6. Zarafa features tab in ADS
Nota
Make sure a particular feature isn’t listed in both zarafaEnabledFeatures and
zarafaDisabledFeatures. Consistency will not be guaranteed.
8.8. Resource configuration
ZCP supports automatic booking of resources, like beamers, rooms or other equipment. To create a
resource add a new non-active mailbox or select in Active Directory or OpenLDAP the resource user
type.
Before a resource can be booked by users, the resource has to configured to automatically accept
meeting requests. The automatic acception of meeting request can be configured in two ways; by
using the zarafa-admin tool or by using the Outlook client.
To configure the resource from Outlook, use the following steps:
• Make the resource temporarily active
• Login as the resource in Outlook
113
Capítulo 8. User Management
• On the Tools menu, click Options, and then click Calendar Options.
• Under Advanced options, click Resource Scheduling
• Enable the automatic acception of meeting request
• If the resource should decline double bookings of the resource or bookings of recurrent meetings,
the options "Decline recurrencing meeting request" and "Decline conflicting meeting requests"
should be enabled.
• Configure the permissions on the calendar of the resource, so the users can book the resource.
Users should have at least write permissions to the calendar of the resource.
To configure the resource with the zarafa-admin tool, use the following command:
zarafa-admin -u <resource name> --mr-accept 1
The resource will now automatically accept meeting requests. To decline double booking or recurrent
meeting, use:
zarafa-admin -u <resource name> --mr-decline-conflict 1
zarafa-admin -u <resource name> --mr-decline-recurring 1
After the automatic acception of meeting requests is configured, make sure the users have
permissions at least write permissions on the calendar of the resource. The permissions can be
configured by opening the resource mailbox to an administrator user and setting the permissions.
To automatic book a resource make sure the resource option is really selected in the Freebusy times
when schedulign the meeting.
Figura 8.7. Resource option in Freebusy times
8.9. Mailbox Storage Relocator
In order to move mailboxes between different multi-server nodes, the mailbox storage relocator is
available. The zarafa-msr tool should be used to relocate mailboxes to other multi-server nodes.
114
Prerequisites
Nota
The zarafa-msr can only be used in multi-server setups. Multi-server support is available in the
Zarafa Enterprise and Hosted edition.
8.9.1. Prerequisites
• Python 2.5 or above
• Python MAPI binding
• Zarafa 6.40.5 or above
8.9.2. Invokation
The only argument required by zarafa-msr is an configuration file specifying the details of the
relocation operation.
zarafa-msr config.cfg
When zarafa-msr is finished with relocating all mailboxes, it will print
"x migrations have completed successfully, maintaining sync."
where x denotes the number of migrated mailboxes. The administrator can now stop zarafa-msr by
pressing Ctrl-C.
zarafa-msr can safely be stopped at any time by pressing Ctrl-C. On the next run it will continue
where it left off when it was stopped.
8.9.3. Updating LDAP/ADS
There are two situations in which it’s safe to update the home servers for the users whose mailboxes
have been relocated:
1. zarafa-msr is still running. In this case all changes in the original mailbox will continue to be
propagated to the new mailbox.
2. No changes in the original mailbox can occur.
Nota
Running zarafa-msr after the LDAP/ADS has been modified will not work, because it will
automatically connect to the new server for the source mailbox.
8.9.4. Configuration
A typical configuration file looks like this:
[Connection]
serverpath: file:///var/run/zarafa
115
Capítulo 8. User Management
sslkey_file: ssl.cert
sslkey_pass: pass
[Servers]
server_alias1: https://server1:237/zarafa
[Mapping]
user1: https://server2:237/zarafa
//user2: %(server_alias1)s
[Logging]
log_file: /var/log/zarafa/msr.log
8.9.4.1. Connection Section
The Connection section contains information on how to connect to a particular node in the multiserver cluster.
Tabela 8.2. Connection section options
Option
Default value
Description
serverpath
file:///var/run/zarafa
Path to the server. Can be any
node in the cluster.
sslkey_file
-
Path the the SSL key file.
sslkey_pass
-
Password for the SSL key
specified with sslkey_file.
8.9.4.2. Servers Section
The Servers section is an optional section that contains a list of server aliases. These aliases can be
used in the Mapping section when a lot of mailboxes are relocated to the same server.
The Servers section has no predefined options. Instead the format is
sever_alias: server_path
As many items as needed can be placed in this section.
8.9.4.3. Mapping Section
The Mapping section contains the list of usernames and the destination node for their mailboxes. The
destination node can be a full server path or an alias specified in the Servers section.
The Mapping section has no predefined options. Instead, the format is
username: destination_node
As many items as needed can be placed in this section.
To relocate the public store a special name should be used for the username:
1. In a multi-tenant environment, the name of the tenant for which to relocate the public store must
be used.
2. In a single-tenant environment, the special name public must be used.
116
Configuration
8.9.4.4. Logging Section
The Logging section is optional and contaings logging specific settings. Currently the only setting
is the log_file setting, which allows an alternate log file to be selected. By default a file called
zarafa-msr.log will be created in the working directory.
117
118
Performance Tuning
When installing a Linux server with Zarafa, it is imperative that MySQL is correctly configured to
achieve maximum performance on the server; almost all performance bottlenecks are within the
database access itself, so getting the SQL queries to run as quickly as possible is very important.
For large installations, it is strongly advised to tune Zarafa’s cache parameters as well; These are
normally set quite low to make sure that Zarafa can run on relatively low-end servers, but in anything
but the smallest installations, these defaults needs to be upped. Any installation with 50 or more users
should definitely tune the cache parameters for maximum performance.
This document assumes the primary role of the server is to run Zarafa. Always make sure that other
factors are taken into account — for example an anti-spam system or a webserver running a site other
than the Zarafa WebAccess.
More information about performance tuning can also be found on http://wiki.zarafa.com.
9.1. Hardware Considerations
There are also various different hardware setups to consider when setting up a server for Zarafa. We
will discuss the various types of hardware that affect performance.
9.1.1. Memory usage
Tuning memory usage is one of the best ways of increasing server performance; as RAM is generally
cheap, using a large amount of RAM in the server properly can boost performance by orders of
magnitude.
On the other hand, setting RAM usage too high may cause the server to swap out parts of the memory
which need to be swapped back in later, causing a large slowdown in all parts of the server. It is
therefore important to set the RAM usage of various components to a high enough setting to use the
RAM available, and at the same time not to set the RAM usage too high.
To make use of the available RAM as best as possible, Zarafa is designed to use only a fixed amount
of physical RAM; the memory usage does increase per user that connects, but only by a small
amount — the largest part of the memory usage is due to cache settings in the configuration file. This
makes it very easy to control the exact amount of memory that will be used in a live situation, and one
can be pretty sure that the actual amount of RAM used will never go far beyond the values set.
So, in general, the optimum RAM usage is as high as possible, without making the system needing to
swap out important parts of available memory.
It is very difficult to give a fixed value for what the optimal memory usage distribution is for a given
server, as data access patterns vary wildly from server to server. We will describe some rule-of-thumb
parameters here and make the RAM usage patterns as clear as possible here.
9.1.2. Hardware considerations
In servers running Zarafa, the main performance bottleneck will be the route between the data on the
hard disk, and the time it takes to get to the client. This means that generally, I/O performance is more
important than CPU performance. Using this as a basis, the following pointers may help in selecting
the correct hardware for the system:
9.1.3. More Memory is More Speed
More RAM means better caching and therefore better speed.
119
Capítulo 9. Performance Tuning
Zarafa is specifically designed to make use of the large amounts of RAM that is available in modern
servers. On the other hand, please remember that in normal Linux server the maximum amount of
usable RAM in a 32-bit server is 3Gb unless PAE (physical address extension) is supported in the
kernel, CPU and mainboard. If more than 3Gb is needed without some sort of limitation, use a 64 bit
system, a 64 bit Linux OS, and a 64 bit Zarafa package.
9.1.4. RAID 1/10 is faster than RAID 5
In general, a RAID1 or RAID10 array is faster at database accesses than RAID5. If it’s an option,
always go for RAID10.
9.1.5. High rotation speed (RPMs) for better database performance
High-end SCSI or SAS disks regularly have high rotation speeds of 10K or even 15K RPMs. The
rotation speed of the disks affects seek times on the disk. Although the Zarafa database format
is optimized to have data available on the disk in a serial fashion, and most reads are done fairly
localized on the disk, seek time is still a large speed factor for I/O. The higher the rotation speed, the
lower the seek time.
9.1.6. Hardware RAID
Hardware RAID controllers often have large amounts of cache RAM. This can also increase
performance and data throughput of the I/O subsystem. If a hardware RAID controller is used
however, always make sure that either write-back cache is not used, or a functioning UPS and
shutdown process for the server are available, as write-cached data will be lost when the power fails.
This is not only harmfull for the data that was written at that moment, the write could actually corrupt
the on-disk innodb data.
9.2. Memory Usage setup
There are basically 4 large parts of the server setup that use server memory:
• Zarafa’s cell cache (caches individual cell data within a table view)
• MySQL’s buffer size (caches reads and writes from the ibdata file)
• MySQL’s query cache (caches exactly repeated SQL queries)
In a server purely running Zarafa, make sure these caches are setup to use around 80% of the RAM
in the server. The other 20% should be free for system processes, other processes (like MTA) and the
webserver.
For a general rule-of-thumb, the following RAM distribution should be used:
Zarafa caches:
• cache_cell_size: around 25% of total RAM size
• cache_object_size: about 100kb per user
• cache_indexedobject_size: about 512kb per user
MySQL caches:
• innodb_buffer_pool_size: around 25% of total RAM size
• mysql_query_cache: 32Mb
120
Zarafa’s Cell Cache (cache_cell_size)
• innodb_log_file_size: 25% of the innodb_buffer_pool_size
• innodb_log_buffer_size: 32M
This will cause around 50%-60% of the RAM to be tied up in caches for MySQL and Zarafa. The
actual memory usage of the MySQL and Zarafa will then be slightly more than this, giving a total of
around 80% of RAM size.
Please refer to the MySQL documentation for the setting of the innodb_log_file_size and related
settings, as these should also be somewhat higher than the defaults to increase write performance.
They don’t affect read performance.
The 4 settings will now shortly be discussed to illustrate the need of each of these cache settings.
9.2.1. Zarafa’s Cell Cache (cache_cell_size)
Data that is actually shown to the user in table views, passes through the cell cache. This means that
any view of a table in Outlook will only retrieve the information from the database of the cells that are
not already in the cache. The cache lifetime is as long as the entire server lifetime, so opening an
inbox twice in succession should result in 0 disk accesses for the second access. It is a good idea to
set the cell cache as high as can be managed, usually about the same size as the MySQL buffer size.
9.2.2. Zarafa’s object cache (cache_object_size)
The Zarafa object cache is used to cache the hierarchy table. Each object that is accessed will be
placed in this cache, making it faster to retrieve the information again without accessing the database.
The more items users have in their folders, the more important this cache becomes. Since the
information is quite small, this cache does not need to be large. About 1Mb for 10 users is even an
overestimation.
9.2.3. Zarafa’s indexedobject cache (cache_indexedobject_size)
To open a specific item, the program needs to send the server a unique key, called an entryid, to
the server to request that item. This cache is a 2 way index of the MAPI key to a database key and
the other way around. The translation of the keys are quite important. This cache is filled per folder, so
large folders will push out otherwise important information. Normal usage is about 0.5 Mb per user.
9.2.4. MySQL innodb_buffer_pool_size
The MySQL buffer is used to cache reads and writes to the ibdata file. In a dedicated MySQL
machine, this would be anywhere between 50% to 80% of the physical RAM size in the machine.
When MySQL is run on the same machine as Zarafa, it is recommended to be around 25% of physical
RAM size (so that Zarafa’s Cell Cache can also be set to this value)
9.2.5. MySQL innodb_log_file_size
The innodb_log_file_size is the size of the transaction log. By default there are two logfiles. The
preferred value size for the innodb_log_file_size is 25% of the innodb_buffer_pool_size.
9.2.6. MySQL innodb_log_buffer_size
The size of the innodb_log_buffer_size that InnoDB uses to write to the log files on disk. A
large log buffer allows large transactions to run without a need to write the log to disk before the
transactions commit. If big transactions are present, making the log buffer larger will save disk I/O.
This value should be 25% of the innodb_log_file_size.
121
Capítulo 9. Performance Tuning
9.2.7. MySQL query_cache_size
The MySQL query cache is normally disabled. Enabling the query cache can cause a small
performance increase, but increasing it to more than a few MBs is not necessary as most recurring
SQL queries are rather small.
9.3. Setup of modules on different servers
There are several parts of the Zarafa server that can be hosted on different servers. In fact, almost
each part of the server can be run on a different system. However, in practice, splitting all modules
of the server on the different servers, will not increase performance. The main parts that should be
considered are:
• Server1: MySQL server
• Server2: Zarafa server
• Server3: MTA + AntiSpam/AntiVirus
• Server4: WebServer
If these 4 parts were to be hosted on 4 servers, each server would communicate with the others to
work as a single system. This setup can be made quite easily simply by configuring the various parts
of the system to communicate with another server.
For the MySQL server, this only has to be accessed by the zarafa-server process on Server2. This
can very easily be done by setting the correct login and host configuration in Zarafa’s server.cfg.
The Zarafa Server will itself be contacted by Outlook Clients, Server3 (MTA), and Server4
(WebServer). This can be done because the zarafa-server process is listening on port 236 on
Server2, and the other servers can connect with it.
Server3 will accept email on port 25 or fetch email via some email protocol like POP3. After passing
the email through anti-spam and anti-virus, the email will be passed to the zarafa-dagent process.
The zarafa-dagent process can be configured to connect with an SSL certificate with Server2.
This SSL certificate is required because the zarafa-dagent needs to be authenticated because it is
connecting from a different server over port 236. When this is configured in both Server3 and Server2,
the email can be delivered directly to Server2 by Server3.
Server4 is the WebAccess server, running Apache, and accepting connections on port 80 (or 443 for
SSL). The Zarafa WebAccess can be configured (in config.php) to connect over port 236 (or port
237 for SSL) to Server2 for the actual data. Once this has been configured, this server is ready to
serve users. No additional configuration is required.
122
Backup & Restore
Currently, Zarafa provides three ways of restoring items:
• Through the softdelete cache
• Using the brick-level backup system
• Via a full database dump
10.1. Softdelete cache
The softdelete cache can be used by users from Outlook with the Restore deleted items dialog from
the Tools menu to restore deleted items. This will cover most accidental deletions.
Items that are deleted by the user (by emptying the deleted items folder or with a hard delete like shiftdelete in Outlook), are simply placed in the deleted items cache. This means that the item will not
actually be removed from the database until the retention time of the item has expired. This expiration
time in can be specified in the server.cfg configuration time and it set to 30 days by default.
Note that the restore deleted items dialog works on the currently selected folder.
In the following overview, which possibilities can be performed by whom, and when it’s most likely
used can be seen.
Tabela 10.1. Recovery options
Restore request
% of time spent
Backup solution
Performer
Items < 30 days old
80 %
Softdelete system
User and Administrator
Items >= 30 days old
10 %
Bricklevel
Administrator
Items from a specific
sender
5%
Bricklevel
Administrator
Items over a specific
time period
3%
Bricklevel
Administrator
Disaster recovery
2%
MySQL Dump
Administrator
As can be seen, the most common restore request can be performed by the user itself. This is
because the softdelete system is accessable through Outlook.
When older messages are requested to be restored, the Administrator will need to consult the
backups. It is not possible to restore a single item with a MySQL dump, so this is the point where the
zarafa-backup tool steps in.
The bricklevel backups from the zarafa-backup tool contain not enough information for disaster
recovery. A complete dump of the MySQL database will be needed to perform this type of recovery.
10.2. Full database dump
All the data that is stored by Zarafa Server is stored within a MySQL database. This means that for a
disaster recovery, all that is needed is a full backup/restore of the database in question. This can be
done in many ways, but we will explain two ways of doing a good backup here. Also, there are some
ways not to do a backup
123
Capítulo 10. Backup & Restore
10.2.1. SQL dump through mysqldump
The contents of an entire Zarafa database can be saved to a file by using the mysqldump command.
There are, however, some options that are important in this case: the --single-transaction
option should always be specified to mysqldump. When this is done, it will cause mysqldump to write
a single snapshot of the database to disk. This will make sure that any writes done in the database
during the backup will not be backed up. In effect, the dump that is made is a ‘snapshot’ of the
database at the moment that the dump started.
When using mysqldump, it is very important not to do any table locking. This means that the --opt
option and --lock-tables should never be used while dumping a Zarafa database. The reason is
that these options will ‘lock’ the tables while they are being dumped to disk, causing any accesses to
the database to ‘freeze’ while the backup runs. This is firstly unnecessary and secondly may cause
emails that are arriving during backup to bounce (depending on the MTA settings).
A simple:
mysqldump ---single-transaction -p <database> > <dumpfile>
will start a good dump of the database.
10.2.2. Binary data dump via LVM Snapshotting
This technique uses the ‘LVM Snapshot’ feature to effectively ‘freeze’ a binary view of the database
file, while the database keeps running. This ‘frozen’ view is then simply binary copied to a remote
server. This works because innodb makes sure that a single snapshot of a database will always be
coherent (ie. It will be able to recover the database when mysql is started up on this dataset.)
As setting up LVM and configuring LVM for snapshots is a complex process, we refer the user to the
LVM documentation and tools on how to set up an LVM volume for the MySQL data, and how to create
and delete snapshot partitions.
10.2.3. Attachments backup
When using the attachments storage outside the database, make sure that these attachments are also
backupped.
Some backup methods thtat can be used to backup the attachments:
• Rsync
• Copy all files to external backup server or external attached hard-drive
• Use of a (commercial) backup agent for Linux, like SEP, Bacula, Arkeia or others
10.3. Brick-level backups
The commercial editions of ZCP provide a brick-level backup tool. This tool will create a backup of the
mailboxes to separate files. The second time a backup is performed , only the changed and new items
are added to the backup.
Please note that this kind of backup is not meant for disaster recovery. Only items are written in the
backup. No information about the users, or specific information the user create, like rules, are not
backed up.
124
Backup format
10.3.1. Backup format
The backup tool creates 2 files for each mail store: a data file and an index file.
The index file contains information about folders, the hierarchy and messages. The fields are colon
separated. There are 3 types of entries in the index file, which are R, C and M. The R stands for Root,
and is always the first and the only R entry in the index. It contains a key which folders use as their
parent key to denote that they are directly connected to the root container of the store.
The C stands for Container, which can be any type of folder. It has 2 keys, one parent and one to
identify the container itself. It also has a unique restore key. This key can be used to select the folder
for the restore tool. It has an indicator of how many items there are in the folder, a last modification
unix timestamp, and a type of the folder (eg. IPF.Note for a mail folder, IPF.Appointment for a
calender). The last part of a C entry is the name of the folder, which may contain a colon itself, so
therefore it is the last part in the entry. A detailed list of the fields for a Container can be found in the
appendix.
The M in the index stands for Message, which can be any type of message or item. It has a parent
key, which matches a folder key. Then it has a restore key, which can be used to restore this specific
message. A unix timestamp follows which is the last modification time of the message. If a user
changed the message, this timestamp will be updated. The index entry continues with the type of
message (mail, calendar, meeting request, etc). The entry contains an offset where the item starts in
the data file, and lastly contains the subject of the item. Since this subject may contain colons, it is at
the end of the entry. A detailed list of the fields for a Message can be found in the appendix.
The data file is a binary dump of all the message properties, recipients and attachments. Folders are
only set in the index file, thus only the name is backed up, since that is enough to recreate the folder.
10.3.2. Backup process
When a first backup of a store is created, the backup tool will perform the following actions:
• Create a list of all the folders and their contents of the store
• For all items found, write them to disk
Because it first creates a list of everything in the store, newly created items during the backup will
not be seen and thus will not be backed up. Moved items will still be in the backup, but in the original
location they were found in. Hard deleted items during the backup will not be backed up because they
cannot be opened anymore.
When the backup is started again, it will find the previous backup and automatically start an
incremental backup, and will perform the following actions:
• Read the index file and create a tree of the previous backup
• Create a list of all the folders and their contents of the store
• Per container, find the items which are already backed up and did not change and remove those
from the list
• Remove the old index file
• Backup the items left in the list, and append them to the data file
To start the backup process use:
zarafa-backup -u <username>
125
Capítulo 10. Backup & Restore
or for all users and public folders:
zarafa-backup -a
There are a few things to notice about this behavior of the backup tool. When the lists of the previous
index and the current contents of the store are compared, it does this per matching container. This
means that if the user moved items from one folder to another, they will not be found, thus will be
backed up again because they will be marked as ‘new’ in the other folder they we’re moved to.
If a message was changed by the user since the last backup, the item will have a new ‘last
modification date’, and will be backed up again in it’s totality since the backup would become
unbearably slow if it would need to check all the properties of a message to see which property
changed and which not. Overwriting the old message is also problematic because the new message
may be bigger than the old, and it will not fit on the old space of the message.
Then when the actual backup process starts, it will first remove the old index. The index file will then
be rebuild while the backup processes each message found in the list. The data file will be appended
with the new data, keeping the old information which was still available and did not need to be stored
again.
For more options of the zarafa-backup tool use:
man zarafa-backup
10.3.3. Restore process
In order to restore items from the zarafa-backup tool, use the zarafa-restore tool. To restore
items or complete folders, find the corresponding restore key in the user.index.zbk file.
This index file isn’t humanly readable with a text editor. Instead, use the readable-index.pl perl
script, which can be found in /usr/share/zarafa-licensed/zarafa-backup-helpers/. To
identify items, use the container name field or the subject to find the items needed to be restored.
/usr/share/zarafa-licensed/zarafa-backup-helpers/readable-index.pl username.index.zbk
When the items are found, place the restore keys in a separated file, or give them as parameters
to the zarafa-restore tool. If the restore key of a container is entered, the complete container
with all its items will be restored on one level. If the subcontainers of the selected container need to
be restored, add the -r parameter to the command. The following example restores the inbox with
subcontainers from userA. The restore key AF000000 is found in the userA.index.zbk file and
needs to be defined at the end of the command.
zarafa-restore -u userA -r -c userA.index.zbk AF000000
The --c parameter as a reference for the index file is not necessary when using an index file from
the same user. For example, if using zarafa-restore --u userA, the zarafa-restore tool will
automatically use the userA.index.zbk file when index.zbk is in the same directory as where the
command is executed.
In the next example a file (keys.txt) containing multiple restore keys from multiple items and folders
from user userA is used. Every restore key in the file needs to be separated with a new line.
zarafa-restore -u userA --r --i keys.txt
126
Restore process
To do a full mailbox restore of an user, the following script can be used.
/usr/share/zarafa-licensed/zarafa-backup-helpers/full-restore.sh <username>
Please make sure the script is executed from the backup directory. To restore a full mailbox to another
user, use:
/usr/share/zarafa-licensed/zarafa-backup-helpers/full-restore.sh <username>
<destination_username>
For more options of the zarafa-restore tool, please check the man page.
man zarafa-restore
127
128
BlackBerry Enterprise Server
11.1. Prerequisites
ZCP supports both BlackBerry Enterprise Server 4 and BlackBerry Enterprise Server 5 (Express),
however it’s recommended to use the BES5 version. This chapter will only describe the configuration
of ZCP with BES5. For more information about the configuration of ZCP with BES4, see http://
download.zarafa.com/zarafa/blackberry4.zip.
11.1.1. Software
To use BlackBerry Enterprise Server (BES) with Zarafa, the following software packages are needed:
• Zarafa client 6.40.5 of higher
• Zarafa BES connector
• BlackBerry Enterprise Server 5 or Blackberry Enterprise Server Express for MS Exchange (only
version 5.0.1 and 5.0.2 are currently supported)
• Microsoft Outlook 2003 or 2007
• Microsoft CDO (part of Office 2003 installation, or separate download for Office 2007)
A ZCP 6.40.0 or 6.30.18 or later server package, running and configured, is also required.
11.1.2. Authentication Preparation
A trust certificate is needed for communication between the calendaring component of BES
(CalHelper.exe) and Zarafa. For normal (email) communication all that is necessary is a user on
the server with administrator privileges. An existing administrator account can be used for this but it is
also possible to create a new administrator account, normally besadmin.
To create the SSL certificate, follow the steps in Capítulo 6, Advanced Configurations. One certificate
is needed. Copy the private key (e.g. bes.pem) to the window machine running BES, and place the
public key (e.g. bes-public.pem) in Zarafa’s /etc/zarafa/sslkeys folder.
Importante
If a self-signed certificate is being used (very likely), then outlook MUST be started under the
user account which BES is using and connect to the server once using SSL. This will pop-up the
SSL warning dialog which allows a remember this choice option. If this is not selected, problems
will arise with calendar synchronization later on. If a cluster is being run, each server must be
connected to.
129
Capítulo 11. BlackBerry Enterprise Server
11.2. Installation steps
Nota
If an existing 6.30 or 6.40 BES4 server is being replaced, please make sure that the old
CalHelper.exe.local directory is deleted, as it is no longer needed in this version.
Importante
BES 5.0 requires an Active Directory Server for installation. However, this is only needed during
installation and is not required while the server is running. Also, the machine installing BES5
must be a domain member, even though everything can be installed using a local Administrator
account. If neither of these is available, the installation will fail to complete.
1. Make sure the ZCP server is setup correctly for SSL (see previous step).
2. Install Outlook (In Outlook 2003, use the custom install mode to enable CDO).
3. Install CDO (only needed when using Outlook 2007).
4. After installing CDO for Outlook 2007 make sure to copy cdo.dll and gapi32.dll from c:
\program files\common files\system\msmapi\langid to c:\windows\system32,
otherwise blackberry server will be unable to detect CDO.
5. Install the Zarafa Windows Client.
6. Install the Zarafa BES connector.
7. Start→+Zarafa+→+Zarafa BES connector+→+Create MAPI profile+. This will prompt for
Zarafa’s server address, username and password. An Admin account should be specified here to
create the profile. It is recommended SSL is used here, because it will expose any problems with
the SSL setup early on.
8. Find any files on the machine called ems*32.dll (normally any of emsui32.dll,
emsmdb32.dll and emsabp.32.dll) and replace each of them with the supplied
emsmdb32.dll in the program files folder for the Zarafa BES Connector.
9. Set the correct path and password of the SSL key in file C:\Program Files\Zarafa\Zarafa
BES Connector\exchange-redirector.cfg
10. Be sure that all steps (1-10) are done and reboot the machine.
11. Start the BES Installer.
12. When prompted, ignore the warning about the required MAPI libraries.
13. The Administrator account which is requested during the BES installation must be the
Administrator of the Active Directory and the Windows domain
14. When prompted for the Exchange server and the mailbox account, please use the Zarafa Server
address and admin account of step 7.
15. When prompted, ignore the warning about the Exchange View Only Administrator privileges.
130
BES Errors
16. To login to the BES Administration Webservice use BES Authentication if the Active Directory is
only temporarily setup for BES installation
Installation should then complete as normal and the Blackberry services will be automatically started.
Nota
It is impossible to contact any exchange server from the machine after installing the ems*32.dll
files.
11.3. BES Errors
Most problems arise from the following:
• Bad SSL setup on client (MAPI_E_INVALID_ARG errors in MAGT log: bad SSL cert or password).
• Bad SSL setup on server (MAPI_E_NETWORK_ERROR errors in MAGT log).
• Server SSL certificate not accepted for this account (MAPI_E_NETWORK_ERROR errors in MAGT
log). Fix it by starting outlook using SSL once and connect with all the servers in the cluster.
• MAGT log complains about BlackBerryServer profile missing. PR_PROFILE_USER or
PR_PROFILE_HOME_SERVER_DN: The BES profile BlackBerryServer must be recreated using
the start menu item Start+→+Zarafa+→+Zarafa exchange redirector+→+Create BES profile.
• MAST log complains about not being able to update user list from GAB: ZCP 6.40.0 or 6.30.18 or
later on your server.
Nota
Some hints and tricks for the ZCP BlackBerry integration can also be found on http://
www.zarafa.com/wiki/index.php/Blackberry_integration.
131
132
Appendix A; Pre-5.2x upgrade
strategies
12.1. Database upgrades from 4.1 or 4.2
Before Zarafa can be started again, the database must be updated. There are several scripts required,
depending on which version is upgraded from. Upgrade scripts are only needed when upgrading from
a 5.0x version or older. The scripts are as follows:
db-convert-4.1-to-4.2
This perl script upgrades the database from 4.1 to the 4.20 format. These are changes that regard
how users are stored in the database. This script is required, and should be run as follows:
perl /usr/share/doc/zarafa/db-convert-4.1-to-4.2 \
<dbuser> <dbpass> <dbname>
Replace <dbuser> with the username used to connect to the database. Replace <dbpass> with
the password of the database user. If there is no password, enter 2 '' single quotes here. Replace
<dbname> with the name of the Zarafa database. This will result in something like:
perl /usr/share/doc/zarafa/db-convert-4.1-to-4.2 root '' zarafa
db-convert-4.20-to-4.21
This perl script upgrades the database from 4.20 to the 4.21 format. It will replace an indexing key to
improve database speed. This script is highly recommended, and should be run as explained for the
db-convert-4.1-to-4.2 script.
Depending on the size of the database and the speed of the system, this script might take a while, but
it will probably complete within 10 to 30 minutes.
db-convert-4.20-to-innodb.sql
This SQL script converts the converted 4.20 database to InnoDB format. Installations that started at
version 4.0 created MyISAM tables. However, the current SQL database layout is optimized for the
InnoDB format. Therefore, converting the MyISAM database to InnoDB will result in a huge speed
increase. Also, the InnoDB format is less error prone and has less overall table locking. It is highly
recommended to convert the database to InnoDB. On the MySQL prompt, import the script:
mysql> source /usr/share/doc/zarafa/db-convert-4.20-to-innodb.sql
Depending on the size of the database and the speed of the system, this script will take a long to very
long time. Reserve up to 8 hours of time for this conversion to complete for a database with several
gigabytes of data. If the MySQL memory settings are optimized before this script is started, it will run
much faster.
db-convert-4.2x-to-5.00
133
Capítulo 12. Appendix A; Pre-5.2x upgrade strategies
This perl script upgrades the database from 4.2x to the 5.0 format. This script calculates and adds
a store column to the properties table. This makes the table sorted on the disk, increasing data
throughput. Execute this script as described for the db-convert-4.1-to-4.2 script.
Depending on the size of the database and the speed of the system, this script might take a while, but
it will probably complete within 10 to 30 minutes on a fast machine.
Nota
It advisable to start this script with screen, so this script can continue in the background.
12.2. Upgrades from 5.0 to 5.1x and up
The Zarafa 5.10 server can upgrade the database itself. It can do this from the database version which
is needed in 5.0. When upgrading from 4.x installations to 5.10 or higher, the database first needs to
be upgraded with the scripts described above to the 5.0 format. Then the 5.10 server can be started
which will finalize the upgrade from 5.0 to 5.10 itself.
Later versions of Zarafa can always upgrade from a 5.0 database format or newer.
12.3. Important changes since 4.x and 5.x
A configuration option in the server.cfg has been changed since 4.20. The option server_name
has been renamed to server_bind. A configuration file with typing errors in the option names or
non-existing options will render a service inoperable, and it will not start. All the errors found in the
configuration file will be printed.
For the 5.0 version some unused options have been removed from the server configuration. SQLite
support was removed, so the option internal_path was also removed. If this option is in the
server.cfg file, please remove this line before starting the zarafa-server process.
Options not set in a configuration file will keep their default value. Default values can be found in the
example configuration file found in /usr/share/doc/zarafa/example-config. Alternatively the
specific manual page for the service can be read:
man zarafa-<service>.cfg
The Zarafa services did not daemonise in versions before 5.0. However, versions 5.0 and newer do
daemonise, and run in the background. To revert this behavior, use the -F switch of a service to keep
it running in the foreground.
Other configuration changes are found in the gateway. The defaults for the ssl_private_file_key
and ssl_certificate_file have been changed. The default directory is now /etc/zarafa/
gateway/, to distinguish it from the service ssl files.
134
Appendix B; LDAP attribute description
This appendix will describe all available LDAP attributes available in the Zarafa schema. The Zarafa
schema is available in the Active Directory integration toolkit and in the directory /usr/share/doc/
zarafa.
Please keep in mind that the Zarafa LDAP configuration files are very flexible, so these attributes are
not in all cases used.
zarafaQuotaOverride
This attribute is used to override the default quota, which configured in the /etc/zarafa/
server.cfg. This attribute always need to enabled to use a custom quota setting.
OID
1.3.6.1.4.1.26278.1.1.1.1
Syntax
Integer
Multi- or Single-Valued
Single-Valued
zarafaQuotaWarn
This attribute contains the warning quota level in Mb.
OID
1.3.6.1.4.1.26278.1.1.1.2
Syntax
Integer
Multi- or Single-Valued
Single-Valued
zarafaQuotaSoft
This attribute contains the soft quota level in Mb.
OID
1.3.6.1.4.1.26278.1.1.1.3
Syntax
Integer
Multi- or Single-Valued
Single-Valued
zarafaQuotaHard
This attribute contains the hard quota level in Mb.
OID
1.3.6.1.4.1.26278.1.1.1.4
Syntax
Integer
Multi- or Single-Valued
Single-Valued
zarafaUserDefaultQuotaOverride
This attribute will override the system wide quota settings for all users within the company.
OID
1.3.6.1.4.1.26278.1.1.1.5
Syntax
Integer
Multi- or Single-Valued
Single-Valued
135
Capítulo 13. Appendix B; LDAP attribute description
zarafaUserDefaultQuotaWarn
This attribute contains the warning quota level in Mb for all users with the company.
OID
1.3.6.1.4.1.26278.1.1.1.6
Syntax
Integer
Multi- or Single-Valued
Single-Valued
zarafaUserDefaultQuotaSoft
This attribute contains the soft quota level in Mb for all users with the company.
OID
1.3.6.1.4.1.26278.1.1.1.7
Syntax
Integer
Multi- or Single-Valued
Single-Valued
zarafaUserDefaultQuotaHard
This attribute contains the hard quota level in Mb for all users with the company.
OID
1.3.6.1.4.1.26278.1.1.1.8
Syntax
Integer
Multi- or Single-Valued
Single-Valued
zarafaAdmin
This attribute will make a user Zarafa administrator.
OID
1.3.6.1.4.1.26278.1.1.2.1
Syntax
Integer
Multi- or Single-Valued
Single-Valued
zarafaSharedStoreOnly
This attribute will configure a mailbox as a shared store. On shared stores you will not be able to login.
OID
1.3.6.1.4.1.26278.1.1.2.2
Syntax
Integer
Multi- or Single-Valued
Single-Valued
zarafaAccount
This attribute can be used in the LDAP search filters to filter users and groups.
OID
1.3.6.1.4.1.26278.1.1.2.3
Syntax
Integer
Multi- or Single-Valued
Single-Valued
zarafaSendAsPrivilege
This attribute will contain users or groups that should have sendas permissions on the user where this
attribute is added.
136
OID
1.3.6.1.4.1.26278.1.1.2.4
Syntax
DN or DirectoryString
Multi- or Single-Valued
Multi-Valued
zarafaMrAccept
This attribute will configure auto-acception of meeting requests. This attribute is not used in the
current Zarafa versions.
OID
1.3.6.1.4.1.26278.1.1.2.5
Syntax
Integer
Multi- or Single-Valued
Single-Valued
zarafaMrDeclineConflict
This attribute will decline meeting requests when the calendar contains already appointments. This
attribute is not used in the current Zarafa versions.
OID
1.3.6.1.4.1.26278.1.1.2.6
Syntax
Integer
Multi- or Single-Valued
Single-Valued
zarafaMrDeclineRecurring
This attribute will decline meeting requests when they are set as recurrent. This attribute is not used
in the current Zarafa versions.
OID
1.3.6.1.4.1.26278.1.1.2.7
Syntax
Integer
Multi- or Single-Valued
Single-Valued
zarafaId
This attribute can be used a generic unique id for example users and groups. This attribute is default
not used by Zarafa.
OID
1.3.6.1.4.1.26278.1.1.2.8
Syntax
Integer
Multi- or Single-Valued
Single-Valued
zarafaResourceType
This attribute will configure the resource type of a shared store. The available options are Room or
"Equipment"
OID
1.3.6.1.4.1.26278.1.1.2.9
Syntax
DirectoryString
Multi- or Single-Valued
Single-Valued
137
Capítulo 13. Appendix B; LDAP attribute description
zarafaResourceCapacity
This attribute will number of rooms or equipment available.
OID
1.3.6.1.4.1.26278.1.1.2.10
Syntax
Integer
Multi- or Single-Valued
Single-Valued
zarafaHidden
This attribute will hide the object in the Global Address Book. Keep in mind that objects are never
hidden for administrator users.
OID
1.3.6.1.4.1.26278.1.1.2.11
Syntax
Integer
Multi- or Single-Valued
Single-Valued
zarafaEnabledFeatures
Controls which features are explicitly enabled for a user, and overrides any disabled features in the
server disabled_features setting.
OID
1.3.6.1.4.1.26278.1.1.2.13
Syntax
String
Multi- or Single-Valued
Multi-Valued
zarafaDisabledFeatures
Controls which features are explicitly disabled for a user.
OID
1.3.6.1.4.1.26278.1.1.2.14
Syntax
String
Multi- or Single-Valued
Multi-Valued
zarafaAliases
This attribute will contain all other email addresses and aliases for the user.
OID
1.3.6.1.4.1.26278.1.1.3.1
Syntax
DirectoryString
Multi- or Single-Valued
Multi-Valued
zarafaUserServer
This attribute will the homeserver of a user when running in multi-server mode.
OID
1.3.6.1.4.1.26278.1.1.4.1
Syntax
DirectoryString
Multi- or Single-Valued
Single-Valued
138
zarafaSecurityGroup
This attribute will specify whether a group has security possibilities. When the attribute is set to 0, the
group will be seen as distribution group.
OID
1.3.6.1.4.1.26278.1.2.2.1
Syntax
Integer
Multi- or Single-Valued
Single-Valued
zarafaViewPrivilege
This attribute will contain companies with view privileges over the selected company.
OID
1.3.6.1.4.1.26278.1.3.2.4
Syntax
DirectoryString
Multi- or Single-Valued
Multi-Valued
zarafaAdminPrivilege
This attribute will contain users from different companies which are administrator over selected
company.
OID
1.3.6.1.4.1.26278.1.3.2.5
Syntax
DirectoryString
Multi- or Single-Valued
Multi-Valued
zarafaSystemAdmin
This attribute will specify the user who is the system administrator for this company.
OID
1.3.6.1.4.1.26278.1.3.2.6
Syntax
Integer
Multi- or Single-Valued
Single-Valued
zarafaQuotaUserWarningRecipients
This attribute will contain users who will receive a notification email when a user exceeds his quota.
OID
1.3.6.1.4.1.26278.1.3.1.5
Syntax
DirectoryString
Multi- or Single-Valued
Multi-Valued
zarafaQuotaCompanyWarningRecipients
This attribute will contain email address who will receive a notification email when a company exceeds
his quota.
OID
1.3.6.1.4.1.26278.1.3.1.6
Syntax
DirectoryString
Multi- or Single-Valued
Multi-Valued
139
Capítulo 13. Appendix B; LDAP attribute description
zarafaCompanyServer
This attribute will contain the home server of a company when running in multi-server mode.
OID
1.3.6.1.4.1.26278.1.3.4.1
Syntax
DirectoryString
Multi- or Single-Valued
Single-Valued
zarafaHttpPort
This attribute will contain the port for the http connections when running in multi-server mode.
OID
1.3.6.1.4.1.26278.1.4.4.1
Syntax
Integer
Multi- or Single-Valued
Single-Valued
zarafaSslPort
This attribute will contain the port for the https connections when running in multi-server mode.
OID
1.3.6.1.4.1.26278.1.4.4.2
Syntax
Integer
Multi- or Single-Valued
Single-Valued
zarafaFilePath
This attribute will contain the unix socket or the named pipe of the server when running in multi-server
mode.
OID
1.3.6.1.4.1.26278.1.4.4.3
Syntax
DirectoryString
Multi- or Single-Valued
Single-Valued
zarafaContainsPublic
This attribute will enable the public store for a specific multi-server node. Make sure only one node has
enabled this attribute.
OID
1.3.6.1.4.1.26278.1.4.4.4
Syntax
Integer
Multi- or Single-Valued
Single-Valued
zarafaFilter
This attribute will contain the LDAP filter to apply for an addresslist or dynamic group.
OID
1.3.6.1.4.1.26278.1.5.5.1
Syntax
DirectoryString
Multi- or Single-Valued
Single-Valued
140
zarafaBase
This attribute will contain the LDAP search base to apply for an addresslist or dynamic group.
OID
1.3.6.1.4.1.26278.1.5.5.2
Syntax
DirectoryString
Multi- or Single-Valued
Single-Valued
141
142