1
Color DUAL QUAD Splitter EVB User Manual
1 KEYPAD PANEL DESCRIPTION ...............................................................2
2 KEYPAD FUNCTION.......................................................................................3
2.1 CH1/CH5,CH2/CH6,CH3/CH7,CH4/CH8 ...........................................................................3
2.2 AUTO ...........................................................................................................................................3
2.3 QUAD ........................................................................................................................................3
2.4 ZOOM ........................................................................................................................................3
2.5 PIP ...............................................................................................................................................3
2.6 FREEZE ........................................................................................................................................4
2.7 PLAY ............................................................................................................................................4
2.8 MENU ..........................................................................................................................................4
2.9 CHANGE MODE ..........................................................................................................................4
2.10 CHANG QUAD OF 8 CHANNELS ............................................................................................4
2.11 CHANG OF CHINESE/ENGLISH LANGUAGE .......................................................................4
3 MAIN MENU........................................................................................................5
3.1 TITLE SETUP ...............................................................................................................................5
3.2 DATE/TIME SETUP ....................................................................................................................6
3.3 DECODER SETUP .......................................................................................................................7
3.4 SENSITIVITY SETUP ..................................................................................................................8
3.5 EVENT LIST ................................................................................................................................9
3.6 AUTO SEQUENCE SETUP ..........................................................................................................9
3.7 BUZZER/MIRROR AND BORDER SETUP .............................................................................10
3.8 KEY LOCK SETUP.................................................................................................................... 11
1
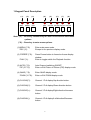
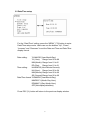
1 Keypad Panel Description
(1)
(2)
(3)
(4)
MENU
FREEZE
AUTO
QUAD
ESC
PLAY
PIP
ZOOM
(5)
(6)
(7)
(8)
CH1/CH5 CH2/CH6 CH3/CH7 CH4/CH8
+
-
Note: (*L) – Press key continuously for about 2 seconds to enter menu
options.
(**S) – Press key to enter menu options.
(1) MENU (**S):
ESC (*L):
(2) FREEZE (**S):
PLAY (*L):
Enter main menu mode.
Escape to the previous display mode.
Press Freeze button to freeze/un-freeze display
window.
Enter to toggle switch the Playback function.
(3) AUTO (**S):
PIP (*L/**S):
Auto Channel switching ON/OFF.
Enter or Exit Picture In Picture (PIP) display mode.
(4) QUAD (**S):
ZOOM (*L/**S):
Enter QUAD display mode.
Enter or Exit ZOOM display mode.
(5) CH1/CH5():
Channel 1 Full display/Up direction button.
(6) CH2/CH6( ):
Channel 2 Full display/Down direction button.
(7) CH3/CH7(+):
Channel 3 Full display/Right direction/Increase
button.
(8) CH4/CH8(-):
Channel 4 Full display/Left direction/Decrease
button.
2
2 Keypad Function
2.1 Ch1/Ch5,Ch2/Ch6,Ch3/Ch7,Ch4/Ch8
Press the respective button (CH1/CH5, CH2/CH6, CH3/CH7 or
CH8) to display the channel in FULL display mode.
2.2 Auto
Press the AUTO (**S) button to sequentially display the turned-on
video channels (CH1/CH5, CH2/CH6, CH3/CH7, CH4/CH8 and
QUAD if turned ON in the Auto sequence setup mode) in the
display window.
2.3 QUAD
Press the QUAD (**S) button to enter QUAD display mode.
2.4 ZOOM
In the full screen display mode, to press the “ZOOM” (*L) button
will enter ZOOM in setup mode. The user can use the “up”, “down”,
“left” and “right“ buttons to move the ZOOM-in frame. To press the
“ZOOM” (**S) button will zoom in two times the selected area.
Users can press buttons “up”, “down”, “left” or “right“ to locate the
ZOOM-in frame in the Zoom-in mode its results in a panning-like
effect on the display window. Press the button “ZOOM” (**S) again
will return to the previous display mode. In the Zoom in setup
mode, to press the “ZOOM” (**L) button the display will return to
QUAD mode.
2.5 PIP
Press button “PIP” (*L) to enter PIP setup mode. By default, the
main window is set on channel 1 and sub-window on channel 2.
While, the main window is flashing, the user can press the “up” or
“down” button to select the video channel for main window. Then
press the “PIP” (**S) button to select the video channel for
sub-window. After selecting the video channel for sub-window and
pressing the “PIP” (**S) button again, the sub-window will stop
3
flashing, the user can press the “up” or “down” button to select
position of sub-window in any one of four channels . To press the
“PIP” (**L) button again, the display will return to QUAD display
mode.
2.6 Freeze
In the full screen display mode, to press the “Freeze” (**S) button
will freeze/un-freeze the display window.
2.7 Play
To press the “PLAY” (*L) button will toggle switch the video source
of CH4 between Camera and VCR.
2.8 Menu
Any time (except Play see 2.7) to press the “MENU” button will
enter or exit menu mode .
2.9 Change mode
To press the “MENU”, “FREEZE” and “CH2/CH6” or “CH3/CH7”
buttons together in the same time will switch the video mode
between PAL and NTSC. After power on, mode will be auto
detected if images in any channels. Mode will be the channel 1
image mode if it has image. If channel 1 has no image, mode will
be channel 2 image mode and so on. If no images in 4 channels.
Mode will be the last mode when power off.
2.10 Chang quad of 8 channels
To press the “MENU” and “QUAD” button together in the same
time will switch automatically between CH1/CH2/CH3/CH4 and
CH5/CH6/CH7/CH8. If enter menu mode and first item “”title
setup” is flashing, then press the “MENU” and “QUAD” buttons
together in the same time will toggle switch between
CH1/CH2/CH3/CH4 and CH5/CH6/CH7/CH8.
2.11 Chang of Chinese/English language
To press the “QUAD” , “AUTO” and “CH1” button together in the
same time will switch between Chinese and English language.
4
3 Main Menu
Press the “MENU” (**S) button to enter menu mode and press the “Up”
or “Down” button to select the setup item.
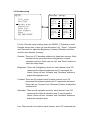
3.1 Title setup
MENU:
Title setup:
Title setup
Date/Time
Decoder setup
Sensitivity
Event List
Auto sequence
Other
KEY LOCK ON/OFF
CH1:C H A N N E L 1
CH2:C H A N N E L 2
CH3:C H A N N E L 3
CH4:C H A N N E L 4
CHANNEL: ON
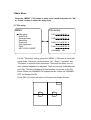
For the “Title setup” setting, press the “MENU” (**S) button to enter title
setup mode. Users can use the buttons “Up”, “Down”, “Increase” and
“Decrease” to select the title characters. There are four titles, one for
each channel needed to be adjusted. There are at most 8 characters for
each title. The title is displayed at fixed position, as shown on the Fig
below. When set CHANNEL ON, display the title. When set CHANNEL
OFF, not display the title.
Press ESC (*L) button will return to the previous display window.
˗˴̌˂˧˼̀˸
˖˛ʳ˄
ˆ
˖˛ʳ˅
˖˛ʳˆ
˖˛ʳˇ
5
3.2 Date/Time setup
For the “Date/Time” setting, press the “MENU” (**S) button to enter
Date/Time setup mode. Users can use the buttons “Up”, “Down”,
“Increase” and “Decrease” to set the Date and Time and Date/Time
display format.
Date setting:
YY-MM-DD (Year-Month-Day):
YY (Year): Range from 00 to 99
MM (Month): Range from 01 to12
DD (Day):
Range from 01 to 31
Time setting:
HH-MM-SS (Hour-Minute-Second):
HH (Hour): Range from 00 to 24
MM (Minute): Range from 00 to 60
SS (Second): Range from 00 to 60
Date/Time format: YY/MM/DD (Year-Month-Day):
MM/DD/YY (Month-Day-Year):
DD/MM/YY (Day-Month-Year):
OFF(Not display date/time)
Press ESC (*L) button will return to the previous display window.
6
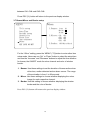
3.3 Decoder setup
ˠ˘ˡ˨ˍ
Efdpefs!tfuvq;
Ujumf!tfuvq
Ebuf0Ujnf
Efdpefs!tfuvq
Tfotjujwjuz
Fwfou!Mjtu
Bvup!tfrvfodf
Puifs
LFZ!MPDL!PO0PGG
ʳ˕̅˼˺˻̇́˸̆̆ˍ ˃˃
ʳ˖̂́̇̅˴̆̇ˍ ˃˃
ʳ˦˴̇̈̅˴̇˼̂́ˍ ˃˃
ʳ˛̈˸ˍ
˃˃
˕̅˼˺˻̇́˸̆̆ˍ ˃˃
˖̂́̇̅˴̆̇ˍ ˃˃
˦˴̇̈̅˴̇˼̂́ˍ ˃˃
˛̈˸ˍ
˃˃
ʳ˕̅˼˺˻̇́˸̆̆ˍ ˃˃
ʳ˖̂́̇̅˴̆̇ˍ ˃˃
ʳ˦˴̇̈̅˴̇˼̂́ˍ ˃˃
ʳ˛̈˸ˍ
˃˃
ʳ˕̅˼˺˻̇́˸̆̆ˍ ˃˃
ʳ˖̂́̇̅˴̆̇ˍ ˃˃
ʳ˦˴̇̈̅˴̇˼̂́ˍ ˃˃
ʳ˛̈˸ˍ
˃˃
For the “Decoder setup” setting, press the “MENU” (**S) button to enter
Decoder setup mode. Users can use the buttons “Up”, “Down”, “Increase”
and “Decrease” to adjust the Brightness, Contrast, Saturation and Hue
level for each decoder (camera).
Decoder: There are 4 TV decoders relative to 4 video input sources. Each
decoder has its own setup items of brightness, contrast,
saturation and hue. Users can use “Up” and “Down” buttons to
select the setup items.
Brightness: There are 64 brightness levels for each channel, level “63”
represents the highest brightness and “0” represents the
lowest. Users can use “Increase” and “Decrease” buttons to
adjust the brightness level.
Contrast: There are 64 contrast levels for each channel, level “63”
represents the highest contrast and “0” represents the lowest.
Users can use “Increase” and “Decrease” buttons to adjust the
contrast level.
Saturation: There are 64 saturation levels for each channel, level “63”
represents the highest saturation and “0” represents the
lowest. Users can use “Increase” and “Decrease” buttons to
adjust the saturation level.
Hue: There are 64 hue levels for each channel, level “63” represents the
7
highest hue and “0” represents the lowest. Users can use “Increase”
and “Decrease” buttons to adjust the hue level.
Press ESC (*L) button will return to the previous display window.
3.4 Sensitivity setup
ˠ˘ˡ˨ˍ
Tfotjujwjuz;
DI2;PGG
Ujumf!tfuvq
Ebuf0Ujnf
Efdpefs!tfuvq
Tfotjujwjuz
Fwfou!Mjtu
Bvup!tfrvfodf
Puifs
LFZ!MPDL!PO0PGG
!DI3;PGG
!DI4;PGG
!DI5;PGG
For the “Sensitivity” setting, press the “MENU” (**S) button to enter into
the sensitivity setup mode for motion detection. Users can use the
buttons “Up”, “Down”, “Increase” and “Decrease” to adjust the sensitivity
level for each channel. There are 8 sensitivity levels for each channel,
level “7” represents the highest level of sensitivity and “0” switches off the
motion detection.
Press ESC (*L) button will return to the previous display window.
8
3.5 Event List
Fwfou!Mjtu;
ˠ˘ˡ˨ˍ
!!Op!!DI!B0M0N!ZZ`NN`EE!!II;NN;TT
12!!!2!!!B!!!12`12`12!!23;23;23
13!!!5!!!M!!!13`13`12!!23;23;23
14
15
Ujumf!tfuvq
Ebuf0Ujnf
Efdpefs!tfuvq
Tfotjujwjuz
Fwfou!Mjtu
Bvup!tfrvfodf
Puifs
LFZ!MPDL!PO0PGG
For the “Event List” setting, press the “MENU” (**S) button to enter event
list mode. There are two pages for events recording. Each page contains
10 records of Alarm, video Loss or Motion detection. Press button “Up” or
“Down” to switch the display of two page records.
Press ESC (*L) button will return to the previous display window.
3.6 Auto sequence setup
˔̈̇̂ʳ̆˸̄̈˸́˶˸ˍ
ˠ˘ˡ˨ˍ
ʳ˖˛˄ˍʳʳˢˡ
˧˼̇˿˸ʳ̆˸̇̈̃
˗˴̇˸˂˧˼̀˸
˗˸˶̂˷˸̅ʳ̆˸̇̈̃
˦˸́̆˼̇˼̉˼̇̌
˘̉˸́̇ʳ˟˼̆̇
˔̈̇̂ʳ̆˸̄̈˸́˶˸
ˢ̇˻˸̅
˞˘ˬʳ˟ˢ˖˞ʳˢˡ˂ˢ˙˙
ʳ˖˛˅ˍʳʳˢˡ
ʳ˖˛ˆˍʳʳˢˡ
ʳ˖˛ˇˍʳʳˢˡ
ʳˤ˨˔˗ˍʳˢˡ
ʳ˧˼̀˸ˍʳ˃ˈ̆˸˶
For the “Auto sequence” setting, press the “MENU” (**S) button to enter
auto sequence setup mode. Users can use “Up” or “Down” button to
select the item and use the “Increase” and “Decrease” buttons to adjust
the ON/OFF mode for full screen display of each channel and Quad
display, and the time duration. The range of time duration is from 0 to 99
seconds. This time is also the automatically switching time duration
9
between CH1-CH4 and CH5-CH8.
Press ESC (*L) button will return to the previous display window.
3.7 Buzzer/Mirror and Border setup
Puifs;
ˠ˘ˡ˨ˍ
2/Cv{{fs; !Mptt; 31
!!!!!!!!!!!!Npujpo; 31
!!!!!!!!!!!!Bmbsn; 31
Ujumf!tfuvq
Ebuf0Ujnf
Efdpefs!tfuvq
Tfotjujwjuz
Fwfou!Mjtu
Bvup!tfrvfodf
Puifs
LFZ!MPDL!PO0PGG
3/Njssps; DI2;!!PGG
!!!!!!!!!!!!DI3;!!PGG
!!!!!!!!!!!!DI4;!!PGG
!!!!!!!!!!!!DI5;!!PGG
4/Cpsefs; !PGG0Xijuf0Cmbdl
For the “Other” setting, press the “MENU” (**S) button to enter other item
setup mode. Users can use “Up” or “Down” button to select the setup item
and use the “Increase” and “Decrease” buttons to adjust the time duration
for buzzer, the ON/OFF mode for mirror channel and color of window
border.
1. Buzzer: Use these settings to set the duration of buzzer active when
video loss, motion detected and an alarm occurs. The range
of time duration is from 1 to 99 seconds.
2. Mirror: Use these settings to choose whether displaying the mirror
image for each respective channel.
3. Border: Use this setting to choose whether displaying the window
border and the color of border.
Press ESC (*L) button will return to the previous display window.
10
3.8 Key Lock setup
ˠ˘ˡ˨ˍ
Ujumf!tfuvq
Ebuf0Ujnf
Efdpefs!tfuvq
Tfotjujwjuz
Fwfou!Mjtu
Bvup!tfrvfodf
Puifs
LFZ!MPDL!PO0PGG
For the “KEY LOCK ON/OFF” setting, press the “MENU” (**S) button to
enter key lock setup mode. Users can use “Up”, “Down”, “Increase” or
“Decrease” button to set the Key Lock ON or OFF. When the Key Lock is
set to ON, all other keys except the “MENU” button will be locked. Users
need to press the “MENU” (**S) button to enter MENU mode and un-lock
the Key Lock function by setting the Key Lock to OFF.
Press ESC (*L) button will return to the previous display window.
11