1
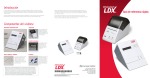
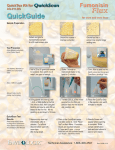
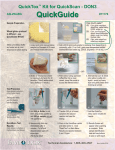
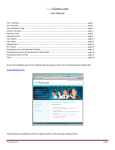
CHO-03-019 LDXQRG_1
4/10/03
1:07 PM
Page 1
Introduction
The Cholestech LDX is a small, portable analyzer and test cassette system. It is easy to use, and gives fast
and reliable results. To run a test, just add a sample to the cassette and place it in the Analyzer. In a few
minutes, the results will appear on the screen.
The Cholestech LDX System is for in vitro diagnostic use only. This guide contains information intended to
familiarize and instruct the user in the proper use and care of the Cholestech LDX System.
Cholestech Corporation and our distributors will provide every customer with technical
support and training needed to properly use the Cholestech LDX System. Cholestech
maintains a staff of qualified Technical Service Representatives who are available
24 hours a day, 7 days a week.
Quick Reference Guide
For ordering information or other customer service–related questions, contact Cholestech
Customer Service from 6:00 AM to 5:00 PM Pacific time, Monday through Friday.
Please feel free to contact us at:
System Components
Cholestech LDX Analyzer
Printer
Results from each
cassette will print out on
the Cholestech Thermal
Printer. One or two labels
may be printed.
Analyzer Display Screen
‘Stop’
Button
Cholestech Corporation
3347 Investment Blvd.
Hayward, CA 94545 U.S.A.
Tel 800 733.0404
Fax 510 732.7227
www.cholestech.com
‘Data’
Button
Test Cassette
Cassette
Drawer
Blood from a fingerstick
sample is placed into a
single-use, disposable
cassette. Multiple test
results are available in
5 minutes.
‘Run’
Button
Capillary Tubes/Plungers
Lancets
Blood from a fingerstick sample
is collected into a capillary
tube with heparin anticoagulant.
The black plunger dispenses
the sample into the sample well
in the cassette.
PLEASE NOTE: Even though the Cholestech LDX is a “CLIA-waived” test system,
each laboratory or testing site using the Cholestech LDX must have a CLIA Certificate
of Waiver. To obtain a Certificate of Waiver, call your state department of health
or Cholestech for an application. Failure to operate the Cholestech LDX in
accordance with the manufacturer’s instructions will void the waived status.
The tests will then be considered highly complex.
A single-use lancet is
used to perform a
fingerstick to collect a
blood sample for testing
on the Cholestech LDX.
403 12047
Cholestech LDX is a registered trademark of Cholestech Corporation.
MiniPet is a trademark of Tri-Continent Scientific, Inc.
© 2002 Cholestech Corporation. 403 12047 Rev. C
3347 Investment Blvd.
Hayward, CA 94545 U.S.A.
Tel 800 733.0404
Fax 510 732.7227
www.cholestech.com
403 12047 Rev. C
CHO-03-019 LDXQRG_1
4/10/03
1:07 PM
Page 2
Setup
Test Procedure
Take the time to examine and familiarize yourself with the contents of the Cholestech LDX System.
the Cholestech LDX
1 Connecting
to the Printer
A
Before starting to test, press and
hold STOP to enter the Configuration
Menu and select options for language,
units, sample type, printer, risk
assessment, date, and time.
A
B
Plug the power supply A into
the Cholestech LDX and the wall
or power strip. Insert the end of
the white printer cable B ,
labeled “To Cholestech LDX”,
into the Analyzer.
The DATA button allows you to select
choices for each of the menu items
in the Configuration Menu. The RUN
button enters your choices and
advances you to the next menu item.
3 Optics Check
4 Running Controls
Run the Optics Check Cassette
Cholestech Level 1 and 2 Controls
Press the RUN button.
The drawer will open.
Place the Optics Check
Cassette into the cassette
drawer. Press the RUN
button again to close
the drawer.
Controls must be run
following manufacturer’s
recommendations.
Controls must be at room
temperature before
testing. Verify that the lot
number on the control vial
and the assay sheet are the same. Mix each
vial by gently inverting 7–8 times immediately
before use. Store controls in the refrigerator
when not in use.
Record Results
Check to see that the four
numbers are within the
acceptable range printed Optics Check Results
on the Optics Check
Cassette. Record the
results on the Optics
Check Log. If the
numbers are outside the
range, the Analyzer will
be temporarily disabled until another optics check
is run that falls within range.
The Optics Check Cassette is used to check the
optical system of the Analyzer. Run the Optics
Check Cassette: once each day before patient
samples are tested and after the Cholestech LDX
has been moved or serviced.
Perform a Fingerstick
2
Collect the Sample
3
Dispense the Sample
4
Open the Drawer
2 Configuration Menu
B
Plug the printer power supply A
into the printer and the wall or
power strip. Connect the end of
the printer cable B , labeled
“To Printer”
, to the printer.
1
Testing QC Material
Use the MiniPet™ Pipette
and tips to measure and
dispense the control
sample into the cassette.
Place the cassette in the
drawer immediately and
press RUN. Record results
on the Quality Control Log.
Results must be within established ranges
before patient samples can be tested.
After cleaning the selected site with alcohol
and drying it thoroughly, firmly prick the site
with a lancet. Gently squeeze the finger to obtain
a large drop of blood. Wipe off the first large
drop of blood.
5
Insert the Cassette
Squeeze the finger gently again until a large drop of blood
forms. Hold the capillary tube horizontally by the end with
the plunger. Touch it to the drop of blood without touching
the skin. Fill the capillary tube within 10 seconds.
Do not allow any bubbles to enter the capillary tube.
6
Immediately place the cassette into the Analyzer
drawer with the black reaction bar toward the Analyzer
and the brown magnetic stripe on the right.
Begin the Test
Press RUN. The drawer will close. Test run time is
5 minutes. When the test is finished, the Analyzer will
beep and the drawer will open. Put everything that
touched the blood sample into a biohazardous
waste container.
Place the end of the capillary tube into the sample
well and dispense the sample by pushing down on
the plunger. Keep the cassette level after the sample
has been applied.
7
View the Results
Press the DATA button on the Analyzer to view
the calculated results.
Press the RUN button on the Analyzer.
The cassette drawer will open, and the
screen will display: Load cassette
and press RUN.
8
Print the Results
The results will print when the test is finished.
If the Framingham Risk is ON, press the DATA
button twice and push RUN to run the risk
assessment, or STOP to print the results.
This reference guide provides a brief summary of the testing procedure. For more information, see the test cassette
product inserts, the Cholestech LDX System User Manual, or the Cholestech LDX System Training Video.
FAQ
Frequently asked questions about the use of the Cholestech LDX
How do I get a CLIA Certificate of Waiver?
Even though the Cholestech LDX is a “CLIA-waived” test system, each laboratory or testing site using the Cholestech LDX
must have a CLIA Certificate of Waiver before starting testing. To obtain a Certificate of Waiver, call your state
department of health or Cholestech Technical Service (800-733-0404) for an application (form HCFA-116). Cholestech
Technical Service can give you the phone number of your state department of health and assist you in filling out the
application.
Remember: The Cholestech LDX System is only waived for fingerstick or venous whole blood.
How often do I have to run the controls?
If you are testing under CLIA-waived status, you must follow the manufacturer’s recommendations for running
controls. Cholestech recommends that you run controls:
• With each new shipment of cassettes (even if cassettes are from the same lot previously received).
• With each new lot of cassettes.
• As otherwise required by your laboratory’s standard quality control procedures.
• If you are not running the Cholestech LDX under CLIA-waived status, or if your local or state regulations require more
frequent testing of quality control material, then quality control must be performed in compliance with those regulations.
How should I store my cassettes?
When stored refrigerated at 36–46˚F (2–8˚C), the cassettes are stable until the expiration date printed on the cassette
pouch and box. Cassettes can be stored at room temperature for 30 days. Do not use a cassette past the expiration
date. Do not return cassettes to the refrigerator once they have been stored at room temperature.