1
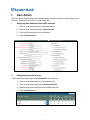
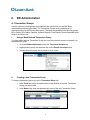
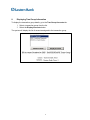
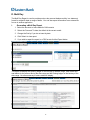
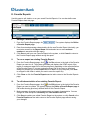
Eastern Bank TreasuryConnect Balance Reporting User Manual This user manual provides instructions for setting up or editing a user and accessing services within the three Balance related groups. Within the Balance Report Admin. The service is: Transaction Group Tran Group Accounts Within the BR Quick Reports Group. The services are: Previous Day Report Within Balance Report Group. The services are: Previous Day Same Day Real Time Account Activity Multi Day Favorite Reports Transaction Download April 2013 1 Table of Contents I. USER ADMIN .................................................................................................................................................3 i. ii. II. Assigning User Balance Report (BR) services.........................................................................................3 Assigning Accounts to users ....................................................................................................................3 BR ADMINISTRATION ................................................................................................................................4 A. TRANSACTION GROUPS ......................................................................................................................................4 i. Using a Bank Defined Transaction Group ..............................................................................................4 ii. Creating a new Transaction Group .........................................................................................................4 B. TRAN GROUP ACCOUNTS ...................................................................................................................................5 i. Adding accounts to a BR Transaction Group ..........................................................................................5 ii. Displaying Tran Group Information........................................................................................................6 III. BR QUICK REPORTS ..............................................................................................................................7 A. i. ii. IV. PREVIOUS DAY QUICK REPORT .....................................................................................................................7 Generating a Previous Day Quick Report ...............................................................................................7 Exporting Report(s) .................................................................................................................................7 BALANCE REPORT.................................................................................................................................8 A. PREVIOUS DAY ..............................................................................................................................................8 Generating a Previous Day Report .........................................................................................................8 Setting Report Preferences ......................................................................................................................9 Exporting Report(s) ...............................................................................................................................10 B. SAME DAY REAL TIME ................................................................................................................................11 i. Generating a Same Day Real Time Report............................................................................................11 C. ACCOUNT ACTIVITY....................................................................................................................................12 i. Date Ranges available...........................................................................................................................12 ii. Create a Favorite within Account Activity.............................................................................................12 D. MULTI DAY .................................................................................................................................................13 i. Generating a Multi Day Report .............................................................................................................13 E. FAVORITE REPORTS ....................................................................................................................................14 i. Adding a Favorite Report ......................................................................................................................14 ii. To run or export an existing Favorite Report:.......................................................................................14 iii. To edit characteristics of an existing Favorite Report: .........................................................................14 iv. To delete an existing Favorite Report: ..................................................................................................15 v. To sort Favorite Report columns:..........................................................................................................15 D. TRANSACTION DOWNLOAD .........................................................................................................................16 i. ii. iii. APPENDIX..............................................................................................................................................................17 A. i. ii. iii. B. REPORT SAMPLES........................................................................................................................................17 Previous Day Report Samples ...............................................................................................................17 Same Day Real Time Report..................................................................................................................19 Account Activity.....................................................................................................................................19 REPORT DEFINITIONS ..................................................................................................................................20 2 I. User Admin The User Admin function allows the corporate admin to setup new Users or edit existing users, Services, Permissions and Limits. To add a new user: i. Assigning User Balance Report (BR) services 1. Click on User Administration in the drop down list 2. Click on User Admin and click the Services link 3. Click on BR functions the user is entitled to 4. Click the Submit button ii. Assigning Accounts to users If still on the User Admin page, click Permissions link otherwise: 1. Click on User Administration in the drop down list 2. Click on User Admin and click the Permissions link 3. Select the accounts for BR previous and BR same day 4. Click the Submit button 3 II. BR Administration A. Transaction Groups Use this service to create groups of transactions that contain one or more BAI (Bank Administration Institute) type codes. The Transaction Groups service enables you to customize output for the Previous Day reports. The Bank has predefined the following groups: ACH Credits, ACH Debits, Deposits, Lockbox Deposits, Paid Checks, Return Deposited Items, Wires In and Wires Out. i. Using a Bank Defined Transaction Group To utilize a Bank defined Transaction Group you must first select an account and permit it to the transaction group. 1. Go to the Balance Rpt Admin, select the Tran Group Account tab 2. Highlight which group you want and click on the Permit Accounts button 3. Choose the account and use the arrow to move it over ii. Creating a new Transaction Group To create a transaction groups, go to the Transaction Group tab: 1. In the Code field, enter the alphanumeric code identifier of the new Transaction Group you want to add. 2. In the Name field, enter the alphanumeric name of the new Transaction Group. 4 3. Click Add, The Transaction Groups Data Entry page displays with an empty Active BAI Codes list. Choose the code or codes you wish to setup, for instance, to set up a group for all incoming ACH items select 165 or to view all return deposited items select 555. Highlight the code then click the > arrow key to move it over. B. Tran Group Accounts This service allows a Corporate Administrator or User to assign multiple accounts to transaction group used to filter the previous day report. Once you assign an account to the transaction group, when the transaction is selected in balance reporting, all accounts assigned to the group will display the information. i. Adding accounts to a BR Transaction Group To permit accounts to transaction groups, go to the Tran Group Accounts tab: 1. Select a transaction group from the list of available types 2. Click on the Permit Accounts button 3. Use the arrow buttons to move selected accounts between the inactive and active account lists. Select the account(s) you want to add/remove from the list by using the Shift key to select a range of accounts in the list or the Ctrl key to select multiple accounts in the list. 5 ii. Displaying Tran Group Information To display the transaction group details, go to the Tran Group Accounts tab: 1. Select a transaction group from the list. 2. Select the Display Accounts button. The system will display the list of accounts assigned to the transaction group. 6 III. BR Quick Reports A. Previous Day Quick Report i. Generating a Previous Day Quick Report This service displays a snapshot of balance and transaction information for accounts and allows you to export the report information to other applications. To generate a previous day quick report, select Bal Quick Reports in the drop down list and go to Prev Day Report tab: 1. The system displays a default table of all accounts for the previous business day 2. To generate a previous day quick report for a different date, enter valid dates 3. Select the Submit button 4. Use the detail arrow to review transaction details for the account ii. Exporting Report(s) To export a previous day quick report, go to the Prev Day Report tab: 1. Select the File Output Format (Options follow) Comma Separated Value [CSV] BAI output CS Basic (CSB) 2. Select the Export button 3. Follow instructions on the File Download Window 7 IV. Balance Report A. Previous Day i. Generating a Previous Day Report This service provides balance and transaction information for accounts from one or more previous business days and allows you to export the report information to other applications. This information is available for 365 days. To generate a previous day report, select Balance Report in the drop down list and go to the Previous Day tab: 1. Select Account(s): all accounts, one account or multiple accounts 2. Select Balance Type: (Options are: All Balances & Transactions, Status Balances, Summary Totals, Detail Credit Transactions, Detail Debit Transactions) 3. Select Transaction Group(s): (Options are: No Transaction Groups, ACH Credits, ACH Debits, Deposits, Lockbox Deposits, Paid Checks, Return Deposited Items, Wires In and Wires Out) 4. Select Query Options: report dates, transactions amounts, or check number range (Note: leave blank for all amounts; if you select a range of dates, please note the system displays 90 days of information at one time). 5. Select Submit to view this report 8 ii. Setting Report Preferences This service allows you to set your report characteristic defaults. These values stay the same until you decide to change them using this capability. To change Report Preferences, go to the Previous Day tab: 1. Select the Preferences button 2. Enter the preferences for the report type, report style, sort order 1, sort order 2, and totals. 3. Click Submit. The system saves your Previous Day report Account sort settings and generates/displays a copy of the report. 4. Choose the account sort order next. To move individual Accounts within the list hierarchy, in the Account Number Display Order list box, highlight the Accounts you want to reposition and click the appropriate Up/Down arrow to move them. 5. Follow a similar procedure to select the sort order of the Transactions groups. Click Submit and save your changes. 9 iii. Exporting Report(s) To export a previous day report, go to the Previous Day tab: 1. Select the File Output Format (Options follow) Comma Separated Value [CSV] BAI output CS Basic (CSB) PDF 2. Select the Export button 3. Follow instructions on the File Download Window 10 B. Same Day Real Time i. Generating a Same Day Real Time Report The Same Day Real Time Report service provides an accurate summary of account information for the current business day. This a real time report so you can only view today’s information. You also can use this service to export the information to an external file for use in other applications. To generate a same day real time report, select Balance Report in the drop down list and go to the Same Day Real Time tab: 1. Select Account(s): all accounts, one account or multiple accounts 2. Select Balance Type: (Options are: All Balances & Transactions, Status Balances, Detail Credit Transactions, Detail Debit Transactions) 3. Select Submit to view this report. 4. If you wish to export the report in a CSB format click on Export button 11 C. Account Activity The Account Activity report will provide a single view of your accounts with multiple date ranges to search history or view current day activity. It provides up to date account balances and transactions. The default date range on the Account Activity report is Last 7 days but there are other options available. The different options available in the Date Range drop down list are: Last 7 Days, Today, Previous Day, Month to Date and Custom. You also can create a favorite within Account Activity or export the report in a .csv format with or without headers. i. ii. Date Ranges available Last 7 Days – Provides information for the last 7 calendar days Today – Provides same day information Previous Day – Provides the previous day information. Month to Date – Provides a view of the month to date activity Custom – Provides an option to view prior activity up to 365 days. If you want to view extended account history (up to 365 days), you need to search in 90 day increments. Create a Favorite within Account Activity You can create Favorites within Account Activity to save commonly used account searches for all date ranges except Custom. You can choose what the accounts you would like in the report or just include debits or credits. Click the Save as Favorite button. 12 D. Multi Day The Multi Day Report is used to provide previous day account balance activity in a statement format for a specific date or range of dates. You can also export information to an external file for use in another application. i. Generating a Multi Day Report 1. Select the accounts or leave default of All Accounts 2. Select the From and To date, the default is the current month. 3. Change the Sort by if you do not want by date 4. Click Submit to view report 5. If you wish to export the report in a CSV format click the Export button The report will display the Opening ledger on the first day of the date range, total credits and total debits for the account during the date range and the Closing ledger on the last day of the date range. No other summary or status totals will display. 13 E. Favorite Reports Use this page to edit, delete, or run your saved Favorite Reports. You can also define new Favorite Reports from this page. i. Adding a Favorite Report 1. From the Favorite Reports page, click a Favorite Report page. . The system displays the Define 2. Enter format and parameter characteristics for the new Favorite Report (minimally, you must enter a name in the Report Name field and select one or more account numbers to associate with this report). 3. Click Save to add your new Favorite Report to the system, or click Cancel to return to the Favorite Reports page without saving the report. ii. To run or export an existing Favorite Report: 1. From the Favorite Reports page, click in the Run column to the right of the Favorite Report you want to run. The system generates and displays the HTML output of the report or creates an export file in the format defined, depending on the output definition of the Favorite Report. If you are running the Export file of the report, a download dialog box prompts you to either open the file or save it to your computer (click Save to navigate to the folder in which you want to save the export file). 2. Click Close or click the Favorite Reports service tab to return to the Favorite Reports page. iii. To edit characteristics of an existing Favorite Report: 1. From the Favorite Reports page, click in the Edit column to the right of the Favorite Report you want to update. The system displays the Define a Favorite Report page in Edit mode showing previously defined fields for this Favorite Report. 2. Make necessary changes to runtime parameters and report characteristics. You can change all fields except the Created By and Last modified on fields. 3. Click Save to update your edited Favorite Report on the system, or click Cancel or the Favorite Reports service tab to return to the Favorite Reports page without saving your changes. 14 iv. To delete an existing Favorite Report: 1. From the Favorite Reports page, click in the Delete column to the right of the Favorite Report you want to delete. A Delete Confirmation dialog box displays, which prompts you to delete this Favorite Report. 2. Click OK to delete the Favorite Report from the system or Cancel to return to the Favorite Reports page without deleting the selected report. 3. The system displays the refreshed Favorite Reports page. v. To sort Favorite Report columns: On the Favorite Reports page, click the appropriate column header to sort the list of Favorite Reports: Shared - Groups all shared Favorite Reports at the top of the list. Click again to group all private reports at the top of the list. Report Name - Sorts Favorite Reports in ascending alphabetical sequence. Click again to sort the list in descending alphabetical sequence. Type - Groups all HTML Favorite Reports at the top of the list. Click again to group all export file reports at the top of the list. Owner - Sorts Favorite Reports in ascending alphabetical sequence by report owner name. Click again to sort the list in descending alphabetical sequence by report owner name. 15 D. Transaction Download Use this page to download cleared transactions into Personal Financial Management (PFM) software such as Intuit Quicken® or QuickBooks® Files you download using this service are in Open Financial Exchange (OFX) format. This page displays when you select the Balance Report group, and click the Transaction Download tab. To download cleared transactions to Quicken or QuickBooks: 1. On the Transaction Download page, in the Accounts field, select one or more accounts for which you want to download cleared transactions. You can press and hold the Shift key to select a range of accounts in the list or the Ctrl key to select multiple noncontiguous accounts . 2. In the From Date field, enter the beginning date for which you want to download transactions. You can enter the date manually, or click the calendar icon to select a date. 3. In the To Date field, enter the ending date for which you want to download transactions. You can enter the date manually, or click the calendar icon to select a date. 4. Click one of the following and follow the prompts to save the file: 16 Appendix A. Report Samples i. Previous Day Report Samples Register report format without the Account Summary expanded Register report format with Account Summary expanded 17 Table report format Table – Horizontal (+ notes) report format 18 ii. Same Day Real Time Report iii. Account Activity 19 B. Report Definitions Previous Day report: Opening Ledger – This is the total amount of funds in your account at the beginning of the day regardless of their availability, i.e., all funds reported in your ledger balance may not be currently available. This is equal to yesterday’s Closing Ledger. Closing Ledger Balance – This is the total amount of funds in your account at the end of the day regardless of their availability, i.e., all funds reported in your ledger balance may not be currently available. This is equal to Opening Ledger plus any credits less any debits. Today’s Opening Available – This reflects the opening available balance of today. All other totals and items on the previous day report reflect balances and items from the previous business day. This is equal to Closing Available plus 1-Day Float. Closing Available – This is the total amount of available funds in your account at the end of the day. Available funds are funds that are available for immediate withdrawal. This is equal to Closing Ledger less Closing 1-Day and 2+ Day Float. 1-Day Float – These funds will be immediately available on the next business day. This total, along with the Closing Available total will be reflected in the Opening Available field. 2+Days Float – These funds will be immediately available the day after tomorrow or later. Float that is greater than 2 days will remain in this bucket. Same Day Real time report: Current Balance & Ledger Balance – This is the closing balance as of last night. Account Available Balance – This balance is a real time balance and will include today’s transactions One, Two and Two+ Float – The float is not reported so they will always be zero Cycle to Date Debit Amount & Count – This is a cumulative total number of debits and dollar amount since the last statement Cycle to Date Credits & Count – This is a cumulative total number of credits and dollar amount since the last statement Last Statement Account Balance – The ending balance when the statement was cut. Accessible Available Balance – This balance includes any related account balances, such as sweeps or loans that can be drawn on for book and money transfers. 20