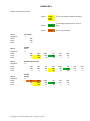
1
GLASS FUSER kiln INSTRUCTIONS (Australian version) CRESS MFG CO., INC. 4736 CONVAIR DR CARSON CITY, NV 89706 Phone 0011-1-775-884-2777 Fax 0011-1-775-884-2991 Imported by Glassfusing Pty Ltd ACN 151 713 996 7 Cotter Place Macgregor, ACT 2615 Phone (02) 6254 7199 Fax (02) 6100 2724 IMPORTANT UNPACK SHIPMENT IMMEDIATELY When this shipment was given to the carrier, neither the carton nor contents were damaged. If the carton is punctured or shows sign of damage do not sign to accept delivery of the item. Unpack immediately in the presence of the carrier and describe any obvious damage, on the carrier’s documentation before signing. If the merchandise is unusable, contact Glassfusing Pty Ltd prior to accepting delivery. In the case of concealed damage, save all packaging material and notify the carrier as soon as possible (within 7 days) and have them inspect. Call us if a freight problem occurs so we may help. Copyright 2011 Cress Manufacturing Company, Inc. All rights reserved. CONGRATULATIONS! Congratulations on being the owner of a new CRESS kiln. Cress has been at the forefront of firing processes for over 50 years. Cress was first in our field with UL listing of ceramic kilns, first with ultra reliable element connections and first with infinitely variable power controls. We sincerely wish you many years of creative and rewarding use of your CRESS kiln. CRESS MANUFACTURING COMPANY, INC. IMPORTANT SAFEGUARDS! Notice: Please read and observe the following safety warnings before operating your kiln. 1. Install the kiln 18” (450 mm) or more from any wall or combustibles. Do not place under any shelf or other obstruction. 2. Never fire hotter than cone 03 or 2000°F (1090°C) 3. Do not fire hotter than the manufacturer’s recommendation for your glass, clay, glazes, decals or other material or permanent damage may result to your kiln or ware. 4. Before opening the lid, turn off switch(es), allow the kiln to cool completely then carefully open until the lid brace that locks the lid is securely in place before allowing it to stand freely. Do not let the lid stand open while the kiln is in use or unattended. 5. Do not leave the kiln unattended while firing. 6. Never use an extension cord. 7. Operate the kiln only in a well-ventilated room. Avoid breathing any fumes. 8. Unplug the kiln before servicing or cleaning. 9. Dangerous Voltage – Do not touch the heating element. For your safety, this kiln is fitted with a cutout switch so elements do not fire when the lid is opened. Do not interfere with the operation of this switch. 10. Do not touch hot sides of the kiln or hot lid. Burns may result. 11. Never store anything against or on top of the kiln; never lean objects against the kiln. 12. Do not store or use flammable liquids or sprays in the same room with your kiln. 13. Do not store or use your kiln outside – keep rain, water and moisture away from the kiln. 14. Do not use the kiln if the electrical cord, plug and/or power outlet are damaged. 15. Use the kiln only with adequate electrical supply of the correct voltage (check kiln label for voltage rating), amperage and correct fuse size. Fitment of a residual current device RCD (safety switch) is recommended. Given that kilns draw large amounts of power Inspection of supply by a licensed electrician is recommended prior to use. 16. All electrical installations must be undertaken by a licensed person. 17. Wear protective welding goggles when looking into a heated kiln. Infrared heat may otherwise damage your eyes. 18. Keep children and animals away from the kiln at all times. 19. Do not fire if the kiln, cord and wall receptacle are not all in perfect operating condition. 20. Follow recommended routine maintenance schedule as detailed below. Copyright 2011 Cress Manufacturing Company, Inc. All rights reserved. GLASS FUSER INSTRUCTIONS SPECIFICATIONS: 2000°F (1090°C) MAXIMUM INTERMITTENT TEMPERATURE 1700°F (927°C) MAXIMUM CONTINUOUS TEMPERATURE. NOTICE: PLEASE READ, UNDERSTAND AND OBSERVE THE FOLLOWING INSTRUCTIONS AND SAFETY WARNINGS BEFORE OPERATING THE KILN. INSTALLATION: Electrical Specifications: Proper electrical wiring is necessary to safely and efficiently operate a kiln. Even though the voltage is a full 230 volts at the meter, the voltage on which the kiln operates may be somewhat lower at the actual kiln location. Make sure your electrical outlet has the correct electrical capacity and voltage to handle your kiln. 230 volt kilns may be used with power in the range 220 volt to 245 volt. If the voltage is low, the kiln may not reach the maximum desired temperature or will fire too slowly. This may reduce element life. Consult your electrician to ensure that the electrical specifications in the table below are met. As voltage drops may occur on all wiring, it may be necessary to measure the voltage at the location of the kiln with the kiln turned on. Additionally, the supply voltage (from your utility) may be temporarily low during periods of peak demand. Do not use an extension cord at any time. ELECTRICAL SPECIFICATIONS TABLE Model Volts Amps Kilowatts Fuser 89EA 230 19 4.3 Fuser 87EA 230 18 4.1 Fuser 75EA 230 10 2.3 PLACEMENT: The kiln must be located a minimum of 18 inches (450 mm) from every wall or vertical surface. Care should be taken to keep the kiln away from combustible surfaces. Do not use the kiln under a shelf or other obstruction to the flow of air. All kilns should be located in an area free from flammable materials such as drapes, boxes, paper, spray cans, paint, gasoline, etc. Keep all flammable liquids out of the room with the kiln. Be sure no curtains or other material that could change position with wind or opening of a door or window can come within an unsafe distance of the kiln. The room in which the kiln is operated should be well ventilated. Before plugging the kiln into your outlet or connecting the kiln to a power source, be sure that the kiln’s power switch is “off”. Be certain that your electrical wiring, socket, circuit breaker and fuses are in good condition before plugging it into the wall socket. If you are not sure, consult a qualified, licensed electrician. Good housekeeping must be observed at all times in the kiln area for safety. Copyright 2011 Cress Manufacturing Company, Inc. All rights reserved. Choose a location carefully. A cement floor, ceramic tile with cement grout, brick or stone is best. If it is necessary to put your kiln on a synthetic or wooden surface, use a sheet of fireproof material underneath your kiln that extends 24 inches beyond the kiln in all directions. This material must be suitable for woodstove application. A layer of hard firebrick is also acceptable for this purpose. Note: floor colouration may be sensitive to heat and may change colour. Your kiln must be fired only on the metal stand provided. It has been designed specifically for the height and weight of your kiln. Do not use any other stand. Be sure to centre the kiln on the stand so that it is stable and position it so that the cord does not touch the sides of the kiln, which will be hot during firing. It is also important that the kiln is level (use a spirit or bubble level for this purpose); otherwise, there is a possibility of pieces falling during firing. Use your kiln only in a well ventilated room. Vapours containing poisonous gases are possible when firing certain materials. Do not breath fumes from the kiln when firing. OPERATION: LOADING: Turn off power to the kiln before the lid is opened. The load should be placed as near the centre of the chamber as possible to give you a uniform temperature. When fusing, the shelf should be supported on ceramic blocks to provide air circulation below the shelf. Glass slumping is very sensitive to variation in temperature. If possible, keep bottom shelf 1” (25 mm) or more off the kiln floor. Do not crowd pieces at any time. It is recommended that any shelf used be prepared with an appropriate glass shelf primer in accordance with the instructions at Annexure B. Alternatively, you may use a firing paper such as Bullseye Thinfire. Do not fire small thin pieces of glass and large thick pieces in the same load. Slumping moulds should be prepared in accordance with the instructions at Annexure C. The thermocouple (2 wires covered by ceramic beads which projects through the kiln from inside the control panel) must not touch anything in the kiln e.g. such as the kiln shelf, glass or slumping mould.. Thermocouples should not be bent against the wall, but remain as originally installed. Space your load as much as possible for air circulating between parts to give you even heating throughout the chamber. Never use more than one level of shelves in the kiln. Unlike ceramics, multiple shelves cannot successfully be used with glass. MODEL 3K CONTROLLER Your kiln is fitted with a Bartlett Instruments Model 3K controller. This sophisticated electronic controller has full PID functionality and allows you to configure four user programs each of up to 8 stages or segments. Copyright 2011 Cress Manufacturing Company, Inc. All rights reserved. Each segment consists of a ramp rate, a target temperature and a hold time (also known as a soak). Programming consists of choosing the User program (1, 2, 3 or 4), choosing how many segments you want (up to 8), then for each segment entering the ramp rate in degrees per hour (rA), target temperature (°C) and hold time in hours:minutes (HLD). Basic Programming of the Model 3K Controller: 1. 2. 3. 4. 5. 6. 7. 8. 9. 10. 11. 12. 13. When the power is first turned on the controller may display an error message (ErrP) to let you know it has been turned off during a program. Alternatively, it will display either StOp and/or Idle alternating with the current temperature. If ErrP is displayed press any key to clear this error message. If StOP / Idle alternating with the current temperature is displayed, you are ready to begin programming. Press ENTER to begin. The number of the previously fired program will be displayed, USrl, USr2, USr3 or USr4. If you wish to fire this program again, press the DOWN arrow key and the program information (number of segments and each segment’s details) will be displayed for checking. Once this is complete the ready prompt (rEdl) will be displayed. Press the ENTER button to start firing. If you wish to use or enter an alternate program, select the user number you want to program by using the UP key and press ENTER. SEG alternating with the last selected number of segments is displayed. Use the UP and DOWN keys to select the number of segments, then press ENTER. NOTE: Each segment consists of a ramp rate to a temperature and a hold time. There are 8 segments available for programming. rA 1 alternates with ramp rate. Use the UP and DOWN keys to select the desired rate and press ENTER. A rate of 9999 will cause the kiln to heat (or cool if in a down ramp) at maximum rate. The first segment must always be an “up” ramp. °C 1 alternates with the currently selected temperature. Use the UP and DOWN keys to select the desired temperature and press ENTER. HLd1 alternates with the currently selected hold time. Use the UP and DOWN keys to select the desired hold time and press ENTER. Repeat the above 3 steps for each additional segment for the ramp rate, temperature and hold time. rEdl will be displayed after the last segment is entered. Press ENTER to begin firing. During Firing: During a firing, you can display the current set point, advance to the next ramp or if you are in a hold add temperature or time to that hold. Details of this functionality is included in the separate Bartlett Instruments User Manual at Annexure D. Error Codes: The controller will display certain diagnostic information in the form of error codes. The most common errors are: Tc FAIL tc alternating with FAIL indicates the thermocouple has failed. Replace the defective thermocouple. To clear the error, press any key. ErrP ErrP is displayed whenever there is a power interruption that is long enough to stop the firing. To clear the error, press any key. If the power interruption is brief, the kiln will continue to fire when power is restored; in this case there will be no indication of a power failure. The manual at Annexure D includes a full list of error and other diagnostic codes. Copyright 2011 Cress Manufacturing Company, Inc. All rights reserved. FIRING GLASS: The kiln may be used for a variety of glass related processes such as fusing glass – including the firing of paints and decals – and also to slump glass. Successful glass work requires precise temperature control which is provided by your controller. Sample firing schedules for System 96 glass are attached at Annexure A. These can be modified to suit the type of glass and process you intend to achieve. As all kilns fire glass differently, careful note taking is recommended as you are learning about your kiln. In some processes, it is necessary to crash cool a kiln to annealing temperatures to avoid devitrification of the glass. This segment needs a ramp rate of 9999. This can be achieved by propping the lid open until a sufficient drop in temperature has been achieved. Do not allow the temperature to fall to the temperature of the next segment as this may start the annealing process too early. HEATING: Do not heat the kiln to temperatures higher than necessary for your process and not for longer periods than required. The higher the temperature and the longer the time in use, the shorter the element life and the thermocouple life. The thermocouple should be replaced about once a year in heavy use. The calibration of the thermocouple can be affected by contaminants fired in the kiln. We do not recommend changing heating elements until they burn out or are so worn that they slow the heating time materially. All controls, switches and electrical components are subject to failure; therefore, you should check the kiln periodically to be sure it is heating properly. FIRING CHARTS: It is a valuable practice to keep a written record of each firing, noting the program, type of glass and outcomes. This firing chart allows you to repeat good results and successful firings and avoid repeating less than satisfactory firing results. OPENING THE KILN DURING FIRING When opening the lid while the kiln is “hot”, you should wear suitable protective clothing such as a face shield, heat resistant gloves and arm shields to prevent burns on hands and arms. Wear welder’s goggles to prevent infrared heat from damaging your eyes. Do not wear loose clothing that could catch on fire should it come in contact with very hot air or heated kiln parts or heated kiln loads. Keep your face and eyes as far away from the hot opening as possible. Copyright 2011 Cress Manufacturing Company, Inc. All rights reserved. AFTER FIRING: Always allow the kiln to return to 50°C before cracking open the lid. Do not unload the kiln until the contents have further cooled and you can do so with bare hands. GENERAL Anything placed in kiln must be degreased and dry. Oil, paint, wax or other matter that could give off fumes may coat elements or bricks with enough conductive material to cause arcing between the element coils. Zinc or tin plated articles should not be placed in kilns exceeding 800°F (425°C). The chamber should be cleaned whenever a deposit or oxide or other material collects on the floor or walls. Acid or other corrosive particles in the atmosphere will react with metal elements causing them to fail. Reasonable care should be taken in opening and closing the kiln lid. The insulating brick will last longer if not subjected to excessive thermal shock (opening the lid at high temperatures) or allowing the lid to “bang” open or closed. Additionally, if you drop the lid when glass is molten, there is a risk that loose materials and/or dust may be deposited in your glass. Combustible materials must not be placed on or close to the kiln. Heat will build up over a period of time if the air circulation around the kiln is impaired and combustion will result. KILN ACCESSORIES There are several items which are either necessary or are commonly used in conjunction with your kiln. The most important are shown below: Kiln Wash: Kiln wash is a refractory material that is used as a coating on parts of the kiln and kiln shelves to prevent ware or glazes from adhering to them. It is usually purchased as a dry powder, and then is mixed with water and applied with a brush. See further Annexure B. Kiln Furniture: Kiln furniture consists of shelves and posts (available in a variety of shapes and heights). Glass is fired on one layer only. Kits containing the most commonly needed assortment of furniture for each kiln model are available from Glassfusing Pty Ltd. KILN MAINTENANCE You can protect your kiln and add many extra years to its life by following some simple maintenance procedures. When new, kiln wash the floor of the kiln to prevent any broken glass melting into it. Alternatively, place a sheet of ceramic fibre on the floor and replace this annually. Daily or per firing Visual inspection for damage – do not use the kiln if it is damaged. Clean the kiln by removing chips and dust. A low power vacuum cleaner works well for this purpose. Kiln wash the floor where it has worn thin. Keep a smooth layer not over 1/16” (1.5mm) thick. Copyright 2011 Cress Manufacturing Company, Inc. All rights reserved. Kiln wash built up to a thick layer may damage the kiln floor by pitting due to differential thermal expansion. Clean and recoat shelves as required. Ensure correct operation of lid cut-out switch. Weekly Check/reposition elements moving from groove. If elements are to be moved, they must be heated with gas torch to orange glow. Monthly Check correct operation of RCD on kiln circuit. Quarterly Thoroughly vacuum kiln chamber and lid. Check condition of thermocouple. Annually Replace fibreboard in base if fitted. “Test and tag” inspection of kiln and controller. WARNING – Do not use the kiln if it is not in perfect operating condition. Thermocouple: Be particularly careful not to hit the thermocouple when loading and unloading your kiln. We advise that you periodically check the thermocouple visually for cracks and thinning of the wire. The thermocouple will oxidize in use and either crack or just become thin until there is no connection. Contaminants may hurt the accuracy of the thermocouple. High temperature firing can damage the accuracy of the thermocouple. If you notice a sudden change in results at a given temperature, have the thermocouple changed in accordance with the instructions below. Lid Brace: Be aware of the lid brace operation every time the kiln is fired. Replace the lid brace if it becomes bent, or does not function perfectly. WARNING – Do not use the kiln if the lid brace is not in perfect operating condition. Lid Band: Tighten the lid band when necessary. The normal differential expansion and contraction of the brick and lid band, will cause a gradual loosening of the lid band. Stainless Steel Case: Normally the case never needs tightening from normal use but tighten if needed. Keep the outside of the kiln clean. It is easier to clean the outside surface before contaminants are burnt onto the surface. Copyright 2011 Cress Manufacturing Company, Inc. All rights reserved. The following maintenance items (if required) must be carried out by a licensed electrician or suitably qualified person Pilot Light: Replace the pilot light if the lens becomes damaged or it fails to operate. Cord: Check the cord every three months for heating. If the cord becomes hot during firing, replace the cord and/or wall receptacle. Check the cord for heat near the wall plug after the kiln has been firing for over three hours. Have a licensed electrician replace the cord with a CRESS cord and a wall receptacle to make sure the heat specifications as well as the amperage and voltage specifications are met. Thermocouple Replacement Instructions: The controller indicates the temperature at the tip of the thermocouple. That is the point the two alloy wires are welded. The thermocouple has been marked with a minus sign (-) on the end of the large white bushing. The thermocouple lead wires must be connected with the red wire to the minus (-) and the yellow wire to the plus (+) side of the thermocouple. RED TO THE “-“ AND YELLOW TO THE “+”. The thermocouple must extend into the kiln to obtain a correct temperature reading. You should keep in mind contamination from products fired may alter its calibration. Change the thermocouple should you doubt the temperature control readings. Pyrometric cones are an inexpensive way to check the controller’s temperature reading. If you hook up the thermocouple incorrectly, your controller will not operate properly. If your thermocouple is not marked, or if you believe it is incorrectly marked, you can check it with a magnet. The magnetic side is always the minus (-) and must be connected to the red wire. After the replacement of your thermocouple, we advise that you do a test fire without a load to be sure that the thermocouple is connected properly. Otherwise, the indicator needle will go in the wrong direction. ATTACHMENTS A B C D Sample Firing Schedules Use of Shelf Primer Use of Slumping Moulds Bartlett Instruments 3K Controller Manual Copyright 2011 Cress Manufacturing Company, Inc. All rights reserved. CRESS MANUFACTURING COMPANY, INC. A Nevada Corporation GLASSS FUSER LIMITED KILN WARRANTY Your Cress kiln is warranted for three (3) years from the date of purchase to the original purchaser. If any defects in workmanship or material appear during this time, Cress Manufacturing Company, Inc., will replace or repair defective parts. Written proof of purchase date is required. This warranty is limited to the original purchaser. Warranty repairs are normally handled through the dealer from whom the kiln was purchased. Otherwise, the purchaser may return the defective part to Cress Manufacturing Company, Inc., 4736 Convair Dr., Carson City, NV 89706 along with the serial number, model number, voltage, proof of purchase date and a statement of what is thought to be wrong with the product. If a defect is confirmed, a new or repaired part will be shipped, postage aid by Cress Manufacturing Company. A Cress kiln may be returned for warranty work to Cress Manufacturing Company, Inc., 4736 Convair Dr., Carson City NV 89706. All transportation costs will be borne by the purchaser. Before shipment, the purchaser will notify Cress Manufacturing Company – phone (775)884-2777 – so that we may help advise in order to keep costs at a minimum, should it not be necessary to ship the entire kiln to us. An RMA (return material authorization) number is required before a return may be accepted. This number must be placed on the outside of the returned part or kiln. Repair or replacement of defective kiln parts shall be considered as a complete fulfillment of this warranty. Warranty does not cover over-firing (exceeding the melting temperature of the material being fired) regardless of the cause, kilns damaged by transporting, abuse, improper use, reactive materials being fired (i.e., reduction firing, salt firing or carbon contamination), moisture, contents being fired, improper electrical installation, kilns used for any purpose other than firing ceramic materials, or ware, kiln furniture or contents being over-fired. Kiln elements warranted during the three (3) year period is limited to one set – the second set is not warranted for any reason. Cress Manufacturing Company is not responsible for consequential damage to contents being fired. Cress Manufacturing Company does not authorize any wholesaler, retailer or employee to assume any other obligation or liability in regard to Cress kilns. For kilns sold in Australia, this warranty is additional to any specific rights conferred by the Competition and Consumer Act 2010 (Clth). Under this Act, certain consumer guarantees may apply to these goods, including that 1. Goods will be of acceptable quality 2. Goods will be fit for a particular purpose 3. Goods will match their description 4. Goods will match the sample or demonstration model 5. Any express warranties will be honoured 6. Spare parts and repair facilities will be available for a reasonable time The kiln includes items which degrade with use. Specifically, thermocouples, relays and elements have a finite life depending on the nature, temperature and environment of use. Kiln bricks and other refractories will crack and break down in normal use. Degradation of these types is not subject to any form of warranty. Copyright 2011 Cress Manufacturing Company, Inc. All rights reserved. GENERAL The information contained in this guide is subject to change without notice. Cress Manufacturing Company, Inc., shall not be liable for technical or editorial omissions made herein; nor for incidental or consequential damages resulting from the furnishing, performance or use of this material or equipment. This contains information protected by copyright. No part of this guide may be photographed or reproduced in any form without prior written consent from Cress Manufacturing Company, Inc. Copyright 2011 Cress Manufacturing Company, Inc. All rights reserved. ANNEXURE A Bartlett 3 Key with Cress Kiln Adjust User 1 Segments Ramp Temp Soak User 2 Segments Ramp Temp Soak User 3 Segments Ramp Temp Soak User 4 Segments Ramp Temp Soak Temp Soak Time to suit type of glass and desired effect. Adjust Temp to annealing temperature for type of glass Adjust Ramp to suit type of mould Cure shelf 1 500 290 15 Simple Fuse 6 200 538 0 500 770 10 5000 538 10 60 516 30 120 427 0 200 50 0 Bubble Squeeze Fuse 8 200 500 538 600 0 0 60 700 0 500 770 10 5000 538 10 60 516 30 5000 538 10 60 516 30 120 427 0 200 50 0 Simple Slump 6 200 538 0 300 670 30 Copyright 2011 Glassfusing Pty Ltd. All rights reserved. 120 427 0 200 50 0 ANNEXURE B Preparing Kiln Shelves One of the secrets to getting good looking glass is to fuse it on well prepared kiln shelves. We recommend that shelves be stripped and recoated after each firing. Whilst you might be able to “get away” with reusing a fired shelf, in our experience the minor inconvenience of having to recoat a shelf is more than outweighed by the very real risk of imparting unwanted textures to the fused glass piece on a re-used shelf – or in extreme circumstances, the kiln wash coating failing and the glass itself sticking to the shelf. CAUTION: There is a dust hazard in this process – always wear a dust mask, suppress dust creation, and keep the work area clean. Check product packaging for specific safety warnings. Step 1 – remove old kiln wash from the shelf. A mild abrasive paper – 240-400 grit is recommended – preferably open weave. Do not use power tools – they create too much dust. Remove dust from the shelf (e.g. lightly brush it off). Step 2 – ensure that the primer is thoroughly mixed. Stir well until there is no residue on the base of the container. Stir again after each coat. Step 3 – apply kiln wash in at least 4 thin coats using a haik brush. Allow brush to glide from one end of shelf to the other – do not paint it on. Allow to dry and change the direction in which you coat, after each coat. 1 2 3 4 There is no magic to the number “4” in terms of coats – it is a minimum not a maximum. You are looking for an even coating which obscures the pattern of the clay in the shelf. If an ultra smooth finish is required or you can see texture in the kiln wash you have applied, apply 2 coats of plain water. Step 4 – fire in kiln to 290° for 10 minutes. Copyright 2011 Glassfusing Pty Ltd. All rights reserved. Mixing kiln wash Follow the manufacturer’s instructions – usually 1 part powder to 5 parts water. A thinner wash is better than a thicker wash. Choosing kiln wash Use of kiln wash in warm glass work is more critical than its use with ceramics. The primary use in ceramics is to protect the kiln shelf from errant glazes or preventing glazed items sticking to the shelf (usually over 1200°C). It is usually applied very thickly. Unglazed ceramics don’t usually require kiln wash. In glass work, the kiln wash provides an essential separation layer between the glass and the shelf – the glass will stick to the shelf if it has the chance. Because the glass and the shelf expand at different rates, any area of glass fusing onto the shelf will cause the piece to shatter on cooling. Use a kiln wash designed for glass – given the different functions and temperatures, many ceramic kiln washes will not work satisfactorily. Additionally, we recommend use of specific high temperature kiln wash for work over 850°C. Kiln Wash Problems The most common problem encountered when using kiln wash is the tendency for kiln wash to be stuck to the rear of the glass. The most likely causes of kiln wash sticking to glass are (in our experience of likelihood): 1. The shelf is re-used – we strip and recoat each shelf every firing. Sometimes you can get away with reusing the shelf but we don’t take the chance. 2. The kiln wash is applied too thinly – this is evident when not only does the wash stick to the glass but the shelf itself takes a lot of effort to clean off. The wash should come off with a gentle scrape (no hard sanding or heavy scraping). With Primo Primer, it should brush off with a dust pan brush. The manufacturer generally recommends 4 coats – we often use 6 coats. 3. The glass has some moisture still on it from the cleaning process before it was placed onto the kiln shelf – this manifests itself as a narrow halo (1~3 mm) of stuck wash around the around the perimeter of the work. Copyright 2011 Glassfusing Pty Ltd. All rights reserved. 4. The shelf is highly textured (generally an old shelf although some new shelves we have come across are like that. Sanding a shelf does not tend to help as it paradoxically tends to makes the surface of the shelf rougher rather than smoother as it breaks up the surface. There are some glasses to which kiln wash seems to stick regularly no matter what you do. Particular culprits in our experience are (in System 96) Uroboros Chocolate White Streaky, and Plum Opal. It is possible that there is some chemical reaction occurring between these glasses and the kiln wash or alternatively - as they are quite dense colours - it may be heat related. The best strategies are prevention – avoid the common errors (1) through (4) above – or modify your firing schedule to shorter soaks at higher temperatures. If the kiln wash still sticks, we soak the glass in a solution of 20% cleaning vinegar (not food vinegar) and 80% water and it will come off easily – 20 minutes for most pieces – 3~4 hours max. This removes the wash but does not solve any texture problems which might be on the rear of the glass. If there is texture in the glass from the stuck wash then the issue is either error (2) or error (4) above. Copyright 2011 Glassfusing Pty Ltd. All rights reserved. ANNEXURE C Ceramic moulds are an economical, easy to use and practical form of mould for slumping glass. Most are made by a slip casting technique (slip being a liquid form of clay) in the same way as many hobby ceramics pieces are made (also known as greenware). But beware - not all greenware is created equal. Most greenware is designed to be painted or decorated and fired with no other weight on it and for a limited number of times (2 ~ 3) at moderate temperatures and firing rates. A good glass slumping mould on the other hand needs to be able to be fired multiple times - carrying also the weight of the glass to be slumped (which is often heavier than the mould itself) - and whilst glass slumps at relatively low temperatures they are often reached relatively quickly. For instance, when curing kiln wash on moulds, it is common to ramp the kiln at 500°/hour to 260° - a rate which will cause many ceramics to break. Even following manufacturer’s recommended firing schedules for a 250 mm x 6 mm fused piece, ramping will often be at far faster rate than recommended for most hobby ceramics greenware. This means that a glass slumping mould needs to be well designed; well made and comprised of clays which are strong; have high resistance to thermal shock; can be worked to remove any textures arising from the manufacturing process; and will accept a good coating of kiln wash. Mould shapes When you look at a mould you must try to imagine the shape of a piece of glass slumped over or into it. Inevitably that means that some beautiful looking moulds can produce ugly pieces of glass and conversely some ugly looking moulds produce beautiful finished pieces – a great example of this is the round scallop plate mould. For this reason, we are using pictures of glass produced in the moulds rather than the moulds themselves. We do not generally recommend slumping glass over (as opposed to into) ceramic molds with square edges as our experiences have not been positive with the glass contracting more rapidly than the ceramic - often trapping the mold or breaking the glass. Mould Sizes A mould can accept a piece of glass up to but not larger than the size specified. The actual mould may be slightly larger – if it seems like a tight fit in your kiln please check with us as to the actual size of the mould as opposed to the glass it accepts. Venting air Every time you slump into a mould you need to think about how you will prevent air being trapped between the mould and the glass. If air is trapped, you may well end up with large (ugly) bubbles in your finished piece. Air expands at an exponential rate so a small bubble at 500° is golf ball size by the time it heats to 670°. Copyright 2011 Glassfusing Pty Ltd. All rights reserved. Many molds have small vent holes to allow air to escape. We have found these to be less than effective at times, particularly when the glass slumps irregularly across the piece – as is often the case with geometric patterns. Some glass colours absorb more heat than others and slump first. Sometimes one part of the glass will slump over (and seal) the strategically placed vent hole which renders it useless. Additionally, we discovered that when moulds cracked they almost inevitably cracked from or to one of the vent holes which had been a form of weakness in the ceramic structure. We recommend for all ceramic moulds that in addition to kiln washing, they receive a light dusting of china clay. This china clay allows multiple pathways for the air to escape as well as preventing the glass dragging on the mould as it slumps – appropriately named “stretch marks” – and, for transparent glasses, the china clay adds an extra sparkle. Therefore we do not put any vent holes in small or gently sloping moulds. Where a mould shape does require vent holes – i.e. drops over square edges – we drill the vent holes after the mould has been fired. Kiln washed Dusted Dusted (detail) How long will a mould last? It is impossible to say how many firings you will get out of a particular mould – suffice it to say that you should regard them as consumable items and keep a spare of your favourite shapes. Unfortunately, some moulds will crack on their first firing, others will last for literally hundreds of firings. We even have some shapes that the only time we have broken them has been from bad handling and not from use in the kiln. Dropping them; banging them together; or storing different shapes on top of each other is definitely not recommended and in our experience is the greatest cause of failure. The other major destroyer of moulds is thermal shock. If your kiln is front loading then never, ever open it whilst above 50°when it has a ceramic mould in it – in a front loading kiln the moulds are actually more susceptible to thermal shock than the glass. (as a rule we don’t recommend the use of front loading kilns for glass work) Copyright 2011 Glassfusing Pty Ltd. All rights reserved. Always allow plenty of air circulation around the mould in the kiln - at least 50 mm all round. If the kiln is 300 square then the maximum mould size is 200 mm; 400 is 300 etc...... Place the mould on fibre or props - not a kiln shelf. A kiln shelf is generally a heat sink and therefore significantly colder (during heat up) or hotter (during cool down) than the rest of the kiln - that sort of temperature variance may cause breaks. Copyright 2011 Glassfusing Pty Ltd. All rights reserved. Model 3K Programming with RMPATE Software General Information The Model 3K controller with RMPATE software has four User programs. Each program can have up to eight segments with each segment consisting of a ramp rate (in degrees per hour), a target temperature, and a hold time. Programming consists of choosing the User program (1, 2, 3, or 4), choosing how many segments you want (up to 8), then programming the ramp (rA), temperature (F), and hold time (HLD) for each segment. Programming the Model 3K Controller When the power is first turned on either ErrP or IdLE alternating with the current temperature will be displayed. If ErrP is displayed press the up arrow to clear this error message. If IdLE alternating with the current temperature is displayed, you are ready to begin programming. Press ENTER to begin. The previously fired program will be displayed, either USr1, USr2, USr3, or USr4. Select the user number you want to program by using the UP and DOWN keys, and press ENTER. dELA is displayed alternating with 00:00. Press ENTER if no delay is wanted. When firing glass no delay is used. Use the UP and DOWN keys to delay the start of the firing (Hours: Minutes). Press ENTER when the desired delay time is displayed. SEG alternating with the last selected number of segments is displayed. Use the UP and DOWN keys to select the number of segments, then press ENTER. NOTE: Each segment consists of a ramp rate to a temperature and a hold time. There are 8 segments available for programming. rA 1 alternates with the ramp rate (/hr). Use the UP and DOWN keys to select the desired rate and press ENTER. A rate of 9999 will cause the kiln to heat (or cool if in a down ramp) at maximum rate. The first segment must always be an "up" ramp. F 1 alternates with the currently selected temperature. Use the UP and DOWN keys to select the desired temperature for this segment and press ENTER. HLd1 alternates with the currently selected hold time. Use the UP and DOWN keys to select the desired hold time for this segment and press ENTER. This completes programming for the first segment. If more than one segment was chosen then rA2 will be displayed and you repeat the steps for ramp rate, temperature, and hold time for each additional segment selected. rEdl will be displayed after the last segment is entered. Press ENTER to begin firing. Firing Example: Tack Fuse Glass Firing Program programmed in User 1 with no delay (For more firing examples see www.bartinst.com) Segment 1 2 3 4 Rate ( /hour) 750 500 9999 200 F 750 1350 1000 975 Hold time (hours.minutes) 00.10 00.15 00.30 00.15 To program this example (from idle): 1 Press ENTER - the display will show Usrx, where "x" is the last fired program number. 2 Use the arrow keys to adjust "x" to 1 for user 1 3 Press ENTER - dELA/00.00 will be displayed 4 Press ENTER - SEG/000x will be displayed, where "x" is the number of segments previously in the program. 5 Use the arrow keys to display 4 6 Press ENTER - the display will show rA 1/xxxx, where "xxxx" is the last saved rate for ramp one. 7 Use the arrow keys to adjust the rate to 750 8 Press ENTER - the display will show F 1/xxxx, where "xxxx" is the previous segment 1 temperature. RMPATED-F 6-15-04 1 Model 3K Programming with RMPATE Software 9 10 11 12 13 Use the arrow keys to adjust the temperature to 750 Press ENTER - the display will show HLd1/xxxx, where "xxxx" is the last saved hold time. Use the arrow keys to adjust to 00.10 for a 10-minute hold time Press ENTER - the display will show rA 2/xxxx Repeat steps 6 - 12 filling in the information for each additional segment from the table. To re-fire the last used program, press the DOWN key when IdLE is displayed. The program will be quickly reviewed and rEdl will be displayed. If the down arrow is pressed twice the controller will go directly to rEdl. Press START to begin the firing. Options During Firing During a firing you may advance from the current segment to the next ramp rate by using Skip Step. If you are in a hold period you may add time or add temperature to the hold period. Displaying the current set-point and accessing the following options When the UP key is pressed during a firing the current ramp or hold is displayed followed by the current or traveling set-point, then "SStP" is displayed. If you do not press a key within several seconds the display will return to showing the current temperature in the kiln. Skip Step This option allows you to skip from the present segment to the next ramp rate. Press the UP key. The display will show the current segment, then the set-point, then "SStP". When "SStP" is displayed press ENTER to skip to the next ramp rate. Add Time to Hold Period This option allows you to add time in 5 minute increments to a hold (soak) period. When in a hold period (during a hold or soak, the temperature in the kiln will be alternating in the display with the remaining hold time), press the UP key. When "SStP" is displayed press the UP key again and "tME" will be displayed. Press ENTER and 5 minutes will be added to the hold time. You may use this procedure as many times as necessary to get the hold time that you want. Add Temperature to Hold Period This option allows you to add temperature in 5 degree increments to a hold (soak) period. When in a hold period (during a hold or soak, the temperature in the kiln will be alternating in the display with the remaining hold time), press the UP key. When "SStP" is displayed press the UP key twice more and "tMP" will be displayed. Press ENTER and 5 minutes will be added to the hold time. You may use this procedure as many times as necessary to get the hold temperature that you want. Error Codes Err1 Error 1 indicates the temperature in the kiln is rising during an up ramp slower than 15F/hr. If this rate continues for 8 minutes the firing will be stopped. Err1 may be an indication that the elements are worn or that a relay has stopped working. ErrF Error F indicates the temperature in the kiln is decreasing during a down ramp less than 15F/hr. If this rate continues for 8 minutes the firing will be stopped. ErrF may be an indication that a relay has stuck in the on position. Errd Error d indicates that the kiln temperature is 100F above the traveling set-point, which is the current desired temperature in the kiln. The traveling set-point will increase or decrease according to the programmed rate. Errd may indicate a relay stuck in the "on" position or a problem with a thermocouple not reading correctly. RMPATED-F 6-15-04 2 Model 3K Programming with RMPATE Software ErrP ErrP is displayed whenever there is a power interruption that is long enough to stop the firing. If the power interruption is brief the kiln will continue to fire when power is restored; in this case there will be no indication of a power failure. To clear the error, press any key. tC FAIL tC alternating with FAIL indicates the thermocouple has failed. Replace the defective thermocouple. To clear the error, press any key. tC- - The red and yellow thermocouple wires are reversed. Display Messages CPLt Firing Cycle Complete (firing time is alternately displayed). dELA Delay. Displays when entering the delay time (hour:minutes) until the start of the firing. DLy Delay. Alternates with the remaining delay time until the start of the kiln. F # Segment temperature in F – Set temperature for a user program. C # Segment temperature in C – Set temperature for a user program. A decimal point will display in lower right cor ner. EdIt Edit the default options (beeping at complete, temperature scale, maximum programmable temperature) Err1 Error 1, kiln was heating less than 15/hr and it has been stopped. Errd Error d, kiln temperature is 50 hotter than the set-point temperature. Kiln has been stopped. ErrF Error F, similar to Err1 but during a down ramp the temperature is decreasing less than 15/hr. Kiln has been stopp ed. ErrP There has been a power interruption that has stopped the firing. Press any key to clear. FULL Beeps continuously at end of firing until a key is pressed. HLd# Soak time in hours:minutes at a hold temperature. OFF No beeping when firing is complete. On Beeps for 15 seconds at end of firing. rA # Ramp Number (rate per hour of temperature increase or decrease). rEdl Ready to fire current program. Press START to begin firing. SEG Short for Segments. You can enter up to 8 segments in a program. SStP Skip Step (used to advance to the next ramp) StOP The kiln is at idle and ready to be programmed. Stop alternates with the current kiln temperature. USr # User program number displayed RMPATED-F 6-15-04 3