1
WinFIBRE
Version 3.0
USER’S MANUAL
INTERNATIONAL ATOMIC ENERGY AGENCY, VIENNA, September 1999
Preface
PREFACE
The WinFIBRE USER’S MANUAL describes how to use the Windows version of FIBRE (Friendly Inputting of
Bibliographic Records) that was developed by Mr L.Iliev in 1995-1996.
Grateful acknowledgment is made to all the staff members of the INIS Section who contributed to the preparation of
this Manual. Special thanks are due to Ms. L. Lewis from Wordworkers Information Services, Ontario, Canada for her
excellent work in the preparation of the first release of the WinFIBRE manual.
Comments, suggestions and criticism from National INIS Centres and users of this document are welcome. Please send
them to:
Head, INIS Section
Division of Scientific and Technical Information
P.O. Box 100
A-1400 Vienna, Austria
Fax: (+43)1-2600-29882
i
Table of Contents
1.
Introduction.................................................................................................................................................................1
1.1.
What is WinFIBRE? ...........................................................................................................................................1
1.2.
New features of WinFIBRE version 3.................................................................................................................1
1.2.1.
User Matrixes ..............................................................................................................................................1
1.2.2.
Batch checking ............................................................................................................................................2
1.2.3.
Menus..........................................................................................................................................................2
1.2.4.
Other small changes ....................................................................................................................................2
1.3.
Organization ................................................................................................................................................2
1.3.2.
Typographical conventions .........................................................................................................................3
1.4.
Hardware and software requirements..................................................................................................................3
1.5.
Using Microsoft Windows™ ..............................................................................................................................3
1.5.1.
Using the mouse ..........................................................................................................................................3
1.5.2.
More about windows ...................................................................................................................................3
1.5.3.
Using the keyboard......................................................................................................................................5
1.6.
2.
3.
4.
Using Help ..........................................................................................................................................................5
Installation...................................................................................................................................................................9
2.1.
How to install WinFIBRE version 3 ...................................................................................................................9
2.2.
Setting up WinFIBRE .........................................................................................................................................9
Using WinFIBRE ......................................................................................................................................................11
3.1.
Starting WinFIBRE ...........................................................................................................................................11
3.2.
The editor screen ...............................................................................................................................................11
3.3.
Leaving WinFIBRE...........................................................................................................................................11
Preparing Bibliographic Input...................................................................................................................................13
4.1.
Input files ..........................................................................................................................................................13
4.1.1.
Creating a new input file ...........................................................................................................................13
4.1.2.
Opening an existing input file ...................................................................................................................13
4.2.
5.
About this manual ...............................................................................................................................................2
1.3.1.
Matrixes.............................................................................................................................................................13
4.2.1.
To use a standard matrix ...........................................................................................................................13
4.2.2.
To select a user matrix...............................................................................................................................14
4.3.
Adding input......................................................................................................................................................15
4.4.
Using authority files ..........................................................................................................................................15
4.5.
Checking input ..................................................................................................................................................16
4.5.1.
Auto Check and Spell................................................................................................................................16
4.5.2.
Checking a field ........................................................................................................................................16
4.5.3.
Checking a document ................................................................................................................................17
4.5.4.
Checking the buffer...................................................................................................................................17
4.6.
Saving work ......................................................................................................................................................17
4.7.
Leaving WinFIBRE...........................................................................................................................................17
Subject Indexing........................................................................................................................................................21
5.1.
Starting WinFIBRE ...........................................................................................................................................21
5.2.
Opening the document ......................................................................................................................................21
5.3.
Assigning subject categories .............................................................................................................................21
5.3.1.
Adding category codes manually. .............................................................................................................21
5.3.2.
Inserting codes from WinFIBRE authority files........................................................................................22
5.3.3.
ETDE and INIS subject categories............................................................................................................25
5.4.
Assigning descriptors ........................................................................................................................................25
i
WinFIBRE User’s Manual
5.4.1.
Assigning descriptors manually ................................................................................................................25
5.4.2.
Using the indexing function ......................................................................................................................25
5.5.
5.5.1.
Manual method of proposing descriptors ..................................................................................................27
5.5.2.
Using the indexing function to propose descriptors ..................................................................................28
5.6.
6.
Proposing descriptors ........................................................................................................................................27
Writing abstracts ...............................................................................................................................................28
5.6.1.
Inserting special characters .......................................................................................................................28
5.6.2.
Checking spelling and abstract length .......................................................................................................29
Menu and Toolbar Functions ....................................................................................................................................31
6.1.
Toolbar ..............................................................................................................................................................31
6.2.
Main menu ........................................................................................................................................................31
6.3.
File menu...........................................................................................................................................................32
6.3.1.
New file (<Ctrl>N)....................................................................................................................................32
6.3.2.
Open file (<Ctrl>O)...................................................................................................................................33
6.3.3.
Close file <Ctrl><F4> ...............................................................................................................................33
6.3.4.
Save (<Ctrl>S) ..........................................................................................................................................33
6.3.5.
Save As......................................................................................................................................................34
6.3.6.
Export INIS/EDTE....................................................................................................................................34
6.3.7.
Batch Check ..............................................................................................................................................35
6.3.8.
Exit (<Alt><F4>) ......................................................................................................................................36
6.3.9.
File List .....................................................................................................................................................36
6.4.
Edit menu ..........................................................................................................................................................36
6.4.1.
Undo (<CTRL>Z) .....................................................................................................................................36
6.4.2.
Cut (<Ctrl>X)............................................................................................................................................36
6.4.3.
Copy (<Ctrl>C) .........................................................................................................................................36
6.4.4.
Paste (<Ctrl>V) .........................................................................................................................................37
6.4.5.
Delete ........................................................................................................................................................37
6.4.6.
Insert Special characters............................................................................................................................37
6.4.7.
Select All (<Ctrl>A)..................................................................................................................................37
6.5.
Search Menu......................................................................................................................................................37
6.5.1.
Find (<CTRL>F).......................................................................................................................................38
6.5.2.
Replace (<CTRL>H).................................................................................................................................38
6.5.3.
Find next (<F3>) .......................................................................................................................................38
6.6.
Options Menu....................................................................................................................................................38
6.6.1.
Toolbar ......................................................................................................................................................39
6.6.2.
Status Bar ..................................................................................................................................................39
6.6.3.
Font ...........................................................................................................................................................39
6.6.4.
Fibre ..........................................................................................................................................................40
6.6.5.
Wrap..........................................................................................................................................................41
6.7.
Command Menu................................................................................................................................................41
6.7.1.
Check field (<Ctrl+Shift>F)......................................................................................................................41
6.7.2.
Check document (<Ctrl+Shift>D).............................................................................................................42
6.7.3.
Check buffer (<Ctrl+Shift>B)...................................................................................................................43
6.7.4.
Call Authority (<Shift><F3>) ...................................................................................................................45
6.7.5.
DataBase ...................................................................................................................................................54
6.8.
Matrix................................................................................................................................................................58
6.8.1.
ii
Select Standard matrix (<Shift><F2>) ......................................................................................................58
Table of Contents
6.8.2.
6.9.
Window Menu...................................................................................................................................................59
6.9.1.
Cascade .....................................................................................................................................................59
6.9.2.
Tile ............................................................................................................................................................59
6.9.3.
Arrange icons ............................................................................................................................................60
6.10.
7.
Select Active matrix ..................................................................................................................................58
Additional keys and key combinations..........................................................................................................60
6.10.1.
Copy next tag from the matrix (<Tab>) ....................................................................................................60
6.10.2.
Switch between Insert and Overwrite modes (<Ins>) ...............................................................................60
Matrixes ....................................................................................................................................................................61
7.1.
Selecting a standard matrix ...............................................................................................................................61
7.2.
User matrixes ....................................................................................................................................................61
8.
7.2.1.
Why use a user matrix? .............................................................................................................................61
7.2.2.
Creating a user matrix ...............................................................................................................................61
7.2.3.
More then one user matrix in the same file ...............................................................................................63
7.2.4.
Select Active matrix ..................................................................................................................................63
7.2.5.
Open a stored user matrix..........................................................................................................................63
7.2.6.
Editing a user matrix .................................................................................................................................64
Checking Input ..........................................................................................................................................................65
8.1.
On-line checking ...............................................................................................................................................65
8.1.1.
Starting WinFIBRE ...................................................................................................................................65
8.1.2.
Opening the document...............................................................................................................................65
8.1.3.
Check the file ............................................................................................................................................65
8.2.
Batch checking ..................................................................................................................................................66
8.3.
Limitations of the checking function.................................................................................................................66
9.
Database for Corporate entries..................................................................................................................................70
10.
Sending Input to INIS ...........................................................................................................................................71
10.1.
Copying the file.............................................................................................................................................71
10.2.
Separating INIS and ETDE input..................................................................................................................71
10.3.
Labeling the disk or e-mail............................................................................................................................71
Appendix A.
Functions and Shortcut Keys.................................................................................................................72
Appendix B.
Transcription of Special Characters in INIS..........................................................................................73
Index .................................................................................................................................................................................75
iii
Chapter 1 - Introduction
1. Introduction
1.1. What is WinFIBRE?
Welcome to WinFIBRE – Windows Friendly Input of Bibliographic Records – a simple and quick way of preparing
input for INIS (the International Nuclear Information System).
WinFIBRE version 3 –
·
prompts you to supply all the information – and only the information – that INIS needs about each type of
document;
· helps check and add terms and codes from the Thesaurus, corporate authority list, list of category codes,
journal list and other INIS authorities;
· checks input using INIS rules;
· prepares a file to send to the INIS Secretariat. The Secretariat can process input prepared using WinFIBRE
quickly and easily, so information from your country will appear in INIS products promptly;
· runs under Microsoft Windows™ NT/9x (Version 3.0 has been tested only under Windows NT4.0 and
Windows 95).
WinFIBRE is a text editing program specially designed for the preparation of INIS input.
1.2. New features of WinFIBRE version 3
WinFIBRE version 3 uses the standard Windows user interface. It looks and acts like any other program that runs under
Microsoft Windows™. The screen layout, dialog boxes, lists, menus, shortcut keys, and toolbars are slightly different
from those in WinFIBRE 2.x/1.x. DOS FIBRE users should treat WinFIBRE version 3 as a new program that does
everything FIBRE 2.1 could do but in a Windows-standard way.
WinFIBRE version 3 has a Windows standard Multiple Document Interface (MDI). During an edit session more than
one input file or user matrix can be open at a time.
WinFIBRE version 3 input files are compatible with files prepared by previous versions of WinFIBRE and DOS FIBRE
version 2.1. WinFIBRE version 3 uses the same data files, user defined matrixes, authority files, format description
files, cross checking rules files, and spelling checker files as previous versions of WinFIBRE. On the other hand, setup
files, help files, and timed backup files are different from previous FIBRE/WinFIBRE versions.
1.2.1. User Matrixes
The most important difference between this and previous versions of WinFIBRE is in the way “user defined matrixes”
are presented and used. The idea behind these changes is that WinFIBRE users are able to use one input document and
several user matrixes to correspond with it. In the previous version the link was one document - one matrix.
In version 3:
·
·
·
Document buffers and user matrixes do not go in pairs anymore.
One can have many matrix buffers not linked to a particular document buffer.
A matrix buffer can be created in three different ways:
From “File/New” menu – creating an empty matrix buffer.
From “Matrix/Select Standard Matrix” – selecting one of the built-in matrixes.
From “File/Open” menu – opening already existing matrix file.
·
·
Any of the matrixes can be changed and saved as a file, if necessary, for future use.
One matrix buffer can contain more than one user matrix. (There is no practical limitation for this number).
One can place many user matrixes in a single buffer by means of “Edit/Copy” and “Edit/Paste”. No
delimiter is required between two matrixes – empty lines are accepted.
· If there are more than one “User matrix” buffers – only one of them can have a status of “Active Matrix”.
This “Active matrix” is going to be used with “Next Tag” (“Tab”) command. The “Active matrix” is
marked with an asterisk (“*”) in the first position in the name. This name is shown in the “Window” menu
and in the title bar as well.
· If the “Active Matrix” buffer contains more than one matrix, the matrix containing the caret (text cursor)
will be used for “Next Tag” (“Tab”) command.
All these changes are made in order to ease usage for more than one user matrix. There are two methods for doing this:
·
Keep any matrix in a separate buffer. When you want to switch the matrix – make the corresponding buffer
current (by clicking with the mouse or through “Window” menu) and make this matrix “Active” through
“Matrix/ Select Active Matrix”.
1
WinFIBRE User’s Manual
·
Keep all the matrixes in a single buffer and keep this buffer as “Active Matrix”. When you want to switch
the matrix – scroll the buffer up or down to find the matrix you want and leave the caret in it.
Any combinations of these two methods are also possible.
1.2.2. Batch checking
Batch checking is an added feature to WinFIBRE version 3. It also existed in the FIBRE for DOS. Unlike the old DOS
version “Batch checking” in WinFIBRE function is selected from a menu. The command line interface is not available
in WinFIBRE v.3, but might be made available in a future version.
“File/Batch checking” menu item calls up a simple dialog. There are two file names to be specified (typed or selected)
– input file and output file. The input file is a WinFIBRE document file. The output file is going to contain the results
of the checks performed. It has one line per document checked and one line per error found. Each error-related line has
information about:
· Line number (from the beginning of the document file).
· Tag number and bibliographic level.
· Relative line number from the beginning of the tag.
· Relative character position from the beginning of the line.
· Text specifying the error. This text should be the same as the one that can be received during interactive
checking, but in the form of a dialog box.
Because there is no screen interaction, “Batch checking” works faster than normal interactive checking.
1.2.3. Menus
Some of the menus have been slightly changed to reflect the new User matrix concept.
· In the “File” menu – “New” and “Open” items work for documents as well as for matrixes. The “Read” menu
item is not supported anymore as it is not needed.
· “Select matrix” item in the “Command” menu has been moved to a newly created “Matrix” menu. This
menu also contains the new item - “Select active matrix”.
· “Document/Matrix” item in the “Window” menu has been removed.
· In the “Search” menu “Goto line” item has also been removed.
· The newly added “Print preview” item in “File” menu creates just an overall view and is not very precise in
the details. The preview can be completely wrong when the font set is a “Screen font” instead of a “True
Type” font. A similar problem could occur when the document is being printed. If a “Screen font” is being
used WinFIBRE, a “similar” font will be substituted for printer, because the “Screen font” cannot be used for
printing.
1.2.4. Other small changes
The new version of WinFIBRE has a document counter in the status bar – which always shows the actual number of
documents (“Items”) in the current buffer. This version also has a so-called “Floating Toolbar”.
1.3. About this manual
1.3.1. Organization
Chapter 1 of this manual introduces WinFIBRE, describes what you need in order to use WinFIBRE, and explains some
basic Windows features and how to get on-line help.
Chapter 2 goes through the process of installing and configuring WinFIBRE.
Chapter 3 explains starting and exiting WinFIBRE.
Chapter 4 describes how to use WinFIBRE to prepare bibliographic input.
Chapter 5 discusses the use of WinFIBRE in subject indexing.
Chapter 6 is a detailed description of menus and function keys.
Chapter 7 talks about matrixes – what they are and how to create, save, use and edit matrixes of your own.
Chapter 8 explains how to use WinFIBRE to check input.
Chapter 9 describes the installation of the Database for Corporate Entries.
Chapter 10 describes making a file to send to the INIS Secretariat.
Appendix A lists all the functions that can be carried out in WinFIBRE and the function key menus and shortcut keys
that perform these functions.
2
Chapter 1 - Introduction
Appendix B lists all the special characters that may be needed in input and how they can be encoded.
1.3.2. Typographical conventions
Special keys are enclosed in pointed brackets (<>):
<Alt>
the key marked Alt
<Ctrl>
the key marked Ctrl
<Shift>
the Shift key
<Enter>
the key marked Enter, Return or
<Ins>
the key marked Ins
<Tab>
the key marked Tab
<F1>, <F2>, etc.
function keys marked F1, F2, etc.
<Left Arrow>, etc
the arrow keys marked ←, →. ↓, ↑
1.4. Hardware and software requirements
To run WinFIBRE you need:
Computer:
an IBM PC or compatible computer capable of running
Microsoft Windows™ NT/9x.
Hard disk:
WinFIBRE’s files take between 6 and 10 MB of space on
the hard disk.
Operating system:
Microsoft Windows™ NT/95/98.
Optional floppy disk drive
Send input to the INIS Secretariat on 5.25 inch or 3.5 inch
disks.
Mouse:
A mouse is very helpful, although it is possible to do most
things with keystrokes.
1.5. Using Microsoft Windows™
You can skip the rest of this chapter if you are an experienced Microsoft Windows™ user.
1.5.1. Using the mouse
It is possible but not easy to use Microsoft Windows™ without a mouse (see section 1.5.3). The mouse controls a
pointer on the screen. When you move the mouse on your desk surface the pointer moves on the screen. Moving the
pointer so it is on top of an object on the screen is called ‘pointing’.
Your mouse will have two or three buttons. The left button is the one most commonly used. Pressing and releasing the
left button once is called ‘clicking’. Pressing and releasing the left button twice quickly (experiment to find the right
speed) is called ‘double-clicking.’ Pressing and holding the left mouse button while moving the pointer is called
‘dragging.’
In WinFIBRE you can position the insertion point by moving it with the mouse and clicking when you reach the right
place. Select text to copy or delete by clicking and dragging with the mouse. Selected text is with inverted videoattributes (white against a dark background if normal text is dark against a light background). Select a single word by
double-clicking on it.
1.5.2. More about windows
1.5.2.1.
Scroll bars
If a window is too small to display all the information available ‘scroll bars’ appear in its frame:
3
WinFIBRE User’s Manual
A scroll bar has arrow-containing buttons at each end and a ‘scroll button’ positioned somewhere between the two
arrow buttons. Use the scroll bar to move through the document. Click the arrow button to move one line up or down,
one character left or right. Click and hold the arrow button to move steadily through the file. Click above or below the
scroll button to move one screen up or down. Drag the scroll button to move to an approximate location in the
document.
1.5.2.2.
File selection windows
A special kind of window (standard dialog) you will use often with WinFIBRE allows you to locate and select a file.
Typical is the ‘Open Document’ window:
This window shows a list of all the files of a particular type in a specified directory on a particular drive. If the file you
want is in the list you can select it by double-clicking on its name, or by clicking the name and then clicking ‘Open’. If
you want to list files of another type, click the down-arrow button under ‘Files of type’ and select the file type from the
list that appears. If you want to look at files on a different drive, click the down-arrow button under ‘Look in’ and select
the drive from the list that appears.
Use the display under ‘Look in’ to change to a different directory. If the directory name appears in the window, doubleclick its name. If the directory does not appear double-click the name of the directory above the current one to move up
the directory tree; double-click the name of a directory below the current one to move down the directory tree.
Like most windows, the file selection window has an ‘Open’ button and a ‘Cancel’ button. Click ‘Open’ or press
<Enter> to open the file you have selected. Click ‘Cancel’ or press <Esc> to cancel this operation.
4
Chapter 1 - Introduction
1.5.3. Using the keyboard
1.5.3.1.
Keyboard shortcuts in Windows
You can use Microsoft Windows™ with just a keyboard if necessary. Here are some useful keystrokes:
Press
To
<Alt> + a character key
Moves to an option containing the underlined letter in its name
<CTRL>O
Opens a list
<Alt><F4>
Quits an application
<Alt><Spacebar>
Opens the Control menu
<Ctrl><F4>
Closes the active window
<CTRL><End>
Moves to the last line in a file
<Enter>
Chooses the selected menu name or command
<Esc>
Stops (Cancel) a procedure
<CTRL><Home>
Moves to the first line in a file
<PgUp>, <PgDn>
Scrolls up or down one screen at a time
<Tab>
Moves from option to option in a dialog box or window
<Shift><Tab>
Moves from option to option in reverse order
<Spacebar>
Selects an item in a list
Check the Microsoft Windows™ User’s Guide for more information about using a keyboard in Windows.
1.5.3.2.
Keyboard shortcuts in WinFIBRE
To move around WinFIBRE’s editor screen use the same keystrokes many other text editors use.
To move
Press
Down one line
<Down arrow>
Up one line
<Up arrow>
Down one screen
<PgDn>
Up one screen
<PgUp>
Left one character
<Left arrow>
Right one character
<Right arrow>
Left one word
<Ctrl><Left arrow>
Right one word
<Ctrl><Right arrow>
To beginning of line
<Home>
To end of line
<End>
To top of buffer
<Ctrl><Home>
To bottom of buffer
<Ctrl><End>
1.6. Using Help
WinFIBRE has a standard Microsoft Windows™ context-sensitive help system. Click a ‘Help’ button whenever one is
available or choose ‘Help’ from the menu bar to get help appropriate to the situation.
When you choose ‘Help’ from the menu bar this drop-down menu is displayed:
Select ‘Contents’ to view the list of topics covered in WinFIBRE’s Help file. By clicking on a topic (in colour and
underlined) the information on that topic is displayed.
5
WinFIBRE User’s Manual
To search through the Help index select ‘Search’. A window similar to this is displayed:
When you start typing in the box under ‘Type the first...’ the list of topics scrolls to those keywords that most closely
match what you type. When the topic you want is highlighted, click the ‘Display’ button (or double-click a phrase in the
list) to show the list of relevant topics. Select the topic you want and choose the ‘Go To’ button. Information about the
topic appears on the screen:
6
Chapter 1 - Introduction
At the top of Help window there are four buttons:
Contents
takes you to the table of contents for the help file
Search
lets you search the help file keyword list (like we did in the
example above)
Back
goes back to the last help topic you viewed
There is a menu bar at the top of the Help window. The File menu has the choices –
Open
opens a new help file
Print Topic
sends the information in this topic window to your printer
Exit
closes the Help window
Using the Edit menu you can
Copy
selects a topic to copy to the Windows Clipboard
Annotate
attaches a note to the current Help topic
The Bookmark menu is a quick way to access frequently-used Help topics.
7
Chapter 2 - Instalation
2. Installation
2.1. How to install WinFIBRE version 3
WinFIBRE version 3 is normally distributed on CD, but is also available on 3½ inch floppy disks or can be downloaded
from INIS FTP-server. Before you install WinFIBRE version 3 consult the “readme.txt” file for installation details
specific for the particular distribution kit. To start the installation usually the “Setup.exe” should be run. On 3½ inch
floppy disks this file is in the root directory on the first disk of the installation kit. On CD this file is normally in the
“WINFIBRE” directory.
When installing WinFIBREv.3 the following will occur:
·
·
The contents of “Readme” file will be shown.
You will be asked to choose, or simply to confirm the default values for the destination directory and
program folder.
· If you are installing WinFIBRE with the floppy disk based installation kit, you will be asked to replace the
disks during the installation.
· After the successful completion WinFIBRE version 3 will be ready for use.
When the WinFIBRE installation is complete you will have a new program group, containing the main WinFIBRE
version 3 program and “WinFIBRE Setup”.
2.2. Setting up WinFIBRE
Although WinFIBRE is ready to use as soon as you have installed it, there are a few additional parameters you can
change, using WinFIBRE Setup utility. (Use the Windows Control Panel/Display/Appearance to change colours and
other windows screen settings.)
Click the WinFIBRE Setup icon in the Windows WinFIBRE group or run it from Start/Program… menu.
The following window appears:
The following parameters can be changed in this window:
· ‘Auto check’. To activate/deactivate Autocheck, click in the box beside the words ‘Auto check.’ The ‘Ö‘ that
appears in this box indicates that Autocheck is activated. Click the box again to remove the ‘Ö‘ and
deactivate Autocheck. (for more information see 4.5.1);
· ‘Minutes between backups’. When WinFIBRE is first installed, it is set to make backups every five minutes.
To change the time between backups, click the box, delete the 5 and enter the desired time between backups
directly in the box;
· ‘Auto increments tag number’. Those using WinFIBRE for INIS input will find it particularly useful to
change the Auto Increment Tag to ‘001’. Then whenever WinFIBRE inserts tag 001 (in response to your
pressing <Tab> at the end of the Abstract field) the TRN will be incremented by 1;
When you have finished changing these options, click ‘Save&Exit’ to save your changes and leave Setup, or ‘Quit’ to
discard your changes. If you click “More options” you will be given a chance to:
· change the default file locations and names;
· change tag definitions
9
WinFIBRE User’s Manual
None of these changes are recommended if you are using WinFIBRE for INIS related input. (They are useful only if
WinFIBRE is used for non INIS input. Using the so-called “optional sets” WinFIBRE can be set to assist input using up
to eight different sets of tag definitions and checking rules.)
10
Chapter 3 - Using WinFIBRE
3. Using WinFIBRE
3.1. Starting WinFIBRE
WindowsÔ provides two ways to start WinFIBRE version 3:
·
Direct - start WinFIBRE click “Start”, and then point to “Programs”, select the “WinFIBRE” folder (or the
proper folder if another one has been selected during the installation) and then select WinFIBRE. If
necessary use Windows capabilities to make another folder, to change the existing one, or to make shortcuts,
etc.
· Indirect - another way to start WinFIBRE is by clicking a file that has an extension “.inp”.
If you attempt to start another WinFIBRE version 3 session indirectly, Windows will not create a new session, but will
simply activate the one currently running and display the desired “.inp” file.
3.2. The editor screen
The WinFIBRE editor screen looks like this:
At the top of the screen is the menu bar, which contains all the commands you need to use WinFIBRE (File, Edit,
Search, ect.).
Below the menu bar is the toolbar, a set of icons that represent the most commonly used commands.
Clicking on one of these icons executes the command it represents. When you place the mouse pointer on top of an icon
for a second or two a label explaining the icon’s function appears. At the same time more detailed information about
the command appears immediately in the “status line.” The “status line” is located at the bottom left of the WinFIBRE
window. As long as this toolbar is “floating” it can moved to any place on the screen you like. WinFIBRE will not save
the toolbar’s position at the end of the editing session though.
The editing area appears below the toolbar. By default, the cursor is positioned at the first occurrence.
Below the edit window is the status line. WinFIBRE displays messages on this line that indicate where you are in the
file being edited and the total number of records entered in your file. Other messages appear on the status line from time
to time.
3.3. Leaving WinFIBRE
Choose Exit from the File menu or press <Alt><F4> to end a WinFIBRE session. If you have made changes to the input
file you will be asked if you want to save them:
11
WinFIBRE User’s Manual
Press <Enter> or click ‘Yes’ to save the changes to the input file and leave WinFIBRE. Click ‘No’ to discard all the
changes you have made in the input file and leave WinFIBRE. Press <Esc> or click ‘Cancel’ to return to your
WinFIBRE session and continue editing.
If you were editing a new input file that did not have a name yet, you will be asked to give it a name. A list of the input
files in your current directory appears.
Type the name of the new file in the File Name box. It will be given the extension ‘.INP’ automatically unless you
specify another extension. If you would like to save the file to a different directory, move through the list under ‘Save
in’ and select the proper one. If you would like to write the file to a different drive, select the drive from the list under
‘Save in’ and click ‘ ‘ or ‘ ‘ (Up One Leve). When the proper name, drive and directory are provided, click ‘Save’.
If you change your mind, click ‘Cancel’ or press <Esc>.
If you have made changes to the matrix you will also be asked if you want to save them:
Press <Enter> or click ‘Yes’ to save the changes to the matrix file and to close your WinFIBRE session. Click ‘No’ to
discard all the changes you have made in the matrix file and exit WinFIBRE. Press <Esc> or click ‘Cancel’ to return to
your WinFIBRE session and continue editing.
12
Chapter 4 -Preparing Bibliographic Input
4. Preparing Bibliographic Input
4.1. Input files
4.1.1. Creating a new input file
When you first start WinFIBRE it creates an empty document. At this point you can start typing in field tags and
information, creating a new input file. However, to make the fullest use of WinFIBRE you should use a matrix. See
section 4.2 to learn more about how to select and use matrixes.
4.1.2. Opening an existing input file
If you want to add information to an existing input file or edit an input file, you will need to open the existing input file.
Do this by clicking on the ‘Open’ button on the toolbar:
or by choosing ‘Open’ from the File menu. WinFIBRE displays a list of possible input files to open:
This window lists all files in the default directory that have the extension ‘.INP’ – the default input file extension. If the
input file you want isn’t listed in the File Name box, make sure that the correct drive and correct directory have been
selected. Use the Drives and Directories selection list under ‘Look in’ to change the drive or the directory. To see a list
of all the files in the current directory, select All Files (*.*) in the ‘Files of Type’ field. Once you locate your ‘.inp’ file,
double-click it to select it. WinFIBRE reads this file into the document window.
This window displays the status of the loading process.
4.2. Matrixes
A matrix is a template or pattern that contains all the tags required and permitted for a particular document type.
WinFIBRE can create standard matrixes for all types of documents and bibliographic levels. If you will be entering a
number of similar documents – reports in the same series, chapters of a book, papers presented at a conference – you
can create your own matrixes by editing one of the standard WinFIBRE matrixes.
4.2.1. To use a standard matrix
Click ‘Matrix’ on the menu bar. The following options appear in a drop-down list:
13
WinFIBRE User’s Manual
Click ‘Select Standard Matrix’ to show a list of possible matrixes (you can also use the shortcut key <Shift><F2>):
Move through the list until you find a type and bibliographic level combination that matches your document. Select the
matrix by double-clicking it or by highlighting it and pressing <Enter> or <OK>.
4.2.2. To select a user matrix
If you want to use an existing user matrix you need to open the matrix file by clicking on the ‘Open’ button on the
toolbar or by choosing ‘Open’ from the File menu.
A file selection list appears:
Change ‘Files of type’ to ‘Matrix Files’ and a list of all files in the default directory
that have the extension ‘.MTX’ – the default matrix file extension appears. If the
matrix file you want isn’t listed in the ‘File Name’ field, make sure that the correct
drive and correct directory have been selected. To see a list of all the files in the
current directory, select All Files (*.*) in the ‘List Files of Type’ field. Select the file
you want by double-clicking its name. WinFIBRE reads this file into the matrix
window.
Edit the matrix if necessary
You may have created this matrix for a previous issue of a journal or an earlier
session of a conference. If so, there are some details that will have to be changed in
the matrix. Make these changes now.
Select active matrix
When several “User matrix” buffers are in use, only one of them can be the “Active
Matrix”. This “Active matrix” will be to be used with “Next Tag” (“Tab”)
14
Chapter 4 -Preparing Bibliographic Input
command. The “Active matrix” is marked with an asterisk (“*”) in front of the
name. This name is shown in the “Window” menu and on the title bar as well.
If the “Active Matrix” buffer contains more than one matrix, the matrix containing
the caret (text cursor) will be used for “Next Tag” (“Tab”) command.
Return to the Document window
Select you input file from the Window menu.
4.3. Adding input
You have selected an input file or opened an empty document to receive your input, and you have selected a matrix as
a guide for your input.
If you are using an existing input file, move to where you want to start working. Usually that will be at the end of the
input buffer. Press <Ctrl><End> to go there quickly.
Now add the information.
Press <Tab> to copy the first line from the matrix. If you are starting a new input file, the screen will look like this:
Tag 001 has been added, and the cursor is at the end of the line ready for you to enter the TRN (Temporary Record
Number). The name of the tag appears in the status line. The word ‘Mandatory’ is displayed in the status line, because
something must be in this tag for every document.
Enter the TRN, then press <Tab> to copy the next tag from the matrix. If you do not need to enter anything in this tag,
press <Tab> again to get the next one.
Continue to enter the necessary information required for the tags and press <Tab> to copy the next tag from the matrix
until you are done.
4.4. Using authority files
Many tags contain information that can be copied from WinFIBRE’s authority files. This is a quick and accurate way of
entering standardized information.
These are the tags that contain standardized data, and the authority files that can be used in connection with them:
Tag
Authority
15
WinFIBRE User’s Manual
Tag
Authority
001
Country Codes
007
Country Codes
008
Bibliographic Level Matrix Types,
ETDE Subject Category Codes, INIS Subject Category Codes & Titles
009
Language Codes (abstract level only)
100
User-defined Corporate Names
109
User-defined Corporate Names
110
User-defined Corporate Names
200
Special Characters
210
Special Characters
211
Country Codes, Country Names
215
Special Characters
229
Journal Titles
230
Special Characters
300
Corporate Report Prefixes, Country Codes
310
Corporate Report Prefixes, Country Codes
320
Journal ISSN
321
Journal CODEN
401
Country Codes, Country Names
600
Language Codes, Language Names
610
Special Characters
611
Special Characters
620
Special Characters
800
INIS Thesaurus Descriptors
860
Special Characters
There are also authority files containing INIS subject category codes and titles. Use these as indexes to find codes to put
in the appropriate fields.
Select ‘Call Authority’ from the Command menu or press <Shift><F3> to display a list of the authority files appropriate
to the tag the cursor is in. If the tag does not usually contain information from one of the authority files, you will see the
complete list of authorities instead. Move from one item to the other in the list using the up and down arrow keys. Press
<Enter> to select an authority.
See section 6.7.4 for a description of the INIS authorities and how to use them.
4.5. Checking input
4.5.1. Auto Check and Spell
When Auto Check is on, WinFIBRE automatically checks that the information being entered follows INIS input rules.
After you finish entering data in a tag, press <Tab> and WinFIBRE will check this tag, according to INIS input rules, to
make sure your entry is correct. After the check is completed the next tag will be created. Continue this process until
you have finished the input entry. If spell checking is activated the appropriate tags will also be checked for spelling.
Auto Check and Spell can be activated by selecting ‘Fibre’ from the Options menu and clicking the boxes beside the
words Auto Check and Spell so ‘!‘ appears in them.
4.5.2. Checking a field
Selecting ‘Check Field’ from the Command menu or pressing <Ctrl+Shift>F checks the data field in which the cursor is
positioned.
The toolbar contains this icon for the ‘check field’ command:
16
Chapter 4 -Preparing Bibliographic Input
The field is checked against INIS rules and the authority files. If spell checking is activated, WinFIBRE checks tags
200, 210 and 860 for spelling.
Refer to section 6.7.1 for more information about checking fields.
4.5.3. Checking a document
Select ‘Check Document’ from the Check menu or press <Ctrl+Shift>D to check the current document from beginning
to end.
The toolbar contains this icon for the ‘check document’ command:
The document is checked against INIS rules and authority files. It is checked for internal consistency, ensuring that all
tags required for each type of record or literary indicator are present and that there are no unexpected tags. Crosschecking is also performed between the three journal tags (journal title, ISSN and CODEN), to ensure that they match.
If spell checking is activated, tags 200, 210 and 860 are checked for spelling.
Refer to section 6.7.2 for more information about checking documents.
4.5.4. Checking the buffer
Select ‘Check Buffer from the ‘Check’ menu or press <Ctrl+Shift>B to check the current buffer, starting from the
cursor location to the end of the buffer.
The toolbar contains this icon for the ‘check buffer’ command:
Each document in the buffer is checked against INIS rules and authority files. It is checked for internal consistency,
ensuring that all tags required for each type of record or literary indicator are present and there are no unexpected tags.
Cross-checking is also performed, i.e. between the three journal tags (journal title, ISSN and CODEN), to ensure that
they match. If spell checking is activated, spelling is also checked in tags 200, 210 and 860.
Refer to section 6.7.3 for more information about checking the buffer.
4.6. Saving work
Select ‘Save’ from the ‘File’ menu or press <Ctrl>S to save the file being edited.
As WinFIBRE saves the file, the following window is displayed:
The toolbar contains this icon for the ‘save’ command:
The old file will be replaced – WinFIBRE does not ask you first before overwriting it. Be certain this is what you want
before you save your work.
4.7. Leaving WinFIBRE
Choose Exit from the File menu or press <Alt><F4> to end a WinFIBRE session. If you have made changes to the input
file you will be asked if you want to save them:
17
WinFIBRE User’s Manual
Press <Enter> or click ‘Yes’ to save the changes to the input file and to close your WinFIBRE session. Click ‘No’ to
discard all the changes you have made in the input file and exit WinFIBRE. Press <Esc> or click ‘Cancel’ to return to
WinFIBRE, leaving the input file as it was.
If you were editing a new input file that did not have a name yet, you will be asked to give it a name. A list of the input
files in your current directory is displayed.
As default ‘WinFIB1’ is shown in the ‘File name:’ field. This name can be changed by typing the name of the new file
in the ‘File name:’ field. By default the extension ‘.INP’ will appear, unless you change the file type under ‘Save as
type:’ to ‘All Files’. If you would like to save the file to a different directory or drive, move through the list under ‘Save
in’ to select the correct one. Once the name, drive and directory have been assigned, click ‘Save’. If you change your
mind, click ‘Cancel’ or press <Esc>.
If you have made changes to the matrix you will also be asked if you want to save them:
Press <Enter> or click ‘Yes’ to save the changes to the matrix file and to close your WinFIBRE session. Click ‘No’ to
discard all the changes you have made in the matrix file and leave WinFIBRE. Press <Esc> or click ‘Cancel’ to return
to WinFIBRE, leaving the matrix file as it was
If you were editing a new matrix file that did not have a name yet, you will be asked to give it a name. A list of the
matrixes files in your current directory is displayed.
18
Chapter 4 -Preparing Bibliographic Input
Type the name of the new matrix file in the ‘File name:’ field. By default, it will be given the extension ‘.mtx’, unless
you change the file type under ‘Save as Type’ to ‘All Files’. If you would like to save the file to a different directory or
drive, move through the list under ‘Save in’ to assign it to the correct one. Once the name, drive and directory have been
assigned, click ‘Save’. If you change your mind, click ‘Cancel’ or press <Esc>
19
Chapter 5 - Subject Indexing
5. Subject Indexing
In some organizations the same person may be responsible for the bibliographic description and subject indexing of
documents. Still in other organizations, subject specialists may assign subject categories and descriptors and write the
abstracts. This section is written primarily for subject specialists who will be adding subject-related information to files
prepared by others, although it can be used by anyone who does subject cataloguing.
WinFIBRE’s computer-aided indexing features are only tools to assist indexers. WinFIBRE doesn’t analyze text or do
anything else to help indexers select the appropriate descriptors. Indexing remains an intellectual exercise that only
humans can accomplish.
5.1. Starting WinFIBRE
Start Microsoft WindowsÔ, if it is not running, and start WinFIBRE. The WinFIBRE editor screen appears, showing
an empty document window.
5.2. Opening the document
If you are subject indexing documents that have already been catalogued, you will need to open the existing input file.
Do this by clicking the ‘Open’ icon button on the toolbar:
or by choosing ‘Open’ from the File menu. WinFIBRE presents a list of possible input files to open:
This window lists all files in the default directory that have the extension ‘.INP’ – the default input file extension. If the
input file you want isn’t listed in the ‘File name:’ field, make sure that the correct drive and correct directory have been
specified. To see a list of all the files in the current directory, select ‘All Files (*.*)’ in the ‘Files of type:’ field. Select
the file you want by double-clicking on it. WinFIBRE opens a new document window and reads the file.
5.3. Assigning subject categories
If someone else did the bibliographic description of the document you are working on, they probably left tag 008
looking like this, with the subject category missing:
008^/01/J/AS/N
You need to add the subject category codes between the carat (^) and the slash (/). There are two ways of doing this:
5.3.1. Adding category codes manually.
Look up the codes in IAEA-INIS--3, Subject Categories and Scope Description, and type them in the proper place. If
more than one category code needs to be assigned, separate the codes with a semicolon (there should not be a space
between the semicolon and the next code).
To check the field against the authority files and INIS rules click the ‘Check Field’ icon on the toolbar:
You can also choose ‘Check Field’ from the Commands menu or press <Ctrl><Shift>F to check the current field.
21
WinFIBRE User’s Manual
5.3.2. Inserting codes from WinFIBRE authority files
Move the cursor so it is positioned in the tag that uses an “Subject category” authority file (008). Click the Authority
icon button on the toolbar:
You can also press <Shift><F3> or select ‘Call Authority’ from the Command menu. A list of the authority files
appropriate to this tag appears. Depending on the tag contents of the tag 008 the list may look like this:
Use the up and down arrow keys to move to INIS Subject Category.Codes&Titles, and press <Enter> or click ‘Select’
to select this authority. Choose ‘Cancel’ or press <Esc> if you do not want to use an authority; click ‘Full List’ to get
the complete list of authorities.
If you choose INIS Subject Category Codes & Titles this window is displayed:
Use this screen to locate subject categories with titles containing a particular word, phrase, or code. The field labeled
‘In’ has the options ‘Codes&Titles’ and ‘Index’. To select one of them click the down arrow next to the field. The field
expands showing both options. Click one of them and the field collapses showing your chosen selection in the field.
The ‘Index’ is a subject index file which can assist you to locate the appropriate category for a topic. In this file you
can enter a key-word in the ‘Term for Search:’ field, you will get a list of all the terms using this word. You can select
a more suitable term from this list by double clicking it. The next screen displays information related to that term. If
you select one of these options by double clicking it, possible suitable categories will shown for your topic. You can
view the full scope (details) of the category to decide whether this category is applicable or not. The ‘Index’ should be
used only as an aid and not as a means for subject classification. It helps you locate an appropriate category, but is in
no way a substitute for the ‘Codes&Titles’.
The ‘Codes&Titles’ contains a list of INIS subject categories as well as its scope definitions. In this file you can either,
for example, search for a category code or search one or more words that may be found in the category code title. Enter
the string you are looking for in the ‘Term for Search’ area. If you enter ‘environmental’ as the term for the search the
next window looks like this:
22
Chapter 5 - Subject Indexing
Use the up and down arrow keys to move through the list. If you find the relevant subject category highlight it and click
‘Select the Term’. If no category seems right, press <Esc> or click ‘Cancel’ and start a new search. If you want to view
the full word block for a term, press <Enter> or click ‘Show Word block.’
The word block window displays full information about the term and lists categories related to it. This window
describes category C5600, ‘Environmental aspects of nonnuclear energy’:
At the top of a screen is a scope note. There is not enough room to display the full note there, but clicking the ‘>>Show
Full definition’ button displays the full definition in a window at the bottom of the screen:
23
WinFIBRE User’s Manual
Click the ‘OK’ button or press <Enter> to close the scope note window.
Following the scope note, the term code and title followed by a list of broader categories are listed. BC1 categories are
up one level (more general) than the category displayed. Those marked BC2 are up yet one more level (even more
general) than BC1 categories and BC3 is yet more general than that.
If more specific categories are available they are marked NC1, NC2, etc. The categories marked as NC2 are more
specific than those marked as NC1.
Finally a list of related categories is displayed.
If the word block is too big to fit in the window the elevator bar on the right will be activated. Use this elevator bar, the
up and down arrow keys, or <PgUp> and <PgDn> to move through the word block.
Press <Enter> to see the full entry for a category highlighted on the screen.
To go back to the previous screen, press <Esc>.
When you find a category you want to assign to the document, move to it or click it so it is highlighted. Then click the
‘Select The Term’ button. WinFIBRE asks where the code should go. If no codes have been assigned to the document
yet, you will see: the following window:
To place the code where the cursor is on the screen, click the ‘Add at cursor’ button. If you need to place the code
somewhere else, click the ‘Manual Selection’ button. This window appears, showing the line to be edited:
Use the left and right arrow keys to place the cursor where the code should go, and press <Enter>.
If you have already assigned codes and are adding another, this window will help you indicate where the code is to be
placed:
24
Chapter 5 - Subject Indexing
To replace one of the codes that has already been assigned highlight the code that is to be replaced and click the
‘Replace the value’ button. To add the code to ones assigned to this document, click the ‘Manual Selection’ button,
move the cursor to its desired position and press <Enter>. In case of ‘Manual Selection’, FIBRE will not add the
semicolon between the two categories so this needs to be done manually.
5.3.3. ETDE and INIS subject categories
Tag 008 can contain either INIS or ETDE subject categories or both.
If tag 008 contains only ETDE category codes, the primary code goes before the number of abstracts and the secondary
codes follow the literary indicators without any separators:
070204/01/R/M/KN130800150500
If tag 008 contains both INIS and ETDE codes, enter the INIS codes before the number of abstracts and the ETDE
codes after the literary indicators without any separators:
B1210/01/R/M/KN130800150500
Before the input file is sent to INIS the INIS and ETDE records must be separated. See section 10.2 for instructions.
5.4. Assigning descriptors
WinFIBRE provides two ways to assign descriptors to a document. Descriptors may be assigned manually or you can
use WinFIBRE’s indexing function.
5.4.1. Assigning descriptors manually
Look up descriptors in IAEA-INIS--13, INIS Thesaurus, and type them following the carat (^) in tag 800. Descriptors
should be separated by a semicolon (;).
To check the field against the authority files and INIS rules click the ‘Check Field’ icon on the toolbar:
You can also choose ‘Check Field’ from the Commands menu or press <Ctrl><Shift>F to check the current field.
5.4.2. Using the indexing function
5.4.2.1.
Opening the Thesaurus
WinFIBRE can search the INIS Thesaurus for words or phrases and insert terms from the Thesaurus into tag 800. Call
up the Thesaurus by clicking on the ‘i’ button on the toolbar:
You can also use the thesaurus by pressing <F9> or selecting ‘Indexing’ from the Command menu.
The Thesaurus window looks like this:
25
WinFIBRE User’s Manual
5.4.2.2.
Searching the Thesaurus
Search terms can be entered directly in the space following ‘Term for Search.’ (A drop-down list of all the terms you
have searched for previously in this thesaurus session is displayed if you click next to the ‘Term for Search’ field. You
can select one of these.) A search term can be a phrase, a word, or part of a word. Press <Enter> or click ‘Search’ to
view a list of all Thesaurus entries that contain the term.
It is not necessary to type in the full search term. WinFIBRE will look for all Thesaurus terms that contain words
beginning with the characters typed. If you enter the characters ‘OXID’, WinFIBRE will permit you to select from the
terms:
THIOBACILLUS OXIDANS
oxidants
....
MIXED OXIDE FUELS
OXIDE MINERALS
....
OXIDES
....
OXIDOREDUCTASES
....
Terms in which the string ‘oxid’ occurs, but in the middle of words, not at the beginning (ALKOXIDES,
HYDROXIDES) are not displayed.
Truncation is a feature that allows you to select from a list of terms that contain two or more words or character strings.
If you type ‘EX*DA’ WinFIBRE locates the terms
energy technology data exchange
EXPERIMENTAL DATA
Both these terms contain words beginning with the characters ‘ex’(exchange, experimental) and ‘da’(data). The
characters on either side of the truncation character ‘*’ appear at the beginning of words that occur in the selected terms.
It is also possible to select terms from the text of the document by copying a word or phrase from the document to the
clipboard, then pasting the term into the ‘Term for Search’ field. See sections 6.4.3 and 6.4.4 for more about copying
and pasting.
The number of Thesaurus entries that contain the search term appears at the bottom of the screen. If there are no
descriptors in the Thesaurus that contain the search term, you will see ‘0 Entries found’ at the bottom of the screen. The
search term can be edited to try another word. Use the right and left arrow keys to move through the term; press <Del>
to delete letters, and type in missing letters.
Searching for the word ‘riemann’ in the Thesaurus produces the following result:
If the list is too long to be seen all at once, the scroll bar can be used as described in section 1.5.3.1. Alternatively the
window can be resized by moving the mouse to the top or bottom edge of the window, pressing the left mouse button
and “dragging” the edge of the window to its desired new position. (This is also true for the windows that follow.)
26
Chapter 5 - Subject Indexing
Use the up and down arrow to navigate through the list of descriptors. Terms that are in upper case are legal descriptors;
terms in lower case are forbidden descriptors. As you navigate, you may find that the window is not wide enough to
display some descriptors fully, in which case the complete descriptor appears at the bottom of the screen.
Press <Enter> or click ‘Show word block’ to see a full Thesaurus word block for a highlighted term:
Move through the word block with the up and down arrow keys. Press <Enter> or click ‘Show Word block’ to display
the word block of any broader, narrower, preferred or forbidden term that is of interest to you. You can select a term by
highlighting it and clicking ‘Select the Term’. An indicator (red ball) appears in front of those terms selected.
If the wordblock is truncated (not all levels of BTs and NTs are displayed) a “+” sign at the descriptor will indicate
where truncation has occurred. Clicking the “+” sign with the left mouse button or pressing the space bar when a
descriptor is highlighted will expand the display by one level. Performing either of these actions on a “-” sign will
collapse the tree completely, enabling more of the wordblock to be displayed. It is possible to select the number of
broader and narrower term levels that are displayed by default via the “Thesaurus Options” button at the bottom of the
window.
A list of selected descriptors can be seen by clicking the down arrow key next to the ‘List of selected terms’ field.
Usually the most recently selected descriptor appears in this field, but if you highlight another descriptor in the list by
clicking it, that descriptor will remain in the field until the next selection.
Press <Esc> or click ‘Back’ to move back to the previous window.
5.4.2.3.
Saving descriptors
Click ‘Save descriptors in Tag 800 and exit’ in the ‘Thesaurus:Indexing’ window to save the terms in tag 800 and exit
the Thesaurus function.
WinFIBRE carries out all necessary checks on tag 800. The indexing function checks to see that descriptors are spelled
correctly and that proper punctuation has been used.
Click ‘OK’ or ‘Cancel’ or press <Enter> or <Esc> to clear the error messages and then correct the problem.
5.4.2.4.
Leaving the indexing function without saving descriptors
Click ‘Cancel’ or press <Esc> when the Thesaurus: Indexing window is visible to cancel all the changes you have made
to the list of descriptors and return to the main document window.
5.5. Proposing descriptors
New descriptors can be proposed manually or by using the indexing function. For either method you must still send the
INIS section a written note with this batch of input giving the a scope note and the suggested word block for the new
descriptor.
5.5.1. Manual method of proposing descriptors
One way to propose and use a new descriptor is to type the descriptor into tag 800. Then create a tag 810 and enter the
new descriptor there.
27
WinFIBRE User’s Manual
5.5.2. Using the indexing function to propose descriptors
The indexing function takes care of using and adding new descriptors for you. Click ‘Propose term’ in the ‘Thesaurus:
Indexing’ window. Type the proposed term in the window that is displayed:
Click ‘OK’ or press <Enter> to use this term; click ‘Cancel’ or press <Esc> to cancel your proposed term. WinFIBRE
creates tag 810, inserts the new term there and adds the proposed term to the list of descriptors.
5.6. Writing abstracts
WinFIBRE does not change the abstracting process. You still need to write and type the abstract using the principles
outlined in IAEA-INIS--4, Instructions for Submitting Abstracts. WinFIBRE offers some help with inserting special
characters and checking the length and spelling of the abstract.
5.6.1. Inserting special characters
When you click the Authorities icon button on the toolbar, select ‘Call Authority’ from the Command menu, or press
<Shift><F3> while the cursor is in the abstract field. WinFIBRE then displays the special characters list as the suitable
authority. Using this list, WinFIBRE can insert special character wherever you need them.
To have WinFIBRE place the symbol for ‘approximately’ in your abstract, type ‘approx’ in the ‘Terms for search’ field
and press <Enter>. A list of symbols that contain the string ‘approx’ is displayed:
Highlight the desired special character and click ‘Select the Term’ to select it. Then indicate where it should go:
This window lists all the special characters already located in the abstract. If you wish to replace one of these characters
with the one you have just chosen, move the highlight bar to that character and click ‘Replace the value.’ If you wish to
put the special character at a new position in the abstract, click ‘Manual Selection.’ The whole abstract appears:
28
Chapter 5 - Subject Indexing
Use the arrow keys to move through the abstract. Press <Enter> or click ‘OK’ when you reach the place where the
symbol should be placed. Press <Esc> or click ‘Cancel’ to cancel the action.
The special characters authority list does not contain all the special characters that can be used in tags 200, 230 and 860,
rather just the ones that will be decoded in the printed version of Atomindex. Appendix B, located at the end of this
manual, provides a complete list of special characters and how they may be transcribed.
5.6.2. Checking spelling and abstract length
Press <Ctrl><Shift>F, click the ‘field check’ icon button on the toolbar, or select ‘Check Field’ from the Command
menu when the cursor is in the abstract field to have WinFIBRE check the field against the INIS rules. If spell checking
is activated, the spelling will be checked as well.
If the abstract is too long, an error window will appear inviting you to edit (shorten) it. You can, of course, choose to
ignore this message but INIS recommends abstracts longer than 6000 characters to be shortened.
A colored highlight appears at the point where the abstract becomes too long. Press <Enter> or click ‘Edit the field’ to
return to the text editing function, where you can shorten the abstract.
If a word is not in the dictionary you will see this window:
Click ‘Ignore’ or press <Esc> to leave the spelling of the word unchanged. Every time the spell checker finds this word
it will again ask you if it should be changed.
Click ‘Ignore All’ to leave the spelling of the word unchanged. The spell checker will not question the spelling of this
word for the rest of this editing session.
Click ‘Add’ to add the word to your personal user dictionary (PUD). If a word is added to the PUD the spell checker
will recognize it as a correctly spelled word, even in future editing sessions.
Click ‘Suggest’ to see a list of possible words:
29
WinFIBRE User’s Manual
Use the up and down arrow keys or the mouse to navigate through the list. As you navigate through the list the word in
the ‘Change To:’ field changes.
Click ‘Change’ to replace the word in the text with the word in the ‘Change To:’ field.
Instead of having WinFIBRE suggest a list of possible words, you can edit the word in the ‘Change To:’ field directly.
Once you have entered the new word click the ‘Change’ button.
Click ‘Quit Checking’ to return to the document without making any changes.
30
Chapter 6 - Menu and Toolbar Functions
6. Menu and Toolbar Functions
The row on the top of the document window (the menu bar), provides access to all of WinFIBRE’s functions. The row
of icons below it (the toolbar), provides quick access to the most commonly used WinFIBRE functions. The following
sections describe in detail each of these functions. Many frequently used functions can be performed using ‘shortcut
key’ combinations. When a function has a shortcut key combination assigned to it, that key combination appears after
the function name in the section heading.
6.1. Toolbar
The toolbar is a collection of icons representing the most frequently used commands:
These icons help you to (in order, from left to right):
creates a new file
opens an existing file into a new window
saves the file
cuts: move the selected text to the clipboard
copies the selected text to the clipboard
pastes the clipboard text at the insertion point
prints the entire document, pages or selection
About WinFIBRE version
undoes the previous edit action
redoes the last undone edit action
checks the document buffer
checks the current document
checks the current field
calls authorities
performs indexing functions
Clicking one these icons executes a command. If you place the mouse pointer on an icon for a second or two, a
description of its function pops up. At the same time a more detailed information about the selected command appears
immediately in the “status line.”
The toolbar is “dockable” (it can be moved around the screen). It can float freely in a convenient place or can be
attached to the bottom or sides of the screen.
To move the toolbar, place the mouse pointer in an empty area of the toolbar and drag it to the desired location. When
the toolbar is floating it can be resized by clicking the edge and dragging its edges. It can be closed by clicking the box,
marked with an X, in the upper right-hand corner.
6.2. Main menu
This menu appears at the top of the WinFIBRE editor screen:
Clicking these words allows further menus to drop down. You can also activate these menus by pressing both the <Alt>
key and the underlined letter key in the menu name.
Clicking ‘Help,’ or pressing <Alt>H calls up the on-line help feature. Section 1.6 describes the help system in further
detail.
31
WinFIBRE User’s Manual
Clicking on this icon will display a list of various functions for rearranging the window.
Restore: Restores present window
Move: Places the cursor pointer in the header of the window and drags it to the desired location.
Size: Resizes the window by clicking on and dragging its edges.
Minimize: Minimizes the window to smallest size
Maximize: Maximizes the window to largest size
Close: Closes the present window
Next: Skips to next open window
The following points describe other menu functions.
6.3. File menu
Clicking ‘File’ on the menu bar activates the File menu. The File menu lists a number of file-management functions:
It is possible to create, open, and save files using this menu. You can also open the most recently used input or matrix
files by choosing them from the list located at the bottom of the menu. This menu also allows you to exit from
WinFIBRE.
6.3.1. New file (<Ctrl>N)
Choosing ‘New’ from the File menu displays another drop-down menu, in which one can choose between ‘New
Document’ and ‘New Matrix’.
Pressing <Ctrl>N opens a new, empty document window and <CTRL+Shift>N opens a new empty matrix window
The toolbar contains only one icon for opening a new, empty document :
32
Chapter 6 - Menu and Toolbar Functions
6.3.2. Open file (<Ctrl>O)
Choosing ‘Open’ from the File menu or pressing <Ctrl>O opens a new document window and allows you to select an
input file. The usual file-selection dialog window will be displayed:
This window lists all files in the default directory that have the extension ‘.INP’ – the default input file extension. If the
input file you want isn’t listed in the ‘File name:’ field, make sure that the correct drive and directory have been
selected. Use the ‘Look in:’ field to change the drive or directory. To see a list of all the files in the current directory,
select ‘All Files (*.*)’ from the ‘Files of Type’ field. Select the file you want by double-clicking it. WinFIBRE reads
this file into a new document window.
The toolbar contains this icon for the ‘Open file’ command:
6.3.3. Close file <Ctrl><F4>
Selecting ‘Close’ from the File menu or pressing <Ctrl><F4> closes the current document or matrix window. If you
have made changes to the document or the matrix you will be asked if you want to save these changes:
Choose ‘Yes’ to save the changes, ‘No’ to discard them, and ‘Cancel’ to go back to editing the file.
The input and matrix files will be saved under their original names.
6.3.4. Save (<Ctrl>S)
Choosing ‘Save’ from the File menu or pressing <Ctrl>S allows you save the file being edited.
As WinFIBRE saves the file the following window is displayed:
33
WinFIBRE User’s Manual
The toolbar contains this icon for the ‘save’ command:
6.3.5. Save As
Selecting ‘Save As’ from the File menu allows you to change the name of the file being edited.
The following window is displayed, asking you for the new name of the file:
Enter the name of the file in the ‘File name:’ field and press <Enter>. Use the ‘Save in:’ field, if you want to save the
file in a different location. This is the easiest way to save an input file to floppy disk.
6.3.6. Export INIS/EDTE
This command has two subcommands: “INIS File” and “ETDE File.” If ‘INIS File’ is selected, the following window
is displayed:
Enter the name of the file in the ‘File name:’ field and press <Enter>. Use the ‘Save in:’ field, if you want to save the
file in a different location. This command will create a new file, while leaving the current input file unchanged.
This command is useful when the records in the current input file have both INIS and ETDE subject categories.
For example: The command “Export/INIS File” will cause WinFIBRE to create a new file. This file will contain all the
records from the current input file that have INIS subject categories. None of the ETDE subject categories will be
included. If there is a record without INIS subject categories, it will not be included in the new file. ‘Export/ETDE
File’ command will work the same way but will export only the records having ETDE subject categories.
Please make sure the buffer only contains correct records, as the “Export” command does not check the buffer for
errors. If there are errors in tags 001 or 008, Export will not work correctly.
34
Chapter 6 - Menu and Toolbar Functions
6.3.7. Batch Check
This command checks your input file in batch mode. There is no screen interaction, “Batch check” works faster than
normal interactive checking. The result of the batch check is written to a file, which can be printed or displayed on
screen.
Select “Batch check” from the file menu and the following window appears:
Two file names, ‘Input File’ and ‘Output File’, need to be specified (typed or selected).
The input file is a WinFIBRE document file. The output file will contain the results of the checks performed. It has one
line per document checked and one line per error found. Each error-related line has information about:
Line number (from the beginning of the document file).
Tag number and bibliographic level.
Relative line number from the beginning of the document.
Relative character position from the beginning of the line.
Text, specifying the error. This text should be the same as the one that can be received during interactive checking, but
in the form of a dialog box.
Below is an example of an error log file:
After entering the input and log file name press ‘OK’ and the following window appears:
This window displays the number of document and TRN being checked. To cancel the process press ‘Cancel’.
35
WinFIBRE User’s Manual
6.3.8. Exit (<Alt><F4>)
Select ‘Exit’ from the File menu or press <Alt><F4> to leave WinFIBRE.
If you have made changes to the input file the following message will be displayed:
Choose ‘Yes’ to save the changes, ‘No’ to discard them, and ‘Cancel’ to go back to editing the file.
If you have made changes to the matrix you will see the following message:
Choose ‘Yes’ to save the changes, ‘No’ to discard them, and ‘Cancel’ to go back to editing the file.
6.3.9. File List
A list of the four most recently used files, input or matrix, appears at the bottom of the file menu. Clicking on one of
these file names tells WinFIBRE to open this file in a new document window.
6.4. Edit menu
Clicking ‘Edit’ or pressing <Alt>E activates the Edit menu. The Edit menu displays number of editing functions:
6.4.1. Undo (<CTRL>Z)
WinFIBRE remembers the last edit operation you made during this editing session. If you want to reverse a change,
press <CTRL>Z or click the ‘Undo’ button on the Edit menu.
The toolbar contains this icon for the ‘undo’ command:
6.4.2. Cut (<Ctrl>X)
To remove a section of text from the document or matrix and place it on the Windows clipboard, select the text and
choose ‘Cut’ from the Edit menu or press <Ctrl>X. Using WinFIBRE’s ‘Paste’ function allows the text to be moved to
a different part of the same file or placed in a different file. Since the text is placed on the Windows clipboard it is
available to all Windows applications, not just WinFIBRE.
The toolbar contains this icon for the ‘cut’ command:
6.4.3. Copy (<Ctrl>C)
To copy a section of text from the document or matrix and place it on the Windows clipboard, select the text and choose
‘Copy’ from the Edit menu or press <Ctrl>C. Using WinFIBRE’s ‘Paste’ function allows the text to be moved to a
36
Chapter 6 - Menu and Toolbar Functions
different part of the same file or placed in a different file. Since the text is placed on the Windows clipboard it is
available to all Windows applications, not just WinFIBRE.
The toolbar contains this icon for the ‘copy’ command:
6.4.4. Paste (<Ctrl>V)
Text that has been copied into the Windows clipboard from WinFIBRE files or from other Windows applications can be
placed into the current input or matrix file. Place the cursor where the text should go and select ‘Paste’ from the Edit
menu or press <Ctrl>V.
The toolbar contains this icon for the ‘paste’ command:
6.4.5. Delete
To remove a section of text from the input file or matrix, select the text and choose ‘Delete’ from the Edit menu. The
text is not saved on the Windows clipboard and cannot be retrieved anymore, except by using the ‘undo’ command
mentioned above.
6.4.6. Insert Special characters
To insert special characters into the current input or matrix file, select ‘Insert special character’ from the ‘Edit’ menu.
A table of all valid INIS Special characters is displayed.
Click the desired special character and press <Insert>. The selected special character will be inserted at the current
cursor position. This character is entered into the record in encoded format e.g. #SIGMA#.
6.4.7. Select All (<Ctrl>A)
To select the entire text in the current window, choose ‘Select All’ from the Edit menu or press <CTRL>A. The
selected text can be copied to the Windows clipboard and pasted into another file. Use this function to append one file
to another: open one input file, select all of its text and copy the selected text to the clipboard. Then open the file to
which this text is to be appended. Move the insertion point to the end of the document (or to another appropriate place)
and use the Paste function to place the selected text into that file.
6.5. Search Menu
Clicking ‘Search’ or pressing <Alt>S activates the ‘Search’ menu. The ‘Search’ menu functions include finding a string
and replacing a string:
37
WinFIBRE User’s Manual
6.5.1. Find (<CTRL>F)
Selecting ‘Find’ from the Search menu locates a text string in a file.
This following window is displayed:
Type the string to search for in the ‘Find what:’ field.
If you want to move to the next find within the document, press ‘Find Next’. If you want to match the capitalization of
the word exactly (locate the acronym ‘CAT,’ for instance, without finding the word ‘cat’) click the ‘Match Case’ box. If
you want to locate whole words only (i.e. the word ‘cat,’ not the word ‘catapult’) click the ‘Match whole words Only’
box.
Press <Enter> or click ‘Find Next’ to start searching. Click ‘Cancel’ to return to the edit window.
When a string is found, WinFIBRE highlights it and places the cursor at the end of the string if the string can be found.
The string will be highlighted.
6.5.2. Replace (<CTRL>H)
Selecting ‘Replace’ from the ‘Search’ menu locates a text string and replaces it with another string.
This following window is displayed:
Type the string to search for in the ‘Find what:’ field.
Type the new string in the ‘Replace with:’ field.
If you want to move to the next find within the document, press ‘Find Next’. If you want to match the capitalization of
the word exactly (i.e.: locate the acronym ‘CAT,’ without finding the word ‘cat’) click the ‘Match Case’ box. If you
want to locate whole words only (i.e. the word ‘cat’, not the word ‘catapult’) click the ‘Match whole words Only’ box.
Press <Enter> or click ‘Find Next’ to start searching. Press <Esc> or click ‘Cancel’ to return to the edit window. If you
want to replace the found text string with the new text from the ‘Replace with’ field, press <Replace>. If you want to
replace all occurrences in your file with the new text from ‘Replace with’ field press <Replace all>.
The ‘Undo’ function on the ‘Edit’ menu (shortcut: <CTRL>Z) is available in case you want to restore the original string
settings within the document.
6.5.3. Find next (<F3>)
Selecting ‘Find next’ from the Search menu or pressing <F3> repeats the last search.
If you are repeating a search, the cursor moves to the next occurrence within the document and highlights the string.
6.6. Options Menu
Clicking ‘Options’ or pressing <Alt>O activates the Options menu. The Options menu allows you to customize the way
WinFIBRE looks.
38
Chapter 6 - Menu and Toolbar Functions
6.6.1. Toolbar
A check mark beside the word ‘Toolbar’ indicates that the toolbar – the row of icons giving access to frequently used
functions – is visible on the screen. Click the word ‘Toolbar’ on the Options menu and the check mark will disappear,
removing the toolbar from the screen.
6.6.2. Status Bar
The status bar at the bottom of the FIBRE window provides information about the active document or the task your are
working on.
A check mark beside the word ‘Status bar’ indicates that the status bar is visible on the screen. Click the word ‘Status
bar’ and the check mark will disappear, hiding the status bar from the screen.
This status bar in the above example illustration contains information about the cursor position and tag 001.
·
·
·
·
Mandatory: TRN (Temporary Record Number) - The cursor is placed in tag 001 which is a mandatory field,
where the ‘Temporary Record Number’ will be input.
Item: 1 - Total number of records in your current file is displayed.
Ln 2, Col 5 - The cursor position is in line number 2 column 5.
Num - ‘Num Lock’ on your keyboard is activated (usually there is a light on your keyboard indicating this).
6.6.3. Font
Change the font used to display the input or matrix on the screen by choosing ‘Font’ from the Options menu. This fontselection window is displayed:
39
WinFIBRE User’s Manual
Select the font you want from the list that appears under the word ‘Font:’. You can change its style – regular, italic,
bold, bold italic; its size in points, and display effects and color. The ‘Sample’ field shows you how the new font will
look. Click ‘OK’ to use the new font; press <Esc> or click ‘Cancel’ to make no changes to the font.
6.6.4. Fibre
Selecting ‘Fibre’ from the Options menu allows you to specify what kinds of automatic checking WinFIBRE will do.
When selected, this window is displayed:
6.6.4.1.
Auto Check
Clicking the box next to the words ‘Auto Check’ toggles automatic field checking (Auto Check) on and off.
When ‘Auto Check’ is on, WinFIBRE automatically checks information as it is entered for agreement with INIS input
rules. Once you finish entering data in that tag, press <Tab> to enter the next tag. The contents of the tag are then
checked using the appropriate authority and matrix. If the spell checker has been activated, your work is spell-checked.
6.6.4.2.
Show One Error per Tag
Clicking the box next to the words ‘Show One Error per Tag’ toggles this function on and off.
When ‘Show One Error per Tag’ is activated WinFIBRE will not continuing checking for further errors in the same
field after the first error is found.
6.6.4.3.
Spell Check Enabled
Clicking the box beside the words ‘Spell Check Enabled’ toggles automatic spell checking on and off.
40
Chapter 6 - Menu and Toolbar Functions
When the ‘spell check enabled’ command is activated, all the other check functions automatically check spelling using
WinFIBRE’s dictionary (MAIN.DIC) and the user dictionary (PUD.DIC). When spell checking is off, the check
functions do not check spelling.
6.6.4.4.
Always suggest
Clicking the box next to the words ‘Always suggest’ toggles this function on and off.
When ‘Always Suggest’ is activated, WinFIBRE will display a list of possible words for each misspelled word found by
the spell checker.
6.6.4.5.
Ignore Formulas
Clicking the box next to the words ‘Ignore Formulas’ toggles this function on and off.
When ‘Ignore formulas’ is activated, WinFIBRE will not check the spelling of any words containing the underscore ( _
) or the double-quote (“) character.
6.6.4.6.
Ignore words with Digits
Clicking the box next to the words ‘Ignore words with Digits’ toggles this function on and off.
When ‘Ignore words with Digits’ is activated, WinFIBRE will ignore all words with digits. For the spell checker a word
is a alpha/numeric string between two spaces or other delimiters such as “.,:;-!?()[]{}”.
6.6.5. Wrap
Clicking the box next to the word ‘Wrap’ on the Options menu indicates that the text of long fields like the abstract or
title wraps to fit the displayed window’s width. If ‘Wrap’ option is disabled, each field in the input buffer takes up only
one line on the screen. Word wrap does not affect the way input appears when it is sent to the INIS Section.
6.7. Command Menu
Clicking ‘Command’ or pressing <Alt>C activates the Command menu. The Command menu provides access to
checking, authority and indexing, and Database functions:
6.7.1. Check field (<Ctrl+Shift>F)
Selecting ‘Check Field’ from the Command menu or pressing <Ctrl+Shift>F checks the data field in which the cursor is
positioned.
The toolbar contains this icon for the ‘check field’ command:
The field is checked using INIS rules and the authority files. If spell checking is activated, WinFIBRE checks tags 200,
210 and 860 for spelling.
If an error is found, WinFIBRE highlights the line containing the error and displays a warning message about the error:
In this example we have entered an incorrect subject category:
Click ‘Edit’ or press <Enter> to correct the error. If you choose to edit the error window will close and the cursor will
be placed in the document where the error occurred.
Click ‘Ignore’ or press <Esc> to ignore the warning, or click ‘Quit the checking’ to quit checking altogether. Select
‘Help’ for more information about what should be placed in the tag that has an error.
41
WinFIBRE User’s Manual
If WinFIBRE finds a spelling error, you will see this warning:
Click ‘Ignore’ or press <Esc> to leave the spelling unchanged. Every time the spell checker sees this word it will ask
you if it should be changed.
Click ‘Ignore All’ to leave the spelling unchanged. The spell checker will no longer question the spelling of this word
during the current editing session.
Click ‘Add’ to add the word to your personal user dictionary (PUD). If a word is added to the PUD, the spell checker
will recognize it as correctly spelled from that time onward.
Click ‘Suggest’ to see a list of possible words:
Use the up and down arrow keys or the mouse to move through the list. As you move through the list the word in the
‘Change To:’ field changes.
Click ‘Change’ to replace the word in the text with the word in the ‘Change To:’ field.
Instead of having WinFIBRE suggest a list of possible words, you can edit the word in the ‘Change To:’ field directly
and click the ‘Change’ button.
Click ‘Quit Checking’ to return to the document without making any changes.
6.7.2. Check document (<Ctrl+Shift>D)
Select ‘Check Document’ from the ‘Check’ menu or press <Ctrl+Shift>D to check the current document from
beginning to end.
The toolbar contains this icon for the ‘check document’ command:
The document is checked using INIS rules and authority files. It is checked for internal consistency, ensuring that all
tags required for each type of record or literary indicator are present and that there are no unexpected tags. Crosschecking is also performed between the three journal tags (journal title, ISSN and CODEN), to ensure that they match.
If spell checking is on, tags 200, 210 and 860 are checked for spelling.
If an error is found, WinFIBRE displays a warning. Here is an example of what you might see when a required tag is
missing:
42
Chapter 6 - Menu and Toolbar Functions
Select ‘OK’ to correct the error, or ‘Help’ to get more information about the message. (In this example ‘Edit’ is not
available because a required tag is missing; the best thing to do would be to quit checking by selecting ‘OK’ and add the
tag.)
If WinFIBRE finds a spelling error, you will see this warning:
Click ‘Ignore’ or press <Esc> to leave the spelling unchanged. Every time the spell checker sees this word it will ask
you if it should be changed.
Click ‘Ignore All’ to leave the spelling unchanged. The spell checker will no longer question the spelling of this word
during the current editing session.
Click ‘Add’ to add the word to your personal user dictionary (PUD). If a word is added to the PUD, the spell checker
will recognize it as correctly spelled from that time onward.
Click ‘Suggest’ to see a list of possible words:
Use the up and down arrow keys or the mouse to move through the list. As you move through the list the word in the
‘Change To:’ field changes.
Click ‘Change’ to replace the word in the text with the word in the ‘Change To:’ field.
Instead of having WinFIBRE suggest a list of possible words, you can edit the word in the ‘Change To:’ field directly
and click the ‘Change’ button.
Click ‘Quit Checking’ to return to the document without making any changes.
After you have corrected an error WinFIBRE continues checking the document. When the check is finished the
insertion point is moved to the start of the next document, if there is one, otherwise to end of the current document.
6.7.3. Check buffer (<Ctrl+Shift>B)
Select ‘Check Buffer’ from the Check menu or <Ctrl+Shift>B to check the current buffer from cursor location to the
end of the document.
The toolbar contains this icon for the ‘check buffer’ command:
Each document in the buffer is checked using INIS rules and authority files. It is checked for internal consistency,
ensuring that all tags required for each type of record or literary indicator are present and there are no unexpected tags.
Cross-checking is also performed between the three journal tags (journal title, ISSN and CODEN), to ensure that they
match. If spell checking is on, spelling is also checked in tags 200, 210 and 860.
If an error is found, WinFIBRE displays a warning. Here is an example of what happens when a journal ISSN does not
match the journal name:
43
WinFIBRE User’s Manual
Select ‘Edit’ to correct the error. The insertion point is positioned at the beginning of the item that caused the error.
Choose ‘Ignore’ to ignore it, ‘Quit the checking’ to quit checking altogether, or ‘Help’ to get more information on what
should be in this tag.
If WinFIBRE finds a spelling error, you will see this warning:
Click ‘Ignore’ or press <Esc> to leave the spelling unchanged. Every time the spell checker sees this word it will ask
you if it should be changed.
Click ‘Ignore All’ to leave the spelling unchanged. The spell checker will no longer question the spelling of this word
during the current editing session.
Click ‘Add’ to add the word to your personal user dictionary (PUD). If a word is added to the PUD, the spell checker
will recognize it as correctly spelled from that time onward.
Click ‘Suggest’ to see a list of possible words:
Use the up and down arrow keys or the mouse to move through the list. As you move through the list the word in the
‘Change To:’ field changes.
Click ‘Change’ to replace the word in the text with the word in the ‘Change To:’ field.
Instead of having WinFIBRE suggest a list of possible words, you can edit the word in the ‘Change To:’ field directly
and click the ‘Change’ button.
Click ‘Quit Checking’ to return to the document without making any changes.
After you have corrected an error, WinFIBRE continues checking the buffer. When checking is complete the insertion
point is positioned at the beginning of the last line in the buffer.
Searching for a word in the dictionary with wild characters:
You can consult the dictionary to find a word using the percent sign (%) or the asterisk (*). The percent sign will denote
a single letter and the asterisk will denote any letter combination. Enter your word in the ‘Change to’ field
and press suggest.
For example: You enter ‘organi%ation’
44
Chapter 6 - Menu and Toolbar Functions
press ‘Suggest’ and the following list of suggested words appear:
Another example: You enter ‘paraph*amine’ and get following word displayed on screen:
6.7.4. Call Authority (<Shift><F3>)
WinFIBRE makes it possible to consult the INIS authorities and copy information from them into your input. These
authority files are available:
Bibliographic Level Matrix Types:
a list of all the valid combinations of record types and
bibliographic levels with a description.
Countries:
a list of valid country codes and country names.
ETDE Subject Category Codes:
ETDE subject category codes and their descriptions.
INIS Subject Categories:
a list of subject categories with their codes and descriptions,
and an index to the list. Broader and narrower categories are
indicated, and suggestions are made about related and
preferred categories.
INIS Thesaurus Descriptors:
the full Thesaurus as it was when the program disks were
produced. All the word blocks and relationships in the printed
publication are available.
Journal CODENs, ISSNs, and
Titles:
each entry gives the full title, the CODEN, the ISSN, and the
country as well as information about previous, new and
variant titles.
Languages:
a list of valid language names and codes.
Special Characters:
a list of the Greek alphabet and scientific symbols as they are
encoded for INIS. The special characters authority list does
not contain all the special characters that can be used in tags
200, 230 and 860, but rather only the ones that will be
decoded in the database. Appendix B provides a more
45
WinFIBRE User’s Manual
comprehensive list of special characters and how they are
transcribed.
User-defined Corporate
Authorities:
a list of corporate names. This authority is maintained by the
user.
Follow these steps to view and insert data from the authority files any time you are editing or adding information to the
input file:
46
Chapter 6 - Menu and Toolbar Functions
1.
Display the list of authorities
2.
Select ‘Call Authority’ from the Command menu, press <Shift><F3>, or click the Authority button icons on
the toolbar
to display a list of the authority files appropriate to the tag the cursor is in. If the tag usually does not contain
information from one of the authority files, you will see the complete list of authorities instead.
This is what you see if you are in tag 008, which can contain subject categories and bibliographic matrix
type codes:
3.
Choose ‘Select’ or press <Enter> to open the highlighted authority. If none of the authorities seems
appropriate, select ‘Full List’ to see the list of all available authorities. This is the list that also appears when
the cursor is in a field that does not normally use information from one of the authority files:
4.
Choose ‘Select’ or press <Enter> to open the authority.
5.
Enter the term to search
When you select an authority file, a window is displayed in which the search term can be entered. If you
select the Journal Titles authority, this window appears:
47
WinFIBRE User’s Manual
48
6.
Use this screen to locate journal titles with titles containing a particular word, phrase, or code. Enter the
string you are looking for in the ‘Term for search’ field. (A list of all the terms you have searched for
previously drops down if you click the arrow beside the ‘Term for Search’ field. You can select one of
these.) If ‘physics’ is entered the next window looks like this:
7.
Narrowing the search
The journal title authority contains more than 285 titles with the word ‘Physics’ in its title. In this case you
need to be more specific in order to find what you want.
Narrow the search by using more specific title name. If you are looking for the AMPI Medical Physics
Bulletin, enter
Physics Bulletin
8.
The search retrieves three titles.
Searches can be narrowed by combining several terms and separating them with an asterisk (*). The order
of the terms is not relevant. The terms can be full words or parts of words.
To find any journal with the words ‘ physics’ and ‘ chemical’ in its name, type
physics*chemical
9.
Limiting the search to one country.
When you are using the journal authorities the search screen has a box labeled ‘Set Default’ with the word
‘Country’ beside it. If you click this box you can limit the search to organizations or journals from a
particular country.
When you choose ‘Set Default’ this window is displayed:
Chapter 6 - Menu and Toolbar Functions
10. Enter all or part of the country’s name or code in the field following ‘Search for’ and press <Enter> or click
‘Search.’ A list of countries and international organizations that match your search string are displayed:
11. Click ‘Set as a default’ to choose the highlighted country. Now all searches in that authority will be limited
to entries belonging to the country chosen.
6.7.4.1.
Search in the user-defined Corporate Names
WinFIBRE allows you to create and maintain your own list of corporate entries.
This module is optional. It will not work unless the additional “INIS Database” package has been installed.
When you are searching for corporate names the window for the search is different.
Use this screen to locate corporate names with containing a particular word or phrase.
Keep in mind that this field currently does not have a full (permuted) index, as is the case with the other WinFIBRE
authorities. This means you cannot search for a word that appears in the middle of a name. The entry found must start
with the text entered in the ‘Name’ field.
The search can be limited to a particular country by selecting the country name.
Click the drop-down menu following ‘Country’ and use the up and down arrow keys, <PgUp> and <PgDn>. to move
through the list. Press <Enter>, type you search string in the field following ‘Name’ and press <Show>. If the selected
country is not installed in your set of corporate names the window remains empty.
If you leave the ‘Name’ and ‘Country’ fields empty and you press the ‘Show’ button the program will display all the
entries in the database.
49
WinFIBRE User’s Manual
In the example above, a list of all entries with the word ‘Salzburg’for the country - Austria is displayed. Use the up and
down arrow keys or mouse to highlight the appropriate name and click <Sel term>.
Choose between ‘Add at cursor’ or ‘Manual Selection’ or ‘Cancel’. If you click ‘Manual Selection’ the following
window is displayed:
Move the cursor to the desired position and press <Enter> or <OK>.
6.7.4.2.
Add new corporate name to the corporate database
You can add new entries to the database at any time.
50
Chapter 6 - Menu and Toolbar Functions
Click ‘Add’ in the window ‘Corporate’ and enter the new corporate name in the field following ‘Name’. Select the
corresponding country name by clicking on the drop-down menu following ‘Country’. Use the up and down arrow
keys, <PgUp> and <PgDn> to move through list, press ‘Enter’ or click ‘OK’ once you have found a country.
If the selected country name does not correspond to the country name entered in parenthesis in the text of corporate
name an error message is displayed:
If the corporate name either does not contain a valid country name nor a valid country code the following message is
displayed:
Press ‘OK’ and make the necessary changes to your entry.
6.7.4.3.
Switching search field in authorities
With some authority files, it is possible to switch to related authority files by opening the drop-down list beside the
word ‘In’ on the search screen.
If you are using
You can switch to
Country codes
Country names
Country names
Country codes
INIS subject category index
INIS subject category codes and titles
INIS subject category codes and
titles
INIS subject category index
Journal titles
CODEN
ISSN
CODEN
Journal titles
ISSN
ISSN
Journal titles
CODEN
Language codes
Language names
Language names
Language codes
6.7.4.4.
Finding a searched term in the document text
This function is not available for the user-defined coporate authority.
51
WinFIBRE User’s Manual
Copy a searched term from the input buffer by entering ‘?’ as a search term in the authority window.
WinFIBRE displays the contents of the current tag in a window. This is what you might see with the cursor in tag 008:
Position the cursor over the term you want to use (if the term is one word) or select it (if it has more than one word) and
press <Enter>.
1.
View the full entry
When you have retrieved a list of entries from the authority, use the up and down arrow keys, <PgUp> and
<PgDn> to move through the list.
Press <Enter> or click ‘Show details’ to display the full information on an entry. This window contains the
full information for category C5600, Environmental aspects of nonnuclear energy:
52
Chapter 6 - Menu and Toolbar Functions
At the top of a screen is a scope note. There is not enough room to display the full note there, but clicking
the
‘>>Show Full definition’ button displays the full definition appears on the screen.
Click the ‘OK’ button or press <Enter> to close the scope note window.
Following the scope note the term code and title followed by a list of broader categories are listed. BC1
categories are up one level (more general) than the category displayed. Those marked BC2 are up yet one
more level (even more general) than BC1 categories and BC3 is yet more level general than that.
If more specific categories are available they are marked NC1, NC2, etc. The categories marked as NC2 are
more specific than those marked as NC1.
Finally a list of related categories is displayed.
If the word block is too big to fit in the window the elevator bar on the right will be activated. Use this
elevator bar, the up and down arrow keys, or <PgUp> and <PgDn> to move through the word block.
Press <Enter> to see the full entry for a category highlighted on the screen.
To go back to the previous screen, press <Esc>.
2.
Copy data from the authority to the input tag
When you find a category you want assigned to your document, move to it or click it to highlight it. Then
click the ‘Select The Term’ button. WinFIBRE asks where the code should go. If you have already assigned
codes and are adding another, this window will help you indicate where the code is to be placed:
To replace one of the codes that has already been assigned highlight the code that is to be replaced and click
the ‘Replace the value’ button. To add the code to the ones assigned to this document, click the ‘Manual
Selection’ button, move the cursor to the desired position and press <Enter>.
3.
Go back to the input buffer
53
WinFIBRE User’s Manual
Press <Esc> to move backwards through all the authority windows until they close and you are returned to
the input buffer screen.
6.7.5. DataBase
The DataBase allows WinFIBRE users to create and maintain their own list of corporate entries.
This module is optional. It will not work unless the additional “INIS Database” package is installed.
If the additional module “INIS Database” is installed, the “Command/Database” item in the menu will show four
options:
6.7.5.1.
Maintenance
‘Maintenance’ is an option that allows you to browse, add, change and delete entries in the corporate list.
Browse:
In order to “Browse” use the “Show” button. If you leave the “Name” and “Country” fields empty in the “Show filter”,
the program will give all the entries in the database.
Only those entries that can fit on the screen will be visible. Use the arrow keys and <PageDown> and <PageUp> to see
more. If you reach the bottom of the list the total number of items will be shown in the status line. The number of the
current line is always showing. The number of items given can be limited by selecting a country or typing something in
the ‘Name’ field. Keep in mind that this field does not yet have a full (permuted) index, as is the case with the other
WinFIBRE authorities. This means you cannot search for a word that appears in the middle of a name. The entry found
must start with the text entered in the ‘Name’ field.
Add:
In order to add a new corporate name use the “Add” button.
54
Chapter 6 - Menu and Toolbar Functions
Enter the corporate name and choose the “Country”. Please do not forget to specify the country by entering either
country code or name in brackets. Because corporate names are used for various purposes, the country (specified by
code or name in brackets) and the country selected in the ‘Country’ field can be different. In this case a warning is
displayed. To avoid any ambiguity the program will not allow you to enter more that one valid country code or name in
the brackets.
Edit:
To change an entry use the “Edit” button. This is similar to the “Add” command. The only difference is that instead of
a new empty entry, you will get the current entry for editing.
Delete:
‘Delete’ is the only function that uses the “selected” entries. You can select as many entries as you wish. Use the
mouse (with or without the “Shift” or “Ctrl” keys) or the “Space” key to change the selection of the current entry. You
can use the “Space” key with or without the “Shift” or “Ctrl” keys as well.
55
WinFIBRE User’s Manual
Another option for selection is the button “Sel all/Unsel all”. With it you can select all records or unselect a selection.
Keep in mind that to select all entries, you will have to find and select not only the visible entries on the screen but all
entries specified by the “Show filter” area. The more they are, the longer this operation takes.
Press ‘Delete’ and following screen is displayed:
Click ‘OK’ to finish this process.
6.7.5.2.
Import
The “Import” option is designed mainly for the initial loading of the database, but can be used any time if needed.
When selected, it will show the same dialog as the “Export” command. Next, specify the input file name or choose it.
You can also choose one or more countries. If none are selected, all the entries in the input file will be loaded. If there
are selected countries, only these countries’ entries will be loaded. If the database already exists and contains entries
then all new additional entries will be loaded. All lines in the input file will be checked for availability of the delimiter
in the third position. The restrictions about the country names and codes described in “Maintenance/Add” will not
apply here. Additional caution is required when using the “Maintenance/Add” option.
56
Chapter 6 - Menu and Toolbar Functions
Press ‘Import’ to import the selected country.
6.7.5.3.
Export
The ‘Export’ option is meant to upload the data from the database as an ASCII text file with simple structure. Each
entry is represented by a single row in the file - the country code followed by the delimiter (^), followed by the
corporate name. This file can be used for maintenance purposes or, even more importantly, for backup purposes. In
case of database malfunction or data loss, an empty database can be reinstalled and the last (or another) backup file can
be easily downloaded into the database.
In the “Export” dialog you must specify the file name in the box ‘Output File’field. Under ‘Select’ you can change the
directory or drive location.
You can also select one, several or even all countries by clicking on the ‘All countries’ or ‘Selected countries only’
button. If no country is selected, all the entries will be exported in the order they appear in the database. If one, several
or all countries are selected, the entries in the output will be sorted first by country and then by name.
Press ‘Export’ to export the selected country to an output file.
6.7.5.4.
Compress
‘Compress’ is a service option used to compress the database. The reason for this is that WinFIBRE does not
automatically free-up unused disk space created as a result of deletion of entries. “Compress” will force the database to
use only the space actually required on the disk. If you decide to use ‘Compress’, INIS recommends you export the
database first. If something goes wrong, you will be able to restore your database easily.
When the ‘compress’ command is selected, the following window is displayed. Press ‘Continue’ to start the database
compression or ‘Cancel’ to return to the input document.
57
WinFIBRE User’s Manual
6.8. Matrix
Clicking ‘Matrix’ or pressing <Alt>M activates the Matrix menu
6.8.1. Select Standard matrix (<Shift><F2>)
Choosing ‘Select Standard matrix’ from the Matrix menu or pressing <Shift><F2> displays a window that lists the
standard matrixes. One of these can be selected as an input template.
This is a list of all standard matrix types – valid combinations of record type and bibliographic level. When you find a
combination that best describes the document you want to catalogue, highlight it and press <Enter> or click ‘OK’ to
select it. The next window shows the selected matrix which can be edited. In order to return to the input file, click
‘Window’ or press <Alt>W and select the desired input file name from the list.
The matrix is a template for document input. Chapter 7 describes matrixes in more detail.
6.8.2. Select Active matrix
If you have more than one matrix open at the same time you have to make on matrix active. This matrix will be used for
you input preparation.
There are two methods for doing this:
1.
Keep each matrix in a separate buffer. To make a matrix active, click the ‘window’ menu and select the matrix you
would like to activate. The matrix you select will be displayed on screen. Now click ‘Matrix’ and chose the ‘Select
active matrix’ command. Your matrix is now active.
2.
Keep the matrixes in a single buffer and keep this buffer as the ‘Active Matrix’. When you want to switch the
matrix, scroll the buffer up or down until you find the matrix needed and leave the caret (the text cursor) in it.
To see which matrix is active click the ‘Window’ menu and locate the asterisk (*) next to the name of the matrix. The
document with the asterisk is the active matrix.
58
Chapter 6 - Menu and Toolbar Functions
6.9. Window Menu
Clicking ‘Window’ or pressing <Alt>W activates the Window menu. The Window menu allows you to toggle to
another document and change the way windows are displayed.
6.9.1. Cascade
If there are several documents open, you can display them all in a ‘cascaded’ form by selecting ‘Cascade’ from the
Windows menu. Part of each document will be visible; the current document is placed top:
To make one document fill the screen, click the middle box in its upper right corner or simply double-click the blue
heading on the top of the document.
6.9.2. Tile
If several documents are open, you can display them in ‘tiled’ form by selecting ‘Tile’ from the ‘Windows’ menu. Each
document will be visible; the current document’s title bar displayed in a different color (in the below example, the
current document is located on the bottom right area of the screen):
59
WinFIBRE User’s Manual
To make one document fill the screen, click the middle box in its upper right corner or simply double-click the heading
on the top of the document.
6.9.3. Arrange icons
Documents and matrixes can be minimized by clicking on the down-arrows in their upper right corners. When they are
minimized they appear as icons on the editing screen. These icons can be arranged at the bottom of the screen by
selecting ‘Arrange icons’ from the Window menu.
6.10.
Additional keys and key combinations
6.10.1.
Copy next tag from the matrix (<Tab>)
When adding a new document to the input file, press <Tab> to copy the next tag and its default information from the
active matrix buffer.
If nothing has been entered in the previous tag and the tag is not mandatory, then that tag will be replaced by the new
one. If you leave a mandatory tag empty WinFIBRE will display an error message and leave the empty tag in the
document.
After a document has been entered, information can be put into a tag that has been previously skipped. Place the cursor
in front of the tag that is missing and press <Tab>. If, according to the matrix, it is not possible to insert a tag, you will
see a warning message:
If the matrix in the matrix buffer does not match the document type you are editing or adding, you will also receive a an
error message.
You may need to change the matrix type to match the document type (see section 7.1 for instructions on changing the
matrix).
6.10.2.
Switch between Insert and Overwrite modes (<Ins>)
Normally when WinFIBRE starts up the text editor is in Insert mode. This means that when you type a character in the
middle of a line it is inserted into the line. In Overwrite mode, new characters overwrite existing ones.
Press the <Ins> key to change from Insert to Overwrite mode, or from Overwrite to Insert mode.
60
Chapter 7 - Matrixes
7. Matrixes
A matrix is a template or pattern that WinFIBRE uses so you will not have to remember which tags are required and
optional for each document type. WinFIBRE has many standard matrixes, one for each document type.You can also
create and edit your own user matrixes. User matrixes are used to insert information that is repeated from document to
document (i.e. for papers from the same conference, journal articles, book chapters, etc.)
7.1. Selecting a standard matrix
When you click the word ‘Matrix’ on the menu bar this drop-down list is displayed:
Click ‘Select Standard Matrix’ to show a list of possible matrixes (you can also use the shortcut key <Shift><F2>):
WinFIBRE has 35 different standard matrixes, one for each valid combination of record type and bibliographic level.
Apply one of these matrixes to a document by choosing ‘Select Standard Matrix’ from the Matrix menu. The following
window is displayed:
To navigate through the list, move up and down using the arrow keys, <PgUp> and <PgDn>, or the elevator bar. When
you reach the item that best describes the document to be catalogued, press <Enter> to select it or click ‘OK’.
The next window shows the selected matrix (which can be updated). For more details refer to ‘User matrixes’. To return
to the input file click ‘Window’ or press <Alt>W and select the desired input file name from the list.
7.2. User matrixes
7.2.1. Why use a user matrix?
If you are cataloguing a number of similar documents you will find a user matrix an easy and convenient way to avoid
entering the same information over and over. User matrixes may be saved as separate files and used later for similar
documents.
7.2.2. Creating a user matrix
Follow these steps to create a user matrix:
1.
Select a standard matrix. Start off with the standard matrix for your document type. If you will be working
with a series of articles from the same journal, select the journals matrix; if you have a series of reports,
select the reports matrix.
2.
Edit the matrix. Delete any tags you will not be using. Add information that is the same for every document
of this type. Be careful not to delete any mandatory tags (tags required for this document type).
After editing a standard matrix article from a journal, the user matrix might look like this:
61
WinFIBRE User’s Manual
The carat or circumflex sign (^) has three functions:
1.
It always appears between the end of a tag number and the beginning of data.
2.
It appears at the end of a data field that you will not need to edit.For instance, if you
were using this matrix and pressed the <Tab> key after tag 610, the following
information would be added automatically:
009^S^
229^Canadian Journal of Physics^
320^ISSN 0008-4204^
403^(Aug 1997)^
500^v. 75(8)^
009^9^
800^
3. If the information appears in the middle of data fields where the data will have to be
input. For instance, in the example below, you will have to add a subject category in
tag 008. The second ‘^’ in the tag places the cursor there when the subject category
is added to the input file.
008^^/J/AS
If there is no carat (^) in the middle or at the end of a data field, the cursor is
positioned at the end of the field ready for input.
62
Chapter 7 - Matrixes
3.
Save the user matrix. Select ‘Save As’ from the File menu. The File Save window is displayed:
Give the matrix file a name associated with the general subject. WinFIBRE automatically adds the extension
‘.MTX’ to the file name - unless explicitly specified.
7.2.3. More then one user matrix in the same file
One matrix buffer can contain more than one user matrix. (There is no limitation for this
number). One can place many user matrixes in a single buffer by using “Edit/Copy” and
“Edit/Paste”. No delimiter is required between two matrixes – empty lines are accepted.
To switch between the matrixes point the cursor to the desired one and click.
7.2.4. Select Active matrix
If you have more than one matrix open at the same time you have to make one matrix active.
This matrix will be used for input preparation.
There are two methods for doing this:
1.
Keep each matrix in a separate buffer. To make a matrix active, click the ‘window’
menu and select the matrix you would like to activate. The matrix you select will be
displayed on screen. Now click ‘Matrix’ and chose the ‘Select active matrix’ command.
Your matrix is now active.
2.
Keep all the matrixes in a single buffer and keep this buffer as the ‘Active Matrix’.
When you want to switch the matrix – scroll the buffer up or down until you find the
matrix needed and leave the caret in it.
To see which matrix is active click the ‘Window’ menu and locate the asterisk (*) next to the
name of the matrix. The document with the asterisk is the active matrix.
7.2.5. Open a stored user matrix
Follow these steps if you are about to add a document, which has already been defined as a
user matrix:
1.
In order to load the matrix file click the ‘Open’ button icon on the toolbar or select
‘Open’ from the File menu. Change the ‘Files of type’ to ‘Matrix Files (*.mtx)’. All files
with the extension ‘.mtx’ will be displayed.
63
WinFIBRE User’s Manual
2.
Select the matrix file from the list. If necessary, change directories and drives to find the
matrix file.
3.
To make the loaded matrix active, select ‘Matrix’ and then ‘Select Active Matrix’. This
step is necessary only if you have more than one matrix open at same time.
4.
Select the input file name from the Window menu to switch back to the input buffer.
7.2.6. Editing a user matrix
You may need to change some of the information the user matrix adds automatically. To update the
matrix, open the matrix file, and change, where needed, the data in the relevant tags.
If you do not save the matrix buffer changes, you will be asked to save them when you close
WinFIBRE or when you close the matrix buffer:
Select ‘Yes’ to save the changes, ‘No’ to discard them, or ‘Cancel’ to return to WinFIBRE.
64
Chapter 8 - Database for Corporate entries
8. Checking Input
Those responsible for doing descriptive and subject cataloguing usually check their work as they go. Sections 4.5 and
6.7.1 to 6.7.3 in this manual describe the checking functions, and section 5.6.2 offers more information on checking for
descriptive cataloguers and subject specialists.
It is a good idea for another person, besides the person who prepared the input, to check an input file before it is
submitted to INIS.
8.1. On-line checking
8.1.1. Starting WinFIBRE
Start Microsoft WindowsÔ if it is not running and start WinFIBRE. The WinFIBRE editor screen appears, showing an
empty document window titled WinFIB1.
8.1.2. Opening the document
Open the existing input file by clicking the ‘Open’ button icon on the toolbar:
or by choosing ‘Open’ from the File menu. WinFIBRE presents a list of possible input files to open:
This window lists all files in the default directory that have the extension ‘.INP’ – the default input file extension. If
the input file you want isn’t listed in the ‘File name:’ field, make sure that the correct drive and correct directory have
been selected. To see a list of all the files in the current directory, select All Files (*.*) in the ‘Files of Type’ field.
Select the file by double-clicking it. WinFIBRE opens a new document window, presenting the file selected.
8.1.3. Check the file
8.1.3.1.
Check field (<Ctrl+Shift>F)
Select ‘Check Field’ from the Command menu or press <Ctrl><Shift>F to check the data field in which the cursor is
positioned.
The toolbar contains this icon for the ‘check field’ command:
The field is checked using INIS rules and the authority files. If the spell checker is activated, WinFIBRE will spell
check tags 200, 210and 860. If an error is found, WinFIBRE highlights the line containing the error and displays a
warning.
8.1.3.2.
Check document (<Ctrl+Shift>D)
Select ‘Check Document’ from the Check menu or press <Ctrl+Shift >D to check the entire current document.
The toolbar contains this icon for the ‘check document’ command:
65
WinFIBRE User’s Manual
The document is checked using INIS rules and authority files. It is checked for internal consistency, ensuring that all
tags required for each type of record or literary indicator are present and that there are no unexpected tags. Crosschecking is also performed between the three journal tags (journal title, ISSN and CODEN), to ensure they match. If
spell checking is on, tags 200, 210 and 860 are checked for spelling. If an error is found, WinFIBRE highlights the line
containing the error and displays a warning.
8.1.3.3.
Check buffer (<Ctrl+Shift>B)
Select ‘Check Buffer’ from the Check menu or <Ctrl+Shift >B to check the current buffer from the cursor location to
the end.
The toolbar contains this icon for the ‘check buffer’ command:
Each document in the buffer is checked using INIS rules and authority files. It is checked for internal consistency,
ensuring that all tags required for each type of record or literary indicator are present and there are no unexpected tags.
Cross-checking is also performed between the three journal tags (journal title, ISSN and CODEN), to ensure they
match. If spell checking is on, spelling is also checked in tags 200 and 860. If an error is found, WinFIBRE highlights
the line containing the error and displays a warning.
8.2. Batch checking
Batch checking checks your input file in batch mode. There is no screen interaction, “Batch checking” works faster than
normal interactive checking. The result of the batch check is written on a file which can be printed or displayed on your
screen. For more detail see section 6.3.7.
8.3. Limitations of the checking function
Tag 001 (Temporary Record Number)
The first two digits (third and fourth characters) of the Temporary Record Number (TRN) are last two numbers the year
the record was submitted. The document with TRN CA000123 was submitted in 2000. These two digits must be
between 98 and 01.
Tag 004 (Record Status)
Tag 005 (Affected RN)
These two tags are seldom used and are not included in any standard matrix. If you need to use these tags, insert them
manually. WinFIBRE will not do any more checking of this record when it encounters these tags. Move to the
beginning of the next record to continue checking.
Note: When you submit a changed record you need to enter all the data fields for the record, not just the changed ones.
Tag 007 (Related RN/TRN)
The year of the related record must be between 70 and 01
Tag 008 (Bibliographic Control Data)
Subject categories: The first character of the subject category code can be entered in upper or lower case.
Number of abstracts: This version of WinFIBRE will accept up to three abstracts.
Type of Record, Bibliographic Level: These codes can be entered in upper or lower case.
Literary Indicator: WinFIBRE allows a maximum of five different literary indicators. They may be entered in upper or
lower case.
Tag 009 (Level)
The level code (A, M, S, 9 or X/) may be in upper or lower case.
Tag 100 (Personal Author(s), Editor(s), Affiliation(s))
Up to 200 personal authors with their affiliations can be entered.
Surname: The surname may contain up to ten words. Each word can be up to 30 characters long.
Initials: An initial may be up to three characters long. A maximum of ten initials is allowed.
Given names: One given name (forename) is allowed. It may be 20 characters long.
Name fragment: One name fragment is allowed. It can consist of up to ten words, each up to 20 characters long.
Affiliation: Nine different affiliations can be entered for one person, each separated by a semicolon and a space.
Some affiliation names begin with numbers. If a number is more than five digits long, it will create an error message.
Tag 107 (Collaboration)
Up to 400 digits of collaboration name may be entered.
66
Chapter 8 - Database for Corporate entries
Tag 109 (Funding Organization)
Up to nine different funding organizations can be entered. Each organization must be separated by a semicolon and a
space.
Some organization names begin with numbers. If a number is more than five digits long, it will create an error message.
Tag 110 (Corporate Entry)
Up to nine different organizations can be entered. Each organization must be separated by a semicolon and a space.
Some organization names begin with numbers. If a number is more than five digits long, it will create an error message.
Tag 111 (Academic Degree)
Up to 300 characters can be entered in this tag.
Tag 200 (Primary Title)
Tag 210 (Conference Title)
Tag 215 (Original Conference Title)
Tag 250 (Edition)
Tag 230 (Original Title)
Tag 610 (General Notes)
Tag 611 (Availability Note)
Tag 620 (Title Augmentation)
These tags may be 150 words long. One word can be up to 75 characters long.
The non-alphabetic encoding characters _ (subscript) and “ (superscript) can be entered up to five times before one
character
Tag 211 (Conference Place)
Up to nine different conference places separated by a semicolon and a space can be entered. Each word in the
conference place name can be 50 characters long. For the city or other geographic names, up to ten words are allowed
separated by a comma.
During checking the country codes or names are compared to the country name and country code authorities.
Tag 213 (Conference Date)
Nine different conference dates separated by a semicolon and a space can be entered. The year must be between 1960
and 2005
Tag 215 (Original Conference Title)
See Tag 200 (Title).
Tag 229 (Full Journal Title) - in level S
The journal title is compared to the journal title authority, which contains the full journal title.
Tag 230 (Original Title, or Series Title in level S)
See Tag 200 (Title).
Tag 250 (Edition)
See Tag 200 (Title).
Tag 300 (Report/Patent Number)
Report Number Prefix: The prefix of the report number is checked against the report number authority.
Report Number Suffix: The first character after the double dash must be numeric The report suffix can be up to 49
characters long.
Patent Number: The country code is checked against the country code authority.
After the words ‘Patent Document’ up to 30 alphabetic or numeric characters are allowed for the patent number.
Tag 310 (Secondary Report Number, Patent Priority)
Secondary Report Number: The first character must be a capital letter. The following characters (up to 29 of them) can
be alphabetic or numeric. The first character after the double dash must be numeric. The next 29 characters can be
alphabetic or numeric
Up to 20 different secondary report numbers can be entered, separated by a semicolon and a space.
Patent Priority/Application Number: The country code is checked against the country code authority. The words
‘priority’ or ‘patent application’ must follow the country code. The application number can be up to 30 alphanumeric
characters long.
67
WinFIBRE User’s Manual
Tag 320 (ISBN/ISSN/IPC Number) in level M
ISBN and or ISSN: Up to ten ISBNs and/or ISSNs can be entered. The ISBN consists of the word ‘ISBN’ followed by
13 characters (ten numbers, three spaces or hyphens). The letter ‘X’ is also allowed at the end of an ISBN.
The ISSN consists of the word ‘ISSN’ followed by 9 characters (two blocks of four numbers separated by a hyphen).
IPC: The number after the words ‘Int. Cl.’ or ‘Nat. Cl.’ can be up to 20 digits long. Up to 20 different numbers
separated by a semicolon and a space can be entered.
Tag 330 (Contract Number)
The number after the words ‘Contract,’ ‘Project Number,’ etc. can be up to 50 digits long. Up to 50 different numbers
separated by a semicolon and a space can be entered.
Tag 401 (Place of Publication)
Each word in the place of publication can be up to 50 characters long. The city and geographic subdivisions can each
contain up to ten words.
During checking the country code or name are validated against the country authority.
Tag 402 (Publisher)
Each word in the publisher’s name can contain up to 50 characters. Up to 10 words are allowed in the name.
Tag 403 (Date of Publication)
Tag 404 (Printing Date)
The year must be between 1960 and 2005.
Tag 500 (Collation)
The number of pages must be numeric, up to five digits long.
Page number ranges must be in ascending order. If the pagination consists of ranges of pages and single pages, each
separated by a comma and a space, only the ranges are checked for ascending order. Up to ten page numbers as ranges
or single numbers are allowed.
Alphanumeric volume identification can be up to 20 characters. Spaces are not allowed.
Additional information and identification can be added in an alphanumeric string in parenthesis. The string can be up to
20 characters long.
Tag 600 (Language)
Up to five different language names or codes separated by a comma and a space can be entered.
Language names or codes are checked against the language authority.
Tag 610 (General Notes)
See Tag 200 (Title)
Tag 611 (Availability Note)
See Tag 200 (Title)
Tag 620 (Title Augmentation)
See Tag 200 (Title)
Tag 800 (Descriptors)
Up to 100 different descriptors may be entered, each separated by a semicolon and a space. During checking each
descriptor is compared to the thesaurus of descriptors.
Tag 810 (Proposed Descriptors)
Up to 20 different proposed descriptors may be entered, each separated by a semicolon and a space. Each descriptor can
be up to 30 characters long.
Tag 860 (Abstract)
The abstract can be up to 6000 characters long. The non-alphabetic encoding characters _ (subscript) and “ (superscript)
can be entered up to five times before one character (a character can be a subscript of a subscript of a subscript of a
subscript of a subscript). Up to three abstracts can be entered.
68
Chapter 8 - Database for Corporate entries
Non-Alphabetic Characters Permitted in Tags
Characters
Tags
$ %
‘
(
)
*
+
,
–
.
/
:
;
100 (Surname)
Ö
Ö
100 (Initials)
Ö
Ö
100 (Given name)
Ö
Ö
100 (Name frag)
Ö
Ö
Ö
100 (Affiliation)
Ö
Ö
Ö
Ö
Ö
Ö
Ö
Ö
107
Ö
Ö
Ö
Ö
Ö
Ö
Ö
Ö
Ö
109
Ö
Ö
Ö
Ö
Ö
Ö
Ö
Ö
Ö
110
Ö
Ö
Ö
Ö
Ö
Ö
Ö
Ö
Ö
111
Ö
Ö
Ö
Ö
Ö
Ö
Ö
Ö
Ö
Ö
<
>
=
?
[
]
|
Ö
200
Ö
Ö
Ö
Ö
Ö
Ö
Ö
Ö
Ö
Ö
Ö
Ö
Ö
Ö
Ö
Ö
Ö
Ö
Ö
Ö
210
Ö
Ö
Ö
Ö
Ö
Ö
Ö
Ö
Ö
Ö
Ö
Ö
Ö
Ö
Ö
Ö
Ö
Ö
Ö
Ö
Ö
Ö
Ö
211
Ö
Ö
215
Ö
Ö
Ö
Ö
Ö
Ö
Ö
Ö
Ö
Ö
Ö
Ö
Ö
Ö
Ö
Ö
Ö
Ö
Ö
Ö
230
Ö
Ö
Ö
Ö
Ö
Ö
Ö
Ö
Ö
Ö
Ö
Ö
Ö
Ö
Ö
Ö
Ö
Ö
Ö
Ö
250
Ö
Ö
Ö
Ö
Ö
Ö
Ö
Ö
Ö
Ö
Ö
Ö
Ö
Ö
Ö
Ö
Ö
Ö
Ö
Ö
Ö
Ö
Ö
Ö
Ö
Ö
Ö
Ö
Ö
Ö
Ö
Ö
Ö
Ö
Ö
Ö
Ö
Ö
Ö
Ö
300 (Report suffix)
300 (Patent)
Ö
310 (Report suffix)
Ö
Ö
310 (Patent)
Ö
Ö
320 (ISBN+ISSN)
Ö
320 (IPC)
Ö
Ö
Ö
Ö
Ö
Ö
Ö
Ö
Ö
330
Ö
401
Ö
Ö
Ö
Ö
402
Ö
Ö
Ö
Ö
Ö
500
Ö
Ö
Ö
Ö
Ö
Ö
Ö
Ö
Ö
Ö
Ö
Ö
Ö
Ö
Ö
Ö
Ö
Ö
Ö
Ö
610
Ö
Ö
Ö
Ö
Ö
Ö
Ö
Ö
Ö
Ö
Ö
Ö
Ö
Ö
Ö
Ö
Ö
Ö
Ö
Ö
611
Ö
Ö
Ö
Ö
Ö
Ö
Ö
Ö
Ö
Ö
Ö
Ö
Ö
Ö
Ö
Ö
Ö
Ö
Ö
Ö
620
Ö
Ö
Ö
Ö
Ö
Ö
Ö
Ö
Ö
Ö
Ö
Ö
Ö
Ö
Ö
Ö
Ö
Ö
Ö
Ö
Ö
Ö
Ö
Ö
Ö
Ö
Ö
Ö
810
860
Ö
Ö
Ö
Ö
Ö
Ö
Ö
Ö
Ö
Ö
Ö
Ö
Ö
Ö
Ö
69
WinFIBRE User’s Manual
9. Database for Corporate entries
The Database allows WinFIBRE users to create and maintain their own list of corporate entries. The database is based
on an ODBC interface to the “MS Access” file. As such it allows, if properly installed and defined, multi-user access
not only for checking but for maintenance as well.
This module is optional. It will not work unless the additional “INIS Database” package is installed. If you do not
install this module, WinFIBRE’s ability to work will not be affected at all. The only option lost by not installing the
package is the possibility to search and choose corporate names from a list instead of entering it manually. This module
is a helpful tool, as it avoids typos and inconsistencies that occur with previous references to particular corporate names.
However, this module package is by no means mandatory and only optional.
The “INIS Database” module contains ODBC software and an empty corporate database. On some systems the
software might have been installed for other purposes.
The corporate database comes with two text files. The first one (CORP.TXT) contains all “good” entries from the last
issue of the INIS “Corporate” authority file in the appropriate format. This file can be selectively downloaded by
country (countries) or even entirely downloaded in the database. Keep in mind that the fully loaded file with
approximately 30,000 items will require a lot of disk space and might affect your PC’s performance. The second file
(CORP1.TXT) contains all the entries omitted from the first one (CORP.TXT). These entries either did not match the
country code field or there was no country specified. These records may require some changes before loading.
You also should be aware that the disk space and performance efficiency of this database module is slower than the
other authority files in WinFIBRE. Bear in mind that corporate entries are not needed in all the tags and hence do not
affect the overall performance of WinFIBRE.
If the additional module “INIS Database” is installed, the “Command/Database” item in the menu will display four
options:
For more details about this four options see section 6.7.5
70
Chapter 9 - Sending Input to INIS
10.
Sending Input to INIS
There are two ways of sending input to INIS.
1.
E-mail:
Use the function ‘Send e-mail’ in the file menu to open your e-mail. The current document is copied and sent as an
attachment to your e-mail.
2.
Diskette or CD-ROM
Use either WinFIBRE’s file saving functions or the DOS COPY command to copy the input file to a disk or CD
you wish to be send to INIS. You will also need to send INIS the additional documents and correspondence
associated with the batch.
10.1.
Copying the file
1.
Load the file into the WinFIBRE editor. Open the file into a new document by selecting
‘Open’ from the File menu or clicking the ‘Open’ button icon on the toolbar.
2.
Select ‘Save As’ from the File menu
3.
Enter the name of the file to be saved in the window that appears:
Choose the drive in which the file should be saved, by selecting the drives list in the
‘Save in:’ field. In this example, the input file will be copied to the file ‘book99.inp’ on
the disk in drive A:. Send this disk to INIS.
You can also use the Windows File Manager or the DOS COPY command to copy the
input file onto a diskette.
10.2.
Separating INIS and ETDE input
Before copying the input file to a diskette for INIS, files containing both ETDE and INIS input must be split into INIS
and ETDE files. Use “Export INIS/EDTE” command in the “File” menu and select “INIS” or ‘ETDE’ . In the “Export
XXXX file as” window specify the “filename” and “drive” and press <Enter>. If you specify “A” (or “B”) for “drive”,
you can export the input directly to a diskette.
10.3.
Labeling the disk or e-mail
Before you send a disk to INIS, label it with the file name, country, date, range of TRNs, and software used to prepare
input. If you use e-mail the same information should be added.
File name: CA9907.INP
Country: Canada
Date: 99/08/20
TRNs: CA9900231-487
Software: WinFIBRE version 3.0
71
WinFIBRE User’s Manual
Appendix A. Functions and Shortcut Keys
72
Authorities
Check buffer
Check document
Check field
Close file
Command menu
Copy block
Copy next tag
Cut block
Edit menu
Exit
File menu
Find
Find next
Go to first line
Go to last line
<Shift><F3>
<Ctrl+Shift >B
<Ctrl+Shift >D
<Ctrl+Shift >F
<Ctrl><F4>
<Alt>C
<Ctrl>C
<Tab>
<Ctrl>X
<Alt>E
<Alt><F4>
<Alt>F
<Ctrl>F
<F3>
<Ctrl><Home>
<Ctrl><End>
Help menu
Indexing functions
New file
New document
New matrix
Open file
Options menu
Paste
Print
Repeat replace
Replace
Save
Search menu
Select all
Select standard matrix
<Alt>H
<F9>
<Ctrl>N
<Ctrl>N
<Ctrl+SHIFT>N
<Ctrl>O
<Alt>O
<Ctrl>V
<Ctrl>P
<F3>
<Ctrl>H
<Ctrl>S
<Alt>S
<Ctrl>A
<Shift><F2>
Thesaurus functions
Undo
Window menu
Word left
Word right
<F9>
<Alt><Bkspc>
<Alt>W
<Ctrl><Left Arrow>
<Ctrl><Right Arrow>
Chapter 5 — Subject Indexing
Appendix B. Transcription of Special Characters in INIS
Scientific Symbols
Symbol
£
±
®
³
~
@
¯
×
†
!
º
Encoded form
#<=#
#+-#
#->#
#>=#
#approx#
#approx =#
#arrow down#
#arrow up#
#centre dot#
#dagger#
#exclamation#
#ident to#
Symbol
¥
ò
{
Ñ
¹
¶
µ
h
«
}
Ö
¨
Encoded form
#infinity#
#integral#
#left brace#
#nabla#
#not =#
#partial deriv#
#propor to#
#Planck constant#
#reversible#
#right brace#
#sq root#
#square#
Greek Alphabet
Symbol
a
b
g
d
e
z
h
q
i
k
l
m
n
x
o
p
r
s
t
u
f
c
y
w
Encoded form
#alpha#
#beta#
#gamma#
#delta#
#epsilon#
#zeta#
#eta#
#theta#
#iota#
#kappa#
#lambda#
#mu#
#nu#
#xi#
#omicron#
#pi#
#rho#
#sigma#
#tau#
#upsilon#
#phi#
#chi#
#psi#
#omega#
Symbol
A
B
G
D
E
Z
H
Q
I
K
L
M
N
X
O
P
R
S
T
¡
F
C
Y
W
Encoded form
#ALPHA#
#BETA#
#GAMMA#
#DELTA#
#EPSILON#
#ZETA#
#ETA#
#THETA#
#IOTA#
#KAPPA#
#LAMBDA#
#MU#
#NU#
#XI#
#OMICRON#
#PI#
#RHO#
#SIGMA#
#TAU#
#UPSILON#
#PHI#
#CHI#
#PSI#
#OMEGA#
73
WinFIBRE User’s Manual
These characters should not be encoded with the hash (#) sign. They should be transcribed as shown in the second
column.
74
Symbol
Transcription
~ ~
K, k
K-tilde, k-tilde
K
K-bar
““
“ “ (double apostrophe)
¬
not
£
Pound
&
And
º (degree)
Deg
Index
Index
^ character
in matrixes, 62
Abstract tag, 68
Abstracts
checking, 29
length, 29
writing, 28
Academic Degree tag, 67
Affected RN tag, 66
Affiliation, 66
Appending files, 37
Arrange icons, 60
Authorities
associated tags, 15
changing files, 51
copying data into tag, 53
corporate names, 49
getting search term from document text, 51
limiting search to one country, 48
list, 45
list, 47
searching, 47
subject category, 22
Auto Increment Tag, 9
Autocheck, 9, 16, 40
Availability Note tag, 67
Backups
timing, 9
Bibliographic Control Data tag, 66
Bibliographic Level codes, 66
Buffer
checking, 17, 43, 66
Carat character in matrixes, 62
Cascade, 59
Category codes
assigning manually, 21
assigning using authority file, 22
Changing
directories, 4
drives, 4
Check buffer, 66
Check field, 65
Checking
automatic, 16
buffer, 17, 43, 66
documents, 17, 42, 65
fields, 16, 41, 65
limitations of checking function, 66
spelling, 16, 40, 41
Clicking mouse, 3
Closing files, 33
Collaboration tag, 66
Collation tag, 68
Command menu, 41
Computer requirements, 3
Conference Date tag, 67
Conference Place tag, 67
Conference Title tag, 67
Contract Number tag, 68
Copying files, 71
Copying tag from matrix, 15, 60
Copying text, 36, 37
Corporate Entry tag, 67
Creating new input file, 13
Cut, 36
Database for Coporate entries, 54
maintenance, 54
Date of Publication tag, 68
Deleting text, 37
Descriptors
assigning, 25
manual indexing, 25
proposing, 27
saving, 27
Descriptors tag, 68
Directories
changing, 4
Disk drive requirements, 3
Documents
checking, 17
checking, 42, 65
Double-clicking mouse, 3
Dragging mouse, 3
Drives
changing, 4
Edit menu, 36
Editor screen, 11
status line, 11
toolbar, 11
ETDE category codes, 25
ETDE input
separating from INIS input, 34, 71
Export files, 34
F_SPLIT, 71
FIBRE for DOS, 1
Fibre option, 40
Fields
checking, 16
checking, 41, 65
File list, 36
File menu, 32
File names
changing, 34
File selection window, 4
Files
closing, 33
copying, 71
creating new, 32
export, 34
opening, 33
reading, 14, 63
renaming, 34
saving, 33
selecting, 4
Finding
next, 38
string, 38
Font, 39
75
WinFIBRE User’s Manual
Funding Organization tag, 67
General Notes tag, 67
Given names (personal authors), 66
Hardware requirements, 3
Help
activating help system, 5
bookmark, 7
contents, 7
searching, 7
Icons
arranging, 60
Indexing, 21, 25
Initials (personal authors), 66
Input
adding, 15
Input files
creating new, 13
opening, 21, 65
opening, 13
saving, 17, 18, 19
Insert
mode, 60
Insertion point
positioning, 3
Installation, 9
IPC tag, 68
Journal Title tag, 67
Keyboard
using in Windows, 5
using in WinFIBRE, 5
Keys
special, 3
Language tag, 68
Leaving WinFIBRE, 11, 17, 36
Level tag, 66
Literary Indicator codes, 66
Main menu, 31
Matrix menu, 58
Matrixes, 61
^ character in, 62
active, 14
automatic data entry, 62
changing, 63
creating user matrix, 61
editing user matrix, 64
opening, 14
saving, 63
saving, 12, 18
selecting, 58, 63
selecting, 13, 61
standard, 61
user, 61
Mouse
clicking, 3
double-clicking, 3
dragging, 3
pointing with, 3
Mouse requirements, 3
Moving through windows, 4
Name fragments (personal authors), 66
Non-alphabetic characters
allowed in tags, 70
Number of abstracts, 66
76
Online thesaurus, 25
Opening input files, 13
Opening input files, 21, 65
Operating system requirements, 3
Options menu, 38
Original Conference Title tag, 67
Original Title tag, 67
Overwrite mode, 60
Paste, 37
Patent Number tag, 67
Patent Priority/Application Number tag, 67
Personal Author(s), Editor(s), Affiliation(s) tag, 66
Place of Publication tag, 68
Pointing with mouse, 3
Primary Title tag, 67
Printing Date tag, 68
Proposed Descriptors tag, 68
Publisher tag, 68
Quitting WinFIBRE, 11, 17, 36
Record Status tag, 66
Related RN/TRN tag, 66
Repeat search, 38
Replace
repeating, 38
text, 38
Report Number Prefix, 67
Report Number Suffix, 67
Report Number tag, 67
Saving
files, 17
Saving files, 12, 18, 19, 33
Scroll bars, 3
Search and replace, 38
Search menu, 37
Secondary Report Number tag, 67
Select Activ matrix, 58, 63
Select all, 37
Select Standard matrix, 58
Selecting text, 3
Sending input to INIS, 71
Separating INIS, ETDE input, 34, 71
Setting up WinFIBRE, 9
Show One Error per Tag, 40
Special character, 37
Special characters
inserting, 28
Special keys, 3
Spell checking, 16, 29, 40, 41, 42, 43, 44
Starting WinFIBRE, 11, 21, 65
Status bar, 39
Status line, 11
Subject categories, 66
assigning, 21
Subject indexing, 21
Surname, 66
Tab key, 60
Tag 001, 66
Tag 004, 66
Tag 005, 66
Tag 007, 66
Tag 008, 66
Tag 009, 66
Tag 100, 66
Index
Tag 107, 66
Tag 109, 67
Tag 110, 67
Tag 111, 67
Tag 200, 67
Tag 210, 67
Tag 211, 67
Tag 213, 67
Tag 215, 67
Tag 229, 67
Tag 230, 67
Tag 300, 67
Tag 310, 67
Tag 330, 68
Tag 401, 68
Tag 402, 68
Tag 403, 68
Tag 404, 68
Tag 500, 68
Tag 600, 68
Tag 610, 67
Tag 611, 67
Tag 620, 67
Tag 800, 68
Tag 810, 68
Tag 860, 68
Temporary Record Number tag, 66
Text
copying, 36
cutting, 36
deleting, 37
finding, 38
pasting, 37
replacing, 38
selecting, 37
selecting, 3
Thesaurus
searching, 26
selecting terms from document, 26
truncation, 26
Tile, 59
Title Augmentation tag, 67
Toolbar, 11, 31, 39
TRN
incrementing automatically, 9
Type of Record codes, 66
Undo, 36
Window menu, 59
Windows
cascading, 59
file selection, 4
scroll bars, 3
tiling, 59
useful keystrokes, 5
WinFIBRE
exiting, 11, 17, 36
Installing, 9
new features, 1
setting up, 9
starting, 21, 65
what it does, 1
77


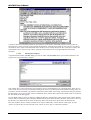
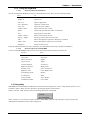
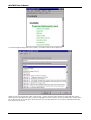


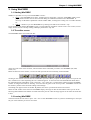
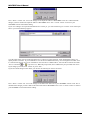
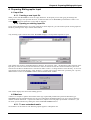
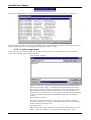
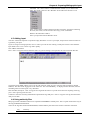
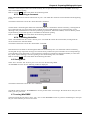

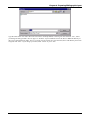
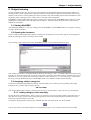
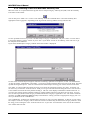
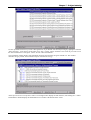
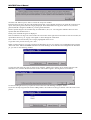

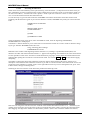

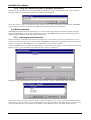
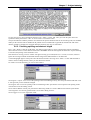

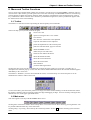
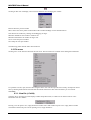
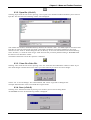

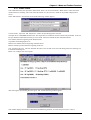
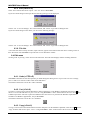
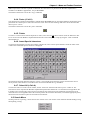
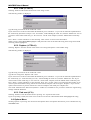
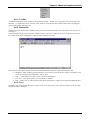
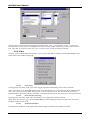
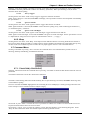

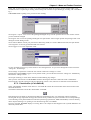
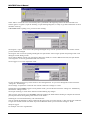
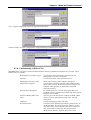

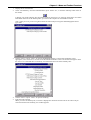
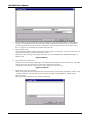
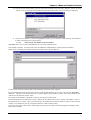
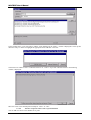
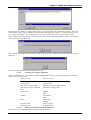

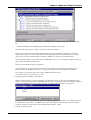
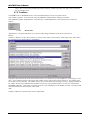
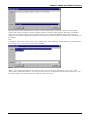
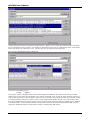
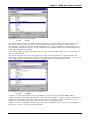


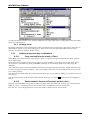

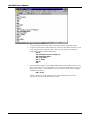
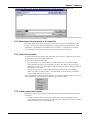
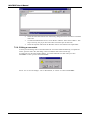
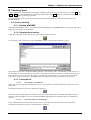
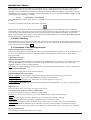

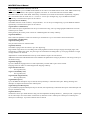

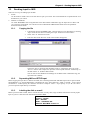
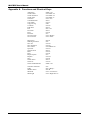
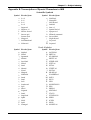


![j:j_"Xt$l"j:]:":,lg]:"r/Human Resources have been duty - e](http://vs1.manualzilla.com/store/data/005657435_1-26d97049bf04f0fd92265d73e45a9ab3-150x150.png)