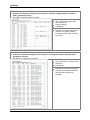
1
Volunteer Impact Standard Edition Version 3.9 Administrator’s Guide Revised: 15 April 2012 TELEPHONE North America: Australia: New Zealand: United Kingdom: Others: (800) 844-1545 1-800-359-067 (04) 889 0403 (0800) 032-7763 +1 905-639-4552 SUPPORT Online and Email: www.volunteer2.com/support FOLLOW US ONLINE Global websites: Facebook: Twitter: LinkedIn: YouTube: www.volunteer2.com (United States) www.volunteer2.ca (Canada) www.volunteer2.com.au (Australia) www.volunteer2.co.uk (United Kingdom) www.voluntario2.com (Latin America) www.volunteer2.com/facebook twitter.com/volsquared http://ca.linkedin.com/in/tonygoodrow http://www.youtube.com/user/VolunteerSoftware Table of Contents Section 1 - Getting Ready To Use Volunteer Impact .................................................. 1 Data Import .............................................................................................................................................. 1 Banner ...................................................................................................................................................... 1 Evaluate Current Application Form ....................................................................................................... 1 Mission Statement .................................................................................................................................. 1 Section 2 - Getting Familiar with Volunteer Impact .................................................... 2 Logging On .............................................................................................................................................. 2 Welcome Page ......................................................................................................................................... 4 Current Status ....................................................................................................................................... 4 System Alerts - Management and Recognition ..................................................................................... 4 Current Message to Volunteers ............................................................................................................ 4 Comparisons - Relative versus Total .................................................................................................... 5 Navigation ................................................................................................................................................ 6 Icons and Buttons ................................................................................................................................... 6 Volunteer Quick Search .......................................................................................................................... 6 Re-sizing and Moving Dialog Boxes ..................................................................................................... 7 Menu Structure ........................................................................................................................................ 7 Getting Help ............................................................................................................................................. 7 Legend .................................................................................................................................................. 7 Glossary ................................................................................................................................................ 7 Tooltips .................................................................................................................................................. 8 User Manual .......................................................................................................................................... 8 Customer Support and Feedback ......................................................................................................... 8 Confirmation of Information Saved........................................................................................................ 8 Rich Text Editor ....................................................................................................................................... 8 Adding Links to Documents or Websites .............................................................................................. 9 Section 3 - Configuring Volunteer Impact ................................................................. 10 Basic Configuration .................................................................................................... 10 Organization Settings ........................................................................................................................... 10 Contact Information and Mission Statement ....................................................................................... 10 General Settings for your Organization ............................................................................................... 11 Hours Log Permission for All Volunteers ............................................................................................ 11 Hours Log Permission for an Individual Volunteer .............................................................................. 11 Signup Settings for New Volunteers ................................................................................................... 11 The Sign-Up Process .......................................................................................................................... 12 Email Message Templates.................................................................................................................... 13 New Email Message Template ........................................................................................................... 14 Quick Info on an Email Message Template ........................................................................................ 14 View, Edit, Delete or Print an Email Message Template .................................................................... 15 Sending an Email using an Email Message Template ....................................................................... 15 Volunteer Profile Customization ................................................................................ 16 General Volunteer Interests ................................................................................................................. 16 New General Volunteer Interest .......................................................................................................... 17 Quick Info on a General Volunteer Interest ......................................................................................... 18 View, Edit, Delete or Print a General Volunteer Interest ..................................................................... 18 Sort General Volunteer Interests ........................................................................................................ 19 Change the Active Status of Multiple General Volunteer Interests ..................................................... 19 Custom Fields ....................................................................................................................................... 20 New Custom Field Category ............................................................................................................... 21 Quick Info on a Custom Field Category .............................................................................................. 22 View, Edit, Delete or Print a Custom Field Category .......................................................................... 22 Re-ordering Custom Field Categories - Drag and Drop...................................................................... 22 Volunteer Impact version 3.8 Standard Edition Administrator’s Guide i New Custom Field ............................................................................................................................... 23 Quick Info on a Custom Field .............................................................................................................. 25 View, Edit, Delete or Print a Custom Field .......................................................................................... 25 Re-ordering Custom Fields - Drag and Drop ...................................................................................... 26 Show or Hide Custom Fields............................................................................................................... 26 Qualifications ........................................................................................................................................ 26 New Qualification Level ....................................................................................................................... 28 Quick Info on a Qualification Level ..................................................................................................... 29 View, Edit, Delete or Print a Qualification Level.................................................................................. 29 New Qualification - Unranked or Ranked ............................................................................................ 29 Quick Info on a Qualification ............................................................................................................... 32 View, Edit, Delete or Print a Qualification ........................................................................................... 32 Changing the Order of Levels in a Ranked Qualification .................................................................... 32 Removing Levels from a Qualification ................................................................................................ 32 Re-ordering Qualifications - Drag and Drop ........................................................................................ 33 Show or Hide Qualification Areas and Qualification Levels ................................................................ 33 Associating a Qualification with an Activity ......................................................................................... 33 Supporting Multiple Application Forms .............................................................................................. 34 Committees ............................................................................................................................................ 35 New Committee ................................................................................................................................... 36 Quick Info on a Committee .................................................................................................................. 36 View, Edit, Delete or Print a Committee .............................................................................................. 37 Sort Committees ................................................................................................................................. 37 Assigning a Person to a Committee .................................................................................................... 37 Activity Configuration ................................................................................................. 38 Outputs................................................................................................................................................... 38 New Output ......................................................................................................................................... 39 Quick Info on an Output ...................................................................................................................... 40 View, Edit, Delete or Print an Output .................................................................................................. 40 Sort Outputs ........................................................................................................................................ 40 Change the Active Status of Multiple Outputs .................................................................................... 41 Assigning an Output to an Activity ...................................................................................................... 41 Activity Shift Recurrence Templates .................................................................................................. 42 New Activity Shift Recurrence Template ............................................................................................. 43 Quick Info on an Activity Shift Recurrence Template.......................................................................... 44 View, Edit, Delete or Print an Activity Shift Recurrence Template ...................................................... 45 Associating an Activity Shift Recurrence Template with an Activity ................................................... 45 Activities ................................................................................................................................................ 45 New Activity Category ......................................................................................................................... 47 Quick Info on an Activity Category ...................................................................................................... 48 View, Edit, Delete or Print an Activity Category .................................................................................. 48 New Activity ......................................................................................................................................... 48 Creating an Activity from a Template .................................................................................................. 52 What Type of Schedule Should I Choose? ......................................................................................... 52 Manual Locking versus Automatic Locking ......................................................................................... 52 Creating an Activity with No Schedule ................................................................................................ 53 Creating a Seasonal Activity ............................................................................................................... 53 Creating a Schedule from a Template ................................................................................................ 53 Creating a Schedule from Scratch ...................................................................................................... 54 Quick Info on an Activity...................................................................................................................... 55 View, Edit, Delete, Copy or Print an Activity ....................................................................................... 55 Adding Shifts to a Scheduled Activity ................................................................................................. 56 Editing Shifts in a Scheduled Activity .................................................................................................. 56 Deleting Shifts from a Scheduled Activity ........................................................................................... 57 Moving Activities between Categories - Drag and Drop ..................................................................... 57 Display Options ................................................................................................................................... 57 Volunteer Impact version 3.8 Standard Edition Administrator’s Guide ii Change the Active Status of Multiple Activities ................................................................................... 58 Show or Hide Activity Categories and Activities ................................................................................. 58 Sample Activity Scenario #1 - Road Marshall for Walkathon ............................................................. 59 Sample Activity Scenario #2 - Chairperson for Next Year’s Walkathon ............................................. 60 Sample Activity Scenario #3 - Information Booth Attendant ............................................................... 60 Final Steps ................................................................................................................... 62 Organizational News: Current Message to Volunteers ..................................................................... 62 Create, Edit or Delete the Current Message to Volunteers ................................................................ 62 View the Current Message to Volunteers ........................................................................................... 62 Make Searchable in MyVolunteerPage.com ....................................................................................... 62 Automatic Email to New Volunteers ................................................................................................... 63 Displaying Volunteer Policies to New Volunteers ............................................................................. 63 Links for Your Website ......................................................................................................................... 63 Sending an Invitation to Become a Volunteer ..................................................................................... 64 Section 4 - Using Volunteer Impact (Administrators) .............................................. 65 Volunteer Profiles ................................................................................................................................. 65 Create a new Volunteer or Administrator ............................................................................................ 66 Searching for a Person - Quick Search .............................................................................................. 66 Searching for a Person ....................................................................................................................... 67 Menu Options that use the Search Filter ............................................................................................ 70 Search Filters Available by Menu Option ............................................................................................ 71 Quick Info on a Profile ......................................................................................................................... 72 Editing a Profile ................................................................................................................................... 72 Editing Your Own Profile ..................................................................................................................... 73 View, Edit, Print or Change the Status of a Profile ............................................................................. 74 Switching Between Viewing and Editing a Profile ............................................................................... 74 Making Changes to Custom Field Values for Multiple People ............................................................ 74 Making Changes to Qualification Values for Multiple People ............................................................. 75 Volunteer Status .................................................................................................................................. 75 Changing the Status of One or More Profiles ..................................................................................... 75 Archiving a Profile ............................................................................................................................... 76 Effects of Archiving a Profile ............................................................................................................... 77 Reactivating a Profile .......................................................................................................................... 77 Deleting a Profile ................................................................................................................................. 77 Changing a Person’s Role (Volunteer to Administrator) ..................................................................... 78 Changing a Person’s Password .......................................................................................................... 78 Managing Volunteers ............................................................................................................................ 79 Managing Applicant and In Process Volunteers ................................................................................. 79 Quick Info on an Applicant or In Process Volunteer ........................................................................... 79 View, Edit, Print or Change the Status of an Applicant or In Process Volunteer ................................ 80 Change the Status of Multiple Applicant or In Process Volunteers .................................................... 80 Send an Email or Text Message to an Applicant or In Process Volunteer ......................................... 81 Acknowledge First Contact ................................................................................................................. 81 Dates and Times - The Language Setting ........................................................................................... 83 Approving Data Entered by Volunteers .............................................................................................. 84 Approving or Rejecting Custom Field and Qualification Entries ......................................................... 84 Approving or Rejecting Logged Hours ................................................................................................ 85 Quick Info on an Hours Log Entry ....................................................................................................... 86 Edit, Approve or Reject an Hours Log Entry ....................................................................................... 86 Approve or Reject Multiple Hours Log Entries .................................................................................... 87 Assigning Volunteers to Activities ...................................................................................................... 87 Enabling Group Scheduling ................................................................................................................ 87 Assignment Filters ............................................................................................................................... 87 Assigning Volunteers to an Activity from their Profile ......................................................................... 88 Emailing Volunteers their Monthly Schedule ...................................................................................... 89 Volunteer Impact version 3.8 Standard Edition Administrator’s Guide iii Icons and Symbols in the Unscheduled and Scheduled Activity Lists ................................................ 90 Assigning Volunteers from the Unscheduled or Scheduled Activity Lists ........................................... 91 Assigning One Person, Multiple People or a Group to an Activity ...................................................... 93 Assigning People using the Visual Schedule ...................................................................................... 95 Summary - Assigning Volunteers from the Activity Lists .................................................................... 95 Printing a Quick Report of the Status of an Activity or Shift ................................................................ 96 Viewing Who is Already Assigned to an Activity or Shift .................................................................... 96 Confirming a Volunteer for an Unscheduled or Scheduled Activity .................................................... 97 Removing a Volunteer from an Unscheduled or Scheduled Activity .................................................. 97 Logging Hours ....................................................................................................................................... 98 Logging Hours for One Person from within a Profile........................................................................... 98 Logging Hours for One or More People .............................................................................................. 99 The TimeClock .................................................................................................................................... 99 Edit, Stop or Delete a Running TimeClock ....................................................................................... 100 Edit or Delete an Hours Log Entry .................................................................................................... 101 Determining How Hours Were Entered: Logged Manually or via the Timeclock .............................. 102 Delete Multiple Hours Log Entries..................................................................................................... 102 Reporting on Logged Hours .............................................................................................................. 103 Communicating with Volunteers ....................................................................................................... 104 Sending Emails or Text Messages to One Person ........................................................................... 104 Sending a Copy of an Email to Yourself ........................................................................................... 104 Sending Emails to Multiple People ................................................................................................... 105 Sending Emails to External Contacts ................................................................................................ 105 Sending Text Messages to Multiple People ...................................................................................... 106 Viewing a History of Sent Email Messages ...................................................................................... 106 Mailing Labels, Phone Lists and Exports ......................................................................................... 107 Producing Mailing Labels .................................................................................................................. 107 Producing Phone Lists ...................................................................................................................... 108 Producing Exports of Profile Information .......................................................................................... 108 Producing an Export of One Person’s Logged Hours ....................................................................... 108 Reporting ............................................................................................................................................. 109 Hours Reports ................................................................................................................................... 109 Outputs Reports ................................................................................................................................ 109 Volunteer Profile Reports .................................................................................................................. 109 Hours and Outputs Reports Available in a Volunteer’s Profile ......................................................... 110 Schedules ............................................................................................................................................ 110 Schedule Reports .............................................................................................................................. 110 Schedule Reports Available in a Volunteer’s Profile ......................................................................... 111 Section 5 - Using MyVolunteerPage.com (Volunteers) .......................................... 112 Logging On .......................................................................................................................................... 112 Tabs .................................................................................................................................................. 114 The Sign-Up Tab.................................................................................................................................. 114 Signing Up For Activities ................................................................................................................... 114 Signing Up For an Unscheduled Activity ........................................................................................... 114 Signing Up For a Scheduled Activity ................................................................................................. 115 Removal From the Signup List .......................................................................................................... 115 The Assignments Tab ......................................................................................................................... 116 Viewing and Confirming Activity Assignments .................................................................................. 116 Removal From a Confirmed or Unconfirmed Activity Assignment .................................................... 116 Generating Your Schedule ................................................................................................................ 116 The Hours Log Tab ............................................................................................................................. 117 Viewing and Deleting Logged Hours ................................................................................................. 117 Logging Hours ................................................................................................................................... 117 The Contact Tab .................................................................................................................................. 117 Communicating with Administrators and Committee members ........................................................ 117 Removing Yourself from an Organization ......................................................................................... 118 Volunteer Impact version 3.8 Standard Edition Administrator’s Guide iv The Reports Tab .................................................................................................................................. 118 Viewing Hours, Accomplishments and Goals ................................................................................... 118 Generating a Summary Report of Your Hours .................................................................................. 118 The My Profile Tab .............................................................................................................................. 118 Updating Your Profile ........................................................................................................................ 118 Basic Info........................................................................................................................................... 119 Additional Info.................................................................................................................................... 119 Qualifications ..................................................................................................................................... 119 Interests ............................................................................................................................................. 119 Availability ......................................................................................................................................... 119 Goals ................................................................................................................................................. 120 Appendix 1 - Glossary of Terms .............................................................................. 121 Appendix 2 - Menu Structure ................................................................................... 125 Appendix 3 - What Do You Want To Do? ................................................................ 128 Activities .............................................................................................................................................. 128 Approvals / Administrative Tasks ..................................................................................................... 128 Communications ................................................................................................................................. 128 Configuration / Setup .......................................................................................................................... 129 Hours .................................................................................................................................................... 129 Reporting ............................................................................................................................................. 129 Schedules ............................................................................................................................................ 129 Volunteer Profiles ............................................................................................................................... 129 Appendix 4 - Reports ................................................................................................ 130 Hours Reports ..................................................................................................................................... 130 12 Month Trend ................................................................................................................................. 130 Hours by Category ............................................................................................................................ 131 Hours by Category - Filtered ............................................................................................................. 132 Hours by Activity Report Group......................................................................................................... 132 Hours by Volunteer ........................................................................................................................... 133 Hours by Volunteer - Filtered ............................................................................................................ 134 Category Hours by Activity ................................................................................................................ 135 Activity Hours by Volunteer ............................................................................................................... 136 Logged Hours Excel Report .............................................................................................................. 136 Outputs Reports .................................................................................................................................. 137 Outputs by Volunteers ....................................................................................................................... 137 Output Totals ..................................................................................................................................... 137 Outputs Excel Report ........................................................................................................................ 138 Volunteer Profile Reports ................................................................................................................... 138 Volunteer Profile Excel Reports ........................................................................................................ 138 Schedule Reports ................................................................................................................................ 139 All Categories by Date ...................................................................................................................... 139 Single Category by Date ................................................................................................................... 139 Single Activity by Date ...................................................................................................................... 140 All Categories by Category ............................................................................................................... 140 Single Category by Activity ............................................................................................................... 141 All Activities by Volunteer .................................................................................................................. 141 Schedule Export to Excel .................................................................................................................. 142 Schedule Summary Export to Excel.................................................................................................. 142 Appendix 5 - Documentation Revisions / Addendum ............................................ 143 Volunteer Impact version 3.8 Standard Edition Administrator’s Guide v SECTION 1 - GETTING READY TO USE VOLUNTEER IMPACT Section 1 - Getting Ready To Use Volunteer Impact Data Import Banner Evaluate Current Application Form Mission Statement Data Import 2 Volunteer staff can import the basic contact information for your volunteers into Volunteer Impact for you if you provide it to us in an Excel spreadsheet formatted as required. A list of data specifications for your region can be obtained by sending an email to [email protected]. Banner A banner is a customized graphic image that displays at the top of the screen in MyVolunteerPage.com once you have logged in or when potential volunteers click on a link from your website to view volunteer opportunities. Once you have created your banner, send it to [email protected] and we will add it to your account within one business day. Images should conform to the following settings: Width: exactly 1002 pixels wide Height: exactly 124 pixels high Resolution: 72 dpi File format: JPG, GIF, PNG (Alternative: TIF, PDF, EPS) Multiple banners are supported if you have multiple organizations in Volunteer Impact Enterprise Edition. You may also specify a link to a website (a “URL”) so that, when volunteers click on your banner image, they are directed to a specific website. Evaluate Current Application Form Whether coming from a paper-based system or some other software system, you will want to evaluate your current application form(s) in order to determine what general custom fields and custom qualification fields (and possibly activities) you will need to set up. 2 If you would like Volunteer staff to assist you with this, please let us know. Additional fees are applicable. Mission Statement A mission statement is a short written statement of the purpose of a company or organization. It details the overall goal and direction of the organization, providing a context in which organization strategies and decisions are formulated. It is beneficial for a variety of reasons that your volunteers and prospective volunteers see this when they log on to MyVolunteerPage.com to sign up for or view your opportunities available. Volunteer Impact version 3.8 Standard Edition Administrator’s Guide 1 SECTION 1 - GETTING READY TO USE VOLUNTEER IMPACT Section 2 - Getting Familiar with Volunteer Impact Logging On Welcome Page Navigation Icons and Buttons Re-sizing and Moving Dialog Boxes Menu Structure Getting Help Rich Text Editor Logging On To log on as an Administrator: 1. Open your web browser (Microsoft Internet Explorer, Mozilla Firefox, etc.) and type admin.Volunteer2.com in the address bar. 2. Type in your username and password and click on the [Log In] button. If you forget your username and/or password, click on the Click Here link below “Forgot your username and password?”. When the “Reset Password” window appears, enter your username or email address and click on the [Reset Password] button. A new password will be emailed to you and you will be able to log in with that new password and then change it to anything you’d like. All passwords are encrypted in our database, which means that even we can’t read them. If you forget your password, it will have to be reset. To log on as a Volunteer: 1. Open your web browser (Microsoft Internet Explorer, Mozilla Firefox, etc.) and type MyVolunteerPage.com in the address bar. 2. Type in your username and password and click on the [Log In] button. Volunteer Impact version 3.8 Standard Edition Administrator’s Guide 2 SECTION 1 - GETTING READY TO USE VOLUNTEER IMPACT If you forget your username and/or password, click on the Click Here link below “Forgot your username and password?” and follow the instructions above. Volunteer Impact version 3.8 Standard Edition Administrator’s Guide 3 SECTION 1 - GETTING READY TO USE VOLUNTEER IMPACT Welcome Page When you log on, you will see the “Welcome Page” for your organization. It contains a summary of your number of volunteers, system alerts, and a comparison of hours logged in a table and charts. (Any 2 important messages or notifications from Volunteer will appear in the “System Messages” area.) To access the welcome page at any time: 1. GO TO: Main » Home The “Welcome” Screen (upper portion): Current Status This section shows a list of the number of people in your organization, listed by their status. You can click on the links to “Applicant” or “In Process” to manage those people. System Alerts - Management and Recognition The “Management” section shows system alert messages, enabling you to link to and manage: First Contact - volunteers awaiting acknowledgement of first contact Custom Field Approvals - information entered by volunteers awaiting administrative approval Qualification Approvals - information entered by volunteers awaiting administrative approval Hours Approvals - hours logged by volunteers awaiting administrative approval Volunteers on the Clock - volunteers currently logged on to the Time Clock If the alerts require your attention, they will be underscored. When not active, the options will still be visible, but they will not be underscored. You will also see which people in your organization are celebrating birthdays and anniversaries of service in the “Recognition” section. Current Message to Volunteers You can enter text that will be displayed to all volunteers when they log on to myVolunteerPage.com (the volunteer interface). Text can include news and information as well as links to other websites and/or documents. By hovering over the text displayed on the Home Page, you will be able to Edit or Delete it. For more information, please refer to the section on “Organizational News” and creating or modifying the Current Message to Volunteers. Volunteer Impact version 3.8 Standard Edition Administrator’s Guide 4 SECTION 2 - GETTING FAMILIAR WITH VOLUNTEER IMPACT Comparisons - Relative versus Total You can compare how many hours and outputs have been logged and how many volunteer profiles have hours logged for a Year, Quarter, Month and Week as of today’s date in an interactive table. Separate charts will show number of volunteers and number of hours for the period selected. The “Relative” section will show you (in the table) the total hours and number of volunteers with hours for the previous and current year/quarter/month/week to date and the difference in totals between those periods. The “Total” section will show you (in the table) the total hours and number of volunteers with hours for the previous and current year/quarter/month/week and the difference in totals between those periods. To refresh the information displayed in the “Comparisons” section, click on the [Refresh] button . Volunteer Impact version 3.8 Standard Edition Administrator’s Guide 5 SECTION 2 - GETTING FAMILIAR WITH VOLUNTEER IMPACT Navigation There are many ways of getting around simply in Volunteer Impact: Menus - hover over a main menu item to see what options are available and click on the desired option Buttons - clicking on a button within a menu (example: [Save], [Cancel] will execute the functionality associated with it Icons - hovering over an icon will reveal a tooltip explaining what that icon is for; clicking on the icon will execute the functionality associated with it Links - links display as underscored within Volunteer Impact; clicking on them will execute the functionality associated with it and/or navigate you to another window Section Headers - within the set up of activities, custom fields, qualifications, etc., information is divided into sections; clicking on the headers for those sections will show/hide information in that section Windows - often, a window will pop up, offering you further options; windows and dialog boxed can sometimes be resized or moved on the screen Hover - moving your mouse over words along the top of the screen will expose menu options you can click on; you can also hover over the [Info] button selected object , when available, for quick information on the Icons and Buttons A variety of icons are available to access the functionality in Volunteer Impact. When you move your mouse over (“hover”) any of these icons, a “tooltip” will display, informing you of what that icon is used for. Title bar area: Other icons used: Info Close Required Increase Font Size Sort Reset Font Size Show Hide Decrease Font Size Print Legend Glossary Help First page Previous page Next page Last page Volunteer Quick Search A field in the main toolbar offers you the ability to search for a volunteer’s name at any time. Type in a few characters of the volunteer’s first or last name and a list of matching volunteers will appear. Click on the desired volunteer to edit his/her profile. Volunteer Impact version 3.8 Standard Edition Administrator’s Guide 6 SECTION 2 - GETTING FAMILIAR WITH VOLUNTEER IMPACT Re-sizing and Moving Dialog Boxes If you move your mouse over the top edge (header area) of a dialog box, the cursor will change to a crosshair symbol. This symbol will vary, depending on the cursor settings on your computer. If you click and hold your mouse button down, you will be able to drag the dialog box to a new location and then release the mouse button. If the dialog box has this symbol in the lower right corner, it indicates that the dialog box can be resized. Click on the symbol and hold your mouse button down. Resize the dialog box by dragging the corner of the box outward or inward. Release the mouse button when you are satisfied with the size of the dialog box. Menu Structure The top level menus across the top of the screen in Volunteer Impact are: Main: People: Communications: Activities: Assign: Reports: Schedules: Configuration: Access welcome page, log out, switch to another account (organization), if applicable Add and manage volunteers and log hours Manage templates, communicate with volunteers via email and text, produce mailing labels and phone lists Manage activities, templates, interests Assign volunteers to activities Generate profile and hours reports and exports Generate schedule reports and exports Set up and customize your Volunteer Impact environment For further details on the menu options available, please refer to Appendix 2 - Menu Structure. Getting Help At any time, you can get help by accessing information on the icons and terms used in Volunteer Impact or the full administrative guide. Legend You can access a legend of all the icons used in the screen you are currently viewing in Volunteer Impact: 1. Click on the [Legend] button 2. Click on the [Close] button when you are finished. Otherwise, the dialog will remain open until you access another screen. Glossary You can access a glossary of terms used in the screen you are currently viewing in Volunteer Impact: 1. Click on the [Glossary] button 2. Click on the [Close] button when you are finished. Otherwise, the dialog will remain open until you access another screen. Volunteer Impact version 3.8 Standard Edition Administrator’s Guide 7 SECTION 2 - GETTING FAMILIAR WITH VOLUNTEER IMPACT Tooltips If you move your mouse over certain labels, text, section headings and buttons in Volunteer Impact, you will see a tooltip appear, providing you with more information on that feature: User Manual The online administrative guide is always available to you when you are using Volunteer Impact Standard Edition by scrolling down to the “Support” section on the Home page and clicking on the link to User Manual. Customer Support and Feedback To access our Customer Support and Feedback system, click on the [Help] button toolbar. in the main Confirmation of Information Saved When you atempt to delete an object in Volunteer Impact or change the status of multiple objects, a dialog box will appear asking you to confirm the operation. When an action has completed, a message will display in the upper right corner of your screen. These dialog boxes will close automatically unless further action (as indicated) needs to be taken. If you receive an error message that is not defined in this document, please contact Volunteer Impact Support at [email protected]. Rich Text Editor In certain places (e.g. email messages, mission statements) in Volunteer Impact, you have the ability to format text that will be displayed to your volunteers. In those places, a rich text editor is available to you, enabling you to define: Bold, italics, underscore, strikethrough, subscript, superscript Alignment, indenting Numbering, bullets Font size, colour, highlighting etc. The “Rich Text Editor” Window: To create paragraph spacing, press the Enter key on your keyboard. To create a single line feed (no extra spacing between lines), hold down the Shift key and press Enter. Volunteer Impact version 3.8 Standard Edition Administrator’s Guide 8 SECTION 2 - GETTING FAMILIAR WITH VOLUNTEER IMPACT Adding Links to Documents or Websites You can include a link to another website or a document for your volunteers to download. Links can be placed in any field that uses the Rich Text Editor such as the description of an activity, an email message, organizational news and volunteer policies text. When a website link is typed in, it is treated as text only. You can use the options in the Rich Text Editor to make the link “clickable”. To add a link to a website or document in the Rich Text Editor: 1. Type in the text you wish to display to volunteers (example: “Click here to visit our website”) 2. Highlight the exact text you wish volunteers to click on (i.e. to link to a website or document) (example: the word “here” in the text displayed in Step 1 above) 3. Click on the [Insert/edit link] button in the formatting toolbar 4. In the resulting dialog box: a. Enter the Link URL (the full address for the website you want to link to) b. Choose the target (open the website in the same window or in a new window) c. Enter the text that will be displayed when the volunteer hovers over the link d. Click on the [Insert] button to create the link or the [Cancel] button to cancel the creation of the link To edit a specific link, highlight it, and then follow steps 2 to 3 above, clicking on the [Update] button to save your changes. You can either delete a link or “unlink” it: 1. Highlight the desired link 2. Click on the [Unlink] button in the formatting toolbar Volunteer Impact version 3.8 Standard Edition Administrator’s Guide 9 SECTION 4 - USING VOLUNTEER IMPACT (ADMINISTRATORS) Section 3 - Configuring Volunteer Impact Basic Configuration Volunteer Profile Customization Activity Configuration Final Steps Basic Configuration Organization Settings Email Message Templates Organization Settings In this section, you are able to define the overall attributes of your organization, appearance and behavior of screens, and general behavior when new volunteers sign up. Area Contact Information Mission Statement General Settings Signup Settings (There are separate settings for Application Forms 1, 2 and 3) What it contains Basic address, telephone and email contact information for the organization Identify your organization’s mission statement, direction, vision, etc. Help text to appear when entering custom field and qualification values, volunteer permissions for logging hours, time zone, etc. Displaying volunteer policies, sending email to new volunteers upon completion of the specified application form, etc. How to get started Configuration >> Organization Settings > “Contact Information” Configuration >> Organization Settings > “Mission Statement” Configuration >> Organization Settings > “General Settings” For more information (see step “2” below) Configuration >> Organization Settings > “Signup Settings” (see step “5” below) (see step “3” below) (see step “4” below) Contact Information and Mission Statement To enter or change any of the organization settings: 1. GO TO: Configuration » Organization Settings 2. Click on the “Contact Information” header (if required) to expand that area and specify the values. Click on the [Save] button to save the information you have entered/updated or [Cancel] to abandon the changes. a. If you select “Canada”, “USA”, “United Kingdom” or “Australia” as the country, the appropriate provinces, states or counties will display. For all other countries, the province/state field is not visible b. To change the main contact person, click on the [Change] button and select the new administrative contact from the list of values, then click on [Save]. Volunteer Impact version 3.8 Standard Edition Administrator’s Guide 10 SECTION 4 - USING VOLUNTEER IMPACT (ADMINISTRATORS) 3. Click on the “Mission Statement” header (if required) to expand that area and specify the organization’s mission statement using the Rich Text Editor. Click on the [Save] button to save the information you have entered/updated or [Cancel] to abandon the changes. 4. Click on the “General Settings” header (if required) to expand that area and specify/select the values. Click on the [Save] button to save the information or [Cancel] to abandon the changes 5. Click on the “Signup Settings” header (if required) for the desired Application Form (1, 2 or 3) to expand that area and specify/select the values. Click on the [Save] button to save the information you have entered/updated or [Cancel] to abandon the changes Each section has its own [Save] and [Cancel] buttons. You must save changes in each applicable section before accessing any other menu options in Volunteer Impact. General Settings for your Organization In the General Settings section of your Organization settings, you can enter or change: Time Zone Timelog permission for volunteers Whether or not to send an alert email for every activity signup and/or edit Whether or not to enable group scheduling (i.e. treating a single profile as a group) when assigning volunteers to activities Enter header text to appear to volunteers when entering/editing custom fields and qualifications. Hours Log Permission for All Volunteers You can control whether or not volunteers in your organization can or cannot log hours. 1. GO TO: Configuration » Organization Settings 2. Click on the “General Settings” header (if required) to expand that area 3. Below “Timelog Permission for Volunteers”, select the appropriate value (Cannot log hours, Can log hours with approval, Can log hours without approval) 4. Click on the [Save] button to save the information or [Cancel] to abandon the changes Hours Log Permission for an Individual Volunteer You can override the permission for logging hours set at the organization level for an individual volunteer. 1. GO TO: People » Search 2. Search for the desired person for which to log hours. a. Hover over the link to their name and click on Edit to edit their profile. For more information, see the section on Searching for a Person. 3. Click on the <Miscellaneous> tab 4. Beside “Timelog Permission”, select the appropriate value (Organization Default, Cannot log hours, Can log hours with approval, Can log hours without approval) 5. Click on the [Save] button for the <Miscellaneous> tab to save the information or [Cancel] to abandon the changes Signup Settings for New Volunteers In the Signup Settings section of your Organization settings, you can control what happens when new volunteers sign up using any of the three potential application forms: Whether or not new volunteers require approval (this will affect the volunteer’s status and will generate a system alert for you) Whether or not to display the General Volunteer Interests Whether or not to show the General Availability fields Define and send an email to new volunteers once they fill in the volunteer application form Define and show volunteer policies to new volunteers before they begin filling in your volunteer application form Volunteer Impact version 3.8 Standard Edition Administrator’s Guide 11 SECTION 4 - USING VOLUNTEER IMPACT (ADMINISTRATORS) The Sign-Up Process As an administrator, you have the ability to control what happens when a person clicks on a link to sign up as a new volunteer with your organization. If there are visible Custom Fields and Qualifications on the Application Form associated with the link that was generated, they will be included in the sign-up process. If there are visible activities, the new volunteer will be able to sign up for them after completing the sign-up process. For more information on the options available when new people are signing up as volunteers, please refer to the Signup Settings section for each application form in Organization Settings. Volunteer Impact version 3.8 Standard Edition Administrator’s Guide 12 SECTION 4 - USING VOLUNTEER IMPACT (ADMINISTRATORS) Email Message Templates You can save time by creating templates for commonly-sent email messages. Email Message Templates are only available to Administrators. Examples: “Birthday Greeting”, “Application Received”, “Schedule Reminder” Area New Template What it contains Create an email message template Info Quick information on an email message template View View all information on an email message template Print information about an email message template Edit an email message template Configuration >> Email Templates > Hover - View Configuration >> Email Templates > Hover - View - [Print] Configuration >> Email Templates > Hover - Edit Delete an email message template Configuration >> Email Templates > Hover - Delete Print Edit Delete How to get started Configuration >> Email Templates > [New Template] Configuration >> Email Templates > Hover - [Info] For more information See instructions in the section below. Hover over [Info] beside an email message template to display the information You can only view the information In the View dialog, click on [Print] Make any changes and click on [Save] to save or [Cancel] to abandon the changes. Click on [Delete] to delete the email message template or [Cancel] to keep it. The “Manage Email Message Templates” Screen: Volunteer Impact version 3.8 Standard Edition Administrator’s Guide 13 SECTION 4 - USING VOLUNTEER IMPACT (ADMINISTRATORS) New Email Message Template Attributes of an Email Message Template: Template Name: Description: Subject: Body: The text entered here is the name of the email message template. This is a required field. Optionally, you may include a description of this email message template that will be visible only to Administrators. The text entered here is the subject of the email message to be sent. It will appear to the recipient(s) of the message, just as with any email. The text entered here will appear within the body of the email message to be sent. You can format the text (font, emphasis, etc.) and include the first and/or last name of the recipient. To create a new email message template: 1. GO TO: Configuration » Email Templates 2. 3. 4. 5. 6. Click on the [New Template] button Enter a name for this template next to “Template Name” Optionally, include a description of this email message template Type in the email subject in the “Subject” box Type in your message in the “Body” box. You can use the Rich Text Editor to format the appearance of the text. a. To include the First Name or Last Name of the recipient of the message within the body of the message, position your cursor at the appropriate location, select the value from the droplist and click on the [Insert name field] button. 7. Click on the [Save] button to save your email message template. If you have made any errors, you can correct them or click on the [Cancel] button to abandon the creation of the email message template. Quick Info on an Email Message Template To view a quick summary of an email message template: 1. GO TO: Configuration » Email Templates 2. Move your mouse over (i.e. hover) the [Info] button to reveal a summary to the left of an email message template Volunteer Impact version 3.8 Standard Edition Administrator’s Guide 14 SECTION 4 - USING VOLUNTEER IMPACT (ADMINISTRATORS) View, Edit, Delete or Print an Email Message Template To view, edit or delete an email message template: 1. GO TO: Configuration » Email Templates 2. Move your mouse over (i.e. hover) the desired email message template 3. When presented with the choice of “View Edit Delete”, click on the desired option a. If you wish to print information on an email message template, choose “View”. In the resulting dialog box, click on the [Print] button report to your desired local or network printer. and follow the prompts to print the Once deleted, you cannot retrieve the email message template. You will need to re-create it. Sending an Email using an Email Message Template To send an email to a person using an email message template, please see the section on Sending Emails. Volunteer Impact version 3.8 Standard Edition Administrator’s Guide 15 SECTION 4 - USING VOLUNTEER IMPACT (ADMINISTRATORS) Volunteer Profile Customization General Volunteer Interests Custom Fields Qualifications Supporting Multiple Application Forms Committees General Volunteer Interests You can create customized areas of interest that can be viewed and selected within a person’s profile or used as criteria in assigning volunteers to an activity. Examples: “Tour Guide”, “Working with the elderly”, “Photography”, “Publicity” Area New General Volunteer Interest What it contains Create a general volunteer interest Info Quick information on a general volunteer interest View View all information on a general volunteer interest Print information about a general volunteer interest Edit a general volunteer interest Activities >> Manage Interests > Hover - View Activities >> Manage Interests > Hover - View - [Print] Activities >> Manage Interests > Hover - Edit Delete Delete a general volunteer interest Activities >> Manage Interests > Hover - Delete Sort Sort the display of general volunteer interests by name or active status Activities >> Manage Interests > [Sort] Change Change selected general volunteer interests to either active or inactive Activities >> Manage Interests > Select - [Change Selected] Print Edit How to get started Activities >> Manage Interests > [New General Volunteer Interest] Activities >> Manage Interests > Hover - [Info] Volunteer Impact version 3.8 Standard Edition Administrator’s Guide For more information See instructions in the section below Hover over [Info] beside a general volunteer interest to display the information You can only view the information In the View dialog, click on [Print] Make any changes and click on [Save] to save or [Cancel] to abandon the changes Click on [Delete] to delete the general volunteer interest or [Cancel] to keep it Click on [Sort] above a column to sort the general volunteer interests by that column’s values Select the general volunteer interests you wish to make active or inactive and click on [Change Selected] 16 SECTION 4 - USING VOLUNTEER IMPACT (ADMINISTRATORS) The “Manage General Volunteer Interests” Screen: New General Volunteer Interest Attributes of a General Volunteer Interest: Name: Description: Active Status: The text entered here is the name of the general volunteer interest. This is a required field. Optionally, you may include a description of this general volunteer interest that will be visible only to Administrators. By clicking on the droplist, you can make this general volunteer interest either “Active” or “Inactive”. Active - value for general volunteer interest is visible in the volunteer’s profile Inactive - value for general volunteer interest is not visible in the volunteer’s profile Volunteer Impact version 3.8 Standard Edition Administrator’s Guide 17 SECTION 4 - USING VOLUNTEER IMPACT (ADMINISTRATORS) Activity Classifications: Schedule Classifications: Suitability Classifications: Time Commitment Classifications: Duration Commitment Classifications: You can specify the type of work or sector associated with the activity, such as animal care, artistic, trades, office, etc. Multiple checkboxes may be selected. You can specify when the associated activity usually occurs by selecting the day(s) and time(s) of day checkboxes. You can specify who the associated activity would be suitable for, such as seniors, youths, adults, groups, families, and those near or on a bus route. Multiple checkboxes may be selected. You can specify how much time is expected or required for the associated activity (a few hours a day/week/month/year or whenever time permits). Multiple checkboxes may be selected. You can specify the suggested length of the volunteer commitment for the associated activity. Multiple checkboxes may be selected. To create a new general volunteer interest: 1. GO TO: Activities » Manage Interests 2. 3. 4. 5. 6. 7. 8. 9. 10. 11. Click on the [New General Volunteer Interest] button Enter a name for this general volunteer interest next to “Name” Optionally, include a description of this general volunteer interest. Set the “Active Status” for this general volunteer interest by selecting the appropriate value from the droplist. The default value is “Active”. Select the “Activity Classifications” associated with the general volunteer interest Select the “Schedule Classifications” associated with the general volunteer interest Select the “Suitability Classifications” associated with the general volunteer interest Select the “Time Commitment Classifications” associated with the general volunteer interest Select the “Duration Commitment Classifications” associated with the general volunteer interest Click on the [Save] button to save your general volunteer interest. If you have made any errors, you can correct them or click on the [Cancel] button to abandon the creation of the general volunteer interest. Any “active” General Volunteer Interests will appear under the “General Volunteer Opportunities” section of the Activity List sign-up page. For more information on creating links to add to your website, please see Links for your Website. Quick Info on a General Volunteer Interest To view a quick summary of a general volunteer interest: 1. GO TO: Activities » Manage Interests 2. Move your mouse over (i.e. hover) the [Info] button to reveal a summary to the left of a general volunteer interest View, Edit, Delete or Print a General Volunteer Interest To view, edit or delete a general volunteer interest: 1. GO TO: Activities » Manage Interests 2. Move your mouse over (i.e. hover) the desired general volunteer interest 3. When presented with the choice of “View Edit Delete”, click on the desired option a. If you wish to print information on a general volunteer interest, choose “View”. In the resulting dialog box, click on the [Print] button report to your desired local or network printer. and follow the prompts to print the Volunteer Impact version 3.8 Standard Edition Administrator’s Guide 18 SECTION 4 - USING VOLUNTEER IMPACT (ADMINISTRATORS) Once deleted, you cannot retrieve the general volunteer interest. You will need to re-create it. If you delete the general volunteer interest, it will be deleted from all activities it was associated with, if any. Sort General Volunteer Interests From the “Manage General Volunteer Interests” screen, general volunteer interests may be sorted alphabetically (ascending or descending) by Name or by their Active Status (active/inactive). To sort general volunteer interests alphabetically by name or by their active status: 1. GO TO: Activities » Manage Interests 2. Click on either the heading “General Volunteer Interests” or “Active Status” to sort the general volunteer interests by the desired column. a. Clicking on the column header again will reverse the sort order The up/down arrows ( ) beside the “General Volunteer Interests” or “Active Status” heading will change to reflect the current sort order. Change the Active Status of Multiple General Volunteer Interests To change the active status of multiple general volunteer interests: 1. GO TO: Activities » Manage Interests 2. In the “Change” column, place a checkmark in the box beside each general volunteer interest for which you wish to change the Active Status or click on the [Select All] checkbox to select all general volunteer interests. (To de-select one of the general volunteer interests, simply click once on the box beside it) 3. With the [Change Selected] button now active, click on the arrow beside the button to reveal the available options 4. Choose [Set to active] to make all selected general volunteer interests active or [Set to inactive] to make all selected general volunteer interests inactive. 5. Click on the [Confirm] button to change the active status of the selected general volunteer interests. To abandon your changes, click on the [Cancel] button. There is no “Save” button associated with this feature. You can change the active status again by following the steps above. Volunteer Impact version 3.8 Standard Edition Administrator’s Guide 19 SECTION 4 - USING VOLUNTEER IMPACT (ADMINISTRATORS) Custom Fields Beyond basic contact information in a volunteer’s profile, you can collect and store further information about a volunteer in a “Custom Field”. Custom fields with something in common can be grouped together into a “Custom Field Category”. Examples: “Emergency contact name”, “Date of last certification”, “How did you hear about us?”, etc. Area New Custom Field Category What it contains Create a custom field category Info Quick information on a custom field category View View all information on a custom field category Print Print information about a custom field category How to get started Configuration >> Custom Fields > [New Custom Field Category] Configuration >> Custom Fields > Hover - [Info] Configuration >> Custom Fields > Hover - View Configuration >> Custom Fields > Hover - View - [Print] Configuration >> Custom Fields > Hover - Edit Edit Edit a custom field category Delete Delete a custom field category Configuration >> Custom Fields > Hover - Delete Drag and Drop Re-order custom field categories and their custom fields by dragging them to a new location Configuration >> Custom Fields > [Drag and Drop] New Custom Field Create a custom field Info Quick information on a custom field Configuration >> Custom Fields > [New Custom Field] Configuration >> Custom Fields > Hover - [Info] View View a custom field Print Print information about a custom field Edit Edit a custom field Configuration >> Custom Fields > Hover - View Configuration >> Custom Fields > Hover - View - [Print] Configuration >> Custom Fields > Hover - Edit Volunteer Impact version 3.8 Standard Edition Administrator’s Guide For more information See instructions in the section below Hover over [Info] beside a custom field category to display the information You can only view the information In the View dialog, click on [Print] Make any changes and click on [Save] to save or [Cancel] to abandon the changes Click on [Delete] to delete the custom field category or [Cancel] to keep it Hold down [Drag and Drop] beside a custom field category, drag it to a new position, and release the mouse button See instructions in the section below Hover over [Info] beside a custom field to display the information You can only view the information In the View dialog, click on [Print] Make any changes and click on [Save] to save or [Cancel] to abandon the changes 20 SECTION 4 - USING VOLUNTEER IMPACT (ADMINISTRATORS) Area Delete What it contains Delete a custom field Drag and Drop Re-order custom fields by dragging them to a different location How to get started Configuration >> Custom Fields > Hover - Delete Configuration >> Custom Fields > [Drag and Drop] For more information Click on [Delete] to delete the custom field or [Cancel] to keep it Hold down [Drag and Drop] beside a custom field, drag it to a new position, and release the mouse button The “Manage Custom Fields” Screen: New Custom Field Category Volunteer Impact version 3.8 Standard Edition Administrator’s Guide 21 SECTION 4 - USING VOLUNTEER IMPACT (ADMINISTRATORS) Attributes of a Custom Field Category: Category: Description: The text entered here is the name of the custom field category. This is a required field. Optionally, you may include a description of this custom field category. To create a new custom field category: 1. GO TO: Configuration » Custom Fields 2. 3. 4. 5. Click on the [New Custom Field Category] button Enter a name for the custom field category next to “Category” Optionally, include a description of this custom field category Click on the [Save] button to save your custom field category. If you have made any errors, you can correct them or click on the [Cancel] button to abandon the creation of the custom field category. Quick Info on a Custom Field Category To view a quick summary of a custom field category: 1. GO TO: Configuration » Custom Fields 2. Move your mouse over (i.e. hover) the [Info] button reveal a summary. to the left of a custom field category to View, Edit, Delete or Print a Custom Field Category To view, edit or delete a custom field category: 1. GO TO: Configuration » Custom Fields 2. Move your mouse over (i.e. hover) the desired custom field category 3. When presented with the choice of “View Edit Delete”, click on the desired option a. If you wish to print information on a custom field category, choose “View”. In the resulting dialog box, click on the [Print] button your desired local or network printer. and follow the prompts to print the report to Once deleted, you cannot retrieve the custom field category. You will need to re-create it. If you delete the custom field category, the associated custom fields will not be deleted. Instead, they will be moved to the section labeled, “Uncategorized Custom Fields”. Re-ordering Custom Field Categories - Drag and Drop From the “Manage Custom Fields” screen, both custom field categories and custom fields may be rearranged (re-ordered) as desired by dragging and dropping them to a new position. To drag and drop a custom field category and all of its associated custom fields: 1. GO TO: Configuration » Custom Fields 2. Click on the [Drag and Drop] button to the right of the desired custom field category. Be sure to hold down the mouse button. 3. Drag the custom field category to its new location and release the mouse button. You can repeat the steps above, as necessary. Volunteer Impact version 3.8 Standard Edition Administrator’s Guide 22 SECTION 4 - USING VOLUNTEER IMPACT (ADMINISTRATORS) New Custom Field Attributes of a Custom Field: Category: Custom Field: Description: Volunteer Permissions: From the droplist, select the category in which to create the custom field. If no categories have been created, you will only be able to select “Uncategorized”. You will still be able to move your custom field after creating it. Provide a name for the custom field. This value is mandatory. Optionally, you may include a description of this custom field. This text can include further information about the custom field, or a link to a website. Set the appropriate permission for volunteers on this custom field by selecting a value from the droplist: Private - only an administrator can enter a value for this field; the volunteer will not see this custom field Read only - only an administrator can enter a value for this field; the volunteer only be able to see the value that has been entered and not change it Read/write with approval - the volunteer can enter or change a value for this field, but it must be approved by an administrator Display on Forms: Read/write without approval - the volunteer can enter or change a value for this field with no approval required If you are supporting multiple sign-up options (i.e. “Application Forms”), you can specify which custom fields will appear to prospective volunteers when signing up and which values are “required” when signing up. If you are not supporting multiple application forms, you can treat “Form 1” as your default. Volunteer Impact version 3.8 Standard Edition Administrator’s Guide 23 SECTION 4 - USING VOLUNTEER IMPACT (ADMINISTRATORS) Type of Field: By clicking on the droplist, you can define the type of custom field you wish to create: Yes/No - the resulting droplist will display choices of “Yes”, “No” and “Not assigned” (only one value may be selected) Check Box - a single checkbox that can be selected or left blank (multiple check boxes can be created to provide answers to a question posed in a custom field category name, permitting multiple check boxes to be selected) Date - only properly formatted date entries will be accepted Number - only whole numbers or numbers with decimals will be accepted Short text - up to 100 characters will be accepted (letters and numerals and certain punctuation can be entered, but any HTML code will automatically be removed) Long text - large amounts of text can be entered (letters and numerals and certain punctuation can be entered, but any HTML code will automatically be removed) Custom options - you can create a custom list of options that will display in a droplist (only one value may be selected) File - enables volunteers to upload a file for you (e.g. resumé) For fields with values that might contain a zero (“0”) at the beginning (e.g. telephone numbers, social security numbers, etc.), do not use “Number” as the type as any zeroes that appear at the beginning will be removed. Instead, use the “Short Text” type. To create a new custom field: 1. GO TO: Configuration » Custom Fields 2. Click on the [New Custom Field] button 3. Select the appropriate custom field category for your custom field. If the custom field category does not exist, you will need to create it first, or create it later, then drag and drop your custom field into it. 4. Enter a name for this custom field next to “Custom Field” 5. Optionally, include a description of this custom field 6. Select the “Volunteer Permissions” for the custom field by selecting the appropriate value from the droplist. The default value is “Private”. 7. Indicate on which application forms (i.e. when a new volunteer signs up) to “Display” the custom field 8. Indicate on which application forms a value for the custom field is “Required” 9. Select the “Type of Field” to create by selecting the appropriate value from the droplist. The default value is “Yes/No”. 10. Click on the [Save] button to save your custom field. If you have made any errors, you can correct them or click on the [Cancel] button to abandon the creation of the custom field. Once you have created a custom field, you can edit it to change any attribute except for the type of field. Volunteer Impact version 3.8 Standard Edition Administrator’s Guide 24 SECTION 4 - USING VOLUNTEER IMPACT (ADMINISTRATORS) Example of Custom Field types: Quick Info on a Custom Field To view a quick summary of a custom field: 1. GO TO: Configuration » Custom Fields 2. Move your mouse over (i.e. hover) the [Info] button summary. to the left of a custom field to reveal a View, Edit, Delete or Print a Custom Field To view, edit or delete a custom field: 1. GO TO: Configuration » Custom Fields 2. Move your mouse over (i.e. hover) the desired custom field 3. When presented with the choice of “View Edit Delete”, click on the desired option a. If you wish to print information on a custom field, choose “View”. In the resulting dialog box, click on the [Print] button desired local or network printer. and follow the prompts to print the report to your You cannot change the type of field once it has been created. Once deleted, you cannot retrieve the data entered in profiles for that field. You might want to perform a search (People menu) to see if values have been entered for that field. Also, performing an export (Communications menu) of your data will provide you with a backup of data that has been entered. Volunteer Impact version 3.8 Standard Edition Administrator’s Guide 25 SECTION 4 - USING VOLUNTEER IMPACT (ADMINISTRATORS) Re-ordering Custom Fields - Drag and Drop From the “Manage Custom Fields” screen, both custom field categories and custom fields may be rearranged (re-ordered) as desired by dragging and dropping them to a new position. To drag and drop a custom field: 1. GO TO: Configuration » Custom Fields 2. Click on the [Drag and Drop] button to the right of the desired custom field. Be sure to hold down the mouse button. 3. Drag the custom field to its new location and release the mouse button. You can repeat the steps above, as necessary. Show or Hide Custom Fields You can show or hide the custom fields within any or all categories. To show or hide custom fields: 1. GO TO: Configuration » Custom Fields 2. Click on the [Show] button ( ) to the left of the “Categories” section header to show all custom fields in all categories or the [Hide] button ( ) to hide all custom fields in all categories. a. To show or hide custom fields in a specific category, click on either the [Show] button ( ) or the [Hide] button ( ) to the left of an individual category section header. Qualifications Beyond basic contact information in a volunteer’s profile, you can collect and store further information about a volunteer in a “Qualification Area”. Typically, a qualification is information you would like to store about a volunteer that impacts whether he/she can do one particular task or another, such as a particular skill, aptitude, or certification. Qualifications can offer multiple possibilities for a response (a “Qualification Level”) and can be ranked or unranked. Examples: “Microsoft Excel skill level”, “Second language spoken”, “Background check completed”, “Orientation completed”, etc. Area New Qualification Level What it contains Create a qualification level Info Quick information on a qualification level, including whether or not it is associated with any qualifications View a qualification level, including the qualifications with which it is associated Print information about a qualification level View Print How to get started Configuration >> Qualifications > [New Qualification Level] Configuration >> Qualifications > Hover - [Info] For more information See instructions in the section below Configuration >> Qualifications > Hover - View You can only view the information Configuration >> Qualifications > Hover - View - [Print] In the View dialog, click Volunteer Impact version 3.8 Standard Edition Administrator’s Guide Hover over [Info] beside a qualification level to display the information on [Print] 26 SECTION 4 - USING VOLUNTEER IMPACT (ADMINISTRATORS) Area Edit What it contains Edit a qualification level How to get started Configuration >> Qualifications > Hover - Edit Delete Delete a qualification level Configuration >> Qualifications > Hover - Delete New Unranked Qualification Create an unranked qualification New Ranked Qualification Create a ranked qualification Info Quick information on a qualification Configuration >> Qualifications > [New Unranked Qualification] Configuration >> Qualifications > [New Ranked Qualification] Configuration >> Qualifications > Hover - [Info] View View a qualification Print Print information about a qualification Configuration >> Qualifications > Hover - View Configuration >> Qualifications > Hover - View - [Print] Configuration >> Qualifications > Hover - Edit Edit Edit a qualification Delete Delete a qualification Configuration >> Qualifications > Hover - Delete Drag and Drop Re-order qualifications by dragging them to a different location Configuration >> Qualifications > [Drag and Drop] For more information Make any changes and click on [Save] to save or [Cancel] to abandon the changes Click on [Delete] to delete the qualification level or [Cancel] to keep it See instructions in the section below See instructions in the section below Hover over [Info] beside a qualification area to display the information You can only view the information In the View dialog, click on [Print] Make any changes and click on [Save] to save or [Cancel] to abandon the changes Click on [Delete] to delete the qualification area or [Cancel] to keep it Hold down [Drag and Drop] beside a qualification area, drag it to a new position, and release the mouse button You must create at least one qualification level before creating the qualification(s) that it will be associated with. Afterwards, you can create new qualification levels and add them to existing qualification areas. Volunteer Impact version 3.8 Standard Edition Administrator’s Guide 27 SECTION 4 - USING VOLUNTEER IMPACT (ADMINISTRATORS) The “Manage Qualifications” Screen: New Qualification Level Attributes of a Qualification Level: Qualification Level: Description: The text entered here is the name of the level. This is a required field. Optionally, you may include a description of this qualification level. To create a new qualification level: 1. GO TO: Configuration » Qualifications 2. 3. 4. 5. Click on the [New Qualification Level] button Enter a name for this qualification level next to “Qualification Level” Optionally, include a description of this qualification level Click on the [Save] button to save your qualification level. If you have made any errors, you can correct them or click on the [Cancel] button to abandon the creation of the qualification level. Volunteer Impact version 3.8 Standard Edition Administrator’s Guide 28 SECTION 4 - USING VOLUNTEER IMPACT (ADMINISTRATORS) Quick Info on a Qualification Level To view a quick summary of a qualification level: 1. GO TO: Configuration » Qualifications 2. Move your mouse over (i.e. hover) the [Info] button a summary to the left of a qualification level to reveal View, Edit, Delete or Print a Qualification Level To view, edit or delete a qualification level: 1. GO TO: Configuration » Qualifications 2. Move your mouse over (i.e. hover) the desired qualification level 3. When presented with the choice of “View Edit Delete”, click on the desired option a. If you wish to print information on a qualification level, choose “View”. In the resulting dialog box, click on the [Print] button your desired local or network printer. and follow the prompts to print the report to Once deleted, you cannot retrieve the qualification level. You will need to re-create it. If you delete the qualification level, the associated qualification will not be deleted, but you may lose any data entered for the associated qualification in any profile in your organization. Prior to deleting a qualification level, performing an export (Communications menu) of your data will provide you with a backup of data that has been entered. Remember that the Manage Qualifications window shows whether a qualification level is associated with a qualification not or . New Qualification - Unranked or Ranked “New Ranked Qualification” Volunteer Impact version 3.8 Standard Edition Administrator’s Guide 29 SECTION 4 - USING VOLUNTEER IMPACT (ADMINISTRATORS) “New Unranked Qualification” Attributes of a Qualification: Qualification Area: Description: Expiry Setting: Provide a name for the qualification. This is a required field. Optionally, you may include a description of this qualification. This text can include further information about the custom field, or a link to a website. Optionally, qualifications can be set to expire on a specified date. Choose the appropriate setting by selecting a value from the droplist: Does not expire - qualification does not have an expiration date Volunteer Permissions: Expires on date - qualification has an expiration date The specific expiry date for a qualification is set in the individual person’s profile. An expiration date can be set for up to 10 years in the future. Set the appropriate permission for volunteers on this qualification by selecting a value from the droplist: Private - only an administrator can enter a value for this qualification; the volunteer will not see this qualification Read only - only an administrator can enter a value for this qualification; the volunteer only be able to see the value that has been entered and not change it Read/write with approval - the volunteer can enter or change a value for this qualification, but it must be approved by an administrator Display on Forms: Read/write without approval - the volunteer can enter or change a value for this qualification with no approval required If you are supporting multiple sign-up options (i.e. “Application Forms”), you can specify which qualifications will appear to prospective volunteers when signing up. If you are not supporting multiple application forms, you can treat “Form 1” as your default. Volunteer Impact version 3.8 Standard Edition Administrator’s Guide 30 SECTION 4 - USING VOLUNTEER IMPACT (ADMINISTRATORS) Available Qualification Levels: Levels can be added by selecting them individually (by clicking on them), or as a group (by clicking and dragging your mouse over multiple levels, or by holding down the Ctrl key and clicking on individual levels) in the “Available Qualification Levels” box and then clicking on the [Add >>] button to add them to the “Qualification Levels” box. Levels can be removed by selecting them in the “Qualification Levels” box and clicking on the [<< Remove] button. As you add levels, they will be removed from the available list. Further levels can be added. Unranked Qualifications - levels will be displayed in alphabetical order Qualification Levels: Ranked Qualifications - the order of levels can be customized This area contains the list of qualification levels you have associated with this qualification. To re-arrange the order of levels in a ranked qualification, select the level and click either [Move Up] or [Move Down] until the level is in the desired position. To create a new qualification: 1. GO TO: Configuration » Qualifications 2. Click on the [New Unranked Qualification] button 3. 4. 5. 6. 7. 8. 9. 10. or the [New Ranked Qualification] button Enter a name for this qualification area next to “Qualification Area” Optionally, include a description of this qualification Select the “Expiry Setting”, if necessary Select the “Volunteer Permissions” for the qualification by selecting the appropriate value from the droplist. The default value is “Private”. Indicate on which forms to “Display” the qualification. Note that providing a value for a qualification is optional. Only custom fields can be made mandatory (i.e. required). Select the levels to associate with the qualification: To select one level from the list: Click on it. To select multiple levels that appear immediately after each other: Click and drag your mouse over the levels you wish to add. To select specific levels from the list: Hold down the Ctrl key and click on each level you wish to add. a. Click on the [Add >>] button. As you add a level from the list of “Available Qualification Levels” to the “Qualification Levels” box, it will be removed from the available list. If you add a level by mistake, you can select it and click on the [<< Remove] button to remove it from the list. You can re-order the levels by selecting a level in the “Qualification Levels” box and clicking on either the [Move Up] or [Move Down] button. The lower the level number, the lower the ranking. For example, when ranking skill levels, “Beginner” would be level 1, “Intermediate” would be level 2 and “Advanced” would be level 3. Click on the [Save] button to save your qualification. If you have made any errors, you can correct them or click on the [Cancel] button to abandon the creation of the qualification. Once you have created a qualification, you can edit it to change any attribute except for the type of qualification (i.e. ranked or unranked) and whether or not it expires. Volunteer Impact version 3.8 Standard Edition Administrator’s Guide 31 SECTION 4 - USING VOLUNTEER IMPACT (ADMINISTRATORS) Quick Info on a Qualification To view a quick summary of a qualification: 1. GO TO: Configuration » Qualifications 2. Move your mouse over (i.e. hover) the [Info] button to the left of a qualification A dialog will appear, showing a summary of the attributes (qualification area, type of area, volunteer permissions, forms, expiry settings) of the selected qualification. View, Edit, Delete or Print a Qualification To view, edit or delete a qualification: 1. GO TO: Configuration » Qualifications 2. Move your mouse over (i.e. hover) the desired qualification 3. When presented with the choice of “View Edit Delete”, click on the desired option a. If you wish to print information on a qualification, choose “View”. In the resulting dialog box, click on the [Print] button desired local or network printer. and follow the prompts to print the report to your You cannot change the expiry setting (whether or not the qualification expires) or the type of qualification (i.e. ranked or unranked) once it has been created. You can, however, change the ranking order in a ranked qualification. Once deleted, you cannot retrieve the qualification. You will need to re-create it. You will also lose any data entered for the qualification in any profile in your organization. Prior to deleting a qualification, performing an export (Communications menu) of your data will provide you with a backup of data that has been entered. Changing the Order of Levels in a Ranked Qualification To change the order of levels in a ranked qualification: 1. GO TO: Configuration » Qualifications 2. Move your mouse over (i.e. hover) the desired qualification 3. When presented with the choice of “View Edit Delete”, click on Edit. 4. In the “Qualification Levels” box, click on the level to move and then click on either [Move Up] to move it up in the order or [Move Down] to move it down in the order. The lower the level number, the lower the ranking. 5. Click on the [Save] button to save your changes or [Cancel] to undo your changes. Removing Levels from a Qualification To remove levels from a qualification: 1. GO TO: Configuration » Qualifications 2. Move your mouse over (i.e. hover) the desired qualification 3. When presented with the choice of “View Edit Delete”, click on Edit. 4. In the “Qualification Levels” box, select the levels to remove (either individual or multiple levels) 5. Click on the [<< Remove] button. 6. Click on the [Save] button to save your changes or [Cancel] to undo your changes. Volunteer Impact version 3.8 Standard Edition Administrator’s Guide 32 SECTION 4 - USING VOLUNTEER IMPACT (ADMINISTRATORS) Re-ordering Qualifications - Drag and Drop From the “Manage Qualifications” screen, qualifications may be re-arranged (re-ordered) as desired by dragging and dropping them to a new position. To drag and drop a qualification: 1. GO TO: Configuration » Qualifications 2. Click on the [Drag and Drop] button to the right of the desired qualification. Be sure to hold down the mouse button. 3. Drag the qualification to its new location and release the mouse button. You can repeat the steps above, as necessary. Show or Hide Qualification Areas and Qualification Levels You can show or hide the list of qualification areas and qualification levels. To show or hide qualification areas and qualification levels: 1. GO TO: Configuration » Qualifications 2. Click on the [Show] button ( ) to the left of either the “Qualification Areas” or “Qualification Levels” section header to show all items in that section or the [Hide] button ( ) to hide all items in that section. Associating a Qualification with an Activity To associate a qualification with an activity, please see the section on Activities. Volunteer Impact version 3.8 Standard Edition Administrator’s Guide 33 SECTION 4 - USING VOLUNTEER IMPACT (ADMINISTRATORS) Supporting Multiple Application Forms You can support up to three different Volunteer Application Forms for your organization, enabling you to assign Custom Fields and Qualifications to specific virtual forms. When new volunteers sign up to work with you, you can direct them to enter the qualifications and custom fields associated with a specific “application form”. For example, you may have seasonal, ongoing, and event-specific volunteers. You may have fields that are only required when student volunteers or adult volunteers sign up, whereas some may be common to all forms. When defining these objects, administrators can now assign them to any, all or none of the three potential application forms. A qualification can be set to display on specific forms: A custom field can also be set to display on specific forms. Additionally, you can specify that a value is required on specific forms: Once a volunteer has signed up, the full listing of Custom Fields and Qualifications will be shown on their <additional info> and <qualifications> tabs in MyVolunteerPage.com according to the visibility settings defined for those objects. Application Forms are intended to streamline the sign-up process for prospective volunteers. Any Application Form filtering that was put into place during the signup process is no longer applicable after initial signup. For more information on configuration, please see the sections on Qualifications and Custom Fields. If the visibility has been set as “Read Only” or “Private”, the qualification or custom field will not display on any application form. Also, if you do not assign a qualification or custom field to an application form, prospective volunteers will not be prompted to enter a value when they are signing up, but it will be part of their profile (again, depending on its visibility) once the signup process is completed. To generate a link (which you can add to your own corporate website) for prospective volunteers to click on and sign up, please refer to the section on generating Links for Your Website. Volunteer Impact version 3.8 Standard Edition Administrator’s Guide 34 SECTION 4 - USING VOLUNTEER IMPACT (ADMINISTRATORS) Committees With Committees, you can add volunteers and administrators to a group which can optionally communicate with each other via email. You can also find people by their committee membership. Volunteers cannot see a committee until they have been assigned to it and, only then if they have been given permission to communicate with other members of the committee. Examples: “Board of Directors”, “Publicity”, “Fundraising”, “Ushers” Area New Committee What it contains Create a committee Info Quick information on a committee View View a committee Print Print information about a committee Edit Edit a committee Delete Delete a committee Sort Sort the display of committees by name How to get started Configuration >> Committees > [New Committee] Configuration >> Committees > Hover - [Info] Configuration >> Committees > Hover - View Configuration >> Committees > Hover - View - [Print] Configuration >> Committees > Hover - Edit Configuration >> Committees > Hover - Delete Configuration >> Committees > [Sort] For more information See instructions in the section below Hover over [Info] beside a committee to display the information You can only view the information In the View dialog, click on [Print] Make any changes and click on [Save] to save or [Cancel] to abandon the changes Click on [Delete] to delete the committee or [Cancel] to keep it Click on [Sort] above committee name column to sort committees alphabetically The “Manage Committees” Screen: Volunteer Impact version 3.8 Standard Edition Administrator’s Guide 35 SECTION 4 - USING VOLUNTEER IMPACT (ADMINISTRATORS) New Committee Attributes of a Committee: Committee Name: Description: Communication Permissions: Meeting location: Meeting time: The text entered here is the name of the committee that will be visible to all people assigned to it. This is a required field. Optionally, you may include a description of this committee that will be visible only to Administrators. By clicking on the droplist, you can set the Communication Permissions for volunteers assigned to the committee. Not allowed to email - committee is not visible to volunteers and they cannot contact committee members via email Allowed to email - committee is visible to volunteers and they can contact committee members via email Optionally, you may specify the location where the committee meets. This will be visible only to Administrators. Optionally, you may specify the time when the committee meets. This will be visible only to Administrators. To create a new committee: 1. GO TO: Configuration » Committees 2. 3. 4. 5. Click on the [New Committee] button Enter a name for this committee next to “Committee Name” Optionally, include a description of this committee Set the “Communication Permissions” for this committee by selecting the appropriate value from the droplist. The default value is “Not allowed to email”. 6. Optionally, specify a “Meeting location” and “Meeting time” for the committee 7. Click on the [Save] button to save your committee. If you have made any errors, you can correct them or click on the [Cancel] button to abandon the creation of the committee. Quick Info on a Committee To view a quick summary of a committee: 1. GO TO: Configuration » Committees 2. Move your mouse over (i.e. hover) the [Info] button summary to the left of a committee to reveal a Volunteer Impact version 3.8 Standard Edition Administrator’s Guide 36 SECTION 4 - USING VOLUNTEER IMPACT (ADMINISTRATORS) View, Edit, Delete or Print a Committee To view, edit or delete a committee: 1. GO TO: Configuration » Committees 2. Move your mouse over (i.e. hover) the desired committee 3. When presented with the choice of “View Edit Delete”, click on the desired option a. If you wish to print information on a committee, click on the [Print] button the prompts to print the report to your desired local or network printer. and follow Once deleted, you cannot retrieve the committee. You will need to re-create it. If you delete the committee, you will need to re-assign volunteers to it if you re-create it. Sort Committees From the “Manage Committees” screen, committees may be sorted alphabetically (ascending or descending) by Name. To sort committees alphabetically by name: 1. GO TO: Configuration » Committees 2. Click on the heading “Committee” above the list of committees to alternate between sorting by name in ascending or descending order The up/down arrows ( ) beside the “Committee” heading will change to reflect the current sort order. Assigning a Person to a Committee To assign a person to a committee, please see the section on Searching for a Person or Editing a Profile. Volunteer Impact version 3.8 Standard Edition Administrator’s Guide 37 SECTION 4 - USING VOLUNTEER IMPACT (ADMINISTRATORS) Activity Configuration Outputs Activity Shift Recurrence Templates Activities Outputs When a volunteer or administrator logs hours against a particular activity, they can also provide other summary total (numeric) information relating to the activity in an “Output”. Examples: “Calls Taken”, “Brochures Distributed”, “Trees Planted” Area New Output What it contains Create an output Info Quick information on an output View View an output Print Print information about an output Edit Edit an output Delete Delete an output Sort Sort the display of outputs by name Change Change selected outputs to either active or inactive How to get started Configuration >> Outputs > [New Output] Configuration >> Outputs > Hover - [Info] Configuration >> Outputs > Hover - View Configuration >> Outputs > Hover - View - [Print] Configuration >> Outputs > Hover - Edit Configuration >> Outputs > Hover - Delete Configuration >> Outputs > [Sort] Configuration >> Outputs > Select - [Change Selected] Volunteer Impact version 3.8 Standard Edition Administrator’s Guide For more information See instructions in the section below Hover over [Info] beside an output to display the information You can only view the information In the View dialog, click on [Print] Make any changes and click on [Save] to save or [Cancel] to abandon the changes Click on [Delete] to delete the output or [Cancel] to keep it Click on [Sort] above a column to sort the outputs by that column’s values Select the outputs you wish to make active or inactive and click on [Change Selected] 38 SECTION 4 - USING VOLUNTEER IMPACT (ADMINISTRATORS) The “Manage Outputs” Screen: New Output Attributes of an Output: Wording for reports: Wording for volunteers: Description: Active: The text entered here is the name that will be visible only to Administrators. This is a required field. The text entered here is the name that will be visible to Volunteers (or Administrators) when they are logging hours for an activity that uses this output. This is a required field. Optionally, you may include a description of this output that will be visible only to Administrators. By clicking on the droplist, you can make this output either “Active” or “Inactive”. Active - value for output is requested when volunteers or administrators are logging hours Inactive - value for output is not requested when volunteers or administrators are logging hours Volunteer Impact version 3.8 Standard Edition Administrator’s Guide 39 SECTION 4 - USING VOLUNTEER IMPACT (ADMINISTRATORS) To create a new output: 1. GO TO: Configuration » Outputs 2. 3. 4. 5. 6. Click on the [New Output] button Enter a name for this output that will be visible to administrators next to “Wording for reports” Enter a name for this output that will be visible to volunteers next to “Wording for volunteers” Optionally, include a description of this output Set the “Active Status” for this output by selecting the appropriate value from the droplist. The default value is “Active”. 7. Click on the [Save] button to save your output. If you have made any errors, you can correct them or click on the [Cancel] button to abandon the creation of the output. Quick Info on an Output To view a quick summary of an output: 1. GO TO: Configuration » Outputs 2. Move your mouse over (i.e. hover) the [Info] button summary to the left of an output to reveal a View, Edit, Delete or Print an Output To view a quick summary of an output: 1. GO TO: Configuration » Outputs 2. Move your mouse over (i.e. hover) the desired output 3. When presented with the choice of “View Edit Delete”, click on the desired option a. If you wish to print information on an output, choose “View”. In the resulting dialog, click on the [Print] button or network printer. and follow the prompts to print the report to your desired local Once deleted, you cannot retrieve the output. You will need to re-create it. If you delete the output, it will be deleted from all activities it was associated with, if any. Sort Outputs From the “Manage Outputs” screen, outputs may be sorted alphabetically (ascending or descending) by Name or by their Active Status (active/inactive). To sort outputs alphabetically by name or by their active status: 1. GO TO: Configuration » Outputs 2. Click on either the “Output” or “Active Status” heading above the list of outputs to alternate between sorting by the desired value The up/down arrows ( ) beside the “Output” or “Active Status” heading will change to reflect the current sort order. Volunteer Impact version 3.8 Standard Edition Administrator’s Guide 40 SECTION 4 - USING VOLUNTEER IMPACT (ADMINISTRATORS) Change the Active Status of Multiple Outputs To change the active status of multiple outputs: 1. GO TO: Configuration » Outputs 2. In the “Change” column, place a checkmark in the box beside each output for which you wish to change the Active Status or click on the [Select All] checkbox to select all outputs. (To de-select one of the outputs, simply click once on the box beside it) 3. With the [Change Selected] button now active, click on the arrow beside the button to reveal the available options 4. Choose [Set to active] to make all selected outputs active or [Set to inactive] to make all selected outputs inactive. 5. Click on the [Confirm] button to change the active status of the selected outputs. To abandon your changes, click on the [Cancel] button. There is no “Save” button associated with this feature. You can change the active status again by following the steps above. Assigning an Output to an Activity To assign an output to an activity, please see the section on Activities. Volunteer Impact version 3.8 Standard Edition Administrator’s Guide 41 SECTION 4 - USING VOLUNTEER IMPACT (ADMINISTRATORS) Activity Shift Recurrence Templates For activities that occur on a very specific or irregular schedule (or on any recurring basis), you can create an activity shift recurrence template that can be associated with activities, thus saving you time creating and adding shifts to an activity. Examples: st “Friday mornings from 7:00am-11:30am”, “Every other Tuesday”, “1 Monday of the month” or any combination of shifts Area New Activity Shift Recurrence Template What it contains Create an activity shift recurrence template Info Quick information on an activity shift recurrence template View View an activity shift recurrence template Print Print information about an activity shift recurrence template Edit Edit an activity shift recurrence template Delete Delete an activity shift recurrence template How to get started Activities >> Manage Activity Shift Recurrence Templates > [New Activity Shift Recurrence Template] Activities >> Manage Activity Shift Recurrence Templates > Hover - [Info] Activities >> Manage Activity Shift Recurrence Templates > Hover - View Activities >> Manage Activity Shift Recurrence Templates > Hover - View - [Print] Activities >> Manage Activity Shift Recurrence Templates > Hover - Edit Activities >> Manage Activity Shift Recurrence Templates > Hover - Delete For more information See instructions in the section below Hover over [Info] beside an activity shift recurrence template to display the information You can only view the information In the View dialog, click on [Print] Make any changes and click on [Save] to save or [Cancel] to abandon the changes Click on [Delete] to delete the activity shift recurrence template or [Cancel] to keep it Activity shift recurrence templates are intended for use with scheduled activities only and do not apply to unscheduled activities. Volunteer Impact version 3.8 Standard Edition Administrator’s Guide 42 SECTION 4 - USING VOLUNTEER IMPACT (ADMINISTRATORS) The “Manage Activity Shift Recurrence Templates” Screen: New Activity Shift Recurrence Template Attributes of an Activity Shift Recurrence Template: Name: Description: Frequency: The text entered here is the name of the activity shift recurrence template. This is a required field. Optionally, you may include a description of this activity shift recurrence template that will be visible only to Administrators. The frequency of the activity can be set by selecting the appropriate radio button: Weekly - activity occurs on a weekly basis Monthly - activity occurs on a monthly basis Volunteer Impact version 3.8 Standard Edition Administrator’s Guide 43 SECTION 4 - USING VOLUNTEER IMPACT (ADMINISTRATORS) Recurrence: The recurrence of the activity can be set by selecting the appropriate radio button: One Week/Month - weekly (monthly) activity occurs every week (month, i.e. 12 times per year) Two Weeks/Months - weekly (monthly) activity occurs every second week (month, i.e. 6 times per year) Three Weeks/Months - weekly (monthly) activity occurs every third week (month, i.e. 4 times per year) Four Weeks/Months - weekly (monthly) activity occurs every fourth week (month, i.e. 3 times per year) Day: For weekly activities, you can create individual shifts by specifying the day on which it occurs. For monthly activities, you can either select a specific day of the month by entering a number or you can select a relative date (e.g. “first Monday”) from the droplists. Each shift has a start time and an end time Start/End Time: To create a new activity shift recurrence template: 1. GO TO: Activities » Manage Activity Shift Templates 2. 3. 4. 5. 6. 7. 8. 9. 10. Click on the [New Template] button Enter a name for this template next to “Name” Optionally, include a description of this activity shift recurrence template Set the frequency of the activity by clicking either the “Weekly” or “Monthly” radio button. You can only make one selection. Set the recurrence of the activity by clicking either the “One Week”, “Two Weeks”, “Three Weeks” or Four Weeks” radio button. (If you had chosen a “Monthly” frequency above, the options are “One Month”, “Two Months”, “Three Months” and Four Months”.) You can only make one selection. Specify the date/day/time for the shift: a. For weekly activities, select the day of the week by choosing the appropriate value from the droplist OR b. For monthly activities, select the appropriate radio button and enter the exact day of the month or select the appropriate radio button and select the relative day of the month (e.g. “first Monday”) from the droplists c. Enter the start and end time for the shift. For weekly shifts, click on the [Add] button to add the shift to the schedule. If you wish to delete a shift you have created, click on it in the “Added Occurrences” box and then click on the [Remove Selected occurrence(s)] button. Repeat steps 7-8 to add additional shifts When finished, or for monthly shifts, click on the [Save] button to save your activity shift recurrence template. If you have made any errors, you can correct them or click on the [Cancel] button to abandon the creation of the activity shift recurrence template. Quick Info on an Activity Shift Recurrence Template To view a quick summary of an activity shift recurrence template: 1. GO TO: Activities » Manage Activity Shift Templates 2. Move your mouse over (i.e. hover) the [Info] button template to reveal a summary to the left of an activity shift recurrence Volunteer Impact version 3.8 Standard Edition Administrator’s Guide 44 SECTION 4 - USING VOLUNTEER IMPACT (ADMINISTRATORS) View, Edit, Delete or Print an Activity Shift Recurrence Template To view, edit or delete an activity shift recurrence template: 1. GO TO: Activities » Manage Activity Shift Templates 2. Move your mouse over (i.e. hover) the desired activity shift recurrence template 3. When presented with the choice of “View Edit Delete”, click on the desired option a. If you wish to print information on an activity shift recurrence template, choose “View”. In the resulting dialog box, click on the [Print] button report to your desired local or network printer. and follow the prompts to print the Once deleted, you cannot retrieve the activity shift recurrence template. You will need to recreate it. If you delete the activity shift recurrence template, shifts added to associated activities will not be deleted. Associating an Activity Shift Recurrence Template with an Activity To associate an activity shift recurrence template with an activity, please see the section on Activities. Activities Activities in Volunteer Impact refer to things that volunteers do or would like to do. In some organizations, they are referred to as jobs, positions, opportunities or volunteer interests. Activities can be grouped together into Activity Categories. This helps by making it easy to communicate with all volunteers performing activities within a category and to get reports on volunteer hours for a group of activities. You can add whatever Activity Categories and Activities that are relevant to your organization. Examples: Docents (Tour Guides), Reception, Maintain website, Usher, Board of directors, etc. Area New Activity Category What it contains Create an activity category Info Quick information on an activity category View View an activity category Print Print information about an activity category Edit Edit an activity category How to get started Activities >> Manage Activities > [New Activity Category] Activities >> Manage Activities > Hover - [Info] Activities >> Manage Activities > Hover - View Activities >> Manage Activities > Hover - View - [Print] Activities >> Manage Activities > Hover - Edit Volunteer Impact version 3.8 Standard Edition Administrator’s Guide For more information See instructions in the section below Hover over [Info] beside an activity category to display the information You can only view the information In the View dialog, click on [Print] Make any changes and click on [Save] to save or [Cancel] to abandon the changes 45 SECTION 4 - USING VOLUNTEER IMPACT (ADMINISTRATORS) Area Delete What it contains Delete an activity category How to get started Activities >> Manage Activities > Hover - Delete New Activity Create an activity Info Quick information on an activity Activities >> Manage Activities > [New Activity] Activities >> Manage Activities > Hover - [Info] View View an activity Print Print information about an activity Edit Edit an activity Delete Delete an activity Copy Copy an activity Drag and Drop Move activities to a different category Display View activities by their status, optionally sorted and/or grouped by category Change selected activities to either active or inactive Change Activities >> Manage Activities > Hover - View Activities >> Manage Activities > Hover - View - [Print] Activities >> Manage Activities > Hover - Edit Activities >> Manage Activities > Hover - Delete Activities >> Manage Activities > Hover - Copy Activities >> Manage Activities > [Drag and Drop] Activities >> Manage Activities > Filter Options [Apply] Activities >> Outputs > Select - [Change Selected] Volunteer Impact version 3.8 Standard Edition Administrator’s Guide For more information Click on [Delete] to delete the activity category or [Cancel] to keep it See instructions in the section below Hover over [Info] beside an activity to display the information You can only view the information In the View dialog, click on [Print] Make any changes and click on [Save] to save or [Cancel] to abandon the changes Click on [Delete] to delete the activity or [Cancel] to keep it Click on [Copy] to make a copy of the activity in the current category Hold down [Drag and Drop] beside an activity, drag it to a new category, and release the mouse button Set desired filter options (status, sorting, grouping), then click on [Apply] Select the activities you wish to make active or inactive and click on [Change Selected] 46 SECTION 4 - USING VOLUNTEER IMPACT (ADMINISTRATORS) The “Manage Activities” Screen: New Activity Category Attributes of an Activity Category: Category: Description: The text entered here is the name of the activity category. This is a required field. Optionally, you may include a description of this activity category. Volunteer Impact version 3.8 Standard Edition Administrator’s Guide 47 SECTION 4 - USING VOLUNTEER IMPACT (ADMINISTRATORS) To create a new activity category: 1. GO TO: Activities » Manage Activities 2. 3. 4. 5. Click on the [New Activity Category] button Enter a name for this activity category next to “Category” Optionally, include a description of this activity category Click on the [Save] button to save your activity category. If you have made any errors, you can correct them or click on the [Cancel] button to abandon the creation of the activity category. Quick Info on an Activity Category To view a quick summary of an activity category: 1. GO TO: Activities » Manage Activities 2. Move your mouse over (i.e. hover) the [Info] button a summary to the left of an activity category to reveal View, Edit, Delete or Print an Activity Category To view, edit or delete an activity category: 1. GO TO: Activities » Manage Activities 2. Move your mouse over (i.e. hover) the desired activity category 3. When presented with the choice of “View Edit Delete”, click on the desired option a. If you wish to print information on an activity category, choose “View”. In the resulting dialog box, click on the [Print] button your desired local or network printer. and follow the prompts to print the report to Once deleted, you cannot retrieve the activity category. You will need to re-create it. If you delete the activity category, the associated activities will not be deleted. Instead, they will be moved to the section labeled, “Uncategorized Activities”. New Activity Volunteer Impact version 3.8 Standard Edition Administrator’s Guide 48 SECTION 4 - USING VOLUNTEER IMPACT (ADMINISTRATORS) Attributes of an Activity: Basic Info: Schedule: Click on the header for this area to expand or collapse the list of options: Activity Name - The text entered here is the name of the activity. This is a required field. Activity Category - From the droplist, select the category in which to create the activity. If no categories have been created, you will only be able to select “Uncategorized”. You will still be able to move your activity after creating it. The default value is “No Category” (i.e. Uncategorized Activities). Active Status - From the droplist, select whether or not this activity is “Active” (visible, hours can be logged) or “Inactive” (not visible, hours cannot be logged). The default value is “Active”. Number of Volunteers - Numeric value representing the minimum number of volunteers required for the activity (for Unscheduled and Seasonal activities) or for a shift of the activity (for Scheduled activities). Description - pre-assigned - Optionally, you may include a description of this activity that will be visible to those that can see the activity exists. This text can include further information about the activity, or a link to a website. Description - post-assigned - Optionally, you may include a description of this activity that will be visible only to those that have been assigned to the activity. This text can include further information about the activity that would only be applicable those that have been assigned to it. Any of these attributes can be modified at any time. Click on the header for this area to expand or collapse the list of options: Schedule Type: o Recurring pattern (scheduled - dates and times on a regular schedule) o Seasonal (unscheduled - no times, but occurs only between two dates) o Disjointed (scheduled - occurs on an irregular schedule) o No Schedule (unscheduled - no dates, no times) o One Time (scheduled - occurs once only) Once you have specified the type of schedule associated with an activity and saved it, you cannot change it. Depending on the schedule type, other options in this area may or may not be visible. Create from a Template or Create from Scratch - you can specify a previously-created activity shift recurrence template to use in establishing shifts for an activity with a schedule type of “recurring pattern” or create the shifts manually by specifying the exact occurrences to add and whether the shifts occur on a weekly or monthly basis. Start Date - date activity starts End Date - date activity ends (more can be added later) Shift Count - once the shifts of a scheduled activity have been created, you can display a count of the number of shifts that have been created Volunteer Impact version 3.8 Standard Edition Administrator’s Guide 49 SECTION 4 - USING VOLUNTEER IMPACT (ADMINISTRATORS) Visibility: Click on the header for this area to expand or collapse the list of options: Not visible - the activity cannot be seen by anyone Visible to public - people who have not signed up as volunteers will be able to see the activity Visible to volunteers - volunteers will be able to see the activity. Optionally, you can specify which volunteers can see it by selecting the appropriate status value: o Applicant (optionally, “If Qualified”) o In Process (optionally, “If Qualified”) o Accepted (optionally, “If Qualified”) o Inactive (optionally, “If Qualified”) Automation: Any of these attributes can be modified at any time. A volunteer’s status may be set in his/her profile. Click on the header for this area to expand or collapse the list of options: / Auto Lock - shifts/activities can lock automatically to prevent others from signing up: o Do not autolock o … on availabilities - lock the shift/activity after the specified number of volunteers have expressed an availability o … on assignments - lock the shift/activity after the specified number of volunteers have been assigned / Auto Assign - volunteers can be automatically assigned to a shift/activity o Do not auto assign o Auto assign - automatically assign specific volunteers based on their status value: o Applicant (optionally, “If Qualified”) o In Process (optionally, “If Qualified”) o Accepted (optionally, “If Qualified”) o Inactive (optionally, “If Qualified”) Assignment Removal - you can permit volunteers to remove themselves from assignments after they have confirmed o Don’t Allow o Allow - specify how many hours notice must be given before an activity starts if a volunteer wants to be removed from the schedule Sign Up Cutoff - you can permit restrict volunteers from signing up for a shift a specific number of hours before it begins o Disabled o Enabled - specify how many hours before an activity starts to cut off further signups Any of these attributes can be modified at any time. A volunteer’s status may be set in his/her profile. Volunteer Impact version 3.8 Standard Edition Administrator’s Guide 50 SECTION 4 - USING VOLUNTEER IMPACT (ADMINISTRATORS) Qualifications: Outputs: TIP: Hover over the [Info] button for more information on the output Classifications: Click on the header for this area to expand or collapse the list of options. Select the appropriate level (or “minimum value”) for each qualification that is required for the performance of an activity. Any of these attributes can be modified at any time. Click on the header for this area to expand or collapse the list of options. Select the appropriate output(s) to be measured when logging hours for this activity. A response to an output is always optional. Any of these attributes can be modified at any time. Click on the header for this area to expand or collapse the list of options. Choose the area or type of work associated with this activity, suitability, and time/duration commitments by checking the appropriate boxes. Any of these attributes can be modified at any time. Multiple checkboxes may be selected for each section. Schedule Classifications - When an associated activity usually occurs (day(s) and time(s) of day) Activity Classifications - The type of work or sector, such as animal care, artistic, trades, office, etc. Suitability Classifications - Who an activity would be suitable for, such as seniors, youths, adults, groups, families, and those near or on a bus route Time Commitment Classifications - How much time is expected or required for the associated activity (a few hours a day/week/month/year or whenever time permits) Duration Commitment Classifications - Suggested length of the volunteer commitment for the associated activity Once an activity has been created, you can modify any aspect of it except for the schedule type. You cannot add shifts to an unscheduled activity and you cannot make a scheduled activity unscheduled by removing all dates from it. To create a new activity: 1. GO TO: Activities » Manage Activities 2. Click on the [New Activity] button 3. Click on the “Basic Info” header (if required) to expand that area and specify the basic identifying information for your activity 4. Click on the “Schedule” header (if required) to expand that area and first specify the type of schedule associated with your activity a. If you have chosen an “unscheduled” activity (seasonal, flexible), you will not be able to specify specific dates and times for your activity b. If you have chosen a “scheduled” activity (recurring pattern, disjointed, one time), you may specify the individual shifts associated with your activity by using a pre-created template or by entering shifts from scratch 5. Click on the “Visibility” header (if required) to expand that area and specify who can see your activity displayed 6. Click on the “Automation” header (if required) to expand that area and specify whether or not the activity (or shifts) lock automatically, volunteers are automatically assigned to a requested activity, whether confirmed volunteers can remove themselves from an activity and whether or not there is a cutoff date after which volunteers cannot sign up for your activity. 7. Click on the “Qualifications” header (if required) to expand that area and specify the minimum level required for each applicable qualification in order for a volunteer to be considered “qualified” for your activity. 8. Click on the “Outputs” header (if required) to expand that area and specify the applicable outputs to be measured when hours are logged for this activity. Note that providing a value for an output is optional. Volunteer Impact version 3.8 Standard Edition Administrator’s Guide 51 SECTION 4 - USING VOLUNTEER IMPACT (ADMINISTRATORS) 9. Click on the “Classifications” header (if required) to expand that area and specify the various predefined classifications associated with this activity 10. Click on the [Save] button to save your activity. If you have made any errors, you can correct them or click on the [Cancel] button to abandon the creation of the activity. Once you have created an activity, you can edit it to change any attribute except for the type of schedule. Creating an Activity from a Template If your organization is part of an Enterprise, your Enterprise administrator can create “Activity Templates” (i.e. the basic framework of an activity). To create a new activity using an Activity Template: 1. GO TO: Activities » Manage Activities 2. Click on the [New Activity From Template] button a. In the “New Activity From Template” window, you will see a list of available Activity Templates. You can click on [Info] to see a summary of a template or move your mouse over (“hover”) the name of a template and click on View to see the attributes of that template. 3. Move your mouse over the name of the template you wish to use. When presented with the choice of “View Use this template”, click on Use this template. 4. Continue creating the activity. You can make modifications to any of the values populated by choosing the template. 5. Click on the [Save] button to save your activity. If you have made any errors, you can correct them or click on the [Cancel] button to abandon the creation of the activity. What Type of Schedule Should I Choose? Schedule Options: No Schedule: Seasonal: One Time: Disjointed: Recurring Pattern: Volunteers can tell you what they would like to do, but no specific dates and times (shifts) are specified Activity only occurs between two dates, but there are no specific times (shifts) specified Activity occurs once only on a specific date at a specific time Activity occurs on an irregular schedule with specific dates and times Activity occurs on a regular schedule with a recurring pattern of scheduled dates and times Manual Locking versus Automatic Locking In the “Automation” section of an activity, you can define whether or not you want to have control over when an unscheduled activity or scheduled shift is locked or whether you want Volunteer Impact to lock that automatically when the specified maximum number of volunteers has either signed up as available or been assigned.: Locking (Automation) Options: Manual Locking: Automatic Locking: Administrators must lock the unscheduled activity or scheduled shift manually. No maximum number of volunteers is indicated. Volunteer Impact will automatically lock the unscheduled activity or scheduled shift whenever the maximum number of volunteers have either signed up as available or been assigned. Volunteer Impact version 3.8 Standard Edition Administrator’s Guide 52 SECTION 4 - USING VOLUNTEER IMPACT (ADMINISTRATORS) If you are using automatic locking, you cannot manually lock a specific shift of a scheduled activity. If you wish to have the ability to lock a specific shift, you will need to specify “Do not autolock” in the “Automation” section of the activity. Creating an Activity with No Schedule Sometimes, an activity may not have any shifts associated with it (i.e. the work is done entirely on the volunteer’s own time). To create an activity with no schedule: 1. GO TO: Activities » Manage Activities 2. Click on the [New Activity] button 3. Information can be entered for any section in any order: a. Basic Info b. Schedule c. Visibility d. Automation e. Qualifications f. Outputs g. Classifications 4. Click on the “Schedule” header (if required) to expand that area 5. For “Schedule Type”, click on the radio button beside “No Schedule” 6. Click on the [Save] button to save your activity. If you have made any errors, you can correct them or click on the [Cancel] button to abandon the creation of the activity. Creating a Seasonal Activity Sometimes, an activity may not have any shifts associated with it (i.e. the work is done entirely on the volunteer’s own time), but only runs between two dates (i.e. the work is done within a specified timeframe). To create a seasonal activity: 1. GO TO: Activities » Manage Activities 2. Click on the [New Activity] button 3. Information can be entered for any section in any order: a. Basic Info b. Schedule c. Visibility d. Automation e. Qualifications f. Outputs g. Classifications 4. Click on the “Schedule” header (if required) to expand that area 5. For “Schedule Type”, click on the radio button beside “Recurring pattern” 6. For “Schedule Type”, click on the radio button beside “Seasonal” 7. Enter the “Start Date” and “End Date” for the activity 8. Click on the [Save] button to save your activity. If you have made any errors, you can correct them or click on the [Cancel] button to abandon the creation of the activity. Creating a Schedule from a Template When creating an activity with a schedule type of “Recurring pattern”, you can base the schedule on a pre-created activity shift recurrence template. 1. GO TO: Activities » Manage Activities 2. Click on the [New Activity] button Volunteer Impact version 3.8 Standard Edition Administrator’s Guide 53 SECTION 4 - USING VOLUNTEER IMPACT (ADMINISTRATORS) 3. Information can be entered for any section in any order: a. Basic Info b. Schedule c. Visibility d. Automation e. Qualifications f. Outputs g. Classifications 4. Click on the “Schedule” header (if required) to expand that area 5. For “Schedule Type”, click on the radio button beside “Recurring pattern” 6. Choose the desired activity shift recurrence template to use by selecting the appropriate value from the droplist beside “Choose a template” 7. Enter the date for the first shift to be created. Shifts will be created on or after that date, depending on what days of the week are specified in the template. 8. Specify the date for the final shift. 9. If desired, click on the [Calculate] button to see how many shift will be created using this template and date range 10. Click on the [Save] button to save your activity. If you have made any errors, you can correct them or click on the [Cancel] button to abandon the creation of the activity. You can edit an activity at a later date to add more shifts to the schedule. Creating a Schedule from Scratch When creating an activity with a schedule type of “Recurring pattern”, “Disjointed” or “One Time” you can enter specific shifts manually by specifying the exactly (or relatively) when the shifts occur. 1. GO TO: Activities » Manage Activities 2. Click on the [New Activity] button 3. Information can be entered for any section in any order: a. Basic Info b. Schedule c. Visibility d. Automation e. Qualifications f. Outputs g. Classifications 4. Click on the “Schedule” header (if required) to expand that area 5. For a one-time scheduled event: a. For “Schedule Type”, click on the radio button beside “One Time” b. Enter the date for the shift to be created. You may either enter the date yourself or select it from the calendar that is displayed upon clicking in the date field. c. Enter the “Start Time” and “End Time”. 6. For an activity on a disjointed (i.e. irregular) schedule: a. For “Schedule Type”, click on the radio button beside “Disjointed” b. Enter the date for the shift to be created. You may either enter the date yourself or select it from the calendar that is displayed upon clicking in the date field. c. Enter the “Start Time” and “End Time” for the first shift. d. Click on the [Add] button to add the shift you have specified. e. Repeat steps b through d to create additional shifts. If you have added one in error, click on the [Remove Selected occurrence(s)] button. 7. For a scheduled activity with recurring pattern: a. For “Schedule Type”, click on the radio button beside “Recurring pattern” b. For a schedule that repeats on a weekly basis: Volunteer Impact version 3.8 Standard Edition Administrator’s Guide 54 SECTION 4 - USING VOLUNTEER IMPACT (ADMINISTRATORS) Click on the radio button to the left of “Weekly” Select the day of the week for the shift from the droplist Enter the start and end time for the shift Click on the [Add] button to add the shift you have specified. Shifts will appear in the box below the day and time. v. Repeat steps ii through iv to create additional shifts. If you have added one in error, click on the [Remove Selected occurrence(s)] button. vi. Select the recurrence for the shifts (i.e. every one week, every two weeks, every three weeks, every four weeks) vii. Enter either the start and end dates (i.e. when the activity runs) directly or with the aid of the calendar. Instead of an end date, you can specify the number of shifts to create. You can edit the activity later to add more shifts. viii. Click on the [Calculate] button, if desired, to display the number of shifts that will be created for your activity. c. For a schedule that repeats on a monthly basis: i. Click on the radio button to the left of “Monthly” ii. Enter either Select the day of the week for the shift from the droplist iii. For day, click on the first radio button and enter the day of the month for your activity, or click on the second radio button and select when the activity occurs “relatively” (i.e. “first Monday”, “second Tuesday”, etc.) iv. Enter the start and end time for the shift v. Select the recurrence for the shifts (i.e. every one month, every two months, every three months, every four months) vi. Enter either the start and end dates (i.e. when the activity runs) directly or with the aid of the calendar. Instead of an end date, you can specify the number of shifts to create. You can edit the activity later to add more shifts. vii. Click on the [Calculate] button, if desired, to display the number of shifts that will be created for your activity. 8. Click on the [Save] button to save your activity. If you have made any errors, you can correct them or click on the [Cancel] button to abandon the creation of the activity. i. ii. iii. iv. You can edit an activity at a later date to add more shifts to the schedule. Quick Info on an Activity To view a quick summary of an activity: 1. GO TO: Activities » Manage Activities 2. Move your mouse over (i.e. hover) the [Info] button summary to the left of an activity to reveal a View, Edit, Delete, Copy or Print an Activity To view, edit, delete or copy an activity: 1. GO TO: Activities » Manage Activities 2. Move your mouse over (i.e. hover) the desired activity 3. When presented with the choice of “View Edit Delete Copy”, click on the desired option a. If you wish to print information on an activity, choose “View”. In the resulting dialog box, click on the [Print] button local or network printer. and follow the prompts to print the report to your desired Volunteer Impact version 3.8 Standard Edition Administrator’s Guide 55 SECTION 4 - USING VOLUNTEER IMPACT (ADMINISTRATORS) You cannot change the type of schedule associated with an activity once it has been created. When you copy an activity, the new activity will be created in the same category as its source. If desired, you can edit it or even drag it to a new category. You cannot delete an activity that has hours or outputs logged against it. Deleting an activity also removes all people assigned to it. Once deleted, you cannot retrieve this information. Adding Shifts to a Scheduled Activity If you have created a one time, disjointed schedule or regularly scheduled activity, you can add shifts to it. To one or more shifts to a scheduled activity: 1. GO TO: Activities » Manage Activities 2. Move your mouse over (i.e. hover) the desired activity 3. When presented with the choice of “View Edit Delete Copy”, click on Edit. 4. Click on the “Schedule” section header to edit the contents. 5. To add a single shift: a. Enter the start date, start time and end time b. Click on the [Add Shift] button 6. To add multiple shifts: a. Click on the [Add Multiple Shifts] button b. Add the shifts as you would to an activity on a recurring pattern by entering the date range and shifts. If desired, you can add shifts from an Activity Shift Recurrence Template you have created. c. When you have entered all the required shifts, click on the [Add Shifts] button or [Cancel Changes] to abandon adding the shifts. You cannot add shifts to an unscheduled activity. While you can change the start and end date for a seasonal activity, you cannot add a new date range to a seasonal activity. Editing Shifts in a Scheduled Activity To edit a shift in a scheduled activity: 1. GO TO: Activities » Manage Activities 2. Move your mouse over (i.e. hover) the desired activity 3. When presented with the choice of “View Edit Delete Copy”, click on Edit. 4. Click on the “Schedule” section header to edit the contents. 5. Click on the link to Edit beside the desired shift. 6. You can a new value for any of the fields: start date, start time, end time. 7. Select what should be done with people who were already assigned to this shift of the activity: a. Do not change existing activity assignments b. Set existing activity assignments to be unconfirmed (Volunteers will need to re-confirm their assignment to the revised date/time) c. Delete existing activity assignments (Volunteers will no longer be assigned to this shift) 8. Select what should be done with people who were already signed up as available for this shift of the activity: a. Do not change existing availabilities (Volunteers will still be listed as available for the revised date/time) b. Delete existing availabilities (Volunteers’ availability will be deleted and they will need to sign up for the revised date/time, if desired) 9. Click on [Save] to save your changes or [Cancel] to abandon your changes. Volunteer Impact version 3.8 Standard Edition Administrator’s Guide 56 SECTION 4 - USING VOLUNTEER IMPACT (ADMINISTRATORS) Deleting Shifts from a Scheduled Activity To delete one or more shifts from a scheduled activity: 1. GO TO: Activities » Manage Activities 2. Move your mouse over (i.e. hover) the desired activity 3. When presented with the choice of “View Edit Delete Copy”, click on Edit. 4. Click on the “Schedule” section header to edit the contents. 5. Click on the link to Delete beside the desired shift. 6. In the confirmation dialog, click on [Delete] to delete the shift or [Cancel] to keep the shift. If you wish to delete multiple shifts, place a check in the box in the “Change Status” column beside the desired shift (you can select all but one shift) and click on the [Change Selected] button. From there, you can delete the selected shifts. You cannot delete the last shift from a scheduled activity. There must always be at least one shift. Moving Activities between Categories - Drag and Drop From the “Manage Activities” screen, you can move an activity to a different category by dragging and dropping it to a new position. To drag and drop an activity: 1. GO TO: Activities » Manage Activities 2. Click on the [Drag and Drop] button to the right of the desired activity. Be sure to hold down the mouse button. 3. Drag the activity until it is over the name of the desired category and release the mouse button. You can repeat the steps above, as necessary to move other activities. Display Options From the “Manage Activities” screen, you can view activities by their status (active/inactive), and change the sort order (name, start/end date, type) and/or grouping (by category). To change which activities are displayed in the Manage Activities screen and how they are displayed: 1. GO TO: Activities » Manage Activities 2. Change any one (or all three) of the display options by following steps 3 to 6 below. 3. Active Status: a. Don’t filter - show both active and inactive activities b. Active only (default) - only active activities will be included in the display c. Inactive only - only inactive activities will be included in the display 4. Sort: a. Activity name (default) - activities are sorted alphabetically by name b. Activity start date - activities are sorted chronologically by start date c. Activity end date - activities are sorted chronologically by end date d. Activity type - activities are sorted according to the schedule type (unscheduled, seasonal, scheduled) 5. Group by category - activities can be displayed by status and sorted either within their categories or as a list of activities with no category names displayed 6. Click on the [Apply] button to change the display according to your settings. You can repeat the steps above, as necessary, to change the display of activities in this screen. You can change the active status of an individual activity by editing it. You can change the active status of multiple activities by following the steps below. Volunteer Impact version 3.8 Standard Edition Administrator’s Guide 57 SECTION 4 - USING VOLUNTEER IMPACT (ADMINISTRATORS) Change the Active Status of Multiple Activities To change the active status of multiple activities: 1. GO TO: Activities » Manage Activities 2. In the “Change” column, place a checkmark in the box beside each activity for which you wish to change the Active Status or click on the [Select All] checkbox to select all activities. (To de-select one of the activities, simply click once on the box beside it) 3. With the [Change Selected] button now active, click on the arrow beside the button to reveal the available options 4. Choose [Set to active] to make all selected activities active or [Set to inactive] to make all selected activities inactive. 5. Click on the [Confirm] button to change the active status of the selected activities. To abandon your changes, click on the [Cancel] button. There is no “Save” button associated with this feature. You can change the active status again by following the steps above. Show or Hide Activity Categories and Activities You can show or hide the list of activity categories and activities. To show or hide activity categories and activities: 1. GO TO: Activities » Manage Activities 2. Click on the [Show] button ( ) to the left of either the “Categories” or a specific activity category section header to show all activities in all categories (or just activities in the selected category) or the [Hide] button ( ) to hide all activities in that category (or just activities in the selected category). Volunteer Impact version 3.8 Standard Edition Administrator’s Guide 58 SECTION 4 - USING VOLUNTEER IMPACT (ADMINISTRATORS) Sample Activity Scenario #1 - Road Marshall for Walkathon Description: Type of schedule: Schedule details: Activity visible to: Volunteers needed: Automatically prevent further signups: Automatically assign: Qualifications: Volunteers needed to act as Road Marshalls for our Walkathon this year Disjointed (scheduled) One day only (Saturday July 16, 2011) Two shifts per day (Morning: 7:00am-12:00pm, Afternoon: 12:00pm-5:00pm) Existing volunteers can see this activity Minimum of 10 per shift, maximum of 11 per shift Once the maximum number of volunteers have been assigned to a shift, volunteers will not be able to sign up for that shift All those that say they are available for an open shift are automatically assigned to that shift No qualifications are required To create this activity: 1. GO TO: Activities » Manage Activities 2. Click on the [New Activity] button 3. Click on the “Basic Info” header (if necessary) to enter the required values: a. Activity Name: Road Marshall b. Activity Category: (select the appropriate category from the droplist) c. Number of Volunteers: 10 4. Click on the “Schedule” header (if necessary) to enter the required values: a. Schedule Type: Disjointed b. Date: 07/16/2011 (or select from the pop-up calendar) c. Start Time: 7:00 AM d. End Time: 12:00 PM e. Click on the [Add] button to add this shift f. Date: 07/16/2011 (or select from the pop-up calendar) g. Start Time: 12:00 PM h. End Time: 5:00 PM i. Click on the [Add] button to add this shift j. If you wish to delete a shift you have created, click on it in the “Added Occurrences” box and then click on the [Remove Selected occurrence(s)] button. 5. Click on the “Visibility” header (if necessary) to enter the required values: a. Visible to: Visible to volunteers b. Select all types of volunteers applicable (i.e. Applicant, In Process, Accepted, Inactive) 6. Click on the “Automation” header (if necessary) to enter the required values: a. Auto Lock: on assignments b. Number of Volunteers: 11 c. Auto Assign: Auto assign d. Select all types of volunteers applicable (i.e. Applicant, In Process, Accepted, Inactive) 7. Click on the [Save] button to save your activity. If you have made any errors, you can correct them or click on the [Cancel] button to abandon the creation of the activity. Volunteer Impact version 3.8 Standard Edition Administrator’s Guide 59 SECTION 4 - USING VOLUNTEER IMPACT (ADMINISTRATORS) Sample Activity Scenario #2 - Chairperson for Next Year’s Walkathon Description: Type of schedule: Schedule details: Activity visible to: Volunteers needed: Automatically prevent further signups: Automatically assign: Qualifications: Chairperson needed for next year’s Walkathon Seasonal (unscheduled) No fixed schedule, but volunteer should be available between 1 June 2012 - 16 July 2012 Existing volunteers can see this activity Minimum of 1 for the activity, maximum of 4 for the activity Once 4 volunteers have said they are available for this activity, no other potential candidates for this activity can sign up Administrator will manually assign volunteers from the list of those available No qualifications are required To create this activity: 1. GO TO: Activities » Manage Activities 2. Click on the [New Activity] button 3. Click on the “Basic Info” header (if necessary) to enter the required values: a. Activity Name: Walkathon Chairperson b. Activity Category: (select the appropriate category from the droplist) c. Number of Volunteers: 1 4. Click on the “Schedule” header (if necessary) to enter the required values: a. Schedule Type: Seasonal b. Start Date: 06/01/2012 (or select from the pop-up calendar) c. End Date: 07/16/2012 (or select from the pop-up calendar) 5. Click on the “Visibility” header (if necessary) to enter the required values: a. Visible to: Visible to volunteers b. Select all types of volunteers applicable (i.e. Applicant, In Process, Accepted, Inactive) 6. Click on the “Automation” header (if necessary) to enter the required values: a. Auto Lock: on availabilities b. Number of Volunteers: 4 c. Auto Assign: Do not auto assign 7. Click on the [Save] button to save your activity. If you have made any errors, you can correct them or click on the [Cancel] button to abandon the creation of the activity. Sample Activity Scenario #3 - Information Booth Attendant Description: Type of schedule: Schedule details: Activity visible to: Volunteers needed: Automatically prevent further signups: Automatically assign: Qualifications: Volunteer needed to staff our Information Booth Recurring Pattern (scheduled) Seven (7) days per week Three (3) shifts per day (Morning: 9:00am-12:00pm, Afternoon: 1:00pm-3:00pm, Evening: 6:00pm-9:00pm; evening shift does not run on Sundays) Display opportunities from 1 June 2011 until 30 August 2011 Qualified volunteers can see this activity Minimum of 1 per shift, maximum of 1 per shift Once 1 volunteer has been assigned to a shift, no other potential candidates can sign up for that shift Qualified volunteers will be automatically assigned; non-qualified volunteers can be assigned manually by administrator Interview completed, Orientation training completed, at least basic proficiency in both Microsoft Excel and Microsoft Word Volunteer Impact version 3.8 Standard Edition Administrator’s Guide 60 SECTION 4 - USING VOLUNTEER IMPACT (ADMINISTRATORS) You can start by setting up an activity shift template to make it easier to add further dates in the future: 1. GO TO: Activities » Manage Activity Shift Templates 2. 3. 4. 5. 6. 7. Click on the [New Template] button Template Name: Information Booth shifts Optionally, include a description of this activity shift recurrence template Frequency: Weekly Recurs Every: One Week Specify the days and times for each shift: a. Day: Monday b. Start Time: 9:00 AM c. End Time: 12:00 PM d. Click on the [Add] button to add the shift e. Day: Tuesday f. Click on the [Add] button to add the shift specified above to Tuesday g. Repeat steps “e” and “f” to add the morning shift specified to Wednesday through Sunday h. Repeat steps “a” to “f” above (with a start time of 1:00 PM and an end time of 3:00 PM) to add the afternoon shift to Monday through Sunday i. Repeat steps “a” to “f” above (with a start time of 6:00 PM and an end time of 9:00 PM) to add the evening shift to Monday through Saturday j. If you wish to delete a shift you have created, click on it in the “Added Occurrences” box and then click on the [Remove Selected occurrence(s)] button. 8. Click on the [Save] button to finish creating this template To create this activity: 1. GO TO: Activities » Manage Activities 2. Click on the [New Activity] button 3. Click on the “Basic Info” header (if necessary) to enter the required values: a. Activity Name: Information Booth Attendant b. Activity Category: (select the appropriate category from the droplist) c. Number of Volunteers: 1 4. Click on the “Schedule” header (if necessary) to enter the required values: a. Schedule Type: Recurring pattern b. Choose a Template: Information Booth shifts (select from droplist) c. Start Date: 06/01/2011 (or select from the pop-up calendar) d. End Date: 08/31/2011 (or select from the pop-up calendar) 5. Click on the “Visibility” header (if necessary) to enter the required values: a. Visible to: Visible to volunteers b. Select all types of volunteers applicable and also check “If Qualified” for each 6. Click on the “Automation” header (if necessary) to enter the required values: a. Auto Lock: on assignments b. Number of Volunteers: 1 c. Auto Assign: Auto assign d. Select all types of volunteers applicable and also check “If Qualified” for each 7. Click on the “Qualifications” header (if necessary) to enter the required values (note: qualifications must already exist): a. Interview completed: Yes b. Orientation training completed: Yes c. Excel proficiency: Basic d. Word proficiency: Basic 8. Click on the [Save] button to save your activity. If you have made any errors, you can correct them or click on the [Cancel] button to abandon the creation of the activity. To assign volunteers to activities, please refer to Assigning Volunteers to Activities in Section 4. Volunteer Impact version 3.8 Standard Edition Administrator’s Guide 61 SECTION 4 - USING VOLUNTEER IMPACT (ADMINISTRATORS) Final Steps Organizational News: Current Message to Volunteers Make Searchable in MyVolunteerPage.com Automatic Email to New Volunteers Displaying Volunteer Policies to New Volunteers Links for Your Website Organizational News: Current Message to Volunteers You can enter text that will be displayed to all volunteers when they log on to myVolunteerPage.com. Text can include news and information as well as links to other websites and/or documents. Create, Edit or Delete the Current Message to Volunteers To create, edit or delete the message that will display to volunteers: 1. GO TO: Main » Home 2. Move your mouse over (i.e. hover) the label, Current Message to Volunteers 3. When presented with the choice of “Edit Delete”, click on the desired option Once deleted, you cannot retrieve the previously entered message to volunteers. You will need to re-create it. View the Current Message to Volunteers If you have a large amount of text entered for the current message to volunteers, not all of it will display on the Welcome Page. You can view the entire message: 1. GO TO: Main » Home 2. Click on the More… link to below the Current Message to Volunteers 3. Click on the [Close] button button to close this dialog box Make Searchable in MyVolunteerPage.com While myVolunteerPage.com is used by volunteers to log on, update profiles, sign up for activities, and log hours, it can also be used as a search tool by people who are not yet volunteers with your organization. 2 Volunteer staff can add list of the cities and towns you serve to the software so that prospective volunteers can sign up with you (and optionally see a listing of the opportunities available, based on the visibility settings defined in your activities). Volunteer Impact version 3.8 Standard Edition Administrator’s Guide 62 SECTION 4 - USING VOLUNTEER IMPACT (ADMINISTRATORS) Automatic Email to New Volunteers If you have not already done so, you can specify an email that will be sent to new volunteers when they have filled in your volunteer application form. To enter or edit your automatic email message to new volunteers: 1. GO TO: Configuration » Organization Settings 2. Click on the “Signup Settings” header (if required) for the desired Application Form (1, 2 or 3) to expand that area. 3. Using the Rich Text Editor, enter/edit the “New volunteer email message” applicable to the selected application form or select the desired message template to use from the droplist beside “Template”. If you specify a template, you will still be able to customize the content of the message. 4. Click on the [Save] button to save the information you have entered/updated or [Cancel] to abandon the changes Displaying Volunteer Policies to New Volunteers If you have not already done so, you can display your volunteer policies to new volunteers when they are signing up via any of your application forms. To enter or edit your volunteer policies: 1. GO TO: Configuration » Organization Settings 2. Click on the “Signup Settings” header (if required) for the desired Application Form (1, 2 or 3) to expand that area. 3. Using the Rich Text Editor, enter/edit the “Volunteer policies text” applicable to the selected application form 4. Click on the [Save] button to save the information you have entered/updated or [Cancel] to abandon the changes Links for Your Website You can generate a link to add to your own website which will enable people to sign up as new volunteers with your organization. Your webmaster will likely know exactly what to do with this script and can change its appearance if desired. This step should not be completed until you are ready for new volunteers to sign up, or to let volunteers enter information into their personal profile and sign up for activities. There are two types of links that can be created to be added to your own website for new volunteers to sign up with your organization. Activity List - This will link to a page showing potential volunteers a list of activities visible to the general public (i.e. those who have not yet signed up as volunteers with your organization) and, if they wish, they can fill in a volunteer application form. Sign Up Form - This will link to a page the will allow potential volunteers to proceed directly to fill in a volunteer application form without viewing the list of activities first. Volunteer Impact version 3.8 Standard Edition Administrator’s Guide 63 SECTION 4 - USING VOLUNTEER IMPACT (ADMINISTRATORS) The “Generate Links” Screen: To generate a link: 1. GO TO: Configuration » Links For Your Website 2. Choose where you would like the link to go by selecting either “Activity List” or “Sign Up Form” 3. Choose the Application Form you wish to use. For example, selecting “Application Form 1” will present the potential volunteer with the Custom Fields and Qualifications that have been associated with application form 1 upon signup. 4. Enter the text to display to volunteers by entering text in the field beside “Link Text” 5. Click on the [Generate Link] button A preview link will appear, enabling you to test the link you have just generated. Below that is the HTML that your website designers can copy and paste to your website. Below that is the URL that can be copied and pasted anywhere. You can also bookmark and share this link via Facebook, Twitter, and various other sites. Sending an Invitation to Become a Volunteer In addition to sharing your link in a variety of ways, you can also send an invitation to someone to sign up as a new volunteer by clicking on the “Email” option after generating a link. Potential volunteers sign up to become volunteers by filling in your application form. Volunteers that already have a username and password log on to myvolunteerpage.com. Volunteer Impact version 3.8 Standard Edition Administrator’s Guide 64 SECTION 4 - USING VOLUNTEER IMPACT (ADMINISTRATORS) Section 4 - Using Volunteer Impact (Administrators) Volunteer Profiles Managing Volunteers Approving Data Entered by Volunteers Assigning Volunteers to Activities Logging Hours Communicating with Volunteers Mailing Labels, Phone Lists and Exports Reporting Schedules Volunteer Profiles In order for a volunteer to have access to the activities within your organization, they must have a profile. Each profile contains basic contact information along with information on other specific objects (custom fields, qualifications, activity assignments, hours logs, committee memberships) that you have created for your organization. Attributes of a new profile: Username / Password: Contact Information: Birthday: Date Joined: Timelog Permission: Status: Usernames must be unique and at least 6 characters in length. Passwords are case-sensitive and must be at least 6 characters in length. The person’s name, address, email IDs, telephone numbers, phone preference and language setting are specified here. Administrative profiles also contain a field for an email signature. All components (month, day, and year) of the date of birth must be entered. This value is used in calculating a volunteer’s anniversary and years of service. The default value is the date that the profile was created, but it can be edited. All components (month, day, and year) must be entered. Only an administrator can view or change this value. While defaults exist to specify whether or not volunteers can log hours for your organization, you may override that value on an individual basis here. Only an administrator can view or change this value. You can set a volunteer’s status to either “Applicant”, “In Process” or “Accepted”. Only an administrator can view or change this value. This setting does not appear in an administrative profile. Volunteer Impact version 3.8 Standard Edition Administrator’s Guide 65 SECTION 4 - USING VOLUNTEER IMPACT (ADMINISTRATORS) Create a new Volunteer or Administrator To create a new volunteer or administrative profile: 1. GO TO: People » Add a Volunteer or People » Add an Admin 2. Enter a value for username and password 3. Enter the contact information, noting which values are required a. If you select “Canada”, “USA”, “United Kingdom” or “Australia” as the country, the appropriate provinces, states or counties will display. For all other countries, the province/state field is not visible 4. The language field is used to determine the display language and how dates and times will display to the person. If no language is specified, the default settings on the person’s computer will be used. 5. Indicate whether or not the volunteer can log hours. This option is not available within administrative profiles. 6. Optionally, include a personal message that will display only to this volunteer when he/she logs on to myVolunteerPage.com. This option is not available within administrative profiles. 7. Set the status for this volunteer (i.e. “Applicant”, “In Process”, “Accepted”). This option is not available within administrative profiles. 8. For administrative profiles, the following additional options are available: Optionally, specify the text that will display at the bottom of all outgoing emails sent within Volunteer Impact by this administrator You can customize the appearance of the schedule for this administrator by specifying the default number of days to display and display options for dates (first future date with activities, a specific date, and the current date). By placing a checkmark beside “Contact Person”, volunteers will be able to contact this administrator via email when they are logged on to myVolunteerPage.com You can choose whether or not this administrator will receive system alert notifications via email 9. Click on the [Save] button to save the new profile At this point, you will be able to edit the profile and specify values for custom fields, qualifications, activity assignments, etc. A volunteer can be made an administrator by searching for the person and updating their security role. At that point, the additional administrative options will be available in that profile. Searching for a Person - Quick Search A field in the main toolbar offers you the ability to search for a volunteer’s name at any time. 1. From any screen, type in a few characters of the volunteer’s first or last name into the Quick Search field in the toolbar. A list of matching volunteers will appear. 2. Click on the desired volunteer to edit his/her profile. For more information on how to edit a profile, please see the section on Editing a Profile. Volunteer Impact version 3.8 Standard Edition Administrator’s Guide 66 SECTION 4 - USING VOLUNTEER IMPACT (ADMINISTRATORS) Searching for a Person You can search through your volunteers and administrators based on multiple criteria. With those search results, you can do many things including edit profiles, send emails and text messages, assign volunteers to activities, and log hours. The “Search People” Screen: The “Search” section contains filters for status and security role along with other search options. Your search results will appear in the “Search Results” section at the bottom of the screen. You can show/hide the contents of these sections by clicking on either the [Show] or [Hide] buttons in each of the section headers or by clicking on the section header itself. Filters: Status Filters: You can search based on the volunteer status. Leaving all boxes unchecked will search across all statuses. (“Archived” statuses are not available for: Log Hours, Send Email, Send Text, Create Mailing Labels, Create Phone List) Security Filters: You can search for either only volunteers or only administrators. Leaving all boxes unchecked will search across security roles. “Security Filters” options are not available for: Log Hours, Remove Volunteers. Email filter options are also available for certain menu options: Bulk Changes - Custom Fields, Bulk Changes - Qualifications, Export for Mail Merge (Volunteer Profile Excel Reports): Send Email, Send Text: Create Mailing Labels, Create Phone List: Volunteer Impact version 3.8 Standard Edition Administrator’s Guide 67 SECTION 4 - USING VOLUNTEER IMPACT (ADMINISTRATORS) To search using only Status and Security Filters, make your selection(s) and then click on the [Search] button. Search Options: Search Options: You can add up to 10 filters from any of these sections by clicking on the [Add to Search] button or, when finished entering criteria, by clicking on the [Add to Search and Go] button to retrieve your results. Contact Information - name, address, telephone numbers, email IDs, country, province / state / county, postal code / zip code General Volunteer Interests - general volunteer interests that you have created General Availability - days of the week and times of day (morning, afternoon, evening, night) Custom Fields - conditions based on custom field values; options depend on the data type (equal to, not equal to, greater than or equal to, less than or equal to, between, empty, not empty, contains, does not contain) Qualifications - conditions based on qualification levels (equal to, not equal to, empty, not empty), ranking (greater than or equal to, less than or equal to) and expiration dates (if applicable) Background Check - no background check on file, or a background check in progress, passed, or failed. (NOTE: This feature is only available in organizations that are part of an Enterprise that is using the Background Check feature.) Activity Category - signed up, not signed up, assigned (confirmed or not), not assigned, on backup list, not on the backup list for any activity within selected categories Activity - signed up, not signed up, assigned (confirmed or not), not assigned, on backup list, not on the backup list for selected activities within selected categories (list can include active, inactive or all activities) Activity Shift - signed up, not signed up, assigned (confirmed or not), not assigned for the selected shift of an activity (list can include active, inactive or all activities) Qualified For Activity - qualified or not qualified for a specific activity (list can include active, inactive or all activities) Schedule Date - on the schedule (confirmed, not confirmed, either confirmed or not confirmed) or not on the schedule within a specified timeframe Hours Logged - greater than or equal to, less than or equal to a specific number of hours logged, optionally within a specified timeframe (on or after, on or before, between), optionally for a specific activity or all activities within a specific category (list can include active, inactive or all activities) Outputs - greater than or equal to, less than or equal to a specific number for a selected output, optionally within a specified timeframe (on or after, on or before, between) Committees - membership in a specific committee or committees Date Joined - date range for person’s start date (on or after, on or before, between) Birthday - date range for a birthday (year is not taken into consideration) For each of these search options, you can indicate whether the results must match all, any, or none of the specified conditions: Volunteer Impact version 3.8 Standard Edition Administrator’s Guide 68 SECTION 4 - USING VOLUNTEER IMPACT (ADMINISTRATORS) To search for a volunteer or volunteers: 1. GO TO: People » Search 2. Click on the “Search” header (if required) to expand that area and specify filters and/or search options 3. Select the appropriate status filters, security (role) filters, and/or email filters for your search. 4. If you have no further conditions to place on your search, click on the [Search] button or proceed to the “Search Options” section. 5. In “Search Options”, click on the appropriate section header to show or hide the options available 6. Select your search options and then click on either [Add To Search] or [Add to Search and Go] a. To remove a condition from a search, click on the [Remove this search condition] button or [Clear Options] to remove all search options 7. To execute the search, click on the [Search] button. Results will appear in the Search Results section. You can click on the header for that section to show or hide the results. If no records match the options you have specified, the text “No people found” will be displayed. The Search Form is used in many options in Volunteer Impact. People menu: Search, Bulk Changes - Custom Fields, Bulk Changes - Qualifications, Log Hours, Remove Volunteers. Communications menu: Send Email, Sent Text, Create Mailing Labels, Create Phone List, Export For Mail Merge. Assign menu: From Volunteers Profile. Reports menu: Hours by Volunteer - Filtered, Volunteer Profile Excel Reports. Click on the [Search] button in the Filters section to retrieve the results that match the search options you have selected: As search options are specified in any of the “Search Options” section, you are reminded what search options you have already chosen. You can click on [Add to Search] to add individual filters or execute the search directly within the specific section by clicking on the [Add to Search and Go] button: If your search requires that all conditions must be met, specify that the Results must match “All” conditions specified. If your search requires that you combine the results retrieved by each condition, specify that the Results must match “Any” conditions specified. Volunteer Impact version 3.8 Standard Edition Administrator’s Guide 69 SECTION 4 - USING VOLUNTEER IMPACT (ADMINISTRATORS) Menu Options that use the Search Filter Several menu options (listed below at the left) in Volunteer Impact use the same type of search facility. Various actions can be taken on the results retrieved. Volunteer Impact version 3.8 Standard Edition Administrator’s Guide 70 SECTION 4 - USING VOLUNTEER IMPACT (ADMINISTRATORS) Search Filters Available by Menu Option Certain menu options have different search filters available, such as searching on status, security role, or email. The table below summarizes which search filters are available in each of the menu options that use a search. Menu option: PEOPLE ASSIGN REPORTS Bulk Changes Custom Fields Bulk Changes Qualifications Log Hours Remove Volunteers Send Email Send Text Create Mailing Labels Create Phone List Export For Mail Merge From Volunteer’s Profile Hours by Volunteer Filtered Volunteer Profile Excel Reports Search STATUS FILTERS Applicant ✓ In Process ✓ Accepted ✓ Inactive (Short ✓ Term, Long Term) Archived ✓ (Didn’t Start, Rejected, Dismissed, Moved, Quit, Deceased, Other) SECURITY FILTERS Volunteer, ✓ Administrator EMAIL FILTERS Email ID ✗ Mobile Email ✗ ID COMMUNICATIONS ✓ ✓ ✓ ✓ ✓ ✓ ✓ ✓ ✓ ✓ ✓ ✓ ✓ ✓ ✓ ✓ ✓ ✓ ✓ ✓ ✓ ✓ ✓ ✓ ✓ ✓ ✓ ✓ ✓ ✓ ✓ ✓ ✓ ✓ ✓ ✓ ✓ ✓ ✓ ✓ ✓ ✓ ✓ ✓ ✓ ✓ ✓ ✓ ✓ ✓ ✗ ✓ ✗ ✗ ✗ ✗ ✓ ✓ ✓ ✓ ✓ ✓ ✗ ✗ ✓ ✓ ✓ ✓ ✓ ✓ ✗ ✓ ✓ ✓ ✓ ✓ ✗ ✗ ✗ ✗ ✗ ✓ ✓ ✗ ✓ ✗ ✓ ✗ ✓ ✓ ✗ ✗ ✗ ✗ ✓ ✓ The following Search Options are available for all menu options utilizing the search feature: Contact Information, Date Joined, Birthday The following Search Options are available if objects of that type have been created: General Volunteer Interests, General Availability, Custom Fields, Qualifications, Activity Category, Activity, Activity Shift, Qualified for Activity, Scheduled Date, Hours Logged, Outputs, Committees The “Background Check” Search Option is only available for organizations within an Enterprise where the Background Check feature has been enabled. Volunteer Impact version 3.8 Standard Edition Administrator’s Guide 71 SECTION 4 - USING VOLUNTEER IMPACT (ADMINISTRATORS) Quick Info on a Profile To view a quick summary of a profile: 1. GO TO: People » Search 2. Click on the “Search” header (if required) to expand that area and specify filters and/or search options 3. To execute the search, click on the [Search] button. Results will appear in the Search Results section. You can click on the header for that section to show or hide the results. If no records match the options you have specified, the text “No people found” will be displayed. 4. Move your mouse over (i.e. hover) the desired volunteer name 5. Move your mouse over (i.e. hover) the [Info] button reveal a summary to the left of a person’s last name to Editing a Profile To edit a person’s profile: 1. GO TO: People » Search 2. Click on the “Search” header (if required) to expand that area and specify filters and/or search options 3. To execute the search, click on the [Search] button. Results will appear in the Search Results section. 4. Move your mouse over (i.e. hover) the desired volunteer name 5. When presented with the choice of “View Edit Change Status”, choose “Edit” 6. Click on the appropriate tab and/or section and enter/update the information, as needed 7. Click on the [Save] button in the section where you entered or updated data in order to save your changes or the [Cancel] button to abandon your changes. 8. Close the profile by clicking on the [close] button at the bottom of the window of the [Close] button at the top of the window. The “Edit Organization Member” Screen: Volunteer Impact version 3.8 Standard Edition Administrator’s Guide 72 SECTION 4 - USING VOLUNTEER IMPACT (ADMINISTRATORS) Tabs and Sections in a Profile: Main: General information about the person separated into sections: Contact Values for username, address, email IDs, telephone numbers, birthday, language, volunteer photograph General Volunteer Interests Custom areas of interest (for more information see the section on General Volunteer Interests) General Availability Volunteer’s availability (mornings, afternoons, evenings, nights) for each day of the week Custom Fields Values for Custom Fields Qualifications Values for Qualifications and their expiration dates (if applicable) Miscellaneous Values for security role, status, date joined, timelog permission, receive alerts*, contact person*, schedule display options, email signature*, logged hours goal, notes and database userid * Items marked with an asterisk are only applicable if the person’s security role Assign: Schedule: Hours: Communicate: Committees: Reports: is set to “Administrator”. Assign the person to an activity View the person’s schedule and generate a monthly schedule report View, log, edit and approve hours Sections: New Timelog Entry, Unapproved Timelog Entries, Approved Timelog Entries Send or display messages to the person Sections: Send Text Message, Send Email, Personal Message (visible only to the specific volunteer when he/she logs on to MyVolunteerPage.com), Email History (history of emails sent to the person) Manage committee membership for the person View and export reports on hours and outputs logged for the person If entering or updating data in the <Main> tab of a profile, you must click on the [Save] button within the appropriate section in order to save the changes you have made within that section. The profile photo for the main contact in an organization will display on the home page for myvolunteerpage.com next to the news if there is text entered for the “Current Message to Volunteers”. Editing Your Own Profile As an administrator, you can edit your own profile (i.e. the profile you have logged in as): 1. GO TO: Configuration » Edit My Profile 2. Click on the appropriate tab and/or section and enter/update the information, as needed 3. Click on the [Save] button in the section where you entered or updated data in order to save your changes or the [Cancel] button to abandon your changes. 4. Close the profile by clicking on the [close] button at the bottom of the window of the [Close] button at the top of the window. Volunteer Impact version 3.8 Standard Edition Administrator’s Guide 73 SECTION 4 - USING VOLUNTEER IMPACT (ADMINISTRATORS) View, Edit, Print or Change the Status of a Profile To view, edit or change the status of a profile: 1. GO TO: People » Search 2. Click on the “Search” header (if required) to expand that area and specify filters and/or search options 3. To execute the search, click on the [Search] button. Results will appear in the Search Results section. You can click on the header for that section to show or hide the results. If no records match the options you have specified, the text “No people found” will be displayed. 4. Move your mouse over (i.e. hover) the desired volunteer name 5. When presented with the choice of “View Edit Change Status”, click on the desired option a. If an email ID exists in the volunteer’s profile, you will also have the option for “Send Email”. If a mobile email ID exists in the volunteer’s profile, you will also have the option for “Send Text Message”. Otherwise, these options will not display. b. If you wish to print information on a profile, choose “View”. In the resulting dialog box, c. click on the [Print] button and follow the prompts to print the report to your desired local or network printer. If changing the active status, choose “Change Status”. In the resulting dialog box, select the appropriate value for the status (and reason, if required). Switching Between Viewing and Editing a Profile When viewing a profile (“View Organization Member” dialog), switch to Edit mode by clicking on [Edit] When editing a profile (“Edit Organization Member” dialog), switch to View mode by clicking on [View] Making Changes to Custom Field Values for Multiple People To change or remove the value in a custom field for multiple people: 1. GO TO: People » Bulk Changes - Custom Fields 2. Perform a search for the desired people. For more information, please see the section on Searching For a Person. 3. Scroll down to the section below the list of people found 4. Click on the droplist beside “Category” and select the desired custom field category from the list 5. Click on the droplist beside “Custom Field” and select the desired custom field to change 6. To change the value for this custom field for all selected people: a. Click on the button beside “Replace everything this field with” b. Select or enter the value to apply to all selected people To remove the value for this custom field for all selected people: a. Click on the button beside “Remove everything in this field” 7. Click on the [Save] button 8. In the confirmation dialog, check the box, “I understand this cannot be undone.” 9. Click on the [Confirm] button to proceed or the [Cancel] button to cancel the changes The contents of custom fields at both the Enterprise level (if applicable) and organization level can be changed. The contents of a custom field with a “File” data type cannot be changed. To change a checkbox from checked to unchecked, select the “remove” option. Volunteer Impact version 3.8 Standard Edition Administrator’s Guide 74 SECTION 4 - USING VOLUNTEER IMPACT (ADMINISTRATORS) Making Changes to Qualification Values for Multiple People To change or remove the value in a qualification for multiple people: 1. GO TO: People » Bulk Changes - Qualifications 2. Perform a search for the desired people. For more information, please see the section on Searching For a Person. 3. Scroll down to the section below the list of people found 4. Click on the droplist beside “Qualification” and select the desired qualification from the list 5. To change the value for this qualification for all selected people: a. Click on the droplist beside “Make the level” b. Select the level to apply to all selected people c. Enter a value beside “and the expiry date”, if applicable To remove the value for this qualification for all selected people: a. Click on the button beside “Remove everything in this field” 6. Click on the [Save] button 7. In the confirmation dialog, check the box, “I understand this cannot be undone.” 8. Click on the [Confirm] button to proceed or the [Cancel] button to cancel the changes The contents of qualifications at both the Enterprise level (if applicable) and organization level can be changed. Volunteer Status Each person in your organization has a status value associated with their profile. New volunteers can begin as “Applicants” and proceed through your approvals process to “In Process” and then “Accepted”. At any time, you can change the status of one of more volunteers, also inactivating or archiving them. Status Values: Applicant: In Process: Accepted: Inactive: Archived: (no sub-options) (no sub-options) (no sub-options) Short Term, Long Term Didn’t Start, Rejected, Dismissed, Moved, Quit, Deceased, Other With the exception of “Archived” you can change the status of multiple people at the same time. To archive a person, you must change the status for one person at a time. Changing the Status of One or More Profiles To change the status of one or more people: 1. GO TO: People » Search 2. Click on the “Search” header (if required) to expand that area and specify filters and/or search options 3. To execute the search, click on the [Search] button. Results will appear in the Search Results section. You can click on the header for that section to show or hide the results. If no records match the options you have specified, the text “No people found” will be displayed. Volunteer Impact version 3.8 Standard Edition Administrator’s Guide 75 SECTION 4 - USING VOLUNTEER IMPACT (ADMINISTRATORS) 4. In the “Change” column, place a checkmark in the box beside each person for which you wish to change the Status or click on the [Select All] checkbox to select all people retrieved by your search. (To de-select one person, simply click once on the box beside that person’s name) 5. With the [Change Selected] button now active, click on the arrow beside the button to reveal the available options 6. Choose the appropriate status to apply to all selected people. 7. Click on the [Confirm] button to change the status of the selected people. To abandon your changes, click on the [Cancel] button. There is no “Save” button associated with this feature. You can change the status again by following the steps above. Archiving a Profile You can archive profiles for volunteers that didn’t start, have been rejected, dismissed, moved, quit, deceased or for other reasons: 1. GO TO: People » Search 2. Click on the “Search” header (if required) to expand that area and specify filters and/or search options 3. To execute the search, click on the [Search] button. Results will appear in the Search Results section. You can click on the header for that section to show or hide the results. If no records match the options you have specified, the text “No people found” will be displayed. 4. Move your mouse over (i.e. hover) the desired volunteer name 5. When presented with the choice of “View Edit Change Status”, choose “Change Status” a. If an email ID exists in the volunteer’s profile, you will also have the option for “Send Email”. If a mobile email ID exists in the volunteer’s profile, you will also have the option for “Send Text Message”. Otherwise, these options will not display. 6. For status, select “Archive” from the droplist 7. Select the appropriate reason (Didn’t Start, Rejected, Dismissed, Moved, Quit, Deceased, Other) 8. Click on the [Save] button to archive the selected person. To abandon the change in status, click on the [Cancel] button. You can change the status again by following the steps above. An archived profile cannot be edited. You must change that person’s status to anything but archived in order to edit the profile. You can, however, view and run hours and outputs reports in an archived profile. If you archive a profile, that person will also be removed from any activity assignments. Volunteer Impact version 3.8 Standard Edition Administrator’s Guide 76 SECTION 4 - USING VOLUNTEER IMPACT (ADMINISTRATORS) Effects of Archiving a Profile If you archive a profile, there are several things to consider: An archived profile cannot be edited. You must change that person’s status to anything but “Archived” in order to edit the profile. Archiving a profile will remove information for that person’s General Volunteer Interests, General Availability, Activity information (assignments, signups, backup list) and Committee memberships Archiving a profile will retain information for contact information, custom fields, qualifications and hours log entries An administrator’s profile cannot be archived. If you wish to archive the profile, you must first set the role to “Volunteer”. Reactivating a Profile Reactivating a profile that was archived involves changing the status back to “Active” (or whatever status value is applicable): 1. GO TO: People » Search 2. Click on the “Search” header (if required) to expand that area and specify filters and/or search options 3. To execute the search, click on the [Search] button. Results will appear in the Search Results section. You can click on the header for that section to show or hide the results. If no records match the options you have specified, the text “No people found” will be displayed. 4. Move your mouse over (i.e. hover) the desired volunteer name 5. When presented with the choice of “View Edit Change Status”, choose “Change Status” a. If an email ID exists in the volunteer’s profile, you will also have the option for “Send Email”. If a mobile email ID exists in the volunteer’s profile, you will also have the option for “Send Text Message”. Otherwise, these options will not display. 6. Select the appropriate status from the droplist 7. Select the appropriate reason from the droplist, where appropriate 8. Click on the [Save] button to archive the selected person. To abandon the change in status, click on the [Cancel] button. You can change the status again by following the steps above. Deleting a Profile You can remove individual profiles or a group of profiles from your organization: 1. GO TO: People » Remove Volunteers 2. Click on the “Search” header (if required) to expand that area and specify filters and/or search options 3. To execute the search, click on the [Search] button. Results will appear in the Search Results section. You can click on the header for that section to show or hide the results. If no records match the options you have specified, the text “No people found” will be displayed. 4. Click on the link for Remove Volunteer beside the desired profile to be removed. a. To remove multiple volunteers, place a checkmark (click) in the box beside each person or click in the “Select All” checkbox, then click on the Remove Selected Volunteers link at the bottom of the screen. You can only remove profiles that are displayed on the current screen page. 5. When presented with the confirmation dialog, check the box “I understand this cannot be undone.” 6. Click on the [Remove] button to remove the selected person. To abandon the removal of the person, click on the [Cancel] button. If a profile is deleted, it is no longer associated with your organization. If a volunteer wishes to re-join your organization, you can send them a sign-up link. Volunteer Impact version 3.8 Standard Edition Administrator’s Guide 77 SECTION 4 - USING VOLUNTEER IMPACT (ADMINISTRATORS) Changing a Person’s Role (Volunteer to Administrator) You can take an existing volunteer profile and make that person an administrator (or the reverse). This involves changing the person’s “Security Role”: 1. GO TO: People » Search 2. Click on the “Search” header to expand that area and specify filters and/or search options 3. To execute the search, click on the [Search] button. Results will appear in the Search Results section. You can click on the header for that section to show or hide the results. If no records match the options you have specified, the text “No people found” will be displayed. 4. Move your mouse over (i.e. hover) the desired person’s name 5. When presented with the choice of “View Edit Change Status”, choose “Edit” 6. In the “Main” tab, click on the “Miscellaneous” section 7. To the right of “Security Role”, click on the [Change Role] button 8. In the “Change Role” window, select either “Volunteer” or “Administrator” 9. Click on [Save] to change the person’s role or [Cancel] to abandon the changes. You cannot change the security role of the main contact person for an organization to “Volunteer”. Changing a Person’s Password As an administrator, you can edit any profile in your organization and change the password, if necessary: 1. GO TO: People » Search 2. Click on the “Search” header to expand that area and specify filters and/or search options 3. To execute the search, click on the [Search] button. Results will appear in the Search Results section. You can click on the header for that section to show or hide the results. If no records match the options you have specified, the text “No people found” will be displayed. 4. Move your mouse over (i.e. hover) the desired person’s name 5. When presented with the choice of “View Edit Change Status”, choose “Edit” 6. In the “Main” tab, click on the “Contact” section 7. Click on the [Change Password] button 8. In the “Change Password” window, enter a new password and confirm it. The text you enter will display as a series of “bullets” (•) 9. Click on [Save] to change the person’s password or [Cancel] to abandon the changes. While you can change a person’s password, you cannot see a person’s current password. Volunteer Impact version 3.8 Standard Edition Administrator’s Guide 78 SECTION 4 - USING VOLUNTEER IMPACT (ADMINISTRATORS) Managing Volunteers Managing Applicant and In Process Volunteers “Applicant Volunteer” or “In Process Volunteer” refers to the current status of a new volunteer. You can view, edit and change the status of a volunteer. Actions: Info - view quick information on an applicant or in process volunteer profile View - view an applicant or in process volunteer profile Print - print information about an applicant or in process volunteer Edit - edit an applicant or in process volunteer profile Send Email - send an email to the applicant or in process volunteer (primary email ID must be specified in volunteer’s profile) Send Text Message - send a text message to the applicant or in process volunteer (mobile email ID must be specified in volunteer’s profile) Sort - sort the display of applicant or in process volunteers by last name, first name or date joined Change - change the status of one or more applicant or in process volunteers The “Manage Applicant Volunteers” Screen: You can sort the display of volunteers alphabetically (ascending or descending) by last name or first name or chronologically by the date joined value in their profile by clicking on the [Sort] button beside the “Last Name”, “First Name” or “Date Joined” column heading. Quick Info on an Applicant or In Process Volunteer To view a quick summary of an “applicant” or “in process” volunteer’s profile: 1. GO TO: People » Manage Applicant Volunteers or People » Manage In Process Volunteers 2. Move your mouse over (i.e. hover) the [Info] button reveal a summary to the left of a volunteer’s last name to Volunteer Impact version 3.8 Standard Edition Administrator’s Guide 79 SECTION 4 - USING VOLUNTEER IMPACT (ADMINISTRATORS) View, Edit, Print or Change the Status of an Applicant or In Process Volunteer To view, edit or change the status of an “applicant” or “in process” volunteer: 1. GO TO: People » Manage Applicant Volunteers or People » Manage In Process Volunteers 2. Move your mouse over (i.e. hover) the desired volunteer name 3. When presented with the choice of “View Edit Change Status”, click on the desired option a. If an email ID exists in the volunteer’s profile, you will also have the option for “Send Email”. If a mobile email ID exists in the volunteer’s profile, you will also have the option for “Send Text Message”. Otherwise, these options will not display. b. If you wish to print information on a profile, choose “View”. In the resulting dialog box, c. click on the [Print] button and follow the prompts to print the report to your desired local or network printer. If changing the active status, choose “Change Status”. In the resulting dialog box, select the appropriate value for the status (and reason, if required). Change the Status of Multiple Applicant or In Process Volunteers To change the status of multiple “applicant” or in “process volunteers”: 1. GO TO: People » Manage Applicant Volunteers or People » Manage In Process Volunteers 2. In the “Change” column, place a checkmark in the box beside each volunteer for which you wish to change the status or click on the [Select All] checkbox to select all volunteers. (To de-select one of the volunteers, simply click once on the box to the right of their date joined value.) 3. With the [Change Selected] button now active, click on the arrow beside the button to reveal the available options: Applicant Volunteers In Process Volunteers 4. Click on the [Confirm] button to change the status of the selected volunteers. To abandon your changes, click on the [Cancel] button. There is no “Save” button associated with this feature. You can change the status again by following the steps above. Volunteer Impact version 3.8 Standard Edition Administrator’s Guide 80 SECTION 4 - USING VOLUNTEER IMPACT (ADMINISTRATORS) Send an Email or Text Message to an Applicant or In Process Volunteer If a primary email ID has been specified, you can send an email to an applicant or in process volunteer. If a mobile email ID has been specified, you can send a text message (email) to an “applicant” or “in process” volunteer: 1. GO TO: People » Manage Applicant Volunteers or People » Manage In Process Volunteers 2. Move your mouse over (i.e. hover) the desired volunteer name 3. When presented with the choice of “View Edit Change Status Send Email Send Text Message”, click on the desired option a. For an email message: fill in the fields to send a generic email or select a pre-existing email template from the droplist. Optionally, you may add attachments (maximum total size cannot exceed 4MB), set the message priority, request a read receipt, and send a copy of the message back to you. b. For a text message: enter up to 100 characters of text for your message. Optionally, you can have a copy of your message sent back to you. 4. Click on the [Send] button to send your message or the [Cancel] button to abandon sending the message to the volunteer. Acknowledge First Contact You can acknowledge and “confirm” users that have been referred from a Community Hub. The option to acknowledge first contact is only available in Community Hub. Actions: Info - view quick information on a profile View - view a profile Print - print information on a profile when viewing it Edit - edit a profile Send Email - send an email to a person (a valid email ID is required in the profile) Send Text Message - send a text message to a person (a valid mobile email ID is required in the profile) Confirm - confirm (accept) the new person as referred from the Community Hub Volunteer Impact version 3.8 Standard Edition Administrator’s Guide 81 SECTION 4 - USING VOLUNTEER IMPACT (ADMINISTRATORS) The “Acknowledge First Contact” Screen: To send a message to a person and acknowledge first contact: 1. GO TO: People » Acknowledge 1st Contact a. To see a summary of a profile (name, address, telephone number, date joined, status, security role), move your mouse over (i.e. hover) the [Info] button to the left of the first name of a person. b. To sort by first name, last name or referral date, click on the sort buttons to the left of any of the column headings. 2. To confirm a single person: a. Move your mouse over (i.e. hover) the desired volunteer name b. When presented with the choice of “View Edit Confirm”, click on [Confirm] i. If an email ID exists in the volunteer’s profile, you will also have the option for “Send Email”. If a mobile email ID exists in the volunteer’s profile, you will also have the option for “Send Text Message”. Otherwise, these options will not display. OR 3. To confirm multiple people: a. In the “Confirm” column, place a checkmark in the box beside each person for which you wish to confirm or click on the [Select All] checkbox to select all people. (To de-select one of the people, simply click once on the box beside it) b. Click on the Confirm Selected link to confirm the people you have selected. 4. Click on the [Confirm] button to confirm the selected people. To abandon the confirmation, click on the [Cancel] button. Volunteer Impact version 3.8 Standard Edition Administrator’s Guide 82 SECTION 4 - USING VOLUNTEER IMPACT (ADMINISTRATORS) Dates and Times - The Language Setting The way that dates and times are displayed (both to administrators and volunteers) depends upon the “Language” setting within the individual’s profile. th In this example, the date used is “March 4 , 2012” and the times used are 8:00am and 8:00pm. Language Short Date format Long Date format (Activity details) Time format English (USA) M/D/YYYY 3/4/2012 Day, Month DD, YYYY Sunday, March 04, 2012 H:MI AM/PM 8:00 AM / 8:00 PM English (Canada) DD/MM/YYYY 04/03/2012 Month D, YYYY March 4, 2012 H:MI AM/PM 8:00 AM / 8:00 PM English (UK) DD/MM/YYYY 04/03/2012 DD Month YYYY 04 March 2012 HH24:MI 08:00 / 20:00 English (Australia) D/MM/YYYY 4/03/2012 Day, D Month YYYY Sunday, 4 March 2012 H:MI AM/PM 8:00 AM / 8:00 PM Français (Canada) YYYY-MM-DD 2012-03-04 D month YYYY 4 mars 2012 HH24:MI 08:00 / 20:00 Español DD/MM/YYYY 04/03/2012 day, DD month YYYY domingo, 04 de marzo de 2012 H24:MI 8:00 / 20:00 Formatting Legend: Code M Meaning Month number with no leading zero MM Two-digit month number with leading zero, if applicable D Date number with no leading zero DD Two-digit date number with leading zero, if applicable YYYY Four-digit year number Day Day of the week spelled out in full (an uppercase “D” indicates that the first letter of the day name will be capitalized) Month Month name spelled out in full (an uppercase “M” indicates that the first letter of the month name will be capitalized) H Hour of the day (1-12) with no leading zero H24 Hour of the day (0-23) with no leading zero HH24 Hour of the day (0-23) with leading zero, if applicable MI Two-digit value for minute (00-59) AM/PM Indicator for either AM (hours 0-11) or PM (hours 12-23) Volunteer Impact version 3.8 Standard Edition Administrator’s Guide 83 SECTION 4 - USING VOLUNTEER IMPACT (ADMINISTRATORS) Approving Data Entered by Volunteers Custom Fields, Qualifications, and Hours Log Entries can be set so that, when volunteers enter or update a value these objects, it requires administrative approval. Hours log permissions can be set for all volunteers in “Organization Settings” or within each individual volunteer’s profile. Approving or Rejecting Custom Field and Qualification Entries If a volunteer has entered or updated a value for a custom field or qualification that was created with a volunteer permission of “Read/write with approval”, you will see a system alert on your organization’s welcome page in the “Management” section. The “Approve Qualifications” Screen: Volunteer Impact version 3.8 Standard Edition Administrator’s Guide 84 SECTION 4 - USING VOLUNTEER IMPACT (ADMINISTRATORS) To approve custom field or qualification values: 1. From the Welcome Page: a. Click on either the Custom Field Approvals or Qualification Approvals system alert 2. From the menu option: 3. Go to either People » Approve Custom Fields or People » Approve Qualifications 4. The approval screen shows both the current and pending values for the custom fields or qualifications requiring administrative approval. Information on this screen can be sorted by first name, last name, or custom field / qualification by clicking on the sort buttons beside the appropriate column header. 5. Click in the checkbox for each item you wish to approve or reject. (To de-select one of the entries, simply click once on the box beside it) 6. With the [Change Selected] button now active, click on the arrow beside the button to reveal the available options 7. Choose [Accept] to accept all selected custom field values or [Reject] to reject (delete) all selected qualification values. 8. Click on the [Confirm] button to approve or reject the new value(s). To abandon the approval or rejection, click on the [Cancel] button. Values cannot be changed. They can only be approved or rejected. Approving or Rejecting Logged Hours If a volunteer has logged hours that require approval, you will see a system alert on your organization’s welcome page in the “Management” section. Actions: Info - view quick information on the hours log entry Edit - edit the hours log entry Approve - approve the hours log entry Reject - reject the hours log entry Sort - sort hours log entries by activity, volunteer name, or date Change - change selected hours log entries to either approved or rejected Volunteer Impact version 3.8 Standard Edition Administrator’s Guide 85 SECTION 4 - USING VOLUNTEER IMPACT (ADMINISTRATORS) The “Approve Logged Hours” Screen: You can sort the display of hours awaiting approval alphabetically (ascending or descending) by activity name, or by last/first name of the volunteer. Hours can also be sorted chronologically (ascending or descending) by the date worked. Click on the [Sort] button appropriate column heading. beside the Quick Info on an Hours Log Entry To view a quick summary of an hours log entry: 1. Either click on the Hours Approvals alert on the welcome page or go to People » Approve Logged Hours 2. Move your mouse over (i.e. hover) the [Info] button summary to the left of an hours log entry to reveal a Edit, Approve or Reject an Hours Log Entry To edit an hours log entry: 1. Either click on the Hours Approvals alert on the welcome page or go to People » Approve Logged Hours 2. Move your mouse over (i.e. hover) the desired hours log entry 3. When presented with the choice of “Edit Approve Reject”, click on the desired option a. If editing an hours log entry, you cannot change the name of the volunteer associated with the hours log entry or the date that the entry was made. Once rejected (deleted), you cannot retrieve the hours log entry or the outputs that may have been recorded for it. A recorded. or will indicate whether or not an hours log entry has outputs If you edit an hours log entry and click on [Save], the entry is approved. If you click on [Cancel], any changes are not saved and the entry will still be awaiting approval. Hours can also be edited, approved and rejected in the “Hours” tab of a volunteer’s profile. Volunteer Impact version 3.8 Standard Edition Administrator’s Guide 86 SECTION 4 - USING VOLUNTEER IMPACT (ADMINISTRATORS) Approve or Reject Multiple Hours Log Entries To approve or reject multiple hours log entries: 1. Either click on the Hours Approvals alert on the welcome page or go to People » Approve Logged Hours 2. In the “Change” column, place a checkmark in the box beside each hours log entry you wish to approve or reject or click on the [Select All] checkbox to select all hours log entries. (To de-select one of the hours log entries, simply click once on the box beside it) 3. With the [Change Selected] button now active, click on the arrow beside the button to reveal the available options 4. Choose [Approve] to approve all selected hours log entries or [Reject] to reject (delete) all selected hours log entries. 5. Click on the [Confirm] button to approve or reject the selected hours log entries. To abandon the approval or rejection, click on the [Cancel] button. Once rejected (deleted), you cannot retrieve the hours log entry or the outputs that may have been recorded for it. A recorded. or will indicate whether or not an hours log entry has outputs Assigning Volunteers to Activities As an administrator, you can assign volunteers to an activity (or activities) from within their profile, or from the list of scheduled or unscheduled activities. Enabling Group Scheduling In order to enable scheduling of groups (i.e. a single profile that is treated as a group) to an activity or shift, you must first enable that option for your organization: 1. GO TO: Configuration » Organization Settings 2. Click on the “General Settings” header (if required) to expand that area 3. To enable group scheduling, click in the box beside “Enable Group Scheduling” 4. Click on the [Save] button to save the information or [Cancel] to abandon the changes Once you have enabled group scheduling and have assigned groups of people to activities, group scheduling should not be turned off as it may have unpredictable results. Assignment Filters When looking for volunteers to assign to an activity, you can filter the list of people: Assigned: Available: Generally Available: Backup List: Qualified: The volunteer has been assigned to the activity The volunteer has declared that he/she is available to perform the activity Based on the general availability specified in the volunteer’s profile, he/she would be free to perform the activity The volunteer has declared that he/she is interested in being assigned to an activity that is already full The volunteer possesses at least the minimum qualifications in order to perform the activity Volunteer Impact version 3.8 Standard Edition Administrator’s Guide 87 SECTION 4 - USING VOLUNTEER IMPACT (ADMINISTRATORS) Assigning Volunteers to an Activity from their Profile You can manage an individual volunteer’s schedule from within their profile. To assign a person to an activity from within his/her profile: 1. GO TO: Assign » From a Volunteer’s Profile 2. Click on the “Search” header (if required) to expand that area and specify filters and/or search options 3. To execute the search, click on the [Search] button. Results will appear in the Search Results section. You can click on the header for that section to show or hide the results. If no records match the options you have specified, the text “No people found” will be displayed. 4. Move your mouse over (i.e. hover) the desired volunteer name 5. When presented with the choice of “View Edit Change Status”, click on “Edit” 6. In the “Edit Organization Member” dialog, click on the [Assign] tab 7. Optionally, you can select which activities to display by choosing the appropriate filter option (assigned, available, generally available, backup list, qualified) and clicking on the [Filter Activities] button. By default, activities for which the volunteer is qualified are shown. 8. Click on the activity to which you want to assign the volunteer. A dialog box will appear. 9. For unscheduled activities: a. You will see the name of the activity, the category to which it belongs, and the type of schedule. Below that are three checkboxes: Available, Assigned, Backup List i. Click on “Signed Up” to mark the person as available for the activity. You can return to assign the person later. ii. Click on “Assigned” to assign the volunteer to the activity. You can remove the person from the assignment later, if necessary. iii. Click on “Backup List” to place the person on the backup list (i.e. list of people interested in the activity). b. Click on the [Save] button to proceed or the [Cancel] button to cancel the operation. If you have made changes, the information displayed will be updated. 10. For scheduled activities: a. You will see the name of the activity, the category to which it belongs, and a summary of the schedule. Below that is a button to place the volunteer on the Backup List. b. To filter the shifts in the display: i. Select the days of the week to display. Note that only days with existing shifts scheduled will be displayed. ii. Select the start times to display. Note that only start times associated with existing shifts scheduled will be displayed. Volunteer Impact version 3.8 Standard Edition Administrator’s Guide 88 SECTION 4 - USING VOLUNTEER IMPACT (ADMINISTRATORS) iii. Select the desired status (Signed Up - show shifts volunteer has already signed up for, Not Available - show shifts volunteer has not signed up for, All - show all shifts) iv. Click on the [Filter Shifts] button c. Each shift will be displayed by date, including the start time, end time, lock status, if the volunteer has another assignment that overlaps with this one, if the volunteer has another assignment on that day, and whether or not the volunteer has already confirmed for the shift. i. Click in the appropriate box in the “Signed Up” (Su) column to mark the person as available for that shift. You can return to assign the person later. ii. Click in the appropriate box in the “Assigned” (As) column to assign the volunteer to that shift. You can remove the person from the assignment later, if necessary. d. Click on the [Save] button to proceed or the [Cancel] button to cancel the operation. If you have made changes, the information displayed will be updated. 11. When you are finished assigning the volunteer to activities, you may continue editing the volunteer’s profile, or click on the [Close] button to finish. If you are signing up or assigning one person (profile) as a group, you can indicate the size of that group in the appropriate box. The default group size is “1”. Once the group size for “signed up” (available) is entered and the assignment is saved, the “assigned” group size will be equal to that value. Sample screens: “Assign to Unscheduled Activity”: “Assign to Scheduled Activity”: You can review the activities on the volunteer’s schedule by clicking on the [Schedule] tab. Emailing Volunteers their Monthly Schedule You can email a volunteer his/her monthly schedule from his/her profile: 1. GO TO: People » Search 2. Search for the desired person. 3. Hover over the link to their name and click on “Edit” to edit their profile. For more information see the section on Searching for a Person. 4. Click on the <Schedule> tab in the volunteer’s profile. 5. Scroll down to the “Schedule By Month” section. 6. Select the output file type (.PDF, .DOC, .XLS, .MHTML) and paper size (if .PDF was chosen). 7. Enter or select the start date for the monthly report. Volunteer Impact version 3.8 Standard Edition Administrator’s Guide 89 SECTION 4 - USING VOLUNTEER IMPACT (ADMINISTRATORS) 8. To email the report to the volunteer, click on the [Email to Volunteer] button. There is no need to generate the report first. In the “Email Schedule To Volunteer” dialog, you can specify an email template, and change the contents of the message to be sent. When you are ready to send the schedule, click on the [Email to Volunteer] button. You can also export the schedule to the selected file type by clicking on the [Export Report] button or view it on screen by clicking on the [View Report] button. Icons and Symbols in the Unscheduled and Scheduled Activity Lists When assigning volunteers from either the unscheduled or the scheduled activity list, various icons and symbols are used to illustrate visually the status of an activity and available volunteers. < Min # available Min # available Min # scheduled Min # confirmed Mn Minimum Mx Maximum BU Backup List Av Available As Assigned Co Confirmed Unlocked Locked Do not auto assign Auto assign Do not autolock Autolock Yes No The number of people who have indicated they are available for the activity (or shift) is less than the minimum number needed The number of people who have indicated they are available for the activity (or shift) is greater than or equal to the minimum number needed The number of people assigned to the activity (or shift) is greater than or equal to the minimum number needed The number of people confirmed for the activity (or shift) is greater than or equal to the minimum number needed This column indicates the minimum number of people needed for the activity (or shift) as specified when the activity was created or updated This column indicates the optional maximum number of people needed for the activity (or shift) as specified when the activity was created or updated (i.e. when the activity or shift will lock automatically) This column indicates the number of people on the backup list for the activity (or shift) This column indicates the number of people that have specified they are available for the activity (or shift) This column indicates the number of people that have been assigned to the activity (or shift) This column indicates the number of people that have confirmed they will participate in the activity (or shift) The activity (or shift) is currently unlocked, indicating there is space available The activity (or shift) is currently locked, indicating there is no space available People are not automatically assigned to the activity (or shift) when they specify an availability People are automatically assigned to the activity (or shift) when they specify an availability. Specific auto assign settings are defined in the automation section activity itself. With no maximum number of people indicated, the activity (or shift) will not lock automatically People are automatically assigned to the activity (or shift) when they specify an availability. Specific auto assign settings are defined in the automation section activity itself. When viewing a list of people assigned to an activity (or shift), a checkmark may be seen in the “Qualified” and/or “Confirmed” columns When viewing a list of people assigned to an activity (or shift), an “X” may be seen in the “Qualified” and/or “Confirmed” columns Volunteer Impact version 3.8 Standard Edition Administrator’s Guide 90 SECTION 4 - USING VOLUNTEER IMPACT (ADMINISTRATORS) Assigning Volunteers from the Unscheduled or Scheduled Activity Lists You can manage your unscheduled and seasonal activities in one screen and your scheduled activities in another. From those screens, you can assign one or more volunteers to an activity or shift of an activity. Actions: Filter Activities - filter the display of activities by category and/or status (scheduled activities can also be filtered by day of the week or specific start/end dates) Activity Info - view quick information on an activity or shift Show/Hide Assigned Volunteers - show or hide the list of volunteers assigned to an activity or shift Assign - assign a volunteer to an activity or shift Confirm - confirm a volunteer’s assignment to an activity or shift Remove - remove a volunteer from an assigned activity or shift The “Assign Unscheduled Activities” Screen: Volunteer Impact version 3.8 Standard Edition Administrator’s Guide 91 SECTION 4 - USING VOLUNTEER IMPACT (ADMINISTRATORS) The “Assign Scheduled Activities” Screen: Hovering over an icon will display a tooltip explaining the meaning of the icon. For a detailed explanation of the icons in this screen, please refer to Icons and Symbols in the Unscheduled and Scheduled Activity Lists. Volunteer Impact version 3.8 Standard Edition Administrator’s Guide 92 SECTION 4 - USING VOLUNTEER IMPACT (ADMINISTRATORS) Assigning One Person, Multiple People or a Group to an Activity To assign volunteers from the list of unscheduled or scheduled activities: 1. GO TO: Assign » From the Unscheduled Activity List OR Assign » From the Scheduled Activity List 2. If desired, select the appropriate filters and click on the [Filter Activities] button 3. Click on the name of the activity or shift of an activity 4. 5. 6. 7. a. By hovering over the [Info] button beside an activity or shift, you will see a quick summary of that activity or shift. In the “Assign Volunteers” dialog, you will see a summary that includes the name of the activity, its status, and the scheduling numbers (minimum, maximum, backup list, availability, assigned, confirmed). For scheduled activities, the date and time of the shift will also be displayed. Optionally you can filter candidates by: a. Availability (don’t filter, show only those available, show only those on the backup list, show both available and backup list people) b. Qualification (don’t filter, show only qualified people) c. Status (accepted, in process, applicant, inactive - short term, inactive - long term) d. Overlap (don’t filter, only people without overlapping assignments, only people without an assignment on this day). This filter is only visible for scheduled activities. You can also sort candidates (by name or earliest availability date) and limit the results retrieved (25, 50, 100, 500) or not. When you have applied the desired filters, click on the [Search] button. Results will be displayed in the “Candidates” section and can be sorted by last name, first name, available, backup list, and qualified. If no volunteers match your filters, you can adjust them and search again. 8. By hovering over the [Info] button beside a person, you will see a quick summary of that person’s profile. Also displayed is whether or not that person is available, on the backup list, and qualified for the activity. 9. To assign one person to the activity or shift, click on the “Assign” option in the “Actions” column. a. With scheduled activities, if one person has expressed an availability for multiple shifts of this activity in the future, you can click on the “Assign Multiple” option in the “Actions” column. This will open up a window enabling you to assign the volunteer to any or all of the shifts they have requested. OR 10. To assign multiple people, click on the checkbox to the right of each desired person or click in the box beside “Select All” (below the list of candidates) to select all people, then click on the “Assign Selected” option below the list of candidates. OR 11. To assign a group to the activity or shift, click on the “Assign” option in the “Actions” column. a. With scheduled activities, if one person has expressed an availability for multiple shifts of this activity in the future, you can click on the “Assign Multiple” option in the “Actions” column. This will open up a window enabling you to assign the volunteer to any or all of the shifts they have requested. b. The “Group Size” column will enable you to indicate how many group members you are assigning to the activity/shift. 12. When you have finished assigning people to the activity, click on the [Close] button at the bottom of the “Assign Volunteers” screen. When viewing the list of people assigned to an activity, you can also view or edit their profile and send email and text messages (if the appropriate email and mobile email IDs exist in their profile). Volunteer Impact version 3.8 Standard Edition Administrator’s Guide 93 SECTION 4 - USING VOLUNTEER IMPACT (ADMINISTRATORS) The “Assign Volunteers” (Unscheduled Activities) Screen: The “Assign Volunteers” (Scheduled Activities) Screen: Volunteer Impact version 3.8 Standard Edition Administrator’s Guide 94 SECTION 4 - USING VOLUNTEER IMPACT (ADMINISTRATORS) Assigning People using the Visual Schedule The “Visual Schedule” is a calendar-driven option that enables you to view the status of activities in your organization and schedule volunteers. To use the Visual Schedule: 1. GO TO: Assign » From Visual Schedule 2. If desired, click on the “Schedule Filters” section header to select the desired “Activity Category” and “Activity” on which to filter. Click on the [Filter] button to refresh the display. 3. You can scroll through the two months displayed by clicking on the [Previous] and [Next] buttons. 4. Hover over one of the days in the calendar (days in the past can still be accessed but are shown greyed out). A window will pop up showing you the status of your activities. The information will include the number of activities at each status compared to the total number of activities and the percentage of your activities at that status. 5. Choose which activities to which you want to assign volunteers: a. To see a list of all activities on that day, click on the link to the date. b. To see all activities on that date corresponding to a specific status, click on the link to the desired status. 6. The selected activities will display below the calendar. Click on the link to an activity to begin assigning volunteers to it. 7. Continue according to the instructions in the section above, “Assigning One Person, Multiple People or a Group to an Activity”, from step 4. Instead of selecting a single day to view, you can also see a summary of all days in a month by hovering over the month above the calendar. From there, clicking on the desired status will show all days within that month matching that status. Summary - Assigning Volunteers from the Activity Lists To assign volunteers from the list of unscheduled or scheduled activities: 1. GO TO: Assign » From the Unscheduled Activity List OR Assign » From the Scheduled Activity List 2. Click on the name of the activity or shift of an activity 3. In the “Assign Volunteers” dialog, set the appropriate filters and click on the [Search] button to reveal a list of potential volunteers for the activity 4. In the “Candidates” section: a. Click on the “Assign” option in the “Actions” column beside each individual volunteer to assign OR Volunteer Impact version 3.8 Standard Edition Administrator’s Guide 95 SECTION 4 - USING VOLUNTEER IMPACT (ADMINISTRATORS) b. Click on the checkbox to the right of each person to assign (or click in the box beside “Select All” checkbox, then click on the “Assign Selected” option below the list of candidates. 5. Indicate the size of the group being assigned, if applicable Printing a Quick Report of the Status of an Activity or Shift To produce a quick report listing the number of people signed up, assigned to, confirmed for, or on the backup list for an activity or shift: 1. GO TO: Assign » From the Unscheduled Activity List OR Assign » From the Scheduled Activity List 2. If desired, select the appropriate display filters and click on the [Filter Activities] button 3. Click on the [Print] button in the toolbar The minimum and maximum number of people needed for the activity or shift will also be included in your printed output. Viewing Who is Already Assigned to an Activity or Shift To see who is already assigned to an unscheduled or scheduled activity: 1. GO TO: Assign » From the Unscheduled Activity List OR Assign » From the Scheduled Activity List 2. If desired, select the appropriate display filters and click on the [Filter Activities] button 3. Click on the [Show] button to the left of the name of the activity (or shift of the activity). A list of assigned volunteers will display. Alternatively, click on the [Show] button beside the “Activity” (unscheduled list) or “All Activities” (scheduled list) header to see a list of volunteers assigned to all activities. Clicking on “All Activities” will only show the names of assigned volunteers if less than 100 shifts are displayed. If a group has been assigned, you will see the number of people in that group in the “Group Size” column to the right of its name. If the person assigned is not a group (i.e. 1 person), no number will display in the “Group Size” column. Volunteer Impact version 3.8 Standard Edition Administrator’s Guide 96 SECTION 4 - USING VOLUNTEER IMPACT (ADMINISTRATORS) Confirming a Volunteer for an Unscheduled or Scheduled Activity To confirm a volunteer’s participation in an unscheduled or scheduled activity: 1. GO TO: Assign » From the Unscheduled Activity List OR Assign » From the Scheduled Activity List 2. If desired, select the appropriate display filters and click on the [Filter Activities] button 3. Click on the [Show] button to the left of the name of the activity (or shift of the activity). A list of assigned volunteers will display. 4. Move your mouse over (i.e. hover) the desired volunteer 5. When presented with the choice of “Confirm Remove View Edit”, click on “Confirm”. The volunteer is now confirmed for the activity or shift. Using MyVolunteerPage.com, a volunteer can confirm his/her participation in an activity. Removing a Volunteer from an Unscheduled or Scheduled Activity To remove a volunteer from an unscheduled activity: 1. GO TO: Assign » From the Unscheduled Activity List OR Assign » From the Scheduled Activity List 2. If desired, select the appropriate display filters and click on the [Filter Activities] button 3. Click on the [Show] button to the left of the name of the activity (or shift of the activity). A list of assigned volunteers will display. 4. Move your mouse over (i.e. hover) the desired volunteer 5. When presented with the choice of “Confirm Remove View Edit”, click on “Remove”. 6. In the confirmation dialog, click on the [Delete] button to remove the volunteer from the activity or shift, or the [Cancel] button to keep the volunteer assigned to the activity or shift. Using MyVolunteerPage.com, a volunteer can remove himself/herself from an activity, providing you have enabled the “Assignment Removal” feature in the attributes of the individual activity. Volunteer Impact version 3.8 Standard Edition Administrator’s Guide 97 SECTION 4 - USING VOLUNTEER IMPACT (ADMINISTRATORS) Logging Hours As an administrator, you can log hours for an activity for individual volunteers, multiple volunteers, or by volunteers assigned to that activity. If you are logging less than one hour for a person, you must include a zero to the left of the decimal place. If you search for people by specifying criteria for the “Activity”, “Activity Shift” or “Qualified For Activity” search options, the activity for which you have searched will be used as the value for the activity for which you are logging hours. Logging Hours for One Person from within a Profile To log hours for one person from within a profile, you will need to perform a search for that person first. 1. GO TO: People » Search 2. Search for the desired person for which to log hours. 3. Hover over the link to their name and click on “Edit” to edit their profile. For more information see the section on Searching for a Person. 4. Click on the <Hours> tab in the volunteer’s profile. 5. 6. 7. 8. Select an activity from the droplist of either Recent, Active, or Inactive activities. Enter the date volunteered (or select from the pop-up calendar). Enter the hours worked. A value greater than zero must be entered. Click on the [Save] button to log the hours or the [Cancel] button to abandon logging the hours. To log hours for another activity for the same volunteer, repeat steps 4 through 7 above. Volunteer Impact version 3.8 Standard Edition Administrator’s Guide 98 SECTION 4 - USING VOLUNTEER IMPACT (ADMINISTRATORS) Logging Hours for One or More People To log hours for one or more people: 1. GO TO: People » Log Hours 2. Search for the desired people for which to log hours. For more information see the section on Searching for a Person. 3. Below the results indicating the number of people found by your search, you can click on the “People Found” section to display the list of people. To de-select a person (i.e. not to log hours for them), click in the checkbox beside their name. 4. Select an activity from the droplist of either Recent, Active, or Inactive activities. 5. Enter the date volunteered (or select from the pop-up calendar). 6. Enter the hours worked. A value greater than zero must be entered. 7. Click on the [Save] button to log the hours. To log hours for another activity for the same people, repeat steps 4 through 7 above or search again (from step 2) to produce a new results set. If there are outputs associated with an activity, you will be asked for a value for the output(s) when logging hours for the activity. You may enter a decimal amount, but there must be one digit to the left of the decimal place. The TimeClock You can set up a computer (with or without a touch screen) in “kiosk mode” at your site where volunteers can log in and have their hours accumulated automatically. The website for this feature is timeclock.myvolunteerpage.com, but this should not be made public to volunteers. Once volunteers have logged in to the TimeClock, they will their first and last name at the bottom of the screen to reassure them that they have logged in correctly. Above that, they will see a list of activities to which they have been assigned for any (or all) of the organizations to which they belong. From this screen, they will be able to click on any one of those activities to start a clock that will accumulate their hours for them. Volunteer Impact version 3.8 Standard Edition Administrator’s Guide 99 SECTION 4 - USING VOLUNTEER IMPACT (ADMINISTRATORS) Once their shift has ended, they can return to the TimeClock to stop accumulating their hours and enter any applicable outputs (accomplishments) for the activity. They will also have the option to begin recording hours for a new task by clicking on the [Start a New Task] button without having to log out and log back in. Edit, Stop or Delete a Running TimeClock When volunteers have logged in to the TimeClock, you will be able to monitor who has logged in and either edit / stop the clock or delete the entry. Actions: Sort - sort the display of running TimeClocks by first name, last name, start date, start time, and activity Edit / Stop Clock - edit the date and start/end time of a running TimeClock or stop a running TimeClock Delete - delete a running TimeClock The “Manage Running Time Clocks” screen: To edit, stop or delete running TimeClocks: 1. GO TO: People » Manage Running Timeclocks a. To sort the information displayed, click on any of the sort buttons headers. beside the column b. By hovering over the [Info] button beside a TimeClock entry, you will see a quick summary of that volunteer’s profile. 2. To edit or stop a running TimeClock: a. Move your mouse over (i.e. hover) the activity for the desired TimeClock entry b. When presented with the choice of “Edit / Stop Clock Delete”, click on “Edit / Stop Clock” c. In the resulting dialog box, you can change the start date, start time, and end time d. Click on the [Save] button to proceed with your changes or the [Cancel] button to abandon any changes made 3. To delete a running TimeClock: a. Move your mouse over (i.e. hover) the activity for the desired TimeClock entry b. When presented with the choice of “Edit / Stop Clock Delete”, click on “Delete” c. In the resulting dialog box, you can change the start date, start time, and end time d. Click on the [Delete] button to delete the entry or the [Cancel] button to keep the TimeClock running When there are running TimeClocks, the “Volunteers on the Clock” system alert will also appear on your organization’s Home Page. Volunteer Impact version 3.8 Standard Edition Administrator’s Guide 100 SECTION 4 - USING VOLUNTEER IMPACT (ADMINISTRATORS) Edit or Delete an Hours Log Entry To edit or delete hours that have already been logged by administrators and/or volunteers: 1. GO TO: People » Edit Logged Hours 2. Search for the desired logged hours to edit. In the “Search” section you can enter specific filters or leave the criteria blank if you wish to retrieve a list of all logged hours: a. Enter the “From” and “To” dates that the activity was worked (i.e. “Date Volunteered”) or select from the pop-up calendar. b. Enter the “From” and “To” dates that the hours were logged (i.e. “Date Created”) or select from the pop-up calendar. c. Select the desired category from the activity category droplist. Select a specific activity within that category from the activity drop list. For all activities within a category, select “Don’t Filter” from the activity droplist. d. Choose a sort method (activity name, date created ascending, date created descending, date (worked) ascending, date (worked) descending, or volunteer name. 3. Click on the [Search] button to retrieve the results. The “Search Results” section will display the activity, last and first name of the volunteer, hours logged, date volunteered, date created, and whether or not any outputs were logged. a. For quick info on an hours log entry (activity, volunteer, number of hours, status, date volunteered, date created, updated, entry type, entered by, timeclock information, outputs recorded), move your mouse over (i.e. hover) the [Info] button to the left of an hours log entry. 4. Move your mouse over (i.e. hover) the desired hours log entry 5. When presented with the choice of “Edit Delete”, click on the desired option You can edit the name of the activity worked, the date volunteered, the number of hours worked, and the values for any outputs (if applicable). You cannot change the name of the volunteer who worked the hours nor the date the hours were originally logged. Hours can also be logged, edited and deleted from within the “Hours” tab of a volunteer’s profile. Once you have deleted an hours log entry, you cannot retrieve it. For further information, please see the section on Approving or Rejecting Logged Hours. Volunteer Impact version 3.8 Standard Edition Administrator’s Guide 101 SECTION 4 - USING VOLUNTEER IMPACT (ADMINISTRATORS) Determining How Hours Were Entered: Logged Manually or via the Timeclock You can determine if hours were entered manually or via the timeclock (and by who). 1. GO TO: People » Edit Logged Hours 2. Search for the desired logged hours to edit. 3. Click on the [Search] button to retrieve the results. 4. Move your mouse over (i.e. hover) the [Info] button to the left of an hours log entry. You will see information associated with the hours log entry (activity, volunteer, number of hours, status, date volunteered, date created, updated, entry type, entered by, timeclock information, outputs recorded): Hours logged manually: Hours logged via the Timeclock: This information is also included in the Logged Hours Excel Report. You can also determine how a specific volunteer’s hours were entered (and by whom) by hovering over the timelog entries in the “Hours” tab of their profile. Delete Multiple Hours Log Entries To delete multiple hours log entries that have already been logged by administrators and/or volunteers: 1. GO TO: People » Edit Logged Hours 2. Search for the desired logged hours to delete. In the “Search” section you can enter specific filters or leave the criteria blank if you wish to retrieve a list of all logged hours: a. Enter the “From” and “To” dates that the activity was worked (i.e. “Date Volunteered”) or select from the pop-up calendar. b. Enter the “From” and “To” dates that the hours were logged (i.e. “Date Created”) or select from the pop-up calendar. c. Select the desired category from the activity category droplist. Select a specific activity within that category from the activity drop list. For all activities within a category, select “Don’t Filter” from the activity droplist. Volunteer Impact version 3.8 Standard Edition Administrator’s Guide 102 SECTION 4 - USING VOLUNTEER IMPACT (ADMINISTRATORS) d. Choose a sort method (activity name, date created ascending, date created descending, date (worked) ascending, date (worked) descending, or volunteer name. 3. Click on the [Search] button to retrieve the results. The “Search Results” section will display the activity, last and first name of the volunteer, hours logged, date volunteered, date created, and whether or not any outputs were logged. a. For quick info on an hours log entry (activity, volunteer, status, date volunteered, date created), move your mouse over (i.e. hover) the [Info] button to the left of an hours log entry. 4. Place a checkmark (click) in the checkbox to the right of each hours log entry you wish to delete. To select all entries for deletion, click in the “Select All” box at the bottom of the screen. 5. Click on the “Delete Selected” option at the bottom of the screen. 6. Click on the [Confirm] button to confirm the deletion of the selected hours log entries or click on the [Cancel] button to cancel the deletion. For further information, please see the section on Approving or Rejecting Logged Hours. Once you have deleted an hours log entry, you cannot retrieve it. Reporting on Logged Hours You can see a list of hours logged from within the <Hours> tab of a volunteer’s profile. To produce reports of hours logged for multiple people in your organization, choose the appropriate report from the “Reports” menu. For more information, see the section on Reporting. Volunteer Impact version 3.8 Standard Edition Administrator’s Guide 103 SECTION 4 - USING VOLUNTEER IMPACT (ADMINISTRATORS) Communicating with Volunteers You can send both email and text messages to your volunteers, providing that a valid email ID or cellular (mobile) phone number exists in their profile. To create paragraph spacing in email messages, press the Enter key on your keyboard. To create a single line feed (no extra spacing between lines), hold down the Shift key and press Enter. When sending emails, click on the [Preview] button in the Rich Text Editor to enable you to see what your message would look like to your recipient(s). Sending Emails or Text Messages to One Person When searching for people, you can hover over a name in the search results and send an email or text message to that one person. To send an email or text message to one person: 1. GO TO: People » Search 2. Click on the “Search” header (if required) to expand that area and specify filters and/or search options 3. To execute the search, click on the [Search] button. Results will appear in the Search Results section. You can click on the header for that section to show or hide the results. If no records match the options you have specified, the text “No people found” will be displayed. 4. Move your mouse over (i.e. hover) the desired volunteer name 5. When presented with the choice of “View Edit Send Email Send Text Message Change Status”, click on the desired option a. Use the Rich Text Editor to compose an email or choose an email message template to use. When finished, click on [Send] to send your message. OR b. Enter the text for your message. You can enter a maximum of 100 characters. When finished, click on [Send] to send your message. In order to send an email to a person, a valid email ID must exist in that person’s profile. In order to send a text message to a person, a valid mobile email ID must exist in that person’s profile. The message will arrive on the person’s phone as a text message. Sending a Copy of an Email to Yourself When you send an email to anyone, you can check the option “Send me a copy of this message” or leave the checkbox blank. The next time you send an email, your previous preferences (i.e. send a message or not) will be remembered. Volunteer Impact version 3.8 Standard Edition Administrator’s Guide 104 SECTION 4 - USING VOLUNTEER IMPACT (ADMINISTRATORS) Sending Emails to Multiple People To send an email to a person: 1. GO TO: Communications » Send Email 2. Click on the “Search” header (if required) to expand that area and specify filters and/or search options 3. To execute the search, click on the [Search] button. Results will appear in the Search Results section. You can click on the header for that section to show or hide the results. If no records match the options you have specified, the text “No people found” will be displayed. a. To show the list of recipients, click on the arrow beside “People Found”. You can deselect anyone to whom you do not wish to send the message. 4. Below the search results you can select an email template to use or compose a message yourself using the Rich Text Editor. a. You can insert the recipient’s first name and/or last name into the message by selecting the appropriate field from the droplist and clicking on the [Insert name field] button. 5. Optionally, select an email template to use. You can still edit the contents of the message. 6. Enter the subject for your message 7. Optionally, you can add attachments (maximum total size cannot exceed 4MB), set the message priority (none, low, normal, high), request a read receipt, and send a copy of the message back to you. 8. Click on the [Send] button to send the email message. In order to send an email to a person, a valid email ID must exist in that person’s profile. Sending Emails to External Contacts To send an email to a person that does not have a volunteer profile: 1. GO TO: Communications » Send Email 2. Click on the “Search” header (if required) to expand that area and specify filters and/or search options 3. To execute the search, click on the [Search] button. Results will appear in the Search Results section. You can click on the header for that section to show or hide the results. If no records match the options you have specified, the text “No people found” will be displayed. 4. Click on the [Contact List] button to see a list of existing external contacts or to add a new external contact a. To add a new contact, click on the [New Email Contact] button and enter the information for the new contact. Note that a first name, last name and primary email ID are required. 5. To select a contact, click in the checkbox beside the name or click in the checkbox beside “Select All” to select al contacts 6. To add the selected contacts to the message, click on the [Add Selected Contacts] button 7. Optionally, select an email template to use. You can still edit the contents of the message. 8. Enter the subject for your message 9. Optionally, you can add attachments (maximum total size cannot exceed 4MB), set the message priority (none, low, normal, high), request a read receipt, and send a copy of the message back to you. 10. Click on the [Send] button to send the email message. Volunteer Impact version 3.8 Standard Edition Administrator’s Guide 105 SECTION 4 - USING VOLUNTEER IMPACT (ADMINISTRATORS) Sending Text Messages to Multiple People To send an email to a person: 1. GO TO: Communications » Send Text 2. Click on the “Search” header (if required) to expand that area and specify filters and/or search options 3. To execute the search, click on the [Search] button. Results will appear in the Search Results section. You can click on the header for that section to show or hide the results. If no records match the options you have specified, the text “No people found” will be displayed. a. To show the list of recipients, click on the arrow beside “People Found”. You can deselect anyone to whom you do not wish to send the message. 4. Below the search results, enter the text for your message. You can enter a maximum of 100 characters. 5. Optionally, you can send a copy of the text message back to you. 6. Click on the [Send] button to send the text message. In order to send a text message to a person, a valid mobile email ID must exist in that person’s profile. The message will arrive on the person’s phone as a text message. Viewing a History of Sent Email Messages To view a history of email messages you have sent: 1. GO TO: Communications » View Email History 2. By default, information (date, subject, sender) on all sent emails will be displayed. You can filter the display by date sent (from, to), text contained in the subject and type of recipients (bulk - sent to many, individual - sent to one person, or don’t filter). Choose the desired filter(s) and click on the [Filter] button a. To reveal a summary (subject, sender, date, number of recipients, number of attachments, priority, message), move your mouse over (i.e. hover) the [Info] button to the left of an entry b. To view more details (subject, sender, date, message, list of attachments, priority, list of recipients) of a sent message, click on the View link to the right of an entry. You can print the contents of this window by clicking on the [Print] button Only email recipients with a profile are shown in the view (along with their email IDs). Any external contacts to whom the message was sent are not included in this display. A history of emails sent to one volunteer is also visible in the “Communicate” tab of the individual’s profile. Volunteer Impact version 3.8 Standard Edition Administrator’s Guide 106 SECTION 4 - USING VOLUNTEER IMPACT (ADMINISTRATORS) Mailing Labels, Phone Lists and Exports With Volunteer Impact, you can produce mailing labels, phone lists and exports of profile information. Producing Mailing Labels You can generate mailing labels in a variety of formats for selected volunteers. To produce mailing labels for selected volunteers: 1. GO TO: Communications » Create Mailing Labels 2. Search for the desired people to include in your mailing labels. For more information see the section on Searching for a Person. 3. Below the results indicating the number of people found by your search, you can click on the “People Found” section to display the list of people. To de-select a person (i.e. remove from the labels), click in the checkbox beside their name. 4. Select the appropriate “Label Type” from the list of Letter (8.5” x 11”) or A4 (210mm x 297) formats: a. The following formats are supported: Avery 5160, 5161, 5163, 5164, 5167, J8158, J8159, J8160, J8162, J8163. 5. Optionally, you can include the name of the country in the label by clicking in the “Include Country” checkbox. 6. Sort the output by last name or postal/zip code by choosing the appropriate “Sort” option 7. Select the appropriate file format (.PDF, .DOC) for the labels. 8. Click on the [Download Labels] button. A dialog will appear asking if you wish to open or save the resulting file. Mailing Label Options: A mailing label will include the person’s first name, last line, both lines of the address (if present), city, province/state, postal/zipcode and (optionally) country. If you want to include additional information or exclude information, you can produce an export of profile information (see below) and use it in a Mail Merge operation in Microsoft Word. “Letter” is the default format for profiles with the language setting of “English (USA)” or “English (Canada)”. If “English (UK)” or “English (Australia)” is the language setting, “A4”will be the default format. Volunteer Impact version 3.8 Standard Edition Administrator’s Guide 107 SECTION 4 - USING VOLUNTEER IMPACT (ADMINISTRATORS) Producing Phone Lists To produce a phone list: 1. GO TO: Communications » Create Phone List 2. Search for the people to include in your list. For more information on performing a search, see the section on Searching for a Person. a. If searching for specific people, below the results indicating the number of people found by your search, you can click on the “People Found” section to display the list of people. To de-select a person (i.e. remove from the export), click in the checkbox beside their name. 3. Select the appropriate file format (.PDF, .DOC, .XLS, .MHTML) for the export. 4. Information can be sorted by either “Last name” or “Preferred call time”. 5. Click on the [Download Phone List] button. A dialog will appear asking if you wish to open or save the resulting file. Producing Exports of Profile Information To export information for selected volunteers to a spreadsheet: 1. GO TO: Communications » Export For Mail Merge 2. By choosing the appropriate radio button, you can either “Export all users” or “Search for users to export”. For more information on performing a search, see the section on Searching for a Person. a. If searching for specific people, below the results indicating the number of people found by your search, you can click on the “People Found” section to display the list of people. To de-select a person (i.e. remove from the export), click in the checkbox beside their name. 3. You can choose to export other values from the profiles by clicking on the header for the appropriate section: a. Basic Export Columns - choose all or specific contact and miscellaneous information to include (first name and last name will always be included) b. Custom Fields - choose all or specific custom field values to include c. Qualifications - choose all or specific qualification values to include d. Hours Logged - enter a date range (date volunteered, date hours entered) for total logged hours to include e. Login History - choose to include the last date the volunteer logged in 4. Select the appropriate file format (.CSV, .TXT, .XLS, .XLSX) for the export. 5. Click on the [Export Users] button. A dialog will appear asking if you wish to open or save the resulting file. The resulting spreadsheet can be used to produce a customized report or serve as data for a mail merge. Producing an Export of One Person’s Logged Hours To produce an export of logged hours for one person: 1. GO TO: People » Search 2. Enter criteria to search for the appropriate person (or people). For more information on performing a search, see the section on Searching for a Person. 3. Move your mouse over (i.e. hover) the desired volunteer name 4. When presented with the choice of “View Edit Change Status”, click on Edit 5. Click on the “Reports” tab 6. Scroll down to the “Export Logged Hours” section 7. If desired, filter for the desired hours log entries to include (by the date volunteered, the date the hours were entered and activity category) and specify a sort order. 8. Select the appropriate file format (.CSV, .TXT, .XLS, .XLSX) for the export. 9. Click on the [Export Logged Hours] button. A dialog will appear asking if you wish to open or save the resulting file. Volunteer Impact version 3.8 Standard Edition Administrator’s Guide 108 SECTION 4 - USING VOLUNTEER IMPACT (ADMINISTRATORS) Reporting A variety of pre-built reports are available within Volunteer Impact, enabling you to report on hours and outputs logged, and volunteer profiles. For more detailed information on the contents of each of the prebuilt reports available, go to Reports » Report Descriptions All reports may either be exported to a file by clicking on the [Export Report] button or viewed on-screen by clicking on the [View Report] button. Export file types include Adobe PDF document (.PDF), MS Word 97-2003 (.DOC), MS Excel 97-2003 (.XLS), and MHTML (Web Archive) document (.MHTML). You can also specify the paper size for PDF files: Letter - 8.5”x11” portrait orientation A4 - 8.27”x11.69” portrait orientation “Letter” is the default format for profiles with the language setting of “English (USA)” or “English (Canada)”. If “English (UK)” or “English (Australia)” is the language setting, “A4”will be the default format. Most reports also permit sorting of data (Number of hours, Number of volunteers, Activity category name), and entry of a Date Range. Hours Reports 12 Month Trend Hours by Category Hours by Category - Filtered Hours by Activity Report Group (NOTE: This report is only available if your organization is part of a Volunteer Impact Enterprise Edition account) Hours by Volunteer Hours by Volunteer - Filtered Category Hours by Activity Activity Hours by Volunteer Logged Hours Excel Report Outputs Reports Outputs by Volunteers Output Totals Outputs Excel Report Volunteer Profile Reports Volunteer Profile Excel Reports Information in a volunteer profile export can also be used to produce reports of birthdays and anniversaries. For samples of report output and more detailed descriptions, see Appendix 4: Reports. Hours Reports Outputs Reports Volunteer Profile Reports Volunteer Impact version 3.8 Standard Edition Administrator’s Guide 109 SECTION 4 - USING VOLUNTEER IMPACT (ADMINISTRATORS) Hours and Outputs Reports Available in a Volunteer’s Profile To produce hours and output reports for a specific volunteer from within his/her profile: 1. GO TO: People » Search 2. Click on the “Search” header (if required) to expand that area and specify filters and/or search options 3. To execute the search, click on the [Search] button. Results will appear in the Search Results section. 4. Move your mouse over (i.e. hover) the desired volunteer name 5. When presented with the choice of “View Edit Change Status”, choose “Edit” 6. Click on the “Reports” tab Comparisons: Interactively compare and view hours and outputs recorded for a year, quarter, month and week Number of Hours by Month: View hours and entries made in chart and table format Hours and Outputs Report: View and export a summary report of the hours and outputs recorded for a specific date range Detailed Hours Report: View and export a report detailing all hours entered for a specific date range Export Logged Hours: Export all information about hours entered for a specific date range Schedules A variety of pre-built reports are available within Volunteer Impact, enabling you to report on volunteer schedules. For more detailed information on the contents of each of the pre-built reports available, go to Schedules » Schedule Descriptions All reports may either be exported to a file by clicking on the [Export Report] button or viewed on-screen by clicking on the [View Report] button. Export file types include Adobe PDF document (.PDF), MS Word 97-2003 (.DOC), MS Excel 97-2003 (.XLS), and MHTML (Web Archive) document (.MHTML). You can also specify the paper size for PDF files: Letter - 8.5”x11” landscape orientation A4 - 8.27”x11.69” landscape orientation Most reports also permit sorting of data (Last name, Activity, Activity category name), and entry of a Date Range. Schedule Reports All Categories by Date Single Category by Date Single Activity by Date All Categories by Category Single Category by Activity All Activities by Volunteer Schedule Export to Excel Schedule Summary Export to Excel To report on activities and/or shifts with nobody assigned to them, select the “Schedule Export to Excel” and choose “Include shifts without assignments”. This schedule report enables you to export information about all activity types (scheduled, unscheduled, seasonal). For samples of schedule report output and more detailed descriptions, see Appendix 4: Reports. Schedule Reports Volunteer Impact version 3.8 Standard Edition Administrator’s Guide 110 SECTION 4 - USING VOLUNTEER IMPACT (ADMINISTRATORS) Schedule Reports Available in a Volunteer’s Profile To produce a calendar detailing a volunteer’s monthly scheduled activity assignments: 1. GO TO: People » Search 2. Click on the “Search” header (if required) to expand that area and specify filters and/or search options 3. To execute the search, click on the [Search] button. Results will appear in the Search Results section. 4. Move your mouse over (i.e. hover) the desired volunteer name 5. When presented with the choice of “View Edit Change Status”, choose “Edit” 6. Click on the “Schedule” tab 7. In the “Schedule by Month” section… 8. Select the output file type (.PDF, .DOC, .XLS, .MHTML) and paper size (if .PDF was chosen). 9. Enter or select the start date for the monthly report. 10. To email the report to the volunteer, click on the [Email to Volunteer] button. There is no need to generate the report first. In the “Email Schedule To Volunteer” dialog, you can specify an email template, and change the contents of the message to be sent. When you are ready to send the schedule, click on the [Email to Volunteer] button. You can also export the schedule to the selected file type by clicking on the [Export Report] button or view it on screen by clicking on the [View Report] button. Volunteer Impact version 3.8 Standard Edition Administrator’s Guide 111 SECTION 5 - USING MYVOLUNTEERPAGE.COM (VOLUNTEERS) Section 5 - Using MyVolunteerPage.com (Volunteers) Logging On The Sign-Up Tab The Assignments Tab The Hours Log Tab The Contact Tab The Reports Tab The My Profile Tab Volunteers cannot access the functionality available in Volunteer Impact. They must log on using MyVolunteerPage.com. Logging On To log on as a Volunteer: 1. Open your web browser (Microsoft Internet Explorer, Mozilla Firefox, etc.) and type MyVolunteerPage.com in the address bar. 2. Type in your username and password and click on the [Log In] button. If you forget your username and/or password, click on the Click Here link below “Forgot your username and password?” and follow the instructions above. Volunteer Impact version 3.8 Standard Edition Administrator’s Guide 112 SECTION 5 - USING MYVOLUNTEERPAGE.COM (VOLUNTEERS) The “MyVolunteerPage.com Home Page”: To log out, click on the [Log Out] button . From the Home Page, you can see news from all organizations to which you belong, in addition to the organization’s mission statement and any personal notes sent directly to you. This information is maintained by the Volunteer Coordinator for each organization. You will also see: a summary of your logged hours o Click on HOURS to view the hours and delete any incorrect entries your upcoming activity assignments (shifts), if applicable o Click on Your next shifts to view upcoming assignments (both unscheduled and scheduled) and confirm, decline or remove yourself from any assignments, where applicable o If you have been assigned as a group, the number of people in the group will display within parentheses after the name of the activity. any unconfirmed activity commitments (assignments) o Click on the [Confirm Now!] button to confirm any activities to which you have been assigned Volunteer Impact version 3.8 Standard Edition Administrator’s Guide 113 SECTION 5 - USING MYVOLUNTEERPAGE.COM (VOLUNTEERS) Tabs The following tabs are available from the Home Page: Home - return to the Home Page Sign-Up - sign up for activities Assignments - display activity assignments and confirm, decline, remove from activities, and generate/print your schedule Hours Log - display logged hours (and remove entries, if necessary) Contact - send email to volunteer coordinators or committee members Reports - view hours reports and summaries My Profile - edit/update your profile The Sign-Up Tab Signing Up For Activities To sign up for an activity: 1. Log on to MyVolunteerPage.com 2. Click on the <Sign-Up> tab 3. If desired, filter the activities by whether or not you are Qualified, Generally Available (according to the availability specified in your profile), already Signed Up (available), already Assigned, or on the Backup List. Click on [Filter Activities] to refresh the display. 4. Click on the desired activity and indicate your availability Signing Up For an Unscheduled Activity To sign up for an unscheduled activity: 1. Log on to MyVolunteerPage.com 2. Click on the <Sign-Up> tab 3. If desired, choose the appropriate filters and click on [Filter Activities] to refresh the display 4. Click on the link to the desired activity 5. Click on the [Sign Up] button to declare that you are available for the activity and wish to be assigned to it. If the activity is full, you can click on the Add me to the back-up list in case you ever need extras link. This will tell the administrator that you have an interest in the activity, even though it is currently fully staffed. After signing up, volunteers will see one of two possible messages: You have not been scheduled for this activity yet but you have been signed up for one or more shifts. You will be contacted later regarding shifts to which you get assigned OR You have been assigned to this activity. Please click confirm to acknowledge this. At this point, if permitted to do so, the volunteers can click on [Remove me from the signup list] to be taken off the signup list now, or return later and remove themselves. Volunteer Impact version 3.8 Standard Edition Administrator’s Guide 114 SECTION 5 - USING MYVOLUNTEERPAGE.COM (VOLUNTEERS) Signing Up For a Scheduled Activity To sign up for a shift (or shifts) of a scheduled activity: 1. Log on to MyVolunteerPage.com 2. Click on the <Sign-Up> tab 3. If desired, choose the appropriate filters and click on [Filter Activities] to refresh the display 4. Click on the link to the desired activity 5. If the desired activity occurs on different days and at different times, you can filter the list of shifts: a. Choose either “Shifts with vacancies only” (default), “Shifts with vacancies that match my general availability” (in the “Availability” section of the <My Profile> tab) or “Shifts I have signed up for” b. In the “Show shifts only on these days” section, check the boxes for the days you are available (or remove the check from boxes for the days you are not available) c. In the “Show shifts starting at” section, check the boxes for the times you are available (or remove the check from boxes for the times you are not available) 6. After selecting the desired filters (if applicable), click on the [Filter Shifts] button. The list of shifts you have chosen to display will show the date, start time, end time, whether or not you are assigned to another activity that overlaps with this one, and whether or not the shift is locked (i.e. full). Depending on the filters chosen, you may also see shifts for which you have already signed up. 7. Click in the “Sign Up” box beside the desired to declare that you are available for that shift and wish to be assigned to it. If the activity (or the desired shift) is full, you can click on the Add me to the back-up list in case you ever need extras link at the bottom of the screen. This will tell the administrator that you have an interest in the activity, even though it is currently fully staffed. 8. Click on the [Save] button After signing up, volunteers will see one of two possible messages: You have not been scheduled for this activity yet but you have been signed up for one or more shifts. You will be contacted later regarding shifts to which you get assigned OR You have been assigned to one or more shifts for this activity. Please click confirm next to each one (or confirm all) to acknowledge this. At this point, if permitted to do so, the volunteers can click on [Remove me from the signup list] to be taken off the signup list now, or return later and remove themselves. Removal From the Signup List To be removed from the signup list for an activity: 1. Log on to MyVolunteerPage.com 2. Click on the <Sign Up> tab 3. If necessary, filter the list of shifts by clicking on the button beside “Shifts I have signed up for”, then clicking on the [Filter Shifts] button 4. Remove the check from the boxes beside the shifts you are no longer available for (i.e. shifts you no longer wish to be assigned to) 5. Click on the [Save] button Volunteer Impact version 3.8 Standard Edition Administrator’s Guide 115 SECTION 5 - USING MYVOLUNTEERPAGE.COM (VOLUNTEERS) The Assignments Tab Viewing and Confirming Activity Assignments To view and confirm unscheduled and scheduled activity assignments: 1. Log on to MyVolunteerPage.com 2. Click on the <Assignments> tab 3. If you have yet to confirm an activity assignment, you will see the options to “Confirm” or “Decline” the assignment. Click on the desired option and choose [Save] to proceed or [Cancel] to cancel the operation. 4. Optionally, you may be able to remove yourself from an assignment for which you have already confirmed your participation. An administrator must enable this option when creating or editing the activity. If your profile has been assigned as a group of people, the number of people in the group will display within parentheses after the name of the activity. Removal From a Confirmed or Unconfirmed Activity Assignment To be removed from an unconfirmed activity assignment (i.e. an activity to which you have been assigned and for which you have yet to confirm your participation) or an assignment for which you have already confirmed your participation: 1. Log on to MyVolunteerPage.com 2. Click on the <Assignments> tab 3. You will see a list of assignments to both Unscheduled and Scheduled activities (where applicable). If you have yet to confirm your participation, click on the Decline option to remove yourself from the activity assignment. 4. In the “Decline Assignment” dialog, click on [Cancel] to stay assigned to the activity/shift or [Decline] to decline the activity assignment. In some organizations, volunteers are not permitted to remove themselves from activity assignments for which they have confirmed their participation. In that case, they would need to contact their Volunteer Coordinator and arrange to be removed from an assignment. In some organizations, administrators may permit volunteers to remove themselves from activity assignments only up until a specific time before the shift begins. Generating Your Schedule To generate your schedule of activities to which you have been assigned: 1. Log on to MyVolunteerPage.com 2. Click on the <Assignments> tab 3. To see your report on-screen in calendar format, click on the [View Report] button OR 4. To produce an export of your report, select the appropriate “Export File Type”, “Paper Size” and “Start Date” for the report, then click on the [Export Report] button Volunteer Impact version 3.8 Standard Edition Administrator’s Guide 116 SECTION 5 - USING MYVOLUNTEERPAGE.COM (VOLUNTEERS) The Hours Log Tab Viewing and Deleting Logged Hours To view hours you have logged (or hours that have been logged for you): 1. Log on to MyVolunteerPage.com 2. Click on the <Hours Log> tab 3. You will see a listing of hours logged. If any of the hours have been entered in error, you will have the option of deleting them by clicking on the “Delete” option. Logging Hours To log hours for an activity you have worked: 1. Log on to MyVolunteerPage.com 2. Click on the <Hours Log> tab 3. Select the activity for which you are logging hours by selecting if from the droplist beside “Activity”. This field contains a list of “Recent” activities. If you don’t see the activity you are looking for, click on the link All Active Activities or All Inactive Activities. You can return to the original list of activities by clicking on the Recent link. 4. Enter the date you worked in the field beside “Date Volunteered” 5. Enter the number of hours and minutes worked 6. Enter the value for any output(s) associated with the activity 7. Optionally, click the checkbox to “Post my hours to Facebook” 8. Click on the [Save] button to create the hours log entry If volunteers belong to multiple organizations, they will first have to select the organization for which they are logging hours prior to selecting the activity. Administrators can enable all volunteers to log hours (with or without approval required) or not. They can also set this permission for an individual volunteer from within his/her profile. The Contact Tab Communicating with Administrators and Committee members To send an email to an administrator or members of a committee to which you belong: 1. Log on to MyVolunteerPage.com 2. Click on the <Contact> tab 3. Select the volunteer coordinator or committee name by clicking on the radio button next to it 4. Enter a subject for your message 5. Enter the text (body) for your message 6. Click on the [Send Email] button to send your message If the volunteer does not belong to any committees (or belongs to committees that do not permit volunteers to email each other), this option will not exist. Email messages are not read in myvolunteerpage.com. You will need to connect to your email service provider (example: Hotmail, Yahoo, Gmail, etc.) in order to read any emails sent to you. Volunteer Impact version 3.8 Standard Edition Administrator’s Guide 117 SECTION 5 - USING MYVOLUNTEERPAGE.COM (VOLUNTEERS) Removing Yourself from an Organization To remove yourself from an organization to which you currently belong: 1. Log on to MyVolunteerPage.com 2. Click on the <Contact> tab 3. Scroll down to the list of organizations to which you belong 4. Click on the Resign from link for the appropriate organization 5. In the confirmation dialog, specify why you are resigning (“I am moving”, “I need / want to resign”) 6. Click on the [Confirm] button to remove yourself or the [Cancel] button to remain with the organization If a volunteer removes himself/herself from an organization, the profile is “Archived”. Other than removing himself/herself from an organization, a volunteer cannot change his/her status. The Reports Tab Viewing Hours, Accomplishments and Goals To see a graph and summary of your hours and outputs logged along with the status of your hours goal: 1. Log on to MyVolunteerPage.com 2. Click on the <Reports> tab 3. A bar chart will show the total hours logged for you over the last 12 months. This information will also be displayed numerically in a chart. The chart also includes any outputs logged. Below that, you can see how you are doing in achieving your hours goals (set within the <My Profile> tab). Generating a Summary Report of Your Hours To produce a summary report of your hours and achievements (outputs): 1. Log on to MyVolunteerPage.com 2. Click on the <Reports> tab 3. Scroll to the bottom where you will see the “Hours and Achievement Report” section 4. Select the Export File Type (PDF, DOC, XLS, MHTML) and Paper Size if exporting your report 5. Select the Date Range for your report. By clicking in the field, you can choose from a variety of pre-defined date range options. 6. Click on either the [Export Report] button to display your report on-screen or the [View Report] button to export your report to the selected file type. The My Profile Tab Updating Your Profile To update or enter information in your profile: 1. Log on to MyVolunteerPage.com 2. Click on the <My Profile> tab 3. Several tabs will now display: o Basic Info o Additional Info o Qualifications o Interests o Availability o Goals Volunteer Impact version 3.8 Standard Edition Administrator’s Guide 118 SECTION 5 - USING MYVOLUNTEERPAGE.COM (VOLUNTEERS) Basic Info This tab contains basic contact information including name, address, email IDs, telephone numbers, birthday, and language. You can also change your password and view, change or delete your profile photograph (JPG, GIF, PNG file). Additional Info This tab contains the custom fields set up for the organization. Some fields may require approval from the Volunteer Coordinator before the values entered will display in the profile. Fields in this tab may be text (short or long), number, date, list of custom options, checkbox, or file data types. Mandatory fields (i.e. where a value is required) will have an asterisk ( ) displayed beside them. Qualifications This tab contains the qualifications set up for the organization. Some qualifications may require approval from the Volunteer Coordinator before the values entered will display in the profile. You may only select one value for each applicable qualification. Some qualifications may also have an expiration date associated with them. Interests In this tab, you will be able to select the specific interests appropriate to you for each organization to which you belong. Additionally, you may select various generic classifications pertaining to activities, organizations, duration commitments, time commitments, and suitabilities. If you are a member of a Community Hub, you will also be able to select the communities in which you volunteer. Availability In this tab, you will be able to specify when you are generally available to volunteer for each of the organizations to which you belong. An administrator can use this information when determining who to assign to an activity. Volunteer Impact version 3.8 Standard Edition Administrator’s Guide 119 SECTION 5 - USING MYVOLUNTEERPAGE.COM (VOLUNTEERS) Goals In this tab, you can set an hours goal you wish to achieve with each of the organizations to which you belong. In the Accomplishments section of the <Reports> tab, you can track how you are doing in achieving your goals. Volunteer Impact version 3.8 Standard Edition Administrator’s Guide 120 APPENDIX Appendix 1 - Glossary of Terms Below is an alphabetical listing of the main terms used in Volunteer Impact. Term Active (status) - activity Active (status) - output Active (status) - volunteer Activity Activity Category Activity Shift Recurrence Template Administrator (role) Applicant (volunteer status) Application Form Approve Archived (volunteer status) Assigned (activity) Assignment Removal Auto Assign Auto Lock Automation (activity) Available (activity) Backup List Classifications Committee Communities Confirmed (activity) Custom Field Definition The activity is visible to those that have permission to see it and hours may be logged against it, where permitted If associated with an activity, a value will be requested for the output when hours are logged for the associated activity/activities A volunteer is active with your organization, either as an applicant, in the process of being approved, or accepted The volunteer’s job, assignment, task, position, etc. Activities with something in common can be grouped together into categories A template containing a schedule of regularly-occurring shifts that can be associated with activities and used to add further dates to an activity’s schedule A profile with administrative rights can create, modify, and delete any object in Volunteer Impact The prospective volunteer has just signed up and is about to go through your approvals process Prospective volunteers sign up to volunteer with you and enter values for custom fields and qualifications that have been added to one of three possible application forms Once a volunteer moves from applicant to in process, they can have their status changed to approved, as per your organization’s orientation/approvals process A volunteer is no longer part of your organization according to the reason (didn’t start, rejected, dismissed, moved, quit, deceased, other) given A volunteer has been assigned to perform an activity Whether or not volunteers can remove themselves from an assignment for which they have already confirmed An activity can be set so that all, qualified or no volunteers are assigned to it automatically when they express an availability An activity or shift can be set to lock, preventing volunteers from signing up for it, once a specified maximum number of people have been assigned to it The set of auto lock, auto assign and assignment removal options for an activity The volunteer has expressed an availability for an activity or specific shift The volunteer has expressed an interest in an activity that currently has the maximum number of volunteers assigned When an activity typically occurs, the area of work involved, who it would be suitable for, the daily/weekly/monthly/yearly time commitment required, and how long a volunteer is required A group to which volunteers can be assigned, enabling communication between volunteers, if appropriate The local communities served by your organization The volunteer has confirmed that he/she can perform the activity on the date/time assigned Data can be entered and stored in text (short, long), number, date, yes/no, custom options, and checkbox fields and files can be uploaded Volunteer Impact version 3.8 Standard Edition Administrator’s Guide 121 APPENDIX Term Custom Field Category Date Logged Date Worked Description Description - pre-assigned Description - post-assigned Disjointed (activity schedule) Email Filter (search) Email Message Email Message Template Enterprise Edition Export Filter (search filter) Floating Menu General Availability General Volunteer Interest Group Header Text Hours Hover Inactive (volunteer status) Info / Info Card In Process (volunteer status) Instance (shift) Interested (activity) Legend Links For Your Website Mailing Label Definition Custom fields that have something in common can be grouped and displayed together in a custom field category When logging hours, this is the date that the hours were entered When logging hours, this is the actual date that the activity was performed or worked Extra textual details entered for a custom field, qualification, output, committee, email template, or activity shift recurrence template to further describe it The description of an activity that people will see before being assigned to it The description of an activity that people will see only after being assigned to it An activity that occurs on an irregular basis When searching for a person, you can filter for those with/without email and/or a mobile number Communication to people in the organization via email A pre-built and email message format that can be applied to a new email message A version of Volunteer Impact typically used by large organizations with multiple departments or divisions spread across multiple Volunteer Impact accounts Generate a report to a variety of file formats (Excel, Word, PDF, text file) When searching for a person, you can create include people based on status, role and whether or not they have email or mobile numbers A menu that appears to the user when hovering over an object, usually to view, edit or delete the object The generic days and times of day when a volunteer is available A list of custom areas of interest A single profile that is treated as if it was a group of people Additional helpful text that can be added to headings above custom fields and qualifications to assist volunteers in filling in the information requested in MyVolunteerPage.com When a volunteer completes an activity, the hours worked can be logged by the volunteer, administrator, or via a TimeClock Moving your mouse over a button, heading or link (without clicking on it) will often reveal a tooltip or further information on the item A volunteer is not currently active with your organization (short term, long term) When hovering over an [Info] button beside profiles, activities, custom fields, qualifications, etc., a pop-up menu will display providing quick information on the item The prospective volunteer has signed up and is currently going through your approvals process The specific time(s) an activity occurs The volunteer has expressed an interest in an activity or specific shift that is currently full A list of icons used in the current screen being viewed A link can be generated to any one of your application forms and placed on your website, enabling people to sign up as new volunteers with your organization Address information that is assembled into a selected pre-formatted layout Volunteer Impact version 3.8 Standard Edition Administrator’s Guide 122 APPENDIX Term Maximum (activity) Merge Code Minimum (activity) Mission Statement MyVolunteerPage.com Occurrence (shift / template) One Time (activity schedule) Organization Organization News Output Profile Public Qualification Qualification Level Qualified (activity) Ranked (qualification) Recurrence (activity) Recurring Pattern (activity schedule) Rehydrate (volunteer status) Report Group Role Scheduled (activity) Search Options Search Results Seasonal (activity schedule) Security (Role) Filter (search) Shift (instance) Signed Up (activity) Signup Cutoff (activity) Definition The maximum number of people that can be assigned to an activity or shift before it will lock, preventing other volunteers from signing up The ability to include the first and/or last name of the recipient in an email message or email template The maximum number of people needed for an activity or shift Statement of the purpose of your organization, detailing your overall goals and direction Volunteers use MyVolunteerPage.com to sign up for activities and log hours A single shift or instance of an activity, indicating the date and time An activity that occurs once only A single Volunteer Impact account Specific organizational information that will display to a volunteer upon logging on to MyVolunteerPage.com Numeric values or amounts that can be measured/accumulated when an activity is performed Information about a person (volunteer, administrator) containing contact details, custom field and qualification values, activity schedule, hours logged and other miscellaneous information People who are not associated with your organization as volunteers or administrators are referred to as the “public” A single response (level) can be selected from a list as data for the volunteer’s profile The answers associated with a qualification According the qualification levels in the profile, the volunteer possesses the minimum requirements to perform a specific activity A qualifications whose levels (i.e. answers) are listed in order of importance or significance Settings pertaining to how often an activity occurs such as once every one/two/three/four weeks An activity that occurs on a regular basis Resetting the status of an archived volunteer to active A group of related activities gathered from various Impact accounts within an Enterprise A person in your organization can either be a volunteer (user of MyVolunteerPage.com) or an administrator (user of Volunteer Impact) An activity that has specific dates and times associated with it When searching for a person, you can create conditions upon which to retrieve profile information based on contact information, interests, availability, custom fields, qualifications, activity assignments, etc. The list of people retrieved by a search An activity that has no time associated with it and is performed on the volunteer’s own time, but only occurs between two dates When searching for a person, you can filter for volunteers, administrators or all people A single occurrence or instance of an activity, indicating the date and time The volunteer has expressed an availability for an activity or specific shift The time interval before an activity begins when no further volunteers may declare that they are available (i.e. sign up) Volunteer Impact version 3.8 Standard Edition Administrator’s Guide 123 APPENDIX Term Signup Settings Standard Edition Status Filter (search) System Alert Text Message TimeClock Unranked (qualification) Unscheduled / No Schedule (activity) Visibility (activity) Volunteer (role) Volunteer Impact Volunteer Permissions Volunteer Policies Definition Organization settings pertaining to the process when a new volunteer signs up, such as whether or not they require approval, a message to be sent to them automatically upon signup, and your volunteer policies which require their acceptance A version of Volunteer Impact typically used by small to medium sized organizations, with information in a single account When searching for a person, you can create include people based on whether or not they are active, inactive, or archived (and the various reasons, where applicable) Alert messages enabling administrators to approve new volunteers or values entered for custom fields, qualifications, hours, or recognition messages listing birthdays and anniversaries of service Communication to people in the organization via text message to a mobile device A facility enabling volunteers to sign in, select the activity they are going to be working, and have their hours accumulated automatically A qualifications whose levels (i.e. answers) are not listed in order of importance or significance An activity that has no date or time associated with it Options that indicate who can see an activity include nobody, members of the public, and volunteers (either qualified and/or with a specific status) A profile with volunteer rights can edit his/her profile, sign up for activities and log hours (where permitted) in MyVolunteerPage.com Administrators use Volunteer Impact to manage volunteers, activities, schedules, and hours Whether or not a custom field or qualification is visible to a volunteer and if a value can be entered/updated with or without administrative approval A list of policies, guidelines, expectations etc. that can be displayed to potential volunteers when they are signing up with your organization Volunteer Impact version 3.8 Standard Edition Administrator’s Guide 124 APPENDIX Appendix 2 - Menu Structure This is the structure of the menus within Volunteer Impact. Main Home Switch Accounts Logout Display the Welcome page Connect to another organization in your enterprise (Applicable for Volunteer Impact Enterprise Edition or managing multiple Volunteer Impact accounts only) Log out of Volunteer Impact People Search Add a Volunteer Add an Admin Manage Applicant Volunteers Manage In Process Volunteers Approve Custom Fields Approve Qualifications Bulk Changes - Custom Fields Bulk Changes - Qualifications Approve Logged Hours Manage Running TimeClocks st Acknowledge 1 Contact Log Hours Edit Logged Hours Remove Volunteers Search for a person. From a list of search results, you can view, edit, and change the status of profiles, assign volunteers, log hours, and send emails and text messages Add a new volunteer profile to your organization Add a new administrative profile to your organization Manage a list of volunteers with a status of “Applicant”. You can view/edit profiles and change the status of the volunteers. Manage a list of volunteers with a status of “In Process”. You can view/edit profiles and change the status of the volunteers. Approve data entered by volunteers for custom fields that have been set up as requiring administrative approval. Approve data entered by volunteers for qualifications that have been set up as requiring administrative approval. Change a value for a custom field for multiple volunteers Change a value for a qualification for multiple volunteers Approve hours logged by volunteers that have been set up as requiring administrative approval. View and manage volunteers logged on to the TimeClock Send an email to a volunteer acknowledging first contact (Community Hub only) Log hours for a volunteer Edit hours that have been logged by volunteers and/or administrators Remove (delete) profiles from your organization Communications Send Email Send Text Create Mailing Labels Create Phone List Export For Mail Merge Email Templates View Email History Send an email message to one or more people Send a text message to one or more people Produce mailing labels in .PDF or .DOC format Produce a phone list (PDF, DOC, XLS, MHTML formats) Produce an export of profile information in .CSV, .TXT, .XLS or .XLSX format Create and modify email templates View a history of sent emails Volunteer Impact version 3.8 Standard Edition Administrator’s Guide 125 APPENDIX Activities Manage Activities Manage Interests Manage Activity Shift Templates Create and modify activities Create and modify general volunteer interests Create and modify activity shift templates used by scheduled activities Assign From the Scheduled Activity List From the Unscheduled Activity List From a Volunteer’s Profile From Visual Schedule Assign volunteers to scheduled activities Assign volunteers to unscheduled activities Assign a volunteer to an activity from within their profile View the status of activities in a two month period and assign volunteers Reports Report Descriptions 12 Month Trend Report Hours by Category Hours by Category - Filtered Hours by Activity Report Group Hours by Volunteer Hours by Volunteer - Filtered Category Hours by Activity Activity Hours by Volunteer Outputs by Volunteers Output Totals Logged Hours Excel Report Outputs Excel Report Volunteer Profile Excel Reports Description of all reports available in this menu Illustrates the change in activity levels over the course of a year (Table, Charts) Displays the number of logged hours and the number of volunteers contributing hours for each Activity Category and graphs the five most active Categories (Table, Charts) Displays the number of logged hours and the number of volunteers contributing hours for each Activity Category and graphs the five most active Categories, filtered on volunteer profile data (Table, Charts) Displays the number of logged hours and the number of volunteers contributing hours for each Activity Report Group and graphs the five most active Report Group (Table) [only available for organizations within a Volunteer Impact Enterprise Edition account] Displays the hours logged and number of entries logged by each volunteer (Table) Displays the hours logged and number of entries logged, filtered by volunteer profile data (Table) Displays the number of logged hours and the number of volunteers contributing hours for each Activity within a specific Activity Category and graphs the five most active Activities (Table, Charts) Displays the number of hours logged and number of entries logged by each volunteer (Table) Displays the total for a specific Output for each volunteer and graphs the seven volunteers with the highest outputs (Table, Chart) Displays the total Output for each Output (Table) Individual hours logged by date, category, activity and volunteer exported to Excel for further data analysis (Export) Individual outputs logged by date, category, activity and volunteer exported to Excel for further data analysis (Export) Volunteer profile information exported to Excel for further data analysis (Export) Volunteer Impact version 3.8 Standard Edition Administrator’s Guide 126 APPENDIX Schedules Schedule Descriptions All Categories by Date Single Category by Date Single Activity by Date All Categories by Category Single Category by Activity All Activities by Volunteer Schedule Export to Excel Schedule Summary Export to Excel Description of all schedule reports available in this menu Schedule of volunteers assigned to all activities in all categories between specified dates, grouped by date (Table) Schedule of volunteers assigned to all activities in a specific category between specified dates, grouped by date (Table) Schedule of volunteers assigned to a specific activity between specified dates, grouped by date (Table) Schedule of volunteers assigned to all activities in all categories between specified dates, grouped by category (Table) Schedule of volunteers assigned to all activities in a specific category between specified dates, grouped by activity (Table) Schedule of volunteers assigned to all activities in all categories between specified dates, grouped by volunteer (Table) Activity assignment schedule details exported to Excel for additional filtering or manipulation (Export) Summary of activity/shift details (minimum/maximum needed, number signed up, number assigned, number confirmed) exported to Excel for additional filtering or manipulation (Export) Configuration Custom Fields Qualifications Outputs Committees Email Templates Organization Settings Links for your Website Edit My Profile Create and modify custom fields Create and modify qualifications Create and modify outputs to be used by activities Create and modify committees Create and modify email templates Create and modify operational settings for your organization and the signup process Generate links to add to your website for new people to sign up as volunteers Edit your own administrative profile (i.e. the profile you have logged in as) Volunteer Impact version 3.8 Standard Edition Administrator’s Guide 127 APPENDIX Appendix 3 - What Do You Want To Do? Here is a list of some of the more basic and commonly-used functionality in Volunteer Impact and the menu options associated with them. The administrators’ guide (Help Manual) from the Welcome Page. In the list of “Helpful Links” at the bottom of the screen, click on the link to the Volunteer Impact Administrator’s Guide Activities Create, edit or delete an activity Create, edit or delete activity shift recurrence templates Assign a volunteer to an unscheduled activity Assign a volunteer to a scheduled activity Assign a volunteer to an activity from within a profile View the status of activities in a two month period and assign volunteers Activities » Manage Activities Activities » Manage Activity Shift Recurrence Templates Assign » From Unscheduled Activity List Assign » From Scheduled Activity List Assign » From Volunteers Profile Assign » From Visual Schedule Approvals / Administrative Tasks Approve custom field values Approve qualification values Manage “applicant” volunteers Manage “in process” volunteers Approve logged hours Acknowledge first contact with a volunteer People » Approve Custom Fields People » Approve Qualifications People » Manage Applicant Volunteers People » Manage In Process Volunteers People » Approve Logged Hours People » Acknowledge 1st Contact Communications Send an email Send a text message Create, edit or delete email templates View a history of sent emails View a history of emails sent to one volunteer Communications » Send Email Communications » Send Text Configuration » Email Templates Configuration » View Email History “Email History” section in “Communicate” tab in volunteer’s profile Volunteer Impact version 3.8 Standard Edition Administrator’s Guide 128 APPENDIX Configuration / Setup Organization news Sign-up settings Email message for new volunteers Create, edit or delete custom fields Create, edit or delete qualifications Create, edit or delete outputs Create, edit or delete committees Generate sign-up links for your website Configuration » Organization Settings Configuration » Organization Settings Configuration » Organization Settings Configuration » Custom Fields Configuration » Qualifications Configuration » Outputs Configuration » Committees Configuration » Links for your Website Hours Entering hours Editing hours TimeClock Approve logged hours People » Log Hours People » Edit Logged Hours People » Manage Running TimeClocks People » Approve Logged Hours Reporting Hours Outputs Volunteer Profile Exports Create mailing labels Create phone lists Create exports for mail merge REPORTS menu (various options) REPORTS menu (various options) Reports » Volunteer Profile Excel Reports Communications » Create Mailing Labels Communications » Create Phone List Communications » Export For Mail Merge Schedules Schedule Reports SCHEDULES menu (various options) Volunteer Profiles Create a volunteer profile Create an administrative profile Search for, edit or change the status of a volunteer Change a value for a custom field for multiple volunteers Change a value for a qualification for multiple volunteers Remove (delete) a volunteer People » Add a Volunteer People » Add an Admin People » Search People » Bulk Changes - Custom Fields People » Bulk Changes - Qualifications People » Remove Volunteers Volunteer Impact version 3.8 Standard Edition Administrator’s Guide 129 APPENDIX Appendix 4 - Reports Below are samples of report output available in Volunteer Impact Standard Edition. Hours Reports The following reports summarize hours logged. Reports can be viewed on-screen or exported to a file (PDF, DOC, XLS, MHTML) Hours reports exports exported to PDF files can be in either Letter or A4 paper size (portrait orientation) 12 Month Trend Illustrates the change in activity levels over the course of a year Reports » 12 Month Trend Report Customization Options: Start Date Output: Table of monthly grand totals (number of volunteers, hours volunteered, average per volunteer) for 12 monthly periods Bar chart of number of hours for 12 monthly periods Bar chart of volunteers with hours for 12 monthly periods Bar chart of average hours per volunteer for 12 monthly periods Volunteer Impact version 3.8 Standard Edition Administrator’s Guide 130 APPENDIX Hours by Category Displays the number of logged hours and the number of volunteers contributing hours for each Activity Category and graphs the five most active Categories Reports » Hours by Category Customization Options: Sort (Number of hours, Number of volunteers, Activity category name) Date Range Output: Bar chart of logged hours by activity category Bar chart of number of volunteers by activity category Table of total hours, number of volunteers, average hours per volunteer Volunteer Impact version 3.8 Standard Edition Administrator’s Guide 131 APPENDIX Hours by Category - Filtered Displays the number of logged hours and the number of volunteers contributing hours for each Activity Category and graphs the five most active Categories, filtered on volunteer profile data Reports » Hours by Category - Filtered Customization Options: Profile Search Sort (Number of hours, Number of volunteers, Activity category name) Date Range Output: Bar chart of logged hours by activity category Bar chart of number of volunteers by activity category Table of total hours, number of volunteers, average hours per volunteer by activity category Hours by Activity Report Group Displays the number of logged hours and the number of volunteers contributing hours for each Activity Report Group and graphs the five most active Report Groups Reports » Hours by Activity Report Group (NOTE: This report is only available if your organization is part of a Volunteer Impact Enterprise Edition account) Customization Options: Sort (Report group name, Number of hours, Number of volunteers) Date Range Output: Table of total hours, number of volunteers, average hours per volunteer by report group Volunteer Impact version 3.8 Standard Edition Administrator’s Guide 132 APPENDIX Hours by Volunteer Displays the hours logged and number of entries logged by each volunteer Reports » Hours by Volunteer Customization Options: Sort (Number of hours, Last name) Minimum hours Date Range Output: Table of total hours and number of entries logged by volunteer Volunteer Impact version 3.8 Standard Edition Administrator’s Guide 133 APPENDIX Hours by Volunteer - Filtered Displays the hours logged and number of entries logged, filtered on volunteer profile data Reports » Hours by Volunteer - Filtered Customization Options: Profile Search Sort (Number of hours, Last name) Minimum hours Date Range Output: Table of total hours and number of entries logged by volunteer Volunteer Impact version 3.8 Standard Edition Administrator’s Guide 134 APPENDIX Category Hours by Activity Displays the number of logged hours and the number of volunteers contributing hours for each Activity within a specific Activity Category and graphs the five most active Activities Reports » Category Hours by Activity Customization Options: Sort (Number of hours, Number of volunteers, Activity name) Activity Category Date Range Output: Bar chart of logged hours by activity Bar chart of number of volunteers by activity Table of total hours, number of volunteers, average hours per volunteer by activity Volunteer Impact version 3.8 Standard Edition Administrator’s Guide 135 APPENDIX Activity Hours by Volunteer Displays the number of hours logged and number of entries logged by each volunteer Reports » Activity Hours by Volunteer Customization Options: Sort (Number of hours, Last name) Activity Category Activity Active Status Date Range Output: Table of total hours logged by volunteers by activity, number of volunteers and average hours per volunteer Logged Hours Excel Report Individual hours logged by date, category, activity and volunteer exported to Excel for further data analysis Reports » Logged Hours Excel Report Customization Options: Date Volunteered From Date Volunteered To Date Created From Date Created To Activity Category File Format (CSV, TXT, XLS, XLSX) Sort (Date volunteered ascending/descending, Date created ascending/descending, Activity name, Volunteer name) Output: Individual hours logged by activity category, activity, volunteer name, hours logged by, entry type (logged or timeclock), timeclock start/end date and time (if applicable), activity report group (if applicable) Volunteer Impact version 3.8 Standard Edition Administrator’s Guide 136 APPENDIX Outputs Reports The following reports summarize outputs logged. Reports can be viewed on-screen or exported to a file (PDF, DOC, XLS, MHTML) Output reports exports exported to PDF files can be in either Letter or A4 paper size (portrait orientation) Outputs by Volunteers Displays the total for a specific Output for each volunteer and graphs the seven volunteers with the highest outputs Reports » Outputs by Volunteer Customization Options: Sort (Output totals, Last name) Output Date Range Output: Bar chart of output totals logged by volunteer Table of output totals logged by volunteer Output Totals Displays the total Output for each Output Reports » Output Totals Customization Options: Sort (Output name) Date Range Output: Table of all output totals logged Volunteer Impact version 3.8 Standard Edition Administrator’s Guide 137 APPENDIX Outputs Excel Report Individual outputs logged by date, category, activity and volunteer exported to Excel for further data analysis Reports » Outputs Excel Report Customization Options: Date Volunteered From Date Volunteered To Date Created From Date Created To Activity Category File Format (CSV, TXT, XLS, XLSX) Sort (Date volunteered ascending/descending, Date created ascending/descending, Activity name, Volunteer name, Output name) Output: Individual outputs logged by activity category, activity, volunteer name, hours logged by, entry type (logged or timeclock), timeclock start/end date and time (if applicable), activity report group (if applicable) Volunteer Profile Reports The following reports display contents of volunteer profiles. Volunteer Profile Excel Reports Volunteer profile information exported to Excel for further data analysis Reports » Volunteer Profile Excel Reports Customization Options: Profile Search Basic Export Columns Custom Fields Qualifications Hours Logged Login History File Format (CSV, TXT, XLS, XLSX) Output: Specified profile contents Volunteer Impact version 3.8 Standard Edition Administrator’s Guide 138 APPENDIX Schedule Reports The following reports summarize activity schedules. Reports can be viewed on-screen or exported to a file (PDF, DOC, XLS, MHTML) Schedule reports exported to PDF files can be in either Letter or A4 paper size (landscape orientation). All Categories by Date Schedule of volunteers assigned to all activities in all categories between specified dates, grouped by date Schedules » All Categories by Date Customization Options: Sort (Start time, Activity category name, Activity name, Last name) Date Range Output: Schedule of volunteers assigned to activities in all categories between specified dates Single Category by Date Schedule of volunteers assigned to all activities in a specific category between specified dates, grouped by date Schedules » Single Category by Date Customization Options: Sort (Start time, Activity name, Last name) Activity Category Date Range Output: Schedule of volunteers assigned to activities in a specific category between specified dates Volunteer Impact version 3.8 Standard Edition Administrator’s Guide 139 APPENDIX Single Activity by Date Schedule of volunteers assigned to a specific activity between specified dates, grouped by date Schedules » Single Activity by Date Customization Options: Sort (Date, Start time, Last name) Activity Category Activity Active Status (Active, Inactive, Don’t Filter) Date Range Output: Schedule of volunteers assigned to a specific activity between specified dates All Categories by Category Schedule of volunteers assigned to all activities in all categories between specified dates, grouped by category Schedules » All Categories by Category Customization Options: Sort (Activity name, Date, Start time, Last name) Date Range Output: Schedule of volunteers assigned to activities in all categories between specified dates, grouped by category Volunteer Impact version 3.8 Standard Edition Administrator’s Guide 140 APPENDIX Single Category by Activity Schedule of volunteers assigned to all activities in a specific category between specified dates, grouped by activity Schedules » Single Category by Activity Customization Options: Sort (Activity name, Date, Start time, Last name) Activity Category Date Range Output: Schedule of volunteers assigned to activities in a specific category between specified dates, grouped by activity All Activities by Volunteer Schedule of volunteers assigned to all activities in all categories between specified dates, grouped by volunteer Schedules » All Activities by Volunteer Customization Options: Sort (Last name, First name, Date, Start time) Date Range Output: Schedule of volunteers assigned to activities in all categories between specified dates, grouped by volunteer Volunteer Impact version 3.8 Standard Edition Administrator’s Guide 141 APPENDIX Schedule Export to Excel Activity assignment schedule details exported to Excel for additional filtering or manipulation Schedules » Schedule Export to Excel Customization Options: Activity Type (Scheduled, Seasonal, Unscheduled) Activity Category Start Date (range) File Format (CSV, TXT, XLS, XLSX) Output: Schedule of activity assignments Schedule Summary Export to Excel Activity assignment schedule details exported to Excel for additional filtering or manipulation Schedules » Schedule Summary Export to Excel Customization Options: Activity Type (Scheduled, Seasonal, Unscheduled) Activity Category Start Date (range) File Format (CSV, TXT, XLS, XLSX) Output: Summary of activity/shift details (Date, time, minimum/maximum needed, number signed up, number assigned, number confirmed) Volunteer Impact version 3.8 Standard Edition Administrator’s Guide 142 APPENDIX Appendix 5 - Documentation Revisions / Addendum Date 21 June 2011 Revision details Initial publication. 4 July 2011 - Version 3.0 “Transitioning from version 2 to version 3” added as Appendix 5. 8 July 2011 - Version 3.0 Clarified “Display on Forms” for custom fields and qualifications. Clarified “Removing a Profile (Archive”). 11 October 2011 - Version 3.1 Reflected updates to the software. Included additional instructions and clarifications. Added information on Group scheduling. 1 November 2011 - Version 3.2 Reflected updates to the software. 28 November 2011 - Version 3.3 Reflected updates to the software. Added information on refreshing statistics, email preview and activity templates. 6 December 2011 - Version 3.4 Reflected updates to the software. Added information on the Visual Schedule. 1 January 2012 - Version 3.5 Reflected updates to the software. Added information on removing a profile. Updated information on displaying months in the Visual Schedule. 23 January 2012 - Version 3.6 Added information on making bulk changes to custom field and qualification values. Cover page updated with current version number and updated website information. 14 February 2012 - Version 3.7 Reflected updates to the software including the ability to produce a phone list, including hours logged in a user export and emailing a volunteer his/her schedule from within a profile. 21 March 2012 - Version 3.8 Reflected updates to the software including enhancements to searches (any, all, none of selected criteria), a redesign of qualification creation, increased information in hours log exports and the ability to associate a URL with a banner. Clarified date and time formatting. 15 April 2012 - Version 3.9 Reflected updates to the software including enhancements to email (history of emails), new archive status reasons (didn’t start, other) the ability to switch between “view” and “edit” modes in a profile, and accessing the volunteer’s last login date. Volunteer Impact version 3.8 Standard Edition Administrator’s Guide 143