1
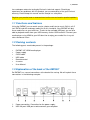
EM7067 – 3,5” SATA HDMI Media player
2 | ENGLISH
EM7067 – 3,5” SATA HDMI Media player
Warnings and points of attention
Repairing of the product should be done by qualified Eminent staff!
Table of contents
1.0 Introduction ........................................................................................................... 2
1.1 Functions and features ...................................................................................... 3
1.2 Packing contents ............................................................................................... 3
1.3 Explanation of the back of the EM7067.............................................................. 3
2.0 Using a 3,5’’ SATA hard disk ................................................................................. 4
2.1 Mounting the hard disk ...................................................................................... 4
3.0 Connecting the media player to your television ...................................................... 4
3.1 Connecting the EM7067 using HDMI ................................................................. 4
3.2 Connecting the EM7067 using composite .......................................................... 5
3.3 Audio connections ............................................................................................. 5
4.0 Setting up the media player ................................................................................... 5
4.1 Language Setting .............................................................................................. 5
4.2 Video Setting ..................................................................................................... 6
4.3 Audio Setting ..................................................................................................... 6
4.4 Photo Setting ..................................................................................................... 6
4.5 Formatting the hard disk (optional) .................................................................... 7
4.6 Setting up priority devices .................................................................................. 7
5.0 Copying media files to the internal hard disk using USB (Windows)....................... 7
5.1 Copying files to the media player ....................................................................... 7
5.2 Copying DVD’s to the media player (menu support)........................................... 8
6.0 Playing Media ........................................................................................................ 8
6.1 Video Playback .................................................................................................. 8
6.1.1 DVD ISO......................................................................................................... 9
6.1.2 DVD (with menu support)................................................................................ 9
6.1.3 Playing other video formats ............................................................................ 9
6.2 Playing Music .................................................................................................... 9
6.3 Playing Photos .................................................................................................. 9
6.4 Playing photos with background music ............................................................ 10
7.0 Frequently asked questions ................................................................................. 10
8.0 Service and support............................................................................................. 11
9.0 Warranty conditions ............................................................................................. 11
10.0 Declaration of Conformity .................................................................................. 11
1.0 Introduction
Congratulations with the purchase of this high-quality Eminent product! This product
3 | ENGLISH
has undergone extensive testing by Eminent’s technical experts. Should you
experience any problems with this product, you are covered by a five-year Eminent
warranty. Please keep this manual and the receipt in a safe place.
Register your product now on www.eminent-online.com and receive product updates!
1.1 Functions and features
Using the EM7067 you can watch movies, photos and listen to music. Built-in a 3,5
inch SATA hard disk and copy media files to this hard disk. Your EM7067 will play
these media files on your television. Thanks to the available USB port, you are also
able to playback media from your USB memory stick or USB hard disk. Connect your
media player using HDMI to your HD television to enjoy your media files in crystal
clear sound and vision.
1.2 Packing contents
The following parts need to be present in the package:
•
•
•
•
•
•
•
EM7067 3,5” HDMI media player
Power supply
CVBS cable
USB cable
Remote control
4 screws
User Manual
1.3 Explanation of the back of the EM7067
De EM7067 has several connections at the back of the casing. We will explain these
connections in the following example:
1.
2.
Power connection: Connection for the power supply.
USB 2.0 port: USB port used to connect your computer.
4 | ENGLISH
3.
4.
5.
6.
7.
HDMI Output: Used to connect to your television.
Composite video: Connect your television if a HDMI connection is not available
Audio L/R: Audio left/right. Used to connect to your television or receiver if HDMI
audio is not available.
USB Host: Used to connect your USB hard disk or USB memory stick.
Power: Press this button to start or shutdown the EM7067.
2.0 Using a 3,5’’ SATA hard disk
It is not necessary to mount a SATA hard disk, because you can also stream from an
external USB device like a USB hard disk. But in order to gain full advantage of the
EM7067, we advise you to built-in a 3,5 “ SATA hard disk.
2.1 Mounting the hard disk
1.
Make sure the EM7067 is completely turned off and no cables connected to the
device.
2. Take up the EM7067 media player.
3. Gently push the lid of the casing in the direction of the back of the EM7067.
4. Take of the lid.
5. The hard disk bracket inside is fixed with four screws. Take these screws out.
6. Take out the hard disc bracket.
7. Align the SATA hard disk with the four mounting holes at the side of the bracket.
8. Fix the hard disk using the four supplied larger screws.
9. Now gently place the hard disk bracket in the casing. If correct, the SATA
connector in the casing will align with the SATA connection of the hard disk.
10. Gently slide the disk towards the internal SATA connection, you will hear a ‘click’
the moment the hard disk slides into the connector .
11. Use the four screws you have taken out at step 5, to fix the hard disk bracket to
the main board of the EM7067.
12. Now place the lid back onto the casing.
Refer to chapter 4.5 to format the hard disk in the EM7067.
3.0 Connecting the media player to your
television
3.1 Connecting the EM7067 using HDMI
The best image quality can be obtained by connecting the media player to your
television using HDMI. HDMI delivers a digital and crystal clear image and sound.
Also, you can benefit from the possibility to use high resolutions when using HDMI.
5 | ENGLISH
1.
2.
Connect the HDMI cable to the HDMI output of the media player.
Connect the other side of the HDMI cable to an available HDMI input of your
television.
Note: Make sure you television and media player are both turned off before
connecting the HDMI cable. This way, damage to your equipment will be prevented.
3.2 Connecting the EM7067 using composite
If your television is not equipped with HDMI connections, then you can connect the
EM7067 using composite.
1.
2.
Connect the yellow plug to the yellow cinch connection on the EM7067.
Now you can connect the yellow plug on the other side of the cable to the yellow
cinch connection on your television.
3.3 Audio connections
If you have connected your media player using HDMI, then you can enjoy the crystal
clear sound experience HDMI delivers. But, if you have connected the media player
using composite, you can connect the red and white cinch connections to your media
player and television to create a 2.0 sound experience.
1.
2.
Connect the white plug to the white cinch connection on the EM7067 and
connect the red plug to the red cinch connection on the EM7067.
Now connect the white and red plugs to the corresponding cinch connections on
your television or connect these cables to your (stereo) receiver to create a 2.0
effect.
4.0 Setting up the media player
Before usage, you can alter some settings on the media player itself in order to
personalize the EM7067. For example, you can change the language of the menu,
change the resolution of the screen so it matches your television, alter the sound
settings etc. We will explain in the following steps how you can alter these settings.
4.1 Language Setting
1.
2.
3.
4.
5.
Make sure the media player is completely started and you see the media players
menu on your screen.
Use the arrow keys of the remote control to navigate to ‘Setup’ and press the
‘OK’ button.
Use the arrow keys to select the third icon.
Use the arrow keys to select ‘OSD LANGUAGE’ and press the ‘OK’ button.
Select the desired language and press the ‘OK’ button. The media player will
6 | ENGLISH
automatically change the language.
4.2 Video Setting
1.
2.
3.
4.
5.
6.
7.
Use the arrow keys on the remote control to navigate to ‘Setup’ and press the
‘OK’ button.
Navigate to ‘HD OUTPUT’ and press the ‘OK’ button.
Select the resolution you want to use and press the ‘OK’ button. The media
player will set itself to the chosen resolution.
Navigate to ‘TYPE TV’ and press the ‘OK’ button. Select the correct screen
ration. Select ‘16:9’ if you have a widescreen television and press the ‘OK’
button.
Navigate to ‘Type System’ and press the ‘OK’ button.
Select the system type. Usually, selecting PAL60 or PAL when situated in Europe
will be the correct setting. Select NTSC if you are located in the United States.
Select ‘AUTO’ if you are not sure what to set. The EM7067 will then automatically
choose the most suitable setting.
Press the ‘Stop’ button to return to the main menu.
Note: The EM7067 is not a stand-alone High Definition player. De EM7067 only plays
‘regular’ SD file formats. If you set the EM7067 to a higher resolution, your movies will
be up scaled to a higher resolution.
4.3 Audio Setting
1.
2.
3.
4.
5.
Use the arrow keys to navigate to ‘Setup’ and press the ‘OK’ button.
Use the arrow keys to navigate to the speaker icon.
Use the arrow keys to select ‘DOWNMIX’ and press the ‘OK’ button. Now select
the desired setting. For example choose ‘V.SURROUND’ to create a virtual
surround sound setting.
Use the arrow keys to navigate to ‘HDMI AUDIO’. If you have connected the
EM7067 using the composite cables (red and white), then select PCM and press
the ‘OK’ button. If you have connected the EM7067 using HDMI, then select
‘AUTO’ and press the ‘OK’ button.
Press the ‘Stop’ button to return to the main menu.
4.4 Photo Setting
1.
2.
3.
4.
Use the arrow keys to navigate to ‘Setup’ and press the ‘OK’ button.
Use the arrow keys to navigate to ‘SLIDE TIME’.
Select the amount of time between displaying photos or images. Select 5
seconds if you want to see a new image every 5 seconds.
Press the ‘Stop’ button to return to the main menu.
7 | ENGLISH
4.5 Formatting the hard disk (optional)
Now you have set the desired settings, you can format the internal hard drive if
needed. When using a brand new hard disk, it is necessary to do so, or in case your
hard disk uses a file system the EM7067 does not support.
1.
2.
3.
Use the arrow keys to select ‘Movie’, ‘Music’ or ‘Photo’ and press the ‘OK’ button.
The media player will give you the notification ‘This device need format’. Are you
sure you to format it?’
Select ‘Yes’ and press the ‘OK’ button. The media player will start to format the
internal hard disk. Be patient, this can take a while. Do not interrupt this
procedure.
4.6 Setting up priority devices
Since the EM7067 can handle both a internal hard disk and USB devices, you can
setup a priority device. Here you can select what type of device get a priority. If you
select ‘HDD’ then the media player will directly access the internal hard disk. If you
choose ‘USB’ , the media player will direct try to access connected USB devices.
1.
2.
3.
Use the arrow keys to select ‘Setup’ and press the ‘OK’ button.
Select ‘PRIOR.STORAGE’ and select ‘USB’ or ‘HDD’. Select ‘HDD’ if you are
using an internal hard disk, select ‘USB’ if you are using USB devices.
Press the ‘OK’ button to save the setting.
Press the ‘Stop’ button to return to the main menu.
5.0 Copying media files to the internal hard
disk using USB (Windows)
Now you have built-in a hard disk and you have setup the media player for usage, you
can now copy media files to the internal hard disk. Copying media files to the built-in
hard disk can be done quickly and easily.
5.1 Copying files to the media player
Use the following steps to copy media files to the media player.
1.
2.
3.
4.
5.
6.
Make sure your computer is turned and is completely started. Also, make sure
the media player is completely started.
Connect the supplied USB cable to the 'USB 2.0’ port of the EM7067.
Connect the other side of the USB cable to a free USB port of your computer.
The media players menu will disappear, while your computer will recognize the
media player.
Now use the Windows explorer to browse to the media files you want to copy.
Select the folder or file with the right mouse button en choose ‘Copy to’. Then
8 | ENGLISH
7.
8.
select the media player’s hard disk.
Once you have finished copying, disconnect the USB cable from the media
player.
If the media player does not automatically return to it’s main menu, press the
power button once. The media player will then automatically return to it’s main
menu.
5.2 Copying DVD’s to the media player (menu support)
If you want to play DVD’s with full menu support, you have to copy the files of the
DVD’s in a slightly different manner. Use the following steps to copy the DVD’s:
1.
2.
3.
4.
5.
6.
7.
8.
Use the Windows Explorer to browse to the media player’s hard disk.
Right-click an empty part of the screen and choose ‘Create folder’. Give the new
folder the name ‘Video’.
Open the folder ‘Video’ and right-click an empty part of the screen again and
choose ‘Create folder’. Give this folder the name of the DVD you want to copy.
Open this folder, right-click an empty part of the screen and choose ‘Create
folder’. Give this folder the name ‘VIDEO_TS’.
Now use the Windows Explorer to browse your computer’s hard disk. Locate the
DVD folder and open this folder. Open the ‘Video_TS’ folder. If correct, you will
see several files.
Select all these files, right-click, and choose ‘Copy’.
Use the Windows Explorer in order to browse to the media player’s hard disk.
Open the folder ‘Video’, open the folder with the name of the DVD and then open
the ‘VIDEO_TS’ folder.
Right-click an empty part of the screen and choose ‘Paste’. The selected video
files will now be copied to the folder.
Refer to chapter 6.1.2 to playback DVD’s with full menu support.
6.0 Playing Media
If you have media files copied to your built-in hard disk or USB device, then you can
playback these media files. Use the following steps to playback different types of
media files. If you want to playback multimedia from a USB device, connect the USB
device to the ‘USB HOST’ connection at the back of the media player. In that case,
select ‘USB’ as explained in chapter 4.6.
6.1 Video Playback
The EM7067 can playback DVD video files and other sorts of video files. Use the
following steps to playback these video files.
Press the ‘Subtitle’ button on the remote control to see the subtitles.
9 | ENGLISH
6.1.1 DVD ISO
1.
2.
3.
Use the arrow keys to navigate to ‘Video’ and press the ‘OK’ button.
Select the folder where the ISO is located and press the ‘OK’ button.
Now select the ISO file and press the ‘Play’ button. The ISO will start to play.
6.1.2 DVD (with menu support)
If you have copied the files as explained in chapter 5.2, you can playback DVD’s with
full menu support. Use the following steps to playback these files.
1.
2.
3.
4.
Use the arrow keys to navigate to ‘Video’ and press the ‘OK’ button.
Select the folder were the video files are located.
If correct, the name of the DVD is shown. You will also see a DVD icon at the
side. This means that the DVD will be show with full menu support.
Select the name of the file and press the ‘OK’ button. The DVD will start to play
and should have full menu support.
6.1.3 Playing other video formats
1.
2.
3.
Use the arrow keys to navigate to ‘Video’ and press the ‘OK’ button.
Select the folder were the video files are located.
Select the desired video file you want to playback and press the ‘Play’ button.
The video file will start to play.
6.2 Playing Music
1.
2.
3.
4.
Use the arrow key to navigate to ‘Music’ and press the ‘OK’ button.
Select the folder where the music or audio files are located and press the ‘OK’
button.
The music or audio files will be displayed.
Select the desired file and press the ‘Play’ button. The music or audio file will
start to play.
6.3 Playing Photos
1.
2.
3.
4.
Use the arrow keys to navigate to ‘Photo’ and press the ‘OK’ button.
Select the folder where the photos or images are located and press the ‘OK’
button.
The photos or images will be displayed automatically. If you have set a ‘slide
time’ in the chapter ‘Photo setting’, the photos or images will be displayed
according to these settings.
Press the ‘Stop’ button to return to the main menu.
10 | ENGLISH
6.4 Playing photos with background music
1.
2.
3.
Follow the steps described in chapter 6.2. The music will start to play.
Then press the yellow ‘Photo’ button on the remote control. You will be redirected
to the photos or images on the hard disk or USB device.
Select a photo or image and press the ‘Play’ or ‘OK’ button. If you have set a
‘slide time’ in the chapter ‘Photo setting’, the photos or images will be displayed
according to these settings, while you can hear background music.
7.0 Frequently asked questions
Q:
A:
The manual mentions subtitles are supported. What sort of subtitles can
be handled by the EM7067?
SRT subtitles are supported. Make sure the subtitle file is located in the
same folder as the video file, and that the name of the SRT file matches the
name of the video file.
Q:
A:
What file systems are supported by the EM7067?
The EM7067 supports FAT32 and NTFS file systems.
Q:
Can I delete, copy or rename files listed on the USB device or internal hard
disk?
Access the folder where the files are located, select the file and then press
the ‘Info’ button on the remote control. You will then see the options ‘Copy’,
‘Move’, or ‘Delete’.
A:
Q:
A:
How can I reset the EM7067?
•
•
•
•
Q:
A:
•
•
•
•
Make sure the EM7067 is completely started
Navigate using the remote control to ‘Setup’ and press the ‘OK’ button
Select ‘Default’ and then ‘Restore’ and press the ‘OK’ button
The EM7067 will then return to factory settings
Is there a possibility to ‘jump’ to a specific time frame using a so called
GOTO function?
Yes, this is possible. Use the following steps to do so:
By pressing the ‘Info’ button, you will see the current played time and track.
Press the ‘Info’ button again, now you can use the ‘GoTo’ function to be
able to select the desired time frame in the movie
The desired can be selected by using the arrow keys on the remote control.
Once selected, press the ‘OK’ button on the remote control to ‘jump’ to the
selected timeframe
11 | ENGLISH
8.0 Service and support
This users manual has been carefully written by Eminent’s technical experts. If you
have problems installing or using the product, please fill out the support form at the
website www.eminent-online.com/support. You can also contact us by phone. Below
you will find a list with phone numbers for each supported country.
Country
Belgium (Dutch)
Belgium (French)
Denmark
Finland
Germany
Italy
Norway
Spain
Sweden
The Netherlands
UK
Phone number
070 277 286
070 277 286
+45 69918565
+35 8942415826
1805 982 234
+39 0240042016
+47 21075033
807 080 042
+46 840 309985
0900-3646368
905 871 0013
Rate per minute*
€0.30
€0.30
Local Costs
Local Costs
€0.14
Local Costs
Local Costs
€0.41
Local Costs
€0.45
£0.30
* Rates mentioned in this table do not include cell phone charges.
9.0 Warranty conditions
The five-year Eminent warranty applies to all Eminent products unless mentioned
otherwise before or during the moment of purchase. When having bought a secondhand Eminent product the remaining period of warranty is measured from the moment
of purchase by the product’s first owner.
The Eminent warranty applies to all Eminent products and parts inextricably
connected to and/or mounted on the main product. Power supply adapters, batteries,
antennas and all other products not integrated in or directly connected to the main
product and/or products of which, without reasonable doubt, can be assumed that
wear and tear show a different pattern than the main product are not covered by the
Eminent warranty. Products are not covered by the Eminent warranty when subjected
to incorrect/improper use, external influences and/or when opened by parties other
than Eminent.
10.0 Declaration of Conformity
To ensure your safety and compliance of the product with the directives and laws
created by the European Commission you can obtain a copy of the Declaration of
Conformity concerning your product by sending an e-mail message to: [email protected]. You can also send a letter to:
12 | ENGLISH
Eminent Computer Supplies
P.O. Box 276
6160 AG Geleen
The Netherlands
Clearly state ‘Declaration of Conformity’ and the article code of the product of which
you would like to obtain a copy of the Declaration of Conformity.
EM7067 | 05-2010