1
This free back issue of
THE QUICK ANSWER is provided courtesy of…
The Monthly Newsletter for Sesame Database Manager
http://www.insidesesame.com
Read a Free Issue of Inside Sesame!
AND
Makers of Sesame Database Manager
Compatible with Symantec Q&A™
http://www.lantica.com
Quick
Answer
The
Merging Data with
Complex Forms—
A Case Study
TM
TOM MARCELLUS
The Independent Guide to Q&A® Expertise
Organizing data to print on complex forms—even creating the forms
in Write—isn’t such a brutal task if you know a few tricks.
M
Y Congressman, Chris Cox, has been an avid Q&A user and
Quick Answer reader for years. In fact, he developed his own
Q&A 4.0 campaign management application to track information
on thousands of supporters and their contributions. He uses Q&A Write
and mail merge for his correspondence and fundraising mailings, and
prepares his Federal Election Committee (FEC) reports from the
information in his databases.
What has stumped Chris and his staff, though, is how to automate the
preparation of these periodic FEC reports. It was taking two days to
organize then manually enter the information into a forms program
designed to print the reports, even though the raw data was already in his
Q&A databases. The data crunching required to generate the information
was complex. The form the FEC wanted it printed on was complex. Here’s
why:
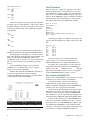
• The FEC form accommodates exactly seven contributors per page. (See
Figure 1 on page 3) A full report for a given period might run to 20 or
more pages.
• Each page must show the page number in a 1 of 20, 2 of 20, and so on,
format, along with a subtotal of receipts for the page.
October 1996
Volume 7, Number 10
1
Merging Data with Complex Forms—
A Case Study
Tom Marcellus
2
Editorial: Time’s Almost Up!
Tom Marcellus
8
QuickTip: Defrag Misinformation
Alec Mulvey
9
@Help
Dave Reid
10
QuickTip: CHome and Goto Differences
Tom Marcellus
10
QuickTip: Incomplete On-Screen Help
David Dvorin
10
QuickTip: Change in
Function Key Assignments
David Dvorin
11
The Program Spec: XPost Your Data—
Post Haste
Jeff Nitka
12
QuickTip: Available
Function Keys for Marcros
David Dvorin
12
QuickTip: Separate a Combined City,
State, and ZIP Field into Component
Fields
Tom Marcellus
13
Report Retrieve Spec Glitch Solved
Gordon Meigs
16
QuickTip: Who Are You, Anyway?
Alec Mulvey
• The final page (20 of 20, for example), must show the grand total of all
receipts (the sum of the page subtotals) for the reporting period.
• Persons making a campaign contribution during the reporting period
have to be listed by name and address in a small address block, with
their employer and occupation in adjacent blocks.
• The receipt date of each contribution along with the amount have to
appear in two adjacent line-item-like columns. (A person might make
several contributions during the reporting period.)
• Each contributor’s aggregate year-to-date contribution amount must
be shown.
• The report must show whether each contributor’s contributions were
for a Primary or General election.
Continues on page 3
Time’s Almost Up!
TOM MARCELLUS,
EDITOR
TM
I
F you see this by October 16, there’s still time to register for The Quick
Answer’s Q&A Master Seminar October 18 in Colorado Springs,
Colorado. Call 800-780-5474 or 301-424-1658 right now to find out if we
can squeeze you in. We’d love to see you!
If you’ve ever tried to spruce up a Q&A for DOS merge document with
Line Draw, chances are you soon abandoned that little adventure. Trying to
keep the lines from going all “kerflooey” as you carefully place the text or
merge fields is practically impossible. And if you use a font other than
Courier, your output looks like it exploded. Now there’s a way you can
add graphic lines and boxes—that won’t distort—anywhere you like, and
still precisely position your text or merge field data. Use the tricks I reveal
to print sophisticated forms with your data joined or merged exactly where
you want it.
Speaking of avoiding explosions, have you ever redesigned a database
that contains saved reports, or used the Copy Design Only feature to copy
a database’s structure? If the answer is yes, your application could be
headed for disaster. Gordon Meigs tells you why, and what you can do to
prevent it.
In The Program Spec, Jeff Nitka shows you how to eliminate interim
calculation fields from your database by using XPost and @XLookup to
save and retrieve temporary variables externally. He also describes his
technique for creating postable records on-the-fly. QA
Spend a Day with
The Quick Answer Masters
You Read Every Month!
Now you can meet and hear these Q&A experts and learn
their best-kept secrets, their coolest tricks, and their
power techniques. Discover new ways to coax more out of
Q&A and extend the functionality of your applications.
Watch what they do with Q&A 5.0 and come away with a
wealth of know-how. These speakers will be available all
day to answer your questions and help you plan your next
Q&A database. Then stay for the weekend and attend the
National Q&A User Group’s 6th Annual BASH!
Register Now!
800-780-5474
The Independent Guide to Q&A® Expertise
Editor
Publisher
Copy Editor
Production Editor
Tom Marcellus
Michael Bell
Laurie Moloney
Paul Gould
The Quick Answer (ISSN 1052-3820) is published
monthly (12 times per year) by Marble
Publications, Inc., 9717 Delamere Ct.,
Rockville, MD 20850.
Cost of domestic subscriptions: 12 issues, $79; 24
issues, $142. Outside the U.S.: 12 issues, $99; 24
issues, $172. Single copy price: $10; outside the
U.S., $12.50. All funds must be in U.S. currency.
Back issues are available upon request, for the
same price as a single copy.
Periodicals postage paid at Rockville, MD.
POSTMASTER: Send address changes to
The Quick Answer, PO Box 9034, Gaithersburg,
MD 20898-9034.
Copyright © 1996 by Marble Publications, Inc. All
rights reserved. No part of this periodical may be
used or reproduced in any fashion whatsoever
(except in the case of brief quotations embodied
in critical articles and reviews) without the prior
written consent of Marble Publications, Inc.
Address editorial correspondence, @HELP
questions, or requests for special permission to:
Marble Publications, Inc., The Quick Answer, PO Box
9034, Gaithersburg, MD 20898-9034. Phone
800-780-5474 or 301-424-1658. Fax 301-424-1658.
CompuServe 73370,1575. Prodigy NEPY97A.
October 18!
For Q&A technical support, call Symantec:
503-465-8600.
David Dvorin
Bill Halpern
Gordon Meigs
Tom Marcellus
10a.m–6p.m.
Friday, October 18, 1996
The Radisson Inn
Colorado Springs,
Colorado
Sponsored by Marble Publications, Inc., publisher of The Quick Answer in association with the National Q&A User Group
2
Quick
Answer
The
Q&A is a trademark of Symantec Corp. Other brand
and product names are trademarks or registered
trademarks of their respective holders.
This publication is intended as a general guide. It
covers a highly technical and complex subject and
should not be used for making decisions
concerning specific products or applications. This
publication is sold as is, without warranty of any
kind, either express or implied, respecting the
contents of this publication, including but not
limited to implied warranties for the publication,
quality, performance, merchantability, or fitness for
any particular purpose. Marble Publications, Inc.,
shall not be liable to the purchaser or any other
person or entity with respect to any liability, loss,
or damage caused or alleged to be caused directly
or indirectly by this publication. Articles published
in The Quick Answer do not necessarily reflect the
viewpoint of Marble Publications, Inc.
The Quick Answer
●
October 1996
Merging Data . . .
Continued from page 1
So we had three challenges: How to compile
(organize) the data; how to arrange it to print to the FEC
form; and how to automate the whole thing.
Square one
Virtually all the data required for the FEC report was in a
check receipt database. Each CHECK.DTF record
contained, among other things, an auto-assigned
sequential check record number, the Donor ID, the
amount of the contribution, and the date it was received.
They were printing a couple of columnar reports to
generate the bulk of the required information—one that
listed contributors, contribution
dates, and amounts, and another that
showed each contributor’s year-todate contribution total. Using these,
they were retyping the data into this
rather lame Windows forms program
(designed for FEC filings) that lacked
any data import facilities.
Using a variety of techniques, we
eventually came up with a way to
organize the data and print it on the
FEC form you see in Figure 1. I’ll
briefly cover how we did this, then
describe the extraordinary merge
document that brought it all together.
Hopefully, you’ll pick up a few ideas
you can put to use in your own
applications.
with XLookups to pull in everything else.
To generate an importable disk file of Donor IDs and
their check record numbers, we designed a CHECK.DTF
report. The Retrieve Spec included all contribution checks
received during the reporting period, and the Column/
Sort Spec and derived column looked like this:
Donor ID: 1, AS, I
Check Record No: 3, AS, CS, F(JL)
Heading: Donor
Formula: #1 + "*"
Spec: 2, AS
With the Report Global Options set to No Repeating
Values and Skip Line at Column Break, and with a page
length of 1000, the report prints the data to disk in Donor
ID and check number order, like this:
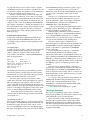
A SUMMARY database
We started by creating a SUMMARY
database to organize the donation
information (check amounts and
dates received) for each person who
made a contribution during the
reporting period. (See Figure 2.) If
someone made three contributions,
his or her SUMMARY record would
show the Donor ID, the three check
record numbers, dates and amounts
(from CHECK.DTF) along with the
name, address, occupation, and
employer (from ADDRESS.DTF).
The first data items we had to
get into the SUMMARY database
were the Donor ID numbers and
check record numbers. With these,
we could Mass Update SUMMARY
The Quick Answer
●
October 1996
Figure 1. A complex form with complex data formatting requirements. You
can create forms like this in Write, and place your data in them with precision.
3
Donor Check Record No
----- --------------933* 3488
3732
3800
1215* 3492
3621
1217* 3490
3611
The macro that prints the report, pulls the output file
into Write, “presses” Shift-F4 twice to remove the column
headings and separator dashes, then replaces the asterisks
with carriage returns (@Cr). The reformatted output file
looks like this:
The YTD database
Since the report also requires the aggregate year-to-date
contribution amount for each listed donor, we created a
YTD.DTF database with two fields—Donor ID and YTD
Amt—and a second CHECK.DTF disk report. This report
retrieves all the CHECK records for contributions made in
the current year, and totals them by Donor ID using the
following Column/Sort Spec and derived columns:
Donor ID: 1,AS,CS
Check Amount: 2, I
Heading:
Formula: #1
Spec: 50, I
Heading: YTD
Formula: @Text((#1<>#50),@Str(@Total(#2, #1)))
Spec: 3, F(N2)
933
3488
3732
3800
1215
3492
3621
1217
3490
3611
The file is now in a format suitable for importing as a
Standard ASCII file into the empty SUMMARY database.
The Merge Spec for the import is a 1 in the Donor ID
field, and 2 through 7 in the Rec1 through Rec6 fields. (See
Figure 2.) Although our SUMMARY records could
accommodate up to six donations, it’s rare that more than
three are received from any donor during a reporting
period.
At the ASCII Import Options screen, the Field
Delimiter was set to Return. This way, two carriage
returns serve as a Record delimiter.
With the import finished, SUMMARY contained one
record for every person who made a campaign
contribution during the reporting period, along with his
or her pertinent check record numbers.
Figure 2. SUMMARY.DTF’s Merge Spec filled out to import the
disk report containing Donor IDs and check record numbers.
4
With the page length set to 1000, the macro prints the
report to disk, then brings it into Write, where it looks like
this:
Donor ID
YTD
-------- ------933
900.00
1215
1000.00
1217
125.00
1311
500.00
1322
200.00
1420
375.00
1566
540.00
The macro removes the column headings and
separator lines, resaves the file, then imports it as a
Standard ASCII file into the empty YTD.DTF database.
The Merge Spec for the import is 1 in the Donor ID
field, and 2 in the YTD Amt field. At the ASCII Import
Options screen, the Field delimiter is set to Space. With the
import done, YTD.DTF is ready to serve as a lookup file
for the SUMMARY.DTF Mass Update to follow.
Mass Updating SUMMARY.DTF
At this point, each SUMMARY record contains a Donor ID
and between one and six check record numbers.
Using the Donor ID as the key value, the Mass
Update performs an XLookup to retrieve the name,
address, occupation and employer from ADDRESS.DTF,
and the year-to-date aggregate from YTD.DTF.
Using the check record numbers in the Rec1 through
Rec6 fields as key values, the check-received dates and
amounts are retrieved via XLookup from CHECK.DTF.
The contributor’s total amount for the reporting period is
then calculated by adding the Amt1 through Amt6 fields.
The macro ends at this point so the SUMMARY data
can be spot checked. If everything looks okay, a second
macro performs a second SUMMARY Mass Update. This
one numbers the SUMMARY records (the RecNo field)
starting at 1, and calculates the running total from record
to record. If, for example, SUMMARY contains 167
The Quick Answer
●
October 1996
records, then the lowest Donor ID’s record is assigned 1,
and the highest Donor ID’s record is assigned 167. Record
167, therefore, contains the grand total of all contributions
from all donors during the reporting period.
We knew we had to merge seven records with each
page of the report. Therefore, we also knew, for example,
that SUMMARY record number 40 will be the fifth record
to print on page 6, record number 113 will be the first one
on page 17, and so forth. By including in the SUMMARY
Mass Update a statement to calculate the running totals of
the records from record 1 on up to however many records
there might be, we can get the subtotal for each report
page (seven records), along with the grand total for the
final report page.
Printing the report forms
At this point, all the data required for the FEC report is
neatly organized in the SUMMARY.DTF records. The
second part of the procedure automates printing it to the
report forms.
The mailing label
To print a group of records to a page, we created a custom
mailing label that includes merge fields for the name,
address, employer, occupation, YTD amount, checkreceived dates and amounts—all from SUMMARY.DTF.
Here are the particulars:
Width: 8"
Left margin: .6"
Height: 1.7"
Other margins: 0
Regular font: LaserJet Line Printer 16
Lines per label sheet: 86
Blank lines at top: 13
Print to: PtrE
The label height, characters per inch, and lines per label
sheet work together to produce the precise line spacing
needed (in this case, just a hair under 8 lines per vertical
inch) to fill the FEC form with seven records.
The macro prints a group of seven labels to FILE
rather than to the forms. We installed Printer E to print to
FILE, specifying the correct printer, an HP LaserJet 4.
(Later, you’ll find out why we didn’t print directly to the
forms.) The macro then opens the file, deletes the first and
last lines (containing LaserJet printer control codes), then
resaves it. The resulting 3PAGE.LBL document is then
joined with a Write merge document (more on this later),
and out comes the FEC form page with the data from the
seven records in it.
The printing procedure
Each page of the FEC report is a seven-record group. The
data originates from SUMMARY.DTF, reformatted by the
mailing label output. The macro prints “labels” for the
first seven SUMMARY records to the 3PAGE.LBL output
file, strips out the printer control codes, then joins it with the
The Quick Answer
●
October 1996
master 4FORM.DOC merge document to print as page 1.
The macro then prints the next seven records to
3PAGE.LBL, and joins that file with 4FORM.DOC to print
as page 2, and so on until the entire report has been
printed.
This process is controlled from a small one-record
database named CONTROL.DTF. When the operator
gives the command to print, an XLookupr statement in
CONTROL retrieves the highest record number in
SUMMARY. If it’s evenly divisible by 7 (@Mod(MaxRecNo,
7) = 0), that’s how many pages the printed report will be.
Otherwise, it’ll be that many pages plus 1. The number is
stored in CONTROL’s LastPageNo field.
When the print command is invoked, CONTROL’s
PrintPageNo field is set to 1, the StartPrintRecord field is
set to 1, the EndPrintRecord field is set to 7, and the
Subtotal field is set to the subtotal for page 1. The macro
saves the record and heads for the “mailing label.”
The label’s Retrieve Spec is comprised of two
@XLookup expressions that retrieve the StartPrintRecord
and EndPrintRecord values from the single CONTROL
record, so Q&A knows to print labels for SUMMARY
records 1 through 7.
The macro prints the seven labels to 3PAGE.LBL,
sends the merge document to the printer (joining
3PAGE.LBL), and returns to the CONTROL record as the
page is printing. StartPrintRecord and EndPrintRecord are
bumped to 8 and 14, respectively, PrintPageNo is set to 2,
the page Subtotal is updated, and the macro is re-invoked
(via @Macro) to process and print page 2 in the same
manner.
This cycle repeats until CONTROL’s PrintPageNo
equals Pages, at which time the Grand Total is retrieved
from the highest record number in SUMMARY, and the
macro is invoked for the last time. (This is a variation on a
theme by Jeff Nitka. See his “Make Your Macros Loop the
Loop” in the June 1996 issue.)
As each page of the report prints, merge fields in the
4FORM.DOC document merge the PrintPageNo, Pages,
Subtotal, and Grand Total fields from the single
CONTROL record. The Grand Total field remains blank
until the final page is processed.
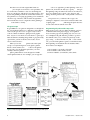
Figure 3 shows how everything fits together.
The merge document
We started out by printing to photocopies of the FEC
forms, but the problem of positioning the original exactly
when making the copies gave mixed results.
Moreover, when you run even high quality paper
through a photocopier, the sheets curl enough to make
running them back through a laser printer problematic.
The first few might print with the data dead on, the next
few a bit off, then the printer might jam due to the curling
and physical handling.
5
But that wasn’t all. The original FEC form was
designed just enough out of whack to cause problems. The
box for the first contributor’s data was 30 cm high, the
next one a bit bigger, and the next a bit bigger still, so that
by the time printing reached the sixth and seventh boxes,
the Q&A data was creeping up, printing a few centimeters
off and on top of the lines and text labels designed into
the form. All these factors conspired to make printing to
copies of the form too chancy.
decimal code to set eight lines per inch printing or invoke a
printer font, and it’ll work. But try to specify nine lines per
inch printing using a decimal code and it won’t. Likewise,
if you use decimal codes to draw a box, the page will
emerge from the printer with a “lucky charm” on it but no
box.
The question was, could I use this escape code
technique to duplicate (create from scratch) the FEC form
on plain paper in the printer, and merge the Q&A data into
it at the same time? It turned out I could.
The great escape
Roger Skidmore—an optician—helped me see the light. In
his “Create Shaded Text Boxes—and More” in the March
1996 issue, Roger shows how to type LaserJet control
codes in a Write document to print precision graphic
lines. (If you’ve ever tried to use Line Draw to spruce up a
Write document containing merge fields or proportionally
spaced fonts, you know the mess that results. You’re
about to find salvation.)
When you use the decimal printer codes that Q&A
accepts at every Print Options screen, Q&A’s printer
driver converts them to the escape codes for the printer.
Escape codes, not the decimal equivalents, are what
actually control the printer.
Q&A’s printer drivers aren’t designed to handle
certain printer functions. For example, you can type the
Programming the printer with escape codes
When using escape codes in a Write document, you have
to think in terms of the physical page. (Laser printers
create an entire page before printing any of it.) You can
use a 300 dpi-based grid (300 dots per inch) to position
the elements (lines, text, or whatever) precisely on the
page. Using x as the horizontal axis, and y as the vertical
axis, you can tell the printer to print a six-inch horizontal
line beginning one-inch from the left and three inches
down. Here it is in English:
1. Move 300 dots (one inch) to the right.
2. Move 900 dots (three inches) down.
3. Print an 1800-dot (six inch) line, 4-dots thick.
Figure 3. From the original CHECK.DTF records to printing the FEC report.
6
The Quick Answer
●
October 1996
The escape codes that perform this feat look like this:
←*p300x900y ←*c1800a4b0p
The LaserJet escape character, the left arrow, tells the
printer “new command coming!” All LaserJet control
codes must begin with it. (Other printer makes have their
own control codes to perform the same functions, though
many support the HP PCL Printer Control Language.) To
create this character in Write, press Alt-F10, then Alt-27,
using the numeric keypad.
The first code tells the printer where to start printing
on the x-y axis. The second one says print a line 1800 dots
long (c1800a) by 4 dots thick (4b), with a solid black fill
(0p), which gives you about a two-point line.
Laser printers have an unprintable margin around the
physical page. The LaserJet 4’s are something like .5-inch
top, and .25-inch left, so when you tell the printer to print
a line one-inch down from the top of the page, and oneinch in from the left, it will start printing at one-inch plus
.5-inch down, and one-inch plus .25-inch to the right. Be
sure to take these unprintable margins into account when
positioning any lines or text on the page.
Figure 4. Using a grid where 300 dots equals one-inch, you
can type escape codes in your Write document to draw
graphic lines and boxes anywhere on the page. Using
additional printing coordinate commands, you can place text
and merge fields inside the boxes.
The Quick Answer
●
October 1996
In the earlier example, the horizontal line begins at
coordinates 300x 900y, so you can send another command
to create a two-inch vertical line starting at 300x 900y. Since
the original horizontal line ends at 2100x 900y, you can
create another two-inch vertical line starting at that point.
You can then create a second horizontal line between the
end points of the two vertical lines, and you’ve got a
rectangular box six-inches wide by two-inches high. (See
Figure 4.)
It took more than a few escape codes to create all the
lines and boxes (and position the text labels) in the FEC
form, but after I typed a few and saw the results on the
printed page, I got the hang of it. (I copied and pasted
using F5, then edited the codes for page position and line
length.)
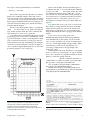
Figure 5 shows the top left portion of the
4FORM.DOC Write merge document I programmed to
create the FEC form. To have plenty of room for all the
codes, I set the document’s top, bottom, and left margins
to 0 (zero), and the right margin and page width to 240 at
the Define Page screen. If your output breaks onto a
second page, simply increase the page length at the
Define Page screen.
The first printer code in the document is ←&l5.5900C
(that’s a lowercase “L” following the “&” sign. You’ll find
these codes at the back of your printer manual.) It tells the
printer to set the line spacing (what the HP LaserJet 4P
Printer User’s Manual calls the “vertical motion index”) to
5.5900, which is 5.59 48ths of an inch, or just under eight
lines per inch—exactly right for the FEC form.
The second line is the Q&A *JOIN* command that
joins (merges) the 3PAGE.LBL document.
Further down the page are the merge fields for the
page number, last page number, page subtotal, and grand
total, all merged from CONTROL.DTF.
Figure 5. The top left portion of the Write document containing
the LaserJet escape codes that create the FEC form in Figure 1.
7
Placing text elements on the page
As you move down the Write document typing the escape
codes for the horizontal and vertical lines that create the
boxes, you can add text (labels for the form’s sections, for
example). To position text on the page, specify the x and y
coordinates, type the text as you want it to print, then
enhance it (Shift-F6) with the appropriate font and size.
(You can add merge fields in the same manner. Simply
precede them with an escape code telling the printer
where on the page to print the data.)You can assign fonts
(Shift-F6, A) at any time. If you need more fonts than the
Font Assignments screen accommodates (eight plus the
Regular font), you can always invoke them via escape
codes. (See the sidebar, “Escape Codes and Printing
Oddities.”)
This 4FORM.DOC document uses Line Printer 16 as
the Regular font (for the joined Q&A data), several sizes
of Univers and Univers bold for the text and text labels,
the Wingdings font for the small check boxes, and two
sizes of the Symbols font for the right angle brackets.
They’re all internal LaserJet 4 fonts.
A procedure that took two days now takes just a few
minutes. And we did it all in Q&A. QA
Tom Marcellus is editor of The Quick Answer and author of PC World Q&A
Bible (IDG Books). His QuickClick Calendar Plus—a time- and activitytracking database for Q&A 5.0—is available from Marble Publications,
publisher of The Quick Answer.
Quick
Tip
Escape Codes and
Printing Oddities
LaserJet escape codes that specify printing
coordinates have an asterisk after the escape
character. If you follow such a code with text or a Q&A
merge field, the first character will be missing in the
output. To prevent this, simply add another asterisk to
the end of the escape code or use the ASCII 7 nonprinting character (press Alt-F10, then Alt-7, using the
numeric keypad).
For example, the following code prints “Year to
Date” in whatever font you’ve enhanced the text (don’t
enhance the escape code), starting at position 720x
1200y :
←*p720x1200y*Year to Date Amount
If you don’t add the second asterisk, you’ll get “ear to
Date.”
When you send an escape-coded document to
the printer with a merge file specified, Q&A thinks the
codes (surrounded by asterisks) are merge fields, and
complains it can’t find them. Simply ignore the
warning and press F10 to continue.
Defrag Misinformation
Chances are you’ve used DEFRAG and
SCANDISK, the disk maintenance utilities
that come with MS-DOS 6.20.
However, be aware that the figure
DEGRAG gives for the percentage of
fragmentated files on your hard disk can be misleading. For
example, DEFRAG might report that “95 percent of Drive C: is not
fragmented.” You might think means hardly any fragmentation at
all, but consider that the vast majority of the files on your hard
disk are program files. They’re never modified and don’t become
fragmented over time. Only data files—or new or modified
files—become fragmented. If such files represent just 10 percent
of your hard disk data, you can multiply DEGRAG’s fragmentation
percentage by 10—that’s a whopping 50 percent in this example.
Worse yet, if you have a large database, it might become
severely fragmented over time. How can you tell? Run SCANDISK.
If your path statement includes the path to your DOS
directory, you can switch to your Q&A data directory and enter
this command:
SCANDISK/F
*.DTF
You’ll get a report that looks like this:
C:\QA5\DATA\VISITS.DTF contains 5 noncontiguous blocks.
C:\QA5\DATA\EXCH.DTF contains 6 noncontiguous blocks.
C:\QA5\DATA\LINKSBAK.DTF contains 25 noncontiguous blocks.
C:\QA5\DATA\TIMEMATH.DTF contains 2 noncontiguous blocks.
C:\QA5\DATA\CONTACT.DTF contains 30 noncontiguous blocks.
C:\QA5\DATA\LINKS.DTF contains 30 noncontiguous blocks.
You can see the degree of fragmentation in all your databases at
a glance. SCANDISK works equally well in Windows 95. Choose
Start / Programs / MS-DOS Prompt, and run the utility with the
same switch and *.DTF wildcard, leaving a space between the F
and asterisk.
Alec Mulvey, Keyword Training, Ascot, England
8
The Quick Answer
●
October 1996
@Help
EDITED BY DAVE REID
minus yesterday’s reading, in column 51. Here’s what a
portion of the report might look like:
Calculate Miles Per Gallon
I run a trucking company that delivers locally.
I need to monitor my trucks’ mileage to track
maintenance intervals and determine which
drivers are the most efficient. My database stores the
ending odometer reading and the number of gallons used
per day per truck. This allows me to print a report showing
the information, but to compute miles per gallon I have to
use a calculator. Is there any way the report can do that
work for me?
Truck #
------1
2
Odometer
-------1000
1100
1250
1500
1700
Gallons
------10
5
7
10
8
1000
1200
1300
10
10
4
Miles
Traveled
--------
Miles/
Gallon
------
100
150
250
200
20.0
21.4
25.0
25.0
200
100
20.0
25.0
What to Do with Error #06A8
Paul MacLellan, Sydney, Nova Scotia, Canada
A few modifications to your existing report should do the
trick. Here’s a sample report’s Column/Sort Spec:
Truck #: 1,AS
Odometer: 2,AS,CS
Gallons: 3
This produces a report similar to yours. Add the
following Derived Columns:
Heading: Dupe Truck Number
Formula: #1
Column Spec: 50,I
Heading: Dupe Odometer Reading
Formula: #2
Column Spec: 51,I
Heading: Miles!Traveled
Formula: @Text (#1=#50, #2-#51)
Column Spec: 10, F(N0)
Heading: Miles/!Gallon
Formula: @Text (#1=#50, #10/#3)
Column Spec: 11, F(N1)
Column 50 is a copy of the Truck #, and it’s used in
columns 10 and 11 to control when the calculations occur.
The values of column 1 and 50 are compared and, when
they’re the same, the related calculations are performed.
(This is the reverse of a popular derived column trick
where calculations are performed only when columns 1
and 50 aren’t equal.) Column 51 is a copy of the Odometer
reading from column 2. It’s necessary because while
column 10 is being computed, column 51 contains the
odometer reading from the previous record. Thus, the
miles traveled today equals today’s reading in column 2,
The Quick Answer
●
October 1996
One of my databases has a problem that seems to
be affecting several others. Once in a while, one of
the records in a lookup database goes bad. Then,
whenever another database performs a lookup to
that record, I receive error message #06A8. I can’t
edit the bad record without receiving the same error
message, but I can delete then re-enter it. Then, all the
databases are once again in harmony. But a few days or
maybe a week later, another record goes bad and I’ll have to
delete then reenter that one. Is there any way to prevent
this from happening?
Angelo Galiber, Christiansted, Virgin Islands
It sounds like the lookup database’s index is corrupted.
The problem might go away if you copy the database
design, then copy all of the records to the new design.
To begin, select Copy from the File menu, and enter
the name of the lookup database. From the Copy menu,
select Copy Design Only, then enter a new name for the
file, such as LOOKBACK.DTF. When Q&A has copied the
design, choose Copy Select Records, and specify the same
database. Press F10 at the Retrieve Spec and again at the
Merge Spec. All the records in the old database are copied
to the new one. Return to the Main menu, and select
Utilities / DOS File Facilities / Rename a File. Type the
name of the original lookup database and press Enter.
Type a new name for the damaged database, such as
LOOKOLD.DTF, then press Enter. Select Rename a File
again, and this time type the name of your copied file,
LOOKBACK.DTF. Press Enter, type the original name of
the database, then press Enter again. The lookup file
should now be free of damage and be reliable.
9
Managing Memory Under Windows 95
I use Q&A 5.0 for DOS on my Windows 95 PC. I
start Windows from the command prompt
instead of having it start automatically. This way,
my PC boots much faster, and I can get into Q&A without
having to wait. However, when I try to use Page Preview
with a merge document, I get an out of memory error. I’ve
examined the System Information screen (press Crtl-F3
from the Main menu) while running Q&A under the two
modes. In Windows, the Q&A column shows 128K of
Expanded memory and no Extended Memory, and Page
Preview works fine. In DOS, where Page Preview doesn’t
work, the Q&A column shows no Expanded memory and
33K of Extended memory. I suspect these values are crucial
to solving the problem, but I don’t know how to control
them.
This line enables the Expanded Memory Manager, but
specifies that no Expanded Memory (EMS) is to be
created. Edit the file, removing the “NOEMS,” and reboot
your computer. When you start Q&A from the command
prompt, it should allocate itself up to 128K of Expanded
Memory. A word of caution, though: this change could
affect the performance of your other programs. QA
[I’ve run a mix of memory-intensive procedures on a variety of
PCs, and never received an out-of-memory message as long as
Q&A 5.0 had at least 512K Conventional Memory along with
128K Expanded Memory and, for the Clipboard, 3K Extended
Memory.—Ed.]
Dave Reid is the coauthor of The Q&A 4.0 Wiley Command Reference,
published by John Wiley and Sons, and works as an independent Q&A
consultant. PO Box 12083, Eugene, OR 97440.
Walt Weaver, Lincoln, Nebraska
The amounts of Expanded and Extended memory
available to Q&A are controlled by settings in the
CONFIG.SYS file. It appears that having some Expanded
memory is important for your mail merge Page Preview,
and I suspect your CONFIG.SYS file includes a line like
this:
DEVICE=C:\WIN95\EMM386.EXE NOEMS D=64
Have a nagging question? Send it to @Help, The Quick Answer,
Marble Publications, Inc., PO Box 9034, Gaithersburg, MD 208989034 or fax to 301-424-1658. When writing, please include your
name, address, and phone number, along with your Q&A
version number (and whether DOS or Windows) and a
detailed description of the problem. We will publish those
questions we feel are of general reader interest; individual
responses are not possible.
?
Quick
Tip
CHome and Goto Differences
Quick
Tip
Incomplete On-Screen Help
Quick
Tip
Change in Function Key Assignments
If the first field on your form contains an
on-field-entry program, it won’t execute if
you use a CHome command in another
field to move to it. If you move to it via a Goto command,
however, it’s program will execute.
Tom Marcellus
The on-screen help that appears in Write
when you press F1 omits two reserved
function key assignments: F9 to scroll the
Q&A 5.0 changes the functionality of
Alt-F9. In Q&A 4.0, Alt-F9 displays the
Calculations Options box in Write, while in
screen up and Shift-F9 to scroll it down.
David Dvorin, Phoenix Solutions, Somerville, New Jersey
5.0 it displays the External Programs menu. The Calculations
Options box was changed to Alt-F8.
David Dvorin, Phoenix Solutions, Somerville, New Jersey
10
The Quick Answer
●
October 1996
The Program Spec
Quick
Answer XPost Your Data—Post Haste
The
TM
JEFF NITKA
By using XPost to save temporary variables, then retrieving
them with @XLookup, you can free your database from the
clutter of all those otherwise useless calculation fields.
I
F I’ve developed a love-hate relationship with any
Q&A command, it has to be 5.0’s XPost. I love XPost’s
ability to post data on-the-fly, in real time, yet I
shudder at the thought of losing data integrity should a
post be performed in error. That’s why I’ve come up with
few ways to make XPost easier to live with.
Storing temporary variables
You can use XPost to store temporary values (variables) in
an external database. This comes in handy when your
programming requires several temporary fields for
interim calculations and the like. Since the fields remain
outside the file you’re working in, you don’t have to
worry about them.
Any number of databases can access (XPost to, and
XLookup from) the same external temporary variables
database. Simply have one database store its temporary
variables in one record, and have another database use a
different record in the same file. It works even in a
network environment.
To demonstrate the technique, let’s use the factorial
function—used in statistical calculations—symbolized in
mathematics by the exclamation point. (For example, 4! =
4 * 3 * 2 * 1 = 24). In this case, you enter a positive whole
number in the X field, and the following program
calculates X!, and returns the answer:
X: > X = @Abs(@Int(X));
Rem "Ensures a whole number >= 0 ";
If X < 2
Then { @Msg(@Str(X) + "! = 1"); X=1; Goto X }
Else { Rem "Stores X in two variables Numb & Fact";
XPost("VAR.DTF", 1, "Page", X, "Numb");
XPost("VAR.DTF", 1, "Page", X, "Fact");
Iter = 1; GOSUB Iter;
@Msg( @Str(X) + "! = "
+ @XLu("VAR.DTF", 1, "Page", "Fact"));
X = @XLu("VAR.DTF", 1, "Page", "Fact");
GoTo X }
Iter: < If Iter < @Tn( @XLu("VAR.DTF", 1, "Page",
"Numb"))
Then { XPost("VAR.DTF", 1, "Page",
@Tn(@XLu("VAR.DTF",
1, "Page", "Numb")) - Iter, "Fact", "MUL");
The Quick Answer
●
October 1996
Iter = Iter + 1; Goto Iter }
Else RETURN
In the Iter (iteration) field’s program, notice that
XPost performs the Fact = Fact * (Numb-Iter) operation
until the loop terminates. Also, the external Numb field
stores the original value of X retrieved via XLookups. This
way, you need only one local (current database) variable
field (Iter), even though three fields are needed to perform
the task.
Create a record and XPost to it on-the-fly
Using @Shell and XPost, you can have Q&A automatically
create a record in an external database, then post to it in
what appears to be a single seamless step.
Suppose you’re entering data into a line-item-type
invoice database. You want to create an external record for
each line item so you can later run reports on sales by
item or stock number. You’ve entered data for the first
line-item. At this point, the cursor moves to a field
containing a program like this:
< If
Then
If
Then
@AskUser("Do you want to make changes?","","")
Goto Item1 else
@AskUser("Post this line item?","","")
{
If
Item1 Ref = ""
Then { REM "Create new record in SALES.DTF";
Item1 Ref = @Shell("C:\QA5\QA.COM -m1");
Item1 Ref = @XLr("Sales", 9999,"RecNo","RecNo") };
If
Item1 Ref <> ""
Then {
XPost("Sales",Item1 Ref,"RecNo",Item1,"Item");
XPost("Sales",Item1 Ref,"RecNo",Descrip1,"Item Desc");
XPost("Sales",Item1 Ref,"RecNo",Qty Sold Item1,"Qty");
XPost("Sales",Item1 Ref,"RecNo",Cost Item1,"Cost");
XPost("Sales",Item1 Ref,"RecNo",ExtPrc Item1,"Ext Prc");
XPost("Sales",Item1 Ref,"RecNo",Date,"Date");
XPost("Sales",Item1 Ref,"RecNo",Cust No,"Cust No")
};
Goto Item2
}
Else Goto Item2
Here, if the Item1 Ref field is empty, it means that no
data for this line-item has been posted to an external
record. In this case, the @Shell command launches a
second copy of Q&A, and invokes a simple autostart
macro. The macro adds a record to SALES.DTF, where an
on-entry programming statement uses @Number to
assign the next record number to the RecNo field. The
macro then saves the record and exits the second copy of
Q&A, returning you to the invoice you were working on.
11
The new external record number is then retrieved into the
Item1 Ref field, and the XPost commands posts the lineitem data.
If Item1 Ref isn’t empty, it tells the program that an
external record for this line-item has already been created.
In this case, the old data is simply overwritten with the
new data (since the particular external record containing
the data is referenced by Item1 Ref).
In an application like this, you should add code that
offers opportunities to change XPosted data. Of course, if
you post data for each line item, then neglect to save the
invoice record, the posted data will probably be useless,
and you’ll have compromised data integrity. But if you
Quick
Tip
can prevent that from happening without too much
trouble, then XPost can prove an indispensable tool in
your application strategy. QA
Jeff Nitka works for a chemical manufacturer and develops Q&A
applications part-time for Epoch Software, 908-874-3989. Jeff is the
author of the Program Evaluator, a Q&A program debugging utility
available from Marble Publications.
[For more on auto-generating an external record to post to (for
example, creating a new customer record during invoice entry),
see “Automatically Create Records to Post To” in the March 1996
issue.—Ed.]
Available Function Keys for Macros
Most function-key combinations using
Shift, Alt, and Ctrl are reserved by Q&A.
The following are unreserved, and thus
available for use as macro hot-key
combinations:
Alt-F3
Alt-F4
Alt-F10
Ctrl-F10
Shift-F11
Alt-F11
Ctrl-F11
Shift-F12
Alt-F12
Ctrl-F12
David Dvorin, Phoenix Solutions, Somerville, New Jersey
Quick
Tip
Separate a Combined City, State,
and ZIP Field into Component Fields
If you have a combined City, State, and ZIP
code field, you might find it advantageous
to have each component in its own separate field. This way you
can easily search and sort on any of the three. Suppose you have
the following arrangement (“CSZ” is the combined City, State, and
ZIP code field):
> CSZ
CSZ
CSZ
City
City
State
CSZ: Corona del Mar CA 92655
The first line replaces any double-spaces (such as between
the state and ZIP code) with a single space.
The second line replaces the space following the state (or
province) with the pipe (“|”) character. The third line replaces the
space preceding the state with a plus sign (“+”).
The fourth line copies the city to the new City field. The fifth
line deletes any comma following the city.
The sixth, seventh, and eighth lines copy the state and ZIP
code to their respective State and Zip fields.
The ninth and tenth lines restore the CSZ field.
To use this program for a Mass Update, simply replace the
on-field-exit symbol (“>”) with #1: (pound sign, 1, colon).
You want to change it to this:
City: Corona del Mar
State: CA
Zip: 92655
Start by adding separate City, State, and Zip fields to your
database, making them all text fields. Next, use the following
program in the CSZ field to separate the components. The
program works whether or not there’s a comma after the city,
whether the ZIP code is five or nine digits, and for Canadian
addresses with three-character province abbreviations and no
space in the postal code:
12
Zip
CSZ
CSZ
=
=
=
=
=
=
@Replace(CSZ, " ", " ");
@Repllas(CSZ, " ", "|");
@Repllas(CSZ, " ", "+");
@Left(CSZ, @Instr(CSZ, "+") -1);
@Replace(City, ",", "");
@Mid(CSZ, @Instr(CSZ, "+") +1,
@Instr(CSZ, "|") - @Instr(CSZ, "+") -1);
= @Mid(CSZ, @Instr(CSZ, "|") +1 , 11);
= @Replace(CSZ, "|", " ");
= @Replace(CSZ, "+", " ")
Tom Marcellus
The Quick Answer
●
October 1996
Quick
Answer
The
TM
Report Retrieve Spec
Glitch Finally Solved
GORDON MEIGS
Do “garbage” characters appear in your report
Retrieve Specs? Have you redesigned a database
that contains saved reports? Do you ever use the
Copy Design Only feature to copy a database’s
structure? If your answer to any of these questions
is “Yes,” you’d be wise to read on.
Q
&A’S Copy Design Only feature has been a hot
topic on the Symantec Q&A Forum on
CompuServe in recent months. Messages with
subjects such as “Bad Report Retrieve Specs” complain of
high ASCII graphics characters (“lucky charms”)—but
sometimes column headers and even programming
expressions—suddenly appearing in Q&A for DOS Report
Retrieve Specs, usually in the last field. Though the
problem has been variously attributed to Q&A 5.0, to
using Q&A 5.0 on a network, or to running it in Windows,
it has shown up in Q&A 4.0, and on standalone PCs
running only DOS as well.
Anatomy of the glitch
The problem is caused by a bug in Q&A’s File / Copy /
Copy Design Only feature. When you redesign a Q&A
database form to add, delete, or move fields, Q&A creates
a “new generation” of the database. If you then create
new reports, or redesign and resave existing reports, they
become part of that latest generation. However, reports
not redesigned or resaved following the database redesign
are still of a “prior generation.”
Now, if you use Copy Design Only on a database
whose reports belong to two or more generations, you
stand a chance that some or all of the reports belonging to
generations prior to the latest will be corrupted with
garbage “retrieval parameters” in the last field on the
form. It has been reported that once this begins to happen,
it “gets worse” or “spreads.” Fortunately, that’s not the
case, but it can sometimes look that way.
Preventing the problem
There are two things you can do to prevent the problem
from ever occurring. The following methods are practical
for databases containing only a dozen or so reports:
The Quick Answer
●
October 1996
• Immediately after you redesign a database, use
Report / Design /Redesign a Report to resave each of
your reports. This brings them up to the current
generation. As you display each report’s Retrieve
Spec, check the last field to be sure it contains no
garbage characters. If it does, delete them, and
continue to press F10 until you’ve resaved the report.
(You don’t have to print it.)
• Before you use the Copy Design Only feature, bring
each of your reports in the database up to the
“current generation” by following the same steps as
in the previous paragraph.
If you have a multitude of reports in the database,
resaving each one to bring it up to the “current
generation” can be a time-consuming process.
Fortunately, there’s an alternative.
A utility that can identify and
fix affected reports
DTFSPECS, a Q&A database utility from John Dow (see
the sidebar, “About DTFSPECS and DTFCHECK”), has
been updated with two new features: one that checks
your reports to see if they’re the same generation as the
database, and another that automates the process of
bringing prior generation reports up to the latest
generation of the database. How you use the utility to fix
your reports depends on your case:
• Case 1. Your reports show no signs of being affected,
but you’ve redesigned the database and at some point
might want to use the Copy Design Only feature.
• Case 2. The database already contains some reports
with garbage “retrieval parameters” in the last field.
Case 1: Steps to take before using Copy Design Only
Assuming the latest DTFSPECS update is installed, go to
the DOS prompt in the directory where it’s located, and
enter DFTSPECS filename.dtf macro. Substitute for
filename.dtf the complete path to the Q&A database file.
The macro switch tells the utility to create macro files for
your reports. With the utility running, select R for
13
Reports, and A for All, and it will create a macro file for
the first 10 reports in the database (REPORTSA.MAC),
another macro file for the next 10 reports
(REPORTSB.MAC), and so on. Instead of the RA
command, you can select RW to generate macros only on
reports of the wrong Generation, or RB to generate
macros only on existing corrupted reports. (See Case 2
below.)
If you add D=path to the end of the DTFSPECS
command line (replacing path with the actual path), the
utility saves the macro files to the specified directory. If
you don’t specify a path, the utility saves them to the
directory specified by your PC’s TEMP environmental
variable, or to the directory from which you issued the
DTFSPECS command if no TEMP variable exists. (You can
About DTFSPECS and DTFCHECK
DTFSPECS is available from John Dow (412-521-1577, Internet
[email protected], CompuServe 102701,2751) for $100, or $25 if
upgrading from a previous version. In addition to providing
valuable information about your Q&A databases (see the
October 1995 issue for a review of DTFSPECS. See also “Create
a Q&A Interface for DTFSPECS” in the July 1996 issue), the
utility creates macros to regenerate Q&A reports (as you’ve
seen), and even lets you copy report designs from one
database to another database of similar design.
DTFCHECK, which comes with DTFSPECS and can be
downloaded separately from the Q&A file library on
CompuServe, flags bad report definitions. The latest version
includes a “verbose” command line switch (DTFCHECK
filename.dtf verbose) that displays additional information
about a database’s reports. The following excerpts are taken
from DTFCHECK’s “verbose” output on four variations of one
database.
POLICY.DTF—a multiple generations database with good
reports from several generations. DTFCHECK verbose (partial
output) returned the following:
The current generation is 37
Generation
9 has
118 fields.
Generation 35 has
133 fields.
Generation 36 has
134 fields.
Generation 37 has
135 fields.
-----------------------------------------Checking report "Open Reminders"
The retrieve spec for this report has 134 fields
and is generation 36. The col spec for this report
has 134 fields and is generation 36
-----------------------------------------Checking report "Uncleared L"
The retrieve spec for this report has 135 fields
and is generation 37. The col spec for this report
has 135 fields and is generation 37
POLICYB.DTF—a Copy Design Only copy of POLICY.DTF.
DTFCHECK reports it as a single-generation file, but the
reports previously identified as generation 36 have been
corrupted with faulty Retrieve Specs:
The current generation is 1
Generation 1 has 135 fields.
-----------------------------------------Checking report "Open Reminders"
14
The retrieve spec for this report has 135 fields
and is generation 1. ERROR: Last pointer inconsistent
with size, pointer=3D2F, size=286
-----------------------------------------Checking report "Uncleared L"
The retrieve spec for this report has 135 fields and
is generation 1. The col spec for this report has 135
fields and is generation 1
POLICYF.DTF—the POLICY database after re-creating all the
reports using the macros generated by DTFSPECS. Note that
while the file still reports several generations, all the reports
are now of the latest generation (37). DTFCHECK verbose
(partial output):
The current generation is 37
Generation
9 has
118 fields.
Generation 35 has
133 fields.
Generation 36 has
134 fields.
Generation 37 has
135 fields.
-----------------------------------------Checking report "Open Reminders"
The retrieve spec for this report has 135 fields
and is generation 37. The col spec for this report
has 135 fields and is generation 37
-----------------------------------------Checking report "Uncleared L"
The retrieve spec for this report has 135 fields
and is generation 37. The col spec for this report has
135 fields and is generation 37
POL-COPY.DTF—a Copy Design Only of POLICYF.DTF. Again,
a single generation file, but this time, all the reports are okay.
DTFCHECK verbose (partial output):
The current generation is 1
Generation
1 has
135 fields.
-----------------------------------------Checking report "Open Reminders"
The retrieve spec for this report has 135 fields and
is generation 1. The col spec for this report has 135
fields and is generation 1
-----------------------------------------Checking report "Uncleared L"
The retrieve spec for this report has 135 fields and
is generation 1. The col spec for this report has 135
fields and is generation 1
Since we first began examining this issue, John has
modified DTFCHECK so it displays WARNING: This report is not
the current generation for reports (such as the first one in
POLICY) from earlier generations. This makes it even easier to
spot potential trouble before it causes damage.
The Quick Answer
●
October 1996
enter the SET command at any DOS prompt to display the
system variables. Look for a line such as
TEMP=C:\WINDOWS\TEMP.)
Exit DTFSPECS, and start Q&A. From the Main
menu, select Reports / Design/Redesign a Report.
Specify the name of the database, continue to the list of
saved reports, then press Esc to return to the Report
menu. (The macros generated by DTFSPECS expect a
filename to be present.)
From the Report menu, press Shift-F2 for the macro
menu, and choose Get Macros. Press the spacebar to clear
the default macro filename (usually QAMACRO.ASC),
then press Enter for Q&A’s List Files screen. Navigate to
the directory where the report macros are stored, and
select the first one—REPORTSA.MAC.
With REPORTSA.MAC in memory, press Shift-F2
again, and select Run Macro. Select the macro named
Define all reports, and it go to work re-creating the first 10
reports, bringing them up to the “current generation.”
If you have more than 10 reports in the database,
repeat the process by loading the other REPORTSx.MAC
macro files (B, C, and so forth) and running them. When
you’re done, all the reports in the database will be of the
current generation.
Now, you can use the Copy Design Only feature, and
the reports in the copy should be 100 percent clean.
Case 2: Steps to take if Copy Design Only
has already corrupted reports.
Proceed as in Case 1 up to the point where you start Q&A.
Since there are “bad” reports in the database, there might
now be “bad” macros in the report macro file(s) that
DTFSPECS created. You’ll need to examine each macro in
Write, and remove the “bad” parts.
Since we first discovered this problem, John Dow has
modified DTFSPECS to generate “clean” macros, but it’s
worth checking the macro files anyway since the “bad”
spots are usually easy to spot. Listing 1 shows examples of
portions of a DTFSPECS-generated report macro file with
several “bad” command strings shown in italics.
Listing 1. Report macros containing bad Retrieve Spec
parameters.
<begdef><alt5><name>"Macro5"<vidoff>d<enter>list
<sp>by<sp>skills<sp>6/26<sp>test<f3>y<capsf4>list
<sp>by<sp>skills<sp>6/26<sp>test<enter>c
<ctrlf7><home><dn><home><f9><tab><tab><tab><tab>
<f6><caps.>1/1/95<f6><tab><f6>res<f6><pgdn><pgdn><pgdn>
<tab><tab>
<f6>************<sp><sp><sp><sp><sp><sp><sp><sp>
<sp><sp><sp><sp><sp><sp><sp><sp><sp><sp><sp><sp>
<sp><sp><sp><sp><sp><sp><sp><sp><sp><sp><sp><sp>
The Quick Answer
●
October 1996
<sp><f6><f10>
<tab><tab><f6>10,AS,R,C,F(T,U)<f6><tab><tab>
<f6>30,AS,R,CS<f6>...
<begdef><alt7><name>"Macro7"<vidoff>d<enter>Next<sp>
Reminder<f3>y<capsf4>Next<sp>Reminder<enter>c
<ctrlf7><home><dn><home><f9><pgdn><pgdn><pgdn>
<tab><tab>
<f6>∑<f6><f10>
<tab><tab><tab><tab><f6>30,AS,I<f6><tab><tab>
<f6>20,AS,I<f6>...
<begdef><alt8><name>"Macro8"<vidoff>d<enter>Old<sp>
records<f3>y<capsf4>Old<sp>records<enter>c
<ctrlf7><home><dn><home><f9><tab><tab><tab><tab>
<f6><caps,>(@DATE-730)}<pgdn><pgdn><pgdn>
<tab><tab>
<f6>******O<f6><f10>
<tab><tab><tab><f6>10,AS,R<f6>...
When you design or redesign a report, the first spec
to appear is the Retrieve Spec. So the first <f10> in the
Listing 1 macros (at the ends of the italicized command
strings) denotes the transition from the Retrieve Spec to
the Column/Sort Spec. In the examples shown, just prior
to the first <f10>, you’ll see the command to expand the
field (<f6>), and in some cases a series of asterisks,
usually followed by a number of spaces (<sp>).
Sometimes, though, another unwanted character or
characters appear. (See Macro8.) The only “bad” report
macro I’ve seen that doesn’t contain the asterisks is
Macro7, and it has a “lucky charm” between the two <f6>
commands, which wouldn’t be a valid retrieval
parameter.
The important thing to look for, as in each of the
Listing 1 macros just before the first <f10>, are “oddball”
characters and commands.
To clean up the report macro files, delete the
<f6>****<f6> commands before the first <f10>, along with
any <pgdn><pgdn><tab><tab> commands preceding it.
Then, resave the macro file to ASCII by pressing Ctrl-F8.
You can now switch to the Report module, and
proceed as in Case 1. When you’re done, you’ll have a
database with all reports of the same generation, and the
Copy Design Only command will yield a clean copy with
reports of the same generation.
Thanks to John Dow, Alec Mulvey, and Bill Halpern
for the many hours they spent with me investigating the
problem, and determining how to prevent and fix it. QA
Gordon Meigs is vice president and general manager of Professional
Computer Technology Associates of Newtown, Pennsylvania. He teaches
courses and does corporate training on Q&A, and has been designing
and installing advanced Q&A business applications for more than nine
years. 215-598-8440, CompuServe 71023,356.
15
Quick
Tip
Who Are You, Anyway?
When designing or troubleshooting a
password-protected multiuser system, it’s
easy to forget the User ID you used to log
into Q&A. It’s easy to set up a facility in
Q&A that emulates Novell’s “Whoami” utility. Here’s how:
Create a new database—call it WHOAMI.DTF or just
WHO.DTF—with these three fields:
way. Any records inadvertently saved can be deleted at any time.
You can create a macro to take you to this database in Add mode.
Alec Mulvey, Keyword Training, Ascot, England
You are User: (Text)
Date: (Date)
Time: (Hours)
Add the following program to the You are User field:
#10: You are User = @Userid;
Date = @Date; Time = @Time
Press F8 from the Program Spec, type 10 on the On-entryfield line, and press F10 to save.
When you open the database in Add Data mode, the form
will show the User ID, date, and time. (See Figure 1.)
The on-record-entry program lets you press Esc to exit the
database without the “Save changes” dialog box getting in your
PO Box 9034
Gaithersburg, MD 20898-9034
Figure 1. Supplementary database tells you who you are.
Periodicals
Postage Paid at
Rockville, MD