1
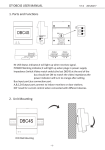
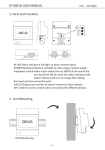
Namelist Update Manual for DMR18
CONTENTS
How to Download Namelist to DMR18
1-2
How to Make a UI File for New Namelist
3-11
3
What’s Namelist?
6
How To Edit Namelist?
9
How To Make a UI File for New Namelist
How to download namelist to DMR18
To download namelist to DMR18, you have to make a new UI file for namelist firstly*
*Details refer to How to make a UI file for new Namelist
Assume that we have prepared the new UI file of namelist whose name is DTP50100. The
following are the steps for updating:
1. Place the UI file named DTP50100 in the root directory of SD card
2. Insert SD card into DMR18
3. Input
#8002 -> 66666666, then entry user setup interface
1
How to download namelist to DMR18
4. Input 1 to entry Language setup interface. Input 8101, then press # button to confirm. Then
UI file will be downloaded to DMR18
5. Take the SD card out after download finishes
2
How to make a UI file for new namelist What’s namelist? What’s the essence of namelist? The following description will show you. 1. Click to start Simulator software, the path is just like following pictures show. 2. Open a new Project just like the following steps show. Select ProjectConfig , then click Open 3 3. In the main page of project, click to turn to namelist page Totally 4 pages for namelist: 16_NameList1, 17_NameList2, 18_NameList3, 19_NameList4. It includes 32 icons, as you see, the icon NO. is from 148# to 179#. 4 How to make a UI file for new namelist 4. Entry the project icon folder, the path is: project folder Æ Icon folder, eg. Demo_Outdoor ‐> Icon. Then you will see the essence of namelist. Actually they are BMP pictures, and their pixel is 480(Width) * 64(Height) . So what you have to do is: 1) Make new BMP icons. 2) Rename the same names for the new icons, just like 148‐Namelist_1.bmp, 149‐Namelist_2.bmp, 150‐Namelist_3.bmp ... and so on. 3) Copy these new icons with same names into the Icon folder. Replace the original ones. 5 How to edit namelist? We supply one prototype of photoshop document named namelist.psd for editing namelist. Of course, Photoshop should have been installed in your PC. Edit operation is as following steps: 1. Double click namelist.psd 2. Totally 33 layer, 32 of them are text layers. Enable layer visibility of one text layer and Background layer 3. Double click in , then the related text 01<[01] User1 can be edited. Just like following pictures show. Double click Edit text 6 How to make a UI file for new namelist 4. Save as BMP file and name it, for the first icon, it’s named 148‐Namelist_1, Select folder for saving, name it and select BMP format, then click Save button Then click OK 7 5. Enable layer visibility of 02<[02] User2, and Disable visibility of 01<[01] User 1, then use the same method to operate the second icon, then save as bmp file named 149‐Namelist_2 6. Repeat similar operation to edit the rest icons, and save as bmp file with the corresponding name, just like 150‐Namelist_3.bmp, 151‐Namelist_4.bmp ... and so on 7. Assume that there are totally 14 users, so 14 icons should be made, just like the follow picture shows: 8 How to make a UI file for new namelist How to make a UI file for new namelist 1. Copy the new icons to Inco folder in the related project. ¾ Select all the new icons and copy them ¾
Paste into Inco folder, and select Copy and Replace like the following pictures show. 9 2. Create UI file ¾ Start Simulator software, you can preview namelist pages just like the following picture shows. ¾
Export a UI file Select Output‐> Output Config Select Save Path for UI file, then click OK It will pop up a window if output succeed. Click OK 10 How to make a UI file for new namelist 3. Finally, you will get a folder of UI named DTP40100, then rename it DT50100, copy it to root directory of SD card, just like the following pictures show. Run the namelist update operation, details refer to How to download namelist to DMR18 chapter. 11