1
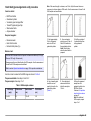
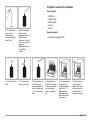
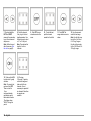
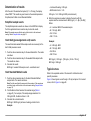
DOC022.52.80363
BODTrak II™
02/2013, Edition 1
User Manual
Table of Contents
Specifications ..................................................................................................................................................................................5
General information .....................................................................................................................................................................5
Safety information ..............................................................................................................................................................................5
Use of hazard information ..................................................................................................................................................................6
Precautionary labels ..........................................................................................................................................................................6
Certification ........................................................................................................................................................................................6
Product overview ...............................................................................................................................................................................7
Product components ..........................................................................................................................................................................7
Installation .........................................................................................................................................................................................7
External connections ..........................................................................................................................................................................7
Connect the RS232 interface .............................................................................................................................................................8
Bottle connections ..............................................................................................................................................................................8
User interface ..................................................................................................................................................................................8
Channel selection keys ......................................................................................................................................................................9
Arrow keys .........................................................................................................................................................................................9
ON key ...............................................................................................................................................................................................9
OFF key .............................................................................................................................................................................................9
Startup .................................................................................................................................................................................................9
Turn the instrument on .......................................................................................................................................................................9
Set the clock ......................................................................................................................................................................................9
Standard operation ....................................................................................................................................................................10
Download test results .......................................................................................................................................................................10
Import data .......................................................................................................................................................................................10
Data format ......................................................................................................................................................................................10
Print test results ...............................................................................................................................................................................11
BODTrak II™ procedures ........................................................................................................................................................11
Procedure notes ...............................................................................................................................................................................11
Simplified procedure ........................................................................................................................................................................12
Hach GGA (glucose/glutamic acid) procedure .................................................................................................................................13
1
Table of Contents
Hach Standard Method procedure ...................................................................................................................................................14
Completion steps for all procedures ................................................................................................................................................15
Determination of results .........................................................................................................................................................17
Simplified sample results .................................................................................................................................................................17
Hach GGA (glucose/glutamic acid) results ......................................................................................................................................17
Hach Standard Method results ........................................................................................................................................................17
Typical curves ...............................................................................................................................................................................17
Special considerations ............................................................................................................................................................18
Sample dilution ................................................................................................................................................................................18
Sample seeding ...............................................................................................................................................................................18
Sample temperature ........................................................................................................................................................................18
Toxic materials .................................................................................................................................................................................18
Chlorine ............................................................................................................................................................................................19
pH effect ...........................................................................................................................................................................................19
Supersaturation ................................................................................................................................................................................19
Maintenance ...................................................................................................................................................................................19
Clean the instrument ........................................................................................................................................................................19
Clean the sample bottles .................................................................................................................................................................19
Clean the stir bars and seal cups .....................................................................................................................................................19
Storage ............................................................................................................................................................................................19
Troubleshooting ..........................................................................................................................................................................20
Incorrect BOD curves .......................................................................................................................................................................20
High oxygen demand .......................................................................................................................................................................20
Nitrification .......................................................................................................................................................................................21
Excessive time lag ...........................................................................................................................................................................21
Sample temperature ........................................................................................................................................................................21
Bottle leak ........................................................................................................................................................................................21
Replacement parts and accessories ...............................................................................................................................21
Replacement parts ...........................................................................................................................................................................21
Required reagents ...........................................................................................................................................................................22
2
Table of Contents
Optional reagents .............................................................................................................................................................................22
Accessories ......................................................................................................................................................................................22
3
Table of Contents
4
Specifications
Specifications are subject to change without notice.
Table 1 General Specifications
Table 2 Method performance specifications
Specification
Details
Precision
Parameters:
•
•
•
•
Standard: 150 mg/L each of glucose and glutamic acid
Number of samples: 44
Number of analysts: 1
Number of BodTrak II instruments: 6
Specification
Details
Operating
temperature
5 to 40 ºC (41 to 104 ºF)
Altitude limit
2000 m (6500 ft)
Pollution degree
2
Installation
category
II
Storage/operating
humidity
Maximum relative humidity is 80% for temperatures up to
31 ºC (87.8 ºF), decreases linearly to 50% relative
humidity at 40 ºC (104 ºF)
Location
Laboratory / Indoor
Protection class
2
General information
Range
Selectable, 0 to 35, 0 to 70, 0 to 350, 0 to 700 mg/L
Dimensions
28.9 x 26 x 9.8 cm (11.375 x 10.25 x 3.875 in.)
External power
supply
Input: 100 to 240 VAC, 50/60 Hz, 1.5 A; Output: 24 VDC,
2.7 A, UL CSA and TUV approved.
Capacity
Six 492 mL bottles
In no event will the manufacturer be liable for direct, indirect, special,
incidental or consequential damages resulting from any defect or
omission in this manual. The manufacturer reserves the right to make
changes in this manual and the products it describes at any time, without
notice or obligation. Revised editions are found on the manufacturer’s
website.
Shipping weight
4 kg (8.8 lb)
Warranty
1 year
Results:
• Mean of 235 mg/L BOD
• Distribution: 11 mg/L or range of 224 to 246 mg/L BOD
• 95% confidence limit
Drift
Less than 3 mg/L BOD in 5 days
Resolution
1 mg/L BOD
Safety information
NOTICE
The manufacturer is not responsible for any damages due to misapplication or
misuse of this product including, without limitation, direct, incidental and
consequential damages, and disclaims such damages to the full extent permitted
under applicable law. The user is solely responsible to identify critical application
risks and install appropriate mechanisms to protect processes during a possible
equipment malfunction.
Please read this entire manual before unpacking, setting up or operating
this equipment. Pay attention to all danger and caution statements.
English 5
Failure to do so could result in serious injury to the operator or damage
to the equipment.
Make sure that the protection provided by this equipment is not impaired.
Do not use or install this equipment in any manner other than that
specified in this manual.
Use of hazard information
DANGER
Indicates a potentially or imminently hazardous situation which, if not avoided, will
result in death or serious injury.
WARNING
Indicates a potentially or imminently hazardous situation which, if not avoided,
could result in death or serious injury.
CAUTION
Indicates a potentially hazardous situation that may result in minor or moderate
injury.
NOTICE
Indicates a situation which, if not avoided, may cause damage to the instrument.
Information that requires special emphasis.
Precautionary labels
Read all labels and tags attached to the instrument. Personal injury or
damage to the instrument could occur if not observed. A symbol on the
instrument is referenced in the manual with a precautionary statement.
This symbol, if noted on the instrument, references the instruction
manual for operation and/or safety information.
Electrical equipment marked with this symbol may not be disposed of
in European public disposal systems after 12 August of 2005. In
conformity with European local and national regulations (EU Directive
2002/96/EC), European electrical equipment users must now return
old or end-of-life equipment to the Producer for disposal at no charge
to the user.
Note: For return for recycling, please contact the equipment producer or supplier
for instructions on how to return end-of-life equipment, producer-supplied
electrical accessories, and all auxiliary items for proper disposal.
Certification
Canadian Radio Interference-Causing Equipment Regulation,
IECS-003, Class A:
Supporting test records reside with the manufacturer.
This Class A digital apparatus meets all requirements of the Canadian
Interference-Causing Equipment Regulations.
Cet appareil numèrique de la classe A respecte toutes les exigences du
Rëglement sur le matériel brouilleur du Canada.
FCC Part 15, Class "A" Limits
Supporting test records reside with the manufacturer. The device
complies with Part 15 of the FCC Rules. Operation is subject to the
following conditions:
1. The equipment may not cause harmful interference.
2. The equipment must accept any interference received, including
interference that may cause undesired operation.
Changes or modifications to this equipment not expressly approved by
the party responsible for compliance could void the user's authority to
operate the equipment. This equipment has been tested and found to
comply with the limits for a Class A digital device, pursuant to Part 15 of
the FCC rules. These limits are designed to provide reasonable
protection against harmful interference when the equipment is operated
in a commercial environment. This equipment generates, uses and can
radiate radio frequency energy and, if not installed and used in
6 English
accordance with the instruction manual, may cause harmful interference
to radio communications. Operation of this equipment in a residential
area is likely to cause harmful interference, in which case the user will be
required to correct the interference at their expense. The following
techniques can be used to reduce interference problems:
The instrument adjusts for any negative errors produced when heat is
applied to a sample. The instrument does not start the test until the
temperature gets to equilibrium.
1. Disconnect the equipment from its power source to verify that it is or
is not the source of the interference.
2. If the equipment is connected to the same outlet as the device
experiencing interference, connect the equipment to a different
outlet.
3. Move the equipment away from the device receiving the interference.
4. Reposition the receiving antenna for the device receiving the
interference.
5. Try combinations of the above.
Make sure that all components have been received. If any of these items
are missing or damaged, contact the manufacturer or a sales
representative immediately.
Product overview
Respirometric Biological Oxygen Demand (BOD) is a test that measures
the quantity of oxygen consumed by bacteria that oxidize organic matter
in a water sample. The test is used to measure waste loadings at
wastewater treatment plants and to examine the efficiency of wastewater
treatment.
The instrument is sealed to prevent external atmospheric pressure
changes in the test bottle. The pressure in the sample bottles is
monitored. Bacteria in the sample use oxygen when they consume
organic matter. This oxygen consumption causes the pressure in the
bottle head space to drop. The pressure drop correlates directly to BOD.
During a test period, stir bars mix the sample and cause oxygen to move
from the air in the bottle to the sample. This helps simulate natural
conditions.
Carbon dioxide is a result of the oxidation process and can interfere with
a measurement. The instrument continuously removes carbon dioxide
from the system so that the monitored pressure difference stays
proportional to the quantity of oxygen used. Pressure changes in the
closed system are shown graphically in milligrams per liter (mg/L) on a
liquid crystal display. The instrument gives 360 uniform data points over
the selected time period.
Product components
• BODTrak™ II instrument
• A UL/CSA approved 115 VAC power cord with a NEMA 5-15P style
plug
• A 230 VAC harmonized power cord with a continental European plug
• Power supply, auto-switching between 115 V and 230 V
• Seal cups (6x)
• BODTrak II amber sample bottles (6x)
• BODTrak II magnetic stir bars (6x)
• Spatula scoop
• Nutrient buffer solution pillows (1 pkg)
• Potassium hydroxide pellets (1 container)
Installation
External connections
Figure 1 shows the locations of the power switch and external
connections.
English 7
Note: The use of the specified cable or an equivalent shielded cable is necessary
to meet radio frequency emissions requirements.
Figure 1 External connections
Bottle connections
Each bottle position/channel has the applicable tube numbered with a
plastic sleeve. The bottle positions are numbered 1 through 6 with
number 1 in the back left corner of the chassis. Use the channel
selection keys as a guide to the bottle positions Figure 2 on page 8.
User interface
The instrument display and the keypad are shown in Figure 2.
Figure 2 Display and keypad
1 Power switch
3 Serial I/O port
2 DC power connector
Connect the RS232 interface
1 Display
4 Arrow keys
All RS232 connections are made through the serial I/O port. Connect the
9-pin D connector of a computer interface cable to the serial I/O port on
the instrument (Figure 1 on page 8). Connect the other end of the cable
to the computer serial I/O port (COM 1 or COM 2).
The instrument is equipped as Data Communication Equipment (DCE).
The instrument operates at 9600 baud with 8 data bits, no parity and one
stop bit. The computer or printer will not receive complete transmissions
if the device cannot continuously receive at 9600 baud.
2 Channel selection keys
5 Power indicator
8 English
3 ON and OFF keys1
1
The ON and OFF keys are used to start and stop a test. They do not power
the instrument on and off.
Channel selection keys
OFF key
Push the related channel selection key to show data for one of the six
bottles. The channel selection keys are also used in the instrument setup
menu to select a parameter to be edited. Refer to Figure 2 on page 8
and Table 3.
When a test is in DELAY or RUN modes, push and hold OFF to
manually end the test. The instrument will show END. The OFF key is
also used to exit the instrument setup menu or range selection menu.
The changes made before the menu is exited are saved.
Table 3 Channel key setup parameters
Channel
Parameter
1
Year (0–99)
2
Month (1–12)
3
Day (1–31)
4
Hour (0–24)
5
Minute (0–59)
6
Test length (5, 7 or 10 days)
Arrow keys
The display shows a graph of BOD values on the vertical axis and time
in days on the horizontal axis. Push the LEFT and RIGHT arrows to
move the cursor along the BOD curve to show the approximate
coordinates (time, BOD) of the selected data point.
The time interval and BOD value of the data point are shown in the lower
right of the display. The cursor is automatically placed at the most
recently collected data point in a channel display.
Push and hold the LEFT and RIGHTarrows at the same time to go into
the instrument setup menu. The arrow keys are also used to change the
time, date, test length and range.
Startup
Turn the instrument on
Note: The ON and OFF keys are used to start and stop a test. They do not power
the instrument on and off.
1. Connect the power adaptor to the DC power connector (Figure 1
on page 8).
2. Toggle the power switch to set the instrument to on and off. (Figure 1
on page 8).
Set the clock
All the channels must show END or CLEAR before the clock can be set.
1. Push and hold the two arrow keys at the same time until the
instrument setup menu is shown.
2. Push the applicable channel key to select the clock parameter to be
adjusted.
3. Use the arrow keys to edit the selected parameter. Adjust each
parameter in the same manner.
4. When all the time adjustments are complete, push OFF to save and
go back to the data display screen.
ON key
To go to the range selection menu, push ON from a channel display
screen. Then push and hold ON to start the test for the selected channel.
English 9
Standard operation
Download test results
To transfer test results to a PC:
1. Select
PROGRAMS>ACCESSORIES>COMMUNICATIONS>HYPERTERM
INAL.
2. In the Connection Description window, type in a name for the
connection and select an icon to represent the connection. Click OK.
3. In the Connect To window, use the drop-down menu to select the
COM port connected to the instrument. Click OK.
4. Configure the COM port properties: BPS = 9600, Data Bits = 8,
Parity = None, Stop Bits = 1, Flow Control = None.
5. Click OK. The connector indicator shows.
6. Select TRANSFER>CAPTURE TEXT.
7. In the Capture Text window, click START.
8. Power the instrument on. Push the key for the channel that has data
to be downloaded.
9. Type GA in the HyperTerminal window and push ENTER. The
transfer is complete when the screen stops adding new data.
10. Select TRANSFER>CAPTURE TEXT>STOP.
11. Select CALL>DISCONNECT. The disconnected indicator shows.
12. To end the HyperTerminal session, select FILE>EXIT.
Import data
4. Click the check boxes for Space delimiter and Treat consecutive
delimiters as one. Click NEXT.
5. Select General as the column data format, then click FINISH.
6. In the Import Data window, select Existing worksheet. Select the
starting cell, then click OK. The data will appear in the spreadsheet.
The spreadsheet data cannot be edited or formatted in
HyperTerminal or with the BODTrak II.
Data format
When a result array is downloaded to HyperTerminal, all of the data from
a test is sent without pause. The data flow cannot be stopped or paused.
The example shows the channel number, start date, start time and the
format of the downloaded data. BOD values in mg/L follow. Only the first
data points of a maximum of 360 equal distance points are shown. Each
line ends with a carriage return and a line feed. The end of the data
stream is shown by a message such as "Test Run to Completion" and a
dollar symbol ($).
If small negative BOD values are seen at the start of a test, refer to
Troubleshooting on page 20.
Example of the data format
BOD Log for Ch 1
Status: END
Full Scale: 700 mg/L
Tst length: 7 days
Start Date: 3/3/08
Time: 13:04
To import the data from the captured text file:
Days, Reading (mg/L)
1. Open a new or existing spreadsheet. Select DATA>IMPORT
EXTERNAL DATA>IMPORT DATA.
2. Select the text file captured in HyperTerminal. Click IMPORT.
3. In the Text Import Wizard, select Delimited as the file type, the start
row in the spreadsheet and Windows (ANSI) as the file origin. Click
NEXT.
0.00, 0
0.05, 10
0.11, 12
0.16, 12
0.22, 14
0.27, 14
10 English
0.33, 12
0.38, 8
0.44, 10
0.50, 12
0.55, 12
0.61, 14
Test Run to Completion
$
CAUTION
Chemical exposure hazard. Dispose of chemicals and wastes in
accordance with local, regional and national regulations.
Procedure notes
There are three procedure variations. Select the procedure that meets
the application requirements.
Print test results
The BODTrak II is compatible with the Citizen PD-24 printer, which is
available as an optional accessory (Accessories on page 22).
1. Connect the printer cable to the serial I/O port on the instrument. Use
the gender adapter supplied with the printer to make the connection.
Make sure that the printer settings are correct (Connect the RS232
interface on page 8).
2. Power on the instrument.
3. Push and hold the applicable channel number for approximately
5 seconds at any time during a test.
The test results move from the instrument to the printer. The
instrument sends a copy of the graphical display and a truncated
data stream (127 data points).
BODTrak II™ procedures
CAUTION
Chemical exposure hazard. Obey laboratory safety procedures and
wear all of the personal protective equipment appropriate to the
chemicals that are handled. Refer to the current material safety data
sheets (MSDS) for safety protocols.
• The Simplified procedure is recommended when sample seeding,
extra nutrients or buffers are not necessary. It is also recommended
when accuracy requirements are not stringent.
• The Hach GGA (glucose/glutamic acid) procedure is
recommended for all accuracy and performance checks that use
seeded GGA. It is also recommended when test accuracy is
important.
• The Hach Standard Method procedure is recommended when
samples are seeded or extra nutrients or reagents are added. Use this
procedure for the Standard Methods for the Examination of Water and
Wastewater, 21st Edition, Method 5219 D Respirometric Method.
After any of the procedure variations, do the completion steps. Refer to
Completion steps for all procedures on page 15. It is possible to use a
combination of these procedures with one instrument but in different
bottles. Only one test length can be chosen.
Before the test:
Use the applicable sample volume tables for each procedure.
If power is interrupted when the instrument is in DELAY status, the test will stop
and the status will change to CLEAR when power returns. Start the test again. If
power is interrupted when the instrument is in RUN status, the test will resume
when power returns.
Keep deionized water overnight in an incubator at 20 ºC. Shake the deionized
water to saturate with air.
Let the seed become stable overnight in the BOD incubator at a temperature of
20 ºC. Be careful not to disturb the settled solution. Pipet seed solution from the
top.
English 11
Table 4 Simplified sample volumes (continued)
Dilution is necessary if samples have BOD values more than 700 mg/L.
At elevations higher than 5000 feet above sea level, the 0 to 35 mg/L BOD
range is decreased to 0 to 25 mg/L BOD. Adjustment is not necessary for other
test ranges.
Refer to Special considerations on page 18 for special considerations
including sample seeding and pretreatment.
BOD range (mg/L)
Sample volume (mL)
0 to 350
160
0 to 700
95
Use only BODTrak II stir bars and bottles. These items are made specifically to
be used with the BODTrak II.
Simplified procedure
Items to collect:
•
•
•
•
•
BODTrak II bottle
Thermometer
Blender (optional)
Graduated cylinder
Nutrient buffer pillow (1x)
1. Heat or cool the
sample to 19 to 21 ºC.
2. Homogenize the
sample in a blender if it
contains large
settleable or floatable
solids.
4. Add the contents of
1 nutrient buffer pillow
to the graduated
cylinder.
5. Move the contents of
the graduated cylinder
to a BODTrak II bottle.
Continue to Completion
steps for all procedures
on page 15. Repeat
steps 1 to 5 for
additional samples.
Use the correct sample volume for the BOD range as shown in Table 4.
Table 4 Simplified sample volumes
BOD range (mg/L)
Sample volume (mL)
0 to 35
420
0 to 70
355
12 English
3. Select the correct
sample volume for the
BOD range (Table 4).
Measure the sample
into a graduated
cylinder.
Hach GGA (glucose/glutamic acid) procedure
Items to collect:
•
•
•
•
•
•
Note: If the seed strength is unknown, use 20 mL. Adjust the seed volume as
necessary to achieve optimum GGA results. Use the same amount of seed for all
GGA samples and seed blanks.
BODTrak II bottle
Graduated cylinder
Volumetric pipet and pipet filler
®
Tensette pipet and pipet tips
Wash water bottle
Ampule breaker
Required reagents:
• Deionized water
• Hach GGA solution
• Nutrient buffer pillow (1x)
1. Add approximately
30 mL of deionized
water to a 200-mL
graduated cylinder.
2. Use a volumetric
pipet to move 8.0 mL of
Hach GGA solution to
the graduated cylinder.
Note: Skip this step
when the seed blank is
prepared.
3. Add the contents of
1 nutrient buffer pillow
to the graduated
cylinder.
4. Use a tensette pipet
to add the correct
quantity of seed to the
graduated cylinder
(Table 5).
5. Use a deionized
water wash bottle to
dilute the sample to
160 mL.
6. Move the prepared
sample from the
graduated cylinder to a
BODTrak II bottle.
Continue to Completion
steps for all procedures
on page 15.
Note: For additional
GGA samples, repeat
steps 1 to 6.
Before a test:
Use Hach BOD Standard Solution Ampules for Manometric Method (3000 mg/L
Glucose, 3000 mg/L Glutamic acid).
Always prepare the seed blank before the GGA samples. Use the same amount
of seed for all GGA samples and seed blank.
Refer to section Special considerations on page 18 for special considerations.
Use the correct volumes for the BOD range as shown in Table 5.
Prepare seed blank: Use steps 1 and 3 to 7.
Prepare sample: Use steps 1 to 7.
Table 5 GGA sample volumes
BOD range
(mg/L)
0 to 350
GGA volume
(mL)
Seed volume
(mL)
Final volume
(mL)
8.0
10 to 35
160
English 13
Hach Standard Method procedure
Note: If the seed strength is unknown, use 20 mL. Adjust the seed volume as
necessary to achieve optimum results.
Items to collect:
•
•
•
•
•
•
Thermometer
BODTrak II bottle
Blender (optional)
Graduated cylinder
Tensette pipet and pipet tips
Wash water bottle
Required reagents:
• 1 nutrient buffer pillow
• Additional nutrient or buffer (optional)
• Deionized water
1. Heat or cool the
sample to 19 to 21 ºC
(66 to 70 ºF).
2. Homogenize the
sample in a blender if it
contains large
settleable or floatable
solids.
3. Select the correct
sample volume for the
BOD range (Table 6).
Measure the sample
into a graduated
cylinder.
4. Add the contents of
1 nutrient buffer pillow
to the graduated
cylinder.
5. If the sample is
seeded, use a tensette
pipet to add the correct
quantity of seed to the
graduated cylinder
(Table 6).
6. If necessary, add
more nutrient or buffer.
Do not add more than a
total volume of 50 mL
(seed, nutrient, buffer).
Before starting the test:
Use the sample volume table to select the correct sample size
If samples are seeded, prepare a seed blank before a sample is prepared. Treat
the seed blank the same as any other sample and omit step 5.
Refer to Special considerations on page 18 for special considerations.
Use the correct volumes and dilution factor for the BOD range as shown
in Table 6.
Table 6 Hach Standard Method sample volumes
BOD range
(mg/L)
Sample
volume (mL)
Seed volume
(mL)
Final volume
(mL)
Dilution
factor
0 to 35
370
10 to 35
420
1.14
0 to 70
305
10 to 35
355
1.16
0 to 350
110
10 to 35
160
1.45
0 to 700
45
10 to 35
95
2.11
14 English
Completion steps for all procedures
Items to collect:
•
•
•
•
•
7. Fill to the final test
range volume if
necessary with a
deionized wash water
bottle (Table 6).
8. Move the prepared
sample from the
graduated cylinder to a
BODTrak II bottle.
Continue to Completion
steps for all procedures
on page 15.
Note: Repeat steps 1 to
8 for additional
samples.
1. Put a stir bar into the
bottle.
2. Put a seal cup into
the neck of the bottle.
BODTrak II
Spatula scoop
BOD incubator
Seal cup
Stir bar
Required reagents:
• 2 potassium hydroxide pellets
3. Use a spatula scoop
to add 2 potassium
hydroxide pellets to the
seal cup. Repeat steps
1 to 3 for each sample
bottle.
4. Put the bottles on
the BODTrak II chassis.
Connect the applicable
tube to the sample
bottle and tighten the
cap.
5. Put the instrument in
the incubator. The
incubator temperature
must be 20 ± 1 ºC.
Note: Instrument
performance has not
been tested at other
temperatures.
6. Plug in and power
on the instrument.
Make sure that all the
stir bars are rotating. If
not, lift the bottle up
then set it down again.
English 15
7. Push and hold the
LEFT and RIGHT
arrows at the same time
to go to the instrument
setup menu.
Note: Set the time and
date if necessary (Set
the clock on page 9).
8. Push the channel
6 key to go to the test
length parameter. Use
the arrow keys to select
a 5, 7 or 10 day test.
Note: The selected test
length is for all six
channels.
13. Push and hold ON
to start a test. A graph
will show.
Note: To cancel a test,
push and hold OFF.
There is a built-in
1 hour
instrument/sample
equilibration period
before data collection.
The display shows
"DELAY" during this
period.
14. Do steps
10 through 13 again to
set the test range and
start each of the six
channels. It is not
necessary to operate all
six channels if less than
six samples are
available.
16 English
9. Push OFF to save
selections and exit the
menu.
10. To start the test,
push the channel
number for the bottle.
11. Push ON. The
range selection menu is
shown.
12. Use the arrows to
select the test range.
Note: Use the left arrow
key for the 0 to 35 and
0 to 70 mg/L ranges.
Use the right arrow key
for the 0 to 350 and 0 to
700 mg/L ranges.
Determination of results
After the end of the selected test period (5, 7 or 10 days), the display
shows "END". The results are given based on the selected procedure:
Simplified, Hach GGA or Hach Standard Method.
Simplified sample results
The simplified procedure results are shown on the BODTrak II display.
Push the applicable channel selection key to show the results.
Note: If the sample was pre-diluted, apply a dilution factor to the instrument
reading. Refer to Sample dilution on page 18.
Hach GGA (glucose/glutamic acid) results
The seed blank and seeded GGA sample results are necessary for the
Hach GGA procedure results.
1. Push the channel selection key for the seed blank bottle. The results
are shown.
2. Push the channel selection key for the seeded GGA sample bottle.
The results are shown.
3. Calculate the results:
BOD mg/L = seeded GGA sample result – seed blank result
Hach Standard Method results
1. Push the channel selection key for the Hach Standard Method
sample bottle. The results are shown.
Note: Treat the seed blank the same as all other samples. If the sample was
pre-diluted, apply a dilution factor to the instrument reading (Sample dilution
on page 18).
• Instrument Reading = 200 mg/L
• BOD dilution factor = 1.45
200 mg/L x 1.45 = 290 mg/L BOD (corrected result)
4. When the samples are seeded, calculate the results with this
equation and the corrected results: BOD (mg/L) = A – [B x (SA÷SB)]
Where:
•
•
•
•
A = corrected BOD of the seeded sample
B = 120 mg/L BOD
SA = 20 mL
SB = 110 mL
Example:
•
•
•
•
A = 290 mg/L BOD
B = 120 mg/L BOD
SA=20 mL
SB=110 mL
BOD (mg/L) = 290 mg/L - [120 mg/L x (20 mL÷110 mL)]
BOD mg/L = 268 mg/L
Typical curves
Refer to the expanded version of the manual for information about
specific procedures.
Figure 3 shows typical curves through a 10 day test period. For incorrect
curves, refer to Figure 4 on page 20.
2. Find the dilution factor based on the selected range (Table 6
on page 14). For example, if the sample range selected is 0 to
350 mg/L BOD, the dilution factor is 1.45.
3. Calculate the corrected results:
BOD mg/L = BOD mg/L (instrument reading) x dilution factor
Example:
English 17
When the oxygen requirement of a sample is more than 700 mg/L, dilute
the sample with high-quality distilled or deionized water.
Calculate the results to include the additional dilution factor. Example: if
the BOD of the sample is 1000 mg/L, dilute the sample 1:1 with distilled
or deionized water. The estimated BOD is now 500 mg/L. Use the
sample volume specified in the table for the 0 to 700 mg/L range of the
selected procedure. Multiply the instrument reading result by 2. If the
Hach Standard Method procedure is used, continue with the rest of the
calculations.
Figure 3 Typical curves
Sample seeding
Some types of BOD samples do not contain sufficient bacteria to oxidize
the organic matter in the sample. Many industrial wastes are of this type.
Some sewage treatment plant effluents are chlorinated and essentially
sterile. A BOD test cannot be done in the absence of viable bacteria. To
test such samples, seed each bottle from a source known to contain a
viable bacterial population.
Settled domestic wastewater plant influent or primary clarifier effluent are
the preferred sources of seed for most samples. Mixed liquor or
undisinfected effluent can be used for seed, but it is recommended to
include a nitrification inhibitor. Commercial seed sources are sometimes
suitable. To prepare, see the instructions from the manufacturer.
Sample temperature
1 Typical with substrate variation
3 Typical with time lag
2 Typical
Special considerations
Sample dilution
Unknown sample BOD effluent is typically in the 0 to 70 mg/L range.
Unknown sample BOD influent is typically in the 0 to 700 mg/L range.
18 English
Standard Methods for the Examination of Water and Wastewater, 21st
Ed., 2005 5210 D recommends an incubation temperature of 20 ±1 ºC
(68 ºF) for the BOD test. Put the instrument in an incubator that is
adjusted to 20 ±1 ºC. Warm or cool samples to 20 ±1 ºC.
Instrument performance has not been validated at temperatures other
than 20 ºC.
Toxic materials
Industrial and chlorinated samples often contain toxic substances and
require special considerations when running BOD tests. Toxic materials
in the sample will cause decreased BOD values. Dilute the sample to
minimize the toxic materials or their effects. Refer to Standard Methods
for the Examination of Water and Wastewater, 21st edition, 5210 D.
Chlorine
Chlorine in the sample must be removed prior to testing. Keep the
sample at room temperature for 1 to 2 hours before a test to dissipate
low chlorine concentrations. If any chlorine remains after sitting for
2 hours, or if the chlorine concentration is high, add sodium thiosulfate to
remove the chlorine.
1. In a 250-mL Erlenmeyer flask, add 100 mL of sample.
2. Add 10 mL of 100 g/L potassium iodide solution and 10 mL of 0.02 N
sulfuric acid standard solution to the Erlenmeyer flask.
3. Add 3 droppers of starch indicator solution and swirl to mix.
4. Titrate from dark blue to colorless with 0.025 N Sodium Thiosulfate
standard solution.
5. Calculate the quantity of sodium thiosulfate standard solution
necessary to dechlorinate the remaining sample:
mL of sodium thiosulfate = (mL used)×(mL sample to be
dechlorinated)÷100
6. Add the necessary quantity of 0.025 N sodium thiosulfate standard
solution to the sample and mix fully. After 10 to 20 minutes, do the
BOD test.
pH effect
Low BOD test results occur when sample pH is outside the range of 6 to
8. Keep this pH to simulate source sample conditions or adjust the pH to
neutrality (buffered at pH 7). Use 1.0 N (or weaker) sulfuric acid to
neutralize caustic samples. Use 1.0 N (or weaker) sodium hydroxide to
neutralize acidic samples. When samples are pH adjusted, they should
also be seeded.
Supersaturation
Equilibrate supersaturated cold samples (samples that contain more
than 9 mg/L of dissolved oxygen at 20 ºC) to saturation.
1. Heat or cool the sample to approximately 20 ºC.
2. Half fill a sample bottle with sample.
3. Shake for 2 minutes or aerate with filtered compressed air for
2 hours.
Maintenance
DANGER
Multiple hazards. Only qualified personnel must conduct the tasks
described in this section of the document.
CAUTION
Chemical exposure hazard. Obey laboratory safety procedures and
wear all of the personal protective equipment appropriate to the
chemicals that are handled. Refer to the current material safety data
sheets (MSDS) for safety protocols.
Clean the instrument
Clean spills on the instrument with a soft cloth that has been dampened
with deionized or distilled water.
Clean the sample bottles
Clean the sample bottles and caps with a brush, water and a mild
detergent. Flush the containers with fresh water followed by a distilled
water rinse.
Clean the stir bars and seal cups
Clean the stir bars with hot water and soap. Use a brush to remove
deposits. Rinse with fresh water and then rinse with distilled water.
Carefully empty and rinse the seal cups with water. Invert to dry.
Storage
The bottle fences prevent tipping of the bottles and provide tubing
management in storage. For storage, put the tubing in the opening in the
English 19
bottle fence. Move the tubing counter-clockwise and secure the bottle
cap inside the fence.
Figure 4 Incorrect curves
Troubleshooting
Incorrect BOD curves
Figure 4 shows incorrect BOD curves for a 10 day test period. For typical
curves, refer to Typical curves on page 17.
1 High oxygen demand
4 Initial sample temperature below
20 ºC or supersaturated with
oxygen
2 Nitrification
5 Bottle leak
3 Excessive time lag
High oxygen demand
Refer to Figure 4 on page 20. Samples that are above range (for
example, a BOD over 350 mg/L when a 160-mL sample is taken) will
20 English
cause results as shown in Curve 1. Dilute the sample or use a higher
BOD range and a different sample volume. Refer to the Sample dilution,
Simplified procedure, Hach GGA procedure or the Hach Standard
method procedure for more information.
When the BOD range of a sample is unknown:
Bacteria acclimation also causes conditions that can cause curve 3. This
sometimes occurs with standards and added seed. Add more seed or
select a different seed source.
• Use the results from the Chemical Oxygen Demand (COD test).
Multiply the COD by 0.68 to get an estimated BOD value.
• Use the results from a series of BOD tests that use the same sample
but different volumes.
• Use dilution ratios to select an applicable BOD range.
Refer to Figure 4 on page 20. The initial negative results of Curve
4 show that the initial sample temperature was below the specified range
of 20 ±1 ºC. A sample supersaturated with oxygen will also show this
type of curve. Refer to the Sample temperature and Supersaturation
sections in the expanded version of this manual for more information.
Typically, effluent is in the 0–70 mg/L range while influent is in the
0-700 mg/L range. when the BOD of the sample is more than 700 mg/L,
prepare a sample dilution. Refer to the Sample dilution section in the
expanded version of this manual for more information.
Nitrification
Refer to Figure 4 on page 20. The condition shown by Curve 2 is an
example of nitrification. Deviation from the typical curve (shown as the
dashed line) is apparent by the concave increase near the end of the
test period.
Biological oxidation of organic nitrogen usually occurs after 5 days with
typical domestic waste. Nitrifying bacteria develop more slowly than
other types of bacteria.
Some samples contain a high concentration of nitrifying bacteria and
nitrification results can occur sooner. Control nitrification problems with
Hach Nitrification Inhibitor. Dispense the inhibitor powder into an empty
sample bottle and then add the sample. With the Hach Dispenser cap,
dispense 6 shots (approximately 0.48 grams) into the empty bottle. Refer
to Optional reagents on page 22.
Excessive time lag
Refer to Figure 4 on page 20. Curve 3 shows a test that did not start with
sufficient bacteria during the incubation period. To do a test on a sample
without sufficient bacteria, seed the sample. Refer to the Seed the
sample section in the expanded version of this manual for more
information.
Sample temperature
Bottle leak
Refer to Figure 4 on page 20. Curve 5 shows a bottle leak. A bottle leak
makes the system unresponsive. If such a condition occurs, examine the
seal cup and bottle cap for contamination or damage.
Replacement parts and accessories
Replacement parts
Description
Quantity
Item no.
BODTrak ™ II instrument, 115/230 VAC
1
2952400
Bottle, BODTrak II, amber
6
714421
Power cord, 18/3 SVT 7.5 ft, 10A,125 VAC
for North American 115 VAC use
1
2959200
Power Cord, 8 ft, with continental
European plug for 230 VAC use
1
2959100
Power supply
1
2952500
Computer cable for data transfer to PC
1
2959300
Seal cup
1
2959500
Spatula scoop
1
1225700
Stir bar, magnetic, BODTrak II
1
2959400
English 21
Required reagents
Description
Accessories
Quantity
Item number
Respirometric BOD nutrient buffer pillows
1
2962266
Potassium hydroxide pellets
1
31425
Optional reagents
Description
Nitrification inhibitor
Item number
Ampule breaker kit for voluette ampules
1
2196800
Bottle, wash, 500 mL
1
62011
Bottle, polyethylene, with spigot, 4 L
1
1486817
Brush, cylinder, size 2
1
68700
1
1405940
Quantity
Item no.
35 g
253335
Clamp, buret, double
1
32800
Cylinder, graduated, 10-mL
1
50838
Cylinder, graduated, 25-mL
1
50840
Cylinder, graduated, 50-mL
1
50841
Cylinder, graduated, 100-mL
1
50842
Cylinder, graduated, 250-mL
1
50846
Cylinder, graduated, 500-mL
1
50849
Cylinder, graduated, 1000-mL
1
50853
Flask, Erlenmeyer
1
50546
Incubator, BOD, Model 205, 110 V
1
2616200
Incubator, BOD, Model 205, 220/240 V
1
2616202
Pipet, Tensette®, 0.1 to 1.0 mL
1
1970001
Pipet, Tensette, 1 to 10 mL
1
1970010
Pipet tips, 0.1 to 1.0 mL
50
2185696
Pipet tips, 0.1 to 1.0 mL
1
45901
Polyseed inoculum
50
2918700
Potassium iodide solution, 100 g/L
500 mL
1228949
Sodium Hydroxide standard solution,
1.0 N
900 mL
104553
Sodium Thiosulfate standard solution,
0.025 N
1000 mL
35253
1000 mL MDB
34932
Sulfuric acid, ACS
500 mL
97949
Sulfuric acid, 0.02 N standard solution
1000 mL
20353
Sulfuric acid, 1.0 N standard solution
1000 mL
127053
16
1486610
Voluette ampule standard for BOD,
3000 mg/L for manometric, 10mL/ampule
Quantity
Buret, straight stopcock, Teflon plug,
25 mL
Dispenser cap for 35 g bottle (for use with
nitrification inhibitor)
Starch indicator solution, dropping bottle
Description
1000
2185628
Pipet tips, 1 to 10 mL
50
2199796
Pipet tips, 1 to 10 mL
250
2199725
1
1218900
Pipet filler, 3 valve
22 English
Accessories (continued)
Description
Quantity
Item number
Pipet serological, glass, 10-mL
1
53238
Printer, Citizen PD-24 with cable
1
2960100
Standard Methods for the Examination of
Water and Wastewater
1
2270800
Support stand, buret
1
32900
Thermometer, Mercury, –20 to 110 ºC
1
56601
Thermometer, non-Mercury, –20 to 110 ºC
1
2635702
Water Still, 120 V
1
2615900
Water Still, 220 V
1
2615902
Water System, Ultrapure, Millipore DirectQ3
1
2512100
DQ3 purification pack
1
2512201
English 23
24 English
HACH COMPANY World Headquarters
P.O. Box 389, Loveland, CO 80539-0389 U.S.A.
Tel. (970) 669-3050
(800) 227-4224 (U.S.A. only)
Fax (970) 669-2932
[email protected]
www.hach.com
©
HACH LANGE GMBH
Willstätterstraße 11
D-40549 Düsseldorf, Germany
Tel. +49 (0) 2 11 52 88-320
Fax +49 (0) 2 11 52 88-210
[email protected]
www.hach-lange.de
HACH LANGE Sàrl
6, route de Compois
1222 Vésenaz
SWITZERLAND
Tel. +41 22 594 6400
Fax +41 22 594 6499
Hach Company/Hach Lange GmbH, 2013. All rights reserved. Printed in Germany.