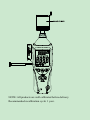
1
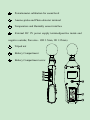
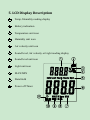
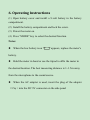
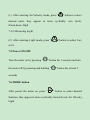
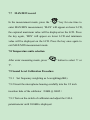
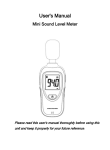
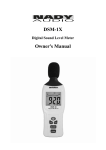
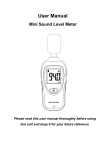
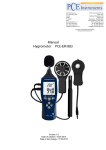
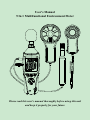
User's Manual 5 In 1 Multifunctional Environment Meter Please read this user's manual thoroughly before using this unit and keep it properly for your future Contents 1. Safety............................................................................1 2.Introduction................................................................... 2 3. Specifications............................................................... 3 4. Meter Description........................................................ 5 5. LCD Display Description............................................ 7 6. Operating Instructions..................................................8 7. Operating Procedures...................................................9 8. Notes...........................................................................13 9. Accessories.................................................................13 1. Safety Read the following safety information carefully before attempting to operate or service the meter. Use the meter only as specified in this manual; otherwise, the protection provided by the meter may be impaired. Environment conditions: Altitude less than 2000 meters RH≤90%(Non-Condensation) Operating Temperature: -30℃ ~ 60℃ Maintenance Repairs or servicing not covered in this manual should only be performed by qualified personnel. Wipe the unit with a dry soft cloth. Do not use abrasives or solvents on this instrument. Safety Symbol Comply with EMC 2.Introduction The 5 in 1 digital Multifunctional Environment Meter is designed to combine the functions of Sound Level Meter, Light Meter, Anemometer, Humidity Meter and Temperature Meter. It is an ideal Multifunctional Environment Meter with different practical applications for professional and home use, like monitoring and collecting data of environment temperature and humidity, measuring noise in factories, schools, offices, airports, home, etc., 3. Specifications Sound Level Applied standard IEC61672-1 CLASS2 Accuracy ±2.0dB Display 4digts Resolution 0.1dB Frequency response 31.5Hz~8kHz Measurement range Auto:35dB~130dB Frequency weighting dBA Microphone 1/2 inch Electric condenser microphone Light Measuring range 0 Lux~200K Lux, 0Fc~20KFc Spectral response CIE photopic(CIE human eye response curve) Spectral accuracy CIE Vλfunction f1’≦6% Cosine response f2’≦2% Accuracy ±4% rdg±0.5%f.s.(<10,000Lux) ±5% rdg±10dgts.(>10,000Lux) Photo detector One silicon photo diode with filter Air velocity Air velocity range 0.5m/s~30.0m/s Air velocity accuracy ±(3%±0.3d) Measurement units m/s, km/h, ft/min, knots, Mph, Temperature Measurement range -40~70℃(-40~158℉) Accuracy ±2.0℃,±3.6℉ Measurement units ℃/℉ Resolution 0.1 Humidity Measurement range 10~95%RH Accuracy ±5RH% Resolution 0.1 Data update 1 time/sec Maximum value MAX Minimum value MIN Data Hold HOLD Auto power off Automatically power off after approx. 15 minutes of inactivity Power supply one 9V battery with type of 006P、 NEDA1604 or IEC6F22 Battery life About 30 hours Operating condition -20℃~60℃,10%RH~90%RH Storage condition -40℃~60℃,10%RH~75%RH Dimensions 252 (L) *66 (W) *33(H) mm Weight 568g 4. Meter Description 1 Windscreen microphone cover 2 Microphone 3 LCD display 4 Temp./Humidity selection key 5 Backlight ON/OFF key 6 HOLD key 7 Units selection key 8 Power ON/OFF key 9 Function selection key 10 MAX/MIN 11 ℃/℉ selection key 12 Potentiometer calibration for sound level 13 Anemo-probe and Photo detector terminal 14 Temperature and Humidity sensor interface 15 External DC 9V power supply terminal(positive inside and negative outside; Pore size:OD 3.5mm, ID 1.35mm) 16 Tripod nut 17 Battery Compartment 18 Battery Compartment screw 5. LCD Display Description 1 Temp./Humidity reading display 2 Battery indication 3 Temperature unit icon 4 Humidity unit icon 5 Air velocity unit icon 6 Sound level, Air velocity or Light reading display 7 Sound level unit icon 8 Light unit icon 9 MAX/MIN 10 Data Hold 11 Power off Timer 6. Operating Instructions (1) Open battery cover and install a 9-volt battery in the battery compartment. (2) Install the battery compartment and lock the screw. (3) Power the meter on. (4) Press "MODE" key to select the desired function. Notes: When the low battery icon " " appears, replace the meter's battery. Hold the meter in hand or use the tripod to affix the meter in the desired location. The best measuring distance is 1~1.5m away from the microphone to the sound source. When the AC adapter is used, insert the plug of the adapter (3.5φ)into the DC 9V connector on the side panel 7. Operating Procedures 7.1 Temp./Humidity reading selection After power the meter on, press" " key to select Temperature reading or Humidity reading. 7.2 Backlight ON/OFF; After power the meter on, press " " key once, the backlight will be on, press this key again to turn it off . The backlight will be automatically turned off after approx. 30 seconds of inactivity 7.3 Data Hold Press " " button once, "HOLD" icon will appear on the LCD, which indicates the data is freezed. To release the held reading, press the button again. 7.4 Units selection 7.4.1 Measuring Air Velocity (1) After entering Air Velocity mode, press “ ” button to select desired units, they appear in turns cyclically: m/s, km/h, ft/min,knots, Mph 7.4.2 Measuring Light (2) After entering Light mode, press “ ” button to select Lux or Fc. 7.5 Power ON/OFF Turn the meter on by pressing " " button for 1 second, and turn the meter off by pressing and holding " " button for at least 3 seconds 7.6 MODE button After power the meter on, press “ ” button to select desired function, they appear in turns cyclically: Sound Level, Air Velocity, Light. 7.7 MAX/MIN record In the measurement mode, press the " " key for one time to enter MAX/MIN measurement, ‘MAX’ will appear on lower LCD, the captured maximum value will be displayed on the LCD. Press the key again, ‘MIN’ will appear on lower LCD and minimum value will be displayed on the LCD. Press the key once again to exit MAX/MIN measurement mode. 7.8 Temperature units selection After enter measuring mode, press “ ” button to select ℃ or ℉. 7.9 Sound Level Calibration Procedure 7.9.1 Set frequency weighting as A-weighting(dBA) 7.9.2 Insert the microphone housing carefully into the 1/2 inch insertion hole of the calibrator(94dB @ 1kHZ) 7.9.3 Turn on the switch of calibrator and adjust the CALL potentiometer until 94.0dB is displayed. NOTE: All products are well calibrated before delivery. Recommended recalibration cycle: 1 year. 8. Notes (1) Do not store or operate the meter in high temperature or humidity. (2) Remove the battery when the meter is to be stored for long periods of time to avoid battery leakage. (3) Wind blowing across the microphone increases the noise measurement. Use the supplied windscreen to cover the microphone when appliance. (4) Keep microphone dry and avoid severe vibration. 9. Accessories 1 User's manual 2 Temperature and Humidity probe 3 Anemo-probe 4 Light detector 5 Windscreen 6 Regulatorrod 7 Tripod(Optional) 8 9V battery and Adaptor(Optional)