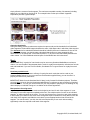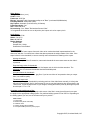
1
Video Production Standards for
Demonstration Videos
Version A 2.3
7-14-11
Important! This document is updated frequently. Always check for an
updated version before getting started on a project.
Introduction…………………………………………………………………… Page 2
Do’s and Don’ts…………………………………………………………………. Page 2
Video Production Standards for Demonstration Videos……………… Page 4
Technical Standards…………………………………………………………… Page 4
Creative Formatting……………………………………………………………. Page 4
Pre-production planning………………………………………………………. Page 5
Determining your location…………………………………………………….. Page 6
Do it for real ……………………………………………………………………. Page 6
Releases ……………………………………………………………………….. Page 6
Shooting Standards - Video introductions…………………………………… Page 6
Shooting Standards - General……………………………………………….. Page 8
Shooting Standards - Lighting ………………………………………………. Page 9
Shooting Standards - Audio Recording …………………………………….. Page 9
Editing Standards for the multiple segment format ………………………… Page 9
Music ……………………………………………………………………………. Page 10
Graphics……………………………... …………………………………………. Page 11
File Naming Standards …………………………………………………………Page 12
Reviews and approvals ……………………………………………………….. Page 12
Required Deliverables ………………………………………………………… Page 12
Shipping instructions ………………………………………………………….. Page 14
Additional Production Tips ………………………………………………… Page 15
About this document
There are many types of videos that Knowlera Media creates. This document provides details on our
production standards for “how-to” videos created specifically for About.com. For production standards on
other video types, please contact our production office at [email protected].
Copyright 2007, Knowlera Media, LLC
Introduction
How-to Videos – The Audience
If you’re reading this document, it’s likely you’ll be working with Knowlera Media to create one or more
video series that will be seen on the popular website About.com. That means your videos can be seen by
millions of people looking for the best way to accomplish a task or project. With so many eyeballs on your
work, you’ll want to do everything you can to create a high quality video that will be interesting to viewers.
Mandatory Requirements
While a few of the standards in this document involve special production techniques required by Knowlera
Media and/or About.com, most will be common sense to any professional producer. However, all the
how-to videos you create must meet the specific technical, and creative formatting requirements
described below, so you’ll want to read this document carefully.
Tip: Read this document thoroughly to ensure that your video will be accepted.
Do’s and Don’ts
Video type - Video must be how-to or instructional
At Knowlera we create many types of videos, but we specialize in how-to videos. We create two primary
types of how-to videos… demonstration videos and advice videos. Each video type is shot very
differently. A demonstration video generally shows the steps in a process actually being performed. In
that case you are documenting an expert performing a task or a process. Advice videos are shot interview
style and include the necessary b-roll, and are usually created when it is not possible to demonstrate the
information by performing a task or process. “How to repair a leaky faucet” is an obvious topic for a
demonstration video. “How to recognize the signs of depression” might be more suitable for an advice
video. Both are good “how-to” video topics. However, all how-to videos created for About.com by
Knowlera Media are demonstration videos.
IMPORTANT! All videos created for About.com by Knowlera Media are demonstration videos, and
you will receive the specific topic for your video from Knowlera Media in advance.
This document only covers the guidelines for “demonstration videos”. If you are in doubt about the type of
how-to video you are creating and the way it should be shot, please contact us for clarification.
Editorial Neutrality - Videos may not promote a specific product or service
For the experts, a how-to demonstration video is an excellent way to promote their business or hobby,
and further establish their credibility as an expert in front of millions of viewers. However, these videos
must be educational, so care must be taken to keep overt marketing or commercial messages out of the
videos. Experts should avoid mentioning brand names whenever possible, and avoid promoting one
product or service over others. It’s permissible to mention brand names when there is no alternative, but
excessive use of brand names will cause a video to be rejected.
The expert should state their name along with the organization or company they are affiliated with, but
should not go on to describe their business or background. Specific guidance on what experts are
permitted to say and when they can say it is provided later in this document.
Experts must be credible
In all cases you will be provided with a specific topic, and in some cases you will be matched with a
specific expert in advance. In other cases you may have found the expert yourself through your own circle
of friends and contacts. The best experts have deep professional experience in their topic area and have
good on-camera presence. While we don’t require information to be delivered by someone with
professional experience, the expert must be someone with above average knowledge in the topic area. At
the beginning of each video segment, the expert will state their name and the organization or company
Copyright 2007, Knowlera Media, LLC
with which they are affiliated in order to establish their credibility. You’ll find specific information about
what the expert should, can, and can’t say to establish their credibility later in this document.
Avoid announcing or displaying contact information in the video
The expert should NOT mention or display contact information, including phone numbers, email
addresses, or URLs, in the video.
Copyrighted material will not be permitted
Copyrighted material (music, video, images, text, etc) may not be included in the video unless the expert
owns the copyright. If they don’t already own it, or have written permission to use it, do not include it.
Videos using copyrighted material without permission cannot be accepted. If you must use material that
you did not shoot, a footage release that gives us permission to use the material is required. We will
provide footage releases as needed.
Signed releases are required
There are several types of releases that must be signed and returned to Knowlera. Keep in mind that
videos will not be accepted without the appropriate signed release forms. Please see the section below
titled “Releases” for specific details on what releases are required.
IMPORTANT: A Videographer Consent and Release Form must be signed and returned by the
producer prior to starting on the project. You’ll receive a copy when you are awarded the project.
Inappropriate content will not be permitted
Videos with inappropriate content will not be accepted. Content that is considered inappropriate includes,
but is not limited to:
- Offensive, lewd, or obscene images, language or nudity
- Hate speech
- Acts that are inherently dangerous to perform, even for skilled experts
- Acts depicting violence or the infliction of bodily harm
- Any illegal activities
Copyright 2007, Knowlera Media, LLC
Video Production Standards
For Demonstration Videos
As mentioned previously, the information in this document pertains to “Demonstration” videos, which is a
type of how-to video where the steps in a process are documented as they are being performed.
Production standards specific to other types of how-to videos are covered in a separate document.
Technical Standards
Deliverables
Knowlera requires the submission of high quality versions of completed Featured Expert videos in a full
HD resolution (.mov format), along with the full set of project and source files. Because of the number and
size of the required files, Featured Expert videos cannot be uploaded directly to Knowlera. Instead, the
video files along with all other required elements are mailed to Knowlera on a portable hard drive that has
been provided to you. You’ll find a complete list of the elements you will be required to submit in the
section called “Required Deliverables” later in this document.
Equipment
Featured Expert videos must be shot with a high definition professional or prosumer camera and must
always be shot in the 16x9 aspect ratio. Additionally, all dialogue must be recorded with a quality, external
microphone. Audio from built in camera microphones will not be accepted. For more details on equipment
requirements, see the Producer Program FAQ.
Creative Formatting
All Knowlera Media/About.com demonstration videos are broken into a series of independent video
segments, with a goal of keeping each segment relatively short (1.5-3 minutes in length). Think of each
video segment as a chapter, with each segment forming a natural index of the video series. To better
understand how we describe these videos, here’s how we refer to the individual parts… you will be
covering a specific “Video Topic” with what we call a “Video Series”, which is made up of individual “Video
Segments” or chapters. Throughout this document we use the terms “Video Topic” and “Video Series”
interchangeably.
A full video series will typically consists of 5 to 7 individual segments, with the target being 6 segments in
each series. Below is an example of a properly formatted Featured Expert demonstration video.
In the example above, the video topic and video series title is “Basic Vegetable Preparation”. Each video
segment in the series has its own unique title, but all of the segments collectively represent a how-to
video on Basic Vegetable Preparation.
Copyright 2007, Knowlera Media, LLC
To see examples of how demonstration videos are typically shot and edited, visit www.monkeysee.com.
Keep in mind that our guidelines have changed over time, so not all videos on MonkeySee.com meet the
current standards described in this document.
Tip: How-to videos must be shot in HD 16x9 and produced in
our multiple segment format or they will not be accepted!
Pre-production planning
The multi-segment format is easy to create once you have the hang of it. Like any other production, it’s all
about proper planning. With demonstration videos you are documenting a process, so they should be
shot unscripted. It is very difficult for nearly anyone to smoothly demonstrate something while reading
from a script. It also sounds unnatural.
However, “unscripted” doesn’t mean unprepared. To be properly prepared it’s crucial that you discuss the
project and create an outline (not a script) of each video segment with the expert well in advance of the
shoot day. On the shoot you should always be working from a simple outline of the entire shoot, and a
simple outline of each individual video segment. Together with your expert, the outlines should answer
the following simple questions:
1. How many videos will be required to fully cover the topic?
In most cases you will be provided with the number of required video segments when you are
awarded the project. Keep in mind that each video should ideally be between two and four minutes in
length. Never create video segments that are less than one minute long, or more than five minutes in
length. It is not uncommon to over- or under-estimate these lengths in the planning process. For that
reason you should pay close attention to the length of videos while you are shooting. If a video comes
up too short or long, adjust the amount of content being delivered and re-shoot the video. If the
process being demonstrated can’t be shortened during the shoot, you’ll need to shorten it in the
editing process. For that reason, make sure you have plenty of coverage.
2. What is the preliminary title of each video segment?
In most cases you will be provided with the preliminary title of each video segment when you are
awarded the project. Having a working title for each video segment prior to your shoot helps a great
deal toward ensuring that your production will be well-crafted and concise. It will also help assure that
no key steps are missed.
3. What are the main points of each video segment?
Again, experts should never work from a script. Just a few bullet points for each video should be all
that’s required on the outline. On the shoot day, the expert can prepare by reviewing those bullet
points prior to recording each video segment. This is one of the benefits of breaking a topic into short
video segments. It makes it easier for experts who are not accustomed to speaking in front of a
camera to get through a complete segment. It’s also easier on the producer, because if the expert
stumbles, it’s never necessary to re-shoot more than a couple of minutes of material.
4. Does each video segment stand alone?
Whenever possible, each individual video segment in a series should stand on its own as a discreet
piece of useful information that does not depend on the other segments in the series for context. The
“Basic Vegetable Preparation” series shown above provides a good example. Collectively, all the
segments support the topic of “Basic Vegetable Preparation”, but if the viewer is only interested in
learning how to dice an onion, they will get all the information they need to accomplish that task by
watching only the second video segment, “How to Dice an Onion”.
Once you have these key ingredients: (1) The number of video segments, (2) The approximate length of
each segment, (3) The title of each video segment, (4) Bullet point outline for each segment – you are
well prepared to show up for a shoot that should be simple and quick.
Copyright 2007, Knowlera Media, LLC
Determining your location
There are three stars in every Knowlera Media/About.com video:
- The Expert
- The Producer/Filmmaker (you)
- The Location.
Assuming you have a great expert and a talented producer, the location where you shoot your video can
still make or break it. For that reason you should do everything in your power to shoot the video in a place
where the task being demonstrated is normally performed by a professional. Some examples:
- If the demonstration is how to perform some type of exercise, shoot the video in a professional gym,
not someone’s living room.
- If it’s a college or pro football player demonstrating how to play football, shoot it on a football field
with goal posts (a local high school or elsewhere), not in someone’s backyard.
- If it’s a professional chef showing how to make a restaurant dish, try to shoot in the restaurant. If a
restaurant is not practical, shooting it in a nice home kitchen may be appropriate.
Tip: Even with a great expert and professional producer, a
poor location will always cause a video to look amateurish.
Do it for real
The expert must always be shown demonstrating/building/creating the real thing. For example, if the
expert is demonstrating how to create a concrete patio, you must document them actually creating a
concrete patio. It is not enough to simply describe the steps in the process. Also, don’t hesitate to "stage"
your location, which is to rearrange items or add appropriate items into the background of your shot to
make it look more pleasing or professional.
Releases
Prior to shooting, ensure that all necessary releases have been signed. Here are the primary types of
releases required:
- Videographer Consent and Release Form – This must be signed and returned by the producer
prior to starting on the project. It is the contract between you and Knowlera Media. You’ll receive a
copy when you are awarded the project.
- Appearance Release – An appearance release must be signed by the expert and any other people
participating on-camera. You will send these releases to us when the project is complete.
- Location Release - The owner of the location where the video is being shot will also need to sign a
location release. You will send these releases to us when the project is complete.
- Footage Release – This is required for anything in the final video that you did not shoot specifically
for this project. You will send these releases to us when the project is complete.
Shooting Standards - Video introductions
Knowlera Media/About.com demonstration videos are recognizable by their multiple-segment formatting,
and consistent high production quality. Ensuring that each video has a consistent, brief, but informative
introduction is an important element of that formula since it helps establish the expert’s credibility. Only
three pieces of information should be conveyed by the expert in the introduction of each Knowlera
Media/About.com video segment.
- Expert’s name
- Expert’s title and affiliation (or other information that establishes their expertise)
- What the individual video segment is about.
Copyright 2007, Knowlera Media, LLC
Typical introduction
Here is a typical video segment introduction using the standards described above:
“Hi, I’m Jane Doe, lead fitness instructor from ABC Fitness Company. In this video I’m going to show
you how to properly work out your core muscles.”
The expert’s affiliation is typically what establishes their credibility. In this case, the fact that they are the
lead fitness instructor adds to their credibility, so it’s okay to include that title. However, you should not
include the expert’s title if it doesn’t add credibility directly to the task they are demonstrating. For
example, “Hi, I’m Jane Doe, Director of Marketing for ABC Fitness Company…” Being the Director of
Marketing doesn’t qualify her to be a fitness expert, so it’s not appropriate to include that title. The simple
fact that she works for ABC Fitness Company is enough. In that case she would say:
“Hi, I’m Jane Doe, from ABC Fitness Company. In this video I’m going to show you how to properly
work out your core muscles.”
However, suppose she was formerly an Olympic gymnast. That’s pretty impressive and it would enhance
her credibility. In that case her introduction could be:
“Hi, I’m Jane Doe, a member of the 2004 U.S. Olympic gymnastics team. In this video I’m going to
show you how to properly work out your core muscles.”
As a last resort, if the expert doesn’t have professional credentials, and is not affiliated with an
organization that adds credibility, simply include whatever makes them an expert. For example:
“Hi, I’m John Smith, an avid fitness enthusiast presenting for About.com. In this video I’m going to
show you how to properly work out your core muscles.”
Avoid announcing or displaying contact information in the video
The expert should NOT mention or display contact information, including phone numbers, email
addresses, or URLs, in the video. The only exception to this rule is when the expert’s business is the
same name as their website. This example is fine:
“Hi, I’m Jane Doe, from ABCfit.com. In this video I’m going to show you how to properly work out your
core muscles.”
This is type of introduction (below) is NOT PERMITTED…
“Hi, I’m Jane Doe, from ABC Fitness Company. You can find us at ABCfit.com. In this video I’m
going to show you how to properly work out your core muscles.”
Important safety tips
Occasionally, a task or demonstration has important safety considerations that should be added to the
introduction. In rare cases where those safety considerations are critical, they should be mentioned by the
expert before the actual demonstration begins. Here’s an example:
“Hi, I’m Joe Smith, welding instructor with ABC Welding Company. In this video I’m going to
demonstrate basic arc welding techniques. Remember; never attempt any welding without an AWS
certified welding helmet, adequate eye protection, and a good pair of welding gloves.”
This safety information would need to be repeated at the beginning of each video segment where welding
is being demonstrated.
Copyright 2007, Knowlera Media, LLC
Video segment endings
Once you understand how to format the video introductions, the last thing required is a smooth transition
at the end of each video. That simply requires a brief mention of what was just covered and a simple
“Thanks for watching”. For example:
“… and that’s the proper way to get your core muscles in shape. Thanks for watching.”
Lower Thirds
In addition to the expert stating their name and title on-camera, you’ll also be required to identify the
expert in a lower-third graphic. The exact specs for this graphic will be found later in the section on
graphics.
Shooting Standards - General
Once you understand our format for introductions, you’ll find shooting for the multiple segment format to
be just like shooting any other video. As mentioned previously, all Knowlera Media/About.com videos
must be shot with a HD professional or prosumer camera, and must be shot in the 16x9 aspect ratio.
Additionally, all dialogue must be recorded with a quality, external microphone.
Don’t zoom… shoot twice!
With demonstration videos you should be shooting for a final product that mimics a professional quality,
two-camera switched production. That means you should shoot a master shot and close-up coverage
separately, paying close attention to continuity, and editing the two shots together in a fashion that
appears seamless to the average viewer. Attempting to capture your master shot and close-ups in a
single shot by continuously zooming in and out is not professional, and we don’t expect to see this type of
shooting.
Tip: Frequent zooming in and out is not acceptable.
Get plenty of close-ups
Show, don’t tell. Viewers want see the experts in action. Often it is very important to see precisely what
the expert is doing in close detail. For that reason, make sure you get plenty of close-up shots and use
them whenever possible during the editing process.
Use the zoom sparingly.
As mentioned previously, you should shoot a master wide shot and close up coverage separately to
eliminate the need for zooming. However, if for some reason you must “zoom in” on the action, do it
sparingly. The number one mistake made by amateur videographers is zooming in and out too often.
When your subject begins an action that requires zooming in, begin zooming in very slowly. Once you are
zoomed in as close as you need to be, leave it there until the action is over and then slowly zoom back
out to your original wide master shot. The goal is to not draw attention to the use of the zoom. Choppy,
fast, sporadic in-and-out zooming can be a major distraction.
Watch for good eye contact
Maintaining a strong connection between the expert and the audience is the key to a great video. Since
the camera represents the audience in a demonstration video, the expert should always maintain eye
contact with the camera whenever they are conveying information. Ask the expert to avoid making
eye contact with anyone else who is not actually in the video, including friends or family members that
may be in the room while the video is being shot. Asking everyone else to leave the area while the video
is being shot is the best way to avoid this inevitable problem. Another common tendency for nonprofessional subjects is to look away from the camera and up to the camera operator as soon as they
have finished speaking. This will look awkward to viewers. To avoid this you should instruct your subject
to continue looking straight into the camera lens for 3 to 5 seconds after they finish speaking. Explain to
Copyright 2007, Knowlera Media, LLC
your subject that although it may feel strange, it will look much better on the final video than having their
eyes wandering around.
Shooting Standards - Lighting
With demonstration videos, the majority of your effort should be concentrated toward the expert and the
demonstration, making sure your shot selection adequately conveys the expert’s knowledge. For that
reason, you should make use of ambient light whenever possible, and supplement with additional light
when necessary. Your goal is to make sure every part of the demonstration, including close-ups, are lit
well enough to provide adequate detail.
No gain
Most importantly - never shoot in low-light situations that require the camera to add gain. If your iris is
wide open, and the camera begins to add gain, you should add light to the scene. Never permit your
camera to exceed 3db of gain.
Don’t shoot in low light
Plain and simple: don’t shoot in locations where it is too dark. If you are outdoors, don’t shoot at dusk or
into the evening unless your camera is capable. If you are indoors, make sure you have a sufficient main
light source, and that shadows are not too dark and lacking in detail.
Audio Recording Standards
There is one extremely important rule related to audio - Always use an external microphone to record
the expert! While this should be common sense to any professional producer, it’s important to repeat it
here because using dialogue from an on-camera microphone is never acceptable. For recording the
expert, a wireless lavalier microphone is best. If you’re going to use an external shotgun microphone for a
demonstration video, you should always have a boom operator if the expert will be moving at all.
Editing Standards for the multiple segment format
If you’ve followed the standards to this point, editing your video will be simple. As we mentioned
previously, with demonstration videos you should be working to achieve a final product that mimics a
professional quality, two-camera switched production. Pay close attention to continuity, and remember to
use close-up shots whenever possible. Also make sure you edit the piece in the same 16x9 format as the
original footage, and output a full quality HD version in that aspect ratio. And again, video lengths should
be between two and four minutes in length. You’ll find more details on our technical requirements later in
this document under the section “Required Deliverables”.
Keep editing simple
In the editing process, concentrate on making sure your shot selection adequately conveys the expert’s
knowledge. For that reason you should avoid anything that calls attention to the editing, especially
gimmicky effects like wipes and other special transitions. As mentioned previously, with demonstration
videos your goal should be a final product that mimics a professional quality, two-camera switched
production. Try to start and end each video with the master shot, and be sure to use plenty of close-up
coverage when possible. Pay close attention to continuity, and edit the two shots together in a fashion
that appears seamless to the average viewer. You should be using mostly cuts, with dissolves whenever
you need to indicate the passage of time. Also, avoid mistakes like cutting in the middle of camera moves
like zooms and pans.
Fade In/Fade Out
Begin and end each video segment with a 15 frame fade up/to black.
Multiple-segment naming conventions
For demonstration videos, producers will be required to submit preliminary titles for all completed video
segments. Generally, these will already be created during the outline process. If not, the titles should
Copyright 2007, Knowlera Media, LLC
simply reflect the content of each segment. The maximum acceptable number of characters (including
spaces) in any video title or clip title is 59. The example below on the topic of Basic Vegetable
Preparation provides a good example.
Capturing thumbnails
During the editing process, producers are required to capture and provide thumbnails for all submitted
video segments. All thumbnail images should be the same 16x9 aspect ratio in which the video was shot.
The minimum size for submitted thumbnails should be 640x360 pixels and a maximum file size of 25k.
For each video segment you should create a thumbnail that shows your expert engaged in their
demonstration or a “beauty shot” of the finished product. Try to pick a frame that visually describes the
video content. You’ll find additional technical specs for thumbnails later in this document.
Music
IMPORTANT! Only “royalty free” stock music may be use on any Knowlera Media/About.com how-to
videos. You must be able to demonstrate that the music is royalty free and permits unlimited use for both
web and broadcast. If you use Final Cut Studio, Soundtrack Pro is a good source for royalty free stock
music.
Knowlera-provided music
Knowlera Media provides access to a library of royalty-free stock music that can be used on your
Knowlera Media projects. If you use music from the Knowlera-supplied library, you can be sure it is
properly licensed for our productions
IMPORTANT! Music from the Knowlera Music Library is only licensed for Knowlera projects. Therefore,
you may only use music from the Knowlera-supplied library on projects you are producing for Knowlera
Media/About.com. You may not use that music for your own projects or projects you are creating for any
other company or individual. Doing so is a violation of the license agreement.
Best practices for using music
In general, you are expected to use music at the beginning and end of each video segment. It is not
necessary to cover each segment completely with music, use multiple tracks of music on an individual
segment, or edit the segment to the music. You may use the same cut of music on each video segment.
In most cases you’ll want to have some music through the expert’s introduction, slowly fade it out for the
main body of the segment, and fade the music back up at an appropriate time near the end of the
segment. You can do more if you wish, but this is the simplest way to use music without adding
significantly to the time required to edit each video segment.
Copyright 2007, Knowlera Media, LLC
Graphics
Required Lower Third Graphic:
You should create a lower third graphic to identify the expert at the beginning of each video segment. For
lower thirds, please use the file named “About_lower3rd” as the background for your text. This graphic will
be provided after your video shoot.
About.com required Lower Third Graphic Sample
Text colors - The color for all text should be plain black.
Expert’s Name - The expert’s name should be Arial*, 28pt font, BOLD.
Affiliation: Text entered below the expert’s name should be ALL CAPS and include the expert’s title,
company, or organization. Text should be left justified, lined up directly under the expert’s name, Arial*,
24pt. font PLAIN.. If the name or title is very long, it is okay to slightly lower the text size to make them fit,
just always make sure the “Affiliation” info is in a smaller font than the expert’s name and that it is not
bold.
* If you don’t have Arial you may substitute one of the following san serif fonts - Helvetica, Universe, Avenir, Lucida
Sans, Arial, Verdana
Additional Graphics:
Any video that requires ingredients, tools or materials (especially with exact measurements or uncommon
supplies needed) should have a supply list. This can be a text graphic with a close up of the actual supply or
a full page graphic with a list. In addition, graphics should be used when an individual video has several
subject changes within the segment. For example, a video on “how to select a smoker” would have a text
graphic pop up for each smoker the expert describes (water smoker, charcoal grill, wood burning, etc.).
Graphics should also be used when highlighting a key point the expert makes. Please use the standard “Full
Page Blank Background” image as the background for your graphic. This will be provided after your shoot.
Full Page Graphic
Copyright 2007, Knowlera Media, LLC
Text colors - The color for all text should be plain white.
Main Title Text - The main title text across the top should be 36pt. Arial font.
Informational text: Text entered below the main title should also be Arial font, plain white and sized
between 22 and 30pt. Justification of the text is up to you but if you use bullet points it should be left
justified. If you are just showing a quotation or sentence, you may elect to center all of the lines.
Transition Effects: There should be a fifteen-frame cross dissolve placed at the beginning and end of
every full-page graphics card.
Bugs and watermarks
You should never use any special branding on Knowlera Media/About.com videos, especially bugs or
watermarks.
File Naming Standards
The file name on each of your videos and thumbnails should include the video title separated by dashes.
For example, if the video is about how to chop an onion the file name should be how-to-chop-an-onion
(with no spaces between the words and dashes).
File names can not exceed 59 characters. If the file name is too long, unnecessary words can be
removed (ie. how or to) so the file name would just be chop-onion.
All video files must include the .mov file extension at the end. All thumbnail files must include the .jpeg
extension at the end.
Reviews and approvals
Once the video segments are complete, you’ll be asked to upload them to our online system so we can
review them and provide feedback as necessary. You’ll be provided a login and instructions on how to
use the system when you are awarded a project. Once we’ve reviewed the videos for quality and
completeness, you’ll be given approval to package everything up for delivery to our offices. Do not ship
any deliverables until the final edit has been approved.
Required Deliverables
Knowlera requires the submission of high quality versions of completed video segments in full resolution,
.mov file format. Because of the number and size of the required files, these videos cannot be uploaded
directly to Knowlera or About.com. Instead, the video files, along with all other required elements, are
mailed to us on a portable hard drive that has been provided to you.
Below is a list of the elements producers will be required to provide with a completed submission,
followed by details on each requirement.
1 - Completed video files
2 - Complete project with all media
3 - Thumbnail files
4 - Submission form
5 - Signed releases
6 - W-9 Tax Form
Completed video files – Output Specifications
Include all of your completed, edited videos on a portable hard drive that will be provided to you. These
videos must be submitted as full resolution Quicktime files (.mov). Here are the output specs:
Copyright 2007, Knowlera Media, LLC
Video Specs:
File type: Quicktime (.mov)
Codec: H.264
Frame rate: 29.97 fps
Bit rate: "Automatic" with Compressor quality set to "Best" (or at least 26,000kbits/sec)
Encoding Method: "Multi-pass" (VBR)
Key Frames: Automatic (or at least every 24 frames)
Frame Reordering: Yes
Size: 1920x1080 16:9
De-interlacing: Yes - Select "De-interlace Source Video"
*If using Adobe Premiere be sure to adjust the pixel aspect ratio to be square pixels. Audio Specs:
Format: Linear PCM
Stereo: Yes (L R)
Rate: 48.000 kHz
Render Settings:
Quality: Best
Sample Size: 16 bits
Selected as "Little Endian"
Thumbnail files
You must provide a frame capture from each video to be used as thumbnail representations for the
About.com web site. You should use a frame that best represents the subject matter of the video. If the
expert’s face is in the thumbnail, be sure to carefully select a frame that is flattering to the expert.
Naming thumbnails
With the exception of the file extension, name each thumbnail the exact same name as the video it
represents.
Required image sizes for thumbnails
All thumbnail images should be the same 16x9 aspect ratio in which the video was shot. The
minimum size for submitted thumbnails should be 640x360 pixels.
Accepted formats for thumbnails
Please submit your thumbnails as .jpeg files. If you have a choice of compression when you output
them, use medium-quality.
Thumbnail aspect ratio
If you are grabbing your thumbnails by selecting portions of the video frame manually, it is likely that
they will not be precisely 16x9. In those cases, be sure to crop the images so they are precisely in the
16x9 format. To test the aspect ratio of your images, dividing the width in pixels by the height in pixels
should equal 1.77 or 1.78.
Complete project with source files
You must also include your complete project with source video files in a way that will permit us to open
the project in the appropriate editing system. Our preferred editing system is Final Cut Pro. Depending on
the editing system you use, here is what we need you to provide…
Final Cut Pro
1. Project Files
2. Render Files (Audio and Video)
3. AutoSave Vault
4. Capture Scratch (Source Media)
5. An exported XML (version 2) of the project
Copyright 2007, Knowlera Media, LLC
6. Source graphics files if applicable
Adobe Premiere
1. Project files
2. All Source Media
3. An exported FCP Pro XML (if using version CS5)
3. AutoSave Folder
4. An Exported EDL
5. Preview File Folder
6. Source graphics files if applicable
Other Editing Systems
If you are using an editing system other than Final Cut or Premiere, please contact us to learn your specific
deliverables.
Delivery Media
In most cases you will be providing all of these files to us on a hard drive that we provide to you. Please keep
a copy of the entire project on your local computer until we’ve received and checked in your submission. Should a
project get lost in the mail, you’ll be asked to send another copy.
Important! – Keep a copy of the entire project on your local computer until we’ve checked in your
submission. Should a project get lost in the mail, you’ll be asked to send another copy.
Source tapes
We do not require you to send in the source tapes if you’ve shot to tape. However, we do request that you
keep the tapes in a safe location for 6 months in case we need them for any reason.
Submission form
Included in your submission package should be a completed submission form. The submission form will
be provided to you when you are awarded a project. The form is a PDF file that can be filled out
electronically. Please print the completed form and include it in your submission package or include the
completed PDF file on the hard drive with your video files. The submission form asks for the following
information:
Series Title
In most cases, you will be receiving your assignment with a pre-determined topic and all video
segment titles already decided. However, there may be occasions where you will be required to
create these names yourself. Generally, these will already be created during the outline process. If
not, the titles should simply reflect the content of each segment. The earlier graphic on the topic of
Basic Vegetable Preparation provides a good example. In any case, the maximum acceptable
number of characters (including spaces) in any video or segment title is 65.
Tip: Video segment titles should not exceed 65 characters including spaces.
Video Running Times
You’ll be required to list on the submission form the total running time of each video segment.
Video Series Description
You’ll be required to provide a brief description of the video series topic on the submission form. A
simple description with just a couple of sentences is adequate.
Video Descriptions
You’ll be required to provide a brief description for each video segment on the submission form. A
simple description with just a couple of sentences is adequate.
Copyright 2007, Knowlera Media, LLC
Releases
There are several types of releases that MUST be signed and returned to Knowlera with your submission
package. Keep in mind that videos will not be accepted without the appropriate signed release forms.
Please see the section Above titled “Releases” for specific details on what releases are required.
IMPORTANT: A Videographer Consent and Release Form must be signed and returned by the
producer prior to starting on the project. You’ll receive a copy when you are awarded the project.
W-9 Tax Form
The W-9 can be downloaded from the Producer Resource Page and must be signed and included in your
submission packet. Producers can’t get paid without the signed W-9. You are only required to submit a
W-9 once each year.
Shipping instructions
First, make copies and backups of all submission materials. In most cases Knowlera will be mailing you a
portable hard drive for copying all the video files. You will also be provided a stamped, self addressed
package that you can use to ship back the hard drive with all video files and required deliverables.
You may also elect to send the materials through some other carrier. In any case, please ship all
materials in a properly padded, sealed shipping packet. Only use carriers that provide tracking
information. If you cannot provide us with tracking information on your return package, you will be
responsible for anything that is lost.
Please ship deliverables to:
Knowlera Media Producer Program
774 Walker Road
Suite H, Second Floor
Great Falls, VA 22066
To be safe, you should always ship your submission packet via a method that provides tracking.
Copyright 2007, Knowlera Media, LLC
Additional Production Tips
Professional producers with varying levels of experience participate in the Knowlera Producer Network.
While many of the tips below will be elementary to the most experienced producers, it should prove
helpful to entry-level professional producers, and it can serve as a useful guide for anyone wanting to
understand the level of quality we expect for video submissions.
Tips for shooting
Use a separate external microphone (not the built-in camera microphone)
This is the single most effective thing you can do to improve the quality of any video, and it’s required for
recording dialogue on any professional-quality production. The built-in microphones on video cameras
simply do not pick up speech adequately. Even when the subject is close to the camera, audio quality will
be audible but poor. Other potential problems include wind noise when shooting outside, and unwanted
surrounding noise when shooting in busy environments. We recommend a good-quality lavalier, or lapel
microphone. Be sure to check the user’s manual for your specific camera model to find out what type of
external microphones can be used, including the necessary plug types, adaptors, or cables required.
Use a Tripod
Nothing says “amateur” more than a shaky, handheld camera and we will not accept any videos with
handheld shots. Tripods allow smooth and controlled level shooting, especially when tilting up and down
or panning right to left, and they are required for most shots on any professional-quality production. Also,
make sure your camera is level when mounted on the tripod. If your tripod does not have a built-in bubble
level, look through your camera viewfinder and try to level the view by sight. An easy way to do this is to
look for horizontal or vertical lines in your shooting location—perhaps the corner of a wall or the edges of
windowsills or doorframes. If they appear crooked or tilted, adjust the tripod and continue to check your
shot in the camera viewfinder until your vertical guidelines appear straight.
Also, make sure the tension of your tripod’s head is adjusted correctly. It should be looser if you plan to tilt
or pan your camera, and tighter when you want the shot to be more “static” (no camera movement). A
common mistake is having the tripod head tension too tight when panning or tilting, causing jerky or
bumpy movements. Finally, if you ever leave your camera mounted on the tripod without someone
operating it, always make sure the tension is tight and locked off before walking away.
Use sufficient lighting
Don’t shoot in low light
Plain and simple: don’t shoot in locations where it is too dark. If you are outdoors, don’t shoot at dusk or
into the evening if your camera is not capable. If you are indoors, make sure you have a sufficient main
light source, and that shadows are not too dark and lacking in detail.
Add light when necessary
Understanding the relationship between the amount of light available and the exposure settings in your
camera will help you avoid dark, grainy images that are common in amateur video. When there is not
enough light to expose an image properly, most camcorders will attempt to compensate electronically.
This compensation, known as adding gain, will make the image brighter, but always at the cost of image
quality in the form of “noise” or “grain”. Read your camera’s manual to understand this function and
recognize when the camera is adding gain. When you are able to see that the camera is adding gain,
you’ll know that it is too dark to shoot, or time to add light to the scene. Never shoot in low-light
situations that require the camera to add gain. In all cases, never permit your camera to exceed
3db of gain.
Shooting outdoors, overcast
Lightly overcast skies will provide the best lighting conditions. Light cloud cover will create a soft, diffused
light that is very pleasing and comfortable for your subject. Beware of partly cloudy conditions, however. If
the sun is darting in and out of the clouds, you’ll find it very difficult to maintain proper exposure and you’ll
Copyright 2007, Knowlera Media, LLC
encounter a lot of difficulty matching shots when you edit your video.
Shooting outdoors, bright sun
Bright sun is the most difficult condition in which to shoot, but is manageable if you position your subject
carefully. Avoid placing your subjects with the sun directly behind them. This will create heavy backlight
and put your subjects in silhouette. With heavy backlighting, viewers will be unable to see your subject’s
face, or what they are doing. Try to always place your subjects with the sunlight in front of them and
slightly to one side, but be careful to avoid heavy shadows cast on them from objects such as tree
branches, microphones, or even the camera itself. Also watch out for shooting when the sun is low (very
early or late in the day), as it will require your subject to squint to keep the sun out of their eyes. Shooting
in the bright sun at mid-day is not ideal either, because the sunlight is directly overhead, usually casting
harsh shadows on the face of your subject. If this is the case, try shooting in an area with some overhead
coverage, such as under a tree or on a porch, as long as it is not too dark or casting large shadows.
Shooting indoors
The most common problem shooting indoors is a lack of available light. Review to the section above titled
“Use sufficient lighting” for ways to avoid low light situations. Another common problem with indoor
shooting is heavy backlighting (light sources behind your subject) that will cause your subject to be dark
in silhouette. This happens most often when your subject is sitting in front of a window or glass door and
the sunlight outdoors is very bright. It is okay to have a small amount of backlight, just as long as it does
not overpower your main lighting source (or “key light”) that is coming from the front of your subject.
When in doubt, let your camera decide
Modern camcorders are capable of overcoming many difficult lighting situations, as long as you
understand the relationship between the various functions and settings on the camera. Before you shoot,
study your camera and make a variety of test shots so you can actually see the results. When in doubt,
use the automatic exposure settings of your camera, and check the viewfinder to ensure you’re getting an
acceptable image.
Stay in focus
Proper focus is the first thing learned by every beginning videographer. Since producers in our program
are not beginners, there should never be an out-of-focus shot in any video created for Knowlera.
The most common reasons for out of focus shots are shooting in low light, not zooming in to focus before
recording, and shooting with auto-focus. Of course, even professionals will use the auto-focus feature on
their camera once in a while. If you are relying on auto-focus, be aware that it will occasionally throw your
shot out of focus, especially if you or your subject is moving. Too often, when automatic focus is used, the
camera will focus in and out on your subject because it tries to focus on other nearby objects instead. The
image will go from sharp to blurry several times. This can be very distracting and results in an amateurish
video. To avoid this situation, try disabling the auto-focus feature of your camera and manually adjust
your focus. Virtually all camcorders have a setting for “manual controls” somewhere on them. Some
cameras may have a simple button on the side or near the lens that says “Manual Focus.” Others may be
more hidden, or you may have to go through the camera’s settings menu to disable automatic focus.
Read the user’s manual for your particular model of camera and learn how to use the manual focus.
Tips for using manual focus
Before you start shooting, take some time to set your focus by zooming in as close as you can on the
subject or object that you are shooting and then manually focus to a nice, sharp image. Zoom back out to
your original position and now your focus is set and you can begin recording. You should be able to zoom
in and out on the subject now and it will stay in focus the whole time. This is assuming your subject is
stationary and will not be moving from the point where you set your focus. If the subject is moving around,
especially closer or further away from the camera, then pre-setting the focus will not work. You will need
to adjust the focus as you go. This will just take time and practice to master, but proper focusing skills will
definitely make your video appear more professional. If you don’t have experience with manual focus,
keep your camera focus on automatic.
Understand “White Balance.”
Copyright 2007, Knowlera Media, LLC
White balancing is a method of calibration where you tell the camera what to interpret as true white, thus
allowing the camera to display all colors based in accordance to the type of light in your scene. Most
modern camcorders have both a manual white balance option and automatic settings that work fairly well.
Usually, there is a button or switch with the symbols of a sun and of a light bulb, denoting the automatic
settings for “outdoor” (the sun) or “indoor” (the light bulb). These automatic setting are normally sufficient,
but if your images appear too blue or orange, or the color otherwise appears unnatural, you may need to
override the automatic setting and white balance manually. After setting white balance, professional
producers will always check white balance whenever lighting conditions change.
Tips for white balancing
Refer to the user’s manual for your particular camera model to see how to do this. Some cameras will
simply have a button on the camera that may say “WB” (probably near the automatic symbols), other
cameras may require that you access the internal settings in the menu. In either case, you will need to
zoom the camera in and focus on something in your shooting location that is truly white—the best action
is to have an assistant hold up a blank sheet of white paper. Make sure the lighting is sufficient on the
white object and that there are no major shadows. Next, press and hold the button for white balancing (or
hold the selection button if it is part of the internal menu settings). In most cameras, this will take about 2
or 3 seconds and a WB symbol of some type will flash in the viewfinder. When the symbol finishes
flashing, you should see a notable change in the colors on your screen or viewfinder. The camera has
now been calibrated to read “true white” as seen under the lighting conditions of your particular shooting
location and has readjusted all colors based on that reading.
Allow for “pre-roll”
Even in today’s digital age, recording on most cameras is not instant. The device needs a few seconds to
actually begin capturing to tape, drive, or disc after the button is pressed. If your subject begins speaking
immediately when you press the record button, it will inevitably cut off the first few words of his or her
sentence. An easy trick is to hit record, silently count at least to three, and then silently cue your speaker
to begin by pointing or nodding. Also, try not to immediately stop recording as soon as the speaker’s last
word is uttered. Again, wait 3 to 5 seconds before ending the shot. When you edit your video, you will be
glad that you have these few seconds of “head” and “tail” on your shots, especially if you need to add
transitions such as fades or dissolves.
Be a director!
Rather than simply being the camera operator, professional producers also play the role of Director and
help their subject through the typical pitfalls of performing on camera. Your relationship with the expert
can make the difference between a poor, or merely adequate video, and a really great one.
Copyright 2007, Knowlera Media, LLC