1
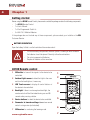
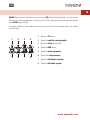
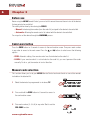
Users Manual 005180 English www.egiaudio.com Avda. Almozara, 79 50003 ZARAGOZA - Spain Phone +34 976 40 53 56 Fax +34 976 40 53 54 http//: www.egiaudio.com e-mail: [email protected] 40100 Remote control Thank you for choosing the EGi DOMOS2 Universal Remote Control. It will allow you to control your home appliances, as well as your EGi Audio & Domotic System. Please read carefully before using the system and save this manual for future reference. equipment, etc.) by the learning process or selecting them on a code list. EGi DOMOS2 Universal Remote Control can program codes from other remote controls (TV, VCR, DVD, audio The advanced functions allow you to program up to 60 commands at the touch of a button. EGi DOMOS2 Universal Remote Control has a LCD backlight touch-screen with 56 buttons to control each device. CHAPTER 1 Getting started 40100 Remote control 4 4 CHAPTER 2 Before use Code/Learn button Manual code selection Automatic code selection 6 6 6 7 CHAPTER 3 Code learning function Code learning process LCD Edit mode: Device buttons Delete codes and devices MACRO Function Reset to initial codes 9 9 10 11 12 14 CHAPTER 4 EGi - Audio EGi - Domotics 15 17 CHAPTER 5 Option settings 19 APPENDIX A Technical specifications 23 APPENDIX B Problem-solving chart 24 4 Chapter 1 Getting started Before using the 40100 Remote Control, please make sure that the package contains the following components: • 1 x 40100 Remote Control. • 1 x User’s Manual. • 1 x Pre-Programmed Code List. • 3 x AAA 1.5 V Alkaline Batteries. If the package does not include any of these components, please contact your installer or the EGi Customer Service. BATTERY ORIENTATION Open the battery lid that is on the backside of the remote control. • Inside the battery compartment there are symbols showing in which direction the batteries should be placed. Carefully follow these directions. • Do not mix new and old batteries. • Replace all batteries at the same time. 40100 Remote control 1 IR Emitter to transmit the signals to the device to be controlled. 2 Ambient light sensor to detect the light in the room and turn the backlight on, if necessary. 3 LCD Touch-screen to display all control buttons of the device to be controlled. 4 Backlight. If there is not enough ambient light, the remote control will be illuminated during use and 90 seconds after pressing a button. 5 Device buttons to select the device to be controlled. 6 Connector to transfer settings between two remote controls using a wire (not included). 7 IR Receiver to use during the learning mode. www.egiaudio.com 1 2 3 4 5 6 7 5 40100 Remote Control will allow you to control your EGi Audio & Domotic System. You will also be able to control all home appliances, as well as your TV, DVD, audio equipment, and radio receiver with your 40100 Remote Control. To select the device or system that you want to control, press the icon on the lower part of your remote control display. 1 5 2 6 3 7 4 8 1 Select the TV device. 2 Select the satellite receiver/cable. 3 Select the video device (VCR). 4 Select the DVD device. 5 Select the audio equipment. 6 Select other audio sources. 7 Select the EGi domotic system. 8 Select the EGi audio system. www.egiaudio.com 6 Chapter 2 Before use Before using the 40100 Remote Control, you must set it to ensure the correct transmission to the devices that are going to be controlled. The setting can be done by introducing the CODES: • Manual: Introducing the number (from the code list) assigned to the device to be controlled. • Automatic: Allowing the remote control to interact with the device to be controlled. You may also set the device through the LEARNING process. Code Learn button Press the CODE button for 3 seconds to access to the confirmation screen. Then press each number in any order to access to the next screen. Press the and buttons to select one of the following options: • CODE: Automatic setting. Your remote control must be included on the code list. • LEARN: If your remote control is not included on the code list, you must prerecord the codes manually. To do so, put the remotes in front of the other. Manual code selection This function allows you to set your 40100 Remote Control and make it work as one of the remotes included on the attached list. 1 Select the device to be programmed for instance, TV. 2 Press and hold the CODE button for 3 seconds to access to the confirmation screen. 3 Press each number (2, 4, 6, 8) in any order. Start to use the PRE-CODE function. www.egiaudio.com 7 4 Press and buttons to select the desired options until you find CODE. Press and access to the code page. 5 Press the 4-digit code manually. NOTES: • Some codes included on the list are not specific to one remote control model. You must select the one that best adapt for your model. • If a code is not included on the Manufacturer’s Code List, the screen will display ERROR when introducing that code. EXAMPLE: Should you wish to control the two televisions that you have at home (TV1 and TV2) with your 40100 Remote Control, follow these steps: 1 Assign the TV1 to the TV device button. Please see “LCD Edit Mode: Device buttons” to introduce the 4 codes, and follow the steps. 2 Assign the TV2 to any of the device buttons except DOMOTICS and EGi AUDIO; for instance, SAT/CBL. Follow the same steps as in TV1. Press the TV button any time you want to control the TV1. Press the SAT/CBL button any time you want to control the TV2. Please note that your remote control may not be listed as there are many manufacturers and remote control models available on the market. If so, please see “Manual code selection” & “Code learning process”. Automatic code selection 1 Manually turn on the device to be controlled. 2 Select the device to be controlled (TV, SAT, AUDIO) on your 40100 Remote Control. 3 Press CODE for 3 seconds. www.egiaudio.com 8 4 Press each number (2, 4, 6, 8) only once in any order. 5 Press the 6 Press AUTO. You will listen to a beep while AUTO and OK blink. 7 When the device (that is being controlled) turns off, press any key of the remote control. 8 Press 9 Press the button to select CODE. or until the device you want to control turns on. button to ensure the correct operation. 10 Press DISPLAY to see the code of your device. 11 Press the OK button to confirm the selection. www.egiaudio.com Chapter 3 9 Code learning function EGi 40100 Remote Control allows you to learn the codes from your existing remote control, for instance TV, without using the Manufacturer’s Code List. Before learning the codes from your existing remote control, please read carefully the following: 1 Before learning the new codes, delete the existing ones from the remote control. For instance, if you want to control your living room TV instead of your kitchen TV, delete first the commands of your kitchen TV. 2 This learning process does not work with all remote controls on the market. 3 Not all of the EGi 40100 Remote Control keys can be programmed: CODE SETUP KEY, DELETE KEY, MACRO KEY and SYSTEM SETUP. Code learning process If we assume that you want to program the TV remote control on the EGi 40100 Remote Control, then put both remotes together as shown in Figure 6 and proceed as follows: 1 Keep the CODE button pressed for 3 seconds to access to the confirmation screen. 2 Press each number (2, 4, 6, 8) only once in any order. 3 Navigate through the menu options using the and buttons until you find the LEARN option. 4 Press the 5 Press the button of the device to be controlled (TV, SAT/CBL, VCR, DVD, Audio, etc.) for instance, DVD. button to confirm this option. www.egiaudio.com 10 6 The button on the 40100 Remote Control blinks. Press the same button on the remote control until it stops blinking. Repeat the process with every blinking button and finish the copy operation. NOTE: If a code of your TV remote control already exists on the 40100 Remote Control, CODE will be displayed on the screen during the learning process. Should you wish to learn a code on any of the device buttons, for instance the TV button; press the TV button for at least 3 seconds. The TV button will start blinking. Then press the start button on the TV remote control. If it has been learnt correctly, the 40100 Remote Control screen will display OK . 5-10 cm. LCD Edit mode: Device buttons The edit mode allows you to define the touch screen so as to match it with your existing remote controls. 1 Keep the remote control button pressed for at least 3 seconds to access to the confirmation screen. 2 Press each number (2, 4, 6, 8) only once in any order to access to the selection screen. Press the button that you want to change on the remote control page. Press repeatly to select any of the available options. 3 4 5 Press KEY to display all the available icons on the LCD screen. Repeat step 3 until all changes are made. Once you have defined the screen, press OK to confirm changes. If you do not want to save changes, press EXIT. www.egiaudio.com 11 Delete codes and devices To delete one or all 40100 Remote Control codes, follow these steps: 1 Keep the DELETE button pressed for 3 seconds to access to the confirmation screen. 2 Press each number (2, 4, 6, 8) only once in any order. 3 Navigate through the menu options using the and buttons until you find the device you want to delete, then press KEY to delete the codes. Should you wish to delete the TV codes from the 40100 Remote Control, select first the TV button and then press KEY. The second option is BANK. If you press this button, you will delete all remote control codes. Then press the OK button. 4 Press the button to confirm this option. www.egiaudio.com 12 MACRO function The MACRO function (a sequence of commands of max. 60 seconds) allows you to have the control of your TV and DVD at the same time by pressing only one button on the 40100 Remote Control. You must create a sequence of commands specifying preference and time of execution of DVD, video and TV. HOW TO CREATE A MACRO 1 Keep the MACRO button pressed for 3 seconds to access to the confirmation screen. 2 Press each number (2, 4, 6, 8) only once in any order. The MACRO icon starts to blink. 3 For instance, select the TV to use it as our MACRO function. Then press any of the numbers to assign this function to it. Listen to 3 beep tones generated by the creation of the macro. If the selected number already has a MACRO function assigned to it, the new function will overwrite the existing one. 4 You can establish when the command is executed. Press any of the buttons with a command assigned to it. Press DELAY and then press the seconds (up to 9) to delay the execution between the commands. 5 Press OK to confirm or EXIT to cancel. www.egiaudio.com 13 EXAMPLE: If we assume that you want to turn on your TV in order to watch a film on DVD in 5 seconds, then follow these steps to set the macro: 1 Press the TV button on the 40100 Remote Control. (This will bring you to your TV remote control menu). 2 Press 3 Activate the TV/VIDEO button. (This will put the channel to watch the DVD on your TV). 4 Press the DVD button on the 40100 Remote Control. 5 Press the 6 Press the DELAY button, and then press number 5. (The remote control will activate the next command in 5 seconds). 7 Press DVD Play on your remote. (Your DVD will start to play). 8 Press OK to confirm this macro. . (This will turn on your TV). button. (This will turn on your DVD device). NOTE: Should you wish to stop the sequence of macro commands, press the EXIT button. MACRO BUTTONS The screen can display the macro function buttons assigned to a particular device. To do this with the TV button, follow these steps: 1 Press the TV device button. 2 Keep the MACRO button pressed in order to display the remote control macros. For example, if you select number 9 as macro button on PAGE 1of the TV, then every time you press the MACRO button, the screen will display the 9 macro function. 3 Press the TV button again to check the macro buttons on PAGE 2. Go back to step 2. www.egiaudio.com 14 STOP MACRO COMMANDS To stop the sequence of macro commands, press first the MACRO button, and then press the EXIT button. If ERROR is displayed on the screen, the sequence is stopped. Reset to initial codes This option allows you to reset to initial codes and macros. The codes and macros that you programmed will be deleted. Should you wish to reset your 40100 Remote Control to its initial state, follow these steps: 1 Keep the DELETE button pressed for 3 seconds to access to the confirmation screen. 2 Press each number (2, 4, 6, 8) only once in any order. 3 Navigate through the menu options using the and buttons until you find the KEY BANK mode. 4 Press the 5 Press each number (2, 4, 6, 8) in any order once again for a definitive confirmation. Check that the OK icon is displayed. It indicates that button to confirm this option. The confirmation screen will be displayed again, then confirm it once again. the codes are reset to their initial state. www.egiaudio.com Chapter 4 15 EGi - Audio 40100 Remote Control will allow you to control some audio and domotic functions of your DOMOS2 system at the touch of a button. GENERAL DOMOS2 Audio Menu. DOMOS2 Domotics Menu. AUDIO CONTROLS Turn on/off the audio of the in-wall control unit. Press the key once to turn off the audio of the control unit of the room. If you press the key again, the control unit will be turned on and you will continue listening to the program that you left. NOTE: This key only turns on/off the audio of the control unit. The other functions will not be affected. Volume regulation. This key turns up/down the volume of the EGi sound system. Keep the up/down key pressed to control the volume of the audio source (radio, music, TV, etc.). Program selector (3 General audio programs and 1 local audio program). It allows you to select any of the general or local audio programs that are available. NOTE: Your EGi sound system has 3 general audio programs (for the whole system) and 1 local program (but only for the room in which the control unit with built-in tuner has been installed). You are able to select different audio sources (FM tuner, audio equipment, TV, etc.) for each audio program. Press the key to select any of the 3 general audio programs and the local FM radio program, provided that your control unit has a built-in tuner. Select a preset radio station in the central unit (General/Local prog.). It allows you to select any of the preset radio stations of the central unit or in-wall control unit (local). Please see “FM Radio station scan”. Pressing the key, the preset radio stations of each audio program will consecutively change 1.. 9. Should you wish to listen to a particular preset radio station; first select the program (general or local) in the unit with the FM tuner, and then press the key to find the desired radio station. www.egiaudio.com 16 FM Radio station scan. If your control unit has a FM tuner, you will be able to scan and set FM radio stations by pressing the button. Press the key to scan FM radio stations. The unit will scan upward through the FM frequency. The in-wall control unit will display the FM radio stations that are being saved. The system select automatically the radio stations. Activate/Deactivate the timer. It activates/deactivates the TIMER function. This function allows you to defer the turn off of the system for a specifc time. Press this key once to activate/deactivate the TIMER function. NOTE: This function must be activated in the central unit. Activate/Deactivate the alarm clock. It activates/deactivates the ALARM CLOCK function. This function allows you to connect the system at a specific time. Press the key once to activate/deactivate the ALARM CLOK function. NOTE: This function must be activated in the central unit. INTERCOM FUNCTIONS • Intercom and baby-phone 1...9 Local intercom. Local intercom with one zone of the installation. Should you wish to talk to other zone, press the key with the number of that zone once. Get close to the in-wall DOMOS2 control unit to talk to the selected zone. You will be able to talk to the other zone for a maximum of 90” before receiving an answer. General call. The general call function allows you to talk to all zones of the house. If you press this key once, you will be able to talk to all zones for no longer than 90”. Once you receive an answer from other zone(s), you will be able to keep the conversation for 90” more and so on for conversations between 2 zones or more. Activate/Deactivate the baby-phone/monitor function. Press this key once to activate/deactivate the baby-phone/monitor function of the selected zone. NOTE: This function must be activated in the central unit. To activate this function, press the key of the in-wall control unit of the room to be monitored. www.egiaudio.com 17 Activate/Deactivate the listening function. Press this key once to activate/deactivate the LISTENING function of the selected zone. NOTE: This function must be activated in the central unit. To activate this function, press the key of the in-wall control unit of the room to be monitored. Activate/Deactivate the “Do not disturb” function. Press this key once to activate/deactivate the DO NOT DISTRUB function of the selected zone. NOTE: This function must be activated in the central unit. If this function is activated, you will not be able to listen to the intercom or any other system call in the room. • Door entry system Press to open the door. If your system has this function activated, the intercom will be activated when receiving a call. Press this key once to open the door when you receive a call. Press to cancel the communication through the door entry system. Press the key once to finish the communication through the door entry system. Answer the door when you receive a call. Press this key once to answer the door after receiving a call and talk to the visitor. EGi - Domotics DOMOTIC FUNCTIONS SOS SOS Alarm function. Keep this key pressed to activate the SOS Alarm. Pull up the blind. Keep this key pressed to pull up the blind of the selected zone. Pull down the blind. Keep this key pressed to pull down the blind of the selected zone. www.egiaudio.com 18 Domotic service (1, 2, 3, 4) for one zone. This icon indicates the domotic services for a specfic zone of the house. It activates/deactivates the domotic service associated with the number by pressing 1...4. Domotic service (7, 8, 9, 0) for the whole installation. This icon indicates the domotic services for the whole installation. It activates/deactivates the domotic service associated with the number by pressing 7...0. Roll up the awning. Keep this key pressed to roll up the awning. Roll down the awning. Keep this key pressed to roll down the awning. www.egiaudio.com Chapter 5 19 Option settings This chapter describes the transmission function, backlight setting, and acoustic signal activation. TRANSMISSION FUNCTION You will be able to use the EGi 40100 Remote control to transmit data to other remote control of the same model. You must first connect both remote controls using a connection wire. Please see “Appendix B” for further details and follow these steps: 1 Keep the SETUP button pressed for 3 seconds to access to the confirmation screen. 2 Press each number (2, 4, 6, 8) only once in any order. 3 Navigate through the menu options using the and buttons until you find the CODE mode. 4 button to confirm the transmission. During the transmission, the screen displays the following: 5 Once the transmisson has correctly finished, the OK Press the icon will be displayed. If the transmission has not finished, ERROR will be displayed. Then go back to step 3. 6 Press the EXIT button to cancel the transmission. NOTE: Before you start the transmission process, ensure that both remote cotrols are connected to the auxiliary wire. Make sure that the batteries supply the necessary energy to run the remote control. www.egiaudio.com 20 BACKLIGHT SETTING Learn how to activate the backlight and set the light sensor sensitivity. To activate the backlight, follow these steps: 1 Keep the SETUP button pressed for 3 seconds to access to the confirmation screen. 2 Press each number (2, 4, 6, 8) only once in any order. 3 Navigate through the menu options using the and buttons until you find the BACKLIGHT mode. 4 Press the 5 Press a number button 1-6. “1” indicates a temporal value of 10 seconds and “60” indicates a temporal value of 60 seconds. It sets the time you want to have the remote control turned on, after pressing a button. 6 Press the OK button to confirm. button to confirm the process. www.egiaudio.com 21 To set the light sensor sensitivity, follow these steps: 1 Keep the SETUP button pressed for 3 seconds to access to the confirmation screen. 2 Press each number (2, 4, 6, 8) only once in any order. 3 Navigate through the menu options using the and buttons until you find the BACKLIGHT mode. 4 Press the 5 Press the OK button to confirm. If you do not want to save the selected light sensitivity, press the EXIT button. or buttons to set the light sensitivity. www.egiaudio.com 22 ACOUSTIC SIGNAL ACTIVATION To activate the acoustic signal, follow these steps: 1 Keep the SETUP button pressed for 3 seconds to access to the confirmation screen. 2 Press each number (2, 4, 6, 8) only once in any order. 3 Navigate through the menu options using the buttons until you find the BEEP mode 4 Press the 5 Press the EXIT button to finish. and . button to activate/deactivate the beep. www.egiaudio.com Appendix A 23 Technical specifications FUNCTIONS • 56 buttons on the touch-screen display. • Macro function with up to 60 sequence commands. • The backlight is automatically activated depending on the lighting in the room. • Energy-saving automatic function. • Movement detector that automatically turns on the remote control. • Low battery indicator. • The information remains on the device, if batteries run down. TECHNICAL SPECIFIATIONS Number of controllable devices Buttons Backlight Learning frequency 8 2 pages/56 buttons for each device Blue LED 20 KHz - 455 KHz. Pulse up to 256 bits long. Memory 512 KB flash memory Batteries AAA Alkaline batteries x 3 Power consumption Operation LCD Off: 50 µA • LCD On: 300 µA 30-150 mA (max.) Operating distance (m.) 8-10 Infrared distance (m.) 8-10 LCD Display (cm.) 5.8 x 12 Dimensions (cm.) 7.9 x 19 x 3.2 Weight without batteries (gr.) 125 www.egiaudio.com 24 Appendix B Problem-solving chart PROBLEMS SOLUTIONS The LCD does not display anything when touching it. The battery has run down. Check that the batteries are inserted in the correct orientation. Check that the remote control displays the correct screen to control, for instance, the TV. The remote control does not execute your commands. It will not operate over a distance of more than 10 meters. Point the remote control at the device to be controlled. Check that there are no obstacles. Check that you have correctly introduced the code for that button. ERROR appears during the code learning process. During the learning pocess, keep the button pressed until OK is displayed. The learning distance must be 5-10 cm. Check that the remote controls are correctly positioned. ERROR appears when using normally the remote control. The button that has been pressed, has no recorded code. Record the code. The video (VCR) does not record. Make sure that you hold the REC button for at least 2 seconds. www.egiaudio.com 25 PROBLEMS SOLUTIONS The battery of the other remote control has run down. The learning distance must be 5-10 cm. The IR Code Learning Function does not work. The learning function must not be done under an incandescent lamp. The memory of the remote control is full. If not successful, contact our technical department. The Macro function does not work. Make sure that the commands are directly sent to the selected device. The function has not been set correctly. Repeat the process. The remote control (TV, DVD, etc.) has 2 or more functions for the same button. The LCD display turns off. Make sure that you assign 1 function to each button, when learning the codes on the EGi 40100 Remote Control. The display of the remote control automatically turns off after 90 seconds. Press the display to turn the screen back on. www.egiaudio.com 26 Notes www.egiaudio.com